ESF6550ROW - Lave-vaisselle AEG-ELECTROLUX - Notice d'utilisation et mode d'emploi gratuit
Retrouvez gratuitement la notice de l'appareil ESF6550ROW AEG-ELECTROLUX au format PDF.

| Type de produit | Lave-vaisselle encastrable |
| Marque | AEG-ELECTROLUX |
| Modèle | ESF6550ROW |
| Dimensions (L x H x P) | 596 x 850 x 610 mm |
| Poids net (estimé) | 45 kg |
| Capacité | 12 couverts |
| Tension d'alimentation | 220-240 V / 50 Hz |
| Pression d'eau min./max. | 0.5 / 8 bar (0.05 / 0.8 MPa) |
| Programmes | ECO, AUTO, Intensif 70°C, Verres 45°C, Rapide 30 min, Prélavage |
| Consommation d'eau (ECO) | 9-11 L |
| Consommation d'énergie (ECO) | 0.9-1.0 kWh |
| Classe énergétique | Non spécifié (ancienne étiquette) |
| Niveau sonore | Non spécifié |
| Fonctions spéciales | EnergySaver, Multitab, MyFavourite, Départ différé 1-24 h |
| Adoucisseur d'eau | Réglable manuellement et électroniquement |
| Matériau de la cuve | Acier inoxydable |
| Sécurité | Dispositif anti-inondation, verrouillage enfants (via programme), sécurité électrique |
| Entretien | Filtres amovibles, bras de lavage auto-nettoyants |
| Pièces détachées | Recommandation d'utiliser des pièces d'origine Electrolux |
| Réparabilité | Service après-vente agréé, pièces disponibles |
FOIRE AUX QUESTIONS - ESF6550ROW AEG-ELECTROLUX
Questions des utilisateurs sur ESF6550ROW AEG-ELECTROLUX
0 question sur cet appareil. Repondez a celles que vous connaissez ou posez la votre.
Poser une nouvelle question sur cet appareil
Téléchargez la notice de votre Lave-vaisselle au format PDF gratuitement ! Retrouvez votre notice ESF6550ROW - AEG-ELECTROLUX et reprennez votre appareil électronique en main. Sur cette page sont publiés tous les documents nécessaires à l'utilisation de votre appareil ESF6550ROW de la marque AEG-ELECTROLUX.
MODE D'EMPLOI ESF6550ROW AEG-ELECTROLUX
ESF 6550ROW
ESF 6550ROX
EN DISHWASHER
КК ыдыс жуғыш машина
USER MANUAL 2
КОЛДАНУ ТУРАЛЫ 18
НУСКАУЛАРЫ

natural_image
Abstract geometric composition with three overlapping white circles on a gray background (no text or symbols)CONTENTS
- SAFETY INSTRUCTIONS 3
- PRODUCT DESCRIPTION 5
- CONTROL PANEL 6
- PROGRAMMES 6
- OPTIONS 8
- BEFORE FIRST USE 9
- DAILY USE 11
- HINTS AND TIPS 13
- CARE AND CLEANING 14
- TROUBLESHOOTING 15
- TECHNICAL INFORMATION 17
- ENVIRONMENT CONCERNS 17
WE'RE THINKING OF YOU
Thank you for purchasing an Electrolux appliance. You've chosen a product that brings with it decades of professional experience and innovation. Ingenious and stylish, it has been designed with you in mind. So whenever you use it, you can be safe in the knowledge that you'll get great results every time.
Welcome to Electrolux.
Visit our website for:

Get usage advice, brochures, trouble shooter, service information: www.electrolux.com

Register your product for better service: www.electrolux.com/productregistration

Buy Accessories, Consumables and Original spare parts for your appliance: www.electrolux.com/shop
CUSTOMER CARE AND SERVICE
We recommend the use of original spare parts.
When contacting Service, ensure that you have the following data available. The information can be found on the rating plate. Model, PNC, Serial Number.

Warning / Caution-Safety information
General information and tips
Environmental information
Subject to change without notice.
1. ⚠ SAFETY INSTRUCTIONS
Before the installation and use of the appliance, carefully read the supplied instructions. The manufacturer is not responsible if an incorrect installation and use causes injuries and damages. Always keep the instructions with the appliance for future reference.
1.1 Children and vulnerable people safety

WARNING!
Risk of suffocation, injury or permanent disability.
- Do not let persons, children included, with reduced physical sensory, reduced mental functions or lack of experience and knowledge use the appliance. They must have supervision or instruction for the operation of the appliance by a person who is responsible for their safety.
- Do not let children play with the appliance.
- Keep all packaging away from children.
- Keep all detergents away from children.
- Keep children and pets away from the appliance door when it is open.
1.2 Installation
- Remove all the packaging.
- Do not install or use a damaged appliance.
- Do not install or use the appliance where the temperature is less than 0 °C.
- Obey the installation instruction supplied with the appliance.
Electrical connection

WARNING!
Risk of fire and electrical shock.
- The appliance must be earthed.
- Make sure that the electrical information on the rating plate agrees with the power supply. If not, contact an electrician.
-
Always use a correctly installed shock-proof socket.
-
Do not use multi-plug adapters and extension cables.
- Make sure not to cause damage to the mains plug and to the mains cable. Should the appliance power supply cable need to be replaced, this must be carried out by our Service Centre.
- Connect the mains plug to the mains socket only at the end of the installation. Make sure that there is access to the mains plug after the installation.
- Do not pull the mains cable to disconnect the appliance. Always pull the mains plug.
- Do not touch the mains cable or the mains plug with wet hands.
- This appliance complies with the E.E.C. Directives.
Water connection
- Make sure not to cause damage to the water hoses.
- Before you connect the appliance to new pipes or pipes not used for a long time, let the water flow until it is clean.
- The first time you use the appliance, make sure that there is no leakage.
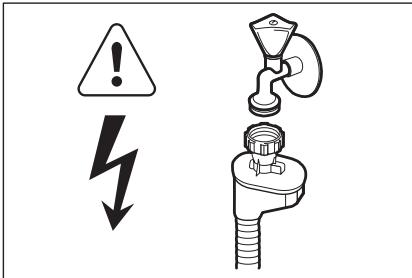
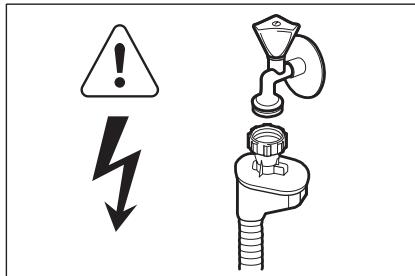
- The water inlet hose has a safety valve and a sheath with an inner mains cable.
text_image
Safety warning symbols and diagram showing a warning triangle with lightning bolt and a valve above a pipe fitting
WARNING!
Dangerous voltage.
- If the water inlet hose is damaged, immediately disconnect the mains plug from the mains socket. Contact the Service to replace the water inlet hose.
1.3 Use
- This appliance is intended to be used in household and similar applications such as:
- Staff kitchen areas in shops, offices and other working environments
- Farm houses
- By clients in hotels, motels and other residential type environments
- Bed and breakfast type environments.

WARNING!
Risk of injury, burns, electrical shock or fire.
- Do not change the specification of this appliance.
- Put knives and cutlery with sharp points in the cutlery basket with the points down or in a horizontal position.
- Do not keep the appliance door open without supervision to prevent to fall on it.
- Do not sit or stand on the open door.
-
Dishwasher detergents are dangerous. Obey the safety instructions on the detergent packaging.
-
Do not drink and play with the water in the appliance.
- Do not remove the dishes from the appliance until the programme is completed. There can be detergent on the dishes.
- The appliance can release hot steam if you open the door while a programme operates.
- Do not put flammable products or items that are wet with flammable products in, near or on the appliance.
- Do not use water spray and steam to clean the appliance.
1.4 Disposal

WARNING!
Risk of injury or suffocation.
- Disconnect the appliance from the mains supply.
- Cut off the mains cable and discard it.
- Remove the door catch to prevent children and pets to get closed in the appliance.
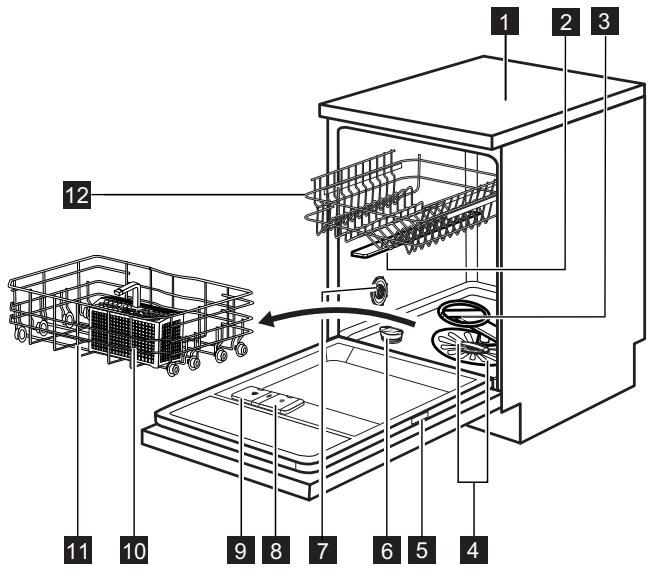
2. PRODUCT DESCRIPTION

text_image
Technical diagram of a refrigerator with numbered parts and internal components, showing exploded view and assembly steps.1 Worktop
2 Upper spray arm
3 Lower spray arm
4 Filters
5 Rating plate
6 Salt container
7 Water hardness dial
8 Rinse aid dispenser
9 Detergent dispenser
10 Cutlery basket
11 Lower basket
12 Upper basket
3. CONTROL PANEL

text_image
1 Auto Off ECO AUTO Automotive 45%-70% Interface 70% Glass Care 45% Quick Plus 60% Rims & Hold EnergyLaser Multisub MyFavourite Save MyFavourite Reset
flowchart
graph TD
    A["Program"] --> B["ECO"]
    B --> C["Auto"]
    C --> D["start"]
    D --> E["End"]
    style A fill:#f9f,stroke:#333
    style B fill:#ccf,stroke:#333
    style C fill:#cfc,stroke:#333
    style D fill:#fcc,stroke:#333
    style E fill:#ffc,stroke:#333
| 1 | On/off button | 5 | Delay button |
| 2 | Program button | 6 | Start button |
| 3 | Programme indicators | 7 | Indicators |
| 4 | Display | 8 | Option button |
| Indicators | Description |
| Washing phase indicator. It comes on when the washing phase and the rinsing phases operate. | |
| Drying phase indicator. It comes on when the drying phase operates. | |
| Salt indicator. It is always off while the programme operates. | |
| Rinse aid indicator. It is always off while the programme operates. | |
| Multitab indicator. | |
| EnergySaver indicator. |
4. PROGRAMMES
1) With this programme you have the most efficient use of water and energy consumption for crockery and cutlery with normal soil. (This is the standard programme for test institutes).
2) The appliance senses the degree of soil and the quantity of items in the baskets. It automatically adjusts the temperature and quantity of the water, the energy consumption and the programme duration.
3) With this programme you can wash a load with fresh soil. It gives good washing results in a short time.
4) Use this programme to quickly rinse the dishes. This prevents the remaining food to bond on the dishes and bad odours to come out from the appliance.
Do not use detergent with this programme.
| Programme | Degree of soil Type of load | Programme phases | Options |
| ECO1) | Normal soil Crockery and cutlery | Prewash Wash 50 °C Rinses Dry | EnergySaver |
| AUTO^2) | All Crockery, cutlery, pots and pans | Prewash Wash from 45 °C to 70 °C Rinses Dry | EnergySaver |
| Heavy soil Crockery, cutlery, pots and pans | Prewash Wash 70 °C Rinses Dry | EnergySaver | |
| Normal or light soil Delicate crockery and glassware | Wash 45 °C Rinses Dry | EnergySaver | |
| 30' 3) | Fresh soil Crockery and cutlery | Wash 60 °C Rinse | |
| 4) | All | Prewash |
Consumption values
| Programme1) | Duration (min) | Energy (kWh) | Water (l) | |
| ECO | 165 - 175 | 0.9 - 1.0 | 9 - 11 | |
| AUTO | 40 - 150 | 0.7 - 1.4 | 7 - 14 | |
 | 150 - 160 | 1.4 - 1.6 | 13 - 14 | |
| [603S] | 70 - 80 | 0.8 - 0.9 | 11 - 12 | |
 | 30 | 0.9 | 9 | |
| [AVCH] | 14 | 0.1 | 4 | |
1) The pressure and the temperature of the water, the variations of the mains supply, the options and the quantity of dishes can change the values.
Information for test institutes
For all the necessary information for test performance. send an email to:
info.test@dishwasher-production.com
Write down the product number (PNC) that is on the rating plate.
5. OPTIONS
i Activate or deactivate the options before the start of a programme. You cannot activate or deactivate the options while a programme operates.
If one or more options are set, make sure that the related indicators are on before the programme starts.
5.1 EnergySaver
This option decreases the temperature in the last rinse phase.
The use of this option decreases the energy consumption (up to 25%) and the programme duration.
The dishes can be wet at the end of the programme.
How to activate the EnergySaver option
- Press Option until the EnergySaver indicator comes on. In the display you can see the update of the programme duration.
- If the option is not applicable to the programme, the related indicator does not come on.
5.2 Multitab
Activate this option only when you use the combi detergent tablets.
This option deactivates the use of rinse aid and salt. The related indicators stay off.
The programme duration can increase.
How to activate the Multitab option
- Press the on/off button to activate the appliance.
- Press Option until the Multitab indicator comes on.
The option stays on until you deactivate it.
Press Option until the Multitab indicator goes off.
If you stop to use the combi detergent tablets, before you start to
use separately detergent, rinse aid and dishwasher salt, do these steps:
- Deactivate the Multitab option.
- Set the water softener to the highest level.
- Make sure that the salt container and the rinse aid dispenser are full.
- Start the shortest programme with a rinsing phase, without detergent and without dishes.
- Adjust the water softener to the water hardness in your area.
- Adjust the released quantity of rinse aid.
5.3 MyFavourite
With this option you can set and memorise the programme that you use more frequently.

You can only memorise 1 programme at a time. A new setting cancels the previous one.
How to memorise a programme
- Press the on/off button to activate the appliance.
- Set the programme that you want to memorise. You can also set applicable options together with the programme. It is not possible to memorise the options Multitab and Delay.
- Press and hold, at the same time, Program and Delay until the indicators of the programme and of the options start to flash.
How to set the MyFavourite programme
- Press and hold Program until the indicators that are related to the MyFavourite programme and options come on
- The display shows the duration of the programme.
5.4 Acoustic signals
The acoustic signals operate when the appliance has a malfunction or when the adjustment of the level of the water softener occurs. It is not possible to deactivate these acoustic signals.
There is also an acoustic signal that operates when the programme is completed. By default, this acoustic signal is off, but it is possible to activate it.
How to activate the acoustic signal for the end of programme
- Press the on/off button to activate the appliance.
- Press and hold, at the same time, Program and Option for a few seconds.
- Press and hold, at the same time, Delay and Start until the programme in-
dicators ECO, AUTO and start to flash.

4. Press Delay.
• The programme indicators ECO and AUTO go off.
• The programme indicator 📄 continues to flash.
- The display shows the current setting.
| 16 | Acoustic signal on |
| 06 | Acoustic signal off |
-
Press Delay to change the setting.
-
Press the on/off button to deactivate the appliance and to confirm the setting.
6. BEFORE FIRST USE
-
Make sure that the set level of the water softener agrees with the water hardness in your area. If not, adjust the water softener. Contact your local water authority to know the water hardness in your area.
-
Fill the salt container.
-
Fill the rinse aid dispenser.
-
Open the water tap.
-
Processing residues can stay in the appliance. Start a programme to remove them. Do not use detergent and do not load the baskets.

If you use the combi detergent tablets, activate the Multitab option.
1) Factory position.
2) Do not use salt at this level.
6.1 Adjusting the water softener
| Water hardness | Water softener adjustment | ||||
| German degrees (°dH) | French degrees (°fH) | mmol/l | Clarke degrees | Manual | Electronic |
| 51 - 70 | 91 - 125 | 9.1 - 12.5 | 64 - 88 | 21) | 10 |
| 43 - 50 | 76 - 90 | 7.6 - 9.0 | 53 - 63 | 21) | 9 |
| 37 - 42 | 65 - 75 | 6.5 - 7.5 | 46 - 52 | 21) | 8 |
| 29 - 36 | 51 - 64 | 5.1 - 6.4 | 36 - 45 | 21) | 7 |
| 23 - 28 | 40 - 50 | 4.0 - 5.0 | 28 - 35 | 21) | 6 |
| 19 - 22 | 33 - 39 | 3.3 - 3.9 | 23 - 27 | 21) | 51) |
| 15 - 18 | 26 - 32 | 2.6 - 3.2 | 18 - 22 | 1 | 4 |
| 11 - 14 | 19 - 25 | 1.9 - 2.5 | 13 - 17 | 1 | 3 |
| 4 - 10 | 7 - 18 | 0.7 - 1.8 | 5 - 12 | 1 | 2 |
| < 4 | < 7 | < 0.7 | < 5 | 12) | 12) |

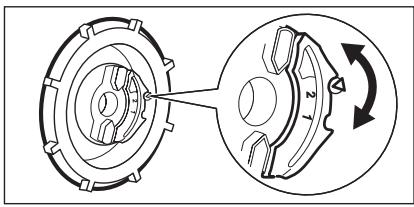
You must adjust the water softener manually and electronically.
Manual adjustment

natural_image
Mechanical gear assembly diagram showing two components with a central knob and directional arrow (no text or labels)Turn the water hardness dial to the position 1 or 2.
Electronic adjustment
- Press the on/off button to activate the appliance.
- Press and hold, at the same time, Program and Option for a few seconds.
-
Press and hold, at the same time, Delay and Start until the programme in-
dicators ECO, AUTO and start to flash. -
Press Program.
• The programme indicators
AUTO and go off.
- The programme indicator ECO continues to flash.
- The acoustic signals operate. E.g. five intermittent acoustic signals = level 5.
-
The display shows the current setting of the water softener. E.g. 5 L = level 5.
-
Press Program again and again to change the setting.
-
Press the on/off button to deactivate the appliance and to confirm the setting.
6.2 Filling the salt container
text_image
SALE ZOUT SALE SEL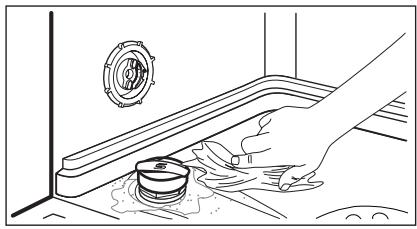
natural_image
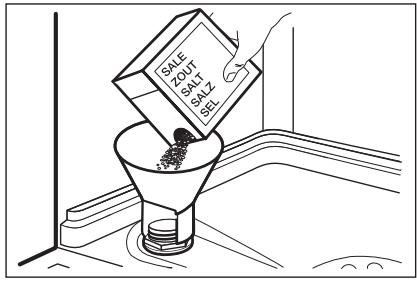
Line drawing of a hand cleaning a drain with a pipe and sink (no text or symbols)- Turn the cap counterclockwise and open the salt container.
- Put 1 litre of water in the salt container (only for the first time).
- Fill the salt container with dishwasher salt.
- Remove the salt around the opening of the salt container.
- Turn the cap clockwise to close the salt container.

CAUTION!
Water and salt can come out from the salt container when you fill it. Risk of corrosion. To prevent it, after you fill the salt container, start a programme.
6.3 Filling the rinse aid dispenser
text_image
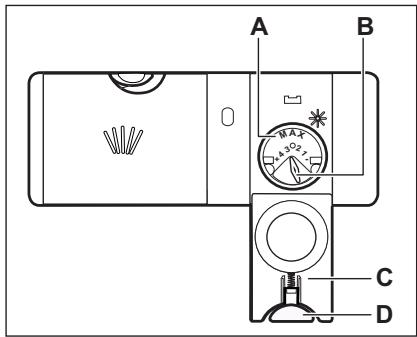
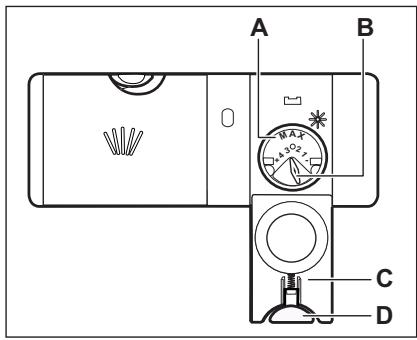
A B C D- Press the release button (D) to open the lid (C).
- Fill the rinse aid dispenser (A), no more than the mark 'max'.
- Remove the spilled rinse aid with an absorbent cloth to prevent too much foam.
- Close the lid. Make sure that the release button locks into position.

You can turn the selector of the released quantity (B) between position 1 (lowest quantity) and position 4 (highest quantity).
7. DAILY USE
- Open the water tap.
- Press the on/off button to activate the appliance.
- If the salt indicator is on, fill the salt container.
-
If the rinse aid indicator is on, fill the rinse aid dispenser.
-
Load the baskets.
- Add the detergent.
- Set and start the correct programme for the type of load and the degree of soil.
7.1 Using the detergent
text_image
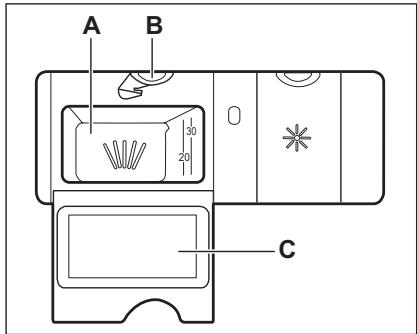
A B 30 20 C7.2 Setting and starting a programme
The Auto Off function
To decrease the energy consumption, this function automatically deactivates the appliance a few minutes after:
- You have not closed the door.
- You have not pressed Start to start the programme.
- The programme is completed.
Starting a programme without delay start
- Open the water tap.
- Press the on/off button to activate the appliance. The indicator and the duration of the last set programme come on.
- Close the appliance door.
-
Set a programme.
-
If you want to start the last set programme, press Start.
- If you want to set the MyFavourite programme, press and hold Program until the indicators that are related to the MyFavourite programme and options come on.
-
If you want to set a different programme, press Program again and again until the indicator of the programme you want to set comes on. You can also set the applicable options.
-
Press the release button (B) to open the lid (C).
- Put the detergent in the compartment (A).
- If the programme has a prewash phase, put a small quantity of detergent on the inner part of the appliance door.
- If you use detergent tablets, put the tablet in the compartment (A).
- Close the lid. Make sure that the release button locks into position.
The display shows the duration of the programme.
-
Press Start to start the programme.
-
The washing phase indicator comes on.
- The programme duration starts to decrease with steps of 1 minute.
Starting a programme with delay start
- Set the programme.
- Press Delay again and again until the display shows the delay time you want to set (from 1 to 24 hours).
- The countdown starts automatically. When the countdown is completed. The programme starts.
Opening the door while the appliance operates
If you open the door, the appliance stops. When you close the door, the appliance continues from the point of interruption.
Cancelling the delay start while the countdown operates
- Press and hold, at the same time, Program and Option until the duration of the set programme comes on.
- Press Start to start the programme.

The cancelling of the delay start cancels also the set options (except Multitab). Make sure, before you press Start, to set the options again.
Cancelling the programme
Press and hold, at the same time, Program and Option for a few seconds.

Make sure that there is detergent in the detergent dispenser before you start a new programme.
At the end of the programme
When the programme is completed, the display shows 0:00.
- The phase indicators go off.
- The indicator of the programme continues to stay on.
- Press the on/off button or wait for the Auto Off function to automatically deactivate the appliance.
- Close the water tap.
Important
- Let the dishes become cold before you remove them from the appliance. Hot dishes can be easily damaged.
- First remove the items from the lower basket, then from the upper basket.
- There can be water on the sides and on the door of the appliance. Stainless steel becomes cool more quickly than the dishes.
8. HINTS AND TIPS
8.1 The water softener
Hard water contains a high quantity of minerals that can cause damage to the appliance and bad washing results. The water softener neutralises these minerals. The dishwasher salt keeps the water softener clean and in good conditions. It is important to set the right level of the water softener. This makes sure that the water softener uses the correct quantity of dishwasher salt and water.
8.2 Using salt, rinse aid and detergent
- Only use salt, rinse aid and detergent for dishwasher. Other products can cause damage to the appliance.
- The rinse aid helps, during the last rinsing phase, to dry the dishes without streaks and stains.
- Combi detergent tablets contain detergent, rinse aid and other added agents. Be sure that these tablets are applicable to the water hardness in your area. Refer to the instructions on the packaging of the products.
- Detergent tablets do not fully dissolve with short programmes. To prevent detergent residues on the tableware, we
recommend that you use the tablets with long programmes.

Do not use more than the correct quantity of detergent. Refer to the instructions on the detergent packaging.
8.3 Loading the baskets

Refer to the supplied leaflet with examples of the load of the baskets.
- Only use the appliance to wash items that are dishwasher-safe.
- Do not put in the appliance items made of wood, horn, aluminium, pewter and copper.
- Do not put in the appliance items that can absorb water (sponges, household cloths).
- Remove remaining food from the items.
- To remove easily remaining burned food, soak pots and pans in water before you put them in the appliance.
- Put hollow items (cups, glasses and pans) with the opening down.
-
Make sure that cutlery and dishes do not bond together. Mix spoons with other cutlery.
-
Make sure that glasses do not touch other glasses.
- Put the small items in the cutlery basket.
- Put the light items in the upper basket. Make sure that they do not move.
- Make sure that the spray arms can move freely before you start a programme.
8.4 Before starting a programme
Make sure that:
- The filters are clean and correctly installed.
- The spray arms are not clogged.
- The position of the items in the baskets is correct.
- The programme is applicable for the type of load and for the degree of soil.
- The correct quantity of detergent is used.
- There is dishwasher salt and rinse aid (unless you use combi detergent tablets).
- The cap of the salt container is tight.
9. CARE AND CLEANING

WARNING!
Before maintenance, deactivate the appliance and disconnect the mains plug from the mains socket.

Dirty filters and clogged spray arms decrease the washing results.
Make a check regularly and, if necessary, clean them.
9.1 Cleaning the filters

text_image
C C B A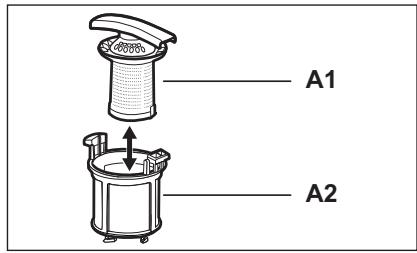
text_image
A1 A2-
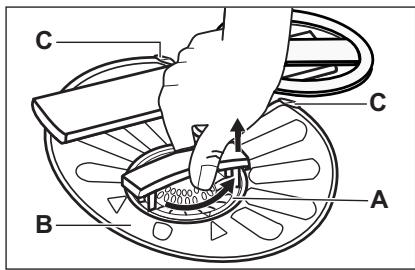
Turn the filter (A) counterclockwise and remove it.
-
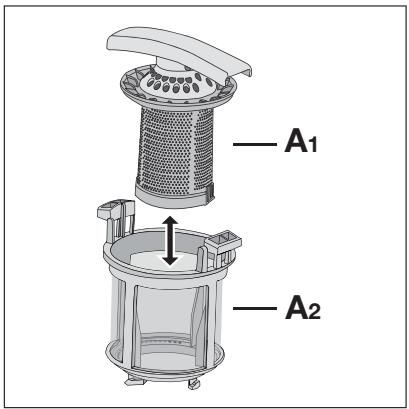
To disassemble the filter (A), pull apart (A1) and (A2).
- Remove the filter (B).
- Wash the filters with water.
- Put the filter (B) to its initial position. Make sure that it assembles correctly under the two guides (C).
natural_image
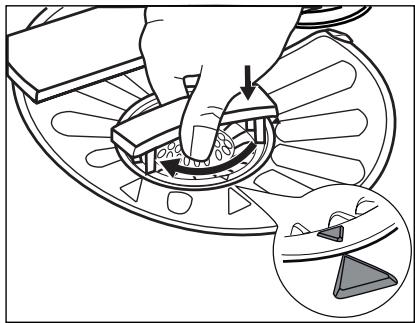
Diagram showing a hand using a tool to adjust or install a circular component, with an inset close-up highlighting a triangular component (no text or symbols present)- Assemble the filter (A) and put it into position in filter (B). Turn it clockwise until it locks.

An incorrect position of the filters can cause bad washing results and damage to the appliance.
9.2 Cleaning the spray arms
Do not remove the spray arms. If the holes in the spray arms are clogged, remove remaining parts of soil with a thin pointed object.
9.3 External cleaning
Clean the appliance with a moist soft cloth.
Only use neutral detergents. Do not use abrasive products, abrasive cleaning pads or solvents.
10. TROUBLESHOOTING
The appliance does not start or it stops during operation. Before you contact the Service, refer to the information that follows for a solution to the problem.
With some problems, the display shows an alarm code:
• ,10 - The appliance does not fill with water.
• ,20 - The appliance does not drain the water.
• ,30 - The anti-flood device is on.

WARNING!
Deactivate the appliance before you do the checks.
| Problem | Possible solution |
| You cannot activate the appli-ance. | Make sure that the mains plug is connected to the mains socket. |
| Make sure that there is not a damaged fuse in the fuse box. | |
| The programme does not start. | Make sure that the appliance door is closed. |
| Press Start. | |
| If the delay start is set, cancel the setting or wait for the end of the countdown. | |
| The appliance does not fill with water. | Make sure that the water tap is open.Make sure that the pressure of the water supply is not too low. For this information, contact your local water authority. |
| Make sure that the water tap is not clogged. | |
| Make sure that the filter in the inlet hose is not clogged. | |
| Make sure that the inlet hose has no kinks or bends. | |
| The appliance does not drain the water. | Make sure that the sink spigot is not clogged. |
| Make sure that the drain hose has no kinks or bends. | |
| The anti-flood device is on. | Close the water tap and contact the Service. |
After the checks are completed, activate the appliance. The programme continues from the point of interruption.
If the problem occurs again, contact the Service.
If the display shows other alarm codes, contact the Service.
10.1 If the washing and drying results are not satisfactory
Whitish streaks or bluish layers on glasses and dishes
- The released quantity of rinse aid is too much. Adjust the rinse aid selector to a lower position.
- The quantity of detergent is too much.
Stains and dry water drops on glasses and dishes
- The released quantity of rinse aid is not sufficient. Adjust the rinse aid selector to a higher position.
- The quality of the detergent can be the cause.
Dishes are wet
- The programme is without a drying phase or with a low temperature drying phase.
- The rinse aid dispenser is empty.
- The quality of the rinse aid can be the cause.
- The quality of the combi detergent tablets can be the cause. Try a different brand or activate the rinse aid dispens-
er and use rinse aid together with the combi detergent tablets.

Refer to ‘HINTS AND TIPS’ for other possible causes.
10.2 How to activate the rinse aid dispenser
The activation of the rinse aid dispenser can occur only with the Multitab option activated.
- Press the on/off button to activate the appliance.
- Press and hold, at the same time, Program and Option for a few seconds.
-
Press and hold, at the same time, Delay and Start until the programme indicators ECO, AUTO and start to flash.
-
Press Option.
- The programme indicators ECO and go off.
• The programme indicator AUTO continues to flash.
- The display shows the current setting.

Rinse aid dispenser off

Rinse aid dispenser on
-
Press Option to change the setting.
-
Press the on/off button to deactivate the appliance and to confirm the setting.
-
Adjust the released quantity of rinse aid.
-
Fill the rinse aid dispenser.
-
TECHNICAL INFORMATION
| Dimensions | Width / Height / Depth (mm) | 596 / 850 / 610 |
| Electrical connection | Refer to the rating plate. | |
| Voltage | 220-240 V | |
| Frequency | 50 Hz | |
| Water supply pressure | Min. / max. (bar / MPa) | (0.5 / 0.05) / (8 / 0.8) |
| Water supply 1) | Cold water or hot water2) | max. 60 °C |
| Capacity | Place settings | 12 |
| Power consumption | Left-on mode | 0.10 W |
| Off-mode | 0.10 W | |
1) Connect the water inlet hose to a water tap with a 3/4" thread.
2) If the hot water comes from alternative sources of energy, (e.g. solar panels, aeolian energy), use the hot water supply to decrease energy consumption.
12. ENVIRONMENT CONCERNS
Recycle the materials with the symbol

. Put the packaging in applicable containers to recycle it.
Help protect the environment and human health and to recycle waste of electrical
and electronic appliances. Do not dispose appliances marked with the symbol 📋
with the household waste. Return the product to your local recycling facility or contact your municipal office.
МАЗМУНЫ
- КАУІПСІЗДІК НУСКАУЛАРЫ 19
- БУЙЫМ СИПАТТАМАСЫ 21
- БАСКАРУ ПАНЕЛИ 22
- БАФДАРЛАМАЛАР 22
- ФУНКЦИЯЛАР 24
- БІРІНШІ КОЛДАНФАНFA ДЕЙІН 25
- ӘРКУНДІК ҚОЛДАНУ 27
- АКЫЛ-КЕНЕС 29
- КУТУ МЕНЕН ТАЗАЛАУ 30
- АКАУЛЫКТЫ ТУЗЕТУ 31
- ТЕХНИКАЛЫК АКПАРАТ 33
- КОРШАФАН ОРТАФА ЗИЯН КЕЛДІРМЕУ ТУРАЛЫ МАФЛУМАТТАР 33
СІЗ ОЙЫМЫЗДА БОЛДЫНЫЗ
Electrolux құрылғысын сатып алғаныңызға рахмет. Сіз ондаған жылдар бойғы кәсіби тәжірибе мен инновацияға сүйеніп жасалған құрылғыны тандадыңыз. Тапқырлықтың туындысы болған, көз тартарлық бүл құрылғыны жасау барысында сіз ойымызда болдыңыз. Сондықтан, қолданған сайын тамаша нәтижеге қол жеткізе алатыныңызға сенімді болыңыз.
Electrolux әлеміне қош келдіңіз.
Біздің веб-сайтка барып келесіні қараңыз:

Колдануға қатысты кеңестер, кітапшалар, ақаулықты түзету, қызмет көрсету туралы ақпарат: www.electrolux.com

Сізге барынша жақсы қызмет көрсету үшін өніміңізді мына жерге тіркеңіз: www.electrolux.com/productregistration

Курылғыңзға қажетті керек-жарактарды, шығынды материалдарды және фирмалық қосалқы бөлшектерді сатып алу үшін: www.electrolux.com/shop
ТУТЫНУШЫФА КОМЕК, КЫЗМЕТ КОРСЕТУ
Фирмалық заттарды қолдануды ұсынамыз.
Кызмет көрсету орталығына хабарласқанда келесі деректердің дайын болуын қамтамасыз етіңіз. Деректерді техникалық ақпарат тақтайшасынан табуға болады. Улгісі, Өнім нөмірі, Сериялық нөмірі

Ескерту / Абайлаңыз - Қауіпсіздік туралы маңызды мағлүмат.

Жалпы мағлүматтар менен кеңестер

Корғаған ортаға зиян көлдірмей пайдалану туралы нұсқаулар
Өндіруші ескертусіз өзгеріс енгізу құқығына ие.
1. ⚠️ КАУІПСІЗДІК НУСКАУЛАРЫ
Құрылғыны орнатып іске қолданар алдында бірге жеткізілген нұсқауларды мұқият окып шығыңыз. Құрылғыны дұрыс орнатпау мен дұрыс пайдаланбау нәтижесінде адам жаракат алса және ақаулық орын алса өндіруші жауапты емес. Нұсқаулықты келешекте қарап журу үшін үнемі сақтап қойыңыз.
1.1 Балалар мен дәрменсіз адамдардың қауіпсіздігі

Назарыңызда болсын!
Түншығып қалу, жаракат алуы немесе мүгедек болып қалу қаупі бар.
- Кембағал, сезім мүкістігі бар немесе ақыл- есі кем, құрылғыны қолдану тәжірибесі жоқ немесе қолдана білмейтін адамдарға, балаларға оны іске қосуға рүқсат бермеңіз. Олар осы құрылғыны өз қауіпсіздігін қамтамасыз ететін адамның нұсқауы немесе қадағалауы бойынша пайдалануға тиіс.
- Балаларға құрылғымен ойнауға рүқсат берменіз.
- Орам материалдарының барлығын балалардан алыс ұстаңыз.
- Жуғыш заттардың барлығын балалардан алыс ұстаңыз.
- Кұрылғының есігі ашық түрганда, балалар мен үй жануарларын алыс ұстаңыз.
1.2 Орнату
- Орам материалдарының барлығын алыңыз.
- Булінген құрылғыны орнатпаңыз немесе іске қоспаңыз.
- Курылғыны температурасы 0 °C градустан темен жерге орнатпаңыз немесе колданбаңыз.
- Күрылғымен бірге берілген орнату бойынша нұсқауларды орынданыз.
Электртофына косу

Назарыңызда болсын!
Өрт шығу және электр қатеріне ұшырау қаупі бар.
- Кұрылғыны міндетті түрде жерге түйықтау кажет.
- Техникалық ақпарат тактайшасындағы электр параметрлерінің электр желісіндегі параметрлерге сай келетініне көз жеткізіңіз. Сай келмесе, электршіге хабарласыңыз.
- Эркашан дұрыс орнатылған, қатерден сақтандырылған розетканы қолданыңыз.
- Көп тармақты адаптерлер мен үзартқыш сымдарды қолданбаңыз.
- Курылғының ашасына және сымына закым келтірмеңіз. Курылғының қорек сымын ауыстыру қажет болса, оны міндettі түрде қызмет көрсету орталығы жүзеге асыруға тиіс.
- Кұрылғының ашасын розеткаға тек кұрылғыны орнатып болғаннан кейін ғана жалғаңыз. Орнатып болғаннан кейін ашаның қол жететін жерде түрғанына көз жеткізіңіз.
- Кұрылғыны төқтан ажырату үшін сымынан тартпаңыз. Өрқашан ашасынан тартып суырыңыз.
- Корек сымын немесе ашасын су қолмен ұстамаңыз.
• Бүл құрылғы Е.Е.С. ережелеріне сай келеді.
Суға қосу
- Су қосылымы түтіктеріне ешбір зақым келтірмеңіз.
- Кұрылғыны жаңа құбырларға немесе үзак ұақыт қолданылмаған құбырларға жалғамай тұрып, суын тазарғанша ағызыңыз.
- Кұрылғыны алғаш рет қолданған кезде еш жерінен су ақпай түрғанына көз жеткізіңіз.
- Су құтын түтік, ішіне сым өткізілген екі қабат қаптамадан тұрады және қауіпсіздік клапанымен жабдықталған.
text_image
Safety warning symbols and diagram showing a warning triangle with lightning bolt and a valve above a plug.
Назарыңызда болсын! Катерлі кернеу.
- Егер су күятын түтік бүлінсе, ашаны дереу розеткадан суырыңыз. Су күятын түтікті ауыстыру үшін Кызмет көрсету орталығына хабарласыңыз.
1.3 Колданылуы
- Бүл құрылғы үйде және сол сияқты төменде аталған жерлерде қолдануға арналған:
– Дукендердің, кеңселердің және басқа жұмыс орындарының қызметкерлерге арналған ас бөлмелерінде
– Фермадағы үйлерде
– Конақ үйлерде, мотельдер мен баска да түрғынды жерлерде
– Төсек және таңғы аспен қамтамасыз ететін жерлерде.

Назарыңызда болсын!
Жаракат алу, күйіп қалу, электр немесе өрт қаупі бар.
- Бул кұрылғының техникалық сипаттамасын өзгертпеніз.
- Өткір үшты пышақтар мен ас күралдарының үштарын төмен қаратып немесе көлденеңінен қойып ас күралдарына арналған себетке салыңыз.
-
Кұрылғының есігі ашық түрған кезде соғылып қалмас үшін қараусыз қалдырмаңыз.
-
Ашык түрған есіkke отырмаңыз немесе устіне шықпаңыз.
- Ыдыс жуғыш машинаға арналған жуғыш заттар қауіпті. Жуғыш заттың орамында көрсетілетін нұсқауларды орынданыз.
- Кұрылғыдағы сумен ойнауға немесе ішуге болмайды.
- Ыдыстарды бағдарлама аяқталғанша құрылғыдан алмаңыз. Ыдыстарда жуғыш зат болуы мүмкін.
- Бағдарлама орындалып түрғанда құрылғы есігін ашсаңыз, ыстық бу шығуы мүмкін.
- Тутанғыш заттарды немесе ішіне тутанғыш зат салынған дымқыл заттарды құрылғының ішіне, қасына немесе үстіне қоймаңыз.
- Кұрылғыны тазалау үшін сулы спрейді және буды қолданбаңыз.
1.4 Курылғыны тастау

Назарыңызда болсын!
Жаракат алу немесе түншығып қалу қаупі бар.
• Кұрылғыны электр желісінен ажыратыңыз.
- Куат сымын кесіп алыңыз да, қоқыска тастаңыз.
- Балалар мен жануарлар құрылғыға қамалып қалмас үшін есіктің бекітпесін алыңыз.
2. БУЙЫМ СИПАТТАМАСЫ
text_image
Technical diagram of a washing machine with numbered components and internal structure annotations1 Жұмыс алаңы
2 Устіңгі бүріkkіш түтік
3 Астыңғы бүріккіш түтік
4 Сүзгілер
5 Техникалық ақпарат тактайшасы
6 Түз сауыты
7 Су кермектігі тетігі
8 Шайғыш зат үлестіргіші
9 Жуғыш зат үлестіргіші
10 Ас құралдары себеті
11 Астыңғы себет
12 Устіңгі себет
3. БАСКАРУ ПАНЕЛИ

text_image
1 Auto Off ECO AUTO 50° AutoFlex Intensive Glaser Care Quick Plus Passive & Hold EnergyCare Multisub MyFavourite Save Reset 45° 70° 45° 60° MyFavourite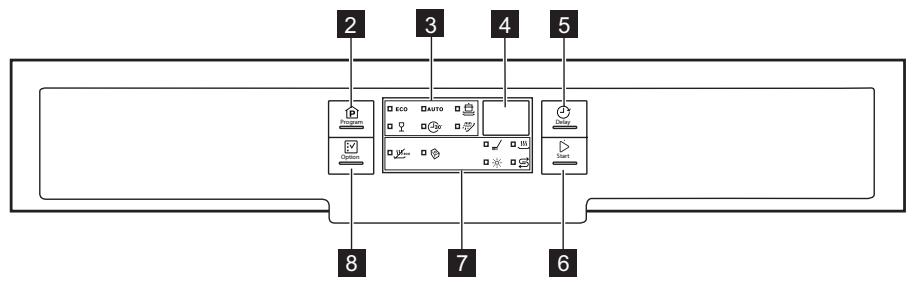
flowchart
graph TD
    A["Program"] --> B["ECO"]
    B --> C["Auto"]
    C --> D["start"]
    D --> E["End"]
    style A fill:#f9f,stroke:#333
    style B fill:#ccf,stroke:#333
    style C fill:#cfc,stroke:#333
    style D fill:#fcc,stroke:#333
    style E fill:#ffc,stroke:#333
1 Косу/сөндіру түймешігі
2 Program түймешігі
3 Бағдарлама индикаторлары
4 Бейнебет
5 Delay түймешігі
6 Start түймешігі
7 Индикатор шамдар
8 Option түймешігі
| Индикатор шамдар | Сипаттама |
| Жуу циклінің индикаторы. Бүл жуу циклі жәнешаю циклдары жұмыс істеген кезде жанады. | |
| Күрғату циклінің индикаторы. Кептіру циклы орындалып түрғанда жанады. | |
| Түз индикаторы. Бағдарлама жұмыс істеп түрған кезде бүл индикатор үнемі сөніп түрады. | |
| Шайғыш зат индикаторы. Бағдарлама жұмыс істеп түрған кезде бүл индикатор үнемі сөніп түрады. | |
| Multitab индикаторы. | |
| EnergySaver индикаторы. |
4. БАФДАРЛАМАЛАР
1) Осы бағдарламаны қолданып, қалыпты кірлеген фарфор ыдыс-аяқ пен ас құралдарын жуғанда, су мен қуат барынша тиімді жүмсалады. (Бул сынақ мекемелеріне арналған стандартты бағдарлама).
2) Курылғы себеттердегі заттардың қаншалықты ластанғанын және заттардың санын анықтай алады. Ол судың температурасы мен мөлшерін, қуаттың тұтынылу шамасы мен бағдарлама уақытын автоматты түрде реттейді.
3) Осы бағдарламамен жаңа ластанған ыдыстарды жууға болады. Бүл қысқа уақыт ішінде жақсы нәтиже береді.
4) Бул бағдарламаны ыдыстарды жылдам шаю үшін қолданыңыз. Бул қалдықтардың ыдыстарға жабысып, құрылғыдан жағымсыз ііс шығуына жол бермейді.
Бул бағдарламаны қолданғанда, жуғыш заттарды пайдаланбаңыз.
| Бағдарлама | Ластану дәрежесіКірдің түрі | Бағдарламациқлдар | Функциялар |
| ECO1) | Қалыпты ластанғанФарфор ыдыс-аяқпен ас құралдары | Алғашқы жууЖуу 50 °СШаю циклдарыҚұрғату | EnergySaver |
| Бағдарлама | Ластану дөрежесіКірдің түрі | Бағдарламациқлдар | Функциялар |
| AUTO2) | БарлығыФарфор ыдыс, аскұралдары,кәстрөлдер ментабалар | Алғашқы жуужүү 45 °C градустан 70°C дейінШаю циклдарыҚұрғату | EnergySaver |
| Қатты ластанғанФарфор ыдыс, аскұралдары,кәстрөлдер ментабалар | Алғашқы жуужүү 70 °CШаю циклдарыҚұрғату | EnergySaver | |
| Қалыпты не шамалыластанғанОсал ыдыс-аяқ пеншыны ыдыс | Жүү 45 °CШаю циклдарыҚұрғату | EnergySaver | |
| 3о’ 3) | Жаңа ластанғанФарфор ыдыс-аяқпен ас құралдары | Жүү 60 °CШаю | |
| 4) | Барлығы | Алғашқы жуу |
Тутыну мәндері
| Бағдарлама1) | Узактық (мин) | Куат (кВт) | Су (л) |
| ECO | 165 - 175 | 0.9 - 1.0 | 9 - 11 |
| AUTO | 40 - 150 | 0.7 - 1.4 | 7 - 14 |
| 150 - 160 | 1.4 - 1.6 | 13 - 14 | |
| 70 - 80 | 0.8 - 0.9 | 11 - 12 | |
| 30' | 30 | 0.9 | 9 |
| 14 | 0.1 | 4 |
1) Мәндөрді судың қысымы мен температурасы, электр куатының ауыткуы, параметрлер және ыдыс-аяқтың мөлшері өзгертуі мүмкін.
Сынақ институттарына арналған акпарат
Сынақ өткізуге қажетті ақпараттар туралы хабарларды мына эл.поштаға жолданыз.
info.test@dishwasher-production.com
Техникалық ақпарат тактайшасындағы құрылғының нөмірін (PNC) жазып қойыңыз.
5. ФУНКЦИЯЛАР

Параметрлерді бағдарламаны бастамай тұрып іске қосыңыз немесе сөндіріңіз. Параметрлерді бағдарлама жұмыс істеп түрған кезде қосу немесе сөндіру мүмкін емес.

Егер бір немесе бірнеше параметрлер орнатылса, тиісті индикаторлардың бағдарламаларды бастамай тұрып қосылғанына көз жеткізіңіз.
5.1 EnergySaver
Бул функция соңғы шаю циклының температурасын азайтады.
Осы функцияны пайдаланған кезде қуат мөлшері (25% пайызға дейін) азайып, бағдарламаның уақыты қыскарады.
Бағдарламаның соңында ыдыстар дымқыл болуы мүмкін.
EnergySaver функциясын іске қосу
- Option түймешігін EnergySaver индикаторы жанғанша басыңыз. Бейнебетте бағдарлама ұзақтығының мәні жаңартылып көрсетіледі.
- Егер бүл параметр бағдарламада жұмыс істемесе, тиісті индикатор жанбайды.
5.2 Multitab
Бүл параметрді аралас жуғыш таблеткаларды қолданғанда ғана іске қосыңыз.
Бүл параметр шайғыш зат пен түзды ағызбай токтатады. Тиісті индикаторлар сөніп тұрады. Бағдарламаның уақыты ұзарады.
Multitab функциясын іске қосу
- Кұрылғыны іске қосу үшін қосу/сәндіру түймешігін басыңыз.
- Option түймешігін Multitab индикаторы жанғанша басыңыз.
Параметр сөндіргенше қосулы тұрады. Option түймешігін Multitab индикаторы сөнгенше басыңыз.
Егер аралас таблетканы қолдануды тоқтатсаңыз, жуғыш зат, шайғыш зат мен ыдыс жуғыш түзды жеке-жеке қолданар алдында мына қадамдарды орынданыз:
- Multitab функциясын ажыратыңыз.
- Су жүмсартқышты ең үлкен мәнге қойыңыз.
- Түз сауыты мен шайғыш зат үлестіргішнің толы екеніне көз жеткізіңіз.
- Шаю циклы бар ең қысқа жуу бағдарламасын, жуғыш зат қолданбай және ыдыс салмай орындаңыз.
- Су жүмсартқышты өзіңіз тұратын жердегі судың кермектігіне лайықтап қойыңыз.
- Шайғыш заттың қосылатын мөлшерін реттеңіз.
5.3 MyFavourite
Осы функцияның көмегімен жиі пайдаланылатын бағдарламаны орнатуға және жадыға сақтап қоюға болады.

Жадыға бір уақытта 1 бағдарламаны ғана сақтауға болады. Жаңа параметр алдыңғы параметрді өшіреді.
Бағдарламаны жадыда қалай сақтау керек
- Кұрылғыны іске қосу үшін қосу/сәндіру түймешігін басыңыз.
- Жадыға сақтағыңыз келген бағдарламаны орнатыңыз. Бағдарламада пайдалануға болатын функцияларды да орнатуға болады. Multitab және Delay функцияларын жадыда сақтау мүмкін емес.
- Program және Delay түймешіктерін бағдарламалардың және функциялардың индикаторлары жыпылықтай бастағанша бірге басып ұстан тұрыңыз.
MyFavourite бағдарламасын қалай орнату керек
- Program түймешігін MyFavourite бағдарламасына қатысты индикаторлар мен функциялар көрінгенше басып ұстан тұрыңыз
- Бейнебетте бағдарламаның үзактығы көрсетіледі.
5.4 Дыбыстык сигналдар
Кұрылғыда ақау пайда болған кезде немесе су жұмсартқыштың деңгейін реттеген кезде дыбыстық сигнал естіледі. Бүл дыбыстық сигналдарды өшіріп қоюға болады. Бағдарлама аяқталған кезде де дыбыстық сигнал естіледі. Әдетте бүл дыбыстық сигнал сәніп турады, бірақ оны қосуға болады.
Бағдарлама аяқталған кезде естілетін дыбыстық сигналды қалай қосуға болады
- Кұрылғыны іске қосу үшін қосу/сәндіру түймешігін басыңыз.
- Program және Option түймешіктерін бірнеше секунд қатар басып ұстан тұрыңыз.
6. БІРІНШІ ҚОЛДАН FHAН ФА ДЕЙ ІН
- Су жүмсартқыштың қойылған деңгейі тұратын жеріңіздегі судың кермектігіне сай келетініне көз жеткізіңіз. Сай келмесе, су жүмсартқыштың деңгейін реттеңіз. Тұратын жеріңіздегі судың кермектігін, жергілікті сумен жабдықтау мекемесіне хабарласып біліңіз.
- Түз сауытын толтырыңыз.
- Шайғыш зат үлестіргішін толтырыңыз.
- Су къятын шумекті ашыңыз.
6.1 Су жүмсартқышты реттеу
| Су крысымы | Су жүмсарткышреттеу | ||||
| Германияградусы(°dH) | Францияградусы(°fH) | ммоль/л | Кларкградусы | Колдан | Электрондытәсілмен |
| 51 - 70 | 91 - 125 | 9.1 - 12.5 | 64 - 88 | 2 1) | 10 |
| 43 - 50 | 76 - 90 | 7.6 - 9.0 | 53 - 63 | 2 1) | 9 |
- Delay және Start түймешіктерін ECO,
AUTO және 🚙️ индикаторлары жыпылықтай бастағанша бірге басып ұстап тұрыңыз.
- Delay түймешігін басыңыз.
• ECO және AUTO
бағдарламаларының индикаторлары сәнеді.
• бағдарламасының индикаторы жыпылықтауын жалғастырады.
- Бейнебетте ағымдық параметр көрсетіледі.
16 Дыбыстык сигнал косулы
06 Дыбыстық сигнал сөндірулі
- Параметрді өзгерту үшін Delay түймешігін басыңыз.
-
Кұрылғыны сөндіру және параметрді растау үшін қосу/сөндіру түймешігін басыңыз.
-
Құрылғыда өндіру үрдісінің қалдықтары қалуы мүмкін. Оларды тазалау үшін бағдарламаны бастаңыз. Жуғыш затты қолданбаныз және себеттерді толтырмаңыз.

Егер аралас жуғыш таблеткаларды қолдансаңыз, Multitab функциясын қосыңыз.
| Су крысымы | Су жумсарткышреттеу | ||||
| Германия градусы (°dH) | Франция градусы (°fH) | ммоль/л | Кларк градусы | Колдан | Электронды тәсілме н |
| 37 - 42 | 65 - 75 | 6.5 - 7.5 | 46 - 52 | 21) | 8 |
| 29 - 36 | 51 - 64 | 5.1 - 6.4 | 36 - 45 | 21) | 7 |
| 23 - 28 | 40 - 50 | 4.0 - 5.0 | 28 - 35 | 21) | 6 |
| 19 - 22 | 33 - 39 | 3.3 - 3.9 | 23 - 27 | 21) | 51) |
| 15 - 18 | 26 - 32 | 2.6 - 3.2 | 18 - 22 | 1 | 4 |
| 11 - 14 | 19 - 25 | 1.9 - 2.5 | 13 - 17 | 1 | 3 |
| 4 - 10 | 7 - 18 | 0.7 - 1.8 | 5 - 12 | 1 | 2 |
| < 4 | < 7 | < 0.7 | < 5 | 12) | 12) |
1) Защита орнатылған параметр.
2) Түзды осы деңгейге қойып қолданбаңыз.

Су жүмсартқышты қолмен және электрондық тәсілмен реттеу қажет.
Колмен реттеу
natural_image
Diagram of a mechanical gear assembly with an inset showing rotational motion (no text or symbols)Су кермектігі дискісін 1-ші немесе 2-ші орынға бұраңыз.
Электрондык жолмен реттеу
- Кұрылғыны іске қосу үшін қосу/сәндіру түймешігін басыңыз.
- Program және Option түймешіктерін бірнеше секунд қатар басып ұстап тұрыңыз.
- Delay және Start түймешіктерін ECO,
AUTO және 🚙️ индикаторлары жыпылықтай бастағанша бірге басып ұстап тұрыңыз.
- Program түймешігін басыңыз.
• AUTO және бағдарламаларының индикаторлары сөнеді.
• ECO бағдарламасының индикаторы жыпылықтауын жалғастырады.
- Дыбыстық сигнал іске қосылады. Мысалы, бес рет үзік-үзік сигнал естілсе = 5-ші деңгей.
- Бейнебетте су жүмсартқыштың ағымдық деңгейі көрсетіледі. Мысалы, 5 L = 5-ші деңгей.
- Параметрді өзгерту үшін Program түймешігін қайта-қайта басыңыз.
- Кұрылғыны сөндіру және параметрді растау үшін қосу/сөндіру түймешігін басыңыз.
6.2 Түз сауытын толтыру

text_image
SALE ZOUT SAL SAL SEL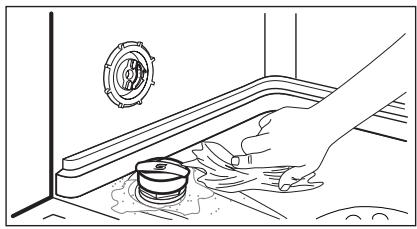
natural_image
Line drawing of a hand washing a drain with a pipe outlet, no text or symbols present- Түз сауытының қакпағын сағат тілінің бағытына қарсы бұрап ашыңыз.
- Түз сауытына 1 литр су күйыңыз (ең алғаш қолданғанда ғана).
- Түз сауытына ыдыс жуғыш машина түзынан салыңыз.
- Түз сауытының ернеуіндегі түзды тазалаңыз.
- Түз сауытының қакпағын сағат тілінің бағытымен бұрап жабыңыз.

Сактандыру туралы ескерту!
Түз сауытын толтырған кезде одан су және түз ағуы мүмкін. Тот басу қауіпі бар. Бүндай жағдайға жол бермеу үшін түз сауытын толтырғаннан кейін бағдарламаны бастаңыз.
6.3 Шайғыш зат үлестіргішін толтыру
text_image
A B C D- (D) босату түймешігін басып, қақпақты (C) ашыңыз.
- Шайғыш зат үлестіргішін (А) толтырыңыз, 'тах' деңгейінен асырмаңыз.
- Төгіліп қалған шайғыш зат қатты көпіршімес үшін сіңіргіш шуберекпен тазалаңыз.
- Какпақшаны жабыңыз. Босату түймешігінің бекіту қалпына қойылғанына көз жеткізіңіз.

Улестіру мөлшерін реттеу тетігін (В) 1 (ең аз мөлшер) және 4 (ең көп мөлшер) аралығына қоюға болады.
7. ЭРКУНДІК КОЛДАНУ
- Су күятын шүмекті ашыңыз.
- Кұрылғыны іске қосу үшін қосу/сәндіру түймешігін басыңыз.
- Түз индикаторы қосулы тұрса, түз сауытын толтырыңыз.
-
Шайғыш зат индикаторы қосулы тұрса, шайғыш зат үлестіргішін толтырыңыз.
-
Себеттерді толтырыңыз.
- Жуғыш заттан қосыңыз.
- Бағдарламаны салынған заттар мен олардың ластану деңгейіне қарай дұрыс орнатыңыз да, іске қосыңыз.
7.1 Жуғыш затты қолдану

text_image
A B 30 20 C7.2 Бағдарламаны орнату және бастау
Auto Off функциясы
Бүл функция пайдаланылатын қуат мөлшерін азайту үшін, құрылғыны келесі жағдайларда бірнеше минуттан кейін автоматты түрде сөндіреді:
- Есік жабылмаса.
- Бағарламаны бастау үшін Start басылмаса.
- Бағдарлама аяқталғанда.
Кешіктіріп бастау функциясы жоқ бағдарламаны бастау
- Су күятын шүмекті ашыңыз.
- Кұрылғыны іске қосу үшін қосу/сәндіру түймешігін басыңыз. Соңғы орнатылған бағдарламаның индикаторы жанып, ұзақтығы көрсетіледі.
- Кұрылғы есігін жабыңыз.
- Бағдарламаны орнатыңыз.
- Егер соңғы орнатылған бағдарламаны бастағыңыз келсе, Start түймешігін басыңыз.
- Erep MyFavourite бағдарламасын орнатқыңыз келсе, Program түймешігін MyFavourite бағдарламасына қатысты индикаторлар мен функциялар жанғанша басып ұстап тұрыңыз.
- Егер баска бағдарламаны орнатқыңыз келсе, Program түймешігін орнатқыңыз келген бағдарламаның индикаторы жанғанша қайта-қайта басыңыз. Сондай-ақ, тиісті функцияларды да орнатуға болады.
- (В) босату түймешігін басып, қақпақты (С) ашыңыз.
- Жуғыш затты (А) бөлігіне салыңыз.
- Бағдарламаның алдын ала жуу циклы болса, құрылғы есігінің ішкі бөліміне жуғыш заттан аздап салыңыз.
- Жуғыш таблеткаларды қолдансаңыз, оларды жуғыш зат үлестіргішіне (А) салыңыз.
- Какпақшаны жабыңыз. Босату түймешігінің бекіту қалпына қойылғанына көз жеткізіңіз.
Бейнебетте бағдарламаның ұзақтығы көрсетіледі.
- Бағдарламаны бастау үшін Start түймешігін басыңыз.
• Жуу циклының индикаторы жанады.
- Бағдарламаның уақыты 1 минутқа тең кадаммен азая бастайды.
Кешіктіріп бастау функциясы бар бағдарламаны бастау
- Бағдарламаны орнатыңыз.
- Delay туймешігін бейнебетте орнаткыңыз келген кешіктіріп бастау уакыты (1- 24 сағат) көрсетілгенше қайта-қайта басыңыз.
- Кері санақ автоматты түрде басталады. Кері санақ аяқталған кезде. Бағдарлама басталады.
Кұрылғы жұмыс істеп түрған кезде есікті ашу
Есікті ашсаңыз, құрылғы токтайды. Есікті жапқаннан кейін, құрылғы токтаған жерінен бастан жұмыс істейді.
Кері санақ жұмыс істеп түрган кезде кешіктіріп бастау функциясын біржола токтату
- Program және Option түймешіктерін орнатылған бағдарламаның ұзақтығы көрсетілгенше қатар басып ұстан тұрыңыз.
- Бағдарламаны бастау үшін Start түймешігін басыңыз.

Кешіктіріп бастау функциясын біржола тоқтатқан кезде орнатылған функциялар да (Multitab функциясынан басқа) біржола токтайды. Start түймешігін баспай тұрып функциялардың қайта орнатылғанына көз жеткізіңіз.
Бағдарламаны біржола токтату
Program және Option түймешіктерін бірнеше секунд қатар басып ұстап тұрыңыз.

Жаңа бағдарламаны бастар алдында, жуғыш зат үлестіргіште жуғыш заттың бар екеніне көз жеткізіңіз.
Бағдарламаның соңы
Бағдарлама аяқталған кезде бейнебетте 0:00 көрсетіледі.
8. АКЫЛ-КЕНЕС
8.1 Су жүмсартқыш
Кермек судың құрамында құрылғыға нұқсан келтіруі және жуу нәтижесіне жаман әсер етуі мүмкін минералдар өте көп мөлшерде кездеседі. Су жүмсартқыш бүл минералдарды бейтарап етеді. Ыдыс жуғыш машинаға арналған түз су жүмсартқышты таза, жақсы қалыпта ұстайды. Су жүмсартқыштың дұрыс деңгейін орнатқан маңызды. Бүл су жүмсартқиштың ыдыс жуғыш машина түзы мен суды дұрыс мөлшерде қолдануын қамтамасыз етеді.
8.2 Түз, шайғыш зат және жуғыш затты пайдалану
- Тек ыдыс жуғыш машинаға арналған түзды, шайғыш және жуғыш затты пайдаланыңыз. Басқа өнімдер құрылғыға нұқсан келтіруі мүмкін.
- Соңғышаю циклі кезінде шайғыш зат ыдыстарға ешбір жолақ, дақ қалдырмай құрғатуға көмектеседі.
- Аралас жуғыш таблеткалардың құрамында жуғыш зат, шайғыш зат және басқа қоспалар бар. Бүл заттардың тұратын жеріңіздегі судың кермектігіне сай
• Цикл индикаторлары сөнеді.
- Бағдарламаның индикаторы жыпылықтауын жалғастырады.
-
Косу/сөндіру түймешігін басыңыз немесе Auto Off функциясының құрылғыны автоматты түрде сөндіруін күтіңіз.
-
Судың шүмегін жабыңыз.
Маңызды
- Ыдыс-аяктарды құрылғыдан суығаннан кейін ғана алыңыз. Ыстық ыдыстар осал келеді.
- Алдымен астыңғы себеттегі, содан кейін устіңгі себеттегі ыдысты алыңыз.
- Күрылғының қабырғалары мен есігіне су тұруы мүмкін. Тот баспайтын болат, ыдысаяққа қарағанда тез салқындайды.
келетініне көз жеткізіңіз. Өнімдердің орамындағы нұсқауларды қараңыз.
- Жуғыш таблеткалар қысқа бағдарламаларда әбден ерімейді. Жуғыш заттардың қалдықтары ыдыстарға тұрып қалмас үшін жуғыш таблеткаларды пайдаланғанда ұзак бағдарламаларды қолдануды ұсынамыз.

Жуғыш затты қажетті мөлшерден артық пайдаланбаңыз. Жуғыш заттың орамындағы нұсқауларды қараңыз.
8.3 Себеттерді толтыру

Себеттерді толтыру мысалдары көрсетілген парақшаны қараңыз.
- Курылғыны ыдыс жуғыш машинада жууға болатын заттарды жуу үшін ғана қолданыңыз.
- Ағаш, мүйіз, алюминий, қалайы және мыстан жасалған заттарды құрылғыға салмаңыз.
- Кұрылғыға су сіңіретін заттарды (жөке, ас үй шуберектері) салмаңыз.
-
Заттарға жабыскан тағам қалдықтарын алыңыз.
-
Куйп жабысып қалған тағамды оңай тазалау үшін кәстрөлдер мен табаларды құрылғыға салмай тұрып, суға салып жібітіңіз.
- Шунғыл ыдыстардың (мысалы, кесе, стакан және кәстрөл) аузын төмен қаратып салыңыз.
- Ас құралдары мен ыдыс-аяқты араласып кетпейтін етіп салыңыз. Қасықтарды басқа ас құралдарымен араластырып салыңыз.
- Стакандарды бір-біріне тигізбей салыңыз.
- Кішкене заттарды ас күралдары себетіне салыңыз.
- Жеңіл заттарды үстіңгі себетке салыңыз. Заттарды жылжып кетпейтін етіп салыңыз.
- Бағдарламаны бастамай тұрып, бүріккіш түтіктердің еркін айнала алатынына кез жеткізіңіз.
8.4 Бағдарламаны бастау алдында
Мынаны ескеріңіз:
- Сүзгілердің таза екенін және орнатылып түрғанын.
• Бүріkkіш түтіктердің бітеліп қалмағанын. - Заттардың себеттерге дұрыс салынғанын.
- Бағдарламаның салынған ыдыстың түріне және ластану дәрежесіне сай екенін.
- Жуғыш зат дұрыс мөлшерде қолданылғанын.
- Кір жуғыш машина тұзы бен шайғыш заттың (егер аралас жуғыш таблетканы қолданбасаңыз) бар екенін.
- Түз сауытының какпағының мыктап жабылғанын.
9. КУТУ МЕНЕН ТАЗАЛАУ

Назарыңызда болсын!
Курылғыны жәндеу алдында электр желісінен ағытып, ашасын розеткадан суырыңыз.

Қоқыс түрған сүзгілер мен бүріккіш түтіктер жуу нәтижесін төмендетеді. Уақытылы тексеріп, қажет болса тазалаңыз.
9.1 Сүзгілерді тазалау
text_image
C C A B- Сүзгіні (А) сағат тілінің бағытына қарсы бұрап алыңыз.
text_image
A₁ A₂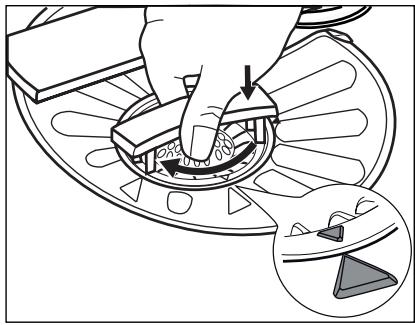
natural_image
Diagram showing a hand using a tool to adjust or install a circular component, with an inset magnified view of a triangular component (no text or symbols present)- (A) сүзгісін бөлу үшін, (A1) және (A2) бөліктерін ажыратыңыз.
- (В) сүзгісін алыңыз.
- Сүзгілерді сумен жуыңыз.
-
(В) сүзгісін әдепкі орнына салыңыз. Сүзгінің екі бағыттағыштың (С) астына дұрыс кірігіп орналасқанына көз жеткізіңіз.
-
(A) сүзгісін құрастырып, (В) сүзгісіндегі орнына қойыңыз. Сырт етіп орнына түскенше сағат тілінің бағытымен бұраңыз.

Сүзгілер дұрыс салынбаса, жуу нәтижесі қанағаттанғысыз болуы және құрылғыға нұқсан келуі мүмкін.
9.2 Бүріккіш түтіктерді тазалау
Бүріккіш түтіктерді ағытып алмаңыз.
Бүріккіш түтіктердің тесіктері бітеліп қалса, қалдықтарды жіңішке шырпымен тазалаңыз.
9.3 Сыртын тазалау
Кұрылғыны дымқыл, жұмсақ шүберекпен тазалаңыз.
Тек бейтарап тазартқыш заттарды қолданыңыз. Жеміргіш заттарды, түрпілі жөкені немесе еріткіштерді пайдаланбаныз.
10. АҚАУЛЫҚТЫ ТУЗЕТУ
Кұрылғы жұмысын бастамай жатыр немесе жұмыс жасап түрган кезде төқтап қалады. Кызмет көрсету орталығына хабарласпай тұрып, ақаулықты шешуге қатысты ұсыныстарды орынданыз.
Кей ақаулықтар орын алғанда, бейнебетте ескерту кодтары көрсетіледі:
• ,10 - Кұрылғыға су құйымай түр.
• ,20 - Кұрылғының сұы төгілмей түр.
• ,30 - Таскынға қарсы құрал қосулы.

Назарыңызда болсын!
Тексеріп көру алдында құрылғыны токтан ажыратыңыз.
| Ақаулық | Ықтимал шешімі |
| Құрылғыны іске қоса алмасаңыз. | Ашаның розеткаға қосылғанына көз жеткізіңіз. |
| Ақаулық | Ыктимал шешімі |
| Сақтандырғыш қорабындағы сақтандырғышқа зақым келмегеніне көз жеткізіңіз. | |
| Бағдарлама басталмай түр. | Құрылғы есігінің жабық түрганына көз жеткізіңіз. |
| Start түймешігін басыңыз. | |
| Егер кешіктіріп бастау функциясы орнатылып түрса, оны ажыратыңыз немесе кері санақ аяқталғанша күтіңіз. | |
| Құрылғыға су құйылмай түр. | Су шумегінің ашық түрганына көз жеткізіңіз. |
| Сумен жабдықтау жүйесіндегі судың қысымының өте төмен емес екеніне көз жеткізіңіз. Бүл ақпаратты жергілікті су ресурстары мекемесіне хабарласып алыңыз. | |
| Су шумегінің бітеліп қалмағанына көз жеткізіңіз. | |
| Су құятын түтіктің сүзгісінің бітеліп қалмағанына көз жеткізіңіз. | |
| Су құятын түтіктің бұратылып немесе майысып қалмағанына көз жеткізіңіз. | |
| Құрылғыдан су акпайды. | Раковина түтікшесінің бітеліп қалмағанына көз жеткізіңіз. |
| Су төгетін түтіктің бұратылып немесе майысып қалмағанына көз жеткізіңіз. | |
| Тасқынға қарсы құрал қосулы. | Судың шумегін жабыңыз да, қызмет көрсету орталығына хабарласыңыз. |
Тексеріп болғаннан кейін құрылғыны іске қосыңыз. Бағдарлама үзілген жерінен бастан жалғасады.
Ақаулық қайта орын алса, қызмет көрсету орталығына хабарласыңыз.
Бейнебетте баска ескерту кодтары көрсетілсе, қызмет көрсету орталығына хабарласыңыз.
10.1 Егер жуу және құрғату нәтижелері қанағаттанарлықтай болмаса
Стакандар мен ыдыстарда ак жолактар немесе көк дактар пайда болған.
- Шайғыш зат тым көп мөлшерде қосылады. Шайғыш затты үлестіру мөлшерін ең төменгі деңгейге қойыңыз.
- Жуғыш зат тым көп мөлшерде салынған.
Стакандар мен ыдыстарда дақтар және кепкен су тамшыларының ізі қалған.
- Шайғыш зат жеткіліксіз мөлшерде үлестірілген. Шайғыш затты үлестіру мөлшерін ең жоғары деңгейге қойыңыз.
- Бүл жуғыш заттың сапасына байланысты болуы мүмкін.
Ыдыстар су болып түр
- Кептіру циклы жоқ немесе төмен температурада кептіру циклы бар бағдарлама таңдалған.
- Шайғыш зат үлестіргіші босап қалған.
- Бул шайғыш заттың сапасына байланысты болуы мүмкін.
- Бул аралас жуғыш таблеткалардың сапасына байланысты болуы мумкін. Басқа түрін қолданыңыз немесе шайғыш зат улестіргішті қосып, шайғыш зат пен аралас жуғыш таблеткаларды бірге пайдаланыңыз.

Баска віктимал себептерді "АҚЫЛ-КЕНЕС" тарауынан қараңыз.
10.2 Шайғыш зат үлестіргішін іске қосу
Multitab функциясы іске қосылған кезде ғана шайғыш зат үлестіргішін қосуға болады.
- Кұрылғыны іске қосу үшін қосу/сәндіру түймешігін басыңыз.
- Program және Option түймешіктерін бірнеше секунд қатар басып ұстан тұрыңыз.
- Delay және Start түймешіктерін ECO,
AUTO және 📄 🌐 индикаторлары жыпылықтай бастағанша бірге басып ұстап тұрыңыз.
- Option түймешігін басыңыз.
• ECO және бағдарламаларының индикаторлары сөнеді.
• AUTO бағдарламасының
индикаторы жыпылықтауын
жалғастырады.
- Бейнебетте ағымдық параметр көрсетіледі.
0d
Шайғыш зат үлестіргіші сөндірулі
Id
Шайғыш зат үлестіргіші қосулы
- Параметрді өзгерту үшін Option түймешігін басыңыз.
- Кұрылғыны сөндіру және параметрді растау үшін қосу/сөндіру түймешігін басыңыз.
- Шайғыш заттың қосылатын мөлшерін реттеңіз.
- Шайғыш зат үлестіргішін толтырыңыз.
11. ТЕХНИКАЛЫК АҚПАРАТ
| Өлшемдері | Ені / Бийктігі / Терендігі (мм) | 596 / 850 / 610 |
| Электртоғына қосу | Техникалық ақпарат тақтайшасына қараңыз. | |
| Кернеу | 220-240 В | |
| Жиілік | 50 Гц | |
| Сумен жабдықтау қысымы | Ең аз / ең көп (бар / мПа) | (0.5 / 0.05 ) / (8 / 0.8 ) |
| Сумен жабдықтау 1) | Суық су немесе ыстық су2) | макс. 60 °C |
| Сыйымдылығы | Орналастыру параметрлері | 12 |
| Қуат тұтынуы | Қосылған қалпы қалдыру режимінде | 0.10 Вт |
| Сөндірулі режимде | 0.10 Вт | |
1) Су құятын түтікті 3/4" бұрамасы бар су шүмегіне жалғаңыз.
2) Егер ыстық су басқа куат көздерінен (мысалы, күн батареасы, желдің куаты) алынса, тұтыну куатын азайту үшін ыстық суды қолданыңыз.
12. КОРШАФАН ОРТАФА ЗИЯН КЕЛДІРМЕУ ТУРАЛЫ МАФЛУМАТТАР
Белгі 📊 салынған материалдарды қайта өндеуден өткізуге тапсырыңыз. Орам материалдарын қайта өндеуден өткізу үшін тиісті контейнерлерге салыңыз.
Электрлік және электроникалық құрылғылардың қалдығын қайта өндеуден өткізу арқылы, қоршаған ортаға және адамның денсаулығына зиын келтіретін жағдайларға жол бермеуге өз үлесіңзді
косыңыз. Белгі салынған кұрылғыларды
турмыстық қалдықтармен бірге тастамаңыз.
Өнімді жергілікті қайта өңдеу орталығына
өткізіңіз немесе жергілікті мекемеге хабарласыңыз.