EOC3485AAX - Four encastrable AEG-ELECTROLUX - Notice d'utilisation et mode d'emploi gratuit
Retrouvez gratuitement la notice de l'appareil EOC3485AAX AEG-ELECTROLUX au format PDF.

| Type de produit | Four encastrable électrique |
| Marque | AEG-ELECTROLUX |
| Modèle | EOC3485AAX |
| Couleur | Inox (argenté) |
| Alimentation électrique | 230 V ~ 50 Hz |
| Puissance maximale | 3680 W |
| Fonctions de cuisson | Chaleur tournante, Convection naturelle, Gril, Gril rapide, Turbo gril, Pizza, Viande, Maintien au chaud, Décongélation, Pyrolyse |
| Nettoyage | Pyrolytique (2 niveaux : P1 1h, P2 1h30) |
| Type d'éclairage | Lampe halogène résistante à 300 °C |
| Affichage | Programmateur électronique avec indicateur de chauffe et chaleur résiduelle |
| Commandes | 2 boutons (fonctions et température) + 3 touches (horloge, +, -) |
| Nombre de niveaux de grille | 5 |
| Porte | Amovible, 4 vitres démontables pour nettoyage |
| Sécurité enfants | Verrouillage des commandes (SAFE) |
| Arrêt automatique | Oui, selon la température (de 3h à 12h30) |
| Thermostat de sécurité | Oui |
| Ventilateur de refroidissement | Automatique, continue après arrêt jusqu'à refroidissement |
| Accessoires fournis | Grille métallique, lèchefrite |
| Classe énergétique | Non spécifiée dans la notice (estimation : A+ à A++) |
| Pays de fabrication | Non spécifié (Europe probablement) |
FOIRE AUX QUESTIONS - EOC3485AAX AEG-ELECTROLUX
Questions des utilisateurs sur EOC3485AAX AEG-ELECTROLUX
0 question sur cet appareil. Repondez a celles que vous connaissez ou posez la votre.
Poser une nouvelle question sur cet appareil
Téléchargez la notice de votre Four encastrable au format PDF gratuitement ! Retrouvez votre notice EOC3485AAX - AEG-ELECTROLUX et reprennez votre appareil électronique en main. Sur cette page sont publiés tous les documents nécessaires à l'utilisation de votre appareil EOC3485AAX de la marque AEG-ELECTROLUX.
MODE D'EMPLOI EOC3485AAX AEG-ELECTROLUX
EOC3485
EN OVEN
USER MANUAL
ES HORNO
MANUAL DE
INSTRUCCIONES
2
26
CONTENTS
- SAFETY INFORMATION 3
2.SAFETYINSTRUCTIONS 4
3.PRODUCT DESCRIPTION 6 - BEFORE FIRST USE 7
5.DAILYUSE 7 - CLOCK FUNCTIONS 9
- ADDITIONAL FUNCTIONS 10
- HELPFUL HINTS AND TIPS 11
9.CARE AND CLEANING 18 - WHAT TO DO IF 22
- INSTALLATION 24
WE'RE THINKING OF YOU
Thank you for purchasing an Electrolux appliance. You've chosen a product that brings with it decades of professional experience and innovation. Ingenious and stylish, it has been designed with you in mind. So whenever you use it, you can be safe in the knowledge that you'll get great results every time.
Welcome to Electrolux.
Visit our website for:

Get usage advice, brochures, trouble shooter, service information: www.electrolux.com

Register your product for better service: www.electrolux.com/productregistration

Buy Accessories, Consumables and Original spare parts for your appliance: www.electrolux.com/shop
CUSTOMER CARE AND SERVICE
We recommend the use of original spare parts.
When contacting Service, ensure that you have the following data available. The information can be found on the rating plate. Model, PNC, Serial Numb

Warning / Caution-Safety information

General information and tips

Environmental information
Subject to change without notice.
1. SAFETY INFORMATION
Before the installation and use of the appliance, carefully read the supplied instructions. The manufacturer is not responsible if an incorrect installation and use causes injuries and damages. Always keep the instructions with the appliance for future reference.
1.1 Children and vulnerable people safety

WARNING!
Risk of suffocation, injury or permanent disability.
- This appliance can be used by children aged from 8 years and above and persons with reduced physical, sensory or mental capabilities or lack of experience and knowledge if they are supervised by an adult or a person who is responsible for their safety.
- Do not let children play with the appliance.
- Keep all packaging away from children.
- Keep children and pets away from the appliance when it operates or when it cools down. Accessible parts are hot.
- If the appliance has a child safety device, we recommend that you activate it.
- Cleaning and user maintenance shall not be made by children without supervision.
1.2 General Safety
- Only a qualified person must install this appliance and replace the cable.
- Internally the appliance becomes hot when in operation. Do not touch the heating elements that are in the appliance. Always use oven gloves to remove or put in accessories or ovenware.
- Do not use a steam cleaner to clean the appliance.
-
Before maintenance cut the power supply.
-
Do not use harsh abrasive cleaners or sharp metal scrapers to clean the glass door since they can scratch the surface, which may result in shattering of the glass.
- Excess spillage must be removed before the pyrolytic cleaning. Remove all parts from the oven.
2. SAFETY INSTRUCTIONS
2.1 Installation

WARNING!
Only a qualified person must install this appliance.
- Remove all the packaging.
- Do not install or use a damaged appliance.
- Obey the installation instruction supplied with the appliance.
Always be careful when you move the appliance because it is heavy. Always wear safety gloves. - Do not pull the appliance by the handle.
- Keep the minimum distance from the other appliances and units.
- Make sure that the appliance is installed below and adjacent safe structures.
- The sides of the appliance must stay adjacent to appliances or to units with the same height.
Electrical connection

WARNING!
Risk of fire and electrical shock.
- All electrical connections should be made by a qualified electrician.
- The appliance must be earthed.
- Make sure that the electrical information on the rating plate agrees with the power supply. If not, contact an electrician.
Always use a correctly installed shockproof socket. - Do not use multi-plug adapters and extension cables.
- Make sure not to cause damage to the mains plug and to the mains cable.
Contact the Service or an electrician to change a damaged mains cable.
- Do not let mains cables to come in touch with the appliance door, specially when the door is hot.
- The shock protection of live and insulated parts must be fastened in such a way that it cannot be removed without tools.
- Connect the mains plug to the mains socket only at the end of the installation. Make sure that there is access to the mains plug after the installation.
- If the mains socket is loose, do not connect the mains plug.
- Do not pull the mains cable to disconnect the appliance. Always pull the mains plug.
- Use only correct isolation devices: line protecting cut-outs, fuses (screw type fuses removed from the holder), earth leakage trips and contactors.
- The electrical installation must have an isolation device which lets you disconnect the appliance from the mains at all poles. The isolation device must have a contact opening width of minimum 3 mm.
- Fully close the oven door before you connect the appliance to mains.
2.2 Use

WARNING!
Risk of injury, burns or electric shock or explosion.
- Use this appliance in a household environment.
-
Do not change the specification of this appliance.
-
Make sure that the ventilation openings are not blocked.
- Do not let the appliance stay unattended during operation.
- Deactivate the appliance after each use.
- Be careful when you open the appliance door while the appliance is in operation. Hot air can release.
- Do not operate the appliance with wet hands or when it has contact with water.
- Do not apply pressure on the open door.
- Do not use the appliance as a work surface or as a storage surface.
- Always keep the appliance door closed when the appliance is in operation.
- Open the appliance door carefully. The use of ingredients with alcohol can cause a mixture of alcohol and air.
- Do not let sparks or open flames to come in contact with the appliance when you open the door.
- Do not put flammable products or items that are wet with flammable products in, near or on the appliance.

WARNING!
Risk of damage to the appliance.
- To prevent damage or discoloration to the enamel:
- do not put ovenware or other objects in the appliance directly on the bottom.
- do not put aluminium foil directly on the bottom of the appliance.
- do not put water directly into the hot appliance.
- do not keep moist dishes and food in the appliance after you finish the cooking.
- be careful when you remove or install the accessories.
- Discoloration of the enamel has no effect on the performance of the appliance. It is not a defect in the sense of the warranty law.
- Use a deep pan for moist cakes. Fruit juices cause stains that can be permanent.
2.3 Care and Cleaning

WARNING!
Risk of injury, fire or damage to the appliance.
- Before maintenance, deactivate the appliance and disconnect the mains plug from the mains socket.
- Make sure the appliance is cold. There is the risk that the glass panels can break.
- Replace immediately the door glass panels when they are damaged. Contact the Service.
- Be careful when you remove the door from the appliance. The door is heavy!
- Clean regularly the appliance to prevent the deterioration of the surface material.
- Remaining fat or food in the appliance can cause fire.
- Clean the appliance with a moist soft cloth. Only use neutral detergents. Do not use abrasive products, abrasive cleaning pads, solvents or metal objects.
- If you use an oven spray, obey the safety instructions on the packaging.
- Do not clean the catalytic enamel (if applicable) with any kind of detergent.
Pyrolytic cleaning

WARNING!
Risk of fire and burns.
-
Before carrying out a Pyrolitic self-cleaning function or the First Use function please remove from the oven cavity:
-
Any excess food residues, oil or grease spills / deposits.
-
Any removable objects (including shelves, side rails etc., provided with the product) particularly any non-stick pots, pans, trays, utensils etc.
-
Read carefully all the instructions for Pyrolytic cleaning.
- Keep children away from the appliance while the Pyrolytic cleaning is in operation. The appliance becomes very hot.
- Pyrolitic cleaning is a high temperature operation that can release fumes from cooking residues and construction ma
terials, as such consumers are strongly advised to:
- Provide good ventilation during and after each Pyrolytic cleaning.
- Provide good ventilation during and after the first use at maximum temperature operation.
-
Remove any pets (especially birds) from the vicinity of the appliance location during and after the Pyrolytic cleaning and first use maximum temperature operation to a well ventilated area.
-
Unlike all humans, some birds and reptiles can be extremely sensitive to potential fumes emitted during the cleaning process of all Pyrolytic Ovens.
- Small pets can also be highly sensitive to the localized temperature changes in the vicinity of all Pyrolytic Ovens when the Pyrolytic self cleaning program is in operation.
- Non-stick surfaces on pots, pans, trays, utensils etc., can be damaged by the high temperature Pyrolytic cleaning operation of all Pyrolytic Ovens and can be also a source for low level harmful fumes.
- Fumes released from all Pyrolytic Ovens / Cooking Residues as descri
bed are not harmful to humans, including infants or persons with medical conditions.
2.4 Internal light
- The type of light bulb or halogen lamp used for this appliance, is only for household appliances. Do not use it for house lighting.

WARNING!
Risk of electrical shock.
- Before replacing the lamp, disconnect the appliance from the power supply.
- Only use lamps with the same specifications.
2.5 Disposal

WARNING!
Risk of injury or suffocation.
- Disconnect the appliance from the mains supply.
- Cut off the mains cable and discard it.
- Remove the door catch to prevent children and pets to get closed in the appliance.
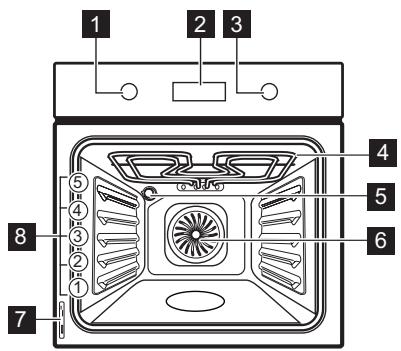
3. PRODUCT DESCRIPTION
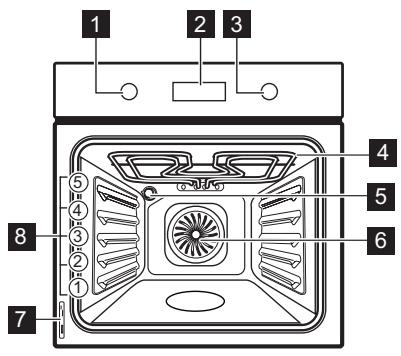
1 Knob for the oven functions
2 Electronic programmer
3 Knob for the temperature
4 Grill
5 Oven lamp
6 Fan
Rating plate
8 Shelf positions
3.1 Oven accessories
- Wire shelf
For cookware, cake tins, roasts.
- Grill- / Roasting pan
To bake and roast or as pan to collect fat.
4. BEFORE FIRST USE

WARNING!
Refer to the Safety chapters.
4.1 Initial cleaning
- Remove all accessories and removable shelf supports (if applicable).
- Clean the appliance before first use.

Refer to the chapter "Care and cleaning".
4.2 Setting the time of day
The display shows hr and 12:00. 12 flashes.
- Press + or - to set the correct hour.
- Press ① to confirm. This is necessary only when you first set the time. Afterwards, the new time value is saved automatically after five seconds.
The display shows min and the set hour. 00 flashes.
- Press + or - to set the correct minutes.
- Press ① to confirm. This is necessary only when you first set the time. Afterwards, the new time value is saved automatically after five seconds.
The display shows the new time.
Changing the time of day

You can change the time of day only if the appliance is off.
Press ① again and again until the indicator for the time of day ① flashes in the display. To set the new time, follow the procedure given in "Setting the time of day".
4.3 Preheating
Preheat the empty appliance to burn off the remaining grease.
- Set the function and the maximum temperature.
- Let the appliance operate for 45 minutes.
- Set the function and the maximum temperature.
- Let the appliance operate for 15 minutes.
Accessories can become hotter than usually. The appliance can emit an odour and smoke. This is normal. Make sure that the airflow is sufficient.
5. DAILY USE

WARNING!
Refer to the Safety chapters.
To use the appliance, push the knob. The knob comes out.
5.1 Activating and deactivating the appliance
-
Turn the knob for the oven functions to an oven function.
-
Turn the knob for the temperature to set the temperature.
- To deactivate the appliance, turn the knob for the oven functions to the off position.
5.2 Oven functions
| Oven function | Application | |
| 0 | Off position | The appliance is off. |
| True Fan Cooking | To roast or roast and bake food with the same cooking temperature, on more than one shelf, without flavour transference. | |
| Conventional Cooking | To bake and roast on one oven level. The top and bottom heating elements operate at the same time. | |
| Grilling | To grill flat food items in small quantities in the middle of the shelf. To make toast. | |
| Fast Grilling | To grill flat food items in large quantities. To make toast. The full grill element operates. | |
| Turbo Grilling | To cook large pieces of meat. The grill element and the oven fan operate one after the other and circulate hot air around the food. | |
| Pizza Setting | To make pizza, quiche or pie. | |
| Meat | To prepare very tender and juicy roasts. | |
| Keep Warm | To keep the food warm. | |
| Defrost | To thaw frozen food. | |
| Pyrolysis | To clean the oven. The high temperature burns off the residual dirt. You can then remove it with a cloth when the appliance is cold. | |
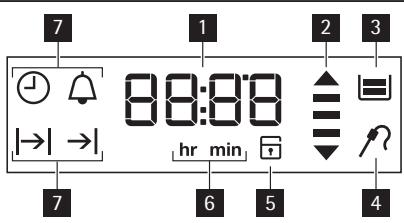
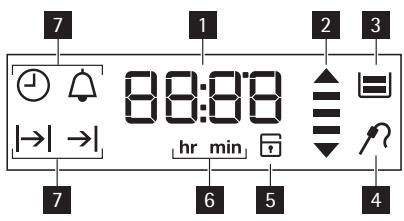
5.3 Display
1 Timer
2 Heat-up and residual heat indicator
3 Water tank (selected models only)
Core temperature sensor (selected models only)
5 Door lock (selected models only)
6 Hours / minutes
Clock functions
5.4 Buttons
| Button | Function | Description |
| ① | Clock | To set a clock function. |
| —, + | Minus, plus | To set the time. |
5.5 Heat-up and residual heat indicator
When you activate an oven function, the bars in the display come on one by one. The bars show that the oven temperature increases or decreases.
When you deactivate the appliance, the display shows the residual heat indicator if the temperature in the oven is more than 40^ . Turn the temperature knob left or right to show the oven temperature on the display.
6. CLOCK FUNCTIONS
| Symbol | Function | Description |
| Δ | Minute Minder | To set a countdown time. |
| ⊕ | Time of day | To set, change or check the time of day. Refer to "Setting the time of day". |
| |→| | Duration | To set how long the appliance must operate. First set an oven function before you set this function. |
| →| | End | To set when the appliance must be deactivated. First set an oven function before you set this function. You can use Duration and End at the same time (Time Delay) to set the time when the appliance must be activated and then deactivated. |
Press again and again to change the clock function.
Press a button or open the appliance door to stop the signal.
Press ① to confirm the settings of the clock functions, or wait 5 seconds for the setting to be confirmed automatically.
i If you press 工 while setting the time for Duration | | ,the appliance switches to setting the End | function.
6.1 Setting the Duration or End function
- Press () again and again until the symbol | | or | flashes in the display.
- Press + or - to set the minutes.
- Press to confirm.
- Press + or - to set the hour.
- Press to confirm.
- When the set time ends, the symbol | | or | and the set time flash. The acoustic signal sounds for two minutes. The appliance deactivates.
6.2 Setting the Minute Minder
Used to set a countdown time. The maximum time you can set is 23 hours 59 minutes. This function has no effect on the operation of the oven. You can set the Minute Minder at any time, also if the appliance is off.
- Press again and again until and 00 flash in the display.
- Press + or - to set the Minute Minder. At first the time is calculated in minutes and seconds. When the time you set is longer than 60 minutes, the symbol hr comes on in the display.
The appliance then calculates the time in hours and minutes.
- The Minute Minder starts automatically after five seconds.
- When the set time ends, the acoustic signal sounds for two minutes. 00:00 and flash in the display. Press a button to stop the signal.

If you set the Minute Minder when the Duration | | or End | function operates, the symbol comes on in the display.
7. ADDITIONAL FUNCTIONS
7.1 Child Lock
When the Child Lock is on, you cannot operate the oven. This is to make sure that children do not accidentally activate the appliance.
Activating and deactivating the Child Lock function:
- Do not set an oven function.
- Press and hold ① and ^+ at the same time for two seconds.
- An acoustic signal sounds. SAFE and come on or go out in the display (when you activate or deactivate the Child Lock).

If the oven has the Pyrolytic cleaning function, the door is locked.
SAFE and come on in the display when you turn a knob or press a button.
7.2 Automatic switch-off
For safety reasons the appliance deactivates after some time:
- If an oven function operates.
If you do not change the oven temperature.
| Oven tempera-ture | Switch-off time |
| 30 -115 °C | 12.5 h |
6.3 Count Up Timer
Use the Count Up Timer to monitor how long the oven operates. It is on immediately when the oven starts to heat. To reset the Count Up Timer, press and hold + and -. The timer starts to count up again.

You cannot use the Count Up Timer when the Duration | | or End | function operates.
| Oven tempera-ture | Switch-off time |
| 120 - 195 °C | 8.5 h |
| 200 - 245 °C | 5.5 h |
| 250 - maximum °C | 3.0 h |
After an automatic switch-off, press a button to activate the appliance again.

The automatic switch-off works with all oven functions, except Duration, End and Time Delay.
7.3 Cooling fan
When the appliance operates, the cooling fan activates automatically to keep the surfaces of the appliance cool. If you deactivate the appliance, the cooling fan continues to operate until the temperature in the appliance cools down.
7.4 Safety thermostat
Incorrect operation of the appliance or defective components can cause dangerous overheating. To prevent this, the oven has a safety thermostat which interrupts the power supply. The oven activates again automatically when the temperature drops.
8. HELPFUL HINTS AND TIPS
- The appliance has five shelf levels. Count the shelf levels from the bottom of the appliance floor.
- The appliance has a special system which circulates the air and constantly recycles the steam. With this system you can cook in a steamy environment and keep the food soft inside and crusty outside. It decreases the cooking time and energy consumption to a minimum.
- Moisture can condense in the appliance or on the door glass panels. This is normal. Always stand back from the appliance when you open the appliance door while cooking. To decrease the condensation, operate the appliance for 10 minutes before cooking.
- Clean the moisture after each use of the appliance.
- Do not put the objects directly on the appliance floor and do not put aluminium foil on the components when you cook. This can change the baking results and cause damage to the enamel.
8.1 Baking cakes
-
Do not open the oven door before 3/4 of the set cooking time is up.
-
If you use two baking trays at the same time, keep one empty level between them.
- The Conventional Cooking function at the default temperature is ideal for bread baking.
8.2 Cooking meat and fish
- Use a deep pan for very fatty food to prevent the oven from stains that can be permanent.
- Leave the meat for approximately 15 minutes before carving so that the juice does not seep out.
- To prevent too much smoke in the oven during roasting, add some water into the deep pan. To prevent the smoke condensation, add water each time after it dries up.
8.3 Cooking times
Cooking times depend on the type of food, its consistency, and volume. Initially, monitor the performance when you cook. Find the best settings (heat setting, cooking time, etc.) for your cookware, recipes and quantities when you use this appliance.
8.4 Baking and roasting table
CAKES
| TYPE OF DISH | Conventional Cooking | True Fan Cooking | Cooking time [min] | Notes | ||
| Shelf position | Temp [°C] | Shelf position | Temp [°C] | |||
| Whisked recipes | 2 | 170 | 3 (2 and 4) | 160 | 45 - 60 | In a cake mould |
| Shortbread dough | 2 | 170 | 3 (2 and 4) | 160 | 20 - 30 | In a cake mould |
| Buttermilk cheesecake | 1 | 170 | 2 | 165 | 60 - 80 | In a 26 cm cake mould |
| Apple cake (Apple pie) | 2 | 170 | 2 (left and right) | 160 | 80 - 100 | In two 20 cm cake moulds on a wire shelf1) |
| Strudel | 3 | 175 | 2 | 150 | 60 - 80 | In a baking tray |
| Jam-tart | 2 | 170 | 2 (left and right) | 165 | 30 - 40 | In a 26 cm cake mould |
| Sponge cake | 2 | 170 | 2 | 160 | 50 - 60 | In a 26 cm cake mould |
| Christmas cake / Rich fruit cake | 2 | 160 | 2 | 150 | 90 - 120 | In a 20 cm cake mould1) |
| Plum cake | 1 | 175 | 2 | 160 | 50 - 60 | In a bread tin1) |
| Small cakes - one level | 3 | 170 | 3 | 140 - 150 | 20 - 30 | In a baking tray |
| Small cakes - two levels | - | - | 2 and 4 | 140 - 150 | 25 - 35 | In a baking tray |
| Small cakes - three levels | - | - | 1, 3 and 5 | 140 - 150 | 30 - 45 | In a baking tray |
| Biscuits / pastry stripes - one level | 3 | 140 | 3 | 140 - 150 | 30 - 35 | In a baking tray |
| Biscuits / pastry stripes - two levels | - | - | 2 and 4 | 140 - 150 | 35 - 40 | In a baking tray |
| Biscuits / pastry stripes - three levels | - | - | 1, 3 and 5 | 140 - 150 | 35 - 45 | In a baking tray |
| Meringues - one level | 3 | 120 | 3 | 120 | 80 - 100 | In a baking tray |
| Meringues-two levels | - | - | 2 and 4 | 120 | 80 - 100 | In a baking tray1) |
| Buns | 3 | 190 | 3 | 190 | 12 - 20 | In a baking tray1) |
| Eclairs - one level | 3 | 190 | 3 | 170 | 25 - 35 | In a baking tray |
| Eclairs - two levels | - | - | 2 and 4 | 170 | 35 - 45 | In a baking tray |
| Plate tarts | 2 | 180 | 2 | 170 | 45 - 70 | In a 20 cm cake mould |
| Rich fruit cake | 1 | 160 | 2 | 150 | 110 - 120 | In a 24 cm cake mould |
| Victoria sandwich | 1 | 170 | 2 (left and right) | 160 | 50 - 60 | In a 20 cm cake mould |
1) Preheat for 10 minutes.
BREAD AND PIZZA
| TYPE OF DISH | Conventional Cooking | True Fan Cooking | Cooking time [min] | Notes | ||
| Shelf position | Temp [°C] | Shelf position | Temp [°C] | |||
| White bread | 1 | 190 | 1 | 190 | 60 - 70 | 1 - 2 pieces, 500 gr per piece1) |
| Rye bread | 1 | 190 | 1 | 180 | 30 - 45 | In a bread tin |
| Bread rolls | 2 | 190 | 2 (2 and 4) | 180 | 25 - 40 | 6 - 8 rolls in a baking tray1) |
| Pizza | 1 | 230 - 250 | 1 | 230 - 250 | 10 - 20 | In a baking tray or a deep pan1) |
| Scones | 3 | 200 | 3 | 190 | 10 - 20 | In a baking tray1) |
1) Preheat for 10 minutes.
FLANS
| TYPE OF DISH | Conventional Cooking | True Fan Cooking | Cooking time [min] | Notes | ||
| Shelf position | Temp [°C] | Shelf position | Temp [°C] | |||
| Pasta flan | 2 | 200 | 2 | 180 | 40 - 50 | In a mould |
| Vegetable flan | 2 | 200 | 2 | 175 | 45 - 60 | In a mould |
| Quiches | 1 | 180 | 1 | 180 | 50 - 60 | In a mould1) |
| Lasagne | 2 | 180 - 190 | 2 | 180 - 190 | 25 - 40 | In a mould1) |
| Cannelloni | 2 | 180 - 190 | 2 | 180 - 190 | 25 - 40 | In a mould1) |
1) Preheat for 10 minutes.
MEAT
| TYPE OF DISH | Conventional Cooking | True Fan Cooking | Cooking time [min] | Notes | ||
| Shelf position | Temp [°C] | Shelf position | Temp [°C] | |||
| Beef | 2 | 200 | 2 | 190 | 50 - 70 | On a wire shelf |
| Pork | 2 | 180 | 2 | 180 | 90 - 120 | On a wire shelf |
| Veal | 2 | 190 | 2 | 175 | 90 - 120 | On a wire shelf |
| English roast beef, rare | 2 | 210 | 2 | 200 | 50 - 60 | On a wire shelf |
| English roast beef, medium | 2 | 210 | 2 | 200 | 60 - 70 | On a wire shelf |
| English roast beef, well done | 2 | 210 | 2 | 200 | 70 - 75 | On a wire shelf |
| Shoulder of pork | 2 | 180 | 2 | 170 | 120 - 150 | With rind |
| Shin of pork | 2 | 180 | 2 | 160 | 100 - 120 | 2 pieces |
| Lamb | 2 | 190 | 2 | 175 | 110 - 130 | Leg |
| Chicken | 2 | 220 | 2 | 200 | 70 - 85 | Whole |
| Turkey | 2 | 180 | 2 | 160 | 210 - 240 | Whole |
| Duck | 2 | 175 | 2 | 220 | 120 - 150 | Whole |
| Goose | 2 | 175 | 1 | 160 | 150 - 200 | Whole |
| Rabbit | 2 | 190 | 2 | 175 | 60 - 80 | Cut in pieces |
| Hare | 2 | 190 | 2 | 175 | 150 - 200 | Cut in pieces |
| Pheasant | 2 | 190 | 2 | 175 | 90 - 120 | Whole |
FISH
| TYPE OF DISH | Conventional Cooking | True Fan Cooking | Cooking time [min] | Notes | ||
| Shelf position | Temp [°C] | Shelf position | Temp [°C] | |||
| Trout / Sea bream | 2 | 190 | 2 | 175 | 40 - 55 | 3 - 4 fish |
| Tuna fish / Salmon | 2 | 190 | 2 | 175 | 35 - 60 | 4 - 6 fillets |
8.5 Grilling

Preheat the empty oven for 10 minutes, before cooking.
| Quantity | Grilling | Cooking time [min] | ||||
| TYPE OF DISH | Pieces | [g] | Shelf po-sition | Temp [°C] | 1st side | 2nd side |
| Fillet steaks | 4 | 800 | 4 | max. | 12 - 15 | 12 - 14 |
| Beef steaks | 4 | 600 | 4 | max. | 10 - 12 | 6 - 8 |
| Sausages | 8 | - | 4 | max. | 12 - 15 | 10 - 12 |
| Pork chops | 4 | 600 | 4 | max. | 12 - 16 | 12 - 14 |
| Chicken (cut in 2) | 2 | 1000 | 4 | max. | 30 - 35 | 25 - 30 |
| Kebabs | 4 | - | 4 | max. | 10 - 15 | 10 - 12 |
| Breast of chick-en | 4 | 400 | 4 | max. | 12 - 15 | 12 - 14 |
| Hamburger | 6 | 600 | 4 | max. | 20 - 30 | - |
| Fish fillet | 4 | 400 | 4 | max. | 12 - 14 | 10 - 12 |
| Toasted sand-wiches | 4 - 6 | - | 4 | max. | 5 - 7 | - |
| Toast | 4 - 6 | - | 4 | max. | 2 - 4 | 2 - 3 |
8.6 Turbo Grilling
Beef
| TYPE OF DISH | Quantity | Shelf posi- tion | Tempera- ture [°C] | Time [min] |
| Roast beef or fil- let, rare | per cm of thickness | 1 | 190 - 200 1) | 5 - 6 |
| Roast beef or fil- let, medium | per cm of thickness | 1 | 180 - 190 1) | 6 - 8 |
| Roast beef or fil- let, well done | per cm of thickness | 1 | 170 - 180 1) | 8 - 10 |
1) Preheat the oven.
Pork
| TYPE OF DISH | Quantity | Shelf posi- tion | Tempera- ture [°C] | Time [min] |
| Shoulder, neck, ham joint | 1 - 1.5 kg | 1 | 160 - 180 | 90 - 120 |
| Chop, spare rib | 1 - 1.5 kg | 1 | 170 - 180 | 60 - 90 |
| Meat loaf | 750 g - 1 kg | 1 | 160 - 170 | 50 - 60 |
| Pork knuckle (precooked) | 750 g - 1 kg | 1 | 150 - 170 | 90 - 120 |
Veal
| TYPE OF DISH | Quantity | Shelf position | Temperature [°C] | Time [min] |
| Roast veal | 1 kg | 1 | 160 - 180 | 90 - 120 |
| Knuckle of veal | 1.5 - 2 kg | 1 | 160 - 180 | 120 - 150 |
Lamb
| TYPE OF DISH | Quantity | Shelf position | Temperature [°C] | Time [min] |
| Leg of lamb, roast lamb | 1 - 1.5 kg | 1 | 150 - 170 | 100 - 120 |
| Saddle of lamb | 1 - 1.5 kg | 1 | 160 - 180 | 40 - 60 |
Poultry
| TYPE OF DISH | Quantity | Shelf posi- tion | Temperature [°C] | Time [min] |
| Poultry por- tions | 200 - 250 g each | 1 | 200 - 220 | 30 - 50 |
| Chicken , half | 400 - 500 g each | 1 | 190 - 210 | 35 - 50 |
| Chicken, pou- lard | 1 - 1.5 kg | 1 | 190 - 210 | 50 - 70 |
| Duck | 1.5 - 2 kg | 1 | 180 - 200 | 80 - 100 |
| Goose | 3.5 - 5 kg | 1 | 160 - 180 | 120 - 180 |
| Turkey | 2.5 - 3.5 kg | 1 | 160 - 180 | 120 - 150 |
| Turkey | 4 - 6 kg | 1 | 140 - 160 | 150 - 240 |
Fish (steamed)
| TYPE OF DISH | Quantity | Shelf position | Temperature [°C] | Time [min] |
| Whole fish | 1 - 1.5 kg | 1 | 210 - 220 | 40 - 60 |
8.7 Defrosting
| TYPE OF DISH | [g] | Defrosting time [min] | Further de-frosting time [min] | Notes |
| Chicken | 1000 | 100 - 140 | 20 - 30 | Place the chicken on an upturned saucer placed on a large plate. Turn halfway through. |
| Meat | 1000 | 100 - 140 | 20 - 30 | Turn halfway through. |
| Meat | 500 | 90 - 120 | 20 - 30 | Turn halfway through. |
| Trout | 150 | 25 - 35 | 10 - 15 | - |
| Strawberries | 300 | 30 - 40 | 10 - 20 | - |
| Butter | 250 | 30 - 40 | 10 - 15 | - |
| Cream | 2 x 200 | 80 - 100 | 10 - 15 | Cream can also be whipped when still slightly frozen in pla-ces. |
| Gateau | 1400 | 60 | 60 | - |
8.8 Drying - True Fan Cooking
Cover the oven shelves with baking parchment.
VEGETABLES
| TYPE OF DISH | Shelf position | Temperature [°C] | Time [hr] | |
| 1 level | 2 levels | |||
| Beans | 3 | 1/4 | 60 - 70 | 6 - 8 |
| Peppers | 3 | 1/4 | 60 - 70 | 5 - 6 |
| Vegetables for soup | 3 | 1/4 | 60 - 70 | 5 - 6 |
| Mushrooms | 3 | 1/4 | 50 - 60 | 6 - 8 |
| Herbs | 3 | 1/4 | 40 - 50 | 2 - 3 |
FRUIT
| TYPE OF DISH | Shelf position | Temperature [°C] | Time [hr] | |
| 1 level | 2 levels | |||
| Plums | 3 | 1/4 | 60 - 70 | 8 - 10 |
| Apricots | 3 | 1/4 | 60 - 70 | 8 - 10 |
| Apple slices | 3 | 1/4 | 60 - 70 | 6 - 8 |
| Pears | 3 | 1/4 | 60 - 70 | 6 - 9 |
9. CARE AND CLEANING

WARNING!
Refer to the Safety chapters.
- Clean the front of the appliance with a soft cloth with warm water and a cleaning agent.
- To clean metal surfaces use a usual cleaning agent.
- Clean the oven interior after each use. Then you can remove dirt more easily and it does not burn on.
- Clean stubborn dirt with a special oven cleaner.
- Clean all oven accessories after each use and let them dry. Use a soft cloth with warm water and a cleaning agent.
- If you have nonstick accessories, do not clean them using aggressive agents, sharp-edged objects or a dishwasher. It can destroy nonstick coating.

Stainless steel or aluminium appliances:
Clean the oven door with a wet sponge only. Dry it with a soft cloth.
Do not use steel wool, acids or abrasive materials, as they can cause damage to the oven surface. Clean the oven control panel with the same precautions.
9.1 Pyrolysis

WARNING!
The appliance becomes very hot.
There is a risk of burns.

CAUTION!
If a hob is installed with the appliance, do not use it at the same times as the Pyrolysis function. It can cause damage to the appliance.
- Remove the removable shelf supports (if applicable) and accessories from the appliance. Refer to "Removing the shelf supports".

CAUTION!
Do not let the removable shelf supports stay in the appliance during the cleaning procedure. There is a risk of damage.
- Remove the worst dirt manually.
- Fully close the oven door.

The cleaning procedure cannot start if you do not close the oven door.
- Set the function Pyrolysis. Refer to "Oven functions".
-
When || flashes, press + or - to set the necessary procedure:
-
P1 - if the oven is not very dirty. The procedure is 1 h long.
-
P2 - if the oven is more dirty. The procedure is 1 h 30 min long.
-
Press to start the procedure. You can use the End function to delay the start of the cleaning.
When the oven is at the set temperature, the door locks. The display shows the symbol l and the bars of the heat indicator.
To stop Pyrolysis before it is completed, turn the knob for the oven functions to the off position.
When Pyrolysis is completed, the display shows the time of day. The oven door stays locked. When the appliance is cool again, an acoustic signal sounds and the door unlocks.
During the Pyrolysis the oven lamp is off.
Cleaning reminder
To remind you that Pyrolysis is necessary, PYR flashes in the display for 10 seconds after each activation and deactivation of the appliance.
The cleaning reminder goes off the display:
After the end of the Pyrolysis function
- If you press + and - at the same time while PYR flashes in the display.
9.2 Oven lamp

WARNING!
Be careful when you change the oven lamp. There is a risk of electrical shock.
Before you change the oven lamp:
- Deactivate the oven.
Removing the oven door and the glass panel
- Remove the fuses in the fuse box or deactivate the circuit breaker.

Put a cloth on the bottom of the oven to prevent damage to the oven light and glass cover. Always hold the halogen lamp with a cloth to prevent grease residue from burning on the lamp.
- Turn the glass cover counterclockwise to remove it.
- Clean the glass cover.
- Replace the oven light bulb with an applicable 300^ heat-resistant oven light bulb. Use the same oven lamp type.
- Install the glass cover.
9.3 Cleaning the oven door
The oven door has four glass panels. You can remove the oven door and the internal glass panels to clean them.

CAUTION!
Do not use the appliance without the glass panels.

The oven door can close if you try to remove the glass panels before you remove the oven door.
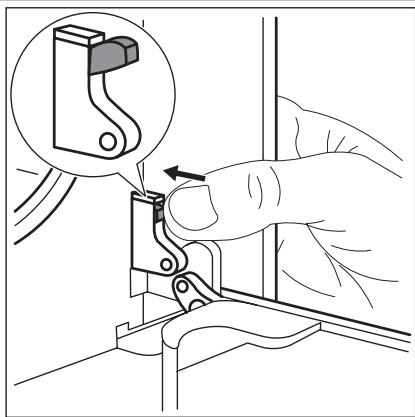
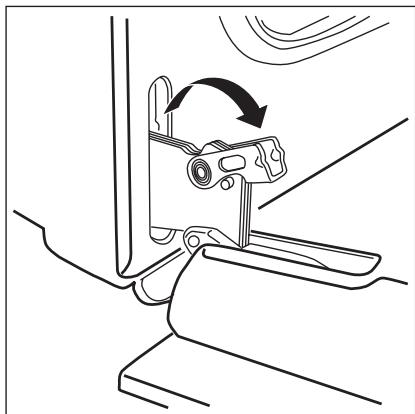
- Fully open the door and identify the hinge to the right side of the door.
- Push the tightening component until it pulls back.

- Hold the pushed component with one hand. Use a screwdriver with the other hand to lift and turn the right side hinge lever.
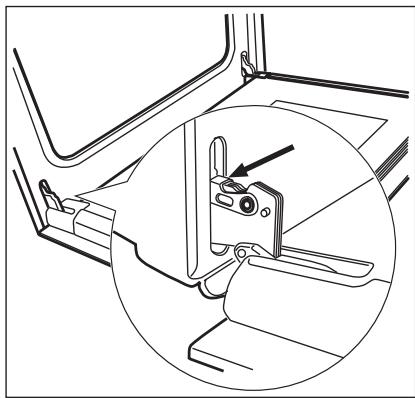
- Identify the hinge to the left side of the door.
- Lift and turn the lever on the left hinge.
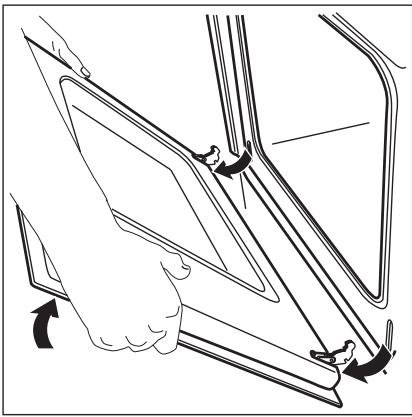
- Close the oven door to the first opening position (halfway). Then pull forward and remove the door from its seat.

- Put the door on a soft cloth on a stable surface.
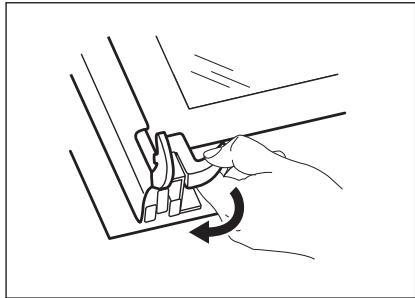
- Release the locking system to remove the glass panels.
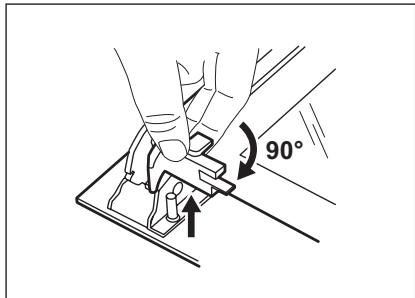
- Turn the two fasteners by 90^ and remove them from their seats.
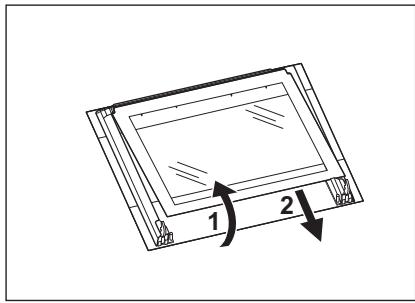
- Carefully lift (step 1) and remove (step 2) the glass panels one by one. Start from the top panel.
- Clean the glass panels with water and soap. Dry the glass panels carefully.
Installing the door and the glass panels

When the cleaning is completed, install the glass panels and the oven door. Do the above steps in the opposite sequence.
Make sure that you put the glass panels (A, B and C) back in the correct sequence. The middle panel (B) has a decorative frame. The screen-printing zone must face the inner side of the door.
Make sure that after the installation the surface of the glass panel frame (B) on the screen-printing zones is not rough when you touch it.
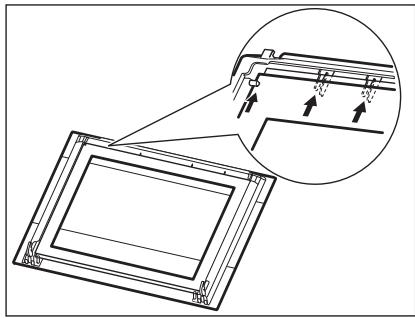
Make sure that you install the top panel in the seats correctly.
10. WHAT TO DO IF...

WARNING!
Refer to the Safety chapters.
| Problem | Possible cause | Remedy |
| The oven does not heat up. | The appliance is deactivated. | Activate the appliance. |
| The oven does not heat up. | The clock is not set. | Set the clock. Refer to "Setting the time of day". |
| The oven does not heat up. | The necessary settings are not set. | Make sure that the settings are correct. |
| The oven does not heat up. | The automatic switch-off is on. | Refer to "Automatic switch-off". |
| The oven does not heat up. | The Child Lock is on. | Refer to "Deactivating the Child Lock". |
| The oven does not heat up. | The fuse in the fuse box is released. | Do a check of the fuse. If the fuse is released more than one time, contact a qualified electrician. |
| The oven lamp does not operate. | The oven lamp is defective. | Replace the oven lamp. |
| The Pyrolysis does not start. The display shows C3. | The door is not fully closed or the door lock is defective. | Fully close the door. |
| The display shows F102. | The door is not fully closed or the door lock is defective. | 1. Fully close the door. 2. Deactivate the appliance with the house fuse or the safety switch in the fuse box and activate it again. 3. If the display shows F102 again, contact the service centre. |
| The oven does not heat up. The display shows Demo. | The demo mode is activated. | 1. Deactivate the appliance. 2. Press and hold the button + 3. When an acoustic signal sounds, turn the knob for the oven functions to the first function. Demo flashes in the display. 4. Turn the knob for the oven functions to the off position. 5. Release the button + 6. Turn the knob for the temperature clock-wise three times. The acoustic signal sounds three times. The demo mode is deactivated. |
| The display shows an error code that is not on this list. | There is an electronic fault. | 1. Deactivate the appliance with the house fuse or the safety switch in the fuse box and activate it again. 2. If the display shows the error code again, contact the service centre. |
| Steam and condensation collect on the food and in the oven. | You left the dish in the oven for too long. | Do not keep the dishes in the oven for longer than 15 - 20 minutes after the cooking ends. |
| If you cannot find a solution to the problem yourself, contact your dealer or the service centre. | The necessary data for the service centre is on the rating plate. The rating plate is on the front frame of the appliance cavity. | |
| We recommend that you write the data here: | ||
| Model (MOD.) | ||
| Product number (PNC) | ||
| Serial number (S.N.) | ||
11. INSTALLATION

WARNING!
Refer to the Safety chapters.
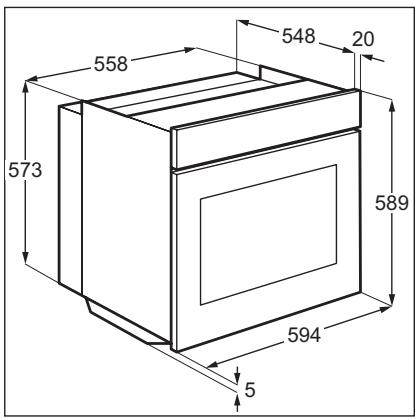
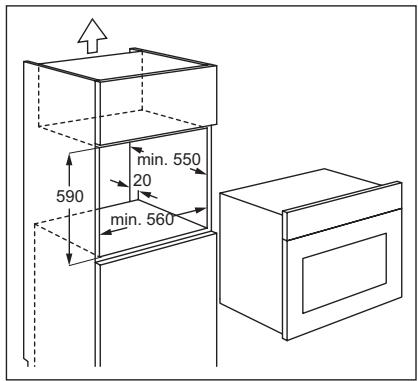
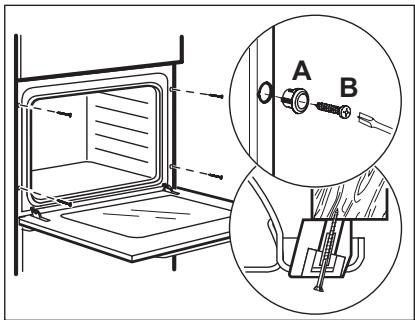
11.1 Building In
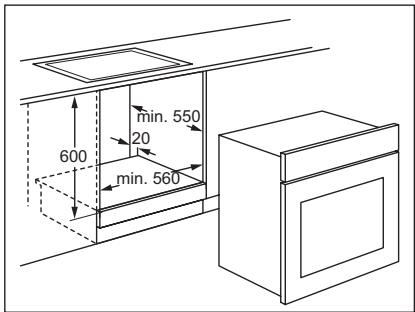
11.2 Electrical installation

WARNING!
Only a qualified person must do the electrical installation.

The manufacturer is not responsible if you do not follow the safety precautions from the chapter "Safety Information".
12. ENVIRONMENT CONCERNS
Recycle the materials with the symbol
. Put the packaging in applicable
containers to recycle it.
Help protect the environment and human health and to recycle waste of electrical
This appliance is supplied with a main plug and a main cable.
11.3 Cable
Cable types applicable for installation or replacement: H07 RN-F, H05 RN-F, H05 RRF, H05 VV-F, H05 V2V2-F (T90), H05 BB-F.
For the section of the cable refer to the total power (on the rating plate) and to the table:
| Total power | Section of the cable |
| maximum 1380 W | 3 x 0.75 mm² |
| maximum 2300 W | 3 x 1 mm² |
| maximum 3680 W | 3 x 1.5 mm² |
The earth cord (green / yellow cable) must be 2 cm longer than phase and neutral cables (blue and brown cables).
and electronic appliances. Do not dispose appliances marked with the symbol
with the household waste. Return the product to your local recycling facility or contact your municipal office.
ÍNDCIDE MATERIALIAS
- INFORMACION SOBRE SEGURIDAD 27
- INSTRUCCIONES DE SEGURIDAD 28
- DESCRIPCION DEL PRODUCTO 31
4.ANTESDELPRIMERUSO 31
5.USO DIARIO 32 - FUNCIONES DE RELOJ 33
- FUNCIONES ADICIONALES 35
- CONSEJOS UTILES 35
- MANTENIMIENTO Y LIMPIEZA 43
- QUE HACER SI 48
- INSTALLACION 50
PENSAMOS EN USTED
Gracias por adquirir un producto Electrolux. Ha escogido un producto que contiene décadas de experiencia e innovación profesionales. Ingenioso y Elegant, se ha disnado pensando en usted. Así que, siempre que lo utilise pueda tener la seguridad de que suguirá excelentes resultados.
Bienvenido a Electrolux.
Visite{nuestro sitio web para:

Obtener consejos, folletos, soluciones a problemas e informacion de service: www.electrolux.com

Registrar su producto para recibir un mejor servicios: www.electrolux.com/productregistration

Adquirir accesos, articulos de consumo y recambios originales para su aparato: www.electrolux.com/shop
ATENCION Y SERVICIO AL CLIENTE
Le recomendamos que utilise recambios originales.
Al contactar con el Servicio, cerciorese de tener lasuma informacion a mano.
La información se pueda encontrar en la placá de característica. Modelo, PNC, Número de série.

Advertencia - Precaúnion-Información sobre seguidad.

Datas y recomendaciones generales

Información medioambiental
Salvo modificaciones.
1. INFORMACION SOBRE SEGURIDAD
Antes de instalar y utiliser el aparato, lea atentamente las instrucciones realizadas. El fabricante no se hace responsable de los días y lesiones causados por una instalación y uso Incorrectos. Guarde siempre las instrucciones jusqu'à con el aparato para futuras consultas.
1.1 Seguidad de niños y personas vulnerables

ADVERTENCIA
Existe riesgo de sufrir asfixia, lesiones o incapacidad permanente.
- Este aparato puede ser utilisé por niños de 8 años en adelante y por personas cuyas capacities físicas, sensoriales o mentalaes estén disminuidas o que carezan de la experiencia y conocimientos suficientes para manejarlo, siempre que@cuenten con la supervisión de una persona que se responsabilece de su seguridad.
- No deje que los niños juguen con el aparato.
- Mantenga los materiales de embalaje alejados de los niños.
- Mantenga a los niños y mascotas alejados del aparato cuando está funciona o enfiándose. Las piezas de fácil acceso están calientes.
- Si el aparato dispone de dispositivo de seguridad para niños, se recomienda activarlo.
- Evite que un niño lleve a cabo la limpieza y el mantenimiento de usuario sin la supervisión adecuada.
1.2 Seguidad general
- Solo un electricistarialmente possible instalar este aparato y sustituir el cable.
-
El aparato se calienta cuando está en funciona. No toque las resistencias del aparato. Utilice siempre guantes de hora cuando introduzca o retire accesos o utensilios refractarios.
-
No utilise un limpiador a vapor para limpiar el aparato.
- Antes de realizar tareas de mantenimiento, corte la corriente electrica.
- No utilise limpiadores abrasivos ásperos ni rascadores de metal aflado para limpar la puerta de cristal si no quiere arañar su superficie, lo que pourrait hacer que el cristal se Highest añicos.
- Los restos de cerrames deben retirarse antes de la limpieza pirolítica. Saque todas las piezas delorno.
2. INSTRUCCIONES DE SEGURIDAD
2.1 Instalación

ADVERTENCIA
Sólo un的技术icoriallicadocould instalar el aparato.
- Retire todo el embalaje.
- No instale ni utilise un aparato dañado.
- Siga las instrucciones de instalación sugministradas con el aparato.
- El aparato es pesado,onga cuidado siempre cuando lo mueva. Utilice siempre guantes de proteccion.
- No tire nunca del aparato sujetando el asa.
- Respete sempre la distancia minima entre el aparato y los demás electrodomésticos y mobiliario.
- Asegürese de que el aparato se instala debajo y+junto aestructuras seguras.
- Los laterales del aparato deben colocarse jusqu'à其他的 aparatos o muebles de la misma.altura.
Conexión electrica

ADVERTENCIA
Riesgo de incendios y descargas electricas.
- Todas las conexiones electricas deben realizarse por electricistas提供优质.
-
El aparatoDebe quedar conectado a tierra.
-
Asegúrese de que las espécificaciones electricas de la placà coinciden con las del suministro electrico de su hogar. En caso contrario, pángase en contacto con un electricista.
- Utilice siempre una toma con aislamiento de conexión a tierra correctamente instalada.
- No utilise adaptadores de enchufes multiples ni cables prolongadores.
- Asegúrese de no provocar daños en el enchufe ni en el cable de red. Póngase en contacto con un electricista o con el servicios técnico para携带 un cable de red dañado.
- Evite que el cable de red entre en contacto con la puerta del aparato, especialmente si la puerta está caliente.
- Los mecanismos de proteccion contra descargas electricas de componentes con corriente y aislados deben fjarse de forma que no能把 aflojarse sin utiliser Herramentas.
- Conecte el enchufe a la toma de corriente únicamente cuando haya terminado la instalación. Asegúrese de tener acceso al enchufe del suministro de red una vez instalado el aparato.
- Si la toma de corriente está floja, no connece el enchufe.
- No desconecte el aparato tirando del cable de connexion a la red. Tire siempre del enchufe.
- Use únicamente dispositivos de aislapimento correctos: linea con protección
contra los cortocircuitos, fusibles (como tornillo que能把an retirarse del soporte), dispositivos de fuga a tierra y contactores.
- La instalación electrica debe tener un dispositivo de aislamiento que permita desconectar el aparato de todos los polos de la red. El dispositivo de aislamiento debe tener una aperture de contacto con una anchura minima de 3 mm.
- Cierre completamente la puerta del horno antes de conectar el aparato a la corriente electrica.
2.2 Uso del aparato

ADVERTENCIA
Riesgo de lesiones, quemaduras, descargas electricas o explosiones.
- Utilice este aparato en entornos domésticos.
- No cambie las specifications de este aparato.
- Cerciórese de que los orificios de ventilación no está obstruidos.
- No deja nunca el aparato desatendido,mientras está en funciona.
- Desactive el aparato antes de cada uso.
- Tenga cuidado alaabrir la puerta del aparato cuando este este en funciona-. miento. Puede liberarse vapeores calientes.
- No utilise el aparato con las manos mojadas ni cuando entree en contacto con el agua.
- No ejerza presión sobre la puerta abierta.
- No utilise el aparato como superficie de trabajo ni de almacenimiento.
- Mantenga siempre cerrada la puerta del aparato cuando este esté en función.
- Abra la puerta del aparato con cuidado. El uso de ingredientes con alcohol peut de tener una mezcla de alcohol y aire.
-
Procure que no haya chispas ni fuego encendido cerca cuando se abra la puerta del aparato.
-
No coloque productos inflamables ni objetivos mojados con productos inflamables dentro, cerca o encima del aparato.

ADVERTENCIA
Podrdaanar el aparato.
-
Para evaporar daños o decoloraciones del esmalte:
-
no coloque recipientes nithers objet- tos directamente sobre la base del aparato.
- no coloque papel de aluminio directamente en la parte inferior del aparato.
- No ponga agua directamente en el aparato caliente.
- No deje platos humedes ni comida en el aparato una vez finalizada la cocccion.
-
Preste especial atencion al descontar o instalar los accesos.
-
La perdida de color del esmalte no afecta al rendimiento del aparato. No se considera un defecto en cuando al de-recho de garantía.
- Utilice una bandeja Honda para pasteleres humedes. Los jugos de las frutas podrian occasionar manchas permanentes.
2.3 Mantenimiento y limpieza

ADVERTENCIA
Riesgo de lesiones, incendio o de occasionar daños al aparato.
- Antes de proceder con el mantenimiento, apague el aparato y desconecte el enchufe de la red.
- Asegürese de que el aparato está frío. Los paneles de cristal能把 romperse.
- Bombie inmediamente los paneles de cristal de la puerta que estén dañados. Póngase en contacto con el servicios técnico.
- Tenga mucho cuidado al descortar la puerta del aparato. ;La puerta es muy pesada!
- Limpie periodicamente el aparato para evaporar el deterioro del material de la superficie.
-
Los restos de comida o grasa en el interior del aparato podrán provocar un incendio.
-
Limpie el aparato con un pañó suave humedecido. Utilice sólo detergentes neutros. No utilise products abrasivos, estropajos duros, disolventes ni objetivos de metal.
- Si utilizes aerosoles de limpieza para hornos, siga las instrucciones del envase.
- No limpie el esmalte catalítico (en su caso) con ningún tipo de detergente.
Limpieza pirolítica

ADVERTENCIA
Existe riesgo de quemaduras.
- Antes de realizar una autolimpieza pirolítica o la función de Primer uso, elimine de la cavidad del hora:
- Cualquier resto de comida, aceite o grasa.
- Todos los objetivos desmontables (incluidos estantes, carriles laterales, etc. suministrados con el producto), en especial todos los recipientes, sartenes, bandejas, utensilios, etc. antiadherentes.
- Lea atentamente todas las instrucciones de la limpieza pirolítica.
- Mantenga a los niños alejados del horo, cuando la limpieza pirolitica se ocurre en funciona. El mundo se calienta mucho.
-
La limpieza pirolítica es una operationa alta temperatura que pueda liberar humanos de los residuos de coccyon y de los materiales de fabricación, por lo que recomendamos encarecidamente a los consumidos:
-
Asegurar una correcta ventilacion durante yuponedescadalimpieza pirolitica.
- Asegurar una correcta ventilación durante y después del primer uso a maxima temperatura.
- Retirarrialquiermascota (especialmentepájaros)de lasproximidades delhorno durante ydescuiesde la limpieza pirolitica y use primero la
temperatura maxima para una zona bien ventilada.
- A diferencia de los seres humanos,algunas aves y algunos reptiles poderes更深 sensibles a los posibles humosemitidos durante la limpieza de todoslos hornos piroliticos.
Las mascotas deklequeño tamanotambienpuede sermuy sensiblesalos Cambios de temperatura localizadoscerca de los hornos,mIJtras se realizael programadeutolimpieza pirolitica.
Las superficies antiadherentes de reci pientes, sartenes, bandejas, utensilios, etc., poder danarse por las altas temperatas de la limpieza pirolitica y también poder ser fuente de humos daninos de bajo intensidad. - Los humos emitidos por todos los hornos pirolíticos y residuos de coccción descritos no son daninos para las personas, incluidos los bebés o personas con problemas Médicos.
2.4 Luz interna
- El tipo de bombilla o lámpara halógena realizada para este aparato es específica para aparatos dométricos. No debe utilizes para la iluminación domestica.

ADVERTENCIA
Riesgo de descargas electricas.
- Antes decaear la bombilla,descencte el aparato del suministro de red.
- Utilice solo bombillas con las mismas specifications.
2.5 Desecho

ADVERTENCIA
Existe riesgo de lesiones o asfixia.
- Desconecte el aparato de la red.
- Corte el cable de connexion a la red y desechelo.
- Retire el pestillo de la puerta para evitar que los niños y las mascotas queden encerrados en el aparato.
3. DESCRIPCION DEL PRODUCTO
1 Mando de las functions del hora
2 Programador electrónico
3 Mando de temperatura
4 Grill
5 Bombilla del hora
6 Ventilador
7 Placa de caracteristicas
8 Posiciones de las parrillas
3.1 Accesorios delorno
Parrilla
Para utensilios de cocina, pasteles en molde, asados.
- Grill / Bandeja de asar
Para homear y asar o como grasera.
4. ANTES DEL PRIMER USO

ADVERTENCIA
Consulte los capitulos sobre seguidad.
4.1 Limpieza inicial
- Retire todos los accesos y carriles laterales extraibles (en su caso).
- Limpie el interior del aparato antes de utiliser por primera vez.

Consulte el capitulo "Mantenimiento y limpieza".
4.2 Programación del reloj
La pantalla muestra hr y 12:00. 12 parpadea.
- Pulse + o - para programar la hora correspondiente.
- Pulse ① para confirmar. Estesoleamente esnecessarylaprimera vezque seajustala hora.Después,laaguaehora se guarda automatamente transcurridos 5segundos).
La pantalla muestra min y la hora ajustada. 00 parpadea.
-
Pulse + o - para programar los Minutes correspondientes.
-
Pulse ① para confirmar. Estesoleamente esnecessarylaprimera vezque seajustala hora.Después,laaguahaseguarda automatically transcurridos5segundos).La pantalla muestra laaguahora.
Cambio de la hora

Se peutecambiar la hora solo.
cuando el hora está apagado.
Pulse ① repetidamente hasta que el indicator de la hora ① parpadee en la pantalla. Paraaabstarla newa hora,siga el procedimiento indicado en"Programacion del reloj".
4.3 Calentamento previo
Precaliente el aparato vacio para quemar los restos de grasa.
- Ajuste la funciona y la temperatura maxima.
- Deje que el aparato funciona durante 45关键时刻.
-
Ajuste la funciona y la temperatura maxima.
-
Deje que el aparato funciona durante 15 Minutes.
Los accesos se PUden calentar más de lo habitual. El aparato pueda emitir
olores y humos. Esto es totalmente normal. Asegürese de que haya una buena ventilación.
5. USO DIARIO

ADVERTENCIA
Consulte los capitulos sobre seguidad.
Si se desea usar el aparato, presione el mando. El mando sale del alojamento.
- Gire el mando del termostato paraaabstar la temperatura.
- Para desactivar el aparato, gire el mando de las functions del homo hasta la posicion de apagado.
5.1 Encendido y apagado del aparato
- Gire el mando del hora hasta la direccion deseada.
5.2 Funciones delorno
| Función delorno | Aplicación | |
| 0 Apagado | El aparato está apagado. | |
| Turbo | Para asar o asar y hornear a la vez alimentos que re-quieran la misma temperatura de coccción, en más de una bandeja y sin que se transfieran los sabores. | |
| Calor superior + inferior | Para hornear y asar en un nivel delorno. Las resisten-cias superior e inferior funcional al mismo tiempo. | |
| Grill | Para asar al grill pequeñas cantidades de alimentos de poco espesor en el centro de la parrilla. Para hacer tostadas. | |
| Grill rápido | Para asar al grill alimentos poco gruesos engrandes cantidades. Para hacer tostadas. Funciona todo el grill. | |
| Grill + Turbo | Para cocinar grandes trozos de carne. El grill y el venti-lador del hora funcional de forma alternara para que el aire caliente circule alrededor de los alimentos. | |
| Pizza | Para hacer pizza, quiche o tarta. | |
| Carne | Para preparar asados muy tiernos y jugosos. | |
| Mantener ca- liente | Paramantener calientes los alimentos. | |
| Descongelar | Para desconcelar alimentos congelados. | |
| Función del hora | Aplicación | |
| Pirólisis | Para limpiar el hora. La elevada temperatura quema la sociedad residual. A continuación possible retiringla con un paño cuando el aparato está frío. | |
5.3 Pantalla
1 Temporizador
2 Indicador de calor residual y calenta-miento
3 Depóstito de agua (solo los modelos selecciónados)
4 SondaTERMica (solo los modelos selec tionados)
5 Bloqueo de puerta (solo los modelos selectionados)
6 Horas/minutos
7 Funciones del reloj
5.4 Teclas
| Tecla | Función | Descripción |
| ① | Reloj | Paraaabsturuna funciona delreloj. |
| —,+ | Menos,más | Paraaabsturel tiempo. |
5.5 Indicador de calor residual y calentimiento
Cuando se activa una función del hora, las barras de la pantalla se encienden de una en una. Las barras indicate que la temperature del hora aumenta o disminuye.
Al desactivar el aparato, la pantalla muestra el indicator de calor residual si la temperatura del hora es superior a 40 ^ C .Gire el mando del termostato a la derecha o la izquierda para estar la temperatura del hora en la pantalla.
6. FUNCIONES DE RELOJ
| Símbolo | Función | Descripción |
| Avisador | Para programar un temporizador. | |
| Hora | Paraaabustar,modificar ocomprobar la hora.Consulta "Programación del reloj". | |
| |→| | Duración | Paraaabustar cuando tiempo debe的功能ar el aparato.Ajuste una función del hora antes de esta funciona. |
| Sim-bolo | Función | Descripción |
| →| | Fin de progra-ma | Para configurar cuando se ha de desactivar el aparato. Ajuste una función del hora antes de esta funciona. Puede utiliser Duración y Fin a la vez (Inicio Diferido) pa-raaabstar la hora a la que debe encenderse y después apagarse el aparato. |
i Pulse 工 repetidamente para!.
cantar la referencia del reloj.
i Pulse ① para confirmar los ajustes de las functions del reloj, o espere 5 segundos para confirmar automatically el ajuste.
6.1 Ajuste de la funciona Duración o Fin
- Pulse ① repetidamente hasta que en la pantalla parpadee o
- Pulse + o - paraaabstar los Minutes.
- Pulse ① para confirmar.
- Pulse + o - para ajustar la hora.
- Pulse ① para confirmar.
- Cuando termina el tiempo ajustado, el símbolo |→| o →| y el tiempo ajustado parpadean. Se emite una Alertsa acústica durante dos Minutes. El aparato se apaga. Pulseichever tecla o abra la puerta del aparato para detener el sonido.
i Si pulsa ①)msteadasajustael tiempo de Duración | | ,el aparato cambia al ajuste de la funcionaFin
6.2 Ajuste del Avisador
Utilicelo para programar una cuenta atras. El periodo de tiempo máximo es de 23 horas 59 horas.Esta funciona no afecta al functionamento del hora. Puede ajustar el Avisador enequalquiermomento, incluso si el aparato está apagado.
- Pulse ① repetidamente hasta que y 00 parpadeen en la pantalla.
- Pulse + o - paraaabstarel Avisador. Al principio, el tiempo se calcula en horas ysegundos.Cuando la hora ajustada es superior a 60minutos,el的概率 se enciende en la panta-lla.El aparato calcula la hora en horas yminutes.
- El Avisador empieza automatamente afterwards de cinco segundos.
- Cuando termina el tiempo programado, se emite una Alertsa durante dos horas. 00:00 y parpa-dean en la pantalla. Pulse una tecla para desactivar la Alertsa.
i Si se ajusta el Minutero cuando la Duracion o el Fin esta en bajo, el symbolo se enciende en lapellata.
6.3 Temporizador de avance del contagior
Utilice el temporizador de avance del控制器 para controlar el tiempo de configuración del hora. Se enciende inmediamente cuando el hora empieza a calentarse.
Para reineciar el temporizador, mantenga pulsadas +y - El temporizador empieza aunar de nuevo.
i No se pueda utiliser el temporiza-dor cuando está en bajo lasfunciones Duración o Fin
7. FUNCIONES ADICIONALES
7.1 Bloqueo de seguridad para niños
Cuando está activado el bloqueo de seguidad para niños, no se pueda usar el hora. De este modo se asegura de que los niños no activen accidentally el aparato.
Activación y desactivación de la funciona de Bloqueo de seguridad para niños:
- No ajusteacularfunciondelhormo.
- Mantenga pulsado y + al mismo tiempo durante dos segundos.
- Se emite una seals acústica. SAFE y se encienden o apagan (cuando se activa o desactiva la tecla de bloqueo) en la pantalla.

Si el hora dispone de la configuración de limpieza pirolítica, la puerta se bloquea.
SAFE y se encienden en la pantalla al girar un mando o pulsar un botón.
7.2 Apagado automatico
Por motivos de seguridad, el aparato se desactiva cuando de un tiempo:
- Si está activada alguna función del horno.
- Si no cambia la temperatura delorno.
| Temperatura del hora | Hora de apaga-do |
| 30 -115 °C | 12.5 h |
| Temperatura del hora | Hora de apaga-do |
| 120 - 195 °C | 8.5 h |
| 200 - 245 °C | 5.5 h |
| 250 - máximo °C | 3.0 h |
Después de un apagado automatico, pulse una tecla para activar de nuevo el aparato.

El apagado automático afecta a todas las functions del hora salvo a Duración, Fin e Inicio diferido.
7.3 Ventilador de enfiambre
Cuando el aparato funciona, el ventilador de refrigeración se pone en marcha automatistically para tener frías las superficies del aparato. Si se desactiva el aparato, el ventilador可以选择 seguir funciónando hasta que se enfríe el aparato.
7.4 Termostato de seguidad
El funciona incorrecto del aparato o los componentes defectuosos puede provocar sobrecalentrientos peligrosos. Para evaporarlo, el hora dispone de un termostato de seguridad que interrupte la alimentacion. El hora se vuelve a connectar automatistically cuando descienda la temperatura.
8. CONSEJOS UTILES
- El hora tiene cinco niveles o alturas. Estos niveles seordenan contándolos de abajo a arriba desde la solera del aparato.
- El aparato estáidotado con un sistemaspecial que hace circular el aire y recicla constanmente el vapor. Graciasaeste sistemasuede cocinar con unentorno de vapor ymantener los ali
mentos blandos en su interior y cruji-tes en su exterior. Ello reduce al minimo el tiempo de cocción y el consumo de energia.
- La humedad puedeninger a condensarse en el aparato o en los paneles de cristal. Esto es totalmente normal. Mantengase alejado del aparato siempre que abra la puerta cuando está en
funcionamiento. Si desea reducir la condensacion,pongat functionamiento el aparato 10 instantos antes de cocinar.
- Limpie la humedad cuando de cada uso del aparato.
- No coloque objetos directamente sobre la solera del aparato ni cubra los componentes con papel de aluminio cuando cocine. De lo contrario puede que se alteren los resultados de la cocción y se dañé el esmalte.
8.1 Reposteria
- No abra la puerta del hora antes de que transcurran 3/4 partes del tiempo de coccción existecido.
- Si utilizes dos bandejas al mesmo tiempo, deje un nivel libre entre ambas.
- La funciona Calor superior + inferior a la temperatura predeterminada es idonea para hornear pan.
horno quede manchado de forma permanente.
- Antes de trinchar la carne, déjela reposar uno 15 Minutes, como minimo, para que retenga los jugos.
- Para evaporar que se forme mucho humano en el hora, vierta un poco de agua en la bandeja Honda. Para evaporar la condensacion de humos, añada aguaymes de que se seque cada vez.
8.3 Tiempos de cocción
Los tiempos de cocción dependen del tipo de alimento, de su consistencia y del volumen.
Inicialmente, supervise el rendimiento cuando cocine. Busque losolestes (de calor, tiempo de coccción, etc.) para sus recipientes, recetas ycantidades cuandoutilice este aparato.
8.2 Carnes y pescados
- Utilice una bandeja Honda con los alimentos muy grasos para evaporar que el
8.4 Cuadro de specifications para hornear y asar
PASTELES
| TIPO DE PLATO | Calor superior + inferior | Turbo | Tiempo de cocío n [min] | Notas | ||
| Posición de la parrilla | Temp. [°C] | Posición de la pa-rilla | Temp. [°C] | |||
| Masas bati-das | 2 | 170 | 3 (2 y 4) | 160 | 45-60 | En molde de reposteria |
| Masa con mantequilla | 2 | 170 | 3 (2 y 4) | 160 | 20-30 | En molde de reposteria |
| Tarta de queso (con suero) | 1 | 170 | 2 | 165 | 60-80 | En molde de reposteria de 26 cm |
| Tarta o pas-tel de man-zana | 2 | 170 | 2 (izquierda y dere-cha) | 160 | 80-100 | En dos mol-des de reposteria de 20 cm en una parri-lla1) |
| Strudel | 3 | 175 | 2 | 150 | 60-80 | En bandeja |
| TIPO DE PLATO | Calor superior + inferior | Turbo | Tiempo de cocío (min) | Notas | ||
| Posición de la parrilla | Temp. [°C] | Posición de la parrilla | Temp. [°C] | |||
| Tarta de mermelada | 2 | 170 | 2 (izquierda y derecha) | 165 | 30-40 | En molde de reposteria de 26 cm |
| Bizcocho | 2 | 170 | 2 | 160 | 50-60 | En molde de reposteria de 26 cm |
| Pastel de Navidad/ Pastel de fruta | 2 | 160 | 2 | 150 | 90-120 | En molde de reposteria de 20 cm1) |
| Pastel de ci-ruelas | 1 | 175 | 2 | 160 | 50-60 | En molde pa-ra pan1) |
| Pasteles pe-queños: un nivel | 3 | 170 | 3 | 140-150 | 20-30 | En bandeja |
| Pasteles pe-queños: dos niveles | - | - | 2 y 4 | 140-150 | 25-35 | En bandeja |
| Pasteles pe-queños: tres niveles | - | - | 1, 3 y 5 | 140-150 | 30-45 | En bandeja |
| Galletas/hojaldres - un nivel | 3 | 140 | 3 | 140-150 | 30-35 | En bandeja |
| Galletas/hojaldres - dos niveles | - | - | 2 y 4 | 140-150 | 35-40 | En bandeja |
| Galletas/hojaldres - tres niveles | - | - | 1, 3 y 5 | 140-150 | 35-45 | En bandeja |
| Merengues: un nivel | 3 | 120 | 3 | 120 | 80-100 | En bandeja |
| Merengues: dos niveles | - | - | 2 y 4 | 120 | 80-100 | En bandeja1) |
| Bollos | 3 | 190 | 3 | 190 | 12-20 | En bandeja1) |
| Bollos relleros: dos niveles | 3 | 190 | 3 | 170 | 25-35 | En bandeja |
| TIPO DE PLATO | Calor superior + inferior | Turbo | Tiempo de coc- ción [min] | Notas | ||
| Posición de la parrilla | Temp. [°C] | Posición de la pa- rilla | Temp. [°C] | |||
| Bollos relle- nos de cre- ma: dos ni- veles | - | - | 2 y 4 | 170 | 35-45 | En bandeja |
| Tartaletas | 2 | 180 | 2 | 170 | 45-70 | En molde de reposteria de 20 cm |
| Pastel de fruta | 1 | 160 | 2 | 150 | 110-120 | En molde de reposteria de 24 cm |
| Tarta Victo- ria | 1 | 170 | 2 (izquier- da y dere- cha) | 160 | 50-60 | En molde de reposteria de 20 cm |
1) Precalentar durante 10关键时刻.
PAN Y PIZZA
| TIPO DE ALIMENTO | Cocción con- vencional | Cocción con turbo | Tiempo de coc- ción (min) | Notas | ||
| Posición de la parrilla | Temp. (°C) | Posición de la pa- rrrilla | Temp. (°C) | |||
| Pan blanco | 1 | 190 | 1 | 190 | 60-70 | 1-2 piezas, 500 g cada pieza1) |
| Pan de cen- teno | 1 | 190 | 1 | 180 | 30-45 | En molde de pan |
| Panecillos | 2 | 190 | 2 (2 y 4) | 180 | 25-40 | 6-8 panecillos en una ban-dea de repos- tería1) |
| Pizza | 1 | 230-2 50 | 1 | 230-2 50 | 10-20 | En una ban-dea o bande- ja honda1) |
| Bollitos | 3 | 200 | 3 | 190 | 10-20 | En bandeja de reposteria1) |
1) Precalentar durante 10关键时刻.
FLANES
| TIPO DE ALIMENTO | Cocción con- vencional | Cocción con turbo | Tiempo de cocción (min) | Notas | ||
| Posición de la parrilla | Temp. (°C) | Posición de la pa- rilla | Temp. (°C) | |||
| Pudin de pasta | 2 | 200 | 2 | 180 | 40-50 | En un molde |
| Flan de ver- duras | 2 | 200 | 2 | 175 | 45-60 | En un molde |
| Quiches | 1 | 180 | 1 | 180 | 50-60 | En un mol- de1) |
| Lasaña | 2 | 180-1 90 | 2 | 180-1 90 | 25-40 | En un mol- de1) |
| Canelones | 2 | 180-1 90 | 2 | 180-1 90 | 25-40 | En un mol- de1) |
1) Precalentar durante 10关键时刻.
CARNE
| TIPO DE ALIMENTO | Cocción con- vencional | Cocción con turbo | Tiempo de coc- ción (min) | Notas | ||
| Posición de la pa- rilla | Temp. (°C) | Posición de la pa- rilla | Temp. (°C) | |||
| Carne de va- cuno | 2 | 200 | 2 | 190 | 50-70 | En un estante de rejilla |
| Cerdo | 2 | 180 | 2 | 180 | 90-120 | En un estante de rejilla |
| Ternera | 2 | 190 | 2 | 175 | 90-120 | En un estante de rejilla |
| Rosbif poco hecho | 2 | 210 | 2 | 200 | 50-60 | En un estante de rejilla |
| Rosbif en su punto | 2 | 210 | 2 | 200 | 60-70 | En un estante de rejilla |
| Rosbif muy hecho | 2 | 210 | 2 | 200 | 70-75 | En un estante de rejilla |
| Paletilla de cerdo | 2 | 180 | 2 | 170 | 120-150 | conIEL |
| Morcillo de cerdo | 2 | 180 | 2 | 160 | 100-120 | 2 piezas |
| Cordero | 2 | 190 | 2 | 175 | 110-130 | Pata |
| Pollo | 2 | 220 | 2 | 200 | 70-85 | Entero |
| TIPO DE ALIMENTO | Cocción con- vencional | Cocción con turbo | Tiempo de cocción (min) | Notas | ||
| Posición de la pa- rilla | Temp. (°C) | Posición de la pa- rilla | Temp. (°C) | |||
| Pavo | 2 | 180 | 2 | 160 | 210-240 | Entero |
| Pato | 2 | 175 | 2 | 220 | 120-150 | Entero |
| Ganso | 2 | 175 | 1 | 160 | 150-200 | Entero |
| Conejo | 2 | 190 | 2 | 175 | 60-80 | Troceada |
| Liebre | 2 | 190 | 2 | 175 | 150-200 | Troceada |
| Faisán | 2 | 190 | 2 | 175 | 90-120 | Entero |
PESCADO
| TIPO DE ALIMENTO | Cocción con- vencional | Cocción con tur- bo | Tiempo de coc- ción (min) | Notas | ||
| Posición de la pa- rilla | Temp. (°C) | Posición de la pa- rilla | Temp . (°C) | |||
| Trucha/Par- go | 2 | 190 | 2 | 175 | 40-55 | 3-4 piezas |
| Atún/Sal- món | 2 | 190 | 2 | 175 | 35-60 | 4-6 filetes |
8.5 Grill

Precaliente el hora vacio durante 10 horas antes de cocinar.
| Cantidad | Grill | Tiempo de coccción [min] | ||||
| TIPO DE ALI-MENTO | Piezas | [g] | Posición de la pa-rilla | Temp [°C] | 1a cara | 2a cara |
| Filetes de solo-millo | 4 | 800 | 4 | máx. | 12-15 | 12-14 |
| Filetes de vacu-no | 4 | 600 | 4 | máx. | 10-12 | 6-8 |
| Salchichas | 8 | - | 4 | máx. | 12-15 | 10-12 |
| Chuletas de cerdo | 4 | 600 | 4 | máx. | 12-16 | 12-14 |
| Pollo (cortado en dos) | 2 | 1000 | 4 | máx. | 30-35 | 25-30 |
| Brochetas | 4 | - | 4 | máx. | 10-15 | 10-12 |
| Pechuga de po-lo | 4 | 400 | 4 | máx. | 12-15 | 12-14 |
| Hamburguesa | 6 | 600 | 4 | máx. | 20-30 | - |
| Filete de pesca-do | 4 | 400 | 4 | máx. | 12-14 | 10-12 |
| Sándwiches tostados | 4-6 | - | 4 | máx. | 5-7 | - |
| Tostadas | 4-6 | - | 4 | máx. | 2-4 | 2-3 |
8.6 Grill + Turbo
Carne de vacuno
| TIPO DE ALI-MENTO | Cantidad | Posición de la parrilla | Temperatu-ra (°C) | Tiempo (min) |
| Rosbif o filete, poco hecho | por cm de grosor | 1 | 190-200 1) | 5-6 |
| Rosbif o filete, al punto | por cm de grosor | 1 | 180-190 1) | 6-8 |
| Rosbif o filete, muy hecho | por cm de grosor | 1 | 170-180 1) | 8-10 |
1) Precaliente elorno.
Cerdo
| TIPO DE ALI-MENTO | Cantidad | Posición de la parrilla | Temperatu-ra (°C) | Tiempo (min) |
| Paletilla,什么叫, jamón asado | 1-1,5 kg | 1 | 160-180 | 90-120 |
| Chuletas, costi-llas y falda | 1-1,5 kg | 1 | 170-180 | 60-90 |
| Pastel de carne | 750 g-1 kg | 1 | 160-170 | 50-60 |
| Codillo de cerdo (precocinado) | 750 g-1 kg | 1 | 150-170 | 90-120 |
Ternera
| TIPO DE ALI-MENTO | Cantidad | Posición de la parrilla | Temperatura (°C) | Tiempo (min) |
| Ternera asada | 1 kg | 1 | 160-180 | 90-120 |
| Codillo de ter-nera | 1,5-2 kg | 1 | 160-180 | 120-150 |
Cordero
| TIPO DE ALI-MENTO | Cantidad | Posición de la parrilla | Temperatura (°C) | Tiempo (min) |
| Pata de cor-dero, cordero asado | 1-1,5 kg | 1 | 150-170 | 100-120 |
| Costillar de cordero | 1-1,5 kg | 1 | 160-180 | 40-60 |
Aves
| TIPO DE ALI-MENTO | Cantidad | Posición de la parrilla | Temperatura (°C) | Tiempo (min) |
| Aves troeadas | 200 - 250 g cada trozo | 1 | 200-220 | 30-50 |
| Pollo, medio | 400 - 500 g cada trozo | 1 | 190-210 | 35-50 |
| Pollo, pularda | 1-1,5 kg | 1 | 190-210 | 50-70 |
| Pato | 1,5-2 kg | 1 | 180-200 | 80-100 |
| Ganso | 3,5-5 kg | 1 | 160-180 | 120-180 |
| Pavo | 2,5-3,5 kg | 1 | 160-180 | 120-150 |
| Pavo | 4-6 kg | 1 | 140-160 | 150-240 |
Pescado (al vapor)
| TIPO DE ALI-MENTO | Cantidad | Posición de la parrilla | Temperatura (°C) | Tiempo (min) |
| Pescado ente-ro hasta | 1-1,5 kg | 1 | 210-220 | 40-60 |
8.7 Descongelar
| TIPO DE ALIMENTO | (g) | Tiempo de descogería (min) | Tiempo de descogería adicional (min) | Notas |
| Pollo | 1000 | 100-140 | 20-30 | Cologne el pollo sobre un Plato puesto del re- vés sobre otro mayor. Déle la vuelta a media cocción. |
| Carne | 1000 | 100-140 | 20-30 | Déle la vuelta a media cocción. |
| Carne | 500 | 90-120 | 20-30 | Déle la vuelta a media cocción. |
| Trucha | 150 | 25-35 | 10-15 | - |
| TIPO DE ALIMENTO | (g) | Tiempo de descogería (min) | Tiempo de descogería (min) | Notas |
| Fresas | 300 | 30-40 | 10-20 | - |
| Mantequilla | 250 | 30-40 | 10-15 | - |
| Nata | 2 x 200 | 80-100 | 10-15 | La nata se pueda montarperfectamente incluso exceptamente que den+puntos ligeramen-te congelados. |
| Pasteles | 1400 | 60 | 60 | - |
8.8 Secar - Turbo
Cubra las bandejas con papel de hornear.
VERDURAS
| TIPO DE ALI-MENTO | Posición de la parrilla | Temperatura (°C) | Tiempo (h) | |
| 1 nivel | 2 niveles | |||
| Judías | 3 | 1/4 | 60-70 | 6-8 |
| Pimientos | 3 | 1/4 | 60-70 | 5-6 |
| Verduras para sopa | 3 | 1/4 | 60-70 | 5-6 |
| Setas | 3 | 1/4 | 50-60 | 6-8 |
| Hierbas aro-máticas | 3 | 1/4 | 40-50 | 2-3 |
FRUTA
| TIPO DE ALI-MENTO | Posición de la parrilla | Temperatura (°C) | Tiempo (h) | |
| 1 nivel | 2 niveles | |||
| Ciruelas | 3 | 1/4 | 60-70 | 8-10 |
| Albaricoques | 3 | 1/4 | 60-70 | 8-10 |
| Manzana en rodajas | 3 | 1/4 | 60-70 | 6-8 |
| Peras | 3 | 1/4 | 60-70 | 6-9 |
9. MANTENIMIENTO Y LIMPIEZA

ADVERTENCIA
Consulte los capités sobre seguidad.
- Limpie la parte delantera del aparato con un paño suave humedecido en agua Templada y jabón neutro.
-
Limpie las superficies metálicas con jabón neutro.
-
Limpie el interior delorno despuesede cada uso. Asipodraretirar la sociedad mas fácilmente e impedirá que se queme.
- Elimine la suciedad resistente con limpiadores especiales para hornos.
- Limpie todos los accesos del hora après de cada uso yooter que se quen. Utilice un paño suave humedecido en agua Templada y jabon neutro.
- No trate los recipientes antiadherentes con productos agresivos u objetos punzantes ni los lave en el lavavajillas. Podría poder el esmalte antiadherente.

Aparatos de acero inoxidable o aluminio:
Limpie la puerta del hora únicamente con una esponja humeda.
Sequela con un paño suave.
No utilise produits abrasivos, acidos ni estropajes de acero, ya que pueda darar la superficie del hora. Limpie el panel de control del hora teniendo en cuenta las mismas precauciones.
9.1 Limpieza pirolítica

ADVERTENCIA
El aparato se caliente mucho.
Puede quemarse.

PRECAUCION
No utilise la funciona de limpieza pirolítica y la placà de coccción al mesmo tiempo (si está instalada en el aparato). El aparato podra dañarse.
- Retire todos los accesos y carriles de apoyo extraíbles (en su caso) del aparato. Consulta la sección "Retirar los carriles de apoyo".

PRECAUCION
No deja los carriles de apoyo extrábiles en el aparato durante la limpieza pirolítica. Podrián producirse daños.
- Elimine a mano la suciedad más gruesa.
- Cierre completamente la puerta del hora.

El procedimiento de limpieza pirolítica no pueda empezar hasta que no cierre la puerta del hora.
- Ajuste la funciona de limpieza pirolítica. Consulte "Funciones delorno".
- Cuando | | parpadea, pulse + o - para ajustar el procedimiento necesario:
- P1 - si el hora no está muy SACIO. El procedimiento tiene una duración de 1 hora.
- P2 - si el hora está más SACU. El procedimiento tiene una duración de 1 hora y 30 horas.
- Pulse ① para起初ar el procedimiento. Puede usar la referencia Fin para retrasar el inicio de la limpieza.
Cuando el hora alcanza la tempera tura programada, la puerta se bloquea. La pantalla muestra el simbolo y las barras del indicator de calor.
Para detener la limpieza Pirolitica antes de que termine, gire el mando de las functions del hora hasta la posicion de desconexión.
Al final de la limpieza pirolitica, la pantalla indica la hora. La puerta del hora permanece bloqueada. Cuando el aparato se enfiña de nuevo, se emite una señal acústica y la puerta se desbloquea.
Durante la limpieza pirolitica, la lampara permanece apagada.
Para recordarle que el besoino realizar una limpieza Pirolitica, PYR parpadea en la pantalla durante 10segundos despues de cadaactivacion ydesactivacion del aparato. - Cuando termina la función de limpieza Pirolítica
- Si pulsa + y - al"Myso tempo quando PYR parpadea en la pantalla.
Tenga cuidado alCambiar la bombilla del hora. Existe riesgo dedescarga electrica.


Aviso de limpieza
El recordatorio de la limpieza se apaga:
9.2 Bombilla delorno

ADVERTENCIA
Antes de cambio la bombilla del hora:
- Apague el hora.
- Retire los fusibles de la caja de fusibles o desconecte el disyuntor.

Coloque un paño en el fondo del hora para proteger la luz y la tapa de cristal.
Coja siempre la bombilla halógena con un paño para estar que mar los residuos de grasa.
- Gire la tapa de cristal hacer la izquierda para extraerla.
- Limpie la tapa de cristal.
- Cambie la bombilla del hora por otra preparada para soportar temperatu- ras de hasta 300^
Utilice una bombilla deorno del mismo tipo.
- Coloque la tapa de cristal.
9.3 Limpieza de la puerta del hora
La puerta del mundo tiene quatre paneles de cristal. Es posible retirar la puerta del homo y los paneles de cristal interiores para limparlos.

PRECAUCION
No实用性 el aparato sin los paneles de cristal.

La puerta del hora peute cerrarse si intenta retiring los paneles de cristal antes de quitar la puerta.
Extracción de la puerta del hora y del panel de cristal

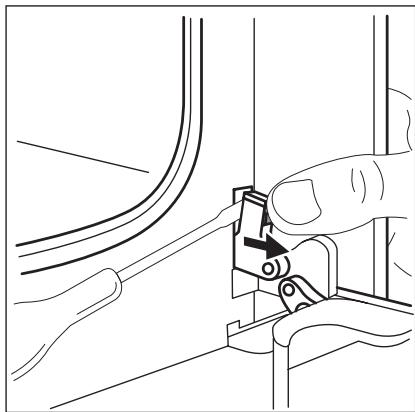
- Abra Completely la puerta e identifique la bisagra del lado derecho de la puerta.
-
Empuje el componente de apriete hasta que retroceda.
-
Sujete el componente con una mano. Utilice un destornillador con la otra mano para levantar y girar la palanca de la bisagra derecha.

- Identifique la bisagra del lado izquierdo de la puerta.
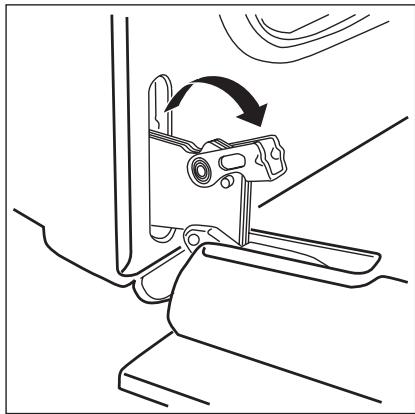
- Levante y gire la palanca de la bisagra izquierda.
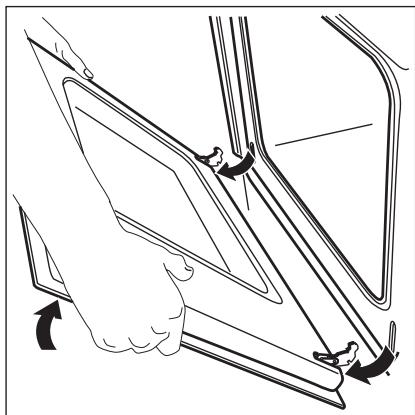
- Cierre la puerta del hora hasta la primera posición de aperture (hasta la mitad). A continuación, tire de la puerta hacía adelante para desencajarla.
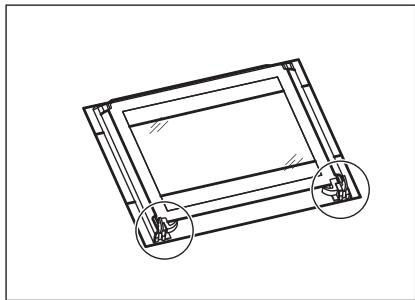
- Coloque la puerta sobre una superficie estable y protegida por un paño suave.
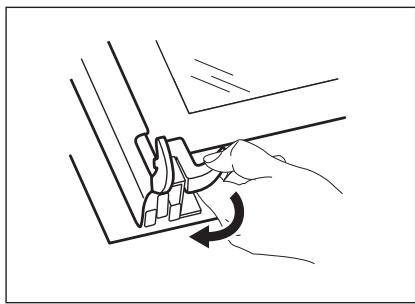
- Suelte el sistemas de bloqueo para retirar los paneles de cristal.
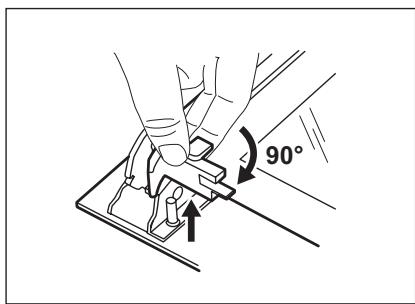
- Gire los dos pasadores en un ángulo de 90^ y extráigalos de sus asientos.
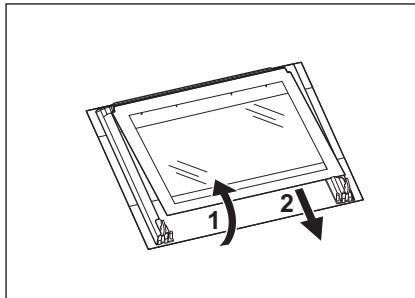
- Levante con cuidado (paso 1) y retire (paso 2) los paneles de cristal uno a uno. Empiece por el panel superior.
- Limpie los paneles de cristal con agua y jabón. Seque los paneles de cristal con cuidado.
Instalación de la puerta y los paneles de cristal
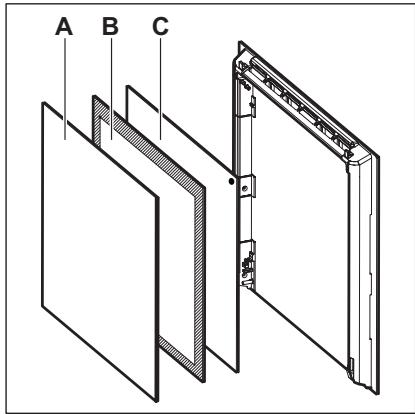
Una vez finalizada la limpieza, instale los paneles de cristal y la puerta delorno. Lleve a cabo los pasos anteriores enorden inverso.
Asegürese de que vuye a colocar los paneles de cristal (A, B y C) en elorden correcto. El panel central (B) tiene un marco decorativo. La cara impresa debe mirar hacía el interior de la puerta. Después de la instalación, asegürese de que la superficie del marco del panel de cristal (B) de las caras impresas no está aspera al tacto.
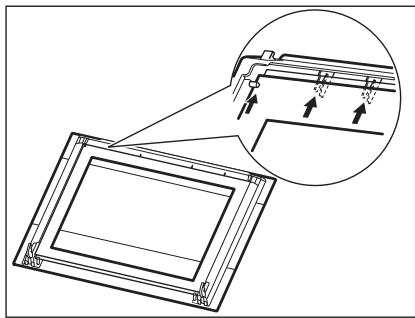
Asegürese de que coloca el panel superior en los soportes correctos.
10. QUE HACER SI...

ADVERTENCIA
Consulte los capitulos sobre seguidad.
| Problema | Possible causa | Solución |
| El hora no calienta. | El aparato está desactivado. | Active el aparato. |
| El hora no calienta. | El reloj no está en hora. | Ajuste la hora. Consulte "Programación del reloj". |
| El hora no calienta. | No se han elegido lasfunciones necesarias. | Asegúrese de que losajustes Sean correctos. |
| El hora no calienta. | La desconexión automática estáactivada. | Consulte el apartado"Desconexión automática". |
| El hora no calienta. | El bloqueo de seguidad para niños está activado. | Consulte "Desactivacion del bloqueo de seguidad para niños". |
| El hora no calienta. | Ha saltado un fusible de la caja de fusibles. | Compruebe el fusible. Si el fusible salta más de una vez, póngase en contacto con un electrónicarialmente. |
| La bombilla del hora no funciona. | La bombilla del hora está defectuosa. | Sustituya la bombilla del hora. |
| La Pirólisis no se inicia. La噎a muestra C3. | La puerta no se ha cerrado totalmente o el bloqueo de puerta es defectuosa. | Cierre bien la puerta. |
| La噎a muestra F102. | La puerta no se ha cerrado totalmente o el bloqueo de puerta es defectuosa. | 1. Cierre bien la puerta.2. Apague el aparato con el fusible domés-tico o el interruptor de seguidad de la caja de fusibles y en-ciendalo de nuevo.3. Si vuelve a aparecer F102 en噎a, póngase en contacto con el servicios专业技术ico. |
| El hora no calienta. La噎a muestra Demo. | Está activado el modo de demostración. | 1. Apague el aparato.2. Mantenga pulsada la tecla+.3. Cuando se emita una seals acústica, gire el mando de las funci-nes del hora a la pri-mera referencia. Demo parpadea en la pan-talla.4. Gire el mando del hora a la posición de apagado.5. Suelte la tecla+.6. Gire el mando del ter-mostato hacía la de-recha tres veces. La seals acústica suena tres vezes. Está de-sactivado el modo de demostración. |
| Problema | Possible causa | Solutación |
| La pantalla muestra un número de error que no fi-gura en esta lista. | Hay un fallo electrónico. | 1. Apague el aparato con el fusible domés-tico o el interruptor de seguridad de la caja de fusibles y en-ciendalo de nuevo. |
| 2. Si vuelve a aparecer el número de error, pángase en contacto con el Centro de ser-vicio técnico. | ||
| Se acumulan vape y condensación en los ali-mentos y en elorno. | Los platos han permane-cido en elorno dema-siado tiempo. | No deje los platos en elorno más de 15-20 mi-nutos tras finalizar el pro-ceso de coccción. |
| Si no lograra subsanar el problema, dirija-se al Centro de servicios técnico. Los datos Necessary para el信息服务 ténc-nico está en la plaza de caracteristicas. | La plaza de caracteristicas se encontrar en el marco delantero de la cavidad del aparato. | |
| Es conveniente que los anoteAquí: | ||
| Modelo (MOD.) | ||
| Número de producto (PNC) | ||
| Número de series (S.N.) | ||
11. INSTALLACION

ADVERTENCIA
Consulte los capitulos sobre seguidad.

11.1 Empotrado


11.2 Instalación electrica

ADVERTENCIA
Deje la instalacion electrica en manos de un profesionalrialdo.

El fabricante declina toda responsabilidad si la instalación no se efectúa suguiendo las instrucciones de seguridad del capítulo "Información sobre seguridad".
El aparato se suministra con enchufe y cable de red.
11.3 Cable
Tipos de cables adequados para su instal-.
acion o cambio: H07 RN-F, H05 RN-F,
H05 RRF, H05 VV-F, H05 V2V2-F (T90),
H05 BB-F.
En lo que respects a la sección del cable, consulte la potencia total (que figura en la placá de caracteristicas) y la tabla:
| Potencia total | Sección del cable |
| máximo de 1380 W | 3 x 0,75 mm² |
| máximo de 2300 W | 3 x 1 mm² |
| máximo de 3680 W | 3 x 1,5 mm² |
El cable de tierra (cable verde/amarillo)
debe tener 2 cm más que los cables de fase y del neutro (cables azul y marrón).
12. ASPECTOS MEDIOAMBIENTALES
Recycle los materiales con el symbolo
Coloque el material de embalaje en los contenedores adecuados para su reciclaje.
Ayude a proteger el medio ambiente y la salute Pública, asi como a reciclar
residuos de aparatos electricos y electrónicos. No deseche los aparatos marcados con el símbolo 📅 jusqu'ànlos residuos domesticos. Lieve el producto a su centro de reciclaje local o póngase en contacto con su oficina municipal.
C E