MODE D'EMPLOI 801 SPORT BERNINA
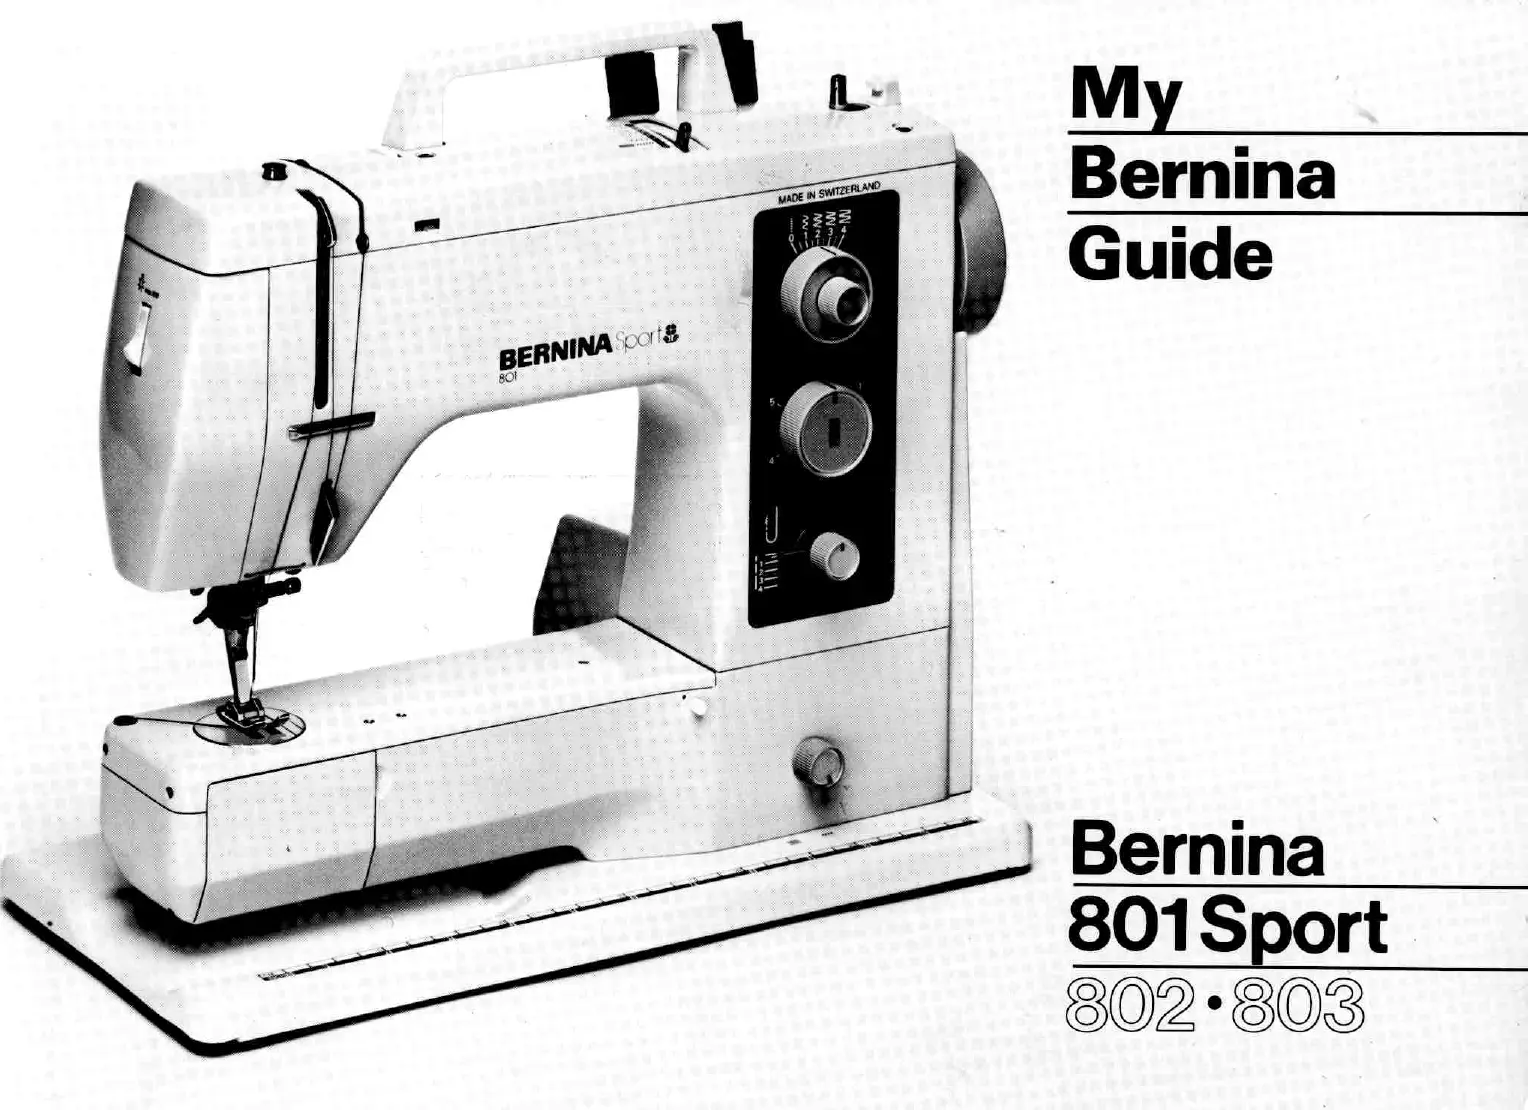
My
Bernina
Guide
Bernina
801Sport
802·803
Contents
Page
2 View of machine
4 Electrical section Connecting power cable and foot control unit Sewing light Motor Removing bobbin case
5 Winding lower thread Inserting bobbin Inserting bobbin case into holo Inserting needle
6 Changing pressor foot Threading upper thread Bringing up lower thread
7 Lowering feed-dog Thread tension Thread cutter
8 Accessories box
9 Template for buttonholes, hems, pleats, scallops, etc.
10 Template for buttonholes, hems, pleats, scallops, etc.
11 Presser feet
12 Needle and thread Special needles Plastic Leather
13 Some sewing tips
14 Straight stitch Forward sewing Reverse sewing Securing the ends Five needle positions
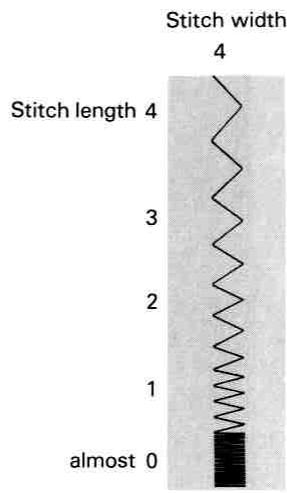
15 Zig-zag Setting the width.
Oversewing edges
Satin stitch
16 Selecting the practical stitches
17 Applications of practical stitches
18 Sewing knitted fabric Rib-trim with overlock seam
Page
19 Visible hem with universal stitch
Visible hem with vari-overlock
Visible hem with stretch stitch
20 Zig-zag seam - open Stretch seam - open
21 Vari-overlock seam Flat joining seam with universal stitch Zip fastener
22 Blind hemming
23 Statching edges using the needle positions
Narrow-stitched edges
Wide-stitched edges
24 Buttonholes, 801S
25 Buttonholes with gimp cord, 801S
26 Buttonholes, 802S, 803S
27 Buttonholes with gimp cord, 802S, 803S
28 Patching Jersey with universal stitch, 801S, 802S Edging with elastic thread on Jersey, 801S, 802S, 803S
29 Patching Jersey with zig-zag stitch, 803S
30 Mending woven fabrics, 801S, 802S Mending tears with running stitch Patching with running stitch
31 Mending woven fabrics, 803S Patching with zig-zag stitch Reinforcing edges
32 Darning
33 The small darning ring.
34 Fine edge finishing
Lace and insertions on woven material
Scallop edging, 801S, 802S
35 Edging on jersey Lace on jersey
Page
Shell edging, 801S, 802S
Elastic, 801S, 802S
36 Gathering with cord
Normal gathering Gathering with elastic thread
37 Monograms
38 Applique - single colour
39 Applique - multi-colour
40 Changing the bulb Maintenance: cleaning and lubricating
Cleaning Lubricating the hook Cleaning the hook
41 Prevention of faults
Upper thread breaks Lower thread breaks
Faulty stitches
Needle breaks
Tension errors
Machine runs slowly or not at all
43 Special accessories
Please note:
Special accessories marked * are not supplied and are available at extra cost.
Important!
Safety Regulations
Subject to BEAB and OSHA safety regulations (official testing centres in Great Britain and the U.S.A.). The following safety regulations must be observed without fail:
- The moving needle is a source of danger (risk of injury to fingers). The sewing position must therefore be kept under constant observation.
- Manipulations within the area of movement of the needle, such as changing the needle, the presser foot or stitch plate, must only be performed with the machine switched off. The same applies when removing and replacing the lower thread bobbin or hook.
- During maintenance work (cleaning or lubricating) or changing the light bulb and interruptions in sewing or after completion of work, the machine must be disconnected from the power supply by pulling out the mains plug.
Repairs to the electronic section, especially the changing of the lead wire to the foot control unit, may only be carried out by one of our service agencies.
Contents
| Page | Page | Page | Page |
| Accessories box | 8 | Gathering - with Cord | 36 | Patching - Jersey with universal stitch | 28 | Stitches - Vari-overlock | 17 |
| Applications of practical stitches | 17 | - Normal | 36 | Woven fabrics with running stitch | 30 | - Zig-zag | 15 |
| Appliqué | 38-39 | Gimp cord - Buttonholes | 25+27 | Plastic | 12 | Stitched edges - Narrow | 23 |
| Blind hemming | 22 | Hems - Blind | 22 | Plastic | 12 | - Wide | 23 |
| Blind stitch | 17 | - Template for | 9 | Pleats - Template for | 9 | Straight stitch | 14 |
| Bobbin - Inserting | 5 | - Visible with stretch stitch | 19 | Presser feet | 11 | Stretch seam | 20 |
| - Removing | 4 | - Visible with universal stitch | 19 | Presser foot - changing | 6 | Stretch stitch - Applications | 17 |
| - Winding | 5 | - Visible with vari-overlock stitch | 19 | Prevention of faults | 41 | - Visible hem | 19 |
| Box - Accessories | 8 | Hook - Cleaning and lubricating | 40 | Removing bobbin case | 4 | Template for buttonholes, hems, pleats, scallops etc. | 9 |
| Bulb - Changing | 40 | Inserting Bobbin | 5 | Reverse sewing | 14 | Tension | 7 |
| Buttonholes | 24-27 | Inserting Bobbin | 5 | Rib-trim with overlock seam | 18 | Thread - Cord gathering | 36 |
| Buttonholes - Template for | 9 | Inserting Bobbin Case | 5 | Running stitch - Applications | 17 | - Cutter | 7 |
| Changing Bulb | 40 | Inserting Needle | 5 | - Mending tears | 30 | - Elastic gathering | 36 |
| Changing Presser foot | 6 | Jersey - Edge with elastic thread | 28 | - Patching | 30 | - Lower breaks | 41 |
| Cleaning | 40 | - Edgings | 35 | Satin stitch | 15 | - Lower bringing up | 6 |
| Connecting power cable and foot control unit | 4 | - Lace on | 35 | Scallop edge | 34 | - Upper breaks | 41 |
| Cutter - Thread | 7 | Lace and insertions on woven material | 34 | Scallops - Template for | 9 | - Upper threading | 6 |
| Darning | 32 | Lace on Jersey | 35 | Scallop stitch | 17 | - Tension | 7 |
| Edges - Elastic | 35 | Machine faults - prevention of | 41 | Seams - Flat joining with universal stitch | 21 | - Winding bobbin | 5 |
| - Elastic thread | 28 | Leather | 12 | - Stretch | 20 | Tips - Sewing | 13 |
| - Fine | 34 | Light | 4 | - Vari-overlock | 21 | Universal stitch - Applications | 17 |
| - Narrow stitched | 23 | Lower thread - bringing up | 6 | - Zig-zag | 20 | - Flat joining seam | 21 |
| - Oversewing | 15 | Lowering feed-dog | 7 | Securing the ends | 14 | - Patching jersey | 28 |
| - Scallop | 34 | Lubricating the hook | 40 | Setting the zig-zag | 15 | - Visible hem | 19 |
| - Shell | 35 | Machine faults | 41 | Sewing - Forward | 14 | Upper thread - threading | 6 |
| - Wide stitched | 23 | Machine view | 2 | - Light | 4 | Vari-overlock - Applications | 17 |
| Elastic | 35 | Maintenance | 40 | - Reverse | 14 | - Seam | 21 |
| Elastic thread - Edge | 28 | Mending - Woven fabrics | 30-31 | - Table | 8 | - Visible hem | 19 |
| Elastic thread - Gathering | 36 | - Tears with running stitch | 30 | - Tips | 13 | View of Machine | 2 |
| Electrical section | 4 | Shell edging | 35 | Winding bobbin | 5 |
| Faults - Prevention of | 41 | Monograms | 37 | Stitches - Blind stitch | 17 | Zig-zag - Seam | 20 |
| Feed-dog | 7 | Motor | 4 | - Faulty | 41 | - Setting | 15 |
| Feet - Presser | 11 | Needle - Breaks | 41 | - Running | 17 | | |
| Feet - Changing presser | 6 | - Five positions | 14 | - Satin | 15 | | |
| Fine edge finishing | 34 | - Inserting | 5 | - Scallop | 17 | | |
| Five needle positions | 14 | - Specials | 12 | - Straight | 14 | | |
| Flat joining seam - Universal stitch | 21 | Needle - Thread | 12 | - Stretch | 17 | | |
| Forward sewing | 14 | Oversewing edges | 15 | - Universal | 17 | | |
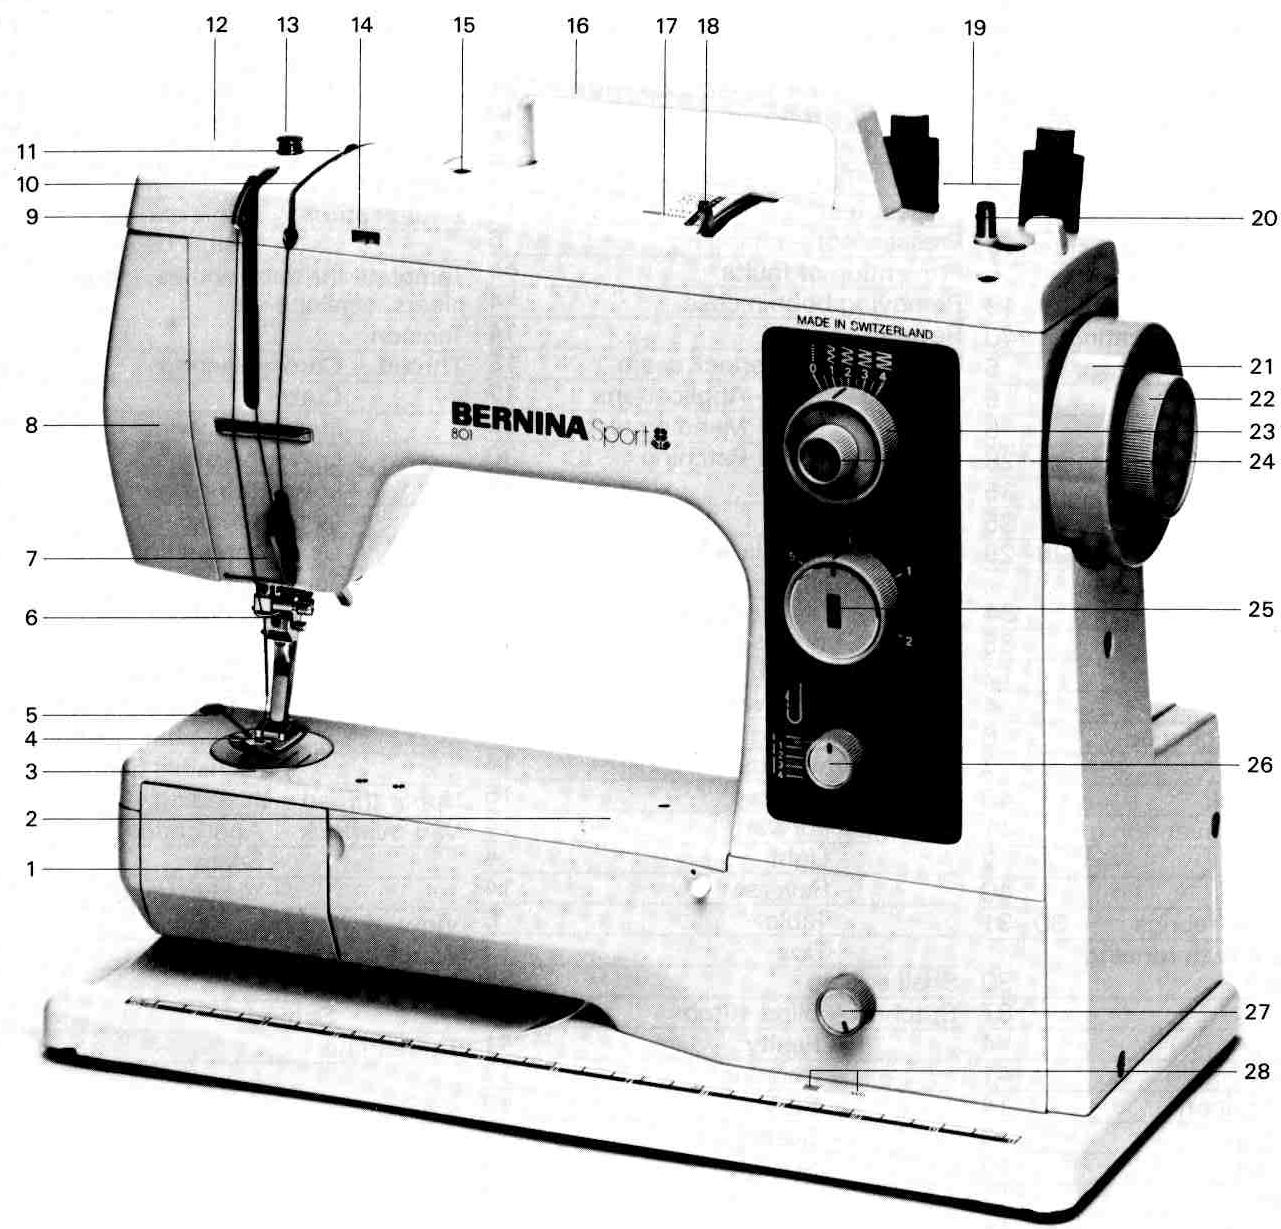
1 Hinged cover on free-arm
2 Free-arm cover
3 Needle plate
4 Presser foot
5 Thread cutter
6 Needle holder clamp
7 Thread regulator
8 Face plate
9 Thread take-up lever
0 Thread tension slot
1 Thread tension disc
2 Top frame cover
3.3 Winder pre-tensioning
4 Thread tension indicator
5 Adjusting wheel for thread tension
6 Carrying handle
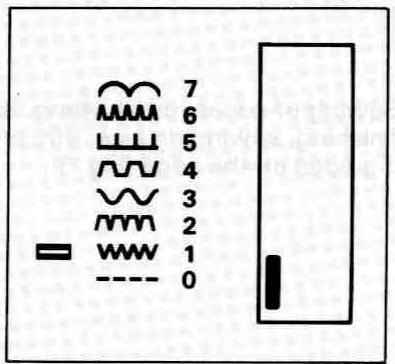
7 Practical stitches
8 Selector lever
9 Reel holder pins
O Bobbin spindle
1 Hand-wheel
2 Hand-wheel release
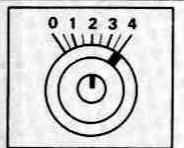
3 Stitch width knob
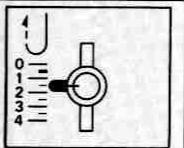
4 Needle position knob
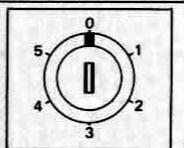
5 Buttonhole knob
6 Stitch length knob
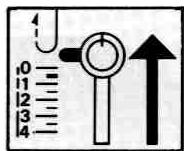
7 Sewing/darning knob
8 Symbol for sewing/darning
Dear Bernina Customer,

We would like to congratulate you on the purchase of your new Bernina sewing machine and thank you for the confidence shown in our products.
You have acquired a top-quality Swiss product, manufactured with the utmost skill and care at our Bernina factory in Steckborn/Switzerland.
"My Bernina Guide" provides you with all the necessary information about your Bernina and its countless applications for sewing work.
If you should require further details or advice about your sewing machine or sewing problems, please contact your Bernina stockist.
We hope you are successful and happy with your sewing and dressmaking work.
With kind regards
Oclette C. Iselin
Odette Ueltschi-Gegauf, Chairman of the Board
FRITZ GEGAUF LTD.
Bernina Sewing Machine Manufacturers, CH-8266 Steckborn TG, Switzerland
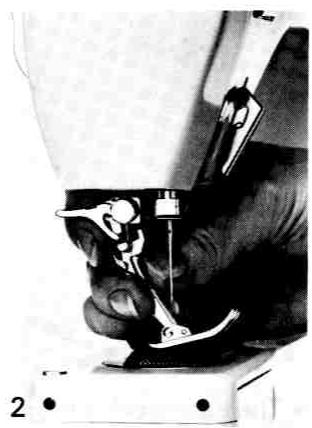
Removing Bobbin Case
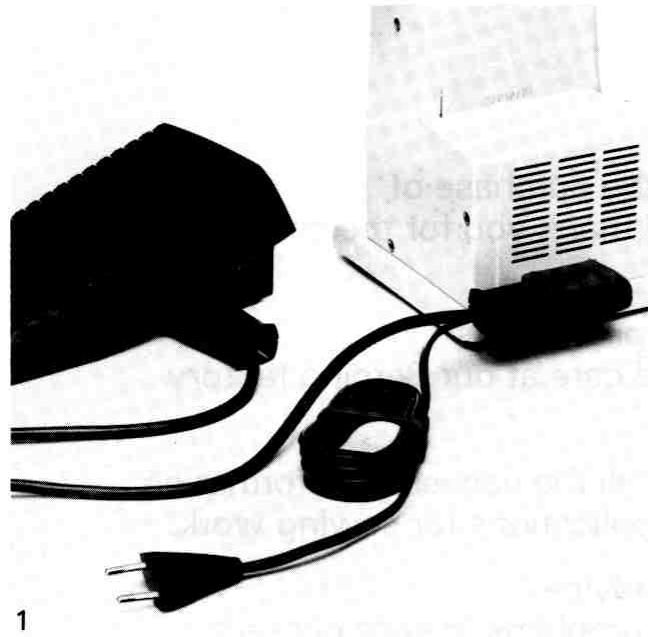
Connecting power cable and foot control unit
Warning! First compare voltage specified on machine with the existing mains voltage.
Fit special plug into foot control. Insert the combined mains and foot control plug into the machine and then connect the mains plug to the socket. Start the machine by pressing lightly on the foot control.
Warning! The special connecting cable may only be used for connecting Bernina sewing machines.

Sewing light The sewing light is switched on and off with the switch fitted in the face plate (Fig. 2).
-
Check whether needle is up. If not, raise needle with handwheel.
-
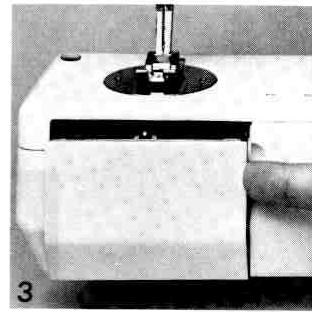
Open hinged cover on free-arm (Fig. 3).
-
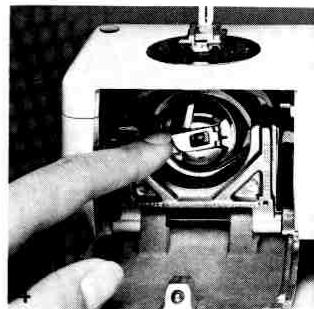
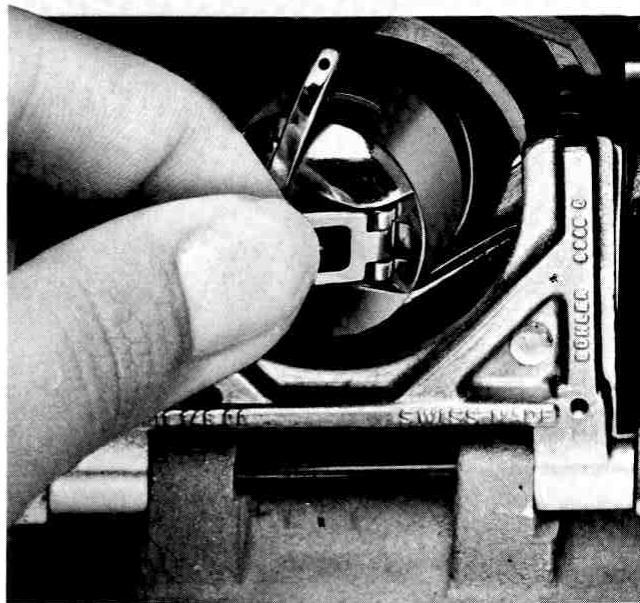
Lift the latch of the bobbin case with the index finger of the left hand (Fig. 4) and remove bobbin case (Fig. 5).
Motor The electronic speed control ensures exceptional penetrating power even when sewing slowly. The high penetrating power considerably simplifies the sewing of very heavy materials, very dense fabrics and thick seams.
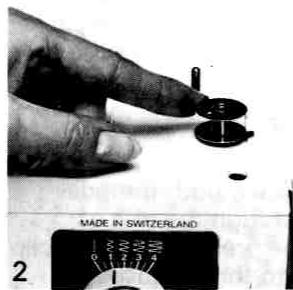
Winding Lower Thread
Inserting Bobbin
Inserting Needle
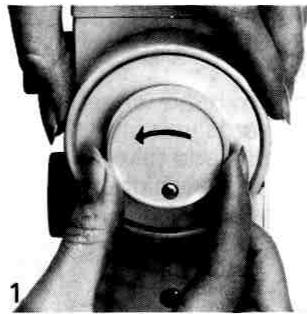
- Release hand-wheel: hold hand-wheel steady with left hand.
- With the right hand loosen handwheel release by turning towards you (Fig.1).
-
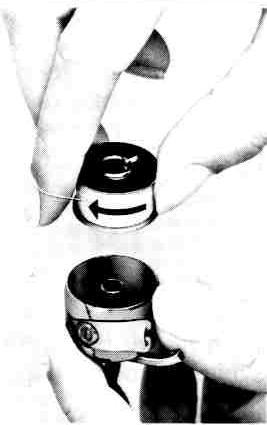
Hold bobbin case in one hand, insert bobbin so that the thread is wound in the clockwise direction, see arrow (Fig. 4).
-
Place empty bobbin on spindle (Fig. 2).
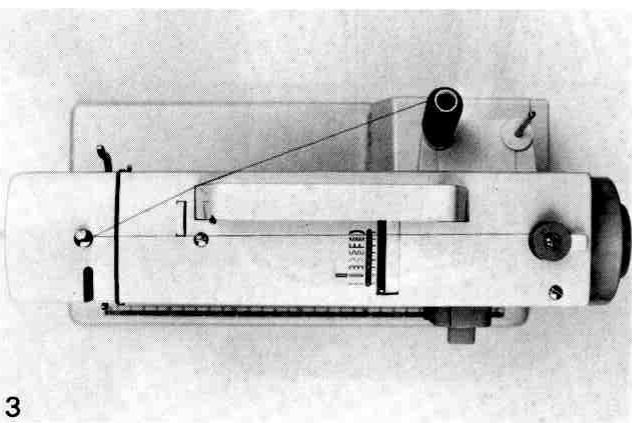
- Place reel on a reel pin and take thread clockwise around the pretensioning to the empty bobbin. Wind round empty bobbin several times, also in a clockwise direction (Fig. 3).
- Start bobbin winding device by pressing foot control. When the bobbin is full, the winding device stops automatically.
-
Remove bobbin and push winder spindle back to left.
-
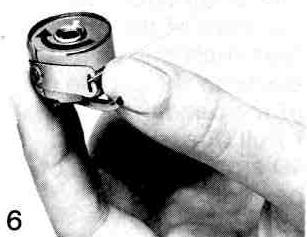
Pull thread through the slot and below the spring until it lies in the T-shaped slot at the end of the spring. Do not hold bobbin for this purpose (Fig. 5).
- The bobbin must turn in the clockwise direction of the arrow when pulling the thread (Fig. 6).
Inserting bobbin case into hook
- Hold bobbin case by the latch with the index finger and thumb of the left hand. Insert so that the finger of the bobbin case points upwards and fits in the notch of the hook race cover.
- Check: pull end of thread
- Close hinged cover
4

5
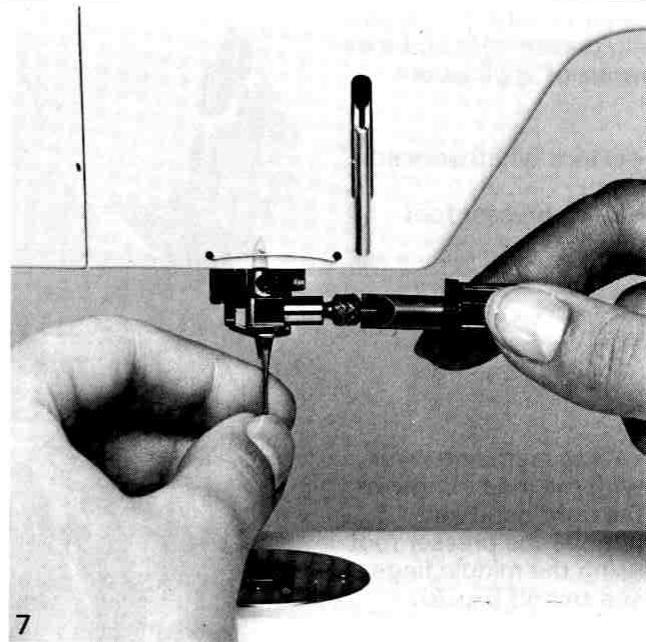
See page 12 for suitable needles sizes.
- Check whether needle is up.
- The accessories box contains a small black screwdriver for loosening or tightening the needle clamp.
- Loosening the needle clamp: half a turn to left, anti-clockwise (Fig. 7).
-
Inserting needle: flat shank side of needle always at rear.
-
Insert needle fully until it reaches the top. If the needle does not contact at the top, i.e. is set too low, faulty stitches are produced.
- Tighten needle clamp firmly.
Threading Upper Thread
Bringing up Lower Thread
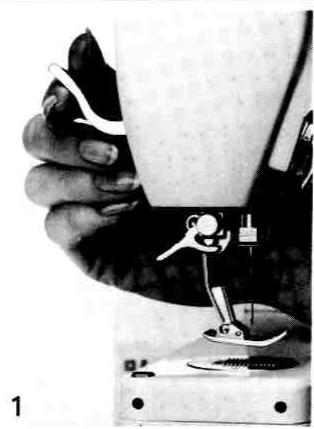
Refer to page 11 concerning presser feet and their range of application.
- Check whether needle is up.
-
Raise presser foot (Fig.1).
-
Raise clamping lever with the index finger of the right hand and remove the presser foot using the middle finger and thumb (Fig. 2).
Securing the presser foot: same procedure, but press clamping lever downwards with index finger (Fig. 3).
- Check whether needle is up.
- Raise presser foot.
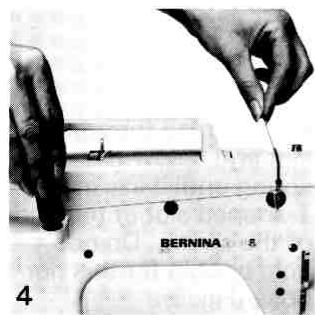
- Place reel of thread on one of the two reel holder pins.
Hold reel of thread firmly while threading (Fig. 4).
- First clip the thread into the thread guide at the rear of the machine, then bring it through the slot in the thread tension (Fig. 4).
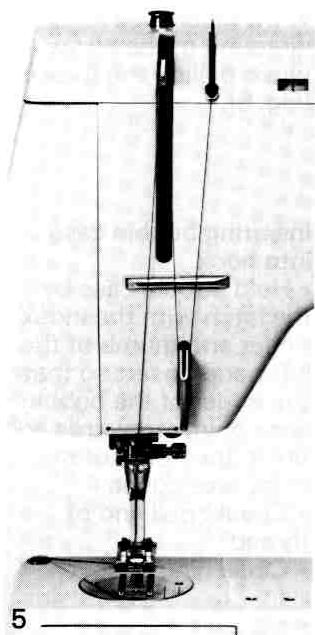
- At the front of the machine take thread downwards under the thread regulator, up again to the take-up lever and then downwards to the needle holder thread guide (Fig. 5).
Always thread needle from front. The small white plate or the front of the presser foot shaft makes it easier to thread the eye of the needle.
- Pull thread approx. 10cm through eye of needle.
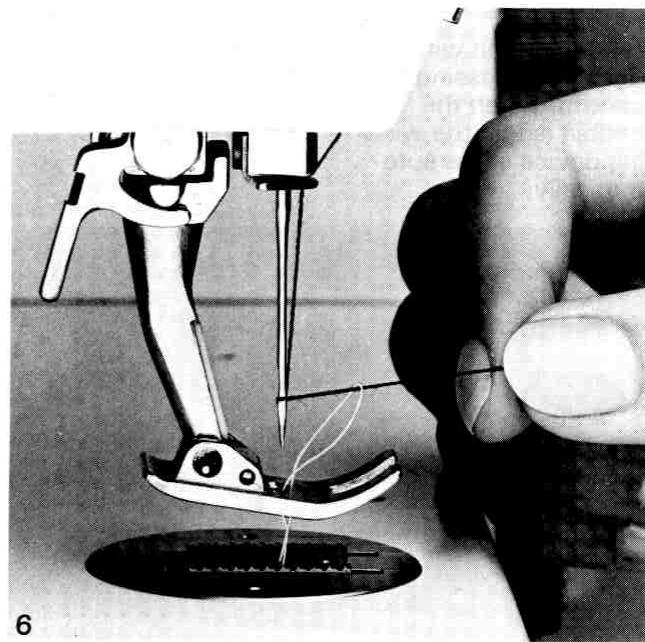
- Hold end of upper thread with the left hand.
-
Turn hand-wheel once towards you until the needle and take-up lever are in their highest position.
-
Pull upper thread so that the lower thread is brought up through the hole in the needle plate (Fig. 6).
Take both threads through the slot of the presser foot and clip into thread cutter.
Lowering Feed-dog
Thread Tension
Thread cutter
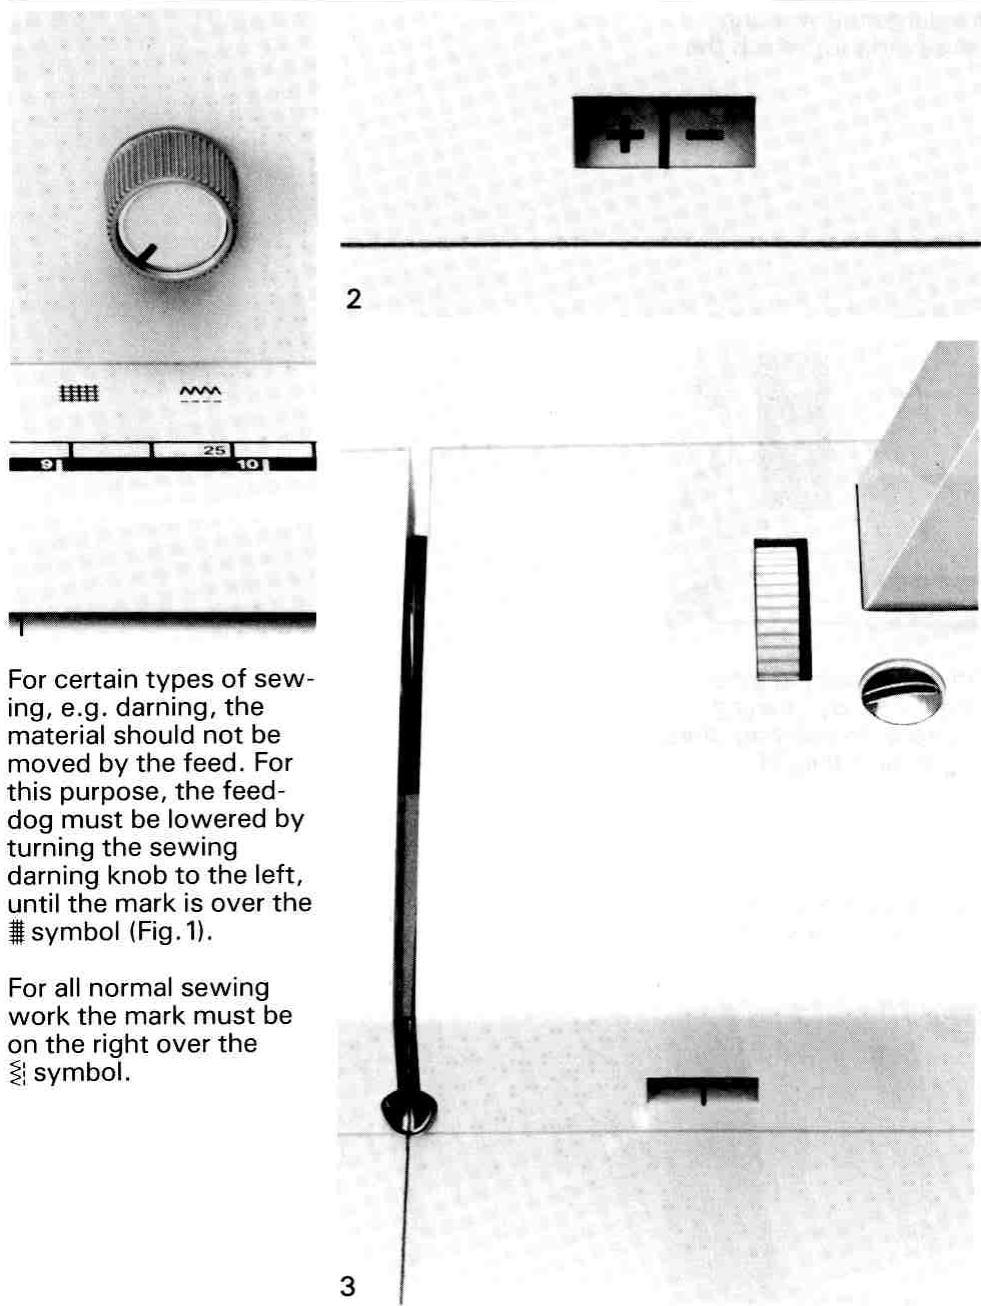
One of the most important Bernina advantages is that the thread tension does not have to be altered for normal sewing. The normal tension is set when the line on the scale is at the middle of the window (Fig. 2).
For special sewing, e.g. for sewing tailor tacks, the thread tension can be adjusted with the adjusting wheel. Turning this wheel backwards, towards the + sign, produces a tighter upper thread tension. Turning the adjusting wheel forwards, towards the - sign, produces a looser upper thread tension (Fig. 3).
Do not forget: reset thread tension to normal, line in the middle, when a special piece of sewing requiring tension alteration has been completed.
When removing the sewing raise the presser foot, remove the sewing to the rear left and pull both threads through the thread cutter (Fig. 4). The threads free themselves automatically when sewing starts again.
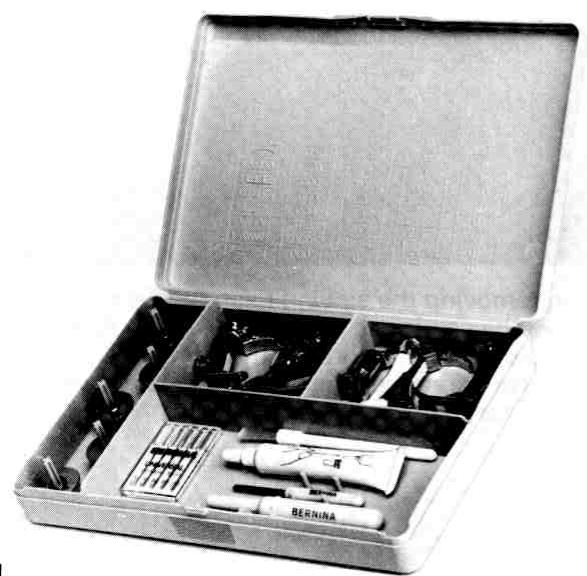
Accessories Box
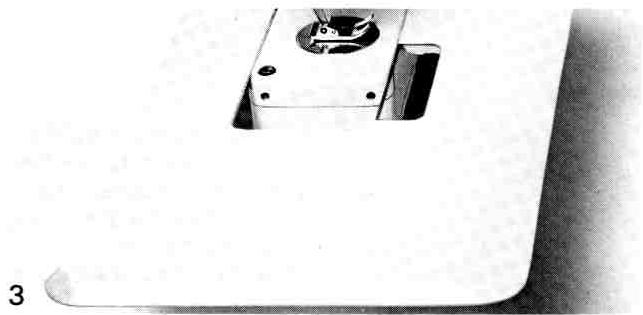
Sewing Table (Special accessory)
The accessories are clearly accommodated in the flat accessories box (Fig.1). A summary of the most important basic settings of your sewing machine can be found inside the cover.
The sewing table is used to enlarge the working surface. It can be used for all sewing for which the free-arm is not required.

Push table over free-arm until the centering pins locate with the corresponding holes. By pushing firmly in the direction of the arrow, the sewing table will be secured with its fixing on pins (Fig. 2).
Removal of attachment table:
The attachment table can be released from its fixing with a powerful push to the left (away from the machine) (Fig. 3).
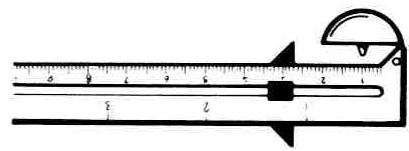
This marking and measuring template is extremely versatile and simple. By means of the red slide, the required measure can be regulated very accurately.
There are two ways of using the template:
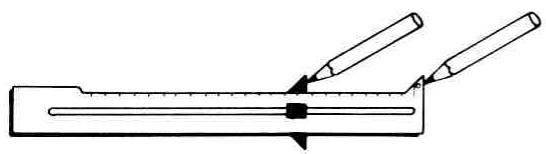
a) Using the edges if lines are required.
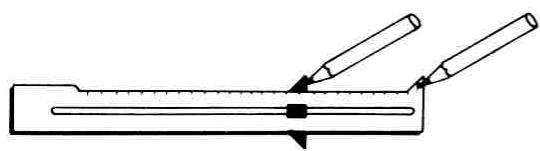
b) Using the small holes if points are required.
Examples:
- Marking of spaces for buttonholes, buttons, eyelets, pleats, etc.
With the red slide, adjust the required space. Transfer with points or lines onto the material
- Calculating the length of buttonholes
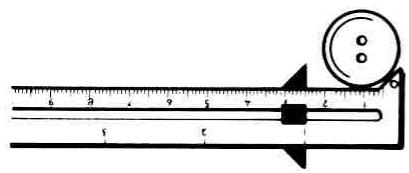
Flat buttons
Button plus 2-3 mm
Ball shaped buttons (or thick fancy buttons)
Button plus 5-8 mm
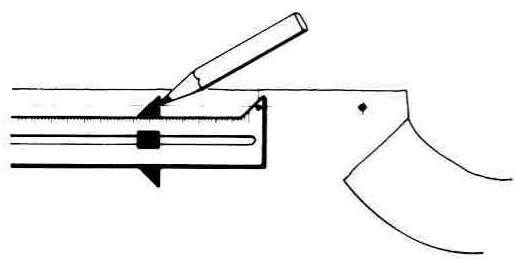
- Marking of buttonholes
Transfer adjusted buttonhole length onto the garment.
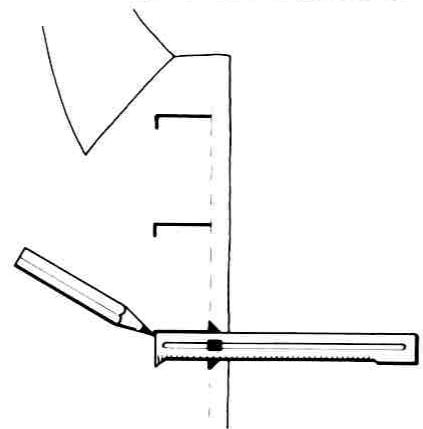
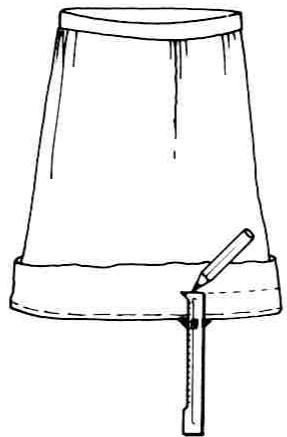
4. Marking of hem depth
With the red slide adjust the required hem depth.
Put the red slide against the hem edge, mark the hem depth.
5. Marking of top-stitch lines
Set the red slide to the required distance.
Put the red slide against the edge or seam. Mark the top-stitch line.
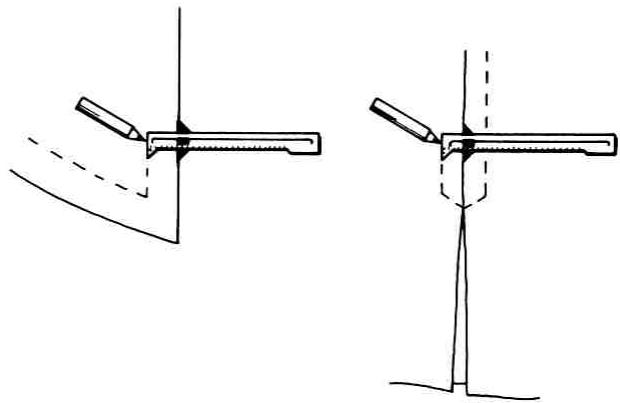
6. Drawing scallops
Drawing the curves:
Determine width and height of the curves.
Draw the necessary base lines and mark central points.
Set the slide, hold firmly with a pin, draw the scallops (use cardboard underlay).
Flat scallops
Sequence of operations:
Preliminary drawing on paper.
Definite drawing on soft cardboard (3 to 5 scallops).
Cut out the scallops (= cardboard template) .
Transfer by means of the cardboard template onto the fabric (using a light coloured crayon or a chalk pencil).
Presser Feet
Presser feet are an important aid to sewing. They are provided with grooves and guides. The success or failure of a piece of sewing therefore depends on the correct choice of presser foot.
The presser feet are not only suitable for a specific operation. They can also be used for simplifying other work.
For example the buttonhole foot:
Buttonhole = main application
Special elastic = further application.
Several presser feet look very similar at first glance. They are provided with numbers to avoid confusion.
The presser feet illustrated on this page are the standard accessories supplied to most countries. In other countries with varying sewing practices the range of presser feet may be different.
Additional presser feet can be obtained for more specialised sewing.
Ask your Bernina dealer for advice.
000
Presser foot
Straight stitch Zig-zag
470
*
Overlock foot
Vari-overlock seam
Vari-overlock hem
Overcasting seams
285
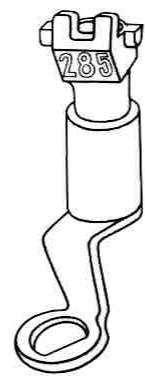
Darning foot
Darning Monograms by free hand Free hand embroidery
452
Can only be used for CI.801S
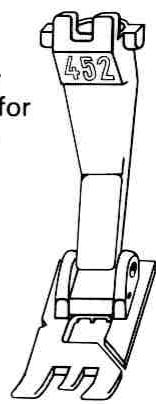
Buttonhole foot
Buttonholes Special elastic
007
*
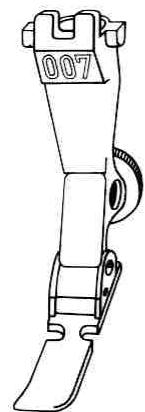
Zipper foot
Sewing in zips
Sewing piping close along stitching line raised seam
016
*
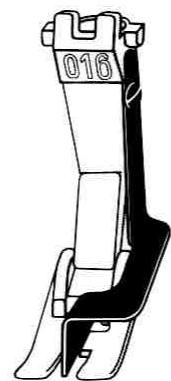
Blind stitch foot
Blind hemming Edge stitching
033
*
Buttonhole foot
Buttonholes
Needle and Thread
| Needle | 70 | 80 | 90 | 100 | 110-120 |
| Darning thread | ※ | ※ | | | |
| Embroidery thread No. 30 | | ※ | | | |
| Sewing thread
Mercerised cotton | | ※ | ※ | | |
| Sewing thread synthetic | | ※ | ※ | | |
| Sewing thread coarse
Mercerised cotton, synthetic | | | ※ | ※ | |
| Buttonhole thread for decorative
seams (cordonnet) | | | | ※ | ※ |
Please note:
Your Bernina is provided with Needle System 130/705H
Make sure when purchasing new needles that you receive needles of the 130/705H system.
The needle size to be used depends on the thread selected, the needle must match the thread.
The adjoining table indicates which needle is suitable for which thread.
Needles size no. 70 to no. 120 are usual in the trade. The finer the needle, the lower the number. It is the opposite for the thread. The finer the thread, the higher the number.
The thread lies in the long groove of the needle during sewing. If the needle is too fine, there is no room for the thread in the groove. The result is faulty stitches.
Special Needles
Plastic Leather
| Special needles make it easier to sew difficult materials. |
| Ball-point needles help to prevent damage to knitted fabric. |
| System 130/705 H-SES = | fine round tip for fine knitted fabrics, particularly synthetics. |
| System 130/705 H-SUK = | medium round tip for medium to coarse knitted fabrics, particularly synthetics. |
| System 130/705 H-S = | stretch (only Nm 90!) specially for elastic synth. knitted fabrics. |
Plastic
Like synthetic fibres, plastic must be treated differently according to surface and graining when sewing. If the work does not slide properly it is often sufficient to lubricate the sewing area slightly with sewing machine oil (using a small cotton wad wrapped in absorbent material). Alternatively use presser foot with sliding rollers or Teflon base. Always sew plastic with long stitch length to prevent cutting.
Jeans needles penetrate easier through hard fabrics.
System 130/705 H-J = slender tipped form for jeans fabrics and other compact, hard fabrics.
Leather and imitation leather
It is, of course, also possible to sew leather. It may be necessary to use leather needles for hard leather. Sew a test piece first.
Stitch length not too short.
Leather needles penetrate leather more easily.
System 130/705 H-LR = cutting tip for hard leather particularly.
Try using the presser foot with sliding rollers or Teflon base.
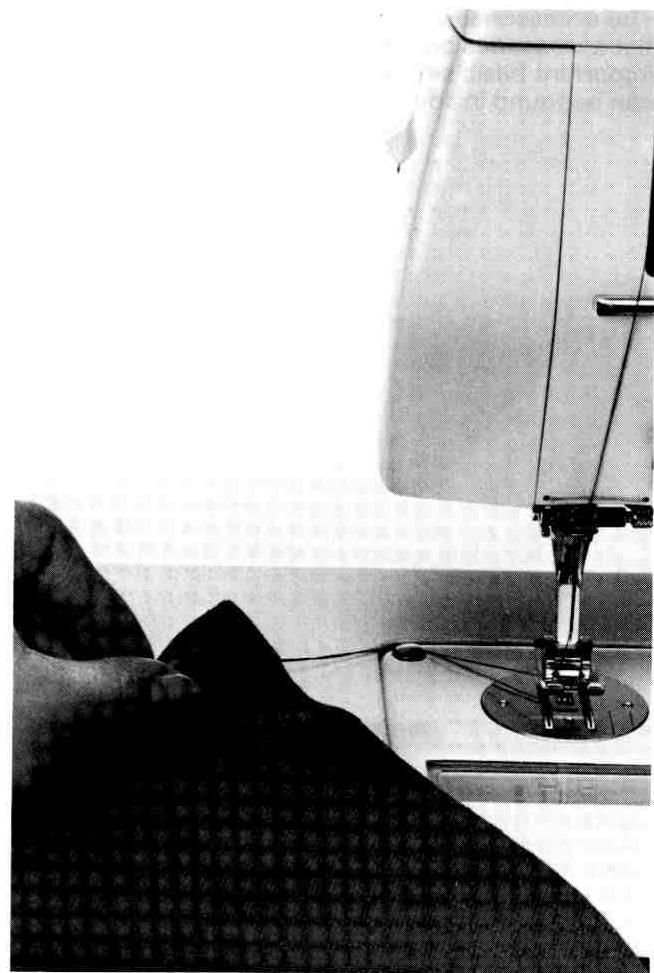
Some Sewing Tips
Sewing is made much easier if the correct sitting position is adopted and the work is guided properly.
Some advice
Place your Bernina approx. 6 - 10cm from the edge of the table.
Sit right in front of the needle, i.e. in front of the work area, and not at the centre of the machine. This will enable you to watch the working area more closely without strain.
Ensure that the height of your seat permits comfortable working. Sitting too low or too high makes the work more tiring.
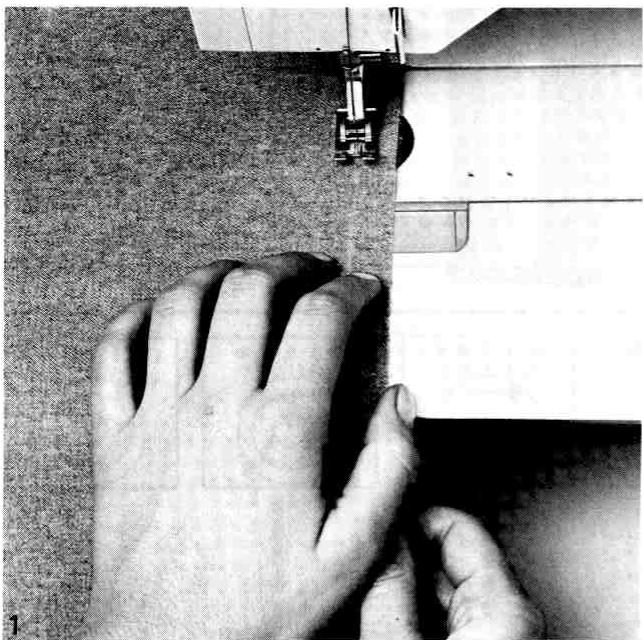
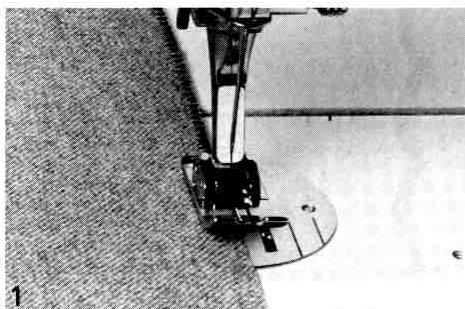
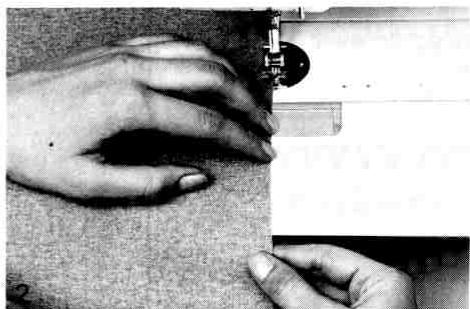
Guiding from the front is not satisfactory, since the material can be involuntarily held back (Fig.1). Nor should the material be pulled from behind the presser foot.
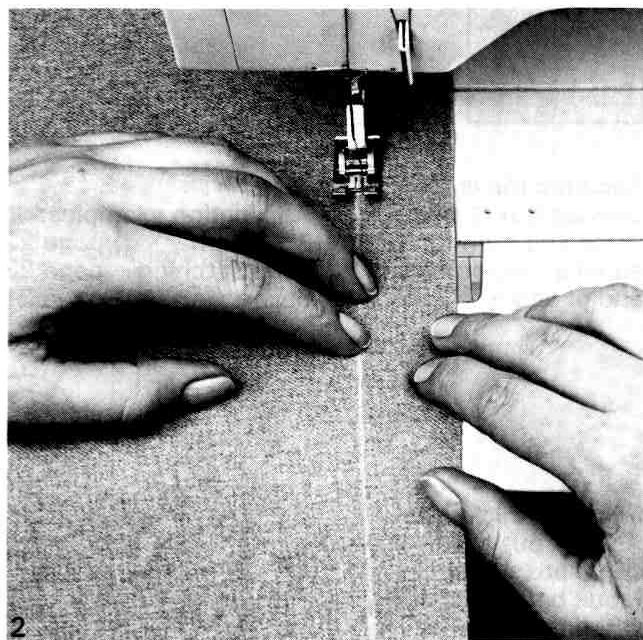
It is best to guide the material from the side with the fingers of the left hand close to the presser foot (Fig. 2).
For difficult work, particularly with thin materials, it is preferable to stop and guide it a little at a time rather than let work slide beneath the hand.
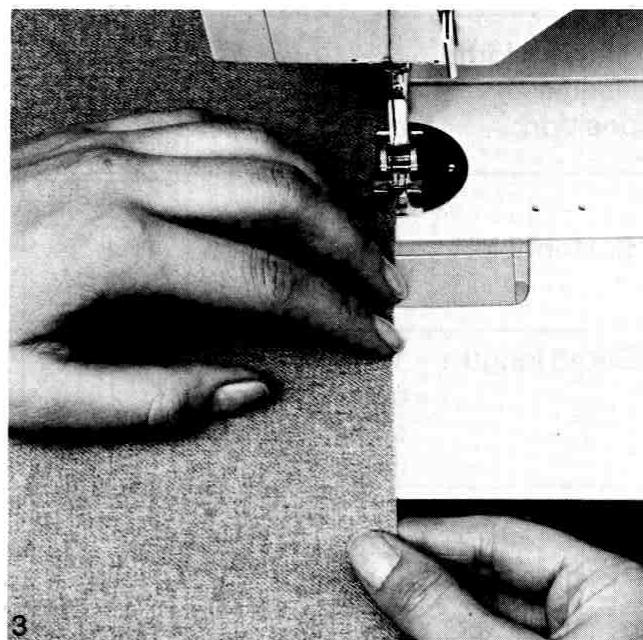
Sewing of edges, overcasting, top stitching, edge finishing, sewing on lace, etc. are more successful if guided on the edge (Fig. 3).
Straight Stitch
Presser foot: 000
Thread: to suit material
Needle: to suit the thread
see needle and thread table page 12
Stitch selector lever 0
selection:
| Stitch width: | 0 |
| Needle
position: | centre |
| Stitch length: | 1-4 as required normal stitch length is 1½-2½ |
Forward sewing
With the settings specified, the machine sews forward with the stitch length selected. The stitch length is selected according to the sewing and material to be sewn.
Reverse sewing
Push stitch length knob upwards and hold above O until reverse sewing is completed.
When the knob is released, the machine sews forward again with the previously selected stitch length.
Securing the ends
Sew approx. 1 cm reverse and then forward again at beginning and end of seam.
Securing thick seams
Always put needle completely down in fabric before moving stitch length lever.
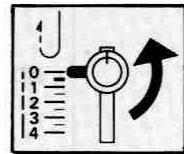
Five needle positions
The position of the stitch can be set to five different places with the knob for setting the needle position.
The needle is at the centre for normal sewing.
Application examples:
Blind hem page 22
Edge stitching page 23
Sewing in zips page 21
Setting zig-zag
| Presser foot: | 000 |
| Thread: | to suit material |
| Needle: | to suit thread |
| Stitch selection: | No.1 | zig-zag stitch |
| Stitch width: | 1-4 |
| Stitch length: | 1-4 |
| Needle position: | centre |
| Feed-dog: | sewing |
Zig-zag setting the width:
The width of the zig-zag stitch is set with the stitch width knob. It can be fully variable up to 4 mm.
The stitch width can be altered while sewing or with the machine stationary.
But the needle must not be in the material when the machine is stationary!
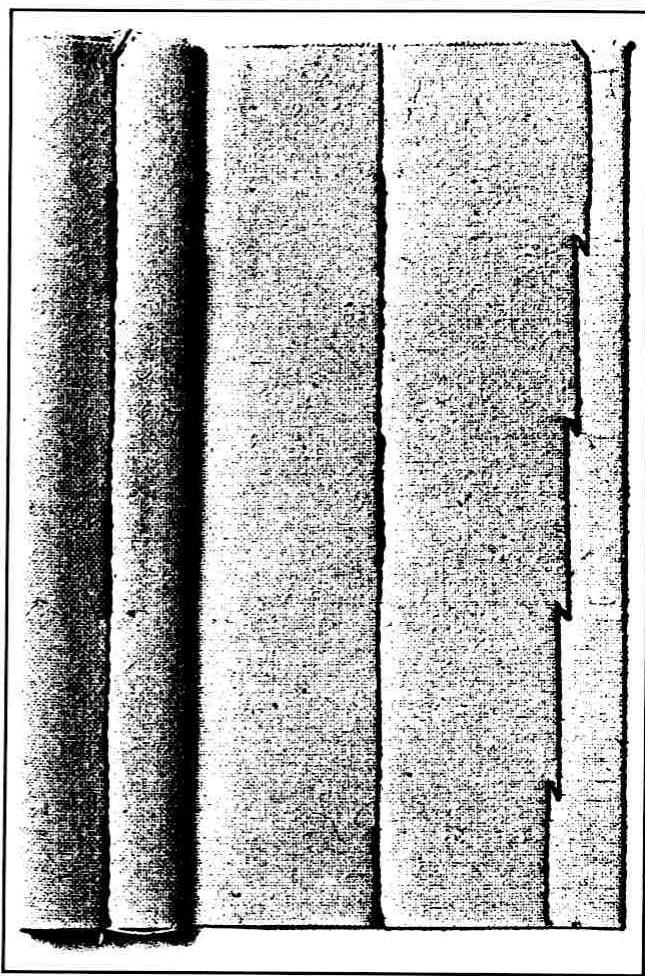
Oversewing edges
| Presser foot: | 000 |
| Thread: | darning thread, possibly sewing thread |
| Needle: | 80-70 |
| Stitch width: | 2 1/2 - 4 |
| Stitch length: | 1-2 |
In general: zig-zag should not be too wide and stitch length not too long, cut edge neatly first. Use darning thread if possible, particularly for fine material.
Guide edge of material to centre of presser foot, so that the needle stitches alternately into the material and over the edge (Fig.1).
If sewing on the edge, then guide on the edge (Fig. 2).
Satin-stitch = close zig-zag
| Presser foot: | 030* embroidery foot |
| Thread: | embroidery thread 30 |
| Needle: | 80 |
| Stitch width: | 1½ - 4 |
| Stitch length: | almost 0 |
- Special accessory all models
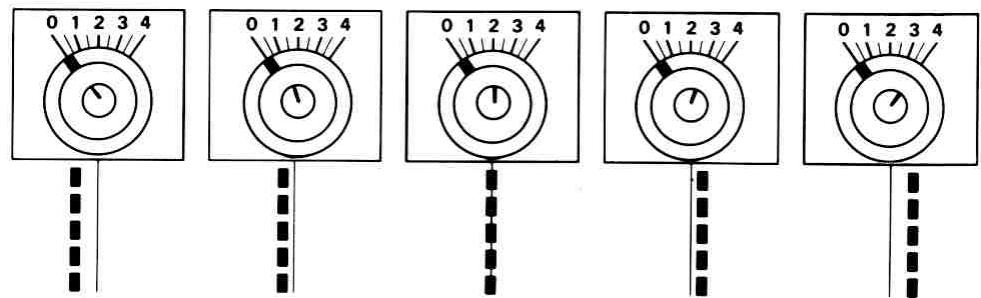
Set stitch length for close zig-zag:
Turn stitch length knob to the right until it locks.
Mark on knob is at the top. Stitch length is then 0.
By turning half a revolution to the left - mark is underneath - the basic setting of stitch length is obtained.
Adjust stitch density from basic setting to suit material. Turn the mark a little to the left for finer materials, a little to the right for thicker materials. Sew a test sample.
Presser foot: 000
Thread: to suit the material
Needle: to suit the thread
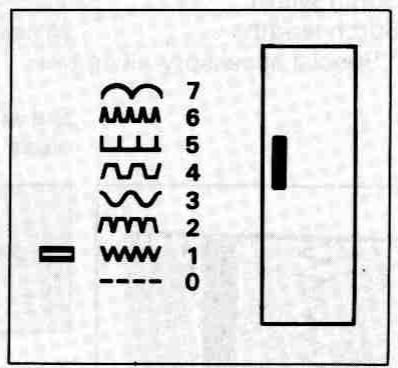
Stitch selection: selector lever 0...7
Stitch width: 0-4
Needle
position: centre
Buttonhole: 0
Stitch length: 1/4 - 4
Feed-dog: sewing
- Press selector lever to right to disengage and set to desired stitch 0 to 7.
See page 17 for application examples of Practical Stitches 0...7.
Universal stitch 4

Stitch selection: selector lever 4
Stitch width: 4
Stitch length: 1-2
Scallop stitch 7

Stitch selection: selector lever 7
Stitch width: 4
Stitch length: 1 / 4
Running stitch 3

Stitch selection: selector lever 3
Stitch width: 4
Stitch length: 1 - 112
Vari-overlock 6

Stitch selection: selector lever 6
Stitch width: 4
Stitch length: 1 - 112
Needle position: right
Applications of Practical Stitches
1 Zig-zag

For most types of material
All simple zig-zag work for instance over casting edges - above all on fine materials -, sewing on elastic bands and lace, etc.
2 Blind stitch

For most types of material
Blind hemstitch, shell edging on soft jackets and fine materials Decorative seams
3 Running stitch
For most types of material Darning with running stitch, mending material, reinforcing edges etc.
Universal stitch
For firmer knitted materials and fabrics, felt, leather, etc. Flat joining seam, visible hems, patchwork, mending jersey, sewing on elastics Decorative seams
5
Stretch stitch
For highly-elastic materials
Highly-elastic, open seam for ski, riding-,climbing, hiking-and activity wear
6 Vari-overlock
Particularly for fine synthetic and silk jackets, helanca and cotton and woollen jackets
Highly-elastic
overlock seam
and highly-elastic
hem, particularly
for sports underw
wear, pyjamas, T-shirts,
sweaters, track-suits, etc.
Scallop stitch
Particularly for woven fabrics Edgings for tablecloths, serviettes, collars, cuffs etc.
e.g. jersey
The following generally applies when sewing knitted material:
- Use a perfect needle! Even a slightly blunt needle damages the knit and holes appear after a short time.
- Use fine sewing thread, particularly for the fine jackets. Coarse thread can also damage the knit.
- Use darning thread for basting. Darning thread, when sewn over, can be more easily removed than the much thicker and shorter-fibre basting thread.
- Press seams immediately after sewing. This considerably simplifies subsequent work.
- Sew a sample to test the stretchiness of the stitch, the chosen stitch should be as elastic as the material. Since the elasticity of modern textiles vary considerably, the basic settings of the practical stitches may need to be adjusted.
For highly-elastic materials try making the stitch length slightly shorter and stitch width slightly wider. This provides the seam with more thread and therefore makes it more elastic.
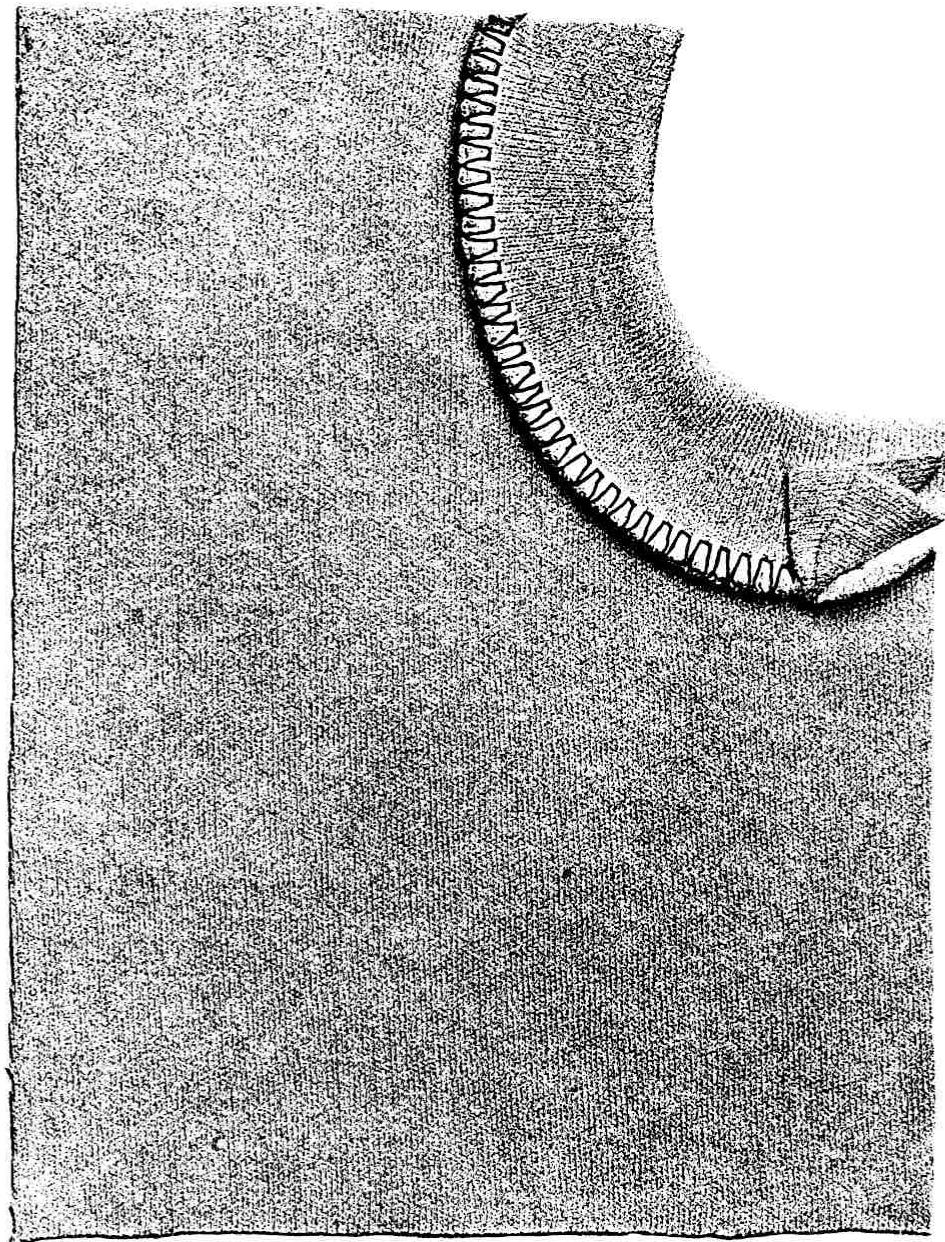
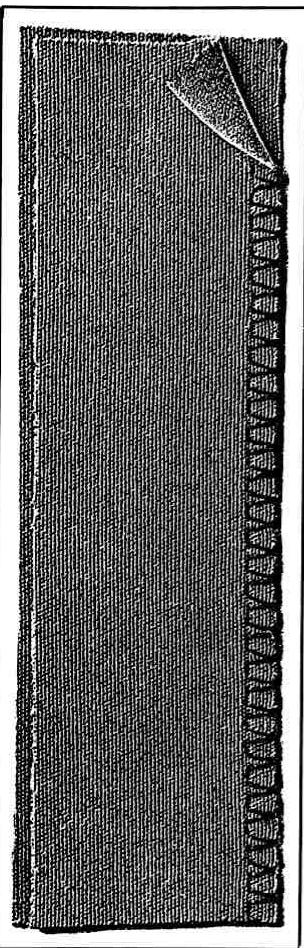
Rib-trim with overlock seam For all kinds of jersey.
| Presser foot: | 470/000 |
| Thread: | sewing thread |
| Needle: | 80-70 |
| Stitch selection: | No. 6 vari-overlock |
| Stitch width: | 4 |
| Stitch length: | 1 approx. |
| Needle position: | right |
| Feed-dog: | sewing |
Press cut strip in half lengthwise. Pin to neckline on right side, cut edges of trim level with edge of neckline.
Hems with Practical Stitches
In general:
baste hem - mark desired width - sew - trim off surplus material.
The "Hints for working with knitted materials" page 18 apply to all types of jersey.
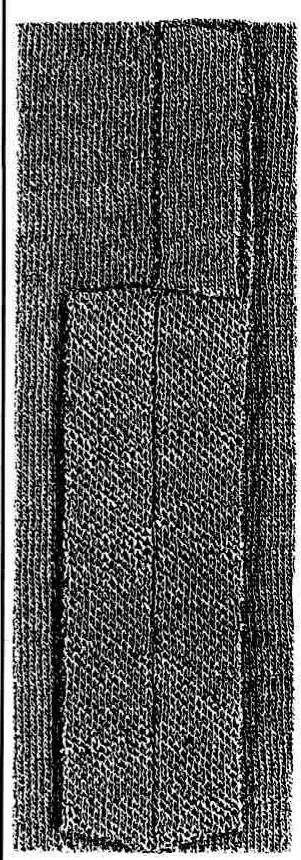
Visible hem with universal stitch
| Presser foot: | 000 |
| Thread: | sewing thread |
| Needle: | 80 |
| Stitch selection: | No.4 universal stitch |
| Stitch width: | 4 |
| Stitch length: | 3/4 approx. |
| Needle position: | centre |
| Feed-dog: | sewing |
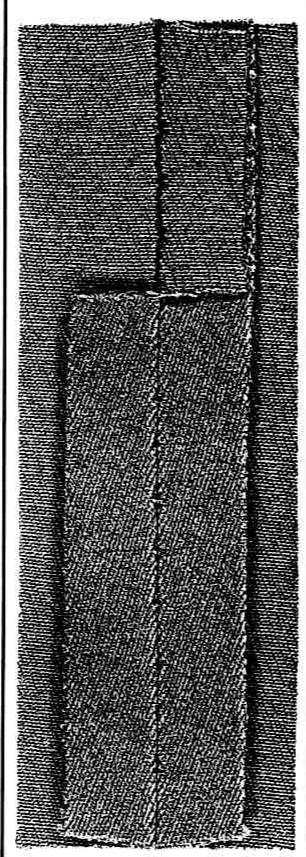
Visible hem with vari-overlock
| Presser foot: | 470/000 |
| Thread: | sewing thread |
| Needle: | 80 |
| Stitch selection: | No.6 vari-overlock |
| Stitch width: | 4 |
| Stitch length: | 1 approx. |
| Needle position: | right |
| Feed-dog: | sewing |
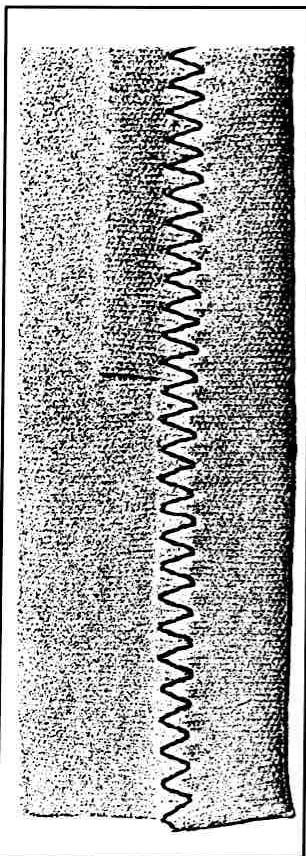
Visible hem with stretch stitch
| Presser foot: | 000 |
| Thread: | sewing thread |
| Needle: | 80 |
| Stitch selection: | No. 5 stretch stitch |
| Stitch width: | 4 |
| Stitch length: | ½ approx. |
| Needle position: | centre |
| Feed-dog: | sewing |
Visible hem with universal stitch
Elastic visible hem for cotton jersey, fine wool, synthetics and blended fibres.
Pyjamas, T-shirts, lingerie, sports underwear.
Pin or baste hem into position. Sew hem approx. 1 cm from raw edge. Cut off surplus material. Alternately, sew directly over the cut edge.
Visible hem with vari-overlock
Very elastic visible hem for all highly-elastic.
jerseys: terry cloth stretch/helanca/very soft cotton and woollen.
jerseys.
Pin or baste hem into position. Sew hem approx. 1 cm from raw edge. Cut off surplus material.
Visible hem with stretch stitch
Hard wearing visible hem for firm fabrics, jeans, etc.
Pin or baste hem into position. Sew hem approx. 1 cm from raw edge. Cut off surplus material.


Seams with Practical Stitches
The choice of type of seam depends entirely on the article. The choice of practical stitch on the material used.
We distinguish between three types of seam:
Open seams:
are seams which are pressed open
- they lie flat and do not roll
- they allow the garment to be let out
Range of application: dresses, pants, skirts, jackets, coats, etc.
Overlap seams:
are seams which are sewn and overcast in one operation
- they are quickly made
- they are narrow, but do not allow the garment to be let out
Range of application: particularly knitted fabrics for sweaters, jackets, jersey blouses, linen, hand and machine-knitted garments.
Flat joining seams:
are seams where the cut edges are lapped and then sewn over.
-theylieflat
- they are narrow and cannot be let out
- they do not roll up, edges are neat.
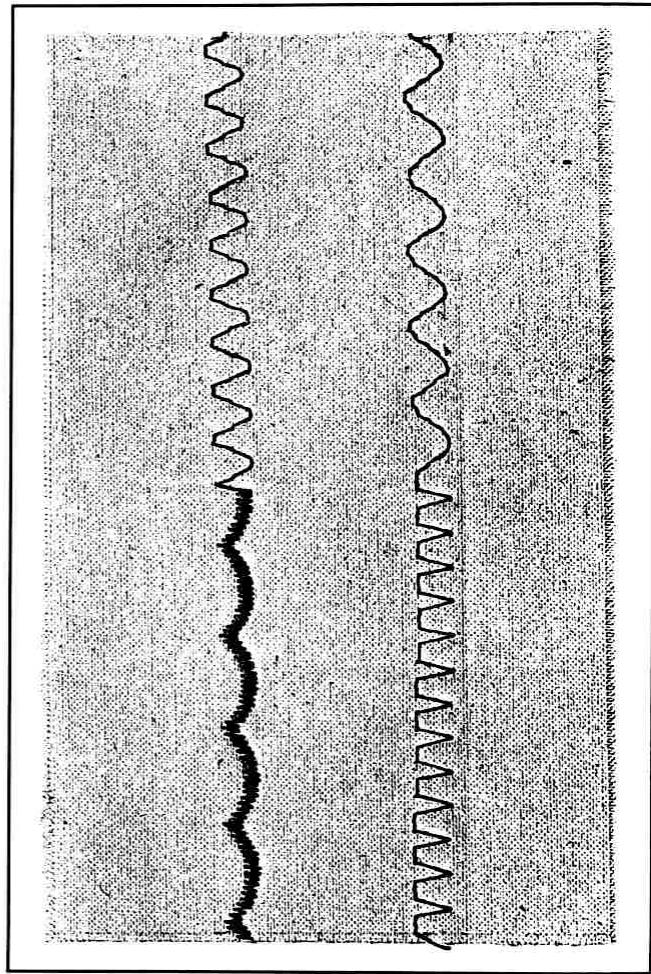
Zig-zag seam open seam
| Presser foot: | 000 |
| Thread: | sewing thread |
| Needle: | 80 |
| Stitch selection: | No.1 zig-zag stitch |
| Stitch width: | 1 |
| Stitch length: | 1-1½ |
| Needle position: | centre |
| Feed-dog: | sewing |
Open seam
Seam for normal elastic jersey in wool, synthetics or blended fibres, as well as for silk-, cotton- and woollen jersey.
Stretch seam open seam
| Presser foot: | 000 |
| Thread: | sewing thread |
| Needle: | 80 |
| Stitch selection: | No. 5 stretch stitch |
| Stitch width: | 1-1½ |
| Stitch length: | ½ -1 |
| Needle position: | centre |
| Feed-dog: | sewing |
Open seam
Highly-elastic seam for stretch materials, particularly for all kinds of sports-wear.
Vari-overlock seam
| Presser foot: | 470/000 |
| Thread: | sewing thread |
| Needle: | 80 |
| Stitch selection: | No. 6 vari-overlock stitch |
| Stitch width: | 4 |
| Stitch length: | 1 approx. |
| Needle position: | right |
| Feed-dog: | sewing |
Vari-overlock seam Highly-elastic overlock seam for all fine jersey. Dresses, blouses, linen, sports underwear.
Flat joining seam
| Presser foot: | 000 |
| Thread: | sewing thread |
| Needle: | 80 |
| Stitch selection: | No. 4 universal stitch |
| Stitch width: | 3-4 |
| Stitch length: | ¾ approx. |
| Needle position: | centre |
| Feed-dog: | sewing |
Flat joining seam Elastic seam for lycramaterial.
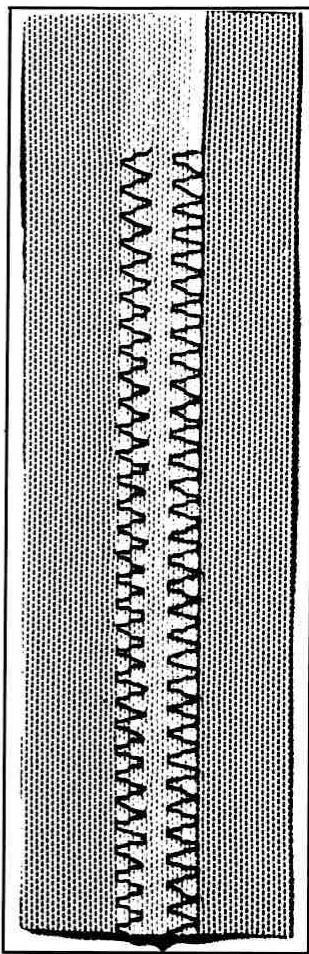
Zip fastener inserted flat
| Presser foot: | 007* |
| Thread: | sewing thread |
| Needle: | 80 |
| Stitch selection: | No. 0 straight stitch |
| Stitch width: | 0 |
| Stitch length: | 2 approx. |
| Needle position: | left/right |
| Feed-dog: | sewing |
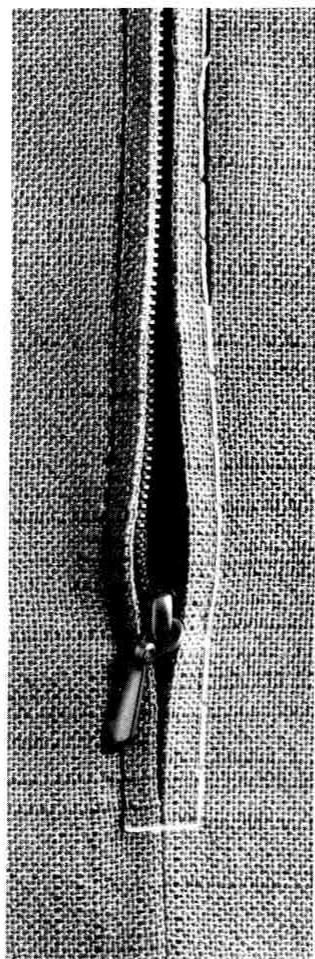
Preparation:
Baste entire length of seam. Mark length of zip and sew seam as far as zip opening. Remove basting thread - except along zip section. Press entire seam, trim evenly and oversew. Remove remaining basting thread. Baste-in zip so that the teeth are covered by the material. Sew-in zip, both sides from bottom to top, once with the needle position right and once with the needle position left.