
EMT10 - Effets de guitare YAMAHA - Notice d'utilisation et mode d'emploi gratuit
Retrouvez gratuitement la notice de l'appareil EMT10 YAMAHA au format PDF.

| Type de produit | Module de générateur de sons AWM expander |
| Marque | YAMAHA |
| Modèle | EMT10 |
| Alimentation | Adaptateur secteur YAMAHA PA-4 (USA : PA-40) ou PA-5 (2 A), 9-12 V CC, 800 mA |
| Consommation électrique | 800 mA max |
| Polyphonie | 8 notes (voix percussives) ; 4 ou 8 notes (voix sustain) |
| Nombre de voix | 12 (9 percussives + 3 sustain) |
| Connectiques | MIDI IN, OUT, THRU ; AUX IN (L/R) ; LINE OUT (L/R) ; DC IN ; DC OUT |
| Réponse MIDI | Réception des notes, sustain, sostenuto (voix percussives), soft pedal ; pas de modulation, aftertouch, pitch bend |
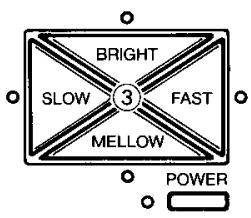
| Variation de voix | BRIGHT/MELLOW (brillance) ; SLOW/FAST (temps d'attaque) |
| Contrôles | Volume, sélecteur de voix, réglage de hauteur (PITCH), variateurs de voix |
| Etendue sonore | La-1 à Do7 (88 touches) ; une octave inférieure pour les basses (La-2 à Do6) |
| Entretien et nettoyage | Chiffon doux et sec ; ne pas utiliser de solvants |
| Sécurité | Ne pas exposer au soleil, à la chaleur, à l'humidité, à la poussière excessive ou aux vibrations. Ne pas obstruer les ouvertures. |
| Accessoires fournis | 2 supports, 2 plaques de montage, vis, cordon DC |
FOIRE AUX QUESTIONS - EMT10 YAMAHA
Questions des utilisateurs sur EMT10 YAMAHA
0 question sur cet appareil. Repondez a celles que vous connaissez ou posez la votre.
Poser une nouvelle question sur cet appareil
Téléchargez la notice de votre Effets de guitare au format PDF gratuitement ! Retrouvez votre notice EMT10 - YAMAHA et reprennez votre appareil électronique en main. Sur cette page sont publiés tous les documents nécessaires à l'utilisation de votre appareil EMT10 de la marque YAMAHA.
MODE D'EMPLOI EMT10 YAMAHA
AWM EXPANDER MODULE TONE GENERATOR
EMT-10
USER'S GUIDE
BEDIENUNGSANLEITUNG
MANUEL DE L'UTILISATEUR
MANUAL DE INSTRUCCIONES
Thank you for purchasing a Yamaha AWM Expander Module Tone Generator EMT-10. The EMT-10 is a totally new type of sound generation module, utilizing the very latest in Yamaha's exclusive digital technology. Capable of producing incredibly authentic sounds, this Expander Module Tone Generator provides a richer dimension to your performances, invoking a deeper response in your audience. It is also equipped with a complete array of MIDI functions so you can greatly expand your range of musical expression when performing on a SINGLE KEYBOARD. This User's Guide has been designed to help you make proper use of the outstanding features of the EMT-10. Be sure to read it carefully before playing your EMT-10.
Contents
Page
1 The Power Supply....1
2 Description of Parts ......2
3 EMT-10 Quick Reference....3
4 Voices & Effects....5
Page
5 The Functions....6
6 MIDI Control ....8
■ Possible Operating Errors ....10
Before Playing
To be sure you are using your EMT-10 under optimum conditions, pay attention to the following precautions.

• • • Choosing a Place for Your EMT-10
Your EMT-10 will be damaged if used in any of the places below, so be sure to avoid doing so:
- Places exposed to direct sunlight, such as near a window, or extremely hot places near a source of heat.
- Places of particularly low temperatures.
- Places exposed to excessive humidity or dust.
- Places exposed to vibrations.
- EMT-10 is provided with numerous openings to allow heat to escape, so be sure they are not obstructed.
- Placing EMT-10 near an audio amplifier or similar device may cause a buzzing sound. If this happens, move EMT-10 away from that device.

• • • Never Apply Unnecessary Force
Strong impact or unnecessary force will damage the unit, take care never to drop the unit nor place heavy objects on top of it.

• • • The Power Supply
After you are finished using the unit, always turn OFF its POWER switch and disconnect the power adaptor.

• • • Cleaning the Outer Case
If the unit requires cleaning, wipe it off with a soft, dry cloth. Never use thinners, benzines, or other similar solvents; their use will damage the unit.

••• Connection with Other Devices
Before connecting the unit with another device such as a SINGLE KEYBOARD instrument, make sure to turn OFF the POWER switches of both devices.
CAUTION: Do not place the power adaptor on top of EMT-10.
1 | The Power Supply
The EMT-10 is designed to use a separately available Yamaha Power Adaptor as its power supply. Be sure to read the following precautions carefully to ensure proper connection of the power supply.
Using EMT-10 alone
Always use the Yamaha Power Adaptor PA-4 (in the U.S., PA-40) or PA-5. The use of another adaptor will damage the EMT-10 and is thus extremely dangerous.
Using EMT-10 concurrently with another EM-Series unit
When using EMT-10 together with another EM-Series unit (such as Disk Recorder EMQ-1), always use the Yamaha Power Adaptor PA-5. If the total maximum current of both EM-Series units is within the range of the adaptor's rated power (2 A), the units can be supplied with power by one PA-5.
Perform connection as shown on the right. Use the DC cord provided to connect the DC OUT jack of one unit to the DC IN jack of the other unit.

Concurrent use of 3 or more units
One PA-5 can be used to supply power to three EM-Series units, depending on the types of units involved. (Power cannot be supplied if the combination results in a total maximum current that exceeds the 2 A rated current of PA-5.) If you wish to use a single PA-5 adaptor, make sure to choose a combination of units for which the total maximum current does not exceed 2 A (2000 mA).
[Combination Example 1]

In the above case, 2 A (2000 mA) is not exceeded so three units can be used with a single PA-5.
[Combination Example 2]

In this case, 2 A (2000 mA) is exceeded, so you will need to use two adaptors.
NOTE: DC OUT → DC IN jack connections should be made only between EM-series Expander Modules. Do not use an EM-series DC OUT jack to power other equipment.
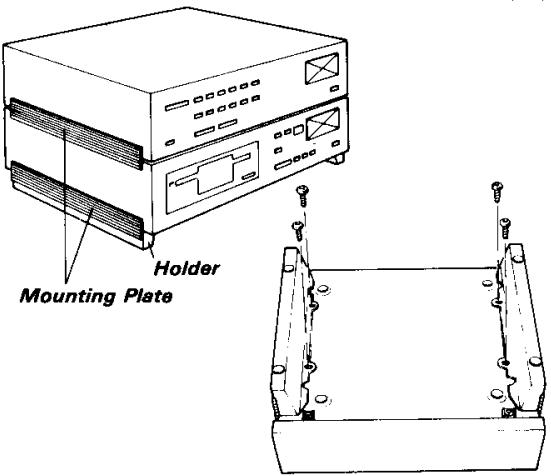
Installing the Holders and Mounting Plates
- The EMT-10 comes supplied with two holders and two mounting plates. If you will be placing the EMT-10 on top of a Clavinova or other keyboard with top-mounted speakers, the holders and mounting plates raise the EMT-10 to prevent obstruction of the speaker. Attach one of the mounting plates to the five grooves on one of the holders. Then attach the mounting plate to the grooves on one side of the EMT-10. For added stability screw two of the screws provided into the holes in the bottom panel via the holes in the holder. Repeat this process with the remaining holder and mounting plate on the other side of the EMT-10.
- To mount an EM-series device on top of another, use only the mounting plates to connect the grooves of the upper and lower units.
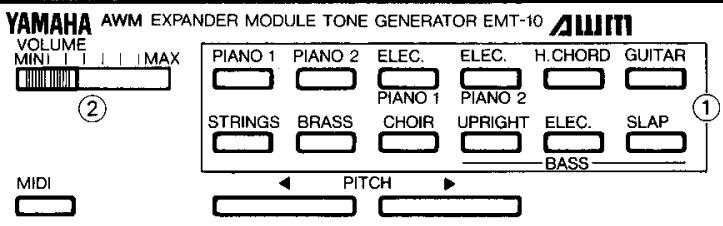
2 | Description of Parts
Front Panel

① VOLUME
Adjusts the volume level of the output sound.
②MIDI
Pressing another button while holding this button down lets you use a variety of functions.
③ Voice Selectors
Used to select the voice.
④ PITCH
Perform fine adjustment of the pitch. Press ◀ to lower the pitch, or press ▶ to raise the pitch.
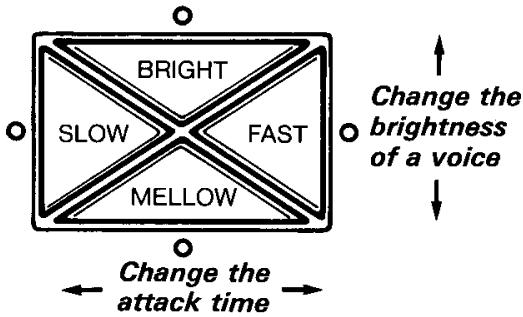
⑤ BRIGHT/MELLOW (Voice Variator)
Adjust the brightness of a voice.
⑥SLOW/FAST (Voice Variator)
Adjust the attack time of a voice.
⑦ POWER switch
Turns the power to ON or OFF.
■ Rear Panel
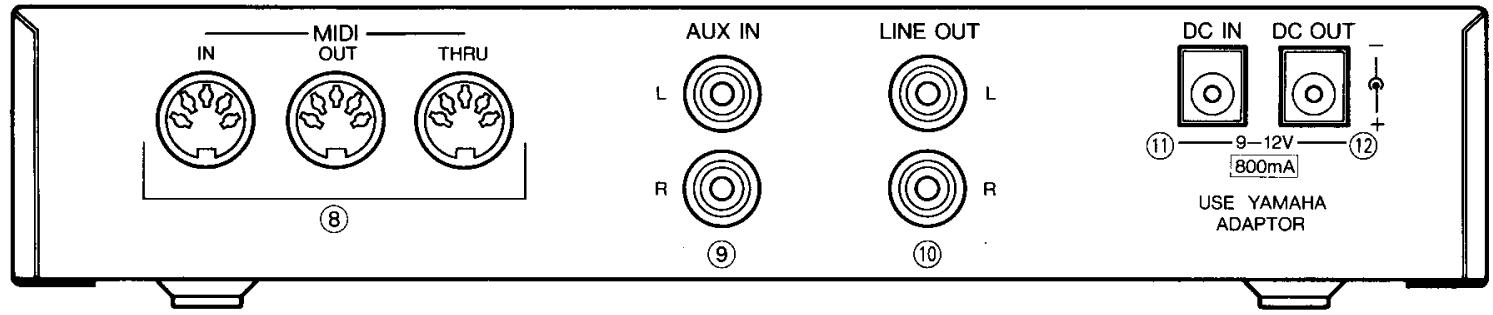
⑧ MIDI jacks
These jacks input or output performance data and other MIDI signals.
⑨ AUX IN jacks
These jacks input the audio signals. They are used when mixing an external sound with the unit's sound then outputting the mixed sound via the LINE OUT jacks.
⑩ LINE OUT jacks
These jacks output the audio signals to the amplifiers, etc.
⑪ DC IN jack
Connect the power adaptor (PA-4/PA-40/PA-5) to this jack.
⑫ DC OUT jack
This jack supplies power to another device.
3 | Quick Reference
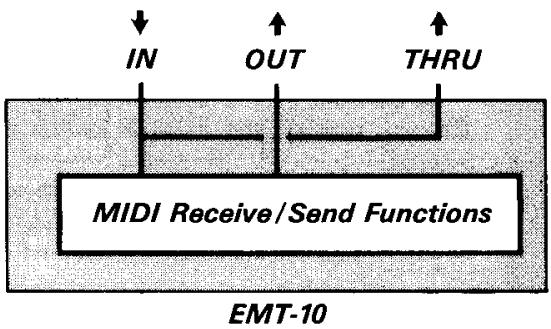
■The MIDI Jacks
EMT-10 is provided with three MIDI jacks.
①MIDI IN : Inputs the MIDI signals.
②MIDI OUT: Outputs the MIDI signals from EMT-10.
③MIDI THRU: Transfers and outputs the MIDI signals that were input to MIDI IN
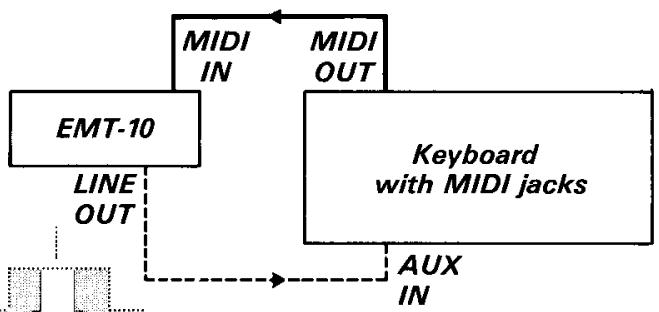
■ Sample Connection with a Keyboard-
Basically, any SINGLE KEYBOARD provided with MIDI jacks can be connected. For details, carefully read the description on keyboards to confirm which data can be transmitted and received.
- You can play the keyboard and enjoy an ensemble sound that includes the voice of EMT-10.
- If the keyboard has no jacks for inputting audio signals, connect an external amplifier.
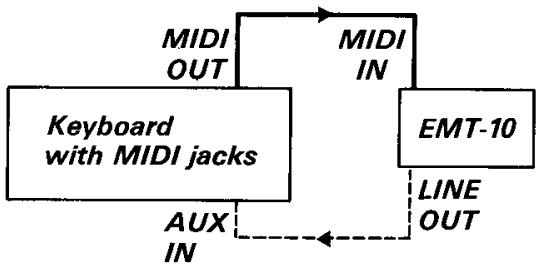
flowchart
graph TD
    A["Keyboard with MIDI jacks"] -->|MIDI OUT| B["MIDI IN"]
    A -->|AUX IN| C["EMT-10"]
    C -->|LINE OUT| B
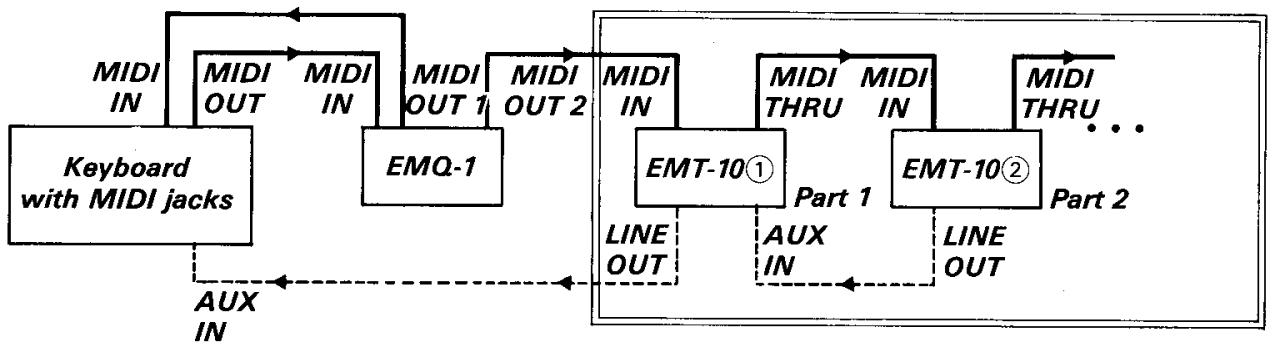
■Enjoying an Orchestra Sound using a Sequencer/Recorder, Etc.
If you have a sequencer/recorder (for example, Yamaha EMQ-1) provided with an Overdub function and have multiple EMT-10 units, you can assign a different part to each EMT-10 unit to enjoy an orchestra-like performance. First, set each Send Channel of the keyboard to a different Channel Number for each part, then perform an Overdub recording. Next, set the Receive Channels of the EMT-10 units to match the Send Channels of the parts you wish to sound, then playback the sequencer/recorder.
flowchart
graph TD
    A["Keyboard with MIDI jacks"] -->|MIDI IN| B["MIDI OUT"]
    A -->|MIDI IN| C["EMQ-1"]
    B -->|MIDI OUT 1| D["MIDI OUT 2"]
    C -->|MIDI OUT 2| D
    D -->|MIDI IN| E["EMT-10①"]
    E -->|MIDI THRU| F["EMT-10②"]
    F -->|MIDI THRU| G["..."]
    E -->|PART 1| F
    F -->|PART 2| G
    H["AUX IN"] --> E
    I["AUX IN"] --> F
    J["AUX IN"] --> E
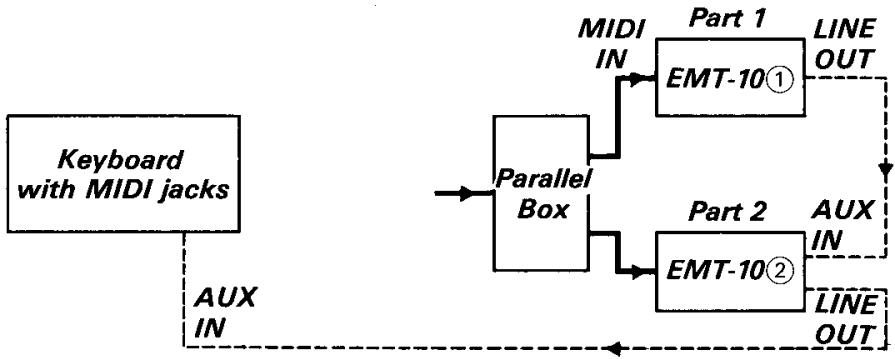
- For the connections surrounded by a double-line, you can use a parallel box as shown on the right to connect the units so that the data is grouped by channel.
flowchart
graph TD
    A["Keyboard with MIDI jacks"] --> B["Parallel Box"]
    B --> C["MIDI IN"]
    B --> D["Part 1 EMT-10①"]
    B --> E["Part 2 EMT-10②"]
    C --> F["LINE OUT"]
    D --> G["LINE OUT"]
    E --> H["AUX IN"]
    E --> I["AUX OUT"]
    J["AUX IN"] --> B
STEP 1
Getting Ready to Perform
① First, use the MIDI cable and connecting cord to perform connection according to the “Sample Connection with a Keyboard” on the previous page.
② Connect the power adaptor (PA-4/PA-40/PA-5) to DC IN of EMT-10.
③ Next, turn on the POWER switch of the keyboard and EMT-10.
4 Set the keyboard to the status in which it can produce sounds.

flowchart
graph TD
    A["EMT-10"] -->|LINE OUT| B["Keyboard with MIDI jacks"]
    A -->|MIDI IN| C["MIDI OUT"]
    A -->|AUX IN| D["AUX IN"]
    C -->|MIDI OUT| D
STEP 2
Performing on the keyboard
① Use the Voice Selectors ① to select a voice.
② Play the keyboard.
The voice of the keyboard and of EMT-10 are being sounded together.
③ Adjust the volume using the VOLUME lever ②.
④ Add the desired effects using the Voice Variator ③.
4 | Voices & Effects
- The following operation assumes that connection has been performed according to STEP 1 of the previous page, and that EMT-10 is set to its default status (the status which is automatically assumed when the power is turned on) of OMNI ON mode.
① Select a voice.
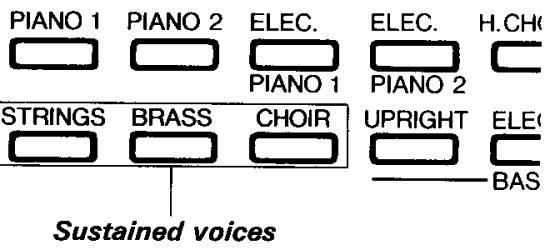
Select one of the voices of the Voice Selectors. The 12 voices are grouped into Percussive voices and sustained voices, with each group having a different number of concurrently soundable notes.
●Percussive voices: The nine voices outside the box shown on the right. Up to eight notes can be concurrently sounded (8-note polyphonic).
●Sustained voices: The three voices enclosed by the box shown on the right. Up to eight notes can be concurrently sounded (8-note polyphonic), but you can also switch to 4-note polyphonic mode.
- Selecting 4-note polyphonic mode for a sustained voice causes the voice to be detuned so that voice is provided with a richer sound.
② Adjust the volume.
Use this VOLUME lever to adjust the volume level.

③ Now, play the keyboard.
When you play the keyboard, the voice of the keyboard and the EMT-10 voice are heard as a layered sound. Because the soundable range is A -1 to C 7 , all of your notes can be sounded if you basically use no more than 88 keys of the keyboard. Bass notes, however, can be sounded one octave lower and the soundable Bass range in that case is A -2 to C 6 .
- Now, try changing the voice of the keyboard. This also changes the voice of EMT-10.

4 Experiment with the operations described below. (Receiving a Control Change)
Receive the following operations from the keyboard.
● Sustain or Damper
●Sustenuto (Percussive voices only)
- Soft Pedal
- Modulation, After Touch, Pitch Bend data cannot be received.
⑤ Use the Voice Variator to produce the desired voice.
- To add a brighter nuance to a voice, press the BRIGHT button. To suppress the brightness and enhance the mellowness of a voice, press the MELLOW button.
- To delay the attack time or the fade out of a voice, press the SLOW button. To speed these both up, press the FAST button.
- To turn OFF an effect that has a lit lamp, press the button on the opposite side.
⑥ Adjust the Touch Curve.
- With touch-sensitive keyboards such as Clavinovas, you can control the volume by key velocity (the speed of your pressure on the keys). If the volume seems too high, however, perform the “Changing the Touch Curve” operation described on page 7.
- AWM EXPANDER MODULE TONE GENERATOR
- EMT-10
- Contents
- Page
- Before Playing
- | The Power Supply
- Using EMT-10 alone
- Using EMT-10 concurrently with another EM-Series unit
- Concurrent use of 3 or more units
- [Combination Example 1]
- [Combination Example 2]
- Installing the Holders and Mounting Plates
- | Description of Parts
- | Quick Reference
- ■The MIDI Jacks
- ■ Sample Connection with a Keyboard-
- ■Enjoying an Orchestra Sound using a Sequencer/Recorder, Etc.
- STEP 1
- Getting Ready to Perform
- STEP 2
- Performing on the keyboard
- | Voices & Effects
- ① Select a voice.
- ② Adjust the volume.
- ③ Now, play the keyboard.
- Experiment with the operations described below. (Receiving a Control Change)
- ⑤ Use the Voice Variator to produce the desired voice.
- ⑥ Adjust the Touch Curve.
Marque : YAMAHA
Modèle : EMT10
Catégorie : Effets de guitare