
RCDC1EB - Radio-réveil PANASONIC - Notice d'utilisation et mode d'emploi gratuit
Retrouvez gratuitement la notice de l'appareil RCDC1EB PANASONIC au format PDF.


| Type de produit | Radio-réveil avec station d'accueil iPod/iPhone |
| Marque | Panasonic |
| Modèle | RC-DC1EB |
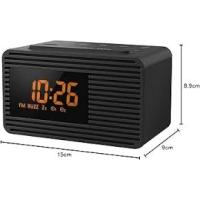
| Dimensions (L x H x P) | 112 mm x 80 mm x 150 mm |
| Poids de l'unité principale | 0,37 kg |
| Poids de l'adaptateur secteur | 0,14 kg |
| Alimentation | Adaptateur secteur AC 100-240 V, 50/60 Hz, sortie DC 7,5 V |
| Consommation électrique (en charge iPod/iPhone) | 7 W |
| Consommation en veille | 0,3 W |
| Fonctions principales | Radio FM, dock iPod/iPhone, double alarme, minuterie sommeil, répétition alarme, gradateur d'affichage, synchronisation horaire, application Memory Loader |
| Type de tuner | FM avec 5 présélections |
| Puissance de sortie (RMS) | 2,6 W par canal (mono) |
| Haut-parleur | 1 haut-parleur de 2,5 cm (type cône) avec bass reflex |
| Pile de sauvegarde | Pile bouton CR2032 (non incluse), durée de vie environ 1 mois |
| Entretien et nettoyage | Essuyer avec un chiffon doux et sec. Ne pas utiliser d'alcool, de diluant ou de benzène. |
| Sécurité | Ne pas exposer à la pluie, à l'humidité ou aux projections. Ne pas obstruer les ouvertures de ventilation. Utiliser uniquement l'adaptateur fourni. |
| Pièces détachées et réparabilité | Pas de pièces réparables par l'utilisateur. Contacter le service agréé Panasonic. Adaptateur secteur disponible (réf. RFEAX1008). |
| Informations générales | Fonctionne avec iPod (4e à 6e génération, mini, nano, classic, touch) et iPhone (2G, 3G, 3GS). Compatible avec l'application Memory Loader (téléchargement gratuit sur App Store). |
FOIRE AUX QUESTIONS - RCDC1EB PANASONIC
Questions des utilisateurs sur RCDC1EB PANASONIC
0 question sur cet appareil. Repondez a celles que vous connaissez ou posez la votre.
Poser une nouvelle question sur cet appareil
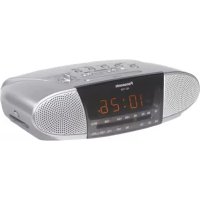
Téléchargez la notice de votre Radio-réveil au format PDF gratuitement ! Retrouvez votre notice RCDC1EB - PANASONIC et reprennez votre appareil électronique en main. Sur cette page sont publiés tous les documents nécessaires à l'utilisation de votre appareil RCDC1EB de la marque PANASONIC.
MODE D'EMPLOI RCDC1EB PANASONIC
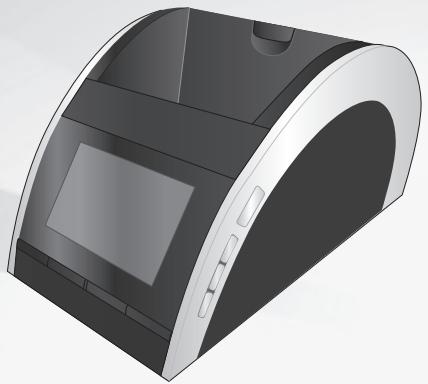
natural_image
3D rendering of a black and silver portable electronic device with curved top and side panels (no text or symbols visible)Panasonic®
Operating Instructions
Clock Radio
Model No. RC-DC1
Note:
“EB” on the packaging indicates the United Kingdom.
Dear Customer
Thank you for purchasing this product.
For optimum performance and safety, please read these instructions thoroughly before connecting, operating or adjusting this product.
Keep this manual for future reference.
CAUTION!
- DO NOT INSTALL OR PLACE THIS UNIT IN A BOOKCASE, BUILT-IN CABINET OR IN ANOTHER CONFINED SPACE. ENSURE THE UNIT IS WELL VENTILATED. TO PREVENT RISK OF ELECTRIC SHOCK OR FIRE HAZARD DUE TO OVERHEATING, ENSURE THAT CURTAINS AND ANY OTHER MATERIALS DO NOT OBSTRUCT THE VENTILATION VENTS.
- DO NOT OBSTRUCT THE UNIT'S VENTILATION OPENINGS WITH NEWSPAPERS, TABLECLOTHS, CURTAINS, AND SIMILAR ITEMS.
- DO NOT PLACE SOURCES OF NAKED FLAMES, SUCH AS LIGHTED CANDLES, ON THE UNIT.
- DISPOSE OF BATTERIES IN AN ENVIRONMENTALLY FRIENDLY MANNER.
THIS UNIT IS INTENDED FOR USE IN MODERATE CLIMATES.
WARNING:
TO REDUCE THE RISK OF FIRE, ELECTRIC SHOCK OR PRODUCT DAMAGE,
- DO NOT EXPOSE THIS APPARATUS TO RAIN, MOISTURE, DRIPPING OR SPLASHING AND THAT NO OBJECTS FILLED WITH LIQUIDS, SUCH AS VASES, SHALL BE PLACED ON THE APPARATUS.
- USE ONLY THE RECOMMENDED ACCESSORIES.
- DO NOT REMOVE THE COVER (OR BACK); THERE ARE NO USER SERVICEABLE PARTS INSIDE. REFER SERVICING TO QUALIFIED SERVICE PERSONNEL.
The socket outlet shall be installed near the equipment and easily accessible.
The mains plug of the power supply cord shall remain readily operable.
To completely disconnect this apparatus from the AC Mains, disconnect the power supply cord plug from AC receptacle.
This product may receive radio interference caused by mobile telephones during use. If such interference is apparent, please increase separation between the product and the mobile telephone.
Product identification marking
| Product | Location |
| Main unit | Bottom |
| AC adaptor | Bottom |
■ Sales and Support Information
Customer Care Centre
- For customers within the UK: 0844 844 3852
- For customers within the Republic of Ireland: 01 289 8333
- Visit our website for product information www.panasonic.co.uk
• E-mail: customer.care@panasonic.co.uk
Direct Sales at Panasonic UK
• For customers: 0844 844 3856
- Order accessory and consumable items for your product with ease and confidence by phoning our Customer Care Centre Monday-Thursday 9:00am-5:30pm, Friday 9:30am-5:30pm (Excluding public holidays).
- Or go on line through our Internet Accessory ordering application at www.pas-europe.com.
- Most major credit and debit cards accepted.
- All enquiries transactions and distribution facilities are provided directly by Panasonic UK Ltd.
- It couldn't be simpler!
- Also available through our Internet is direct shopping for a wide range of finished products, take a browse on our website for further details.
Information for Users on Collection and Disposal of Old Equipment and used Batteries
natural_image
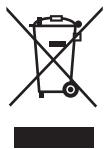
Symbol of a trash bin with crossed lines indicating no waste or restriction, and a solid rectangle below (no text or labels)These symbols on the products, packaging, and/or accompanying documents mean that used electrical and electronic products and batteries should not be mixed with general household waste.
For proper treatment, recovery and recycling of old products and used batteries, please take them to applicable collection points, in accordance with your national legislation and the Directives 2002/96/EC and 2006/66/EC.
By disposing of these products and batteries correctly, you will help to save valuable resources and prevent any potential negative effects on human health and the environment which could otherwise arise from inappropriate waste handling.
For more information about collection and recycling of old products and batteries, please contact your local municipality, your waste disposal service or the point of sale where you purchased the items.
Penalties may be applicable for incorrect disposal of this waste, in accordance with national legislation.
natural_image
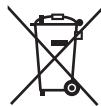
Symbol of a trash bin crossed out by two crossed lines (no text or numbers present)For business users in the European Union
If you wish to discard electrical and electronic equipment, please contact your dealer or supplier for further information.
[Information on Disposal in other Countries outside the European Union]
These symbols are only valid in the European Union. If you wish to discard these items, please contact your local authorities or dealer and ask for the correct method of disposal.
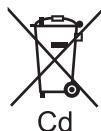
Note for the battery symbol (bottom two symbol examples):
This symbol might be used in combination with a chemical symbol. In this case it complies with the requirement set by the Directive for the chemical involved.
Safety precautions
Placement
Set the unit up on an even surface away from direct sunlight, high temperatures, high humidity, and excessive vibration. These conditions can damage the cabinet and other components, thereby shortening the unit's service life.
Place it at least 15 cm away from wall surfaces to avoid distortion and unwanted acoustical effects.
Do not place heavy items on the unit.
Voltage
Do not use high voltage power sources. This can overload the unit and cause a fire.
Do not use a DC power source. Check the source carefully when setting the unit up on a ship or other places where DC is used.
AC adaptor protection
Ensure the AC adaptor is connected correctly and not damaged. Poor connection and lead damage can cause fire or electric shock. Do not pull, bend, or place heavy items on the lead.
Grasp the plug firmly when unplugging the adaptor. Pulling the AC adaptor can cause electric shock.
Do not handle the plug with wet hands. This can cause electric shock.
Foreign matter
Do not let metal objects fall inside the unit. This can cause electric shock or malfunction.
Do not let liquids get into the unit. This can cause electric shock or malfunction. If this occurs, immediately disconnect the unit from the power supply and contact your dealer.
Do not spray insecticides onto or into the unit. They contain flammable gases which can ignite if sprayed into the unit.
Service
Do not attempt to repair this unit by yourself. If sound is interrupted, indicators fail to light, smoke appears, or any other problem that is not covered in these instructions occurs, disconnect the AC adaptor and contact your dealer or an authorised service centre. Electric shock or damage to the unit can occur if the unit is repaired, disassembled or reconstructed by unqualified persons.
Extend operating life by disconnecting the unit from the power source if it is not to be used for a long time.
Table of contents
Safety precautions ....5
Supplied accessories......6
Compatible iPod and iPhone....7
Overview of controls....8
Making the connections....10
Setting the clock....10
Using an iPod or iPhone 11
Using the radio 12
Using the sleep timer....13
Using the alarm....13
Using the Memory Loader application .....15
Memory back-up battery....16
Troubleshooting guide......17
Maintenance....18
Specifications....19
Supplied accessories

Please check and identify the supplied accessories.

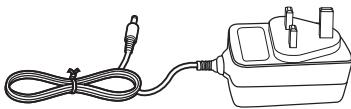
1 AC adaptor
natural_image
Line drawing of a plug with a cord and plug, no text or symbols present(RFEAX1008)
Made for

iPod

iPhone
“Made for iPod” and “Made for iPhone” mean that an electronic accessory has been designed to connect specifically to iPod, or iPhone, respectively, and has been certified by the developer to meet Apple performance standards.
Apple is not responsible for the operation of this device or its compliance with safety and regulatory standards.
iPhone, iPod, iPod classic, iPod nano, and iPod touch are trademarks of Apple Inc., registered in the U.S. and other countries.
Compatible iPod and iPhone
- iPod nano 5th generation (video camera) (8GB, 16GB)
- iPod touch 2nd generation (8GB, 16GB, 32GB, 64GB)
- iPod classic [120GB, 160GB (2009)]
- iPod nano 4th generation (video) (8GB, 16GB)
- iPod classic (160GB) (2007)
- iPod touch 1st generation (8GB, 16GB, 32GB)
- iPod nano 3rd generation (video) (4GB, 8GB)
- iPod classic (80GB)
- iPod nano 2nd generation (aluminum) (2GB, 4GB, 8GB)
- iPod 5th generation (video) (60GB, 80GB)
- iPod 5th generation (video) (30GB)
- iPod nano 1st generation (1GB, 2GB, 4GB)
- iPod 4th generation (colour display) (40GB, 60GB)
- iPod 4th generation (colour display) (20GB, 30GB)
- iPod 4th generation (40GB)
- iPod 4th generation (20GB)
- iPod mini (4GB, 6GB)
- iPhone 3GS (16GB, 32GB)
- iPhone 3G (8GB, 16GB)
- iPhone (4GB, 8GB, 16GB)
Compatibility depends on the software version of your iPod or iPhone.
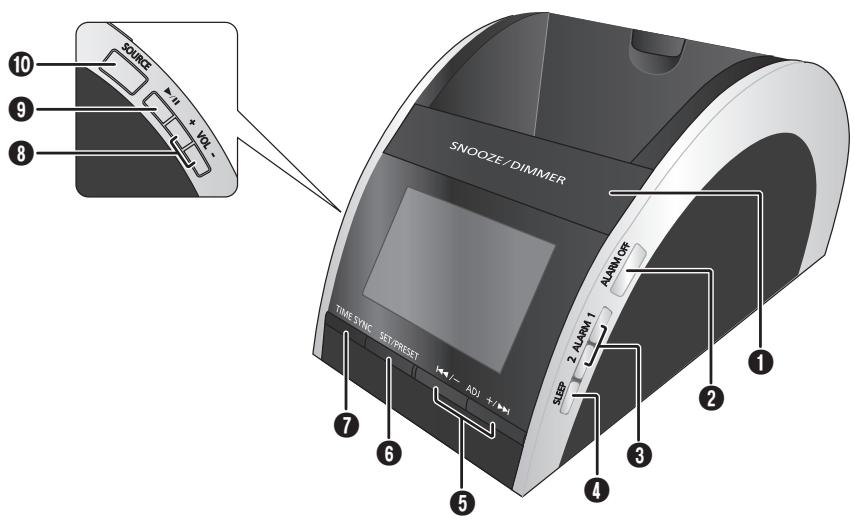
① [SNOOZE/DIMMER]
Snooze: To stop the alarm for 9 minutes. Dimmer: To adjust the display panel's brightness (High (default), Medium or Low).
② [ALARM OFF]
To turn off the alarm.
③ [ALARM 1], [ALARM 2]
To activate either alarm 1 or alarm 2 function. To display alarm 1 or alarm 2 setting.
4 [SLEEP]
To activate sleep function. To activate daylight saving time (summer time) in clock mode.
⑤ [|◀◀/−, ADJ], [+/▶▶|, ADJ]
To adjust clock, radio and alarm settings. To skip to previous or next track. To backward or forward search through a track.
6 [SET/PRESET]
To set the clock. To perform automatic presetting or to view preset channels in radio mode.
⑦ [TIME SYNC]
To synchronise the main unit with an iPod or iPhone's time.
⑧ [+ , VOL], [−, VOL]
To adjust the volume. To select a 12-hour or 24-hour clock display.
⑨ [▶/II]
To start music playback from an iPod or iPhone and to pause during playback.
10 [SOURCE]
To select clock, "IPOD" or "RADIO FM" mode.
Making the connections
Rear view
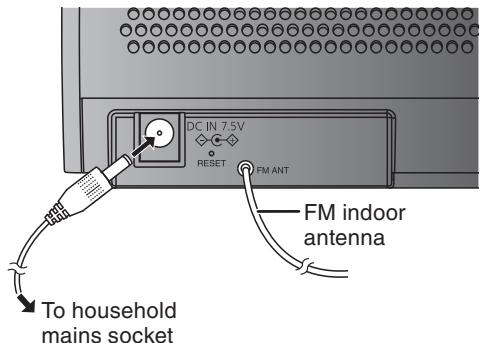
Connect the AC adaptor.
- Do not use an AC adaptor from other equipment.
- Do not use any other AC adaptors except the supplied one.
- The unit is in the standby condition when the AC adaptor is connected. The primary circuit is always “live” as long as the AC adaptor is connected to an electrical outlet.
Setting the clock
The clock is displayed once the main unit is connected to the household mains socket.
Reset the clock regularly to maintain accuracy (monthly accuracy +/- 60 seconds).
1 Press and hold [SET/PRESET] for 2 seconds.
2 Press [|◀◀/−, ADJ] or [+/▶▶, ADJ] to select the day.
3 Press [SET/PRESET] again to confirm.
4 Repeat steps 2 and 3 to set the hour and minute.
Example:
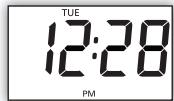
To change the clock display
In clock mode, press and hold [+ , VOL] and [- , VOL] at the same time for 2 seconds to select between a 12-hour or 24-hour display.
For 12-hour display:
AM : “PM” is not displayed.
PM : "PM" is displayed.
Daylight saving time (summer time)
In clock mode, press and hold [SLEEP] to activate or cancel daylight saving time (summer time) function.
“DST” is displayed when the function is activated.
Synchronising clock with iPod or iPhone time
This function allows you to set the clock's time to be the same time as your iPod or iPhone's time (→ page 7, "Compatible iPod or iPhone").
Press [TIME SYNC] while an iPod or iPhone is docked unto the main unit.
Note:
- Exact synchronisation of an iPod or iPhone with the main unit is not possible. There could be a difference of up to 59 seconds between them.
- Compatibility depends on the software version of your iPod or iPhone.
Using an iPod or iPhone
1 Pull out the iPod or iPhone support.
Adjust the support according to the height of your iPod or iPhone.
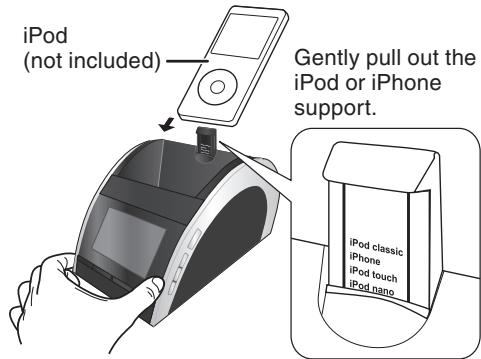
2 Connecting an iPod or iPhone.
Hold the main unit when connecting or disconnecting the iPod or iPhone.
Note:
When docking an iPod touch or iPhone for the first time, a message will be displayed on your iPod touch or iPhone if the Memory Loader application has not been installed ( page 15).
Charging an iPod or iPhone
The iPod or iPhone charges automatically when connected to the main unit.
- See iPod or iPhone display to check its charging status.
- If the iPod or iPhone is not being used for an extended period of time after charging has completed, disconnect it from the main unit, as the battery will be depleted naturally. (Once fully charged, additional charging will not occur.)
Playing an iPod or iPhone
1 Place an iPod or iPhone in the dock and turn it on.
2 Press [SOURCE] to select "IPOD".
3 Press [▶/II] once to start music playback from the iPod or iPhone. Press again to pause playback.
4 Press [|◀◀/−, ADJ] or [+/▶▶, ADJ] to skip to the previous or next track.
5 Press and hold [◀◀/−, ADJ] or [+/▶▶l, ADJ] to backward or forward search through a track.
Note:
- If the iPod or iPhone automatically shuffles or skip a track;
- Turn off its "Shake" feature (if there is any).
- Play the iPod or iPhone using an iPod or iPhone dock adaptor (not included).
For iPod or iPhone operation details, refer to iPod or iPhone's User Guide.
Using the radio
Manual tuning
1 Press [SOURCE] to select "RADIO FM".
2 Press [|◀◀/−, ADJ] or [+/▶▶, ADJ] to select the desired frequency.
To tune automatically
Press and hold [I◄◄/−, ADJ] or [+/►►I, ADJ] until the frequency starts changing rapidly.
Automatic tuning stops when it finds a station or when [I◄◄/−, ADJ] or [+/►►I, ADJ] is pressed again.
Note:
For better reception, extend and change the direction of the FM antenna.
Memory preset
You may store your favourite channels in 5 FM preset channels.
Preparation
Press [SOURCE] to select "RADIO FM".
Automatic presetting (AP)
Press and hold [SOURCE] until "AP" is displayed.
Note:
- Automatic presetting begins from the current frequency.
- Only the first 5 stations detected will be stored.
- “AP” will blink continuously until all 5 channels have been set.
Manual presetting
1 Press [|◀◀/−, ADJ] or [+/▶▶, ADJ] to select the desired frequency.
2 Press and hold [SET/PRESET] for 2 seconds to display the preset number.
3 Press [|◀◀/−, ADJ] or [+/▶▶, ADJ] to select a preset number.
4 Press [SET/PRESET] again to confirm.
Tuning in to a preset channel Press [SET/PRESET] to switch between preset channels.
Using the sleep timer
This function enables you to turn off the unit automatically after the set time (only in iPod and radio mode).
1 Press [SLEEP] to activate the timer.
2 Press [SLEEP] again to select your desired time (in minutes).
$$ \begin{array}{c}\text {OFF (default)} \rightarrow 3 0 \rightarrow 6 0 \rightarrow 9 0 \rightarrow 1 2 0\\uparrow\end{array} $$
Note:
Press [SLEEP] once to check the remaining time.
Using the alarm
You can set two different alarm times. Before setting the alarm, make sure to set the clock ( page 10, “Setting the clock”).
Setting the alarm
1 Press and hold [ALARM 1] or [ALARM 2] until the hour display blinks.
2 Within 10 seconds, press [|◀◀/−, ADJ] or [+/▶▶|, ADJ] to set the hour.
3 Press [ALARM 1] or [ALARM 2] to confirm.
4 Repeat steps 2 and 3 to set the minutes.
5 Press [|◀◀/−, ADJ] or [+/▶▶, ADJ] to select the days of the week:
$$ \begin{array}{c} \text {MON - SUN (everyday)\to MON - FRI (weekdays)} \ \uparrow \quad \text {SAT - SUN (weekend)} \end{array} $$
6 Press [ALARM 1] or [ALARM 2] to confirm.
7 Press [|◄◄/−, ADJ] or [+/►►], ADJ] to select the desired alarm mode: “IPOD”, “RADIO” or “BUZZER”.
8 Press [ALARM 1] or [ALARM 2] to confirm.
“IPOD” selection: Continue with steps 9 and 10.
"RADIO" selection: Continue from steps 11 to 14.
Setting iPod alarm
9 Press [|◀◀/−, ADJ] or [+/▶▶, ADJ] to adjust the volume level.
10 Press [ALARM 1] or [ALARM 2] to confirm the setting.
Note:
- The buzzer will sound if no iPod or iPhone is detected at the set alarm time.
- Music will be played from the iPod or iPhone's library when the alarm sounds.
Setting radio alarm
11 Press [|◀◀/−, ADJ] or [+/▶▶, ADJ] to adjust the volume level.
12 Press [ALARM 1] or [ALARM 2] to confirm.
13 Press [|◀◀/−, ADJ] or [+/▶▶, ADJ] to select the desired preset channel.
14 Press [ALARM 1] or [ALARM 2] to confirm the setting.
Note:
- Alarm will function only when powered by AC power.
- To activate or display the alarm setting, press [ALARM 1] or [ALARM 2] once.
- Press [ALARM 1] or [ALARM 2] again to deactivate the alarm function.
Turning off the alarm
Press [ALARM OFF] to turn off the alarm.
The alarm will sound at the same time on the next day.
Note:
If the alarm is not turned off, it will sound continuously for 59 minutes before turning off by itself.
Snoozing the alarm
Press [SNOOZE] when the alarm sounds to stop it for a few minutes.
The alarm will sound again after 9 minutes.
Tip:
For iPod touch and iPhone users, use the Memory Loader application to unlock custom alarm settings ( page 15).
Using the Memory Loader application
This main unit is designed to operate with the Memory Loader application which can be downloaded from the App Store (search for MemoryLoader).
If you have not already downloaded the free Memory Loader application, you will see the following message on your iPod touch or iPhone display:
Application Not Installed
This accessory requires an application you do not have installed. Would you like to install it from the App store?
This message is a reminder for you to download the application in order to enjoy the enhanced features of this main unit. However, your iPod touch and iPhone will work properly with this main unit even without the Memory Loader application installed.
The Memory Loader application only works with iPod touch and iPhone running on OS 3.0 or later.
Once the Memory Loader application is installed into your iPod touch or iPhone, the following functions can be easily accessible and controlled directly through the application's platform.
Alarm
- Adjust alarm 1 and alarm 2 settings easily.
- You may select any combination of days for the alarm to sound.
- You can choose your desired snooze settings from a choice of 1 to 30 minutes.
Radio
- Preset 5 FM channels by scrolling through your desired frequencies by using the picker.
Events
- You can be alerted of dates stored on your iPod touch or iPhone contacts (if the alarm is set to sound on that day).
Nap
- You can set a short nap timer or countdown on your iPod touch or iPhone.
Daylight saving time (DST)
- Activate or deactivate the daylight saving time function with one simple step.
For more information, visit:
www.memoryloader.com
Memory back-up battery
The back-up battery (CR2032, not included) saves the clock and alarm settings in the event of a power interruption.
Inserting the battery
When there is no battery, the battery-weak indicator will be displayed until a battery is inserted.
Bottom view
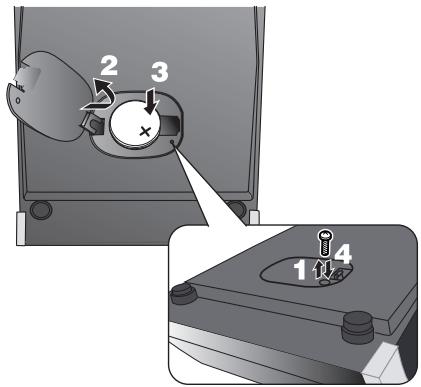
1 Keep the AC adaptor connected to the household mains socket when unscrewing the screw on the cover of the battery holder using a screwdriver.
2 Open the cover of the battery holder.
3 Insert a new battery with the (+) side facing up.
4 Close the cover of the battery holder and secure it with the screw.
Replacing the battery
The service life of this battery is approximately 1 month.
When the battery is weak, the battery-weak indicator will blink constantly on the display.
Note:
- Do not heat or expose to flame.
- Do not leave the battery(ies) in an automobile exposed to direct sunlight for a long period of time with doors and windows closed.
- Remove the battery if the clock radio is not going to be used for a long period of time. Store in a cool, dark place.
CAUTION
Danger of explosion if battery is incorrectly replaced. Replace only with the same or equivalent type recommended by the manufacturer. Dispose of used batteries according to the manufacturer's instructions.
Warning
Keep the Button-Type battery out of the reach of children. Never put Button-Type battery in mouth. If swallowed call your doctor.
Warning
Risk of fire, explosion and burns. Do not recharge, disassemble, heat above 60^ C or incinerate.
Troubleshooting guide
Before requesting service, make the following checks. If you are in doubt about some of the check points, or if the solutions indicated do not solve the problem, consult your dealer for instructions.
Clock
Clock cannot be synchronised to iPod or iPhone's time.
- Make sure the iPod or iPhone is securely connected and turned on (→ page 11).
- Update your iPod or iPhone with the latest software.
Daylight saving time does not work.
- Make sure the clock has been set correctly.
- Press and hold [SLEEP] in clock mode to activate daylight saving time (→ page 11).
Alarm
The iPod, radio or buzzer alarm does not sound at the preset time.
- Check that “ALARM 1” or “ALARM 2” has been correctly activated (→ page 13).
The iPod or radio alarm is activated but there is no sound at the preset time.
- Check the alarm's volume setting (→ page 14).
■ iPod or iPhone
The iPod or iPhone cannot be operated with this unit.
- Make sure the iPod or iPhone has been securely connected and turned on (→ page 11).
- Update your iPod or iPhone with the latest software.
There is no sound from the iPod or iPhone.
- Make sure the iPod or iPhone has been securely connected (→ page 11).
- Adjust the volume.
The iPod or iPhone does not charge.
- Check the connections. Turn off and remove the iPod or iPhone from the dock connector. Reinsert and turn it on again (→ page 11).
Radio
A noise or sound distortion is heard.
- Distance the unit away from any television, personal computer or device easily influenced by magnetism.
Reset
This function enables you to restore the main unit to the original factory settings or when it is behaving abnormally.
Rear view
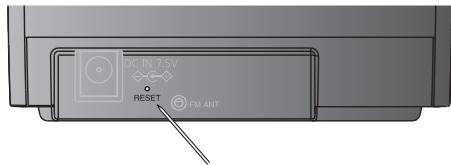
Press [RESET] with a paper clip or a pointed object.
Maintenance
To clean this unit, wipe with a soft, dry cloth.
- Never use alcohol, paint thinner or benzine to clean this unit.
- Before using chemically treated cloth, read the instructions that came with the cloth carefully.
Specifications
AMPLIFIER SECTION
RMS Output Power (Mono)
Front channel
2.6 W per channel (8 Ω), 1 kHz, 10% THD
TUNER SECTION
Preset memory
FM 5 stations
Frequency modulation (FM)
Frequency range
87.50 MHz to 108.00 MHz (50 kHz step)
Antenna terminals
75 Ω (unbalanced)
SPEAKER SECTION
Type
1 way, 1 speaker system (Bass reflex)
Speaker unit(s)
Impedance 8 Ω
Full range
2.5 cm cone type
GENERAL
Power supply (AC adaptor)
AC 100 to 240 V, 50/60 Hz
DC Output
7.5 V
Power consumption
(with iPod or iPhone charging)
Main unit
7 W
Dimensions (W x H x D)
112 mm x 80 mm x 150 mm
Mass
Main unit
0.37 kg
AC adaptor
0.14 kg
Operating temperature range
0^ C to +35^ C
Operating humidity range
20% to 80% RH (no condensation)
Power consumption in standby mode:
Main unit
0.3 W (approximate)
AC adaptor
0.3 W (approximate)
Note:
1) Specifications are subject to change without notice.
Mass and dimensions are approximate.
2) Total harmonic distortion is measured by the digital spectrum analyser.
Panasonic Corporation
Web Site: http://panasonic.net
Pursuant to at the directive 2004/108/EC, article 9 (2)
Panasonic Testing Centre
Panasonic Marketing Europe GmbH
Winsbergring 15, 22525 Hamburg, Germany

RQTX1210-1B
L0610HH1060
- Panasonic®
- Note:
- Dear Customer
- CAUTION!
- WARNING:
- ■ Sales and Support Information
- Customer Care Centre
- Direct Sales at Panasonic UK
- Information for Users on Collection and Disposal of Old Equipment and used Batteries
- For business users in the European Union
- [Information on Disposal in other Countries outside the European Union]
- Note for the battery symbol (bottom two symbol examples):
- Safety precautions
- Placement
- Voltage
- AC adaptor protection
- Foreign matter
- Service
- Table of contents
- Supplied accessories
- Compatible iPod and iPhone
- ① [SNOOZE/DIMMER]
- ② [ALARM OFF]
- ③ [ALARM 1], [ALARM 2]
- [SLEEP]
- ⑤ [|◀◀/−, ADJ], [+/▶▶|, ADJ]
- [SET/PRESET]
- ⑦ [TIME SYNC]
- ⑧ [+ , VOL], [−, VOL]
- ⑨ [▶/II]
- [SOURCE]
- Making the connections
- Rear view
- Connect the AC adaptor.
- Setting the clock
- To change the clock display
- Daylight saving time (summer time)
- Synchronising clock with iPod or iPhone time
- Press [TIME SYNC] while an iPod or iPhone is docked unto the main unit.
- Using an iPod or iPhone
- Pull out the iPod or iPhone support.
- Connecting an iPod or iPhone.
- Charging an iPod or iPhone
- Playing an iPod or iPhone
- Using the radio
- Manual tuning
- To tune automatically
- Memory preset
- Preparation
- Automatic presetting (AP)
- Manual presetting
- Using the sleep timer
- Using the alarm
- Setting the alarm
- Press [ALARM 1] or [ALARM 2] to confirm.
- Setting iPod alarm
- Press [|◀◀/−, ADJ] or [+/▶▶, ADJ] to adjust the volume level.
- Press [ALARM 1] or [ALARM 2] to confirm the setting.
- Setting radio alarm
- Turning off the alarm
- Press [ALARM OFF] to turn off the alarm.
- Snoozing the alarm
- Press [SNOOZE] when the alarm sounds to stop it for a few minutes.
- Tip:
- Using the Memory Loader application
- Application Not Installed
- Alarm
- Radio
- Events
- Nap
- Daylight saving time (DST)
- Memory back-up battery
- Inserting the battery
- Bottom view
- Replacing the battery
- CAUTION
- Warning
- Troubleshooting guide
- Clock
- Clock cannot be synchronised to iPod or iPhone's time.
- Daylight saving time does not work.
- The iPod, radio or buzzer alarm does not sound at the preset time.
- The iPod or radio alarm is activated but there is no sound at the preset time.
- ■ iPod or iPhone
- The iPod or iPhone cannot be operated with this unit.
- There is no sound from the iPod or iPhone.
- The iPod or iPhone does not charge.
- A noise or sound distortion is heard.
- Reset
- Maintenance
- Specifications
- AMPLIFIER SECTION
- TUNER SECTION
- SPEAKER SECTION
- GENERAL
- Panasonic Corporation
Marque : PANASONIC
Modèle : RCDC1EB
Catégorie : Radio-réveil