Movie Cube V850H - Mediaplayer EMTEC - Gratis gebruiksaanwijzing en handleiding
Vind de handleiding van het apparaat gratis Movie Cube V850H EMTEC in PDF-formaat.

Gebruikersvragen over Movie Cube V850H EMTEC
0 vraag over dit apparaat. Beantwoord die u kent of stel uw eigen vraag.
Stel een nieuwe vraag over dit apparaat
Download de handleiding voor uw Mediaplayer in PDF-formaat gratis! Vind uw handleiding Movie Cube V850H - EMTEC en neem uw elektronisch apparaat weer in handen. Op deze pagina staan alle documenten die nodig zijn voor het gebruik van uw apparaat. Movie Cube V850H van het merk EMTEC.
GEBRUIKSAANWIJZING Movie Cube V850H EMTEC
Table of contents
- User Information....6
1.1 Caution 6
- Product Introduction 7
2.1 Product Overview....7
2.2 Package Contents 8
2.3 Connection 8
2.4 Front Panel 13
2.5 Side Panel 13
2.6 Back Panel 14
2.7 Menu Language 14
2.8 HDD Format 14
2.9 Remote Control (*V800H/V850H) 15
- Main Menu....17
3.1 Setup Menu 17
3.2 Music Playback 25
3.3 Photo Playback 26
3.4 Movie Playback 27
3.5 All Files 28
3.6 Net Service 29
3.7 Help Function 29
3.8 DTV Menu (V800H/V850H) 30
- Web Server & BitTorrent....35
4.1 Web Server (unicgi) 35
4.2 Account Management 35
4.3 Visit Neighbor (samba) 35
4.4 BitTorrent Download (btpd) 36
-
Media Library....38
-
Upgrading the Firmware 38
-
Appendixes....39
7.1 Specifications 39
7.2 Frequently Asked Questions 39
-
Copyrights and Trademarks....41
-
Warranty 41
-
License information 41
1.1 Caution
This player's design and manufacture has your safety in mind. In order to safely and effectively use this player, please read the following before usage.
1.1.1 Usage cautions
User should not modify this player. If commercial hard disk is being used, the environmental temperature should be within +5^ +35^ .
1.1.2 Power
The player's power voltage: DC 12V.
When using this player, please connect the supplied AC adapter or AC adapter cable to the player's power jack. When placing the adapter cable, make sure it can not get damaged or be subject to pressure. To reduce the risk of electric shock, unplug the adapter first before cleaning it. Never connect the adapter to the player in a humid or dusty area. Do not replace the adapter or cable's wire or connector.
1.1.3 Radio interference/compatibility
If not properly shielded, almost all electronic devices will get radio interference. Under some conditions, your player might get interference.
The design of this player has followed the FCC/CE standard, and has followed the following rules:
(1) This player may not cause harmful interference;
(2) This player could accept some interference received including interference that may cause undesired operation.
1.1.4 Repair
If the player has a problem, you should take it to an appointed repair center and let the specialists do the repair, never repair the player yourself, you might damage the player or endanger yourself or your data.
1.1.5 Disposing of the player
When you dispose of the player, be sure to dispose it appropriately. Some countries may regulate disposal of electrical device, please consult with your local authority.
1.1.6 Hard disk cautions
The player uses an internal hard disk for data storage, in normal case, format or repair is not required.
You should carefully read the < Frequently Asked Questions > chapter, and check our website for latest information before formatting the hard disk.
Physical impact may create bad sector in the hard disk, you can use CHKDSK to fix the problem.
All data stored in the player may be lost due to physical impact, electrical shock, power lost, HDD format etc. Please backup your data.
It is suggested to do defragment after a long period of usage.
Regularly backup the data in the hard disk so that it can be recovered in the event of data corruption or loss. Our company takes no responsibility for loss of data stored on the hard disk.
1.1.7 Others
When using this player, please do not let the player come into contact with water or other liquid, if water is accidentally spilled on the player, please use a dry cloth to absorb the spillage.
Electronic products are vulnerable, when using please avoid shaking or hitting the player, and do not press the buttons too hard.
Do not let the player come into contact with water or other liquid.
Do not disassemble the player, repair the player or change the design of the player, any damage done will not be included in the repair policy.
Do not press the buttons of the player too hard.
Avoid hitting the player with hard object, avoid shaking the player, and stay away from magnetic fields.
During electrostatic discharge and the strong electromagnetic field, the product will malfunction, then unplug the power cable and the product will return to normal performance next time it is powered on.
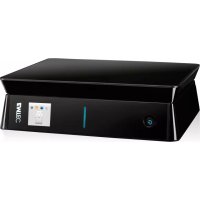
2.1 Product Overview
Thank you very much for purchasing the Movie Cube V800H. In the digital era, this product is a great home entertainment partner. With the outstanding design, you can enjoy Full HD movies and music, view photos of precious moments, and record your favorite TV or movie programs and view them in your own time. The editing function provides you with an easy way to save these. It's easy to use this product as a portable external storage device with its built-in HDD and high-speed USB 2.0.
Network Feature
A/V streaming/transmission via Ethernet (10M/100M) & Wi-Fi (802.11b/g/n, optional)
File sharing via Samba server
A/V streaming via UPnP Media Server
BitTorrent download (controlled and managed via web server)
Internet Radio
USB 2.0 Support
USB DEVICE port (for computer connection)
USB HOST port x 2 (for USB storage devices)
Card Reader
Support SD/MMC/MS/MS Pro
Navigation Options Include
Search: search by genre, album, date, folder, recent, playlist and artist.
Media Library: lets you view all your media files in one menu regardless of its location in folders or drivers. You can filter by categories such as genre, artist, album and so on.
Photo Viewing
You can view photos in slide show mode with background music.
Zoom in/out, Rotate
Photo format: HD JPEG/BMP/GIF/TIF/PNG
Movie Playback
Fast forward/rewind
View subtitle
Supports major audio formats (1080p HD video decoding)
Subtitle control: color/offset/size
Movie format: AVI/MKV/TS/TP/TRP/M2TS/MPG/MP4/M4V/MOV/VOB/ISO/IFO/DAT/WMV/ASF/RM/RMVB/FLV
Music Playback
Fast forward/rewind
Shuffle
Repeat
Music format: MP3/OGG/WMA/WAV/FLAC
DVB-TTV
Supports Digital Video Broadcasting Terrestrial (DVB-T) TV reception
Supports double-tuner, allow to watch other programs while recording one program
Supports Electronic Program Guide (EPG), Teletext and subtitle
Supports loop out the DVB-T signal received from Aerial.
Video Recording
Supports one button recording and scheduled recording, can easily record programs from DVB-T TV, DVD player, DV, etc., and save as MPEG-2 (.mpg, or .ts) format;
Supports time shifting function
File Copy
Supports copying & moving files among USB, card, HDD, and Network
Note:
All the information contained in this manual was correct at the time of publication. However, as our engineers are always updating and improving the product, your device's software may have a slightly different appearance or modified functionality than presented in this manual.
2.2 Package Contents
| Part | Quantity |
| Player | 1 |
| A/V cable | 1 |
| YUV cable | 1 |
| USB cable | 1 |
| Remote Control | 1 |
| AC/DC adaptor | 1 |
| Power cord | |
| User Manual | 1 |
| Quick Installation Guide | 1 |
| CD (with User Manual) | 1 |
| Warranty Card | 1 |
| SCART out adapter | 1 |
Note: The actual contents in the package might be different from the packing list in this manual.
2.3 Connection
2.3.1 Connect to Computer
(1) Make sure the player is powered on;
(2) Plug in the squarish connector of the USB cable to this player's USB DEVICE port;
(3) Plug in the rectangular connector of the USB cable to computer.
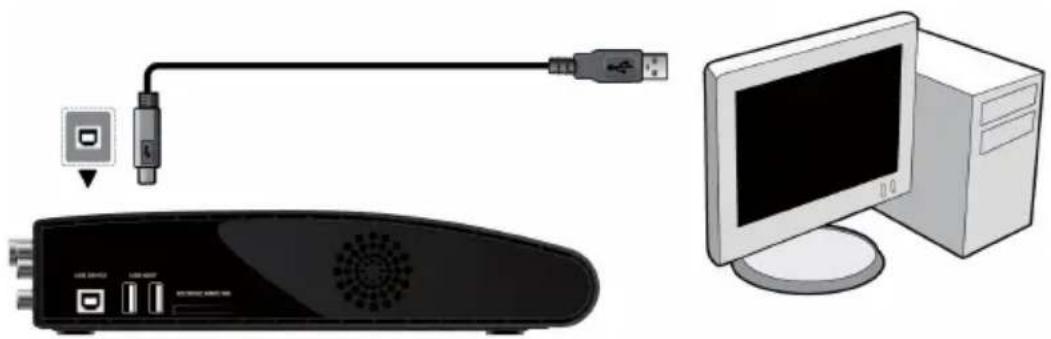
natural_image
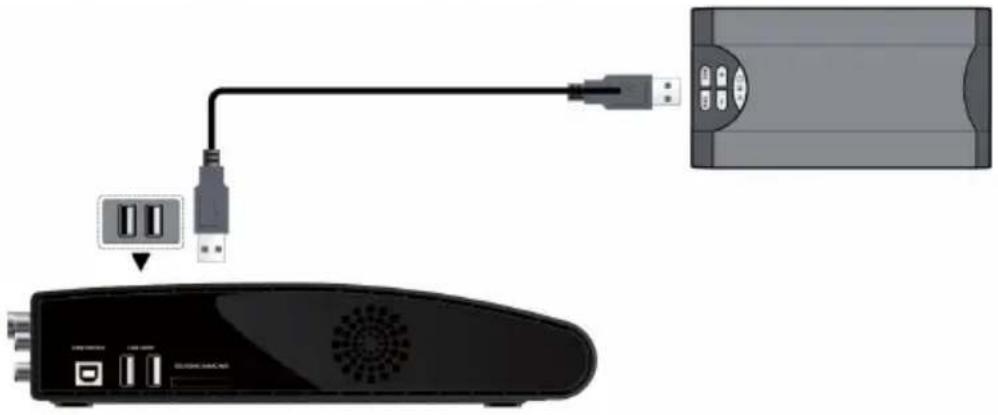
Illustration of a remote network device connected to a computer tower (no text or symbols present)2.3.2 USB Mass Storage Device (like USB stick, MP3, USB HDD etc.) Connection
(1) Make sure the player is powered on;
(2) Plug in the USB stick or USB HDD etc. to one of the USB host ports of this player.
natural_image
Diagram showing connection between a USB cable and a device with ports and connectors (no text or symbols)2.3.3 Connecting a Memory Card
Memory card can be used by inserting to the card slot
(1) Follow the picture to insert the memory card to the card slot properly;
(2) Insert the card by following the arrow pointer in the picture.

text_image
CARD USB 104003 USB 60007 USB 104003 USB 60007In this way, you can browse contents on the memory card.
Removing a USB Device or Memory Card
In order to prevent data loss, it is highly recommended you press EJECT button on the remote control before remove a USB device or Memory Card.
To remove a USB Device or Memory Card:
- Press EJECT button on the remote control
- Select the USB device you want to remove
- Press ENTER button on the remote control to remove USB device or Memory card.
2.3.4 TV connection
2.3.4.1 A/V IN
(1) Follow the picture and plug in the 3 color connector to the player's A/V IN jack;
(2) Follow the picture and plug in the 3 color connector to the A/V OUT jack of the TV/IPTV Set-Top Box (STB).
In this way, you can record TV programs from the TV/IPTV Set-Top Box.
text_image
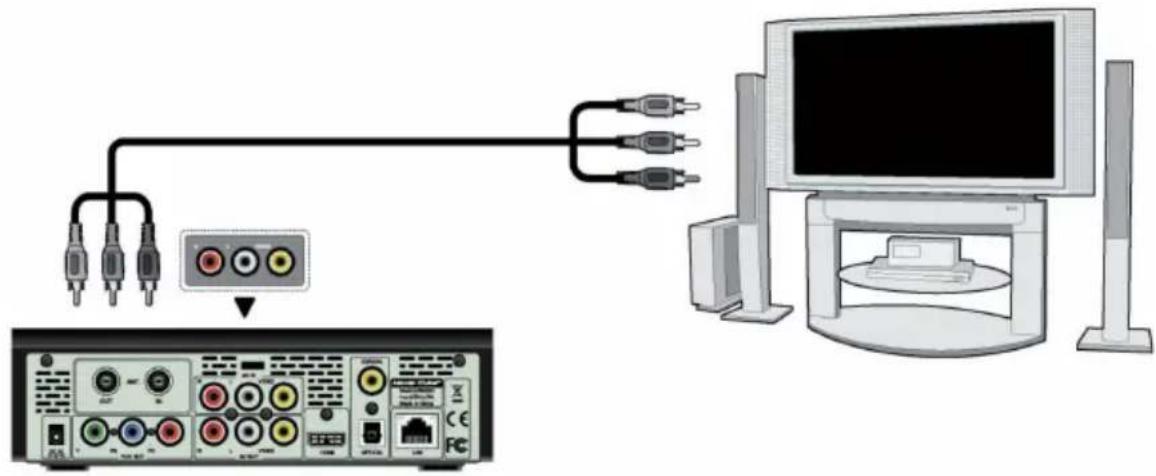
Diagram showing audio connection between a computer monitor and a separate CD-ROM interface with labeled ports and connectors.2.3.4.2 A/V OUT
(1) Follow the picture and plug in the 3 color connector to the player's A/V OUT jack;
(2) Follow the picture and plug in the 3 color connector to the TV's A/V IN jack.
In this way, you can enjoy the content in the player on TV or other display devices.
natural_image
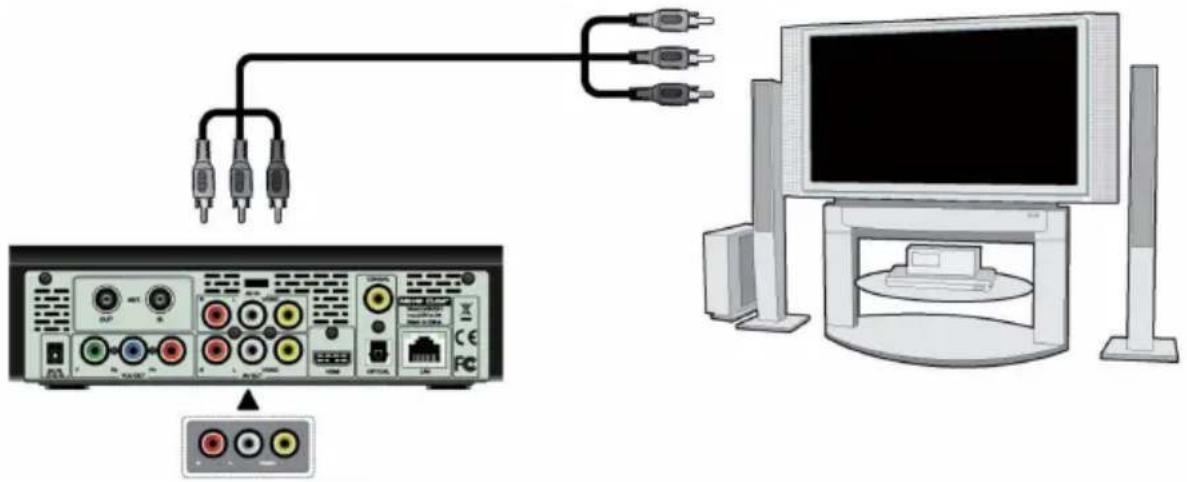
Diagram showing connections between a computer monitor and an audio equipment setup with three connected cables (no text or symbols present)2.3.4.3 Y/Pb/Pr Component OUT
(1) Follow the picture and plug in the 3 color connector to the player's Y/Pb/Pr jack;
(2) Follow the picture and plug in the 3 color connector to the TV's Y/Pb/Pr jack.
Audio Connection while using Y/Pb/Pr Video out:
First method: use the audio output from the A/V OUT jack;
Second method: use the audio output from the S/PDIF Coaxial or Optical jack.

text_image
Diagram showing connections between a computer monitor and an audio equipment interface with labeled ports and connectors.In this way, you can also enjoy videos, music, and photos in the player on TV.
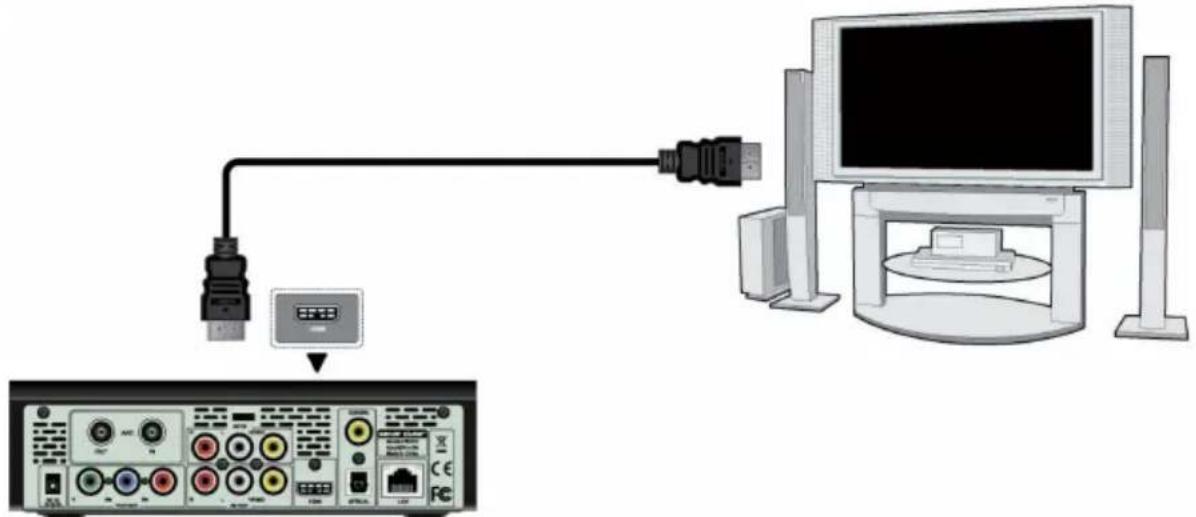
2.3.4.4 HDMI OUT
(1) Follow the picture and plug one connector on your HDMI cable to the player's HDMI jack;
(2) Follow the picture and plug the other connector on your HDMI cable to the TV's HDMI jack.
natural_image
Diagram showing connection between a computer monitor and an audio equipment interface (no text or symbols present)In this way, you can have the highest quality video and audio via a single cable.
2.3.4.5 ANT./RF IN (V800H/V850H)
Follow the picture and plug a TV Aerial or analog TV cable to the ANT. / RF IN socket.
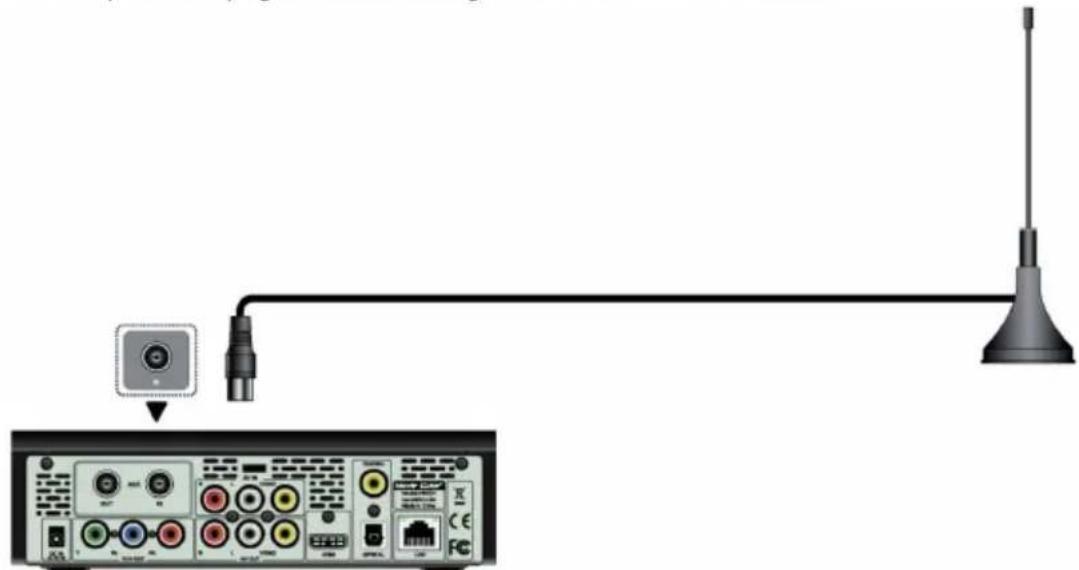
natural_image
Diagram showing connection between a CD-ROM interface and a antenna, with no visible text or symbols.2.3.4.6 ANT. / RF OUT (V800H/V850H)
(1) Make sure the player is connected to power supply;
(2) Make sure a TV Aerial is connecting to the ANT. / RF IN socket;
(3) Follow the picture and plug a TV cable to the ANT. / RF OUT socket then plug the cable to a TV or other TV receiver.

natural_image
Diagram showing connection between a computer monitor and an audio device via cable (no text or symbols present)The player can loop out the DVB-T signal to other TV receiver device. In this way, you can watch the TV programs with another TV receiver while recording.
2.3.5 Digital Audio Device connection
(1) Follow the picture and plug in the RCA connector on your coaxial cable to the player's S/PDIF Coaxial jack. Or if you use optical fiber, please plug in the Toslink connector on your optical fiber to the player's S/PDIF Optical jack; (not supplied)
(2) Follow the picture and plug in the other connector on your coaxial cable or optical fiber to the digital audio device. (not supplied)

text_image
Diagram showing audio equipment connection with audio jack, connected to two speakers and a CD-ROM interface2.3.6 Power connection
(1) Follow the picture and connect the AC adaptor to the player's DC IN jack;
(2) Follow the picture and plug in the AC adaptor to the power outlet.
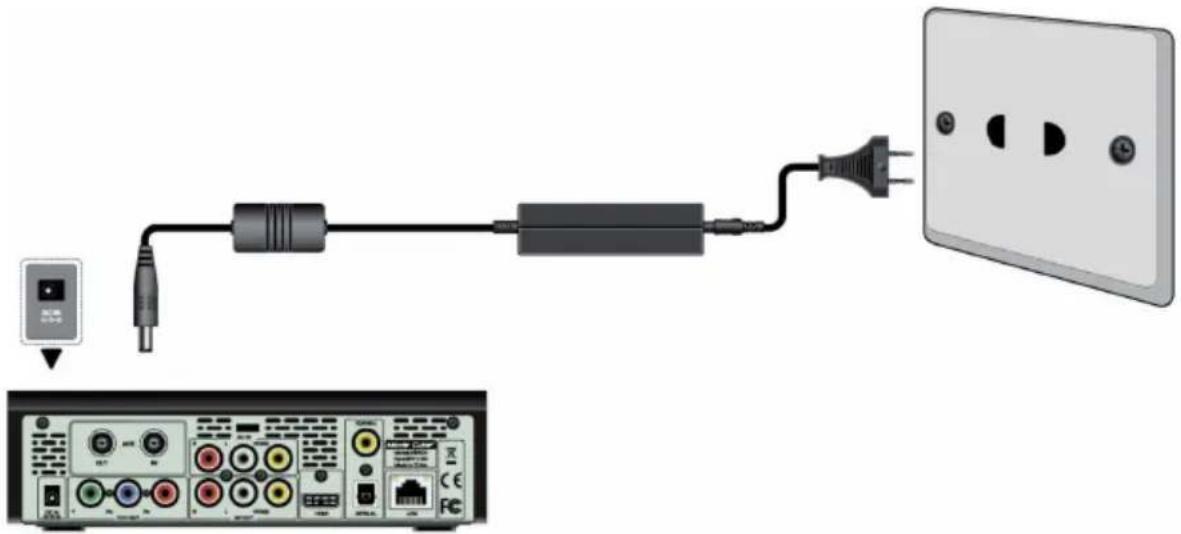
text_image
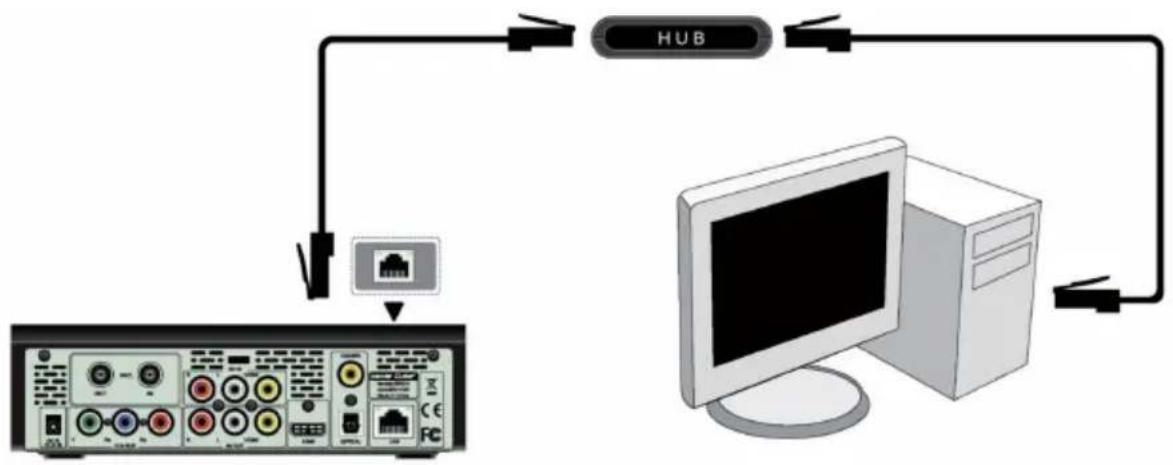
Diagram showing connection between a power adapter, audio jack, and wall-mounted switch with labeled ports and connectors2.3.7 Ethernet connection
To connect to a LAN (Local Area Network) you require a cat5, cat5e or cat6 network cable (not supplied).
(1) Connect one of the crystal plugs on the cable to the player's RJ45 LAN socket;
(2) Connect the other crystal plug on the cable to a RJ45 LAN port on your router, switch, or hub devices.
flowchart
graph TD
    A["Port 1"] --> B["HUB"]
    B --> C["Computer"]
    C --> D["Switch"]
    D --> E["Switch"]
    E --> F["Switch"]
    F --> G["Switch"]
    G --> H["Switch"]
    H --> I["Switch"]
    I --> J["Switch"]
    J --> K["Switch"]
    K --> L["Switch"]
    L --> M["Switch"]
    M --> N["Switch"]
    N --> O["Switch"]
    O --> P["Switch"]
    P --> Q["Switch"]
    Q --> R["Switch"]
    R --> S["Switch"]
    S --> T["Switch"]
    T --> U["Switch"]
    U --> V["Switch"]
    V --> W["Switch"]
    W --> X["Switch"]
    X --> Y["Switch"]
    Y --> Z["Switch"]
2.3.8 WLAN connection
(1) Make sure the player is powered on;
(2) Plug the Wireless LAN USB Adapter (i.e. Wi-Fi USB Dongle) to the USB HOST port of the player.
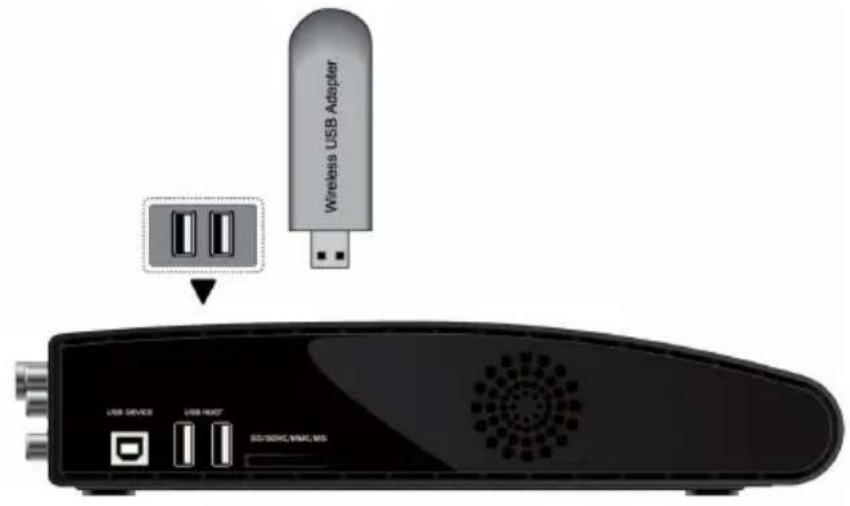
text_image
Wireless USB Adapter USB DEVICE USB HEAD SD-SDHC/SMC-MS2.4 Front Panel
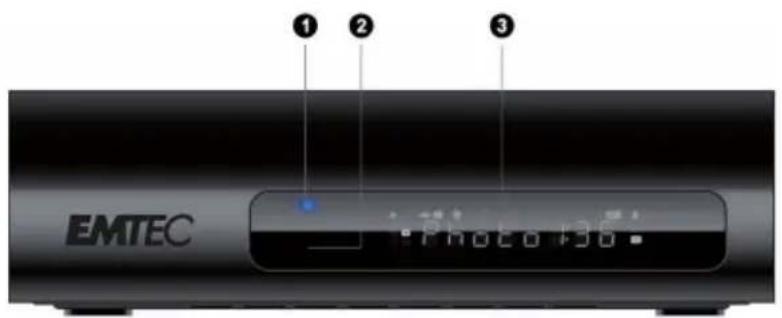
text_image
EMTEC 1 2 3- POWER / STANDBY indicator
- Infrared receiver window
- VFD Screen
2.5 Side Panel

text_image
USB DRIVE USB HOST CDG/CDHC/NIME/INS- USB DEVICE port
- USB HOST x2 ports
- CARD slot
2.6 Back Panel
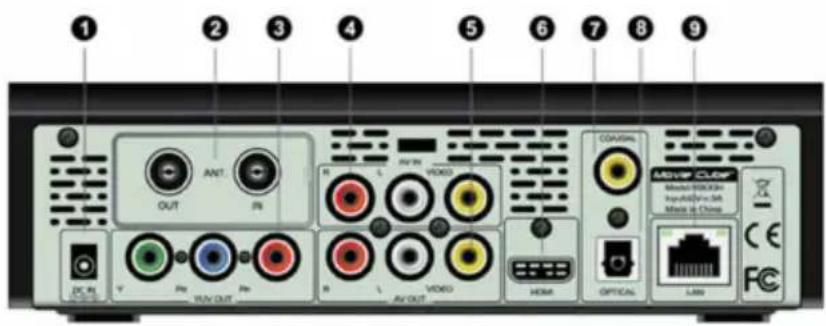
text_image
1 2 3 4 5 6 7 8 9 OUT ANT. IN AV IN HOM CONVIAL V Pe VIN-OUT Pe L AV OUT HOM OPTICAL LAN Movie CLUB Movie 10000+V Input@V/mM Music & China CE FC1.DC-IN jack
3. Y/Pb/Pr OUT jack
4. AV IN jack
5. A/V OUT jack
6. HDMI jack
7. S/PDIF COAXIAL jack
8. S/PDIF OPTICAL jack
9. RJ45 LAN socket
- ANT. / RF IN and OUT socket (V800H/V850H)
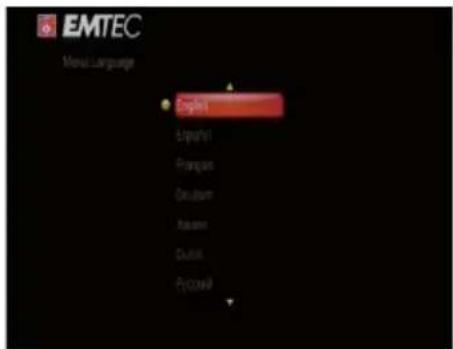
2.7 Menu Language
The system language of this player can be set to English or other languages. Change the language you wish in the setup menu, the selected language will take effect immediately.
text_image
EMTEC Metal Language English Spanish Portuguese Dutch Italian Dutch P...2.8 HDD Format
For users who wish to install a new SATA HDD into the player, please refer to the following procedures to format the hard disk on the player before usage.
Step 1: Select OK on the Warning page, press ENTER to confirm.

text_image
Warning !!! You are going to enter the hard disc format process. All data in this hard disc will be lost after this process. Please read the user manual to get more information!! OK CANCELNote: This page can be also accessed via Setup->System->HDD Format menu.
Step 2: Press the up / down button to adjust the capacity of time shift buffer.
Press the left / right button to select Next, and the enter button to confirm.
Step 3: Select Format, press ENTER, and then hard disk format will start.
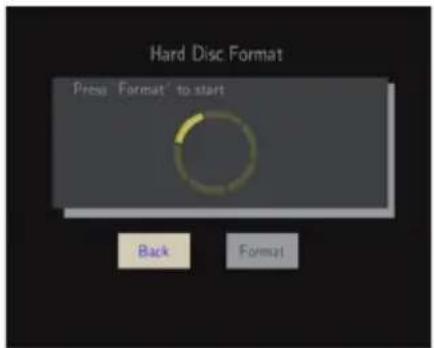
text_image
Hard Disc Format Press 'Format' to start Back FormatThe formatting procedure will be finished within a few minutes. And then you can use the hard disk properly on the player.
Note: HDD format will remove all data stored on the hard disk drive. Please take care and backup your data in advance!
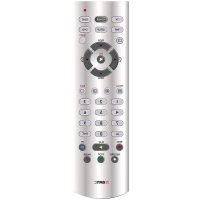
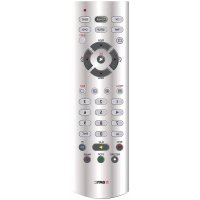
2.9 Remote Control (\*V800H/V850H)

text_image
1 2 3 4 5 6 7 8 9 10 11 12 13 14 15 16 17 18 19 20 21 22 23 UPDC MTCP VSPS RPG SAMS DCOM ADMI OK +/- - 1 2 3 4 5 6 7 8 9 ⑨ 0 SMTZ 6 7 8 9 0.8 10 11 300 300 300 300 300 300 300 300 300 300 300 300 300 300 300 300 300 300 300 300 300 300 300 300 300 300 EMTEC| 1. MUTE | 15. PLAY | 29. SLOW |
| 2. OPTION | 16. FR | 30. NEXT |
| 3. SETUP | 17. FF | 31. PREV |
| 4. INFO | 18. A-B | 32. STOP |
| 5. SEARCH | 19. REC. | 33. EJECT |
| 6. HOME | 20. TIME SHIFT | 34. VOL+ |
| 7. UP | 21. COPY | 35. RIGHT |
| 8. LEFT | 22. RED * | 36. RETURN |
| 9. OK | 23. GREEN * | 37. AUDIO |
| 10. DOWN | 24. YELLOW * | 38. ZOOM |
| 11. VOL- | 25. BLUE * | 39. |
| 12. Numeric buttons | 26. REPEAT | 40. TV SYS |
| 13. HELP | 27. SELECT | 41. POWER |
| 14. PAUSE | 28. SUBTITLE |
No. Button Function
| 1 | MUTE | Press to mute audio output, and press again to resume. |
| 2 | OPTION | Press to add the file to Playlist;Press to display or hide the information bar during playback; |
| 3 | SETUP | Press to enter the setup menu. |
| 4 | INFO | Press to display current status.Press during playback and an onscreen display appears, showing track number and time elapsed/remaining.Press during recording and an onscreen display appears, showing the recording quality setting and time elapsed.Press during live TV and an onscreen display appears, showing the current channel number and time.Press during time shifting to turn the time shifting bar on/off |
| 5 | SEARCH | Filter the current folder to locate the specific media file. Does not search subfolder;Press to jump to a specific point on a title. Specify the point using Title, Chapter and Time. |
| 6 | HOME | Press to enter the home screen. |
| 7 | UP | Navigational button. Press the arrow buttons to select menu options. |
| 8 | LEFT | Navigational button. Press the arrow buttons to select menu options. |
| 9 | OK | Press OK button to confirm. |
| 10 | DOWN | Navigational button. Press the arrow buttons to select menu options. |
| 11 | VOL- | Press to decrease the volume. |
| 12 | Numeric buttons | Press to enter channel numbers or numeric input when changing settings. |
| 13 | HELP | Help Button. Press to get information guide. |
| 14 | PAUSE | Press to pause the current playback.Press again to step to the next frame. |
| 15 | PLAY | Press to begin playback |
| 16 | FR | Press to fast rewind the current playback. Press repeatedly to select speeds |
| 17 | FF | Press to fast forward the current playback. Press repeatedly to select speeds. |
| 18 | A-B | Press to set the beginning and end points of a section to repeat |
| 19 | REC. | Press to begin recording or to resume when recording has been paused. Press repeatedly to set one touch recording (OTR) length (30 MIN. / 60 MIN. / 90 MIN. / 120 MIN. / 180 MIN. / 240 MIN. / Off). |
| 20 | TIME SHIFT | While in the DVB-T or A/V IN mode, press to activate the time shift function, which allows you to pause live TV and resume the program from the point you left it. While paused, the program is recorded to the internal HDD as long as the space is available.Press to activate the time shift function and wait for the play arrow to appear on the screen.Press the PAUSE button and the program will be paused.Press the PLAY button to resume viewing the program.Time shift mode remains active until you press the STOP button or the TIME SHIFT button again. |
| 21 | COPY | Press to enter the file copy menu. |
| 22 | RED * | Press to add/delete schedule recording in EPG menu. |
| 23 | GREEN (EPG) * | Press to enter the Electronic Program Guide which displays an on-screen list of programs for the coming week when watching Digital Terrestrial TV. |
| 24 | YELLOW (TTX) * | Press to open Teletext OSD if it is available in the broadcasted stream of Digital Terrestrial TV. |
| 25 | BLUE * | Press to activate sort function in channel set in TV setup menu. |
| 26 | REPEAT | Press to set repeat option. |
| 27 | SELECT | Press to select files in browser and file copy menu. |
| 28 | SUBTITLE | Press to set subtitle options. You can change the color/size/offset/text encoding of subtitle. |
| 29 | SLOW | Press to play back in slow motion. Press the PLAY button to resume regular playback. |
| 30 | NEXT | Press to view the next file / page down. |
| 31 | PREV | Press to view the previous file / page up. |
| 32 | STOP | Press to stop playback. |
| 33 | EJECT | Press to safely remove the USB device. |
| 34 | VOL+ | Press to increase the volume. |
| 35 | RIGHT | Navigational button. Press the arrow buttons to select menu options. |
| 36 | RETURN | Press to return to the previous screen while navigating menus. |
| 37 | AUDIO | Press to select an audio track. |
| 38 | ZOOM | Press to zoom in/out the image (photo or video). |
| 39 | Press to go to movie/music/photo playlist | |
| 40 | TV SYS. | Press to switch between NTSC, PAL, 480P, 576P, 720P, 1080I, and 1080P. |
| 41 | POWER | Press to enter standby mode or wake up. |
3. Main Menu
3.1 Setup Menu
The Setup menu allows you to personalize and configure the preferences for your player.
To select a Setup option:
Select the Setup icon on the home screen
Use the UP/DOWN navigational buttons to select an option, and then press ENTER.

text_image
EMTEC Setup TVThere are nine Setup options, including TV, Audio, Video, Photo, REC, Network, System, MISC and Media Library. Use the UP/DOWN navigational buttons to select a menu. Press ENTER to confirm. Press RETURN to cancel and display the previous menu screen.
3.1.1 Changing DVB-T TV settings (V800H/V850H)
TV Region Select to set the region for Digital Terrestrial TV.

text_image
EMTEC TV Region Cloud Düsseldorf Finland France Germany Sweden HungaryPress the up / down button to select, and the enter button to confirm.
Channel Scan Select to scan for available Digital Terrestrial TV channels.

text_image
EMTEC Channel Scan CHECK AUTO SCAN MANUAL SCANPress the up / down button to select from AUTO SCAN and MANUAL SCAN, and press the enter button to confirm.
AUTO SCAN

text_image
STV Scanning -1 MHz Found 3 - PR CancelIn AUTO SCAN mode, the system will automatically scan for available DVB-T TV channels.
MANUAL SCAN

text_image
Noise Ratio Noise Frequency Frequency Bandwidth Count QualityIn MANUAL SCAN mode, you can select the CH name, Bandwidth, and Input Frequency. Use the navigational and numerical buttons on the remote control to select or input. Press the enter button to confirm.
Channel Set
Select to edit channel information.
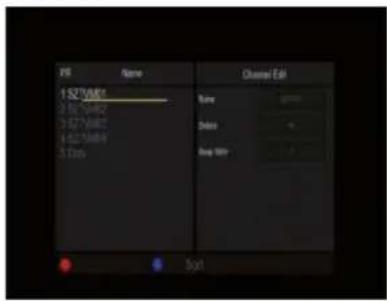
text_image
1.527V800 2.500V800 3.527V800 4.527V800 5.000 Name Delete Stop Help SortPress the up / down button to select DVB-T, and press the enter button to confirm.

text_image
PR Name Channel Edit 8 BBC TOUR 71 CBoxbox 9) BBC Parliament 87 Community 906 305 907 502 908 901 909 305 Name Choose Delete %1 Swap With %2In this menu, you can edit the Name, and sequence for the DVB-T TV channels. Use the navigational buttons to select and modify the settings, and press the enter button to confirm.
3.1.2 Changing Audio Settings
Use this menu to configure audio settings.

text_image
EMTEC Audio 01 of 02 Audio Mode OFF Digital Output HDMI LPCMNight Mode
Choose between Off / On / Comfort. If the option is turned on, the audio output volume will be decreased to make you more comfortable.
Digital Output
Select to set Digital Output (S/PDIF) mode.
Note: In raw mode, Dolby Digital, DTS, or MPEG sound can be bypassed to the HDMI TV or Digital amplifier.
3.1.3 Changing Video Settings
Use this menu to configure video settings
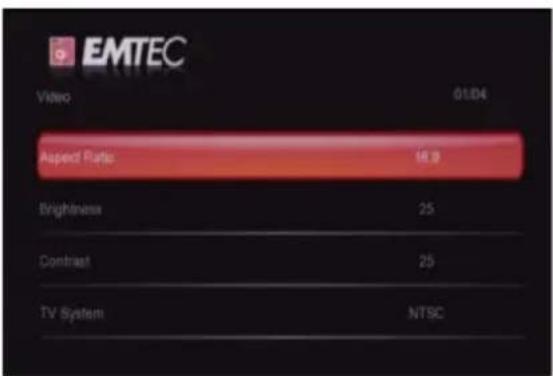
text_image
EMTEC Video 01:04 Aspect Ratio 16.8 Brightness 25 Contrast 25 TV System NTSCAspect Ratio
- Pan Scan 4:3: Display a wide picture on the entire screen and cuts off the redundant portions. Select when a standard 4:3 TV is connected.
- Letter Box 4:3: Display a wide picture with two black borders on the top and bottom of 4:3 screen. Select when a standard 4:3 TV is connected.
- 16:9: Compress the image to convert the whole image. Select when a 16:9 TV is connected.
Brightness
Adjust the level of brightness.
Contrast
Adjust the level of contrast.
TV SYSTEM
Select to adjust TV Type and video output resolution. This setting depends on your regional location. Include: NTSC - United States, Canada, Japan, Mexico, the Philippines, South Korea, and Taiwan. PAL - Europe, Greenland, parts of Africa and South America, the Mideast, China, India, Australia, and Indonesia. Resolution - video output resolution
Slide Show Timing
Select to set the interval time for photo slide show.
Transition Effect
Select to set the transition effect for photo slide show.
Background Music
Select to set the background music options while view pictures.
3.1.4 Changing Photo Settings
Use this menu to configure photo settings

text_image
EMTEC Photo 01/03 Show Show Timing Off Transition Effect Off Background Music FolderSlide Show Timing
Select to set the interval time for photo slide show.
Transition Effect
Select to set the transition effect for photo slide show.
Background Music
Select to set the background music options while view pictures
3.1.5 Changing REC settings

text_image
EMTEC REC 08:00 Quality UP Permanent Touchout OB PEC Device HSDQuality
- Select the recording quality. Choose from HQ, SLP, EP, LP and SP
Permanent Timeshift
- Select to set Time Shift mode. If On, the time shift will start automatically while in Video In mode.
Rec Device
- Select to set device to restore the recorded files.
3.1.6 Changing Network Settings
Use this menu to configure Ethernet and WLAN (Wireless Local Area Network) settings.
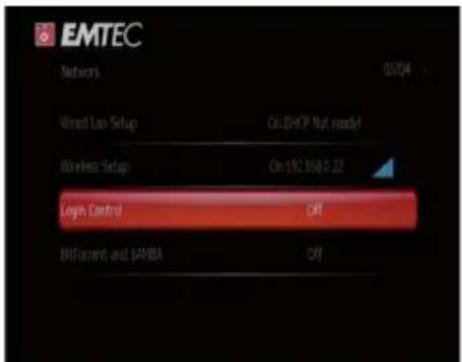
text_image
EMTEC Networks 01/24 Wireless Setup On:DHOP Nut ready! Wireless Setup On:192.3568.0.22 Login Control Off ENFiorent and GAVERA OffWired LAN Setup
• DHCP IP (AUTO)
Select to obtain IP address automatically.
• FIX IP (MANUAL)
Select to manually input the IP Address, Subnet Mask, Default Gateway, and DNS Server IP Address.
Wireless Setup
- Selecting a connection profile

text_image
EMTEC Select a connection profile Profile Name: LanguageSet Connection2 Connection3 ENTER Enter Cancel PlayThis player can store up to three wireless network connections. Press ENTER to go to next step, press RETURN to cancel, and press PLAY to connect.

text_image
EMTEC Get Connection Mode Connection Mode Infrastructure (AP) Peer to Peer (Ad Hoc)Choose between Infrastructure (AP) and Peer to Peer (Ad Hoc). Press ENTER to go to next step, and press RETURN to cancel.
• Infrastructure (AP)
Infrastructure mode is used to connect computers with wireless network adapters, also known as wireless clients, to an existing wired network with the help from wireless router or access point.
Get SSID Name

text_image
EMTEC Get SSID Name SSID Security MELE TP LINK WEP Higher WEP Inkaya WPA ENTER Enter Cancel OPTION RetreshPress ENTER to go to next step, press RETURN to cancel, and press OPTION to refresh the SSID list.
Note: In the Security list, WEP (Wired Equivalent Privacy) and WPA (Wi-Fi Protected Access) means the network is encrypted, i.e. an encryption key is needed to access the network. NONE means it is an open system network.
Input WEP / WPA Key
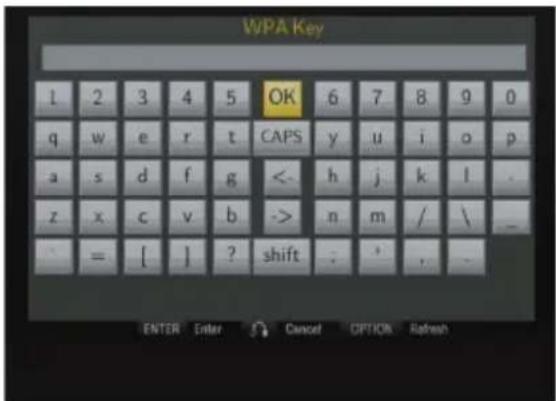
text_image
WPA Key 1 2 3 4 5 OK 6 7 8 9 0 q w e r t CAPS y u i o p a s d f g <- h j k l . z x c v b -> n m / \ _ = [ ] ? shift : , , . ENTER Enter Cancel OPTION RefreshEncryption keys can be inputted via the virtual keyboard. Press the navigational buttons to select, ENTER to input, CAPS to switch between uppercase and lowercase, <- to delete a character, -> to insert a space, shift to make more symbols available, and OK to confirm.
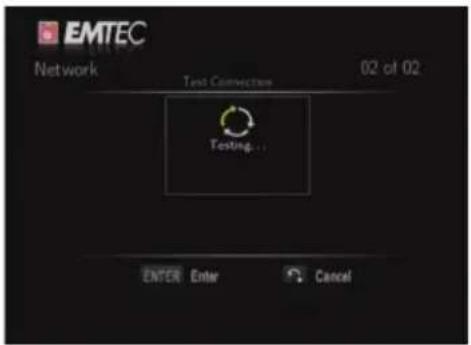
text_image
EMTEC Network 02 of 02 Test Connection Testing... ENTER Enter CancelThe testing process will take for a while, please be patient to wait. If the test is ok, the network information (Profile Name, IP address, Subnet Mask, Gateway, etc.) will be displayed on the screen.
Peer to Peer (Ad Hoc)
Peer to Peer mode, which is also called Ad Hoc mode or computer-to-computer mode, is used to connect wireless clients directly together, without the need for a wireless router or access point.
Ad-Hoc Setup
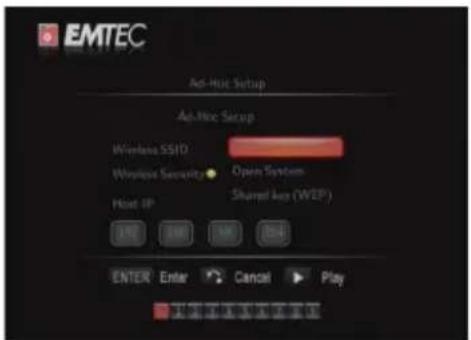
text_image
EMTEC Ad-Hut Setup Ad-Moc Setup Wireless SSID Wireless Security Open System Host IP Shared key (WEP) H0 OK OK Enter Enter Cancel PlayPress ENTER to go to next step, press RETURN to cancel, and press PLAY to connect.
Login Control
- Select to turn on / off password protect for the Web server (Neighbor Web).
Note:
1) The default user name is 'admin', and the default password is '123';
2) When it is turned off, and then turned on again, the password will be restored to default.
BT and SAMBA
- Select on/off to control the BitTorrent, samba and Web server services.
3.1.7 Changing System Settings
Use this menu to configure system settings.
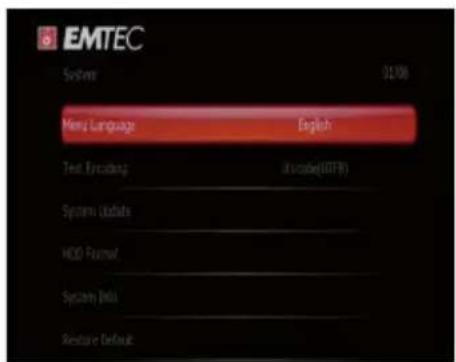
text_image
EMTEC Systems 01:50 Menu Language English Text Encoding Unicode(UTFR) Systems Update HDD Format Systems Build Restaur DefaultMenu Language
Select to choose the OSD (On-Screen Display) language.
Text Encoding
Select to set the text encoding option (subtitle display)
System Info
This tab gives you information about the software installed and about the material components of your player.
System Update
Select to update the firmware or extension package via a USB stick.
1) Copy 'install.img' or extension files to the root directory of a USB stick, and connect it to the USB HOST port of the player.
2) Press ENTER to confirm.
Extension Package Upgrade
Select to upgrade the extension packages (btpd, samba, unicgi, etc.)
System Upgrade
Select to upgrade the firmware. (Configuration and settings will be reserved)
System Reinstall
Select to reinstall the firmware completely (All settings will be lost).
Time
• Select to set the system time.
Parental Control
- Select to set the TV parental control options. A password will be needed for the modification. The default one is '0000'. Press the numerical buttons to input, and the enter button to confirm.
HDD Format
• Select to format the HDD.
Restore Default
• Select to restore factory defaults.
3.1.8 Miscellaneous
Use this menu to adjust miscellaneous settings.
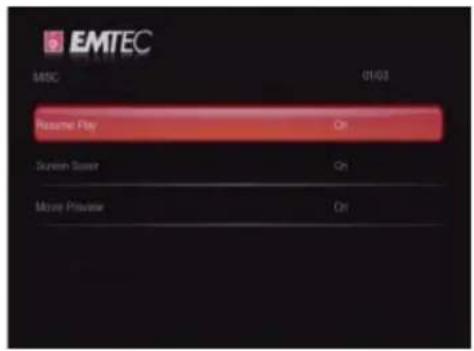
text_image
EMTEC MISC 01/03 Resume Play Ctrl Sunrun Saster Ctrl Move Preview CtrlResume Play
Select to turn on / off resume playback (auto-bookmarking) feature for movies.
Screen Saver
Select to turn on / off screen saver.
Movie Preview
Select to turn on / off movie preview in the browser menu.
3.1.9 Changing Media library Settings
Use this menu to set the scan folder, update media library and media library mode.

text_image
EMTEC Media Library 01:03 Select Scan Follen Update Media Library Media Binary ModeSelect Scan Folder
Select the scan folders from HDD or external USB device.
Update Media Library
Press to update media library.
Media library Mode
Press to select media library mode. You can set off/auto/manual mode from USB/HDD. Off: When you set off mode, system will turn off media library and won't scan media library.
Auto: When you set auto mode, system will update media library after you turn on the player.
Manual: When you set manual mode, you need enter into Update Media library and select update by manual.
Note: System only scan the folders what you have selected. System default to scan all of the folders. It will take some time to scan all of the folders.
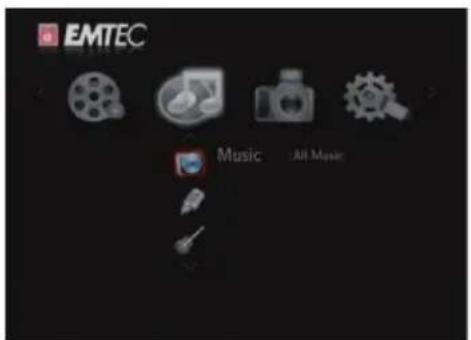
3.2 Music Playback
Enter music interface, only supported audio files and folder will be displayed. This player supports MP3, WMA, and OGG audio files.
text_image
EMTEC Music All MusicYou can navigate using a filter option (Date, Folder, Recent, Playlist, All music, Artist, Genre, or Album) by selecting the Music icon and using UP and DOWN button to scroll through the options listed.
3.2.1 Music Playback Control
Button Function
PLAY/PAUSE Begin/Pause playback.
FR / FF Fast rewind or fast forward. Press repeatedly to select the speed.
PREV / NEXT View the previous or next movie.
SEARCH Search for a music file.
OPTION Hide or display the Music toolbar during playback.
VOL+/- Increase/Decrease the volume.
3.2.2 Music Playback Options
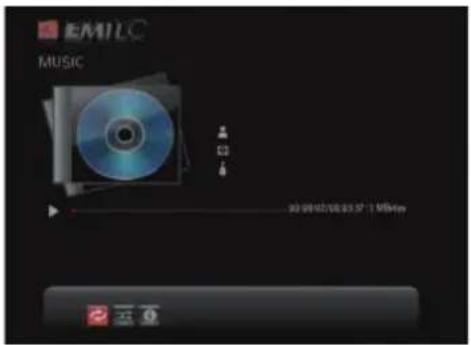
During music playback, press OPTION button. The music toolbar opens at the bottom of the screen.
text_image
EMILC MUSIC 4 3 6 视频放映的51 MB/8mThe music toolbar has several command icons to customize the way you play music.
The functions from left to right are repeat, shuffle mode, info.
3.2.3 Quick-Search
You can search for a media file by filter current folder to locate the specific media file. Press SEARCH button while browsing music files in the music library.

text_image
EMTEC All Music April Lavigne(夏薇儿)-I Dr April Lavigne(夏薇儿)-I'm April Lavigne(夏薇儿)-I'm April Lavigne(夏薇儿)-My April Lavigne(夏薇儿)-My April Lavigne(夏薇儿)-NO U#: 中国电影集团 中国电影集团3.3 Photo Playback
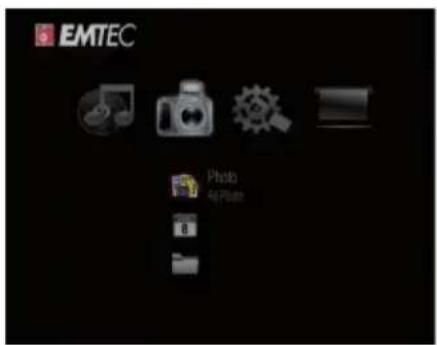
Enter into photo interface, only supported image files and folder will be displayed. This player supports JPG/JPEG/BMP/files.
You can navigate using a filter option (Date, Folder, Recent or All photo) by selecting the photo icon and using UP and DOWN button to scroll through the options listed.
text_image
EMTEC Photo File Photo3.3.1 Photo Playback Control
| Button | Function |
| PREV / NEXT | View the previous or next photo. |
| LEFT / RIGHT | Rotate a photo in any angle. |
| OPTION | Hide or display the Photo toolbar during playback. |
| STOP | Stop playback. |
| ZOOM | Zoom in and out the photo |
3.3.2 Photo Playback Options
During photo playback, press OPTION button. The photo toolbar opens at the bottom of the screen.

natural_image
Nighttime cityscape with illuminated buildings and waterfront, no visible text or symbolsThe photo toolbar has several command icons to customize the way you play photo.
The functions from left to right are zoom in, zoom out, rotate picture, info.
3.3.3 Quick-Search
You can search for a media file by filter current folder to locate the specific media file. Press SEARCH button while browsing photo files in the photo library.

text_image
EMTEC AI Photo 001.jpg 001.jpg 003.jpg 003.jpg 004.jpg 004.jpg 005.jpg LHP3.4 Movie Playback
Enter into movie interface, only supported image files and folder will be displayed. This player supports AVI, MKV, MOV, MPG files. You can navigate using a filter option (Date, Folder, Recent, Playlist, or All movies) by selecting the photo icon and using UP and DOWN button to scroll through the options listed.

text_image
EMTEC Movies All Movies3.4.1 Movie Playback Control
| Button | Function |
| PLAY/PAUSE | Begin/Pause playback. |
| PREV / NEXT | View the previous or next file/chapter. |
| FR/FF | Fast rewind or fast forward. Press repeatedly to select the speed |
| OPTION | Hide or display the Movie toolbar during playback. |
| STOP | Stop playback. |
| VOL+/- | Press to increase/decrease the volume. |
3.4.2 Movie Playback Options

natural_image
Sunset over a colorful sky with a glowing sun in the center, displayed within a video player interface (no text or symbols on the scene itself)During movie playback, press OPTION button. The movie toolbar opens at the bottom of the screen.
The movie toolbar has several command icons to customize the way you play movie. The functions from left to right are zoom in, zoom out, repeat, subtitle, info, audio, dvd.
3.4.3 Quick-Search

text_image
EMTEC All Movie Avril.Lavigne - 10 Mb. 11Mbps. Avril. Lavigne. 13D9L -divx6.0-6ch -auc 13D9L -divx6.0-6ch -auc 9.8Mbps. Avril. Lavigne. 9.8Mbps. Avril. Lavigne . 9.8Mbps. Avril. Lavigne . 02:00:03/00:02:14 U/SIYou can search for a media file by filter current folder to locate the specific media file. Press SEARCH button while browsing movie files in the movie library.
3.5 All Files
The «all files» allows you to browse and play music, photo and movie files stored on an internal HDD, external USB device, and Network.

text_image
EMTEC All NET3.6 Net Service
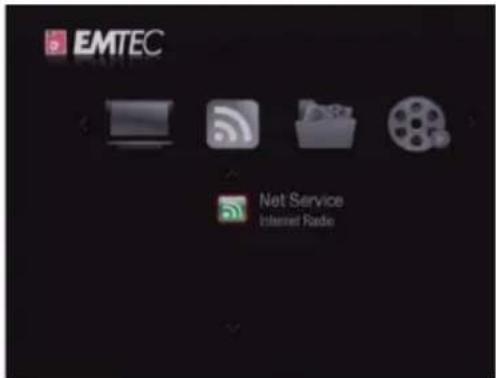
This player integrates the SHOUTcast free Internet radio function. Select the Net Service icon and press UP/DOWN to enter into internet radio.
text_image
EMTEC Net Service Internet RadioNote:
Make sure the player is connected properly to a LAN or WLAN with Internet access, please refer to '3.1.6 Changing Network Settings' for more details;
When you enter the Digital Radio menu at the first time, it will take several seconds to download data from the Internet, please be patient to wait;
For more about SHOUTcast, please refer to the website: www.shoutcast.com
The following buttons can be used under this menu.
| Button | Function |
| UP / DOWN | Move cursor up / down to select station, channel, and genre. |
| PREV / NEXT | Page up / down. |
| ENTER | Confirm and enter the selected menu. |
| OPTION | Add / delete a station to / from Favorite while it is highlighted. |
| PLAY | Begin playback after a channel has been selected. |
| STOP | Stop playback. |
| RETURN | Return to the previous menu. |
Station
All downloaded stations will be listed under this menu.
Genre
You can search for stations by genre (pop, rock, jazz, etc.) under this menu.
Favorite
Your favorite stations can be kept under this menu.
3.7 Help Function
In this menu, you can get helpful information about this product and answers about frequently asked questions (FAQ).

text_image
EMTEC Help FAQ
text_image
EMTEC DVB-T DTV SignalIn this menu, you can watch and record Digital Terrestrial TV programs, or have the time shift function. To enter the DVB-T TV mode, select the DTV icon on the main menu.
3.8.1 Watch DVB-T
The following are some functional buttons on the remote control available when watching Digital TV programs.
Name Function
OK Press to view the program list menu.
up / down Press to switch channels. (Channels cannot be switched in the recording mode.)
numeric buttons Press to input channel numbers. Press the enter button to confirm.
record Press to start recording the current TV program.
time shift Press to activate the time shift function.
subtitle Press to activate the subtitle list menu if available.
green Press to activate the EPG menu if available.
yellow Press to activate the Teletext menu if available.
zoom Press to zoom out the image.
Program List Menu
Press the enter button when watching DVB-T TV programs, and the program list menu where you can see the program number and name will be displayed.
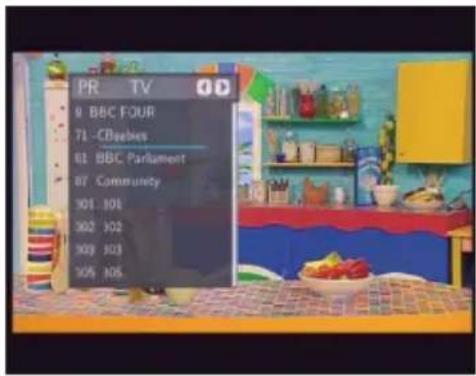
text_image
PR TV 9 BBC FOUR 71 -CDeebes 81 BBC Parliament 87 Community 301 301 302 302 303 303 305 305Press the up / down button to select channels, and press the enter button to confirm.
Info Bar
While switching channels by the up / down button, an info bar will be displayed to show the channel information.

text_image
Info Bar 71 Chlaner B/A ENG 55 TT 400 By Time: Live Loss 26:40 29:20There're 4 strings displayed on the bar. Taking the info bar in the above photo for example:
N/A – Stands for TV rating;
ENG – Stands for the voice language;
SS - Stands for subtitle;
TT - Stands for Teletext;
480 - Stands for resolution (SD - Standard Definition, HD - High Definition).
When the string looks concave, the option will be available.
Electronic Programming Guide
Press the Green button when watching DVB-T TV programs, the Electronic Programming Guide will be displayed.
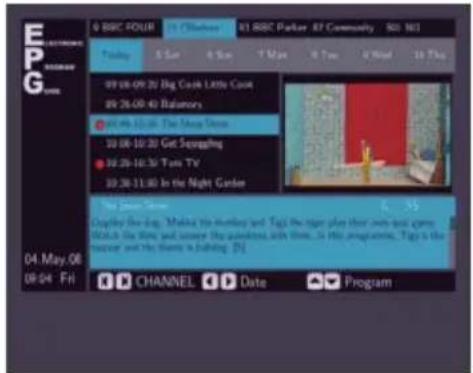
text_image
6 BSC FOUR 31 Christmas 81 BSC Parlor. RF Community 90 N1 Today 5 Sun 6 Sun 7 Map 8 Tue 9 Wed 10 Thu 89:08-09:20 Big Cook Little Cook 89:26-09:40 Balanor 10:06-10:20 The Smart Home 10:08-10:20 Get Scraping 10:25-10:30 Tots TV 10:30-11:00 In the Night Garden 1st search time 6:55 Display the day. Making the Monday and Tag the game play their own and game. Watch the time and answer the questions, time then, in this programme. Tag is the request and his theme is building [1] CHANNEL Date Program 04.May.08 08:04 FriPress the prev / next button to change channels. Press the left / right button to change date.
Press the up / down button to change program. Press the Red button to add / delete scheduled recording
Teletext Menu
If the broadcasted stream supports Teletext, press the TTX button to enter the Teletext menu.

text_image
P100.2 100 TELEVIDEO GI 21 Feb 11:57:57 TELEVIDEO Rai + CREAMIAL, FLOO, A 5400 euro in contanti p. 356 101 ULYD'ORA 799 INDICE A+2 103 PRIMA 201 Calcio 200 SPORT 229 Brevi Calcio 230+250 Calcio Club 200 CONSUMI 208 Altri Sport TV-MAGRINE 209 Sport Tv-Radio LOTTO-LOTTENIE 270 Schedine 299 Brevissime 770 SOTTOTITOLI 720 Ippica 800 OSCI-FLASH www.televideo.rai.it Abbonamenti tv a paging 300Press the navigational and numeric buttons to view the content in the Teletext menu.
Subtitle List Menu
Press the subtitle button when watching DVB-T TV programs, the Subtitle List menu will be displayed.
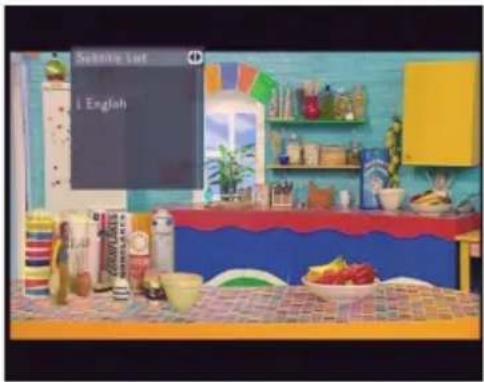
text_image
Simple List i EnglishPress the up / down button to select the subtitle, and press the enter button to confirm.
3.8.1.2 DVB-T Program Recording
Press REC button to start the recording, recording files are automatically stored in a folder named REC by default.

text_image
904 251 0100 start price BMO now at £7.99 quantity left 45 sery favourites and more 12 cd kids bumper pack collection inc + p&p 0904 251 0103 limited quantity available now...ikasu 1gb m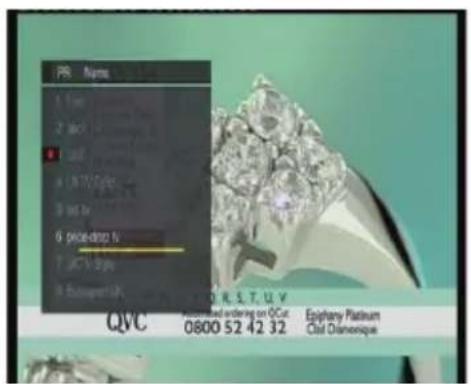
text_image
PR Name 1. 1m 2. 2m 3. 3m 4. 3m (H/T/Cyle) 5. 3m (V) 6. 3m (pole/dopa N) 7. 3M (V-3Pc) 8. 30mm (Pb) QVC 0800 52 42 32 Epiophany Platinum Cld DiamoniqueV850H:
This product allows you to watch other programs while the recording is running. When the recording is running, press the ENTER button. You can access the program list: use the UP/DOWN buttons to select the channel.
3.8.1.3 Time shifting
Time shift function allows you to pause live TV and resume the program from the point you left it. While paused, the program is recorded on the internal HDD as long as the space is available. Press the TIME SHIFT button to activate the Time shift function. Press PLAY button to resume the program. The time shift mode remains active until you press the STOP button.

text_image
0904 251 0100 Old weight you £7.95.83 start price (£0) now at £7.99 quantity left 13:48:32 13:48:32/13:48:57 avourite Max rate: 3Q1M45 nc fun sc 1.99 + p&p 0904 251 0103 limited quantity available now...ikasu 1g3.8.2 AV INPUT Menu
In this menu, you can watch and record audio-visual signal from the A/V IN jack on the rear panel of the unit, or have the time shift function.
Select the A/V Input icon on the main interface to enter this menu.
Name
Function
Record
Press to start recording the current TV program.
Time shift
Press to activate the time shift function.
Zoom
Press to zoom out the image.
3.8.3 Schedule Recording Menu
The Schedule Recording menu allows you to create, edit and delete recording schedules and view all schedule status and history.
Create a New Schedule
Press the left / right button on the remote control to select the Edit tab from the menu bar. Select Add a New Schedule and press the enter button. The schedule setting screen appears.

text_image
Exit No. Source Start time Length Status 1 Dtv2 11:27 22:25 00:01 Ready 2 Dtv1 11:27 23:22 01:00 Ready 2025/1/27 Thar 22:22
text_image
27Sep2008 Sat 10:50 HDD Free Space: Total remaining KBB HD: 1 km, SP: 2 km, LP: 4 km, EP: 5 km, SUP: 8 km Start time Length Repeat Device Quality/Noise 27 366/9/27 18 56 26 48 60 600 HDD SP 04Use the left / right button on the remote control to move between fields and press the up / down button to adjust each setting.
Source Select the video source or TV channels for the recording.
Start Time Enter the date and time of the recording.
Length Enter the length of the recording
Repeat Select how often you want the schedule to record. Choose from Once, Everyday, Mon-Fri, Mon-Sat or for an individual day of the week.
Quality Select the recording quality. Choose from HQ, SLP, EP, LP and SP.
The higher the quality, the more space required on the hard drive. See HDD Free Space on the left of the screen for details of how long you can record for using each setting.
Preview This small preview window will show the current program of the selected channel.
Editing Schedule
- Press the left / right button on the remote control to select the Edit tab from the menu bar.

text_image
Edit No. Source Start time Length Status Add a new schedule 1 Dth2 11/27 22:25 00:01 Ready 2 Dth1 11/27 23:22 01:00 Ready 2025/11/27 Thur 22:22Select the schedule you want to edit from the list and press the enter button. The schedule setting screen appears. Modify the schedule as described in '3.8.3 Creating a New Schedule'.
Delete Schedule
- Press the left / right button on the remote control to select the Delete tab from the menu bar. Select the schedule you want to delete and press the enter button. A confirmation message appears.
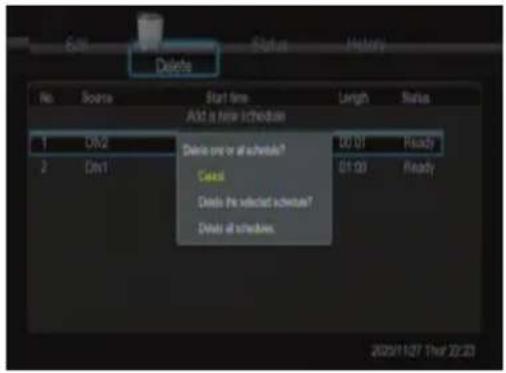
text_image
Delete No. Source Start time Length Status Add a new schedule 1 DN2 Delete one or all schedules? 00:01 Ready 2 Div1 Cancel Delete the selected schedule? 01:03 Ready Delete all schedules. 2025/11/27 That 22:23- Select CANCEL, Delete the selected schedule, or Delete all schedules. Press the enter button to confirm.
Viewing Schedule Status
- Press the left / right button on the remote control to select the Status tab from the menu bar. The schedule list is displayed. Select a schedule and press the enter button.
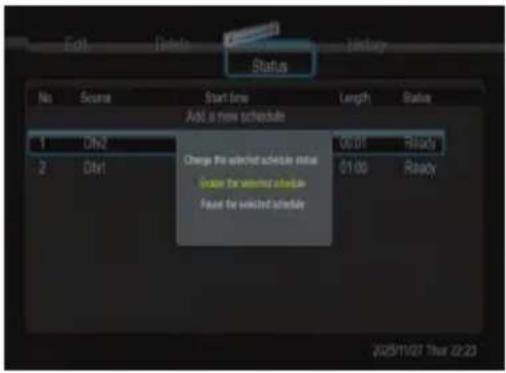
text_image
Status No Score Start time Length Status Add a new schedule 1 Div2 00:07 Ready Charge the selected schedule minus Share the selected schedule 01:00 Ready 2 Div1 Share the selected schedule Share the selected schedule 2025/1/02 Thar 02:23- Select Enable the selected schedule or Pause the selected schedule. Press the enter button to confirm.
Viewing Recording History
- Press the left / right button on the remote control to select the History tab from the menu bar. Here you can view a complete history of all recordings that were set.

text_image
Result OK Source Start time 09/27 17:00 Length 01.00 Device HOLD4.1 Web Server (unicgi)
A Web server called 'Neighbor Web' has been integrated into the player.
Connect the player to your home network (LAN or WLAN).
Get the IP address of the player under SETUP -> NETWORK menu.
Type the IP address (e.g., 192.168.3.15) in the address bar of Internet Explore on your PC.
Then you can access the Web server on your PC.
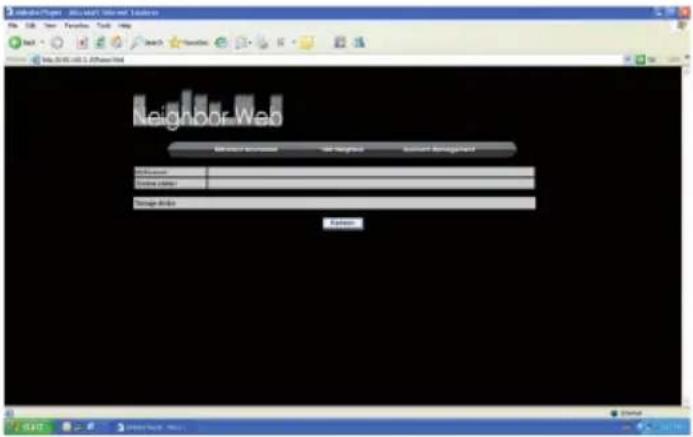
text_image
NeighborWeb Welcome to Web Get Inside Standard Management Access Home content Image icon EnterNote: Please select ON in BT and Samba interface to turn on the BT function.
4.2 Account Management
Click Account Management on the home page of Neighbor Web.
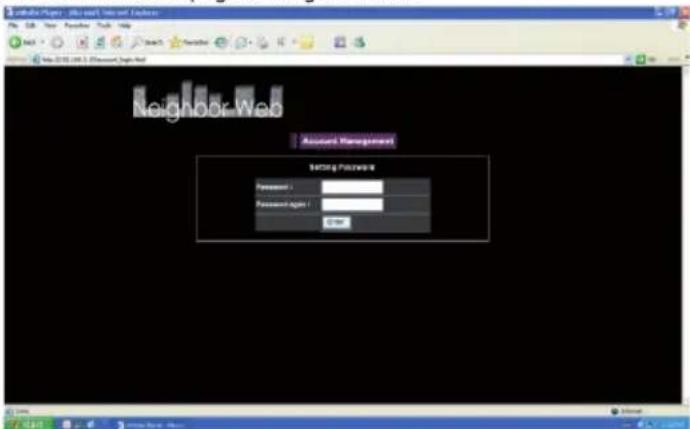
text_image
Neighbor Web Account Management Setting Password: Password : 1 Password again : 1 OKThis page allows you to set a password for accessing Neighbor Web.
Note:
Password will become effective when Login Control is turned on. (Please refer to Login Control in chapter '3.1.6 Changing Network Settings' for more details)
The default user name is 'admin', and the default password is '123'.
When login control is turned off, and then turned on again, the password will be restored to default.
When login control is turned off, this menu is not able to be accessed.
4.3 Visit Neighbor (samba)
Click Visit Neighbor on the home page of Neighbor Web.
Then you will be able to browse, edit, and copy files to / from the local HDD of the player.
4.4 BitTorrent Download (btpd)
BitTorrent is a peer-to-peer file sharing protocol used for distributing large amounts of data on the Internet. A BitTorrent utility (btpd - BitTorrent Protocol Daemon) has been integrated into the player.
The BitTorrent client btpd is running in daemon (a process running in the background) mode and you can manipulate the process via the Web server.
Click BitTorrent Download on the home page of Neighbor Web, then you will enter the BitTorrent Download page.

text_image
Media Player - Microsoft Internet Explorer File Edit View Insert Tools Help Search Help View Browse Add New Web Name File Edit View Insert Tools Help Share Web Share Web Share Web Share Web Share Web Share Web Share Web Share Web Share Web Share Web Share Web Share Web Share Web Share Web Share Web Share Web Share Web Share Web Share Web Share Web Share Web Share Web Share Web Share Web Share Web Share Web Share Web Share Web Share Web Share Web Share Web Share Web Share Web Share Web4.4.1 Add new torrent
Click Add new torrent on the BitTorrent Download page.

text_image
Neighbor Web Add new features Step 1. Choose Selection file p38:File local PC. Browse Step 2. Create your new file No click this action and add different installed pages No click existing and add different installed pagesClick Browse to upload a torrent file, and click Yes to confirm.
4.4.2 Managing the downloads
The BitTorrent Download page also allows you to start, stop, delete torrents, and set priorities for torrents, as well as view the status of current torrents.
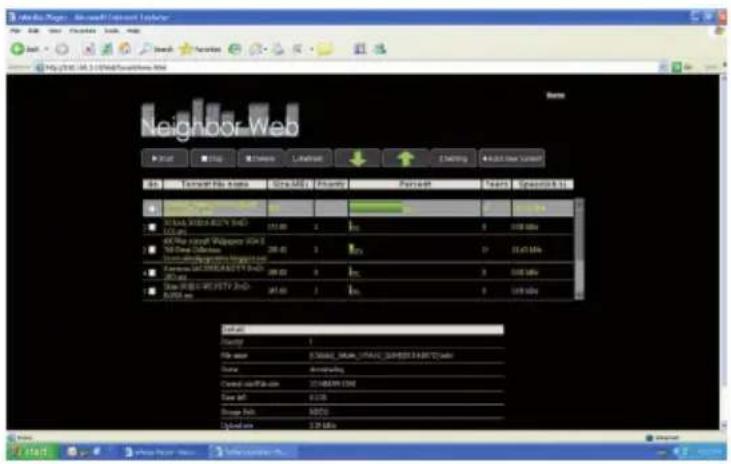
text_image
Neighbor Web File Edit View Insert Help Show Options Send Favorites View Web: Web 1.0 (Add) Options to Name Go Tarrant File Name Sina(M) Points Pavnet Text SpreadTo: OK/ADD/ADD/ADD/ADD/ADD 151.00 2 3 4 5 6 7 8 9 10 11 12 13 14 15 16 17 18 19 20 21 22 23 24 25 26 27 28 29 30 31 32 33 34 35 36 37 38 39 40 41 42 43 44 45 46 47 48 49 50 51 52 53 54 55 56 57 58 59 60 61 62 63 64 65 66 67 68 69 70 71 72 73 74 75 76 77 78 79 80 81 82 83 84 85 86 87 88 89 90 91 92 93 94 95 96 97 98 99 100Click Start to begin download.
Click Stop to stop download.
Click Delete to delete the selected torrent.
Click Refresh to refresh the current status.
Click Down arrow to decrease the priority for the selected torrent.
Click Up arrow to increase the priority for the selected torrent.
4.4.3 Settings
Click Setting on the BitTorrent Download page to enter the BitTorrent Setting page.
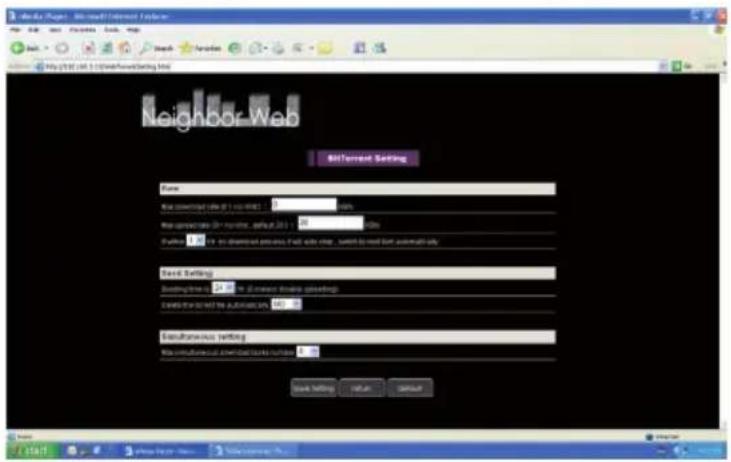
text_image
Media Page - Web-Web Internet Explorer File Edit View Favorites Help Help New Help Name: 123456788 BitTorrent Setting Name Web transcript name (if any text) : 123456788 Name: http://www.123456788.net/123456788 Password: 123456788 Email: www.123456788.net/123456788 Email: www.123456788.net/123456788 Email: www.123456788.net/123456788 Email: www.123456788.net/123456788 Email: www.123456788.net/ Email: www.123456788.net/123456788 Email: www.123456788.net/123456788 Email: www.123456788.net/123456788 Email: www.123456788.net/123456788In the BitTorrent Setting page, you can configure the following settings.
Set the maximum download rate.
Set the maximum upload rate.
Set the idle hours to start the next download automatically.
Set the seeding hours.
Set to delete the finished torrent files automatically or not.
Set the maximum number of simultaneous download tasks.
Thanks to a powerful search engine, the library menu allows you to search and browse multimedia files stored on an internal HDD or external USB HOST device in most easy ways.
Media Library Categories
| Media Type | Icon | Category | Description |
| Music | All Music | Select to list all the music files in the library | |
| Artist | Select to search for music files by artist | ||
| Genre | Select to search for music files by genre | ||
| Album | Select to search for music files by album | ||
| Date | Select to search for music files by creation or modified date | ||
| Folder | Select to search for music files in file folder | ||
| Recent | Select to search for music files that have been played recently | ||
| Playlist | Select to search for music files by playlist | ||
| Photo | All Photo | Select to list all the photo files in the library | |
| Date | Select to search for photo files by creation or modified date | ||
| Folder | Select to search for photo files in file folder | ||
| Recent | Select to search for photo files that have been played recently | ||
| Playlist | Select to search for photo files by playlist | ||
| Movie | All Movies | Select to list all the movie files in the library | |
| Date | Select to search for movie files by creation or modified date | ||
| Folder | Select to search for movie files in file folder | ||
| Recent | Select to search for movie files that have been played recently | ||
| Playlist | Select to search for movie files by playlist |
6. Upgrading the Firmware
The firmware is the operating system (OS) installed on the device. Firmware upgrades can bring new features, improvements and bug fixes.
Please refer to System Update in chapter '3.1.7 Changing System Settings' for more details.
7.1 Specifications
I/O INTERFACES SUPPORTED:
3.5" SATA HDD USB 2.0 HOST port x 2 (compatible to USB Device port Support SD/SDHC/MMC/MS Card Composite (CVBS) A/V jack AV IN jack Component Y/Pb/Pr jack HDMI V1.3 interface S/PDIF optical jack ANT. / RF IN and OUT socket (V800H) DC-IN 12V
FILE SYSTEM SUPPORTED:
FAT32/NTFS
CONTENT FORMATS SUPPORTED:
AVI/MKV/TS/MPG/MP4/MOV/VOB/ISO/IFO/DAT/WMV/RM/RMVB, resolution up to 720p/1080i/1080p MP3/OGG/WMA/WAV/FLAC HD JPEG/BMP
VIDEO CODECS SUPPORTED:
MPEG-1 HD MPEG-2 HD MPEG-4 SP/ASP/AVC(H.264) WMV9(VC-1) RealNetworks (RM/RMVB) 8/9/10, up to 720p
AUDIO CODECS SUPPORTED:
MP2/3, OGG Vorbis, WMA Standard (DRM, and Advanced Profile not supported), PCM, LPCM, AAC, RA
VIDEO RECORDING FORMAT
DTV Recording: TS AV IN Recording: MPG(MPEG2,MP2)
SUBTITLE FORMATS SUPPORTED:
SRT, SMI, SSA, SUB, IDX+SUB
NETWORK FEATURES
10/100Mbps Auto-Negotiation Ethernet 802.11b/g/n WLAN, up to 300Mbps (supported by optional WLAN USB Adapter)
Note: The specifications and design of this product are subject to change without notice.
7.2 Frequently Asked Questions
Question 1. When I try to disconnect the USB device, I keep on getting «The device 'Generic volume' cannot be stopped right now. Try stopping the device again later.» message, what should I do?
Answer: Close any program that might be accessing data on the player, including Windows/E Explorer. If it does not work, close all programs and wait for another 20 seconds, then try the green arrow icon again. If it still does not work, you should shut down the player and disconnect the USB cable.
Question 2. I find new file names and folder names that I never created before or they have strange gibberish names.
Answer: Most likely, the player's file allocation table (FAT) has been corrupted. This might be due to the player shutting down (due to low battery power) while reading or writing to your computer by the USB connection. Windows and Macintosh often write extra files to the hard disk such as finder.def or System volume info. These are normal and will not do any harm to the player.
Question 3. I used my player to transfer files back and forth between different computers. Will defragmenting the player hard disk do any harm to it?
Answer: Defragmenting the player hard disk may be useful after having transferred many files to and from the player. It is never harmful to use the defragment on the player. Make sure no other programs are running while using the WindowsÆ defragment utility. Make sure you have connected the player with the external power adapter during this procedure.
Question 4. My files have disappeared from the player.
Answer: Make sure that you browse your files via the correct browser mode which means correct filtered views such as Photos, Music, or Movies.
Question 5. During power on, why does the TV will have a short flashing, blue screen or screensaver?
Answer: This is normal, when the system initializes, it will setup the corresponding parameters so it can output the correct video signal to the TV, during the initializing time, the TV will receive incorrect signals or the signals will not be stable and will cause the TV screen to flash, some TV's will treat this as no signal, and will display a blue screen or screensaver.
Question 6. Why when I switch to Y/Pb/Pr 480p, 576p, 720p, 1080i, and 1080p, does the TV screen display an unwatchable picture?
Answer: Please check if your TV supports Y/Pb/Pr 480p, 576p, 720p, 1080i, and 1080p output, if your TV does not support, please use the A/V signal display instead, press the TV SYSYEM button on the remote control, then switch the TV's video input to NTSC or PAL.
Question 7. Why is there no sound on movie or music playback when using Y/Pb/Pr component output?
Answer: Y/Pb/Pr output is a video output only, and does not include sound signals. When using Y/Pb/Pr output, please plug the A/V OUT or the S/PDIF jack to output sound.
Question 8. I cannot get SSID name, the screen always displays: 'Can't get any SSID!!'
Answer: When the WLAN USB Adapter is connected to the player, it needs some time to get initialized. Please wait for about 1\~2 minutes and try refreshing the SSID list again.
Question 9. I cannot see files shared on my computer via Browser->Network menu.
Answer: Please check following items:
1) Connect the player to network and obtain an IP address first;
2) Please enable NetBIOS of TCP/IP on computer;
3) Please check your PC's firewall settings;
4) Please enable your PC's 'Guest' account;
5) Please share the folders which you wish to browse on your PC, and make sure that 'Everyone' or 'Guest' has the right to access.
Question 10. I configured everything correctly, but still cannot get the wireless network or UPnP function to work.
Answer: Are you using a firewall such as Norton Internet Security, McAfee Personal Firewall, Zone Alarm, etc. or even the built-in firewall of Windows XP? (Don't forget that Service Pack 2 for Windows XP automatically upgrades your firewall and turn it on by default)
If you have a firewall, it may need to be configured or have exceptions created to allow you to see and communicate with the player on the network. To test if your firewall is preventing network communication (including PING and access shared folders), try disabling it to see if you can connect. If you can connect with the firewall disabled, you may need to add the player to the 'Trusted' list or configure the firewall for local intranet access. Worst-case, disable your firewall long enough to use the player, then enable it again when done.
Question 11. I am using the 802.11n Wi-Fi dongle with an 802.11n wireless router, why the speed is still 802.11g 54Mbps rather than 300Mbps?
Answer: The IEEE 802.11n Draft standard prohibits using high throughput with WEP or TKIP as the unicast cipher. If you use these encryption methods (e.g. WEP, WPA-TKIP), your data rate will drop to 54 Mbps. You may contact the Access Point or router manufacturer to download the latest firmware, or try other encryption methods (WPA2-AES or WPA2-TKIP), or choose to configure an unsecured profile, but this option is not recommended.
Question12. Why couldn't the player find the hard disc?
Answer: Make sure the firmware is installed correctly, and no system partitions on the HDD were deleted. If hard disc failure occurs, please backup your data and reinstall the firmware.
Question13. Some functions like recording, time shift etc. do not work. What should I do?
Answer: If you find some functions do not work properly on the player, please change system settings to the default (Refer to 3.1.7 for changing system settings).
8. Copyrights and Trademarks
Copyrights
All rights reserved. No part of this manual may be reproduced, or transmitted in any form or by any means, whether by electronically or mechanically, without the express written permission from the copyright holder.
Copyrighted materials, such as software, music files, or movies, are protected by local law, and may not be illegally copied or used without permission from the copyright owner.
Trademarks
Microsoft and Windows are registered trademarks of Microsoft Corporation.
All other trademarks are property of their respective holders.

Manufactured under license under U.S. Patent #'s:5,451,942; 5,956,674; 5,974,380; 5,978,762; 6,487,535 & other U.S. and worldwide patents issued & pending. DTS and DTS 2.0 + Digital Out are registered trademarks and the DTS logos and Symbol are trademarks of DTS, Inc. © 1996-2008 DTS, Inc. All Rights Reserved.

Manufactured under license from Dolby Laboratories.
Dolby and the double-D symbol are registered trademarks of Dolby Laboratories.
9. Warranty
What your warranty does not cover:
Acts of nature, such as fire, static discharge.
Damage from unauthorized repair, alteration or accident.
Damage from misuse or neglect.
A unit that has been modified or incorporated into other products or is used for institutional or other commercial purposes. Loss of customer's software, firmware, information, or memory data.
Improper handling or installation.
10. License information
This product contains Free Software which is licensed under the GNU General Public License, Version 2 (GPL). You will find hereinafter a copy of the GPL license text.
We offer, valid for at least 3 years, to send you the source code of the GPL software. Please contact us at Dexxon Data Media gplsourcecodes@dexxon.eu. We will charge a fee for the physical act of transferring a copy.
GNU GENERAL PUBLIC LICENSE TERMS AND CONDITIONS FOR COPYING, DISTRIBUTION AND MODIFICATION
- This License applies to any program or other work which contains a notice placed by the copyright holder saying it may be distributed under the terms of this General Public License. The «Program», below, refers to any such program or work, and a «work based on the Program» means either the Program or any derivative work under copyright law: that is to say, a work containing the Program or a portion of it, either verbatim or with modifications and/or translated into another language. (Hereinafter, translation is included without limitation in the term «modification».) Each licensee is addressed as «you».
Activities other than copying, distribution and modification are not covered by this License; they are outside its scope. The act of running the Program is not restricted, and the output from the Program is covered only if its contents constitute a work based on the Program (independent of having been made by running the Program). Whether that is true depends on what the Program does.
-
You may copy and distribute verbatim copies of the Program's source code as you receive it, in any medium, provided that you conspicuously and appropriately publish on each copy an appropriate copyright notice and disclaimer of warranty; keep intact all the notices that refer to this License and to the absence of any warranty; and give any other recipients of the Program a copy of this License along with the Program. You may charge a fee for the physical act of transferring a copy, and you may at your option offer warranty protection in exchange for a fee.
-
You may modify your copy or copies of the Program or any portion of it, thus forming a work based on the Program, and copy and distribute such modifications or work under the terms of Section 1 above, provided that you also meet all of these conditions:
a) You must cause the modified files to carry prominent notices stating that you changed the files and the date of any change.
b) You must cause any work that you distribute or publish, that in whole or in part contains or is derived from the Program or any part thereof, to be licensed as a whole at no charge to all third parties under the terms of this License.
c) If the modified program normally reads commands interactively when run, you must cause it, when started running for such interactive use in the most ordinary way, to print or display an announcement including an appropriate copyright notice and a notice that there is no warranty (or else, saying that you provide a warranty) and that users may redistribute the program under these conditions, and telling the user how to view a copy of this License. (Exception: if the Program itself is interactive but does
not normally print such an announcement, your work based on the Program is not required to print an announcement.)
These requirements apply to the modified work as a whole. If identifiable sections of that work are not derived from the Program, and can be reasonably considered independent and separate works in themselves, then this License, and its terms, do not apply to those sections when you distribute them as separate works. But when you distribute the same sections as part of a whole which is a work based on the Program, the distribution of the whole must be on the terms of this License, whose permissions for other licensees extend to the entire whole, and thus to each and every part regardless of who wrote it.
Thus, it is not the intent of this section to claim rights or contest your rights to work written entirely by you; rather, the intent is to exercise the right to control the distribution of derivative or collective works based on the Program. In addition, mere aggregation of another work not based on the Program with the Program (or with a work based on the Program) on a volume of a storage or distribution medium does not bring the other work under the scope of this License.
- You may copy and distribute the Program (or a work based on it, under Section 2) in object code or executable form under the terms of Sections 1 and 2 above provided that you also do one of the following:
a) Accompany it with the complete corresponding machine-readable source code, which must be distributed under the terms of Sections 1 and 2 above on a medium customarily used for software interchange; or,
b) Accompany it with a written offer, valid for at least three years, to give any third party, for a charge no more than your cost of physically performing source distribution, a complete machine-readable copy of the corresponding source code, to be distributed under the terms of Sections 1 and 2 above on a medium customarily used for software interchange; or,
c) Accompany it with the information you received as to the offer to distribute corresponding source code. (This alternative is allowed only for noncommercial distribution and only if you received the program in object code or executable form with such an offer, in accord with Subsection b above.)
The source code for a work means the preferred form of the work for making modifications to it. For an executable work, complete source code means all the source code for all modules it contains, plus any associated interface definition files, plus the scripts used to control compilation and installation of the executable. However, as a special exception, the source code distributed need not include anything that is normally distributed (in either source or binary form) with the major components (compiler, kernel, and so on) of the operating system on which the executable runs, unless that component itself accompanies the executable.
If distribution of executable or object code is made by offering access to copy from a designated place, then offering equivalent access to copy the source code from the same place counts as distribution of the source code, even though third parties are not compelled to copy the source along with the object code.
-
You may not copy, modify, sublicense, or distribute the Program except as expressly provided under this License. Any attempt otherwise to copy, modify, sublicense or distribute the Program is void, and will automatically terminate your rights under this License. However, parties who have received copies, or rights, from you under this License will not have their licenses terminated so long as such parties remain in full compliance.
-
You are not required to accept this License, since you have not signed it. However, nothing else grants you permission to modify or distribute the Program or its derivative works. These actions are prohibited by law if you do not accept this License. Therefore, by modifying or distributing the Program (or any work based on the Program), you indicate your acceptance of this License to do so, and all its terms and conditions for copying, distributing or modifying the Program or works based on it.
-
Each time you redistribute the Program (or any work based on the Program), the recipient automatically receives a license from the original licensor to copy, distribute or modify the Program subject to these terms and conditions. You may not impose any further restrictions on the recipients' exercise of the rights granted herein. You are not responsible for enforcing compliance by third parties to this License.
-
If, as a consequence of a court judgment or allegation of patent infringement or for any other reason (not limited to patent issues), conditions are imposed on you (whether by court order, agreement or otherwise) that contradict the conditions of this License, they do not excuse you from the conditions of this License. If you cannot distribute so as to satisfy simultaneously your obligations under this License and any other pertinent obligations, then as a consequence you may not distribute the Program at all. For example, if a patent license would not permit royalty-free redistribution of the Program by all those who receive copies directly or indirectly through you, then the only way you could satisfy both it and this License would be to refrain entirely from distribution of the Program.
If any portion of this section is held invalid or unenforceable under any particular circumstance, the balance of the section is intended to apply and the section as a whole is intended to apply in other circumstances.
It is not the purpose of this section to induce you to infringe any patents or other property right claims or to contest validity of any such claims; this section has the sole purpose of protecting the integrity of the free software distribution system, which is implemented by public license practices. Many people have made generous contributions to the wide range of software distributed through that system in reliance on consistent application of that system; it is up to the author/donor to decide if he or she is willing to distribute software through any other system and a licensee cannot impose that choice. This section is intended to make thoroughly clear what is believed to be a consequence of the rest of this License.