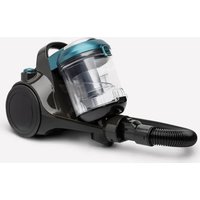
UPX26 - Aspiradora H.KOENIG - Manual de uso y guía de instrucciones gratis
Encuentra gratis el manual del aparato UPX26 H.KOENIG en formato PDF.

Elija su idioma y proporcione su correo: le enviaremos una version traducida especificamente para usted.
| Tipo de producto | Aspirador escoba 2 en 1 plegable |
| Marca | H.Koenig |
| Modelo | UPX26 |
| Dimensiones del embalaje | 690 x 270 x 145 mm |
| Peso | 1,8 kg |
| Alimentación | Batería Li-ion 25,9 V / 2200 mAh |
| Cargador | Entrada 31 V / 500 mA |
| Tiempo de carga | 4,5 horas |
| Autonomía | 40 min (baja velocidad), 20 min (media), 10 min (alta) |
| Potencia del motor | 220 W |
| Caudal de aire | 20 dm³/s |
| Tipo de aspiración | Solo seco |
| Capacidad del depósito de polvo | Aproximadamente 0,5 L (estimación) |
| Filtración | Filtro HEPA lavable |
| Accesorios incluidos | Cepillo eléctrico, cepillo redondo, boquilla 2 en 1, boquilla larga, base de carga |
| Funciones principales | Aspirador escoba y de mano, plegable, 3 velocidades, indicador LED |
| Seguridad | Parada automática en caso de sobrecarga, protección de batería |
| Mantenimiento | Limpiar el filtro HEPA regularmente, vaciar el depósito después de cada uso |
| Garantía | 2 años |
| Servicio postventa | sav.hkoenig.com |
Preguntas frecuentes - UPX26 H.KOENIG
¿Cómo cargar la batería del aspirador H.Koenig UPX26?
Coloque el aspirador sobre la base de carga y enchufe el cargador. El indicador LED parpadea durante la carga y se apaga cuando la batería está llena. El tiempo de carga es de aproximadamente 4,5 horas.
¿Cuál es la autonomía del aspirador UPX26?
La autonomía varía según la velocidad: 40 minutos a baja velocidad, 20 minutos a velocidad media y 10 minutos a alta velocidad.
¿Cómo vaciar el depósito de polvo?
Presione el botón de desbloqueo del depósito, retírelo y luego vacíe el contenido. También puede retirar el filtro HEPA para limpiarlo por separado.
¿Cómo limpiar el filtro HEPA?
Retire el filtro HEPA del depósito, lávelo con agua limpia y déjelo secar completamente antes de volver a colocarlo. No use detergente.
El aspirador ya no funciona, ¿qué hacer?
Verifique que la batería esté cargada, que el depósito de polvo esté correctamente encajado y que el filtro no esté obstruido. Consulte la guía de solución de problemas en el manual.
¿Se puede usar el aspirador UPX26 para aspirar líquidos?
No, este aspirador está diseñado solo para aspiración en seco. Nunca aspire líquidos ni sustancias húmedas.
¿Cómo pasar del aspirador escoba al aspirador de mano?
Desprenda el tubo metálico y el cepillo, luego fije directamente un accesorio (boquilla o cepillo) en el cuerpo del aspirador. El modo de mano es ideal para superficies pequeñas.
¿Qué significa el parpadeo del indicador del cepillo?
Si el indicador del cepillo parpadea, indica que el cepillo eléctrico está bloqueado. Apague el aspirador, retire el cepillo y límpielo para eliminar cualquier obstrucción.
¿Cómo ajustar la velocidad de aspiración?
Presione el botón de control de velocidad ubicado en el mango. Una primera pulsación activa la velocidad baja, una segunda la velocidad media y una tercera la velocidad alta. El aspirador se apaga presionando el botón de encendido/apagado.
¿Dónde encontrar piezas de repuesto para el UPX26?
Las piezas de repuesto y accesorios están disponibles en el sitio de servicio postventa de H.Koenig: sav.hkoenig.com. Escriba la referencia UPX26 en la barra de búsqueda.
Preguntas de los usuarios sobre UPX26 H.KOENIG
0 pregunta sobre este aparato. Responde a las que conoces o haz la tuya.
Hacer una nueva pregunta sobre este aparato
Aún no hay preguntas. Sé el primero en hacer una.
Descarga las instrucciones para tu Aspiradora en formato PDF gratis! Encuentra tus instrucciones UPX26 - H.KOENIG y toma tu dispositivo electrónico nuevamente en la mano. En esta página están publicados todos los documentos necesarios para el uso de su dispositivo. UPX26 de la marca H.KOENIG.
MANUAL DE USUARIO UPX26 H.KOENIG
H
Instruction Manual
Manuel d'instructions
Bedienungsanleitung
Gebruiksaanwijzing
Manual de instrucciones
Manuale d'uso
Instrukcja obstugi

natural_image
Exterior view of a black and gray vacuum cleaner (no text or symbols visible)
2 in 1 foldable vacuum cleaner
Balai Aspirateur Pliable 2 En 1
2 In 1 Klappbarer Handstaubsauger
2 In 1 Opvouwbare Steel Stofzuiger
Aspiradora De Mango Plegable 2 En 1
2 In 1 Scopa Aspirapolvere Pieghevole

ENGLISH
IMPORTANT SAFETY INSTRUCTIONS
IMPORTANT: READ ALL INSTRUCTIONS BEFORE USE.
RETAIN INSTRUCTIONS FOR FUTURE REFERENCE.
Do not use in rain or leave outdoors whilst raining
WARNING: Basic safety precautions should always be observed when using an electrical appliance, including the following to reduce the risk of tire, electrical shock, or injury.
Personal Safety:
1. Store indoors in a dry place out of the reach of children;
2. Always use responsibly. This appliance can be used by persans with reduced physical, sensory or mental capabilities or lack of experience and knowledge if they have been given supervision or instruction concerning use of the appliance in a safe way and understand the hazards involved;
3. Don't let children play with the appliance; supervise children using or maintaining the appliance;
4. Use only manufacturer's recommended attachments as described in this manual; misuse or use of any accessory or attachment other than those recommended, may present a risk of persona! injury;
5. Take extra care when cleaning stairs;
6. Keep the appliance and accessories away from hot surface;
7. Do not black the appliances openings or hinder air flow, keep openings free of any abjects including dust, lint, clothing, fingers (and all parts of the body);
8. Particularly keep hair away from openings and moving parts;
9. This appliance may be used by children of at least 8 years of age, as long as they are supervised and have been given instructions about using the appliance safely and are fully aware of the dangers involved.
10. Cleaning and maintenance should not be carried out by children unless they are at least 8 years of age and are supervised by an adult.
11. Keep the appliance and its power cord out of reach of children under 8 years of age.
12. When using electrical equipment, safety precautions must always be taken to prevent the risk of fire, electric shock and/or injury in the event of misuse.
13. Make sure that the voltage rating on the typeplate corresponds to your main voltage of your installation. If this is not the case, contact the dealer and do not connect the unit
14. Never leave the unit unattended while in operation.
15. Please keep this document at hand and give it to the future owner in case of transfer of your device
Electrical Safety:
1. Only use batteries and chargers supplied by the manufacturer;
2. Never modify the charger in any way;
3. The charger has been designed for a specific voltage. Always check that the mains voltage is the same as that stated on the rating plate;
4. A charger that is suitable for one type of battery pack may create a risk of fire when used with another battery pack;
5. Before use, check the charger cord for signs of damage or ageing. A damaged or entangled charger cord increases the risk of fire and electric shock
6. Do not abuse the charger cord;
7. Never carry the charger by the cord;
8. Do not pull the cord to disconnect from a socket, grasp the plug and pull to disconnect;
9. Don't wrap the cod around the charger when storing;
10. Keep the charger cord away from hot surfaces and sharp edges;
11. The supply cord cannot be replaced. If the cord is damaged the charger should be discarded and replaced.
12. Do not handle the charger or the appliance with wet hands;
13. Do not store or charge the appliance outdoors
14. The charger must be removed from the socket before removing the battery, cleaning or maintaining the appliance.
Battery safety:
1. This appliance includes Li-ion batteries, do not incinerate batteries or expose to high temperatures, as they may explode;
2. Liquid ejected from the battery may cause irritation or burns;
3. In an emergency situation contact professional help immediately;
4. Leaks from the battery cells can occur under extreme conditions. Do not touch any liquid that leaks from the battery. If the liquid that gets on skin wash immediately with soap and water. If the liquid gets into the eyes, flush them immediately with clean water for a minimum of 10 minutes and seek medical attention. Wear gloves to handle the battery an dispose of immediately in accordance with local regulations;
5. Shorting the battery terminais may cause burns or fire;
6. When the battery pack is not in use, keep it away from paper clips, coins, keys, nails, screws or other small metal abjects that could make a connection from one terminal to another.
7. When you dispose of the appliance remove the battery and dispose of the battery safely in accordance with local regulations.
Service:
1. Before using the appliance and after any impact, check for signs of wear of damage and repair as necessary;
2. Do not use the appliance if any part is damaged or defective;
3. Repairs should be carried out by a service agent or a suitably qualified persan in accordance with relevant safety regulations. Repairs by unqualified persans could be dangerous;
4. Never modify the appliance in any way as this may increase the risk of personal injury;
5. Only use replacement parts or accessories provided or recommended by manufacturer.
Intended use:
1, This appliance has been designed for domestic dry vacuum cleaning only;
2, Do not pick up liquids or use on wet surfaces;
3, Do not pick up anything that is flammable, burning or smoking;
4, Use only as described in this manual;
5, Don't use on concrete, tarmacadam or other rough surfaces.
WARNING:
1. Do not use water, solvents, or polishes to clean the outside of the appliance; wipe clean with a dry cloth;
2. Never immerse the unit in water and do not clean in a dish washer.
INTRODUCTION OF COMPONENTS:

Charging base & charger

Long crevice
PRODUCT INSTALLATION:
I. Use as stick vacuum cleaner
a) Assemble the battery pack with handle assembly, make sure the battery bolt head insert the dust cup slot rightly as below

natural_image
Line drawing of a mechanical device with no visible text or symbols
Put the slot in the right position

natural_image
Technical line drawing of a mechanical component with cross-sectional and top views (no text or symbols)
b) Attached the metal tube to the body as below until hear click sound
c) attached the brush to another head of metal tube as below shown

natural_image
Technical line drawing of a mechanical assembly showing a lever and shaft assembly (no text or symbols)

flowchart
graph LR
    A["PUSH"] --> B["←"]
    B --> C["←"]
    C --> D["←"]
    D --> E["CLICK"]
d) Turn on the switch, vacuum cleaner start to work.

flowchart
graph TD
    A["On-off switch"] --> B["Touch-Speed control"]
    B --> C["Low speed"]
    C --> D["High speed"]
    D --> E["Middle speed"]
    E --> F["Touch button"]
Three levels speed contrai
a) Lower speed :It's lower speed when you press switch button first time ,vacuum cleaner stop work right after turn off the button .
b) Touch the speed contrai button, it will turn to middle, and again to high speed.
c) No matter which speed vacuum cleaner on, it will stop to work when you push on-off button.
II. Use as handy vacuum
Insert the accessory to body as shown bellow.

natural_image
Technical line drawing of a mechanical device before and after assembly, showing internal components and motion arrows (no text or symbols)
II. Battery charging:
1) When the battery power indicator is blinking, lease power off the machine, then put it back to charge base for charging.
2) Plug in & indication will blink, it shows charging. Battery will be self-cutting when battery is full.


3) If battery indication is not blinking, it shows battery is full.
4) Brush indicator normally is light, in case the power brush is blocked, it will blink, to warning customer turn on the vacuum cleaner & clean the brush, or check any other abnormal of brush.
III. How to empty the dust cup
1) ) release dust cup release button
2) remove dust cup with direction shown as below

natural_image
Line drawing of hands operating a mechanical device with a tool, no text or symbols present
Dust cup
release button

natural_image
Illustration of a hand using a handheld device to adjust or install a cylindrical component (no text or symbols visible)
3) take out HEPA filter as shown below

natural_image
Illustration of a hand holding a mechanical component with a rotating arrow indicating rotation (no text or symbols)
5 ) make sure HEPA filter and filter case dry completely.

natural_image
Line drawings of various household appliances including a sun, kitchen sink, toilet, and fan (no text or symbols)
7) Put the filter case back to dust cup

natural_image
Hand holding a cup with chopsticks, no text or symbols visible
4) wash HEPA & filter cone

natural_image
Illustration showing hands holding a container and dipping into a liquid in a bowl (no text or symbols)
6) Assemble the filter to case

8) Assemble the dust cup to handle correctly after a "c lick" sound.

natural_image
Illustration of hands operating a mechanical device with a curved arrow indicating rotation (no text or symbols present)
TROUBLESHOOTING
Not cleaning well 1, Empty the dust bin2,Checked dust bin is correctly assembled3, Check the filter is correctly fitted4, Clean the filter Stop or doesn't work 1,Chargebattery2, Clean the filter Battery not charge 1, Check connections with power cord 2,Check wall socket Power brush doesn't work 1. Make sure dust cup assembled correctly & locked2. Make sure power brush & metal tube connected tightly3. Check the brush blocked or not
TECHNICAL SPECIFICATION
Battery 25.9V/2200mAh Charging period 4 .5hours Input 31V/500mA Weight 1.8kg Using time 40min (low speed), 20min (middle speed), 10min (low speed)f Motor power 220W airflow 20dm3/s Packing dimension 690*270*145mm
WARRANTY
The warranty period for our products is 2 years, unless otherwise stated, starting from the date of initial purchase or the date of delivery.
If you have any problems or questions, you can easily access our help pages, troubleshooting tips, FAQ, and user manuals on our service site: https://sav.hkoenig.com.
By typing the reference name of your device in the search bar, you can access all available online support, designed to best meet your needs.
If you still cannot find an answer to your question or problem, then click on “Did the answer solve your problem?”. This will direct you
to the Customer Support Request Form, which you can fill out to validate your request and get help.
WARRANTY CONDITIONS
The warranty covers all failures occurring under normal use, in accordance with the usage and specifications in the user's manual.
This warranty does not apply to packaging or transportation problems during shipment of the product by the owner. It also does not include normal wear and tear of the product, nor maintenance or replacement of consumable parts.
EXCLUSION OF WARRANTY
- Accessories and wearing parts (\*).
- Normal maintenance of the device.
- All breakdowns resulting from improper use (shocks, failure to comply with power supply recommendations, poor conditions of use, etc.), insufficient maintenance or misuse of the device, as well as the use of unsuitable accessories.
- Damage of external origin: fire, water damage, electrical surge, etc.
- Any equipment that has been disassembled, even partially, by persons other than those authorized to do so (notably the user).
- The products whose serial number would be missing, deteriorated or illegible that would not allow its identification.
- The products subjected to leasing, demonstration, or exhibition.
(\*) Some parts of your device, called wear parts or consumables, deteriorate with time and frequency of use of your device. This wear and tear are normal but can be accentuated by poor conditions of use or maintenance of your device. These parts are therefore not covered by the warranty.
The accessories supplied with the device are also excluded from the warranty. They cannot be exchanged or refunded. However, some accessories can be purchased directly through our website: https://sav.hkoenig.com/.
ENVIRONMENT
CAUTION:

Do not dispose of this product as it has with other household products. There is a separation of this waste product into communities, you will need to inform your local authorities about - the places where you can return this product. In fact, electrical and electronic products contain hazardous substances that have harmful effects on the environment or human health and should be recycled. The symbol here indicates that electrical and electronic equipment should be chosen carefully, a wheeled waste container is marked with a cross.
Adeva SAS/ H.Koenig Europe - 8 rue Marc Seguin - 77290 Mitry Mory - France www.hkoenig.com - sav@hkoenig.com - contact@hkoenig.com - Tél: +33 1 64 67 00 05
FRANÇAIS
CONSIGNES DE SÉCURITÉ IMPORTANTES
IMPORTANT : LIRE TOUTES LES INSTRUCTIONS AVANT UTILISATION.
CONSERVER CE MANUEL D'INSTRUCTIONS EN LIEU SÛR.
Ne pas utiliser sous la pluie et ne pas laisser dehors lorsqu'il pleut
AVERTISSEMENT : lors de l'utilisation d'un appareil électrique, vous devez toujours respecter les consignes de sécurité élémentaires, notamment les suivantes, afin de réduire les risques d'incendie, de choc électrique ou de blessure.
Sécurité personnelle :
1. Rangez l'aspirateur à l'intérieur dans un endroit sec et hors de la portée des enfants.
2. Utilisez toujours l'appareil de manière responsable. Il peut être utilisé par des personnes avec des capacités physiques, sensorielles ou mentales réduites ou manquant d'expérience et de connaissances si elles sont surveillées ou si elles ont reçues des instructions concernant l'emploi de l'aspirateur et si elles comprennent les dangers encourus.
3. Ne laissez pas les enfants jouer avec l'appareil; surveillez ceux qui utilisent ou entretiennent l'appareil.
4. Utilisez uniquement les accessoires recommandés par le fabricant, comme décrit dans ce manuel. Une mauvaise utilisation de l'aspirateur et de ses accessoires ou l'emploi d'accessoires autres que ceux recommandés peuvent provoquer un accident.
5. Prenez des précautions supplémentaires lors du nettoyage des escaliers.
6. Gardez l'appareil et ses accessoires loin de toute surface chaude.
7. Ne bloquez pas les grilles d'aération de l'appareil et n'entravez pas le flux d'air ; ne bouchez pas les ouvertures avec un objet, que ce soit la poussière, les peluches, les vêtements, les doigts (et toutes les parties du corps).
8. Gardez particulièrement les cheveux loin des ouvertures et des pièces mobiles.
9. Cet appareil peut être utilisé par des enfants âgés d'au moins 8 ans, à condition qu'ils bénéficient d'une surveillance ou qu'ils aient reçu des instructions quant à l'utilisation de l'appareil en toute sécurité et qu'ils comprennent bien les dangers encourus.
10. Le nettoyage et l'entretien par l'utilisateur ne doivent pas être effectués par des enfants, à moins qu'ils ne soient âgés de plus de Bans et qu'ils soient sous la surveillance d'un adulte.
11. Conserver l'appareil et son câble hors de portée des enfants âgés de moins Bans.
12. Lors de l'utilisation d'appareils électriques, des précautions de sécurité doivent toujours être prises pour prévenir tout risque d'incendie, de choc électrique et/ou de blessure en cas de mauvaise utilisation.
13. Vérifier que le voltage indiqué sur la plaque signalétique de l'appareil correspond bien à celui de votre installation électrique. Si ce n'est pas le cas, adressez-vous au revendeur et ne branchez pas l'appareil
14. Ne jamais laisser l'appareil sans surveillance lorsqu'il est en fonctionnement.
15. Veuillez conserver ce document à disposition et le remettre au futur propriétaire en cas de cession de votre appareil
Sécurité électrique :
1. Utilisez uniquement la batterie et le chargeur fournis par le fabricant.
2. Ne modifiez jamais le chargeur de quelque manière que ce soit.
3. Le chargeur a été conçu pour une tension spécifique. Vérifiez toujours que la tension du secteur soit identique à celle indiquée sur la plaque signalétique.
4. Un chargeur qui convient pour un type de batterie peut entraîner un risque d'incendie quand il est utilisé avec un autre type de batterie.
5. Avant utilisation, vérifiez si le cordon du chargeur présente des signes de dommage ou de vieillissement. Un cordon de chargeur endommagé ou enchevêtré augmente les risques d'incendie et de choc électrique.
6. Manipulez avec soin le cordon du chargeur.
7. Ne portez jamais le chargeur par le cordon.
8. Ne tirez pas sur le cordon pour le débrancher d'une prise, saisissez la fiche et tirez dessus pour débrancher le cordon.
9. N'enroulez pas le cordon autour du chargeur lors du stockage.
10. Tenez le cordon à l'écart des surfaces chaudes et des rebords coupants.
11. Le cordon d'alimentation ne peut pas être remplacé. Si le cordon est endommagé, le chargeur doit être mis au rebut et remplacé.
12. Ne manipulez pas le chargeur ou l'appareil avec les mains mouillées.
13. Ne rangez pas et ne chargez pas l'appareil à l'extérieur.
14. Le chargeur doit être débranché de la prise avant de retirer la batterie, de nettoyer ou d'entretenir l'appareil.
Sécurité de la batterie :
1. Cet appareil comprend une batterie li-ion, ne pas incinérer la batterie ni l'exposer à des températures élevées, car elle peut exploser.
2. Le liquide s'écoulant de la batterie peut provoquer une irritation ou des brûlures.
3. En cas d ^1 urgence, contactez immédiatement un professionnel.
4. Des fuites des compartiments de la batterie peuvent se produire dans des conditions extrêmes. Ne touchez aucun liquide qui fuit de la batterie. Si le liquide entre en contact avec votre peau, lavez-vous immédiatement à l'eau et au savon. Si le liquide pénètre dans les yeux, rincez-les immédiatement à l'eau claire pendant au moins 10 minutes et consultez un médecin. Portez des gants pour manipuler la batterie et débarrassez-vous en immédiatement conformément à la réglementation locale.
5. Court-circuiter les bornes de la batterie peut causer des brûlures ou un incendie.
6. Quand le bloc-batterie n'est pas utilisé, tenez-le éloigné de tout objet métallique comme les trombones, les pièces de monnaie, les clés, les clous, les vis ou tout autre petit objet métallique qui risque d'établir le contact entre les deux bornes.
7. Lorsque vous vous débarrassez de l'appareil, retirez la batterie et éliminez-la en toute sécurité, conformément à la réglementation locale.
Entretien:
1. Avant d'utiliser l'appareil et après un choc, recherchez les traces d'usure ou de dommages et faite-le réparer si nécessaire.
2. N'utilisez pas l'appareil si une partie est endommagée ou défectueuse.
3. Les réparations doivent être effectuées par un agent agréé ou une personne dûment qualifiée, conformément à la réglementation de sécurité en vigueur. Les réparations effectuées par des personnes non qualifiées peuvent être dangereuses.
4. Ne modifiez jamais l'appareil de quelque manière que ce soit car cela pourrait augmenter le risque de blessure.
5. Utilisez uniquement des pièces de rechange ou des accessoires fournis ou recommandés par le fabricant.
USAGE PREVU :
1. Cet appareil a été conçu pour un usage domestique uniquement.
2. N'aspirez pas de liquides ou n'utilisez pas l'aspirateur sur des surfaces humides.
3. N'aspirezrien qui soit inflammable, qui brûle ou qui dégage de la fumée.
4. Employez l'appareil uniquement comme cela est décrit dans le manuel.
5. N'utilisez pas l'aspirateursur du béton, du macadam ou d'autres surfaces rugueuses.
AVERTISSEMENT:
1. N'utilisez pas d'eau, de solvants ni de produits pour polir quand vous nettoyez l'extérieur de l'appareil. Essuyez-le avec un chiffon sec.
2. Ne plongez pas l'appareil dans l'eau et ne le mettez pas au lave-vaisselle.
DESCRIPTION DE L'APPAREIL.

Base de charge et chargeur

Accessoire pour les anfractuosités
MONTAGE DE I' APPAREIL
1. Utilisation d'un aspirateur balai
a) Assemblez le bloc-batterie à la poignée, assurez-vous que la tête du boulon de la batterie s'insère exactement dans l'encoche du réservoir comme ci-dessous :

natural_image
Line drawing of a mechanical device with no visible text or symbols
Mettez l'encoche dans la bonne position

natural_image
Technical line drawing of a mechanical component with two views (top and side), no text or symbols present.
b) Fixez le tube métallique au boitier comme indiqué ci-dessous jusqu'à ce que vous entendiez un déclic

natural_image
Technical line drawing of a mechanical device with two views: top shows a cylindrical component, bottom shows a stepped shaft assembly (no text or symbols)
c) Fixez la brosse à l'autre extrémité du tube métallique comme indiqué ci-dessous :

natural_image
Technical line drawing of a mechanical device with an arrow indicating transformation (no text or symbols present)

flowchart
graph LR
    A["APPUYER"] --> B["Device shift"]
    B --> C["Table setting"]
    C --> D["CLICK"]
d) Actionnez l'interrupteur, l'aspirateur commence à fonctionner

1. Contrôle de vitesse à trois niveaux
a) Basse vitesse : lorsque vous appuyez sur le bouton pour la première fois, l'aspirateur démarre à la vitesse la plus faible ; il s'arrête de fonctionner immédiatement après avoir éteint le bouton.
b) Touchez à nouveau le bouton de contrôle de la vitesse, la vitesse moyenne s'enclenchera, puis en appuyant à nouveau, ce sera la haute vitesse.
c) Quelle que soit la vitesse de votre aspirateur, il cessera de fonctionner lorsque vous appuyez sur le bouton marche-arrêt.
II. Utilisation de l'aspirateur balai
Insérez les accessoires dans le boîtier comme indiqué ci-dessous :

natural_image
Technical line drawing of a mechanical device before and after assembly, showing internal components and motion arrows (no text or symbols)
III. Chargementde la batterie.
1) Lorsque le témoin de charge de la batterie clignote, veuillez éteindre l'aspirateur, puis le remettre en place pour charger le bloc-batterie.
2) Branchez à nouveau et le témoin clignotera, la charge est affichée. La batterie se coupe d'elle-même lorsqu'elle est pleine.

3) Si le témoin de la batterie ne clignote pas, cela signifie que la batterie est pleine.
4) Le témoin de la brosse est normalement allumé ; dans le cas où il y a un problème, clignotera pour avertir qu 'il faut allumer l'aspirateur et nettoyer la brosse ou pour vérifier toute autre anomalie de la brosse.
M. Comment vider le réservoir à poussière
1) Débloquer le bouton de verrouillage du réservoir
2) Retirer le réservoir comme indiqué ci-dessous

natural_image
Technical line drawing of a mechanical device with hands operating it (no text or symbols present)
Bouton de verrouillage
du réservoir à poussière

natural_image
Line drawing of a hand holding a cylindrical device with an upward arrow indicating motion (no text or symbols)
3) Retirer le filtre HEPA comme indiqué ci-dessous

natural_image
Illustration of a hand holding a glass jar with a magnified inset showing the process (no text or symbols)
5) Assurez-vous que les éléments du filtre soient bien secs.

natural_image
Line drawings of various household appliances including a sun, a cup holder, a washer, and a fan (no text or symbols)
7) Replacer le filtre dans le réservoir à poussière

natural_image
Hand holding a cup with chopsticks, no text or symbols visible
4) Laver les éléments du filtre

natural_image
Illustration showing hands pouring liquid into a container and then into a bowl (no text or symbols)
6 ) Assembler les éléments du filtre.

8) ) Assembler le réservoir à poussière jusqu'à entendre un déclic.

natural_image
Illustration of hands operating a mechanical device with a rotating shaft (no text or symbols)
GUIDE DE DÉPANNAGE
Nettoyage insuffisant 1. Videz le réservoir à poussière.2. Vérifiez que le réservoir à poussière soit correctement assemblé3. Vérifiez que le filtre soit correctement installé4. Nettoyez le filtre S'arrête ou ne fonctionne pas 1. Chargez la batterie2. Nettoyez le filtre La batterie ne se charge pas 1. Vérifiez les branchements du cordon d'alimentation2. Vérifiez la prise murale La brosse ne fonctionne pas 4. Assurez-vous que le réservoir à poussière soit correctement installé et verrouillé5. Assurez-vous que la brosse et le tube métallique soient bien assemblés6. Vérifiez si la brosse est bloquée ou non
CARACTÉRISTIQUES TECHNIQUES
Batterie 25.9V / 2200mAh Durée de charge 4,5 heures Entrée 31V / 500mA Poids 1,8 kg Durées de fonctionnement 40min (basse vitesse), 20min (moyenne vitesse), 10min (haute vitesse) Puissance 220W Flux d'air 20dm3 / s Dimensions de l'emballage 690 * 270 * 145mm
GARANTIE
La durée de garantie de nos produits est de 2 ans, sauf décret en vigueur, à compter de la date d'achat initiale ou la date de livraison.
En cas de problèmes ou d'interrogations, vous pouvez facilement accéder à nos pages d'aides, conseils de dépannage, FAQ et modes d'emplois sur notre site SAV : https://sav.hkoenig.com.
En tapant le nom de référence de votre appareil dans la barre de recherche, vous accédez à tous les supports en ligne disponibles, conçus pour vous répondre au mieux à vos besoins.
Si vous ne trouvez toujours pas de réponse à votre question ou
votre problème, alors cliquez sur « Est-ce que la réponse a résolu votre problème ? ». Vous accéderez alors au formulaire de demande d'assistance SAV, qu'il vous suffira de compléter pour valider votre demande et obtenir de l'aide.
CONDITIONS DE GARANTIE
La garantie couvre l'ensemble des pannes survenant dans le cadre d'une utilisation normale, conforme aux usages et spécifications présentes sur le manuel d'utilisation.
Cette garantie ne s'applique pas aux problèmes d'emballage ou de transport pendant l'expédition du produit par son propriétaire. Elle n'inclut également pas l'usure normale du produit, ni la maintenance ou le remplacement de pièces consommables.
EXCLUSION DE GARANTIE
- Les accessoires et les pièces d'usure (\*).
- L'entretien normal de l'appareil.
- Toutes pannes survenant par suite d'une mauvaise utilisation (chocs, non-respect des préconisations d'alimentation électrique, mauvaises conditions d'utilisation, etc.), d'un entretien insuffisant ou d'un détournement de fonction de l'appareil, ainsi que l'usage d'accessoires non appropriés.
- Les dommages d'origine externe : incendie, dégâts des eaux, surtension électrique, etc.
- Tout matériel qui aura été démonté même partiellement par des personnes autres que celles habilitées (notamment l'utilisateur).
- Les produits dont le numéro de série serait absent, détérioré ou illisible que ne permettrait pas son identification.
- Les produits soumis à la location, à la démonstration ou à l'exposition.
(\*) Certaines pièces de votre appareil dites pièces d'usure ou consommables se détériorent avec le temps et la fréquence d'usage de votre appareil. Cette usure est normale, mais peut
être accentuée par des mauvaises conditions d'utilisation ou entretien de votre appareil. Ces pièces ne sont donc pas couvertes par la garantie.
Les accessoires fournis avec l'appareil sont également exclus du champ de la garantie. Ils ne peuvent donc être ni échangés, ni remboursés. Toutefois, certains accessoires peuvent être directement achetés via notre site : https://sav.hkoenig.com/.
ENVIRONNEMENT
ATTENTION :

Vous ne devez pas vous débarrasser de cet appareil avec vos déchets ménagers. Un système de collecte sélective pour ce type de produit est mis en place par les communes, vous devez vous renseigner auprès de votre mairie afin d'en connaître les emplacements. En effet,
les produits électriques et électroniques peuvent contenir des substances dangereuses qui ont des effets néfastes sur l'environnement ou la santé humaine et doivent être recyclés. Le symbole ci-contre indique que les équipements électriques et électroniques font l'objet d'une collecte sélective, il représente une poubelle sur roues barrée d'une croix.
Adeva SAS / H.Koenig Europe - 8 rue Marc Seguin - 77290 Mitry Mory - France www.hkoenig.com - sav@hkoenig.com - contact@hkoenig.com - Tél: +33 1 64 67 00 05
DEUTSCH
WICHTIGE SICHERHEITSANWEISUNGEN
WICHTIG: LESEN SIE ALLE ANWEISUNGEN VOR DEM GEBRAUCH.
BEWAHREN SIE DIE ANWEISUNGEN ALS KÜNFTIGE REFERENZ AUF.
Benutzen Sie das Gerät nicht im Regen oder lassen Sie es nicht während des Regens drauBen.
WARNUNG: Grundlegende Sicherheitsvorkehrungen müssen während der Nutzung des elektrischen Gerates immer beachtet werden, einschließlich die folgenden, um das Risiko eines Brandes, eines Stromschlages oder einer Verletzung zu verringern.
Persönliche Sicherheit:
1. Lagern Sie das Gerät an einem trockenen Ort auBer Reichweite von Kindern;
2. Immer verantwortungsvoll benutzen. Das Gerät darf von Personen mit eingeschrankten körperlichen, sensorischen oder geistigen Fahigkeiten oder mangels Erfahrung und Wissen bedient werden, wenn sie beaufsichtigt werden oder Anweisungen erhielten, wie das Gerät sicher zu benutzen ist und haben die daraus resultierenden Gefahren verstanden.
3. Erlauben Sie Kindern nicht mit dem Gerät zu spielen; Beaufsichtigen Sie Kinder während der Nutzung oder der Wartung des Gerates;
4. Benutzen Sie ausschließlich das von dem Hersteller empfohlene Zubehör, wie in dieser Anleitung beschrieben ist; Der Missbrauch oder die Nutzung jegliches Zubehörs oder Aufsatzes, auBer deren, die empfohlen wurden,
kann das Risiko einer Körperverletzung darstellen; 5.Seien Sie besonders vorsichtig, wenn Sie Treppen reinigen.
6. Halten Sie das Gerät und das Zubehör von heißen Flachen fern.
7. Blockieren Sie nicht die Öffnungen des Gera.tes oder behindern Sie nicht die Belüftung, halten Sie die Öffnungen frei von jeglichen Gegenstanden einschließlich Staub, Fusseln, Kleidung, Fingern (und allen anderen Körperteilen)
8. Halten Sie besonders Haare von den Öffnungen und beweglichen Teilen fern;
9. Dieses Gerät darf von Kindern ab 8 Jahren benutzt werden, sofern diese beaufsichtigt werden oder eine Einweisung in den sicheren Gebrauch des Gerats erhalten haben und die damit verbundenen Gefahren verstehen.
10. Kinder dürfen das Gerät nur reinigen oder pflegen, wenn sie mindestens 8 Jahre ait sind und von einem Erwachsenen beaufsichtigt werden.
11. Bewahren Sie das Gerät und das zugehörige Netzkabel auBerhalb der Reichweite von Kindern unter 8 Jahren auf.
12. Bei der Verwendung elektrischer Gera.te sind stets Sicherheitsvorkehrungen zu treffen, um bei unsachgemaBer Verwendung die Gefahr von Branden, elektrischen Schlagen und/oder Verletzungen zu vermeiden.
13. Achten Sie darauf, dass die auf dem Typenschild angegebene Nennspannung mit Ihrer Netzspannung übereinstimmt Ihrer Installation. Wenn dies nicht der Fall ist,
wenden Sie sich an den Handler und schließen Sie das Gerät nicht an.
14. Lassen Sie das Gerät wahrend des Betriebs niemals unbeaufsichtigt.
15. Bitte halten Sie dieses Dokument bereit und geben Sie es im Falle einer Übertragung Ihres Gerates an den zukünftigen Besitzer weiter.
Elektrische Sicherheit:
1. Benutzen Sie ausschließlich die von dem Hersteller zu Verfügung gestellten Batterien und Ladegerate;
2. Modifizieren Sie das Ladegerat in keinerlei Weise;
3. Das Ladegerat ist für eine bestimmte Spannung entwickelt worden. Überprüfen Sie immer, ob die Netzspannung mit der auf dem Typenschild angegebenen Spannung übereinstimmt;
4. Ein Ladekabel, das für eine bestimmte Art von Batterien geeignet ist, kann bei der Nutzung mit einer anderen Art von Batterien zu dem Risiko eines Brandes führen;
5. Vor der Nutzung überprüfen Sie das Ladekabel auf Anzeichen von einer Beschadigung oder Alterung. Ein beschadigtes, verwickeltes Kabel erhoht das Risiko eines Brandes oder eines Stromschlages;
6. Missbrauchen Sie das Ladekabel nicht;
7. Bewegen Sie das Ladegerat nie am Kabel;
8. Ziehen Sie niemals am Kabel, um es von der Steckdose zu trennen, halten Sie den Stecker und ziehen Sie diesen aus der Steckdose;
9. Wickeln Sie das Kabel nicht um das Ladegerat während der Lagerung;
10. Halten Sie das Ladekabel von heiBen Flachen und
scharfen Kanten fern
11. Das Stromkabel kann nicht ausgetauscht werden.
Wenn das Kabel beschadigt ist, muss das Ladegerat entsorgt und ersetzt werden.
12. Halten Sie das Ladegerat oder das Gerät nicht mit nassen Handen
13. Lagern Sie das Gerät oder laden Sie dieses nicht drauBen;
14. Das Ladekabel muss aus der Steckdose entfernt werden, bevor die Batterie entnommen oder das Gerät gereinigt und gewartet wird.
Batteriesicherheit:
1. Dieses Gerät beinhaltet Li-ion Batterien, verbrennen Sie die Batterien nicht oder setzen Sie diese keinen hohen Temperaturen aus, da sie explodieren können;
2. Die aus der Batterie ausgetretene Flüssigkeit kann Irritationen oder Brandwunden verursachen;
3. In einer Notsituation kontaktieren Sie unverzüglich professionelle Hilfe;
4. Unter extremen Bedingungen können Leckagen aus den Batteriezellen entstehen. Fassen Sie keine Flüssigkeit an, die aus der Batterie austritt. Wenn die Flüssigkeit auf die Haut gelangt, waschen Sie diese unverzüglich mit Seife und Wasser ab. Wenn die Flüssigkeit in die Augen gelangt, spülen Sie diese mit sauberem Wasser für mindestens 10 Minuten aus und suchen Sie umgehend einen Arzt auf. Tragen Sie Handschuhe, wenn Sie die Batterie handhaben und entsorgen Sie diese unverzüglich gemäß den örtlichen Vorschriften;
5. Der Kurzschluss von Batterieklemmen kann zu
Verbrennungen oder einem Brand führen;
6. Wahrend der Batteriepack nicht benutzt wird, halten Sie diesen von Büroklammern, Münzen, Schlüsseln, Nageln, Schrauben oder anderen kleinen Metallgegenstanden fern, die eine Verbindung von einem Pol zum anderen herstellen können.
7. Wenn Sie das Gerät entsorgen, entnehmen Sie die Batterie und entsorgen Sie diese sicher gemaB lokalen Vorschriften.
SERVICE:
1, Vor der Nutzung des Gerates und nach jedem Einfluss, prüfen Sie das Gerät auf Verschleiß und Beschädigung und reparieren Sie dieses, wenn notig;
2, Benutzen Sie das Gerät nicht, wenn jegliches Teil beschadigt oder defekt ist;
3, Reparaturen müssen von einem Dienstleister oder einer passend qualifizierten Person gemaB den lokalen Sicherheitsvorschriften durchgeführt werden. Reparaturen durch eine unqualifizierte Person können gefährlich sein;
4, Modifizieren Sie das Gerät in keinerlei Weise, da dies das Risiko einer Körperverletzung erhöhen konnte;
5, Benutzen Sie ausschließlich das Zubehör oder die Ersatzteile, die von dem Hersteller empfohlen oder zur Verfügung gestellt worden sind.
VERWENDUNGSZWECK:
1, Dieses Gerät ist ausschließlich für das trockene Staubsaugen im Haushalt geeignet;
2, Saugen Sie keine Flüssigkeiten oder benutzen Sie das Gerät nicht auf feuchten Flachen;
3, Saugen Sie keine entflammbaren, brennenden oder rauchenden Stoffe;
4, Nur auf die in diesem Handbuch beschriebene Weise benutzen;
5, Benutzen Sie das Gerät nicht auf dem Beton, Teermakadam oder anderen groben Flachen.
WARNUNG:
1. Benutzen Sie kein Wasser, keine Lösungs- oder Poliermittel, um die Außenflache des Gerates zu reinigen; wischen Sie diese mit einem trockenen Tuch ab
2. Tauchen Sie das Gerät niemals in Wasser oder reinigen Sie dieses nicht in einer Spülmaschine.
BESCHREIBUNG DER KOMPONENTEN:


PRODUKTINSTALLATION:
1. Nutzung als Stielstaubsauger
a) Montieren Sie den Batteriepack an die Griff-Baugruppe, vergewissern Sie sich, dass der Batterie-Verschlussknopf in den Staubbehalter-Schlitz korrekt, wie unten angezeigt, eingesetzt wurde.

natural_image
Line drawing of a mechanical device with no visible text or symbols
Richten Sie den Schlitz korrekt aus

natural_image
Technical line drawing of a mechanical component with two views (top and side), no text or symbols present.
b) Befestigen Sie das Metallrohr an dem Geratekë>rper, wie unten angezeigt, bis dieses einrastet.

natural_image
Technical line drawing of a mechanical device with two views: top shows cylindrical component, bottom shows angled housing (no text or symbols)
c) Befestigen Sie die Bürste an einem anderen Ende des Metallrohrs, wie unten angezeigt.

natural_image
Technical line drawing of a mechanical assembly with an arrow indicating direction (no text or symbols present)

flowchart
graph LR
    A["DRÜCKEN"] --> B["Step 1: Hand movement with arrow indicating motion"]
    B --> C["Step 2: Click button with arrow indicating motion"]
    C --> D["Step 3: Table setting with arrow indicating movement"]
    D --> E["Step 4: Click button with arrow indicating motion"]

flowchart
graph TD
    A["An-Aus Schalter"] --> B["Touch-Geschwindigkeitsregelung"]
    B --> C["Niedrige Geschwindigkeit"]
    C --> D["Touch-Taste"]
    D --> E["Mittlere Geschwindigkeit"]
    E --> F["Gohe Geschwindigkeit"]
Drei-Stufen-Geschwindigkeitsregelung
a) Niedrige Geschwindigkeit: niedrige Geschwindigkeit wird gewählt, wenn Sie auf den Knopfschalter einmal drücken, der Staubsauger beendet den Betrieb, sobald der Ausschaltknopf gedrückt wird.
b) Sie können auf die mittlere und hohe Geschwindigkeit umschalten, indem Sie die Geschwindigkeits- Kontrolltaste berühren.
c) Unabhangig von der eingestellten Geschwindigkeit wird der Staubsauger ausgehen, sobald der Ausschalt-Knopf gedrückt wird.
Nutzung als Handstaubsauger.
Setzen Sie das Zubehör in den Geratekörper wie unten angezeigt ein.

natural_image
Technical line drawing of a mechanical device before and after assembly, showing internal components and motion arrows (no text or symbols)
Batterieaufladung:
1) Wenn der Ladezustand-Indikator blinkt, schalten Sie das Gerät bitte aus, dann platzieren Sie dieses zurück auf der Lade-Grundlage zum Laden.
2) Nach dem Anschließen wird der Ladevorgang durch das Blinken des Indikators anzeigen. Die Batterie wird das Aufladen abbrechen, sobald diese voll ist.


3) Wenn die Batterieanzeige nicht blinkt, ist die Batterie vollgeladen.
4) Die Bürsten-Anzeige leuchtet normalerweise andauernd. Im Falle einer Blockierung der Power-Bürste wird die Anzeige blinken, um den Nutzer zu warnen, den Staubsauger aufleuchten und die Bürste zu reinigen, oder die Bürste auf andere Fehlfunktionen zu überprüfen.
Den Staubbehalter entleeren
1) Léisen Sie den Staubbehalter- Ausléiser
2) Entnehmen Sie den Staubbehalter in die unten angezeigte Richtung


natural_image
Illustration of hands holding a camera lens with an upward arrow indicating motion (no text or symbols)
3) Entnehmen Sie den HEPA-Filter, wie unten angezeigt

natural_image
Illustration of a hand holding a cylindrical object with a magnified view showing the process (no text or symbols)
5) Vergewissern Sie sich, dass der HEPA-Filter und die Filter-Hülle vol getrocknet sind.

natural_image
Diagram showing sun, plastic components, and a mechanical component with no text or symbols
7) Platzieren Sie die Filter-Hülle zurück in dem Staubbehalter.

natural_image
Hand holding a glass jar with chopsticks, no text or symbols visible
4) Reinigen Sie den HEPA & den Filter-Konus

natural_image
Illustration showing hands pouring liquid into a container and then into a bowl (no text or symbols)
6) Montieren Sie den Filter in die Hülle.

8) Montieren Sie den Staubfilter an dem Griff korrekt, bis dieser einrastet.

natural_image
Illustration of hands operating a mechanical device with a rotating arrow indicating rotational motion (no text or symbols)
FEHLERSUCHE:
Saugt nicht gut 1, Entleeren Sie den Staubbehalter.2, Überprüfen Sie, dass der Staubbehalter korrekt montiert ist. 3, Überprüfen Sie, dass der Filter korrekt eingesetzt ist.4, Reinigen Sie den Filter. Hait an oder funktioniert nicht. 1, Laden Sie die Batterie auf.2, Reinigen Sie den Filter. Die Batterie lad nicht. 1, Überprüfen Sie die Verbindung mit dem Stromkabel.2, Überprüfen Sie die Steckdose. Power-Bürste funktioniert nicht. 7. Stellen Sie sicher, dass der Staubbehalter korrekt montiert und verriegelt ist.8. Stellen Sie sicher, dass die Bürste und das Metallrohr test verbunden sind.9. Prüfen Sie, dass die Bürste nicht blockiert ist.
TECHNISCHE SPEZIFIKATIONEN
Batterie 25.9V/2200mAh Ladezeit 4 .5 Stunden Eingang 31V/500mA Gewicht 1.8kg Nutzungsdauer 40 Min (niedrige Geschwindigkeit), 20 Min (mittlere Geschwindigkeit) , 10 Min (hohe Geschwindigkeit) Motorleistung 220W Luftstrom 20dm3/s VerpackungsmaBe 690*270*145mm
GARANTIE
Die Garantiezeit für unsere Produkte beträgt 2 Jahre, sofern keine anderen Bestimmungen gelten, ab dem Datum des ursprünglichen Kaufs oder ab dem Lieferdatum.
Bei Problemen oder Fragen können Sie sich an unsere Hilfeseiten, Tipps zur Fehlerbehebung, FAQs und Bedienungsanleitungen auf unserer Kundendienst-Website wenden: https://sav.hkoenig.com.
Wenn Sie den Referenznamen Ihres Geräts in die Suchleiste eingeben, erhalten Sie Zugang zu allen verfügbaren Online-Supports.
Wenn Sie immer noch keine Antwort auf Ihre Frage oder Ihr Problem finden, dann klicken Sie auf "Hat die Antwort Ihr Problem gelöst?". Sie können dieses Formular ausfüllen, um Ihre Anfrage zu bestätigen und Hilfe zu erhalten.
GARANTIEBEDINGUNGEN
Die Garantie deckt alle Defekte ab, die bei normalem, bestimmungsgemäßem Gebrauch und den in der Bedienungsanleitung enthaltenen Spezifikationen auftreten. Diese Garantie gilt nicht für Probleme mit der Verpackung oder dem Transport während des Versands des Produkts durch den Eigentümer. Sie umfasst auch nicht den normalen Verschleiß des Produkts, die Wartung oder den Austausch von Verschleißteilen.
AUSSCHLUSS DER GARANTIE
- Zubehör und Verschleißteile (\*).
- Die normale Wartung des Geräts.
- Alle Defekte, die durch unsachgemäßen Gebrauch (Stöße, Nichteinhaltung der empfohlenen Stromzufuhr, schlechte Nutzungsbedingungen usw.), unzureichende Wartung oder Zweckentfremdung des Geräts auftreten, sowie die Verwendung von ungeeignetem Zubehör.
- Schäden durch äußere Einflüsse: Brand, Wasserschäden, elektrische Überspannung usw.
- Alle Geräte, die von anderen als den befugten Personen (insbesondere dem Nutzer) auch nur teilweise auseinandergebaut wurden.
- Produkte, deren Seriennummer fehlt, beschädigt oder unleserlich ist, sodass sie nicht identifiziert werden können.
- Produkte, die vermietet, vorgeführt oder ausgestellt werden.
Zeit und der Häufigkeit der Nutzung Ihres Geräts. Diese Abnutzung ist normal, kann aber durch falsche Nutzung oder Pflege Ihres Geräts noch verstärkt werden. Diese Teile sind daher nicht durch die Garantie abgedeckt.
Das mit dem Gerät gelieferte Zubehör ist ebenfalls von der Garantie ausgeschlossen. Sie können daher weder umgetauscht noch erstattet werden. Einige Zubehörteile können jedoch direkt über unsere Website https://sav.hkoenig.com/ erworben werden.
UMWELT
ACHTUNG :

Werfen Sie nicht dieses Produkt, wie es mit anderen Haushaltsprodukten hat. Es gibt eine Mülltrennungs von diesem Produkt in Gemeinden, Sie müssen ihre lokalen Behörden über - die Orte, wo man dieses Produkt zurückgeben können zu informieren. In der Tat enthalten elektrische und elektronische Produkte gefährliche Staffe, die schadliche Auswirkungen auf die Umwelt oder die menschliche Gesundheit haben und sollte recycelt werden. Das Symbol hier darauf hinweisen, dass elektrische oder elektronische Gera.te sollten sorgfaltig ausgewahlt werden, ist ein fahrbarer Abfallbehalter mit einem Kreuz markiert.
Adeva SAS/ H.Koenig Europe - 8 rue Marc Seguin - 77290 Mitry Mory - France www.hkoenig.com - sav@hkoenig.com - contact@hkoenig.com - Tél: +33 1 64 67 00 05
NEDERLAND
BELANGRIJKE VEILIGHEIDSINSTRUCTIES
BELANGRIJK: LEES ALLE INSTRUCTIES VOOR GEBRUIK.
BEWAAR DE HANDLEIDING VOOR TOEKOMSTIGE REFERENTIE.
Niet gebruiken in de regen of buiten laten liggen in de regen
WAARSCHUWING: De standaard veiligheidsregels moeten altijd worden opgevolgd bij het gebruik van een elektrisch apparaat, inclusief de volgenden om de risico's te verkleinen op brand, elektrische schok, of verwondingen.
Persoonlijke Veiligheid:
1. Binnen bewaren op een droge plek en buiten bereik van kinderen;
2. Altijd verantwoordelijk gebruiken. Dit apparaat kan gebruikt worden door en ouder en door personen met beperkte geestelijke of lichamelijke capaciteiten, of met een gebrek aan ervaring en kennis, zolang ze toezicht krijgen of instructies voor het veilig gebruik van dit apparaat hebben gehad en de bijbehorende gevaren begrijpen;
3. Laat kinderen niet spelen met dit apparaat; houd toezicht op kinderen die het apparaat gebruiken of onderhouden;
4. Gebruik alleen accessoires die door de fabrikant worden aanbevolen, zoals beschreven in deze handleiding; verkeerd gebruik of een andere accessoire dan aanbevolen, kunnen risico's of persoonlijke verwondingen veroorzaken;
5. Wees extra voorzichtig met het zuigen van trappen;
6. Houd het apparaat en accessoires bij hete oppervlakken vandaan;
7. Niet openingen van het apparaat afdekken of luchtstromen beperken, houd openingen vrij van objecten, inclusief stof, pluisjes, kleren en vingers (en andere lichaamsdelen);
8. Houd vooral haar weg bij openingen en bewegende onderdelen;
9. Dit apparaat mag worden gebruikt door kinderen vanaf 8 jaar en ouder indien dit gebeurt onder toezicht, ais zij van tevoren instructies hebben ontvangen betreffende het veilige gebruik van het apparaat en ais zij de mogelijke gevaren kennen.
1O. Reiniging en onderhoud mogen niet worden uitgevoerd door kinderen tenzij ze 8 jaar of ouder zijn en onder toezicht van een volwassene staan.
11. Houd het apparaat en het snoer buiten bereik van kinderen onder de 8 jaar.
12. Bij het gebruik van elektrische apparatuur moeten altijd veiligheidsmaatregelen worden genomen om het risico van brand, elektrische schokken en/of letsel in geval van verkeerd gebruik te voorkomen.
13. Controleer of de spanning op het typeplaatje overeenkomt met de spanning die op het typeplaatje staat van uw installatie. Ais dit niet het geval is, neem dan contact op met de dealer en sluit het apparaat niet aan.
14. Laat het apparaat nooit onbeheerd achter terwijl het in bedrijf is.
15. Bewaar dit document bij de hand en geef het aan de toekomstige eigenaar in geval van overdracht van uw apparaat.
ELEKTRISCHE VEILIGHEID:
1. Gebruik alleen accu's en opladers die worden geleverd door de fabrikant;
2. Nooit aanpassingen maken aan de lader op wat voor manier ook;
3. De oplader is ontworpen voor een specifiek voltage. Altijd controleren dat het voltage overeen komt met hetgeen op het typeplaatje;
4. Een oplader die geschikt is voor een bepaald type accu kan een risico op vuur creëren bij gebruik van een ander type accu.
5. Voor gebruik, controleer de kabel van de oplader op beschadigingen of ouderdom. Een beschadigde of verknoopte kabel verhoogt de risico op vuur en elektrische schokken.
6. Gebruik de kabel van lader op de juiste wijze;
7. Nooit de lader dragen aan de kabel;
8. Nooit aan de kabel trekken om de lader uit het stopcontact te halen, altijd netjes de lader vastpakken;
9. Niet de kabel om de lader wikkelen voor opslag;
10. Houd de kabel van de lader weg van hete oppervlakken en scherpe randen;
11. De kabel kan niet worden vervangen. Ais de kabel is beschadigd moet de lader worden afgevoerd en worden vervangen.
12. Hanteer het apparaat of de oplader niet met natte handen;
13. Niet het apparaat buiten opslaan.
14. De lader moet worden verwijderd uit het stopcontact voor het verwijderen van de accu, schoonmaak of onderhoud van het apparaat.
ACCU VEILIGHEID:
1. Dit apparaat bevat een Li-ion-accu, niet de accu verbranden of blootstellen aan hoge temperaturen, dit kan een explosie veroorzaken;
2. Vloeistoffen die uit de accu komen kunnen leiden tot irritaties en verbrandingen;
3. In een noodgeval altijd meteen contact opnemen met een professional;
4. Lekkage van de accucellen kan voorkomen onder extreme omstandigheden. Raak geen vloeistof aan die uit de accu loopt. Ais de vloeistof in contact komt met de huid meteen wassen met zeep en water. Ais de vloeistof in de ogen komt, meteen spoelen met water voor minimaal 10 minuten en zoek medische hulp. Draag handschoenen om de accu te hanteren en voer het direct af volgens de lokale wetgeving;
5. Het kortsluiten van de accu-polen kan leiden tot vonken of vuur;
6. Ais de accu niet in gebruik is, houd het dan weg bij paperclips, munten, sleutels, spijkers, schroeven of andere kleine metalen objecten die tot een kortsluiting van de accu kan leiden.
7. Bij het afvoeren van het apparaat, verwijder dan de accu en lever deze in volgens de lokale wetgeving.
ONDERHOUD:
1. Voor gebruik van het apparaat en ais het een tik heeft gehad, controleer op tekenen van slijtage of schade en zorg voor reparaties indien nodig;
2. Gebruik het apparaat niet ais er een onderdeel beschadigd of defect is;
3. Reparaties moeten worden uitgevoerd door een onderhoudsmonteur of een gekwalificeerd persoon volgens de relevante veiligheidsregels. Reparaties uitgevoerd door ongekwalificeerde personen kunnen gevaarlijk zijn;
4. Nooit het apparaat aanpassen op welke manier dan ook, dit kan het risico verhogen op persoonlijke verwondingen;
5. Alieen vervangende onderdelen gebruiken van de fabrikant of door de fabrikant worden aanbevolen.
BEOOGD GEBRUIK:
1. Dit apparaat is alleen ontworpen voor huishoudelijk droog stofzuigen;
2. Zuig er geen vloeistoffen mee op en niet gebruiken op natte oppervlakken;
3. Zuig niets op wat brandbaar is, in brand staat of rookt.
4. Alieen gebruiken zoals aangegeven in deze handleiding;
5. Niet gebruiken op beton, asfalt of andere ruwe oppervlakken.
WAARSCHUWING:
1. Gebruik geen water, oplosmiddelen of poetsmiddelen om de buitenkant van het apparaat schoon te maken; maak het schoon met een droge doek;
2. Nooit het apparaat onderdompelen in water en niet schoonmaken in een vaatwasser.
INTRODUCTIE VAN ONDERDELEN:


INSTALLATIE PRODUCT:
1. Gebruik ais een steelstofzuiger
A) Plaats de accu aan het handvat, zorg dat de kop van de accu op de juiste manier de stofbak ingaat zoals hieronder aangegeven

natural_image
Line drawing of a mechanical device with no visible text or symbols
Plaat alles op de juiste plek

natural_image
Technical line drawing of a mechanical component with two views (top and side), no text or symbols present.
b) Sluit de metalen buis in de behuizing zoals hieronder aangegeven en luister naar de klik

natural_image
Technical line drawing of a mechanical device with two views: top shows a cylindrical component, bottom shows a flanged housing (no text or symbols)
c) plaats de borstel of een ander mondstuk of metalen buis zoals hieronder getoond

natural_image
Technical line drawing of a mechanical assembly with an arrow indicating direction (no text or symbols present)

flowchart
graph LR
    A["DUW"] --> B["Step 1: Hand holding device"]
    B --> C["Step 2: Downward shift in airbag"]
    C --> D["Step 3: Table with switch and mouse"]
    D --> E["Step 4: Click button"]
d) Zet de schakelaar om, de stofzuiger begint te werken.

flowchart
graph TD
    A["Aan-uit-schakelaar"] --> B["Snelheidsregelaar"]
    B --> C["Hoge snelheid"]
    B --> D["Lage snelheid"]
    B --> E["Druk knop in"]
    B --> F["Gemiddelde snelheid"]
e) Lage snelheid: hij begint op lage snelheid aïs je hem inschakelt, hij stop meteen aïs je hem uitschakelt.
f) Druk op de snelheidsregelaar, dan wordt de gemiddelde snelheid gekozen, druk nogmaals voor hoge snelheid.
g) Op elke snelheid stopt de stofzuiger zodra de uit-knop wordt ingedrukt.
1. Gebruik ais handige stofzuiger
Plaats de accessoire zoals hieronder aangegeven.

natural_image
Technical line drawing of a mechanical device before and after assembly, showing internal components and motion arrows (no text or symbols)
II. Accu opladen:
1) Ais de indicator van de accu brandt, schakel dan het apparaat uit en plaats deze op de basis om hem op te laden.
2) Steek de stekker in het stopcontact en de indicator zal gaan branden, dan wordt er opgeladen. Het opladen stopt als de accu vol is.

3) Ais de indicator van de accu niet brandt, is de accu vol.
4) Normaal brandt de indicator van de borstel, aïs de borstel geblokkeerd is, knippert deze om de consument te waarschuwen de stofzuiger uit te oplichten, de borstel schoon te maken en te controleren of er mogelijk iets niet klopt.
III. Hoe de stofbak legen
1) ontgrendel de stofbak - vergrendeling

2 ) verwijder de stofbak in de richting zoals hieronder aangegeven

natural_image
Illustration of hands using a camera lens to adjust the lens (no text or symbols present)
3 ) haal het HEPA-filter eruit zoals hieronder getoond wordt

natural_image
Illustration of a hand holding a cylindrical object with a separate view showing the process of a mechanical or electrical component (no text or symbols present)
5) zorg dat het HEPA-filter en de filterbehuizing helemaal droog zijn

natural_image
Line drawings of various household appliances including a sun, a cup holder, a washer, and a fan (no text or symbols)
7) plaats de filterbehuizing weer terug in de stofbak

natural_image
Hand holding a jar with chopsticks, no text or symbols visible
4 ) was het HEPA-filter en de filterbehuizing

natural_image
Illustration of hands holding a container and dipping into a basin (no text or symbols)
6 ) plaats het filter in de behuizing

8) plaats de stofbak weer correct aan de handgreep en er klinkt een 'klik'.

natural_image
Illustration of hands operating a mechanical device with rotation arrows (no text or symbols)
PROBLEEMOPLOSSING:
Zuigt niet goed 1. Leeg de stofbak2. Controleer dat de stofbak goed is geplaatst3. Controleer dat het filter goed is geplaatst4. Maak het filter schoon Stopt of werkt niet 1. Laad de accu op2. Maak het filter schoon Accu laad niet op 1. Controleer de aansluiting van het stopcontact2. Controleer stopcontact De powerborstel werkt niet 1. Zorg dat de stofbak juist geplaatst is en vastzit2. Zorg dat de powerborstel & de metalen buis stevig aangesloten zijn3. Controleer dat de borstel niet geblokkeerd wordt
TECHNISCHE SPECIFICATIES
Accu 25,9V/2200mAh Oplaadtijd 4,5 uur Invoer 31V/500mA Gewicht 1,8kg Gebruiktijd 40Min (lage snelheid), 20 min (gemiddelde snelheid), 10min (hoge snelheid) Motorvermogen 220W Luchtstroming 20dm3/s Afmetingen verpakking 690 x 270 x 145mm
GARANTIE
De garantieperiode op onze producten is 2 jaar, tenzij anders vermeld, beginnend vanaf de datum van de initiële aankoop of bezorgdatum.
Als u problemen of vragen heeft, kunt u eenvoudig onze hulppagina's bezoeken voor tips om problemen op te lossen, de FAQ's en andere gebruikershandleidingen op onze website: https://sav.hkoenig.com.
Door de referentienaam van uw apparaat in de zoekbalk te typen, krijgt u toegang tot alle beschikbare online hulpmiddelen, ontworpen om aan uw behoeften te voldoen.
Als u toch niet geen antwoord op uw vraag kunt vinden, klik dan op "Heeft het antwoord uw probleem opgelost? Hierdoor gaat u naar het Aanvraagformulier voor Klantenondersteuning, dat u in kunt vullen om uw verzoek te valideren en hulp te ontvangen.
GARANTIEVOORWAARDEN
De garantie dekt alle mankementen die voortkomen uit normaal gebruik, volgens de sectie gebruik en specificaties in de gebruikershandleiding.
Deze garantie omvat niet verpakkings- of transportproblemen tijdens het vervoer van het product door de eigenaar. Het omvat ook niet de normale slijtage van het product, noch het onderhoud of vervangen van verbruiksartikelen.
UITSLUITINGEN VAN DE GARANTIE
- Accessoires en verbruiksartikelen (\*).
- Normaal onderhoud van het apparaat.
- Alle mankementen veroorzaakt door verkeerd gebruik (schokken, het niet opvolgen van de aanbevolen stroomvoorziening, in slechte omstandigheden gebruiken, etc.), onvoldoende onderhoud of ondeugdelijk gebruik van het apparaat, alsook het gebruik van ongeschikte accessoires.
- Schade van buitenaf: vuur, waterschade, elektrische stroompiek, etc.
- Apparaten die uit elkaar zijn gehaald, ook gedeeltelijk, door personen die niet er niet gekwalificeerd voor zijn (zoals de gebruiker).
- Producten waarvan het serienummer verdwenen, beschadigd of onleesbaar is, waardoor we het niet kunnen identificeren.
- Producten die verhuurd werden of ter demonstratie of showmodel waren.
(\*) Sommige onderdelen van uw apparaat, genaamd verbruiksartikelen, slijten naar verloop van tijd en bij veel gebruik van uw apparaat. Deze slijtage is normaal, maar kan verergerd worden door slechte omstandigheden of onderhoud van uw apparaat. Deze onderdelen worden daarom niet gedekt door de garantie.
De accessoires meegeleverd met het apparaat zijn ook uitgesloten van de garantie. Ze kunnen niet vervangen of gerestitueerd worden. Echter, sommige accessoires zijn te koop via onze website: https://sav.hkoenig.com/.
MILIEU
ATTENTIE:
Dit apparaat mag niet met uw ander huishoudelijke toestellen worden verwijdert. Dit product moet op een

geselecteerde stortplaats verwijdert worden. U kunt bij de gemeente een
indiceerde plaats aanvragen. Elektrisch en elektronische producten kunnen gevaarlijke stiffen
i\`nhouden di'e schadelIJ'k zIJn voor mensen en het m'llIe'u en moet recycled worden.
Het symbool aan de kant geeft aan dat het een elektrisch en elektronisch toestel is en zijn dus
artikelen van een selectieve collectie. Het beeld geeft een afvalbak met een X teken aan.
Adeva SAS/ H.Koenig Europe - 8 rue Marc Seguin - 77290 Mitry Mory - France www.hkoenig.com - sav@h koenig.com - contact@hkoenig.com - Tél: +33 1 64 67 00 05
ESPAGNOL
MEDIDAS DE SEGURIDAD IMPORTANTES
IMPORTANTE: LEA TODAS LAS INSTRUCCIONES ANTES DE USAR LA ASPIRADORA.
GUARDE ESTE MANUAL DE INSTRUCCIONES PARA CONSULTAS FUTURAS.
No use la aspiradora bajo la lluvia ni la deje a la intemperie mientras llueve.
ADVERTENCIA: Durante la manipulación y el uso de cualquier electrodoméstico siempre se deben acatar las precauciones basicas de seguridad, incluyendo las que se relacionan a continuación, para reducir el riesgo de incendias, descargas eléctricas o lesiones personales.
SEGURIDAD PERSONAL:
- Almacenar en interiores, en un lugar seco y tuera del alcance de los nifios.
- Usar siempre de manera responsable. Esta aspiradora puede ser usada por personas con discapacidad ffsica, sensorial o motora, o con falta de experiencia y conocimiento, siempre que sean supervisados o hayan sido debidamente instruidos en el uso del aparato de forma segura y entienden los peligros involucrados.
- No permita que los nifios jueguen con la aspiradora; mantenga a los nifios bajo vigilancia cuando estén usandola o dandole mantenimiento.
- Use solamente los accesorios recomendados por el fabricante, conforme a las instrucciones en este manual. El uso indebido de los accesorios, o el uso de aditamentos no recomendados por el fabricante, pueden crear un riesgo de lesiones personales.
- Redoble la precaución cuando limpie escaleras.
\- Mantenga el aparato y sus accesorios lejos de superficies calientes.
\- No obstruya las ranuras, ni dificulte el flujo de aire, mantenga las ranuras libres de cualquier objeto, incluyendo polvo, hilas, pelusas, dedos (o cualquier parte del cuerpo).
\- Especialmente, aleje su cabello de las ranuras de ventilacion y de las partes moviles.
\- Este aparato puede ser utilizado por ninas de al menas 8 anas de edad, siempre que cuenten con supervision y hayan recibido instrucciones sobre el uso seguro del electrodoméstico y sean plenamente conscientes de los peligros que implica.
\- La limpieza y mantenimiento de la maquina no debe ser efectuada por ninas a menas que tengan coma mfnimo 8 anas de edad y cuenten con la supervision de un adulto.
\- Mantenga el aparato y su cable eléctrico tuera del alcance de ninas de menas de 8 anas.
\- Al utilizar equipos eléctricos, siempre se deben tomar precauciones de seguridad para evitar el riesgo de incendia, descarga eléctrica y/o lesiones en casa de uso indebido.
\- Asegurese de que la tension nominal de la placa de caracterfisticas corresponde a la tension de red de su instalacion. Si no es asf, pongase en contacta con el distribuidor y no conecte la unidad.
\- Nunca deje la unidad desatendida mientras esté en funcionamiento.
\- Por favor, tenga este documenta a mana y entréguelo al futuro propietario en casa de transferencia de su dispositivo
SEGURIDAD ELÉCTRICA:
- Use solamente baterfas y cargadores distribuidos par el fabricante.
- No modifique el cargador en ninguna circunstancia.
- El cargador se alimenta con una tension específica. Siempre verifique que la tension de su red eléctrica coincida con la indicada en la placa de caracterfisticas.
- Un cargador adecuado para un determinado tipo de baterfa, puede crear un riesgo de incendia si se utiliza para cargar otros tipos de baterfa.
- Antes de usar el cargador, verifique el estado del cable de alimentacion. Un cable de alimentacion deteriorado aumenta el riesgo de incendia y descargas eléctricas.
- No maltrate el cable de alimentacion del cargador.
- Nunca arrastre o levante el cargador par el cable.
- No tire del cable para desconectarlo del tomacorriente, hagalo agarrando firmemente el enchufe.
- No enrosque el cable alrededor del cargador cuando vaya a guardar la aspiradora.
- Mantenga el cable del cargador lejos de superficies calientes y bordes afilados.
- No es posible reemplazar el cable de alimentacion del cargador. Si el cable se rompe, hay que substituir el cargador completo.
- No manipule el cargador ni la aspiradora con las manas mojadas.
- No guarde ni ponga a cargar la aspiradora a la intemperie.
- Debe desconectar el cargador del tomacorriente antes de retirar la bacteria, limpiar la aspiradora o llevar a cabo cualquier accion de mantenimiento.
SEGURIDAD DE LA BATERIA:
- Esta aspiradora se distribuye con baterfas de Li-ion. Nunca incinere las baterias ni las exponga a altas temperaturas, esta puede hacer que exploten.
- El Ifquido expelido del interior de la bacteria puede causar irritaci6n o quemaduras.
- En casa de emergencia, procure ayuda profesional de inmediato.
- En condiciones extremas, pueden ocurrir fugas de las celdas de la baterfa. No toque ningun lfquido que provenga de la baterfa. Si el lfquido hace contacta con su piel, lave la zona afectada de inmediato con agua y jab6n. Si le cae en los ojos, enjuague inmediatamente con agua limpia durante al menas 10 minutas y procure atención médica. Use guantes para manipular la baterfa y luego deséchelos en conformidad con las regulaciones específicas de su localidad.
- Recortar los terminales de la baterfa puede crear un riesgo de incendia o quemaduras.
- Cuando no esté utilizando la baterfa, manténgala alejada de grampas para papel, monedas, llaves, clavas, tornillos y otros objetos metalicos pequenos que pudieran servir de conexi6n entre los terminales de la baterfa y provocar descargas.
- Cuando vaya a desechar la aspiradora, primera retire la baterfa y deséchela de forma segura en conformidad con las regulaciones específicas de su localidad.
MANTENIMIENTO:
- Antes de usar la aspiradora y después de cualquier impacta, compruebe si hay cualquier tipo de dano y reparelo si es necesario.
- No use la aspiradora si cualquiera de sus componentes esta con problemas o defectuoso.
- Las reparaciones deben ser realizadas por un agente de servicio o una persona debidamente calificada de acuerdo con las normas de seguridad pertinentes. Las reparaciones realizadas por personas no calificadas pueden ser peligrosas.
- Nunca modifique la aspiradora de ninguna manera, ya que esta puede aumentar el riesgo de lesiones personales.
- Utilice unicamente piezas de repuesto y accesorios distribuidos o recomendados por el fabricante.
USO PREVISTO:
Este aparato está previsto para usa doméstico, exclusivamente para la aspiraci6n en seco. No aspire Ifquidos con esta aspiradora, ni la utilice sobre superficies humedas.
No aspire nada que sea inflamable, que esté ardiendo o emitiendo huma.
Utilice la aspiradora unicamente coma se describe en este manual.
No use la aspiradora sobre el concreto, asfalto u otras superficies rugosas.
ADVERTENCIA:
No utilice agua, solventes o pulimentos de ningún tipo para limpiar el exterior de la aspiradora, Ifmpiela apenas con un pana seco.
Nunca sumerja la aspiradora en agua y no la friegue en un lavavajillas.
DESCRIPCIÓN DE LA ASPIRADORA


Base del cargador & Cargador

INSTALACIÓN DE LA ASPIRADORA
1. Uso de la aspiradora con el mango
a) Monte la batería con el conjunto de la manija, asegurese de que la cabeza del perno de la batería encaje correctamente en la ranura del dep6sito de polvo como se muestra a continuaci6n.

natural_image
Line drawing of a mechanical device with no visible text or symbols
Ponga la ranura en la posici6n correcta

natural_image
Technical line drawing of a mechanical component with two views (top and side), no text or symbols present.
b) Acople el mango metalico al cuerpo de la unidad hasta que sienta un clic en la trab.

natural_image
Technical line drawing of a mechanical device with two views: front view and side view (no text or symbols)
c) Inserte el cepillo en el otro extremo del mange metalico, tal corne se muestra a continuaci6n.

natural_image
Technical line drawing of a mechanical assembly with an arrow indicating direction (no text or symbols present)

flowchart
graph LR
    A["EMPUJAR"] --> B["Step 1: Manual grip with arrow indicating motion"]
    B --> C["Step 2: Click button on a table with arrow indicating movement"]
    C --> D["Step 3: Click button on a side table with arrow indicating movement"]
d) Presione el interruptor de la unidad para encender la aspiradora.

Control de velocidad de tres niveles.
a) Potencia baja: Cuando presiona el interruptor por primera vez, selecciona la mener potencia de trabajo, la aspiradora deja de funcionar inmediatamente después de apagar el bot6n.
b) Toque el bot6n de control de velocidad por segunda vez para seleccionar la potencia media y nuevamente para potencia alta.
c) No importa a qué velocidad se encuentre trabajando la aspiradora, dejara de funcionar cuando presione el interruptor de encendido/apagado.
II. Uso de la aspiradora con la mano
Inserte el accesorio deseado en la unidad corne se muestra en el siguiente esquema

natural_image
Technical line drawing of a mechanical device before and after assembly, showing internal components and motion arrows (no text or symbols)
III. Recarga de la baterfa
1. Cuando el indicador luminoso de la batería empiece a parpadear, apague la Aspiradora y llévela a la base del cargador para recargar la batería.
2. Enchufelo al tomacorriente. El indicador luminoso parpadeará mostrando que se está cargando. Cuando la batería esté completamente cargada, el indicador automáticamente dejará de parpadear.

3. Si el indicador de la batería no está parpadeando significa que la batería está completamente cargada.
4. El indicador del cepillo normalmente está iluminado, en casa de que el cepillo eléctrico esté bloqueado, parpadeará, para advertir al usuario que encende la aspiradora y limpie el cepillo, o revise cualquier anormalidad.
IV. Vaciar el dep6sito de polvo
1) Presione el interruptor para liberar el dep6sito de polvo.
2) Retire el dep6sito de polvo en la direcci6n que se muestra.


natural_image
Illustration of a hand using a camera lens to adjust the lens (no text or symbols present)
3) Retire el filtro HEPA como se muestra a continuación.

natural_image
Illustration showing a hand holding a small object with a magnified view of the ring being twisted (no text or symbols present)
5) Asegurese de secar bien el filtro HEPA y su embudo antes de volver a montarlos.

natural_image
Line drawings of various household appliances including a sun, a cup, a washer, and a bulb (no text or symbols)
7)Coloque el embudo del filtro

natural_image
Hand holding a glass jar with chopsticks, no text or symbols visible
4) Lavar el filtro HEPA y el embudo del filtro.

natural_image
Illustration showing a hand holding a container and another with a small container submerged in liquid (no text or symbols)
6) Cuando estén completamente
secos, introduzca el filtro en el embudo.

8) Monte el depósito de polvo y gire en el sentido antihorario hasta escuchar un "clic".

natural_image
Illustration of hands operating a mechanical device with a rotating knob (no text or symbols)
SOLUCIÓN DE PROBLEMAS
La Aspiradora no limpia bien. 1. Vade el dep6sito de polvo.2. Compruebe que el dep6sito de polvo esté bien ajustado.3. Compruebe que el filtro del dep6sito esté bien ajustado.4. Limpie el filtro. La aspiradora se 1. Cargue la baterfa. apaga o no funciona. 2. Retire los residuos de la barra del cepillo. La baterfa no se recarga. 1. Compruebe las conexiones eléctricas.2. Compruebe el tomacorriente. El cepillo eléctrico no funciona 1. Asegurese de que el dep6sito de polvo esté montado correctamente y bloqueado.2. Asegurese de que el cepillo eléctrico y el mango de metal estén bien conectados.3. Comprobar si el cepillo esta bloqueado o no.
PLACA DE CARACTERISTICAS
Baterfa 25.9 V/2200 mA Perfodo de carga 4.5 horas Salida 31 V/500 mA Peso neto 1.8 kg Tiempo de uso 40 min (velocidad baja), 20 min (velocidad media), 10 min (velocidad baja). Potencia del motor 220W Flujo de aire 20 dm3/s Dimension de embalaje 690*270*145 mm
GARANTÍA
El periodo de garantía de nuestros productos es de 2 años, salvo que la ley estipule lo contrario, a partir de la fecha de la compra inicial o de la fecha de entrega.
Si tiene algún problema o pregunta, puede acceder fácilmente a nuestras páginas de ayuda, consejos para solucionar problemas, preguntas frecuentes y manuales de usuario en nuestro sitio de servicio: https://sav.hkoenig.com.
Al escribir el nombre de referencia de su dispositivo en la barra de búsqueda, puede acceder a toda la asistencia en línea disponible, diseñada para satisfacer mejor sus necesidades.
Si sigue sin encontrar una respuesta a su pregunta o problema, haga clic en "¿La respuesta ha resuelto su problema? Esto le llevará al formulario de solicitud de asistencia posventa, que puede rellenar para validar su solicitud y obtener ayuda.
CONDICIONES DE GARANTÍA
La garantía cubre todos los fallos que se produzcan en el contexto de un uso normal, de acuerdo con los usos y especificaciones del manual de usuario.
Esta garantía no se aplica a los problemas de embalaje o transporte durante el envío del producto por parte del propietario. Tampoco incluye el desgaste normal del producto, ni el mantenimiento o la sustitución de piezas consumibles.
EXCLUSIÓN DE GARANTÍA
- Accesorios y piezas de desgaste (\*).
- Mantenimiento normal del aparato.
- Todas las averías derivadas de un uso incorrecto (golpes, incumplimiento de las recomendaciones de alimentación eléctrica, malas condiciones de uso, etc.), de un mantenimiento insuficiente o de un mal uso del aparato, así como del uso de accesorios inadecuados.
- Daños de origen externo: incendio, daños por agua, sobrecarga eléctrica, etc.
- Cualquier equipo que haya sido desmontado, incluso parcialmente, por personas que no estén autorizadas a hacerlo (en particular el usuario).
- Productos cuyo número de serie falte, esté dañado o sea ilegible, lo que no permitiría su identificación.
- Productos sujetos a alquiler, demostración o exposición.
(\*) Algunas piezas de su aparato, conocidas como piezas de desgaste o consumibles, se deterioran con el tiempo y la
frecuencia de uso de su aparato. Este desgaste es normal, pero puede acentuarse por las malas condiciones de uso o de mantenimiento de su aparato. Por lo tanto, estas piezas no están cubiertas por la garantía.
Los accesorios suministrados con el aparato también están excluidos de la garantía. No se pueden cambiar ni reembolsar. No obstante, algunos accesorios pueden adquirirse directamente en nuestro sitio web: https://sav.hkoenig.com/
MEDIO AMBIENTE
ATENCIÓN:

No se deshaga de este producto coma lo hace con otros productos del hogar. Existe un sistema selectivo de colecta de este producto puesto en marcha par las comunidades, debe de informarse en su ayuntamiento acerca de los lugares en los que puede depositar
-este producto. De hecho, los productos eléctricos y electrónicos pueden contener substancias peligrosas que tienen efectos nefastos para el media ambiente o para la salud humana y deben ser reciclados. El símbolo aquí presente indica que los equipos eléctricos o electrónicos deben de ser cuidadosamente seleccionados, representa un recipiente de basura con ruedas marcado con una X.
Adeva SAS/ H.Koenig Europe - 8 rue Marc Seguin, 77290 Mitry-Mory, France www.hkoenig.com - sav@hkoenig.com - contact@hkoenig.com - Tél: +33 1 64 67 00 05
ITALIANO
IMPORTANTI ISTRUZIONI DI SICUREZZA
IMPORTANTE: LEGGERE TUTTE LE ISTRUZIONI PRIMA DELL'USO.
CONSERVARE LE ISTRUZIONI PER RIFERIMENTO FUTURO.
Non usare sotte la pioggia o lasciare all'aperto mentre piove
AVVERTENZA: Osservare sempre le precauzioni di sicurezza di base quando si utilizza un apparecchio elettrico, incluse le seguenti, per ridurre il rischio di incendi, scosse elettriche o lesioni.
SICUREZZA PERSONALE:
1. conservare al chiuso e in un luogo asciutto, fuori dalla portata dei bambini;
2. utilizzare sempre in modo responsabile. Questo apparecchio può essere utilizzato da persane con ridotte capacità fisiche, sensoriali o mentali o senza esperienza e conoscenza, solo se sono supervisionati o sono stati istruiti sull'uso dell'apparecchio in modo sicuro e ne comprendano i pericoli annessi;
3. non lasciare che i bambini giochino con l'apparecchio; sorvegliare i bambini che usano o detengono l'apparecchio;
4. utilizzare solo gli accessori raccomandati dal produttore corne descritto in questo manuale; un uso improprio o l'uso di qualsiasi accessorio diverse da quelli raccomandati, possono rappresentare un rischio di lesioni personali;
5. prestare particolare attenzione quando si puliscono le scale;
6. Tenere l'apparecchio e gli accessori lontano da superfici
calde;
7. Non bloccare le aperture degli apparecchi o ostacolare il flusso d'aria, tenere le aperture libere da oggetti quali polvere, Ianugine, vestiti, dita (e tutte le parti del corpo);
8. Tenere in particolare i capelli lontano da aperture e parti mobili;
9. Questo apparecchio può essere utilizzato da bambini a partire da 8 anni, purché sorvegliati e istruiti all'uso sicuro dell'apparecchio e pienamente a conoscenza dei pericoli che comporta.
10. La pulizia e la manutenzione non devono essere eseguite da bambini a mena che abbiano più di 8 anni e siano sorvegliati da un adulto.
11. Conservare l'apparecchio e il cava di alimentazione fuori dalla portata di bambini di età inferiore a 8 anni. Quando si utilizzano apparecchiature elettriche, è necessario adottare sempre misure di sicurezza per prevenire il rischio di incendi, scosse elettriche e/o lesioni in casa di usa improprio.
12. Accertarsi che la tensione nominale sulla targhetta corrisponda alla tensione principale della vostra installazione. In casa contrario, contattare il rivenditore e non collegare l'unità
13. Non lasciare mai l'unità incustodita durante il funzionamento.
14. Si prega di tenere questo documenta a portata di mana e di consegnarlo al futuro proprietario in casa di trasferimento del dispositivo.
SICUREZZA ELETTRICA:
1. utilizzare solo batterie e caricabatterie forniti dal produttore
2. non modificare mai il caricabatterie in alcun modo;
3. il caricatore è stato progettato per una tensione specifica. Verificare sempre che la tensione di rete corrisponda a quella indicata sulla targhetta dei dati tecnici;
4. un caricabatterie adatto per un tipo di batteria può creare un rischio di incendia se utilizzato con un altro gruppo batteria;
5. Prima dell'uso, controllare il cava di ricarica per verificare che non vi siano segni di danni o deterioramento. Un cava di carica danneggiato o impigliato aumenta il rischio di incendia e scosse elettriche;
6. utilizzare con cura il cava del caricatore;
7. non trasportare mai il caricatore dal cava;
8. non tirare il cava per scollegarlo da una presa, afferrare la spina e tirare per disconnetterla;
9. non avvolgere il cava intorno al caricatore durante la conservazione;
1O. Tenere il cava del caricabatterie lontano da superfici calde e spigoli vivi;
11. il cava di alimentazione non può essere sostituito. Se il cava è danneggiato, il caricabatterie deve essere smaltito e sostituito.
12. non maneggiare il caricatore o l'apparecchio con le mani bagnate;
13. Non conservare o caricare l'apparecchio all'aperto;
14. Il caricatore deve essere rimosso dalla presa prima di rimuovere la batteria, pulire o effettuare la manutenzione dell'apparecchio.
SICUREZZA DELLA BATTERIA:
1. Questo apparecchio include batterie agli ioni di litio, non incenerire le batterie e non esporle a temperature elevate, in quanta potrebbero esplodere;
2. il liquida espulso dalla batteria può causare irritazioni o ustioni;
3. In una situazione di emergenza richiedere immediatamente un aiuto professionale;
4. delle perdite dalle celle della batteria possono verificarsi in condizioni estreme. Non toccare alcun liquida che fuoriesce dalla batteria. Se il liquida entra a contatto con la pelle, sciacquare immediatamente con acqua e sapone. Se il liquida entra a contatto con gli occhi, sciacquarli immediatamente con acqua pulita per almeno 10 minuti e consultare un medico. Indossare guanti per maneggiare la batteria e smaltire immediatamente in conformità con le normative locali;
5. cortocircuitare i terminali della batteria potrebbe causare ustioni o incendi;
6. Quando la batteria non è in uso, tenerla lontano da graffette, monete, chiavi, chiodi, viti o altri piccoli oggetti metallici che potrebbero effettuare una connessione da un terminale all'altro.
7. Quando si smaltisce l'apparecchio, rimuovere la batteria e smaltirla in modo sicuro in conformità con le normative locali.
FUNZIONAMENTO:
1. Prima di utilizzare l'apparecchio e dopa agni impatto, controllare se vi sono segni di usura e d'effettuare una riparazione se necessario;
2. non utilizzare l'apparecchio se una qualsiasi parte è danneggiata o difettosa;
3. Le riparazioni devono essere eseguite da un agente di assistenza o da una persona adeguatamente qualificata in conformità con le pertinenti norme di sicurezza. Le riparazioni eseguite da persane non qualificate potrebbero essere pericolose;
4. Non modificare mai l'apparecchio in alcun modo poiché cià potrebbe aumentare il rischio di lesioni personali;
5. utilizzare solo parti di ricambio o accessori forniti o raccomandati dal produttore.
USO PREVISTO:
1. questo apparecchio è stato progettato solo perla pulizia domestica a secco;
2. non raccogliere liquidi e non utilizzare su superfici bagnate;
3. non raccogliere nulla che sia infiammabile, bruci o sia fumante;
4. utilizzare solo corne descritto in questo manuale;
5. non utilizzare su cemento, asfalto o aitre superfici ruvide.
AWERTIMENTO:
1. non utilizzare acqua, solventi o lucidanti per pulire l'esterno dell'apparecchio; pulire con un panno asciutto;
2. non immergere mai l'unità in acqua e non lavare in lavastoviglie.
ILLUSTRAZIONE DEI COMPONENTI:


ISTALLAZIONE PRODOTTO:
1. Utilizzo corne aspirapolvere
a) Montare il gruppo batteria con il gruppo rnaniglia, assicurarsi che la testa del bullone della batteria si inserisca correttamente la fessura del contenitore polvere corne indicato di seguito

natural_image
Line drawing of a mechanical device with no visible text or symbols
Posizionare lo slot in posizione corretta

natural_image
Technical line drawing of a mechanical component with two views (top and side), no text or symbols present.
b) Collegare il tubo metallico al corpo corne indicato nell'immagine fino a sentire un clic

natural_image
Technical line drawing of a mechanical device with two views: front view and side view (no text or symbols)
c) fissare la spazzola al tubo metallico corne mostrato di seguito

natural_image
Technical line drawing of a mechanical assembly with an arrow indicating direction (no text or symbols present)

flowchart
graph LR
    A["Hand positioning on SPINGERE"] --> B["Tool movement with arrows indicating motion"]
    B --> C["Table setting with arrow indicating movement"]
    C --> D["Click action on SPINGERE"]
d) Accendere l'interruttore, l'aspirapolvere inizia a funzionare.

Tre livelli di controllo della velocità
a) Bassa velocità: è la velocità più bassa quando si preme il pulsante interruttore la prima volta, l'aspirapolvere smette di funzionare subito dopo aver spento il pulsante.
b) Toccare il pulsante di controllo della velocità, passerà alla velocità media e di nuovo alla alta velocità.
c) Indipendentemente dalla velocità, l'aspirapolvere smetterà di funzionare quando si preme il pulsante di accensione / spegnimento.
II. Utilizzo corne aspirapolvere manuale
Inserisci l'accessorio al corpo corne mostrato sotto

natural_image
Technical line drawing of a mechanical device before and after assembly, showing internal components and motion arrows (no text or symbols)
II. Carica della batteria :
1) Quando l'indicatore di carica della batteria lampeggia, si prega di spegnere l'apparecchio e rimetterlo alla base di ricarica per la ricarica.
2) La spina e l'indicatore lampeggeranno, per indicare la carica. La batteria si spegnerà automaticamente quando la batteria sarà completamente carica.


3) Se l'indicatore della batteria non lampeggia, la batteria è carica.
4) L'indicatore della spazzola normalmente è leggero, nel caso in cui la spazzola di alimentazione sia bloccata , lampeggerà, per avvisare il cliente accendere l'aspirapolvere e pulire la spazzola, o controllare qualsiasi altra anomalia della spazzola.
III. Come svuotare il contenitore della polvere
1 ) premere il pulsante di rilascio del Contenitore polvere
2) rimuovere il
Contenitore corne
mostrato nell'immagine

natural_image
Line drawing of hands operating a mechanical device with a tool, no text or symbols present
Pulsante rilascio
contenitore polvere

natural_image
Illustration of hands using a handheld device to adjust or install a cylindrical component (no text or symbols visible)
3) ) estrarre il filtra HEPA corne mostrato nell'immagine

natural_image
Illustration of a hand holding a glass jar and rotating a circular object, showing a step-by-step motion (no text or symbols)
5 ) assicurarsi che il filtro HEPA e il contenitore del filtra siano completamente asciutti

natural_image
Line drawings of a sun, a plastic component with filter, and a mechanical component (no text or symbols)
7) Posizionare il Contenitore filtra nel Contenitore polvere

natural_image
Illustration of a hand holding a cup with fingers, no text or symbols present
4) lavare il filtra HEPAe il filtra conico

natural_image
Illustration showing hands pouring liquid into a container with a small inset image of a test tube submerged in water (no text or symbols)
6) Assemblare il filtro

8 ) Assemblare
correttamente il contenitore
filtra fino a sentire un click

natural_image
Illustration of hands operating a mechanical device with a rotating arrow indicating rotation (no text or symbols present)
RISOLUZIONE DEI PROBLEMI:
Non aspira bene 1. Svuotare il contenitore della polvere2. Assicurarsi che il contenitore della polvere sia montato correttamente3. controllare che il filtro sia montato correttamente4, pulire il filtro Si blocca o non funziona 1. Caricare la batteria2. Pulire il filtro La batteria non si carica 1. Controllare la connessione del cavo batteria2. Controllare la presa a muro La spazzola elettrica non funziona 1. Assicurarsi che il contenitore della polvere sia montato correttamente e bloccato2. Assicurarsi che la spazzola elettrica e il tubo metallico siano collegati saldamente3. Controllare se la spazzola elettrica è bloccata
SPECIFICHE TECNICHE
Batteria 25.9V/ 2200mAh Tempo necessario perla carica 4,5 ore Input 31V/500mA Peso 1.8kg Durata di utilizzo 40min (bassa velocità), 20min (media velocità), 10min (alta velocità) Potenza motore 220W Flusso aria 20dm3 /s Dimensioni imballaggio 690*270*145mm
GARANZIA
Il periodo di garanzia per i nostri prodotti è di 2 anni, se non diversamente stabilito dalla legge, a partire dalla data di acquisto iniziale o di consegna.
Se avete problemi o domande, potete facilmente accedere alle nostre pagine di aiuto, consigli per la risoluzione dei problemi, FAQ e manuali d'uso sul nostro sito post-vendita:
https://sav.hkoenig.com.
Digitando il nome di riferimento del tuo dispositivo nella barra di ricerca, puoi accedere a tutto il supporto online disponibile, progettato per soddisfare al meglio le tue esigenze.
Se ancora non riesci a trovare una risposta alla tua domanda o al tuo problema, allora clicca su "La risposta ha risolto il tuo problema? Questo vi porterà al modulo di richiesta di supporto post-vendita, che potete completare per convalidare la vostra richiesta e ottenere aiuto.
CONDIZIONI DI GARANZIA
La garanzia copre tutti i guasti derivanti da un uso normale, in conformità con gli usi e le specifiche del manuale utente.
Questa garanzia non si applica a problemi di imballaggio o di trasporto durante la spedizione del prodotto da parte del proprietario. Non include inoltre la normale usura del prodotto, né la manutenzione o la sostituzione delle parti di consumo.
ESCLUSIONE DELLA GARANZIA
- Accessori e parti soggette a usura (\*).
- Normale manutenzione dell'apparecchio.
- Tutti i guasti derivanti da un uso improprio (urti, mancato rispetto delle raccomandazioni sull'alimentazione, cattive condizioni d'uso, ecc.), da una manutenzione inadeguata o da un uso improprio dell'apparecchio, nonché dall'uso di accessori inadeguati.
- Danni di origine esterna: incendio, danni d'acqua, sovratensione elettrica, ecc.
- Qualsiasi attrezzatura che sia stata smontata, anche parzialmente, da persone diverse da quelle autorizzate a farlo (in particolare l'utente).
- Prodotti per i quali il numero di serie è mancante, danneggiato o illeggibile, il che non permetterebbe la sua identificazione.
- Prodotti soggetti a noleggio, dimostrazione o esposizione.
(\*) Alcune parti del suo apparecchio, note come parti soggette a
usura o materiali di consumo, si deteriorano con il tempo e la frequenza d'uso del suo apparecchio. Questa usura è normale, ma può essere accentuata da cattive condizioni d'uso o di manutenzione del vostro apparecchio. Queste parti non sono quindi coperte dalla garanzia.
Anche gli accessori forniti con l'apparecchio sono esclusi dalla garanzia. Non possono essere scambati o rimborsati. Tuttavia, alcuni accessori possono essere acquistati direttamente dal nostro sito web: https://sav.hkoenig.com/.
AMBIENTE
ATTENZIONE:

Non gettare quest' apparecchio tra i rifiuti domestici. Per questo tipo di prodotti è fornito dai comuni un sistema di raccolta e ritiro in zona ed è quindi un dovere informarsi per conoscere
\- il giusto smistamento del rifiuto. Infatti, i prodotti elettrici ed elettronici possono contenere sostanze
pericolose che hanno effetti dannosi sull'ambiente o sulla nostra salute e quindi devono essere riciclati. Il simbolo al lato indica che le apparecchiature elettriche ed elettroniche fanno parte di una raccolta selettiva e differenziata (rappresentata da un bidone su due ruote sbarrato da una croce.
Adeva SAS / H.Koenig Europe - 8 rue Marc Seguin - 77290 Mitry Mory - France www.hkoenig.com - sav@h koenig.com - contact@hkoenig.com - Tél: +33 1 64 67 00 05
Instruction Manual
Manuel d'instructions Bedienungsanleitung Gebruiksaanwijzing Manual de instrucciones Manuale d'uso Instrukcja obstugi natural_image
Exterior view of a black and gray vacuum cleaner (no text or symbols visible)2 in 1 foldable vacuum cleaner
Balai Aspirateur Pliable 2 En 1 2 In 1 Klappbarer Handstaubsauger 2 In 1 Opvouwbare Steel Stofzuiger Aspiradora De Mango Plegable 2 En 1 2 In 1 Scopa Aspirapolvere Pieghevole ENGLISH
IMPORTANT SAFETY INSTRUCTIONS
IMPORTANT: READ ALL INSTRUCTIONS BEFORE USE. RETAIN INSTRUCTIONS FOR FUTURE REFERENCE. Do not use in rain or leave outdoors whilst raining WARNING: Basic safety precautions should always be observed when using an electrical appliance, including the following to reduce the risk of tire, electrical shock, or injury.Personal Safety:
1. Store indoors in a dry place out of the reach of children; 2. Always use responsibly. This appliance can be used by persans with reduced physical, sensory or mental capabilities or lack of experience and knowledge if they have been given supervision or instruction concerning use of the appliance in a safe way and understand the hazards involved; 3. Don't let children play with the appliance; supervise children using or maintaining the appliance; 4. Use only manufacturer's recommended attachments as described in this manual; misuse or use of any accessory or attachment other than those recommended, may present a risk of persona! injury; 5. Take extra care when cleaning stairs; 6. Keep the appliance and accessories away from hot surface; 7. Do not black the appliances openings or hinder air flow, keep openings free of any abjects including dust, lint, clothing, fingers (and all parts of the body); 8. Particularly keep hair away from openings and moving parts; 9. This appliance may be used by children of at least 8 years of age, as long as they are supervised and have been given instructions about using the appliance safely and are fully aware of the dangers involved. 10. Cleaning and maintenance should not be carried out by children unless they are at least 8 years of age and are supervised by an adult. 11. Keep the appliance and its power cord out of reach of children under 8 years of age. 12. When using electrical equipment, safety precautions must always be taken to prevent the risk of fire, electric shock and/or injury in the event of misuse. 13. Make sure that the voltage rating on the typeplate corresponds to your main voltage of your installation. If this is not the case, contact the dealer and do not connect the unit 14. Never leave the unit unattended while in operation. 15. Please keep this document at hand and give it to the future owner in case of transfer of your deviceElectrical Safety:
1. Only use batteries and chargers supplied by the manufacturer; 2. Never modify the charger in any way; 3. The charger has been designed for a specific voltage. Always check that the mains voltage is the same as that stated on the rating plate; 4. A charger that is suitable for one type of battery pack may create a risk of fire when used with another battery pack; 5. Before use, check the charger cord for signs of damage or ageing. A damaged or entangled charger cord increases the risk of fire and electric shock 6. Do not abuse the charger cord; 7. Never carry the charger by the cord; 8. Do not pull the cord to disconnect from a socket, grasp the plug and pull to disconnect; 9. Don't wrap the cod around the charger when storing; 10. Keep the charger cord away from hot surfaces and sharp edges; 11. The supply cord cannot be replaced. If the cord is damaged the charger should be discarded and replaced. 12. Do not handle the charger or the appliance with wet hands; 13. Do not store or charge the appliance outdoors 14. The charger must be removed from the socket before removing the battery, cleaning or maintaining the appliance.Battery safety:
1. This appliance includes Li-ion batteries, do not incinerate batteries or expose to high temperatures, as they may explode; 2. Liquid ejected from the battery may cause irritation or burns; 3. In an emergency situation contact professional help immediately; 4. Leaks from the battery cells can occur under extreme conditions. Do not touch any liquid that leaks from the battery. If the liquid that gets on skin wash immediately with soap and water. If the liquid gets into the eyes, flush them immediately with clean water for a minimum of 10 minutes and seek medical attention. Wear gloves to handle the battery an dispose of immediately in accordance with local regulations; 5. Shorting the battery terminais may cause burns or fire; 6. When the battery pack is not in use, keep it away from paper clips, coins, keys, nails, screws or other small metal abjects that could make a connection from one terminal to another. 7. When you dispose of the appliance remove the battery and dispose of the battery safely in accordance with local regulations.Service:
1. Before using the appliance and after any impact, check for signs of wear of damage and repair as necessary; 2. Do not use the appliance if any part is damaged or defective; 3. Repairs should be carried out by a service agent or a suitably qualified persan in accordance with relevant safety regulations. Repairs by unqualified persans could be dangerous; 4. Never modify the appliance in any way as this may increase the risk of personal injury; 5. Only use replacement parts or accessories provided or recommended by manufacturer.Intended use:
1, This appliance has been designed for domestic dry vacuum cleaning only; 2, Do not pick up liquids or use on wet surfaces; 3, Do not pick up anything that is flammable, burning or smoking; 4, Use only as described in this manual; 5, Don't use on concrete, tarmacadam or other rough surfaces.WARNING:
1. Do not use water, solvents, or polishes to clean the outside of the appliance; wipe clean with a dry cloth; 2. Never immerse the unit in water and do not clean in a dish washer. INTRODUCTION OF COMPONENTS:  Charging base & charger  Long crevicePRODUCT INSTALLATION:
I. Use as stick vacuum cleaner a) Assemble the battery pack with handle assembly, make sure the battery bolt head insert the dust cup slot rightly as below natural_image
Line drawing of a mechanical device with no visible text or symbolsnatural_image
Technical line drawing of a mechanical component with cross-sectional and top views (no text or symbols)natural_image
Technical line drawing of a mechanical assembly showing a lever and shaft assembly (no text or symbols)flowchart
graph LR
A["PUSH"] --> B["←"]
B --> C["←"]
C --> D["←"]
D --> E["CLICK"]
flowchart
graph TD
A["On-off switch"] --> B["Touch-Speed control"]
B --> C["Low speed"]
C --> D["High speed"]
D --> E["Middle speed"]
E --> F["Touch button"]
II. Use as handy vacuum
Insert the accessory to body as shown bellow. natural_image
Technical line drawing of a mechanical device before and after assembly, showing internal components and motion arrows (no text or symbols)II. Battery charging:
1) When the battery power indicator is blinking, lease power off the machine, then put it back to charge base for charging. 2) Plug in & indication will blink, it shows charging. Battery will be self-cutting when battery is full.   3) If battery indication is not blinking, it shows battery is full. 4) Brush indicator normally is light, in case the power brush is blocked, it will blink, to warning customer turn on the vacuum cleaner & clean the brush, or check any other abnormal of brush.III. How to empty the dust cup
1) ) release dust cup release button 2) remove dust cup with direction shown as below natural_image
Line drawing of hands operating a mechanical device with a tool, no text or symbols presentnatural_image
Illustration of a hand using a handheld device to adjust or install a cylindrical component (no text or symbols visible)natural_image
Illustration of a hand holding a mechanical component with a rotating arrow indicating rotation (no text or symbols)natural_image
Line drawings of various household appliances including a sun, kitchen sink, toilet, and fan (no text or symbols)natural_image
Hand holding a cup with chopsticks, no text or symbols visiblenatural_image
Illustration showing hands holding a container and dipping into a liquid in a bowl (no text or symbols)natural_image
Illustration of hands operating a mechanical device with a curved arrow indicating rotation (no text or symbols present)TROUBLESHOOTING
| Not cleaning well | 1, Empty the dust bin2,Checked dust bin is correctly assembled3, Check the filter is correctly fitted4, Clean the filter |
| Stop or doesn't work | 1,Chargebattery2, Clean the filter |
| Battery not charge | 1, Check connections with power cord 2,Check wall socket |
| Power brush doesn't work | 1. Make sure dust cup assembled correctly & locked2. Make sure power brush & metal tube connected tightly3. Check the brush blocked or not |
TECHNICAL SPECIFICATION
| Battery | 25.9V/2200mAh |
| Charging period | 4 .5hours |
| Input | 31V/500mA |
| Weight | 1.8kg |
| Using time | 40min (low speed), 20min (middle speed), 10min (low speed)f |
| Motor power | 220W |
| airflow | 20dm3/s |
| Packing dimension | 690*270*145mm |
WARRANTY
The warranty period for our products is 2 years, unless otherwise stated, starting from the date of initial purchase or the date of delivery. If you have any problems or questions, you can easily access our help pages, troubleshooting tips, FAQ, and user manuals on our service site: https://sav.hkoenig.com. By typing the reference name of your device in the search bar, you can access all available online support, designed to best meet your needs. If you still cannot find an answer to your question or problem, then click on “Did the answer solve your problem?”. This will direct you to the Customer Support Request Form, which you can fill out to validate your request and get help.WARRANTY CONDITIONS
The warranty covers all failures occurring under normal use, in accordance with the usage and specifications in the user's manual. This warranty does not apply to packaging or transportation problems during shipment of the product by the owner. It also does not include normal wear and tear of the product, nor maintenance or replacement of consumable parts.EXCLUSION OF WARRANTY
- Accessories and wearing parts (\*). - Normal maintenance of the device. - All breakdowns resulting from improper use (shocks, failure to comply with power supply recommendations, poor conditions of use, etc.), insufficient maintenance or misuse of the device, as well as the use of unsuitable accessories. - Damage of external origin: fire, water damage, electrical surge, etc. - Any equipment that has been disassembled, even partially, by persons other than those authorized to do so (notably the user). - The products whose serial number would be missing, deteriorated or illegible that would not allow its identification. - The products subjected to leasing, demonstration, or exhibition. (\*) Some parts of your device, called wear parts or consumables, deteriorate with time and frequency of use of your device. This wear and tear are normal but can be accentuated by poor conditions of use or maintenance of your device. These parts are therefore not covered by the warranty. The accessories supplied with the device are also excluded from the warranty. They cannot be exchanged or refunded. However, some accessories can be purchased directly through our website: https://sav.hkoenig.com/.ENVIRONMENT
CAUTION:  Do not dispose of this product as it has with other household products. There is a separation of this waste product into communities, you will need to inform your local authorities about - the places where you can return this product. In fact, electrical and electronic products contain hazardous substances that have harmful effects on the environment or human health and should be recycled. The symbol here indicates that electrical and electronic equipment should be chosen carefully, a wheeled waste container is marked with a cross. Adeva SAS/ H.Koenig Europe - 8 rue Marc Seguin - 77290 Mitry Mory - France www.hkoenig.com - sav@hkoenig.com - contact@hkoenig.com - Tél: +33 1 64 67 00 05FRANÇAIS
CONSIGNES DE SÉCURITÉ IMPORTANTES
IMPORTANT : LIRE TOUTES LES INSTRUCTIONS AVANT UTILISATION.
CONSERVER CE MANUEL D'INSTRUCTIONS EN LIEU SÛR.
Ne pas utiliser sous la pluie et ne pas laisser dehors lorsqu'il pleut AVERTISSEMENT : lors de l'utilisation d'un appareil électrique, vous devez toujours respecter les consignes de sécurité élémentaires, notamment les suivantes, afin de réduire les risques d'incendie, de choc électrique ou de blessure.Sécurité personnelle :
1. Rangez l'aspirateur à l'intérieur dans un endroit sec et hors de la portée des enfants. 2. Utilisez toujours l'appareil de manière responsable. Il peut être utilisé par des personnes avec des capacités physiques, sensorielles ou mentales réduites ou manquant d'expérience et de connaissances si elles sont surveillées ou si elles ont reçues des instructions concernant l'emploi de l'aspirateur et si elles comprennent les dangers encourus. 3. Ne laissez pas les enfants jouer avec l'appareil; surveillez ceux qui utilisent ou entretiennent l'appareil. 4. Utilisez uniquement les accessoires recommandés par le fabricant, comme décrit dans ce manuel. Une mauvaise utilisation de l'aspirateur et de ses accessoires ou l'emploi d'accessoires autres que ceux recommandés peuvent provoquer un accident. 5. Prenez des précautions supplémentaires lors du nettoyage des escaliers. 6. Gardez l'appareil et ses accessoires loin de toute surface chaude. 7. Ne bloquez pas les grilles d'aération de l'appareil et n'entravez pas le flux d'air ; ne bouchez pas les ouvertures avec un objet, que ce soit la poussière, les peluches, les vêtements, les doigts (et toutes les parties du corps). 8. Gardez particulièrement les cheveux loin des ouvertures et des pièces mobiles. 9. Cet appareil peut être utilisé par des enfants âgés d'au moins 8 ans, à condition qu'ils bénéficient d'une surveillance ou qu'ils aient reçu des instructions quant à l'utilisation de l'appareil en toute sécurité et qu'ils comprennent bien les dangers encourus. 10. Le nettoyage et l'entretien par l'utilisateur ne doivent pas être effectués par des enfants, à moins qu'ils ne soient âgés de plus de Bans et qu'ils soient sous la surveillance d'un adulte. 11. Conserver l'appareil et son câble hors de portée des enfants âgés de moins Bans. 12. Lors de l'utilisation d'appareils électriques, des précautions de sécurité doivent toujours être prises pour prévenir tout risque d'incendie, de choc électrique et/ou de blessure en cas de mauvaise utilisation. 13. Vérifier que le voltage indiqué sur la plaque signalétique de l'appareil correspond bien à celui de votre installation électrique. Si ce n'est pas le cas, adressez-vous au revendeur et ne branchez pas l'appareil 14. Ne jamais laisser l'appareil sans surveillance lorsqu'il est en fonctionnement. 15. Veuillez conserver ce document à disposition et le remettre au futur propriétaire en cas de cession de votre appareilSécurité électrique :
1. Utilisez uniquement la batterie et le chargeur fournis par le fabricant. 2. Ne modifiez jamais le chargeur de quelque manière que ce soit. 3. Le chargeur a été conçu pour une tension spécifique. Vérifiez toujours que la tension du secteur soit identique à celle indiquée sur la plaque signalétique. 4. Un chargeur qui convient pour un type de batterie peut entraîner un risque d'incendie quand il est utilisé avec un autre type de batterie. 5. Avant utilisation, vérifiez si le cordon du chargeur présente des signes de dommage ou de vieillissement. Un cordon de chargeur endommagé ou enchevêtré augmente les risques d'incendie et de choc électrique. 6. Manipulez avec soin le cordon du chargeur. 7. Ne portez jamais le chargeur par le cordon. 8. Ne tirez pas sur le cordon pour le débrancher d'une prise, saisissez la fiche et tirez dessus pour débrancher le cordon. 9. N'enroulez pas le cordon autour du chargeur lors du stockage. 10. Tenez le cordon à l'écart des surfaces chaudes et des rebords coupants. 11. Le cordon d'alimentation ne peut pas être remplacé. Si le cordon est endommagé, le chargeur doit être mis au rebut et remplacé. 12. Ne manipulez pas le chargeur ou l'appareil avec les mains mouillées. 13. Ne rangez pas et ne chargez pas l'appareil à l'extérieur. 14. Le chargeur doit être débranché de la prise avant de retirer la batterie, de nettoyer ou d'entretenir l'appareil.Sécurité de la batterie :
1. Cet appareil comprend une batterie li-ion, ne pas incinérer la batterie ni l'exposer à des températures élevées, car elle peut exploser. 2. Le liquide s'écoulant de la batterie peut provoquer une irritation ou des brûlures. 3. En cas d ^1 urgence, contactez immédiatement un professionnel. 4. Des fuites des compartiments de la batterie peuvent se produire dans des conditions extrêmes. Ne touchez aucun liquide qui fuit de la batterie. Si le liquide entre en contact avec votre peau, lavez-vous immédiatement à l'eau et au savon. Si le liquide pénètre dans les yeux, rincez-les immédiatement à l'eau claire pendant au moins 10 minutes et consultez un médecin. Portez des gants pour manipuler la batterie et débarrassez-vous en immédiatement conformément à la réglementation locale. 5. Court-circuiter les bornes de la batterie peut causer des brûlures ou un incendie. 6. Quand le bloc-batterie n'est pas utilisé, tenez-le éloigné de tout objet métallique comme les trombones, les pièces de monnaie, les clés, les clous, les vis ou tout autre petit objet métallique qui risque d'établir le contact entre les deux bornes. 7. Lorsque vous vous débarrassez de l'appareil, retirez la batterie et éliminez-la en toute sécurité, conformément à la réglementation locale.Entretien:
1. Avant d'utiliser l'appareil et après un choc, recherchez les traces d'usure ou de dommages et faite-le réparer si nécessaire. 2. N'utilisez pas l'appareil si une partie est endommagée ou défectueuse. 3. Les réparations doivent être effectuées par un agent agréé ou une personne dûment qualifiée, conformément à la réglementation de sécurité en vigueur. Les réparations effectuées par des personnes non qualifiées peuvent être dangereuses. 4. Ne modifiez jamais l'appareil de quelque manière que ce soit car cela pourrait augmenter le risque de blessure. 5. Utilisez uniquement des pièces de rechange ou des accessoires fournis ou recommandés par le fabricant.USAGE PREVU :
1. Cet appareil a été conçu pour un usage domestique uniquement. 2. N'aspirez pas de liquides ou n'utilisez pas l'aspirateur sur des surfaces humides. 3. N'aspirezrien qui soit inflammable, qui brûle ou qui dégage de la fumée. 4. Employez l'appareil uniquement comme cela est décrit dans le manuel. 5. N'utilisez pas l'aspirateursur du béton, du macadam ou d'autres surfaces rugueuses.AVERTISSEMENT:
1. N'utilisez pas d'eau, de solvants ni de produits pour polir quand vous nettoyez l'extérieur de l'appareil. Essuyez-le avec un chiffon sec. 2. Ne plongez pas l'appareil dans l'eau et ne le mettez pas au lave-vaisselle.DESCRIPTION DE L'APPAREIL.
 Base de charge et chargeur  Accessoire pour les anfractuositésMONTAGE DE I' APPAREIL
1. Utilisation d'un aspirateur balai
a) Assemblez le bloc-batterie à la poignée, assurez-vous que la tête du boulon de la batterie s'insère exactement dans l'encoche du réservoir comme ci-dessous : natural_image
Line drawing of a mechanical device with no visible text or symbolsnatural_image
Technical line drawing of a mechanical component with two views (top and side), no text or symbols present.natural_image
Technical line drawing of a mechanical device with two views: top shows a cylindrical component, bottom shows a stepped shaft assembly (no text or symbols)natural_image
Technical line drawing of a mechanical device with an arrow indicating transformation (no text or symbols present)flowchart
graph LR
A["APPUYER"] --> B["Device shift"]
B --> C["Table setting"]
C --> D["CLICK"]
natural_image
Technical line drawing of a mechanical device before and after assembly, showing internal components and motion arrows (no text or symbols)M. Comment vider le réservoir à poussière
1) Débloquer le bouton de verrouillage du réservoir 2) Retirer le réservoir comme indiqué ci-dessous natural_image
Technical line drawing of a mechanical device with hands operating it (no text or symbols present)natural_image
Line drawing of a hand holding a cylindrical device with an upward arrow indicating motion (no text or symbols)natural_image
Illustration of a hand holding a glass jar with a magnified inset showing the process (no text or symbols)natural_image
Line drawings of various household appliances including a sun, a cup holder, a washer, and a fan (no text or symbols)natural_image
Hand holding a cup with chopsticks, no text or symbols visiblenatural_image
Illustration showing hands pouring liquid into a container and then into a bowl (no text or symbols)natural_image
Illustration of hands operating a mechanical device with a rotating shaft (no text or symbols)GUIDE DE DÉPANNAGE
| Nettoyage insuffisant | 1. Videz le réservoir à poussière.2. Vérifiez que le réservoir à poussière soit correctement assemblé3. Vérifiez que le filtre soit correctement installé4. Nettoyez le filtre |
| S'arrête ou ne fonctionne pas | 1. Chargez la batterie2. Nettoyez le filtre |
| La batterie ne se charge pas | 1. Vérifiez les branchements du cordon d'alimentation2. Vérifiez la prise murale |
| La brosse ne fonctionne pas | 4. Assurez-vous que le réservoir à poussière soit correctement installé et verrouillé5. Assurez-vous que la brosse et le tube métallique soient bien assemblés6. Vérifiez si la brosse est bloquée ou non |
CARACTÉRISTIQUES TECHNIQUES
| Batterie | 25.9V / 2200mAh |
| Durée de charge | 4,5 heures |
| Entrée | 31V / 500mA |
| Poids | 1,8 kg |
| Durées de fonctionnement | 40min (basse vitesse), 20min (moyenne vitesse), 10min (haute vitesse) |
| Puissance | 220W |
| Flux d'air | 20dm3 / s |
| Dimensions de l'emballage | 690 * 270 * 145mm |
GARANTIE
La durée de garantie de nos produits est de 2 ans, sauf décret en vigueur, à compter de la date d'achat initiale ou la date de livraison. En cas de problèmes ou d'interrogations, vous pouvez facilement accéder à nos pages d'aides, conseils de dépannage, FAQ et modes d'emplois sur notre site SAV : https://sav.hkoenig.com. En tapant le nom de référence de votre appareil dans la barre de recherche, vous accédez à tous les supports en ligne disponibles, conçus pour vous répondre au mieux à vos besoins. Si vous ne trouvez toujours pas de réponse à votre question ou votre problème, alors cliquez sur « Est-ce que la réponse a résolu votre problème ? ». Vous accéderez alors au formulaire de demande d'assistance SAV, qu'il vous suffira de compléter pour valider votre demande et obtenir de l'aide.CONDITIONS DE GARANTIE
La garantie couvre l'ensemble des pannes survenant dans le cadre d'une utilisation normale, conforme aux usages et spécifications présentes sur le manuel d'utilisation. Cette garantie ne s'applique pas aux problèmes d'emballage ou de transport pendant l'expédition du produit par son propriétaire. Elle n'inclut également pas l'usure normale du produit, ni la maintenance ou le remplacement de pièces consommables.EXCLUSION DE GARANTIE
- Les accessoires et les pièces d'usure (\*). - L'entretien normal de l'appareil. - Toutes pannes survenant par suite d'une mauvaise utilisation (chocs, non-respect des préconisations d'alimentation électrique, mauvaises conditions d'utilisation, etc.), d'un entretien insuffisant ou d'un détournement de fonction de l'appareil, ainsi que l'usage d'accessoires non appropriés. - Les dommages d'origine externe : incendie, dégâts des eaux, surtension électrique, etc. - Tout matériel qui aura été démonté même partiellement par des personnes autres que celles habilitées (notamment l'utilisateur). - Les produits dont le numéro de série serait absent, détérioré ou illisible que ne permettrait pas son identification. - Les produits soumis à la location, à la démonstration ou à l'exposition. (\*) Certaines pièces de votre appareil dites pièces d'usure ou consommables se détériorent avec le temps et la fréquence d'usage de votre appareil. Cette usure est normale, mais peut être accentuée par des mauvaises conditions d'utilisation ou entretien de votre appareil. Ces pièces ne sont donc pas couvertes par la garantie. Les accessoires fournis avec l'appareil sont également exclus du champ de la garantie. Ils ne peuvent donc être ni échangés, ni remboursés. Toutefois, certains accessoires peuvent être directement achetés via notre site : https://sav.hkoenig.com/.ENVIRONNEMENT
ATTENTION :  Vous ne devez pas vous débarrasser de cet appareil avec vos déchets ménagers. Un système de collecte sélective pour ce type de produit est mis en place par les communes, vous devez vous renseigner auprès de votre mairie afin d'en connaître les emplacements. En effet, les produits électriques et électroniques peuvent contenir des substances dangereuses qui ont des effets néfastes sur l'environnement ou la santé humaine et doivent être recyclés. Le symbole ci-contre indique que les équipements électriques et électroniques font l'objet d'une collecte sélective, il représente une poubelle sur roues barrée d'une croix. Adeva SAS / H.Koenig Europe - 8 rue Marc Seguin - 77290 Mitry Mory - France www.hkoenig.com - sav@hkoenig.com - contact@hkoenig.com - Tél: +33 1 64 67 00 05DEUTSCH
WICHTIGE SICHERHEITSANWEISUNGEN
WICHTIG: LESEN SIE ALLE ANWEISUNGEN VOR DEM GEBRAUCH. BEWAHREN SIE DIE ANWEISUNGEN ALS KÜNFTIGE REFERENZ AUF. Benutzen Sie das Gerät nicht im Regen oder lassen Sie es nicht während des Regens drauBen. WARNUNG: Grundlegende Sicherheitsvorkehrungen müssen während der Nutzung des elektrischen Gerates immer beachtet werden, einschließlich die folgenden, um das Risiko eines Brandes, eines Stromschlages oder einer Verletzung zu verringern.Persönliche Sicherheit:
1. Lagern Sie das Gerät an einem trockenen Ort auBer Reichweite von Kindern; 2. Immer verantwortungsvoll benutzen. Das Gerät darf von Personen mit eingeschrankten körperlichen, sensorischen oder geistigen Fahigkeiten oder mangels Erfahrung und Wissen bedient werden, wenn sie beaufsichtigt werden oder Anweisungen erhielten, wie das Gerät sicher zu benutzen ist und haben die daraus resultierenden Gefahren verstanden. 3. Erlauben Sie Kindern nicht mit dem Gerät zu spielen; Beaufsichtigen Sie Kinder während der Nutzung oder der Wartung des Gerates; 4. Benutzen Sie ausschließlich das von dem Hersteller empfohlene Zubehör, wie in dieser Anleitung beschrieben ist; Der Missbrauch oder die Nutzung jegliches Zubehörs oder Aufsatzes, auBer deren, die empfohlen wurden, kann das Risiko einer Körperverletzung darstellen; 5.Seien Sie besonders vorsichtig, wenn Sie Treppen reinigen. 6. Halten Sie das Gerät und das Zubehör von heißen Flachen fern. 7. Blockieren Sie nicht die Öffnungen des Gera.tes oder behindern Sie nicht die Belüftung, halten Sie die Öffnungen frei von jeglichen Gegenstanden einschließlich Staub, Fusseln, Kleidung, Fingern (und allen anderen Körperteilen) 8. Halten Sie besonders Haare von den Öffnungen und beweglichen Teilen fern; 9. Dieses Gerät darf von Kindern ab 8 Jahren benutzt werden, sofern diese beaufsichtigt werden oder eine Einweisung in den sicheren Gebrauch des Gerats erhalten haben und die damit verbundenen Gefahren verstehen. 10. Kinder dürfen das Gerät nur reinigen oder pflegen, wenn sie mindestens 8 Jahre ait sind und von einem Erwachsenen beaufsichtigt werden. 11. Bewahren Sie das Gerät und das zugehörige Netzkabel auBerhalb der Reichweite von Kindern unter 8 Jahren auf. 12. Bei der Verwendung elektrischer Gera.te sind stets Sicherheitsvorkehrungen zu treffen, um bei unsachgemaBer Verwendung die Gefahr von Branden, elektrischen Schlagen und/oder Verletzungen zu vermeiden. 13. Achten Sie darauf, dass die auf dem Typenschild angegebene Nennspannung mit Ihrer Netzspannung übereinstimmt Ihrer Installation. Wenn dies nicht der Fall ist, wenden Sie sich an den Handler und schließen Sie das Gerät nicht an. 14. Lassen Sie das Gerät wahrend des Betriebs niemals unbeaufsichtigt. 15. Bitte halten Sie dieses Dokument bereit und geben Sie es im Falle einer Übertragung Ihres Gerates an den zukünftigen Besitzer weiter.Elektrische Sicherheit:
1. Benutzen Sie ausschließlich die von dem Hersteller zu Verfügung gestellten Batterien und Ladegerate; 2. Modifizieren Sie das Ladegerat in keinerlei Weise; 3. Das Ladegerat ist für eine bestimmte Spannung entwickelt worden. Überprüfen Sie immer, ob die Netzspannung mit der auf dem Typenschild angegebenen Spannung übereinstimmt; 4. Ein Ladekabel, das für eine bestimmte Art von Batterien geeignet ist, kann bei der Nutzung mit einer anderen Art von Batterien zu dem Risiko eines Brandes führen; 5. Vor der Nutzung überprüfen Sie das Ladekabel auf Anzeichen von einer Beschadigung oder Alterung. Ein beschadigtes, verwickeltes Kabel erhoht das Risiko eines Brandes oder eines Stromschlages; 6. Missbrauchen Sie das Ladekabel nicht; 7. Bewegen Sie das Ladegerat nie am Kabel; 8. Ziehen Sie niemals am Kabel, um es von der Steckdose zu trennen, halten Sie den Stecker und ziehen Sie diesen aus der Steckdose; 9. Wickeln Sie das Kabel nicht um das Ladegerat während der Lagerung; 10. Halten Sie das Ladekabel von heiBen Flachen und scharfen Kanten fern 11. Das Stromkabel kann nicht ausgetauscht werden. Wenn das Kabel beschadigt ist, muss das Ladegerat entsorgt und ersetzt werden. 12. Halten Sie das Ladegerat oder das Gerät nicht mit nassen Handen 13. Lagern Sie das Gerät oder laden Sie dieses nicht drauBen; 14. Das Ladekabel muss aus der Steckdose entfernt werden, bevor die Batterie entnommen oder das Gerät gereinigt und gewartet wird.Batteriesicherheit:
1. Dieses Gerät beinhaltet Li-ion Batterien, verbrennen Sie die Batterien nicht oder setzen Sie diese keinen hohen Temperaturen aus, da sie explodieren können; 2. Die aus der Batterie ausgetretene Flüssigkeit kann Irritationen oder Brandwunden verursachen; 3. In einer Notsituation kontaktieren Sie unverzüglich professionelle Hilfe; 4. Unter extremen Bedingungen können Leckagen aus den Batteriezellen entstehen. Fassen Sie keine Flüssigkeit an, die aus der Batterie austritt. Wenn die Flüssigkeit auf die Haut gelangt, waschen Sie diese unverzüglich mit Seife und Wasser ab. Wenn die Flüssigkeit in die Augen gelangt, spülen Sie diese mit sauberem Wasser für mindestens 10 Minuten aus und suchen Sie umgehend einen Arzt auf. Tragen Sie Handschuhe, wenn Sie die Batterie handhaben und entsorgen Sie diese unverzüglich gemäß den örtlichen Vorschriften; 5. Der Kurzschluss von Batterieklemmen kann zu Verbrennungen oder einem Brand führen; 6. Wahrend der Batteriepack nicht benutzt wird, halten Sie diesen von Büroklammern, Münzen, Schlüsseln, Nageln, Schrauben oder anderen kleinen Metallgegenstanden fern, die eine Verbindung von einem Pol zum anderen herstellen können. 7. Wenn Sie das Gerät entsorgen, entnehmen Sie die Batterie und entsorgen Sie diese sicher gemaB lokalen Vorschriften.SERVICE:
1, Vor der Nutzung des Gerates und nach jedem Einfluss, prüfen Sie das Gerät auf Verschleiß und Beschädigung und reparieren Sie dieses, wenn notig; 2, Benutzen Sie das Gerät nicht, wenn jegliches Teil beschadigt oder defekt ist; 3, Reparaturen müssen von einem Dienstleister oder einer passend qualifizierten Person gemaB den lokalen Sicherheitsvorschriften durchgeführt werden. Reparaturen durch eine unqualifizierte Person können gefährlich sein; 4, Modifizieren Sie das Gerät in keinerlei Weise, da dies das Risiko einer Körperverletzung erhöhen konnte; 5, Benutzen Sie ausschließlich das Zubehör oder die Ersatzteile, die von dem Hersteller empfohlen oder zur Verfügung gestellt worden sind.VERWENDUNGSZWECK:
1, Dieses Gerät ist ausschließlich für das trockene Staubsaugen im Haushalt geeignet; 2, Saugen Sie keine Flüssigkeiten oder benutzen Sie das Gerät nicht auf feuchten Flachen; 3, Saugen Sie keine entflammbaren, brennenden oder rauchenden Stoffe; 4, Nur auf die in diesem Handbuch beschriebene Weise benutzen; 5, Benutzen Sie das Gerät nicht auf dem Beton, Teermakadam oder anderen groben Flachen.WARNUNG:
1. Benutzen Sie kein Wasser, keine Lösungs- oder Poliermittel, um die Außenflache des Gerates zu reinigen; wischen Sie diese mit einem trockenen Tuch ab 2. Tauchen Sie das Gerät niemals in Wasser oder reinigen Sie dieses nicht in einer Spülmaschine.BESCHREIBUNG DER KOMPONENTEN:
  PRODUKTINSTALLATION:
1. Nutzung als Stielstaubsauger
a) Montieren Sie den Batteriepack an die Griff-Baugruppe, vergewissern Sie sich, dass der Batterie-Verschlussknopf in den Staubbehalter-Schlitz korrekt, wie unten angezeigt, eingesetzt wurde. natural_image
Line drawing of a mechanical device with no visible text or symbolsnatural_image
Technical line drawing of a mechanical component with two views (top and side), no text or symbols present.natural_image
Technical line drawing of a mechanical device with two views: top shows cylindrical component, bottom shows angled housing (no text or symbols)natural_image
Technical line drawing of a mechanical assembly with an arrow indicating direction (no text or symbols present)flowchart
graph LR
A["DRÜCKEN"] --> B["Step 1: Hand movement with arrow indicating motion"]
B --> C["Step 2: Click button with arrow indicating motion"]
C --> D["Step 3: Table setting with arrow indicating movement"]
D --> E["Step 4: Click button with arrow indicating motion"]
flowchart
graph TD
A["An-Aus Schalter"] --> B["Touch-Geschwindigkeitsregelung"]
B --> C["Niedrige Geschwindigkeit"]
C --> D["Touch-Taste"]
D --> E["Mittlere Geschwindigkeit"]
E --> F["Gohe Geschwindigkeit"]
natural_image
Technical line drawing of a mechanical device before and after assembly, showing internal components and motion arrows (no text or symbols)Batterieaufladung:
1) Wenn der Ladezustand-Indikator blinkt, schalten Sie das Gerät bitte aus, dann platzieren Sie dieses zurück auf der Lade-Grundlage zum Laden. 2) Nach dem Anschließen wird der Ladevorgang durch das Blinken des Indikators anzeigen. Die Batterie wird das Aufladen abbrechen, sobald diese voll ist.   3) Wenn die Batterieanzeige nicht blinkt, ist die Batterie vollgeladen. 4) Die Bürsten-Anzeige leuchtet normalerweise andauernd. Im Falle einer Blockierung der Power-Bürste wird die Anzeige blinken, um den Nutzer zu warnen, den Staubsauger aufleuchten und die Bürste zu reinigen, oder die Bürste auf andere Fehlfunktionen zu überprüfen.Den Staubbehalter entleeren
1) Léisen Sie den Staubbehalter- Ausléiser 2) Entnehmen Sie den Staubbehalter in die unten angezeigte Richtung  natural_image
Illustration of hands holding a camera lens with an upward arrow indicating motion (no text or symbols)natural_image
Illustration of a hand holding a cylindrical object with a magnified view showing the process (no text or symbols)natural_image
Diagram showing sun, plastic components, and a mechanical component with no text or symbolsnatural_image
Hand holding a glass jar with chopsticks, no text or symbols visiblenatural_image
Illustration showing hands pouring liquid into a container and then into a bowl (no text or symbols)natural_image
Illustration of hands operating a mechanical device with a rotating arrow indicating rotational motion (no text or symbols)FEHLERSUCHE:
| Saugt nicht gut | 1, Entleeren Sie den Staubbehalter.2, Überprüfen Sie, dass der Staubbehalter korrekt montiert ist. 3, Überprüfen Sie, dass der Filter korrekt eingesetzt ist.4, Reinigen Sie den Filter. |
| Hait an oder funktioniert nicht. | 1, Laden Sie die Batterie auf.2, Reinigen Sie den Filter. |
| Die Batterie lad nicht. | 1, Überprüfen Sie die Verbindung mit dem Stromkabel.2, Überprüfen Sie die Steckdose. |
| Power-Bürste funktioniert nicht. | 7. Stellen Sie sicher, dass der Staubbehalter korrekt montiert und verriegelt ist.8. Stellen Sie sicher, dass die Bürste und das Metallrohr test verbunden sind.9. Prüfen Sie, dass die Bürste nicht blockiert ist. |
TECHNISCHE SPEZIFIKATIONEN
| Batterie | 25.9V/2200mAh |
| Ladezeit | 4 .5 Stunden |
| Eingang | 31V/500mA |
| Gewicht | 1.8kg |
| Nutzungsdauer | 40 Min (niedrige Geschwindigkeit), 20 Min (mittlere Geschwindigkeit) , 10 Min (hohe Geschwindigkeit) |
| Motorleistung | 220W |
| Luftstrom | 20dm3/s |
| VerpackungsmaBe | 690*270*145mm |
GARANTIE
Die Garantiezeit für unsere Produkte beträgt 2 Jahre, sofern keine anderen Bestimmungen gelten, ab dem Datum des ursprünglichen Kaufs oder ab dem Lieferdatum. Bei Problemen oder Fragen können Sie sich an unsere Hilfeseiten, Tipps zur Fehlerbehebung, FAQs und Bedienungsanleitungen auf unserer Kundendienst-Website wenden: https://sav.hkoenig.com. Wenn Sie den Referenznamen Ihres Geräts in die Suchleiste eingeben, erhalten Sie Zugang zu allen verfügbaren Online-Supports. Wenn Sie immer noch keine Antwort auf Ihre Frage oder Ihr Problem finden, dann klicken Sie auf "Hat die Antwort Ihr Problem gelöst?". Sie können dieses Formular ausfüllen, um Ihre Anfrage zu bestätigen und Hilfe zu erhalten.GARANTIEBEDINGUNGEN
Die Garantie deckt alle Defekte ab, die bei normalem, bestimmungsgemäßem Gebrauch und den in der Bedienungsanleitung enthaltenen Spezifikationen auftreten. Diese Garantie gilt nicht für Probleme mit der Verpackung oder dem Transport während des Versands des Produkts durch den Eigentümer. Sie umfasst auch nicht den normalen Verschleiß des Produkts, die Wartung oder den Austausch von Verschleißteilen.AUSSCHLUSS DER GARANTIE
- Zubehör und Verschleißteile (\*). - Die normale Wartung des Geräts. - Alle Defekte, die durch unsachgemäßen Gebrauch (Stöße, Nichteinhaltung der empfohlenen Stromzufuhr, schlechte Nutzungsbedingungen usw.), unzureichende Wartung oder Zweckentfremdung des Geräts auftreten, sowie die Verwendung von ungeeignetem Zubehör. - Schäden durch äußere Einflüsse: Brand, Wasserschäden, elektrische Überspannung usw. - Alle Geräte, die von anderen als den befugten Personen (insbesondere dem Nutzer) auch nur teilweise auseinandergebaut wurden. - Produkte, deren Seriennummer fehlt, beschädigt oder unleserlich ist, sodass sie nicht identifiziert werden können. - Produkte, die vermietet, vorgeführt oder ausgestellt werden. Zeit und der Häufigkeit der Nutzung Ihres Geräts. Diese Abnutzung ist normal, kann aber durch falsche Nutzung oder Pflege Ihres Geräts noch verstärkt werden. Diese Teile sind daher nicht durch die Garantie abgedeckt. Das mit dem Gerät gelieferte Zubehör ist ebenfalls von der Garantie ausgeschlossen. Sie können daher weder umgetauscht noch erstattet werden. Einige Zubehörteile können jedoch direkt über unsere Website https://sav.hkoenig.com/ erworben werden.UMWELT
ACHTUNG :
 Werfen Sie nicht dieses Produkt, wie es mit anderen Haushaltsprodukten hat. Es gibt eine Mülltrennungs von diesem Produkt in Gemeinden, Sie müssen ihre lokalen Behörden über - die Orte, wo man dieses Produkt zurückgeben können zu informieren. In der Tat enthalten elektrische und elektronische Produkte gefährliche Staffe, die schadliche Auswirkungen auf die Umwelt oder die menschliche Gesundheit haben und sollte recycelt werden. Das Symbol hier darauf hinweisen, dass elektrische oder elektronische Gera.te sollten sorgfaltig ausgewahlt werden, ist ein fahrbarer Abfallbehalter mit einem Kreuz markiert. Adeva SAS/ H.Koenig Europe - 8 rue Marc Seguin - 77290 Mitry Mory - France www.hkoenig.com - sav@hkoenig.com - contact@hkoenig.com - Tél: +33 1 64 67 00 05NEDERLAND
BELANGRIJKE VEILIGHEIDSINSTRUCTIES BELANGRIJK: LEES ALLE INSTRUCTIES VOOR GEBRUIK. BEWAAR DE HANDLEIDING VOOR TOEKOMSTIGE REFERENTIE. Niet gebruiken in de regen of buiten laten liggen in de regen WAARSCHUWING: De standaard veiligheidsregels moeten altijd worden opgevolgd bij het gebruik van een elektrisch apparaat, inclusief de volgenden om de risico's te verkleinen op brand, elektrische schok, of verwondingen.Persoonlijke Veiligheid:
1. Binnen bewaren op een droge plek en buiten bereik van kinderen; 2. Altijd verantwoordelijk gebruiken. Dit apparaat kan gebruikt worden door en ouder en door personen met beperkte geestelijke of lichamelijke capaciteiten, of met een gebrek aan ervaring en kennis, zolang ze toezicht krijgen of instructies voor het veilig gebruik van dit apparaat hebben gehad en de bijbehorende gevaren begrijpen; 3. Laat kinderen niet spelen met dit apparaat; houd toezicht op kinderen die het apparaat gebruiken of onderhouden; 4. Gebruik alleen accessoires die door de fabrikant worden aanbevolen, zoals beschreven in deze handleiding; verkeerd gebruik of een andere accessoire dan aanbevolen, kunnen risico's of persoonlijke verwondingen veroorzaken; 5. Wees extra voorzichtig met het zuigen van trappen; 6. Houd het apparaat en accessoires bij hete oppervlakken vandaan; 7. Niet openingen van het apparaat afdekken of luchtstromen beperken, houd openingen vrij van objecten, inclusief stof, pluisjes, kleren en vingers (en andere lichaamsdelen); 8. Houd vooral haar weg bij openingen en bewegende onderdelen; 9. Dit apparaat mag worden gebruikt door kinderen vanaf 8 jaar en ouder indien dit gebeurt onder toezicht, ais zij van tevoren instructies hebben ontvangen betreffende het veilige gebruik van het apparaat en ais zij de mogelijke gevaren kennen. 1O. Reiniging en onderhoud mogen niet worden uitgevoerd door kinderen tenzij ze 8 jaar of ouder zijn en onder toezicht van een volwassene staan. 11. Houd het apparaat en het snoer buiten bereik van kinderen onder de 8 jaar. 12. Bij het gebruik van elektrische apparatuur moeten altijd veiligheidsmaatregelen worden genomen om het risico van brand, elektrische schokken en/of letsel in geval van verkeerd gebruik te voorkomen. 13. Controleer of de spanning op het typeplaatje overeenkomt met de spanning die op het typeplaatje staat van uw installatie. Ais dit niet het geval is, neem dan contact op met de dealer en sluit het apparaat niet aan. 14. Laat het apparaat nooit onbeheerd achter terwijl het in bedrijf is. 15. Bewaar dit document bij de hand en geef het aan de toekomstige eigenaar in geval van overdracht van uw apparaat.ELEKTRISCHE VEILIGHEID:
1. Gebruik alleen accu's en opladers die worden geleverd door de fabrikant; 2. Nooit aanpassingen maken aan de lader op wat voor manier ook; 3. De oplader is ontworpen voor een specifiek voltage. Altijd controleren dat het voltage overeen komt met hetgeen op het typeplaatje; 4. Een oplader die geschikt is voor een bepaald type accu kan een risico op vuur creëren bij gebruik van een ander type accu. 5. Voor gebruik, controleer de kabel van de oplader op beschadigingen of ouderdom. Een beschadigde of verknoopte kabel verhoogt de risico op vuur en elektrische schokken. 6. Gebruik de kabel van lader op de juiste wijze; 7. Nooit de lader dragen aan de kabel; 8. Nooit aan de kabel trekken om de lader uit het stopcontact te halen, altijd netjes de lader vastpakken; 9. Niet de kabel om de lader wikkelen voor opslag; 10. Houd de kabel van de lader weg van hete oppervlakken en scherpe randen; 11. De kabel kan niet worden vervangen. Ais de kabel is beschadigd moet de lader worden afgevoerd en worden vervangen. 12. Hanteer het apparaat of de oplader niet met natte handen; 13. Niet het apparaat buiten opslaan. 14. De lader moet worden verwijderd uit het stopcontact voor het verwijderen van de accu, schoonmaak of onderhoud van het apparaat.ACCU VEILIGHEID:
1. Dit apparaat bevat een Li-ion-accu, niet de accu verbranden of blootstellen aan hoge temperaturen, dit kan een explosie veroorzaken; 2. Vloeistoffen die uit de accu komen kunnen leiden tot irritaties en verbrandingen; 3. In een noodgeval altijd meteen contact opnemen met een professional; 4. Lekkage van de accucellen kan voorkomen onder extreme omstandigheden. Raak geen vloeistof aan die uit de accu loopt. Ais de vloeistof in contact komt met de huid meteen wassen met zeep en water. Ais de vloeistof in de ogen komt, meteen spoelen met water voor minimaal 10 minuten en zoek medische hulp. Draag handschoenen om de accu te hanteren en voer het direct af volgens de lokale wetgeving; 5. Het kortsluiten van de accu-polen kan leiden tot vonken of vuur; 6. Ais de accu niet in gebruik is, houd het dan weg bij paperclips, munten, sleutels, spijkers, schroeven of andere kleine metalen objecten die tot een kortsluiting van de accu kan leiden. 7. Bij het afvoeren van het apparaat, verwijder dan de accu en lever deze in volgens de lokale wetgeving.ONDERHOUD:
1. Voor gebruik van het apparaat en ais het een tik heeft gehad, controleer op tekenen van slijtage of schade en zorg voor reparaties indien nodig; 2. Gebruik het apparaat niet ais er een onderdeel beschadigd of defect is; 3. Reparaties moeten worden uitgevoerd door een onderhoudsmonteur of een gekwalificeerd persoon volgens de relevante veiligheidsregels. Reparaties uitgevoerd door ongekwalificeerde personen kunnen gevaarlijk zijn; 4. Nooit het apparaat aanpassen op welke manier dan ook, dit kan het risico verhogen op persoonlijke verwondingen; 5. Alieen vervangende onderdelen gebruiken van de fabrikant of door de fabrikant worden aanbevolen.BEOOGD GEBRUIK:
1. Dit apparaat is alleen ontworpen voor huishoudelijk droog stofzuigen; 2. Zuig er geen vloeistoffen mee op en niet gebruiken op natte oppervlakken; 3. Zuig niets op wat brandbaar is, in brand staat of rookt. 4. Alieen gebruiken zoals aangegeven in deze handleiding; 5. Niet gebruiken op beton, asfalt of andere ruwe oppervlakken.WAARSCHUWING:
1. Gebruik geen water, oplosmiddelen of poetsmiddelen om de buitenkant van het apparaat schoon te maken; maak het schoon met een droge doek; 2. Nooit het apparaat onderdompelen in water en niet schoonmaken in een vaatwasser.INTRODUCTIE VAN ONDERDELEN:
 INSTALLATIE PRODUCT:
1. Gebruik ais een steelstofzuiger A) Plaats de accu aan het handvat, zorg dat de kop van de accu op de juiste manier de stofbak ingaat zoals hieronder aangegeven natural_image
Line drawing of a mechanical device with no visible text or symbolsnatural_image
Technical line drawing of a mechanical component with two views (top and side), no text or symbols present.natural_image
Technical line drawing of a mechanical device with two views: top shows a cylindrical component, bottom shows a flanged housing (no text or symbols)natural_image
Technical line drawing of a mechanical assembly with an arrow indicating direction (no text or symbols present)flowchart
graph LR
A["DUW"] --> B["Step 1: Hand holding device"]
B --> C["Step 2: Downward shift in airbag"]
C --> D["Step 3: Table with switch and mouse"]
D --> E["Step 4: Click button"]
flowchart
graph TD
A["Aan-uit-schakelaar"] --> B["Snelheidsregelaar"]
B --> C["Hoge snelheid"]
B --> D["Lage snelheid"]
B --> E["Druk knop in"]
B --> F["Gemiddelde snelheid"]
1. Gebruik ais handige stofzuiger
Plaats de accessoire zoals hieronder aangegeven. natural_image
Technical line drawing of a mechanical device before and after assembly, showing internal components and motion arrows (no text or symbols)II. Accu opladen:
1) Ais de indicator van de accu brandt, schakel dan het apparaat uit en plaats deze op de basis om hem op te laden. 2) Steek de stekker in het stopcontact en de indicator zal gaan branden, dan wordt er opgeladen. Het opladen stopt als de accu vol is.  3) Ais de indicator van de accu niet brandt, is de accu vol. 4) Normaal brandt de indicator van de borstel, aïs de borstel geblokkeerd is, knippert deze om de consument te waarschuwen de stofzuiger uit te oplichten, de borstel schoon te maken en te controleren of er mogelijk iets niet klopt.III. Hoe de stofbak legen
1) ontgrendel de stofbak - vergrendeling  2 ) verwijder de stofbak in de richting zoals hieronder aangegeven natural_image
Illustration of hands using a camera lens to adjust the lens (no text or symbols present)natural_image
Illustration of a hand holding a cylindrical object with a separate view showing the process of a mechanical or electrical component (no text or symbols present)natural_image
Line drawings of various household appliances including a sun, a cup holder, a washer, and a fan (no text or symbols)natural_image
Hand holding a jar with chopsticks, no text or symbols visiblenatural_image
Illustration of hands holding a container and dipping into a basin (no text or symbols)natural_image
Illustration of hands operating a mechanical device with rotation arrows (no text or symbols)PROBLEEMOPLOSSING:
| Zuigt niet goed | 1. Leeg de stofbak2. Controleer dat de stofbak goed is geplaatst3. Controleer dat het filter goed is geplaatst4. Maak het filter schoon |
| Stopt of werkt niet | 1. Laad de accu op2. Maak het filter schoon |
| Accu laad niet op | 1. Controleer de aansluiting van het stopcontact2. Controleer stopcontact |
| De powerborstel werkt niet | 1. Zorg dat de stofbak juist geplaatst is en vastzit2. Zorg dat de powerborstel & de metalen buis stevig aangesloten zijn3. Controleer dat de borstel niet geblokkeerd wordt |
TECHNISCHE SPECIFICATIES
| Accu | 25,9V/2200mAh |
| Oplaadtijd | 4,5 uur |
| Invoer | 31V/500mA |
| Gewicht | 1,8kg |
| Gebruiktijd | 40Min (lage snelheid), 20 min (gemiddelde snelheid), 10min (hoge snelheid) |
| Motorvermogen | 220W |
| Luchtstroming | 20dm3/s |
| Afmetingen verpakking | 690 x 270 x 145mm |
GARANTIE
De garantieperiode op onze producten is 2 jaar, tenzij anders vermeld, beginnend vanaf de datum van de initiële aankoop of bezorgdatum. Als u problemen of vragen heeft, kunt u eenvoudig onze hulppagina's bezoeken voor tips om problemen op te lossen, de FAQ's en andere gebruikershandleidingen op onze website: https://sav.hkoenig.com. Door de referentienaam van uw apparaat in de zoekbalk te typen, krijgt u toegang tot alle beschikbare online hulpmiddelen, ontworpen om aan uw behoeften te voldoen. Als u toch niet geen antwoord op uw vraag kunt vinden, klik dan op "Heeft het antwoord uw probleem opgelost? Hierdoor gaat u naar het Aanvraagformulier voor Klantenondersteuning, dat u in kunt vullen om uw verzoek te valideren en hulp te ontvangen.GARANTIEVOORWAARDEN
De garantie dekt alle mankementen die voortkomen uit normaal gebruik, volgens de sectie gebruik en specificaties in de gebruikershandleiding. Deze garantie omvat niet verpakkings- of transportproblemen tijdens het vervoer van het product door de eigenaar. Het omvat ook niet de normale slijtage van het product, noch het onderhoud of vervangen van verbruiksartikelen.UITSLUITINGEN VAN DE GARANTIE
- Accessoires en verbruiksartikelen (\*). - Normaal onderhoud van het apparaat. - Alle mankementen veroorzaakt door verkeerd gebruik (schokken, het niet opvolgen van de aanbevolen stroomvoorziening, in slechte omstandigheden gebruiken, etc.), onvoldoende onderhoud of ondeugdelijk gebruik van het apparaat, alsook het gebruik van ongeschikte accessoires. - Schade van buitenaf: vuur, waterschade, elektrische stroompiek, etc. - Apparaten die uit elkaar zijn gehaald, ook gedeeltelijk, door personen die niet er niet gekwalificeerd voor zijn (zoals de gebruiker). - Producten waarvan het serienummer verdwenen, beschadigd of onleesbaar is, waardoor we het niet kunnen identificeren. - Producten die verhuurd werden of ter demonstratie of showmodel waren. (\*) Sommige onderdelen van uw apparaat, genaamd verbruiksartikelen, slijten naar verloop van tijd en bij veel gebruik van uw apparaat. Deze slijtage is normaal, maar kan verergerd worden door slechte omstandigheden of onderhoud van uw apparaat. Deze onderdelen worden daarom niet gedekt door de garantie. De accessoires meegeleverd met het apparaat zijn ook uitgesloten van de garantie. Ze kunnen niet vervangen of gerestitueerd worden. Echter, sommige accessoires zijn te koop via onze website: https://sav.hkoenig.com/.MILIEU
ATTENTIE:
Dit apparaat mag niet met uw ander huishoudelijke toestellen worden verwijdert. Dit product moet op een  geselecteerde stortplaats verwijdert worden. U kunt bij de gemeente een indiceerde plaats aanvragen. Elektrisch en elektronische producten kunnen gevaarlijke stiffen i\`nhouden di'e schadelIJ'k zIJn voor mensen en het m'llIe'u en moet recycled worden. Het symbool aan de kant geeft aan dat het een elektrisch en elektronisch toestel is en zijn dus artikelen van een selectieve collectie. Het beeld geeft een afvalbak met een X teken aan. Adeva SAS/ H.Koenig Europe - 8 rue Marc Seguin - 77290 Mitry Mory - France www.hkoenig.com - sav@h koenig.com - contact@hkoenig.com - Tél: +33 1 64 67 00 05ESPAGNOL
MEDIDAS DE SEGURIDAD IMPORTANTES
IMPORTANTE: LEA TODAS LAS INSTRUCCIONES ANTES DE USAR LA ASPIRADORA. GUARDE ESTE MANUAL DE INSTRUCCIONES PARA CONSULTAS FUTURAS. No use la aspiradora bajo la lluvia ni la deje a la intemperie mientras llueve. ADVERTENCIA: Durante la manipulación y el uso de cualquier electrodoméstico siempre se deben acatar las precauciones basicas de seguridad, incluyendo las que se relacionan a continuación, para reducir el riesgo de incendias, descargas eléctricas o lesiones personales.SEGURIDAD PERSONAL:
- Almacenar en interiores, en un lugar seco y tuera del alcance de los nifios. - Usar siempre de manera responsable. Esta aspiradora puede ser usada por personas con discapacidad ffsica, sensorial o motora, o con falta de experiencia y conocimiento, siempre que sean supervisados o hayan sido debidamente instruidos en el uso del aparato de forma segura y entienden los peligros involucrados. - No permita que los nifios jueguen con la aspiradora; mantenga a los nifios bajo vigilancia cuando estén usandola o dandole mantenimiento. - Use solamente los accesorios recomendados por el fabricante, conforme a las instrucciones en este manual. El uso indebido de los accesorios, o el uso de aditamentos no recomendados por el fabricante, pueden crear un riesgo de lesiones personales. - Redoble la precaución cuando limpie escaleras. \- Mantenga el aparato y sus accesorios lejos de superficies calientes. \- No obstruya las ranuras, ni dificulte el flujo de aire, mantenga las ranuras libres de cualquier objeto, incluyendo polvo, hilas, pelusas, dedos (o cualquier parte del cuerpo). \- Especialmente, aleje su cabello de las ranuras de ventilacion y de las partes moviles. \- Este aparato puede ser utilizado por ninas de al menas 8 anas de edad, siempre que cuenten con supervision y hayan recibido instrucciones sobre el uso seguro del electrodoméstico y sean plenamente conscientes de los peligros que implica. \- La limpieza y mantenimiento de la maquina no debe ser efectuada por ninas a menas que tengan coma mfnimo 8 anas de edad y cuenten con la supervision de un adulto. \- Mantenga el aparato y su cable eléctrico tuera del alcance de ninas de menas de 8 anas. \- Al utilizar equipos eléctricos, siempre se deben tomar precauciones de seguridad para evitar el riesgo de incendia, descarga eléctrica y/o lesiones en casa de uso indebido. \- Asegurese de que la tension nominal de la placa de caracterfisticas corresponde a la tension de red de su instalacion. Si no es asf, pongase en contacta con el distribuidor y no conecte la unidad. \- Nunca deje la unidad desatendida mientras esté en funcionamiento. \- Por favor, tenga este documenta a mana y entréguelo al futuro propietario en casa de transferencia de su dispositivoSEGURIDAD ELÉCTRICA:
- Use solamente baterfas y cargadores distribuidos par el fabricante. - No modifique el cargador en ninguna circunstancia. - El cargador se alimenta con una tension específica. Siempre verifique que la tension de su red eléctrica coincida con la indicada en la placa de caracterfisticas. - Un cargador adecuado para un determinado tipo de baterfa, puede crear un riesgo de incendia si se utiliza para cargar otros tipos de baterfa. - Antes de usar el cargador, verifique el estado del cable de alimentacion. Un cable de alimentacion deteriorado aumenta el riesgo de incendia y descargas eléctricas. - No maltrate el cable de alimentacion del cargador. - Nunca arrastre o levante el cargador par el cable. - No tire del cable para desconectarlo del tomacorriente, hagalo agarrando firmemente el enchufe. - No enrosque el cable alrededor del cargador cuando vaya a guardar la aspiradora. - Mantenga el cable del cargador lejos de superficies calientes y bordes afilados. - No es posible reemplazar el cable de alimentacion del cargador. Si el cable se rompe, hay que substituir el cargador completo. - No manipule el cargador ni la aspiradora con las manas mojadas. - No guarde ni ponga a cargar la aspiradora a la intemperie. - Debe desconectar el cargador del tomacorriente antes de retirar la bacteria, limpiar la aspiradora o llevar a cabo cualquier accion de mantenimiento.SEGURIDAD DE LA BATERIA:
- Esta aspiradora se distribuye con baterfas de Li-ion. Nunca incinere las baterias ni las exponga a altas temperaturas, esta puede hacer que exploten. - El Ifquido expelido del interior de la bacteria puede causar irritaci6n o quemaduras. - En casa de emergencia, procure ayuda profesional de inmediato. - En condiciones extremas, pueden ocurrir fugas de las celdas de la baterfa. No toque ningun lfquido que provenga de la baterfa. Si el lfquido hace contacta con su piel, lave la zona afectada de inmediato con agua y jab6n. Si le cae en los ojos, enjuague inmediatamente con agua limpia durante al menas 10 minutas y procure atención médica. Use guantes para manipular la baterfa y luego deséchelos en conformidad con las regulaciones específicas de su localidad. - Recortar los terminales de la baterfa puede crear un riesgo de incendia o quemaduras. - Cuando no esté utilizando la baterfa, manténgala alejada de grampas para papel, monedas, llaves, clavas, tornillos y otros objetos metalicos pequenos que pudieran servir de conexi6n entre los terminales de la baterfa y provocar descargas. - Cuando vaya a desechar la aspiradora, primera retire la baterfa y deséchela de forma segura en conformidad con las regulaciones específicas de su localidad.MANTENIMIENTO:
- Antes de usar la aspiradora y después de cualquier impacta, compruebe si hay cualquier tipo de dano y reparelo si es necesario. - No use la aspiradora si cualquiera de sus componentes esta con problemas o defectuoso. - Las reparaciones deben ser realizadas por un agente de servicio o una persona debidamente calificada de acuerdo con las normas de seguridad pertinentes. Las reparaciones realizadas por personas no calificadas pueden ser peligrosas. - Nunca modifique la aspiradora de ninguna manera, ya que esta puede aumentar el riesgo de lesiones personales. - Utilice unicamente piezas de repuesto y accesorios distribuidos o recomendados por el fabricante.USO PREVISTO:
Este aparato está previsto para usa doméstico, exclusivamente para la aspiraci6n en seco. No aspire Ifquidos con esta aspiradora, ni la utilice sobre superficies humedas. No aspire nada que sea inflamable, que esté ardiendo o emitiendo huma. Utilice la aspiradora unicamente coma se describe en este manual. No use la aspiradora sobre el concreto, asfalto u otras superficies rugosas.ADVERTENCIA:
No utilice agua, solventes o pulimentos de ningún tipo para limpiar el exterior de la aspiradora, Ifmpiela apenas con un pana seco. Nunca sumerja la aspiradora en agua y no la friegue en un lavavajillas.DESCRIPCIÓN DE LA ASPIRADORA
  Base del cargador & Cargador INSTALACIÓN DE LA ASPIRADORA
1. Uso de la aspiradora con el mango
a) Monte la batería con el conjunto de la manija, asegurese de que la cabeza del perno de la batería encaje correctamente en la ranura del dep6sito de polvo como se muestra a continuaci6n. natural_image
Line drawing of a mechanical device with no visible text or symbolsnatural_image
Technical line drawing of a mechanical component with two views (top and side), no text or symbols present.natural_image
Technical line drawing of a mechanical device with two views: front view and side view (no text or symbols)natural_image
Technical line drawing of a mechanical assembly with an arrow indicating direction (no text or symbols present)flowchart
graph LR
A["EMPUJAR"] --> B["Step 1: Manual grip with arrow indicating motion"]
B --> C["Step 2: Click button on a table with arrow indicating movement"]
C --> D["Step 3: Click button on a side table with arrow indicating movement"]
II. Uso de la aspiradora con la mano
Inserte el accesorio deseado en la unidad corne se muestra en el siguiente esquema natural_image
Technical line drawing of a mechanical device before and after assembly, showing internal components and motion arrows (no text or symbols)III. Recarga de la baterfa
1. Cuando el indicador luminoso de la batería empiece a parpadear, apague la Aspiradora y llévela a la base del cargador para recargar la batería. 2. Enchufelo al tomacorriente. El indicador luminoso parpadeará mostrando que se está cargando. Cuando la batería esté completamente cargada, el indicador automáticamente dejará de parpadear.  3. Si el indicador de la batería no está parpadeando significa que la batería está completamente cargada. 4. El indicador del cepillo normalmente está iluminado, en casa de que el cepillo eléctrico esté bloqueado, parpadeará, para advertir al usuario que encende la aspiradora y limpie el cepillo, o revise cualquier anormalidad.IV. Vaciar el dep6sito de polvo
1) Presione el interruptor para liberar el dep6sito de polvo. 2) Retire el dep6sito de polvo en la direcci6n que se muestra.  natural_image
Illustration of a hand using a camera lens to adjust the lens (no text or symbols present)natural_image
Illustration showing a hand holding a small object with a magnified view of the ring being twisted (no text or symbols present)natural_image
Line drawings of various household appliances including a sun, a cup, a washer, and a bulb (no text or symbols)natural_image
Hand holding a glass jar with chopsticks, no text or symbols visiblenatural_image
Illustration showing a hand holding a container and another with a small container submerged in liquid (no text or symbols)natural_image
Illustration of hands operating a mechanical device with a rotating knob (no text or symbols)| La Aspiradora no limpia bien. | 1. Vade el dep6sito de polvo.2. Compruebe que el dep6sito de polvo esté bien ajustado.3. Compruebe que el filtro del dep6sito esté bien ajustado.4. Limpie el filtro. |
| La aspiradora se 1. Cargue la baterfa. | apaga o no funciona. 2. Retire los residuos de la barra del cepillo. |
| La baterfa no se recarga. | 1. Compruebe las conexiones eléctricas.2. Compruebe el tomacorriente. |
| El cepillo eléctrico no funciona | 1. Asegurese de que el dep6sito de polvo esté montado correctamente y bloqueado.2. Asegurese de que el cepillo eléctrico y el mango de metal estén bien conectados.3. Comprobar si el cepillo esta bloqueado o no. |
| Baterfa | 25.9 V/2200 mA |
| Perfodo de carga | 4.5 horas |
| Salida | 31 V/500 mA |
| Peso neto | 1.8 kg |
| Tiempo de uso | 40 min (velocidad baja), 20 min (velocidad media), 10 min (velocidad baja). |
| Potencia del motor | 220W |
| Flujo de aire | 20 dm3/s |
| Dimension de embalaje | 690*270*145 mm |
GARANTÍA
El periodo de garantía de nuestros productos es de 2 años, salvo que la ley estipule lo contrario, a partir de la fecha de la compra inicial o de la fecha de entrega. Si tiene algún problema o pregunta, puede acceder fácilmente a nuestras páginas de ayuda, consejos para solucionar problemas, preguntas frecuentes y manuales de usuario en nuestro sitio de servicio: https://sav.hkoenig.com. Al escribir el nombre de referencia de su dispositivo en la barra de búsqueda, puede acceder a toda la asistencia en línea disponible, diseñada para satisfacer mejor sus necesidades. Si sigue sin encontrar una respuesta a su pregunta o problema, haga clic en "¿La respuesta ha resuelto su problema? Esto le llevará al formulario de solicitud de asistencia posventa, que puede rellenar para validar su solicitud y obtener ayuda.CONDICIONES DE GARANTÍA
La garantía cubre todos los fallos que se produzcan en el contexto de un uso normal, de acuerdo con los usos y especificaciones del manual de usuario. Esta garantía no se aplica a los problemas de embalaje o transporte durante el envío del producto por parte del propietario. Tampoco incluye el desgaste normal del producto, ni el mantenimiento o la sustitución de piezas consumibles.EXCLUSIÓN DE GARANTÍA
- Accesorios y piezas de desgaste (\*). - Mantenimiento normal del aparato. - Todas las averías derivadas de un uso incorrecto (golpes, incumplimiento de las recomendaciones de alimentación eléctrica, malas condiciones de uso, etc.), de un mantenimiento insuficiente o de un mal uso del aparato, así como del uso de accesorios inadecuados. - Daños de origen externo: incendio, daños por agua, sobrecarga eléctrica, etc. - Cualquier equipo que haya sido desmontado, incluso parcialmente, por personas que no estén autorizadas a hacerlo (en particular el usuario). - Productos cuyo número de serie falte, esté dañado o sea ilegible, lo que no permitiría su identificación. - Productos sujetos a alquiler, demostración o exposición. (\*) Algunas piezas de su aparato, conocidas como piezas de desgaste o consumibles, se deterioran con el tiempo y la frecuencia de uso de su aparato. Este desgaste es normal, pero puede acentuarse por las malas condiciones de uso o de mantenimiento de su aparato. Por lo tanto, estas piezas no están cubiertas por la garantía. Los accesorios suministrados con el aparato también están excluidos de la garantía. No se pueden cambiar ni reembolsar. No obstante, algunos accesorios pueden adquirirse directamente en nuestro sitio web: https://sav.hkoenig.com/MEDIO AMBIENTE
ATENCIÓN:  No se deshaga de este producto coma lo hace con otros productos del hogar. Existe un sistema selectivo de colecta de este producto puesto en marcha par las comunidades, debe de informarse en su ayuntamiento acerca de los lugares en los que puede depositar -este producto. De hecho, los productos eléctricos y electrónicos pueden contener substancias peligrosas que tienen efectos nefastos para el media ambiente o para la salud humana y deben ser reciclados. El símbolo aquí presente indica que los equipos eléctricos o electrónicos deben de ser cuidadosamente seleccionados, representa un recipiente de basura con ruedas marcado con una X. Adeva SAS/ H.Koenig Europe - 8 rue Marc Seguin, 77290 Mitry-Mory, France www.hkoenig.com - sav@hkoenig.com - contact@hkoenig.com - Tél: +33 1 64 67 00 05ITALIANO
IMPORTANTI ISTRUZIONI DI SICUREZZA
IMPORTANTE: LEGGERE TUTTE LE ISTRUZIONI PRIMA DELL'USO. CONSERVARE LE ISTRUZIONI PER RIFERIMENTO FUTURO. Non usare sotte la pioggia o lasciare all'aperto mentre piove AVVERTENZA: Osservare sempre le precauzioni di sicurezza di base quando si utilizza un apparecchio elettrico, incluse le seguenti, per ridurre il rischio di incendi, scosse elettriche o lesioni.SICUREZZA PERSONALE:
1. conservare al chiuso e in un luogo asciutto, fuori dalla portata dei bambini; 2. utilizzare sempre in modo responsabile. Questo apparecchio può essere utilizzato da persane con ridotte capacità fisiche, sensoriali o mentali o senza esperienza e conoscenza, solo se sono supervisionati o sono stati istruiti sull'uso dell'apparecchio in modo sicuro e ne comprendano i pericoli annessi; 3. non lasciare che i bambini giochino con l'apparecchio; sorvegliare i bambini che usano o detengono l'apparecchio; 4. utilizzare solo gli accessori raccomandati dal produttore corne descritto in questo manuale; un uso improprio o l'uso di qualsiasi accessorio diverse da quelli raccomandati, possono rappresentare un rischio di lesioni personali; 5. prestare particolare attenzione quando si puliscono le scale; 6. Tenere l'apparecchio e gli accessori lontano da superfici calde; 7. Non bloccare le aperture degli apparecchi o ostacolare il flusso d'aria, tenere le aperture libere da oggetti quali polvere, Ianugine, vestiti, dita (e tutte le parti del corpo); 8. Tenere in particolare i capelli lontano da aperture e parti mobili; 9. Questo apparecchio può essere utilizzato da bambini a partire da 8 anni, purché sorvegliati e istruiti all'uso sicuro dell'apparecchio e pienamente a conoscenza dei pericoli che comporta. 10. La pulizia e la manutenzione non devono essere eseguite da bambini a mena che abbiano più di 8 anni e siano sorvegliati da un adulto. 11. Conservare l'apparecchio e il cava di alimentazione fuori dalla portata di bambini di età inferiore a 8 anni. Quando si utilizzano apparecchiature elettriche, è necessario adottare sempre misure di sicurezza per prevenire il rischio di incendi, scosse elettriche e/o lesioni in casa di usa improprio. 12. Accertarsi che la tensione nominale sulla targhetta corrisponda alla tensione principale della vostra installazione. In casa contrario, contattare il rivenditore e non collegare l'unità 13. Non lasciare mai l'unità incustodita durante il funzionamento. 14. Si prega di tenere questo documenta a portata di mana e di consegnarlo al futuro proprietario in casa di trasferimento del dispositivo.SICUREZZA ELETTRICA:
1. utilizzare solo batterie e caricabatterie forniti dal produttore 2. non modificare mai il caricabatterie in alcun modo; 3. il caricatore è stato progettato per una tensione specifica. Verificare sempre che la tensione di rete corrisponda a quella indicata sulla targhetta dei dati tecnici; 4. un caricabatterie adatto per un tipo di batteria può creare un rischio di incendia se utilizzato con un altro gruppo batteria; 5. Prima dell'uso, controllare il cava di ricarica per verificare che non vi siano segni di danni o deterioramento. Un cava di carica danneggiato o impigliato aumenta il rischio di incendia e scosse elettriche; 6. utilizzare con cura il cava del caricatore; 7. non trasportare mai il caricatore dal cava; 8. non tirare il cava per scollegarlo da una presa, afferrare la spina e tirare per disconnetterla; 9. non avvolgere il cava intorno al caricatore durante la conservazione; 1O. Tenere il cava del caricabatterie lontano da superfici calde e spigoli vivi; 11. il cava di alimentazione non può essere sostituito. Se il cava è danneggiato, il caricabatterie deve essere smaltito e sostituito. 12. non maneggiare il caricatore o l'apparecchio con le mani bagnate; 13. Non conservare o caricare l'apparecchio all'aperto; 14. Il caricatore deve essere rimosso dalla presa prima di rimuovere la batteria, pulire o effettuare la manutenzione dell'apparecchio.SICUREZZA DELLA BATTERIA:
1. Questo apparecchio include batterie agli ioni di litio, non incenerire le batterie e non esporle a temperature elevate, in quanta potrebbero esplodere; 2. il liquida espulso dalla batteria può causare irritazioni o ustioni; 3. In una situazione di emergenza richiedere immediatamente un aiuto professionale; 4. delle perdite dalle celle della batteria possono verificarsi in condizioni estreme. Non toccare alcun liquida che fuoriesce dalla batteria. Se il liquida entra a contatto con la pelle, sciacquare immediatamente con acqua e sapone. Se il liquida entra a contatto con gli occhi, sciacquarli immediatamente con acqua pulita per almeno 10 minuti e consultare un medico. Indossare guanti per maneggiare la batteria e smaltire immediatamente in conformità con le normative locali; 5. cortocircuitare i terminali della batteria potrebbe causare ustioni o incendi; 6. Quando la batteria non è in uso, tenerla lontano da graffette, monete, chiavi, chiodi, viti o altri piccoli oggetti metallici che potrebbero effettuare una connessione da un terminale all'altro. 7. Quando si smaltisce l'apparecchio, rimuovere la batteria e smaltirla in modo sicuro in conformità con le normative locali.FUNZIONAMENTO:
1. Prima di utilizzare l'apparecchio e dopa agni impatto, controllare se vi sono segni di usura e d'effettuare una riparazione se necessario; 2. non utilizzare l'apparecchio se una qualsiasi parte è danneggiata o difettosa; 3. Le riparazioni devono essere eseguite da un agente di assistenza o da una persona adeguatamente qualificata in conformità con le pertinenti norme di sicurezza. Le riparazioni eseguite da persane non qualificate potrebbero essere pericolose; 4. Non modificare mai l'apparecchio in alcun modo poiché cià potrebbe aumentare il rischio di lesioni personali; 5. utilizzare solo parti di ricambio o accessori forniti o raccomandati dal produttore.USO PREVISTO:
1. questo apparecchio è stato progettato solo perla pulizia domestica a secco; 2. non raccogliere liquidi e non utilizzare su superfici bagnate; 3. non raccogliere nulla che sia infiammabile, bruci o sia fumante; 4. utilizzare solo corne descritto in questo manuale; 5. non utilizzare su cemento, asfalto o aitre superfici ruvide.AWERTIMENTO:
1. non utilizzare acqua, solventi o lucidanti per pulire l'esterno dell'apparecchio; pulire con un panno asciutto; 2. non immergere mai l'unità in acqua e non lavare in lavastoviglie.ILLUSTRAZIONE DEI COMPONENTI:
  ISTALLAZIONE PRODOTTO:
1. Utilizzo corne aspirapolvere
a) Montare il gruppo batteria con il gruppo rnaniglia, assicurarsi che la testa del bullone della batteria si inserisca correttamente la fessura del contenitore polvere corne indicato di seguito natural_image
Line drawing of a mechanical device with no visible text or symbolsnatural_image
Technical line drawing of a mechanical component with two views (top and side), no text or symbols present.natural_image
Technical line drawing of a mechanical device with two views: front view and side view (no text or symbols)natural_image
Technical line drawing of a mechanical assembly with an arrow indicating direction (no text or symbols present)flowchart
graph LR
A["Hand positioning on SPINGERE"] --> B["Tool movement with arrows indicating motion"]
B --> C["Table setting with arrow indicating movement"]
C --> D["Click action on SPINGERE"]
II. Utilizzo corne aspirapolvere manuale
Inserisci l'accessorio al corpo corne mostrato sotto natural_image
Technical line drawing of a mechanical device before and after assembly, showing internal components and motion arrows (no text or symbols)II. Carica della batteria :
1) Quando l'indicatore di carica della batteria lampeggia, si prega di spegnere l'apparecchio e rimetterlo alla base di ricarica per la ricarica. 2) La spina e l'indicatore lampeggeranno, per indicare la carica. La batteria si spegnerà automaticamente quando la batteria sarà completamente carica.   3) Se l'indicatore della batteria non lampeggia, la batteria è carica. 4) L'indicatore della spazzola normalmente è leggero, nel caso in cui la spazzola di alimentazione sia bloccata , lampeggerà, per avvisare il cliente accendere l'aspirapolvere e pulire la spazzola, o controllare qualsiasi altra anomalia della spazzola.III. Come svuotare il contenitore della polvere
1 ) premere il pulsante di rilascio del Contenitore polvere 2) rimuovere il Contenitore corne mostrato nell'immagine natural_image
Line drawing of hands operating a mechanical device with a tool, no text or symbols presentnatural_image
Illustration of hands using a handheld device to adjust or install a cylindrical component (no text or symbols visible)natural_image
Illustration of a hand holding a glass jar and rotating a circular object, showing a step-by-step motion (no text or symbols)natural_image
Line drawings of a sun, a plastic component with filter, and a mechanical component (no text or symbols)natural_image
Illustration of a hand holding a cup with fingers, no text or symbols presentnatural_image
Illustration showing hands pouring liquid into a container with a small inset image of a test tube submerged in water (no text or symbols)natural_image
Illustration of hands operating a mechanical device with a rotating arrow indicating rotation (no text or symbols present)RISOLUZIONE DEI PROBLEMI:
| Non aspira bene | 1. Svuotare il contenitore della polvere2. Assicurarsi che il contenitore della polvere sia montato correttamente3. controllare che il filtro sia montato correttamente4, pulire il filtro |
| Si blocca o non funziona | 1. Caricare la batteria2. Pulire il filtro |
| La batteria non si carica | 1. Controllare la connessione del cavo batteria2. Controllare la presa a muro |
| La spazzola elettrica non funziona | 1. Assicurarsi che il contenitore della polvere sia montato correttamente e bloccato2. Assicurarsi che la spazzola elettrica e il tubo metallico siano collegati saldamente3. Controllare se la spazzola elettrica è bloccata |
SPECIFICHE TECNICHE
| Batteria | 25.9V/ 2200mAh |
| Tempo necessario perla carica | 4,5 ore |
| Input | 31V/500mA |
| Peso | 1.8kg |
| Durata di utilizzo | 40min (bassa velocità), 20min (media velocità), 10min (alta velocità) |
| Potenza motore | 220W |
| Flusso aria | 20dm3 /s |
| Dimensioni imballaggio | 690*270*145mm |