MANUAL DE USUARIO Fiorina 902 SLINE QLIMA
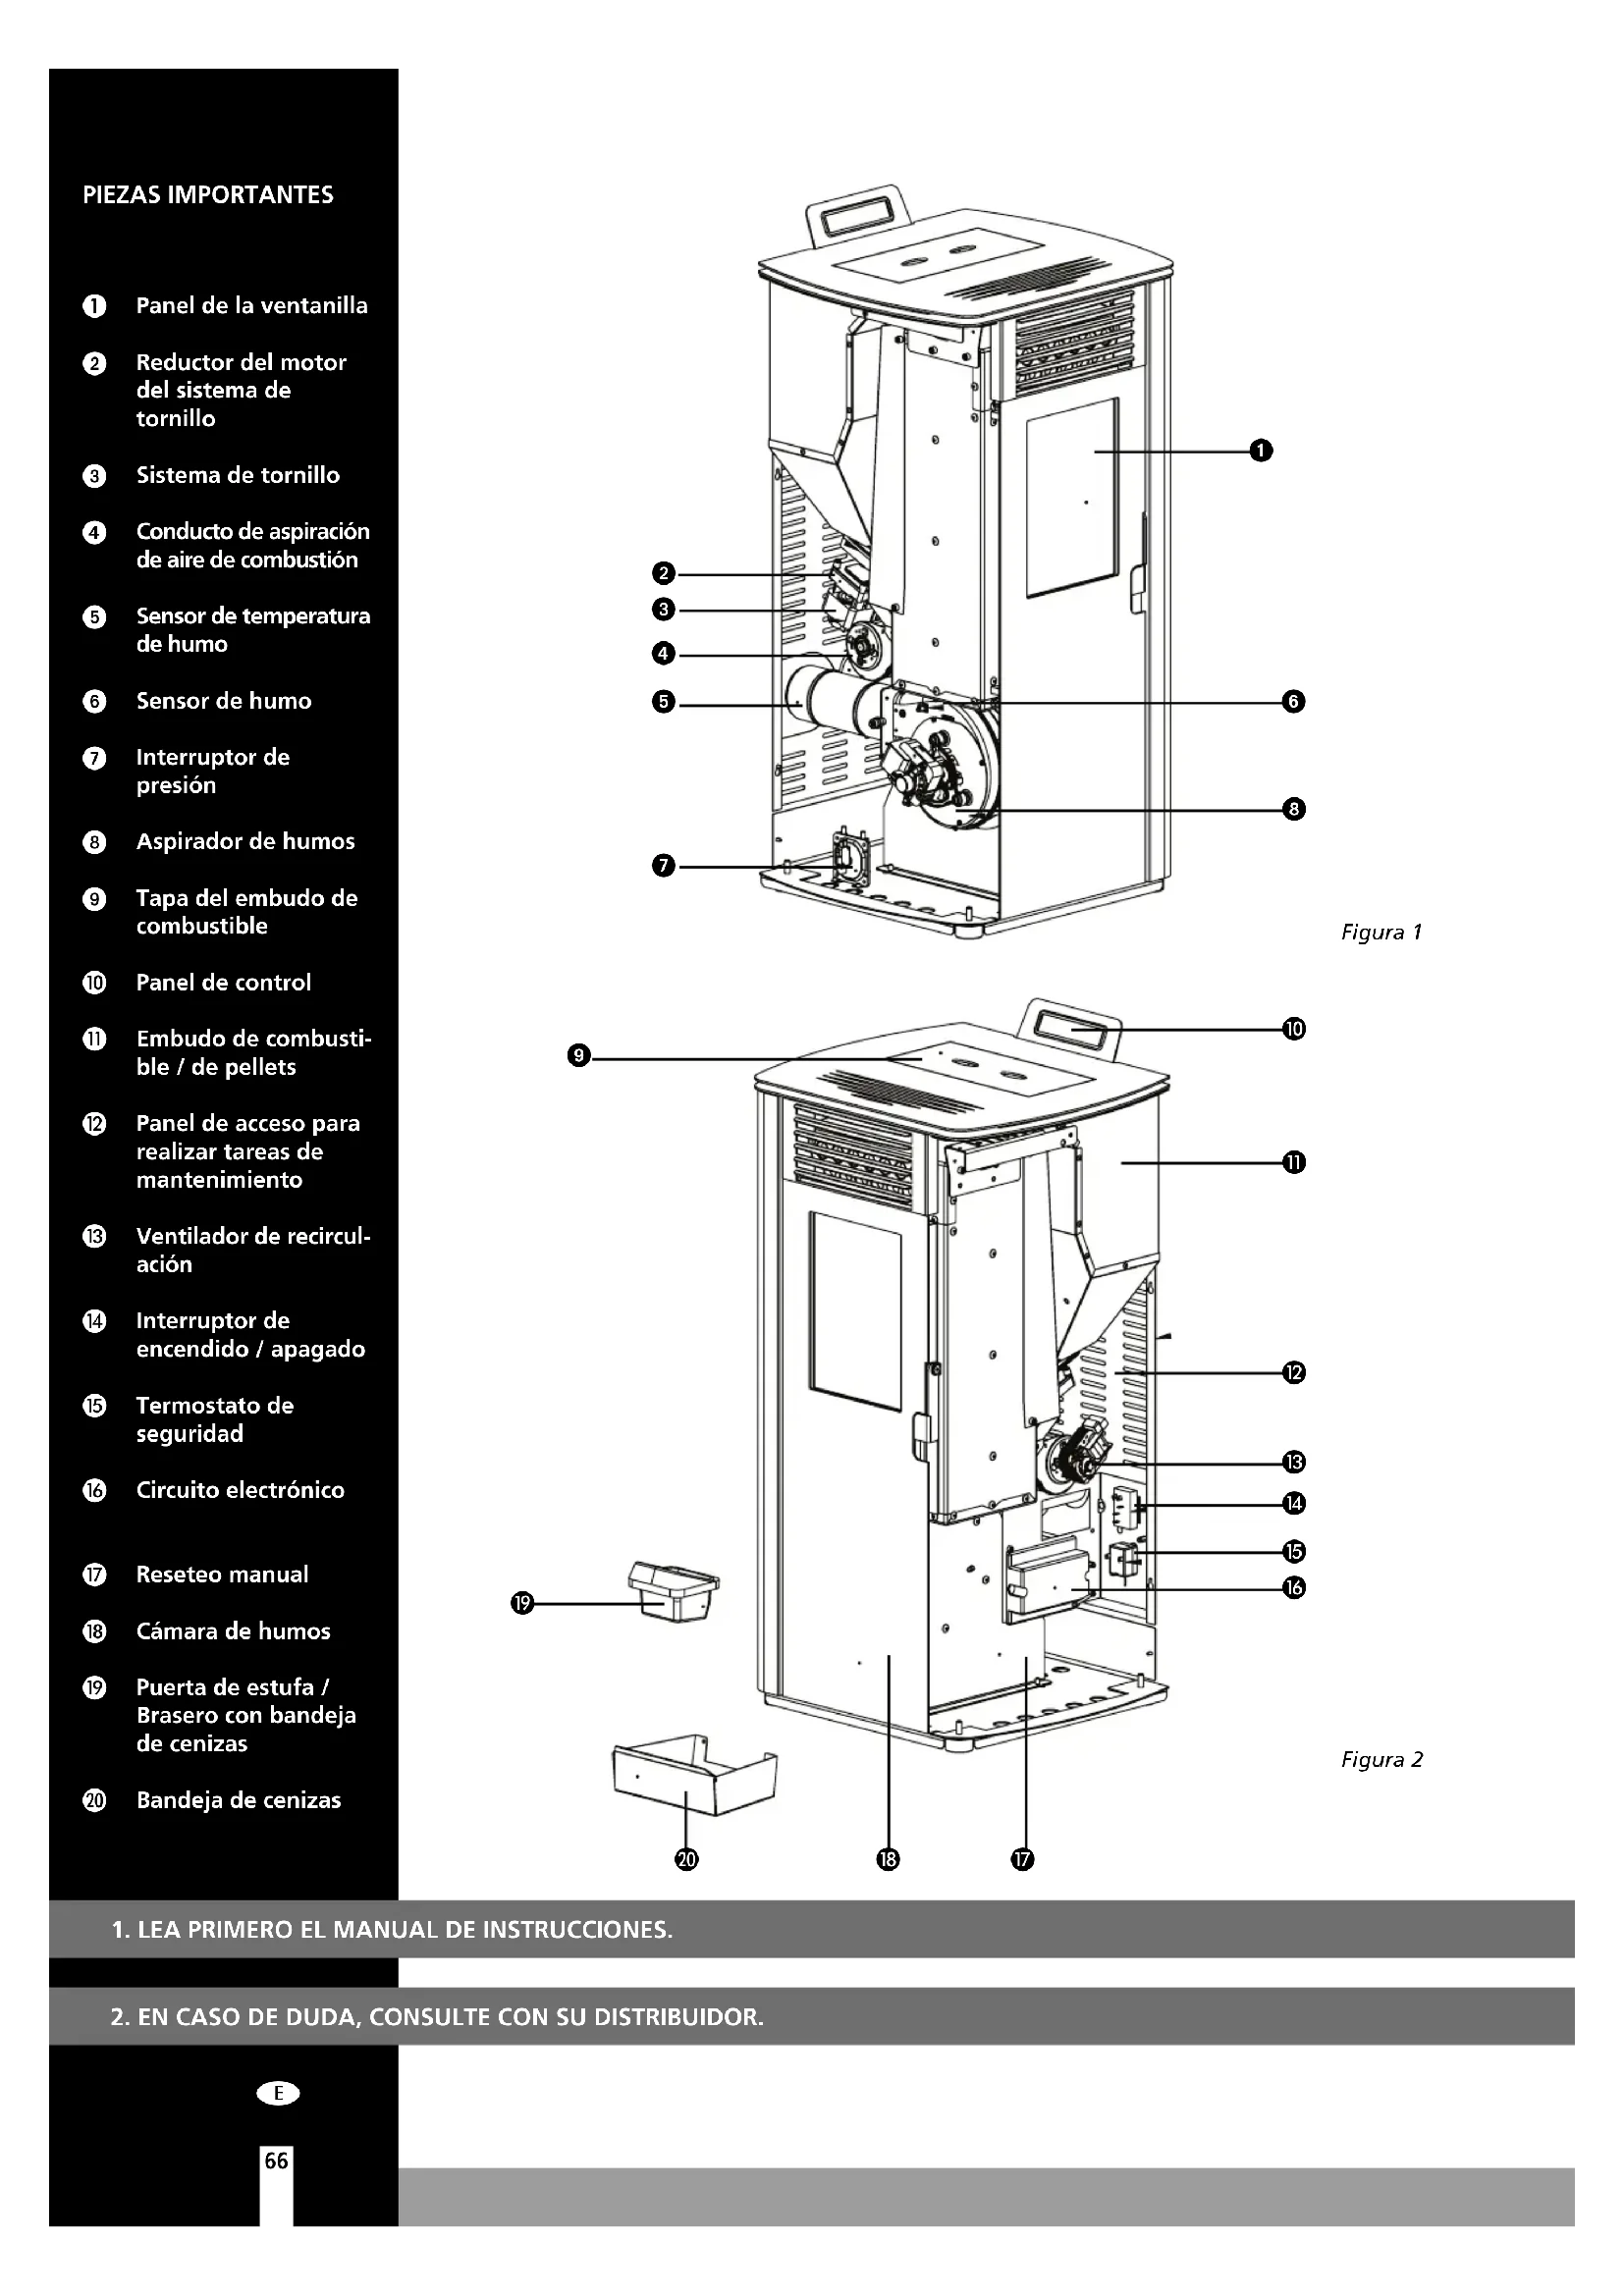
Panel de la ventanilla
2 Reductor del motor del sistemas de tornillo
3 Sistema de tornillo
Conducto de aspiración de aire de combustión
Sensor de temperatura de humano
6 Sensor de humano
7 Interruptor depresión
Aspirador de humos
9 Tapa del embudo de combustible
10 Panel de control
10 Embudo de combustible / de pellets
Panel de acceso para realizar tareas de mantenimiento
Ventilador de recirculación
Interruptor de encendido /apagado
15 Termostato de seguidad
16 Circuito electrónico
7 Reseteo manual
16 Camara de humos
Puerta de estufa / Brasero con bandeja de cenizas
20 Bandeja de cenizas
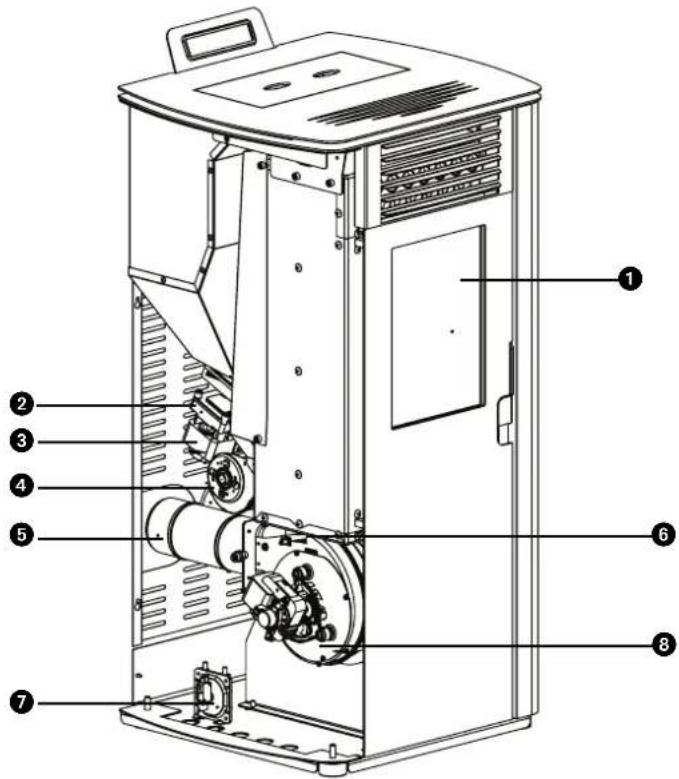
Figura 1
Figura 2
- LEA PRIMERO EL MANUAL DE INSTRUCCIONES.
- EN CASO DE DUDA, CONSULTE CON SU DISTRIBUTOR.
E
Estimado/a senor/senora:
Felicidades por la compra de una estufa Qlima. Este es un producto de alta calidad del queouldrdisfurtardurantemuchosanossi lousa de forma responsable.
Para garantizar una larga vida útily un uso seguro de este producto de calefaction Qlima, lea primero atentamente este manual. Guardelo bien despues, para poder consultarlo en el futuro.
En nombre del fabricante le-ofrecemos 24 meses de garantia por fallos de material yfabricacion.
Disfrute de su Qlima!
Le salute atentamente,
PVG Holding b.v.
Departamento de atencion al cliente.
- INSTRUCCIONES DE SEGURIDAD
- QUE HACER EN SITUACIONES DE EMERGENCIA O UN FUEGO EN LA CHIMENEA
- PRIMERA PUESTA EN FUNCIONAMENTO
3.1 Tareas antes y durante el primer arranque
- USO NORMAL DE LA ESTUFA
4.1 Información de pantalla
4.2 Procedimiento normal de arranque
4.3 Procedimiento de arranque fuera de lo normal
4.4. Ajustar la temperatura
4.5 Modificar la capacité calorifica de la estufa
4.6 Modo ahorro
4.7 Apagado normal
4.8 Mando a distancia
4.9 Sustituir las pilas del mando a distancia
4.10 Conexión WIFI
5.1 El combustible
5.2 Llenado del embudo para pellets
- MANTENIMIENTO
6.1 Mantenimiento a realizar por el usuario (final)
6.2 Limpieza del exterior de la estufa
6.3 Limpieza del cristal
6.4 Limpieza del brasero con bandeja de cenizas
6.5 Limpieza del conmutador de calor
6.6 Limpieza del foco de la houguera
6.7 Comprobar el cierre de la portezuela delantera
6.8 Limpieza de embardo y contentedor para pellets
6.9 Limpieza del tubo de entrada paraPellets
6.10 Mantenimiento a realizar por un的技术ico (autorizzato)
-
SERVICIO TECNICO Y PIEZAS ORIGINALES
-
LISTADO SOLUCION ERRORES
8.1 Reseteo antes de una avería
8.2 Listado de averías
-
FICHA DE PRODUCTO
-
CONDICIONES DE LA GARANTIA

Todas las imagenes a las que se hace referencia en estas instrucciones se encontrartran al final del manual
1. NORMAS DE SEGURIDAD:

ATENCLON! Todas las ilustraciones en este manual y en el envoltorio sirven unicamente a titulo informativo y pueda ser algo diferente del aparato que haya adquirido. Unicamente el Diseño es lo importante.

El incumplimiento de los requisitos incluidos en este manual puede provocar situaciones peligrosas y que se invalidate la garantía.
Instale este aparato únicamente si cumple con la legislación, las disponeciones y normativa locales/nzonales.Esta estufa sirve para calendar espacios en viviendas y es únicamente apta para uso en interiores en salas de estar, cocinas y garajes en lugares secs en situaciones domesticas normales. No instale la estufa en dormitorios o cuartos de bazo.
La instalación correcta de esta estufa es desuma importante para el funcionacorrecto del producto y para su seguridad personal. Para ese se aplican las siguientesindicaciones:
-Esta estufadebeshereinstalada porun ingeniero decalefacion o de instalacion professtional(preferiblemente autorizzato por Qlima),deotromodo lagarantia no seravalida.Si las instrucciones de este manual no son acordes con la legislacion local y/o nacional,sedeferan aplicar las conditionesmas restrictivas.El fabricante y distribuidorno podrancheresponsables si la instalacion
de la estufa no se ajusta a las normativas y regulaciones locales, ventilacion inadeuda y/o uso de aplicacion incorrecta.
- Solo se pueda instalar la estufa en una habitación en la que laubicación,la arquitectura y el uso, no impidan un functionamiento seguro de la estufa.
Si tiene algo problema con su estufa, o si lecee. ta trabajo leer este manual o no lo comprende (totalmente),pongase siempre en contacto directamente con su distribuidor o instalador.
- Para la combustión de pellets hace falta oxígeno, es decir aire.

Procure que los conductos del aire de combustión siempre PODan absorber aire del exterior.
- No cubra nunca las entradas y salidas de aire y compruebe con regularidad que la entrada no está obstruía por la sociedad.
- Transporte la estufa con el equipo adecuado. Si no se usa el equipo adecuado, pueda provocar daños personales y/o perjuicios a la estufa.
- No coloque un objeto inflatable y/o materiales a 200 mm de los laterales y 200 mm de la parte posterior de la estufa o 800 mm de la parte delantera de la estufa.
- La estufa se diseño para instalarse independiente y no es apta para incrustarse en la pared. Mantenga una distancia de 200 mm entre los muros y los laterales, parte de atrás de la estufa.
- Cuando está en funciona, la estufa
se puedaUCTar mucho. NUNCA deje a niños solos y sin supervision circa de la estufa. Vigile a los niños y evite que jueguen con la estufa.
- Este aparato no deben ser utilisé por personas (incluyendo niños) con reducía你能earas, mental o sensorial, o que carezcan de la experiencia y los conocimientos necessarios, a menos que Sean vigilados einstruidos en el uso del aparato por othera persona que sea responsable de su seguridad. Los niños meores de 3 años deben tenermantenerse alejados del dispositivo, excepto si tienen supervisión permanente.
- Los niños de 3 a 8 años solo podrán encender o apagar el electrodomístico siempre y cuando este haya sido colocado o instalado en su posición de funciona bajo normal prevista y que@cuenten con supervisión o con las instrucciones relativas al uso seguro del electrodométrico y que entiendan los riesgos involucrados.
- Los niños de 3 a 8 años no deben enchubar, regular, ni limpiar el electrodomístico olover a cabo ningunaarea de mantenimiento.
- Cuando está en funciona, la estufa se pueda calentar mucho. Cuando está manejando la estufa, utilise protecciones personales adequadas y resistentes al calor como quantes resistentes al calor.
- Durante la instalación y el mantenimiento de la estufa, utilise siempre las protecciones personales nécessarias, como gafas de seguridad, guantes, etc.
- Tenga cuidado al (re)llenar el embudo con pellets si la estufa está (todavia) caliente.
Procure que la bolsa con pellets no está en un situó en el que se pueda prender fuego.
- Tenga cuidado con la ropa inflamable; pueda prenderse fuego si se acercablemado a la estufa.
- No utilise sustancias inflamables en el mismo空間 donde esté la estufa en configuración. Evite los riesgos; retire sustancias inflamables yotiros materiales inflamables de la habitación.
- La estufa peso,lastante;la resistencia del suejo la debe revisar un experto autorizzato.
- Utilice únicamente pellets de madera seca y de buena calidad sin restos de cola, resina o aditivos. Diámetro 6 mm.large máximo 30 mm.
- No utilise autre combustible que no sean los pellets de madera. No se permite utiliserotiros combustibles como por exemple restos de madera que tengan cola y/o disolventes, qualquier residuo de madera - carton - carburante liquido - alcohol, petrroleo - gasolina, residuos o basura, etc.
- Un combustible de mala calidad, mojado, impregnado o pintado provoca la formación de condensación y/o oxido en la chimenea o en la estufa. Esto reduce el rendimiento y pueda provocar una situación peligrosa.
- Limpie y desholline la chimenea con regularidad según la legislación y normativa local y/o como lo estipule su seguro. Si no hubiera una normativa o legislación local o asi lo estipule el seguro:cede que un profesional autorizado revise y mantenga al menos dos veces al año (la primera vez al principio de la temporada) todo su sistemas de estufa,
chimenea incluida. Cuando se use la estufa intensivamente, habria que limpiar todo el sistema, chimenea incluida con más Frequencia.
No use la estufa como barbacoa.

Conecte una sola estufa por canal de homo. Si se conectan más estufas en el mismo canal de homo se pueda create situaciones peligrosas.
Esta estufa también nécessita una conexión electrica. Léase bien los siguientes comentaños y advertencias:
- No utilizes un cable de alimentacion estropeado.
- Unicamente un distribuidor o una persona o punto de servicios capacitada pueda sustituir un cable de corriente estropeado.
- Procure que el cable no se quede atrapado y no lo pliegue.
- Procure que el cable de alimentación no roce ninguna pieza caliente de la estufa.
- No connecte NUNCA el aparato con un alargador. Si no hubiera un contacto de tierra apropriado, tiene que solicitar a un electrónica reconocido que se lo instale.
- Compruebe la tension de la corriente. Este aparato es unicamente apto para enchufes de tierra con una tension de 230 voltios /~50 Hz.

El aparato TIENE que contar siempre con una connexion de tierra. Si el enchufeno es de tierra, NO pueda conectar el aparato
- El enchufe tiene que ser de fácil acces cuando el aparato está connectado.
No coloque el aparato bajo del enchufe de pared.
Antes de enchufar el aparato, compruebe que:
- La tension de connexion coincide con el valor de la placar del modelo.
- El enchufe y la alimentación son los aptos para el aparato.
- Que la clavija del cable entra bien en el enchufe.

Consulte con un experto que controle la instalacion electrica si suspecha de que hay algo que no va bien.
No cubra nunca las entradas y salidas de aire.
- No introduzca ningún objeto en las aperturas del aparato.
- Nocede que el aparato entre en contacto con el agua. No rocie el aparato con agua y no lo sumerja en un liquido,esto pueda provocar un cortocircuito.
- Desenchufe el aparato antes de limpiarlo o antes de sustituir una pieza o todo el aparato.
- Desenchufe la estufa antes de realizarrialquierarea demantimiento.
Desenchufe el aparato si no está en uso.
- No se permitte realizaraculardadación en el aparato. Este pueda provocaciones peligrosas. Además este invalidaría la garantía.
- Guarde bien el manual de instalación y uso.
- En caso de emergencia, siga las instrucciones del equipo de bomberos.
2. QUE HACER EN SITUACIONES DE EMERGENCIA O UN FUEGO EN LA CHIMENEA (FUEGO FUERA DE LA CÁMARA DE COMBUSTION)
- Apague la estufa inmediatamente, desenchufandola.
- Apague el fuego en la estufa con un extintor de CO2, arena, sosa o sal para reducir la emisión de humos en el espacio. No utilise nunca agua para apagar el incendio.
- En el caso de un incendio en la chimenea: Cierre la valvula solenoide (consulte las leyes, disponeciones, estipulaciones y normas locales / naciales para ver si se permite tener una valvula solenoide) o cierre la chimenea con un paño humedo.

ATENCLON: la chimenea pueda estar muy caliente. Cuando la vaya a cerrar, I'vee sempre guantes resistentes al calor.
- Avise inmediamente a los bomberos.
- Ventile el espacio abriendo todas las ventanas y puertas debido a la possible formación de monóxido de carbono.
3. PRIMERA PUESTA EN FUNCIONAMIENTO
La primera.puesta en functionamento la三是 que realizar un先进技术 de service Qlima reconocido. Cuando se arranca por primera vez hay que regular la estufa para促成 una proportiOn correcta de aire/combustion en cada uno de los cinco niveles de combustion. La proportiOn correcta depende en gran medida del canal de humos
montado y solo se pueda regular afterwards de haber instalado la estufa. Una proportiación incorrecta entre el aire y la combustión puede darñar gravamente la estufa. Además aumento el consumo de combustible.

No cambie nunca ustedismo los parámetros de servicios en el menu de servicios. Esto pueda darar gravamente la estufa e invalidarla la garantia. Unicamente un technician de service Qlima reconocido能把 realizar la regulacion de la estufa.
3.1 TAREAS ANTES Y DURANTE EL PRIMER ARRANQUE

En el caso de una casa de nuevo Construccion o una remodelacion: deje que las paredes se sequen bien antes de poder la estufa por primera vez en functionamento. Se sabe que los muros, los techos y/o los sueños necessitan mucho tiempo para secarse totalmente. El hollín y las partículas de ceniza se pueda adherir fácilmente a muros que no estén totalmente secs.
- Compruebe que la estufa se ha instalado según el manual de instalación.
-
Retire todos los elementos, como manual, herramientos para la estufa, etc. de la estufa antes de ponerla en funcionaimiento.
-
Ponga pellets en el embudo. VerApartado 5 «Llenar el embudo con pellets» de este manual de instrucciones para ver la explicacion de los pellets a utilizez y como rellenar el embudo.
- Enchufe el aparato a una toma de tierra y encienda el interruptor de corriente, que se enquirytra en la parte trasera de la estufa.

Compruebe elApartado 9 «Conexiones electricas» del manual de instrucciones antes de enchufar el aparato a la corriente.
- Lea bien elApartado 4 «Uso normal de la estufa» para ver más información sobre el control del mando a distancia (si es que lo hubiera) y el proceso del procedimiento de arranque.
- Procure que haya suficiente ventilacion en la habitacion. La estufa es de acero de alta calidad con un revestimiento de proteccion. Las primeras vezes que se encienda, el revestimiento se endurecer y el acero se asentará. Este proceso vale su tiempo. Durante el primer uso es normal que se despora un olor y humano desagradables provenrientes de la capa de pintura de la estufa.
- Nocede la estufa en funciona si la portezuela está abierta. Mantén-gala siempre cerrada cuando la estufa está en funciona y procure que el cierre de puerta está bien bloqueado.
- Arranque la estufay seleccione el nivele de combustion 1

Para registrar cuando el dia de la estufa, hay que encenderla progrisamente empezmando por un fuego bajo. Mantenga este fuego bajo durante las primeras cinco horas; cuando se pueda subir la capacité progrisamente. Deje la estufa funciona al menos tres o quatre horas.
- Compruebe que no haya humano del proceso de combustión en la habitación. Si es asi, apague inmediamente la estufay repare la fuga.
- Compruebe que el ventilador de espacio se pone a functionar sintiendo si sale aire de la rejilla de expulsion en el frontal de la estufa. El ventilador no arranca hasta que la estufa no está lo suficientmente caliente (después de 15 o 20 horas desde que haya arrancado la estufa). Si el ventilador de es-paceo no funciona, apague la estufa para evaporar que esta se dae. Soluccione el problema antes de reiniciar la estufa.

Esta estufa cuenta con un ventilador que hace circular el aire en la habitación. Cuando el ventilador está activado, el aire pasa por las superficies calientes interiores de la estufa, se calenta y se expulsa a la habitación como aire caliente. Nocede la estufa encendida si el ventilador de espacio no funciona.
- Compruebe que la estufaonga la proportiencia correcta de aire/combustible controlando la llama en cada una de las cinco posiciones de combustion.Ver ilustracion 1.Regule la proportiencia airecombustible si hicera falta.La regulacion de la proportiencia de airecombustible laiene que realizar un technician
de service Qlima reconocido.
- Compruebe el tiro de la chimenea con un medidor diferencial de presión. Regule la valvula solenoide, si hubiera una, de la chimenea.

Una vez regulada la valvula, solo se puedaCambiar la posición en el caso de un desastre, como que la chimenea se queme, por exemple.
- Compruebe que en cada una de las cinco posiciones de combustión, la temperatura del humano no supere los 220^ . Si la temperatura del humano en una de las cinco posiciones de combustión supra los 220^ , hay que volver a regular la estufa en la posicion correspondiente reduciendo la entrada de pellets y la velocidad de contorno del ventilador dehumos y/o subir la velocidad del ventilador de espacio.

El hecho de que un的技术ico Qlima reconocido realice la puesta en servicios de la estufa tiene las siguientes ventajas:
- Se formará menos hollín, por lo que la chimenea y la estufa ensuciarán menos.
- La estufa consumirá menos pellets.
- La estufaendaleunrendimiento optimo.
- Las piezas en la estufa sufrirán menos energia, con lo que se alargará la vida fácil de la estufa.
-
Se reducirán el número de horas de servicios y mantenimiento.
-
Después de ajustarla, la estufa está lista para su uso.
4. USO NORMAL DE LA ESTUFA

Antes de cada uso, hay que limpiar la bandeja de cenizas y el brasero. Paraarlo, consulte el apartado 6.4. Además la portezuela tiene que estar cerrada.

La estufa no se pueda usar si se utilizes un sistema de aspiración de aire, calefacción por aire caliente o cualquier(other aparato que pueda influrir en la presión de aire en el空間. Hay que apagar todos这些东西 aparatos, si se utilizes una estufa de pellets.
2.
E
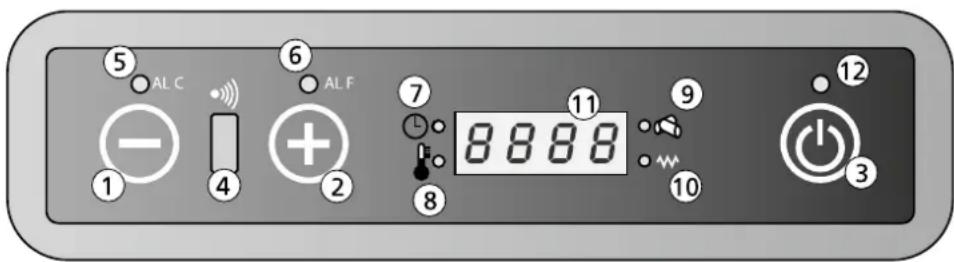
Botón 1: Reduce la temperatura de la habitación Solicitada por el usuario. El botón 1 también se pueda usar para(""); no matter how much it is, you can still use it in the suministro de calor.
Botón 2: Aumenta la temperatura de la habitación solicitada por el usuario. El botón 2 también se pueda usar para(""); no matter how much it is, you can still use it in the suministro de calor.
Botón 3: Se usa para encender y apagar la estufa.
Receptor 4: Receptor del mando a distancia
Piloto 5: Indica que hay una avería de Alarma C (C significa temperatura). Para más información, consulte el apartado 8.2 « lista de averías».
Piloto 6: Indica que hay una avería de Alarma F (F significa gases de humano). Para más información, consulte el apartado 8.2 «listado de averías».
Piloto 7: La estufa cuenta con un temporizador para regular los tiempos de encendido y apagado. Si este piloto está encendido, el temporizador está activado.
Piloto 8: Indica que se ha llegado a la temperatura programada. Además se va en la pantalla el texto ECO y la temperatura programada.
Piloto 9: Indica que el sistema de tornillo de la entrada de pellets está activado.
Piloto 10: Indica que la barra de encendido está activada.
Pantalla 11: Indica la temperatura del espacio y la posicion del suministro de calor. Si hay una averia, se做不到e el numero de error en la pantalla.
Piloto 12: Indicador encendido-apagado.
| Off La estufa está | apagada o apagándose. |
| Fan La estufa está | en el modo precalentimiento. |
| Load La entrada | de pellets está en funcionaiento. Además el pi-loto 9 estaré encendido (ver ilustración 2) |
| Fire On La estufa | está en la fase de ignisión. |
| On 1 La estufa está | encendida y funciona con la capacité más baja, posición 1. |
| Eco La estufa ha alcancado la temperatura programada. |
| StoP La estufa está | en el modo autolimpieza de la caldera. El ventilador de humos está al número máximo de revoluciones y el motor de entrada de pellets funciona a la velocidad más baja. |
| Atte | Esteviso aparece cuando se intenta arrancar laquina durante el enfriimiento. |
4.2 PROCEDIMIENTO NORMAL DE ARRANQUE

Antes de cada arranque hay que limpiar el brasero. Si se usa la func del temporizador, hay que limpiar el brasero antes del arranque automatico.
Este es el procedimiento normal de arranque y funcionaamente:
- Procure que la caldera est limpia y vacía.
- Procure que la portezuela de la estufa este cerrada.
- Rellene el embudo del combustible con pellets de madera de buena calidad.
- Pulse el botón 3 durante 2segundos. El ventilador de humos se inicia y la barra de ignación se encenderá. En la pantalla aparece el texto FAC ACC y el piloto LED 10 se encenderá, para indicar que la barra de ignación está encendida.
- Pasado 1 minuto aprox. la pantalla lostraré el mensaje Load Wood. Duran-
te esta fase, el sistema de tornillo transporte los pellets del embudo de combustible a la caldera. Con el calor de la barra de ignacion se empezaran a quemar los pellets.
- Cuando se统计数据 a la temperatura de superficie deseada en la estufa, la pantalla做不到 el aviso FIRE ON. El piloto 10 se apagará.
- El ventilador de recirculación empezará a functionar y absorberá el aire del espacio por la parte de aftas. A continuación el conmutador de calor sopla el aire y asi se calienta. El aire caliente se expulsa al espacio por la parte delantera de la estufa.
- Durante el funciona normal, la pantalla muestra la posicion de calidad (1, 2, 3, 4 o 5) y la temperatura de la habitacion.
- Cuando se haya alcanzado la temperatura deseada en la habitación, la pantalla做不到 el aviso ECO y la temperatura del espacio. La estufa seguirá encendida, en la capacité más baja. Si el modo SAVE está activado, la estufa se apagará automatistically cuando se haya alcanzado la temperatura programada. Consulte elApartado 4.6 para ver más explicación sobre elFuncióncimiento y programación del modo Save (Ahorro).
4.3 PROCEDIMIENTO DE ARRANQUE FUERA DE LO NORMAL
Cuando se arranca la estufa con una temperatura de espacio por debajo de los 0^ o cuando el aire de combustión está por debajo de los 0^ , el procedimiento de arranque se dice que es fuera de lo normal.
Si con estas bajas temperatas, el procedimiento de combustión no consigue una buena fogata, la pantalla indica «ALAr No FirE».
Para arrancar el fuego, tiene que colocar «bloques de leña» en la base del brasero. Encienda el bloque de leña con una cerilla y espere 1 minuto antes de arrancar la estufa según el «procedimiento normal de arranque» tal y como se describe en el apartado 4.2.
Si con this no se consigue que prenda fuego, un profesoal Tiene que cambiar los parámetros de instalación de la estufa. Póngase en contacto con un instalador aprobado por Qlima.
4.4 AJUSTAR LA TEMPERATURA
3.
- Pulse el botón 1 para ir al menu de configuración de la temperatura. En la pantalla aparece «set» y la temperatura deseada.
- Pulse en el botón 1 para reducir la temperatura deseada. La Pantalla indica la temperatura deseada.
- Pulse en el botón 2 paraacular la temperatura deseada. La pantalla indica la temperatura deseada.
E
- Ahora se ha ajustado la temperatura. Después de 3segundos la temperatura volverá al modo de funciona bajo el lawal automática.
- Se ha terminado el proceso de modifier la temperatura.
- La temperatura deseada también se pueda regular con el mando a distancia. Consulte elApartado 4.8 para ver como se usa el mando a distancia.

La temperatura deseada se pueda modifier entre el minimum de 0^ y el máximo de 40^ .
4.5 MODIFICAR LA EMISION DE CALOR DE LA ESTUFA
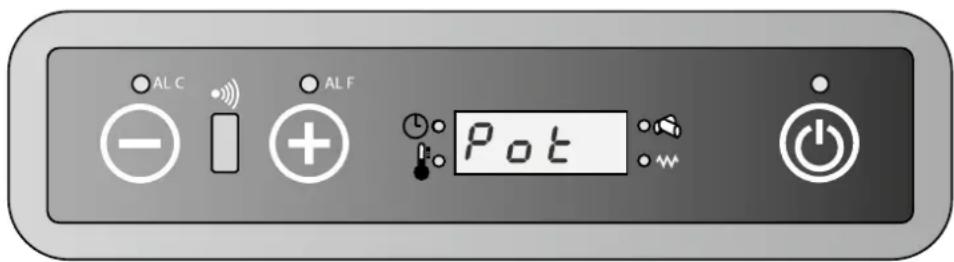
- Pulse una vez el botón 2. La pantalla indica «pot» y una de las 5 positions de capacité calorífica.
- Pulse en el botón 1 para reducir la capacité calorifica deseada. La pantalla做不到 lo.
- Pulse en el botón 2 para augmentar la capacité deseada de calor. La panta-lla做不到la capacité modificada.
- Después de que la pantalla mueste la capacité calorifica deseada, y tras 3 segundos volverá al modo de funciona normal automatistically.
- Se ha terminado el proceso de modifier la capacité.
- La capacité calorífica deseada también se pueda regular con el mando a distancia. Consulte elApartado 4.8 para ver como se usa el mando a distancia.
4.6 MODO AHORRO
Cuando se activa esta funciona, la estufa se apaga automatistically una vez que la temperatura de la habitación haya llegado a la temperatura configurada, más la temperatura diferencial programada. La estufa se encenderá automatistically una vez que la temperatura de la habitación haya llegado a la temperatura configurada, menos la temperatura diferencial programada.

El modo ahora solo se pueda usar cuando no se usa la funciona del temporizador.
ACTIVACION DEL MODO AHORRO
- Aague la estufa.
- Pulse el botón 1 y después una série de veces en el 3 hasta que aparezca en la pantalla UT04.
- Pulse el botón 2. Aparece el valor 1 en la pantalla. Deje pulsado ahora el botón 2 hasta que en la pantalla aparezca el valor A9.
- Volviendo a pulsar el botón 3, la pantalla indica Pr01. Pulse repetidamente el botón 3 hasta que aparezca Pr28, alternando con el texto «OFF» o un valor número del 1 al 15.
- Si en la pantalla aparece el texto «OFF», el MODO AHORRO está desactivado. Se pueda activar con los botones 1 o 2. Pulsando los botones 1 o 2, aparece en la pantalla la temperatura diferencial que se pueda configurar entre 1^ y 15^ .
- Elija el valor diferencial y pulse a continuacion el boton P3 para grabar la configuracion.
- La estufa está ahora en el modo Ahorro y se pueda reinecer.
TEMPERATURA DIFERENTIAL
La temperatura diferencial es la diferencia en grados con la temperatura configurada. Por exemple: La temperatura configurada es de 20^ y la temperatura diferencial configurada es de 2^ . La estufa se apagará con una temperatura de espacio de 22^ y se volverá a encender con una temperatura de espacio de 18^ .
DEACTIVAR EL MODO AHORRO
- Apague la estufa y repita los pasos anteriores hasta que aparezca el texto «OFF» en la pantalla.
- Pulse a continuación el botón 3.
- Ahora se desactivaré el modo ahorro.
Para evaporar que haya demasiados arranques y paradas y por lo tanto que se desgasten diversas piezas, se recomienda no configurar la temperatura diferencial por debajo de 2^ o más de 4^ .
4.7 APAGADO NORMAL
La estufa se pueda apagar pulsando el botón 3 hasta que aparezca «off» en la pan-talla. Mientras la estufa se apaga, se detiene la entrada dePellets de madera a la caldera y se apaga el ventilador de circulación del aire de la habitación.
El extractor de humano sigue functioning un tiempo y se apagará antes de la fase de enfiambre.
4.
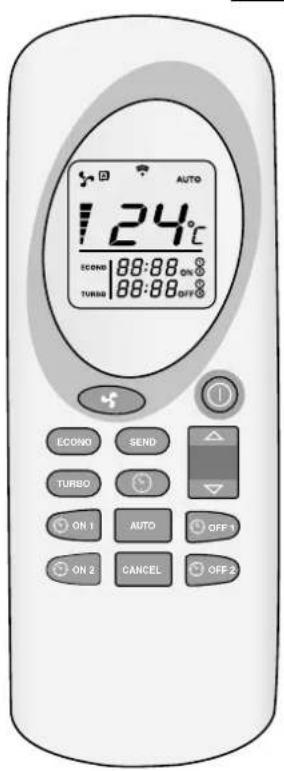
4.8 MANDO A DISTANCIA
como usar el mando a distancia:
- Dirija el mando a distancia hacía el panel de control de la estufa.
- Compruebe que no haya obstáculos entre el mando a distancia y el receptor de la estufa.
- Cada funciona que se selección con el mando a distancia tiene que confirmarse con el botón . Después de cada selección se oirá una seals acústica que confirmma la.option elegida.

Utilice esta funciona para apagar y encender la estufa y el mando a distancia. Mantenga el botón pulsado 2seguidos como minimo para encender o apagar el sistema. Pulse la para confirmar.

UP / DOWN: Utilice"These botones para configurar la temperatura deseada. La temperatura se pueda configurar entre 7^ y 40^ .

FAN:Selezione la capacité deseada
A = Modo automatico
Capacidad 1 (on1)
Capacidad 2 (on2)
Capacidad 3 (on3)
Capacidad 4 (on4)
Capacidad 5 (on5)
E
SEND: Utilice este botón para confirmar la funcionalegantá y enviarla a la estufa.
ECONO: Utilice esta funciona para activar / desactivar la funciona ECONO. Mantenga el boton pulsado 2segundos como minimum para activar /desactivar esta funciona.
TURBO: Utilice este botón para activar / desactivar esta funciona TURBO. Mantenga el botón pulsado 2seguidos como minimum para activar /desactivar esta funciona.
CLOCK: Siga"These pasos para configurar la funciona temporizador en el mando a distancia:
- Pulse en la
-
El symbolo aparece y la hora parpadea.
-
Utilice los botones
para configurar las horas ycretodos.
- Vuelva a pagar en
para confirmar y pulse en
ON1: Utilice este botón para planificar una hora de encendido automatico de la estufa (programa 1).
OFF1: Utilice este botón para planificar una hora de apagado automatico de la estufa (programa 1).
ON2: Utilice este botón para planificar una hora de encendido automatico de la estufa (programa 2).
OFF2: Utilice este botón para planificar una hora de apagado automatico de la estufa (programa 2).
AUTO: Utilice este botón para repetir diariamente los programas configurados del temporizador (1 y 2). Mantenga el botón pulsado 2seguidos como minimumo para activar /desactivar esta funciona. Aparece la palabra Auto en la pantalla.
CANCEL: Utilice este boton para cancelar una hora de encendido / apagado preconfigurada.
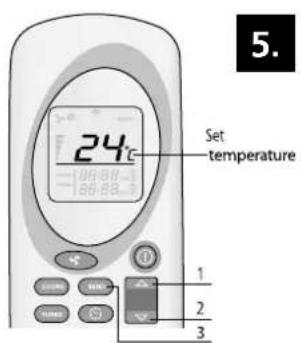
AJUSTAR LA TEMPERATURA
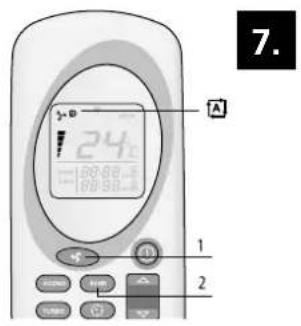
Utilice los botones e (1 y 2) paraaabstar la temperatura deseada (desde 7^ hasta 40^ como maximo).Cuando se seleccione la temperatura deseada, pulse en (3).Vea ilustracion 5.
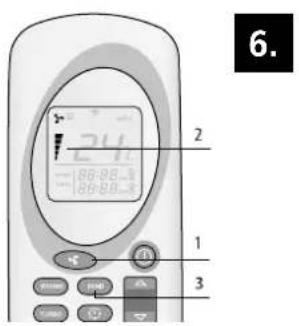
AJUSTAR LA CAPACIDAD DE CALOR
Pulse el botón (1) para selectionar la calidad calorifica deseada. Pulse a continuación (3). En la estufa aparece el texto on1-on2-on3-on4 o on5. En el mando a distancia también se indica la calidad (2). Internacional se pueda selectionar el modo Auto. Vea ilustracion 6.
MODO AUTOMÁTICO
En esta funciona, la estuña calcula la capacité necesaria, según la diferencia entre la temperatura deseada y la temperatura de la habitación. Para selecciónar el modo automatico, pulse en (1) hasta que aparezca el symbolo Pulse en (2) para confirmar la selección. Para finalizar el modo automatico, vuelva a pulsar en (1), selecciónla capacité deseada y confirmelmo con (2).Vea ilustracion 7.
MODO TURBO
En el modo Turbo, la estufa funciona al máximo rendimiento durante 30 horas. En el modo Turbo la temperatura está preprogramada a 30^ . Después de 30 horas, la estufa vuelve al modo que tenía antes de activar el modo turbo. Para selecciónar el modo Turbo, pulse el botón (1) durante más de 2segundos y despues en (3). Para desactivar la función, pulse el botón (1) durante al menos 2segundos. Desaparece la palabra Turbo (2) en la pantalla del mando a distancia y se volverán a ver la capacité y la temperatura configurada. Pulse en (3) para confirmar la elección. Vea ilustración 8.
MODO ECONOMICO
En el modo económico, la temperature está siempre constante. La estufa adapta la capacité cada 10 horas hasta que se统计数据 a la capacité calorifica 1. Para selecciónar el modo econo, pulse el botón (1) más de 2seguidos hasta que aparezca ECONO en la pantalla (2) y pulse e (3). Para desactivar la función, pulse el botón (1) durante al menos 2seguidos. Desaparecerá la palabra Econo de la pantalla del mando a distancia (2). Pulse en (3) para confirmar la elección. Vea ilustración 9.
PROGRAMA 1 (ON1 Y OFF1)

- El tiempo deseado de apagado y encendido tiene que configurarse cuando el mando a distancia está apagado.
- La estufa mantiene la temperatura y posicion de la capacité antes de que se apague la estufa.
- La duración minima entre apagado y encendido es de 20关键时刻. La estufa necesita este tiempo para terminar todo el proceso de enfiambre.
- Después de un corte de corriente hay que volver a configurar el temporizador.
ENCENDIDO AUTOMÁTICO (ON1)
Pulse el botón 1) para encender la estufa según el programa 1. El tiempo y el symbolo ON1 parpadean en el mando a distancia. Utilice los botones e (2 y 3) para selecciónar el tiempo deseedo (intervalos de 10 Minutes). Para confirmarlo, elija (1). La hora deseada de encendido se做不到 en el mando a distancia. Pulse en (4) para confirmar. Aparecerá « Chrono» en la pantalla de la estufa (5). Vea ilustraciones 10 y 11.
APAGADO AUTOMÁTICO (OFF1)
Pulse el botón (1) para encender la estufa según el programa 1. El tiempo y simbolo OFF1 parpadean en el mando a distancia. Utilice los botones (2 y 3) para selecciónar el tiempo deseedo (intervalos de 10 Minutes). Para confirmarlo,
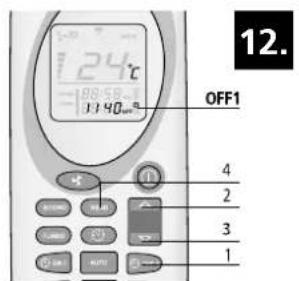
elija (1). La hora deseada de apagado aparecería en el mando a distancia. Pulse en (4) para confirmar. Aparecerá « Chrono» en la pantalla de la estufa. Este texto desaparecerá cuando haya pasado el tiempo de encendido y apagado. Vea ilustración 12.
ComoAquiarriba,pero con los botones (1)e (2).
CÓMO ANULAR LOS PROGRAMAS CONFIGURADOS DEL TEMPORIZADOR
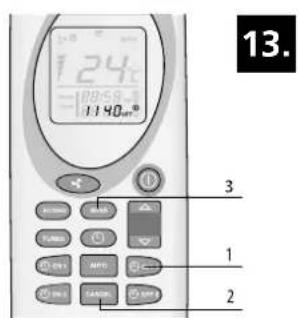
Pulse en el botón ON y OFF correspondiente del programa que quiera anular. Las horas y horas y el símbolo correspondiente aparecería en la pantalla del mando a distancia. Pulse en el botón Cancel (2) para anular el encendido o apagado automatístico de la estufa. Pulse en SEND (3) para confirmar. Vea ilustración 13.
REPETICIONDIARIA
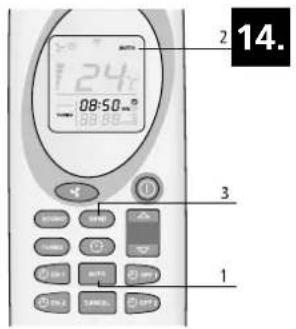
Con la funciona Auto, se pueda repetir la hora programada de encendido y apagado todos los días. Para activar esta funciona, pulse el botón (1) durante 2seguidos como minimo. En la pantalla del mando a distancia aparecer (2). Pulse en (3) para confirmar. Aparecerá « Chrono» en la pantalla de la estufa. Mantenga pulsado el botón (1) durante 2seguidos como minimo para desactivar la funciona y pulse a continua en (3). Vea ilustracion 14.
Limpie sempre el brasero antes de arrancar la estufa por medio de un encendido automatico. Así se evita que se dañe la estufa y el espacio alrededor.
4.9 CÓMO CAMBIAR LAS BATERías DEL MANDO A DISTANCIA
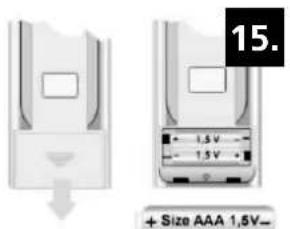
Si hay que cambiar las baterias del mando a distancia, retire la cubierta de la parte trasera del mando a distancia como se muestra en la ilustracion 15. Sustituya las viejas baterias porunas新品as. Fijese en la polaridad antes de colocarlas. Utilice unicamente pilas AAA, 1,5V. No tire las baterias al fuego, podrián explotar o derramar liquidos peligrosos. Si sustituya o destruye el mando a distancia, saque las baterias y disponible de ellas según la normativa vigente ya que son dañinas para el medio ambiente.
4.10 CONEXION WIFI
La estufa se pueda conectar a un modulo WiFi optional. La estufa se pueda encender o apagar con este modulo WiFi. El temporizador de la estufa también se pueda operar de manière muy fácil y conveniente. Además, la temperatura se pueda leer de forma remota. Se proportionscna una connexion en la parte posterior de la unidad para la connexion del modulo WiFi especial de esta estufa. Para Obtener más información,pongase en contacto con su distribuidor local.
5. LLENAR EL EMBUDO CON PELLETS
5.1 EL COMBUSTIBLE

No utiliseOTHERDypeo de combustible que lospellets de madera.No estapermitidousrto tipode combustible como restosde madera con pegamento y/o disolventes,qualquier residuo de madera,carton,combustibleliquido-alcohol,petroleo,gasolina-,basura oresiduos,etc.
En el mercado hay disponiblepellets de diversas calidades ydifferentes propiedades.Lospelletsde mala calidadafectan negativamente laeficacia de combustion,ensucianla estufaypuedeprovocar situacionespeligrosas,encasos extremos.

El uso dePelletsincorrectos (de mala calidad o de other diametro que el nombrado)uede dañar su estufa.Los daños provocados por el uso de pellets incorrectos no entran en la garantía.
Utilice únicamente pellets de madera de buena calidad con un diametro de 6 mm y un长大o de 30~mm como maximo. Hay differsentes temas de pellets de madera de diversa calidad y propiedades disponibles en el mercado. Los pellets de una buena calidad se reconocen por las siguientes caracteristicas:
-diametro 6mm
-长大 30mm como Tmaximo.
- pellets de madera裱ando las normas 6mm DIN+ / + / EN+ o similares.
-bien prensado, sin restos de pegamento, resina o aditivos.
- la superficie brilla y es lisa
-uniformidad en el长大o.Pobre en polvo
- proporción de humedad: < 10%
- proporción de cenizas: < 0,5%
- los pellets de buena calidad se hunden cuando se meten en el agua.
- no tienen el diametro de 6mm recommendado y/o tiene diametrosVRTES
- largos differentes, un percentaje mas alto de pellets cortos
- la superficie muestra grietas verticales y/o horizontales
- alta proportiún de polvo
- la superficie es opaca
- flota
El uso de un combustible de mala calidaduedeprovocar:
- mala combustión
-bloqueo frecuente de la caldera
- mayorconsumodepellets
- baja capacité calorifica y menos eficacidia
- sucidad en el cristal
- más cenizas y pellets que no prenden.
- másastos demantenimiento

Incluso si se usespellets buenos estandarizados,es normal que haya diferencias en velocidad de combustion, produccion de cenizas y la aparacion de polvo. Si se usesan un tipo de pellet differente al que se uso durante la prima puesta en functionamento, un technician de service Qlima reconocido tiene que volver a regular la estufa.

Guarde y transporte los pellets en un lugar absolutamente seco. Los pellets de madera se;puen hinchar considerablemente cuando entran en contacto con el agua.
Póngase en contacto con un vendedor Qlima o un instalador Qlima certificado para Obtener más información sobre pellets.
5.2 CÓMOLLENAREL EMBUDO DE PELLETS
Abra la tapa del embudo de pellets en la parte superior de la estufa y llene cuidadosamente el embudo con 3/4 de pellets. Procure que no caiga ningún pellet en la estufa. Después cierre la tapa.

No toque nunca ninguna pieza móvil bajo del embudo de pellets. Para evaporar queastedoquepiezasmobilesdentroldeembudodepellets,esejorqueapaguetotalmentelaestufadesenchufandola.

Si hubiera que relllenar el embardo cuando la estufa está operativa, procure que losPellets y/o la Bolsa no entre en contacto con las partes calientes de la estufa. Esto podra provocar una situacion peligrosa. Procure no tocar nunca ninguna pieza movable bajo del embardo de pellets.
6. MANTENIMIENTO
Debido al calor, la ceniza y los residuos que surgen por la incineracion del combustible, esnecessaryque tanto el usuario final como un technician autorizo realicen tareas periodicas de limpieza yostenimiento. La limpieza periodica y con cuidado de la estufa es importante para la seguridad y para el funcionalemente eficaz y al本身就是 timeo augmenta la vidautildelaestufa.Noutiliceunestropajo de acero,clorurode hidrrogeno o综合素质despuesdehaber estadomuchotempo sin usarsehayque controlarlaestufayelystemadec Chimeneasporsihaybloqueos.
Debe limpiar la vasija del quemador, el cristal de la estufa y la bandeja recoge cenizas antes de cada uso. Esto es muy importante para un funciona correcto y seguro. Esto es algo que debe tenerse en cuenta, ya que pueda olvidarse fácilmente, sobre todo si utilizes la programacion del temporizador o el control WiFi.
6.1 MANTENIMIENTO A REALIZAR POR EL USUARIO (FINAL)

Realice las tareas de mantenimiento en la estufa una vez que haya controlado que la estufa se haya enfriado totalmente por dentro y por fuera.

Antes de realizar tareas de mantenimiento, desenchufe siempre la estufa.
Tarea Frecuencia\*
Limpiar el exterior de la estufa Cada dos semanas
Limpiar el cristal Antes de cada arranque Internacionalmente se arranque con el temporizador
Limpiar el brasero Antes de cada arranque Internacional y como se arranque con el temporizador
Limpiar la bandeja de cenizas Cuando la bandeja esté llena y antes de cada inicio. Internacionalmente, para ser arranque con el temporizador
Limpieza del conmutador de calor Diariamente
Limpieza del foco de la hougura Cada dos semanas
Comprobar el cierre de la portezuela Dos vezes al ano, la primera vez al principio de la temporada y/o cuando se hayan consumido 2500 kg de pellets
Limpieza de embardo y el sistemas de tornillo Una vez al mes y/o cuando se hayan consumido 2500kg de pellets
Limpieza del tubo de entrada de Una vez a la semanapellets
6.2 LIMPIAR EL EXTERIOR DE LA ESTUFA
Limpie la superficie de la estufa con agua (caliente) y jabón. No utilizes ningún producto de limpieza abrasivo o con un disolvente como base, esteoulda darar laULTima capa de la superficie.
6.3 LIMPIEZA DEL CRISTAL

Hay que limpiar el cristal de la portezuela de la estufa antes de cada arranque para registrar la combustión de hollín y partículas de ceniza.
El cristal es resistente al calor, pero puede resquebrajarse con los Cambios bruscos de temperatura. Deje que el cristal se enfié totalmente antes de limpiarlo. Utilice un limpiador normal de cristales y páños de limpieza.

Limpie el cristal únicamente cuando la estufa está totalmente fria.
6.4 LIMPIEZA DEL BRASERO CON BANDEJA DE CENIZAS

El brasero con la bandeja de cenizas se Tienen que limpiar antes de cada arranque.
- Saque el brasero y la bandeja de cenizas de la caldera. Vea ilustracion 16 y 17.
- Limpie la bandeja de cenizas.
- Limpie el brasero y la rejilla con un cepillo o aspiradora. Si los agujeros de la rejilla está bloqueados, utilize un objeto puntiagudo para destaponarlos (vea ilustracion 18).
- Limpie el espacio bajo del brasero y de la bandeja de cenizas con una aspiradora.

Es esencial que los agujeros no estén bloqueados en la rejilla de la caldera para que losPellets se pueda incinerar bien.
- Vuelva a colocar el brasero y la bandeja de cenizas en la estufa. Procure que vuelva a colocar el brasero de la forma correcta. Coloque la gran aperture en la barra de ignacion (como se indica en las ilustraciones 19 y 20). Si el brasero se coloca Incorrectamente, la estufa no se encenderá.
6.5 LIMPIEZA DEL CONMUTADOR DE CALOR
Hay que limpiar diariamente el conmutador de calor contipsa de una rascadora. Procure que la estufa este apagada y la puerta cerrada. Mueva el mando de la rascadora, montada en la rejilla de salute (vea ilustracion 21) hacia delante y despues hacia atras. Repita este paso 5 o 6 vezes hasta que la rascadora se mueva sin encontrar resistencia.
6.6 LIMPIEZA DEL FOCO DE LA HOGUERA
Limpie primero el conmutador de calor (veaApartado 6.5 Limpieza del conmutador de calor).
- Retire el brasero con la bandeja de cenizas. Vea elApartado 6.4.
- Retire el protector refractario, que seswana en la parte superior de la estufa.
a. Suba el protector refractario por la parte delantera (ilustracion 22) hasta que se suelten los+puntos de fijacion 2 (ilustracion 23).A continuacion更快a el protector refractario hacia delante para soltar también el punto de fijacion 1 (ilustracion 23).
b. Mueva la parte trasera del protector refractario hacía abajo (ilustración 24).
c. Empuje hacer arriba el lateral izquierda en la direccion de la flecha 1 (ilustracion 25) y gire el lateral derecho hacia abajo en la direccion de la flecha 2 (ilustracion 25).
d. Saque a continuación el protector refractario de la caldera.
3. Despues desmonte las placas internas del foco de la hougera.
a. Quite los tornillos 1 y 2 (ilustración 26).
b. Suelte las placas con ayud de un destornillador (ilustracion 27).
c. Tire de la placía hacer delante en direccion de la puerta y retirela del foco de la houguera. Repita esta operation para las placas de la derecha (ilustración 28 y 29).
d. Retire la mampara de la parte posterior del foco de la houguera, tirando hacía delante. Si hiciera falta, use un destornillador. Retire la mampara de la estufa (ilustración 30).
e. Retire las mamparas en la parte izquierda y derecha. Deslice la mamptonara lateralunos 2cm hacía delante en la direccion de la puerta hasta que pase la parte que se indica con una flecha (ilustracion 31).
f. Mueva después la parte superior de la mampara hacer la mitad del foco de la houguera y sáquela de la estufa. Repita este procedimiento con la mampara a la derecha para sacarla del foco de la houguera de la estufa (ilustración 32).
g. Retire la placá de base a la derecha. Súbala conshipsa de un destornilladora y saque la placá de la estufa (ilustración 33).
h. Retire la plac de base a la izquierda deslizandola horizontallymente primo 3 cm hacía la derecha para poder sacarla afterwards del foco de la houguera (ilustración 34 y 35).
- Limpie el foco de la hougera, la parte debajo del brasero y las placas con un cepillo y una aspiradora.
- Después de la limpieza vuelva a colocar en el foco de hoguera todas las piezas que haya SACado enorden inverso.
6.7 COMPROBAR EL CIERRE DE LA PORTEZUELA DELANTERA
Compruebe el cierre de la puerta, controlando que no tengas fugas o danos, al menos dos vezes al ano, la primera vez antes de que empiece la temporada. Si hacera falta,cede que un technician Qlima certificado sustituya el cierre de la portezuela. Utilice uniquamente piezas de repuesto originales Qlima.
6.8 LIMPIEZA DE EMBUDO Y EL MECANISMO DE TORNILLON
Limpie el embudo y el mecanismo de tornillo una vez al mes.
- Retire la rejilla de seguridad del embudo de pellets.
- Vacie el embudo para pellets.
- Limpie el embudo de pellets y la parte visible del mecanismo de tornillo con una aspiradora (ilustración 36).
- Vuelva a colocar la rejilla de proteccion en su situio.
- Llene el embudo con pellets.
6.9 LIMPIEZA DEL TUBO DE ENTRADA PARA PELLETS
Limpie el tubo de entrada para pellets una vez pormana con un cepillo de cerradas duras y redondas (ilustracion 37). El tubo de entrada se incluye en la caldera de la estufa. En el tubo de entrada se pueda formar creosota, con lo que se ensucia bastante y se pueda quedar incluso taponado con los pellets.
6.10 MANTENIMIENTO A REALIZAR POR UN TECNICO CERTIFICADO
| Tarea Frecuencia* | |
| Inspeccion y mantenimiento pro-fesional general de la estufa (y el conductor de humos) | Dos veces por temporada, la prima vez al principio de a temporada y/o antes de 900 horas de combustión cuando la estufa indique SERV |
| Limpieza/barrido de la chimenea/sistema de humos | Dos vezes por temporada, la prima vez al principio de la temporada |
| Sustitución de piezas que no se nombran en este manual | Cuando se haya constatado un daño |
| Comprobación de la connexion de la estufa a la chimenea / el conductor de humos | Dos vezes por temporada, la prima vez al principio de la temporada y/o antes de 900 horas de combustión cuando la estufa indique SERV |
| Todas lasREMásactividades demantenimiento que no se nom-bren asignificamente en este ma-nual. | Una vez por temporada, la prima vez al principio de la temporada |
| Limpieza del ventilador de espacio/de humos | Dos vezes por temporada, la prima vez al原則o de la temporada y/o antes de 900 horas de combustión cuando la estufa indique SERV |
| Limpieza de la estuya por dentro y por fuera | Una vez por temporada o.afterés de 900 ho-ras, cuando la estuya indique «SERV» |
| Engrasar el reductor del mecanis-mo de tornillo para pellets | Una vez por temporada, al final de la tem-porada |
| Limpieza de la cármara de humos Una | a vez por temporada, al final del invierno o afterés de 900 horas de uso, cuando la estuya indique «SERV» |
| Control del elemento de ignisión Una | una vez por temporada |
| Limpieza del conmutador de calor por el lado del aire | Una vez por temporada o afterés de 900 horas, cuando la estuya indique «SERV» |
| Limpieza del conmutador de calor por el lado del humo | Una vez por temporada o afterés de 900 horas, cuando la estuya indique «SERV» |
| Comprobar el sistemas electrónico como el cableado PCB, los sensores y los dispositivos de seguridad. | Una vez por temporada o afterés de 900 horas, cuando la estuya indique «SERV» |
| Comprobar las tuberías de silicona del sensor de presión | Una vez por temporada o afterés de 900 horas, cuando la estuya indique «SERV» |
| Comprobación de cierrés de puerta y si hace falta sustituirlos. | Dos veces por temporada, la prima vez al principio de la temporada o afterés de 900 horas, cuando la estuya indique «SERV» |
| Probar la estuya en todos los nive-les, los 5 | Una vez por temporada o afterés de 900 horas, cuando la estuya indique «SERV» |
| Comprobar los dispositivos de seguidad | Una vez por temporada o afterés de 900 horas, cuando la estuya indique «SERV» |
(*) La Frequencia indica es lo minimum. La legislacion local y/o el contrato de su seguro tiene prioridad dependiendo de cada sea el más stricto. Si se usa la estufa de forma intensivamente, hay que limpar la chimenea con más regularidad.
7. SERVICIO TECNICO, PIEZAS DE REPUESTO ORIGINALES
Antes de que la estufa salga de la fabricula, casa controles strictos y se pone en configuracion. Cualquier tarea de reparacion o puesta en marcha por primera vez que pudieran parecer necessities durante o.afteres de la instalacion lasiene que realizar un technician de calefaction autorizzato por Qlima. Las piezas de repuesto originales solo se peuvent&#ngir a工程技术 de Servicio Tecnico y+puntos autorizados de vente.
Tenga a mano el modelo y número de série antes de ponarse en contacto con su distribuidor, el centro de Servicio Tecnico o el先进技术 autorizzato por Qlima.
Utilice únicamente piezas deresherva originales Qlima. Si uses other piezas dereshva que no sean las originales Qlima invalida la garantia.
Antes de resetear después de una avería, consulta la lista de averías (apartado 8.2) y siga las instrucciones. Resetee la estufa pulsando el botón 3 (vea la ilustración 2)
de la pantalla yøjándolo pulsado 3 segundos.
Si après del reseteo de la averia, sigue apareciendo el avis, consulte con su distribuidor.
8.2 LISTADO DE AVERIAS
PROBLEMA CAUSA SOLUCIONnot in timer mode.
mer mode.
ode.
| El panel de control no arranca MODE | La estufa no recibe corriente
2. Push button 1 and then repeatedly push button 3 until UT04 appears in the display.
3. Push button 2. The value 1 will appear in the display. Now hold down button 2 until the value A9 appears in the display.
4. By pushing on button 3 again, the display will show Pr01. Push button 3 repeatedly until Pr28 appears in the display, alternating with the text "OFF" or a numeric value between 1 and 15.
5. If "OFF" is shown on the display, then SAVE MODE is off. This can be switched on with buttons 1 or 2. By pushing buttons 1 or 2 the differential temperature, which can be set from 1^ to 15^ , will appear in the display.

6. Select the desired differential value and then push button P3 to save the setting.
7. The stove is now in Save mode and can be started up again.
Compruebe que está enchufaday push button 3 until UT04 appears in the display.
3. Push button 2. The value 1 will appear in the display. Now hold down button 2 until the value A9 appears in the display.
4. By pushing on button 3 again, the display will show Pr01. Push button 3 repeatedly until Pr28 appears in the display, alternating with the text "OFF" or a numeric value between 1 and 15.
5. If "OFF" is shown on the display, then SAVE MODE is off. This can be switched on with buttons 1 or 2. By pushing buttons 1 or 2 the differential temperature, which can be set from 1^ to 15^ , will appear in the display.

6. Select the desired differential value and then push button P3 to save the setting.
7. The stove is now in Save mode and can be started up again.
h button 3 until UT04 appears in the display.
3. Push button 2. The value 1 will appear in the display. Now hold down button 2 until the value A9 appears in the display.
4. By pushing on button 3 again, the display will show Pr01. Push button 3 repeatedly until Pr28 appears in the display, alternating with the text "OFF" or a numeric value between 1 and 15.
5. If "OFF" is shown on the display, then SAVE MODE is off. This can be switched on with buttons 1 or 2. By pushing buttons 1 or 2 the differential temperature, which can be set from 1^ to 15^ , will appear in the display.

6. Select the desired differential value and then push button P3 to save the setting.
7. The stove is now in Save mode and can be started up again.
El fusible del circuito im-preso se ha quemadotton 2. The value 1 will appear in the display. Now hold down button 2 until the value A9 appears in the display.
4. By pushing on button 3 again, the display will show Pr01. Push button 3 repeatedly until Pr28 appears in the display, alternating with the text "OFF" or a numeric value between 1 and 15.
5. If "OFF" is shown on the display, then SAVE MODE is off. This can be switched on with buttons 1 or 2. By pushing buttons 1 or 2 the differential temperature, which can be set from 1^ to 15^ , will appear in the display.

6. Select the desired differential value and then push button P3 to save the setting.
7. The stove is now in Save mode and can be started up again.
Sustituya el fusible Únicamente lo pueda hacer un técnico aprobado por Qlimae A9 appears in the display.
4. By pushing on button 3 again, the display will show Pr01. Push button 3 repeatedly until Pr28 appears in the display, alternating with the text "OFF" or a numeric value between 1 and 15.
5. If "OFF" is shown on the display, then SAVE MODE is off. This can be switched on with buttons 1 or 2. By pushing buttons 1 or 2 the differential temperature, which can be set from 1^ to 15^ , will appear in the display.

6. Select the desired differential value and then push button P3 to save the setting.
7. The stove is now in Save mode and can be started up again.
appears in the display.
4. By pushing on button 3 again, the display will show Pr01. Push button 3 repeatedly until Pr28 appears in the display, alternating with the text "OFF" or a numeric value between 1 and 15.
5. If "OFF" is shown on the display, then SAVE MODE is off. This can be switched on with buttons 1 or 2. By pushing buttons 1 or 2 the differential temperature, which can be set from 1^ to 15^ , will appear in the display.

6. Select the desired differential value and then push button P3 to save the setting.
7. The stove is now in Save mode and can be started up again.
El panel de control está averiadotton 3 again, the display will show Pr01. Push button 3 repeatedly until Pr28 appears in the display, alternating with the text "OFF" or a numeric value between 1 and 15.
5. If "OFF" is shown on the display, then SAVE MODE is off. This can be switched on with buttons 1 or 2. By pushing buttons 1 or 2 the differential temperature, which can be set from 1^ to 15^ , will appear in the display.

6. Select the desired differential value and then push button P3 to save the setting.
7. The stove is now in Save mode and can be started up again.
Sustituya el panel de control Únicamente lo pueda hacer un técnico aprobado por Qlimaisplay, alternating with the text "OFF" or a numeric value between 1 and 15.
5. If "OFF" is shown on the display, then SAVE MODE is off. This can be switched on with buttons 1 or 2. By pushing buttons 1 or 2 the differential temperature, which can be set from 1^ to 15^ , will appear in the display.

6. Select the desired differential value and then push button P3 to save the setting.
7. The stove is now in Save mode and can be started up again.
y, alternating with the text "OFF" or a numeric value between 1 and 15.
5. If "OFF" is shown on the display, then SAVE MODE is off. This can be switched on with buttons 1 or 2. By pushing buttons 1 or 2 the differential temperature, which can be set from 1^ to 15^ , will appear in the display.

6. Select the desired differential value and then push button P3 to save the setting.
7. The stove is now in Save mode and can be started up again.
El panel de control está averiadoc value between 1 and 15.
5. If "OFF" is shown on the display, then SAVE MODE is off. This can be switched on with buttons 1 or 2. By pushing buttons 1 or 2 the differential temperature, which can be set from 1^ to 15^ , will appear in the display.

6. Select the desired differential value and then push button P3 to save the setting.
7. The stove is now in Save mode and can be started up again.
Sustituya el cable plano. Únicamente lo能把 hacer un técnico aprobado por Qlimaf. This can be switched on with buttons 1 or 2. By pushing buttons 1 or 2 the differential temperature, which can be set from 1^ to 15^ , will appear in the display.

6. Select the desired differential value and then push button P3 to save the setting.
7. The stove is now in Save mode and can be started up again.
is can be switched on with buttons 1 or 2. By pushing buttons 1 or 2 the differential temperature, which can be set from 1^ to 15^ , will appear in the display.

6. Select the desired differential value and then push button P3 to save the setting.
7. The stove is now in Save mode and can be started up again.
El circuito impreso está averiado.ushing buttons 1 or 2 the differential temperature, which can be set from 1^ to 15^ , will appear in the display.

6. Select the desired differential value and then push button P3 to save the setting.
7. The stove is now in Save mode and can be started up again.
Sustituya el circuito impreso. Únicamente lo能把 hacer un técnico aprobado por Qlima{C}to15^{\circ}\mathrm{C}$ , will appear in the display.

6. Select the desired differential value and then push button P3 to save the setting.
7. The stove is now in Save mode and can be started up again.
to 15^ , will appear in the display.

6. Select the desired differential value and then push button P3 to save the setting.
7. The stove is now in Save mode and can be started up again.
El interruptor principal no está encendido

6. Select the desired differential value and then push button P3 to save the setting.
7. The stove is now in Save mode and can be started up again.
Encienda el interruptor principalb6d3ae59e9c0320b006fecafcb68e7350db.jpg)
6. Select the desired differential value and then push button P3 to save the setting.
7. The stove is now in Save mode and can be started up again.
e59e9c0320b006fecafcb68e7350db.jpg)
6. Select the desired differential value and then push button P3 to save the setting.
7. The stove is now in Save mode and can be started up again.
La estufa se apaga, aparece la alarma «AlAr no FirE» and then push button P3 to save the setting.
7. The stove is now in Save mode and can be started up again.
El embudo dePellets está vaciotting.
7. The stove is now in Save mode and can be started up again.
Rellene el embudo conPellets mode and can be started up again.
and can be started up again.
| El brasero está sucio Limpie el brasero.emperature"> | e">FFERENTIAL TEMPERATURE | El motor del sistemas de tornillo está averiado.the difference in degrees Celsius in relation to the set temperature. Example: The set temperature is 20^ and the set differential temperature is 2^ . The stove will now go out at a room temperature of 22^ and start up again at a temperature of 18^ .
Sustituya el motor del sistemas de tornillos. Únicamente lo pueda hacer un técnico aprobado por Qlimarc}\mathrm{C}and the set differential temperature is2^{\circ}\mathrm{C}. The stove will now go out at a room temperature of22^{\circ}\mathrm{C}and start up again at a temperature of18^{\circ}\mathrm{C}$ .
athrm{C}and the set differential temperature is2^{\circ}\mathrm{C}. The stove will now go out at a room temperature of22^{\circ}\mathrm{C}and start up again at a temperature of18^{\circ}\mathrm{C}$ .
El circuito impreso electró-nico está averiado.\mathrm{C}. The stove will now go out at a room temperature of22^{\circ}\mathrm{C}and start up again at a temperature of18^{\circ}\mathrm{C}$ .
Sustituya el circuito impreso. Únicamente lo能把 hacer un técnico aprobado por Qlima start up again at a temperature of 18^ .
t up again at a temperature of 18^ .
| El sensor de temperatura no ha detectado el umbral de temperature个小ima para arrancarNG OFF SAVE MODE | Vacie la caldera ywhelming a empezar, si el problema persiste. Póngase en contacto con un instalador aprobado por Qlima si el problema persiste. is now switched off.
To prevent excessive start-ups and shut-downs and extra wear on various parts, it is recommended not to set the differential temperature at less than 2^ or higher than 4^ .
ow switched off.
To prevent excessive start-ups and shut-downs and extra wear on various parts, it is recommended not to set the differential temperature at less than 2^ or higher than 4^ .
No llega suficientie aire de combustión al fuegons and extra wear on various parts, it is recommended not to set the differential temperature at less than 2^ or higher than 4^ .
Compruebe lo singular (username final): - Possible obstruccion del tubo de entrada del aire de combustión en la parte trasera de la estufa. Limpie el tubo de entrada con aire limpio. - Los agujeros de la revilla de la caldera están obturados y/o la caldera está demasiada suecia o Tiene demasiada ceniza. Hay que limpiarla. Únicamente lo pueda hacer un técnico aprobado por Qlima - El conmutador de calor dentro de la estufa está sucio. Limpie el conmutador de calorction blower will continue to run for a short time, switching off after the cooling-down phase.
blower will continue to run for a short time, switching off after the cooling-down phase.
LosPellets de madera no son de buena calidadoff after the cooling-down phase.
| Pruebe conpellets de madera de mayor calidadcontrol">ol"> | El sistema de tornillo está bloqueado control:
1. Point the remote control at the stove's control panel.
2. Check that there are no obstacles between the remote control and the signal sensor on the stove.
3. Each mode that can be selected using the remote control must be confirmed with the button. An acoustic signal will sound after each selection to confirm the selected option.

ON/OFF: Use this mode to switch the stove and the remote control on or off. Hold the button down for at least 2 seconds to switch the system on or off.

Press to confirm.
UP / DOWN: Use these buttons to set the desired temperature. The temperature can be set between 7^ and 40^ .

FAN: Select the desired speed
A = Automatic mode
Speed 1 (on1)
Speed 2 (on2)
Speed 3 (on3)
Speed 4 (on4)
Speed 5 (on5)


SEND: Use this button to confirm the selected mode and send it to the stove.

ECONO: Use this button to activate/deactivate the ECONO mode. Hold the button down for at least 2 seconds to activate/deactivate this mode.

TURBO: Use this button to activate/deactivate the TURBO mode. Hold the button down for at least 2 seconds to activate/deactivate this mode.

CLOCK: To set the clock mode on the remote control, proceed as follows:
1. Press
2. The symbol appears and the time flashes.
3.Use the buttons to set the hours and minutes.
4. Press the again to confirm and press

ON1: Use this button to set a schedule for switching the stove on automatically (programme 1).

OFF1: Use this button to set a schedule for switching the stove off automatically (programme 1).

ON2: Use this button to set a schedule for switching the stove on automatically (programme 2).

OFF2: Use this button to set a schedule for switching the stove off automatically (programme 2).

AUTO: Use this button to repeat the set timer programmes (1 and 2) daily. Hold the button down for at least 2 seconds to activate/deactivate this mode. The display shows AUTO.

CANCEL: Use this button to cancel the programmed switch-on or switch-off times.
Desenchufe la estufa. Retire la revilla de proteccion en el depósito, vacielo. Limpie con cuidado las partes visibles del sistema de tornillo. Vuelva a colocar la revilla de proteccion y arranque de nuevo laquia. Póngase en contacto con un instalador aprobado por Qlima si el problema persisteer each selection to confirm the selected option.

ON/OFF: Use this mode to switch the stove and the remote control on or off. Hold the button down for at least 2 seconds to switch the system on or off.

Press to confirm.
UP / DOWN: Use these buttons to set the desired temperature. The temperature can be set between 7^ and 40^ .

FAN: Select the desired speed
A = Automatic mode
Speed 1 (on1)
Speed 2 (on2)
Speed 3 (on3)
Speed 4 (on4)
Speed 5 (on5)


SEND: Use this button to confirm the selected mode and send it to the stove.

ECONO: Use this button to activate/deactivate the ECONO mode. Hold the button down for at least 2 seconds to activate/deactivate this mode.

TURBO: Use this button to activate/deactivate the TURBO mode. Hold the button down for at least 2 seconds to activate/deactivate this mode.

CLOCK: To set the clock mode on the remote control, proceed as follows:
1. Press
2. The symbol appears and the time flashes.
3.Use the buttons to set the hours and minutes.
4. Press the again to confirm and press

ON1: Use this button to set a schedule for switching the stove on automatically (programme 1).

OFF1: Use this button to set a schedule for switching the stove off automatically (programme 1).

ON2: Use this button to set a schedule for switching the stove on automatically (programme 2).

OFF2: Use this button to set a schedule for switching the stove off automatically (programme 2).

AUTO: Use this button to repeat the set timer programmes (1 and 2) daily. Hold the button down for at least 2 seconds to activate/deactivate this mode. The display shows AUTO.

CANCEL: Use this button to cancel the programmed switch-on or switch-off times.
ch selection to confirm the selected option.

ON/OFF: Use this mode to switch the stove and the remote control on or off. Hold the button down for at least 2 seconds to switch the system on or off.

Press to confirm.
UP / DOWN: Use these buttons to set the desired temperature. The temperature can be set between 7^ and 40^ .

FAN: Select the desired speed
A = Automatic mode
Speed 1 (on1)
Speed 2 (on2)
Speed 3 (on3)
Speed 4 (on4)
Speed 5 (on5)


SEND: Use this button to confirm the selected mode and send it to the stove.

ECONO: Use this button to activate/deactivate the ECONO mode. Hold the button down for at least 2 seconds to activate/deactivate this mode.

TURBO: Use this button to activate/deactivate the TURBO mode. Hold the button down for at least 2 seconds to activate/deactivate this mode.

CLOCK: To set the clock mode on the remote control, proceed as follows:
1. Press
2. The symbol appears and the time flashes.
3.Use the buttons to set the hours and minutes.
4. Press the again to confirm and press

ON1: Use this button to set a schedule for switching the stove on automatically (programme 1).

OFF1: Use this button to set a schedule for switching the stove off automatically (programme 1).

ON2: Use this button to set a schedule for switching the stove on automatically (programme 2).

OFF2: Use this button to set a schedule for switching the stove off automatically (programme 2).

AUTO: Use this button to repeat the set timer programmes (1 and 2) daily. Hold the button down for at least 2 seconds to activate/deactivate this mode. The display shows AUTO.

CANCEL: Use this button to cancel the programmed switch-on or switch-off times.
A los 15 minu-tos de arran-car, aparece elsiguito avisoen la estufa: «ALARM NOACC»929049bcde52e2.jpg)
ON/OFF: Use this mode to switch the stove and the remote control on or off. Hold the button down for at least 2 seconds to switch the system on or off.

Press to confirm.
UP / DOWN: Use these buttons to set the desired temperature. The temperature can be set between 7^ and 40^ .

FAN: Select the desired speed
A = Automatic mode
Speed 1 (on1)
Speed 2 (on2)
Speed 3 (on3)
Speed 4 (on4)
Speed 5 (on5)


SEND: Use this button to confirm the selected mode and send it to the stove.

ECONO: Use this button to activate/deactivate the ECONO mode. Hold the button down for at least 2 seconds to activate/deactivate this mode.

TURBO: Use this button to activate/deactivate the TURBO mode. Hold the button down for at least 2 seconds to activate/deactivate this mode.

CLOCK: To set the clock mode on the remote control, proceed as follows:
1. Press
2. The symbol appears and the time flashes.
3.Use the buttons to set the hours and minutes.
4. Press the again to confirm and press

ON1: Use this button to set a schedule for switching the stove on automatically (programme 1).

OFF1: Use this button to set a schedule for switching the stove off automatically (programme 1).

ON2: Use this button to set a schedule for switching the stove on automatically (programme 2).

OFF2: Use this button to set a schedule for switching the stove off automatically (programme 2).

AUTO: Use this button to repeat the set timer programmes (1 and 2) daily. Hold the button down for at least 2 seconds to activate/deactivate this mode. The display shows AUTO.

CANCEL: Use this button to cancel the programmed switch-on or switch-off times.
El mecanismo de ignicónestá averiado switch the stove and the remote control on or off. Hold the button down for at least 2 seconds to switch the system on or off.

Press to confirm.
UP / DOWN: Use these buttons to set the desired temperature. The temperature can be set between 7^ and 40^ .

FAN: Select the desired speed
A = Automatic mode
Speed 1 (on1)
Speed 2 (on2)
Speed 3 (on3)
Speed 4 (on4)
Speed 5 (on5)


SEND: Use this button to confirm the selected mode and send it to the stove.

ECONO: Use this button to activate/deactivate the ECONO mode. Hold the button down for at least 2 seconds to activate/deactivate this mode.

TURBO: Use this button to activate/deactivate the TURBO mode. Hold the button down for at least 2 seconds to activate/deactivate this mode.

CLOCK: To set the clock mode on the remote control, proceed as follows:
1. Press
2. The symbol appears and the time flashes.
3.Use the buttons to set the hours and minutes.
4. Press the again to confirm and press

ON1: Use this button to set a schedule for switching the stove on automatically (programme 1).

OFF1: Use this button to set a schedule for switching the stove off automatically (programme 1).

ON2: Use this button to set a schedule for switching the stove on automatically (programme 2).

OFF2: Use this button to set a schedule for switching the stove off automatically (programme 2).

AUTO: Use this button to repeat the set timer programmes (1 and 2) daily. Hold the button down for at least 2 seconds to activate/deactivate this mode. The display shows AUTO.

CANCEL: Use this button to cancel the programmed switch-on or switch-off times.
Sustituya el mecanismo de ignisiónÁnicamente lo pueda hacer un的专业aprorado por Qlimands to switch the system on or off.

Press to confirm.
UP / DOWN: Use these buttons to set the desired temperature. The temperature can be set between 7^ and 40^ .

FAN: Select the desired speed
A = Automatic mode
Speed 1 (on1)
Speed 2 (on2)
Speed 3 (on3)
Speed 4 (on4)
Speed 5 (on5)


SEND: Use this button to confirm the selected mode and send it to the stove.

ECONO: Use this button to activate/deactivate the ECONO mode. Hold the button down for at least 2 seconds to activate/deactivate this mode.

TURBO: Use this button to activate/deactivate the TURBO mode. Hold the button down for at least 2 seconds to activate/deactivate this mode.

CLOCK: To set the clock mode on the remote control, proceed as follows:
1. Press
2. The symbol appears and the time flashes.
3.Use the buttons to set the hours and minutes.
4. Press the again to confirm and press

ON1: Use this button to set a schedule for switching the stove on automatically (programme 1).

OFF1: Use this button to set a schedule for switching the stove off automatically (programme 1).

ON2: Use this button to set a schedule for switching the stove on automatically (programme 2).

OFF2: Use this button to set a schedule for switching the stove off automatically (programme 2).

AUTO: Use this button to repeat the set timer programmes (1 and 2) daily. Hold the button down for at least 2 seconds to activate/deactivate this mode. The display shows AUTO.

CANCEL: Use this button to cancel the programmed switch-on or switch-off times.
o switch the system on or off.

Press to confirm.
UP / DOWN: Use these buttons to set the desired temperature. The temperature can be set between 7^ and 40^ .

FAN: Select the desired speed
A = Automatic mode
Speed 1 (on1)
Speed 2 (on2)
Speed 3 (on3)
Speed 4 (on4)
Speed 5 (on5)


SEND: Use this button to confirm the selected mode and send it to the stove.

ECONO: Use this button to activate/deactivate the ECONO mode. Hold the button down for at least 2 seconds to activate/deactivate this mode.

TURBO: Use this button to activate/deactivate the TURBO mode. Hold the button down for at least 2 seconds to activate/deactivate this mode.

CLOCK: To set the clock mode on the remote control, proceed as follows:
1. Press
2. The symbol appears and the time flashes.
3.Use the buttons to set the hours and minutes.
4. Press the again to confirm and press

ON1: Use this button to set a schedule for switching the stove on automatically (programme 1).

OFF1: Use this button to set a schedule for switching the stove off automatically (programme 1).

ON2: Use this button to set a schedule for switching the stove on automatically (programme 2).

OFF2: Use this button to set a schedule for switching the stove off automatically (programme 2).

AUTO: Use this button to repeat the set timer programmes (1 and 2) daily. Hold the button down for at least 2 seconds to activate/deactivate this mode. The display shows AUTO.

CANCEL: Use this button to cancel the programmed switch-on or switch-off times.
El sensor de tempera-tura no ha detectado elumbral de temperaturaminima para arrancare9d2f4e59.jpg)
Press to confirm.
UP / DOWN: Use these buttons to set the desired temperature. The temperature can be set between 7^ and 40^ .

FAN: Select the desired speed
A = Automatic mode
Speed 1 (on1)
Speed 2 (on2)
Speed 3 (on3)
Speed 4 (on4)
Speed 5 (on5)


SEND: Use this button to confirm the selected mode and send it to the stove.

ECONO: Use this button to activate/deactivate the ECONO mode. Hold the button down for at least 2 seconds to activate/deactivate this mode.

TURBO: Use this button to activate/deactivate the TURBO mode. Hold the button down for at least 2 seconds to activate/deactivate this mode.

CLOCK: To set the clock mode on the remote control, proceed as follows:
1. Press
2. The symbol appears and the time flashes.
3.Use the buttons to set the hours and minutes.
4. Press the again to confirm and press

ON1: Use this button to set a schedule for switching the stove on automatically (programme 1).

OFF1: Use this button to set a schedule for switching the stove off automatically (programme 1).

ON2: Use this button to set a schedule for switching the stove on automatically (programme 2).

OFF2: Use this button to set a schedule for switching the stove off automatically (programme 2).

AUTO: Use this button to repeat the set timer programmes (1 and 2) daily. Hold the button down for at least 2 seconds to activate/deactivate this mode. The display shows AUTO.

CANCEL: Use this button to cancel the programmed switch-on or switch-off times.
Vacia la caldera y vuelva a empezar, si el problema persiste. Póngase en contacto con un instaladoraprorado por Qlima si el problema persiste.and40^{\circ}\mathrm{C}$ .

FAN: Select the desired speed
A = Automatic mode
Speed 1 (on1)
Speed 2 (on2)
Speed 3 (on3)
Speed 4 (on4)
Speed 5 (on5)


SEND: Use this button to confirm the selected mode and send it to the stove.

ECONO: Use this button to activate/deactivate the ECONO mode. Hold the button down for at least 2 seconds to activate/deactivate this mode.

TURBO: Use this button to activate/deactivate the TURBO mode. Hold the button down for at least 2 seconds to activate/deactivate this mode.

CLOCK: To set the clock mode on the remote control, proceed as follows:
1. Press
2. The symbol appears and the time flashes.
3.Use the buttons to set the hours and minutes.
4. Press the again to confirm and press

ON1: Use this button to set a schedule for switching the stove on automatically (programme 1).

OFF1: Use this button to set a schedule for switching the stove off automatically (programme 1).

ON2: Use this button to set a schedule for switching the stove on automatically (programme 2).

OFF2: Use this button to set a schedule for switching the stove off automatically (programme 2).

AUTO: Use this button to repeat the set timer programmes (1 and 2) daily. Hold the button down for at least 2 seconds to activate/deactivate this mode. The display shows AUTO.

CANCEL: Use this button to cancel the programmed switch-on or switch-off times.
40^ .

FAN: Select the desired speed
A = Automatic mode
Speed 1 (on1)
Speed 2 (on2)
Speed 3 (on3)
Speed 4 (on4)
Speed 5 (on5)


SEND: Use this button to confirm the selected mode and send it to the stove.

ECONO: Use this button to activate/deactivate the ECONO mode. Hold the button down for at least 2 seconds to activate/deactivate this mode.

TURBO: Use this button to activate/deactivate the TURBO mode. Hold the button down for at least 2 seconds to activate/deactivate this mode.

CLOCK: To set the clock mode on the remote control, proceed as follows:
1. Press
2. The symbol appears and the time flashes.
3.Use the buttons to set the hours and minutes.
4. Press the again to confirm and press

ON1: Use this button to set a schedule for switching the stove on automatically (programme 1).

OFF1: Use this button to set a schedule for switching the stove off automatically (programme 1).

ON2: Use this button to set a schedule for switching the stove on automatically (programme 2).

OFF2: Use this button to set a schedule for switching the stove off automatically (programme 2).

AUTO: Use this button to repeat the set timer programmes (1 and 2) daily. Hold the button down for at least 2 seconds to activate/deactivate this mode. The display shows AUTO.

CANCEL: Use this button to cancel the programmed switch-on or switch-off times.
La temperatura exteriores demasiado bajo.a9aec37d25ec6a53c02ff3f3ffae79b8bf7ee45c36629c95.jpg)
FAN: Select the desired speed
A = Automatic mode
Speed 1 (on1)
Speed 2 (on2)
Speed 3 (on3)
Speed 4 (on4)
Speed 5 (on5)


SEND: Use this button to confirm the selected mode and send it to the stove.

ECONO: Use this button to activate/deactivate the ECONO mode. Hold the button down for at least 2 seconds to activate/deactivate this mode.

TURBO: Use this button to activate/deactivate the TURBO mode. Hold the button down for at least 2 seconds to activate/deactivate this mode.

CLOCK: To set the clock mode on the remote control, proceed as follows:
1. Press
2. The symbol appears and the time flashes.
3.Use the buttons to set the hours and minutes.
4. Press the again to confirm and press

ON1: Use this button to set a schedule for switching the stove on automatically (programme 1).

OFF1: Use this button to set a schedule for switching the stove off automatically (programme 1).

ON2: Use this button to set a schedule for switching the stove on automatically (programme 2).

OFF2: Use this button to set a schedule for switching the stove off automatically (programme 2).

AUTO: Use this button to repeat the set timer programmes (1 and 2) daily. Hold the button down for at least 2 seconds to activate/deactivate this mode. The display shows AUTO.

CANCEL: Use this button to cancel the programmed switch-on or switch-off times.
Vacia la caldera y vuelva a empezar. Póngase en contacto con un instaladoraprorado por Qlima si el problema persiste. 2 (on2)
Speed 3 (on3)
Speed 4 (on4)
Speed 5 (on5)


SEND: Use this button to confirm the selected mode and send it to the stove.

ECONO: Use this button to activate/deactivate the ECONO mode. Hold the button down for at least 2 seconds to activate/deactivate this mode.

TURBO: Use this button to activate/deactivate the TURBO mode. Hold the button down for at least 2 seconds to activate/deactivate this mode.

CLOCK: To set the clock mode on the remote control, proceed as follows:
1. Press
2. The symbol appears and the time flashes.
3.Use the buttons to set the hours and minutes.
4. Press the again to confirm and press

ON1: Use this button to set a schedule for switching the stove on automatically (programme 1).

OFF1: Use this button to set a schedule for switching the stove off automatically (programme 1).

ON2: Use this button to set a schedule for switching the stove on automatically (programme 2).

OFF2: Use this button to set a schedule for switching the stove off automatically (programme 2).

AUTO: Use this button to repeat the set timer programmes (1 and 2) daily. Hold the button down for at least 2 seconds to activate/deactivate this mode. The display shows AUTO.

CANCEL: Use this button to cancel the programmed switch-on or switch-off times.
n2)
Speed 3 (on3)
Speed 4 (on4)
Speed 5 (on5)


SEND: Use this button to confirm the selected mode and send it to the stove.

ECONO: Use this button to activate/deactivate the ECONO mode. Hold the button down for at least 2 seconds to activate/deactivate this mode.

TURBO: Use this button to activate/deactivate the TURBO mode. Hold the button down for at least 2 seconds to activate/deactivate this mode.

CLOCK: To set the clock mode on the remote control, proceed as follows:
1. Press
2. The symbol appears and the time flashes.
3.Use the buttons to set the hours and minutes.
4. Press the again to confirm and press

ON1: Use this button to set a schedule for switching the stove on automatically (programme 1).

OFF1: Use this button to set a schedule for switching the stove off automatically (programme 1).

ON2: Use this button to set a schedule for switching the stove on automatically (programme 2).

OFF2: Use this button to set a schedule for switching the stove off automatically (programme 2).

AUTO: Use this button to repeat the set timer programmes (1 and 2) daily. Hold the button down for at least 2 seconds to activate/deactivate this mode. The display shows AUTO.

CANCEL: Use this button to cancel the programmed switch-on or switch-off times.
Lospellets de maderaestán humedes5)


SEND: Use this button to confirm the selected mode and send it to the stove.

ECONO: Use this button to activate/deactivate the ECONO mode. Hold the button down for at least 2 seconds to activate/deactivate this mode.

TURBO: Use this button to activate/deactivate the TURBO mode. Hold the button down for at least 2 seconds to activate/deactivate this mode.

CLOCK: To set the clock mode on the remote control, proceed as follows:
1. Press
2. The symbol appears and the time flashes.
3.Use the buttons to set the hours and minutes.
4. Press the again to confirm and press

ON1: Use this button to set a schedule for switching the stove on automatically (programme 1).

OFF1: Use this button to set a schedule for switching the stove off automatically (programme 1).

ON2: Use this button to set a schedule for switching the stove on automatically (programme 2).

OFF2: Use this button to set a schedule for switching the stove off automatically (programme 2).

AUTO: Use this button to repeat the set timer programmes (1 and 2) daily. Hold the button down for at least 2 seconds to activate/deactivate this mode. The display shows AUTO.

CANCEL: Use this button to cancel the programmed switch-on or switch-off times.
Utilice únicamentepellets de madera seca30d52f616ce4f86c445af19e81e7a6.jpg)


SEND: Use this button to confirm the selected mode and send it to the stove.

ECONO: Use this button to activate/deactivate the ECONO mode. Hold the button down for at least 2 seconds to activate/deactivate this mode.

TURBO: Use this button to activate/deactivate the TURBO mode. Hold the button down for at least 2 seconds to activate/deactivate this mode.

CLOCK: To set the clock mode on the remote control, proceed as follows:
1. Press
2. The symbol appears and the time flashes.
3.Use the buttons to set the hours and minutes.
4. Press the again to confirm and press

ON1: Use this button to set a schedule for switching the stove on automatically (programme 1).

OFF1: Use this button to set a schedule for switching the stove off automatically (programme 1).

ON2: Use this button to set a schedule for switching the stove on automatically (programme 2).

OFF2: Use this button to set a schedule for switching the stove off automatically (programme 2).

AUTO: Use this button to repeat the set timer programmes (1 and 2) daily. Hold the button down for at least 2 seconds to activate/deactivate this mode. The display shows AUTO.

CANCEL: Use this button to cancel the programmed switch-on or switch-off times.
f616ce4f86c445af19e81e7a6.jpg)


SEND: Use this button to confirm the selected mode and send it to the stove.

ECONO: Use this button to activate/deactivate the ECONO mode. Hold the button down for at least 2 seconds to activate/deactivate this mode.

TURBO: Use this button to activate/deactivate the TURBO mode. Hold the button down for at least 2 seconds to activate/deactivate this mode.

CLOCK: To set the clock mode on the remote control, proceed as follows:
1. Press
2. The symbol appears and the time flashes.
3.Use the buttons to set the hours and minutes.
4. Press the again to confirm and press

ON1: Use this button to set a schedule for switching the stove on automatically (programme 1).

OFF1: Use this button to set a schedule for switching the stove off automatically (programme 1).

ON2: Use this button to set a schedule for switching the stove on automatically (programme 2).

OFF2: Use this button to set a schedule for switching the stove off automatically (programme 2).

AUTO: Use this button to repeat the set timer programmes (1 and 2) daily. Hold the button down for at least 2 seconds to activate/deactivate this mode. The display shows AUTO.

CANCEL: Use this button to cancel the programmed switch-on or switch-off times.
El sensor de temperaturaestá averiado.f148c7d6df12f15ecc06b3efe1782c47875ddef6ee5d8118e05ae69f.jpg)


SEND: Use this button to confirm the selected mode and send it to the stove.

ECONO: Use this button to activate/deactivate the ECONO mode. Hold the button down for at least 2 seconds to activate/deactivate this mode.

TURBO: Use this button to activate/deactivate the TURBO mode. Hold the button down for at least 2 seconds to activate/deactivate this mode.

CLOCK: To set the clock mode on the remote control, proceed as follows:
1. Press
2. The symbol appears and the time flashes.
3.Use the buttons to set the hours and minutes.
4. Press the again to confirm and press

ON1: Use this button to set a schedule for switching the stove on automatically (programme 1).

OFF1: Use this button to set a schedule for switching the stove off automatically (programme 1).

ON2: Use this button to set a schedule for switching the stove on automatically (programme 2).

OFF2: Use this button to set a schedule for switching the stove off automatically (programme 2).

AUTO: Use this button to repeat the set timer programmes (1 and 2) daily. Hold the button down for at least 2 seconds to activate/deactivate this mode. The display shows AUTO.

CANCEL: Use this button to cancel the programmed switch-on or switch-off times.
Sustituya el sensor. Únicamente lo能把hacer un的专业aprorado por Qlima2a46166cb166f899102368e2bc594a12f706c7d306617b725d42e3fe4602d830.jpg)

SEND: Use this button to confirm the selected mode and send it to the stove.

ECONO: Use this button to activate/deactivate the ECONO mode. Hold the button down for at least 2 seconds to activate/deactivate this mode.

TURBO: Use this button to activate/deactivate the TURBO mode. Hold the button down for at least 2 seconds to activate/deactivate this mode.

CLOCK: To set the clock mode on the remote control, proceed as follows:
1. Press
2. The symbol appears and the time flashes.
3.Use the buttons to set the hours and minutes.
4. Press the again to confirm and press

ON1: Use this button to set a schedule for switching the stove on automatically (programme 1).

OFF1: Use this button to set a schedule for switching the stove off automatically (programme 1).

ON2: Use this button to set a schedule for switching the stove on automatically (programme 2).

OFF2: Use this button to set a schedule for switching the stove off automatically (programme 2).

AUTO: Use this button to repeat the set timer programmes (1 and 2) daily. Hold the button down for at least 2 seconds to activate/deactivate this mode. The display shows AUTO.

CANCEL: Use this button to cancel the programmed switch-on or switch-off times.
66cb166f899102368e2bc594a12f706c7d306617b725d42e3fe4602d830.jpg)

SEND: Use this button to confirm the selected mode and send it to the stove.

ECONO: Use this button to activate/deactivate the ECONO mode. Hold the button down for at least 2 seconds to activate/deactivate this mode.

TURBO: Use this button to activate/deactivate the TURBO mode. Hold the button down for at least 2 seconds to activate/deactivate this mode.

CLOCK: To set the clock mode on the remote control, proceed as follows:
1. Press
2. The symbol appears and the time flashes.
3.Use the buttons to set the hours and minutes.
4. Press the again to confirm and press

ON1: Use this button to set a schedule for switching the stove on automatically (programme 1).

OFF1: Use this button to set a schedule for switching the stove off automatically (programme 1).

ON2: Use this button to set a schedule for switching the stove on automatically (programme 2).

OFF2: Use this button to set a schedule for switching the stove off automatically (programme 2).

AUTO: Use this button to repeat the set timer programmes (1 and 2) daily. Hold the button down for at least 2 seconds to activate/deactivate this mode. The display shows AUTO.

CANCEL: Use this button to cancel the programmed switch-on or switch-off times.
El circuito impreso elec-trónico está averiado.jpg)

SEND: Use this button to confirm the selected mode and send it to the stove.

ECONO: Use this button to activate/deactivate the ECONO mode. Hold the button down for at least 2 seconds to activate/deactivate this mode.

TURBO: Use this button to activate/deactivate the TURBO mode. Hold the button down for at least 2 seconds to activate/deactivate this mode.

CLOCK: To set the clock mode on the remote control, proceed as follows:
1. Press
2. The symbol appears and the time flashes.
3.Use the buttons to set the hours and minutes.
4. Press the again to confirm and press

ON1: Use this button to set a schedule for switching the stove on automatically (programme 1).

OFF1: Use this button to set a schedule for switching the stove off automatically (programme 1).

ON2: Use this button to set a schedule for switching the stove on automatically (programme 2).

OFF2: Use this button to set a schedule for switching the stove off automatically (programme 2).

AUTO: Use this button to repeat the set timer programmes (1 and 2) daily. Hold the button down for at least 2 seconds to activate/deactivate this mode. The display shows AUTO.

CANCEL: Use this button to cancel the programmed switch-on or switch-off times.
Sustituya el circuito impreso electrónico. Únicamente lo能把hacer un的专业aprorado por Qlimae this button to confirm the selected mode and send it to the stove.

ECONO: Use this button to activate/deactivate the ECONO mode. Hold the button down for at least 2 seconds to activate/deactivate this mode.

TURBO: Use this button to activate/deactivate the TURBO mode. Hold the button down for at least 2 seconds to activate/deactivate this mode.

CLOCK: To set the clock mode on the remote control, proceed as follows:
1. Press
2. The symbol appears and the time flashes.
3.Use the buttons to set the hours and minutes.
4. Press the again to confirm and press

ON1: Use this button to set a schedule for switching the stove on automatically (programme 1).

OFF1: Use this button to set a schedule for switching the stove off automatically (programme 1).

ON2: Use this button to set a schedule for switching the stove on automatically (programme 2).

OFF2: Use this button to set a schedule for switching the stove off automatically (programme 2).

AUTO: Use this button to repeat the set timer programmes (1 and 2) daily. Hold the button down for at least 2 seconds to activate/deactivate this mode. The display shows AUTO.

CANCEL: Use this button to cancel the programmed switch-on or switch-off times.
s button to confirm the selected mode and send it to the stove.

ECONO: Use this button to activate/deactivate the ECONO mode. Hold the button down for at least 2 seconds to activate/deactivate this mode.

TURBO: Use this button to activate/deactivate the TURBO mode. Hold the button down for at least 2 seconds to activate/deactivate this mode.

CLOCK: To set the clock mode on the remote control, proceed as follows:
1. Press
2. The symbol appears and the time flashes.
3.Use the buttons to set the hours and minutes.
4. Press the again to confirm and press

ON1: Use this button to set a schedule for switching the stove on automatically (programme 1).

OFF1: Use this button to set a schedule for switching the stove off automatically (programme 1).

ON2: Use this button to set a schedule for switching the stove on automatically (programme 2).

OFF2: Use this button to set a schedule for switching the stove off automatically (programme 2).

AUTO: Use this button to repeat the set timer programmes (1 and 2) daily. Hold the button down for at least 2 seconds to activate/deactivate this mode. The display shows AUTO.

CANCEL: Use this button to cancel the programmed switch-on or switch-off times.
El depósito estávacío. Llene el embardo para pellets.5edf3b2c699875c2c861bfc1b17b8a83a8eb1e7a330132f697138fa574ddea.jpg)
ECONO: Use this button to activate/deactivate the ECONO mode. Hold the button down for at least 2 seconds to activate/deactivate this mode.

TURBO: Use this button to activate/deactivate the TURBO mode. Hold the button down for at least 2 seconds to activate/deactivate this mode.

CLOCK: To set the clock mode on the remote control, proceed as follows:
1. Press
2. The symbol appears and the time flashes.
3.Use the buttons to set the hours and minutes.
4. Press the again to confirm and press

ON1: Use this button to set a schedule for switching the stove on automatically (programme 1).

OFF1: Use this button to set a schedule for switching the stove off automatically (programme 1).

ON2: Use this button to set a schedule for switching the stove on automatically (programme 2).

OFF2: Use this button to set a schedule for switching the stove off automatically (programme 2).

AUTO: Use this button to repeat the set timer programmes (1 and 2) daily. Hold the button down for at least 2 seconds to activate/deactivate this mode. The display shows AUTO.

CANCEL: Use this button to cancel the programmed switch-on or switch-off times.
b2c699875c2c861bfc1b17b8a83a8eb1e7a330132f697138fa574ddea.jpg)
ECONO: Use this button to activate/deactivate the ECONO mode. Hold the button down for at least 2 seconds to activate/deactivate this mode.

TURBO: Use this button to activate/deactivate the TURBO mode. Hold the button down for at least 2 seconds to activate/deactivate this mode.

CLOCK: To set the clock mode on the remote control, proceed as follows:
1. Press
2. The symbol appears and the time flashes.
3.Use the buttons to set the hours and minutes.
4. Press the again to confirm and press

ON1: Use this button to set a schedule for switching the stove on automatically (programme 1).

OFF1: Use this button to set a schedule for switching the stove off automatically (programme 1).

ON2: Use this button to set a schedule for switching the stove on automatically (programme 2).

OFF2: Use this button to set a schedule for switching the stove off automatically (programme 2).

AUTO: Use this button to repeat the set timer programmes (1 and 2) daily. Hold the button down for at least 2 seconds to activate/deactivate this mode. The display shows AUTO.

CANCEL: Use this button to cancel the programmed switch-on or switch-off times.
Lospellets de madera nolegan a la calderaONO: Use this button to activate/deactivate the ECONO mode. Hold the button down for at least 2 seconds to activate/deactivate this mode.

TURBO: Use this button to activate/deactivate the TURBO mode. Hold the button down for at least 2 seconds to activate/deactivate this mode.

CLOCK: To set the clock mode on the remote control, proceed as follows:
1. Press
2. The symbol appears and the time flashes.
3.Use the buttons to set the hours and minutes.
4. Press the again to confirm and press

ON1: Use this button to set a schedule for switching the stove on automatically (programme 1).

OFF1: Use this button to set a schedule for switching the stove off automatically (programme 1).

ON2: Use this button to set a schedule for switching the stove on automatically (programme 2).

OFF2: Use this button to set a schedule for switching the stove off automatically (programme 2).

AUTO: Use this button to repeat the set timer programmes (1 and 2) daily. Hold the button down for at least 2 seconds to activate/deactivate this mode. The display shows AUTO.

CANCEL: Use this button to cancel the programmed switch-on or switch-off times.
Elsystema de tornillo estabyloqueadohe ECONO mode. Hold the button down for at least 2 seconds to activate/deactivate this mode.

TURBO: Use this button to activate/deactivate the TURBO mode. Hold the button down for at least 2 seconds to activate/deactivate this mode.

CLOCK: To set the clock mode on the remote control, proceed as follows:
1. Press
2. The symbol appears and the time flashes.
3.Use the buttons to set the hours and minutes.
4. Press the again to confirm and press

ON1: Use this button to set a schedule for switching the stove on automatically (programme 1).

OFF1: Use this button to set a schedule for switching the stove off automatically (programme 1).

ON2: Use this button to set a schedule for switching the stove on automatically (programme 2).

OFF2: Use this button to set a schedule for switching the stove off automatically (programme 2).

AUTO: Use this button to repeat the set timer programmes (1 and 2) daily. Hold the button down for at least 2 seconds to activate/deactivate this mode. The display shows AUTO.

CANCEL: Use this button to cancel the programmed switch-on or switch-off times.
Desenchufe la estufa. Retire la rejilla deprotección en el depósito, vaciélo. Limpie con cuidado las partes visibles del sistemasde tornillo. Vuelva a colocar la rejilla deprotección y arranque de nuevo la lámu-ina. Póngase en contacto con un instaladoraprorado por Qlima si el problema persiste.this mode.

CLOCK: To set the clock mode on the remote control, proceed as follows:
1. Press
2. The symbol appears and the time flashes.
3.Use the buttons to set the hours and minutes.
4. Press the again to confirm and press

ON1: Use this button to set a schedule for switching the stove on automatically (programme 1).

OFF1: Use this button to set a schedule for switching the stove off automatically (programme 1).

ON2: Use this button to set a schedule for switching the stove on automatically (programme 2).

OFF2: Use this button to set a schedule for switching the stove off automatically (programme 2).

AUTO: Use this button to repeat the set timer programmes (1 and 2) daily. Hold the button down for at least 2 seconds to activate/deactivate this mode. The display shows AUTO.

CANCEL: Use this button to cancel the programmed switch-on or switch-off times.
mode.

CLOCK: To set the clock mode on the remote control, proceed as follows:
1. Press
2. The symbol appears and the time flashes.
3.Use the buttons to set the hours and minutes.
4. Press the again to confirm and press

ON1: Use this button to set a schedule for switching the stove on automatically (programme 1).

OFF1: Use this button to set a schedule for switching the stove off automatically (programme 1).

ON2: Use this button to set a schedule for switching the stove on automatically (programme 2).

OFF2: Use this button to set a schedule for switching the stove off automatically (programme 2).

AUTO: Use this button to repeat the set timer programmes (1 and 2) daily. Hold the button down for at least 2 seconds to activate/deactivate this mode. The display shows AUTO.

CANCEL: Use this button to cancel the programmed switch-on or switch-off times.
El motor del systemadetornillo está dañado.065f94a550788b00958b0a7837.jpg)
CLOCK: To set the clock mode on the remote control, proceed as follows:
1. Press
2. The symbol appears and the time flashes.
3.Use the buttons to set the hours and minutes.
4. Press the again to confirm and press

ON1: Use this button to set a schedule for switching the stove on automatically (programme 1).

OFF1: Use this button to set a schedule for switching the stove off automatically (programme 1).

ON2: Use this button to set a schedule for switching the stove on automatically (programme 2).

OFF2: Use this button to set a schedule for switching the stove off automatically (programme 2).

AUTO: Use this button to repeat the set timer programmes (1 and 2) daily. Hold the button down for at least 2 seconds to activate/deactivate this mode. The display shows AUTO.

CANCEL: Use this button to cancel the programmed switch-on or switch-off times.
Sustituya el motor. Únicamente lo能把hacer un的专业aprorado por Qlimate control, proceed as follows:
1. Press
2. The symbol appears and the time flashes.
3.Use the buttons to set the hours and minutes.
4. Press the again to confirm and press

ON1: Use this button to set a schedule for switching the stove on automatically (programme 1).

OFF1: Use this button to set a schedule for switching the stove off automatically (programme 1).

ON2: Use this button to set a schedule for switching the stove on automatically (programme 2).

OFF2: Use this button to set a schedule for switching the stove off automatically (programme 2).

AUTO: Use this button to repeat the set timer programmes (1 and 2) daily. Hold the button down for at least 2 seconds to activate/deactivate this mode. The display shows AUTO.

CANCEL: Use this button to cancel the programmed switch-on or switch-off times.
ntrol, proceed as follows:
1. Press
2. The symbol appears and the time flashes.
3.Use the buttons to set the hours and minutes.
4. Press the again to confirm and press

ON1: Use this button to set a schedule for switching the stove on automatically (programme 1).

OFF1: Use this button to set a schedule for switching the stove off automatically (programme 1).

ON2: Use this button to set a schedule for switching the stove on automatically (programme 2).

OFF2: Use this button to set a schedule for switching the stove off automatically (programme 2).

AUTO: Use this button to repeat the set timer programmes (1 and 2) daily. Hold the button down for at least 2 seconds to activate/deactivate this mode. The display shows AUTO.

CANCEL: Use this button to cancel the programmed switch-on or switch-off times.
El depósito estávacío. Llene el embardo para pellets.shes.
3.Use the buttons to set the hours and minutes.
4. Press the again to confirm and press

ON1: Use this button to set a schedule for switching the stove on automatically (programme 1).

OFF1: Use this button to set a schedule for switching the stove off automatically (programme 1).

ON2: Use this button to set a schedule for switching the stove on automatically (programme 2).

OFF2: Use this button to set a schedule for switching the stove off automatically (programme 2).

AUTO: Use this button to repeat the set timer programmes (1 and 2) daily. Hold the button down for at least 2 seconds to activate/deactivate this mode. The display shows AUTO.

CANCEL: Use this button to cancel the programmed switch-on or switch-off times.
El fuego tieneduna llamadébil y naran-ja. Lospelletsno se queman bien y/o el cristal se ennegre-ce (demasiado)rápido.e5eb84caa19dbe106b457c90ee8ca.jpg)
ON1: Use this button to set a schedule for switching the stove on automatically (programme 1).

OFF1: Use this button to set a schedule for switching the stove off automatically (programme 1).

ON2: Use this button to set a schedule for switching the stove on automatically (programme 2).

OFF2: Use this button to set a schedule for switching the stove off automatically (programme 2).

AUTO: Use this button to repeat the set timer programmes (1 and 2) daily. Hold the button down for at least 2 seconds to activate/deactivate this mode. The display shows AUTO.

CANCEL: Use this button to cancel the programmed switch-on or switch-off times.
La saliva/conducto dehumos/chimenea establoqueadoo set a schedule for switching the stove on automatically (programme 1).

OFF1: Use this button to set a schedule for switching the stove off automatically (programme 1).

ON2: Use this button to set a schedule for switching the stove on automatically (programme 2).

OFF2: Use this button to set a schedule for switching the stove off automatically (programme 2).

AUTO: Use this button to repeat the set timer programmes (1 and 2) daily. Hold the button down for at least 2 seconds to activate/deactivate this mode. The display shows AUTO.

CANCEL: Use this button to cancel the programmed switch-on or switch-off times.
Deje que un deshollinador autorizzato limpie inmediamente la salida/el conductorde humos/chimenea. Póngase en contacto con un deshollinador..jpg)
OFF1: Use this button to set a schedule for switching the stove off automatically (programme 1).

ON2: Use this button to set a schedule for switching the stove on automatically (programme 2).

OFF2: Use this button to set a schedule for switching the stove off automatically (programme 2).

AUTO: Use this button to repeat the set timer programmes (1 and 2) daily. Hold the button down for at least 2 seconds to activate/deactivate this mode. The display shows AUTO.

CANCEL: Use this button to cancel the programmed switch-on or switch-off times.
El brasero está sucio Limpie elbrasero.e off automatically (programme 1).

ON2: Use this button to set a schedule for switching the stove on automatically (programme 2).

OFF2: Use this button to set a schedule for switching the stove off automatically (programme 2).

AUTO: Use this button to repeat the set timer programmes (1 and 2) daily. Hold the button down for at least 2 seconds to activate/deactivate this mode. The display shows AUTO.

CANCEL: Use this button to cancel the programmed switch-on or switch-off times.
automatically (programme 1).

ON2: Use this button to set a schedule for switching the stove on automatically (programme 2).

OFF2: Use this button to set a schedule for switching the stove off automatically (programme 2).

AUTO: Use this button to repeat the set timer programmes (1 and 2) daily. Hold the button down for at least 2 seconds to activate/deactivate this mode. The display shows AUTO.

CANCEL: Use this button to cancel the programmed switch-on or switch-off times.
La estufa estábloqueada por Dentro.d8f4842b43c5f847222c30e2400bee9af487003c2e8a3ff027bc950766.jpg)
ON2: Use this button to set a schedule for switching the stove on automatically (programme 2).

OFF2: Use this button to set a schedule for switching the stove off automatically (programme 2).

AUTO: Use this button to repeat the set timer programmes (1 and 2) daily. Hold the button down for at least 2 seconds to activate/deactivate this mode. The display shows AUTO.

CANCEL: Use this button to cancel the programmed switch-on or switch-off times.
Hace falta hacer tareas deostenimientoen la estufa. Únicamente lo能把hacer un的专业aprorado por Qlimaor switching the stove on automatically (programme 2).

OFF2: Use this button to set a schedule for switching the stove off automatically (programme 2).

AUTO: Use this button to repeat the set timer programmes (1 and 2) daily. Hold the button down for at least 2 seconds to activate/deactivate this mode. The display shows AUTO.

CANCEL: Use this button to cancel the programmed switch-on or switch-off times.
itching the stove on automatically (programme 2).

OFF2: Use this button to set a schedule for switching the stove off automatically (programme 2).

AUTO: Use this button to repeat the set timer programmes (1 and 2) daily. Hold the button down for at least 2 seconds to activate/deactivate this mode. The display shows AUTO.

CANCEL: Use this button to cancel the programmed switch-on or switch-off times.
Elextractor de humosestá dañadoe 2).

OFF2: Use this button to set a schedule for switching the stove off automatically (programme 2).

AUTO: Use this button to repeat the set timer programmes (1 and 2) daily. Hold the button down for at least 2 seconds to activate/deactivate this mode. The display shows AUTO.

CANCEL: Use this button to cancel the programmed switch-on or switch-off times.
Lospellets de madera se PUden quemargracias al tiro natural del humo de lachimenea. Sustituya inmediamente elventiladorazo que esta situación possibleafectar su salute. Únicamente lo能把hacer un的专业aprorado por Qlima.2f71dc0c7c68b1bb57f8239410dfc408bc052d5.jpg)
AUTO: Use this button to repeat the set timer programmes (1 and 2) daily. Hold the button down for at least 2 seconds to activate/deactivate this mode. The display shows AUTO.

CANCEL: Use this button to cancel the programmed switch-on or switch-off times.
c0c7c68b1bb57f8239410dfc408bc052d5.jpg)
AUTO: Use this button to repeat the set timer programmes (1 and 2) daily. Hold the button down for at least 2 seconds to activate/deactivate this mode. The display shows AUTO.

CANCEL: Use this button to cancel the programmed switch-on or switch-off times.
Lospellets de madera no son de buena calidad.tton to repeat the set timer programmes (1 and 2) daily. Hold the button down for at least 2 seconds to activate/deactivate this mode. The display shows AUTO.

CANCEL: Use this button to cancel the programmed switch-on or switch-off times.
Pruebe con pellets de madera de mayor calidad.. Hold the button down for at least 2 seconds to activate/deactivate this mode. The display shows AUTO.

CANCEL: Use this button to cancel the programmed switch-on or switch-off times.
d the button down for at least 2 seconds to activate/deactivate this mode. The display shows AUTO.

CANCEL: Use this button to cancel the programmed switch-on or switch-off times.
La estufa no está bienregulada activate/deactivate this mode. The display shows AUTO.

CANCEL: Use this button to cancel the programmed switch-on or switch-off times.
Regule la estufa. Únicamente lo能把hacer un的专业aprorado por Qlimadd3e39697c2dc4217807147e8b42fb2947f19fbdba21368d58b067aa0a2ac.jpg)
CANCEL: Use this button to cancel the programmed switch-on or switch-off times.
9697c2dc4217807147e8b42fb2947f19fbdba21368d58b067aa0a2ac.jpg)
CANCEL: Use this button to cancel the programmed switch-on or switch-off times.
El ventilador de recirculación del aire de la habi-tación sigoue functioningo cuando la estuía está vacia-on or switch-off times.
| El circuito impreso elec-trónico está averiado.e"> | Sustituya el circuito impreso. Únicamente lo pueda hacer un técnico aprobado por Qlimathe desired temperature (from 7^ to 40^ ). When the desired temperature has been selected, press (3). See figure 5.
esired temperature (from 7^ to 40^ ). When the desired temperature has been selected, press (3). See figure 5.
Hay cenizas en el suejo alrededor de la estufa Los conductos no están herméticos al aire\odot$ (3). See figure 5.
| Los conductos no están herméticos al airet-output"> | Unicamente lo能把 hacer un especialista en chimeneas certificado:Los conductos de humano que no son herméticos,uen ser peligrosos para su salute.Cierre las juntas del conducto inmediata-mente (con Loctite 598 o producto similar)y/o sustituya los conductos.ee figure 6.
gure 6.
El cierre de la puerta está roto,gastado o dañadostove uses the difference between the desired temperature and the room temperature itself to calculate the required output. To select auto mode, press (1) until the symbol appears. Press (2) to confirm your choice. To end auto mode, press (1) again, select the desired output and confirm with (2). See figure 7.

Sustituya el cierre. Únicamente lo能把 hacer un technician aprobado por Qlimatself to calculate the required output. To select auto mode, press (1) until the symbol appears. Press (2) to confirm your choice. To end auto mode, press (1) again, select the desired output and confirm with (2). See figure 7.

to calculate the required output. To select auto mode, press (1) until the symbol appears. Press (2) to confirm your choice. To end auto mode, press (1) again, select the desired output and confirm with (2). See figure 7.

La estufa está con la misma potencia,la pantalla mues-tra: «Eco».mbol appears. Press (2) to confirm your choice. To end auto mode, press (1) again, select the desired output and confirm with (2). See figure 7.

Se ha alcanzado la temperatura de espacio deseada. mode, press (1) again, select the desired output and confirm with (2). See figure 7.

Esto no es un error. La estufa funciona en modo eco.Estamericanypeecodermicar con un mando a distanciad209763e2fabe22cb7b5e814306c4816f67b8b7e2d8b1cfe17f.jpg)
63e2fabe22cb7b5e814306c4816f67b8b7e2d8b1cfe17f.jpg)
En la panta-Ila aparece «SERV»17f.jpg)
No es una avería. La estufaledge 900 horas en usa y necesita que se le hagan tareas de mantenimiento. La estufa seguiráfuncionando.urbo mode the temperature is pre-set to 30^ . After 30 minutes, the stove returns to the mode before the Turbo mode was activated. To select Turbo mode, hold down the button (1) for more than 2 seconds, and then push (3). To deactivate this mode, hold down the button (1) for at least 2 seconds. The word Turbo (2) will disappear from the remote control display and be replaced by the output level and the set temperature. Press (3) to confirm your choice. See figure 8.
La estufa necesitaostenimiento. Pónga-se en contacto con un先进技术ode serviceQlima reconocido. Realizará tareas demantimiento en la estufa y resetearáel aviso. mode, hold down the button (1) for more than 2 seconds, and then push (3). To deactivate this mode, hold down the button (1) for at least 2 seconds. The word Turbo (2) will disappear from the remote control display and be replaced by the output level and the set temperature. Press (3) to confirm your choice. See figure 8.
, hold down the button (1) for more than 2 seconds, and then push (3). To deactivate this mode, hold down the button (1) for at least 2 seconds. The word Turbo (2) will disappear from the remote control display and be replaced by the output level and the set temperature. Press (3) to confirm your choice. See figure 8.
En la panta-Ila aparecer «Atte»econds, and then push (3). To deactivate this mode, hold down the button (1) for at least 2 seconds. The word Turbo (2) will disappear from the remote control display and be replaced by the output level and the set temperature. Press (3) to confirm your choice. See figure 8.
Se está intentandoarrancar la estufa cuando está todas en la fase deenframbimiento.seconds. The word Turbo (2) will disappear from the remote control display and be replaced by the output level and the set temperature. Press (3) to confirm your choice. See figure 8.
Espere a que termine con la fase de en-friamento antes de volver a arrancar la estufa.he output level and the set temperature. Press (3) to confirm your choice. See figure 8.
tput level and the set temperature. Press (3) to confirm your choice. See figure 8.
La estufa se apaga. El avis de alarma que aparece es "AlAr dEp" y uno de los pilotos ALF y ALC del panel de control o también empiezan a brillar.Every 10 minutes the stove adjusts the power until heat output level 1 is reached. To select Econo mode, hold down the button (1) for more than 2 seconds, until Econo appears in the display (2) and then push (3). To deactivate this mode, hold down the button (1) for at least 2 seconds. The word Econo will disappear from the remote control display (2). Press (3) to confirm your choice. See figure 9.
El sensor/interruptor de presión está averiado output level 1 is reached. To select Econo mode, hold down the button (1) for more than 2 seconds, until Econo appears in the display (2) and then push (3). To deactivate this mode, hold down the button (1) for at least 2 seconds. The word Econo will disappear from the remote control display (2). Press (3) to confirm your choice. See figure 9.
Sustituya el interruptor de presión. Unicamente lo pueda hacer un técnico aprobado por Qlimantil Econo appears in the display (2) and then push (3). To deactivate this mode, hold down the button (1) for at least 2 seconds. The word Econo will disappear from the remote control display (2). Press (3) to confirm your choice. See figure 9.
Econo appears in the display (2) and then push (3). To deactivate this mode, hold down the button (1) for at least 2 seconds. The word Econo will disappear from the remote control display (2). Press (3) to confirm your choice. See figure 9.
La calidad/el conductor de humos/la chimenea está bloqueado/a., hold down the button (1) for at least 2 seconds. The word Econo will disappear from the remote control display (2). Press (3) to confirm your choice. See figure 9.
Deje que un deshollinador autorizzato limpie inmediamente la calidad/el conductor de humos/chimenea. Póngase en contacto con un deshollinador autorizzato.9.
h1 id="programme-1-on1-and-off1">| El circuito impreso eletrónico está averiado.) | Sustituya el circuito impreso electrónico. Únicamente lo pueda hacer un工程技术aprobado por Qlimaed switch-on and switch-off timer must be set when the remote control is switched off.
2. The stove retains the temperature and heat output settings it had before being switched off.
3. The minimum period of time between switching off and switching on is 20 minutes. This is the time needed for the stove to complete the cooling-down phase.
4. After a brief power interruption, the timer mode will have to be set again.
itch-on and switch-off timer must be set when the remote control is switched off.
2. The stove retains the temperature and heat output settings it had before being switched off.
3. The minimum period of time between switching off and switching on is 20 minutes. This is the time needed for the stove to complete the cooling-down phase.
4. After a brief power interruption, the timer mode will have to be set again.
Chimenea demasiado largaset when the remote control is switched off.
2. The stove retains the temperature and heat output settings it had before being switched off.
3. The minimum period of time between switching off and switching on is 20 minutes. This is the time needed for the stove to complete the cooling-down phase.
4. After a brief power interruption, the timer mode will have to be set again.
Consulte un especialista en chimeneas para que le compruebe si la chimenea cumple con la legislación. Consulte con un工程技术aprobado por Qlima para saber si la chimenea es apta para la estufa. and switching on is 20 minutes. This is the time needed for the stove to complete the cooling-down phase.
4. After a brief power interruption, the timer mode will have to be set again.
switching on is 20 minutes. This is the time needed for the stove to complete the cooling-down phase.
4. After a brief power interruption, the timer mode will have to be set again.
Condiciones climáticas desfavorablesed for the stove to complete the cooling-down phase.
4. After a brief power interruption, the timer mode will have to be set again.
Cuando el viento soplá muy fuerte, puede haber una presión negativa en la chimenea. Compruébelo y vuelva a arrancar la estufa.
id="10-3"> |
|
|
|
| |
|
|
|
|
|
|
|
|
|
|
|
|
|
|
|
|
|
|
|
|
|
|
|
|
|
|
|
|
|
|
|
|
|
|
|
|
|
|
|
|
|
|
|
|
|
|
|
|
|
|
|
|
|
|
|
|
|
|
|
|
|
|
|
|
|
|
|
|
|
|
|
|
|
|
|
|
|
|