
ViewPad V10s - Tableta VIEWSONIC - Manual de uso y guía de instrucciones gratis
Encuentra gratis el manual del aparato ViewPad V10s VIEWSONIC en formato PDF.

| Tipo de producto | Tableta PC |
| Marca | ViewSonic |
| Modelo | ViewPad V10s (VPAD10) |
| Sistema operativo | Windows 7 |
| Pantalla táctil | Pantalla táctil multitáctil (tamaño no especificado) |
| Cámara | Cámara web integrada para fotos, videos y videollamadas |
| Conectividad inalámbrica | WiFi, Bluetooth, 3G (vía tarjeta SIM) |
| Almacenamiento integrado | SSD (controladores instalados en la última partición) |
| Puertos | 1 x Mini VGA, 1 x USB 2.0, 1 x conector de audio, 1 x Micro SD, 1 x conector de alimentación |
| Alimentación | Adaptador de corriente (entrada CA) y batería recargable integrada |
| Autonomía de la batería | Variable según el uso; optimizable reduciendo el brillo y desactivando las conexiones no utilizadas |
| Sensor de orientación | Sensor G (acelerómetro) integrado para rotación automática de la pantalla |
| Garantía | 1 año |
| Accesorios incluidos | Adaptador de corriente con cable, guía del usuario, CD del controlador |
| Funciones de entrada | Panel de entrada táctil, teclado virtual, escritura a mano, gestos multitáctiles |
| Instrucciones de seguridad | No exponer a la humedad, no desmontar, usar solo accesorios aprobados |
| Mantenimiento y limpieza | Limpiar con un paño suave; no usar productos líquidos; mantener seco |
| Piezas de repuesto | Adaptador de corriente, batería (reemplazo por un tipo aprobado) |
| Información de conformidad | CE, RoHS (limitación de sustancias peligrosas) |
| Servicio al cliente | Datos de contacto disponibles en el sitio web de ViewSonic; requiere el número de serie |
Preguntas frecuentes - ViewPad V10s VIEWSONIC
Preguntas de los usuarios sobre ViewPad V10s VIEWSONIC
0 pregunta sobre este aparato. Responde a las que conoces o haz la tuya.
Hacer una nueva pregunta sobre este aparato
Descarga las instrucciones para tu Tableta en formato PDF gratis! Encuentra tus instrucciones ViewPad V10s - VIEWSONIC y toma tu dispositivo electrónico nuevamente en la mano. En esta página están publicados todos los documentos necesarios para el uso de su dispositivo. ViewPad V10s de la marca VIEWSONIC.
MANUAL DE USUARIO ViewPad V10s VIEWSONIC
Información de conformidad
Certificación CE para países europeos

Este dispositivo cumple con la Directiva EMC (Compatibilidad Electromagnética) 2004/108/EC y la Directiva de Baja Tensión 2006/95/EC.
La información siguiente es sólo para los estados miembros de la UE:
La marca cumple con la Directriz para el Desecho de Equipos Electrónicos y Eléctricos 2002/96/EC (WEEE).
La marca indica el requisito de NO desechar el equipo, incluyendo cualquier batería gastada o desechada ni acumuladores como desechos municipales sin separar, sino que deben usarse los sistemas de devolución y recolección disponibles.
Si en las baterías, acumuladores o pilas de botón incluidas con este equipo aparecen los símbolos químicos Hg, Cd, o Pb, significa que la batería tiene un contenido de metales pesados de más de un 0.0005% de Mercurio, de más de un 0.002% de Cadmio o de más de un 0.004% de Plomo.

Declaración sobre el Cumplimiento R&TTE CE!
Este dispositivo de módulo inalámbrico cumple con los Requisitos Esenciales de la Directiva de la Unión Europea R&TTE (1999/5/EC). Este equipo cumple con las siguientes estándares de conformidad:
ETSI EN 300 328
EN 301 489
EN 301 489
Países notificados: Alemania, Reino Unido, Holanda, Bélgica, Suecia, Dinamarca, Finlandia, Francia, Italia, España, Austria, Irlanda, Portugal, Grecia, Luxemburgo, Estonia, Letonia, Lituania, República Checa, Eslovaquia, Eslovenia, Hungría, Polonia y Malta.
Advertencias Importantes de Seguridad
- No presione o toque la pantalla LCD. No ponga su Tablet PC con las cosas pequeñas, las cuales pueden arañar la pantalla LCD o entrar en su Tablet PC.
- No exponga su Tablet PC en el ambiente sucio o polvoroso. Mantenga el ambiente limpio y seco.
- No ponga su Tablet PC en la superficie desnivelada o no estable.
- No ponga o deje caer objetos en su Tablet PC. No insierte cualquier objeto exterior en su Tablet PC. No cierre la pantalla LCD fuertemente.
- No exponga su Tablet PC en el ambiénte magnético o electrónico. No exponga el disquete cerca dsu Tablet PC o sobre su Tablet PC para evitar la pérdida de los datos en el disquete.
- No deje su Tablet PC cara al sol por que eso puede dañar la pantalla LCD, especialmente en el coche.
- Temperatura segura: El portatil sólo se puede utilizar en el ambiente de las temperaturas entre 5°C (41°F) y 35°C(95°F).
- No exponga o utilice su Tablet PC cerca del líquido, lluvia o humedad.
- Advertencia: Hay riesgo de explosión si la bateria no está sustituida por el modelo incorrecto. Elimine la bateria usada según las instrucciones.
- No tire su Tablet PC en la basura diaria. Chquee los reglamentos locales para el dishecho de los productos electrónicos. Por favor recicle la pila de la bateria y chequee con las autoridades locales o con los minoristas por el reciclaje.
- Su Tablet PC y el adaptador puede producir el calor durante la operación o la carga de bateria. No deje su Tablet PC en las rodillas o en cualquier otra parte de su cuerpo para evitar la incomodidad o daño por el calor.
-
Índice de entrada: Respecto al índice de entrada en su Tablet PC, asegure que el adaptador de potencia cumpla con el índice. Solamente utilice los accesorios indicados por el manufacturero.
-
Chequee la conexión entre la unidad principal y los accesorios antes de encender su Tablet PC.
- No utilice su Tablet PC cuando come para evitar el ensuciamiento dsu Tablet PC.
- No insierte cualquier cosa en su Tablet PC para evitar el corto-circuito o el daño al circuito.
- Apache su Tablet PC cuando quiere instalar o desinstalar los dispositivos exteriores que no adapten al enchufe caluroso.
- Antes de limpiar su Tablet PC desconecte su Tablet PC de la salida electrónica, quite la bateria instalada y ponga su Tablet PC lejos de los niños.
- No desensamble su Tablet PC. Sólo un técnico certificado puede repararlo. Si no, puede causar problema y el manufacturero no tomará la responsabilidad del daño.
- Solo utilice la bateria y los paquetes aprobados por el manufacturo, si no, habrá daño.
- Su Tablet PC tiene unas piezas metálicas para dispersa el calor. No ponga su Tablet PC sobre objetos blandos como la cama, el sofa, las rodillas, etc. Si no, su Tablet PC se volverá caluroso y el sistema de operación suspendrá.
Declaración de Cumplimiento de RoHS
Este producto ha sido diseñado y fabricado cumpliendo la Directiva 2002/95/EC del Parlamento Europeo y el Consejo para la restricción del uso de ciertas sustancias peligrosas en equipos eléctricos y electrónicos (Directiva RoHS) y se considera que cumple con los valores de concentración máximos publicados por el European Technical Adaptation Committee (Comité Europeo de Adaptaciones Técnicas) (TAC) tal y como se muestra a continuación:
| Sustancia | Concentración Máxima Propuesta | Concentración Real |
| Plomo (Pb) 0,1% < 0,1% | ||
| Mercurio (Hg) 0,1% < 0,1% | ||
| Cadmio (Cd) 0,01% < 0,01% | ||
| Cromo Hexavalente (Cr6+) 0,1% < 0,1% | ||
| Bifenilo Polibromado (PBB) 0,1% < 0,1% | ||
| Éteres de Difenilo Polibromado (PBDE) 0,1% < 0,1% |
Ciertos componentes de los productos indicados más arriba están exentos bajo el Apéndice de las Directivas RoHS tal y como se indica a continuación:
Ejemplos de los componentes exentos:
- Mercurio en bombillas fluorescentes compactas que no exceda los 5 mg por bombilla y en otras bombillas no mencionadas específicamente en el Apéndice de la Directiva RoHS.
- Plomo en el cristal de los tubos de rayos catódicos, componentes electrónicos, tubos fluorescentes y piezas electrónicas de cerámica (p.ej. dispositivos piezoelectrónicos).
- Plomo en soldaduras del tipo de alta temperatura (p.ej. las aleaciones basadas en plomo que contiene en peso un 85% o más de plomo).
- Plomo como elemento aleador en acero que contenga hasta un 0,35% de plomo en peso, aluminio que contenga hasta un 0,4% de plomo en peso y como aleación de cobre que contenga hasta un 4% de plomo en peso.
Información del Copyright
Copyright © ViewSonic® Corporation, 2010. Reservados todos los derechos.
ViewSonic, el logotipo de los tres pájaros y OnView son marcas registradas de ViewSonic Corporation.
Renuncia: ViewSonic Corporation no se hace responsable de los errores técnicos o editoriales contenidos en el presente documento, ni de los daños incidentales o consecuentes resultantes del mal uso de este material, o del rendimiento o uso de este producto.
Para continuar con la mejora del producto, ViewSonic Corporation se reserva el derecho de cambiar las especificaciones sin previo aviso. La información presente en este documento puede cambiar si aviso previo.
Este documento no debe ser copiado, reproducido o transmitido total o parcialmente por ningún medio y para ningún propósito sin permiso escrito de ViewSonic Corporation.
Registro del producto
Para que nuestros productos se ajusten a sus futuras necesidades, así como para recibir información adicional sobre el producto cuando esté disponible, regístrelo a través de Internet en: www.viewsonic.com. El CD-ROM del Asistente de ViewSonic® le ofrece también la posibilidad de imprimir el formulario de registro para enviarlo por correo o fax a ViewSonic®.
Para el historial
| Nombre del producto: | VPAD10 |
| ViewSonic Tablet PC | |
| Número de modelo: | VS13790 |
| Número del documento: | VPAD10_UG_ESP Rev. 1A 09-28-10 |
| Número de serie: | |
| Fecha de compra: |
Desecho del producto al final de su vida útil
ViewSonic es respetuoso con el medioambiente y está comprometido a trabajar y vivir de una manera que sea respetuosa con el medioambiente. Gracias por ser parte de una forma de Computación más Inteligente y más Verde. Visite el sitio web de ViewSonic para saber más.
EE.UU. y Canadá: http://www.viewsonic.com/company/green/recycle-program/
Europa: http://www.viewsoniceurope.com/uk/support/recycling-information/
Taiwán: http://recycle.epa.gov.tw/recycle/index2.aspx
Tabla de Contenido
Breve introducción....ii
Contenido del paquete ....iii
Explorar su Tablet PC....1
Vista frontal....1
Vista posterior....3
Vista lateral 5
Indicadores 8
Aplicación para sistemas con Windows 7 .... 10
Utilizar la función Cámara 27
Utilizar la pantalla multitáctil 27
Problemas generales de hardware, causas posibles y soluciones 28
Breve introducción
Instrucciones de seguridad
Siga las pautas de seguridad que se indican a continuación para protegerse usted mismo y al dispositivo VPAD10.
- No intente reparar usted mismo el dispositivo VPAD10. Siga siempre las instrucciones de instalación al pie de la letra.
- Asegúrese de que no hay ningún objeto que descanse sobre el cable de alimentación del adaptador de CA y que dicho cable no se encuentra en ningún lugar donde se pueda pisar o tropezar con él.
- No tape el adaptador de CA con papeles u otros artículos que puedan reducir la refrigeración; tampoco utilice el adaptador de CA mientras se encuentra dentro de un maletín de transporte.
- Utilice solamente el adaptador de CA, el cable de alimentación y la batería probados para utilizarse con este dispositivo VPAD10. El uso de otro tipo de batería o de adaptador de CA puede causar riesgo de incendio o explosión.
- Si utiliza un alargador con el adaptador de CA, asegúrese de que el valor nominal del amperaje total de los productos enchufados a dicho alargador no supera el de este.
- Si traslada el dispositivo VPAD10 entre entornos cuyos intervalos de temperatura y humedad difieran bastante, se puede formar condensación en dicho dispositivo o dentro de él. Para no dañar el dispositivo VPAD10, deje que transcurra el tiempo suficiente para que la humedad se evapore antes de utilizarlo.
- Cuando desconecte un cable, tire de su conector o de su lazada de liberación de tensión, no del propio cable. Cuando tire del conector, manténgalo alineado uniformemente para no doblar ninguno de sus contactos. Asimismo, antes de conectar un cable, asegúrese de que ambos conectores están correctamente orientados y alineados.
El contenido de esta día puede variar de los productos reales. En este caso, remítase a dichos productos.
Contenido del paquete
Después de abrir el paquete, inspeccione atentamente el contenido. Si cualquiera de los artículos falta o está dañado, póngase en contacto son su distribuidor. La caja debe contener los siguientes artículos:
ESTÁNDAR
- Un dispositivo VPAD10
- Un adaptador de CA con cable de alimentación
- Guía del usuario
- CD con los controladores (instalados en SSD)

ADVERTENCIA
El controlador de este dispositivo VPAD10 está colocado en última partición SSD. Tenga cuidado para no eliminar o formatear los archivos.
OPCIONAL
Los siguientes artículos suelen ser opcionales, pero algunos proveedores pueden incluirlos en el paquete estándar. Some items may not be available in some countries, or some vendors may choose not to carry all the items. not to carry all the items.
- Funda
- Cable Mini VGA
- Paño de limpieza
- Audifono
ViewSonic VPAD10
ix
Explorar su Tablet PC
Vista frontal
ViewSonic VPAD10
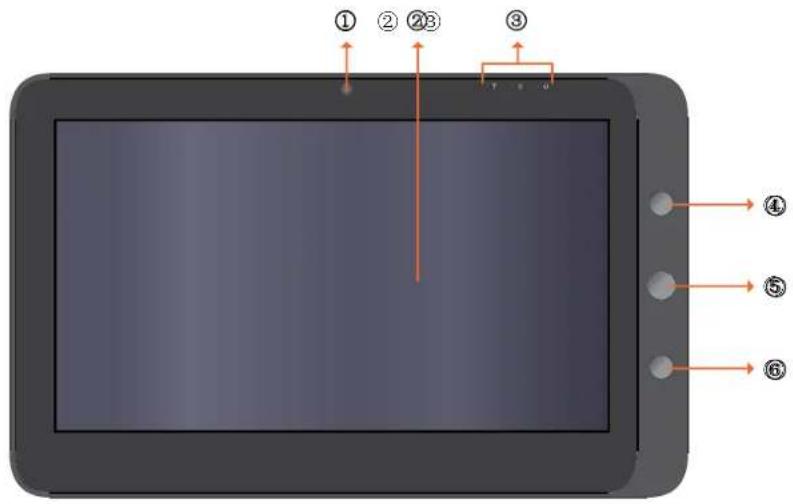
① Cámara
Cámara Web integrada que permite capturar imágenes estáticas, grabar vídeos y conversar en línea.
② Pantalla táctil
Utilice el dedo para controlar el sistema y las aplicaciones.
③ Indicadores
Consulte la sección "Indicadores" en la página 8\~9 para obtener detalles.
④ Botón Encendido y apagado
Permite encender y apagar el dispositivo VPAD10.
⑤ Botón de función 1
Mantenga presionado este botón para la tecla "Esc". Presiónelo brevemente para llamar al "Panel de entrada de su Tablet".
(Si no hay acceso al sistema, manténgalo presionado para la tecla de desplazamiento "Arriba". Presiónelo brevemente para la tecla de desplazamiento "Abajo".)
⑥ Botón de función 2
Mantenga presionado este botón para activar o desactivar la función 3G. Presiónelo brevemente para activar o desactivar las funcionalidades Wi-Fi y Bluetooth.
(Si no hay acceso al sistema, presiónelo para la tecla "Entrar".)
Vista posterior
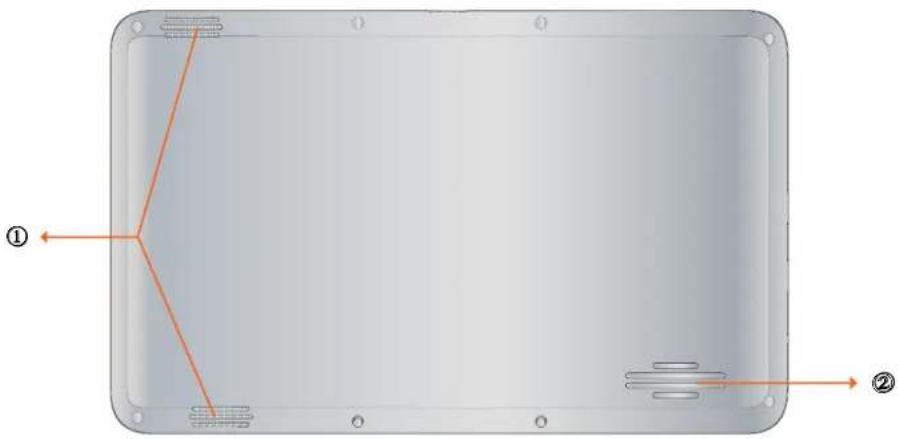
Produce sonido de los archivos multimedia o del sistema operativo.
② Conductos de ventilación
Permiten disipar el calor y mantener una temperatura óptima en el dispositivo VPAD10.
Vista lateral
Lateral izquierdo
Lado derecho
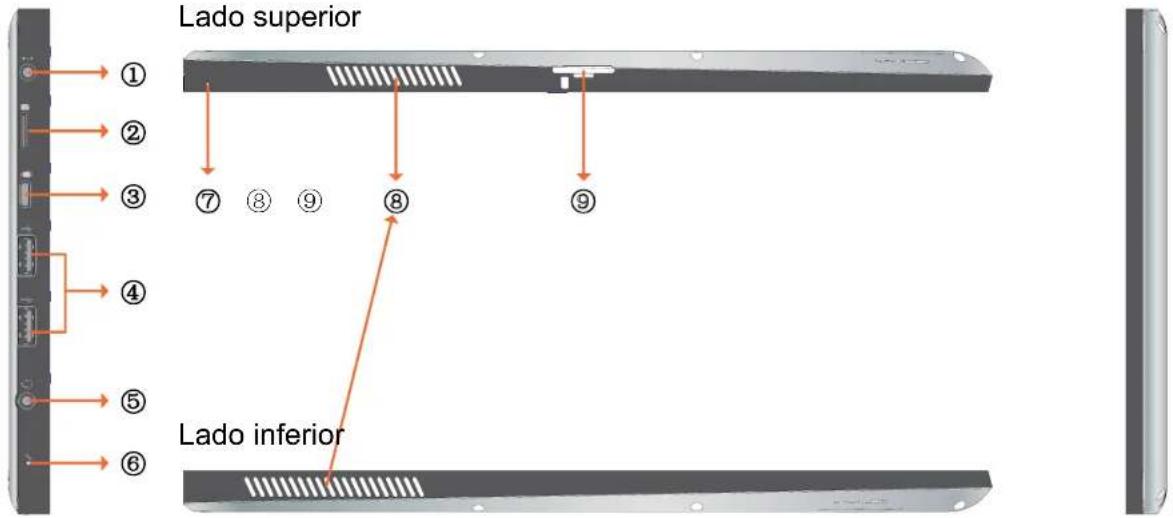
ViewSonic VPAD10
① Conector de alimentación
Permite conectar la fuente de alimentación de CA para proporcionar energía al dispositivo VPAD10 y cargar la batería.
② Ranura para tarjetas Micro SD
Permite insertar una tarjeta de memoria Micro SD. Puede intercambiar material de datos con el dispositivo VPAD10.
③ Puerto Mini VGA
Permite conectar un dispositivo de visualización externo (como un monitor o proyector) al conector de vídeo Mini VGA del equipo portátil con un cable Mini VGA.
④ Botón Encendido y apagado
Permite conectar periféricos, como por ejemplo ratones, cámaras digitales y reproductores MP3, que utilizan la interfaz USB 2.0.
⑤ Conector de salida de audio
Permite conectar un audifono, auricular o altavoz externo para reproducir el audio del dispositivo VPAD10.
⑥ MIC
Permite recibir sonidos y voces para grabar.
⑦ Orificio de expulsión y restablecimiento
Cuando el estado del sistema es anómalo (no se puede iniciar o activar) inserte un objeto o fino y recto (como un clip de papel) en el orificio de expulsión manual de su Tablet.
⑧ Conductos de ventilación
Permiten disipar el calor y mantener una temperatura óptima en el dispositivo VPAD10.
⑨ Ranura para tarjetas SIM 3G
Inserte una tarjeta SIM 3G (no se admite PnP) para poder conectarse a una red 3G.
(Para obtener más información, póngase en contacto con los operadores de telecomunicaciones locales.)
Indicadores
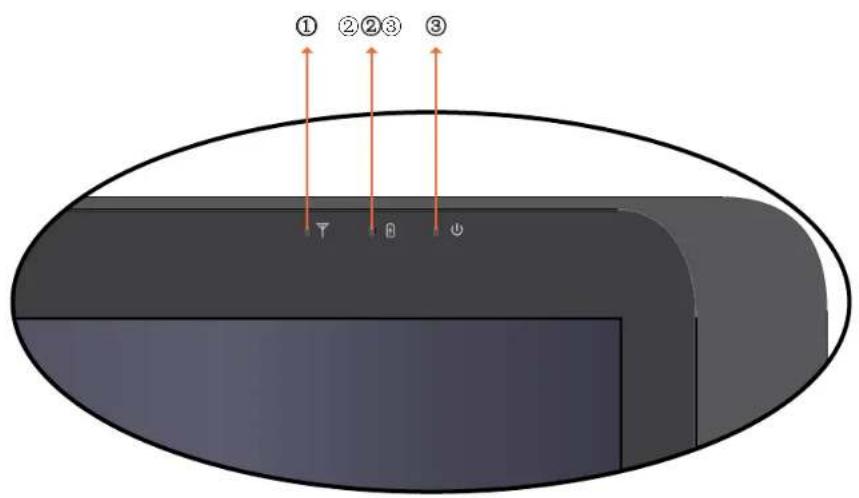
① Indicador LAN inalámbrico
Cuando la funcionalidad WLAN está activada, se ilumina en color azul.
Cuando la funcionalidad WLAN está desactivada, la luz se apaga.
② Indicación del estado de la batería
Cuando la batería se está cargando, se ilumina en color rojo.
Cuando la carga de la batería es baja, parpadea en color rojo.
Cuando la batería está completamente cargada, se ilumina en color azul.
③ Indicador de encendido
Cuando el sistema está encendido, se ilumina en color azul.
Cuando el sistema se encuentra en el modo de suspensión, parpadea en color azul.
Cuando el sistema está apagado o se encuentran el modo de hibernación, la luz se apaga.
Aplicación para sistemas con Windows 7
Comenzar a utilizar el dispositivo VPAD10
Conecte el dispositivo VPAD10 a una fuente de alimentación externa mediante el adaptador de CA, mantenga presionado el botón de encendido y apagado durante 2\~3 segundos y encienda dicho dispositivo. Deje de presionar el botón cuando el indicador de encendido se ilumine en color azul. Por último, siga las instrucciones de la pantalla para completar la configuración del sistema operativo inicial.
Aparecerá la pantalla de inicio del sistema (escritorio). (El movimiento del sensor G integrado del dispositivo cambia su ángulo y orientación.)
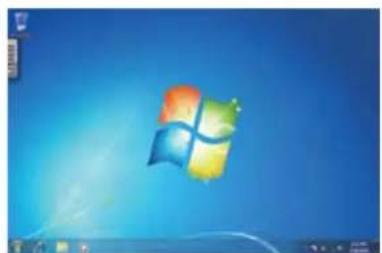
El escritorio predeterminado del sistema incluye los siguientes elementos: ① Papelera de reciclaje, ② Teclado virtual, ③ Área de trabajo y ④ Barra de tareas.

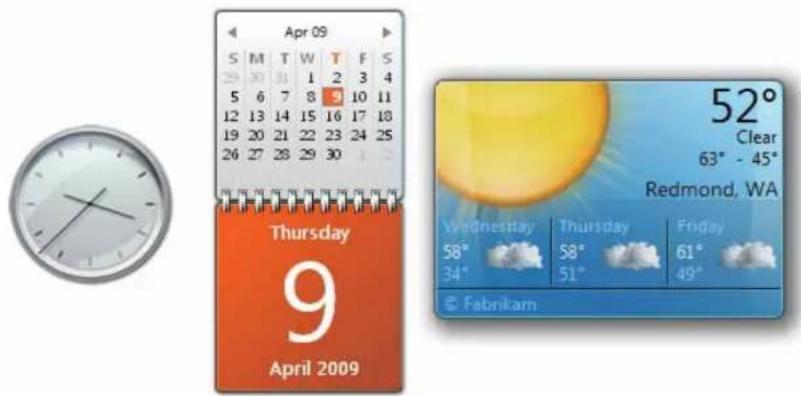
Área de trabajo
Se trata del área de la pantalla en la que los usuarios pueden realizar su trabajo así como almacenar programas, documentos y sus accesos directos. Puede agregar Gadgets para proporcionar a los usuarios acceso rápido a información personalmente relevante y tareas sencillas (sin obstáculos).
La barra de tareas es el punto de acceso para los programas mostrados en el escritorio, incluso si el programa está minimizado. Se dice de tales programas que tienen presencia en el escritorio. Con la barra de tareas, los usuarios pueden ver las ventanas principales abiertas y ciertas ventanas secundarias en el escritorio, así como cambiar rápidamente entre ellas.
Botón Inicio: Se trata del punto de acceso para todos los programas y lugares de Windows especiales (Documentos, Imágenes, Música, Juegos, Pc, Panel de control). Tiene listas de tipo "los más usados recientemente" para acceder rápidamente a los programas y documentos recientemente utilizados.
Bandas del escritorio: programas funcionales y de ejecución a largo plazo, como por ejemplo la barra de idioma. Los programas que se minimizan en las bandas del escritorio no muestran botones en la barra de tareas cuando se minimizan. No se recomienda el uso de las bandas del escritorio en Windows 7.
Área de notificación: se trata de una fuente para notificaciones y estado a corto plazo así como un punto de acceso para funciones relacionadas con el sistema y con los programas que no tienen presencia en el escritorio.

Conectarse a una red inalámbrica
-
Asegúrese de que se encuentra dentro del área de servicio de la red inalámbrica. Presione el botón Wi-Fi para activar la funcionalidad Wi-Fi. El indicador Wi-Fi se iluminará en azul. (Si inserta una tarjeta SIM 3G y activa la funcionalidad 3G, también podrá conectarse a redes 3G.)
-
Haga clic en el icono de red del área de notificación. Se mostrará una lista de redes inalámbricas disponibles.

(Las zonas con cobertura Wi-Fi y las redes 3G se mostrarán juntas en la misma lista. Windows 7 también virtualiza la tarjeta Wi-Fi para que pueda utilizarla dos veces, por ejemplo para conectar dispositivos WPS a un punto de acceso que no es WPS.)
(Para conectarse a algunas redes que requieren autenticación de seguridad, puede que tenga que pasar otro proceso de autorización y especificar el nombre de usuario y la contraseña. Para obtener detalles, consulte a su administrador de red.)
(Para garantizar la seguridad de los datos, es recomendable conectarse a redes inalámbricas que tengan seguridad siempre que sea posible.)
(Cuando viaje en avión, asegúrese de desactivar la conexión de red inalámbrica para evitar posibles riegos y volar seguro.)
- Elija una red y haga clic en Connect (Conectar). Si la red que utiliza no requiere autenticación de seguridad, aparecerá un mensaje indicando que se ha conectado a la red correctamente.
Bluetooth
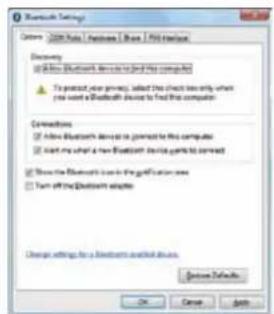
- Haga clic con el botón secundario en el icono 🧑 en el área de notificación (situado en la esquina inferior derecha del escritorio o haga clic en el icono 🧑 para acceder a dicho icono 🧑 desde los iconos ocultos) y seleccione Open Settings (Abrir configuración). (Si el adaptador está desactivado, activévelo.)
- En la ficha Options (Opciones), seleccione Allow Bluetooth devices to find this computer (Permitir que los dispositivos Bluetooth encuentren este equipo) y haga clic en OK (Aceptar). Por tanto, otros dispositivos Bluetooth pueden encontrar el equipo portátil y establecer una conexión Bluetooth.
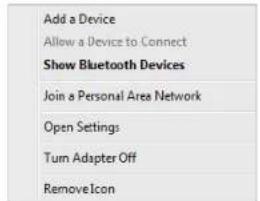
Enviar un archivo a un dispositivo Bluetooth
Si el dispositivo Bluetooth es capaz de enviar y recibir datos, como por ejemplo un teléfono móvil, puede utilizar la conectividad Bluetooth para transferir datos de forma inalámbrica entre dicho dispositivo y su Tablet. 1. Haga clic con el botón secundario en Ⓧ y seleccione Show Bluetooth Devices (Mostrar dispositivos Bluetooth).  2. En este ejemplo, haga doble clic en el icono S88 (el teléfono móvil S88 puede transferir datos a través de la funcionalidad Bluetooth).  3. Haga clic en Send files to your phone (S88) (Enviar archivos al teléfono (S88)).  4. Haga clic en Browse Files (Buscar archivos) para seleccionar los archivos que desea transferir y, a continuación, haga clic en Sned (Enviar).  5. Los archivos seleccionados se enviarán ahora al teléfono móvil S88. Una vez terminada la transferencia, el cuadro de diálogo Sending Items (Enviando elementos) se cerrará automáticamente.  (El ejemplo mostrado anteriormente es específico para conectarse a un teléfono móvil. Cuando se conecte a otros tipos de dispositivo Bluetooth, los pasos pueden ser diferentes.)Especificación de información mediante el panel táctil
Panel de entrada del dispositivo VPAD10 El panel de entrada del dispositivo VPAD10 es el panel de entrada principal utilizado para especificar contenido de texto. Tablero de escritura
También existe un tablero de escritura que captura el texto manuscrito y lo convierte en texto que impreso. Existen dos métodos para capturar texto manuscrito: Escribir a mano alzada o Escribir carácter a carácter.1. Escribir a mano alzada
2. Escribir carácter a carácter
Configuración del dispositivo VPAD10
Para obtener el máximo provecho de todas las funciones táctiles de este sistema, elija "Start" (Inicio) > "Control Panel" (Panel de control) y, a continuación, seleccione "VPAD10 Settings" (Configuración del dispositivo VPAD10). Introducción a la configuración del dispositivo VPAD10
Display (Visualización) 1. Configuration (Con figuración)
Para configurar el lápiz y la pantalla táctil, haga clic en el botón Setup (Configuración). A continuación, toque la pantalla con el dedo para completar la configuración de identificación de la pantalla táctil. 2. Display Options (Opciones de visualización)
Display (Visualización): seleccione el dispositivo de visualización de salida. Calibration (Calibración): No utilice la calibración de pantalla y integrada del sistema Windows. Si desea calibrar una pantalla táctil, consulte la página adicional "Calibration of the touch screen" (Calibración de la pantalla táctil). Reset (Restablecer): Si la calibración de la pantalla integrada no se realizó correctamente, puede hacer clic en el botón Reset (Restablecer) para restaurar la calibración predeterminada. Go to Orientation (Ir a orientación) El sensor G está integrado en este dispositivo, no es necesario realizar esta configuración. Others (Otros)
 1. Handedness (Diestro o zurdo) Seleccione la posición preferida de los menús en función de si es diestro o zurdo. Si selecciona una configuración para zurdos, los menús aparecen a la right-handed (derecha); si selecciona una configuración para diestros, los menús aparecen a la left-handed (izquierda). 2. Pen and Touch (Lápiz y entrada táctil) Haga clic en el vínculo "Go to Pen and Touch" (Ir a Lápiz y panel táctil) que se encuentra en el cuadro Lápiz y entrada táctil. 3. VPAD10 Input Panel Options (Opciones del panel de entrada del dispositivo VPAD10) Haga clic en el vínculo "Go to Input Panel Settings" (Ir a la configuración de Panel de entrada) que aparece en las opciones del panel de entrada del dispositivo VPAD10.Configuración del lápiz y la entrada táctil
Habilitar entrada táctil 1. Active la casilla "Use your finger as an input device" (Usar el dedo como dispositivo de entrada) para habilitar la interfaz táctil. 2. Active la casilla "Enable multi-touch gestures and inking" (Habilitar movimientos multitoque y entradas manuscritas) para habilitar los movimientos multitoque, como por ejemplo zoom con dos dedos.  Settings (Configuración) Haga clic en el botón "Settings" (Configuración) para ajustar la velocidad de doble toque y la tolerancia espacial, y probar la configuración.  ViewSonic VPAD10Touch Pointer (Puntero táctil)
Active la casilla "Touch pointer" (Puntero táctil) para mostrar el puntero táctil cuando los dedos interactúan con elementos de la pantalla. En el área Advanced Option (Opciones avanzadas) puede establecer los elementos "Touch Pointer Location Option" (Opciones de ubicación del puntero táctil) y "Touch Pointer Appearance and Behavior" (Apariencia y comportamiento del puntero táctil). Panning (Panorámica)
En la ficha "Panning" (Panorámica), active la casilla "Turn on Single Finger Panning" (Activar movimiento panorámico con un dedo) para habilitar el movimiento panorámico con el dedo. Active ambas casillas en el cuadro "Gestures" (Movimientos) y seleccione el valor que desee en Inertia settings (Configuración de inercia).  ViewSonic VPAD10Utilizar la función Cámara
La cámara integrada permite participar en llamadas de vídeo y hacer fotografías.Utilizar la pantalla multitáctil
La tecnología multitáctil permite controlar el equipo con uno o dos dedos simultáneamente. Un doble clic equivale a tocar con un dedo dos veces. El desplazamiento de las páginas Web es tan intuitivo como mover el dedo hacia arriba y hacia abajo por una página. Utilice dos dedos para ampliar y reducir las imágenes (pellizar para reducir, separar para ampliar). Para hacer clic con el botón secundario en un archivo, tóquelo con un dedo y toque la pantalla con otro dedo (también puede utilizar un dedo para tocar la pantalla durante 2\~3 segundos).Problemas generales de hardware, causas posibles y soluciones
A continuación se citan algunos problemas comunes de hardware y soluciones recomendadas: 1. El sistema dejó de funcionar durante la ejecución del programa. Causa: error al utilizar el procedimiento actual. Solución: haga clic en las teclasDistribuidores de contacto
Después de leer la sección anterior, si el problema no se resuelve, realice los pasos siguientes para ponerse en contacto con el distribuidor. Los distribuidores pueden determinar si el equipo necesita de volverse a la tienda. Antes de llamar al distribuidor, prepare la siguiente información: 1. Configuración y modelo de su dispositivo VPAD10 Los distribuidores necesitan saber qué periféricos utiliza. 2. ¿Aparece algún mensaje de error en la pantalla? 3. Si se produce un error de funcionamiento, ¿qué programa de software estaba intentando usar? 4. ¿Qué pasos ha intentado realizar para solucionar el problema? Si pasa por alto algunos pasos, los distribuidores pueden ayudarle por teléfono para completar estos pasos.Customer Support
For technical support or product service, see the table below or contact your reseller. NOTE: You will need the product serial number.| Country/Region Website | T = TelephoneF = FAX | ||
| Australia/New Zealand www.viewsonic.com.au | AUS= 1800 880 818NZ= 0800 008 822 | service@au.viewsonic.com | |
| Canada www.viewsonic.com | T (Toll-Free)= 1-866-463-4775T (Toll)= 1-424-233-2533F= 1-909-468-3757 | service.ca@viewsonic.com | |
| Europe www.viewsonicourope.com | www.viewsoniceurope.com/uk/Support/Calidesk.htm | ||
| Hong Kong | www.hk.viewsonic.com | T= 852 3102 2900 | service@hk.viewsonic.com |
| India www.in.viewsonic.com T= 1800 11 9999 service@in.viewsonic.com | |||
| Ireland (Eire) www.viewsoniceurope.com/uk/ www.viewsoniceurope.com/uk/support/call-desk/ service_ie@viewsoniceurope.com | |||
| Korea | www.kr.viewsonic.com | T= 080 333 2131 | service@kr.viewsonic.com |
| Latin America(Argentina) | www.viewsonic.com/la/ T= 0800-4441185 | soporte@viewsonic.com | |
| Latin America (Chile) | www.viewsonic.com/la/ | T= 1230-020-7975 | soporte@viewsonic.com |
| Latin America(Columbia) | www.viewsonic.com/la/ T= 01800-9-157235 | soporte@viewsonic.com | |
| Latin America (Mexico) | www.viewsonic.com/la/ | T= 001-8882328722 | soporte@viewsonic.com |
| Renta y Datos, 29 SUR 721, COL. LA PAZ, 72160 PUEBLA, PUE. Tel: 01.222.891.55.77 CON 10 LINEASElectroser, Av Reforma No. 403Gx39 y 41, 97000 Mérida, Yucatán. Tel: 01.999.925.19.16Other places please refer to http://www.viewsonic.com/la/soporte/index.htm#Mexico | |||
| Latin America (Peru) | www.viewsonic.com/la/ | T= 0800-54565 | soporte@viewsonic.com |
| Macau | www.hk.viewsonic.com T= 853 2870 0303 service@hk.viewsonic.com | ||
| Middle East | ap.viewsonic.com/me/ | Contact your reseller | service@ap.viewsonic.com |
| Puerto Rico & Virgin Islands | www.viewsonic.com | T= 1-800-688-6688 (English)T= 1-866-379-1304 (Spanish)F= 1-909-468-3757 | service.us@viewsonic.comsoporte@viewsonic.com |
| Singapore/Malaysia/Thailand | www.ap.viewsonic.com | T= 65 6461 6044 | service@sg.viewsonic.com |
| South Africa | ap.viewsonic.com/za/ | Contact your reseller | service@ap.viewsonic.com |
| United Kingdom | www.viewsoniceurope.com/uk/ | www.viewsoniceurope.com/uk/support/call-desk/ | service_gb@viewsoniceurope.com |
| United States | www.viewsonic.com | T (Toll-Free)= 1-800-688-6688T (Toll)= 1-424-233-2530F= 1-909-468-3757 | service.us@viewsonic.com |
Garantía limitada Tablet PC ViewSonic®
Cobertura de la garantía:
ViewSonic garantiza que sus productos no tendrán defectos de materiales ni de fabricación durante el período de garantía. Si algún producto presenta alguno de estos defectos durante el período de garantía, ViewSonic decidirá si repara o sustituye el producto por otro similar. Los productos o las piezas sustituidos pueden incluir componentes o piezas reparadas o recicladas.Período de validez de la garantía:
ViewSonic Tablet PC tiene una garantía de 1 año en mano de obra a partir de la fecha de compra del primer compradorDestinatario de la garantía:
Esta garantía sólo es válida para el primer comprador de este producto.La garantía no cubre:
1. Cualquier producto cuyo número de serie haya sido manipulado, modificado o eliminado. 2. Cualquier daño, deterioro o funcionamiento incorrecto causado por: a. Accidente, utilización incorrecta, negligencia, incendio, inundación, rayo o cualquier desastre natural, modificación sin autorización del producto o por no seguir las instrucciones proporcionadas con el producto. b. Cualquier daño en el producto debido al transporte. c. Traslado o instalación del producto. d. Causas externas al producto, como fluctuaciones o fallas eléctricas. e. El uso de suministros o piezas que no cumplen las especificaciones de ViewSonic. f. Desgaste y deterioro normales. g. Cualquier causa no relacionada con defectos del producto. 3. Cualquier producto que muestre una condición comúnmente conocida como "imagen quemada" lo que resulta cuando una imagen estática es mostrada por un periodo largo de tiempo. 4. Cargos por servicio de desinstalación, instalación, transporte en envío, seguro y configuración.Cómo obtener asistencia:
1. Para obtener informacion sobre como recibir asistencia cubierta en la garantia, pongase en contacto con el Servicio de atención al cliente de ViewSonic (por favor, consulte la página de Atención al Cliente). Tendra que proporcionar el numero de serie del producto. 2. Para recibir la asistencia cubierta por la garantía, tendrá que proporcionar (a) el recibo con la fecha de compra original, (b) su nombre, (c) dirección, (d) descripción del problema y (e) el número de serie del producto. 3. Lleve o envíe (con todos los gastos pagados) el producto en su embalaje original a un centro de asistencia de ViewSonic autorizado o a ViewSonic. 4. Para obtener el nombre del centro de asistencia de ViewSonic más cercano, póngase en contacto con ViewSonic.Límite de las garantías implícitas:
No existe ninguna garantía, expresa o implícita, aparte de la descrita en este documento, incluida la garantía implícita de comerciabilidad o adecuación a un fin concreto.Exclusión de daños:
La responsabilidad de viewsonic se limita al coste de la reparación o sustitución del producto. Viewsonic no se hace responsable de: 1. Daños a otras pertenencias causados por defectos del producto, inconvenientes, pérdida de uso del producto, de tiempo, de beneficios, de oportunidades comerciales, de fondo de comercio, interferencia en relaciones comerciales u otras pérdidas comerciales, incluso si existe el conocimiento de la posibilidad de dichos daños. 2. Cualquier daño, ya sea fortuito, resultante o de cualquier tipo. 3. Cualquier reclamación al usuario por terceros. 4. Reparación o intento de reparación por parte de personal no autorizado por ViewSonic. 4.3: ViewSonic TPC Warranty TPC\_LW01 Rev. 1A 06-20-08 bar
| Category | Value | |---|---| | Category 1 | 100 | | Category 2 | 100 | | Category 3 | 100 | | Category 4 | 100 | | Category 5 | 100 | | Category 6 | 100 | | Category 7 | 100 | | Category 8 | 100 | | Category 9 | 100 | | Category 10 | 100 |ViewSonic®
VPAD10 Tablet PC  ViewSonic - User Guide - Guide de l'utilisateur - Bedienungsanleitung - Guía del usuario - Kullanıcı kılavuzu - Руководство пользователя Model No.: VS13790Uygunluk Bilgisi
Avrupa Ülkeleri için CE Uyumu CE Aygıt 2004/108/ec sayılı EMC yönergesi ve 2006/95/EC sayılı Düşük Voltaj Yönergesi ile uyumludur.Aşağıdaki bilgi sadece AB üyesi ülkeler içindir:
Sağda gösterilen işaret Atık Elektrikli ve Elektronik Cihaz Yönergesi 2002/96/EC (WEEE) ile uyumludur. İşaret, cihazın belediye atıkları ile ATILMAMASI gerektiğini, bunun yerine yerel yasalara gore toplama sistemlerine bırakılması gerektiğini gösterir. Bu cihazda bulunan pil, batarya ve saat pillerinde Hg, Cd veya Pb kimyasal sembolleri bulunuyorsa, bu pilin %0.0005 Civa'dan daha fazla, %0.002 Kadmiyum'dan daha fazla ya da %0.004 Kurşun'dan daha fazla ağır metal içeriğine sahip olduğu anlamına gelmektedir.  R&TTE Uygunluk Beyani CE!
Bu kablosuz modül cihazı Avrupa Birliği R%TTE (1999/5/EC) Yönergesinin Temel Şartlarına uygundur. Bu cihaz aşağıdaki uygunluk standartlarını karşılamaktadır: ETSI EN 300 328 EN 301 489 EN 301 489 EN 62209-2 Onaylayan Ülkeler: Almanya, Birleşik Krallık, Hollanda, Belçika, İsveç, Danimarka, Finlandiya, Fransa, İtalya, İspanya, Avusturya, İrlanda, Portekiz, Yunanistan, Luüksemburg, Letonya, Litvanya, Çek Cumhuriyeti, Slovakya, Slovenya, Macaristan, Polonya ve Malta.Önemli Güvenlik Yönergeleri
1. LCD erkana BASMAYIN veya DOKUNMAYIN. Tablet bilgisayarı, LCD ekranı çizebilecek veya tablet bilgisayarın havalandırmalarına girebilecek küçük nesnelerle birlikte YERLEŞTİRMEYİN. 2. Tablet bilgisayarı kirli veya tozlu ortama maruz BIRAKMAYIN. Ortamı temiz ve kuru turun. 3. Tablet bilgisayarı düz olmayan ve dengesiz çalışma yüzeyine YERLEŞTİRMEYİN. 4. Tablet bilgisayarın üstüne herhangi bir nesne KOYMAYIN veya DÜŞÜRMEYİN. Tablet bilgisayarın içine herhangi bir nesne SOKMAYIN. LCD Ekran kapağını zorla KAPATMAYIN. 5. Tablet bilgisayarı güçlü manyetik veya elektrik alanına maruz BIRAKMAYIN; Disketlerdeki verilerin kaybolmasına neden olabileceğinden, disketleri tablet bilgisayarın yanına veya üstüne KOYMAYIN. 6. Özellikle arabadayken, LCD ekrana zarar verebileceğinden tablet bilgisayarı güneşte BIRAKMAYIN. 7. GÜVENLİ SICAKLIK: Bu tablet bilgisayar yalnızca 5°C (41°F) ve 35°C(95°F) arasındaki ortam sıcaklıklarındaki ortamlarda kullanılmalıdır. 8. Tablet bilgisayarı sıvı, yağmur veya neme maruz BIRAKMAYIN veya bunlara yakın KULLANMAYIN. 9. Dikkat: yanlış pil tipi kullanılırsa, patlama tehlikesi vardır. Kullanılmış pilleri yönergelere göre atın. 10. Tablet bilgisayarı belediye çöpüne ATMAYIN. Elektronik ürünlerin atılmasıyla ilgili yerel düzenlemeleri kontrol edin. Lütfen Pil Paketini geri dönüştürün ve geri dönüştürme tavsiyesi için Yerel Yetkili veya satıcınıza danışın. 11. Tablet bilgisayar ve güç adaptörü çalışırken veya dahili pili şarj ederken biraz ısınabilir. Isıdan dolayı rahatsızlık veya yaralanmayı önlemek için tablet bilgisayarı dizinizin veya vücudunuzun herhangi bir kısmına KOYMAYIN. 12. GİRİŞ DEĞERİ: Tablet bilgisayarınızdaki değer etiketine bakın ve Güç Adaptörünün bu değere uygun olduğundan emin olun. Yalnızca ViewSonic tarafından önerilen aksesuarları kullanın. 13. Tablet bilgisayarınızı açmadan önce, ana ünite ve takılan aygıtlar arasındaki bağlantıyı kontrol edin. 14. Tablet bilgisayarınızın kirlenmesini önlemek için, tablet bilgisayarınızı bir şeyler yerken KULLANMAYIN. 15. Tablet bilgisayara kısa devreye neden olabilecek veya elektronik devrelere hasar verebilecek herhangi bir şey SOKMAYIN. 16. Çalışırken takmayı desteklemeyen bazı harici aygıtları takmak veya çıkarmak isterseniz, tablet bilgisayarınızı kapatın. 17. Tablet bilgisayarınızı temizlemeden önce, tablet bilgisayarı elektrik prizinden ayırın ve takılı pilleri çıkarın. Tablet bilgisayarınızı çocuklardan uzak tutun. 18. Tablet bilgisayarı SÖKMEYİN. Bilgisayarınızdaki onarım işlemlerini yalnızca sertifikalı bir servis teknisyeni gerçekleştirmelidir. 19. Yalnızca ViewSonic tarafından onaylanmış Pil Paketlerini kullanın. 20. Tablet bilgisayarda ısıyı dağıtmak için havalandırmalar vardır. Tablet bilgisayar ısınabileceğinden ve sistem durabileceğinden, tablet bilgisayarı yumuşak nesnelerin (örneğin, yatak, kanepe, diziniz) üstüne KOYMAYIN.RoHS Uyum Beyani
Bu ürün, Elektrikli ve elektronik cihazlardaki belirli tehlikeli madde kullanımını sınırlandıran (RoHS Yönergesi) Avrupa Parlamentosu ve Konseyinin 2002/95/EC numaralı direktifine uygun olarak tasarlanmış ve üretilmiş tır ve Avrupa Teknik Adaptasyon Komitesi (TAC) tarafından yayınlanan ve a'ağıda gösterilen azami yoğunla'ma değerlerine uyacağı beklenmektedir:| Madde | Önerilen Maksimum Yoğunluk | Gerçek Yoğunluk |
| Kur°un (Pb) %0,1 < %0,1 | ||
| Civa (Hg) %0,1 < %0,1 | ||
| Kadmiyum (Cd) %0,01 < %0,01 | ||
| Heksavalent Krom ( Cr^6+ ) %0,1 < %0,1 | ||
| Polibrominat bifeniller (PBB) %0,1 < %0,1 | ||
| Polibrominat difenil eterler (PBDE) %0,1 < %0,1 |
Telif Hakki Bilgileri
Telif Hakkı © ViewSonic® Corporation, 2010. Tüm Hakları saklıdır. ViewSonic in üç kuplu simgesi, OnView, ViewMatch ve ViewMeter ViewSonic Corporation pirketinin tescilli ticari markalarýdýr. Android is a trademark of Google Inc. Use of this trademark is subject to Google Permissions. This product has an Android ^™ platform based on Linux, which can be expanded by a variety of JME-based application SW. All products use in this device and trademarks mentioned herein are trademarks or registered trademarks of their respective owners. Google™, the Google logo, Android™, the Android logo and Gmail™ are trademarks of Google Inc. Use of this trademark is subject to Google Permissions. Wi-Fi and the Wi-Fi CERTIFIED logo are registered trademarks of the Wireless Fidelity Alliance. microSD ^TM is a trademark of SD Card Association. Bluetooth and the Bluetooth logo are trademarks owned by Bluetooth SIG, Inc. The prediction engine of the input method is TOUCHPAL, provided by COOTEK. Feragat: ViewSonic Corporation bu belgede geçen teknik veya yayýnsal hatalardan sorumlu olmayacaktır; ve bu malzemenin ifpa edilmesi veya bu ürünün kullanýlmasý ve uygulanması sonucu olupan rastlantýsal ya da sonuçsal hasarlardan da sorumlu olmayacaktır. Ürünün sürekli olarak geliptirilmesi sebebiyle ViewSonic Corporation herhangi bir bildiride bulunmadan ürünün teknik özelliklerinde deöipiklik yapma hakkýný saklý tutar. Bu belgede belirtilen bilgilerde bildiride bulunmadan deöipiklik yapýlabilir. Bu belgenin hiçbir bölümü, ViewSonic Corporation'dan önceden alýnan yazylý izin olmaksýzýn kopyalanamaz, yeniden üretilemez veya herhangi bir þekilde iletilemez.Ürün Kaydı
Gelecekteki gereksinimlerinizi karşılaması ve hazır olduğunda ek ürün bilgilerini alabilmeniz için lütfen ürününüzü aşağıdaki web adresinde kaydediniz: www.viewsonic.com. ViewSonic Sihirbazı CD-ROM'u kayıt formunu ViewSonic'e posta ile gönderebilmeniz ya da faks çekebilmeniz için formu yazdırabilmenize olanak sağlamaktadır.Kayıtlarınız için
Ürün Adı: VPAD10 ViewSonic Tablet PC Model Numarası: VS13790 Belge Numarası: VPAD10\_UG\_TRK Rev. 1A 09-28-10 Seri Numarası: Satın Alınma Tarihi:Ürün ömrünün bitiminde ürünün imha edilmesi
ViewSonic, çevreye saygı gösterir ve çevreci çalışmaya ve yaşamaya bağlıdır. Daha Akıllı, Daha Çevreci Bilgisayar Kullanımının bir parçası olduğunuz için teşekkür ederiz. Daha fazla bilgi almak için lütfen ViewSonic web sitesini ziyaret edin. ABD & Kanada: http://www.viewsonic.com/company/green/recycle-program/ Avrupa: http://www.viewsoniceurope.com/uk/support/recycling-information/ Tayvan: http://recycle.epa.gov.tw/recycle/index2.aspxİçindekiler
Kısa giriş......ii Paket içeriği......iii Tablet PC'yi Keşfetme 1 Önden Görünüm....1 Arkadan Görünüm 3 Yandan görünüm 5 Göstergeler 8 Windows 7 sistem uygulaması 10 Kamerayı Kullanma....27 Çok Dokunuşlu Ekranı Kullanma....27 Genel donanım sorunları / olası nedenler ve çözümleri 28Kısa giriş
Güvenlik Talimatları
Kendinizi ve VPAD10'unuzu korumaya yardımcı olmak için aşağıdaki güvenlik yönergelerini kullanın. - VPAD10'u kendiniz tamir etmeye çalışmayın. Yükleme talimatlarını her zaman sıkı bir şekilde takip edin. - AC adaptörünün güç kablosu üzerine bir nesne koyulmadığından ve kablonun takılıp düşülecek veya üzerine basılabilecek bir yerde olmadığından emin olun. - AC adaptörünü soğutmayı azaltacak şekilde kağıtlarla veya başka öğelerle kapatmayın; ayrıca AC adaptörünü taşıma çantası içindeyken kullanmayın. - Yalnızca bu VPAD10 ile kullanılması onaylanan alanlarda AC adaptörünü, güç kablosunu ve pilleri kullanın. Başka türde pil veya AC adaptörünün kullanılması yangına veya patlamaya neden olabilir. - AC adaptörle bir uzatma kablosu kullanıyorsanız, uzatma kablosuna takılı ürünlerin toplam amperinin uzatma kablosunun amperini aşmadığından emin olun. - VPAD10'u çok farklı sıcaklık ve/veya nem aralıkları değişen bir ortamdan diğerine götürdüğünüzde, VPAD10 üzerinde veya içinde yoğuşma oluşabilir. VPAD10'un zarar görmemesi için, VPAD10'u kullanmadan önce nemin buharlaşması için bir süre bekleyin. - Bir kablonun bağlantısını keserken, konektöründen veya gevşetme halkasından tutun, kablonun kendisini tutmayın. Konektörü çekerken konektör pinlerinin eğilmemesi için eşit hizalayarak tutun. Ayrıca, bir kablo bağlamadan önce her iki konektörün de doğru yönlendirildiğinden ve hizalandığından emin olun. Bu kılavuzdaki görüntüler Gerçek üründen farklı olabilir, lütfen gerek üründen takip edin.Paket içeriği
Paketi açıktan sonra, dikkatlı bir şekilde içindekileri inceleyin. Herhangi bir öğe yoksa veya hasarlı görünüyorsa satıcınıza başvurun. Nakliye kartonu şunları içermelidir:STANDART
- Bir VPAD10 - Güç kablosu ile bir AC adaptörü - Kullanıcı kılavuzu - Sürücü CD'si (SSD'de yüklü) UYARI
Bu VPAD10 sürücüsü SSD'nin son bölümüne yerleştirilmiştir, dosyaları silmediğinizden veya biçimlendirmediğinizden emin olun.İSTEĞE BAĞLI
Aşağıdaki öğeler normal olarak isteğe bağlıdır, ancak bazı satıcılar standart pakete dahil edebilirler. Bazı öğeler bazı ülkelerde bulunmayabilir veya bazı satıcılar tüm öğeleri taşımayabilirler. • Çanta - Mini VGA Kablo - Temizleme bezi - KulaklıkTablet PC'yi Keşfetme
Önden Görünüm  ViewSonic VPAD10 ① Kamera Fotoğraf çekmenizi, video kaydetmenizi ve çevrimiçi sohbet etmenizi sağlayan yerleşik bir web kamerası. ② Dokunmatik ekran Sistemi ve uygulamayı kontrol etmek için parmağınızı kullanın. ③ Göstergeler Ayrıntılar için "Göstergeler", sayfa 8\~9 konusuna bakın. ④ Güç düğmesi VPAD10'unuzu açar veya kapatır. ⑤ İşlev düğmesi 1 "Esc" tuşuna basın ve basılı tutun, kısa bir süre basıldığında "Tablet giriş paneli" çağrılır. (Sisteme erişilemezse, "yukarı" ok tuşu işlevi için basın ve basılı tutun, "aşağı" ok tuşu işlevi için kısa bir süre basın.) ⑥ İşlev düğmesi 2 3G'yi açmak/kapatmak için basın ve basılı tutun, Wi-Fi ve bluetooth'u hızlı bir şekilde açmak/kapatmak için hızlı bir şekilde basabilirsiniz. (Sisteme erişilemezse, "girmek" tuşunun yerine geçer.)Arkadan Görünüm
natural_image
3D rendering of a rectangular electronic device with labeled components (no text or symbols beyond labels ① and ②)Windows 7 sistem uygulaması
VPAD10'unuzu kullanmaya başlama
VPAD10'u harici güç kaynağına AC adaptörü aracılığıyla bağlayın, güç düğmesine basın ve 2\~3 saniye basılı tutun, sonra VPAD10'unuzu başlatın. Güç göstergesi mavi yandığında düğmeyi bırakın. Ve sonra başlangıç İşletim sistemi ayarları için ekran talimatlarını izleyin. Sistem ana (masaüstü) ekranı şu şekilde görünecektir (Cihazın yerleşik G sensörü hareketi ve açısındanki/yönündeki değişiklikler). natural_image
Windows XP desktop wallpaper showing the logo and application icons (no readable text or symbols)natural_image
Windows logo on a blue background, no text or symbols visibleAna (masaüstü)
Varsayılan sistem masaüstünde şunlar bulunur: ① Geri Dönüşüm Kutusu, ② Sanal klavye, ③ Çalışma alanı ve ④ Görev çubuğu. Çalışma alanı
Kullanıcıların işlerini gerçekleştirilile bilgilere ve basit görevlere hızlı bir şekilde işlerine engel olmadan erişebilmeleri için araçlar ekleyebilirsiniz  Araçlar (örnekler)Görev çubuğu
Görev çubuğu, masaüstünde görüntülenen programlar için program simge durumunda küçültülse bile erişim noktasıdır. Bazı programların masaüstünde görünürler. Görev çubuğu ile kullanıcılar masaustündeki açık ana pencereyi ve bazı ikincil pencereleri görüntüleyebilir ve bunlar arasında hızlı bir şekilde geçiş yapabilirler. Başlat düğmesi: Tüm programlar ve özel Windows yerleri (Belgeler, Resimler, Müzik, Oyunlar, Bilgisayar, Denetim Masası) için erişim noktasıdır; "en son kullanılan" listeleri ile en son kullandığınız programlara ve belgelere hızlı erişim sağlanır. Masa bantları: Dil Çubuğu gibi simge durumunda küçültülmüş işlevsel, uzun süre çalışan programlardır. Masa bantlarına küçültülen programlar küçültüldüklerinde görev çubuğu düğmeleri olarak gösterilmezler. Masa bantları Windows 7 için önerilmez. Bildirim alanı: Bildirim ve durumların yayınlandığı, aynı zamanda masa üstünde bulunmayan sistemle ve programla ilgili özellikleri erişim noktasıdır. Kablosuz ağa bağlanma
1. Kablosuz ağ hizmet alanı içinde bulunduğunuzdan emin olun. Wi-Fi'yi açmak için Wi-Fi düğmesine basın, Wi-Fi göstergesi mavi yanar. (Bir 3G SIM kartı takarsanız ve 3G'yi açarsanız, bir 3G ağa da bağlanabilirsiniz) 2. Bildirim alanındaki ağ simgesini 🔑 tıklatın, kullanılabilir bir kablosuz ağlar listesi görüntülenecektir.  (Wi-Fi sıcak noktaları ve 3G ağlar aynı listede birlikte gösterilecektir. Windows 7, ayrıca Wi-Fi kartını sanallaştırır, böylece iki kez kullanabilirsiniz, örneğin WPS cihazlarını WPS olmayan bir erişim noktasına bağlamak için.) (Güvenlik kimlik doğrulaması gerektiren bazı ağlara bağlanmak için, başka bir yetkilendirme işlemi kullanıp kullanıcı adı ve parolayı girebilirsiniz. Ayrıntılar için lütfen ağ yöneticinize başvurun.) (Veri güvenliği için, mümkün oldukça güvenlik etkinleştirilmiş kablosuz ağlara bağlanmayı öneririz.) (Havada seyahat ediyorsanız, güvenliği riske atma olasılığına karşı lütfen kablosuz ağı kapattığınızdan emin olun.) 3. Bir ağ seçin ve sonra Connect (Bağlan'ı) tıklatın. Güvenlik kimlik doğrulaması kullandığınız ağda gerekmiyorsa, ağa başarılı bir şekilde bağlandığınızı söyleyen bir mesaj gösterilecektir.Bluetooth
1. Bildirim alanında öğesini sağ tıklatın (masaüstünn sağ alt köşesinde bulunur veya gizli simgelerden öğesine erişmek için öğesi tıklatılır) ve Open Settings'i (Ayarları Aç) seçin. (Adaptör kapalıysa, lütfen açın.)  2. Options (Seçenekler) sekmesinde, Allow Bluetooth devices to find this computer (Bu bilgisayarı bulmak için Bluetooth cihazlara izin ver) öğesini seçin ve OK'i (Tamam) tıklatın. Böylece, diğer Bluetooth cihazları Ağıınız bulabilir ve Bluetooth bağlantısı yapılabilir.  (Bağlanmak istediğiniz cihazın Bluetooth bağlantısı özelliğini de etkinleştirmeniz gerekir.) 3. Sağ tıklatın ve Add a Device (Cihaz Ekle) öğesini seçin. Biraz beklediğinizde bulunan etkin Bluetooth cihazları gösterilir.  (Cihazın Bluetooth işlevini etkinleştirme hakkında ayrıntılar için, lütfen belgelerine bakın.) (VPAD10 ve Bluetooth cihazınız arasındaki bağlantı için maksimum etkin aralık yaklaşık 10 metredir.) 4. Bir Bluetooth cihazı seçin ve Next'i (İleri) tıklatın.  5. Windows, ekranda gösterilen rastgele bir kod numarası üretir. Bu kod numarasını VPAD10'unuzun bağlanmaya çalıştığı Bluetooth cihazıniza yazın. Bir Bluetooth cihazına bir dosya gönderme
Bluetooth cihazınız (örneğin mobil ahize) veri gönderebiliyor ve alabiliyorsa, verileri kablosuz olarak Bluetooth cihazınız ve Tablet'iniz arasında aktarmak için Bluetooth bağlantısını kullanabilirsiniz. 1. öğesini sağ tıklatın ve Show Bluetooth Devices'ı (Bluetooth Cihazlarını Göster) seçin.| Add a Device |
| Allow a Device to Connect |
| Show Bluetooth Devices |
| Join a Personal Area Network |
| Open Settings |
| Turn Adapter Off |
| Remove Icon |
Dokunmatik Panel Girişi
VPAD10 giriş paneli VPAD10 giriş paneli, metin içeriği girmek için kullanılan ana giriş panelidir.  Yazma Tahtası Bu, ayrıca el yazısını yakalayan ve yazılan metne dönüştüren bir Yazma Tahtasıdır. El yazısını yakalamak için iki yöntem vardır: Serbest yazma ve Kılavuza Yazma. 1. Serbest yazma 2. Kilavuza Yazma
VPAD10 Ayarları
Bu sistemin tüm Dokunmatik özelliklerinden tam olarak yararlanabilmek için, "Start" (Başlat) > "Control Panel" (Denetim Masası) na gidin ve sonra "VPAD10 Settings" i (VPAD10 Ayarları) seçin. VPAD10 Ayarlarına Giriş
Display (Görüntü) 1. Conguration (Yapılandırma)
Kalem ve dokunmatik ekranı yapılandırmak için, Setup (Kurulum) düğmesini tıklatın. Dokunmatik ekran tanımlama ayarlarını tamamlamak için parmağınızla ekrana dokunun. 2. Display Options (Görüntü Seçenekleri)
Display (Görüntü): Çıkış görüntüleme cihazını seçin Calibration (Kalibrasyon): Windows sistem yerleşik ekranı kalibrasyonunu kullanmayın, bir Dokunmatik ekranı Kalibre etmek istiyorsanız, lütfen ek sayfalara bakın: "Dokunmatik ekranın kalibrasyonu". Reset (Sifirlama): Yerleşik ekran kalibrasyonunda yanlış değişiklikler yaptıysanız, varsayılanı geri yüklemek için Reset (Sifirla) düğmesini tıklatabilirsiniz. Go to Orientation (Yönlendirmeye gidin) Bu cihazın yerleşik G-sensörü için bu ayarları yapmanız gerekmez. Others (Diğerleri)
 1. Handedness (Sol/Sağ El Kullanımı) Sol veya sağ el kullanmanza göre menüler için tercih ettiğiniz konumu seçin. left-handed (Sol el) ayarını seçerseniz, menüler sağda görünür; right-handed (sag el) kullanımını seçerseniz, menüler solda görünür. 2. Pen and Touch (Kalem ve Dokunma) Kalem ve Dokunma kutusundaki "Go to Pen and Touch" (Kalem ve Dokunmaya Gidin) bağlantısını tıklatın. 3. VPAD10 Input Panel Option (VPAD10 Giriş Paneli Seçenekleri) VPAD10 Giriş Paneli seçeneklerindeki "Go to Input Panel Settings" (Giriş Paneli Ayarlarına Gidin) bağlantısını tıklatın.Kalem ve Dokunma Ayarları
Dokunmayı Etkinleştirme
1. Dokunma arayüzünü etkinleştirmek için "Use your finger as an input device" (Giriş cihazı olarak parmağınızı kullanın) onay kutusunu seçin. 2. 2 parmakla yakınlaştırma gibi çok dokunuşlu hareketleri etkinleştirmek için "Enable multi-touch gestures and inking" (Çok dokunuşlu hareketleri ve bağlantıı etkinleştir) onay kutusunu seçin. Settings (Ayarlar)
Çift dokunma hızını ve uzamsal toleransı ayarlamak ve ayarlarını zı test etmek için "Settings" (Ayarlar) düğmesini tıklatın.  ViewSonic VPAD10 Touch Pointer (Dokunma İşaretçisi) Parmaklar ekrandaki öğelerle etkileşimde bulunduğu dokunma işaretçisini göstermek için "Touch pointer" (Dokunma işaretçisi) onay kutusunu seçin. Advanced (Gelişmiş) Seçeneğinde, "Touch Pointer Location Option" (Dokunma İşaretçisi Konum Seçeneği) ve "Touch Pointer Appearance and Behavior" (Dokunma İşaretçisi Hörünümü ve Davranışı) ayarlarını yapabilirsiniz.  Panning (Kaydırma) "Panning" (Kaydırma) sekmesinde, tek parmakla kaydırmayı etkinleştirmek için "Turn on Single Finger Panning" (Tek Parmakla Kaydırmayı Aç) onay kutusunu seçin. "Gestures" (Hareketler) kutusundaki her iki onay kutusunu da seçin ve istenen Inertia settings (Eylemsizlik ayarlarını) seçin.  ViewSonic VPAD10Kamerayı Kullanma
Yerleşik kamera, video aramalarına katılmayı ve fotoğraf çekmeyi sağlar.Çok Dokunuşlu Ekranı Kullanma
Çok dokunuş teknolojisi, bilgisayarınızı bir veya aynı anda iki parmakla kontrol etmenizi sağlar. Çift dokunuş bir parmağınızı iki kez dokundurmaya eşdeğerdir. Web sayfalarında dolaşma, sayfada parmağınızı yukarı ve aşağı kaydırma şeklinde sezgiseldir. Resimleri yakınılaştırmak ve uzaklaştırmak için iki parmağınızı kullanın – uzaklaştırmak için parmaklarını bir araya getirin, yakınılaştırmak için ayırın. Bir dosyayı sağ tıklatmak için, bir parmağınızla dokunun ve ekrana ikinci parmağınızla dokunun (bir parmağınızı kullanarak ekrana 2\~3 saniye de dokunabilirsiniz).Genel donanım sorunları / olası nedenler ve çözümleri
Bazı genel donanım sorunları ve önerilen çözümler aşağıdadır: 1. Programın Yürütülmesi Sırasında Sistemi Durdurma İşlemi. Neden: geçerli yordam kullanıldığında hata. Çözüm:Dağıticılara Başvurun
Önceki bölümü okuduktan sonra, sorun devam ederse, sonraki adım dağılıciya başvurmaktır. Dağıtıcılar bilgisayarın mağazaya geri gönderilmeye ihtiyacı olup olmadığını belirleyebilir. Dağıticıyı aramadan önce, lütfen aşağıdaki bilgileri sağlayın: 1. VPAD10'unuzun yapılandırması/modeli nedir? Dağıtıcılar hangi çevre aygıtlarını kullandığınızı bilmek isterler. 2. Ekranda hiç hata mesajı var mı? 3. Çalışmada sorun yaşadığınızda, hangi yazılımı kullanmaya çalışıyorduuz? 4. Sorunu çözmek için hangi adımları denediniz? Bazı adımları atlarsanız, dağılıcılar bu adımları tamamlamanız için size telefonla yardım edecektir.Müşteri Desteği
Teknik destek veya ürün servisi için aşağıdaki tabloya bakınız veya yetkili satıcınız ile temasa geçiniz. NOT: Ürün seri numarasını vermeniz gerekecektir.| Ülke Web sitesi Telefon E-posta | |||
| Türkiye http://www.viewsoniceurope.com/tr/ | www.viewsoniceurope.com/tr/support/call-desk/ | service_tr@viewsoniceurope.com | |
Sınırlı Garanti
ViewSonic® Tablet Bilgisayar
Garanti kapsamı:
ViewSonic, garanti süresince malzemede ve işçilikte hata bulunmadığını garanti etmektedir. Eğer garanti süresi boyunca ürünün malzemesinde veya işçilikte arıza bulunduğu kanıtlanırsa, ViewSonic kendi isteğine bağlı olarak ürünü onaracak ya da benzeri bir ürünle değiştirecektir. Değiştirme ürünü veya parçaları yeniden üretilen veya yenilenen parçaları veya komponentleri içerebilir.Garanti ne kadar geçerlidir:
ViewSonic Tablet Bilgisayar, müşterinin ürünü satın alma tarihinden itibaren 1 yıl boyunca işçilik hatalarına karşı garantilidir.Garanti neyi kapsamamaktadır:
Bu garanti sadece ürünü ilk satın alan kişi için geçerlidir.Garanti neyi kapsamamaktadýr:
1. Seri numarasının kazındığı, değiştirildiği veya çıkarıldığı herhangi bir ürün. 2. Aşağıdakilerden kaynaklanan hasar, bozulma veya arızalanma: a. Kaza, yanlış kullanım, ihmal, yangın, su, yıldırım veya diğer doğal afetler, ürünün izinsiz değiştirilmesi veya ürün ile birlikte verilen talimatların yerine getirilmemesi. b. Nakliye sebebiyle üründe meydana gelen herhangi bir hasar. c. Ürünün sökülmesi veya kurulumu. d. Elektrik gücündeki dalgalanmalar veya arızalanmalar gibi üründen kaynaklanmayan sebepler. e. ViewSonic'in teknik özelliklerini yerine getirmeyen malzemeler veya parçalar. f. Normal yipranma ve yırtılma. g. Ürün arızası ile ilgili olmayan diğer bir sebep. 3. Üründe uzun süreli olarak statik görüntü oluptuðunda meydana gelen ve genel olarak "görüntü yanması" olarak bilinen bir durumdaki herhangi bir ürün. 4. Sökme, kurma, tek yönlü taşıma, sigorta ve ayar hizmeti için olan masraflar.Nasıl hizmet alırım:
1. Garanti altında hizmet almak ile ilgili bilgi için ViewSonic Müşteri Desteği ile temasa geçiniz (lütfen Müşteri Desteği sayfasına bakınız). Ürünün seri numarasını vermeniz gerekecektir. 2. Garanti altında hizmet almak için aşağıdakikeri sağlanınız gerekecektir (a) satış tarihi bulunan satış makbuzu, (b) adınız, (c) adresiniz, (d) sorunun açıklaması ve (e) ürünün seri numarası. 3. Ürünü ön ödemeli olarak yetkili bir ViewSonic servis merkezine veya ViewSonic'e orijinal kutusunda gönderin. 4. Ek bilgi almak için ua da en yakın ViewSonic servis merkezini öğrenmek için ViewSonic® ile temas kurunuz.Zimni garanti sınırlaması
Satışa uygunlukla ilgili olarak verilen zımni garanti ve belli bir amaca uygunluk da dahil olmak üzere zımni ya da beyan edilen herhangi bir garanti bulunmamaktadır.Hasarların hariç bırakılması
ViewSonic'in sorumluluğu onarım maliyetleri veya ürünün değiştirilmesi ile sınırlıdır. ViewSonic aşağıdaki kiler için sorumlu değildir: 1. Üründeki herhangi bir hasar sebebiyle diğer mülklere verilen hasar, uygun olmama, ürünün kullanılmaması, zaman kaybı, iş fırsatlarının kaybı, itibar kaybı, iş ilişkilerinin zarar görmesi veya bu tür kayıpların bildirilmesine rağmen diğer ticari kayıplar sebebiyle oluşan hasarlar. 2. Rastlantısal, sonuçsal veya diğer türlü hasarlar. 3. Diğer tarafların ortaya attığı diğer iddialar. 4. ViewSonic tarafından yetki verilmeyen bir kişi tarafından onarılması veya onarılmaya çalışılması. 4.3: ViewSonic TPC Warranty TPC\_LW01 Rev. 1A 06-20-08 ViewSonic VPAD10 33 bar
| Category | Value | |---|---| | Category 1 | 100 | | Category 2 | 100 | | Category 3 | 100 | | Category 4 | 100 | | Category 5 | 100 | | Category 6 | 100 | | Category 7 | 100 | | Category 8 | 100 | | Category 9 | 100 | | Category 10 | 100 |ViewSonic®
VPAD10 Tablet PC  ViewSonic - User Guide - Guide de l'utilisateur - Bedienungsanleitung - Guía del usuario - Kullanıcı kılavuzu - Руководство пользователя Model No.: VS13790Соответствие стандартам
Соответствие СЕ для европейских стран СЕ Устройство соответствует Директиве по электромагнитной совместимости 2004/108/ЕС и Директиве по электробезопасности 2006/95/ЕС. Символ, указанный справа, соответствует Директиве 2002/96/EC об Отходах электического и электронного оборудования (WEEE). Продукция, обозначенная данным символом, не может быть утилизирована в виде обычного городского мусора, а должна быть утилизирована при помощи систем возврата и сбора, доступных в Вашей стране или регионе, в соответствии с местным законодательством. Если на батареях, аккумуляторах и микробатареях, поставляемых с этим устройством, имеются химические символы Hg, Cd или Pb, это означает, что батареи содержат тяжелые металлы: более 0,0005% ртути, более 0,002% кадмия или более 0,004% свинца.  Соответствие стандартам R&TTE CE!
Это устройство с беспроводным модулем соответствует требованиям директивы Евросоюза R&TTE (1999/5/EC). Это оборудование соответствует следующим стандартам: ETSI EN 300 328 EN 301 489 EN 301 489 Страны: Германия, Великобритания, Нидерланды, Бельгия, Швеция, Дания, Финляндия, Франция, Италия, Испания, Австрия, Ирландия, Португалия, Греция, Люксембург, Эстония, Латвия, Литва, Чехия, Словакия, Словения, Венгрия, Польша и Мальта.Инструкция по Безопасности
1. Не нажимайте на жидкокристаллический экран. Не кладите планшетный ПК вперемешку с мелкими предметами, т.к. они могут поцарапать сам планшетный ПК и, в частности, его экран или попасть внутрь планшетного ПК через его вентиляционные отверстия. 2. Избегайте хранения или использования планшетного ПК в грязной или пыльной среде. 3. Не ставьте планшетный ПК на неровные или нестабильные поверхности. 4. Не кладите и не бросайте посторонние предметы на крышку планшетного ПК, не пытайтесь засунуть их в полости планшетного ПК. Не захлопывайте с силой крышку планшетного ПК. 5. Не подвергайте планшетный ПК воздействию сильного электромагнитного излучения. Не кладите флоппи дискеты рядом или на планшетный ПК, т.к. это может привести к потере данных на дискетах. 6. Не подвергайте планшетный ПК продолжительному воздействию прямых солнечных лучей, особенно, будучи в автомобиле, т.к. это может повредить жидкокристаллический экран планшетного ПК. 7. Диапазон безопасных температур: планшетный ПК стоит использовать при температурах от 5 до 35 градусов Цельсия. 8. Не подвергайте планшетный ПК воздействию влаги, не используйте его под дождём или в непосредственной близости от источников воды. 9. Предостережение: использование батарей с неверными техническими характеристиками может привести к взрыву. Утилизация батарей должна производиться в соответствии с инструкциями. 10. Данный планшетный ПК не должен утилизовываться вместе с обычным городским мусором, а только в соответствии с местным законодательством по утилизации электроники. Батарея должна быть отдана в переработку. Проконсультируйтесь с органами местного самоуправления или с местным представительством ViewSonic о том, как должна осуществляться утилизация. 11. Данный планшетный ПК и его блок питания могут незначительно нагреваться в процессе работы и/или зарядки батареи. Во избежание дискомфорта или ожога, не кладите планшетный ПК на колени или другие части тела. 12. Характеристики электропитания данного планшетного ПК указаны на наклейке на днище планшетного ПК. Перед использованием, убедитесь, что электрические характеристики блока электропитания соответствуют электрическим характеристикам планшетного ПК. Необходимо использовать только аксессуары, рекомендованные ViewSonic. 13. Перед включением планшетного ПК проверьте все соединения между планшетным ПК и периферийными устройствами. 14. Во избежание загрязнения планшетного ПК, не пользуйтесь планшетным ПК во время еды. 15. Не засовывайте в планшетный ПК предметы, которые могут вызвать короткое замыкание или каким-либо иным образом повредить его электронные схемы. 16. Перед тем как устанавливать, подключать или отключать периферийные устройства, которые не поддерживают технологию «горячего» подключения, выключите и обесточьте данный планшетный ПК. 17. Перед тем как чистить планшетный ПК, выключите его, отключите от сети электропитания и отсоедините его батареи. 18. Не разбирайте данный планшетный ПК. Это должен делать только сертифицированный специалист. 19. Разрешается использовать только те аккумуляторные батареи, которые были сертифицированы ViewSonic для использования с данным планшетным ПК. 20. Данный планшетный ПК имеет вентиляционные отверстия для отвода тепла. Не рекомендуется класть планшетный ПК на мягкие поверхности (кровать, колени и т.п.) т.к. при этом вентиляционные отверстия могут быть заблокированы, а планшетный ПК зависнуть от перегрева.Декларация о соответствии RoHS
Данный продукт был разработан и произведен в соответствии с Директивой 2002/95 Европейского парламента и Совета Европы об ограничении использования некоторых вредных веществ в электрическом и электронном оборудовании (Директива RoHS), он также соответствует требованиям к максимальным значениям концентрации, предложенным Техническим Комитетом Адаптации Европейской Комиссии (TAC):| Вещество | Предложенная максимальная концентрация | Фактическая концентрация |
| Свинец (Pb) 0,1% < 0,1% | ||
| Ртуть (Hg) 0,1% < 0,1% | ||
| Кадмий (Cd) 0,01% < 0,01% | ||
| Гексавалентный хром (Cr6+) 0,1% < 0,1% | ||
| Полиброминатные бифенилы (PBB) 0,1% < 0,1% | ||
| Полиброминантные эфиры дифенила (PBDE) 0,1% < 0,1% |
Авторские права
© Корпорация ViewSonic®, 2010. С сохранением всех прав. Торговые наименования ViewSonic, OnView, ViewMatch, ViewMeter и логотип компании с изображением трех птиц являются зарегистрированными товарными знаками компании ViewSonic. Android is a trademark of Google Inc. Use of this trademark is subject to Google Permissions. This product has an Android ^™ platform based on Linux, which can be expanded by a variety of JME-based application SW. All products use in this device and trademarks mentioned herein are trademarks or registered trademarks of their respective owners. Google ^™ , the Google logo, Android ^™ , the Android logo and Gmail ^™ are trademarks of Google Inc. Use of this trademark is subject to Google Permissions. Wi-Fi and the Wi-Fi CERTIFIED logo are registered trademarks of the Wireless Fidelity Alliance. microSD ^™ is a trademark of SD Card Association. Bluetooth and the Bluetooth logo are trademarks owned by Bluetooth SIG, Inc. The prediction engine of the input method is TOUCHPAL, provided by COOTEK. Отказ от ответственности: Компания ViewSonic не несет ответственности за технические и редакторские ошибки в этом документе и любые намеренные, случайные или косвенные убытки, возникающие в связи с содержащимся в нем материалом, а также с характеристиками или использованием этого продукта. В интересах непрерывного совершенствования изделий, компания ViewSonic сохраняет за собой право изменять конструкцию, комплект поставки и параметры изделия без предварительного уведомления. Информация в этом документе может быть изменена без предварительного уведомления. Никакая часть этого документа не может быть скопирована, воспроизведена или передана какими-либо средствами, для каких-либо целей и в какой бы то ни было форме без получения предварительного письменного разрешения от компании ViewSonic.Регистрация изделия
В будущем Вам может понадобиться дополнительная информация о продукции корпорации ViewSonic. Для получения этой информации Вам необходимо зарегистрировать Ваше изделие на странице сети Интернет: www.viewsonic.com. Вы также можете с помощью компакт-диска мастера ViewSonic распечатать регистрационную форму, которую Вы можете послать по почте или факсу в корпорацию ViewSonic.Справочная информация
| Наименование изделия: | VPAD10 |
| ViewSonic Tablet PC | |
| Номер модели: | VS13790 |
| Номер документа: | VPAD10_UG_RUS Rev. 1A 09-28-10 |
| Серийный номер: | |
| Дата покупки: |
Утилизация продукта по истечении срока эксплуатации
Компания ViewSonic заботится о состоянии окружающей среды и обязуется направить все свои усилия на создание экологически чистых условий работы и жизни. Компания признательна за ваш вклад в более «умные» и экологически чистые информационные технологии. Для получения дополнительной информации посетите веб-сайт компании ViewSonic. США и Канада: http://www.viewsonic.com/company/green/recycle-program/ Европа: http://www.viewsoniceurope.com/uk/support/recycling-information/ Тайвань: http://recycle.epa.gov.tw/recycle/index2.aspxОглавление
Краткое описание ....ii Комплект поставки....iii Внешний вид планшетного ПК....1 Вид спереди....1 Вид сзади....3 Вид сбоку 5 Индикаторы 8 Использование операционной системы Windows 7....10 Использование камеры 27 Использование мультитач-экрана 27 Типовые аппаратные проблемы, их возможные причины и решения 28Краткое описание
Инструкции по технике безопасности
Ниже приведены рекомендации по технике безопасности, позволяющие обеспечить безопасность пользователей и планшетного ПК VPAD10. - Не пытайтесь самостоятельно осуществлять ремонт планшетного ПК VPAD10. Всегда неукоснительно соблюдайте инструкции по установке. - Не допускайте нахождения каких-либо предметов на кабеле питания сетевого блока питания и не располагайте кабель в таких местах, где об него могут споткнуться люди или на него могут наступить. - Не накрывайте сетевой блок питания бумагой или другими предметами, которые могут нарушить его охлаждение. Кроме того, не допускается использовать сетевой блок питания, когда он находится в чехле для переноски. - Используйте только сетевой блок питания, кабель питания и аккумуляторы, предназначенные для использования с планшетным ПК VPAD10. Использование аккумулятора или сетевого блока питания другого типа может привести к возгоранию или взрыву. - При использовании с сетевым блоком питания удлинителя следует убедиться, что суммарный потребляемый ток (в амперах) приборов, подключенных к удлинителю, не превышает номинальный ток удлинителя. - При перемещении планшетного ПК VPAD10 между местами с сильно различающимися температурой и (или) влажностью внутри планшетного ПК VPAD10 может конденсироваться влага. Во избежание повреждения планшетного ПК VPAD10 перед использованием VPAD10 выждите достаточное время, чтобы влага испарилась. - При отсоединении кабеля тяните его за разъем или за петлю снятия натяжения, но не тяните за сам кабель. Отсоединяя разъем, удерживайте его ровно, чтобы предотвратить изгибание его контактов. Кроме того, перед подсоединением кабеля правильно сориентируйте и совместите оба его разъема. Иллюстрации в настоящем руководстве могут отличаться от фактического внешнего вида изделий, см. фактическое изделие.Комплект поставки
Распаковав изделие, внимательно проверьте комплектность. Если какой-либо из указанных ниже предметов отсутствует или поврежден, обратитесь к продавцу камеры. В упаковке изделия должны находиться перечисленные ниже предметы. СТАНДАРТНЫЙ КОМПЛЕКТ • Планшетный ПК VPAD10 - Сетевой блок питания с кабелем питания • Руководство пользователя - Образ компакт-диска с драйверами (расположен на SSD-диске)⚠️ ПРЕДУПРЕЖДЕНИЕ
Драйверы VPAD10 хранятся на последнем разделе SSD-диска, соблюдайте осторожность, чтобы не удалить эти файлы и не отформатировать данный раздел.ДОПОЛНИТЕЛЬНО
Перечисленные предметы обычно являются дополнительными, но некоторые поставщики включают их в стандартный комплект. Некоторые предметы могут предлагаться не во всех странах. Некоторые поставщики могут включать в комплект не все предметы. • Чехол • Кабель Mini VGA • Ткань для очистки - Наушники ViewSonic VPAD10 IXВнешний вид планшетного ПК
Вид спереди  ViewSonic VPAD10 ① Камера Встроенная веб-камера позволяет фотографировать, записывать видеоролики и общаться в онлайновых чатах. ② Сенсорный экран Сенсорный экран позволяет управлять системой и приложениями с помощью пальцев. ③ Индикаторы Подробные сведения см. в разделе «Индикаторы» на стр. 8–9. ④ Кнопка питания Эта кнопка служит для включения и выключения планшетного ПК VPAD10. ⑤ Функциональная кнопка 1 Длительное нажатие этой кнопки соответствует нажатию клавиши «Esc», кратковременное нажатие позволяет вызвать панель ввода планшетного ПК. (Вне операционной системы длительное нажатие этой кнопки соответствует клавише курсора «вверх», кратковременное нажатие – клавише курсора «вниз».) ⑥ Функциональная кнопка 2 Длительное нажатие этой кнопки позволяет включить или выключить модуль 3G-связи, кратковременное нажатие позволяет быстро включить или выключить модули Wi-Fi и Bluetooth. (Вне операционной системы нажатие этой кнопки соответствует клавише «Enter» (Ввод).) Вид сзади  ViewSonic VPAD10 ① Динамик Динамик воспроизводит содержимое мультимедийных файлов и звуки операционной системы. ② Вентиляционные отверстия Эти отверстия служат для отвода тепла и поддержания оптимальной температуры планшетного ПК VPAD10. Вид сбоку Левая панель Правая панель  ViewSonic VPAD10 ① Гнездо питания. Это гнездо служит для подключения к планшетному ПК VPAD10 блока питания и для зарядки аккумулятора. ② Гнездо для карты памяти Micro SD Установите в это гнездо карту памяти Micro SD для обмена данными с планшетным ПК VPAD10. ③ Порт Mini VGA Подключите внешнее устройство отображения (например, монитор или проектор) к видеовходу Mini VGA планшетного ПК с помощью кабеля Mini VGA. ④ Кнопка питания Эти порты предназначены для подключения периферийных устройств, таких как мыши, цифровые камеры и MP3-плееры с интерфейсом USB 2.0. ⑤ Гнездо аудиовыхода Это гнездо предназначено для подключения наушников (гарнитуры) или внешней акустической системы для воспроизведения аудиофайлов, сохраненных в памяти планшетного ПК VPAD10. ⑥ Микрофон Микрофон позволяет записывать звуки и речь. ⑦ Отверстие кнопки сброса Если работа системы нарушена (система не запускается или не включается), вставьте тонкий прямой предмет (например, канцелярскую скрепку) в отверстие кнопки сброса на планшетном ПК. ⑧ Вентиляционные отверстия Эти отверстия служат для отвода тепла и поддержания оптимальной температуры планшетного ПК VPAD10. ⑨ Гнездо для SIM-карты 3G-связи Вставьте в это гнездо SIM-карту 3G-связи (режим «PnP» не поддерживается) для подключения к сотовой сети 3G-связи. (За дополнительной информацией обращайтесь к операторам связи.) Индикаторы  ViewSonic VPAD10 ① Индикатор беспроводной ЛВС Когда модуль беспроводной ЛВС включен, этот индикатор светится синим цветом. Когда беспроводная сеть выключена, Индикатор не светится. ② Индикатор состояния аккумулятора Когда аккумулятор заряжается, этот индикатор светится красным цветом. При низком уровне заряда аккумулятора этот индикатор мигает красным цветом. Когда аккумулятор полностью заряжен, этот индикатор светится синим цветом. ③ Индикатор питания Когда система включена, этот индикатор светится синим цветом. Когда система находится в спящем режиме, этот индикатор мигает синим цветом. Когда система выключена или находится в режиме гибернации, этот индикатор не светится.Использование операционной системы Windows 7
Начало использования планшетного ПК VPAD10
Подключите планшетный ПК VPAD10 к электрической сети при помощи сетевого блока питания, нажмите и удерживайте кнопку питания 2–3 секунды, после этого планшетный ПК VPAD10 включится. Отпустите кнопку, когда индикатор питания станет светиться синим цветом. Для выполнения первоначальной настройки операционной системы следуйте инструкциям, отображающимся на экране. Рабочий стол операционной системы выглядит, как показано ниже. Компьютер оснащен встроенным акселерометром и при развороте изменяет ориентацию изображения на экране. natural_image
Windows XP desktop wallpaper showing the logo and window controls (no text or symbols on the screen)natural_image
Windows logo on a blue background, no text or symbols visibleРабочий стол
По умолчанию на рабочем столе операционной системы отображаются следующие элементы: ① «Корзина», ② виртуальная клавиатура, ③ рабочая область и ④ панель задач. Рабочая область
В рабочей области экрана пользователи могут выполнять свои задачи, а также хранить программы, документы и ярлыки. На рабочую область можно добавлять гаджеты (мини-приложения), обеспечивающие быстрый доступ к полезной информации и выполнение простых задач без открытия каких-либо программ.  Примеры гаджетовПанель задач
Панель задач обеспечивает доступ к программам, отображающимся на рабочем столе, даже если программы свернуты. Такие программы считаются отображающимися на рабочем столе. Панель задач позволяет просматривать открытые основные окна и вложенные окна на рабочем столе, а также быстро переключать окна. Кнопка «Пуск» – это точка доступа ко всем программам и специальным папкам Windows (Документы, Фотографии, Музыка, Игры, Компьютер, Панель управления) со списками недавно открывавшихся программ и файлов для быстрого доступа к недавно использованным программам и документам. Панели приложений содержат свернутые специализированные программы, выполняющиеся в фоновом режиме, например Языковая панель. Для программ, сворачивающихся в панели приложений, не отображаются кнопки панели задач. Панели приложений не рекомендуется использовать в Windows 7. Область уведомлений – это место кратковременного отображения уведомлений и информации о состоянии, а также точка доступа к функциям системы и программ, которые не отображаются на рабочем столе. Подключение к беспроводным сетям
1. Удостоверьтесь, что компьютер находится в зоне действия беспроводной сети. Нажмите кнопку «Wi-Fi» для включения модуля Wi-Fi, индикатор Wi-Fi начнет светиться синим цветом. (Если установлена SIM-карта 3G-связи и включен модуль 3G-связи, также можно подключить компьютер к сотовым сетям 3G-связи.) 2. Щелкните значок сети в области уведомлений, отобразится список доступных сетей.  В одном списке отобразятся и точки доступа Wi-Fi и сотовые сети 3G-связи. Windows 7 также создает виртуальную карту Wi-Fi, чтобы ее можно было использовать дважды, например, для подключения WPS-устройств к точке доступа без WPS. Для подключения к некоторым сетям, требующим проверки подлинности, может потребоваться пройти процесс аутентификации и ввести имя пользователя и пароль. За подробной информацией обращайтесь к администратору сети. С целью обеспечения безопасности настоятельно рекомендуется по возможности подключать компьютер к защищенным беспроводным сетям. При нахождении на борту самолета обязательно выключайте модуль беспроводной ЛВС во избежание угрозы безопасности полета. 3. Выберите сеть и нажмите «Connect (Подключиться)». Если для используемой сети не требуется проверка подлинности, отобразится сообщение об успешном подключении к сети.Bluetooth
1. Щелкните правой кнопкой мыши значок в области уведомлений (он расположен в нижнем левом углу рабочего стола, либо щелкните значок, чтобы отобразить скрытый значок) и выберите пункт «Open Settings (Открыть параметры)». (Если Bluetooth-адаптер выключен, включите его.)  2. На вкладке «Options (Параметры)» установите флажок «Allow Bluetooth devices to find this computer (Разрешить устройствам Bluetooth обнаруживать этот компьютер)» и нажмите кнопку «ОК». После этого другие Bluetooth-устройства смогут обнаруживать данный планшетный ПК и устанавливать Bluetooth-соединение.  (Также необходимо активировать функцию Bluetooth-соединения на устройстве, которое требуется подключить.) 3. Щелкните правой кнопкой мыши и выберите пункт «Add a Device (Добавить устройство)». Дождитесь отображения списка обнаруженных активных Bluetooth-устройств.  (Подробные сведения об активации функции Bluetooth см. в документации устройства.) (Максимальный радиус действия соединения между планшетным ПК VPAD10 и Bluetooth-устройством составляет приблизительно 10 метров.) 4. Выберите Bluetooth-устройство и нажмите кнопку «Next (Далее)».  5. Windows сгенерирует случайный цифровой код, который отобразится на экране. Введите этот цифровой код на Bluetooth-устройстве, к которому подключается планшетный ПК VPAD10. Отправка файла на Bluetooth-устройство
Если Bluetooth-устройство может отправлять и принимать данные как, например, мобильный телефон, можно использовать Bluetooth-соединение для передачи данных между Bluetooth-устройством и планшетным ПК. 1. Щелкните правой кнопкой мыши значок ⚙️ и выберите пункт «Show Bluetooth Devices (Показать устройства Bluetooth)».  2. В показанном примере следует дважды щелкнуть значок «S88» (телефон S88 может передавать данные посредством Bluetooth).  3. Нажмите пункт «Send files to your phone (Отправка файлов на телефон (S88))».  4. Нажмите кнопку «Browse Files (Обзор файлов)», чтобы выбрать файлы для передачи, а затем нажмите «send (Отправить)».  5. Выбранные files (файлы) будут отправлены на телефон S88. После завершения передачи диалоговое окно «Sending Items (Отправка объектов)» автоматически закроется.  Выше приведен пример подключения к мобильному телефону. При подключении к другим Bluetooth-устройствам процедура может отличаться.Панель сенсорного ввода
Панель ввода планшетного ПК VPAD10 Панель ввода представляет собой главное средство ввода текста на планшетном ПК VPAD10.  Панель рукописного ввода Также предусмотрена панель рукописного ввода, распознающая и преобразующая рукописный текст в печатный. Доступно два способа распознавания рукописного текста: свободный рукописный ввод и ввод отдельных знаков. 1. Свободный рукописный ввод 2. Ввод отдельных знаков
Настройки планшетного ПК VPAD10
Для полного использования всех сенсорных функций данного компьютера следует открыть пункты «Start (Пуск)» > «Control Panel (Панель управления)», а затем выбрать пункт «VPAD10 Settings (Параметры планшетного компьютера VPAD10)». Общие сведения о настройках VPAD10
Display (Экран) 1. Conguration (Настройка)
Для настройки пера и сенсорного экрана нажмите кнопку «Setup (Настройка)». Затем касайтесь сенсорного экрана пальцем для завершения калибровки сенсорного экрана. 2. Display Options (Параметры отображения)
Display (Экран): Пункт «Экран» позволяет выбрать устройство отображения. Calibration (Калибровка): не используйте встроенную функцию калибровки экрана Windows, сведения о калибровке сенсорного экрана см. в разделе «Calibration of the touch screen (Калибровка сенсорного экрана)». Reset (Сброс): позволяет Reset (сброс) стандартные настройки в случае некорректной калибровки экрана встроенными средствами Windows. Go to Orientation (Перейдите к ориентации) Встроенный акселерометр данного компьютера автоматически определяет ориентацию экрана, поэтому использование этой ссылки не требуется. Others (Другие)
 1. Handedness (Правша или левша) Выберите предпочтительное положение меню на экране в зависимости от рабочей руки. При выборе настройки left-handed (для левши) меню отображаются справа от руки. При выборе настройки right-handed (для правши) меню отображаются слева от руки. 2. Pen and Touch (Перо и сенсорный ввод) Нажмите ссылку «Go to Pen and Touch (Перейти к разделу Перо и сенсорный ввод)» в разделе «Перо и сенсорный ввод». 3. VPAD10 Input Panel Options (Параметры панели ввода планшетного ПК VPAD10) Нажмите ссылку «Go to Input Panel Settings (Перейти к разделу параметры панели ввода)» в разделе «Параметры панели ввода планшетного ПК VPAD10».Параметры пера и сенсорного ввода
Включение сенсорного ввода 1. Установите флажок «Use your finger as an input device (Использовать палец как устройство ввода)» для включения сенсорного ввода. 2. Установите флажок «Enable multi-touch gestures and inking (Включить мультисенсорные жесты и ввод)», чтобы включить жесты мультитач, например увеличение двумя пальцами. Settings (Параметры)
Нажмите кнопку «Settings (Параметры)» для настройки скорости двойного касания и пространственного доступа и проверки настройки.  ViewSonic VPAD10 Touch Pointer (Указатель касания) Установите флажок «Touch Pointer (Указатель касания)», чтобы при нажатием на экран пальцами отображался указатель касания. В окне «Дополнительные параметры» можно настроить параметры «Touch Pointer Location Option (Расположение указателя касания)» и «Touch Pointer Appearance and Behavior (Внешний вид и поведение указателя касания)».  Panning (Прокрутка) На вкладке «Panning (Прокрутка)» установите флажок «Turn on Single Finger Panning (Включить панорамирование пальцем)», чтобы включить прокрутку одним пальцем. Установите оба флажка в разделе «Gestures (Жесты)» и настройте параметр «Inertia settings (Инерция)».  ViewSonic VPAD10Использование камеры
Встроенная камера позволяет осуществлять видеовызовы и снимать фотографии.Использование мультитач-экрана
Мультитач-экран позволяет управлять компьютером при помощи жестов, используя один или два пальца. Двойной щелчок выполняется двойным касанием экрана пальцем. Прокрутка веб-страниц выполняется интуитивно понятно перемещением пальца вверх или вниз по странице. Двумя пальцами можно увеличивать и уменьшать масштаб изображений – сводите пальцы вместе для уменьшения масштаба, разводите пальцы для увеличения масштаба. Для выполнения правого щелчка файла удерживайте его одним пальцем и коснитесь экрана другим пальцем (либо можно удерживать один палец на экране в течение 2–3 секунд).Типовые аппаратные проблемы, их возможные причины и решения
Ниже перечислены типовые аппаратные проблемы и рекомендованные решения. 1. Система прекратила работать во время выполнения программы. Причина: ошибка при выполнении текущей процедуры. Решение: нажмите одновременно клавишиОбращение к дистрибьюторам
Если после выполнения рекомендаций, приведенных в предыдущем разделе, проблему устранить не удается, следует обратиться к дистрибьютору. Дистрибьюторы могут определить, необходимо ли вернуть компьютер в магазин, где он был приобретен. Перед обращением к дистрибьютору соберите указанную ниже информацию. 1. Конфигурация и модель планшетного ПК VPAD10. Дистрибьюторам необходимо знать, какие периферийные устройства вы используете. 2. Сообщение об ошибке, отображающееся на экране, если оно отображается. 3. Программное обеспечение, которое используется, когда происходит сбой в работе компьютера. 4. Шаги, предпринятые для решения проблемы. Если вы пропустили некоторые шаги, дистрибьюторы могут помочь вам выполнить их, давая инструкции по телефону.Служба поддержки
Для получения технической поддержки или технического обслуживания изделия воспользуйтесь информацией, приведенной ниже, или обратитесь в организацию, в которой Вы приобрели данное изделие. ПРИМЕЧАНИЕ: Вам будет нужен серийный номер данного изделия.| Страна или регион Веб-сайт Список телефонов Адрес электронной почты | |||
| Россия www.viewsoniceurope.com/ru/ www.viewsoniceurope.com/ru/support/call-desk/ service_ru@viewsoniceurope.com | |||
| Беларусь (Русский) | www.viewsoniceurope.com/ru/ | www.viewsoniceurope.com/ru/support/call-desk/ | service_br@viewsoniceurope.com |
| Латвия (Русский) | www.viewsoniceurope.com/ru/ | www.viewsoniceurope.com/ru/support/call-desk/ | service_lv@viewsoniceurope.com |
Ограниченная гарантия Рамка фотоего ViewSonic® цифров
Область действия гарантии:
В течение гарантийного срока корпорация ViewSonic гарантирует отсутствие в своих изделиях дефектов в материалах и изготовлении. Если в течение гарантийного срока в изделии будут обнаружены дефекты в материалах и изготовлении, корпорация ViewSonic по своему усмотрению отремонтирует или заменит изделие на аналогичное. Заменяемое изделие или детали могут содержать отремонтированные или восстановленные детали и компоненты.Гарантийный срок:
На планшетный ПК ViewSonic предоставляется гарантия сроком 1 год со дня приобретения планшетного ПК первоначальным покупателем, которая распространяется на производственный брак.Субъект гарантии:
Гарантия распространяется только на первого конечного покупателя.Гараетия не распространяется на следующие случаи:
1. Любое изделие с испорченным, измененным или удаленным серийным номером. 2. Повреждение, ухудшение работы или неисправность, явившиеся следствием следующих обстоятельств: а. Несчастный случай, неправильное использование, небрежное обращение, пожар, попадание воды, молнии или другие природные явления, несанкционированная модификация изделия или несоблюдение инструкций, поставляемых с изделием. b. Любые повреждения изделия во время транспортировки. с. Снятие или установка изделия. d. Причины, не связанные с изделием, например колебания или отключение питания. e. Использование расходных материалов и комплектующих, не удовлетворяющих техническим требованиям корпорации ViewSonic. f. Естественный износ или старение. g. Любые другие причины, не относящиеся к дефектам в изделии. 3. Любое изделие показывает состояние, известное как «приработка изображения», которое происходит когда статическое изображение отображается на изделии в течение длительного периода времени. 4. Расходы на услуги по демонтажу, установке, транспортировке в один конец, страхованию и настройке. ViewSonic VPAD10Обращение за обслуживанием:
1. Для получения информации о порядке гарантийного обслуживания обращайтесь в отдел обслуживания клиентов компании ViewSonic (см. страничку обслуживания клиентов). При этом потребуется сообщить серийный номер изделия. 2. Для получения гарантийного обслуживания необходимо предоставить (a) чек с датой первичной покупки, (b) свою фамилию, (c) свой адрес, (d) описание неисправности и (e) серийный номер изделия. 3. Доставьте или отправьте изделие оплаченной посылкой в заводской упаковке в сервисный центр, уполномоченный корпорацией ViewSonic, или в корпорацию ViewSonic. 4. За дополнительной информацией или адресом ближайшего сервисного центра ViewSonic обращайтесь в корпорацию ViewSonic.Ограничение подразумеваемых гарантий:
Не предоставляется никаких гарантий, будь то явных или подр, выходящих за пределы данного описания, включая дразумеваемые гарантии пригодности к продаже и соответствия определенному назначению.Ограничение возмещаемого ущерба:
Ответственность корпорации ViewSonic ограничивается стоимостью ремонта или замены изделия. Корпорация ViewSonic не несет ответственности за: 1. Повреждения другого имущества, связанные с неисправностью данного изделия, убытки, связанные с неудобством, невозможностью использования изделия, потерей времени, упущенной выгодой, упущенной возможностью, потерей деловой репутации, ущербом деловым отношениям или другие коммерческие убытки, даже если было получено уведомление о возможности таких убытков. 2. Любые другие убытки, независимо от того, были ли они второстепенными, побочными или какими-либо другими. 3. Любые претензии, предъявляемые пользователю третьими лицами. 4. Ремонт или попытка ремонта лицом, не уполномоченным корпорацией ViewSonic. 4.3: ViewSonic TPC Warranty TPC\_LW01 Rev. 1A 08-05-08 bar
| Category | Value | |---|---| | Category 1 | 100 | | Category 2 | 100 | | Category 3 | 100 | | Category 4 | 100 | | Category 5 | 100 | | Category 6 | 100 | | Category 7 | 100 | | Category 8 | 100 | | Category 9 | 100 | | Category 10 | 100 |
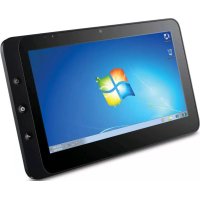
- Información de conformidad
- Declaración sobre el Cumplimiento R&TTE CE!
- Advertencias Importantes de Seguridad
- Declaración de Cumplimiento de RoHS
- Información del Copyright
- Registro del producto
- Para el historial
- Desecho del producto al final de su vida útil
- Tabla de Contenido
- Breve introducción
- Contenido del paquete
- ESTÁNDAR
- ADVERTENCIA
- OPCIONAL
- Explorar su Tablet PC
- Vista posterior
- Aplicación para sistemas con Windows 7
- Comenzar a utilizar el dispositivo VPAD10
- Área de trabajo
- Conectarse a una red inalámbrica
- Bluetooth
- Enviar un archivo a un dispositivo Bluetooth
- Especificación de información mediante el panel táctil
- Tablero de escritura
- Escribir a mano alzada
- Escribir carácter a carácter
- Configuración del dispositivo VPAD10
- Introducción a la configuración del dispositivo VPAD10
- Configuration (Con figuración)
- Display Options (Opciones de visualización)
- Others (Otros)
- Configuración del lápiz y la entrada táctil
- Touch Pointer (Puntero táctil)
- Panning (Panorámica)
- Utilizar la función Cámara
- Utilizar la pantalla multitáctil
- Problemas generales de hardware, causas posibles y soluciones
- Distribuidores de contacto
- Customer Support
- Garantía limitada Tablet PC ViewSonic®
- Cobertura de la garantía:
- Período de validez de la garantía:
- Destinatario de la garantía:
- La garantía no cubre:
- Cómo obtener asistencia:
- Límite de las garantías implícitas:
- Exclusión de daños:
- ViewSonic®
- Uygunluk Bilgisi
- Aşağıdaki bilgi sadece AB üyesi ülkeler içindir:
- R&TTE Uygunluk Beyani CE!
- Önemli Güvenlik Yönergeleri
- RoHS Uyum Beyani
- Telif Hakki Bilgileri
- Ürün Kaydı
- Kayıtlarınız için
- Ürün ömrünün bitiminde ürünün imha edilmesi
- İçindekiler
- Kısa giriş
- Güvenlik Talimatları
- Paket içeriği
- STANDART
- UYARI
- İSTEĞE BAĞLI
- Tablet PC'yi Keşfetme
- Arkadan Görünüm
- Windows 7 sistem uygulaması
- VPAD10'unuzu kullanmaya başlama
- Ana (masaüstü)
- Çalışma alanı
- Görev çubuğu
- Kablosuz ağa bağlanma
- Bir Bluetooth cihazına bir dosya gönderme
- Dokunmatik Panel Girişi
- Kilavuza Yazma
- VPAD10 Ayarları
- VPAD10 Ayarlarına Giriş
- Conguration (Yapılandırma)
- Display Options (Görüntü Seçenekleri)
- Others (Diğerleri)
- Kalem ve Dokunma Ayarları
- Dokunmayı Etkinleştirme
- Settings (Ayarlar)
- Kamerayı Kullanma
- Çok Dokunuşlu Ekranı Kullanma
- Genel donanım sorunları / olası nedenler ve çözümleri
- Dağıticılara Başvurun
- Müşteri Desteği
- Sınırlı Garanti
- ViewSonic® Tablet Bilgisayar
- Garanti kapsamı:
- Garanti ne kadar geçerlidir:
- Garanti neyi kapsamamaktadır:
- Garanti neyi kapsamamaktadýr:
- Nasıl hizmet alırım:
- Zimni garanti sınırlaması
- Hasarların hariç bırakılması
- Соответствие стандартам
- Соответствие стандартам R&TTE CE!
- Инструкция по Безопасности
- Декларация о соответствии RoHS
- Авторские права
- Регистрация изделия
- Справочная информация
- Утилизация продукта по истечении срока эксплуатации
- Оглавление
- Краткое описание
- Инструкции по технике безопасности
- Комплект поставки
- ⚠️ ПРЕДУПРЕЖДЕНИЕ
- ДОПОЛНИТЕЛЬНО
- Внешний вид планшетного ПК
- Использование операционной системы Windows 7
- Начало использования планшетного ПК VPAD10
- Рабочий стол
- Рабочая область
- Панель задач
- Подключение к беспроводным сетям
- Отправка файла на Bluetooth-устройство
- Панель сенсорного ввода
- Ввод отдельных знаков
- Настройки планшетного ПК VPAD10
- Общие сведения о настройках VPAD10
- Conguration (Настройка)
- Display Options (Параметры отображения)
- Others (Другие)
- Параметры пера и сенсорного ввода
- Settings (Параметры)
- Использование камеры
- Использование мультитач-экрана
- Типовые аппаратные проблемы, их возможные причины и решения
- Обращение к дистрибьюторам
- Служба поддержки
- Ограниченная гарантия Рамка фотоего ViewSonic® цифров
- Область действия гарантии:
- Гарантийный срок:
- Субъект гарантии:
- Гараетия не распространяется на следующие случаи:
- Обращение за обслуживанием:
- Ограничение подразумеваемых гарантий:
- Ограничение возмещаемого ущерба:
Marca : VIEWSONIC
Modelo : ViewPad V10s
Categoría : Tableta