
LED24F4 - Television TV Star - Free user manual and instructions
Find the device manual for free LED24F4 TV Star in PDF.


| Product Type | LED Color TV |
| Screen Size | 24 inches (16:9 aspect ratio) |
| TV System | PAL/SECAM |
| Speaker Output | 5W + 5W |
| Power Consumption | 48W (typical) |
| Power Supply | AC 100-240V, 50/60Hz |
| Dimensions (approx.) | 550 x 340 x 80 mm (without stand) |
| Weight (approx.) | 4.5 kg (without stand) |
| VESA Mount Pattern | 100 x 100 mm (wall mount compatible) |
| Inputs | HDMI, VGA, PC Audio, AV (Composite), YPbPr, SCART, USB, CI Slot, Antenna (75 ohm) |
| Outputs | Earphone (3.5mm), Coaxial (SPDIF) |
| Picture Features | Picture Mode (Standard, Movie, Sports, User), Contrast, Brightness, Colour, Tint, Sharpness, Contrast Booster, Colour Temperature, DNR |
| Sound Features | Sound Mode (Standard, Music, Movie, User), Bass, Treble, Balance, Surround, AVL, Digital Audio Output (PCM/Bitstream) |
| Tuner | DVB-T/T2, DVB-C (digital); PAL/SECAM (analog) |
| Media Playback | USB playback (Photo, Movie, Music) |
| Other Functions | Teletext, EPG, Parental Control, Sleep Timer, Auto Power Down, Key Lock, OSD Timer |
| Accessories Included | User Manual, Remote Controller, AAA Batteries (x2) |
| Safety Certifications | CE, RoHS |
| Care Instructions | Clean with dry cloth; avoid water and heat sources; ensure proper ventilation |
Frequently Asked Questions - LED24F4 TV Star
User questions about LED24F4 TV Star
0 question about this device. Answer the ones you know or ask your own.
Ask a new question about this device
Download the instructions for your Television in PDF format for free! Find your manual LED24F4 - TV Star and take your electronic device back in hand. On this page are published all the documents necessary for the use of your device. LED24F4 by TV Star.
USER MANUAL LED24F4 TV Star
natural_image
Logo featuring a stylized 'TV' with stars and curved lines, no text or symbols present.STAR
LED COLOR TV
EN USER MANUAL
Please read these instructions carefully and retain for future reference
LT VARTOTOJO INSTRUKCIJA
Please read these instructions carefully and retain for future reference.
Table Of Contents
Preparations Guide
Safety Information....2
Important Safety Precautions....3
Installed And Connected TV
TV Bracket assemble....4
TV Buttons And Terminal Interface....5
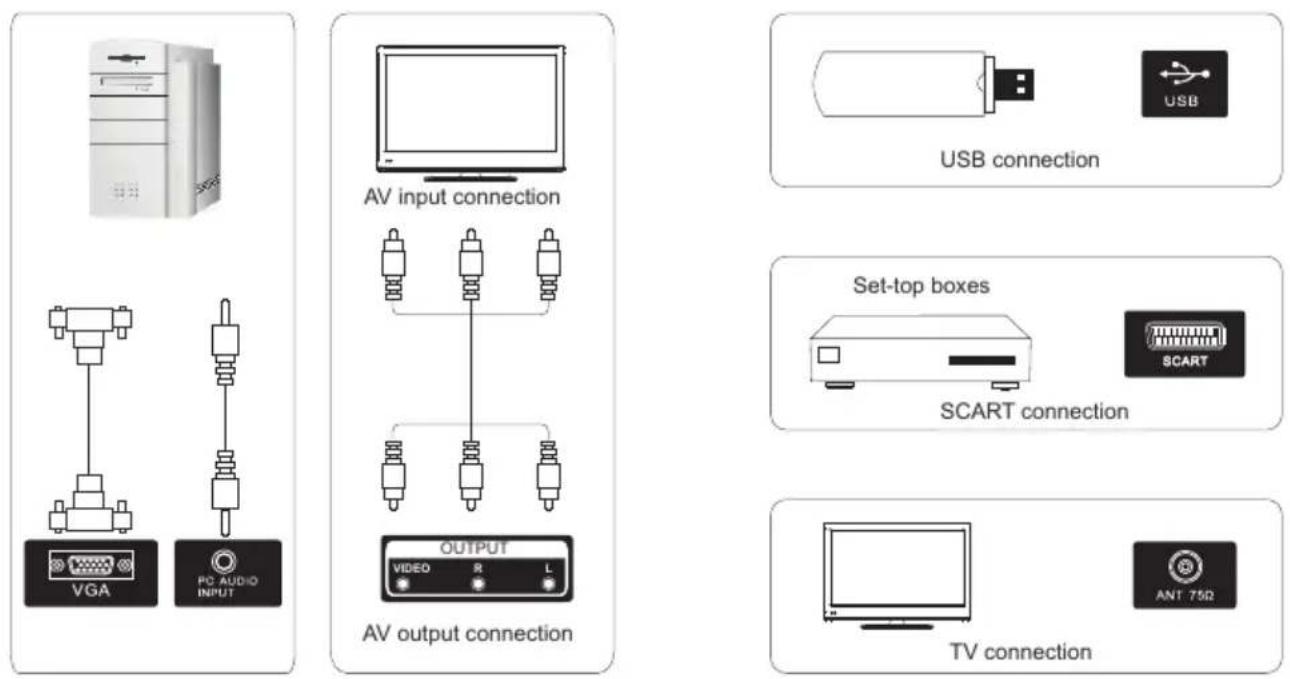
External device connection diagram....6
Install And Connect TV....7
TV Stand installation Instructions....7
Function Description
Picture Menu....8
Sound Menu....10
Applications....12
Preferences....15
Setup 18
Media Operation....20
Multimedia
Photo....21
Movie....22
Music....23
Setup....24
Other Information
Help....25
Specifications....26
Remote Controller....27
Safety Information
CAUTION
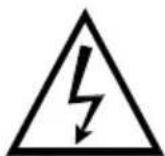
RISK OF ELECTRIC SHOCK DO NOT OPEN
High voltages are used in the operation of this product. to reduce the risk of electric shock, do not remove cover of the cabinet, refer servicing to qualified service personal
If the TV any changes or coarse adjustment, electric shocks to be hurt, do not attempt to open a machine-maintenance, customer contact centres needed overhaul.

The exclamation point within an equilateral triangle is intended to alert the user to the presence of important operating in the literature accompanying the appliance.
natural_image
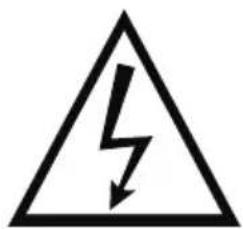
Warning symbol of a lightning bolt inside a triangle (no text or numbers)Warning The lightning flash with arrowhead symbol within an equilateral triangle, is intended to alert the user to the presence of uninsulated dangerous voltage within the products enclosure that may be of sufficient magnitude to constitute a risk of electric shock to persons.
Important Safety Precautions
- Read these instructions.
- Keep these instructions.
- Heed all warnings.
- Follow all instructions.
- Do not use this apparatus near water.
-
Clean only with dry cloth.
-
Do not block any ventilation openings. Install in accordance with the manufacturer's instructions.
-
Do not install near any heat sources such as radiators, heat registers, stoves, or other apparatus (including amplifiers) that produce heat.
-
Do not defeat the safety purpose of the polarized or grounding-type plug. A polarized plug has two blades with one wider than the other. A grounding type plug has two blades and third grounding prong. The wide blade or third prong are provided for your safety. When the provided plug does not fit into your outlet, consult an electrician for replacement of the obsolete outlet.
-
Protect the power cord from being walked on or pinched, particularly at plugs, convenience receptacles, and the point where they exit from the apparatus.
-
Only use attachments/accessories specified by the manufacturer.
-
Use only with the cart, stand, tripod, bracket, or table specified by the manufacturer, or sold with the apparatus. When a cart is used caution when moving the cart/apparatus combination to avoid injury tip-over.
-
Unplug this apparatus during lightning storms or when unused for long periods of time.
-
Refer all servicing to qualified service personnel. Servicing is required when the apparatus has been damaged in any way, such as power-supply cord or plug is damaged, liquid has been spilled or objects have fallen into the apparatus, the apparatus has been exposed to rain or moisture, does not operate normally, or has been dropped. Warning to reduce the risk of fire or electric shock, do not expose this apparatus to rain or moisture.
-
The apparatus shall be disconnected from the mains by placing the power/standby switch in the standby position and unplugging the power cord of the apparatus from the AC mains receptacle.
-
The socket-out shall be installed near the equipment and shall be easily accessible.
-
This product should never be placed in a built-in installation such as a bookcase or rack unless proper ventilation is provided or the manufacturer's instructions have been adhered to.
-
Apparatus shall not be exposed to dripping or splashing.
-
Do not place any sources of danger on the apparatus (e.g. liquid filled objects, lighted candles).
-
Wall or Ceiling Mounting - The appliance should be mounted to a wall or ceiling only as recommended by the manufacturer.
-
Never place the TV, remote control or batteries near naked flames or other heat sources, including direct sunlight. To prevent the spread of fire, keep candles or other flames away from the TV, remote control and batteries at all times.
-
The USB terminal should be loaded with 0.5 A under normal operation.

TV Bracket assemble
Fix the TV on the wall
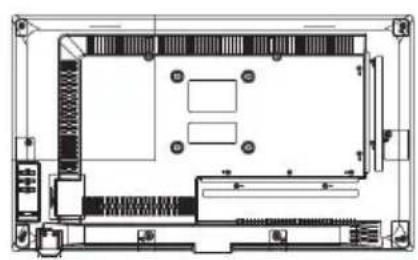
- First, put the TV on the table smoothly and put some soft cloth on the table to avoid scratching the screen.
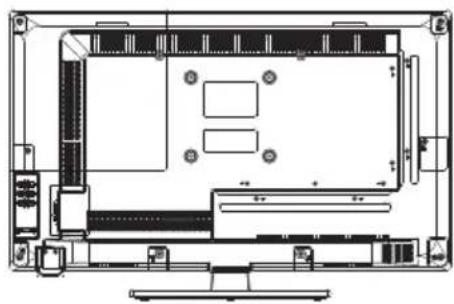
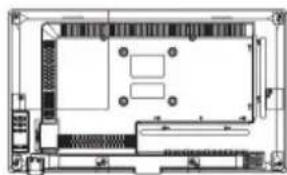
- User the screw driver to take off the screws which are fixed on the bottom stand (the direction of the arrow, refer to the ptoto1). And take off the bottom stand (please take off the screws and bottom stand carefully).
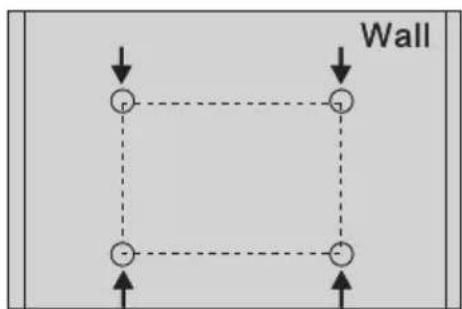
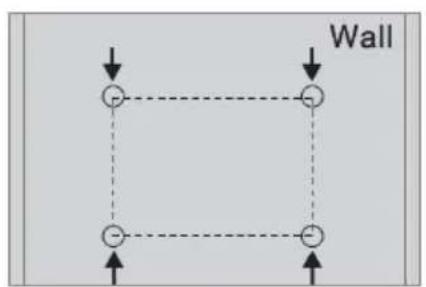
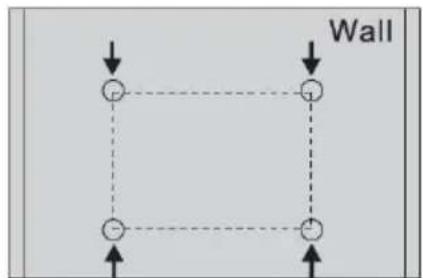
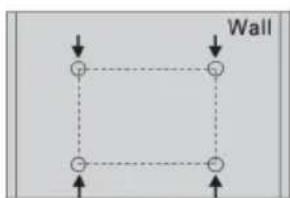
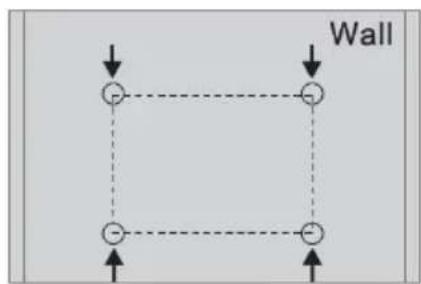
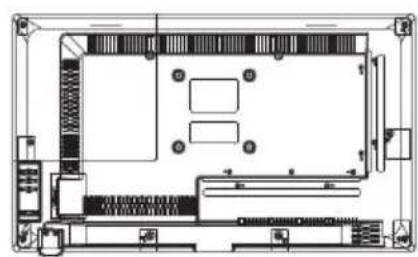
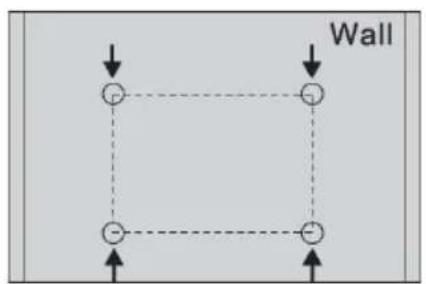
- Make one bracket which can fix on the wall according to the size of arrow direction of photo2 and photo3.
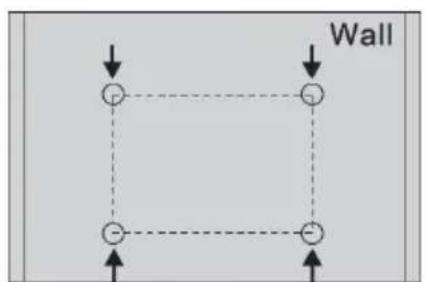
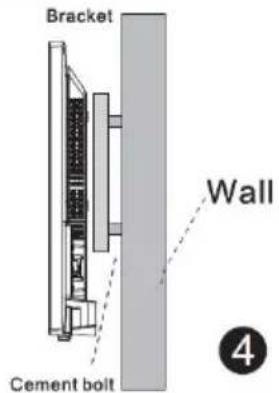
- Drill four holes properly on the wall (the size only for reference) and put into four screws.(optional parts) Drill four holes properly on the wall (the size only for reference) and put into four screws.(optional parts)
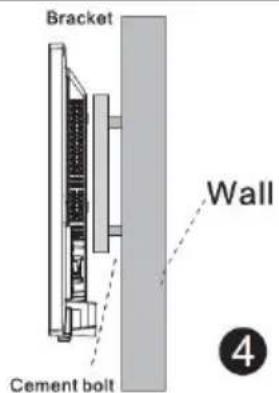
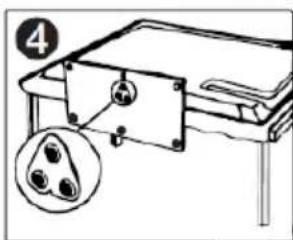
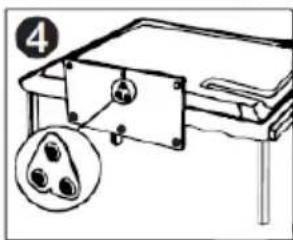
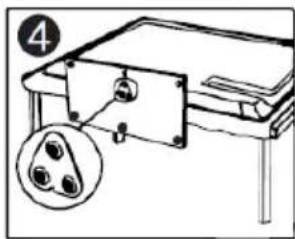
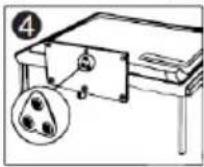
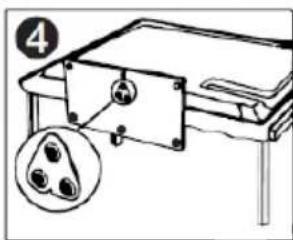
- according to the step 4, use the screwdriver to lock the screw on the back of the TV. then hang the TV on the wall.
natural_image
Technical line drawing of a computer monitor layout (no text or symbols)1

natural_image
Top-down schematic of a device layout with no visible text, numbers, or symbols2
3

Note:
- The bracket fixed on the wall is optional part.
- when you assemble the TV, there should be no other articles on the around and front and please keep the distance from other articles.
- When assemble the TV, please ask the career man to fix in order to avoid the danger.
- The fixing picture is only for reference.
- Please follow the use manual about bracket assemble to fix the TV.
- Attach the mounting bracket from the VESA compatible wall mounting kit.
TV Buttons And Terminal Interface
TV Buttons
Note: The following is only functional schematic, And the actual position and arrangement of different models may be different.
VOL+
VOL -
CH+
CH-
MENU
SOURCE

(1):Turn ON/OFF Power.
SOURCE: External Signal Input Selection.
MENU: Display Main MENU And Confirm MENU Item Selection.
CH+/-:Selecting Channel.
VOL+/-:Adjusting Volume.
Terminal Interface
Note: The following are the various terminal interface, the actual position and arrangement, the number of different models may be different.
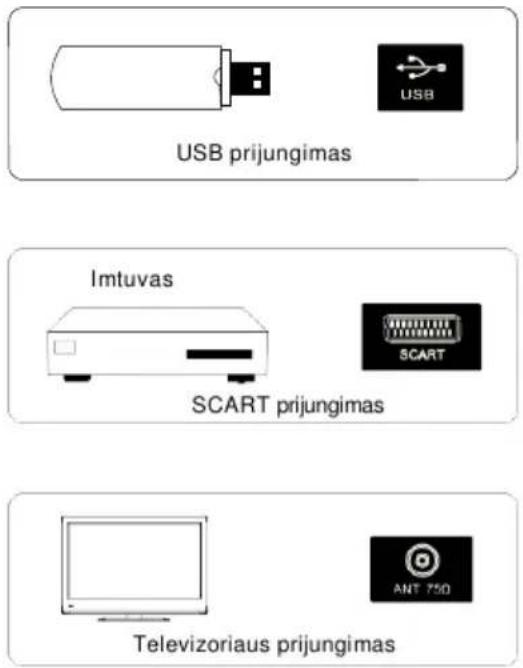
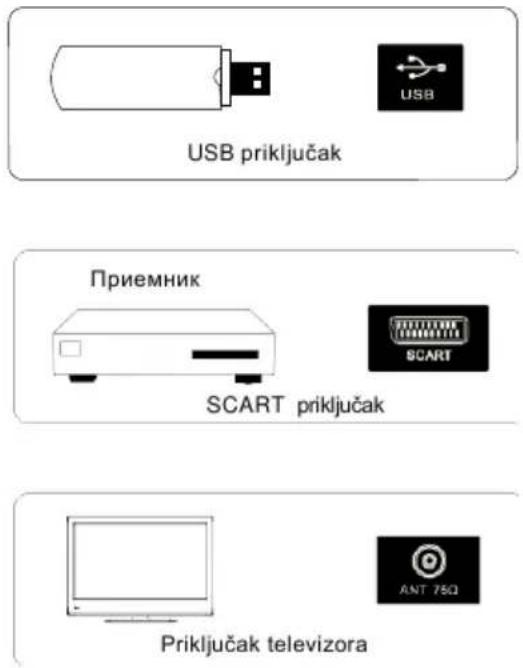
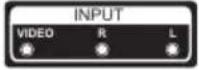 | AV inputExternal AV Signal Input AndRelevant Rith/Left Sound Channel |  | EARPHONE outputWhen earphones are plugged in,speakers are disabled |
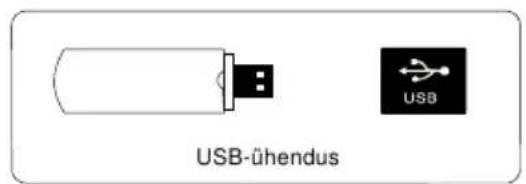
 | CI SLOTThe card reader input CI(common interface) this requires CAM (conditional access module) used for pay TV. |  | USB inputConnect a USB device here to play its media files or to recordprograms via the PVR function. |
 | Y Pb Pr inputConnect to the composite terminal of your DVD/VCR(Some models without this interface) |  | SCART inputstandard,it supports composite and RGBsignal input.It is a connection for european(Some models without this interface) |
 | HDMI inputDigital signal input from HDMI video connector. |  | COAXIALConnect the SPDIF receiver. |
 | ANT 75Connect the antennal/cadle tv input (75/VHF/UHF) | ||
 | VGA inputPC analog signal input | ||
 | PC AUDIO INPUTVGA input and audio input when VGA input |
External device connection diagram

flowchart
graph TD
    A["DVD"] --> C["Set-top boxes"]
    B["HDMI"] --> C
    C --> D["AV input connection"]
    D --> E["AV input connection"]
    E --> F["Output HDMIs"]
    F --> G["Output HDMIs"]
    style A fill:#f9f,stroke:#333
    style B fill:#f9f,stroke:#333
    style C fill:#ccf,stroke:#333
    style D fill:#cfc,stroke:#333
    style E fill:#cfc,stroke:#333
    style F fill:#fcc,stroke:#333
Install And Connect TV

3

2
1
Set your TV
To put your TV in a firm place which can bear the weight of the TV.
To avoid danger, please don't expose the TV near water or heating place (such as light, candle, heating machine), do not block the ventilation at the back of TV.
Connect antenna and power
-
Connect the antenna cable to the antenna socket on the back of the TV.
-
To plug the power cord of TV (AC 100-240V\~50/60Hz).
Turn on TV
- Press the power button of the TV the indication light will turn to green. if it is on standby mode (the light is red), press the power button on the remote control to turn on the TV.
Note:
Picture for reference purposes only.
Please prevail in kind
TV Stand Installation Instructions
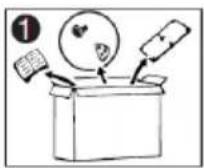
- Open the carton and remove the TV and scattered accessories and base (some models without base).
- to avoid the injury of the TV, covered with a soft mattress, put it on the table, face down on a soft mattress, the base of the neck is fixed on the TV with screws.
- screw the base and connected to the TV.
- the installation is complete.
Note:
Picture for reference purposes only.
Please prevail in kind


natural_image
Simple line drawing of a mechanical setup with a lever and base, no text or symbols present

Function Description
Picture Menu
The picture is for a reference only; the actual item is the standard.
Press TV MENU button to display the main menu.
Press ▲/▼ button to select Picture in the main menu, and then press ENTER button to enter.

bar
PICTURE | Picture Mode | Standard | Normal | |---|---|---| | Contrast | 50 | 50 | | Brightness | 50 | 50 | | Colour | 50 | 50 | | Tint | 50 | 50 | | Sharpness | 50 | 50 | | Contrast Booster | On | | | Colour Temperature | Normal | |- Press ▲/▼ button to select the option that you want to adjust in the Picture menu, and then press ENTER button or ▶ button to enter.
- Press ◀/▶ button to adjust or press ▲/▼ button to select. And press ENTER button to select the sub menu.
- After finishing your adjustment, press MENU button to save and return back to the previous menu, and press EXIT button to exit the entire menu.
Picture Mode
Press ▲/▼ button to select Picture Mode, then press ENTER button to enter and press ◀/▶ button to select.
You only can change the value of brightness, contrast, sharpness, color, when the picture is in User mode.
TIPS: You can press P-MODE button on the remoter control again and again to change the picture mode directly.
Picture Mode
Standard
Contrast
Press ▲/▼ button to select Contrast, then press ENTER button to enter and press ◀/▶
Function Description
button to adjust. Then press MENU button to return back the previous menu directly.
Brightness
Press ▲/▼ button to select Brightness, then press ENTER button to enter and press ◀/▶ button to adjust. Then press MENU button to return back the previous menu directly.
Colour
Press ▲/▼ button to select Colour, then press ENTER button to enter and press ◀/▶ button to adjust. Then press MENU button to return back the previous menu directly.
Tint
Press ▲/▼ button to select Tint, then press ENTER button to enter and press ◀/▶ button to adjust. Then press MENU button to return back the previous menu directly.
Sharpness
Press ▲/▼ button to select Sharpness, then press ENTER button to enter and press ◀/▶ button to adjust. Then press MENU button to return back the previous menu directly.
Contrast Booster
Press ▲/▼ button to select Contrast Booster, then press ENTER button to enter and press ◀/▶ button to select On or Off. Then press MENU button to return back the previous menu directly.
Colour Temperature
Press ▲/▼ button to select Colour Temperature, then press ENTER button to enter and ◀/▶ button to select Standard, Cool, Warm.
DNR
Press ▲/▼ button to select DNR, and then press ENTER button to enter and ◀/▶ button to select Off, Low, Middle, High.
Reset
Press ▲/▼ button to select Reset, then press ENTER button to enter the confirm menu, and then choose OK to reset the value.
Function Description
SOUND Menu
The picture is for a reference only; the actual item is the standard.
Press MENU button to display the main menu.
Press ▲/▼ button to select Sound in the main menu, and then press ENTER button or ▶ button to enter.

bar
SOUND | Sound | Stable Sound | Standard | | :--- | :--- | :--- | | Bass | 50 | 50 | | Treble | 50 | 50 | | Balance | 0 | 0 | | Surround | Off | Off | | AVL | Off | Off | | Digital Audio Output | PCM | PCM | | Reset | Enter | Enter |- Press ▲/▼ button to select the option that you want to adjust in the Sound menu, then press ENTER button to enter.
- press ◀/▶ button to adjust or press ▲/▼ to select, and press ENTER button to select submenu.
- After finishing your adjustment, Press MENU button to save and return back to the previous menu, or press EXIT button to exit the entire menu.
Sound mode
Press ▲/▼ button to select Sound mode, and then press ENTER button to enter. And then press ◀/▶ button to select.
You can change the value of bass and treble, Balance and EQ, when the sound is in User mode.
TIPS: You can press S-MODE button on the remote control to change the Sound Mode directly.
Sound Mode
Standard
Bass
Press ▲/▼ button to select Bass, then press ENTER or ▶ button to enter and press ◀/▶ button to adjust. It can only be adjusted under user mode. Then press MENU button to return
Function Description
back the previous menu directly.
Treble
Press ▲/▼ button to select Treble, then press ENTER button to enter and press ◀/▶ button to adjust. It can only be adjusted under user mode Then press MENU button to return back the previous menu directly.
Balance
Press ▲/▼ button to select Balance, then press ENTER button to enter and press ◀/▶ button to adjust. Then press MENU button to return back the previous menu directly.
Surround
Press ▲/▼ button to select Surround, and then press ENTER button to enter and press ◀/▶ button to select ON or OFF.
AVL
Press ▲/▼ button to select AVL, and then press ENTER button to enter and press ◀/▶ button to select ON or OFF.
Digital Audio Output
Press ▲/▼ button to select Digital Audio Output, then press ENTER button to enter and press ◀/▶ button to select.
Then press ENTER button or ▶ button to enter and press ◀/▶ button to adjust, then press MENU button to return back the previous menu directly.
Reset
Press ▲/▼ button to select Reset, then press ENTER button to enter RESET menu.
Function Description
APPLICATIONS
The picture is for a reference only; the actual item is the standard.
Press MENU button to display the main menu.
Press ▲/▼ button to select APPLICATIONS in the main menu, and then press ENTER button to enter.
 |  |  |  |  |
| APPLICATIONS | ||||
| Channel | Enter | |||
| Channel Options | Enter | |||
| Country | Russia | |||
| DTV Type | Terrestrial | |||
| Auto Tuning | Enter | |||
| ATV Manual Tuning | Enter | |||
| DTV Manual Tuning | Enter | |||
| Common Interface | Enter | |||
- Press ▲/▼ button to select the option that you want to adjust in the APPLICATIONS menu, and then press ENTER button to enter.
- Press ◀/▶ button to select and press ENTER button to select the sub menu.
- After finishing your adjustment, press MENU button to save and return back to the previous menu, or press EXIT button to exit the entire menu.
Function Description
Channel
Press ▲/▼ button to select Channel, and then press ENTER button to play the channel selected. The menu will appear as follows:
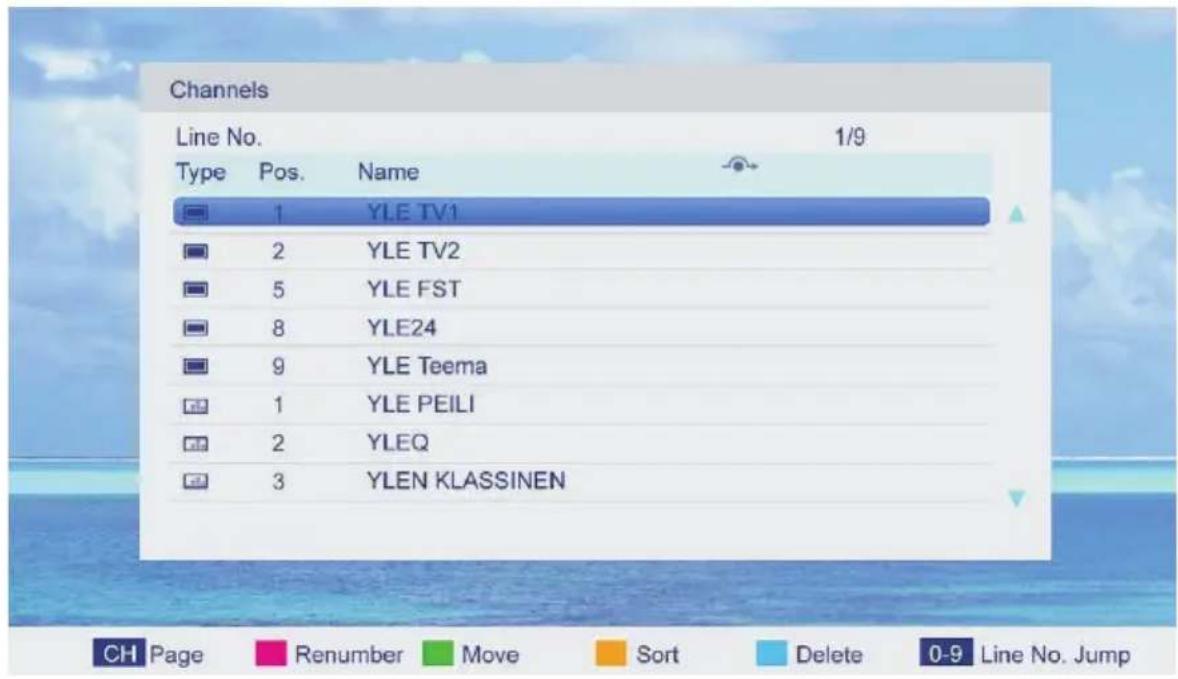
Key Description:
CH button: Press CH+ or CH- to turn the page.
RED button: Press this button to modify the channel number.
GREEN button: Press this button to move down the channel.
YELLOW button: Press this button to the order to restore the default channel.
GREEN button: Press this button to delete the channel selected.
0-9 button: Press these buttons to jump to the appropriate channel by inputting different channel number.
Function Description
Channel Options
Press ▲/▼ button to select Channel Options, and then press ENTER button to the channel List menu. The menu will appear as follows:
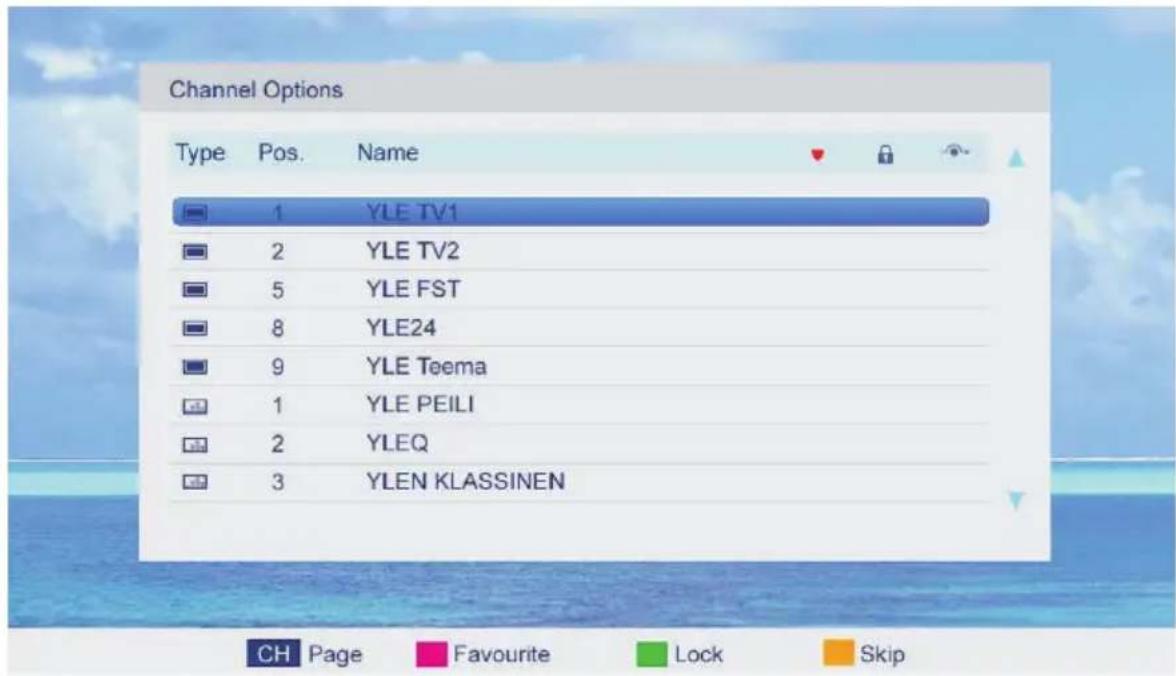
Key Description:
CH button: Press CH+ or CH- to turn the page.
RED button: Press this button to set the favorites channels.
GREEN button: Press this button to lock the channel.
YELLOW button: Press this button to skip the channel, if the channels already skipped, press YELLOW button again will cancel skip.
Country
Press ▲/▼ button to select Country, and then press ◀/▶ button to select which area you stay.
DTV Type
Press ▲/▼ button to select DTV Type, then press ◀/▶ button to select.
(Available DTV Type: Cable, Terrestrial)
Auto Tuning
Press ▲/▼ button to select Auto Tuning, and then press ENTER button to enter (When the System Lock is on, please input the PIN code to unlock).
Select to open the auto searching page, and press Enter button to start the scan.
ATV Manual Tuning
Press ▲/▼ button to select ATV Manual Tuning, and then press ENTER button to start the scan.
Function Description
DTV Manual Tuning
Press ▲/▼ button to select DTV Manual Tuning, and then press ENTER button to start the scan.
Common Interface
Press ▲/▼ button to select Common Interface, and then press ENTER button to display the CI slot Information.
PREFERENCES
The picture is for a reference only; the actual item is the standard.
Press MENU button to display the main menu.
Press ▲/▼ button to select PREFERENCES in the main menu, and then press ENTER or ▶ to enter.
| PREFERENCES | ||
| Menu Language | English | |
| Teletext Language | English | |
| Key Lock | Off | |
| PC Settings | Enter | |
| PIN Setting | Enter | |
| Parental Control | Enter | |
| Auto Power Down | 4 hours | |
- Press ▲/▼ button to select the option that you want to adjust in the PREFERENCES menu, then press ENTER to enter.
- Press ◀/▶ button to adjust or press ▲/▼ button to select.
- After finishing your adjustment, press MENU button to save and return back to the previous menu and press EXIT button to exit the entire menu.
Function Description
Menu Language
Press ▲/▼ button to select Menu Language, then press ENTER or ▶ button to enter the sub menu, then press ▲/▼ button to select, then press ENTER or ▶ button to confirm.
Teletext Language
Press ▲/▼ button to select Teletext Language, then press ENTER or ▶ button to enter the sub menu, then press ▲/▼ button to select, then press ENTER or ▶ button to confirm.
Key Lock
Press ▲/▼ button to select Key Lock, then press ENTER button to enter and press ◀/▶ button to select ON or OFF.
PC Settings
Press ▲/▼ button to select PC Settings, then press ENTER to enter the sub menu. Then Press ▶ to enter, then press ENTER or ▶ to confirm. (When the PC signal is connected).
Function Description
PIN Setting
Press ▲/▼ button to select PIN Setting, then press ENTER button to enter the sub menu, and than you can set a password.
Parental Control
Press ▲/▼ button to select Parental Control, then press ENTER or ▶ button to enter the sub menu. Then press ▲/▼ button to select Rate (From4-17, or None). Then press
ENTER or ▶ button to confirm.
Change Pin Code
Press ▲/▼ button to select Change Pin Code, then press ENTER to enter and Change Pin Code menu will appear as follows:
Input old password at "Old Password", (if the old password is incorrect, the password will not be allowed to modify.)
Input new password at "New Password".
Input new password again at "Confirm New Password", if new password and confirm new password consistent, the successfully updated menu will appear a few second, otherwise, the menu will display the password mismatch.
Auto Power Down
Press ▲/▼ button to select Auto Power Down and press ◀/▶ button to select OFF/1 hours/2 hours/3 hours/4 hours
Function Description
SETUP
The picture is for a reference only; the actual item is the standard.
Press MENU button to display the main menu.
Press ▲/▼ button to select Setup in the main menu, then press ENTER to enter.
 |  |  |  |  |
| SETUP | ||||
| OSD Timer | Off | |||
| Cinema | Super Live | |||
| Blue Screen | On | |||
| Sleep Timer | Off | |||
| Location | Home | |||
| Quick Setup | Enter | |||
| Upgrade | Enter | |||
| Channel Details | Enter | |||
| Reset TV | Enter | |||
- Press ▲/▼ button to select the option that you want to adjust in the Setup menu, then press ENTER or ▶ button to enter.
- Press ◀/▶ button to adjust or press ▲/▼ button to select.
- After finishing your adjustment, press MENU button to save and return back to the previous menu and press EXIT button to exit the entire menu.
OSD Timer
Press ▲/▼ button to select OSD Timer, and then Press ◀/▶ button to select. (Available OSD Timer: 10 S, 20 S, 30S, 40S, 50S, 60S, off), then press ENTER button to confirm.
Cinema
Press ▲/▼ button to select Cinema, and then Press ◀/▶ button to select. (Available Cinema: Auto, 4x3, Wide, Super Live), then press ENTER button to confirm.
Blue Screen
Press ▲/▼ button to select Blue Screen, then press ◀/▶ to select On or Off. Then press ENTER to confirm.
Function Description
Sleep Timer
Press ▲/▼ button to select Sleep Timer, and then Press ◀/▶ button to select. (Available Sleep Timer: 00:15, 00:30, 01:00, 01:30, 02:00, off), then press ENTER button to confirm.
Location
Press ▲/▼ button to select Location, and then Press ◀/▶ button to select Home or Store, then press ENTER button to confirm.
Quick Setup
Press ▲/▼ button to select Quick Setup, and then Press then press ENTER button to enter the sub menu, enter the password if locked, and then you can quickly make some basic settings of the TV.
Channel Detaile
Press ▲/▼ button to select Channel Detaile.
Upgrade
Press ▲/▼ button to select Upgrade.
Reset TV
Press ▲/▼ button to select Reset TV, and then press ENTER to enter the sub menu, enter the password if locked, and then you can restore factory settings.
Shopping Mode
Press ▲/▼ button to select Shopping Mode.
Multimedia
MEDIA OPERATION
The picture is for a reference only; the actual item is the standard.
Note: Before operation MEDIA menu, Plug in USB device or memory card, then press SOURCE button to set the Source to Media.
Press ▲/▼ button to select MEDIA in the Source Menu, and then press ENTER or ▶ to enter. You can also enter the Media by pressing MEDIA button on the remote control.
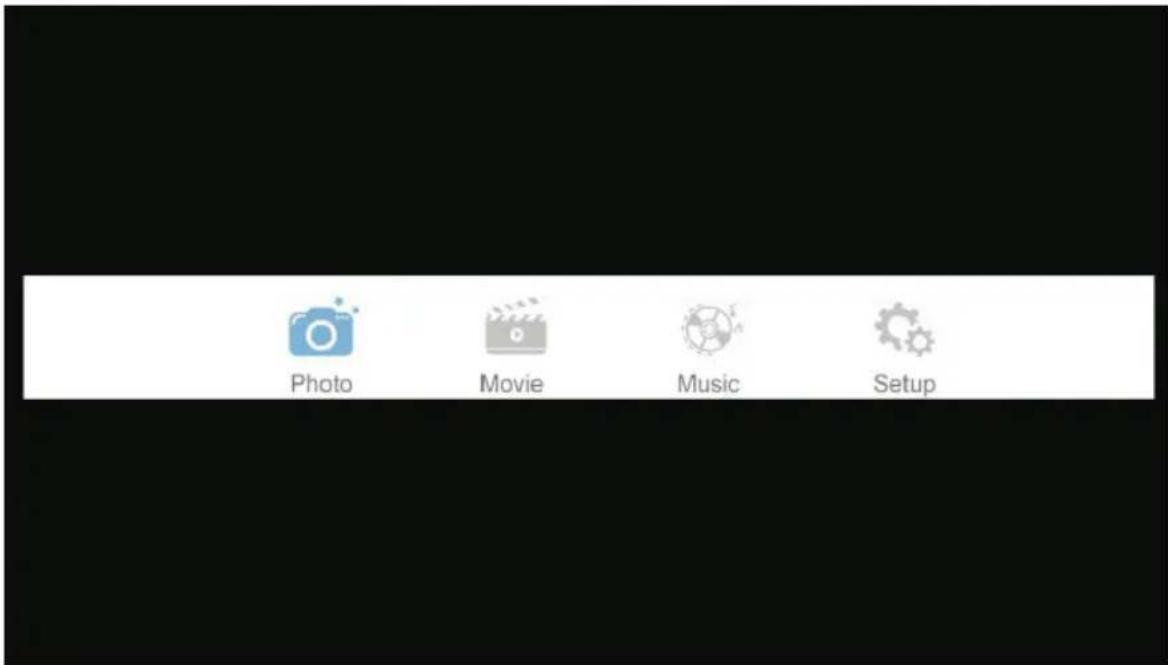
- Press ▲/▼ button to select the option that you want to adjust in the Media menu, then press ENTER or ▶ button to enter.
- Press ◀/▶ button to adjust or press ▲/▼ button to select.
- After finishing your adjustment, press MENU button to save and return back to the previous menu and press EXIT button to exit the entire menu.
Multimedia
Photo
The picture is for a reference only; the actual item is the standard.
Press ◀/▶ button to select Music in the main menu, and then press ENTER button to enter.
Press EXIT button to return back to the previous menu.

Press ▲/▼ to select the photos, press ENTER or ▶ || button to view.

You can see the information of the current playing photo after press INFO button, then press
▶ || button to play or pause, you can see the playing state in the right.
Then press ▲/▼ or ◀/► button to ratite the picture.
Notes: Other menu and description are the same as that for Movie menu.
Multimedia
Movie
The picture is for a reference only; the actual item is the standard.
Press ◀/▶ button to select Movie in the main menu, then press ENTER button to enter.
Press EXIT button to return back to the previous menu.
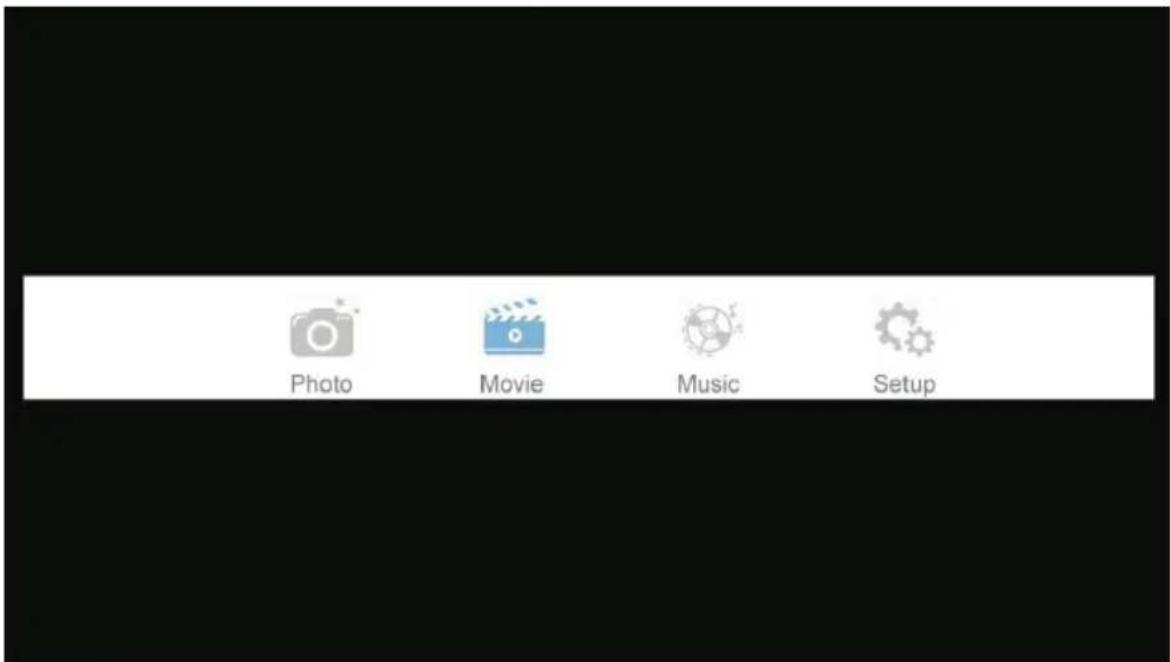
Press ▲/▼button to select the folder that you want to view.
Press ENTER button to select the sub folder.

Press ENTER button or ▶ || button to play,
Press ■ button or EXIT button to stop playing.
Press the ◀ button to return back to previous page.
Multimedia
You can see the information of the current playing media at the first flew second or after press INFO button.
Music
The picture is for a reference only; the actual item is the standard.
Press ◀/▶ button to select Music in the main menu, and then press ENTER button to enter.
Press EXIT button to return back to the previous menu.

Press ▲/▼ button to select the sonny you want to listen, and then press ENTER or ▶ || or ▶ button to play.
Press ◀ button to return back to the previous menu.

Multimedia
You can see the information of the current playing sonny at the left of the menu.
Setup
The picture is for a reference only; the actual item is the standard.
Press ◀/▶ button to select Setup in the main menu, and then press ENTER button to enter.
Press EXIT button to return back to the previous menu.

Press ▲/▼ button to select the option, and then Press ◀/▶ button to select it on or off.

Help
| No Power | Check the AC cord of TV is plus in or not. If still no power, please Pull out the plug and replug in after60 seconds. And open the TV again |
| Signal receive not properly | To cause double image or phantom if there has high building or high mountain round TV. You can adjust image effect by manually operation: consult instruction of vernier regulation or change the direction of external antenna.If you use the indoor antenna . under certain circumstance, receive will be more difficult .So you can change the direction of the antenna to adjust the image effect . If can't change image receiving effect either , you have to use external antenna. |
| No picture | Check the antenna at the back of TV is connected properly or not.Try to select other channels and check whether the TV problem itself or not. |
| but,Video is ok without audio | Increase the volume.Check the TV is in mute mode or not , and please press the mute button to make sound resume. |
| Audio is ok, but color error or no picture. | Increase contrast and brightness. |
| snow statics picture and noise | Check the antenna at the back of TV is connected or not. |
| Level broken line | vacuum, such as hair drier, Maybe has electrical appliance interfere-please turn off these kinds of electrical appliance, cleaner and so on. |
| Image or-Dual "simulacrum" The TV no response with the Remote. | Perhaps the location for the antenna is not good. Use the tall beamed antenna can be improved quality of the display image.Operate the remote direct to the remote sensor on the TV. If still no response for the TV, please check if the plastic bag on the remote take or not. And check if the location for the battery is correct. Change the new battery.The TV will shift to the STAND BY if no response from the remote in the few minutes. |
| .NO Video In (PC Mode) | Please check if the display cable connect to the VGA correcte .Please check if there has the bend on the display cable. |
| Vertical twinkling (PC Mode) | Enter the main menu, Use the clock regulator for the Video display noise to eliminate the vertical line. |
| horizontal ripping (PC Mode) | Adjust the Audio sound horizontal in the main menu to clear the horizontal ripping line. |
| The screen is too bright or too dark (PC Mode) | Adjust the contrast ratio or brightness in the main menu. |
| PC Function no response | Check the computer setting in the state of compatible display resolution |
| Ripping line in RCA connecting | Please use good quality connecting cable. |
| Problem still exist | Unplug the power cable and wait for 30 seconds, then connect. If there is some problem with our TV, do not repair it by yourself, please contact with the customer service center. |
There will be complete picture and the brightness will come down if the TV is in: Note So please do not keep the TV in a state of same, the static picture for too long time Menu or same picture that has much difference in brightness and contrast ratio for too long time.
Machine Technical Specifications
| Screen Size | TV System | Speaker Output |
| 16" | PAL/SECAM | 5W+5W |
| 19" | PAL/SECAM | 5W+5W |
| 20" | PAL/SECAM | 5W+5W |
| 22" | PAL/SECAM | 5W+5W |
| 24" | PAL/SECAM | 5W+5W |
| 32" | PAL/SECAM | 10W+10W |
| 39"/40" | PAL/SECAM | 10W+10W |
| 42" | PAL/SECAM | 10W+10W |
| 46" | PAL/SECAM | 10W+10W |
| 50" | PAL/SECAM | 10W+10W |
| Screen Size | Power Consumption | Main accessories |
| 16" | 24W | User's manual x1Remote controller x1AAA Batteries x2 |
| 19" | 36W/48W | |
| 20" | 36W/48W | |
| 22" | 36W/48W | |
| 24" | 48W | |
| 26" | ||
| 32" | 56W/65W/100W | |
| 39"/40" | 70W/75W | |
| 42" | 85W | |
| 46" | 110W | |
| 50" | 135W |
★ LIFE TIME : 60,000 Hrs
Remote Controller
- POWER : Set your TV to power on or standby mode.
- MUTE : Press to mute the sound. Press again or press VOL+ to unmute.
- 0-9: Press 0\~9 to select a TV channel directly while watching TV. The channel will change after 2 seconds. Applicable for entering page number in teletext mode and so on.
- DTV/ATV: Switch between Analog and Digital TV
- Return to the previous viewed program.
- S.MODE: Press to cycle through the different sound settings
- SLEEP: Select amount of time before TV turn itself off automatically.
- MTS: Press to search the NICAM modes.
- P.MODE: Press to cycle through the different picture settings
- MENU: Allow you to navigate the on-screen menus.
- SOURCE: Open the main menu, press to list the sources
- ▲▼ ◀▶ ENTER: Allow you to navigate the on-screen menus and adjust the system settings to your preference.
- EXIT: Exit from the menu or sub-menu and cancel the function in process (if applicable)
- DISPLAY: Press to display the source and channel's info.
Battery Installation:
Remove the battery compartment lid on the rear of the remote control by sliding the lid down, then off. Put two AAA batteries inside the battery compartment with their + and - ends aligned as indicated. Do not mix old and new batteries or different types of batteries.
Slide the lid until you hear it click into place.
Using the Remote Control:
Unless stated, otherwise, the remote control can operate all the features of the TV.
Always point the remote control directly at the remote sensor in front of the TV.
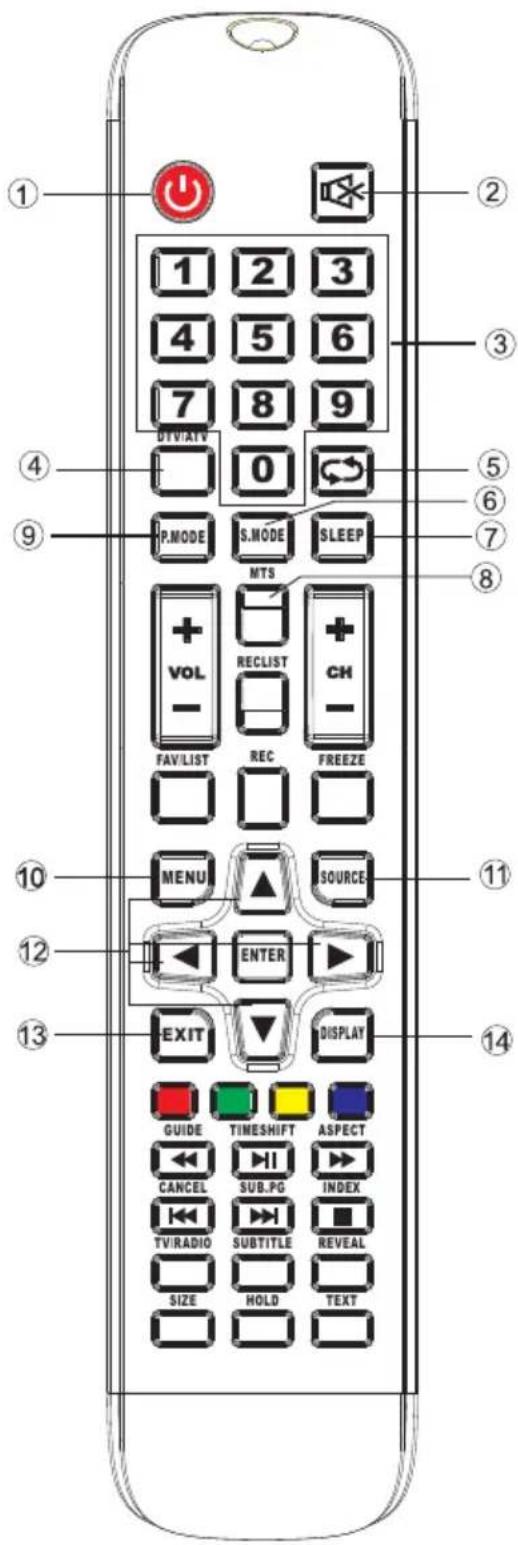
Remote Controller
- VOL+/VOL-: Press to increase / decrease the sound level.
- TV/RADIO : When watching channel, allows you to switch between TV and Radio modes
- GUIDE:1. Launches the EPG (Electronic Program Guide) 2. Fast reverse in PVR or Media Player mode.
- TIME SHIFT: 1.DTV channel time shift Function. 2.play on PVR or Media Player mode.
- CANCEL: 1. When a page is selected in the mode of text, it may take some time before it becomes available, pressing the CANCEL key will return to the TV mode. When the required page is found, the page number will appear at the top of the TV picture, press the CANCELkey to return to the mode of text for you to browse this page.
- Previous chapter in PVR or Media Player mode
- INDEX:1. Request the Index page in Teletext mode. 2.Exit the playing function in PVR or Media Player mode.
- SIZE: Change the size of display in Teletext mode.
- REVEAL: Reveal or Hide the hidden words.
- COLOR BUTTONS: Teletex switch of the analog parts, the items selection in the menu of the digital parts and the practice of the MHEG5 in the DVB menu.
- CH+/CH- : Press to scan through channels.
- FAV/LIST: press to open the favorite list. then you can select the favorite channel.
- ASPECT: 1. Select picture scale.
- fast forward in PVR or Media Player mode.
- FREEZE: press to freeze the picture
- SUB. PG 1. Press to access sub page.
- Next chapter in PVR or Media Player mode.
- SUBTITLE: To show and set the language of current DTV.
- HOLD: HOLD On or Off for current page display.
- TEXT: Switch the teletext on and off.
- RECLIST: Show the recorded list.
- REC: Record begin in PVR mode.

CAUTION
RISK OF ELECTRIC SHOCK DO NOT OPEN

natural_image
Warning symbol of a lightning bolt inside a triangle (no text or numbers)natural_image
Top-down schematic of a computer monitor layout showing front, top, and side views (no text or labels)1

natural_image
Architectural floor plan of a multi-chamber office or kitchen area (no text or labels visible)2
3

Pastaba:



natural_image
Simple line drawing of a mechanical device with a lever and base, no text or symbols present

Funkciju aprašymas
Vaizdo meniu
bar
PICTURE | Picture Mode | Standard | Normal | |---|---|---| | Contrast | 50 | 50 | | Brightness | 50 | 50 | | Colour | 50 | 50 | | Tint | 50 | 50 | | Sharpness | 50 | 50 | | Contrast Booster | On | | | Colour Temperature | Normal | | |  |  |  |  |
| APPLICATIONS | ||||
| Channel | Enter | |||
| Channel Options | Enter | |||
| Country | Russia | |||
| DTV Type | Terrestrial | |||
| Auto Tuning | Enter | |||
| ATV Manual Tuning | Enter | |||
| DTV Manual Tuning | Enter | |||
| Common Interface | Enter | |||
 |  |  |  |  |
| PREFERENCES | ||||
| Menu Language | English | |||
| Teletext Language | English | |||
| Key Lock | Off | |||
| PC Settings | Enter | |||
| PIN Setting | Enter | |||
| Parental Control | Enter | |||
| Auto Power Down | 4 hours | |||
 |  |  |  |  |
| SETUP | ||||
| OSD Timer | Off | |||
| Cinema | Super Live | |||
| Blue Screen | On | |||
| Sleep Timer | Off | |||
| Location | Home | |||
| Quick Setup | Enter | |||
| Upgrade | Enter | |||
| Channel Details | Enter | |||
| Reset TV | Enter | |||
natural_image
Warning symbol of a lightning bolt inside a triangle (no text or numbers)natural_image
Top-down schematic of a computer monitor layout showing front, top, and side views (no text or labels)1

natural_image
Architectural floor plan showing room layouts and structural elements (no text or labels)2

3
Примечание:

bar
PICTURE | Picture Mode | Standard | Normal | |---|---|---| | Contrast | 50 | 50 | | Brightness | 50 | 50 | | Colour | 50 | 50 | | Tint | 50 | 50 | | Sharpness | 50 | 50 | | Contrast Booster | On | | | Colour Temperature | Normal | | |  |  |  |  |
| APPLICATIONS | ||||
| Channel | Enter | |||
| Channel Options | Enter | |||
| Country | Russia | |||
| DTV Type | Terrestrial | |||
| Auto Tuning | Enter | |||
| ATV Manual Tuning | Enter | |||
| DTV Manual Tuning | Enter | |||
| Common Interface | Enter | |||
 |  |  |  |  |
| PREFERENCES | ||||
| Menu Language | English | |||
| Teletext Language | English | |||
| Key Lock | Off | |||
| PC Settings | Enter | |||
| PIN Setting | Enter | |||
| Parental Control | Enter | |||
| Auto Power Down | 4 hours | |||
 |  |  |  |  |
| SETUP | ||||
| OSD Timer | Off | |||
| Cinema | Super Live | |||
| Blue Screen | On | |||
| Sleep Timer | Off | |||
| Location | Home | |||
| Quick Setup | Enter | |||
| Upgrade | Enter | |||
| Channel Details | Enter | |||
| Reset TV | Enter | |||
EE
CAUTION
RISK OF ELECTRIC SHOCK DO NOT OPEN
natural_image
Top-down schematic of a computer monitor layout showing front, top, and side views (no text or labels)1

natural_image
Architectural floor plan showing room layouts and furniture layout (no text or labels)2
3
Märkus:
natural_image
Diagram showing a desktop computer tower connected to two audio connectors: VGA and PC audio input (no text or symbols on components)
flowchart
graph TD
    A["AV-sisend"] --> B["Module 1"]
    A --> C["Module 2"]
    A --> D["Module 3"]
    B --> E["Submodule 1"]
    C --> F["Submodule 2"]
    D --> G["Submodule 3"]
    E --> H["Submodule 4"]
    F --> I["Submodule 5"]
    G --> J["Submodule 6"]
    H --> K["AV-jund"]
    I --> K
    J --> K
    K --> L["VIDEO R L"]


natural_image
Simple line drawing of a mechanical setup with a lever and base, no text or symbols present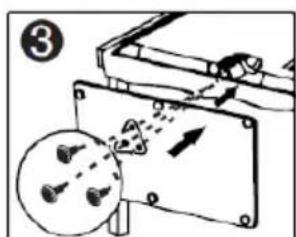
bar
PICTURE | Picture Mode | Standard | Normal | |---|---|---| | Contrast | 50 | 50 | | Brightness | 50 | 50 | | Colour | 50 | 50 | | Tint | 50 | 50 | | Sharpness | 50 | 50 | | Contrast Booster | On | | | Colour Temperature | Normal | | |  |  |  |  |
| APPLICATIONS | ||||
| Channel | Enter | |||
| Channel Options | Enter | |||
| Country | Russia | |||
| DTV Type | Terrestrial | |||
| Auto Tuning | Enter | |||
| ATV Manual Tuning | Enter | |||
| DTV Manual Tuning | Enter | |||
| Common Interface | Enter | |||
| PREFERENCES | ||
| Menu Language | English | |
| Teletext Language | English | |
| Key Lock | Off | |
| PC Settings | Enter | |
| PIN Setting | Enter | |
| Parental Control | Enter | |
| Auto Power Down | 4 hours | |
 |  |  |  |  |
| SETUP | ||||
| OSD Timer | Off | |||
| Cinema | Super Live | |||
| Blue Screen | On | |||
| Sleep Timer | Off | |||
| Location | Home | |||
| Quick Setup | Enter | |||
| Upgrade | Enter | |||
| Channel Details | Enter | |||
| Reset TV | Enter | |||
Kaugjuhtimispult
CAUTION
RISK OF ELECTRIC SHOCK DO NOT OPEN

natural_image
Warning symbol of a lightning bolt inside a triangle (no text or numbers)natural_image
Architectural floor plan of a flat-screen TV unit with ventilation grilles and buttons (no text or labels)1

natural_image
Architectural floor plan of a room with furniture layout (no text or labels)2

3

Σημείωση:
Ρυθμίστε
την τηλεόρασή σας

natural_image
Simple line drawing of a mechanical device with a lever and base, no text or symbols present
bar
PICTURE | Picture Mode | Standard | Value | |---|---|---| | Contrast | 50 | 50 | | Brightness | 50 | 50 | | Colour | 50 | 50 | | Tint | 50 | 50 | | Sharpness | 50 | 50 | | Contrast Booster | On | | | Colour Temperature | Normal | || APPLICATIONS | |
| Channel | Enter |
| Channel Options | Enter |
| Country | Russia |
| DTV Type | Terrestrial |
| Auto Tuning | Enter |
| ATV Manual Tuning | Enter |
| DTV Manual Tuning | Enter |
| Common Interface | Enter |
 |  |  |  |  |
| PREFERENCES | ||||
| Menu Language | English | |||
| Teletext Language | English | |||
| Key Lock | Off | |||
| PC Settings | Enter | |||
| PIN Setting | Enter | |||
| Parental Control | Enter | |||
| Auto Power Down | 4 hours | |||
 |  |  |  |  |
| SETUP | ||||
| OSD Timer | Off | |||
| Cinema | Super Live | |||
| Blue Screen | On | |||
| Sleep Timer | Off | |||
| Location | Home | |||
| Quick Setup | Enter | |||
| Upgrade | Enter | |||
| Channel Details | Enter | |||
| Reset TV | Enter | |||
natural_image
Warning symbol of a lightning bolt inside a triangle (no text or numbers)Ovaj znak upozorava korisnika na to, da postoje bitna uputstva za korišćenje i održavanje u materijalu dobijenom sa uređajem.
Upozorenje Ovaj znak u trouglu upozorava na opasan napon u ovom uređaju, koji predstavlja rizik od strujnog udara.
natural_image
Architectural floor plan showing room layouts and furniture layout (no text or labels)1
natural_image
Architectural floor plan of a multi-room building with visible door, windows, and furniture (no text or labels)2
3

Napomena:
- Zidni nosač, koji je pričvršćen na zid, je dopunski deo.
- Montirajući televizor, budite sigurni, da okolo i ispred nema stranih predmeta, držite ih na dovoljnoj udaljenosti.
- Montirajući televizor, zamolite pomoćnika da ga učvrsti, da bi se izbegli problemi.
5.Slike montaže – su samo za uputstvo. - Pratite uputstvo za montažu televizora.
- Montirajte nosač iz kompleta za zidno montiranje.
Dugmad TV i priključci interfejsa
SRB
Dugmad televizora
Napomena: dole je navedena samo funkcionalna šema, stvaran položaj i raspored u različitim modelima može da se razlikuje.
VOL+
VOL -
CH+
CH-
MENU
SOURCE

① :Uklj/Isklj napajanja.

3

2
1
Montirajte televizor

natural_image
Simple line drawing of a table with a hanging object and a label (2), no text or symbols present.
Opis funkcija
Postavke slike
Slika je samo za uputstvo; faktički element je standardni.
Pritisnite dugme TV MENU, da bi se otvorio glavni meni.
Pritisnite dugme ▼ / ▲, da bi ste izabrali Picture u glavnom meniju, zatim pritisnite dugme ENTER, da bi ste ušli.

bar
PICTURE | Picture Mode | Standard | Normal | |---|---|---| | Contrast | 50 | 50 | | Brightness | 50 | 50 | | Colour | 50 | 50 | | Tint | 50 | 50 | | Sharpness | 50 | 50 | | Contrast Booster | On | | | Colour Temperature | Normal | |- Pritisnite dugme ▲/▼, da bi ste izabrali tu stavku, koju želite da podesite u meniju Slike, pritisnite ENTER ili▶, da bi ste ušli.
- Pritisnite dugme ◀/▶, da bi ste podesili ili pritisnite ▲/▼, da bi ste izabrali. Pritisnite ENTER, da bi ste izabrali podmeni.
- Nakon završetka podešavanja, Pritisnite dugme MENU, da bi ste sačuvali i vratili u prethodni meni, pritisnite dugme EXIT, da bi ste izašli iz menija.
Režim slike
Pritisnite dugme ▲/▼, da bi ste izabrali režim slike, zatim pritisnite ENTER, da bi ste ušli i pritisnite ◀/▶, da bi ste izabrali..
Vi možete da promenite osvetljenje, kontrast, oštrinu, boje samo tad, kad se slika nalazi u režimu korisnika.
Napomena: Vi možete pritisnuti dugme P-MODE na daljinskom upravljaču, da bi ste neposredno promenili režim slike.
Picture Mode
Standard
Kontrast
Pritisnite dugme ▲/▼, da bi ste izabrali kontrast, zatim pritisnite dugme ENTER, da bi ste ušli i pritisnite ◀/►, da bi ste podesili. Zatim pritisnite dugme MENU, da bi ste se vratili u prethodni meni..
Opis funkcije
Osvetljenje
Pritisnite dugme ▲/▼, da bi ste izabrali Osvetljenje, zatim pritisnite dugme ENTER, da bi ste ušli i pritisnite ◀/▶, da bi ste podesili. Zatim pritisnite dugme MENU, da bi ste se vratili u prethodni meni.
Boja
Pritisnite dugme ▲/▼, da bi ste izabrali Boju, zatim pritisnite dugme ENTER, da bi ste ušli i pritisnite ◀/►, da bi ste podesili. Zatim pritisnite dugme MENU, da bi ste se vratili u prethodni meni.
Pozadinsko svetlo
Pritisnite dugme ▲/▼, da bi ste izabrali Pozadinsko svetlo, zatim pritisnite dugme ENTER, da bi ste ušli i pritisnite ◀/►, da bi ste podesili. Zatim pritisnite dugme MENU, da bi ste se vratili u prethodni meni.
Oštrina
Pritisnite dugme ▲/▼, da bi ste izabrali Oštrina, zatim pritisnite dugme ENTER, da bi ste ušli i pritisnite ◀/▶, da bi ste podesili. Zatim pritisnite dugme MENU, da bi ste se vratili u prethodni meni.
Filter Contrast Booster
Pritisnite dugme ▲/▼, da bi ste izabrali filter Contrast Booster, zatim pritisnite dugme ENTER, da bi ste ušli i pritisnite ◀/►, da bi ste izabrali UKLJ ili ISKLJ. Zatim pritisnite dugme MENU, da bi ste se vratili u prethodni meni.
Temperatura boje
Pritisnite dugme ▲/▼, da bi ste izabrali Temperaturu boja, zatim pritisnite dugme ENTER, da bi ste ušli i pritisnite ◀/▶, da bi ste izabrali standardni, hladni ili topli režim.
Digitalna redukcija buke (DNR)
Pritisnite dugme ▲/▼, da bi ste izabrali Digitalna redukcija buke, zatim pritisnite dugme ENTER, da bi ste ušli i pritisnite ◀/►, da bi ste izabrali nivo redukcije buke: isklj, niski, srednji, visoki.
Resetovanje
Pritisnite dugme ▲/▼, da bi ste izabrali Resetovanje, zatim pritisnite dugme ENTER, da bi ste ušli u potvrđujući meni i izaberite OK, da bi ste resetovali.
Opis funkcija
Opcije zvuka
Slika je samo za uputstvo; faktički element je standardni.
Pritisnite dugme TV MENU, da bi se otvorio glavni meni.
Pritisnite dugme ▼ / ▲, da bi ste izabrali Sound u glavnom meniju, zatim pritisnite dugme ENTER, da bi ste ušli

bar
SOUND | Sound | Stable Sound | Standard | | :--- | :--- | :--- | | Bass | 50 | 50 | | Treble | 50 | 50 | | Balance | 0 | 0 | | Surround | Off | Off | | AVL | Off | Off | | Digital Audio Output | PCM | PCM | | Reset | Enter | Enter |- Pritisnite dugme ▲/▼, da bi ste izabrali tu stavku, koju želite da podesite u meniju zvuka, zatim pritisnite dugme ENTER.
- Pritisnite dugme ◀/▶, da bi ste podesili ili pristisnite ▲/▼, da bi ste izabrali., zatim pritisnite dugme ENTER, da bi ste izabrali podmeni.
- Nakon završetka podešavanja, pritisnite dugme MENU, da bi ste sačuvali i vratili u prethodni meni i pritisnite dugme EXIT, da bi ste izašli iz menija.
Režim zvuka
Pritisnite dugme ▲/▼, da bi ste izabrali Sound mode, zatim pritisnite dugme ENTER, da bi ste ušli. Zatim pritisnite dugme ◀/►, da bi ste izabrali.
Vi možete promeniti značenje niskih i visokih frekvenci, bilans i ekvilajzer, kada je zvuk u režimu korisnika.
Napomena: Vi možete pritisnuti dugme S-MODE na daljinskom upravljaču, da bi ste neposredno promenili režim zvuka.
Sound Mode Standard
Niske
Pritisnite dugme ▲/▼, da bi ste izabrali Bass, zatim pritisnite dugme ENTER ili dugme ◀/►, da bi ste ušli, i pritisnite ◀/►, da bi ste podesili. Podešavanje je moguće samo u režimu korisnika.
Zatim pritisnite dugme MENU, da bi ste se vratili u prethodni meni.
Opis funkcija
Visoke
Pritisnite dugme ▲/▼, da bi ste izabrali Treble, zatim pritisnite dugme ENTER, da bi ste ušli, i pritisnite ◀/►, da bi ste podesili. Zatim pritisnite dugme MENU, da bi ste se vratili u prethodni meni.
Bilans
Pritisnite dugme ▲/▼, da bi ste izabrali Balance, zatim pritisnite dugme ENTER, da bi ste ušli, i pritisnite ◀/▶, da bi ste podesili. Podešavanje je moguće samo u režimu korisnika. Zatim pritisnite dugme MENU, da bi ste se vratili u prethodni meni
Okružujući zvuk
Pritisnite dugme ▲/▼, da bi ste izabrali Surround, zatim pritisnite dugme ENTER, da bi ste ušli, i pritisnite ◀/►, da bi ste izabrali ON ili OFF.
AVL
Pritisnite dugme ▲/▼, da bi ste izabrali AVL, zatim pritisnite dugme ENTER, da bi ste ušli, i pritisnite ◀/▶, da bi ste izabrali ON ili OFF.
Digitalni audio izlaz
Pritisnite dugme ▲/▼, da bi ste izabrali Digital Audio Output, zatim pritisnite dugme ENTER, da bi ste ušli, i pritisnite ◀/►, da bi ste izabrali.
Zatim pritisnite dugme ENTER ili ▶, da bi ste ušli, i pritisnite ◀/▶, da bi ste podesili. Zatim pritisnite dugme MENU, da bi ste se vratili u prethodni meni
Resetovanje
Pritisnite dugme ▲/▼, da bi ste izabrali Reset, zatim pritisnite dugme ENTER, da bi ste ušli u meni resetovanja.
Opis funkcija
Prilozi
Slika je samo za uputstvo; faktički element je standardni.
Pritisnite dugme
| APPLICATIONS | |
| Channel | Enter |
| Channel Options | Enter |
| Country | Russia |
| DTV Type | Terrestrial |
| Auto Tuning | Enter |
| ATV Manual Tuning | Enter |
| DTV Manual Tuning | Enter |
| Common Interface | Enter |
- Pritisnite dugme ▲/▼, da bi ste izabrali tu stavku, koju želite da podesite u meniju priloga, zatim pritisnite dugme ENTER, da bi ste ušli.
- Pritisnite dugme ◀/▶, da bi ste izabrali i pritisnite ENTER, da bi ste izabrali podmeni.
- Nakon završetka podešavanja, pritisnite dugme MENU, da bi ste sačuvali i vratili u prethodni meni i pritisnite dugme EXIT, da bi ste izašli iz menija.
Opis funkcija
Kanali
Pritisnite dugme ▲/▼, da bi ste izabrali Channel, zatim pritisnite dugme ENTER, da bi ste prešli na izabrani kanal.
 |  |  |  |  |
| PREFERENCES | ||||
| Menu Language | English | |||
| Teletext Language | English | |||
| Key Lock | Off | |||
| PC Settings | Enter | |||
| PIN Setting | Enter | |||
| Parental Control | Enter | |||
| Auto Power Down | 4 hours | |||
- Pritisnite dugme ▲/▼, da bi ste izabrali tu stavku, koju želite da podesite u meniju mogućnosti, zatim pritisnite dugme ENTER, da bi ste ušli.
- Pritisnite dugme ◀/▶, da bi ste podesili i pritisnite ▲/▼, da bi ste izabrali podmeni.
- Nakon završetka podešavanja, pritisnite dugme MENU, da bi ste sačuvali i vratili u prethodni meni i pritisnite dugme
EXIT, da bi ste izašli iz menija.
Opis funkcija
Jezik menija
Pritisnite dugme ▲/▼, da bi ste izabrali Menu Language, zatim pritisnite dugme ENTER ili ▶, da bi ste ušli u podmeni, zatim, da bi ste izabrali, pritisnite ▲/▼, pritisnite dugme ENTER ili ▶, da bi ste potvrdili.
Jezik teleteksta
Pritisnite dugme ▲/▼, da bi ste izabrali Teletext Language, zatim pritisnite dugme ENTER ili ▶, da bi ste ušli u podmeni, zatim, da bi ste izabrali, pritisnite ▲/▼, pritisnite dugme ENTER ili ▶, da bi ste potvrdili.
Blokiranje dugmadi
Pritisnite dugme ▲/▼, da bi ste izabrali Key Lock, zatim pritisnite dugme ENTER ili ▶, da bi ste izabrali ON ili OFF.
Parametri PC
Pritisnite dugme ▲/▼, da bi ste izabrali PC Settings, zatim pritisnite dugme ENTER, da bi ste ušli u podmeni, pritisnite ▶, da bi ste ušli, zatim pritisnite dugme ENTER ili ▶, da bi ste potvrdili. (Kada je podključen ka PC).
Opis funkcija
Podešavanje PIN
Pritisnite dugme ▲/▼, da bi ste izabrali PIN Setting, zatim pritisnite dugme ENTER, da bi ste ušli u podmeni, nakon čega možete podesiti šifru..
Roditeljska kontrola
Pritisnite dugme ▲/▼, da bi ste izabrali Parental Control, zatim pritisnite dugme ENTER ili▶, da bi ste ušli u podmeni. Zatim pritisnite dugme ▲/▼, da bi ste izabrali nivo (od 4 do 17 ili ne uključivati). Zatim pritisnite dugme ENTER ili▶, da bi ste potvrdili.
Promena PIN koda
 | [X6ST] |  |  |  |
| SETUP | ||||
| OSD Timer | Off | |||
| Cinema | Super Live | |||
| Blue Screen | On | |||
| Sleep Timer | Off | |||
| Location | Home | |||
| Quick Setup | Enter | |||
| Upgrade | Enter | |||
| Channel Details | Enter | |||
| Reset TV | Enter | |||
- Pritisnite dugme ▲/▼, da bi ste izabrali tu stavku, koju želite da podesite u meniju podešavanja, zatim pritisnite dugme ENTER ili ▶ da bi ste ušli.
- Pritisnite dugme ◀/▶, da bi ste podesili i pritisnite ▲/▼, da bi ste izabrali.
- Nakon završetka podešavanja, pritisnite dugme MENU, da bi ste sačuvali i vratili u prethodni meni i pritisnite dugme
الله轮胎هان 401-2016.1.38
CAUTION
RISK OF ELECTRIC SHOCK DO NOT OPEN
Suiwai unppu oqunwqnpdlnui k hnuwuph pwndp lwnfuwi unwl: thtlwnpwuw hnuwuph hwnpudsh ynuwuhgh hnuwwhtini hwufwp syktnp k hupunipnju hwutl htnnuunwgnjgh ywhwnphz, wnl nhutl npwuhwnpudw uwwubwtuh:
tpt htnniunwgnjgh htn utnh tu niutgti nput yhnuhunipnniutp lwwi utnwnpnuiu hpwlyuwgylt k n ywwun2wd tnwiwynl, wwwh hwwpuwnp t thtlnpwlywt hnuwuph hwpluodh qnuuq: Uh yhpdtp huptunipnuu inidt lhuhnp, wjl nhutp npwlwynnpulud uwwuwqtuh:

Uju 12wup hnniú t: lquunwpniú nkuqh uwpph qhuunwpnpptpniu wnyu lquplnp 2whwqnpdufuwu u unhuhphqlwpu uuquwwplfuwu gnignufutphu:
natural_image
Top-down schematic of a computer monitor layout showing front, top, and side views (no text or labels)1
natural_image
Architectural floor plan of a computer room showing internal components and ventilation ducts (no text or labels)②
3

L2nu:
- Πωυημ υρωριωδ ρωραωρη ωωύημωνιτίξ πρωτει χρωγιθής ύωυ:
2.2tnniuunwgnjgp untwnnptlhu' hwufnqutp, np 2nnpg slywu lynnufuwlh wnwplywutp, wnlywnipjwu ntkupniu wuhtp npwup htnwnnpniipjuwu qpu:
3.2tnnuunwgnjgn utnwnptlhu, hunntp 2tp oquwlywuhu wupwglt l wju hunhputphg huniwwhtni hwufwn: - Stwnnpu wq dwu lquwutpp u hui duunpwgu wu hwup tu:
5.2tultp htnnuunwgnjgh pwnpwlp utnwnptlni hpwhwuqutphu: - Stnwnptp wju pwndwqn, npp utpwnlwd t wwnh unluunwdh hwnlp hwnjwnntuqlwd hwnlwpwdni utg:
flowchart
graph TD
    A[" DVD "] --> D[" Ethernet "]
    B[" Cognitiz "] --> D
    D --> C1[" HDMI "]
    D --> C2[" Ethernet "]
    D --> C3[" Ethernet "]
    D --> C4[" Ethernet "]
    D --> C5[" Ethernet "]
    D --> C6[" Ethernet "]
    D --> C7[" Ethernet "]
    D --> C8[" Ethernet "]
    D --> C9[" Ethernet "]
    D --> C10[" Ethernet "]
AV uunuph uhugniu
AV ununph uhwgnul

natural_image
Diagram showing two electronic devices connected to a server rack unit (no text or symbols present)


Ztnniuunwgnjgh untwnpniu l u whgniu
Stnwnntp htnnuuugnign
Stnwnptp htnnuunwgnjgh wufip uwltptuh ypu, npp muiwly t nhfuwuwl ypu pu2hú: qnuwqhg funuwtjlni hwiwp htnni uwhtp htnnuunwgnjgn zph yuw gtpuniŋjwi nput wnpniptphg, (onhfuwl' unu, unwpwgnigh), ujh juwwhwutp htnnuunwgnjgh tuhtu ywhwuwlh ypu qntuyn onwuhnjunipjwi huufwlpqqh w2huunuwp:
Uhugptp withwulwpu ni hthynpwlywi ulnigniup
- Uhwgntp wlthwulwph lhwptlp htnnnwnwngnjgh tunhú lwhwubwqh ynw qnuynn wlthwulwph hwufwp hwhwuntuulud puhlyhú:
- Uhwqntp htnniunwgnigh hl. ulnigfuwi lwpp: (AC 100-240V\~50/60Hz)
Uhwgntp htnnuunwgnjgn
- Utnutp htnntuunwgnjgh ynw qnuulnn uhwguwu lynawhp, qniuwjhu gnighzp yhwuwsh; kpt wju qnuulniuf t uwwuuufw ntdhuniuf, wuw qniuwjhu gnighzp ywpufhp t; utnutp htnwlqwnwulwpufw uwhuwuh ynw qnuulnn uhwguwu lynawhp` uhwgutni hwiup:
U2nu: qduuqwnltputpp uhuju dwunpnipjwu huwup tu:
Ztnnluunwgnjgh unwlnhph untwnpufu nntgnuig
- Fugtp wplhp, npipu hwutp htoniunwgnjgp, wputuniwputpp u unwlnhpp (npn2 unntjutpnuf unwlnhpp utpwnlud sk):
- Чунцьцьцьцьцьцьцьцьцьцьцьцьцьцьцьцьцьцьцьцьцьцьцьцьцьцьцьцьцьцьцьцьцьцьцьцьцьцьцьцьцьцьцьцьцьцьцьцьцьцьцв
- Tunutp húpp l u wúpwgptp htnnuunwgnjghú:
- Stwnnpniup lwwwnpulud t:
U2nu: qduuquunltputnp uhuju duunpnipjuu huuup tu:


\$nh48hultrtyuugnho3nh
Twnlytnutph pwnpwgwth
Uqwnp uhwju dwunpnipjwi huufwp t; uhwuwgh hufwpjnul t unwuhwpun:
Utntutp TV MENU lynawlqn` hhuwllquu plunpwgwlqn gnigwnptni hwufwn:
Uttnutp ▼ / ▲ lynówln hhuówluqiu plunpwguwulyniu Picture pudhbu plunptni hwnfup, wjünhtbnu utnutp ENTER lynówln unljuw pudhu üninp qnpdtni hwnfup:

bar
PICTURE | Picture Mode | Standard | Normal | |---|---|---| | Contrast | 50 | 50 | | Brightness | 50 | 50 | | Colour | 50 | 50 | | Tint | 50 | 50 | | Sharpness | 50 | 50 | | Contrast Booster | On | | | Colour Temperature | Normal | || APPLICATIONS | |
| Channel | Enter |
| Channel Options | Enter |
| Country | Russia |
| DTV Type | Terrestrial |
| Auto Tuning | Enter |
| ATV Manual Tuning | Enter |
| DTV Manual Tuning | Enter |
| Common Interface | Enter |
ARM
| PREFERENCES | ||
| Menu Language | English | |
| Teletext Language | English | |
| Key Lock | Off | |
| PC Settings | Enter | |
| PIN Setting | Enter | |
| Parental Control | Enter | |
| Auto Power Down | 4 hours | |
\$NH4Y8HUTFHYUFGNHP3NH
Cunpwgwlgh ltqni
Utnutp ▲/▼ lynówln Menu Language pünptini hwufw, wjunihtuni utnutp ENTER lwwf ▶ ' túpwguwln pwgtini hwufw, nphg htunn utnutp ▲/▼ lynówln pünnpni pniu lwwuwptini hwufw, utnutp ENTER lwwf ▶ plunpuw d tqniu hwwunwuntini hwufw:
Ztnniuunwutpuuh ltqni
Utnutp ▲/▼ lynawln Teletext Language pwnptni huwup, wjunihtnu utnutp ENTER lquf ▶ túpwgwulpn pwgtni huwup, nphg htunn utnutp ▲/▼ lynawln pwnpnipjniu lquwnuptni huwup, utnutp ENTER lquf ▶ pwnpluw ltqniu hwwunwnntni huwup:
Чнáwlutph wpqtlwuhwniu
Utnutp ▲/▼ lynawlpr Key Lock plunptini hwufw, wjunihtuni utnutp ENTER l ◀/▶ ' uhwgutini yuw wuguntini hwufw ON/OFF:
Zuwlywnqzwjhui wwwwutunptn
Utnutp ▲/▼lnawlqn PC Settings pwnptni hwufw, wjunihtuni utnutp ENTER tupwguulyn gnigwnptni hwufw, utnutp ▶ unutni hwufw, nphg htunn utnutp ENTER lquf ▶ huuunwuntni hwufw: (uwpnn t oqnwqnpdlti hwufwlpqshu uhwglud lhtuni pupwgpni):
\$nht48hultrtyuugrnho3nht
PIN lunnh lwnpwnpnufup
Utnutp ▲/▼ lynawlp PIN Setting punptni hwufw, wjunihtuni utnutp ENTER tupugwtlp pugtni hwufw, nphg htunn lwpnn tp uwhufutl quuntuwpwn:
| SETUP | |
| OSD Timer | Off |
| Cinema | Super Live |
| Blue Screen | On |
| Sleep Timer | Off |
| Location | Home |
| Quick Setup | Enter |
| Upgrade | Enter |
| Channel Details | Enter |
| Reset TV | Enter |
ARM
- Utnutp ▲/▼ lynawlp, npuhtuqh pünntp wju lhtnp, npp gwuhwulniuf tp lwpqwulnptl uwhuhwulniufutph pünpwugwulniuf, utnutp ENTER lwiuf ▶ uninp qnpdtjni hwnfup:
- Utnutp ◀/▶ lynawlp lwpqwulnpniufutp uwwni hwufw pwwf utnutp ▲/▼ lwpqwulnpniufu plunptni hwufw:
- Υπρωμηρημιτρμ υμωρυκήνις θλυν ατημε τρ ΜΕΝΟΥ 'ηρωμρ υμωρυκήνις ι λυμηρη γωθύγις ιτρωμανδυμης Ηωθών; ατημε τρ ΕΧΙΤ' πλυρωγωθύγις ηπιρο χωμης Ηωθών:
OSD 'kynwuhu gnigwnpulnn puunpwgutuh dwiufuwlywuzuh
Uttnutp ▲/▼ lynawlp Timer pwnptni hudwp, wjunihtunl utnutp ◀/► 2tp tuwupuupw d unwnptpwlu pwnptni hudwp: (2uupuwlpnpnipnjntutlp: 10 uplq., 20 uplq., 30 uplq., 40 uplq., 50 uplq., 60 uplq., wugwunt), utnutp ENTER huuunwuntni hudwp:
Чипршппн
Utnutp ▲/▼ lynawln Cinema pwnptni hwufw, utnutp ◀/► 2tp uwhpwnpwd wnpptpwlu pwnptni hwufw: (Uhnpwnpnuh hwwpwlnpnipjntutpp: Uqunn, 4x3, luju, Super Live` qtpntuw), nphg htunn utnutp ENTER hwwunwuntnu hwufw:
UNHLSHUETRU
Чипрчупнпшлтр
Uwupn uhwju dwunpnipjwi huwup t; yhuunwgh huwupiyniu t uwnuqnupn: Utnutp MENU lynawlp qjhuwlnp plunpwgwulp gnigwnptini huwup: Utnutp ▼ / ▲ lynawlp qjhuwlnp plunpwgwulpni Setup pwdhui plunptini huwup, wjunihtuni utnuttp ENTER lynawlp unljwl pwdhui uninp qnpdtini huwup:

Utnútp ▲/▼lnáwln lpwnqwnlpnniufu pünptjni hwnfwp, wuw utnútp ◀/►lnáwln wju uhwgutjni lquf wigwnntjni hwnfwp ON /OFF:
Setup

09104304
Etyunpwuünigufwupugulwynipjniu
Uqnui2wup uhui t pünniuyniu
^a wunlykpp puqgwlywniu t
Чнітн умшіг дміці
2wju lqu, uwlquju puqulqujnu t wuwuqtpn lquf juuqhp t dwqtl qniutph htn
Uü2wpd uwwuhtp li wunfniq
Howwinlup
Чрлчwlч упрнлчп: Зтмлцкнвжнцгп 2h чунчлчпрнцч чwhшлчпч:
Znphqnluwlyu 6tnptpn U2 ndhpunui
Elypwnzwnhwqwug uniq lwnf wnhwqwug wuwdwn t (U2 ntdhpunuf)
U2 \$nuiqghwú zh qnpδniú
98th lunpuwdp RCA puhlyhui uhuwuhu
Iounhp nknu iniduid sk
Unniqtp, wpnjnp hnuwuph uwnjnp uhwqud t: Gpt uwnigntfp nknlu pugwulqujntuf t, huihtp hnuwuph lwppl u utyi pnut wug lyplju uhwgntp:Uhwgntp htnnuunwgntjgp:
Uwpunlyngutph utwnwnnu
Zwutp htnwlqwnwlwpufw uwhwuhgh qwhwphsp, uwhtgutniu wju ntuyh utppl: Stwnnptp hughyniu AAA untuwlyh tplyni uwpunlng, hwunqutp, np uwpunlngutph u hughlyh utpuniu putnwwlwnipjntiutupu hpwn hwdfwwqnwnuwuhwi ti: Uh juwnutp hhlu ti unp, húzytu tuul unwpptn untuwlyh uwpunlngutp: Stwnnptp qwhwphsp:
26nwlqwnwlpwfu ywhwlyh oqnwnpdnlup
Ztwnwqwnwlpupfu uwhwuhgh uhngndl qupnn tp ytpwhuhtl htnnuunwgnjgh pnyn pniulghwutpn:
Uh2n wwhtp ywhwluwln htnniunwgnjgh nhfuwjhui hwnylwdniuf qnluyn htnwlywnwlpwpufui utluunpwjhui gnighzh nunnipjuwp:
- VOL-/VOL+. oqnuwqnpdlniú t áwjún pwnápnwgutni/hótgutni huuup:
- TV/RADIO. wquwhnul t htnnuunwuntunipjnhg ntuh nuqhn wugniup, u hwluwnuyn:
17. GUIDE
- Uhwunuf EPG \$nulghwu (htnniunudwpwqptph Δkniwnp).
- Upwq wugnul PVR ntduhuhg nthuh utnhw lwhwqwnlhyu hwlqwnwnp:
18. TIME SHIFT
CAUTION
RISK OF ELECTRIC SHOCK DO NOT OPEN
natural_image
Top-down schematic of a computer monitor layout showing front, top, and side views (no text or labels)1

natural_image
Architectural floor plan showing room layouts and furniture placement (no text or labels)2
3

∂gδο∂36s:
modification of the following
VOL+/-: bān lādān mān lān qān gān mān gān.


3
ωσχβδον
modification
2
Rs###g### ###308m60
- ὡssʃoŋɔn bʌmɔzɔu ὡoʊnsʒi 有时ɒbʌmɒŋ, oboqəsʒɪmɔn dʒɜsʒis, οŋ dmbqol ɒgjoddɔs (obqoəsʒɪmɔn fɔmɡrɔos) 有时ɒbʌmɔn bʌsʃoŋɔn bʌmɔzɔu ὡoʊnsʒi 有时ɒbʌmɒŋ. āgboāzbs: bʌsʒɪŋɔn dʌmɛmmɔq 有时ɒbʌmɔzɔu.

natural_image
Simple line drawing of a mechanical setup with a lever and base, no text or symbols present
bar
PICTURE | Picture Mode | Standard | Value | |---|---|---| | Contrast | 50 | 50 | | Brightness | 50 | 50 | | Colour | 50 | 50 | | Tint | 50 | 50 | | Sharpness | 50 | 50 | | Contrast Booster | On | | | Colour Temperature | Normal | |- ωssfɔŋɡən ωɔŋnszʌ ▲/▼, οδ ʒʌŋbʃɔŋʊs ʌsʌmbʒʒəq, ὡmɑdəmʊs sʃyɪmðs ʌŋŋʃən ɒŋbɔŋy „ʒɑdəmʌsbŋɛŋɡðs“-đən, ɒŋbʌsʒɛŋɡənsq ωssfɔŋɡən ENTER sb ►.
- Φοσμόμηση μομαςζυ ◀/► σθγμδού δριλυβημησχος σδ σλυσκβεςσω Φοσμόμηση ▲/▼. Φοσμόμηση μομαςζυ ENTER χβθδρογμί σλυσκβεςσω.
- Ashmola qsdanszmbol dghggh dglssbsqo cos jobs dgbongdo qslsabngbdmsqo qssfomgo mocmsbl MENU, qssfomgo mocmsbl EXIT dgbongosb zslsizemgmsqo.
zsdmlsbŋŋgðol bggodo
zsdmlsbgtgndou 6ggodou slmbg3sco . qssfomgoq qocns3b ▲/▼, ddagga qssfomgo ENTER dglsbzmcwso cos qssfomgo◀/▶ slmbg3sco.
modification of the following
bān bāng
 |  |  |  |  |
| APPLICATIONS | ||||
| Channel | Enter | |||
| Channel Options | Enter | |||
| Country | Russia | |||
| DTV Type | Terrestrial | |||
| Auto Tuning | Enter | |||
| ATV Manual Tuning | Enter | |||
| DTV Manual Tuning | Enter | |||
| Common Interface | Enter | |||
- ζωςζούμον ζωςζυ ▲/▼, οδ δηθερίου συσκήσες, ήπαξων σφγμός χυγόσι "σεμοτοχούδο" θηβογάσι, θηλυσκησες ζωςζούμον ENTER.
- slusmbg3sqo qssfomgn nomssbl ◀/▶, qssfomgn nomssbl ENTER dʒdʒbɔŋbl slusmbg3sqo.
- Ashymbol cosdomszgndol dghcgz dghsbsbso co s fobs dghboŋdo co slsdngbdcmso co ssfoŋgo oonmszl MENU, qssfomgo oonmszl EXIT dghoŋcosb zslsuzcmwso.
Channel Options—ol slus689350,
aydoyg qssfomg mowssb
ENTER 3660800
zaslubgmsq. 3sdmolsbgs
∂∂∂∂∂∂∂∂∂∂∂∂∂∂∂∂∂∂∂∂∂∂∂∂∂∂∂∂∂∂∂∂∂∂∂∂∂∂∂∂∂∂∂∂∂∂∂∂∂∂∂∂∂∂∂∂∂∂∂∂∂∂∂∂∂∂∂∂∂∂∂∂∂∂∂∂∂∂∂∂∂∂∂∂∂∂∂∂∂∂∂∂∂∂∂∂∂∂∂∂Δρρρρρρρρρρρρρρρρρρρρρρρρρρρρρρρρρρρρρρρρρρρρρρρρρρρρρρρρρρρρρρρρρρρρρρρρρρρρρρρρρρρρρρρρρρρρρρρρρρρρ
πομεσθόν υψηφωρωδ:
مосто СН: موزбогн нажмите
zsdmls?m3g8msq? mny s6bo
330 330 330, 330

###
d309s6s
f g ▲/▼, Country-ol slss6h3sφ. σρ3g6o σρσομαργδs6mδοι slss6h3sφ f g ◄/►.
contents of TV https://www.itv.com/
f g m z b / , DTV Type—ob slusbghzso, g f g m ◀/▶ g to TV g o d u slusbghzso: g , u g .
s30madsyngo shymds
| PREFERENCES | |
| Menu Language | English |
| Teletext Language | English |
| Key Lock | Off |
| PC Settings | Enter |
| PIN Setting | Enter |
| Parental Control | Enter |
| Auto Power Down | 4 hours |
3m300g60u 3s6s4g6m6o
qssfomg on qomszb ▲/▼, PC Settings -ob slsmhgsq, dgdqng qssfomg on qomszb ENTER sb ▶ dʒdʒbɔŋjdo dʒlsuzemgnsq, qslsqspslʒŋmghdmsq qssfomg on ENTER sb ▶ (kmggls3 ʃgɛnʒɔrbmno doŋmndʒymos 3mdʒoŋŋgmbssb).
| SETUP | |
| OSD Timer | Off |
| Cinema | Super Live |
| Blue Screen | On |
| Sleep Timer | Off |
| Location | Home |
| Quick Setup | Enter |
| Upgrade | Enter |
| Channel Details | Enter |
| Reset TV | Enter |
∂ψησθοδρωσ
CAUTION
RISK OF ELECTRIC SHOCK DO NOT OPEN
natural_image
Top-down schematic of a computer monitor layout showing front, top, and side views (no text or labels)1

natural_image
Top-down schematic of a device layout with no visible text, numbers, or symbols2

3

Piezīmes:
natural_image
Simple line drawing of a mechanical setup with a lever and base, no text or symbols present

Funkciju apraksts
Attēla izvēlne
bar
PICTURE | Picture Mode | Standard | Normal | |---|---|---| | Contrast | 50 | 50 | | Brightness | 50 | 50 | | Colour | 50 | 50 | | Tint | 50 | 50 | | Sharpness | 50 | 50 | | Contrast Booster | On | | | Colour Temperature | Normal | || APPLICATIONS | |
| Channel | Enter |
| Channel Options | Enter |
| Country | Russia |
| DTV Type | Terrestrial |
| Auto Tuning | Enter |
| ATV Manual Tuning | Enter |
| DTV Manual Tuning | Enter |
| Common Interface | Enter |
Kanāli
| PREFERENCES | |
| Menu Language | English |
| Teletext Language | English |
| Key Lock | Off |
| PC Settings | Enter |
| PIN Setting | Enter |
| Parental Control | Enter |
| Auto Power Down | 4 hours |
 |  |  |  |  |
| SETUP | ||||
| OSD Timer | Off | |||
| Cinema | Super Live | |||
| Blue Screen | On | |||
| Sleep Timer | Off | |||
| Location | Home | |||
| Quick Setup | Enter | |||
| Upgrade | Enter | |||
| Channel Details | Enter | |||
| Reset TV | Enter | |||
CAUTION
RISK OF ELECTRIC SHOCK DO NOT OPEN
natural_image
Warning symbol of a lightning bolt inside a triangle (no text or numbers)natural_image
Top-down schematic of a computer monitor layout with no visible text or labels1
natural_image
Architectural floor plan showing room layouts and structural elements (no text or labels)2
3

Nota:
Instale
a TV
natural_image
Simple line drawing of a mechanical setup with a lever and base, no text or symbols present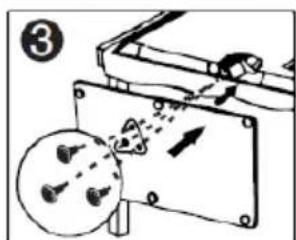

Menu de imagem
bar
PICTURE | Picture Mode | Standard | Normal | |---|---|---| | Contrast | 50 | 50 | | Brightness | 50 | 50 | | Colour | 50 | 50 | | Tint | 50 | 50 | | Sharpness | 50 | 50 | | Contrast Booster | On | | | Colour Temperature | Normal | | |  |  |  |  |
| APPLICATIONS | ||||
| Channel | Enter | |||
| Channel Options | Enter | |||
| Country | Russia | |||
| DTV Type | Terrestrial | |||
| Auto Tuning | Enter | |||
| ATV Manual Tuning | Enter | |||
| DTV Manual Tuning | Enter | |||
| Common Interface | Enter | |||
 |  |  |  |  |
| PREFERENCES | ||||
| Menu Language | English | |||
| Teletext Language | English | |||
| Key Lock | Off | |||
| PC Settings | Enter | |||
| PIN Setting | Enter | |||
| Parental Control | Enter | |||
| Auto Power Down | 4 hours | |||
| SETUP | |
| OSD Timer | Off |
| Cinema | Super Live |
| Blue Screen | On |
| Sleep Timer | Off |
| Location | Home |
| Quick Setup | Enter |
| Upgrade | Enter |
| Channel Details | Enter |
| Reset TV | Enter |
- STAR
- LED COLOR TV
- EN USER MANUAL
- LT VARTOTOJO INSTRUKCIJA
- Table Of Contents
- Preparations Guide
- Installed And Connected TV
- Function Description
- Multimedia
- Other Information
- Safety Information
- CAUTION
- Important Safety Precautions
- TV Bracket assemble
- Fix the TV on the wall
- Note:
- TV Buttons And Terminal Interface
- TV Buttons
- Terminal Interface
- Install And Connect TV
- Set your TV
- Connect antenna and power
- Turn on TV
- TV Stand Installation Instructions
- Picture Menu
- Picture Mode
- Contrast
- Brightness
- Colour
- Tint
- Sharpness
- Contrast Booster
- Colour Temperature
- DNR
- Reset
- SOUND Menu
- Sound mode
- Bass
- Treble
- Balance
- Surround
- AVL
- Digital Audio Output
- APPLICATIONS
- Channel
- Channel Options
- Country
- DTV Type
- Auto Tuning
- ATV Manual Tuning
- DTV Manual Tuning
- Common Interface
- PREFERENCES
- Menu Language
- Teletext Language
- Key Lock
- PC Settings
- PIN Setting
- Parental Control
- Change Pin Code
- Auto Power Down
- SETUP
- OSD Timer
- Cinema
- Blue Screen
- Sleep Timer
- Location
- Quick Setup
- Channel Detaile
- Reset TV
- Shopping Mode
- MEDIA OPERATION
- Photo
- Movie
- Music
- Help
- Machine Technical Specifications
- Remote Controller
- Battery Installation:
- Using the Remote Control:
- Pastaba:
- Funkciju aprašymas
- Vaizdo meniu
- Примечание:
- Märkus:
- Kaugjuhtimispult
- RISK OF ELECTRIC SHOCK DO NOT OPEN
- Σημείωση:
- Ρυθμίστε
- την τηλεόρασή σας
- Napomena:
- Dugmad TV i priključci interfejsa
- Dugmad televizora
- Montirajte televizor
- Opis funkcija
- Postavke slike
- Režim slike
- Kontrast
- Opis funkcije
- Osvetljenje
- Boja
- Pozadinsko svetlo
- Oštrina
- Filter Contrast Booster
- Temperatura boje
- Digitalna redukcija buke (DNR)
- Resetovanje
- Opcije zvuka
- Režim zvuka
- Niske
- Visoke
- Bilans
- Okružujući zvuk
- Digitalni audio izlaz
- Prilozi
- Kanali
- Jezik menija
- Jezik teleteksta
- Blokiranje dugmadi
- Parametri PC
- Podešavanje PIN
- Roditeljska kontrola
- Promena PIN koda
- الله轮胎هان 401-2016.1.38
- L2nu:
- Ztnniuunwgnjgh untwnpniu l u whgniu
- Stnwnntp htnnuuugnign
- Uhugptp withwulwpu ni hthynpwlywi ulnigniup
- Uhwgntp htnnuunwgnjgn
- Ztnnluunwgnjgh unwlnhph untwnpufu nntgnuig
- \$nh48hultrtyuugnho3nh
- Twnlytnutph pwnpwgwth
- ARM
- \$NH4Y8HUTFHYUFGNHP3NH
- Cunpwgwlgh ltqni
- Ztnniuunwutpuuh ltqni
- Чнáwlutph wpqtlwuhwniu
- Zuwlywnqzwjhui wwwwutunptn
- \$nht48hultrtyuugrnho3nht
- PIN lunnh lwnpwnpnufup
- OSD 'kynwuhu gnigwnpulnn puunpwgutuh dwiufuwlywuzuh
- Чипршппн
- UNHLSHUETRU
- Чипрчупнпшлтр
- 09104304
- Uwpunlyngutph utwnwnnu
- 26nwlqwnwlpwfu ywhwlyh oqnwnpdnlup
- GUIDE
- TIME SHIFT
- ∂gδο∂36s:
- modification of the following
- ωσχβδον
- modification
- Rs###g### ###308m60
- zsdmlsbŋŋgðol bggodo
- bān bāng
- d309s6s
- contents of TV https://www.itv.com/
- s30madsyngo shymds
- 3m300g60u 3s6s4g6m6o
- ∂ψησθοδρωσ
- Piezīmes:
- Funkciju apraksts
- Attēla izvēlne
- Kanāli
- Nota:
- a TV
- Menu de imagem
Brand : TV Star
Model : LED24F4
Category : Television