
H6301 - Iron IMETEC - Free user manual and instructions
Find the device manual for free H6301 IMETEC in PDF.


| Type | Steam Iron |
| Brand | IMETEC |
| Model | H6301 |
| Power Supply | 220-240 V, 50-60 Hz |
| Power Consumption | 2000-2400 W |
| Temperature Control | Adjustable thermostat with LED indicator |
| Steam Control | Variable steam selector (0 to max) |
| Functions | Dry ironing, steam ironing, super-steam, vertical steam, spray |
| Eco Mode | Yes, reduces energy consumption for delicate fabrics |
| Anti-Scale System | Zero-Calc permanent resin filter (non-replaceable) |
| Self-Clean System | Calc-Clean button, recommended every 5-10 uses |
| Water Tank Capacity | Approx. 300 ml |
| Cord Length | Approx. 2 m |
| Weight | Approx. 1.5 kg |
| Accessories Included | Water cup |
| Warranty | Manufacturer's warranty (details in attached sheet) |
| Usage | Household use only |
Frequently Asked Questions - H6301 IMETEC
User questions about H6301 IMETEC
0 question about this device. Answer the ones you know or ask your own.
Ask a new question about this device
Download the instructions for your Iron in PDF format for free! Find your manual H6301 - IMETEC and take your electronic device back in hand. On this page are published all the documents necessary for the use of your device. H6301 by IMETEC.
USER MANUAL H6301 IMETEC
Operating instructions
natural_image
Illustration of a steam iron with smoke clouds (no text or symbols)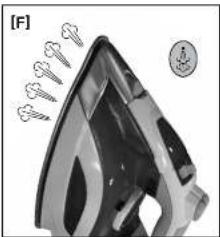
natural_image
Close-up of a mechanical component with multiple metallic fasteners and a circular icon (no text or symbols)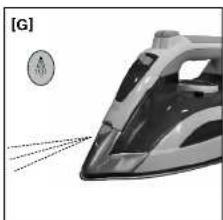
natural_image
Illustration of a steam iron with motion lines indicating speed (no text or symbols)DATI TECNICI
TECHNICAL DATA
SISTEMA ANTICALCARE ZERO-CALC
SISTEMA SELF CLEAN/CALC CLEAN
Dear customer, IMETEC thanks you for having purchased this product. We are certain you will appreciate the quality and reliability of this appliance, designed and manufactured with customer satisfaction in mind. This instruction manual has been drawn up in compliance with the European Standard EN 62079.

ATTENTION!
Instructions and warnings for a safe use
Before using this appliance, carefully read the instructions and in particular the safety warnings, which must be complied with. Keep this manual and illustrative guide with the appliance for future consultation. Should you pass the appliance on to another user, make sure to also include this documentation.
Should certain parts of this booklet be difficult to understand or should doubts arise, contact the company before using the product, at the address indicated on the last page.
INDEX
INSTRUCTIONS FOR USE page 10
SAFETY WARNINGS page 11
SYMBOLS page 13
DESCRIPTION OF APPLIANCE AND ITS ACCESSORIES page 13
PREPARATION page 14
USE page 14
- Filling the reservoir page 14
- Selecting the temperature page 14
• ECO function page 15 - Ironing without steam (dry) page 15
- Ironing with steam page 15
- Super-steam and vertical steam page 15
- Spray Function page 15
AFTER IRONING page 16
- Emptying process page 16
MAINTENANCE page 16
- Zero-Calc anti-scale system page 16
- Self Clean/Calc-Clean system page 16
- Cleaning page 16
TROUBLESHOOTING page 17
DISPOSAL page 18
ASSISTANCE AND WARRANTY page 18
Illustrative guide I-II
Technical data III
SAFETY WARNINGS
- After having removed the appliance from its packaging, verify its integrity based on the drawing and any presence of damage caused by transport. If in doubt, do not use the appliance and contact an authorised service centre.
- Do not let children play with the packaging! Keep the plastic bag out of the reach of children - risk of suffocation!
- Before connecting the appliance, please make sure that the voltage data indicated on the identification technical data (12) correspond to those of the mains voltage. The identification technical data (12) are found on the appliance (and on the charger, if present).
- This appliance must be used solely for the purpose for which it was designed, namely, as a steam iron for home use. Any other use is considered not compliant and therefore dangerous.
- This appliance can be used by children aged from 8 years and above and persons with reduced physical, sensory or mental capabilities or lack of experience and knowledge if they have been given supervision or instruction concerning use of the appliance in a safe way and understand the hazards involved or if supervised by a person responsible for their safety. Children shall not play with the appliance. The appliance cannot be cleaned or serviced by children without adult supervision. Keep the appliance and power cord away from children under 8 when the appliance is on or cooling down.

DO NOT use the appliance with wet hands, damp feet or barefoot.

DO NOT pull the power cable or the appliance itself to remove the plug from the socket.

DO NOT expose the appliance to humidity or weather conditions (rain, sun, etc.).
- Always disconnect the appliance from the mains supply before cleaning or performing maintenance and when the appliance is not in use.
- If the appliance is faulty or malfunctions, switch it off and do not tamper with it. Any repairs must only be carried out by an
EN
authorised technical service centre.
- The iron must be used on a stable surface. When the iron is placed on the iron rest, make sure the support is stable. The iron must not be used if it has been dropped, if it is visibly damaged or if it leaks water.
- If the power cable is damaged it must be replaced by an authorised technical service centre, so as to prevent all risks.
- The electrical safety of this appliance is only guaranteed when it is connected correctly to an effective earthing system as required by applicable electrical safety standards. This important safety requirement must be verified and, if in doubt, request a thorough check of the system by a qualified technician.
- The electrical safety of this appliance is only guaranteed when it is connected correctly to an effective earthing system as required by applicable electrical safety standards. This important safety requirement must be verified and, if in doubt, request a thorough check of the system by a qualified technician.

DO NOT immerse the iron, the power cord or the plug in any kind of liquid.

DO NOT leave the hot iron in contact with easily flammable fabric.

DO NOT leave the iron unattended when connected to the power supply.

DO NOT dispense steam when the iron is resting on its mat.
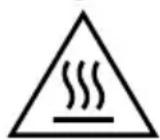
ATTENTION! Hot surface.

DO NOT use chemical additives, scented substances or descaling agents.
- This iron is not equipped with a pressure boiler and has been designed to be used for brief periods of time in order to prevent stress related to this chore. For this reason it is recommended not to iron for more than an hour.
IMPORTANT GUIDELINES
The appliance is designed to work with tap water; however, if the water in your area is very hard, mix the tap water (50%) with distilled and/or demineralised water (50%). Salt concentration in water in certain seaside areas is very high: in such cases it is important to use “demineralised water for irons” available on the market. If in doubt, only demineralised water for steam irons must be used.
Do not use diluting agents, scented liquids or descaling agents as these substances can damage the product. Do not use water from dryers, air-conditioners and rain water.
The reservoir may contain some water as each product is tested before being put on the market.
It is recommended to place a cloth between the iron and the fabric when using the iron for the first time.
It is recommended to direct a jet of steam into the air before starting to iron, for any residual condensation to be let out.
SYMBOLS

WARNING PROHIBITION

DESCRIPTION OF THE APPLIANCE AND ITS ACCESSORIES
Refer to the illustrative drawing at the beginning of this instructions booklet to verify your appliance equipment. All the figures are on the cover pages of these instructions for use.

ATTENTION! The accessories and features vary according to the models. Identify your model by referring to the illustrative drawings at the beginning of the instruction booklet and on the product package.
- Plate temperature LED
- Temperature adjustment knob
- Spray button
- Super-steam button
- Steam selector
- Water fill-up opening
-
Spray
-
Calc clean button
- Max fill-up level Max
- Plate with steam holes
- Water reservoir
12.Technicaldata
13.Plug - Water cup
EN
PREPARATION
Sort the laundry according to the international symbols shown on the label; if this is missing, sort according to the type of material.
Start to iron the garments that require a lower temperature so as to reduce idle time (the iron requires less time to warm up than to cool down) and eliminate the risk of burning the fabric.

synthetic, acrylic, nylon, polyester: low temperatures;

wool, silk: medium temperatures;

cotton, linen: high temperatures;

do not iron.
USE
FILLING THE RESERVOIR
Verify that the plug (13) is disconnected from the socket.
Set the steam selector (5) to 0 [Fig. B].
Open the latch (6).
Set the iron in a position that facilitates filling the water and prevents it from overflowing.
Slowly pour the water into the reservoir using the special cup (14) [Fig. C].
Do not exceed the maximum (MAX) level indicated on the reservoir (9).
Close the hatch (6).
SELECTING THE TEMPERATURE
Set the iron upright.
Insert the plug (13) in the socket.
Set the temperature according to the type of fabric in line with the international symbols shown on the labels; using the adjustment knob (2) [Fig. D].
The plate temperature LED (1) indicates that the iron is warming up.
Wait for the plate temperature LED (1) to go off before starting to iron.
Consult the table below to select the cortemperature:
| Label garments | Type material | Temperature control |
 | syntheticse.g. viscose, polyester | ● |
 | silk, wool | ● ● |
 | cotton, linen | ● ● ● |
ECO FUNCTION
The appliance is equipped with new technology that optimises steam production, thereby reducing energy consumption.
Set the steam selector (5) to ECO to activate the function.
It is recommended to use the ECO function for delicate garments (silk, wool and light cotton).
IRONING WITHOUT STEAM (DRY)
Follow the instructions in the “steam ironing” section, leaving the steam selector (5) set to 0.
IRONING WITH STEAM
Select the amount of steam via the steam selector (5).
Move the steam selector (5) to any position between minimum and maximum according to the desired amount.
Continuous steam will only be dispensed when the iron is in a horizontal position.
This stops when the iron is set upright or the steam selector (5) is set to 0.
Steam can only be used at the highest temperatures, as indicated by the symbol on the temperature adjustment knob (2) [Fig. D].
If the selected temperature is too low, water droplets may drip from the plate.

Warning: the plate temperature LED (1) goes on intermittently while ironing, thereby indicating that the selected temperature is maintained.
SUPER-STEAM AND VERTICAL STEAM
Press the super-steam button (4) to generate a strong shot of steam that penetrates the fabric and eliminates the most difficult creases.
Wait a few seconds between each pressing action of the iron [Fig. E].
Press the super-steam button (4) intermittently to iron in an upright direction (curtains, hung clothes, etc.) [Fig. F].

Warnings: the super-steam function can only be used at high temperatures.
Stop the steam when the plate temperature LED (1) lights up and start ironing when this goes off.
SPRAY FUNCTION
Verify that there is water in the reservoir (11).
Press the spray button (3): slowly for dense spray or fast for mist [Fig. G].

Warnings: dampen delicate fabric using the spray function (3) or alternatively, lay a damp cloth between the fabric and the iron.
Do not use the spray on silk or synthetics.
EN
AFTER IRONING
EMPTYING PROCESS
Disconnect the plug (13) from the socket.
Empty the reservoir (11) by turning the iron upside down and shaking it lightly.
Let the iron cool down completely.
Always set the iron upright.
MAINTENANCE
ZERO-CALC ANTI-SCALE SYSTEM
A special resin filter inside the water reservoir decreases the water hardness and limits the formation of limescale in the plate. The resin filter is permanent and cannot be replaced.
SELF CLEAN/CALC-CLEAN SYSTEM
The function allows the internal part of the plate to be cleaned from limescale residue or other impurities.
It is recommended to implement this function every 5 - 10 times it is used.
Fill the water reservoir (11) up to the maximum (MAX) level (9).
Set the steam selector (5) to 0.
Adjust the temperature knob (2) to maximum and wait for the plate temperature control LED (1) to go off.
Disconnect the plug (13) from the socket and immediately place the iron in a horizontal position over a wash basin.
Press the Calc-Clean (8) button until hot water, steam and any impurities or limescale come out of the plate.
Once the iron plate has cooled down (10), clean it with a damp cloth.
CLEANING

ATTENTION!
sure the plug of the appliance (13) is disconnected from the socket and the plate has cooled down completely before cleaning the iron.
Any starch deposits or residue on the surface of the plate can be removed with a damp cloth and non-abrasive liquid detergent.
Avoid scratching the plate with steel wool or metal objects.
The plastic parts can be cleaned with a damp cloth and then wiped with a dry cloth.
TROUBLESHOOTING
This chapter describes the most common problems that can arise using the appliance. If the problems cannot be solved with the information below, please contact the Authorised Assistance Centre.
| Problem Possible cause Solution | ||
| The plate (10) remains cold or does not heat up. | There is no power supply. | Verify whether the plug (13) is inserted correctly or try inserting it in another socket. |
| Verify whether the temperature adjustment knob (2) is set to the minimum temperature ∅ (Fig. D). | ||
| The plate temperature LED (1) goes on and off. | Normal procedure. | The switching ON and OFF of the LED indicates the heating phase of the iron. The LED goes off once the set temperature is reached. |
| Only a little steam or none at all is dispensed. | The steam selector (5) is set to ∅. | Set the steam selector (5) to the desired field (Fig. B). |
| There is not enough water in the reservoir (11). | Fill the reservoir (11). | |
| The impurities that come out from the steam holes stain the garments. | Possible residue in the steam chamber/plate. | Carry out the Self Clean procedure (see paragraph Seal Clean/Calc-Clean System). |
| Chemical additives, scented liquids or descaling agents are being used. | These substances damage the product: do not add additives to the water in the reservoir. | |
| Pure distilled water or softened water is being used. | Mix tap water (50%) with distilled and/or demineralised (50%) water. | |
| Starch is being used. | Always spray the starch on the reverse side of the fabric. | |
| Water leaks from the plate. | The plate temperature is too low due to the super-steam button (4) being pressed too often. | Allow slightly longer intervals between the jets of steam. |
| The temperature adjustment knob (2) is set to a temperature that is too low (Fig. D). | Turn the temperature adjustment knob (2) to the Max level (Fig. D). | |
DISPOSAL

The product is packaged in recyclable materials. Dispose of it in compliance with the environmental protection standards.

The appliance must be disposed of in compliance with EU standard 2002/96/EC.
The recyclable materials contained in the appliance must be collected to prevent environmental pollution. For further information contact the local waste authority or the appliance retailer.
ASSISTANCE AND WARRANTY
To request repairs or purchase spare parts please contact IMETEC's authorised customer service centre on the Toll-Free Number below or via the website. The appliance is covered by the manufacturer's warranty. For details, read the attached warranty sheet.
Failure to comply with the instructions for use and maintenance provided in this manual will render the manufacturer's warranty null and void.
SISTEMA ANTICAL CERO-CALC
SISTEMA SELF CLEAN/CALC CLEAN
- Sistema Self Clean/Calc-Clean
- Limpeza
PROBLEMAS E SOLUÇÕES
ELIMINAÇÃO
ASSISTÊNCIA E GARANTIA
Guia ilustrado
Dados técnicos
pág. 33
pág. 33
pág. 33
pág. 33
pág. 34
pág. 34
pág. 34
pág. 34
pág. 34
pág. 34
pág. 35
pág. 36
pág. 36
| - ||
III
AVISOS SOBRE A SEGURANÇA
INDICAÇÕES IMPORTANTES
SISTEMA ANTICALCÁRIO ZERO-CALC
SISTEMA SELF CLEAN/CALC CLEAN
PROBLEMAS E SOLUÇÕES
ASSISTÊNCIA E GARANTIA
SELF CLEAN/CALC CLEAN RENDSZER
ΣΥΣΤΗΜΑ SELF CLEAN/CALC CLEAN
SISTEM SELF CLEAN/CALC CLEAN
- SISTEMA ANTICALCARE ZERO-CALC
- SISTEMA SELF CLEAN/CALC CLEAN
- ATTENTION!
- Instructions and warnings for a safe use
- INDEX
- SAFETY WARNINGS
- EN
- IMPORTANT GUIDELINES
- SYMBOLS
- DESCRIPTION OF THE APPLIANCE AND ITS ACCESSORIES
- PREPARATION
- USE
- FILLING THE RESERVOIR
- SELECTING THE TEMPERATURE
- ECO FUNCTION
- IRONING WITHOUT STEAM (DRY)
- IRONING WITH STEAM
- SUPER-STEAM AND VERTICAL STEAM
- SPRAY FUNCTION
- AFTER IRONING
- EMPTYING PROCESS
- MAINTENANCE
- ZERO-CALC ANTI-SCALE SYSTEM
- SELF CLEAN/CALC-CLEAN SYSTEM
- CLEANING
- TROUBLESHOOTING
- DISPOSAL
- ASSISTANCE AND WARRANTY
- SISTEMA ANTICAL CERO-CALC
- AVISOS SOBRE A SEGURANÇA
- INDICAÇÕES IMPORTANTES
- SISTEMA ANTICALCÁRIO ZERO-CALC
- PROBLEMAS E SOLUÇÕES
- ASSISTÊNCIA E GARANTIA
- SELF CLEAN/CALC CLEAN RENDSZER
- ΣΥΣΤΗΜΑ SELF CLEAN/CALC CLEAN
- SISTEM SELF CLEAN/CALC CLEAN
Brand : IMETEC
Model : H6301
Category : Iron