
MXU2 - Audio Mixer CAD Audio - Free user manual and instructions
Find the device manual for free MXU2 CAD Audio in PDF.


| Product Type | Audio Mixer |
| Brand | CAD Audio |
| Model | MXU2 |
| Dimensions (approx.) | 20 cm x 15 cm x 5 cm |
| Weight (approx.) | 1 kg |
| Power Supply | USB-C (5V/1A) or 9V battery (not included) |
| Input Channels | 2 (XLR/TRS combo) |
| Output | 1x Stereo 1/4" jack, 1x RCA |
| Main Functions | Volume control per channel, master volume, 3-band EQ per channel, headphone monitoring |
| Phantom Power | +48V switchable per channel |
| Frequency Response | 20 Hz - 20 kHz |
| Signal-to-Noise Ratio | >90 dB |
| Total Harmonic Distortion | <0.01% |
| Material | Metal chassis with plastic knobs |
| Maintenance & Cleaning | Wipe with a soft dry cloth; avoid solvents |
| Safety Precautions | Keep away from moisture; do not open; use only specified power supply |
| Spare Parts & Repairability | No user-serviceable parts; contact support for repairs |
| General Information | Compact mixer suitable for small venues, home studios, and live streaming |
Frequently Asked Questions - MXU2 CAD Audio
User questions about MXU2 CAD Audio
0 question about this device. Answer the ones you know or ask your own.
Ask a new question about this device
Download the instructions for your Audio Mixer in PDF format for free! Find your manual MXU2 - CAD Audio and take your electronic device back in hand. On this page are published all the documents necessary for the use of your device. MXU2 by CAD Audio.
USER MANUAL MXU2 CAD Audio
Multipurpose 2-Channel (2Mic/Line) Analog Mixer with a Built-in USB Interface
User Guide
Precautions
PLEASE READ CAREFULLY BEFORE PROCEEDING
Please keep this manual in a safe place for future reference
WARNING
Always follow the basic precautions listed below to avoid the possibility of serious injury or even death from electrical shock, short-circuiting, damages, fire or other hazards. These precautions include, but are not limited to, the following:
Do not open
- This device contains no user-serviceable parts. Do not open the device or attempt to disassemble the internal parts or modify them in any way. If it should appear to be malfunctioning, discontinue use immediately and have it inspected by qualified service personnel.
Water warning
- Do not expose the device to rain, use it near water or in damp or wet conditions, or place on it any containers (such as vases, bottles or glasses) containing liquids which might spill into any openings. If any liquid such as water seeps into the device, turn off the power immediately and disconnect the USB cable from the computer. Then have the device inspected by qualified service personnel.
- Never insert or remove a USB cable with wet hands.
Fire warning
- Do not put burning items, such as candles, on the unit. A burning item may fall over and cause a fire.
If you notice any abnormality
When one of the following problems occur, immediately turn off the power switch and disconnect the USB cable from the computer. Then have the device inspected by qualified service personnel.
• The USB cable becomes frayed or damaged
- It emits unusual smells or smoke.
• Some object has been dropped into the device.
• There is a sudden loss of sound during use of the device.
If this device should be dropped or damaged, immediately turn off the power switch, disconnect the USB cable from the computer, and have the device inspected by qualified service personnel.
CAUTION

Always follow the basic precautions listed below to avoid the possibility of physical injury to you or others, or damage to the device or other property. These precautions include, but are not limited to, the following:
Location
- Do not place the device in an unstable position where it might accidentally fall over.
• Before moving the device, remove all connected cables.
- Do not place the device in a location where it may come into contact with corrosive gasses or salt air. Doing so may result in malfunction.
Connections
- Before connecting the device to other devices, turn off the power for all devices.
• Before turning the power on or off for all devices, set all volume levels to minimum.
Maintenance
- Remove the USB cable from a computer when cleaning the device.
Handling caution
- Do not insert your fingers or hands in any gaps or openings on the device.
- Avoid inserting or dropping foreign objects (paper, plastic, metal, etc.) into any gaps or openings on the device. If this happens, turn off the power immediately and disconnect the USB cable from the computer. Then have the device inspected by qualified service personnel.
- Do not rest your weight on the device or place heavy objects on it, and avoid use excessive force on the buttons, switches or connectors
- Do not use speakers or headphones for a long period of time at a high or uncomfortable volume level, since this can cause permanent hearing loss. If you experience any hearing loss or ringing in the ears, consult a physician.
CAD Audio cannot be held responsible for damage caused by improper use or modifications to the device, or data that is lost or destroyed.
NOTICE
To avoid the possibility of malfunction/ damage to the product, damage to data, or damage to other property, follow the notices below.
Handling and maintenance
- Do not use the device in the vicinity of a TV, radio, stereo equipment, mobile phone, or other electric devices. Otherwise, the device, TV, or radio may generate noise.
- Do not expose the device to excessive dust or vibration, or extreme cold or heat (such as in direct sunlight, near a heater, or in a car during the day), in order to prevent the possibility of panel disfiguration, unstable operation, or damage to the internal components.
- Do not place vinyl, plastic or rubber objects on the device, since this might discolor the panel.
- When cleaning the device, use a dry and soft cloth.
- Do not use paint thinners, solvents, cleaning fluids, or chemical-impregnated wiping cloths.
- Condensation can occur in the device due to rapid, drastic changes in ambient temperature — when the device is moved from one location to another, or air conditioning is turned on or off, for example. Using the device while condensation is present can cause damage. If there is reason to believe that condensation might have occurred, leave the device for several hours without turning on the power until the condensation has completely dried out.
- Avoid setting all equalizer controls and faders to their maximum. Depending on the condition of the connected devices, doing so may cause feedback and may damage the speakers.
- Do not apply oil, grease, or contact cleaner to the faders. Doing so may cause problems with electrical contact or fader function.
- When turning on the AC power in your audio system, always turn on the power amplifier LAST, to avoid speaker damage. When turning the power off, the power amplifier should be turned off FIRST for the same reason.
- Turn the power to the device off if it will not be used for an extended period of time.
Connectors
XLR-type connectors are wired as follows (IEC60268 standard): pin 1: ground, pin 2: hot (+), and pin 3: cold (-).
Information about this manual
The illustrations as shown in this manual are for instructional purposes only.
• The company names and product names in this manual are the trademarks or registered trademarks of their respective companies.
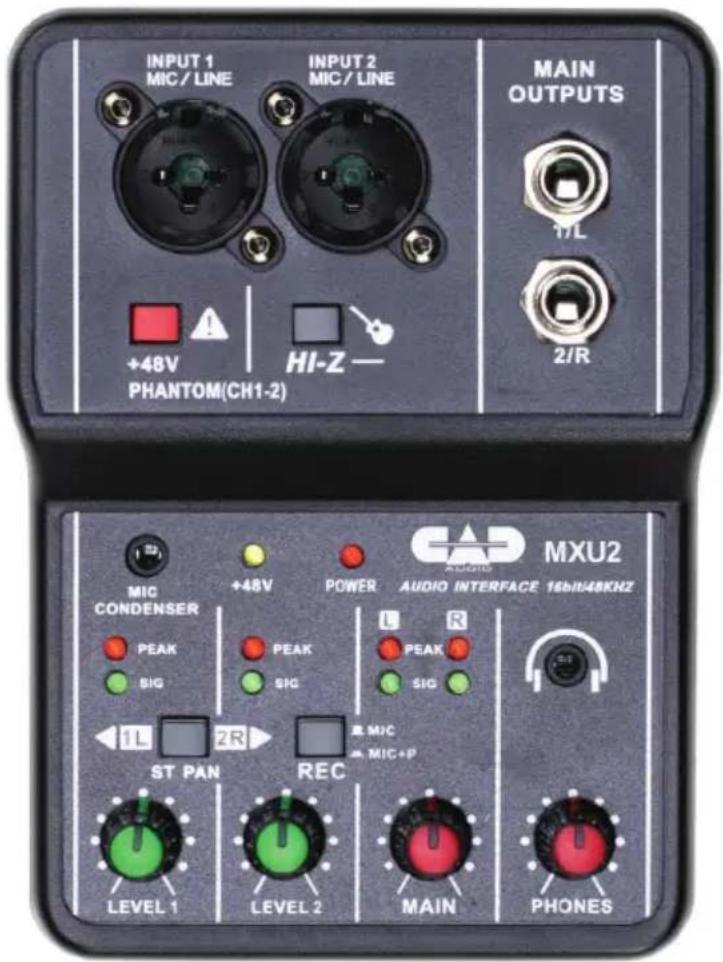
CAD MXU2 is a multipurpose 2 channel (2mic/line) analog mixer with a built-in USB interface. USB connectivity and +48V phantom power make it an ideal compact option for live performance, broadcasting, podcasting or home recording.
The MXU2 contains the following features:
• 2 XLR combo inputs for mic or instrument signal
• USB output connects to computer for easy recording or podcasting (16-bit/48kHz)
- Bus powered – no need for external power supply when using with a computer
• +48V phantom power for use with condenser microphones
• Output can be stereo or panned L/R
Computer Connection Settings: Drive-Free Installation on Mac®, Windows7®
- Monitor Settings - As shown in the figure below, turn off the return listening in the computer volume mixer, otherwise the sound will be repeated and seriously distorted. After closing, click "apply" first, and then click "OK" to complete the setting.

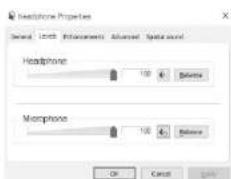
- Playback Settings - Find the local device as shown in the figure below, and set the sampling rate and bit width of the volume mixer to 16bit/48kHz. Improper setting will lead to abnormal operation of the sound card.


- Recording Settings - Find the local device as shown in the figure below, and set the sampling rate and bit width to 16bit/48kHz. Improper setting will lead to abnormal operation of the sound card.


Controls and Functions

-
Mic/Line - Mono input jack, you can connect XLR plug or phone plug to connect the microphone or instrument you want to use.
-
Main Output - TRS phone type unbalanced output jack for mixed stereo signal. The signal level can be adjusted through the [MAIN] knob. For example, these jacks can be used to connect the power amplifier of the main speaker.
-
48V Phantom Switch -
■ off / — on, for using condenser microphones requiring phantom power.
Notice:
- The phantom power supply only supplies power to XLR plugs connected to channel 1 and 2 jacks.
- Do not disconnect the XLR plug when the switch is on.
- Before turning on and off the phantom power supply, set the output control such as [MAIN] to the minimum level.
- INPUT2 Signal Input Mode Switching
■ Line input mode / ■ Instrument input mode. When connecting high impedance sources, such as electric guitar or electric bass, set to instrument mode.
-
3.5mm Microphone Interface - This interface is suitable for 3V condenser microphone. The level signal is adjusted by 1-channel volume knob and sent to [MAIN] mixed output.
-
[PEAK] Indicator Light - When the input signal level reaches 3dB of clipping distortion, the indicator will light. Adjust the channel volume knob to
make the [PEAK] indicator light flash briefly for the best recording level.
- [SIG] Indicator Light - Shows presence of signal.
- [ST PAN] Mono/Stereo Switch - When channel 1 or 2 are independent signals, switch to mono (■). When stereo signal is applied, switch to stereo (■). Channel 1 volume knob controls the level of left channel and channel 2 volume knob controls the level of right channel.
- [LEVEL] - Channel volume control knob, which can control the channel level and send it to [MAIN] mixed output.
- [MAIN] - Controls the signal level of the [MAIN OUTPUT] jack.
- [PHONES] - Controls the signal level of the monitoring earphone jack.
- [+48V] Indicator Light - Indicates the presence of phantom power.
- Power Indicator - Indicates the presence of power.
- Headphone Monitoring Jack - For connecting 3.5mm plug stereo headphones.
- [REC] Computer Recording Signal Selection Switch - (■) Sound source recorded by the computer is the signal output of channels 1 and 2. (■) Sound source recorded by the computer is mixed (signal played by the computer + the signal output by channels 1 and 2).
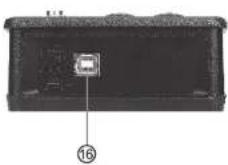
- Type B USB 2.0 Port - Connects the computer to transmit data and charge the device at the same time.
MXU2 Specifications
Inputs ......2 XLR mic/line combo
Outputs....1/4" TRS, balanced
Frequency Response 20Hz - 20kHz
Distortion (THD) 0.03%
Weight 0.63lbs (0.285kg)
Dimensions....6" x 5" x 2.2" (15.2cm x 12.5cm x 5.5cm)
Troubleshooting
The power indicator is not on?
Confirm whether the correct USB cable is used, and be sure to use the included USB cable. Check whether the USB connector is firmly connected. Confirm whether the USB power supply is normal.
No sound
Confirm whether the correct USB cable is used, and be sure to use the included USB cable. Check whether the computer's volume controller is set to the correct level.
Confirm whether [MAIN] volume knob and [PHONES] volume knob are up. Check whether the input signal and output to the monitoring speaker are connected correctly. Check whether the monitor speaker power switch is on.
Check whether the volume knob of the monitoring speaker is up.
Abnormal sound recorded by the computer (noise interruption of distortion)
Confirm whether the computer meets system requirements, the audio data processing capacity of the computer depends on many factors, including CPU speed and external access equipment.
Check whether the recording level is overloaded. It is recommended to set the recording level to 0dB (0dB = 1V).
Check whether the input microphone or other audio devices are connected correctly.
This page intentionally left blank.
This page intentionally left blank.
Two-Year Limited Warranty
CAD Audio hereby warrants that this product will be free of defects in material and workmanship for a period of two years from the date of purchase. In the unlikely event that a defect occurs, CAD will, at its option, either repair or replace with a new unit of equal or greater value. In the event that a suitable replacement is unavailable, CAD Audio may elect to reimburse owner for the cost of local repairs or issue a refund in the amount of the original purchase price. Items must be purchased from an authorized CAD Audio dealer, and the warranty is not transferable from the original owner. Please retain proof of purchase to validate the purchase date and include it with any warranty claim.
This warranty excludes exterior finish or appearance, damage from abuse, misuse of the product, use contrary to CAD's instructions or unauthorized repair. All implied warranties, merchantability, or fitness for a particular purpose is hereby disclaimed and CAD hereby disclaims liability for incidental, special or consequential damages resulting from the use or unavailability of this product.
This warranty gives you specific legal rights and you may have other rights that vary from state to state. Some states do not allow the exclusion or limitation of incidental or consequential damages or limitations on how long an implied warranty lasts, so the above exclusions and limitations may not apply to you.
Note: No other warranty, written or oral is authorized by CAD Audio.
To initiate a warranty claim, please contact American Music and Sound at 1-800-431-2609 to obtain a return authorization number and shipping instructions.
- A return authorization is required for all returns. RETURNS WITHOUT A PRE-APPROVED RETURN AUTHORIZATION NUMBER WILL BE REUSED
- Please use at least 3 inches of padding surrounding the product for protection during shipment.
during shipment
- Retain your tracking number until your warranty claim has been resolved - We recommend using an insured shipping method in case of loss or damage during shipment
If outside the United States, contact your local dealer or distributor for warranty details.

CAD Audio
6573 Cochran Rd., Bldg. I Solon, OH 44139 U.S.A.
Tel: (440) 349-4900 Fax: (440) 248-4904
Sales: 800-762-9266 cadaudio.com
Distributed Worldwide by American Music and Sound
925 Broadbeck Drive, Suite 220
Newbury Park, CA 91320 U.S.A.
Tel: (800) 431-2609 Fax: (800) 431-3129
©2022 CAD Audio Rev00 0622





- Precautions
- PLEASE READ CAREFULLY BEFORE PROCEEDING
- WARNING
- Do not open
- Water warning
- Fire warning
- If you notice any abnormality
- CAUTION
- Location
- Connections
- Maintenance
- Handling caution
- NOTICE
- Handling and maintenance
- Connectors
- Information about this manual
- Computer Connection Settings: Drive-Free Installation on Mac®, Windows7®
- Controls and Functions
- MXU2 Specifications
- Troubleshooting
- The power indicator is not on?
- No sound
- Abnormal sound recorded by the computer (noise interruption of distortion)
- Two-Year Limited Warranty
Brand : CAD Audio
Model : MXU2
Category : Audio Mixer