
HT-RC460 - Home Theater ONKYO - Free user manual and instructions
Find the device manual for free HT-RC460 ONKYO in PDF.


| Product Type | Home Theater AV Receiver |
| Brand | Onkyo |
| Model | HT-RC460 |
| Number of Channels | 7.1 |
| Output Power | 100 W per channel (8 ohms, 20 Hz-20 kHz, 0.08% THD) |
| HDMI Inputs | 4 inputs, 1 output with ARC |
| Digital Audio Inputs | 2 optical, 1 coaxial |
| Analog Audio Inputs | 4 RCA (including MM phono) |
| Connectivity | Bluetooth, Wi-Fi (via optional adapter) |
| Supported Audio Formats | Dolby TrueHD, DTS-HD Master Audio, Dolby Atmos |
| Speaker Calibration | Audyssey MultEQ |
| Built-in Radio | FM/AM with RDS |
| Dimensions (W × H × D) | 435 × 174 × 330 mm |
| Weight | 10.5 kg |
| Power Supply | 220-240 V AC, 50/60 Hz |
| Power Consumption | 600 W (standby 0.15 W) |
| Maintenance and Cleaning | Dust with a soft, dry cloth. Do not use any solvents. |
| Safety | Unplug before cleaning. Do not expose to moisture. Do not block ventilation openings. |
| Spare Parts and Repairability | Available parts: remote control, antenna. For any repair, contact an authorized Onkyo service center. |
| Included Accessories | Remote control, battery, FM/AM antenna, quick start guide, power cable |
Frequently Asked Questions - HT-RC460 ONKYO
User questions about HT-RC460 ONKYO
0 question about this device. Answer the ones you know or ask your own.
Ask a new question about this device
Download the instructions for your Home Theater in PDF format for free! Find your manual HT-RC460 - ONKYO and take your electronic device back in hand. On this page are published all the documents necessary for the use of your device. HT-RC460 by ONKYO.
USER MANUAL HT-RC460 ONKYO
Safety Information and Introduction ......2

Table of Contents......5
Connections ......11
Turning On & Basic Operations....19
Advanced Operations 43
Controlling Other Components......66
Appendix....73
Internet Radio Guide
Remote Control Codes
Made for

iPhone

Safety Information and Introduction
WARNING:
TO REDUCE THE RISK OF FIRE OR ELECTRIC SHOCK, DO NOT EXPOSE THIS APPARATUS TO RAIN OR MOISTURE.
CAUTION:
TO REDUCE THE RISK OF ELECTRIC SHOCK, DO NOT REMOVE COVER (OR BACK). NO USER-SERVICEABLE PARTS INSIDE. REFER SERVICING TO QUALIFIED SERVICE PERSONNEL.

WARNING
RISK OF ELECTRIC SHOCK
DO NOT OPEN
AVIS
RISQUE DE CHOC ELECTRIGUE
NE PAS OUVRIR


The lightning flash with arrowhead symbol, within an equilateral triangle, is intended to alert the user to the presence of uninsulated "dangerous voltage" within the product's enclosure that may be of sufficient magnitude to constitute a risk of electric shock to persons.
The exclamation point within an equilateral triangle is intended to alert the user to the presence of important operating and maintenance (servicing) instructions in the literature accompanying the appliance.
Important Safety Instructions
- Read these instructions.
- Keep these instructions.
- Heed all warnings.
- Follow all instructions.
- Do not use this apparatus near water.
- Clean only with dry cloth.
- Do not block any ventilation openings. Install in accordance with the manufacturer's instructions.
-
Do not install near any heat sources such as radiators, heat registers, stoves, or other apparatus (including amplifiers) that produce heat.
-
Do not defeat the safety purpose of the polarized or grounding-type plug. A polarized plug has two blades with one wider than the other. A grounding type plug has two blades and a third grounding prong. The wide blade or the third prong are provided for your safety. If the provided plug does not fit into your outlet, consult an electrician for replacement of the obsolete outlet.
- Protect the power cord from being walked on or pinched particularly at plugs, convenience receptacles, and the point where they exit from the apparatus.
- Only use attachments/accessories specified by the manufacturer.
- Use only with the cart, stand, tripod, bracket, or table specified by the manufacturer, or sold with the apparatus. When a cart is used, use caution when moving the cart/apparatus combination to avoid injury from tip-over.
- Unplug this apparatus during lightning storms or when unused for long periods of time.
- Refer all servicing to qualified service personnel. Servicing is required when the apparatus has been damaged in any way, such as power-supply cord or plug is damaged, liquid has been spilled or objects have fallen into the apparatus, the apparatus has been exposed to rain or moisture, does not operate normally, or has been dropped.
- Damage Requiring Service
Unplug the apparatus from the wall outlet and refer servicing to qualified service personnel under the following conditions:
PORTABLE CART WARNING G
A. When the power-supply cord or plug is damaged,
B. If liquid has been spilled, or objects have fallen into the apparatus,
C. If the apparatus has been exposed to rain or water,

D. If the apparatus does not operate normally by following the operating instructions. Adjust only those controls that are covered by the operating instructions as an improper adjustment of other controls may result in damage and will often require extensive work by a qualified technician to restore the apparatus to its normal operation,
E. If the apparatus has been dropped or damaged in any way, and
F. When the apparatus exhibits a distinct change in performance this indicates a need for service.
- Object and Liquid Entry
Never push objects of any kind into the apparatus through openings as they may touch dangerous voltage points or short-out parts that could result in a fire or electric shock.
The apparatus shall not be exposed to dripping or splashing and no objects filled with liquids, such as vases shall be placed on the apparatus.
Don't put candles or other burning objects on top of this unit.
- Batteries
Always consider the environmental issues and follow local regulations when disposing of batteries. - If you install the apparatus in a built-in installation, such as a bookcase or rack, ensure that there is adequate ventilation. Leave 20 cm (8") of free space at the top and sides and 10 cm (4") at the rear. The rear edge of the shelf or board above the apparatus shall be set 10 cm (4") away from the rear panel or wall, creating a flue-like gap for warm air to escape.

En-2


Precautions
-
Recording Copyright—Unless it's for personal use only, recording copyrighted material is illegal without the permission of the copyright holder.
-
AC Fuse—The AC fuse inside the unit is not user-serviceable. If you cannot turn on the unit, contact your Onkyo dealer.
-
Care—Occasionally you should dust the unit all over with a soft cloth. For stubborn stains, use a soft cloth dampened with a weak solution of mild detergent and water. Dry the unit immediately afterwards with a clean cloth. Don't use abrasive cloths, thinners, alcohol, or other chemical solvents, because they may damage the finish or remove the panel lettering.
4. Power
WARNING
BEFORE PLUGGING IN THE UNIT FOR THE FIRST TIME, READ THE FOLLOWING SECTION CAREFULLY.
AC outlet voltages vary from country to country. Make sure that the voltage in your area meets the voltage requirements printed on the unit's rear panel (e.g., AC 230 V, 50 Hz or AC 120 V, 60 Hz).
The power cord plug is used to disconnect this unit from the AC power source. Make sure that the plug is readily operable (easily accessible) at all times.
For models with [POWER] button, or with both [POWER] and [ON/STANDBY] buttons:
Pressing the [POWER] button to select OFF mode does not fully disconnect from the mains. If you do not intend to use the unit for an extended period, remove the power cord from the AC outlet.
For models with [ON/STANDBY] button only: Pressing the [ON/STANDBY] button to select Standby mode does not fully disconnect from the mains. If you do not intend to use the unit for an extended period, remove the power cord from the AC outlet.
5. Preventing Hearing Loss
Caution
Excessive sound pressure from earphones and headphones can cause hearing loss.
6. Batteries and Heat Exposure
Warning
Batteries (battery pack or batteries installed) shall not be exposed to excessive heat as sunshine, fire or the like.
- Never Touch this Unit with Wet Hands—Never handle this unit or its power cord while your hands are wet or damp. If water or any other liquid gets inside this unit, have it checked by your Onkyo dealer.
8. Handling Notes
- If you need to transport this unit, use the original packaging to pack it how it was when you originally bought it.
- Do not leave rubber or plastic items on this unit for a long time, because they may leave marks on the case.
- This unit's top and rear panels may get warm after prolonged use. This is normal.
- If you do not use this unit for a long time, it may not work properly the next time you turn it on, so be sure to use it occasionally.
For U.S. models
FCC Information for User
CAUTION:
The user changes or modifications not expressly approved by the party responsible for compliance could void the user's authority to operate the equipment.
NOTE:
This equipment has been tested and found to comply with the limits for a Class B digital device, pursuant to Part 15 of the FCC Rules. These limits are designed to provide reasonable protection against harmful interference in a residential installation.
This equipment generates, uses and can radiate radio frequency energy and, if not installed and used in accordance with the instructions, may cause harmful interference to radio communications. However, there is no guarantee that interference will not occur in a particular installation. If this equipment does cause harmful interference to radio or television reception, which can be determined by turning the equipment off and on, the user is encouraged to try to correct the interference by one or more of the following measures:
- Reorient or relocate the receiving antenna.
- Increase the separation between the equipment and receiver.
- Connect the equipment into an outlet on a circuit different from that to which the receiver is connected.
- Consult the dealer or an experienced radio/TV technician for help.
For Canadian Models
NOTE: THIS CLASS B DIGITAL APPARATUS COMPLIES WITH CANADIAN ICES-003.
For models having a power cord with a polarized plug:
CAUTION: TO PREVENT ELECTRIC SHOCK, MATCH WIDE BLADE OF PLUG TO WIDE SLOT, FULLY INSERT.
Supplied Accessories
Make sure you have the following accessories:
Indoor FM antenna (→ page 18)
AM loop antenna (→ page 18)
Speaker cable labels ( → page 12)
Speaker setup microphone ( → page 33)
Remote controller (RC-834M) and two batteries (AA/R6)
Quick Start Guide
* In catalogs and on packaging, the letter at the end of the product name indicates the color. Specifications and operations are the same regardless of color.
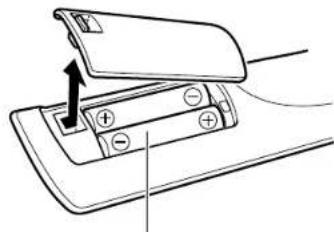
■Installing the batteries
natural_image
Diagram of a battery pack with an open lid and internal components, showing no text or symbolsBatteries (AA/R6)
Note
- If the remote controller doesn't work reliably, try replacing the batteries.
- Don't mix new and old batteries or different types of batteries.
- If you intend not to use the remote controller for a long time, remove the batteries to prevent damage from leakage or corrosion.
- Remove expired batteries as soon as possible to prevent damage from leakage or corrosion.
■Aiming the remote controller
To use the remote controller, point it at the AV receiver's remote control sensor, as shown below.

Thank you for purchasing an Onkyo AV Receiver. Please read this manual thoroughly before making connections and plugging in the unit.
Following the instructions in this manual will enable you to obtain optimum performance and listening enjoyment from your new AV Receiver. Please retain this manual for future reference.

En-4

Safety Information and Introduction


Table of Contents
Safety Information and Introduction
Important Safety Instructions ....2
Precautions ....3
Supplied Accessories....4
Table of Contents......5
Features 6
Front & Rear Panels....7
Front Panel....7
Display 8
Rear Panel 9
Remote Controller....10
Controlling the AV Receiver 10
Connections
Connecting the AV Receiver....11
Connecting Your Speakers 11
About AV Connections....14
Connecting Components with HDMI 15
Connecting Your Components 16
Connecting Onkyo RI Components....17
Connecting the Antennas....18
Connecting the Power Cord 18
Turning On & Basic Operations
Turning On/Off the AV Receiver 19
Turning On 19
Turning Off 19
Initial Setup....20
Selecting the Language
for the Onscreen Setup Menus....20
Audyssey 2EQ: Auto Setup....20
Source Connection....21
Remote Mode Setup 21
Network Connection....21
Terminating the Initial Setup 21
Playback 22
Playing the Connected Component 22
Controlling Contents of USB or Network Devices..... 23
Understanding Icons on the Display 24
Playing an iPod/iPhone via USB.... 24
Playing a USB Device.... 25
Listening to vTuner Internet Radio.... 26
Registering Other Internet Radio 27
Changing the Icon Layout
on the Network Service Screen....27
Playing Music Files on a Server 28
Remote Playback.... 29
Listening to AM/FM Radio 30
Using Basic Functions 32
Using the Automatic Speaker Setup....32
Using the Listening Modes 35
Using the Home Menu 40
Using the Sleep Timer ....41
Setting the Display Brightness....41
Displaying Source Information....41
Changing the Input Display.... 41
Using the Music Optimizer....42
Muting the AV Receiver 42
Using Headphones 42
Advanced Operations
On-screen Setup....43
Using the Quick Setup 43
Using the Audio Settings of Quick Setup....44
Using the Setup Menu (HOME) 46
About the HYBRID STANDBY indicator 47
Setup menu items.... 47
Input/Output Assign 48
Speaker Setup 50
Audio Adjust.... 52
Source Setup 53
Listening Mode Preset 58
Miscellaneous 59
Hardware Setup....59
Remote Controller Setup 63
Lock Setup....63
Zone 2 64
Making Zone 2 Connections 64
Controlling Zone 2 Components ....65
Safety Information and Introduction
Controlling Other Components
iPod/iPhone Playback via Onkyo Dock 66
Using the Onkyo Dock.... 66
Controlling Your iPod/iPhone 67
Controlling Other Components.... 68
Preprogrammed Remote Control Codes 68
Looking up for Remote Control Codes 68
Entering Remote Control Codes.... 69
Remapping Colored Buttons 69
Remote Control Codes
for Onkyo Components Connected via RI ..... 70
Resetting the REMOTE MODE Buttons 70
Resetting the Remote Controller 70
Controlling Other Components 70
Appendix
Troubleshooting 73
Firmware Update 79
Connection Tips and Video Signal Path 83
Using an RIHD-compatible TV, Player,
or Recorder 86
About HDMI....88
Network/USB Features....89
License and Trademark Information 92
Specifications 93
To reset the AV receiver to its factory defaults, turn it on and, while holding down CBL/SAT, press
ON/STANDBY ( → page 73).

En-5


Features
Amplifier
• 80 Watts/Channel @ 8 ohms (FTC)
• Optimum Gain Volume Circuitry
• H.C.P.S. (High Current Power Supply) Massive High Power Transformer
Processing
- Incorporates Qdeo™ technology for HDMI Video Upscaling (to 4K Compatible)
• HDMI (Audio Return Channel, 3D, DeepColor, x.v.Color, Lip Sync, DTS-HD Master Audio, DTS-HD High Resolution Audio, Dolby TrueHD, Dolby Digital Plus, DSD and Multi-CH PCM)
• Dolby Pro Logic IIz
• Non-Scaling Configuration
• A-Form Listening Mode Memory - Direct Mode
• Music Optimizer for Compressed Digital Music files
• 192 kHz/24-bit D/A Converters
• Powerful and Highly Accurate 32-bit Processing DSP
• Jitter Cleaning Circuit Technology
Connections
• 8 HDMI Inputs (1 on front panel) and 2 Outputs
• Onkyo RIHD for System Control
• 4 Digital Inputs (2 Optical/2 Coaxial)
- Component Video Switching (1 Input/1 Output)
- Banana Plug-Compatible Speaker Posts
- Powered Zone 2
• Bi-Amping Capability for FL/FR with SBL/SBR
- Internet Radio Connectivity
• Network Capability for Streaming Audio Files
- 2 USB Inputs (Front/Rear) for Memory Devices and iPod®/iPhone® models (Enables Display of Album Artwork)
* Only the front-panel USB input is compatible with iPod/iPhone.
• MHL-Enabled AUX Front Input
Miscellaneous
• 40 FM/AM Presets
- Audyssey 2EQ® to correct room acoustic problems
- Audyssey Dynamic EQ® for loudness correction
- Audyssey Dynamic Volume® to maintain optimal listening level and dynamic range
• Crossover Adjustment
(40/50/60/70/80/90/100/120/150/200 Hz)
• A/V Sync Control Function (up to 800 ms)
• Auto Standby Function
• On-Screen Display via HDMI
• Preprogrammed RI-Compatible Remote
Safety Information and Introduction

En-6


Front & Rear Panels
Front Panel

For detailed information, see the pages in parentheses.
① ON/STANDBY button (19)
② ZONE 2, OFF buttons (65)
③ Remote control sensor (4)
④ Display (8)
⑤ LISTENING MODE buttons (35)
⑥ DIMMER button (41)
⑦ MEMORY button (31)
⑧ TUNING MODE button (30)
⑨ DISPLAY button (41)
⑩ SETUP button (46)
⑪ TUNING ▲/▼ (30), PRESET ◀/▶ (31), cursor and ENTER buttons
⑫ RETURN button
⑬ MASTER VOLUME control (22)
⑭ MUSIC OPTIMIZER button and indicator (42, 45)
⑮ PHONES jack (42)
⑯ AUX INPUT HDMI/MHL jack (15)
⑰ TONE and Tone Level buttons (44)
⑱ Input selector buttons (22)
⑲ VIDEO jack (16)
⑳ USB port (16)
②1 SETUP MIC jack (33)
② HYBRID STANDBY indicator (47)

En-7


Display

For detailed information, see the pages in parentheses.
① Z2 (Zone 2) indicator (65)
② 3D indicator
This lights when a 3D input signal is detected.
③ Headphone indicator (42)
④ ▶, Ⅱ and cursor indicators (24)
⑤ Listening mode and format indicators (35)
⑥ Audyssey indicator (32, 53)
Dynamic EQ indicator (54)
Dynamic Vol indicator (54)
⑦ M.Opt indicator (42, 45)
⑧ Tuning indicators
AUTO indicator (30)
TUNED indicator (30)
FM STEREO indicator (30)
⑨ MUTING indicator (42)
⑩ Input indicators (84)
HDMI indicator (60)
DIGITAL indicator
⑪ ARC indicator (61)
⑫ USB indicator (24, 25)
⑬ NET indicator (26 to 29, 62)
⑭ Message area
⑮ SLEEP indicator (41)
⑯ Channel/Unit indicators
ch indicator
Hz indicator
m/ft indicator
dB indicator
① DIGITAL IN COAXIAL and OPTICAL jacks
② COMPONENT VIDEO IN and OUT jacks
③ USB port
④ ETHERNET port
⑤ FM ANTENNA jack and AM ANTENNA terminal
⑥ HDMI IN and HDMI output (HDMI OUT MAIN and HDMI OUT SUB) jacks
⑦ SPEAKERS terminals
(CENTER, FRONT, SURROUND, SURROUND BACK or FRONT HIGH, ZONE 2)
⑧ Power cord
⑨ RI REMOTE CONTROL jack
⑩ Composite video and analog audio jacks (BD/DVD IN, CBL/SAT IN, GAME IN, PC IN, TV/CD IN)
⑪ ZONE 2 LINE OUT jacks
⑫ SUBWOOFER PRE OUT jacks
⑬ MONITOR OUT V jack
See "Connecting the AV Receiver" for connection (→ pages 11 to 18).

En-9


Remote Controller
Controlling the AV Receiver

Safety Information and Introduction
To control the AV receiver, press RECEIVER to select Receiver mode.
You can also use the remote controller to control Onkyo Blu-ray Disc/DVD player, CD player, and other components.
See "Entering Remote Control Codes" for more details (→ page 69).
For detailed information, see the pages in parentheses.
① ◊ RECEIVER button (19)
② REMOTE MODE/INPUT SELECTOR buttons (22)
③ ▲/▼/◄/► and ENTER buttons
④ Q SETUP button (43)
⑤ Listening Mode buttons (35)
⑥ DIMMER button (41)
⑦ MUTING button (42)
⑧ DISPLAY button (41)
⑨ VOL ▲/▼ button (22)
⑩ RETURN button
⑪ HOME button (40)
⑫ SLEEP button (41)
■Controlling the tuner
To control the AV receiver's tuner, press AM or FM (or RECEIVER).
① ▲/▼ buttons (30)
② D.TUN button (30)
③ DISPLAY button
④ CH +/- button (31)
⑤ Number buttons (30)
Connecting the AV Receiver
Connecting Your Speakers
Speaker Configuration
The following table indicates the channels you should use depending on the number of speakers that you have.
No matter how many speakers you use, a powered subwoofer is recommended for a really powerful and solid bass.
To get the best from your surround sound system, you need to set the speaker settings automatically ( → page 32) or manually ( → page 50).
| Number of speakers 2 3 4 5 6 7 7 | ||||||
| Front speakers √ √ √ √ √ √ | ||||||
| Center speaker √ √ √ √ √ | ||||||
| Surround speakers √ √ √ √ √ | ||||||
| Surround back speaker 1*2 | √ | |||||
| Surround back speakers 2 | √ | |||||
| Front high speakers 2 |
*1 If you're using only one surround back speaker, connect it to the SURROUND BACK or FRONT HIGH L terminals.
*2 Front high and surround back speakers cannot be used at the same time.
Connecting the Speaker Cables
The following illustration shows how to connect the speakers to each pair of terminals. If you're using only one surround back speaker, connect it to the SURROUND
BACK or FRONT HIGH L terminals.
Tip
- You can specify whether surround back or front high speakers are connected in the "Speaker Configuration" menu (→ page 50) or during Audyssey 2EQ® Room Correction and Speaker Setup (→page 32).
Connections

flowchart
graph TD
    A["Surround back/ Front high right"] --> B["SURROUND BACK or FRONT high"]
    C["Surround back/ Front high left"] --> D["SURROUND"]
    E["Front right"] --> F["R"]
    G["Front left"] --> H["R"]
    I["Center"] --> J["SPEAKERS"]
    K["Surround left"] --> L["SURROUND"]
    M["Front right"] --> N["SURROUND"]
    O["Front left"] --> P["SURROUND"]
    Q["Center"] --> R["SPEAKERS"]
■Screw-type speaker terminals
Strip 1/2" to 5/8" (12 to 15 mm) of insulation from the ends of the speaker cables, and twist the bare wires tightly, as shown.

■Push-type speaker terminals
Strip 3/8" to 1/2" (10 to 12 mm) of insulation from the ends of the speaker cables, and twist the bare wires tightly, as shown.

Banana Plugs
- If you are using banana plugs, tighten the speaker terminal before inserting the banana plug.
- Do not insert the speaker code directly into the center hole of the speaker terminal.

En-11


Attaching the Speaker Cable Labels
The speaker terminals are color-coded for identification purpose.
| Speaker Color | |
| Front left, Front high left, Zone 2 left White | |
| Front right, Front high right, Zone 2 right Red | |
| Center Green | |
| Surround left Blue | |
| Surround right Gray | |
| Surround back left Brown | |
| Surround back right Tan |
The supplied speaker cable labels are also color-coded and you should attach them to the positive (+) side of each speaker cable in accordance with the table above. Then all you need to do is to match the color of each label to the corresponding speaker terminal.

Speaker Connection Precautions
Read the following before connecting your speakers:
- You can connect speakers with an impedance of between 6 and 16 ohms. If you use speakers with a lower impedance, and use the amplifier at high volume levels for a long period of time, the built-in amp protection circuit may be activated.
- Disconnect the power cord from the wall outlet before making any connections.
- Read the instructions supplied with your speakers.
- Pay close attention to speaker wiring polarity. In other words, connect positive (+) terminals only to positive (+) terminals, and negative (−) terminals only to negative (−) terminals. If you get them the wrong way around, the sound will be out of phase and will sound unnatural.
- Unnecessarily long, or very thin speaker cables may affect the sound quality and should be avoided.
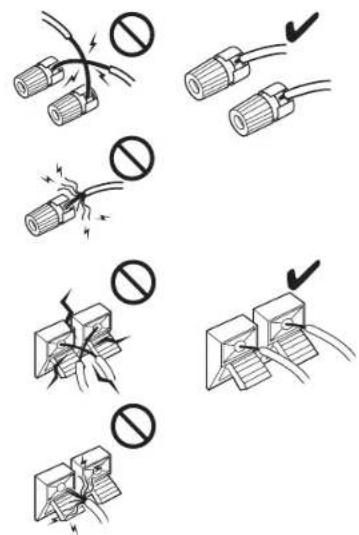
- Be careful not to short the positive and negative wires. Doing so may damage the AV receiver. - Make sure the metal core of the wire does not have contact with the AV receiver's rear panel. Doing so may damage the AV receiver.
Connections
- Don't connect more than one cable to each speaker terminal. Doing so may damage the AV receiver.
- Don't connect one speaker to several terminals.


En-12


Using Powered Subwoofers

flowchart
graph TD
    A["Input 1"] --> B["LINE INPUT"]
    C["Input 2"] --> D["LINE INPUT"]
    B --> E["Control Panel"]
    D --> E
    E --> F["Terminal"]
    style A fill:#f9f,stroke:#333
    style C fill:#f9f,stroke:#333
    style E fill:#ccf,stroke:#333
Powered subwoofer
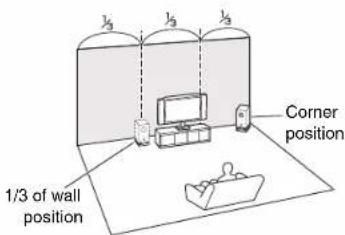
To find the best position for your subwoofer, while playing a movie or some music with good bass, experiment by placing your subwoofer at various positions within the room, and choose the one that provides the most satisfying results.
You can connect the powered subwoofer with two SUBWOOFER PRE OUT jacks respectively.
The same signal is output from each jack.
Tlp
- If your subwoofer is unpowered and you're using an external amplifier, connect the subwoofer pre out jack to an input on the amplifier.
Bi-amping the Front Speakers
Important:
- When making the bi-amping connections, be sure to remove the jumper bars that link the speakers' tweeter (high) and woofer (low) terminals.
- Bi-amping can be used only with speakers that support bi-amping. Refer to your speaker manual.
Bi-amping provides improved bass and treble performance. When bi-amping is used, the AV receiver is able to drive up to a 5.1 speaker system in the main room. Once you've completed the bi-amping connections as shown and turned on the AV receiver, you must set the speaker setting to enable bi-amping (→ page 50).

Front right Front left
Connections

En-13


About AV Connections
Connecting AV components
HDMI cable

flowchart
graph TD
    A["TV, projector, etc."] --> B["AV receiver"]
    B --> C["Blu-ray Disc/ DVD player"]
    B --> D["Game console"]
Other cables

flowchart
graph TD
    A["TV, projector, etc."] --> B["AV receiver"]
    B --> C["Blu-ray Disc/DVD player"]
    B --> D["Game console"]
    B --> E["Video"]
    B --> F["Audio"]
- Before making any AV connections, read the manuals supplied with your AV components.
- Don't connect the power cord until you've completed and double-checked all AV connections.
- Push plugs in all the way to make good connections (loose connections can cause noise or malfunctions).
• To prevent interference, keep audio and video cables away from power cords and speaker cables.

AV Cables and Jacks
HDMI
HDMI connections can carry digital video and audio.

■ Component video
Component video separates the luminance (Y) and color difference signals (PB, PR), providing the best picture quality (some TV manufacturers label their component video sockets slightly differently).


Green
Blue
Red
■Composite video
Composite video is commonly used on TVs, DVDs, and other video equipment.


Yellow
■Optical digital audio
Optical digital connections allow you to enjoy digital sound such as PCM 1 , Dolby Digital or DTS. The audio quality is the same as coaxial.


Coaxial digital audio
Coaxial digital connections allow you to enjoy digital sound such as PCM 1 , Dolby Digital or DTS. The audio quality is the same as optical.

Orange

En-14

Connections
■Analog audio (RCA)
Analog audio connections (RCA) carry analog audio.


White
Rcd
*1 For PCM signals, the supported sampling rates are 32/44.1/48/88.2/96 kHz. With HDMI connections, 176.4 and 192 kHz are also supported.
Note
- The AV receiver does not support SCART plugs.
- The AV receiver's optical digital jacks have shutter-type covers that open when an optical plug is inserted and close when it's removed. Push plugs in all the way.
Caution
• To prevent shutter damage, hold the optical plug straight when inserting and removing.


Connecting Components with HDMI
Connections
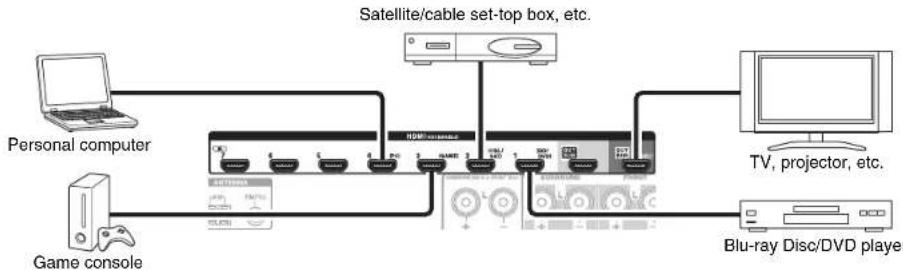
flowchart
graph TD
    A["Personal computer"] --> B["Game console"]
    B --> C["Satellite/cable set-top box, etc."]
    C --> D["TV, projector, etc."]
    D --> E["Blu-ray Disc/DVD player"]
* If your TV doesn't support Audio Return Channel (ARC), you need to connect an optical digital cable together with the HDMI cable to the AV receiver.
* When listening to an HDMI component through the AV receiver, set the HDMI component so that its video can be seen on the TV screen (on the TV, select the input of the HDMI component connected to the AV receiver). If the TV power is off or the TV is set to another input source, this may result in no sound from the AV receiver or the sound may be cut off.
Connect your components to the appropriate jacks. The default input assignments are shown below.
√: Assignment can be changed (→ page 48).
Jack Components
| IN1 Blu-ray Disc/DVD player √ | ||
| IN2 Satellite/cable set-top box, etc. √ | ||
| IN3 Game console √ | ||
| IN4 Personal computer √ | ||
| IN5 Other components √ | ||
| IN6 Other components √ | ||
| IN7 Other components √ | ||
| Front Camcorder, etc. | ||
| OUT MAIN TV | ||
| OUT SUB | Projector, etc. | |
See also:
- "Connection Tips and Video Signal Path" (→ page 83)
- "Using an RIHD-compatible TV, Player, or Recorder" (→page 86)
- "About HDMI" (→ page 88)
Tip
- To listen to the audio of a component connected via HDMI through your TV's speakers, enable "HDMI Through" (→ page 60) and set the AV receiver to standby mode.

Note
- In the case of Blu-ray Disc/DVD players, if no sound is output despite following the above-mentioned procedure, set your Blu-ray Disc/DVD player's HDMI audio settings to PCM.
■Audio Return Channel (ARC) function
The Audio Return Channel (ARC) function enables an HDMI capable TV to send the audio stream to HDMI OUT MAIN on the AV receiver.
- This function can be used when:
- Your TV is ARC capable, and
- The TV/CD input selector is selected, and
- "HDMI Control(RIHD)" is set to "On" (→ page 60), and
- "Audio Return Channel" is set to "Auto" (→ page 61).
■MHL (Mobile High-Definition Link)
With its support for MHL (Mobile High-Definition Link), the AUX (Front) input allows you to deliver high-definition video from a connected mobile device.

En-15


Connecting Your Components

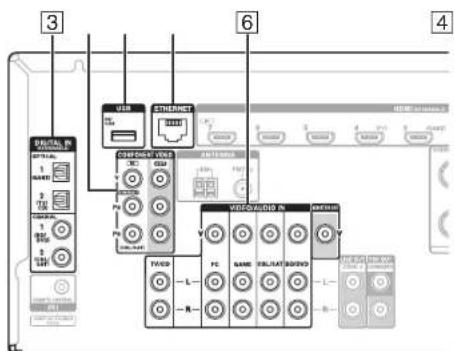
Connect your components to the appropriate jacks. The default input assignments are shown below. See "Connection Tips and Video Signal Path" for more information (→ page 83).
The on-screen menus appear only on a TV that is connected to HDMI OUT MAIN. If your TV is connected to other video outputs, use the AV receiver's display when changing settings.
√: Assignment can be changed (→ page 49).
No. Jack/Port Components
| 1 | USB. VIDEO*1 | iPod/iPhone (vidco playback) | |
| 2 | USB*2*3 | iPod/iPhone, MP3 player. USB flash drive | |
| 3 | DIGITAL IN | ||
| OPTICAL 1 (GAME) Game consoles √ | |||
| OPTICAL 2 (TV/CD) TV, CD player √ | |||
| COAXIAL 1 (BD/DVD) Blu-ray Disc/DVD player √ | |||
| COAXIAL 2 (CBL/SAT) Satellite/cable set-top box, RI dock, etc. | √ | ||
| 4 | COMPONENT VIDEO | ||
| IN (CBL/SAT) Satellite/cable set-top box. RI dock, etc. | √ | ||
| OUT TV, projector, etc. | |||
| 5 | ETHERNET | Router | |
| 6 | MONITOR OUT | TV, projector, etc. | |
| BD/DVD IN | Blu-ray Disc/DVD player | ||
| CBL/SAT IN Satellite/cable set-top box, etc. | |||
| GAME IN | Game console, RI dock | ||
| PC IN | Personal computer | ||
| TV/CD IN | TV, CD player, cassette tape deck, MD, CD-R, Turntable*4. RI dock | ||

En-16

Connections
Note
* When the USB input is selected, you can input video signals from the VIDEO jack. Video signals input from VIDEO will be output from the MONITOR OUT and HDMI output jacks.
2 Do not connect the AV receiver's USB port to a USB port on your computer. Music on your computer cannot be played through the AV receiver in this way.
3 Only the front-panel USB input is compatible with iPod/iPhone.
4 Connect a turntable (MM) that has a phono precamp built-in. If your turntable (MM) doesn't have it, you'll need a commercially available phono precamp.
If your turntable has a moving coil (MC) type cartridge, you'll need a commercially available MC head amp or MC transformer as well as a phono precamp. See your turntable's manual for details.
- With connection ③, you can enjoy Dolby Digital and DTS. (To listen in Zone 2 as well, use ③ and ⑥.)
- With connection 6, you can enjoy audio from external components while you are in Zone 2.
- With connection [6], if your Blu-ray Disc/DVD player has both the main stereo and multichannel outputs, be sure to connect the main stereo.


Connecting Onkyo RI Components
1 Make sure that each Onkyo component is connected with an analog audio cable (connection 6 in the hookup examples) (→ page 16).
2 Make the RI connection (see the illustration).
3 If you're using an RI Dock, or cassette tape deck, change the Input Display (→ page 41).
With RI (Remote Interactive), you can use the following special functions:
■System On/Auto Power On
When you start playback on a component connected via RI, while the AV receiver is on standby, the AV receiver will automatically turn on and select that component as the input source.
■Direct Change
When playback is started on a component connected via RI, the AV receiver automatically selects that component as the input source.
Remote Control
You can use the AV receiver's remote controller to control your other RI-capable Onkyo components, pointing the remote controller at the AV receiver's remote control sensor instead of the component. You must enter the appropriate remote control code first (→page 70).

flowchart
graph TD
    A["RS1"] --> B["e.g., cassette tape deck"]
    C["RS2"] --> B
    D["RS3"] --> B
    E["RS4"] --> B
    F["RS5"] --> G["Ri Dock"]
    H["TWCD"] --> I["L"]
    J["GARE"] --> K["R"]
    L["ANALOG AUDIO OUT"] --> M["L R"]
    N["ANALOG AUDIO OUT"] --> O["L II"]
Note
- Use only RI cables for RI connections. RI cables are supplied with Onkyo components.
- Some components have two RI jacks. You can connect either one to the AV receiver. The other jack is for connecting additional RI-capable components.
- Connect only Onkyo components to RI jacks. Connecting other manufacturer's components may cause a malfunction.
- Some components may not support all RI functions. Refer to the manuals supplied with your Onkyo components.
- While Zone 2 is on, the System On/Auto Power On and Direct Change RI functions do not work.
Connections
Connecting the Antennas
This section explains how to connect the supplied indoor FM antenna and AM loop antenna.
The AV receiver won't pick up any radio signals without any antenna connected, so you must connect the antenna to use the tuner.
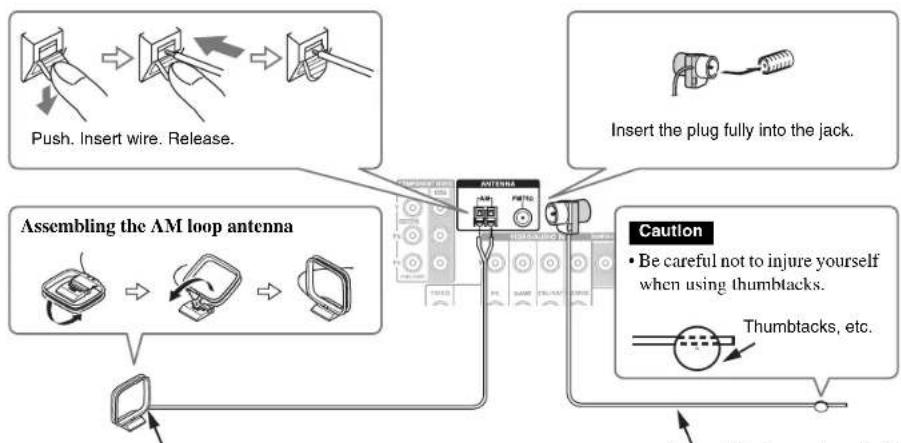
flowchart
graph TD
    A["Push. Insert wire. Release."] --> B["Switch"]
    C["Insert the plug fully into the jack."] --> D["Plug with plug"]
    E["Assembling the AM loop antenna"] --> F["Switch with plug"]
    G["Caution"] --> H["Check for unsecured thumbtacks"]
    I["Thumbtacks, etc."] --> J["Check for unsecured thumbtacks"]
Indoor FM antenna (supplied) AM loop antenna (supplied)
Note
- Once your AV receiver is ready for use, you'll need to tune into a radio station and position the antenna to achieve the best possible reception.
- Keep the AM loop antenna as far away as possible from your AV receiver, TV, speaker cables, and power cords.
Tip
- If you cannot achieve good reception with the supplied indoor FM antenna, try a commercially available outdoor FM antenna instead.
- If you cannot achieve good reception with the supplied indoor AM loop antenna, try using it with a commercially available outdoor AM antenna.
Connecting the Power Cord
1 Plug the power cord into an AC wall outlet.
Note
- Before connecting the power cord, connect all of your speakers and AV components.
- Turning on the AV receiver may cause a momentary power surge that might interfere with other electrical equipment on the same circuit. If this is a problem, plug the AV receiver into a different branch circuit.
Turning On/Off the AV Receiver
ON/STANDBY

Turning On & Basic Operations
Turning On
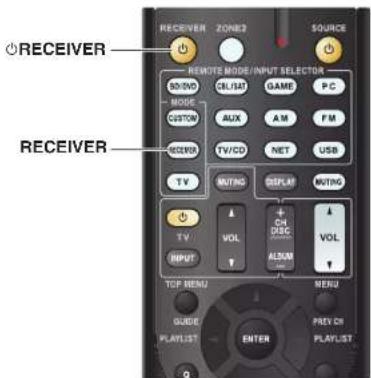
1 Press ⏻ON/STANDBY on the front panel. or
Press RECEIVER followed by ⏻RECEIVER on the remote controller.
The AV receiver comes on and its display lights.
Turning Off
1 Press ON/STANDBY on the front panel. or
Press RECEIVER followed by ⏻RECEIVER on the remote controller.
The AV receiver will enter standby mode. To prevent any loud surprises when you turn on the AV receiver, always turn down the volume before you turn it off.
Tip
- The HYBRID STANDBY indicator may light depending on the status of settings (→ page 47).
- For details on power management settings, see "Auto Standby" (→ page 61).
■ Smooth Operation In a Few Easy Steps (Initial Setup)
To ensure smooth operation, here's a few easy steps to help you configure the AV receiver before you use it for the very first time. These settings only need to be made once. See "Initial Setup" for details (→ page 20).
If the "Firmware Update Available" window appears.
When a new version of the firmware is available, the notification window "Firmware Update Available" pops up. This notification only appears when the AV receiver is connected to your home network
(→ page 89). To perform the firmware update, follow the instructions on screen.
Use ▲/▼ and ENTER on the AV receiver or remote controller to select one of the options.
Update Now:
Starts the firmware update.
Refer to "Firmware Update" (→ page 79).
Remind me Later:
The update notification will pop up again the next time you turn the AV receiver on.
▶ Never Remind me:
Disables the automatic update notification.
Tlp
- The update notification window can be enabled or disabled in "Update Notice" (→ page 62).
Initial Setup
This section explains the settings that we recommend you to make before using the AV receiver for the very first time. A setup wizard is launched upon first-time use to let you perform those settings.
The on-screen menus appear only on a TV that is connected to HDMI OUT MAIN.
Selecting the Language for the Onscreen Setup Menus
This step determines the language used for the onscreen setup menus. See "Language" in "OSD Setup" (→page 59).
Tip
- Pressing HOME will close the setup wizard. To restart the initial setup, select "Initial Setup" in the "Hardware Setup" menu (→page 62).
After selecting the language for on-screen setup menus, a welcome screen is displayed.

1 Use ▲/▼ on the AV receiver or remote controller to select one of the following options, and then press ENTER.
Yes: Continues to "Audyssey 2EQ: Auto Setup".
No: Skips the settings and terminates the initial setup. The setup wizard goes to "Terminating the Initial Setup". You can always restart the initial setup by selecting "Initial Setup" in the "Hardware Setup" menu (→ page 62).
Audyssey 2EQ: Auto Setup
This step performs the automatic speaker setup.
1 Use ▲/▼ to select one of the following options, and then press ENTER.
Do it Now: The automatic speaker setup is performed following instructions on screen. Refer to step 2 of "Using the Automatic Speaker Setup" (→ page 32). When this setting is complete, the setup wizard continues to "Source Connection".
Do it Later: Skips this setting. Press ENTER and continue to "Source Connection".
Source Connection
This step checks the connection of source components.
1 Use ▲/▼ to select one of the following options, and then press ENTER.
Yes, Continue: Performs the checkings.
No, Skip:
Skips this step and continues to "Remote Mode Setup".
2 Select the input selector for which you want to check the connection and press ENTER.
The picture of the corresponding source should appear on screen with a verification prompt.
3 When prompted, use ▲/▼ to select one of the following options and then press ENTER.
Yes: Confirms that the source is properly displayed. No: Displays an error report. Follow the troubleshooting instructions and recheck the source.
4 Use ▲/▼ to select one of the following options, and then press ENTER.
- Yes: Returns to step 2. - No, Done Checking: The setup wizard continues to "Remote Mode Setup".
Remote Mode Setup
With this step, you can enter remote control codes for the components you want to operate.
1 Use ▲/▼ to select one of the following options, and then press ENTER.
Yes: Performs the remote control code input. Refer to step 5 of "Looking up for Remote Control Codes" (→ page 68). No, Skip: Skips this step and continues to "Network Connection".
2 When you're finished, select one of the following options and press ENTER.
Yes, Done: The setup wizard continues to "Network Connection". No, not yet: You can enter other remote control codes
Network Connection
This step checks your network connection.
1 Use ▲/▼ to select one of the following options, and then press ENTER.
Yes: Performs the checkings.
No, Skip:
Skips this step and terminates the initial setup.
Note
- If you use both wired and wireless network connections, the wireless will take priority. For further details, see the instruction manual provided with your wireless device.
2 Follow the instructions on screen to perform the network checking.
The checking is complete when the message "Successfully connected." appears at the middle of the screen. Press ENTER to terminate the initial setup.
3 If an error message appears, select one of the following options and press ENTER.
▶ Retry:
Performs the checking again.
No, Do it Later:
Skips this step and terminates the initial setup.
The setup wizard goes to "Terminating the Initial Setup".
Terminating the Initial Setup
This step ends the initial setup process.
1 Press ENTER.
To restart the initial setup, select "Initial Setup" in the "Hardware Setup" menu (→ page 62).
Playback
The on-screen menus appear only on a TV that is connected to HDMI OUT MAIN. If your TV is connected to other video outputs, use the AV receiver's display when changing settings.
This section describes the procedure for using the remote controller, unless otherwise specified.
Turning On & Basic Operations
Playing the Connected Component
■Operating with the remote controller
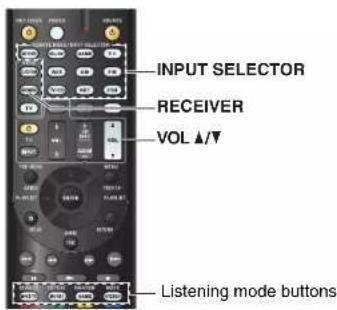
■Operating on the AV receiver
Input selector buttons

1 Use the input selector buttons to select the input source.
2 Start playback on the source component.
3 To adjust the volume, use the MASTER VOLUME control.
4 Select a listening mode and enjoy!
Screen Saver
If there is no video signal on the current input source and no operation for a specific time (three minutes by default), a screen saver automatically comes on.
Tip
- The time until the screen saver activates itself can be changed in the "Screen Saver" setting (→ page 59).
- The screen will return to its previous state if the AV receiver is operated.
1 Press RECEIVER followed by an INPUT SELECTOR button.
2 Start playback on the source component. See also:
- "Playing an iPod/iPhone via USB" (→ page 24)
- "Playing a USB Device" (→ page 25)
• "Listening to vTuner Internet Radio" (→ page 26) - "Registering Other Internet Radio" (→ page 27)
- "Playing Music Files on a Server" (→ page 28)
- "Remote Playback" (→ page 29)
• "Listening to AM/FM Radio" (→ page 30) - “iPod/iPhone Playback via Onkyo Dock” (→page 66)
- "Controlling Other Components" (→ page 68)
3 To adjust the volume, use VOL ▲/▼.
4 Select a listening mode and enjoy!
See also:
• "Using the Listening Modes" (→ page 35)

En-22


Controlling Contents of USB or Network Devices

Turning On & Basic Operations
① TOP MENU
This button displays the top menu for each media or service.
② ▲/▼ and ENTER
These buttons navigate through the menus.
This button cycles through pages.
In Standard Mode (iPod/iPhone), this button selects playlists.
③
This button starts playback.
④
This button selects the beginning of the current song. Pressing this button twice selects the previous song.
⑤
This button fast-reverses the current song.
⑥ II
This button pauses playback.
⑦ SEARCH
You can toggle between the playback screen and the list screen during playback.
⑧ DISPLAY
This button switches between song information during playback.
Press this button while the list screen is displayed to return to the playback screen.
⑨ ALBUM +/-
In Standard Mode (iPod/iPhone), this button selects albums.
⑩ MENU
This button displays the menu of Internet radio services.
⑪ RETURN
This button returns to the previous menu.
⑫
This button fast-forwards the current song.
⑬
This button selects the next song.

PLAYLIST ◀/▶
⑭
This button stops playback.
⑮ MODE
You can switch between Standard Mode and Extended Mode during iPod/iPhone playback.
16 RANDOM
This button performs random playback.
⑰ REPEAT
Press this button repeatedly to cycle through the repeat modes.
Tip
- See "Controlling Other Components" about the operation of other components (→ page 68).
Note
- The buttons you can use will differ depending on the devices and media used for playback.

En-23


Understanding Icons on the Display
This section describes icons that appear on the AV receiver's display during media playback.
| Icon Description | |
| Folder | |
| Track | |
| Playback | |
| Pause | |
| Fast Forward | |
| Fast Reverse | |
| Artist | |
| Album | |
| Repeat One Track | |
| Repeat Folder (USB Device) | |
| Repeat | |
| Shuffle | |
| Shuffle Album (iPod/iPhone) | |
Playing an iPod/iPhone via USB
The on-screen menus appear only on a TV that is connected to HDMI OUT MAIN.
This section explains how to play music/video files on the iPod/iPhone.
Compatible iPod/iPhone models
Made for:
iPod touch (1st, 2nd, 3rd and 4th generation), iPod classic, iPod nano (2nd, 3rd, 4th, 5th and 6th generation),
iPhone 4S, iPhone 4, iPhone 3GS, iPhone 3G, iPhone
1 Press USB repeatedly to select the "USB(Front)" input.
Tip
- The same operation can be done by selecting "USB" in the Home menu.
2 Connect the USB cable that comes with the iPod/iPhone to the USB port on the front of the AV receiver.
While reading the contents of your iPod/iPhone, the message "Connecting..." appears on the AV receiver's display.
The USB indicator lights. It will flash if the AV receiver cannot read the iPod/iPhone.
Tip
- When connecting your iPod/iPhone with a USB cable, we recommend you use an official USB cable from Apple Inc.
3 Press MODE repeatedly to switch to Extended Mode (Music) or Extended Mode (Video).
A list of your iPod/iPhone model's contents appears.
Tip
- If you want to operate using the iPod/iPhone or the remote controller, press MODE repeatedly to switch to Standard mode.
- When you disconnect the iPod/iPhone, the AV receiver remembers the current mode. This means that if you disconnect when in Extended Mode (Music), the AV receiver will start in Extended Mode (Music) the next time you connect the iPod/iPhone.
4 Use ▲/▼ to select a folder, and then press ENTER to open it.
Tlp
- You can also use the ▲/▼, ENTER and TUNING MODE buttons on the front panel. TUNING MODE allows you to switch modes.
5 Use ▲/▼ to select a music/video file, and press ENTER or ▶ to start playback.
Note
- While the message "Connecting..." appears on the AV receiver's display, do not disconnect the USB cable supplied with your iPod/iPhone or the USB device from the USB port.
- If you connect an iPod or iPhone to the USB port, no sound will be output from the headphones jack.
Extended Mode (Music) Control
The music content information is displayed (lists are displayed), and you can control the music content while looking at the screen.
Top screen list:
Playlists, Artists, Albums, Genres, Songs, Composers, Shuffle Songs, Now Playing.
Note
- In this mode, video contents are not displayed, even if they are input from the VIDEO jack on the AV receiver's front panel.
Extended Mode (Video) control
The video content information is displayed (lists are displayed), and you can control the video content while looking at the screen.
Top screen list:
Movies, Music Videos, TV Shows, Video Podcasts, Rentals.
Note
• To view the video contents of your iPod/iPhone, connect it to the USB port and VIDEO jack on the AV receiver's front panel, using the official Apple Composite AV Cable.
- Depending on your iPod/iPhone model and generation, the displayed items may vary and the support for Extended Mode (Video) is not guaranteed.
Standard Mode Control
The content information is not displayed, but can be operated using the iPod/iPhone or the remote controller.
Playing a USB Device
The on-screen menus appear only on a TV that is connected to HDMI OUT MAIN.
This section explains how to play music files from a USB device (e.g., USB flash drives and MP3 players). See also:
• "Network/USB Features" (→ page 89).
1 Press USB repeatedly to select the "USB(Front)" or "USB(Rear)" input.
2 Plug your USB device into the AV receiver's USB port.
The USB indicator lights. It will flash if the AV receiver cannot read the USB device.
3 Press ENTER.
A list of the device's contents appears. To open a folder, use ▲/▼ to select it, and then press ENTER.
4 Use ▲/▼ to select a music file, and press ENTER or ▶ to start playback.
Note
- While the message "Connecting..." appears on the AV receiver's display, do not disconnect the USB cable supplied with your iPod/iPhone or the USB device from the USB port.
Listening to vTuner Internet Radio
You need to connect the AV receiver to your home network ( → page 89). The on-screen menus appear only on a TV that is connected to HDMI OUT MAIN.
The vTuner Internet Radio Service is a portal site featuring radio stations from all over the world.
You can search for stations by categories such as genre or location. The AV receiver is preinstalled with this service.
1 Press NET.
The network service screen appears, and the NET indicator lights. If it flashes, verify that the Ethernet cable is firmly connected to the AV receiver.
Tip
- The same operation can be done by selecting "Network Service" in the Home menu.
2 Use ▲/▼/◄/► to select "vTuner Internet Radio" and then press ENTER.
3 Use ▲/▼ to select a program and then press ENTER.
Playback starts.

Tip
- You can find stations similar to the one being played. During playback, press MENU on the remote controller, select "Stations like this" and press ENTER.
■ Adding vTuner Internet Radio Stations to Favorites
There are two ways you can register specific Internet radio stations (programs) from the vTuner Internet Radio.
Adding to My Favorites
The selected program will be added to "My Favorites" on the network service screen, which appears when pressing NET on the remote controller.
- Press MENU with the station selected or while a station is playing.
- Use ▲/▼ to select "Add to My Favorites", and press ENTER.
- Use ▲/▼/◄/► to select "OK", and press ENTER.
Tip
- You can rename the stations saved in "My Favorites".
Adding to vTuner Internet Radio's Favorites
Select "vTuner Internet Radio" and press ENTER to display the "Favorites" folder that appears on the same screen as "Stations By Genre", "Stations By Location", etc. This is where your favorite Internet radio bookmarks will be stored.
To register your favorite stations using a personal computer, you need to connect your PC to the same network as the AV receiver. Enter the ID# (MAC address) of your unit on the http://onkyo.vtuner.com/. You can then register your favorite radio programs. The ID# is shown at the bottom of the "vTuner Internet Radio" top menu, and the AV receiver's MAC address is shown on "Network" of the Setup menu (→page 62).
Registering Other Internet Radio
You need to connect the AV receiver to your home network ( → page 89). The on-screen menus appear only on a TV that is connected to HDMI OUT MAIN.
Internet radio URLs in the following formats are supported: PLS, M3U, and podcast (RSS). However, depending on the type of data or audio format used by the Internet radio station, you may not be able to listen to some stations.
To listen to other Internet radio stations, you must register your station in "My Favorites" of the network service screen, as described below.
Note
• Services available may vary depending on the region. See the separate instructions for more information.
1 Select "Network" on the Setup menu to verify your IP address (→ page 62). Take a note of the IP address.
2 On your computer, start your web browser.
3 Enter the AV receiver's IP address in the browser's Internet address (URL) field. If you are using Internet Explorer®, you can also enter the URL by selecting "Open..." on the "File" menu. Information on the AV receiver is then shown on your Internet browser (Web Setup).
4 Click on the "My Favorites" tab, and enter the Internet radio station's name and URL.
5 Click "Save" to save the Internet radio station. The Internet radio station is then added to "My Favorites". To play the registered station, press NET, and then select "My Favorites" on the network service screen. A list of registered Internet radio stations appears. Select the one that you saved and press ENTER.
Tip
- If you want to add a new station directly from "My Favorites", select an empty slot in the list and press MENU. Then, select "Create New Station" and press ENTER.
Pressing ENTER again will display the keyboard screen. Use that keyboard to enter the station's name and URL respectively, and then press ENTER.
- If you want to delete a station saved in "My Favorites", press MENU with the station selected or while the station is playing. Then, use ▲/▼ to select "Delete from My Favorites" and press ENTER. You can also delete stations from the Web Setup.
- If you want to rename a station, select the desired station and press MENU. Then, use ▲/▼ to select "Rename this station" and press ENTER.
- You can save up to 40 Internet radio stations.
Changing the Icon Layout on the Network Service Screen
The layout of icons can be customized by switching their positions on the network service screen.
1 Press NET.
The network service screen appears, and the NET indicator lights. If it flashes, verify that the Ethernet cable is firmly connected to the AV receiver.
Tip
- The same operation can be done by selecting "Network Service" in the Home menu.
2 Press MODE/D (blue) on the remote controller.
3 Use ▲/▼/◄/► to select an icon to move, and then press ENTER.
4 Use ▲/▼/◄/► to select another icon as the destination, and then press ENTER.
The icons switch positions and the message "Completed!" appears.
If you press RETURN, the "Custom Mode" process will be cancelled or it will go back one step.
Playing Music Files on a Server
You need to connect the AV receiver to your home network ( → page 89). The on-screen menus appear only on a TV that is connected to HDMI OUT MAIN.
This section explains how to play music files on a computer or media server through the AV receiver (Server Playback).
1 Start your computer or media server.
2 Press NET.
The network service screen appears. The NET indicator lights. If it flashes, confirm the network connection.
Tlp
- The same operation can be done by selecting "Network Service" in the Home menu.
3 Use ▲/▼/◄/► to select "DLNA", and press ENTER.
Tip
• To go back to the previous screen, press RETURN.
4 Use ▲/▼ to select a server, and then press ENTER. The menu is displayed according to the server functions.
Note
- The search function does not work with media servers which do not support this function.
- Photos and movies stored on a media server cannot be accessed from the AV receiver.
- Depending on the sharing settings in the media server, the AV receiver may not be able to access the content. See the instruction manual of the media server.
5 Use ▲/▼ to select an item, and then press ENTER or ▶ to start playback.

Note
- Depending on the media server, ◀◀/▶▶/|| may not work.
- If the message "No Item." appears, this means that no information can be retrieved from the server. In this case, check your server, network, and AV receiver connections.
Windows Media Player 11 Setup
This section explains how to configure Windows Media Player 11 so that the AV receiver can play the music files stored on your computer.
1 Start Windows Media Player 11.
2 On the "Library" menu, select "Media Sharing". The "Media Sharing" dialog box appears.
3 Select the "Share my media" check box, and then click "OK".
A list of the supported devices appears.
4 Select the AV receiver in the list, and then click "Allow".
The corresponding icon will be checked.
5 Click "OK" to close the dialog box.
This completes the Windows Media Player 11 configuration.
You can now play the music files in your Windows Media Player 11 library through the AV receiver.
Tlp
- Windows Media Player 11 can be downloaded for free from the Microsoft web site.
Remote Playback
You need to connect the AV receiver to your home network ( → page 89). The on-screen menus appear only on a TV that is connected to HDMI OUT MAIN.
Remote Playback means you can play the music files stored on a media server or personal computer with the AV receiver by operating the controller device in the home network.
Windows Media Player 12 Setup
This section explains how to configure Windows Media Player 12 so that the AV receiver can play the music files stored on your personal computer.
1 Start Windows Media Player 12.
2 On the "Stream" menu, select "Turn on media streaming".
A dialog box appears.
Tip
- If the media streaming is already activated, clicking on "More streaming options..." in the "Stream" menu will display a list of the playback devices connected to the network. You can skip step 3.
3 Move your cursor and click on "Turn on media streaming".
A list of media server appears. Wording may vary slightly depending on the network location.
4 On the "Media streaming options", select the AV receiver and confirm that it is set to "Allow".
5 Click "OK" to close the dialog box.
This completes the Windows Media Player 12 configuration. You can now play the music files in your Windows Media Player 12 library.
Tlp
- On the "Stream" menu, confirm that "Allow remote control of my Player..." is checked.
Using Remote Playback
1 Turn on the AV receiver.
2 Start Windows Media Player 12.
To enable remote playback, you must first configure Windows Media Player 12.
3 On Windows Media Player 12, right-click on a music file.
The right-click menu appears.
Tip
- For selecting another media server, select the desired media server from the "Other Libraries" menu on Windows Media Player 12.
4 Select the AV receiver in "Remote playback".
The "Play to" window appears and playback on the AV receiver starts. Operations during remote playback can be made from the "Play to" window of Windows 7 on your personal computer.
A playback screen will be displayed on the connected TV.
5 Adjusting the Volume.
You can adjust the volume by adjusting the volume bar in the "Remote playback" window. The default maximum volume level is 64. If you wish to change this, enter the value from the Web Setup in your browser. Refer to step 3 of "Registering Other Internet Radio" for details (→ page 27).
The volume value of the remote window and the volume value of the AV receiver may not always match.
Adjustments you make to the volume in the AV receiver will not be reflected in the "Remote playback" window.
Note
- Remote playback cannot be used in any of the following cases:
- Network services are being used.
- Contents are being played from a USB device or iPod/iPhone.
- Zones are turned on.
Listening to AM/FM Radio
This section describes the procedure of using the buttons on the front panel, unless otherwise specified.
Using the Tuner
With the built-in tuner you can enjoy AM and FM radio stations. You can store your favorite stations as presets for quick selection.
You can also change the frequency steps ( → page 59).
1 Press AM or FM to select either "AM" or "FM". In this example, FM has been selected.
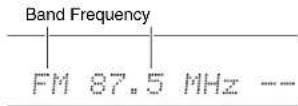
(Actual display depends on the country.)
Tuning into Radio Stations
■Auto tuning mode
1 Press TUNING MODE so that the AUTO indicator lights on the AV receiver's display.
2 Press TUNING ▲/▼.
Searching stops when a station is found.
When tuned into a station, the TUNED indicator lights. When tuned into a stereo FM station, the FM STEREO indicator lights as shown.

Tlp
• Tuning into weak FM stereo stations
If the signal from a stereo FM station is weak, it may be impossible to get good reception. In this case, switch to manual tuning mode and listen to the station in mono.
Turning On & Basic Operations
■Manual tuning mode
In manual tuning mode, FM stations will be in mono.
1 Press TUNING MODE so that the AUTO indicator goes off on the AV receiver's display.
2 Press and hold TUNING ▲/▼.
The frequency stops changing when you release the button.
Press the buttons repeatedly to change the frequency one step at a time.
■Tuning into stations by frequency
You can tune into AM and FM stations directly by entering the appropriate frequency.
1 On the remote controller, press AM or FM to select "AM" or "FM", followed by D.TUN.

(Actual display depends on the country.)
2 Within 8 seconds, use the number buttons to enter the frequency of the radio station.
For example, to tune to 87.5 (FM), press 8, 7, 5 or 8, 7, 5, 0.
If you have entered the wrong number, you can retry after 8 seconds.
Turning On & Basic Operations
Presetting AM/FM Stations
You can store a combination of up to 40 of your favorite AM/FM radio stations as presets.
1 Tune into the AM/FM station that you want to store as a preset. See the previous section.
2 Press MEMORY. The preset number flashes.
AM 530kHz
(Actual display depends on the country.)
3 While the preset number is flashing (about 8 seconds), use PRESET ◀/▶ to select a preset from 1 through 40.
4 Press MEMORY again to store the station or channel. The station or channel is stored and the preset number stops flashing. Repeat this procedure for all of your favorite AM/FM radio stations.
■ Selecting Presets
1 To select a preset, use PRESET ◀/▶ on the AV receiver, or the remote controller's CH +/-
Tlp
- You can also use the remote controller's number buttons to select a preset directly.
■ Deleting Presets
1 Select the preset that you want to delete. See the previous section.
2 While holding down MEMORY, press TUNING MODE.
The preset is deleted and its number disappears from the AV receiver's display.
Using Basic Functions
Using the Automatic Speaker Setup
With the supplied calibrated microphone, Audyssey 2EQ® automatically determines the number of speakers connected, their size for purposes of bass management, optimum crossover frequencies to the subwoofer (if present), and distances from the primary listening position. Audyssey 2EQ then removes the distortion caused by room acoustics by capturing room acoustical problems over the listening area in both the frequency and time domain. The result is clear, well-balanced sound for everyone. Audyssey 2EQ can be used with Audyssey Dynamic EQ® and Audyssey Dynamic Volume® (→ page 54). Before using this function, connect and position all of your speakers.
Audyssey 2EQ offers two ways of measuring: the "Audyssey Quick Start" and "Audyssey 2EQ Full Calibration".
- “Audyssey Quick Start” uses the measurement from one position to perform the speaker setting only.
- “Audyssey 2EQ Full Calibration” uses the measurement from three positions to correct room response in addition to the speaker setting.
The more positions are used in measuring, the better the listening environment will become. We recommend using a measurement from three positions to create the best listening environment.
The Quick Start takes 2 minutes and Full Calibration takes about 10 minutes.
Total measurement time varies depending on the number of speakers.
Measurement procedure
To create a listening environment in your home theater that all listeners will enjoy, Audyssey 2EQ takes measurements at up to three positions within the listening area. Position the microphone at ear height of a seated listener with the microphone tip pointed directly at the ceiling using a tripod. Do not hold the microphone in your hand during measurements as this will produce inaccurate results.
① First measurement position
Also referred to as the Main Listening Position, this refers to the most central position where one would normally sit within the listening environment.
Audyssey 2EQ uses the measurements from this position to calculate speaker distance, level, polarity, and the optimum crossover value for the subwoofer.
② Second measurement position
The right side of the listening area.
③ Third measurement position
The left side of the listening area.
The distances from position ① to ② and ① to ③ must be at least 1 meter (3.3 ft.).
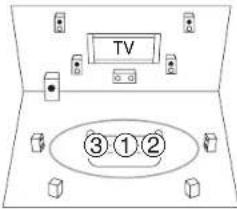
○: Listening area
① to ③: Listening position
Turning On & Basic Operations
Note
- Make the room as quiet as possible. Background noise and Radio Frequency Interference (RFI) can disrupt the room measurements. Close windows, televisions, radios, air conditioners, fluorescent lights, home appliances, light dimmers, or other devices. Turn off the cell phone (even if it is not in use) or place it away from all audio electronics.
- The microphone picks up test tones played through each speaker as Audyssey 2EQ Room Correction and Speaker Setup runs.
- Audyssey 2EQ Room Correction and Speaker Setup cannot be performed while a pair of headphones is connected.
1 Turn on the AV receiver and the connected TV. On the TV, select the input to which the AV receiver is connected.
2 Set the speaker setup microphone at the Main Listening Position ①, and connect it to the SETUP MIC jack.

The speaker setting menu appears.
Note
- The on-screen menus appear only on a TV that is connected to HDMI OUT MAIN. If your TV is connected to other video outputs, use the AV receiver's display when changing settings.
3 When you've finished making the settings, press ENTER.

Perform the "Speaker Setup" according to your speaker configuration:
- Speakers Type (Front) (→ page 50)
- Powered Zone 2 (→ page 50)
- Surround Back/Front High (→ page 50)
4 Use ▲/▼ to select "Audyssey Quick Start" or "Audyssey 2EQ Full Calibration", and then press ENTER.
5 Press ENTER.
Audyssey 2EQ® Room Correction and Speaker Setup starts.
Test tones are played through each speaker as Audyssey 2EQ Room Correction and Speaker Setup runs. This process takes a few minutes. Please refrain from talking during measurements and do not stand between speakers and the microphone.
Do not disconnect the speaker setup microphone during Audyssey 2EQ Room Correction and Speaker Setup, unless you want to cancel the setup.
If you select "Audyssey Quick Start", you will go to step 8.
6 Place the speaker setup microphone at the next position, and then press ENTER.
Audyssey 2EQ performs more measurements. This takes a few minutes.
7 When prompted, repeat step 6.
8 Use ▲/▼ to select an option, and then press ENTER.

The options are:
Save:
Save the calculated settings and exit
Audyssey 2EQ Room Correction and Speaker Setup.
Cancel:
Cancel Audyssey 2EQ Room Correction and Speaker Setup.
Tip
- You can view the calculated settings for the speaker configuration, speaker distances, and speaker levels by using ◀/▶.
9 Use ▲/▼ to select a target, and use ◀/► to change the setting.
After the results of Audyssey 2EQ have been saved, the menu will display the "Audyssey" (→ page 53), "Dynamic EQ" (→ page 54), "Dynamic Volume" (→ page 54) settings.
Note
- When "Audyssey Quick Start" has been used for measurement, "Audyssey" cannot be selected.
• These settings are applied to all input selectors.
10 Press ENTER.
11 Disconnect the speaker setup microphone.
Note
- You can cancel Audyssey 2EQ Room Correction and Speaker Setup at any point in this procedure simply by disconnecting the setup microphone.
- Do not connect or disconnect any speakers during Audyssey 2EQ Room Correction and Speaker Setup.
- If the AV receiver is muted, it will be unmuted automatically when Audyssey 2EQ Room Correction and Speaker Setup starts.
- Changes to the room after Audyssey 2EQ Room Correction and Speaker Setup requires you run Audyssey 2EQ Room Correction and Speaker Setup again, as room EQ characteristics may have changed.
Turning On & Basic Operations
Error Messages
While Audyssey 2EQ® Room Correction and Speaker Setup is in progress, one of the error messages below may appear.

flowchart
graph TD
    A["2EQ AUTO Setup"] --> B["(AUTOSET)"]
    B --> C["Ambient noise is too high"]
    C --> D["Retry"]
    C --> E["Cancel"]
    D --> F["Error message"]
    E --> F
The options are:
▶ Retry:
Try again.
Cancel:
Cancel Audyssey 2EQ Room Correction and Speaker Setup.
- Ambient noise is too high.
The background noise is too loud. Remove the source of the noise and try again.
- Speaker Matching Error!
The number of speakers detected was different from that of the first measurement. Check the speaker connection.
- Writing Error!
This message appears if saving fails. Try saving again. If this message appears after 2 or 3 attempts, contact your Onkyo dealer.
- Speaker Detect Error
This message appears if a speaker is not detected. "No" means that no speaker was detected.
Tip
- See "Speaker Configuration" for appropriate settings (→page 11).
Changing the Speaker Setup Manually
You can manually make changes to the settings found during Audyssey 2EQ Room Correction and Speaker Setup.
See also:
- "Speaker Configuration" (→ page 50)
- "Speaker Distance" (→ page 51)
• "Level Calibration" (→ page 51)
Using a Powered Subwoofer
If you're using a powered subwoofer and it outputs very low-frequency sound at a low volume level, it may not be detected by Audyssey 2EQ Room Correction and Speaker Setup.
If the "Subwoofer" appears on the "Review Speaker Configuration" screen as "No", increase the subwoofer's volume to the half-way point, set it to its highest crossover frequency, and then try running Audyssey 2EQ Room Correction and Speaker Setup again. Note that if the volume is set too high and the sound distorts, detection issues may occur, so use an appropriate volume level. If the subwoofer has a low-pass filter switch, set it to Off or Direct. Refer to your subwoofer's instruction manual for details.
Using the Listening Modes
Selecting Listening Modes
See “About Listening Modes” for detailed information about the listening modes ( → page 36).
■Listening Mode Buttons
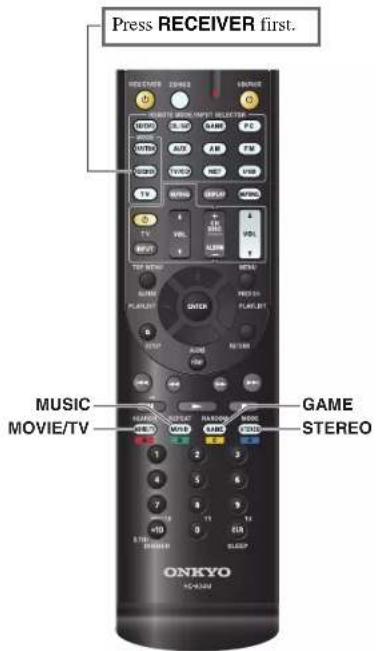
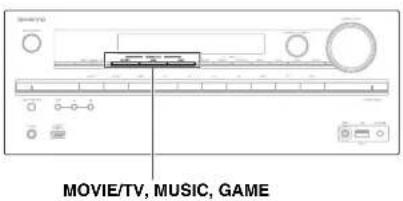
MOVIE/TV button
This button selects the listening modes intended for use with movies and TV.
MUSIC button
This button selects the listening modes intended for use with music.
GAME button
This button selects the listening modes intended for use with video games.
STEREO button
This button selects the Stereo listening mode and All Channel Stereo listening mode.
• The Dolby Digital and DTS listening modes can only be selected if your Blu-ray Disc/DVD player is connected to the AV receiver with a digital audio connection (coaxial, optical, or HDMI).
- The listening modes you can select depends on the format of the input signal. To check the format, see “Displaying Source Information” (→ page 41).
- While a pair of headphones is connected, you can select the following listening modes: Mono, Direct, and Stereo.
About Listening Modes
The AV receiver's listening modes can transform your listening room into a movie theater or concert hall, with high fidelity and stunning surround sound.
Explanatory Notes
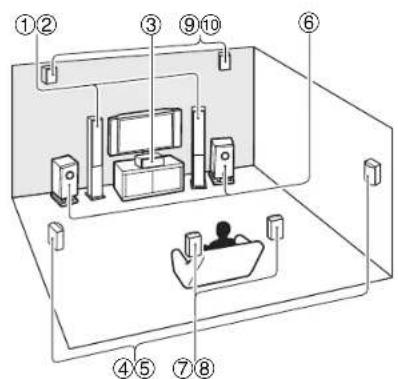
①② Front speakers
③ Center speaker
④⑤ Surround speakers
⑥ Subwoofer(s)
⑦ ⑧ Surround back speakers
⑨ ⑩ Front high speakers
Input Source
The following audio formats are supported by the listening modes.
| MONO | This is mono (monophonic) sound. |
| STEREO | This is stereo (sterephonic) sound. Two independent audio signal channels are reproduced through two speakers. |
| 5.1ch | This is 5.1-channel surround sound. This surround system has five main channels of sound and a sixth subwoofer channel (called the point-onc channel). |
| 7.1ch | This is 7.1-channel surround sound. This is a further sound enhancement to 5.1-channel sound with two additional speakers that provide greater sound envelopment and more accurate positioning of sounds. |
| DTS-ES | This is DTS-ES surround sound. This surround system can produce a discrete or a matrix-encoded sixth channel from existing DTS 5.1 encoded material. |
| DOEX | This is Dolby Digital EX surround sound. This provides a center back surround channel from 5.1-channel sources. |
Turning On & Basic Operations
Speaker Layout
The illustration shows which speakers are activated in each channel. See "Speaker Configuration" for the speaker setup (→ page 50).
| 2.1 |  |
| 3.1 |  |
| 5.1 | 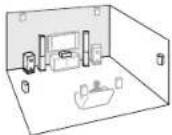 |
| 7.1 | [7.1-FH] |
[7.1-SB] |

En-36


Turning On & Basic Operations
■ Onkyo-Original DSP Listening Modes
| Listening Mode Description Input | Source | Speaker Layout | |
| OrchestraSuitable for classical or operatic music, this mode emphasizes the surround channels in order to widen the stereo image, and simulates the natural reverberation of a large hall. | MONO STEREO 5.1ch 7.1ch DTS-ES DIEX | 5.1[7.1] | |
| UnpluggedSuitable for acoustic instruments, vocals and jazz, this mode emphasizes the front stereo image, giving the impression of being right in front of the stage. | |||
| UnpluggedStudio-MixSuitable for rock or pop music, listening to music in this mode creates a lively sound field with a powerful acoustic image, like being at a club or rock concert. | |||
| TV LogicThis mode adds realistic acoustics to TV shows produced in a TV studio, surround effects to the entire sound, and clarity to voices. | |||
| Game-RPGIn this mode, the sound has a dramatic feel with a similar atmosphere to Orchestra mode. | |||
| Game-RPGGame-ActionIn this mode, sound localization is distinct with emphasis on bass. | |||
| Game-RockIn this mode, sound pressure is emphasized to heighten live feel. | |||
| Game-RockGame-SportsIn this mode, reverberation is increased and sound localization decreased slightly. | |||
| Game-SportsGame-Sports | 3.1[5.1]7.1 | ||
| All Ch StereoAll Ch Stereo | Ideal for background music, this mode fills the entire listening area with stereo sound from the front, surround, and surround back speakers. | ||
| Full MonoIn this mode, all speakers output the same sound in mono, so the sound you hear is the same regardless of where you are within the listening room. | |||
| Full MonoFull Mono | |||
| Listening Mode Description Input | Source | Speaker Layout | |
| T-D (Theater-Dimensional) | With this mode you can enjoy a virtual surround sound even with only two or three speakers. This works by controlling how sounds reach the listener's left and right ears. Good results may not be possible if there's too much reverb, so we recommend that you use this mode in an environment with little or no natural reverb. | MONO STEREO 5.1ch 7.1ch DTS-ES DC EX | 2.1 3.1 5.1 7.1 |
Turning On & Basic Operations
■Listening Modes
| Listening Mode Deserption Input | Source | Speaker Layout | |
| Direct In this mode, audio from the input source is output without surround-sound processing. Direct The speaker configuration (presence of speakers) and speaker distance settings are enabled, but much of the processing set via the audio setup is disabled. See “On-screen Setup” for more details (→ page 43). | MONO STEREO 5.1ch 7.1ch DTS-ES DIEX | 2.1 3.1 5.1 7.1 1 | |
| Stereo Sound is output from the front left and right speakers and subwoofer. | 2.1 3.1 5.1 7.1 | ||
| Mono Use this mode when watching an old movie with a mono soundtrack, or use it with the foreign language soundtracks recorded in the left and right channels of some movies. It can also be used with DVDs or other sources containing multiplexed audio, such as karaoke DVDs. | |||
| Multichannel Multich | This mode is for use with PCM multichannel sources. | 5.1ch 7.1ch | 3.1 5.1 7.1 |
| DSD 2 DSD | In this mode, audio from the input source is output without surround-sound processing. The speaker configuration (presence of speakers), crossover frequency, speaker distance, A/V Sync and much of the processing set via the audio setup are enabled. See “On-screen Setup” for more details (→ page 43). | 5.1ch | 3.1 5.1 7.1 |
| Dolby Digital Dolby D | 5.1ch | 3.1 5.1 7.1 | |
| Dolby Digital Plus 3 Dolby D + | 7.1ch | 3.1 5.1 7.1 1 | |
| Dolby TrueHD Dolby TrueHD | 5.1ch | 3.1 5.1 7.1 | |
| 7.1ch | 3.1 5.1 7.1 1 | ||
| Listening Mode Description Input | Source | Speaker Layout | |
| DTS | In this mode, audio from the input source is output without surround-sound processing. | 5.1ch | 3.1 [5.1] [7.1] |
| DTS | The speaker configuration (presence of speakers), crossover frequency, speaker distance, A/V Sync and much of the processing set via the audio setup are enabled. See “On-screen Setup” for more details ( → page 43). | 5.1ch | 3.1 [5.1] [7.1] |
| DTS-HD HR | 7.1ch | 3.1 [5.1] [7.1] 1 | |
| DTS-HD Master Audio | 5.1ch | 3.1 [5.1] [7.1] | |
| DTS-HD MSTR | 7.1ch | 3.1 [5.1] [7.1] 1 | |
| DTS Express | 5.1ch | 3.1 [5.1] [7.1] | |
| DTS Express | |||
| DTS 96/24 4 | This mode is for use with DTS 96/24 sources. This is high-resolution DTS with a 96 kHz sampling rate and 24-bit resolution, providing superior fidelity. Use it with DVDs that bear the DTS 96/24 logo. | 5.1ch | 3.1 [5.1] [7.1] |
| DTS 96/24 | |||
| DTS-ES Discrete 5 | This mode is for use with DTS-ES Discrete soundtracks, which use a discrete surround back channel for true 6.1/7.1-channel playback. The seven totally separate audio channels provide better spatial imaging and 360-degree sound localization, perfect for sounds that pan across the surround channels. Use it with DVDs that bear the DTS-ES logo, especially those with a DTS-ES Discrete soundtrack. | DTS-ES | 7.1-SB |
| ES Discrete | |||
| DTS-ES Matrix 5 | This mode is for use with DTS-ES Matrix soundtracks, which use a matrix-encoded back-channel for 6.1/7.1-channel playback. Use it with DVDs that bear the DTS-ES logo, especially those with a DTS-ES Matrix soundtrack. | DTS-ES | 7.1-SB |
| ES Matrix | |||
Turning On & Basic Operations
| Listening Mode Description Input | Source | Speaker Layout | |
| Dolby Pro Logic IIxDolby Pro Logic IIPLIMoviePLLMusicPLIGamePLIX MoviePLIX MusicPLIX Game | Dolby Pro Logic IIx expands any 2-channel source for 7.1-channel playback. It provides a very natural and seamless surround-sound experience that fully envelops the listener. As well as music and movies, video games can also benefit from the dramatic spatial effects and vivid imaging.If you're not using any surround back speakers.Dolby Pro Logic IIwill be used instead of Dolby Pro Logic IIx.Dolby PLIIx MovieUse this mode with any stereo or Dolby Surround (Pro Logic) movie (e.g., TV, DVD, VHS).Dolby PLIIx MusicUse this mode with any stereo or Dolby Surround (Pro Logic) music source (e.g., CD, radio, cassette, TV, VHS, DVD).Dolby PLIIx GameUse this mode with video games, especially those that bear the Dolby Pro Logic II logo. | STEREO | 3.1|5.1|7.1 |
| Dolby PLIIx MovieDolby PLIIx MusicThese modes use the Dolby Pro Logic IIx modes to expand 5.1-channel sources for 7.1-channel playback. | 5.1ch | 7.1-SB | |
| Dolby Pro Logic IIz HeightPLg Height | Dolby Pro Logic IIz Heightis designed to more effectively use existing program material when height channel speaker outputs are present.Dolby Pro Logic IIz Heightcan be used to upmix a variety of sources from movies and music, but are particularly well-suited to upmix game content. | STEREO5.1ch7.1chDIS-ESDCEX | 7.1-FH |
| Dolby EX These modesDolby EXDolby D EX | expand 5.1-channel sources for 6.1/7.1-channel playback. They're especially suited to Dolby EX soundtracks that include a matrix-encoded surround back channel. The additional channel adds an extra dimension and provides an enveloping surround sound experience, perfect for rotating and fly-by sound effects. | 5.1chDCEX | 7.1-SB |
| Listening Mode | Description Input | Source | Speaker Layout |
| DTS Neo:6 | This mode expands any 2-channel source for up to 7.1-channel playback. It uses seven full-bandwidth channels of matrix decoding for matrix-encoded material, providing a very natural and seamless surround sound experience that fully envelops the listener. | ||
| Neo:6 Cinema | • DTS Neo:6 CinemaUsc this mode with any stereo movie (e.g., TV, DVD, VHS). | STEREO | 3.1 [5.1] [7.1] |
| Neo:6 Music | • DTS Neo:6 MusicUsc this mode with any stereo music source (e.g., CD, radio, cassette, TV, VHS, DVD). | ||
| Neo 6 | • D T S N e o : 6This mode uses DTS Neo:6 to expand 5.1-channel sources for 6.1/7.1-channel playback. | 5.1ch | 7.1-SB |
Note
*1 Based on the audio channel signal contained in the source, the corresponding speakers will output the sound.
2 The AV receiver can input the DSD signal from HDMI IN. Depending on the player, setting the output on the player side to PCM might bring better sound.
3 For the Blu-ray Discs, Dolby Digital is used in a 3.1/5.1-channel speaker system.
*4 DTS is used depending on the configuration of the AV receiver.
*5 If there are no surround back speakers, DTS is used.
*6 If there are no surround back speakers, Dolby Pro Logic II is used.
• The listening modes cannot be selected with some source formats.
Using the Home Menu
The Home menu provides quick access to frequently used menus.
The Home menu appears only on a TV that is connected to HDMI OUT MAIN. If your TV is connected to other video outputs, use the AV receiver's display when changing settings.
1 Press RECEIVER followed by HOME.
The Home menu will be superimposed on the TV screen.

2 Use ▶/▶ or ▲/▼ and ENTER to make the desired selection.
Press HOME to close the menu.
Network Service
You need to connect the AV receiver to your home network ( → page 89).
With this selection, you can use various Internet radio services or play the contents stored in media connected to your home network (DLNA) (→ pages 26 to 29). Note that this selection will be grayed out for a short while after the AV receiver is turned on. Please wait until it becomes operable. Press ENTER to display the network service screen. If you want to use the Internet radio services, use ▲/▼/◄/► to select the desired service. Pressing
ENTER again switches to that selection. If you want to play music files on a server, use ▲/▼/◄/► to select "DLNA" and then press ENTER.
USB
With this selection, you can play contents of portable players (iPod, etc.) and USB storage devices connected to the AV receiver's USB port (→ pages 24, 25).
Note that this selection will be grayed out for a short while after the AV receiver is turned on. Please wait until it becomes operable.
First, press USB repeatedly to select the "USB(Front)" or "USB(Rear)" input.
Then, press ENTER to select a drive or browse the contents of the media connected, followed by ▲/▼ to select the desired folder or track. Pressing ENTER as a track is selected will start playback.
Note
- Only the front-panel USB input is compatible with iPod/iPhone.
InstaPrevue
With this selection, you can preview audio/video streams coming from HDMI inputs (HDMI IN 1/2/3/4/AUX INPUT). Even with multiple components connected through HDMI, you can easily switch between inputs as their previews are displayed on a single screen.
Press ENTER to display the main preview (currently selected HDMI input) and the additional previews (other HDMI inputs). Using ▲/▼ or ◀/► to select a preview thumbnail and pressing ENTER will switch the AV receiver to that input source.
Tip
- If no video signals are present, the thumbnails will be filled in black.
- You can specify the number of preview thumbnails as well as their positioning on screen (→ page 61).
Note
- This function cannot be selected when:
- HDMI IN 5/6/7 is the current HDMI input source, or
- No signal is present on the current input source.
- Depending on video signals, the picture may not be properly rendered on the preview thumbnails of InstaPrevue.
Setup
With this selection, you can access the common settings of the on-screen Setup menu.
Press ENTER to display the Setup menu
(→page 46).
Tip
- You can also access frequently used settings from Quick Setup (→ page 43).
Firmware Update
With this selection, you can update the firmware of the AV receiver. Note that this selection will be grayed out for a short while after the AV receiver is turned on. Please wait until it becomes operable.
Press ENTER to start the procedure ( → page 79).
Using the Sleep Timer
With the sleep timer, you can set the AV receiver to turn off automatically after a specified period.
1 Press RECEIVER once followed by SLEEP repeatedly to select the required sleep time. The sleep time can be set from 90 to 10 minutes in 10 minute steps. The SLEEP indicator lights on the AV receiver's display when the sleep timer has been set. The specified sleep time appears for about 5 seconds, then the previous display reappears.
Tip
- If you need to cancel the sleep timer, press SLEEP repeatedly until the SLEEP indicator goes off.
• To check the time remaining until the AV receiver sleeps, press SLEEP. Note that if you press again on SLEEP as the time being displayed is 10 minutes or less, the sleep timer will go off.
Setting the Display Brightness
You can adjust the brightness of the AV receiver's display.
1 Press RECEIVER once followed by DIMMER repeatedly to switch between: normal, dim, or dimmer brightness.
Tip
• Alternatively, you can use DIMMER on the AV receiver.
Displaying Source Information
You can display various information about the current input source as follows.
1 Press RECEIVER once followed by DISPLAY repeatedly to cycle through the available information.
Tip
• Alternatively, you can use DISPLAY on the AV receiver.
The following information can be typically displayed.

flowchart
graph TD
    A["Input source & volume*1"] --> B["BD/DVD 25"]
    B --> C["Listening mode"]
    C --> D["Stereo"]
    D --> E["Signal format*2"]
    E --> F["Dolby D 5.1°"]
    F --> G["Sampling frequency*2"]
    G --> H["fs: 48kHz"]
    H --> I["Input signal resolution"]
    I --> J["480i/60÷"]
    J --> K["Output resolution"]
    K --> L["→720F/60"]
*1 When AM or FM radio is used, the band, preset number, and frequency are displayed.
2 If the input signal is digital, the signal format is displayed. Information is displayed for about three seconds, then the previously displayed information reappears.
Changing the Input Display
When you connect an RI-capable Onkyo component, you must configure the input display so that RI can work properly.
This setting can be done only from the front panel.
1 Press TV/CD or GAME.
"TV/CD" or "GAME" appears on the AV receiver's display.
2 Press and hold down the same button (about 3 seconds) to change the input display.
Repeat this step to select the desired input display.
■TV/CD: TV/CD → DOCK ↑- TAPE ←
■ GAME: GAME ↔ DOCK
Note
- "DOCK" can be selected for the "TV/CD" or "GAME" input selector, but not at the same time.
- Enter the appropriate remote control code before using the remote controller for the first time (→ page 70).
Using the Music Optimizer
The Music Optimizer function enhances the sound quality of compressed music files.
1 Press MUSIC OPTIMIZER on the front panel. The M.Opt indicator lights on the AV receiver's display. The MUSIC OPTIMIZER indicator lights on the front panel.
Tip
• Alternatively, you can use Q SETUP on the remote controller.
• See "Music Optimizer" for more details (→ page 45).
Muting the AV Receiver
You can temporarily mute the output of the AV receiver.
1 Press RECEIVER followed by MUTING.
The output is muted and the MUTING indicator flashes on the AV receiver's display.
Tip
• To unmute, press MUTING again or adjust the volume.
- Muting is automatically cancelled when the AV receiver is set to standby.
Using Headphones
1 Connect a pair of stereo headphones with a standard plug (1/4 inch or 6.3 mm) to the PHONES jack.
While the headphones plug is inserted in the PHONES jack, indicator lights.
Note
• Always turn down the volume before connecting your headphones.
- While the headphones plug is inserted in the PHONES jack, the speakers are turned off. (The Powered Zone 2 speakers are not turned off.)
- When you connect a pair of headphones, the listening mode is set to Stereo, unless it's already set to Stereo, Mono, Direct.
- If you connect an iPod or iPhone to the USB port on the AV receiver, no sound will be output from the headphones jack.
On-screen Setup
With the AV receiver connected to a TV, there are two ways of changing the settings on-screen: using the Quick Setup or the Setup Menu (HOME).
Quick Setup
The Quick Setup provides quick access to frequently used settings. You can change settings and view the current information.
Setup menu (HOME)
The Setup menu (HOME) provides a convenient way to change the AV receiver's various settings. Settings are organized into 9 categories.
The on-screen menus appear only on a TV that is connected to HDMI OUT MAIN. If your TV is connected to other video outputs, use the AV receiver's display when changing settings.
This section describes the procedure for using the remote controller unless otherwise specified.
Using the Quick Setup
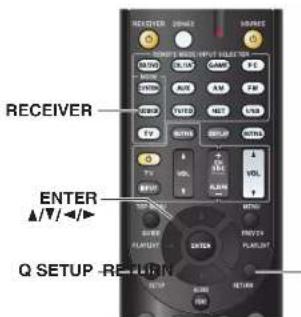
1 Press RECEIVER followed by Q SETUP.
The Quick Setup will be superimposed on the TV screen.
2 Use ▲/▼ and ENTER to make the desired selection.
Press Q SETUP to close the menu.
Press RETURN to return to the previous menu.
Explanatory Notes

① Setting target
② Setting options (default setting underlined)


En-43

Advanced Operations
Input
You can select input sources and view the following information: the name of input selectors, input assignments, radio information, and ARC function setting.
In addition, previews of the video streams coming from HDMI inputs (HDMI IN 1/2/3/4/AUX INPUT) are displayed. 1
"EXTRA1" and "EXTRA2" can only be selected if they are assigned to HDMI, component, coaxial, or optical inputs.
Use ▲/▼ to select an input source and view the related information. Pressing ENTER switches to the selected input source.
■ Audio (→ page 44)
You can change the following settings: "Bass", "Treble", "Subwoofer Level", "Center Level", "Audyssey", "Dynamic EQ", "Dynamic Volume", "Late Night", "Music Optimizer", and "Cinema Filter".
Video
▶ You can change the following settings: "Wide Mode" and "Picture Mode 2 ".
See also:
• "Picture Adjust" (→ page 56)
Information 3
You can view the information of the following items: "Audio", "Video" and "Tuner".
■Listening Mode \*4
You can select the listening modes that are grouped in the following categories: "MOVIE/TV", "MUSIC", "GAME".
Use ▲/▼ to select the category and ◀/► to select the listening mode. Press ENTER to switch to the selected listening mode.
To be continued


Note
- When the "Monitor Out" setting is set to "Sub", "Video" cannot be selected.
*1 • The video preview is not displayed when: - HDMI IN 5/6/7 is the current HDMI input source, or
- No signal is present on the current input source.
• The video of the currently-selected input is displayed on the main screen, not on a preview thumbnail.
2 Only when you have selected "Custom" in the "Picture Mode" (→ page 56), pressing ENTER allows you to adjust the following items via the Quick Setup: "Brightness", "Contrast", "Hue" and "Saturation". Press RETURN to return to the "Picture Mode" setting.
*3 Depending on the input source and listening mode, not all channels shown here output the sound.
4 • This setting is not available in either of the following cases: - The "Audio TV Out" setting is set to "On" (→ page 60).
- "HDMI Control(RIHD)" is set to "On" (→ page 60) and you're listening through your TV speakers.
Using the Audio Settings of Quick Setup
You can change various audio settings from the Quick Setup ( → page 43).
Note
- These settings are not available in either of the following cases: - The "Audio TV Out" setting is set to "On" (→ page 60). - "HDMI Control(RIHD)" is set to "On" (→ page 60) and you're listening through your TV speakers.
Tone Control
Bass
- -10dB to 0dB +10dB in 2 dB steps You can boost or cut low-frequency sounds output from the front speakers.
Treble
- -10dB to 0dB +10dB in 2 dB steps You can boost or cut high-frequency sounds output from the front speakers.
You can adjust the bass and treble for the front speakers, except when Direct listening mode is selected.
Operating on the AV receiver
1 Press TONE repeatedly to select either "Bass" or "Treble".
2 Use - and + to adjust.
Speaker Levels
Subwoofer Level
-15dB to 0dB +12dB in 1 dB steps
Center Level
- -12dB to 0dB to +12dB in 1 dB steps You can adjust the volume of each speaker while listening to an input source.
These temporary adjustments are cancelled when the AV receiver is set to standby. To save the setting you made here, go to "Level Calibration" (→ page 51) before setting the AV receiver to standby.
Note
- You cannot use these function while the AV receiver is muted.
- These settings cannot be used while a pair of headphones is connected.
- Speakers that are set to "No" or "None" in "Speaker Configuration" (→ page 50) cannot be adjusted.
Audyssey®
Audyssey
See "Audyssey" in "Source Setup" (→ page 53).
■ Dynamic EQ
See "Dynamic EQ" in "Source Setup" (→ page 54).
■Dynamic Volume
See "Dynamic Volume" in "Source Setup" (→ page 54).
Note
• These technologies can be used when all the following conditions are met:
- Room Correction and Speaker Setup is completed. Note that "Audyssey" requires the "Audyssey 2EQ Full Calibration" method.
- Any listening mode other than Direct is selected.
- A pair of headphones is not connected.
• The setting is stored individually for each input selector.
Late Night
Late Night
For Dolby Digital and Dolby Digital Plus sources, the options are:
Off
Low:
Small reduction in dynamic range.
▶ High:
Large reduction in dynamic range.
For Dolby TrueHD sources, the options are:
Auto
The Late Night function is set to "On" or "Off" automatically.
Off
On
Turn this setting on to reduce the dynamic range of Dolby Digital material so that you can still hear quiet parts even when listening at low volume levels—ideal for watching movies late at night when you don't want to disturb anyone.
Note
• The effect of the Late Night function depends on the material that you are playing and the intention of the original sound designer, and with some material there will be little or no effect when you select the different options.
- The Late Night function can be used only when the input source is Dolby Digital, Dolby Digital Plus, or Dolby TrueHD.
- The Late Night function is set to "Off" when the AV receiver is set to standby. For Dolby TrueHD sources, it will be set to "Auto".
- With Dolby TrueHD sources, the Late Night function cannot be used when "TrueHD Loudness Management" is set to "Off" (→page 53).
Music Optimizer
Music Optimizer
Off
On
The Music Optimizer function enhances the sound quality of compressed music files. When set to "On", the M.Opt indicator lights on the AV receiver's display, and the MUSIC OPTIMIZER indicator lights on the front panel.
Tip
• Alternatively, you can use MUSIC OPTIMIZER on the AV receiver.
Note
- The Music Optimizer function only works with PCM digital audio input signals with a sampling rate below 48 kHz and analog audio input signals.
• The Music Optimizer is disabled when the Direct listening mode is selected.
• The setting is stored individually for each input selector.
CinemaFILTER
Cinema Filter
Off
On
Turn this setting on to soften overly bright movie soundtracks, which are typically mixed for reproduction in a movie theater.
CinemaFILTER can be used with the following listening modes: Dolby Digital, Dolby Digital EX, Dolby Digital Plus, Dolby TrueHD, Dolby Pro Logic IIx Movie, Dolby Pro Logic II Movie, Dolby Pro Logic IIz Height, Multichannel, DTS, DTS-ES, DTS Neo:6 Cinema, DTS 96/24, DTS Neo:6, DTS-HD High Resolution Audio, DTS-HD Master Audio and DTS Express.
Note
- The CinemaFILTER may not work when used with certain input sources.

En-45


Using the Setup Menu (HOME)
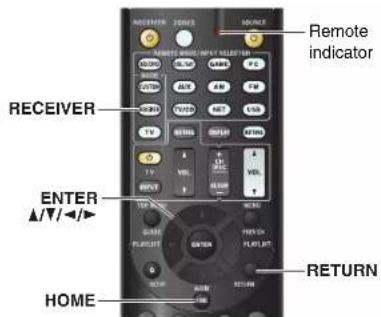
1 Press RECEIVER followed by HOME.
2 Use ◀/▶ to select "Setup", and then press ENTER.
3 Use ▲/▼ to select a main menu item, and then press ENTER.
4 Use ▲/▼ to select a sub menu item, and then press ENTER.
5 Use ▲/▼ to select a setting target, and use ◀/► to change the setting.
Press HOME to close the menu.
Press RETURN to return to the previous menu.
Note
- This procedure can also be performed on the AV receiver by using SETUP, the cursor buttons, and ENTER.
- During Audyssey 2EQ® Room Correction and Speaker Setup, messages, etc., that are displayed on the TV screen will appear on the AV receiver's display.
Screen Saver
If there is no video signal on the current input source and no operation for a specific time (three minutes by default), a screen saver automatically comes on.
Tlp
- The time until the screen saver activates itself can be changed in the "Screen Saver" setting (→ page 59).
- The screen will return to its previous state if the AV receiver is operated.
Explanatory Notes
① Main Menu Speaker Setup
②—Speaker Configuration
③ Subwoofer
④→Yes
No
① Main Menu
② Sub Menu
③ Setting target
④ Setting options (default setting underlined)


En-46


Advanced Operations
About the HYBRID STANDBY indicator
By way of optimized circuitry, this function reduces power consumption when the AV receiver is in standby mode. The HYBRID STANDBY indicator will light in either of the following conditions:
- “HDMI Through” is enabled (the HDMI indicator is off).
- "Network Standby" is enabled (the NET indicator is off).

Note
- If Zones are turned on or, if a mobile device connected to the Front Input (MHL) is charging, the HYBRID STANDBY indicator won't light.
Setup menu items
| Main menu Item Sub menu Item | |
| Input/Output Assign(→page 48) | Monitor Out |
| HDMI Input | |
| Component Video Input | |
| Digital Audio Input | |
| Speaker Setup(→page 50) | Speaker Settings |
| Speaker Configuration | |
| Speaker Distance | |
| Level Calibration | |
| Audio Adjust(→page 52) | Multiplex/Mono |
| Dolby | |
| DTS | |
| Theater-Dimensional | |
| Source Setup(→page 53) | Audyssey |
| IntelliVolume | |
| A/V Sync | |
| Name Edit | |
| Picture Adjust | |
| Audio Selector | |
| Listening Mode Preset(→page 58) | BD/DVD |
| CBL/SAT | |
| GAME | |
| PC | |
| AUX | |
| TUNER | |
| TV/CD | |
| NET | |
| USB | |
| EXTRA1 | |
| EXTRA2 | |
| Miscellaneous(→page 59) | Volume Setup |
| OSD Setup | |
| Main menu item Sub menu item | |
| Hardware Setup(→page 59) | Tuner |
| HDMI | |
| Auto Standby | |
| Network | |
| Initial Setup | |
| Remote Controller Setup(→page 63) | Remote ID |
| Remote Mode Setup | |
| Lock Setup(→page 63) | Setup |

En-47


Input/Output Assign

Main Menu Input/Output Assign
Monitor Out
On the "Monitor Out" settings, you can select whether or not to have the video sources' images output through the HDMI output.
If you connect your TV to HDMI output, "Monitor Out" setting is automatically set and composite video and component video sources are upconverted* and output.

flowchart
graph TD
    A["Composite video, component video"] --> B["IN"]
    B --> C["(*)"]
    C --> D["OUT"]
    D --> E["HDMI"]
    style A fill:#f9f,stroke:#333
    style B fill:#ccf,stroke:#333
    style C fill:#cfc,stroke:#333
    style D fill:#fcc,stroke:#333
    style E fill:#cff,stroke:#333
Note
- See "Video Connection Formats" (→ page 83) for charts showing how the "Monitor Out" and "Resolution" settings affect the video signal flow through the AV receiver.
Monitor Out
Main
Select this if your TV is connected to HDMI OUT MAIN.
Sub:
Select this if your TV is connected to HDMI OUT
SUB.
Both:
Select this if your TVs are connected to HDMI OUT MAIN and HDMI OUT SUB. Video signals are
output from both HDMI outputs at the resolution supported by both TVs.
Resolution
Through:
Select this to pass video through the AV receiver at the same resolution and with no conversion.
Auto
Select this to have the AV receiver automatically convert video at resolutions supported by your TV.
▶ 480p, 720p, 1080i, 1080p:
Select the desired output resolution.
1080p/24:
Select this for 1080p output at 24 frames per second.
4K Upscaling:
Select this for an output resolution four times that of 1080p. Depending on the resolution supported by your TV, it will result in either 3840 × 2160 or 4096 × 2160 pixels.
You can specify the output resolution for the HDMI OUT MAIN and have the AV receiver upconvert the picture resolution as necessary to match the resolution supported by your TV.
Tip
- You can see the picture by pressing ENTER to check the "Resolution" setting (excluding NET input source).
Note
- Depending on the incoming video signal, the video playback may not be smooth or the vertical resolution may be lowered. In this case select anything other than "1080p/24".
- With some TVs, there may be no picture when this setting is set to "4K Upscaling".
- If the "Monitor Out" setting is set to "Sub", this setting is fixed to "Through".
- If the "Monitor Out" setting is set to "Both", this setting is fixed to "Auto".
Advanced Operations
HDMI Input
If you connect a video component to an HDMI input, you must assign that input to an input selector. For example, if you connect your Blu-ray Disc/DVD player to HDMI IN 2, you must assign "HDMI2" to the "BD/DVD" input selector.
If you've connected your TV to the AV receiver with an HDMI cable, composite video and component video sources can be upconverted* and output by the HDMI output. You can set this for each input selector by selecting the “-···-” option. See “Video Connection Formats” for more information on video signal flow and upconversion (→page 83).

flowchart
graph TD
    A["Composite video, component video"] --> B["IN"]
    B --> C["OUT"]
    C --> D["HDMI"]
    style A fill:#f9f,stroke:#333
    style B fill:#ccf,stroke:#333
    style C fill:#cfc,stroke:#333
    style D fill:#fcc,stroke:#333
Here are the default assignments.
| Input selector Default assignment | |
| BD/DVD HDMI1 | |
| CBL/SAT HDMI2 | |
| GAME HDMI3 | |
| PC HDMI4 | |
| AUX | FRONT (Fixed) |
| TV/C D | ---- |
| EXT RA1 ---- | |
| EXT RA2 ---- | |
■ BD/DVD, CBL/SAT, GAME, PC, TV/CD, EXTRA1, EXTRA2
HDMI1, HDMI2, HDMI3, HDMI4, HDMI5, HDMI6, HDMI7: Select the input to which the component has been connected.
Output composite video and component video sources from the HDMI output. The video output signal from the HDMI output is the one configured in "Component Video Input".
Each HDMI input cannot be assigned to two input selectors or more. When HDMI1 - HDMI7 have already been assigned, you must first set any unused input selectors to “----” or you will be unable to assign HDMI1 - HDMI7 to other input selectors.
Tip
- "EXTRA1" and "EXTRA2" can be selected as input sources in "Input" of "Quick Setup" (→ page 43).
Note
- If no video component is connected to HDMI output (even if the HDMI input is assigned), the AV receiver selects the video source based on the setting of "Component Video Input".
- When an HDMI IN is assigned to an input selector as explained here, the same HDMI IN will be set as a priority in the "Digital Audio Input". In this case, if you want to use the coaxial or optical audio input, make the appropriate selection in the "Audio Selector" setting (→ page 57).
- Do not assign an HDMI IN to the TV/CD selector while "HDMI Control(RIHD)" is set to "On" (→ page 60), otherwise appropriate CEC (Consumer Electronics Control) operation will not be guaranteed.
- If you assign “----” to an input selector that is currently selected in “HDMI Through” (→ page 60), the “HDMI Through” setting will be automatically switched to “Off”.
- “ AUX” is used only for input from the front panel.
Component Video Input
If you connect a video component to a component video input, you must assign that input to an input selector. For example, if you connect your Blu-ray Disc/DVD player to COMPONENT VIDEO IN, you must assign "IN1" to the "BD/DVD" input selector.
Here are the default assignments.
| Input selector Default assignment | |
| BD/DVD ---- | |
| CBL/SAT IN1 | |
| GAME ---- | |
| P C ---- | |
| A U X ---- (Fixed) | |
| TV/CD ---- | |
| EXTRA 1 | ---- |
| EXTRA 2 | ---- |
■ BD/DVD, CBL/SAT, GAME, PC, TV/CD, EXTRA1, EXTRA2
IN1:
Select the input to which the component has been connected.
Output composite video sources from the HDMI output.
Tlp
- "EXTRA1" and "EXTRA2" can be selected as input sources in "Input" of "Quick Setup" (→ page 43).
Note
- When composite video and component video sources are upconverted for HDMI OUT SUB, only signals with a resolution of 480i are output and the resolution remains the same. If your TV doesn't support this resolution, there will be no picture (→page 85).
- "AUX" is fixed to the "----" option.
Digital Audio Input
If you connect a component to a digital audio input, you must assign that input to an input selector. For example, if you connect your CD player to the OPTICAL IN 1, you must assign "OPTICALI" to the "TV/CD" input selector. Here are the default assignments.
| Input selector Default assignment | |
| BD/DVD | COAXIAL1 |
| CBL/SAT COAXIAL2 | |
| GAME | OPTICAL1 |
| P C ---- | |
| A U X ---- (Fixed) | |
| TV/CD | OPTICAL2 |
| E X T R A 1 | ---- |
| E X T R A 2 | ---- |
■ BD/DVD, CBL/SAT, GAME, PC, TV/CD, EXTRA1, EXTRA2
▶ COAXIAL1, COAXIAL2, OPTICAL1. OPTICAL2:
Select the input to which the component has been connected.
- - - - - : Select if the component is connected to an analog audio input.
Tip
- "EXTRA1" and "EXTRA2" can be selected as input sources in "Input" of "Quick Setup" (→ page 43).
Note
- When an HDMI IN is assigned to an input selector in "HDMI Input" ( → page 48), the same HDMI IN will be set as a priority in this assignment. In this case, if you want to use the coaxial or optical audio input, make the appropriate selection in the "Audio Selector" ( → page 57).
- Supported sampling rates for PCM signals (stereo/mono) from a digital input (optical and coaxial) are 32/44.1/48/88.2/96 kHz/16, 20, 24 bit.
- "AUX" is fixed to the "----" option.
Speaker Setup

Main Menu Speaker Setup
Some of the settings in this section are set automatically by Audyssey 2EQ® Room Correction and Speaker Setup (→page 32).
Here you can check the settings made by Audyssey 2EQ Room Correction and Speaker Setup function, or set them manually, which is useful if you change one of the connected speakers after using Audyssey 2EQ Room Correction and Speaker Setup function.
Speaker Settings
If you change these settings, you must run Audyssey 2EQ Room Correction and Speaker Setup again (→ page 32).
If you bi-amp the front speakers, you must change the "Speakers Type (Front)" setting. For details on speaker wire connection, see "Bi-amping the Front Speakers" (→page 13).
Note
- When bi-amping is used, the AV receiver is able to drive up to 5.1 speakers in the main room.
- Before you change these settings, turn down the volume.
Speakers Type (Front)
Normal
Select this if you've connected your front speakers normally.
Bi-Amp:
Select this if you've bi-amped your front speakers.
Powered Zone 2

Zone 2 speakers can be used. (Powered Zone 2 enabled).
Note
- If the "Speakers Type (Front)" setting is set to "Bi-Amp", Powered Zone 2 cannot be used.
- When the "Powered Zone 2" setting is set to "Yes" and Zone 2 is turned on. the surround back and front high speakers cannot be used.
Speaker Configuration
This setting is set automatically by Audyssey 2EQ Room Correction and Speaker Setup ( → page 32).
With these settings, you can specify which speakers are connected and a crossover frequency for each speaker. Specify "Full Band" for speakers that can output low frequency bass sounds adequately, for example, speakers with a good sized woofer. For smaller speakers, specify a crossover frequency. Sounds below the crossover frequency will be output by the subwoofer instead of the speaker. Refer to your speaker's manuals to determine the optimum crossover frequencies.
Subwoofer

Front
Full Band
40Hz to 100Hz 20Hz, 150Hz, 200Hz
Note
- If the "Subwoofer" setting is set to "No", the "Front" setting is fixed at "Full Band".
■Center *1 , Surround *1
Full Band
40Hz to 100Hz, 20Hz, 150Hz, 200Hz
None
Front High 1*2*3*5
Full Band
▶ 40Hz to 100Hz, 120Hz, 150Hz, 200Hz
None
■Surround Back \*1^2\*3^4
Full Band
40Hz to 100Hz, 120Hz, 150Hz, 200Hz
None
Note
"1 "Full Band" can be selected only when "Full Band" is selected in the "Front" setting.
2 If the “Surround” setting is set to “None”, this setting cannot be selected.
3 If the “Speakers Type (Front)” setting is set to “Bi-Amp”, or the “Powered Zone 2” setting is set to “Yes” together with Zone 2 turned on, this setting cannot be selected.
*4 If anything else than "None" is selected in "Front High", this setting is automatically set to "None".
*5 If anything else than "None" is selected in "Surround Back", this setting is automatically set to "None".
■Surround Back Ch
1ch:
Select if only one surround back speaker L is connected.
2ch
Select if two (left and right) surround back speakers are connected.
Note
- If the "Surround Back" setting is set to "None", this setting cannot be selected.
- If the "Powered Zone 2" setting is set to "Yes" and Zone 2 is turned on, this setting cannot be selected.

En-50


LPF of LFE
(Low-Pass Filter for the LFE Channel)
▶ 80Hz, 90Hz, 100Hz, 120Hz
Off:
Low-Pass Filter is not applied.
With this setting, you can specify the cutoff frequency of the LFE channel's low-pass filter (LPF), which can be used to filter out unwanted hum. The LPF only applies to sources that use the LFE channel.
Double Bass
This setting is NOT set automatically by Audyssey 2EQ® Room Correction and Speaker Setup (→page 32).
On
Off
Turn this setting on to boost bass output by feeding bass sounds from the front left, right, and center channels to the subwoofer.
Note
- When the "Subwoofer" setting is set to "No" or the "Front" setting to anything other than "Full Band", this setting is fixed to "...".
- This setting is set to "On" automatically when the "Subwoofer" and "Front" settings are set for the first time to "Yes" and "Full Band" respectively.
Speaker Distance
This setting is set automatically by Audyssey 2EQ Room Correction and Speaker Setup ( → page 32).
Here you can specify the distance from each speaker to the listening position so that the sound from each speaker arrives at the listener's ears as the sound designer intended.
Unit
feet
Distances can be set in feet. Range: 1.0ft to 30.0ft in 1.0 foot steps.
meters:
Distances can be set in meters. Range: 0.30m to 9.00m in 0.30 meter steps.
■ Left, Front High Left, Center, Front High Right, Right, Surround Right, Surround Back Right, Surround Back Left, Surround Left, Subwoofer
▶ Specify the distance from each speaker to your listening position.
Note
- Speakers that you set to "No" or "None" in "Speaker Configuration" cannot be selected (→ page 50).
- When the "Powered Zone 2" setting is set to "Yes" and Zone 2 is turned on, the surround back and front high speakers cannot be used.
Level Calibration
This setting is set automatically by Audyssey 2EQ Room Correction and Speaker Setup ( → page 32).
Here you can adjust the level of each speaker with the built-in test tone so that the volume of each speaker is the same at the listening position.
Note
• These settings cannot be calibrated in either of the following cases:
- The "Audio TV Out" setting is set to "On" (→ page 60).
- "HDMI Control(RIHD)" is set to "On" (→ page 60) and
you're listening through your TV speakers.
- The AV receiver is muted.
■ Left, Front High Left, Center 1, Front High Right, Right, Surround Right, Surround Back Right, Surround Back Left, Surround Left
-12dB to 0dB to +12dB in 1 dB steps.
Subwoofer 1
-15dB to 0dB to +12dB in 1 dB steps.
Note
- Speakers that you set to "No" or "None" in
"Speaker Configuration" cannot be selected (→ page 50). - When the "Powered Zone 2" setting is set to "Yes" and Zone 2 is turned on, the surround back and front high speakers cannot be used.
*1 For the center speaker and subwoofer, the level settings made by using the Quick Setup are saved in this menu (→ page 44).
Tip
- If you're using a handheld sound level meter, adjust the level of each speaker so that it reads 75 dB SPL at the listening position, measured with C-weighting and slow reading.
Audio Adjust

Main Menu Audio Adjust
With the Audio Adjust functions and settings, you can adjust the sound and listening modes as you like.
Multiplex/Mono
Multiplex
Input Channel
Main
Sub
Main/Sub
This setting determines which channel of a stereo multiplex source is output. Use it to select audio channels or languages with multiplex sources, multilingual TV broadcasts, and so on.
Mono
Input Channel
Left + Right
Left
Right
This setting specifies the channel to be used for playing any 2-channel digital source such as Dolby Digital, or 2-channel analog/PCM source in the Mono listening mode.
Dolby
■PL IIx Music (2ch Input)
These settings apply to only 2-channel stereo sources. If you're not using any surround back speakers, these settings apply to Dolby Pro Logic II, not Dolby Pro Logic IIx.
Panorama
On Off
With this setting, you can broaden the width of the front stereo image when using the Dolby Pro Logic IIx Music listening mode.
Dimension
-3 tot0 +3
With this setting, you can move the sound field forward or backward when using the Dolby Pro Logic IIx Music listening mode. Higher settings move the sound field backward. Lower settings move it forward.
If the stereo image feels too wide, or there's too much surround sound, move the sound field forward to improve the balance. Conversely, if the stereo image feels like it's in mono, or there's not enough surround sound, move it backward.
Center Width
▶ 0 to3 7
With this setting, you can adjust the width of the sound from the center speaker when using the Dolby Pro Logic IIx Music listening mode. Normally, if you're using a center speaker, the center channel sound is output from only the center speaker. (If you're not using a center speaker, the center channel sound will be distributed to the front left and right speakers to create a phantom center). This setting controls the front left, right, and center mix, allowing you to adjust the weight of the center channel sound.
PL Ilz Height Gain
Low
Mid
High
The Height Gain Control in Dolby Pro Logic IIz enables the listener to select how much gain is applied to the front high speakers. There are three settings, "Low", "Mid" and "High", and the front high speakers are accentuated in that order. While "Mid" is the default listening setting, the listener may adjust the Height Gain Control to their personal preference.
Note
- If the "Front High" setting is set to "None" (→ page 50), this setting cannot be selected.
- If the "Powered Zone 2" setting is set to "Yes" (→ page 50) and Zone 2 is turned on, this setting cannot be selected.
Dolby EX
Auto:
If the source signal contains a Dolby EX flag, the Dolby EX listening mode is used.
Manual
You can select any available listening mode.
This setting determines how Dolby EX encoded signals are handled. This setting is unavailable if no surround back speakers are connected. This setting is effective with Dolby Digital, Dolby Digital Plus and Dolby TrueHD only.
Note
- If the "Surround Back" setting is set to "None" (→ page 50), this setting cannot be selected.
- If the "Powered Zone 2" setting is set to "Yes" (→ page 50) and Zone 2 is turned on, this setting cannot be selected.

En-52


■TrueHD Loudness Management
Off
On
This setting specifies whether or not to apply the Late Night processing on a Dolby TrueHD source.
Note
- When this setting is set to "Off", the Late Night function for Dolby TrueHD sources is automatically fixed to "Off" (→page 45).
DTS
Neo:6 Music
Center Image
0 to 3 5
The DTS Neo:6 Music listening mode creates 6-channel surround sound from 2-channel stereo sources. With this setting, you can specify by how much the front left and right channel output is attenuated in order to create the center channel.
Changing the value from "0" to "5" will spread the sound of the center channel to left and right (outwards).
Theater-Dimensional
■Listening Angle
Wide
Select if the listening angle is greater than 30 degrees.
Narrow:
Select if the listening angle is less than 30 degrees.
With this setting, you can optimize the Theater-Dimensional listening mode by specifying the angle of the front left and right speakers relative to the listening position. Ideally, the front left and right speakers should be equidistant from the listening position and at an angle close to one of the two available settings.
Front left speaker Front right speaker

Listening angle: 30°
Note
- For best results, we recommend setting "Narrow" to 20irc and "Wide" to 40irc .
Source Setup
1


Items can be set individually for each input selector.
Preparation
Press the input selector buttons to select an input source.
Main Menu Source Setup
Audyssey®
The tone for each speaker is set automatically by Audyssey 2EQ® Room Correction and Speaker Setup. To enable the following settings, you must first perform the Room Correction and Speaker Setup (→ page 32).
• These technologies cannot be used when:
-a pair of headphones is connected, or
- Direct listening mode is selected.
Audyssey
Off
Movie:
Select this setting for movie material.
The Audyssey indicator will light.
Music:
Select this setting for music material.
The Audyssey indicator will light.
Note
- When "Audyssey Quick Start" has been used for measurement, "Audyssey" cannot be selected.
- Audyssey equalizing does not work with DSD sources.

En-53


■Dynamic EQ
Off
On:
Audyssey Dynamic EQ ® becomes active.
The Dynamic EQ indicator will light.
With Audyssey Dynamic EQ, you can enjoy great sound even when listening at low volume levels.
Audyssey Dynamic EQ solves the problem of deteriorating sound quality as volume is decreased by taking into account human perception and room acoustics. It does so by selecting the correct frequency response and surround volume levels moment-by-moment so that the content sounds the way it was created at any volume level — not just at reference level.
■Reference Level
Audyssey Dynamic EQ Reference Level Offset
0dB:
This should be selected for movie contents.
5dB
Select this setting for content that has a very wide dynamic range, such as classical music.
10dB:
Select this setting for jazz or other music that has a wider dynamic range. This setting should also be selected for TV content as that is usually mixed at 10 dB below film reference.
15dB:
Select this setting for pop/rock music or other program material that is mixed at very high listening levels and has a compressed dynamic range.
Movies are mixed in rooms calibrated for film reference. To achieve the same reference level in a home theater system each speaker level must be adjusted so that -30 dBFS band-limited (500 Hz to 2000 Hz) pink noise produces 75 dB sound pressure level at the listening position. A home theater system automatically calibrated by Audyssey 2EQ 69 will play at reference level when the master volume control is set to the 0 dB position. At that level you can hear the mix as the mixers heard it.
Audyssey Dynamic EQ is referenced to the standard film mix level. It makes adjustments to maintain the reference response and surround envelopment when the volume is turned down from 0 dB. However, film reference level is not always used in music or other non-film content. Audyssey Dynamic EQ Reference Level Offset provides three offsets from the film level reference (5 dB, 10 dB, and 15 dB) that can be selected when the mix level of the content is not within the standard.
Note
- If "Dynamic EQ" setting is set to "Off", this technology cannot be used.
■ Dynamic Volume
Off
Light:
Activates Light Compression Mode.
Medium:
Activates Medium Compression Mode.
Heavy:
Activates Heavy Compression Mode. This setting affects volume the most. It quiets the loud parts, such as explosions, and boosts the quiet parts so they can be heard.
Note
- If you make Dynamic Volume active, "Dynamic EQ" is set to "On". The Dynamic Vol indicator will light.
- When "Dynamic EQ" is set to "Off", "Dynamic Volume" is automatically switched to "Off".
About Audyssey Dynamic EQ®
Audyssey Dynamic EQ solves the problem of deteriorating sound quality as volume is decreased by taking into account human perception and room acoustics. Dynamic EQ selects the correct frequency response and surround levels moment-by-moment at any user-selected volume setting. The result is bass response, tonal balance, and surround impression that remain constant despite changes in volume. Dynamic EQ combines information from incoming source levels with actual output sound levels in the room, a prerequisite for delivering a loudness correction solution.
Audyssey Dynamic EQ works well by itself. However, if Audyssey 2EQ® is on, the two technologies work in tandem to provide well-balanced sound for every listener at any volume level.
About Audyssey Dynamic Volume®
Audyssey Dynamic Volume solves the problem of large variations in volume level between television programs, commercials, and between the soft and loud passages of movies. Dynamic Volume looks at the preferred volume setting by the user and then monitors how the volume of program material is being perceived by listeners in real time to decide whether an adjustment is needed. Whenever necessary, Dynamic Volume makes the necessary rapid or gradual adjustments to maintain the desired playback volume level while optimizing the dynamic range. Audyssey Dynamic EQ is integrated into Dynamic Volume so that as the playback volume is adjusted automatically, the perceived bass response, tonal balance, surround impression and dialog clarity remain the same whether watching movies, flipping between television channels or changing from stereo to surround sound content.
IntelliVolume
IntelliVolume
-12dB to 0dB +12dB in 1 dB steps.
With IntelliVolume, you can set the input level for each input selector individually. This is useful if one of your source components is louder or quieter than the others.
Use ◀/▶ to set the level.
If a component is noticeably louder than the others, use to reduce its input level. If it's noticeably quieter, use to increase its input level.
Note
• IntelliVolume does not work for Zone 2.
A/V Sync
A/V Sync
▶ 0 m ste 800 msec in 10 msec steps
When using progressive scanning on your Blu-ray Disc/DVD player, you may find that the picture and sound are out of sync. With this setting, you can correct this by delaying the audio signals.
To view the TV picture while setting the delay, press
ENTER.
To return to the previous screen, press RETURN.
The range of values you can adjust will depend on whether your TV or display supports HDMI Lip Sync and if the "LipSync" setting is set to "On" or not (→ page 61).
Note
- A/V Sync is disabled when the Direct listening mode is used with an analog input source.
- This setting cannot be used with the NET input selector.
Name Edit
You can enter a custom name for each individual input selector and radio preset for easy identification. When entered, the custom name will appear on the display.
The custom name is edited using the keyboard screen.
Name
1 Use ▲/▼/◄/► to select a character, and then press ENTER.
Repeat this step to enter up to 10 characters.
2 To store a name when you're done, be sure to select "OK" by using ▲/▼/◄/►, and then press ENTER.
![Name input area 4 - 4. Name Edit Name a b c d e f g h i } k l m n o p q r s t u v w x y z 1 2 3 4 5 6 7 8 9 0 - * . . / : : Q [ ] Space Shift ←→ Back Space OK -10 Shift All Erase CLR A B C D E F G H I J K L M N O P Q R S T U V W X Y Z ! " + 5 % & ' || - - ? + * ' { } < × Space Shift ←→ Back Space OK -10 Shift All Erase CLR](/content/2026/05/997302/images/071e4b6bab29037feaba929b7403d3b0e3026c79f08a5c7ca928827798dd0fc5.jpg)
Advanced Operations
Space:
Enters a space character.
Shift *1 :
Toggles between lower and upper case characters.
←(Left)/ →(Right):
Moves the cursor left or right in the Name input area.
Back Space 2 :
Moves the cursor backward and deletes one character.
OK:
Confirms your entry.
Tip
1 This can also be performed by using +10 on the remote controller.
'2 Press CLR on the remote controller to delete all the characters you have input.
Tip
- To name a radio preset, select AM or FM, and then select the preset (→ page 31).
- To restore a name to its default, erase all characters with CLR, select "OK" and then press ENTER.
Note
- This setting cannot be used for the NET and USB input selectors.
Picture Adjust
Using Picture Adjust, you can adjust the picture quality and reduce any noise appearing on the screen.
To view the TV picture while setting, press ENTER. To return to the previous screen, press RETURN.
■Wide Mode \*1\*6
This setting determines the aspect ratio.
4:3:


Full:


Zoom:


Wide Zoom:

Auto
According to the input signals and monitor output setting, the AV receiver automatically selects the "4:3", "Full", "Zoom" or "Wide Zoom" mode. See "Monitor Out" for details on the monitor output setting (→ page 48).
Picture Mode *1
Custom:
All settings can be performed manually.
Cinema:
Select when the picture source is a movie or alike.
Game:
Select when the video source is a game console.
Through:
Does not adjust picture quality (changes resolution).
Direct:
Does not adjust picture quality (does not change resolution). The video coming from an analog input and output by HDMI output(s) is processed in the same way as "Through".
With "Picture Mode", you can change the following settings to be suitable for the movie or game screen by one operation; "Game Mode", "Film Mode", "Edge Enhancement", "Noise Reduction", "Brightness",
"Contrast", "Hue", "Saturation" or "Color Temperature".
Game Mode 234
Off
On
If video signal delay occurs during playback on a video component (i.e., game console), select the corresponding input source and set the "Game Mode" setting to "On". The delay will decrease but in return the picture quality will become poor.
Film Mode 24
Video:
"Film Mode" detection is not applied and the input signal is handled as a video source.
Auto:
Detects whether the input signal is a video or a movie. If it is a movie, the appropriate conversion is applied.
The AV receiver will adjust to the picture source, automatically converting it to the appropriate progressive signal and reproducing the natural quality of the original picture.
■Edge Enhancement \*2\*4\*5
Off
Low
Mid
High
With this setting, you can make the picture appear sharper.
Noise Reduction ^2'4'5
Off
Low
Mid
High
With this setting, you can reduce noise appearing on the screen. Select the desired level.
Brightness 124
-50 to 0 to +50
With this setting, you can adjust the picture brightness. “-50” is the darkest. “+50” is the brightest.
Contrast 124
-50 to 0 to +50
With this setting, you can adjust contrast. “-50” is the least. “+50” is the greatest.
Hue 124
-50 to 0 to +50
With this setting, you can adjust the color hue between “-50” and “+50”.
Saturation *1*2*4
-50 to 0 to +50
With this setting, you can adjust saturation. “-50” is the weakest color. “+50” is the strongest color.
Color Temperature 24
Warm
Normal
Cool
With this setting, you can adjust the color temperature.
Note
• "Picture Adjust" cannot be used when:
- The NET input selector is selected, or
- "Monitor Out" is set to "Sub".
*1 This procedure can also be performed on the remote controller by using the Quick Setup ( → page 43).
2 When the “Picture Mode” setting is set to anything other than “Custom”, this setting cannot be used.
*3 If the "Resolution" setting is set to "4K Upscaling" (→ page 48), this setting is fixed at "Off".
*4 Press CLR if you want to reset to the default value.
5 If the "Game Mode" setting is set to "On", this setting is fixed at "Off".
6 When a 3D video source is input, “Wide Mode” is fixed to “Full”.
Audio Selector
Audio Selector
ARC:
The audio signal from your TV tuner can be sent to HDMI OUT MAIN of the AV receiver. 1 With this selection, the TV's audio can be automatically selected as a priority among other assignments.
HDMI:
This can be selected when HDMI IN has been assigned as an input source. If both HDMI (HDMI IN) and digital audio inputs (COAXIAL IN or OPTICAL IN) have been assigned, HDMI input is automatically selected as a priority.
COAXIAL:
This can be selected when COAXIAL IN has been assigned as an input source. If both coaxial and HDMI inputs have been assigned, coaxial input is automatically selected as a priority.
OPTICAL
This can be selected when OPTICAL IN has been assigned as an input source. If both optical and HDMI inputs have been assigned, optical input is automatically selected as a priority.
Analog:
The AV receiver always outputs analog signals.
You can set priorities of audio output when there are both digital and analog inputs.
Note
- This setting can be made only for an input source that is assigned to HDMI IN, COAXIAL IN, or OPTICAL IN.
- This setting cannot be used with the NET and USB input selectors.
1 You can select "ARC" if you select the TV/CD input selector. But you cannot if you've selected "Off" in the "Audio Return Channel" setting (→ page 61).
Setting the Incoming Digital Signal (Fixed Mode)
Fixed Mode
Off
The format is detected automatically. If no digital input signal is present, the corresponding analog input is used instead.
PCM
Only 2-channel PCM format input signals will be heard. If the input signal is not PCM, the PCM indicator will flash and noise may also be produced.
DTS:
Only DTS (but not DTS-HD) format input signals will be heard. If the input signal is not DTS, the dts indicator will flash and there will be no sound.
When "HDMI", "COAXIAL" or "OPTICAL" is selected in the "Audio Selector" setting, you can then specify the signal type in "Fixed Mode".
Normally, the AV receiver detects the signal format automatically. However, if you experience either of the following issues when playing PCM or DTS material, you can manually set the signal format to PCM or DTS.
- If the beginnings of tracks from a PCM source are cut off, try setting the format to PCM.
- If noise is produced when fast forwarding or reversing a DTS CD, try setting the format to DTS.
Note
- The setting will be reset to "Off" when you change the setting in "Audio Selector".

En-57


Listening Mode Preset

Main Menu Listening Mode Preset
You can assign a default listening mode to each input source that will be selected automatically when you select each input source. For example, you can set the default listening mode to be used with Dolby Digital input signals. You can select other listening modes during playback, but the mode specified here will be resumed once the AV receiver has been set to standby.
1 Use ▲/▼ to select the input source that you want to set, and then press ENTER.
The following menu appears.

2 Use ▲/▼ to select the signal format that you want to set, and then use ◀/► to select a listening mode. Only listening modes that can be used with each input signal format can be selected (→ pages 35 to 39).
The "Last Valid" option means that the listening mode selected last will be used.
The "Straight Decode" option means that straight decoding listening mode (Dolby Digital, DTS, etc.) is selected.
Note
- For the "AM" or "FM" input selector, only "Analog" will be available.
- For the "NET" or "USB" input selector, only "Digital" will be available.
Analog/PCM/Digital
With this setting, you can specify the listening mode used when an analog (CD, TV, LD, VHS, MD, turntable, radio, cassette, cable, satellite, etc.) or PCM digital (CD, DVD, etc.) audio signal is played.
Note
- For the "AUX", "EXTRA1", and "EXTRA2" input selectors, only "PCM" is available.
Mono/Multiplex Source
With this setting, you can specify the listening mode used when a mono digital audio signal is played (DVD, etc.).
2ch Source
With this setting, you can specify the listening mode used when 2-channel (2/0) stereo digital sources, such as Dolby Digital or DTS, are played.
■Dolby D/Dolby D Plus/TrueHD
With this setting, you can specify the listening mode used when Dolby Digital or Dolby Digital Plus format digital audio signals are played (DVD, etc.). Specifies the default listening mode for Dolby TrueHD sources, such as Blu-ray or HD DVD (input via HDMI).
DTS/DTS-ES/DTS-HD
With this setting, you can specify the listening mode used when DTS or DTS-HD High Resolution format digital audio signals are played (DVD, LD, CD, etc.). Specifies the default listening mode for DTS-HD Master Audio sources, such as Blu-ray or HD DVD (input via HDMI).
■ Other Multich Source
Specifies the default listening mode for multichannel PCM sources from HDMI IN such as DVD-Audio, and DSD multichannel sources such as Super Audio CD.
Miscellaneous

Main Menu Miscellaneous
Volume Setup
■Maximum Volume
▶ Qf30 to 79
With this setting, you can limit the maximum volume. To disable this setting, select "Off".
Power On Volume
LasMin, 1 to 79 or Max
With this setting, you can specify the volume setting to be used each time the AV receiver is turned on.
To use the same volume level that was used when the AV receiver was turned off, select "Last".
The "Power On Volume" setting cannot be set higher than the "Maximum Volume" setting.
Headphone Level
-12dB to 0dB +12dB
With this setting, you can specify the headphone volume relative to the main volume. This is useful if there's a volume difference between your speakers and your headphones.
OSD Setup
On Screen Display
On Off
This preference determines whether operation details are displayed on-screen when an AV receiver function is adjusted.
Even when "On" is selected, operation details may not be output if the input source is connected to an HDMI IN.
Language
EnglisDeutsch, Français, Español, Italiano, Nederlands, Svenska
This setting determines the language used for the on-screen menus.
Screen Saver
With this setting, you can set the time until the screen saver activates itself. Once active, the screen saver will go off and the screen will return to its previous state if the AV receiver is operated in any way.
Hardware Setup

Main Menu Hardware Setup
Tuner
■AM/FM Frequency Step
10kHz/200kHz
9kHz/50kHz:
Select the frequency step according to your area.
For AM/FM tuning to work properly, you must specify the AM/FM frequency step used in your area.
Note
- When this setting is changed, all radio presets will be deleted.

En-59


HDMI
HDMI Control(RIHD)
Off On
Turn this setting on to allow RUHD-compatible components connected via HDMI to be controlled by the AV receiver ( → page 86).
Note
- When the setting is set to "On" and the menu is closed, the names of connected RIHD-compatible components and "RIHD On" are displayed on the AV receiver.
"Search..." → "(name)" → "RIHD On"
When the AV receiver cannot receive the name of the component, it is displayed as "Player*" or "Recorder*", etc. ("*") shows up and indicates the number of components, when two or more are received).
- When an RIHD-compatible component is connected to the AV receiver via an HDMI cable, the name of the connected component is displayed on the AV receiver display. For example, while you are watching TV broadcasting, if you operate a Blu-ray Disc/DVD player (being powered on) with the remote control of the AV receiver, the name of the Blu-ray Disc/DVD player will be displayed on the AV receiver.
- Set it to "Off" when a connected piece of equipment is not compatible or it is unclear whether the equipment is compatible or not.
- If operation is not normal when set to "On", change the setting to "Off".
- Refer to the connected component's instruction manual for details.
- When the "HDMI Control(RIHD)" setting is set to "On", the power consumption on standby mode slightly increases. (Depending on the TV status, the AV receiver will enter standby mode as usual.)
• The RIHD control does not support HDMI OUT SUB. Use HDMI OUT MAIN instead.
- When the source equipment is connected with the RI connection, it may malfunction if "HDMI Control(RIHD)" is set to "On".
HDMI Through
Off
BD/DVD, CBL/SAT, GAME, PC, AUX, TV/CD, EXTRA1, EXTRA2:
Selects the input source for which the HDMI Through function is enabled.
Last:
The HDMI Through function is activated on the input source selected at the time of setting the AV receiver to standby mode.
When enabling the HDMI Through function, regardless of whether the AV receiver is on or in standby, both audio and video streams from an HDMI input will be output to the TV or other components via HDMI connection. The HDMI indicator will be dimly-lit in standby mode. Note that the indicator may not light under certain conditions (→page 47).
This setting is fixed to "Auto" automatically when the above "HDMI Control(RIHD)" setting is set to "On", resulting in automatic input source selection.
Note
- Only an input source assigned to an HDMI IN via "HDMI Input" setting is enabled (→ page 48).
• The power consumption in standby mode will increase during the HDMI Through function; however in the following cases, the power consumption can be saved:
The TV is in standby mode.
- You are watching a TV program.
- Refer to the connected component's instruction manual for details.
- Depending on the connected component, the correct input source may not be selected with the setting fixed to "Auto".
- This setting is set to "Off" automatically when the "HDMI Control(RIHD)" setting is set to "Off".
Audio TV Out
▶ Off ▶ On
This preference determines whether the incoming audio signal is output from the HDMI output. You may want to turn this preference on if your TV is connected to the HDMI output and you want to listen to the audio from a connected component through your TV's speakers. Normally, this should be set to "Off".
Note
- If "On" is selected and the audio can be output from the TV, the AV receiver will output no sound through its speakers. In this case, "TV Speaker" appears on the AV receiver's display by pressing DISPLAY.
- When "HDMI Control(RIHD)" is set to "On", this setting is fixed to "Auto".
- With some TVs and input signals, no sound may be output even when this setting is set to "On".
- When "Audio TV Out" or "HDMI Control(RIHD)" is set to "On" and you're listening through your TV's speakers (→ page 15), turning up the AV receiver's volume control will make the sound be output from the AV receiver's front left and right speakers. To stop the AV receiver's speakers producing sound, change the settings, change your TV's settings, or turn down the AV receiver's volume.
- Listening mode cannot be changed when this setting is set to "On" and the input source is not HDMI.
■Audio Return Channel (ARC)
Off
Auto:
The audio signal from your TV tuner can be sent to HDMI OUT MAIN of the AV receiver.
The audio return channel (ARC) function allows an ARC capable TV to send the audio stream to HDMI OUT MAIN of the AV receiver. To use this function, you must select the TV/CD input selector and your TV must be ARC capable. The ARC indicator will light when the audio signal is detected. Default setting: “...”
Note
- This setting is fixed to “- - -” when the “HDMI Control(RIHD)” setting is set to “Off”.
- This setting is set to "Auto" automatically when the "HDMI Control(RIHD)" setting is set to "On" for the first time.
- If you set "Audio Return Channel" to "Auto", the "Audio Selector" settings of the TV/CD input selector will be automatically switched to "ARC" (→ page 57).
After changing the settings of the "HDMI Control(RIHD)", "HDMI Through" or "Audio Return Channel", turn off the power on all connected pieces of equipment and then turn them on again. Refer to the user's manuals for all connected pieces of equipment.
LipSync
Off
On
This function allows the AV receiver to automatically correct any delay between the video and the audio, based on the data from the connected monitor.
Note
- This function works only if your HDMI-compatible TV supports HDMI Lip Sync.
InstaPrevue
These settings apply to "InstaPrevue" of the Home menu (→ page 40) and specify the preview display of HDMI video streams.
Sub Window
Multi
Displays preview thumbnails all at once.
Single:
Displays preview thumbnails one-by-one.
With this setting, you can set the number of preview thumbnails displayed.
Position
(with "Sub Window" set to "Multi")
Top, BottonLeft, Right
(with "Sub Window" set to "Single")
▶ Upper Left, Upper Right, Lower Left, Lower Right
With this setting, you can set the position of preview thumbnails on the TV screen.
Note
- Depending on video signals, the picture may not be properly rendered on the preview thumbnails of InstaPrevue.
Auto Standby
■Auto Standby
▶ Off
On
When "Auto Standby" is set to "On", the ASb indicator lights and the AV receiver will automatically enter standby mode if there is no operation for 30 minutes with no audio and no video signal input.
"Auto Standby" will appear on the AV receiver's display and OSD 30 seconds before the Auto Standby comes on.
Note
- Set On", the Auto Standby function may activate itself during playback with some sources.
• The A Standby function does not work when Zone 2 is on.
Network
After modifying the network settings, you must confirm the changes by executing "Save".
This section explains how to configure the AV receiver's network settings manually.
If your router's DHCP server is enabled, you don't need to change any of these settings, as the AV receiver is set to use DHCP to configure itself automatically by default (i.e., DHCP is set to "Enable"). If, however, your router's
DHCP server is disabled (you're for example using static IP), you'll need to configure these settings yourself, in which case, a knowledge of Ethernet networking is essential.
What's DHCP?
DHCP (Dynamic Host Configuration Protocol) is used by routers, computers, the AV receiver, and other devices to automatically configure themselves on a network.
What's DNS?
The DNS (Domain Name System) translates domain names into IP addresses. For example, when you enter a domain name such as www.onkyousa.com in your Web browser, before accessing the site, your browser uses DNS to translate this into an IP address, in this case 63.148.251.142.
MAC Address
This is the AV receiver's MAC (Media Access Control) address. This address cannot be changed.
DHCP
Enable Disable
This setting determines whether or not the AV receiver uses DHCP to automatically configure its IP Address, Subnet Mask, Gateway, and DNS Server settings.
Note
- If you select "Disable", you must configure the "IP Address", "Subnet Mask", "Gateway", and "DNS Server" settings yourself.
IP Address
Class A: "10.0.0.0" to "10.255.255.255"
Class B: "172.16.0.0" to "172.31.255.255"
Class C: "192.168.0.0" to "192.168.255.255"
Enter a static IP address provided by your Internet Service Provider (ISP).
Most routers use Class C IP addresses.
Subnet Mask
Enter the subnet mask address provided by your ISP (typically 255.255.255.0).
Gateway
Enter the gateway address provided by your ISP.
DNS Server
Enter the DNS server address provided by your ISP.
Proxy URL
To use a Web proxy, enter its URL here.
Proxy Port
If you're using a Web proxy, enter a proxy port number here.
Network Standby
On Off
This setting enables or disables control over the network. When enabled, the NET indicator will be dimly-lit while the AV receiver is in standby mode. Note that the indicator may not light under certain conditions (→page 47).
Note
- When set to "On", the power consumption slightly increases in standby mode.
Update Notice
Enable Disable
When this setting is enabled, you will be notified if a firmware update via network is available.
Note
- Selecting "Never Remind me" on the notification window will switch this setting to "Disable" (→ page 19). - For details on the update notification, see "If the "Firmware Update Available" window appears." (→ page 19).
Initial Setup
If you skipped the initial setup wizard, for example on first-time use, you can reaccess it from here. See "Initial Setup" (→ page 20).
Advanced Operations
Remote Controller Setup

Main Menu Remote Controller Setup
Remote ID
Remote ID
▶, 2, or 3
When several Onkyo components are used in the same room, their remote ID codes may overlap. To differentiate the AV receiver from other components, you can change its remote ID from "1", to "2" or "3".
Note
- If you do change the AV receiver's remote ID, be sure to change the remote controller to the same ID (see below), otherwise, you won't be able to control it with the remote controller.
Changing the remote controller's ID
1 While holding down RECEIVER, press and hold down Q SETUP until the remote indicator lights (about 3 seconds).
2 Use the number buttons to enter ID 1, 2, or 3. The remote indicator flashes twice.
Remote Mode Setup
See "Looking up for Remote Control Codes" (→page 68).
Lock Setup

Main Menu Lock Setup
With this preference, you can protect your settings by locking the setup menus.
Setup
Locked
Unlocked
When "Locked" is selected, the setup menus will be locked and you cannot change any setting.

En-63


Zone 2
In addition to the main listening room, you can also enjoy playback in another room, or as we call Zone 2. And, you can select a different source for each room.
Making Zone 2 Connections
There are two ways you can connect Zone speakers:
- Connect them directly to the AV receiver.
- Connect them to an additional amplifier.
Connecting the Zone Speakers Directly to the AV receiver
This setup allows you to select different sources for Main room and Zone 2. This is called Powered Zone, as the Zone 2 speakers are powered by the AV receiver.
To use this setup, you must activate the Powered Zone 2 setting ( → page 50).

flowchart
graph TD
    A["Main room"] --> B["TV"]
    B --> C["AV receiver"]
    C --> D["Zone 2"]
    D --> E["R L"]
    D --> F["L ZONE 2"]
    style A fill:#f9f,stroke:#333
    style C fill:#ccf,stroke:#333
    style D fill:#cfc,stroke:#333
Note
- With this setup, the volume of Zone 2 is controlled by the AV receiver.
- When Powered Zone 2 is used, playback in the main room is reduced to 5.1 channels.
Advanced Operations
Connecting the Zone Speakers to an Additional Amplifier
This setup allows 7.1-channel playback in your main listening room and 2-channel stereo playback in Zone 2.

flowchart
graph TD
    A["Main room"] --> B["TV"]
    B --> C["AV receiver"]
    C --> D["Line OUT ZONE 2 L R"]
    D --> E["Receiver/ integrated amp"]
    F["Zone 2"] --> G["R"]
    G --> H["L"]
    H --> I["IN"]
    I --> J["R"]
    J --> K["L"]
    K --> L["IN"]
Note
- The volume of Zone 2 must be set on the Zone 2 amplifier.
Controlling Zone 2 Components
■Operating on the AV receiver
Input selector buttons
ZONE 2 OFF MASTER VOLUME

natural_image
Front view of a washing machine control panel with buttons and indicator lights (no text or labels visible)1 To turn on Zone 2 and select an input source, press ZONE 2 followed by an input selector button within 8 seconds.
Zone 2 turns on, the Z2 indicator lights on the AV receiver's display.
To select the same source as the main room's, press
ZONE 2 twice. "Z2 Sel: Source" appears on the AV receiver's display.
2 To turn off Zone 2, press OFF.
The zone is turned off.
■Operating on the remote controller
To control Zone 2, you must press ZONE2 on the remote controller first.

1 Press ZONE2, then point the remote controller at the AV receiver and press ⒽRECEIVER. Zone 2 turns on, the Z2 indicator lights on the AV receiver's display.
2 To select an input source for Zone 2, press ZONE2, followed by an INPUT SELECTOR button.
3 To turn off Zone 2, press ZONE2, followed by ⏻RECEIVER.
The zone is turned off.
Adjusting the Volume for Zone 2
■Operating on the remote controller
1 Press ZONE2.
2 Use VOL ▲/▼.
■Operating on the AV receiver
1 Press ZONE 2 (the Z2 indicator on the AV receiver's display flash).
2 Use MASTER VOLUME control within 8 seconds.
If your Zone 2 speakers are connected to a receiver or integrated amplifier in Zone 2, use its volume control to adjust the volume.
Muting Zone 2
■Operating on the remote controller
1 Press ZONE2 followed by MUTING.
Tip
- To unmute, press ZONE2 followed by MUTING again. Zone can also be unmuted by adjusting the volume.
Note
- Only analog input sources are output from the ZONE 2 LINE OUT jacks and ZONE 2 L/R terminals. Digital input sources are not output. If no sound is heard when an input source is selected, verify that the source is connected to an analog input.
- You cannot select different AM or FM radio stations for your main room and Zone 2. The same AM/FM radio station will be heard in each room. Namely, if you have selected an FM station for the main room, that station will also be output in Zone 2.
- When you have selected NET or USB as input selector, the last selector selected will be set for Main room and Zone 2.
- When Zone 2 is activated and its input selector is selected, the power consumption of standby mode slightly increases.
- While Zone 2 is on, RI functions will not work.
- When setting the AV receiver to standby mode while Zone 2 is active, the Z2 indicator is dimly lit.
- "AUX", "EXTRA1" and "EXTRA2" cannot be selected as input sources for Zone 2.
- When "AUX", "EXTRA1" or "EXTRA2" is the input source of Main room and Zone 2 is set to share the same source, no sound will be output from Zone 2.
iPod/iPhone Playback via Onkyo Dock
Using the Onkyo Dock
The Dock is sold separately. Models sold are different depending on the region.
For the latest information on the Onkyo Dock components, see the Onkyo web site at: http://www.onkyo.com
Before using the Onkyo Dock components, update your iPod/iPhone with the latest software, available from the Apple web site.
For supported iPod/iPhone models, see the instruction manual of the Onkyo Dock.
RI Dock
With the RI Dock, you can easily play the music of your iPod/iPhone, or watch the slideshows and videos of your iPod/iPhone on a TV. In addition, the on-screen display (OSD) allows you to view, navigate, and select your iPod/iPhone model's contents on your TV, and with the supplied remote controller, you can control your iPod/iPhone from the comfort of your sofa. You can even use the AV receiver's remote controller to operate your iPod/iPhone.
Note
- Enter the appropriate remote control code before using the AV receiver's remote controller for the first time (→ page 69).
- Connect the RI Dock to the AV receiver with an RI cable (→ page 17).
- Set the RI Dock's RI MODE switch to "HDD" or "HDD/DOCK".
- Set the AV receiver's Input Display to "DOCK" (→ page 41).
System Function
Depending on your iPod/iPhone model and generation, some of the linked operations may not be available.
System On
When you turn on the AV receiver, the RI Dock and iPod/iPhone turn on automatically. In addition, when RI Dock and iPod/iPhone are on, the AV receiver can be turned on by pressing ◦SOURCE.
Auto Power On
If you press the remote controller's ▶ (Playback) while the AV receiver is on standby, the AV receiver will automatically turn on, select your iPod/iPhone as the input source, and your iPod/iPhone will start playback.
Direct Change
If you start iPod/iPhone playback while listening to another input source, the AV receiver will automatically switch to the input to which the RI Dock is connected.
Controlling Other Components
Other Remote Operations
You can use the remote controller that came with the AV receiver to control other iPod/iPhone functions. The available functionality depends on the AV receiver.
Note
- If you use your iPod/iPhone with any other accessories, iPod/iPhone playback detection may not work.
- The System On function may not work depending on the RI Dock.
iPod Alarm
If you use the Alarm function on your iPod to start playback, the AV receiver will turn on at the specified time and select your iPod as the input source automatically.
Note
- This linked operation won't work while a video is being played or when the sound set for the alarm is a built-in sound (Beep).
- This linked operation won't work with models on which music files cannot be used to set the alarm sound.
Operating Notes
- Use the AV receiver's volume control to adjust the playback volume.
- While your iPod/iPhone is inserted in the RI Dock, its volume control has no effect.
- If you do adjust the volume control on your iPod/iPhone while it's inserted in the RI Dock, be careful that it's not set too loud before you reconnect your headphones.
Controlling Your iPod/iPhone
By pressing the REMOTE MODE button that's been programmed with the remote control code for your Dock, you can control your iPod/iPhone in the Dock with the buttons described further in this section.
See "Entering Remote Control Codes" for details on entering a remote control code (→ page 69).
See the Dock's instruction manual for more information.
RI Dock
- Set the RI Dock's RI MODE switch to "HDD" or "HDD/DOCK".
- ◎SOURCE may not work with a remote control code (without RI). In this case, make an RI connection and enter the remote control code 81993 (with RI).
■With the RI Control
Make an RI connection and enter the remote control code 81993 (with RI).
- Set the AV receiver's Input Display to "DOCK" (→page 41).
■ Without the RI Control
You must enter the remote control code 82990 first (→page 70).
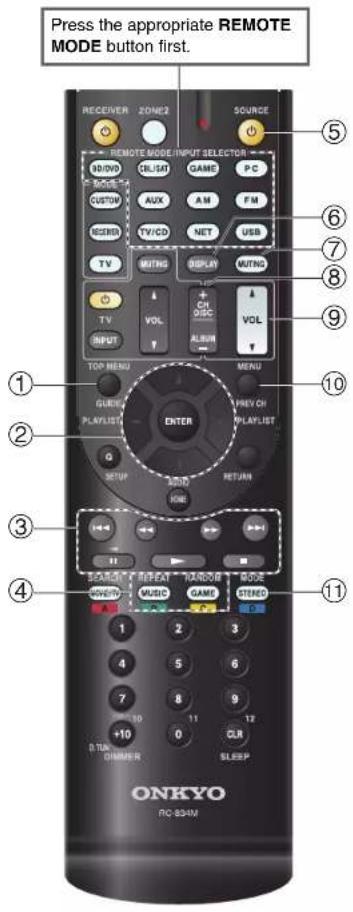

En-67

Controlling Other Components
RI Dock operation
| Available buttons | |||
| 1 | TOP MENU*1 | 5 | SOURCE*2 |
| 2 | ▲/▼/◄/►, ENTER | 6 | DISPLAY*3 |
| PLAYLIST ◀/► 7 | MUTING | ||
| 3 | ►-, II, ■, ◀◀, ►▶, |◄◄, ►►| | 8 | ALBUM +/- |
| 9 | VOL ▲/▼ | ||
| 4 | REPEAT | 10 | MENU |
| RANDOM | 11 | MODE*4 | |
- With some iPod/iPhone models, generations and RI Docks, certain buttons may not work as expected.
- For detailed operation of iPod/iPhone, please refer to the instruction manual of the RI Dock.
*1 TOP MENU works as the mode button when used with the DS-A2 RI Dock.
*2 This button does not turn the Onkyo DS-A2 or DS-A2X RI Dock on or off. Also, your iPod/iPhone may not respond the first time you press this button, in which case you should press it again. This is because the remote controller transmits the On and Standby commands alternately, so if your iPod/iPhone is already on, it will remain on when the remote controller transmits the On command. Similarly, if your iPod/iPhone is already off, it will remain off when the remote controller transmits the Off command.
3 DISPLAY turns on the backlight for a few seconds.
4 Resume mode With the Resume function, you can resume playback of the song that was playing when you removed your iPod/iPhone from the Onkyo DS-A2 R1 Dock.


Controlling Other Components
You can use the AV receiver's remote controller to control your other AV components. This section explains how to enter the remote control code for a component that you want to control: DVD, TV, CD, etc.
Preprogrammed Remote Control Codes
The following REMOTE MODE buttons are preprogrammed with remote control codes for controlling the components listed. You do not need to enter a remote control code to control these components. For details on controlling these components, see the indicated pages.
BD/DVD Onkyo Blu-ray Disc player ( → page 71) TV/CD Onkyo CD player ( → page 70)
Looking up for Remote Control Codes
You can look up for an appropriate remote control code from the on-screen menu.
Note
- This can only be carried out using the on-screen menu.
1 Press RECEIVER followed by HOME.
2 Use ◀/▶ to select "Setup", and then press ENTER.
3 Use ▲/▼ to select "Remote Controller Setup", and then press ENTER.
4 Use ▲/▼ to select "Remote Mode Setup", and then press ENTER.
5 Use ▲/▼ to select a remote mode, and then press ENTER.
The menu of category selection appears.
6 Use ▲/▼ to select a category, and then press ENTER. The keyboard screen for brand name input appears.
7 Use ▲/▼/◄/► to select a character, and then press ENTER.
Repeat this step for the first three characters of the brand name.
When you have entered the 3rd character, select "Search" and press ENTER.
A list of brand names is retrieved.
If the desired brand name is not found:
Use ▶ to select "Not Listed", and then press ENTER.
The keyboard screen for brand name input appears.
8 Use ▲/▼ to select a brand, and then press ENTER.
A remote control code with its instructions are displayed. Follow the procedure.
9 If you can control the component, use ▲/▼ to select "OK", and then press ENTER. The on-screen menu returns to the "Remote Mode Setup" front screen.
If you cannot control the component, use ▲/▼ to select "Try Next Code" and press ENTER. The next code is displayed.
Entering Remote Control Codes
You'll need to enter a code for each component that you want to control.
1 Look up the appropriate remote control code in the separate Remote Control Codes list.
The codes are organized by category (e.g., DVD player, TV, etc.).
2 While holding down the REMOTE MODE button to which you want to assign a code, press and hold down DISPLAY (about 3 seconds).
The remote indicator lights.
Note
- Remote control codes cannot be entered for RECEIVER and the multi zone button.
- Only TV remote control codes can be entered for TV.
- Except for RECEIVER, TV, and the multi zone button, remote control codes from any category can be assigned for the REMOTE MODE buttons. However, these buttons also work as input selector buttons (→ page 22), so choose a REMOTE MODE button that corresponds with the input to which you connect your component. For example, if you connect your CD player to the CD input, choose TV/CD when entering its remote control code.
3 Within 30 seconds, use the number buttons to enter the 5-digit remote control code.
The remote indicator flashes twice. If the remote control code is not entered successfully, the remote indicator will flash once slowly.
Note
- Though the provided remote control codes are correct at the time of release, they are subject to change.
Remapping Colored Buttons
You can change the configuration of colored buttons, with which REMOTE MODE buttons are preset.
1 While holding down the REMOTE MODE button that you want to program, press and hold down A (Red) until the remote indicator lights (about 3 seconds).
You can only change colored buttons for components whose codes belong to categories of the Remote Control Codes list (BD/DVD player, TV, cable set-top box, etc).
2 Within 30 seconds, press the colored buttons in the order that you want to reassign them.
The button presses are assigned to each button from left to right. The remote indicator flashes twice, indicating that the sequence has been successfully assigned. If the sequence is not successfully assigned, the remote indicator will flash once slowly.
Tip
- To reset the REMOTE MODE buttons to their default settings. see "Resetting the REMOTE MODE Buttons" (→ page 70).
Note
- If any other button than the colored buttons is pressed, the operation will be cancelled.
- This operation cannot be done while the AV receiver is in Receiver mode or when ZONE 2 is active.
Remote Control Codes for Onkyo Components Connected via RI
Onkyo components that are connected via RI are controlled by pointing the remote controller at the AV receiver, not the component. This allows you to control components that are out of view, in a rack, for example.
1 Make sure the Onkyo component is connected with an RI cable and an analog audio cable (RCA). See “Connecting Onkyo RI Components” for details ( → page 17).
2 Enter the appropriate remote control code for a REMOTE MODE button, by referring to the previous section.
42157: Onkyo cassette tape deck with RI 81993: Onkyo Dock with RI
3 Press the REMOTE MODE button, point the remote controller at the AV receiver, and operate the component.
Controlling Onkyo components without RI
If you want to control an Onkyo component by pointing the remote controller directly at it, or you want to control an
Onkyo component that's not connected via RI, use the following remote control codes:
30627: Onkyo DVD player without RI
71817: Onkyo CD player without RI
32900/33100/33500: Onkyo Blu-ray Disc player
32901/33104/33504: Onkyo HD DVD player
70868: Onkyo MD recorder without RI
71323:
Onkyo CD recorder without RI
82990:
Onkyo Dock without RI
Resetting the REMOTE MODE Buttons
You can reset a REMOTE MODE button to its default remote control code.
1 While holding down the REMOTE MODE button that you want to reset, press and hold down HOME until the remote indicator lights (about 3 seconds).
2 Within 30 seconds, press the REMOTE MODE button again.
The remote indicator flashes twice, indicating that the button has been reset.
Each REMOTE MODE button is preprogrammed with a remote control code. When a button is reset, its preprogrammed code is restored.
Resetting the Remote Controller
You can reset the remote controller to its default settings.
1 While holding down RECEIVER, press and hold down HOME until the remote indicator lights (about 3 seconds).
2 Within 30 seconds, press RECEIVER again.
The remote indicator flashes twice, indicating that the remote controller has been reset.
Controlling Other Components
By pressing the REMOTE MODE button that's been programmed with the remote control code for your component, you can control your component as described below.
For details on entering a remote control code for other components, see “Entering Remote Control Codes” (→page 69).
Controlling a TV
TV is preprogrammed with the remote control code for controlling a TV that supports the RIHD 1 (limited to some models). The TV must be able to receive remote control commands via RIHD and be connected to the AV receiver via HDMI. If controlling your TV via
RIHD doesn't work very well, program your TV's remote control code into TV and use the TV remote mode to control your TV.
Use the following remote control codes:
11807/13100/13500: TV with RJHD
Controlling Apple TV
By programming the supplied remote controller with the appropriate remote control code, you can use it to operate your Apple TV.
Use the following remote control codes:
02615: Apple TV
Controlling MHL-Enabled Mobile Device
By programming the supplied remote controller with the appropriate remote control code, you can use it to operate your MHL-enabled mobile device.
Connect your MHL-enabled mobile device to the AUX INPUT MHL jack. We advise you to program the remote control code on the AUX button.
Use the following remote control codes:
33101:
MHL-enabled mobile device
Note
- With some mobile devices, reliable operation cannot be guaranteed.
Controlling a Blu-ray Disc/DVD Player, HD DVD Player or DVD Recorder
BD/DVD is preprogrammed with the remote control code for controlling a component that supports the RIHD 1 (limited to some models). The component must be able to receive remote control commands via RIHD and be connected to the AV receiver via HDMI.
Use the following remote control codes:
32910/33101/33501/31612: Blu-ray Disc/DVD player with RIHD
*1 The RIHD supported by the AV receiver is the CEC system control function of the HDMI standard.


En-71

Controlling Other Components
TV operation
| Available buttons | |||
| 1 | ∅, INPUT, TV VOL ▲/▼, MUTING | 7 | Number: 1 to 9.0 |
| Number: +10*1 | |||
| 2 | GUIDE | 9 | DISPLAY |
| 3 | ▲/▼/◄/► ENTER | 11 | CH +/- |
| 12 | PREV CH | ||
| 4 | SETUP | 13 | RETURN |
| 5 | ►, II, ■, ◀◀, ►▶, |←◀, ►▶|*1 | 14 | AUDIO*1 |
| 15 | CLR | ||
| 6 | A (Red)*1 | ||
| B (Green)*1 | |||
| C (Yellow)*1 | |||
| D (Blue)*1 | |||
■Blu-ray Disc player / HD DVD player operation
| Available buttons | |||
| 2 | TOP MENU | 8 | ◎SOURCE |
| 3 | ▲/▼/◄/►ENTER | 9 | DISPLAY |
| 10 | MUTING | ||
| 4 | SETUP | 11 | CH +/- |
| 5 | ►, □, ■, ◀◀, ►▶, |←◀, ►▶| | 12 | DISC +/- |
| 6 | A (Red) | 13 | RETURN |
| B (Green) | 14 | AUDIO*1 | |
| C (Yellow) | 15 | CLR | |
| D (Blue) | |||
| 7 | Number: 1 to 9. 0 | ||
| Number: +10*1 | |||


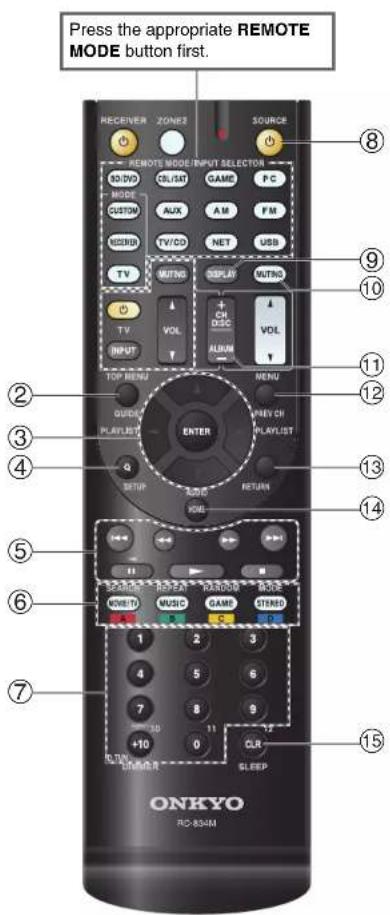
Controlling Other Components
■DVD player / DVD recorder operation
| Available buttons | |||
| 2 | TOP MENU | 8 | ○SOURCE |
| 3 | ▲/▼/◄/►ENTER | 9 | DISPLAY |
| 10 | MUTING | ||
| 4 | SETUP | 11 | CH +/- |
| 5 | ►. II. ■. ◀◀, ►▶.I◄◄. ►►I | 12 | DISC +/- |
| 6 | A (Red)1 | 13 | RETURN |
| B (Green) | 14 | AUDIO1 | |
| C (Yellow)1 | 15 | CLR | |
| D (Blue)1 | |||
| 7 | Number: 1 to 9, 0 | ||
| Number: +10*1 | |||
VCR/PVR operation
| Available buttons | |||
| 2 | GUIDE | 8 | ○SOURCE |
| 3 | ▲/▼/◄/►ENTER | 9 | DISPLAY |
| 10 | MUTING | ||
| 4 | SETUP | 11 | CH +/- |
| 5 | ►-, II, ■, ◀◀, ►►, |◄◄, ►►| | 12 | PREV CH |
| 13 | RETURN | ||
| 7 | Number: 1 to 9, 0 | 19 | CLR |
| Number: +10 | |||
■Cassette tape deck operation
| Available buttons | |||
| 5 | ▶, ◀ (ReversePlayback), ■, ◀◀, ▶▶, |◀◀, ▶▶| | 8 | ○SOURCE |
| 10 | MUTING | ||
Satellite receiver / Cable receiver operation
| Available buttons | |||
| 2 | GUIDE | 7 | Number: 1 to 9, 0 |
| 3 | ▲/▼/◄/►ENTER | Number: +10 | |
| 8 | ◎SOURCE | ||
| 4 | SETUP | 9 | DISPLAY |
| 5 | ►-, II, ■, ◀◀, ►►, |◄◄, ►►| | 10 | MUTING |
| 11 | CH +/- | ||
| 6 | A (Red) | 12 | PREV CH |
| B (Green) | 13 | RETURN | |
| C (Yellow) | 14 | AUDIO | |
| D (Blue) | 15 | CLR | |
■CD player / CD recorder / MD recorder operation
| Available buttons | |||
| 3 | ▲/▼/◄/►ENTER | 7 | Number: 1 to 9, 0 |
| Number: +10 | |||
| 4 | SETUP | 8 | ◎SOURCE |
| 5 | ►, II, ■, ◀◀, ►►, |◄◄, ►►| | 9 | DISPLAY |
| 10 | MUTING | ||
| 6 | SEARCH | 11 | DISC +/- |
| REPEAT | 12 | CLR | |
| RANDOM | |||
| MODE | |||
Note
- With some components, certain buttons may not work as expected, and some may not work at all.
- See "Controlling Your iPod/iPhone" about the operation of iPod/iPhone (→ page 67).
*1 The RIHD function is not supported. The RIHD supported by the AV receiver is the CEC system control function of the HDMI standard.
Troubleshooting
If you have any trouble using the AV receiver, look for a solution in this section. If you can't resolve the issue yourself, contact your Onkyo dealer.
If you can't resolve the issue yourself, try resetting the AV receiver before contacting your Onkyo dealer. To reset the AV receiver to its factory defaults, turn it on and, while holding down CBL/SAT, press ON/STANDBY. "Clear" will appear on the AV receiver's display and the AV receiver will enter standby mode.

Note that resetting the AV receiver will delete your radio presets and custom settings.

To reset the remote controller to its factory defaults, while holding down RECEIVER, press and hold down HOME until the remote indicator lights (about 3 seconds). Within 30 seconds, press RECEIVER again.
The on-screen menus appear only on a TV that is connected to HDMI OUT MAIN. If your TV is connected to other video outputs, use the AV receiver's display when changing settings.
Power
- Can't turn on the AV receiver
Make sure that the power cord is properly plugged — into the wall outlet. Unplug the power cord from the wall outlet, wait five — seconds or more, then plug it in again.
■The AV receiver turns off unexpectedly
The AV receiver will automatically enter standby mode when Auto Standby has been set and launches.
■The AV receiver turns off and after restoring the power, it turns off again
The protection circuit has been activated. Remove the power cord from the wall outlet immediately. Make sure that all speaker cables and input sources are properly connected, and leave the AV receiver with its power cord disconnected for 1 hour. After that, reconnect the power cord and turn the power on. If the AV receiver turns off again, unplug the power cord and contact your Onkyo dealer. Caution: If "CHECK SP WIRE" appears on the AV receiver's display, the speaker cables may be shorting.
WARNING
If smoke, smell or abnormal noise is produced by the AV receiver, unplug the power cord from the wall outlet immediately and contact your Onkyo dealer.
Appendix
Audio
There's no sound, or it's very quiet
Make sure that the digital input source is selected properly. 49
Make sure that all audio connecting plugs are pushed in all the way.
Make sure that the inputs and outputs of all components are connected properly. 15-17
Make sure that the polarity of the speaker cables is correct, and that the bare wires are in contact with the metal part of each speaker terminal.
Make sure that the input source is properly selected. 22
Make sure that the speaker cables are not shorting. 12
Check the volume. The AV receiver is designed for — home theater enjoyment. It has a wide volume range, allowing precise adjustment.
If the MUTING indicator is flashing on the AV receiver's display, press the remote controller's MUTING button to unmute the AV receiver.
While a pair of headphones is connected to the 42 PHONES jack, no sound is output from the speakers.
If there's no sound from a DVD player connected to — an HDMI IN, check the DVD player's output settings, and be sure to select a supported audio format.
Check the digital audio output setting on the connected device. On some game consoles, such as those that support DVD, the default setting is off.
With some DVD-Video discs, you need to select an — audio output format from a menu.
If your turntable uses an MC cartridge, you must connect an MC head amp, or an MC transformer.
Make sure that none of the connecting cables are bent, twisted, or damaged.
Not all listening modes use all speakers. 35
Specify the speaker distances and adjust the individual speaker levels. 51
Make sure that the speaker setup microphone is not still connected.
Appendix
If the input signal format is set to "PCM" or "DTS". 57 Set it to "Off".
■ Only the front speakers produce sound
When the Stereo or Mono listening mode is selected, 38 only the front speakers and subwoofer produce sound.
Check the Speaker Configuration. 50
■Only the center speaker produces sound
If you use the Dolby Pro Logic IIX Movie, Dolby Pro — Logic IIX Music, or Dolby Pro Logic IIX Game listening mode with a mono source, such as an AM radio station or mono TV program, the sound is concentrated in the center speaker.
Make sure the speakers are configured correctly. 50
■The surround speakers produce no sound
When the T-D (Theater-Dimensional), Stereo or Mono listening mode is selected, the surround speakers produce no sound.
Depending on the source and current listening mode, 35 not much sound may be produced by the surround speakers. Try selecting another listening mode.
Make sure the speakers are configured correctly. 50
■The center speaker produces no sound
When the Stereo or Mono listening mode is selected, — the center speaker produces no sound.
Make sure the speakers are configured correctly. 50
■The front high and surround back speakers produce no sound
Depending on the current listening mode, no sound may be produced by the front high and surround back speakers. Select another listening mode.
Depending on the sources, the sound produced by the — front high and surround back speakers may be weak.
Make sure the speakers are configured correctly. 50
When Powered Zone 2 is used, playback in the main room is reduced to 5.1 channels and the front high and surround back speakers produce no sound.
■The subwoofer produces no sound
When you play source material that contains no information in the LFE channel, the subwoofer produces no sound.
Make sure the speakers are configured correctly. 50
There's no sound with a certain signal format
Check the digital audio output setting on the connected device. On some game consoles, such as those that support DVD, the default setting is off.
With some DVD-Video dises, you need to select an audio output format from a menu.
Depending on the input signal, some listening modes 35-39 cannot be selected.
Can't get 6.1/7.1 playback
If no surround back speakers and front high speakers are connected, or the Zone 2 speakers are being used, 6.1/7.1 playback is not possible.
Depending on the number of connected speakers, it is 35-39 not always possible to select all of the listening modes.
■The speaker volume cannot be set as required
Check to see if a maximum volume has been set. 59
If the volume level of each individual speaker has been adjusted to high positive values, then the maximum master volume possible may be reduced. Note that the individual speaker volume levels are set automatically after the Audyssey 2EQ® Room Correction and Speaker Setup has been performed.
Noise can be heard
Using cable ties to bundle audio cables with power cords, speaker cables, and the like may degrade the audio performance, so refrain from doing it.
An audio cable may be picking up interference. Try — repositioning your cables.
The Late Night function doesn't work
Make sure the source material is Dolby Digital, 45 Dolby Digital Plus, and Dolby TrucHD.
Make sure that the "TrueHD Loudness Management" setting is not set to "Off". The Late Night function doesn't work when this setting is disabled.
■About DTS signals
When DTS program material ends and the DTS bitstream stops, the AV receiver remains in DTS listening mode and the dts indicator remains on. This is to prevent noise when you use the pause, fast forward, or fast reverse function on your player. If you switch your player from DTS to PCM, you may not hear any sound because the AV receiver does not switch formats immediately. In such case, you should stop your player for about three seconds and then resume playback.
With some CD and LD players, you won't be able to — playback DTS material properly even though your player is connected to a digital input on the AV receiver. This is usually because the DTS bitstream has been processed (e.g., output level, sampling rate, or frequency response changed) and the AV receiver doesn't recognize it as a genuine DTS signal. In such cases, you may hear noise.
Playing DTS program material, using the pause, fast forward, or fast reverse function on your player may produce a short audible noise. This is not a malfunction.
The beginning of audio received by an HDMI IN can't be heard
Since it takes longer to identify the format of an HDMI signal than it does for other digital audio signals, audio output may not start immediately.
Video
There's no picture
Make sure that all video connecting plugs are pushed 14 in all the way.
Make sure that each video component is properly connected. 15, 16
If your TV is connected to the HDMI output(s), select 48 "……" in the "HDMI Input" setup to watch composite video, and component video sources.
If the video source is connected to a component video 16, 49 input, you must assign that input to an input selector, and your TV must be connected to either the HDMI output(s) or COMPONENT VIDEO OUT.
If the video source is connected to a composite video input, your TV must be connected to the HDMI output(s) or the corresponding composite video output.
If the video source is connected to an HDMI input, you must assign that input to an input selector, and your TV must be connected to the HDMI output(s).
On your TV, make sure that the video input to which — the AV receiver is connected is selected.
There's no picture from a source connected to an HDMI IN
Reliable operation with an HDMI-to-DVI adapter is not guaranteed. In addition, video signals from a PC are not guaranteed.
When the resolution is set to any resolution not supported by the TV, no video is output from the HDMI outputs.
If the message "Resolution Error" appears on the AV receiver's display, this indicates that your TV does not support the current video resolution and you need to select another resolution on your DVD player.
■The on-screen menus don't appear
On your TV, make sure that the video input to which — the AV receiver is connected is selected.
When the AV receiver is not connected to a TV via — HDMI OUT MAIN, on-screen menus are not displayed.
■The on-screen display does not appear
Depending on the input signal, the on-screen display may not appear when the input signal from HDMI IN is output to a device connected to HDMI OUT MAIN.
Tuner
■Reception is noisy, FM stereo reception is noisy, or the FM STEREO indicator doesn't light
Relocate your antenna. — Move the AV receiver away from your TV or computer.
Listen to the station in mono. 30 When listening to an AM station, operating the remote controller may cause noise.
Passing cars and airplanes can cause interference. — Concrete walls weaken radio signals. —
If nothing improves the reception, install an outdoor — antenna.
Remote Controller
■The remote controller doesn't work
Before operating this unit, be sure to press RECEIVER.
Make sure that the batteries are installed with the correct polarity.
Install new batteries. Don't mix different types of batteries, or old and new batteries.
Make sure that the remote controller is not too far away from the AV receiver, and that there's no obstruction between the remote controller and the AV receiver's remote control sensor.
Make sure that the AV receiver is not subjected to direct sunshine or inverter-type fluorescent lights. Relocate if necessary.
Appendix
| If the AV receiver is installed in a rack or cabinet with colored-glass doors, the remote controller may not work reliably when the doors are closed. | — |
| Make sure you've selected the correct remote controller mode. | 10.70 |
| When using the remote controller to control other manufacturers' AV components, some buttons may not work as expected. | — |
| Make sure you've entered the correct remote control code. | 69 |
| Make sure to set the same ID on both the AV receiver and remote controller. | 63 |
Can't control other components
If it's an Onkyo component, make sure that the RI 17 cable and analog audio cable are connected properly. Connecting only an RI cable won't be enough.
Make sure you've selected the correct remote controller mode. 10,70
If you've connected an cassette tape deck to the TV/CD IN jack, or an RI Dock to the TV/CD IN or GAME IN jacks, for the remote controller to work properly, you must set the input display appropriately.
If you cannot operate it, you will need to enter the appropriate remote control code.
To control another manufacturer's component, point 69 the remote controller at that component.
To control an Onkyo component that's connected via 70
RI, point the remote controller at the AV receiver. Be sure to enter the appropriate remote control code first.
To control an Onkyo component that's not connected 70 via RI, point the remote controller at the component. Be sure to enter the appropriate remote control code first.
The entered remote control code may not be correct. — If more than one code is listed, try each one.

En-75


RI Dock for iPod/iPhone
There's no sound
Make sure your iPod/iPhone is actually playing. — Make sure your iPod/iPhone is properly inserted in the Dock.
Make sure the AV receiver is turned on, the correct input source is selected, and the volume is turned up. Make sure the plugs are pushed in all the way. — Try resetting your iPod/iPhone. —
There's no video
Make sure that your iPod/iPhone model's TV OUT — setting is set to On.
Make sure the correct input is selected on your TV or — the AV receiver. Some versions of the iPod/iPhone do not output — video.
The AV receiver's remote controller doesn't control my iPod/iPhone
Make sure your iPod/iPhone is properly inserted in the Dock. If your iPod/iPhone is in a case, it may not connect properly to the Dock. Always remove your iPod/iPhone from the case before inserting it into the Dock.
The iPod/iPhone cannot be operated while it's displaying the Apple logo.
Make sure you've selected the right remote mode. 67 When you use the AV receiver's remote controller, — point it toward your AV receiver.
If you still can't control your iPod/iPhone, start playback by pressing your iPod/iPhone model's Play button. Remote operation should then be possible.
Try resetting your iPod/iPhone. — Depending on your iPod/iPhone, some buttons may not work as expected.
■The AV receiver unexpectedly selects my iPod/iPhone as the input source
Always pause iPod/iPhone playback before selecting — a different input source. If playback is not paused, the Direct Change function may select your iPod/iPhone as the input source by mistake during the transition between tracks.
■iPod/iPhone doesn't work properly
Try reconnecting your iPod/iPhone. —
Zone 2
There's no sound
Only components connected to analog inputs can be — played in Zone 2.
■The Zone 2 speakers produce no sound
Powered Zone 2 cannot be used if "Speakers Type (Front)" is set to "Bi-Amp".
Music Server and Internet Radio
Can't access the server or Internet radio
Check the network connection between the AV receiver and your router or switch. 89
Make sure that your modem and router are properly connected, and make sure they are both turned on. Make sure the server is up and running and compatible with the AV receiver.
Check the "Network" settings. 62
■Playback stops while listening to music files on the server
Make sure your server is compatible with the AV receiver. 90
Appendix
If you download or copy large files on your computer, playback may be interrupted. Try closing any unused programs, use a more powerful computer, or use a dedicated server.
If the server is serving large music files to several networked devices simultaneously, the network may become overloaded and playback may be interrupted. Reduce the number of playback devices on the network, upgrade your network, or use a switch instead of a hub.
- Can't connect to the AV receiver from a Web browser
If you're using DHCP, your router may not always allocate the same IP address to the AV receiver, so if you find that you can't connect to a server or Internet radio station, recheck the AV receiver's IP address on the "Network" screen.
Check the "Network" settings. 62
USB Device Playback
- Can't access the music files on a USB device
Make sure the USB device is plugged in properly. —
The AV receiver supports USB devices that support the USB mass storage device class. However, playback may not be possible with some USB devices even if they conform to the USB mass storage device class.
USB memory devices with security functions cannot — be played.

En-76


Others
■ Standby power consumption
In the following cases, the power consumption in standby mode may reach up to a maximum of 8.3 W:
- The “HDMI Control(RIHD)” setting is set to “On”. (Depending on the TV status, the AV receiver will enter standby mode as usual.) - The “HDMI Through” setting is set to other than “Off”.
- The "Network Standby" setting is set to "On".
If an MHL-enabled mobile device is connected to the AUX (front) input, the power consumption in standby mode will increase.
■The sound changes when I connect my headphones
When a pair of headphones is connected, the listening — mode is set to Stereo, unless it's already set to Stereo, Mono, or Direct.
■The speaker distance cannot be set as required
The values entered may be automatically adjusted — with values best-suited for your home theater.
How do I change the language of a multiplex source
Use the "Multiplex" setting in the "Audio Adjust" menu to select "Main" or "Sub".
The RI functions don't work
To use RI, you must make an RI connection and an 17 analog audio connection (RCA) between the component and AV receiver, even if they are connected digitally.
While Zone 2 is selected, the RI functions don't work.
The functions System On/Auto Power On and Direct Change don't work for components connected via RI
These functions don't work when Zone 2 is turned on.
When performing "Automatic Speaker Setup", the measurement fails and the message "Ambient noise is too high." is displayed.
This can be caused by a malfunction in your speaker — unit. Check if the unit produces normal sounds.
■The following settings can be made for the composite video inputs
You must use the buttons on the unit to make these settings.
On the AV receiver, press the input selector for the input source that you want to set and the SETUP button simultaneously. While holding down the input selector button, press SETUP until "Video ATT :On" appears on the AV receiver's display. Then, release both buttons. To turn the setting off, repeat the above process so that "Video ATT :Off" appears on the AV receiver's display, and release the buttons.
• Video Attenuation
This setting can be made for the BD/DVD, CBL/SAT, GAME, PC or USB input.
If you have a game console connected to the composite video input, and the picture isn't very clear, you can attenuate the gain.
Video ATT :Off: (default).
Video ATT :On: Gain is reduced by 2 dB.
If the picture on your TV/monitor connected to the HDMI output(s) is unstable, try switching the DeepColor function off
To turn off the DeepColor function, simultaneously press the GAME and ON/STANDBY buttons on the AV receiver. While holding down GAME, press
Appendix
ON/STANDBY until "Deep Color:Off" appears on the AV receiver's display. Then, release both buttons. To reactivate the DeepColor function, repeat the above process until "Deep Color:On" appears on the AV receiver's display and release the buttons.
The AV receiver contains a microcomputer for signal processing and control functions. In very rare situations, severe interference, noise from an external source, or static electricity may cause it to lockup. In the unlikely event that this happens, unplug the power cord from the wall outlet, wait at least five seconds, and then plug it back in.
Onkyo is not responsible for damages (such as CD rental fees) due to unsuccessful recordings caused by the unit's malfunction. Before you record important data, make sure that the material will be recorded correctly.
Before disconnecting the power cord from the wall outlet, set the AV receiver to standby.
Important Note Regarding Video Playback
The AV receiver can upconvert component video and composite video sources for display on a TV connected to the HDMI output(s). However, if the picture quality of the source is poor, upconversion may make the picture worse or disappear altogether.
In this case, try the following:
1 If the video source is connected to a component video input, connect your TV to COMPONENT VIDEO OUT. If the video source is connected to a composite video input, connect your TV to MONITOR OUT V.
2 On the main menu, select "Input/Output Assign", and then select "Component Video Input" (→page 49).
If the video source is connected to COMPONENT VIDEO IN, select the relevant input selector, and assign it to "IN1".
If the video source is connected to a composite video input, select the relevant input selector, and assign it to "----".
Tip
- To by-pass the upconversion, set the "Picture Mode" setting to "Direct" (→ page 56).
Appendix
Firmware Update
To update the firmware of the AV receiver, you can choose from the following two methods: update via network, or update via USB storage. Choose the one that best suits your environment. Before proceeding with the update, please read the corresponding explanations carefully.
■Update via network
You need a wired Internet connection to update the firmware.
■ Update via USB storage ( → page 81)
Please prepare a USB storage device such as a USB flash memory stick. You need at least 32 MB of available space to update the firmware.
Note
- Check the network connection before updating.
- Do not touch any cable or device connected to the AV receiver during the update process.
- Do not attempt to access the AV receiver from your PC while it is being updated.
- Do not shutdown the power of the AV receiver while it is being updated.
• The storage media in the USB card reader may not work. - If the USB device is partitioned, each section will be treated as an independent device.
- If the USB device contains a lot of data, the AV receiver may take a while to read it.
- Operation is not guaranteed for all USB devices, which includes the ability to power them.
- Onkyo takes no responsibility whatsoever for the loss or damage of data resulting from the use of a USB device with the AV receiver. Onkyo recommends that you back up your important music files beforehand.
- If you connect a USB hard disk drive to the USB port, Onkyo recommends that you use its AC adapter to power it.
• USB hubs and USB devices with hub functions are not supported.
Do not connect your USB device via a USB hub. - USB devices with security functions are not supported.
Limitation of liability
The program and accompanying online documentation are furnished to you for use at your own risk. Onkyo will not be liable and you will have no remedy for damages for any claim of any kind whatsoever concerning your use of the program or the accompanying online documentation, regardless of legal theory, and whether arising in tort or contract. In no event will Onkyo be liable to you or any third party for any special, indirect, incidental, or consequential damages of any kind, including, but not limited to, compensation, reimbursement or damages on account of the loss of present or prospective profits, loss of data, or for any other reason whatsoever.
See the Onkyo web site for latest information.
Updating the Firmware via Network
The AV receiver allows you to update the firmware using network connection on the rear panel.
Note
• Make sure your AV receiver and TV are turned on and an Ethernet cable is connected to the rear panel of the AV receiver.
- Never unplug or turn off the AV receiver while it is being updated.
- Never plug or unplug an HDMI or Ethernet cable during the update process.
- Do not attempt to access the AV receiver from your PC while it is being updated.
- Never unplug the power cord during the update process.
- It takes up to 60 minutes to complete the firmware update.
- The AV receiver will retain all your settings after the update is finished.
Before Starting
- Set the "HDMI Control(RIHD)" setting to "Off" (→page 60).
- Turn off the controller device connected via Ethernet cable.
- Turn off Multi Zone if this function is present.
- Stop playback of contents from Internet Radio, iPod/iPhone, USB or servers, etc.
To be continued
Update Procedure Troubleshooting
1 Press RECEIVER followed by HOME on the remote controller.
The Home menu appears on the TV screen.
2 Select "Firmware Update" and press ENTER. Note that the "Firmware Update" option will be grayed out for a short while after the AV receiver is turned on. Please wait until it becomes operable.
3 Select "Update via NET" and press ENTER. Note that this option will not be available if there is no firmware file newer than the currently installed version.
4 Select "Update" and press ENTER. The update process will begin. During the update process, the on-screen display may disappear depending on the updated program. When this occurs, you can still view the update progress on the AV receiver's display. The on-screen display will reappear after the update is complete, and upon turning the AV receiver off and on again.
5 The message "Completed!" appears on the AV receiver's display, indicating that the update has been completed.
6 Turn off the AV receiver using ⏻ON/STANDBY on the front panel.
Do not use ◎RECEIVER on the remote controller. Once turned off, the AV receiver will automatically turn on again.
Congratulations! You now have the latest firmware installed on your Onkyo AV receiver.
Case 1:
If an error occurs, "Error!! *-**" is displayed on the AV receiver's display. (Alpha-numeric characters on the front display are denoted by asterisks.) Refer to the following table and take appropriate action.
■Errors during an update via network
| Error Code Description | |
| *-10, *-20 | The Ethernet cable was not detected.Reconnect the cable properly. |
| *-11, *-13, *-21, *-28 | Internet connection error.Check the following items:Make sure the IP address, subnet mask,gateway address, and DNS server areconfigured properly.Make sure the router is turned on.Make sure the AV receiver and the router areconnected with an Ethernet cable.Make sure your router is configured properly.See the instruction manual of the router.If your network allows only one clientconnection and there is any other devicealready connected, the AV receiver will not beable to access the network. Consult yourInternet Service Provider (ISP).If your modem docs not function as a router,you will need a router. Depending on yournetwork, you may need to configure the proxyserver if necessary. See the documentprovided by your ISP. If you are still unable toaccess the Internet, the DNS or proxy servermay be temporarily down. Contact your ISP. |
| Others Retry the update procedure from the beginning.If the error persists, please contact OnkyoSupport (→ page 82) and provide the errorcode. | |
Case 2:
If an error occurs during the update process, disconnect then reconnect the AC power cord and try again.
Appendix
Case 3:
If you do not have an Internet connection to the network, please contact Onkyo Support ( → page 82).
Updating the Firmware via USB
The AV receiver allows you to update the firmware using a USB device.
Note
- Never unplug or turn off the AV receiver during the update process.
- Never plug or unplug an HDMI cable or a USB device during the update process.
- Never unplug the USB storage device containing the firmware file or the AC power cord during the update process.
- Do not attempt to access the AV receiver from your PC while it is being updated.
- It takes up to 60 minutes to complete the firmware update.
- The AV receiver will retain all your settings after the update is finished.
Before Starting
- Set the "HDMI Control(RIHD)" setting to "Off" (→page 60).
- Turn off the controller device connected via Ethernet cable.
- Turn off Multi Zone if this function is present.
- Stop playback of contents from Internet Radio, iPod/iPhone, USB or servers, etc.
- If there is any data in the USB device, remove it first.
Update Procedure
1 Connect a USB device to your PC. If there is any data in the USB device, remove it first.
2 Download the firmware file from the Onkyo web site. The file name is as follows:
ONKAVR****_************.zip
Unzip the downloaded file. The following three files are created:
ONKAVR****_**********.of1
ONKAVR****_************.of2
ONKAVR****_**********.of3
3 Copy the extracted files to the USB device. Be careful not to copy the zip file.
4 Remove the USB device from your PC and connect it to the USB port on the AV receiver.
When the AV receiver has two USB ports, you can use either one.
5 Make sure the AV receiver and TV are turned on. If the AV receiver is in standby mode, press
ON/STANDBY on the AV receiver to light up the front display.
6 Select the USB input source.
"Now Initializing..." appears on the AV receiver's display and then the name of the USB device is displayed. It takes 20 to 30 seconds to recognize the USB device.
7 Press RECEIVER followed by HOME on the remote controller.
The Home menu appears on the TV screen.
8 Select "Firmware Update" and press ENTER.
9 Select "Update via USB" and press ENTER.
Note that this option will not be available if there is no firmware file newer than the currently installed version.
Appendix
10 Select "Update" and press ENTER.
The update process will begin.
During the update process, the on-screen display may disappear depending on the updated program. When this occurs, you can still view the update progress on the AV receiver's display. The on-screen display will reappear after the update is complete, and upon turning the AV receiver off and on again.
Do not turn off the AV receiver and do not remove the USB device during the update process.
11 The message "Completed!" appears on the AV receiver's display, indicating that the update has been completed.
Remove the USB device.
12 Turn off the AV receiver using ON/STANDBY on the front panel.
Do not use ◎RECEIVER on the remote controller. Once turned off, the AV receiver will automatically turn on again.
Congratulations! You now have the latest firmware installed on your Onkyo AV receiver.
Troubleshooting
Case 1:
If an error occurs, "Error!! *-**" is displayed on the AV receiver's display. (Alpha-numeric characters on the front display are denoted by asterisks.) Refer to the following table and take appropriate action.
■Errors during an update via USB
| Error Code Description | |
| *-10, *-20 | The USB device was not detected. Make sure the USB flash memory or USB cable is properly connected to the USB port. If the USB storage device has its own power supply, use it to power the USB device. |
| *-14 | The firmware file was not found in the root folder of the USB device, or the firmware file is for another model. Retry and download the file on the support page of the web site, following the on-site instructions. If the error persists, please contact Onkyo Support and provide the error code. |
| Others Retry the update procedure from the beginning. If the error persists, please contact Onkyo Support and provide the error code. | |
Case 2:
If an error occurs during the update process, disconnect then reconnect the AC power cord and try again.
Onkyo Sound & Vision Corporation
2-1, Nisshin-cho, Neyagawa-shi, OSAKA 572-8540, JAPAN http://www.onkyo.com/
The Americas
Onkyo U.S.A. Corporation
18 Park Way, Upper Saddle River, N.J. 07458, U.S.A.
For Dealer, Service, Order and all other Business Inquiries:
Tel: 201-785-2600
Fax: 201-785-2650
Hours: M-F 9am-5pm ET
http://www.us.onkyo.com/
For Product Support Team Only:
1-800-229-1687
Hours:M-F 9am-8pm / Sat-Sun 10am-8pm ET
http://www.us.onkyo.com/
Europe
Onkyo Europe Electronics GmbH
Liegnitzerstrasse 6, 82194 Groebenzell, GERMANY
Tel: +49-8142-4401-0 Fax: +49-8142-4208-213
http://www.eu.onkyo.com/
China, Hong Kong
Onkyo China Limited
Unit 1033, 10/F, Star House, No 3, Salisbury Road, Tsim
Sha Tsui Kowloon, Hong Kong.
Tel: 852-2429-3118 Fax: 852-2428-9039
http://www.onkyochina.com
Asia, Oceania, Middle East, Africa
Please contact an Onkyo distributor referring to Onkyo
SUPPORT site.
http://www.intl.onkyo.com/support/firmware/index.html
The above-mentioned information is subject to change
without prior notice. Visit the Onkyo web site for the latest
update.
Appendix
Connection Tips and Video Signal Path
The AV receiver supports several connection formats for compatibility with a wide range of AV equipment. The format you choose will depend on the formats supported by your components. Use the following sections as a guide.
The on-screen menus appear only on a TV that is connected to HDMI OUT MAIN. If your TV is connected to other video outputs, use the AV receiver's display when changing settings.
Video Connection Formats
Video components can be connected by using any one of the following video connection formats: composite video, component video, or HDMI, the latter offering the best picture quality.
Tip
- To by-pass the upconversion, set the "Picture Mode" setting to "Direct" (→ page 56).
■ "Monitor Out" set to "Main" or "Sub"
Video input signals flow through the AV receiver as shown, with composite video and component video sources all being upconverted for the HDMI output. Use these settings if you connect either HDMI OUT MAIN or HDMI OUT SUB of the AV receiver to your TV.
The composite video and component video outputs pass through their respective input signals as they are.
Video Signal Flow Chart
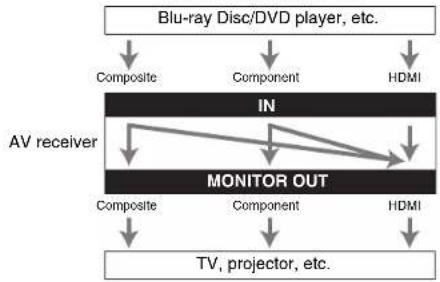
flowchart
graph TD
    A["Blu-ray Disc/DVD player, etc."] --> B["Composite"]
    A --> C["Component"]
    A --> D["HDMI"]
    E["AV receiver"] --> F["IN"]
    F --> G["MONITOR OUT"]
    G --> H["Composite"]
    G --> I["Component"]
    G --> J["HDMI"]
    K["TV, projector, etc."] --> L["Composite"]
    K --> M["Component"]
    K --> N["HDMI"]
Note
- When composite video and component video sources are upconverted for HDMI OUT SUB, only signals with a resolution of 480i arc output and the resolution remains the same. If your TV doesn't support this resolution, there will be no picture (→page 85).
Appendix
■ "Monitor Out" set to "Both"
Video input signals flow through the AV receiver as shown, with composite video and component video sources all being upconverted for both HDMI outputs. Use this setting if you connect both HDMI OUT MAIN and HDMI OUT SUB of the AV receiver to your TV.
Note that video signals are output from both HDMI outputs at the resolution supported by both TVs.
The composite video and component video outputs pass through their respective input signals as they are.
Video Signal Flow Chart

flowchart
graph TD
    A["Blu-ray Disc/DVD player, etc."] --> B["Composite"]
    A --> C["Component"]
    A --> D["HDMI"]
    E["AV receiver"] --> F["Monitor Out"]
    F --> G["Composite"]
    F --> H["Component"]
    F --> I["HDMI"]
    G --> J["TV, projector, etc."]
    H --> J
    I --> J
    style A fill:#f9f,stroke:#333
    style E fill:#ccf,stroke:#333
    style F fill:#cfc,stroke:#333
    style G fill:#fcc,stroke:#333
    style H fill:#cff,stroke:#333
    style I fill:#ffc,stroke:#333
Note
- When "Monitor Out" is set to "Both", the "Resolution" setting cannot be selected.

En-83


Signal Selection
If signals are present at more than one input, the inputs will be selected automatically in the following order of priority: HDMI, component video, composite video.
However, for component video only, regardless of whether a component video signal is actually present, if a component video input is assigned to the input selector, that component video input will be selected. And if no component video input is assigned to the input selector, this will be interpreted as no component video signal being present.
In the Signal Selection Example shown below, video signals are present at both the HDMI and composite video inputs. However, the HDMI signal is automatically selected as the source and the video is output by the HDMI outputs.

flowchart
graph TD
    A["Signal Selection Example"] --> B["Blu-ray Disc/DVD player, etc."]
    B --> C["Composite"]
    B --> D["Component"]
    B --> E["HDMI"]
    F["AV receiver"] --> G["IN"]
    G --> H["Monitor OUT"]
    H --> I["Composite"]
    H --> J["Component"]
    H --> K["HDMI"]
    L["TV, projector, etc."] --> M["Composite"]
    L --> N["Component"]
    L --> O["HDMI"]
Audio Connection Formats
Audio components can be connected by using any of the following audio connection formats: analog, optical, coaxial, or HDMI.
When choosing a connection format, bear in mind that the AV receiver does not convert digital input signals for analog line outputs and vice versa.
If signals are present at more than one input, the inputs will be selected automatically in the following order of priority: HDMI, digital, analog.

flowchart
graph TD
    A["Blu-ray Disc/DVD player, etc."] --> B["Optical"]
    A --> C["HDMI/Coaxial Analog"]
    D["AV receiver"] --> E["IN"]
    D --> F["OUT"]
    D --> G["TV, projector, etc."]
    E --> H["+1"]
    F --> I["+1"]
    G --> J["+1"]
    H --> K["+1"]
    I --> L["+1"]
    J --> M["+1"]
1 Depends on the “Audio TV Out” setting ( → page 60).
2 This is possible when “Audio Return Channel” is set to “Auto” ( → page 61), the TV/CD input selector is selected, and your TV is ARC capable.
Tip
- When a signal is input via HDMI and the corresponding input selector is selected, the HDMI indicator lights. In the case of an optical or coaxial connection, the DIGITAL indicator lights. In the case of an analog connection, neither of the HDMI and DIGITAL indicators light.

En-84

Appendix


Appendix
Video Resolution Chart
The following tables show how video signals at different resolutions are output by the AV receiver.
NTSC
√: Output available
| Input\Output | HDMI Component Composite | ||||||||||||||
| 4K*1 | 1080p/24 | 1080p | 1080l | 720p | 480p | 480l | 1080p | 1080l | 720p | 480p | 480l | 480l | |||
| HDMI 1080p/24 √ | √*2 | ||||||||||||||
| 1080p √ | √ | √*2 | |||||||||||||
| 1080i √ | √ | √ | √*2 | √ | |||||||||||
| 720p √ | √ | √ | √ | √*2 | |||||||||||
| 480p √ | √ | √ | √ | √ | √*2 | ||||||||||
| 480i √ | √ | √ | √ | √ | √*2 | ||||||||||
| Component 1080p √ | |||||||||||||||
| 1080l | √ | ||||||||||||||
| 720p | √ | ||||||||||||||
| 480p | √ | ||||||||||||||
| 480i √ | √ | √ | √ | √ | √*2 | √ | |||||||||
| Composite 480i √ | √ | √ | √ | √ | √ | √*2 | √ | ||||||||
*1 Supported resolutions: [3840 × 2160\ 24/25/30\ Hz] , [4096 × 2160\ 24\ Hz]
*2 Supported resolutions for HDMI OUT SUB.

En-85


Using an RIHD-compatible TV, Player, or Recorder
RIHD, which stands for Remote Interactive over HDMI, is the name of the system control function found on Onkyo components. The AV receiver can be used with CEC (Consumer Electronics Control), which allows system control over HDMI and is part of the HDMI standard. CEC provides interoperability between various components, however, operation with components other than RIHD-compatible components cannot be guaranteed.
About RIHD-compatible components
The following components are RIHD-compatible (As of January 2012).
TV
- Toshiba TV
• Sharp TV
■Players/Recorders
- Onkyo and Integra RIHD-compatible players
• Toshiba players and recorders - Sharp players and recorders (only when used together with Sharp TV)
* Models other than those mentioned above may have some interoperability if compatible with CEC, which is part of the HDMI Standard, but operation cannot be guaranteed.
Note
- For proper linked operations, do not connect more RIHD-compatible components than the quantities specified below, to the HDMI input terminal.
- Blu-ray Disc/DVD players: up to three.
- Blu-ray Disc/DVD recorders/Digital Video Recorders: up to three.
Cable/Satellite Set-top boxes: up to four. - Do not connect the AV receiver to another AV receiver/AV amplifier via HDMI.
- Proper linked operations are not guaranteed when more RIHD-compatible components than the above-mentioned quantities are connected.
Appendix
Operations that can be performed with RIHD connection
For RIHD-compatible TV
The following linked operations are enabled by connecting the AV receiver to an RIHD-compatible TV.
- The AV receiver will enter standby mode when the TV is set to standby.
- You can set on the menu screen of the TV to either output the audio from the speakers connected to the AV receiver, or from the speakers of the TV.
- It is possible to output the audio coming from the tuner or auxiliary input of your TV to the speakers of the AV receiver. (A connection such as an optical digital cable or similar is required in addition to the HDMI cable.)
- Input to the AV receiver can be selected with the remote controller of the TV.
- Operations such as volume adjustment or similar for the AV receiver can be performed from the remote controller of the TV.
For RIHD-compatible players/recorders
The following linked operations are enabled by connecting the AV receiver to an RIHD-compatible player/recorder.
- When playback is started on the player/recorder, AV receiver will switch to the HDMI input of the player/recorder that is playing back.
• Operation of the player/recorder is possible using the remote controller supplied with the AV receiver.
* Depending on the model used, not all operations may be available.
To be continued

En-86


■How to connect and setup
1 Confirm the connection and settings.
- Connect the HDMI OUT MAIN jack to the HDMI input jack of the TV.
Blu-ray Disc/DVD player, etc.

flowchart
graph TD
    A["AC"] --> B["AV receiver"]
    B --> C["TV projector, etc."]
    B --> D["DIGITAL AUDIO connection (OPTICAL)"]
    B --> E["HDMI connection"]
    C --> F["↓"]
    D --> G["↓"]
    E --> H["HDMI connection"]
- Connect the audio output from the TV to the OPTICAL IN 2 jack of the AV receiver using an optical digital cable.
Note
- When the audio return channel (ARC) function is used with an ARC capable TV, this connection is not necessary ( → page 61).
- Connect the HDMI output of the Blu-ray Disc/DVD player/recorder to the HDMI IN 1 jack of the AV receiver.
Note
- It is necessary to assign the HDMI input when connecting the Blu-ray Disc/DVD player/recorder to other jacks (→ page 48). Do not assign an HDMI IN to the TV/CD selector at this time, otherwise appropriate CEC (Consumer Electronics Control) operation will not be guaranteed.
2 Change each item in the "HDMI" menu according to the following settings:
• HDMI Control(RIHD): On
• Audio Return Channel (ARC): Auto
See details of each setting ( → pages 60, 61).
3 Confirm the settings.
-
Turn on the power for all connected components.
-
Turn off the power of the TV, and confirm that the power of the connected components is turned off automatically with the link operation.
- Turn on the power of the Blu-ray Disc/DVD player/recorder.
-
Start playback on the Blu-ray Disc/DVD player/recorder, and verify the following
-
The AV receiver automatically turns on, and selects the input to which the Blu-ray Disc/DVD player/recorder is connected.
-
The TV automatically turns on, and selects the input to which the AV receiver is connected.
-
Following the operating instructions of the TV, select "Use the TV speakers" from the menu screen of the TV, and confirm that the audio is output from the speakers of the TV, and not from the speakers connected to the AV receiver.
-
Select "Use the speakers connected from the AV receiver" from the menu screen of the TV, and confirm that the audio is output from the speakers connected to the AV receiver, and not from the TV speakers.
Note
- Perform the above operations when you use the AV receiver for the first time, when the settings of each component are changed, when the main power of each component is turned off, when the power cable is disconnected from the power supply, or when there has been a power outage.
Appendix
4 Operate with the remote controller.
For buttons that can be operated (→ page 71).
Note
- Audio from DVD-Audio or Super Audio CD may not output from the TV speakers. You will be able to output the audio from the TV speakers by setting the audio output of the DVD player to 2ch PCM. (It may not be possible depending on the player models.)
- Even if you set to output audio on the TV speakers, audio will be output from the speakers connected to the AV receiver when you adjust the volume or switch the input on the AV receiver. To output audio from the TV speakers, redo the corresponding operations on the TV.
- In case of an RIHD connection with RI and RI audio control compatible components, do not connect the RI cable at the same time.
- On the TV, when you select anything other than the HDMI jack to which the AV receiver is connected, the input on the AV receiver will be switched to "TV/CD".
- The AV receiver will automatically power on in conjunction when it determines it to be necessary. Even if the AV receiver is connected to an RIHD compatible TV or player/recorder, it will not power on if it is not necessary. It may not power on in conjunction when the TV is set to output audio from the TV.
- Linked functions with the AV receiver may not work depending on the component model connected. In such cases, operate the AV receiver directly.

En-87


About HDMI
Designed to meet the increased demands of digital TV, HDMI (High Definition Multimedia Interface) is a new digital interface standard for connecting TVs, projectors, Blu-ray Disc/DVD players, set-top boxes, and other video components. Until now, several separate video and audio cables have been required to connect AV components. With HDMI, a single cable can carry control signals, digital video, and up to eight channels of digital audio (2-channel PCM, multichannel digital audio, and multichannel PCM).
The HDMI video stream (i.e., video signal) is compatible with DVI (Digital Visual Interface), so TVs and displays with a DVI input can be connected by using an HDMI-to-DVI adapter cable. (This may not work with some TVs and displays, resulting in no picture.)
The AV receiver uses HDCP (High-bandwidth Digital Content Protection) 2 , so only HDCP-compatible components can display the picture.
The AV receiver's HDMI interface is based on the following: Audio Return Channel, 3D, x.v.Color, DeepColor, Lip Sync, DTS-HD Master Audio, DTS-HD High Resolution Audio, Dolby TrueHD, Dolby Digital Plus, DSD and Multichannel PCM.
Supported Audio Formats About Copyright
• 2-channel linear PCM (32–192 kHz, 16/20/24 bit)
- Multichannel linear PCM (up to 7.1 ch, 32–192 kHz, 16/20/24 bit)
- Bitstream (DSD, Dolby Digital, Dolby Digital Plus, Dolby TrueHD, DTS, DTS-HD High Resolution Audio, DTS-HD Master Audio)
Your Blu-ray Disc/DVD player must also support HDMI output of the above audio formats.
Appendix
ection
The AV receiver supports HDCP (High-bandwidth Digital Content Protection) 2 , a copy-protection system for digital video signals. Other devices connected to the AV receiver via HDMI must also support HDCP.
1 DVI (Digital Visual Interface): The digital display interface standard set by the DDWG 3 in 1999.
*2 HDCP (High-bandwidth Digital Content Protection): The video encryption technology developed by Intel for HDMI/DVI. It's designed to protect video content and requires a HDCP-compatible device to display the encrypted video.
3 DDWG (Digital Display Working Group): Lead by Intel, Compaq, Fujitsu, Hewlett Packard, IBM, NEC, and Silicon Image, this open industry group's objective is to address the industry's requirements for a digital connectivity specification for high-performance PCs and digital displays.
Note
- The HDMI video stream is compatible with DVI (Digital Visual Interface), so TVs and displays with a DVI input can be connected by using an HDMI-to-DVI adapter cable. (Note that DVI connections only carry video, so you'll need to make a separate connection for audio.) However, reliable operation with such an adapter is not guaranteed. In addition, video signals from a PC are not supported.
- The HDMI audio signal (sampling rate, bit length, etc.) may be restricted by the connected source component. If the picture is poor or there's no sound from a component connected via HDMI, check its setup. Refer to the connected component's instruction manual for details.
Network/USB Features
Connecting to the Network
The following diagram shows how you can connect the AV receiver to your home network. In this example, it's connected to a LAN port on a router, which has a 4-port 100Base-TX switch built-in.

flowchart
graph TD
    A["Internet radio"] --> B["Modem"]
    B --> C["WAN"]
    B --> D["LAN"]
    C --> E["Router"]
    D --> E
    F["Computer"] --> C
    G["Computer"] --> D
Computer or media server
Network Requirements
Ethernet Network
For the best results, a 100Base-TX switched Ethernet network is recommended. Although it's possible to play music on a computer that's connected to the network wirelessly, playback may be unreliable, so it is recommended to use wired connections.
Ethernet Router
A router manages the network, data-routing and supplying of IP addresses. Your router must support the following:
- NAT (Network Address Translation). NAT allows several networked computers to access the Internet simultaneously via a single Internet connection. The AV receiver needs Internet access for Internet radio.
- DHCP (Dynamic Host Configuration Protocol). DHCP supplies IP addresses to the network devices, allowing them to configure themselves automatically.
- A router with a built-in 100Base-TX switch is recommended.
Some routers have a built-in modem, and some Internet Service Providers (ISP) require you to use specific routers. Please consult your ISP or computer dealer if you're unsure.
CAT5 Ethernet cable
Use a shielded CAT5 Ethernet cable (straight-type) to connect the AV receiver to your home network.
■Internet Access (for Internet radio)
To receive Internet radio, your Ethernet network must have Internet access. A narrowband Internet connection (e.g., 56K modem, ISDN) will not provide satisfactory results, so a broadband connection is strongly recommended (e.g., cable modem, xDSL modem, etc). Please consult your ISP or computer dealer if you're unsure.
Note
• To receive Internet radio with the AV receiver, your broadband Internet connection must be working and able to access the Web.
Appendix
Consult your ISP if you have any problems with your Internet connection.
- The AV receiver uses DHCP to configure its network settings automatically. If you want to configure these settings manually, see "Network" (→ page 62).
- The AV receiver does not support PPPoE settings, so if you have a PPPoE-type Internet connection, you must use a PPPoE-compatible router.
- Depending on your ISP, you may need to specify a proxy server to use Internet radio. If your computer is configured to use a proxy server, use the same settings for the AV receiver (→page 62).


En-89

Server Requirements
Server playback
The AV receiver can play digital music files stored on a computer or media server and supports the following technologies:
• Windows Media Player 11
• Windows Media Player 12
- Windows Media Connect 2.0
• DLNA-certified media server
If the operating system of your computer is Windows Vista, Windows Media Player 11 is already installed.
Windows Media Player 11 for Windows XP can be downloaded for free from the Microsoft web site.
- The computer or media server must be on the same network as the AV receiver.
- Up to 20,000 folders can be displayed, and folders may be nested up to 16 levels deep.
Note
- Depending on the media server, the AV receiver may not recognize it, or may not be able to play its music files.
Minimum system requirements for Windows Media Player 11 on Windows XP
Operating system
Windows XP Home Edition (SP2), Windows XP Professional (SP2), Windows XP Tablet PC Edition (SP2), Update Rollup 2 for Windows XP Media Center Edition 2005 (KB900325), October 2006 Update Rollup for Windows XP Media Center Edition (KB925766)
Processor: 233 MHz Intel Pentium II, Advanced Micro Devices (AMD), etc.
Memory: 64 MB
Hard disk: 200 MB of free space
Drive: CD or DVD drive
Modem: 28.8 kbps
Sound card: 16-bit sound card
Monitor: Super VGA (800 x 600)
Video card: 64 MB VRAM, DirectX 9.0b
Software: Microsoft ActiveSync (only when using a Windows Mobile-based Pocket PC or smartphone)
Web browser: Microsoft Internet Explorer 6 or Netscape 7.1
■ Remote playback
• Windows Media Player 12
- DLNA-certified (within DLNA Interoperability Guidelines version 1.5) media server or controller device. The setting varies depending on the media server or controller devices. Refer to your devices' instruction manual for details.
If the operating system of your personal computer is Windows 7, Windows Media Player 12 is already installed. For more information, see the Microsoft web site.
USB Device Requirements
- USB mass storage device class (but not always guaranteed).
• FAT16 or FAT32 file system format. - If the storage device has been partitioned, each section will be treated as an independent device.
- Up to 20,000 folders can be displayed, and folders may be nested up to 16 levels deep.
- USB hubs and USB devices with hub functions are not supported.
Note
- If the media you connect is not supported, the message "No Storage" will be displayed.
- If you connect a USB hard disk drive to the AV receiver's USB port, we recommend that you use its AC adapter to power it.
- The AV receiver supports USB MP3 players that support the USB Mass Storage Class standard, which allows USB devices to be connected to computers without the need for special drivers or software. Note that not all USB MP3 players support the USB Mass Storage Class standard. Refer to your USB MP3 player's instruction manual for details.
- Protected WMA music files on an MP3 player cannot be played.
- Onkyo accepts no responsibility whatsoever for the loss or damage to data stored on a USB device when that device is used with the AV receiver. We recommend that you back up your important music files beforehand.
- MP3 players containing music files that are managed with special music software are not supported.
- Operation is not guaranteed for all USB devices, which includes the ability to power them.
- Do not connect your USB device via a USB hub. The USB device must be connected directly to the AV receiver's USB port.
- If the USB device contains a lot of data, the AV receiver make take a while to read it.
- USB devices with security functions cannot be played.
Appendix
Supported Audio File Formats About DLNA
For server playback and playback from a USB device, the AV receiver supports the following music file formats. Variable bit-rate (VBR) files are supported. However, playback times may not display correctly.
Note
- With remote playback, the AV receiver does not support the following music file formats: FLAC and Ogg Vorbis.
- In the case of server playback, the above-mentioned file formats may not be played depending on the server type.
■MP3 (.mp3 or .MP3)
- MP3 files must be MPEG-1/MPEG-2 Audio Layer 3 format with sampling rates of 8kHz , 11.025kHz , 12kHz , 16kHz , 22.05kHz , 24kHz , 32kHz , 44.1kHz , 48kHz and bitrates of between 8 kbps and 320 kbps. Incompatible files cannot be played.
■WMA (.wma or .WMA)
WMA stands for Windows Media Audio and is an audio compression technology developed by Microsoft Corporation. Audio can be encoded in WMA format by using Windows Media® Player.
• WMA files must have the copyright option turned off.
- Sampling rates of 8 kHz, 11.025 kHz, 12 kHz, 16 kHz, 22.05 kHz, 24 kHz, 32 kHz, 44.1 kHz, 48 kHz, bitrates of between 5 kbps and 320 kbps, and WMA DRM are supported.
• WMA Pro/Voice formats are not supported.
■WMA Lossless (.wma or .WMA)
- Sampling rates of 44.1 kHz, 48 kHz, 88.2 kHz, 96 kHz are supported.
• Quantization bit: 16 bit, 24 bit
WAV files contain uncompressed PCM digital audio.
- Sampling rates of 8 kHz, 11.025 kHz, 12 kHz, 16 kHz, 22.05 kHz, 24 kHz, 32 kHz, 44.1 kHz, 48 kHz, 64 kHz, 88.2 kHz, 96 kHz, 176.4 kHz and 192 kHz are supported.
• Quantization bit: 8 bit, 16 bit, 24 bit
AAC
(.aac/.m4a/.mp4/.3gp/.3g2/.AAC/.M4A/.MP4/.3GP or .3G2)
AAC stands for MPEG-2/MPEG-4 Audio.
- Sampling rates of 8 kHz, 11.025 kHz, 12 kHz, 16 kHz, 22.05 kHz, 24 kHz, 32 kHz, 44.1 kHz, 48 kHz, 64 kHz, 88.2 kHz, 96 kHz and bitrates of between 8 kbps and 320 kbps are supported.
■FLAC (.flac or .FLAC)
FLAC is a file format for lossless audio data compression.
- Sampling rates of 8 kHz, 11.025 kHz, 12 kHz, 16 kHz, 22.05 kHz, 24 kHz, 32 kHz, 44.1 kHz, 48 kHz, 64 kHz, 88.2 kHz, 96 kHz, 176.4 kHz and 192 kHz are supported.
• Quantization bit: 8 bit, 16 bit, 24 bit
■Ogg Vorbis (.ogg or .OGG)
- Sampling rates of 8 kHz, 11.025 kHz, 12 kHz, 16 kHz, 22.05 kHz, 24 kHz, 32 kHz, 44.1 kHz, 48 kHz and bitrates of between 48 kbps and 500 kbps are supported. Incompatible files cannot be played.
■LPCM (Linear PCM)
- Sampling rates of 8 kHz, 11.025 kHz, 12 kHz, 16 kHz, 22.05 kHz, 24 kHz, 32 kHz, 44.1 kHz, 48 kHz, 64 kHz, 88.2 kHz, 96 kHz, 176.4 kHz and 192 kHz are supported.
• Quantization bit: 8 bit, 16 bit, 24 bit
* Only for playback via network.
The Digital Living Network Alliance is an international, cross-industry collaboration. Members of DLNA develop a concept of wired and wireless interoperable networks where digital content such as photos, music, and videos can be shared through consumer electronics, personal computers, and mobile devices in and beyond the home. The AV receiver complies with the DLNA Interoperability Guidelines version 1.5.
License and Trademark Information
“x.v.Color” is a trademark of Sony Corporation.
dts-hd
Manufactured under license under U.S. Patent Nos: 5,956,674; 5,974,380; 6,226,616; 6,487,535; 7,212,872; 7,333,929; 7,392,195; 7,272,567 & other U.S. and worldwide patents issued & pending. DTS-HD, the Symbol, & DTS-HD and the Symbol together are registered trademarks & DTS-HD Master Audio is a trademark of DTS, Inc. Product includes software. © DTS, Inc. All Rights Reserved.
DOLBY
TRUE
PRO LOGIC IIz
Manufactured under license from Dolby Laboratories. Dolby, Pro Logic and the double-D symbol are trademarks of Dolby Laboratories.
Music Optimizer™ is a trademark of Onkyo Corporation.
HDMI
"HDMI, the HDMI Logo, and High-Definition Multimedia Interface are trademarks or registered trademarks of HDMI Licensing LLC in the United States and other countries."

InstaPrevue
InstaPrevue and the InstaPrevue logo are trademarks or registered trademarks of Silicon Image, Inc. in the United States and other countries.
Made for
iPod iPhone
iPhone, iPod, iPod classic, iPod nano, iPod shuffle, and iPod touch are trademarks of Apple Inc., registered in the U.S. and other countries.
"Made for iPod" and "Made for iPhone" mean that an electronic accessory has been designed to connect specifically to iPod or iPhone, respectively, and has been certified by the developer to meet Apple performance standards. Apple is not responsible for the operation of this device or its compliance with safety and regulatory standards.
Please note that the use of this accessory with iPod or iPhone may affect wireless performance.
Apple TV is a trademark of Apple Inc., registered in the U.S. and other countries.
AUDYSSEY
DYNAMIC VOLUME
Manufactured under license from Audyssey Laboratories™, Inc. U.S. and foreign patents pending. Audyssey 2EQ®, Audyssey Dynamic EQ® and Audyssey Dynamic Volume® are registered trademarks of Audyssey Laboratories, Inc.
"DLNA®, the DLNA Logo and DLNA CERTIFIED™ are trademarks, service marks, or certification marks of the Digital Living Network Alliance."
Windows and the Windows logo are trademarks of the Microsoft group of companies.
Qdeo and QuietVideo are trademarks of Marvell or its affiliates.
\*MHL
Mobile High-Definition Link
"MHL, the MHL Logo, and Mobile High-Definition Link are trademark or registered trademarks of MHL LLC in the United States and other counties."

En-92

Appendix


Specifications
Amplifier Section
Rated Output Power
All channels: 80 watts minimum continuous power per channel, 8 ohm loads, 2 channels driven from 20 Hz to 20 kHz, with a maximum total harmonic distortion of 0.7% (FTC)
Dynamic Power*
* IEC60268-Short-term maximum output power
180 W (3 Ω. Front)
160 W (4 Ω, Front)
100 W (8 Ω, Front)
THD+N (Total Harmonic Distortion+Noise)
0.08% (20 Hz - 20 kHz, half power)
Damping Factor 60 (Front, 1 kHz, 8 Ω)
Input Sensitivity and Impedance (Unbalance)
200 mV/47 kΩ (LINE)
Rated RCA Output Level and Impedance
200 mV/2.2 kΩ (LINE OUT)
Maximum RCA Output Level and Impedance
2 V/2.2 kΩ (LINE OUT)
Frequency Response 5 Hz - 100 kHz/+1 dB, -3 dB (DSP bypass)
Tone Control Characteristics
±10 dB, 50 Hz (BASS)
±10 dB, 20 kHz (TREBLE)
Signal to Noise Ratio 100 dB (LINE, IHF-A)
Speaker Impedance 6 Ω - 16 Ω
Video Section
Input Sensitivity/Output Level and Impedance
1 Vp-p/75 Ω (Component Y)
0.7 Vp-p/75 Ω (Component PB/CB, PR/CR)
1 Vp-p/75 Ω (Composite)
Component Video Frequency Response
5 Hz - 100 MHz/+0 dB, -3 dB
Tuner Section
FM Tuning Frequency Range
87.5 MHz - 107.9 MHz
AM Tuning Frequency Range
530 kHz - 1710 kHz
Preset Channel 40
General
Power Supply AC 120 V, 60 Hz
Power Consumption 5 A
No-sound Power Consumption
65 W
Stand-by Power Consumption
0.15 W
Dimensions (W × H × D)
435 mm × 173.5 mm × 328 mm
17-1/8"×6-13/16"×12-15/16"
Weight 9.0 kg (19.8 lbs.)
HDMI
Input IN 1, IN 2, IN 3, IN 4, IN 5, IN 6, IN 7, AUX
INPUT
Output OUT MAIN, OUT SUB
Video Resolution 1080p
Audio Format Dolby TrucHD, DTS-HD Master Audio.
DVD-Audio, DSD
Supported
3D. Audio Return Channel, DeepColor,
x.v.Color, LipSync, CEC (RIHD)
Video Inputs
Component
IN I
Composite
BD/DVD, CBL/SAT, GAME, PC, USB
Video Outputs
Component
OUT
Composite
MONITOR OUT
Appendix
Audio Inputs
Digital
Optical: 2
Coaxial: 2
Analog BD/DVD, CBL/SAT, GAME, PC, TV/CD
Audio Outputs
Analog ZONE2 LINE OUT
Subwoofer Pre Outputs
(1)
7
Speaker Outputs
Main (L, R, C, SL, SR, SBL/FHL,
SBR/FHR) + ZONE2 (L, R)
Phones 1 (6.3 φ)
Others
Setup Mic
1
RI
1
USB
1 (Front)/1 (Rear)
Ethernet
1
Specifications and features are subject to change without notice.

En-93


Memo
Appendix

En-94


Memo
Appendix

En-95


ONKYO
Onkyo Sound & Vision Corporation
2-1, Nisshin-cho, Neyagawa-shi, OSAKA 572-8540, JAPAN
Tel: 072-831-8023 Fax: 072-831-8163
http://www.onkyo.com/
Onkyo U.S.A. Corporation
18 Park Way, Upper Saddle River, N.J. 07458, U.S.A.
Tel: 800-229-1687, 201-785-2600 Fax: 201-785-2650
http://www.us.onkyo.com/
Onkyo Europe Electronics GmbH
Liegnitzerstrasse 6, 82194 Groebenzell, GERMANY
Tel: +49-8142-4401-0 Fax: +49-8142-4208-213
http://www.eu.onkyo.com/
Onkyo Europe Electronics GmbH (UK Branch)
The Coach House 81A High Street, Marlow, Buckinghamshire, SL7 1AB, UK
Tel: +44-(0)1628-473-350 Fax: +44-(0)1628-401-700
Onkyo China Limited
Unit 1033, 10/F, Star House, No 3, Salisbury Road, Tsim Sha Tsui Kowloon, Hong Kong.
Tel: 852-2429-3118 Fax: 852-2428-9039
http://www.onkyochina.com/
Onkyo China PRC
1301, 555 Tower, No.555 West NanJin Road, Jin an, Shanghai,
China 200041, Tel: 86-21-52131366 Fax: 86-21-52130396
http://www.cn.onkyo.com/
SN 29401115EN
(C) Copyright 2012 Onkyo Sound & Vision Corporation Japan. All rights reserved.
Y1203-1
ONKYO
Using Internet Radio
Using Internet Radio
Common Procedures in Internet Radio Menu
Note
• Available services may vary depending on the region.
1 Press NET.
A list of the network services appears, and the NET indicator lights. If it flashes, verify that the Ethernet cable is firmly connected to the AV receiver.
2 Select the desired service and press ENTER.
The top page of the selected service appears.
Using Multiple Accounts
The AV receiver supports multiple user accounts, which means you can freely switch between several logins. After registering user accounts, login is performed from the "Users" screen.
1 Press MENU while the Users screen is displayed.
The following menu items appear:
Add new user:
Remove this user:
You can either store a new user account, or delete an existing one.
Tip
- Some of the services don't allow the use of multiple user accounts.
- You can store up to 10 user accounts.
- To switch between accounts you must first log out from the current account, and log in again on the "Users" screen.
Pandora® internet radio –Getting Started (U.S. only) 2
Using Rhapsody (U.S. only).... 3
Using the SiriusXM Internet Radio (North American only) 4
Using Last.fm Internet Radio.... 5
Using Slacker Personal Radio....6
Using MP3tunes....7

En-1


Pandora® internet radio –Getting Started (U.S. only)
Pandora is a free, personalized Internet radio service that plays the music you know and helps you discover music you'll love.
1 Use ▲/▼ to select "I have a Pandora Account" or "I'm new to Pandora" and then press ENTER.
If you are new to Pandora select "I'm new to Pandora". You will see an activation code on your TV screen. Please write down this code. Go to an Internet connected computer and point your browser to www.pandora.com/onkyo
Enter your activation code and then follow the instructions to create your Pandora account and your personalized Pandora Internet radio stations. You can create your stations by entering your favorite songs and artists when prompted. After you have created your account and stations you can return to your Onkyo receiver and press enter to begin listening to your personalized Pandora Internet radio.
If you have an existing Pandora account, you can add your Pandora account to your Onkyo receiver by selecting "I have a Pandora Account" and logging in with your email and password.
TIp
- If you want to use multiple user accounts, see "Using Multiple Accounts" (→ page 1). Login can be made from the "Users" screen.
2 To play a station, use ▲/▼ to select the station from your station list, and then press ENTER.
Playback starts and the playback screen appears.
Create a New Station:
Enter the name of a song, artist, or genre and Pandora will create a unique radio station for you based on the musical qualities of that song, artist, or genre.
■Menu Items
I like this song:
Give a song "thumbs-up" and Pandora will play more music like it.
I don't like this song:
Give a song "thumbs-down" and Pandora will ban that song from the current station.
Why is this song playing?:
Discover some of the musical attributes that Pandora uses to create your personal radio stations.
Don't play the song for a month:
If you are tired of a song, you can put the song to sleep and Pandora will not play it for one month.
Create station from this artist:
Creates a radio station from this artist.
Delete this station:
This will permanently delete a station from your Pandora account. All of your thumbs feedback will be lost should you choose to re-create the station with the same song or artist.
Create station from this song:
Creates a radio station from this song.
Rename this station:
Lets you rename the current radio station.
Bookmark this artist:
Pandora will bookmark your favorite artist for your profile on www.pandora.com.
Bookmark this song:
Pandora will bookmark the current song and allow you to buy them all from Amazon or iTunes in one step!
Add to My Favorites:
Adds a station to My Favorites list.
PANDORA
PANDORA, the PANDORA logo, and the Pandora trade dress are trademarks or registered trademarks of Pandora Media, Inc. Used with permission.
Using Rhapsody (U.S. only)
1 Use ▲/▼ to select "Sign in to your account" and then press ENTER.
To use Rhapsody, you need an account. If you don't have one yet, you can create a new account at www.rhapsody.com/onkyo
If you have an existing Rhapsody account, select "Sign in to your account" and press ENTER.
Enter your user name (usually your email) and password in the next keyboard screen, or in Web Setup.
■ Using the keyboard screen
- Use ▲/▼/◄/► and ENTER to enter your user name and password.
- Select "OK"
- Press ENTER. The "Confirm your entries" screen appears.
- Press ENTER.
Tip
- If you want to use multiple user accounts, see "Using Multiple Accounts" (→ page 1). Login can be made from the "Users" screen.
2 Use ▲/▼ to select the menu, then press ENTER.
Search:
You can search for music by Artist, Album, or Track. Music Guide:
You can play tracks from Genres, Top Artists, Top Albums, Top Tracks, New Releases, and Staff Picks. Rhapsody Channels:
Listen to radio channels programmed by Rhapsody's top-notch editors.
Playlists:
Play your own personal playlists.
My Library:
Bookmark your favorite albums and tracks from the Rhapsody catalog using My Library.
Account Info:
Confirm your account information.
Sign Out:
Sign out from your Rhapsody account.
3 Use ▲/▼ to select a channel, and press ENTER or ▶ to start playback.
Playback starts and the playback screen appears. You can control the tracks with the buttons on the remote control.
Enabled buttons: ▶, □, ■, ◀◀, ▶▶, |◀◀, ▶▶|, RANDOM, REPEAT
Note
- On Rhapsody Channels, some of the buttons don't work.
Menu Items
Add track to My Library:
Bookmark currently-playing tracks.
Add album to My Library:
Bookmark currently-playing albums.
Add playlist to My Library:
Bookmark currently-playing playlists.
Add channel to My Channels:
Bookmark currently-playing Rhapsody radio channels.
Add to My Favorites:
Adds a track, channel or playlist to My Favorites list.
Tip
- You can remove bookmarked tracks, albums, and Rhapsody Channels from My Library.
Using the SiriusXM Internet Radio (North American only)
Your Onkyo AV receiver includes a free trial of SiriusXM Internet Radio. The "Account Info" screen shows how many days are left in your trial. After the trial period expires, if you want to continue listening to the service, you must subscribe. To subscribe go to www.siriusxm.com/internetradio with your computer.
When you subscribe, you will be provided with a username and password which has to be entered into the AV receiver.
To use SiriusXM Internet Radio, you must have your AV receiver connected to the Internet. Using the remote control, follow these steps:
1 Use ▲/▼ to select "Sign In", and then press ENTER. If you have an existing SIRIUS account, you can sign in by selecting "Sign In". Enter your user name and password in the next keyboard screen, or in Web Setup. If you don't know your username or password, call Sirius XM at (888) 539-7474 for assistance.
Tlp
- If you want to use multiple user accounts, see "Using Multiple Accounts" (→ page 1). Login can be made from the "Users" screen.
■ Using the keyboard screen
-
Use ▲/▼/◄/► and ENTER to enter your user name and password.
-
Select "OK".
-
Press ENTER. The "Confirm your entries" screen appears.
-
Press ENTER
"Please wait..." appears and then "SiriusXM Internet Radio" screen appears which displays the category available for selection.
2 Use ▲/▼ to select the category and then press ENTER.
The channel list screen for the selected category appears.
3 Use ▲/▼ to select the desired channel and then press ENTER.
The playback screen for the selected channel appears and you can listen to SiriusXM Internet Radio. You can control the tracks with the buttons on the remote control.
Enabled buttons: ■, □, |◀◀, ▶▶
Menu Items
Add to My Favorites:
Adds a channel to My Favorites list.
((SiriusXM))
SiriusXM Internet Radio subscriptions are sold separately and are governed by the Sirius Terms and Conditions (see www.sirius.com). Be sure to read this agreement before you purchase your subscription. Sirius, XM and all related marks and logos are trademarks of Sirius XM Radio Inc. and its subsidiaries. All rights reserved.

En-4


Using Last.fm Internet Radio
Last.fm is a music service that learns what you love... Your new Onkyo AV receiver is very clever. If you have a free Last.fm account, it will keep track of all the songs you've just played. When you visit the Last.fm website, you can see personal charts of the music you've enjoyed, share them with friends and see what they like, too.
With thousands of biographies, reviews and an endless choice of personalised, ad-free radio stations, Last.fm is a great way to discover music. Pick up your free Last.fm account today at www.last.fm/join
Get a subscription and you can enjoy the best of ad-free Last.fm Radio on your Onkyo AV receiver without a computer!
Recommended Radio:
Discover smart personalised recommendations that adapt as your tastes change.
Artist Radio:
Pick any artist and we'll play you a whole station of music inspired by your choice.
My Library:
Sit back and enjoy selections from all the music you've heard since you joined Last.fm.
Tag Radio:
Polish funk? Death pop? Think of a style and we'll entertain you with it for hours.
Start your free trial straight away when you create your account and see for yourself what it's like to have the world's music at your fingertips. Latest prices and full information are available at www.last.fm/subscribe
1 Use ▲/▼ to select "Sign in to your account", and then press ENTER. If you have the existing Last.fm account, you can sign in to your account to select "Sign in to your account". Enter your user name and password in the next keyboard screen.
■ Using the keyboard screen
- Use ▲/▼/◄/► and the ENTER to enter your user name and password.
- Select "OK".
- Press ENTER. The "Confirm your entries" screen appears.
- Press ENTER.
"Please wait..." appears and then "Last.fm Internet Radio" screen appears.
Tip
- If you want to use multiple user accounts, see “Using Multiple Accounts” (→ page 1). Login can be made from the “Users” screen.
2 Use ▲/▼ to select menu and then press ENTER. Search Station:
You can search station by Artist, Tag, or User Name.
Top Artists Station:
You can play tracks of top-rated artists.
Top Tags Station:
You can play tracks of top-rated tags.
Personal Station:
- You can play tracks from personalized station ("Your Library", "Your Neighbourhood" and "Your Recommendations").
Profile:
You can play tracks from "Recently Listened
Tracks", "Library" and "Neighbours".
Account Info:
Confirm your account information.
Sign Out:
It signs out from your account.
3 Use ▲/▼ to select a station, and press ENTER or ▶ to start playback.
Playback starts and the playback screen appears.
Menu Items
I Love this track:
Track information is saved in Last.fm server, and playback frequency increases.
Ban this track:
Track information is saved in Last.fm server, and playback frequency reduces.
Add to My Favorites:
Adds a station to My Favorites list.
■ Using scrobbling control
Use ▲/▼ to select "Enable", and then press ENTER.
* Internet radio services provided by a third party may be terminated with or without notice.
Internet radio services may not be available in some areas.
Using Slacker Personal Radio
1 If you do not have an account, create one on the Slacker website (www.slacker.com) with your computer.
If you already have a Slacker account, select "Sign in to your account" and then press ENTER. The keyboard screen appears. You can enter information from the remote control or the keys on the main unit.
2 If there are no mistakes in the information you have entered, use ▲/▼/◄/► to select "OK" then press ENTER.
An account information confirmation screen appears.
3 If you do not have an account, select "Access without Sign In" and press ENTER to use a restricted version of the service.
Note that use will be restricted.
Tlp
- If you want to use multiple user accounts, see "Using Multiple Accounts" (→ page 1). Login can be made from the "Users" screen.
4 Use ▲/▼ to select a menu item and then press ENTER.
To sign out, use ▲/▼ to select "Sign out" from this screen and then press ENTER.
5 Use ▲/▼ to select a station and then press ENTER or ▶ to start playback from the station.
The playback screen appears.
6 You can control the tracks with the buttons on the remote control.
Rate Song as Favorite:
Stores information to server, making it more likely that the song will be played again.
Ban Song:
Stores information to server, making it less likely that the song will be played again.
Ban Artist:
Stores information to server, making it less likely that the songs from this artist will be played again.
Mark Favorite:
Adds the currently playing station to your favorites.
Unmark Favorite:
Deletes the currently playing station from your favorites.
Add song to Library:
Adds the currently playing track to your library.
Delete song from Library:
Deletes the currently playing track from your library.
Add to My Favorites:
Adds a station or song to My Favorites list.
Using MP3tunes
Listen to your music collection on your home stereo in complete digital fidelity without a personal computer plus safely backup all your songs. Here's how:
Creating an Account on your Computer
1 From your computer, open a web browser and go to: www.mp3tunes.com/signup
2 Create an account.
3 Click the Upload link (www.mp3tunes.com/upload) to add files to your Locker.
4 View, edit and listen to your files by clicking on Player (www.mp3tunes.com/player).
Playing Contents on the AV Receiver
Tip
- Before proceeding, you need to select the MP3tunes service as described in "Common Procedures in Internet Radio Menu" (→page 1).
1 Use ▲/▼ to select "Sign in to your account", and then press ENTER.
2 Enter the e-mail address and password you used when creating your account, select "OK" and press ENTER.
The keyboard screen appears. You can enter your user name and password from the remote controller or the buttons on the AV receiver.
3 If there are no mistakes in the information you have entered, select "OK" and press ENTER.
An account information confirmation screen appears.
Tip
- If you want to use multiple user accounts, see "Using Multiple Accounts" (→ page 1). Login can be made from the "Users" screen.
4 Use ▲/▼ to select the menu, then press ENTER. Music:
The place to find your Artists, Albums, and Playlists. Shuffle:
Starts playing a random selection of tracks from your Locker.
Search:
Find a specific Album, Artist, or Song.
Account Info:
Your MP3tunes account information.
Sign Out:
Log out of your MP3tunes account.
The track at the top of the music list is automatically played back.
Using Internet Radio
5 Use ▲/▼ to select a track and press ENTER or ▶ to start playback.
A playback screen appears.
You can control the tracks with the buttons on the remote control.
Displays additional menu options.
6 You can view or change your MP3tunes account settings by going to www.mp3tunes.com/account.

En-7


Create a New Station :
I don't like this song :
Why is this song playing? :
Don't play the song for a month :
Create station from this artist :
Delete this station :
Create station from this song :
Rename this station :
Bookmark this artist :
Bookmark this song :
Add track to My Library :
Add album to My Library :
Add playlist to My Library :
Add channel to My Channels :
Top Artists Station :
Rate Song as Favorite :
Add song to Library :
Delete song from Library :
Create a New Station:
I don't like this song:
Why is this song playing?:
Don't play the song for a month:
Create station from this artist:
Delete this station:
Create station from this song:
Rename this station:
Add to My Favorites:
Add track to My Library:
Add album to My Library:
Add playlist to My Library:
Add channel to My Channels:
Add to My Favorites:
Add to My Favorites:
Top Artists Station:
Add to My Favorites:
Rate Song as Favorite:
Add song to Library:
Delete song from Library:
Add to My Favorites:
(C) Copyright 2012 Onkyo Sound & Vision Corporation Japan. All rights reserved.
Y1203-2

ONKYO
Using Internet Radio
Using Internet Radio
Common Procedures in Internet Radio Menu
Note
• Available services may vary depending on the region.
1 Press NET.
A list of the network services appears, and the NET indicator lights. If it flashes, verify that the Ethernet cable is firmly connected to the AV receiver.
2 Select the desired service and press ENTER.
The top page of the selected service appears.
Using Multiple Accounts
The AV receiver supports multiple user accounts, which means you can freely switch between several logins. After registering user accounts, login is performed from the "Users" screen.
1 Press MENU while the Users screen is displayed.
The following menu items appear: Add new user:
Remove this user:
You can either store a new user account, or delete an existing one.
Tip
- Some of the services don't allow the use of multiple user accounts.
- You can store up to 10 user accounts.
- To switch between accounts you must first log out from the current account, and log in again on the "Users" screen.
Using Last.fm Internet Radio....2

En-1


Using Last.fm Internet Radio
Last.fm is a music service that learns what you love... Your new Onkyo AV receiver is very clever. If you have a free Last.fm account, it will keep track of all the songs you've just played. When you visit the Last.fm website, you can see personal charts of the music you've enjoyed, share them with friends and see what they like, too.
With thousands of biographies, reviews and an endless choice of personalised, ad-free radio stations, Last.fm is a great way to discover music. Pick up your free Last.fm account today at www.last.fm/join
UK and Germany only: Get a subscription and you can enjoy the best of ad-free Last.fm Radio on your Onkyo AV receiver without a computer!
Recommended Radio: Discover smart personalised recommendations that adapt as your tastes change.
Artist Radio: Pick any artist and we'll play you a whole station of music inspired by your choice.
My Library: Sit back and enjoy selections from all the music you've heard since you joined Last.fm.
Tag Radio: Polish funk? Death pop? Think of a style and we'll entertain you with it for hours.
Start your free trial straight away when you create your account and see for yourself what it's like to have the world's music at your fingertips. Latest prices and full information are available at www.last.fm/subscribe
1 Use ▲/▼ to select "Sign in to your account", and then press ENTER. If you have the existing Last.fm account, you can sign in to your account to select "Sign in to your account". Enter your user name and password in the next keyboard screen.
■ Using the keyboard screen
- Use ▲/▼/◄/► and the ENTER to enter your user name and password.
- Select "OK".
- Press ENTER. The "Confirm your entries" screen appears.
- Press ENTER.
“Please wait...” appears and then “Last.fm Internet Radio” screen appears.
Tip
- If you want to use multiple user accounts, see “Using Multiple Accounts” (→ page 1). Login can be made from the “Users” screen.
2 Use ▲/▼ to select menu and then press ENTER. Search Station:
You can search station by Artist, Tag, or User Name. Top Artists Station:
You can play tracks of top-rated artists.
Top Tags Station:
You can play tracks of top-rated tags.
Personal Station:
You can play tracks from personalized station (“Your Library”, “Your Neighbourhood” and “Your Recommendations”).
Profile: You can play tracks from “Recently Listened Tracks”, “Library” and “Neighbours”.
Account Info:
Confirm your account information.
Sign Out:
It signs out from your account.
3 Use ▲/▼ to select a station, and press ENTER or ▶ to start playback.
Playback starts and the playback screen appears.
Track information is saved in Last.fm server, and playback frequency increases.
Ban this track:
Track information is saved in Last.fm server, and playback frequency reduces.
Add to My Favorites:
Adds a station to My Favorites list.
■ Using scrobbling control
Use ▲/▼ to select "Enable", and then press ENTER.
* Internet radio services provided by a third party may be terminated with or without notice.
Internet radio services may not be available in some areas.

En-2


Top Artists Station:
Add to My Favorites:
Remote Control Codes
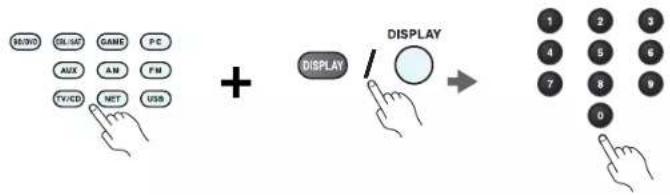
flowchart
graph LR
    A["Hand icon: H/WD"] --> B["Hand icon: SL/AD"]
    B --> C["Hand icon: GAME"]
    C --> D["Hand icon: PC"]
    D --> E["Hand icon: AUX"]
    E --> F["Hand icon: AM"]
    F --> G["Hand icon: FM"]
    G --> H["Hand icon: TV/CD"]
    H --> I["Hand icon: NET"]
    I --> J["Hand icon: USB"]
    J --> K["+"]
    K --> L["DISPLAY"]
    L --> M["→"]
    M --> N["Display 1-0"]
    N --> O["Display 1-3"]
    O --> P["Display 4-6"]
    P --> Q["Display 7-9"]
Remote Control Codes
1 While holding down the REMOTE MODE button to which you want to assign a code, press and hold down [DISPLAY] (about 3 seconds).
The REMOTE MODE button/Remote indicator lights.
On Integra products, button names are capitalized. For example, "Remote Mode" button and "Display" button.
Notes:
- Remote control codes cannot be entered for [RECEIVER] and the multi zone button.
- Only TV remote control codes can be entered for [TV].
- Except for [RECEIVER], [TV], and the multi zone button, remote control codes from any category can be assigned for the REMOTE MODE buttons. However, these buttons also work as input selector buttons, so choose a REMOTE MODE button that corresponds with the input to which you connect your component. For example, if you connect your CD player to the CD input, choose [TV/CD] when entering its remote control code.
2 Within 30 seconds, use the number buttons to enter the 5-digit remote control code.
The REMOTE MODE button/Remote indicator flashes twice.
If the remote control code is not entered successfully, the REMOTE MODE button/Remote indicator will flash once slowly.
Notes:
- The flashing element of the remote controller will differ according to your AV receiver's model.
- The remote controller is preconfigured with remote controller presets of different components. By entering a code from the Remote Control Code list, you can activate the relevant preset for that component.
- When there are multiple codes related to one manufacturer, try and enter them one-by-one until it matches your component.
- Depending on the model and year of your component, compatibility is not guaranteed.
- With some models, the remote controller may not not work or its compatibility may be limited to part of the component's functionality.
- Besides, it is not possible to add new codes to the existing remote controller presets.
- Though the provided remote control codes are correct at the time of printing, they are subject to change by the manufacturer.

1


Remote Control Codes
| Dedicated Onkyo Receiver | |
| Default 62503 | |
| Zone 2 62506 | |
| Zone 3 62507 | |
| Cable Set Top Box | |
| ADB 02254, 02769 | |
| Aon 02769 | |
| Arris 02187 | |
| AT&T 00858 | |
| Bright House 01376, 01877 | |
| BT Vision 02294 | |
| Cable & Wireless 01068 | |
| Cable Onc 01376, 01877 | |
| Cablecom 01582 | |
| Cablevision 01376, 01877 | |
| Charter 01376, 01877, 02187 | |
| Cisco 01877, 00858, 01982,02345, 02378 | |
| Com Hcm | 00817, 00660, 01666,02015, 02447 |
| Comcast | 01376, 01877, 01982,02187 |
| Cox | 01376, 01877 |
| Dacryung | 01877 |
| Digeo | 02187 |
| DX Antenna | 01500 |
| France Telecom | 00817 |
| Freebox | 01482 |
| Fujitsu | 01497 |
| Humax | 00660, 02142, 02447,03051, 03053 |
| Insight 01376, 01877 | |
| J:COM | 03051, 03053 |
| Knology | 01877 |
| Krcatcl | 01385 |
| Macab 00817 | |
| Mediacom 01376, 01877 | |
| Cable Set Top Box | |
| mio TV | 02802 |
| Motorola | 01376, 00858, 01562, 01982, 01998, 02378 |
| Moxi | 02187 |
| NEC | 01496 |
| Neuf TV | 03107 |
| Noos 00817 | |
| NTL | 01068, 01060 |
| Numericable | 02767 |
| Ono 01068, 01562 | |
| Optus | 01060 |
| Orange | 00817 |
| Pace | 01376, 01877, 01068, 01060, 01982 |
| Panasonic | 01488, 01982 |
| Philips | 00817, 01582, 02294, 02767 |
| Pioneer | 01877, 01500 |
| RCN 01376 | |
| Rogers 01877 | |
| Sagem 00817 | |
| Samsung | 01877, 01060, 01666, 02015, 02774 |
| Scientific Atlanta | 01877, 00858, 01982, 02345 |
| SFR | 03107 |
| Shaw | 01376 |
| SingTel | 01998, 02802 |
| Sony 01460 | |
| Stofa 02015 | |
| Suddenlink | 01376, 01877 |
| Sumitomo 01500 | |
| Telewest | 01068 |
| TeliaSonera | 01385 |
| Telus | 02345 |
| Thomson | 01582, 01982, 02769 |
| Time Warner 01376, 01877, 02187 | |
| Cable Set Top Box | |
| Toshiba | 01509 |
| UPC | 01582 |
| Verizon | 02378 |
| Vidcotron | 01877 |
| Virgin Media | 01068, 01060 |
| Visiopass | 00817 |
| VTR | 01376 |
| WideOpenWest | 01877 |
| Ziggo | 00660, 01666, 02015, 02142, 02447, 02774 |
| Cable/PVR Combination | |
| Arris 02187 | |
| Bright House 01376, 01877 | |
| Cable One 01376, 01877 | |
| Cablevision 01376, 01877 | |
| Charter 01376, 01877, 02187 | |
| Cisco 01877, 01982 | |
| Comcast | 01376, 01877, 01982, 02187 |
| Cox | 01376, 01877 |
| Digeo | 02187 |
| Freebox | 01482 |
| Humax | 02142, 03051, 03053 |
| Insight | 01376, 01877 |
| J:COM | 03051, 03053 |
| Knology | 01877 |
| Mediacom | 01376, 01877 |
| Motorola | 01376 |
| Moxi | 02187 |
| Numericable | 02767 |
| Pace | 01877 |
| Panasonic | 01982 |
| Philips | 01582, 02767 |
| Pioneer | 01877 |
| Rogers 01877 | |
| Cable/PVR Combination | |
| Samsung | 01877 |
| Scientific Atlanta | 01877, 01982 |
| Shaw | 01376 |
| Suddenlink | 01376, 01877 |
| Thomson | 01582 |
| Time Warner 01376, 01 | 877, 02187 |
| UPC | 01582 |
| Videotron | 01877 |
| VTR | 01376 |
| WideOpenWest | 01877 |
| Ziggo | 02142 |
| IPTV | |
| ADB 02254, 02769 | |
| Aon 02769 | |
| AT&T 00858 | |
| BT Vision 02294 | |
| Canal+ | 02657 |
| Cisco 00858, 02345, 02378 | |
| Kreatel | 01385 |
| mio TV | 02802 |
| Motorola | 01376, 00858, 01998, 02378 |
| Neuf TV | 03107 |
| Pace | 02657 |
| Scientific Atlanta | 00858, 02345 |
| SFR | 03107 |
| SingTel | 01998, 02802 |
| TeliaSonera | 01385 |
| Telus | 02345 |
| Thomson | 02769 |
| Verizon | 02378 |
| IPTV/PVR Comblnation | |
| ADB 02769 | |
| Aon 02769 | |
Remote Control Codes
| IPTV/PVR Combination | |
| AT&T 00858 | |
| BT Vision 02294 | |
| Cisco 00858, 02345, 02378 | |
| Kreatel 01385 | |
| Motorola 00858, 02378 | |
| Neuf TV 03107 | |
| Philips 02294 | |
| Scientific Atlanta 00858 | |
| SFR 03107 | |
| Verizon 02378 | |
| CD | |
| Advantage 70032 | |
| AH! 70157 | |
| Aiwa 70157 | |
| Arcam 70157 | |
| Atoll Electronique 70157 | |
| Audio Research 70157 | |
| Audiolab 70157 | |
| Audiomeca | 70157 |
| Audioton | 70157 |
| AVI 70157 | |
| Balanced Audio Technology | 70157 |
| Cairn | 70157 |
| California Audio Labs | 70029, 70303 |
| Cambridge | 70157 |
| Cambridge Audio | 70157 |
| Carver 70157 | |
| CCE | 70157 |
| Cyrus | 70157 |
| Denon | 70626, 70766 |
| DKK 70000 | |
| DMX Electronics | 70157 |
| Dynaco | 70157 |
| Genexxa 70000, 70032 | |
| CD | |
| Goldmund | 70157 |
| Grundig | 70157 |
| Harman/Kardon | 70157 |
| Hitachi 70032 | |
| Integra | 71817, 70101 |
| JVC 70072 | |
| Kenwood | 70626, 70157, 70036 |
| Krell | 70157 |
| Linn | 70157 |
| Loewe 70157 | |
| Magnavox | 70157 |
| Marantz | 70626, 70029, 70157 |
| Matsui 70157 | |
| MCS | 70029 |
| Memorex | 70032 |
| Meridian | 70157 |
| Micromega | 70157 |
| Miro | 70000 |
| Mission 70157 | |
| Myryad | 70157 |
| NAD 70000, 70721 | |
| Naim | 70157 |
| NSM 70157 | |
| Onkyo 71817 | |
| Optimus | 70000, 70032 |
| Panasonic | 70029, 70303 |
| Philips 70626, 70157 | |
| Pioneer | 70032, 70101 |
| Polk Audio | 70157 |
| Primare | 70157 |
| Proton | 70157 |
| QED | 70157 |
| Quad 70157 | |
| Quasar | 70029 |
| Radiola | 70157 |
| RCA | 70032 |
| CD | |
| Restek 70157 | |
| Revox | 70157 |
| Rotcl 70157 | |
| SAE | 70157 |
| Sansui | 70157 |
| SAST | 70157 |
| Siemens | 70157 |
| Silsonic 70036 | |
| Simaudio | 70157 |
| Sonic Frontiers | 70157 |
| Sony | 70490, 70000 |
| Sylvania | 70157 |
| TAG McLaren | 70157 |
| Tandy | 70032 |
| Technics 70029, 70303 | |
| Thorens | 70157 |
| Thule Audio | 70157 |
| Traxdata 70626 | |
| Universum | 70157 |
| Victor | 70072 |
| Wards | 70000, 70032, 70157 |
| Yamaha | 70490, 70032, 70036 |
| Zonda | 70157 |
| CD-R | |
| Dcnon | 70626, 70766 |
| JVC 70072 | |
| Kenwood | 70626 |
| Marantz | 70626 |
| Onkyo 71323 | |
| Philips 70626 | |
| Sony | 70000 |
| MD | |
| Onkyo 70868 | |
| Sony | 70490, 70000 |
| MD | |
| Yamaha | 70490 |
| Cassette Deck | |
| Aiwa 40029 | |
| Arcam 40076 | |
| Audiolab 40029 | |
| Carver 40029 | |
| Denon | 40076 |
| Grundig | 40029 |
| Harman/Kardon | 40029 |
| Inkel | 40070 |
| JVC 40244 | |
| Kenwood | 40070 |
| Magnavox | 40029 |
| Marantz | 40029 |
| Myryad | 40029 |
| Onkyo 42157 | |
| Optimus | 40027 |
| Philips 40029 | |
| Pioneer | 40027 |
| Polk Audio | 40029 |
| Radiola | 40029 |
| RCA | 40027 |
| Revox | 40029 |
| Sansui | 40029 |
| Sony | 40243 |
| Thorens | 40029 |
| Victor | 40244 |
| Wards | 40027, 40029 |
| Yamaha | 40097 |
| Accessory | |
| Apple | 81115 |
| Jamo | 82228 |
| Logitech | 82182 |
| Onkyo 82990, 81993, 82351 | |
Remote Control Codes
| Accessory | |
| Polk Audio 82228 | |
Video - Accessory
| ADB 02254, 02769 | |
| Aon 02769 | |
| Apple 02615 | |
| AT&T 00858 | |
| BT Vision 02294 | |
| Canal+ 02657 | |
| Cisco 00858, 02345, 02378 | |
| Kreatel 01385 | |
| mio TV 02802 | |
| Motorola 01376, 00858, 01998, 02378 | |
| Neuf TV 03107 | |
| Pacc 02657 | |
| Philips 02294 | |
| Scientific Atlanta | 00858, 02345 |
| SFR | 03107 |
| SingTel 01998, 02802 | |
| TeliaSonera | 01385 |
| Telus | 02345 |
| Thomson | 02769 |
| Verizon | 02378 |
Receiver
| Onkyo 52503 |
Satellite Set Top Box
| @sat | 01300 |
| @Sky | 01334 |
| Acoustic Solutions | 01284 |
| ADB 00642, 00887, 01259 | |
| Akura | 01626 |
| Alba | 01284 |
| Allvision 01334 | |
Satellite Set Top Box
| Amstrad | 00847, 01175, 01662, 01693 |
| Ansonic | 02418 |
| Arnion | 01300 |
| ASCI 01334 | |
| AssCom | 00853 |
| Astro | 00173, 01100 |
| Atlanta 02418 | |
| Atsat 01300 | |
| AtSky | 01334 |
| Audiola | 02418 |
| Aurora | 00879, 00642, 01433 |
| Austar | 00879, 00642, 01259 |
| Avunit 01631 | |
| Awa 02418 | |
| Axil | 01413, 01457, 02418 |
| Axitronic | 01626 |
| Balmet 01457 | |
| Bell ExpressVu | 00775 |
| Belson 02418 | |
| Big Sat 01457 | |
| Black Diamond | 01284 |
| Blaupunkt 00173 | |
| Boshmann | 01413, 01631 |
| Boston | 01251 |
| Boxer 01458 | |
| British Sky Broadcasting | 00847, 01175, 01662 |
| BskyB 00847, 01175, 01662 | |
| Bush | 01284, 01291, 01626, 01645 |
| Canal Digital | 00853, 01334 |
| Canal Satellite | 00853, 02657 |
| Canal+ 00853, 02657 | |
| CanalSat 00853, 02657 | |
| Centrex 01457 | |
Satellite Set Top Box
| CGV 01413, 01567 | |
| Chess | 01334, 01626 |
| CityCom | 01176 |
| Clatronic 01413 | |
| Clayton 01626 | |
| Com Hem | 01176, 01915 |
| Comag 01413 | |
| Comsat | 01413 |
| Coship | 01457 |
| Crown 01284 | |
| CS | 01631 |
| Cyfra+ 01409 | |
| Cyfrowy Polsat | 00853, 02527 |
| D-box | 00723, 01114 |
| Dantax 01626 | |
| Denver 02418 | |
| Dgtec | 01242, 01631, 02418 |
| Dick Smith Electronics | 02418 |
| Digi Raum Electronics | 01176 |
| Digiality | 01334 |
| Digifusion | 01645 |
| Digihome | 01284 |
| DigiLogic | 01284 |
| DigiQuest | 01300, 01457, 01631 |
| Digisky 01457 | |
| DigitalBox | 01100, 01631 |
| Digiwave | 01631 |
| DirecTV 01377, 00099 | |
| Dish Network | 00775 |
| Dishpro | 00775 |
| DishTV | 01300 |
| DRE | 01176 |
| Dream Multimedia | 01237 |
| DSE 02280, 02418 | |
| DSTV | 00879, 00642, 01433 |
Satellite Set Top Box
| Durabrand | 01284 |
| Echostar | 00775, 00853, 01323, 01409, 02527 |
| Eco-Star | 01413 |
| Edision | 01631 |
| Elap | 01413, 01567 |
| Elbe | 02418 |
| Energy Sistem | 01631, 02418 |
| Engel | 01251 |
| EuroLine | 01251 |
| Europhon | 01334 |
| Europsat 01413, 01611 | |
| Expressvu 00775 | |
| Fagor | 01611 |
| Ferguson 01291 | |
| Finlux | 01626 |
| Fly Com | 01457 |
| FMD | 01413, 01457 |
| Foxtel | 00879, 01176, 01356 |
| Freesat 02408 | |
| Fuba | 00173, 01251 |
| Galaxis | 00853, 00879 |
| General Satellite | 01176 |
| Globo | 01251, 01334, 01626 |
| GOI | 00775 |
| Gold Box | 00853 |
| Gold Vision | 01631 |
| GoldMaster | 01334 |
| Goodmans | 01284, 01291 |
| Gradiente | 00099, 00887 |
| Grandin | 01626 |
| Grocos 01409, 01457 | |
| Grundig | 00847, 00853, 00173, 00879, 01284, 01291 |
| Haicr | 02418 |
| Hallo | 01626 |
Remote Control Codes
| Satellite Set Top Box | |
| Hama 01567 | |
| Hanseatic 01100 | |
| Hirschmann 00173 | |
| Hitachi 01284 | |
| Hornet 01300 | |
| HTS 00775 | |
| Humax 01377, 01176, 01427, 01675, 01808, 01882, 01915, 02144, 02408, 02616 | |
| ID Digital 01176 | |
| ID Sat 01334 | |
| ILLUSION sat 01631 | |
| Imperial 01195, 01334 | |
| Indovision 00887 | |
| iNETBOX 01237 | |
| Inno Hit 01626 | |
| Innova 00099 | |
| inVion 02418 | |
| iotronic | 01413 |
| ISkyB 00887 | |
| ITT | 02418 |
| ITT Nokia 00723 | |
| Jadeworld | 00642 |
| Jacger 01334 | |
| JVC | 00775 |
| KabclBW | 01195, 01882, 01915 |
| Kaon | 01300 |
| Kathrein | 00173, 01561, 01567 |
| Kenwood | 00853 |
| Koenig 01631 | |
| Kreiling | 01626 |
| Kreiselmeyer | 00173 |
| L&S Electronic | 01334 |
| LaSAT 00173 | |
| Lava | 01631 |
| Satellite Set Top Box | |
| Leiko | 01626 |
| Lemon | 01334 |
| Lenoxx | 01611 |
| Linsar | 01284 |
| Listo | 01626 |
| Lodos | 01284 |
| Logik 01284 | |
| Macab 00853 | |
| Manhattan 01300 | |
| Maspro | 00173 |
| Matsui 00173, 01284, 01626 | |
| Maximum | 01334 |
| Mediabox 00853 | |
| Mediacom 01206 | |
| MediaSat | 00853 |
| Medion | 01334, 01626 |
| MegaSat | 01631 |
| Melronic | 01334, 01413, 01631, 02418 |
| Metz | 00173 |
| Moscrbacr 01251 | |
| Movistar | 02527, 02761 |
| Multichoice | 00879, 00642, 01433, 02059, 02060 |
| MySky 01356, 01693, 01850 | |
| NEOTION | 01334 |
| Netsat | 00099, 00887 |
| Nikko | 00723 |
| Nokia | 00853, 00723, 01223 |
| Nordmcnde | 01611 |
| NPG | 01631 |
| Onn | 01284 |
| Optex | 01413, 01611, 01626 |
| Optus 00879, 01356 | |
| Orbis | 01334 |
| Orbilech | 01100, 01195 |
| Satellite Set Top Box | |
| Pace 00847, 00853, 00887, | 01175, 01323, 01356,01423, 01662, 01693,01850, 02059, 02060,02211, 02657 |
| Pacific 01284 | |
| Palcom | 01409, 01611 |
| Panasat | 00879, 01433 |
| Panasonic 00847, 01304, 01404,03099 | |
| Panda | 00173 |
| Pass | 01567 |
| peeKTon | 01457, 02418 |
| Philips 00099, 00853, 00173,01114, 00887, 00133,02211 | |
| Phoenix | 02418 |
| Pino | 01334 |
| Pioneer | 00853, 01308 |
| PMB | 01611 |
| Premiere | 00723 |
| Pro Basic | 00853 |
| Proline | 01284 |
| QNS | 01404 |
| RCA | 01291 |
| Regal | 01251 |
| Roadstar | 00853 |
| Rollmaster | 01413 |
| Rownsonic | 01567 |
| SAB | 01251, 01300, 01631 |
| Sagcm 01114 | |
| Saivod 02418 | |
| Samsung | 01377, 00853, 01175,01206, 01458, 01662,02986 |
| Sansui | 01251 |
| Sanyo | 01626 |
| Sat Control | 01300 |
| Satellite Set Top Box | |
| Sat Industrie | 01611 |
| SAT+ | 01409 |
| Satplus 01100 | |
| SatyCon | 01631 |
| Schaub Lorenz | 02418 |
| Schneider | 01206, 01251 |
| Schwaiger | 01334, 01457, 01631 |
| Sedca Electronique | 01206, 01626 |
| SEG 01251, 01284, 01626 | |
| Servimat | 01611 |
| ServiSat 01251 | |
| Shark | 01631 |
| Sherwood 01409 | |
| Siemcns 00173, 01334, | 01626, 02418 |
| Sigmatek | 02418 |
| SKY | 00099, 00847, 00887, 01175, 01662, 01693, 01850, 02754 |
| SKY Brazil | 00887 |
| SKY Deutschland | 02754 |
| SKY Italia 00853, 01693, 01850 | |
| SKY New Zealand | 02211 |
| SKY PerfecTV! | 02299, 02616, 03099 |
| Sky XL | 01251 |
| Sky+ | 01175, 01662 |
| Skymaster | 01334, 01409, 01567, 01611 |
| Skymax | 01413 |
| Skyplus | 01175, 01334 |
| SkySat | 01100 |
| Skyvision | 01334 |
| SM Electronic | 01409 |
| Smart 01404, 01413, 01631 | |
| SmartVision | 01457 |
| Sony | 00847, 00853, 01558, 02299 |
Remote Control Codes
| Satellite Set Top Box | |
| Star 00887 | |
| Stream System 01300 | |
| Strong 00853, 00879, 01284,01300, 01409, 01626,02418 | |
| Sunny 01300 | |
| Sunstar 00642 | |
| Supernova 00887 | |
| Supratech 01413 | |
| Systcc 01334 | |
| Sytech 02418 | |
| TBoston 01251, 02418 | |
| Teac 01251 | |
| Technical 01626 | |
| Technika 01284 | |
| TechniSat 01100, 01195 | |
| Technosat | 01206 |
| Techwood | 01251, 01284, 01626 |
| TELE System | 01251, 01409, 01611 |
| Telefonica 02527, 02761 | |
| Telcstar | 01100, 01195, 01251,01334, 01626 |
| Televes | 01300, 01334 |
| Televisa | 00887 |
| Tevion | 01409 |
| Thomson | 00847, 00853, 01175,01046, 01291, 01662 |
| Tonna 01611 | |
| Topfield 01206 | |
| Toshiba | 01284 |
| Trevi | 01251 |
| Triax | 00853, 01251, 01291,01413, 01611, 01626,01631 |
| Tricolor TV | 01176 |
| True Visions | 02408 |
| Twinner | 01611 |
| Satellite Set Top Box | |
| UBC | 00642 |
| UEC | 00879, 01356 |
| United 01251, 01626, 02418 | |
| Unitymedia | 01882 |
| Universum | 00173, 01251 |
| Variosat | 00173 |
| VEA | 02418 |
| Vestel 01251, 01284 | |
| Viasat 01195 | |
| Vision 01626 | |
| Visiosat | 01413, 01457 |
| Vitecom 01413 | |
| Vivax | 02418 |
| Volcasat | 02418 |
| Wavelength | 01413 |
| Wharfedale | 01284 |
| Wisi | 00173 |
| Worldsat | 01251 |
| Woxter 02418 | |
| Xsat | 00847, 01323 |
| Xtreme 01300 | |
| Yakumo 01413 | |
| Yes | 00887 |
| Zehnder | 01251, 01334, 01413, 01631 |
| Zinwell | 02280, 02761 |
| Satellite Set Top Box | |
| @sat | 01300 |
| SAT/PVR Combination | |
| @sat | 01300 |
| Amstrad 01175, 01662, | 01693 |
| Atsat | 01300 |
| Bell ExpressVu | 00775 |
| British Sky Broadcasting | 01175, 01662 |
| SAT/PVR Combination | |
| BskyB 01175, 01662 | |
| Bush | 01645 |
| Canal Satellite | 02657 |
| Canal+ | 02657 |
| CanalSat | 02657 |
| Cyfrowy Polsat | 02527 |
| Digifusion 01645 | |
| DigiQuest | 01300 |
| DirecTV | 01377, 00099, 20739 |
| Dish Network | 00775 |
| Disbpro | 00775 |
| Dream Multimedia | 01237 |
| Echostar | 00775, 02527 |
| Edision | 01631 |
| Expressvu | 00775 |
| Foxtel 01356 | |
| Humax | 01176, 01427, 01675, 01808 |
| ID Sat 01334 | |
| iNETBOX | 01237 |
| Kaon | 01300 |
| Kathrein | 01561 |
| Maximum | 01334 |
| Mediacom 01206 | |
| MegaSat | 01631 |
| Movistar | 02527 |
| Multichoice | 02059, 02060 |
| MySky | 01356, 01693, 01850 |
| NEOTION | 01334 |
| Pace | 01175, 01356, 01423, 01662, 01693, 01850, 02059, 02060, 02211, 02657 |
| Panasonic 01304, 03099 | |
| Philips | 00099 |
| Samsung | 01175, 01206, 01662 |
| Sat Control | 01300 |
| SAT/PVR Combination | |
| Schneider 01206 | |
| Sedea Electronique | 01206 |
| SKY | 01175, 01662, 01693, 01850, 02754 |
| SKY Deutschland | 02754 |
| SKY Italia | 01693, 01850 |
| SKY New Zealand | 02211 |
| SKY PerlecTV! | 02299, 03099 |
| Sky+ | 01662 |
| Skyplus | 01175, 01334 |
| Smart | 01631 |
| Sony | 02299 |
| Stream System 01300 | |
| Strong 01300 | |
| Sunny 01300 | |
| TechniSat 01195 | |
| Technosat | 01206 |
| Telefonica 02527 | |
| Telestar | 01195 |
| Thomson | 01175, 01662 |
| Topfield 01206 | |
| Viasat 01195 | |
| Xtreme 01300 | |
| Television | |
| A.R. Systems | 10556, 10037 |
| Accent | 10037 |
| Acer 11339 | |
| Acoustic Solutions | 11037, 11667 |
| Action 10650 | |
| Addison | 10653 |
| AEG | 11037, 11324 |
| Agfaphoto 12719 | |
| Aiko | 10037 |
| Aim | 10037, 10499 |
Remote Control Codes
Television
| Akai 10178, 10556, 10037, 10714, 10715, 10208, 11675 | |
| Akiba 10037 | |
| Akito 10037 | |
| Akura 10171, 10037, 10714, 10668, 11037, 11363, 11585, 11667, 11709 | |
| Alba 10037, 10714, 10668, 11037, 11585 | |
| Alien 11037 | |
| Allstar 10037 | |
| Amstrad 10171, 10037, 11037 | |
| Anam 10037 | |
| Anam National 10037, 10650 | |
| Andersson 11585 | |
| Anitech 10037 | |
| Ansonic 10037, 10668 | |
| AOC 10178, 10625, 11365 | |
| Ardem 10037, 10714 | |
| Arena 10037 | |
| Aristona 10556, 10037 | |
| ART 11037 | |
| Art Mito | 11585 |
| Asberg | 10037 |
| Astra | 10037 |
| ATD | 10698 |
| Atlantic | 10037 |
| Audiosonic | 10037, 10714, 10715 |
| Audiovox | 11564 |
| Audioworld | 10698 |
| Aventura | 10171 |
| Axxon 10714 | |
| Baird 10208 | |
| Bang & Olufsen | 10565 |
| Barco | 10556 |
Television
| Basic Line 10556, 10037, 10668, 11037 | |
| Baur 10037, 10195, 10512 | |
| Bcaumark | 10178 |
| Beijing | 10208 |
| Beko 10037, 10714, 10715, 11652 | |
| Bclson 10698 | |
| Belstar | 11037 |
| Bcon 10037 | |
| Berthen 10556, 10668 | |
| Bestar | 10037 |
| Bcxa | 12493 |
| Black Diamond | 11037 |
| Blaupunkt | 10195 |
| Blue Sky | 10556, 10037, 10625, 10714, 10668, 11037, 10715, 10499, 11324, 11363, 11652, 11709 |
| Boca | 11652 |
| Boman | 11324 |
| Bork 11363 | |
| BPL | 10037, 10208 |
| Brandt 10625, 10714, 10560 | |
| Brimax | 11709 |
| Brinkmann | 10037, 10668 |
| Brionvega | 10037 |
| Bush | 10556, 10037, 10714, 10668, 11037, 10698, 10208, 11585, 11652, 11667, 12719 |
| Byd:sign | 12140, 12209 |
| Camper 10037 | |
| Carad | 10668, 11037 |
| Carena | 10037 |
| Carrefour | 10037 |
| Cascade 10037 | |
Television
| Casio 10037 | |
| Cathay | 10037 |
| CCE 10037 | |
| Centrum | 11037 |
| Centurion | 10037 |
| Changhong | 10508 |
| Chimei | 11666 |
| Clarivox | 10037 |
| Classic | 10499 |
| Clatronic | 10037, 10714, 11324 |
| Clayton 11037 | |
| Condor | 10037 |
| Conrowa | 10698 |
| Contce | 10037 |
| Cosmel | 10037 |
| CPTEC | 10625, 11363 |
| Crown 10037, 10714, 10668, 11037, 10715, 10208, 11652 | |
| Cyberpix | 11667 |
| D-Vision | 10556, 10037 |
| Daewoo 10178, 10556, 10037, 10634, 10499, 12098 | |
| Dansai 10037, 10208 | |
| Dantax | 10714, 11037, 10715, 11652 |
| Datsura | 10208 |
| Dawa | 10037 |
| Daytron | 10037 |
| De Graaf | 10208 |
| DEC 11709 | |
| Decca 10037 | |
| Denver | 10037, 11709 |
| Desmet | 10037 |
| Diamant 10037 | |
| Diamond | 10698 |
Television
| Dick Smith Electronics | 10698 |
| Digatron | 10037 |
| Digihome | 11667 |
| Digiline | 10037, 10668 |
| Digitek | 11709 |
| Digitor | 10037, 10698 |
| Dixi | 10037 |
| DL | 11363 |
| DMTech | 12001 |
| Domeos 10668 | |
| Drean 10037 | |
| DSE | 10698 |
| Dual 10037, 11037, 11585, 11667 | |
| Durabrand 10178, 10171, 10714, 11037, 11652 | |
| Dux | 10037 |
| DX Antenna | 11817, 13817 |
| Dynatron | 10037 |
| Dynex | 12049 |
| c-motion | 11709 |
| E:max | 11324 |
| Easy Living | 11666, 11709 |
| ECE | 10037 |
| Elbc | 10556, 10037 |
| Electrograph | 11755 |
| Element 11886 | |
| Elfunk 11037 | |
| ELG 10037 | |
| Elin | 10037 |
| Elite | 10037 |
| Emerson | 10178, 10171, 10037, 10714, 10668, 11394, 11864, 11886 |
| Envision | 11365, 11506 |
| Epson 11379 | |
Remote Control Codes
| Television | |
| Erres 10037 | |
| ESA 10171 | |
| ESC 10037 | |
| Euroman 10037 | |
| Europa 10037 | |
| Europhon 10037 | |
| Evesham 11248, 11667 | |
| Excello 11037 | |
| Exquisit 10037 | |
| Ferguson 10037, 10625, 10560, 10195, 11037, 11585 | |
| Fidelity 10171, 10037, 10512 | |
| Finlandia 10208 | |
| Finlux 10556, 10037, 10714, 10715, 11248, 11667 | |
| Firstline 10556, 10037, 10714, 10668, 11037, 10208, 11363 | |
| Fisher 10208 | |
| Flint 10037 | |
| Formenti 10037 | |
| Fraba 10037 | |
| Friac | 10037, 10499 |
| Fujicom 11709 | |
| Fujitsu | 10809 |
| Fujitsu Siemens | 10809, 11248, 11666 |
| Funai 10171, 10714, 10668, 11037, 11394, 11666, 11817, 13817 | |
| G-Hanz 11363 | |
| Gaba 11037 | |
| Galaxi | 10037 |
| Galaxis 10037 | |
| Gateway | 11755 |
| GE | 10178, 11454, 10625, 10560 |
| GEC | 10037 |
| Television | |
| Genesis | 10037 |
| Genexxa | 10037 |
| GFM | 10171, 11864, 11886 |
| Godrej | 11585 |
| Goldfunk | 10668 |
| GoldStar | 10178, 10037, 10714, 10715 |
| Goodmans | 10556, 10037, 10625, 10714, 10560, 10668, 10634, 11037, 10499, 11585, 11667 |
| Gorenje | 11585 |
| Gradiente 10037 | |
| Gractz | 10714 |
| Granada | 10037, 10560, 10208 |
| Grandin | 10556, 10037, 10714, 10668, 11037, 10715, 11652 |
| Grundig 10556, 10037, | 10195, 11223, 11667, 12625 |
| GVA | 11363, 12098 |
| H & B | 12001 |
| Haier | 10037, 10698, 10508 |
| Hallmark 10178 | |
| Hankook 10178 | |
| Hanseatic 10556, 10037, | 10625, 10714, 10634, 10499, 12001 |
| Hantarex 10037 | |
| Hantor | 10037 |
| Harwood 10037 | |
| Hauppauge | 10037 |
| IIB | 11324 |
| HCM 10037 | |
| Highline | 10037 |
| Hinari | 10037, 10208 |
| Hisawa | 10714 |
| Television | |
| Hisense | 10556, 10508, 10208, 11363, 12098 |
| Hitachi | 10150, 10178, 10037, 10634, 11037, 10508, 10499, 10578, 11576, 11585, 11643, 11667, 11691, 12433 |
| Hitachi Fujian | 10150 |
| Hitcc | 10698 |
| Hocher | 10714 |
| Hornyphon | 10037 |
| Hugoson | 11666 |
| Humax | 11295 |
| Hypson 10556, 10037, | 10714, 10668, 11037, 10715 |
| Hyundai | 11037, 10698 |
| Iberia | 10037 |
| ICE | 10037 |
| iLo | 11394 |
| Imperial | 10037 |
| Indiana | 10037 |
| Ingelen | 10714 |
| Inno Hit | 11037, 11585 |
| Innova | 10037 |
| Insignia | 10171, 11423, 11564, 12049 |
| Integra 11807, 13100, | 13500 |
| Interbuy | 10037 |
| Interfunk 10037, 10512 | |
| Internal 10556 | |
| Intervision | 10037 |
| Irradio | 10037 |
| IRT | 10698 |
| Isukai | 10037 |
| ITS | 10037 |
| ITT | 10208 |
| ITT Nokia | 10208 |
| Television | |
| ITV | 10037 |
| JGC | 11709 |
| Jinfeng | 10208 |
| Jinxing | 10556, 10037, 10698 |
| JMB | 10556, 10634, 10499 |
| Jubilee | 10556 |
| JVC | 10650, 10653, 10508, 11428, 11601, 12271 |
| Kaisui 10037 | |
| Karchcr | 10714, 11324 |
| Kathrein | 10556 |
| Kendo | 10037, 11037, 11585 |
| Kennex 11037 | |
| Kioto 10556 | |
| Kiton 10037, 10668 | |
| KLL | 10037 |
| Kneissel | 10556, 10037, 10499 |
| Koenig | 10037 |
| Kolin 10150, 10037, 11610, 11755 | |
| Kolster | 10037 |
| Konka | 10037, 10714 |
| Korpel | 10037 |
| Kosmos | 10037 |
| Kunlun | 10208 |
| L&S Electronic | 10714 |
| Lavic 11363 | |
| Lavis | 11037 |
| Leeson 10037 | |
| Lenco 10037, 11037 | |
| Leyco 10037 | |
| LG | 10178, 10556, 10037, 10714, 10715, 10698, 11423, 11768, 11840, 12182, 12358, 12424, 12834 |
| Licsenkoetter | 10037 |
Remote Control Codes
| Television | |
| Lifetec 10037, 10714, 10668, 11037, 12001 | |
| Linsar 11585 | |
| Local India TV 10208 | |
| Local Malaysia TV 10698 | |
| Lodos 11037 | |
| Loewe 10037, 10512, 11884 | |
| Logik 11037, 10698 | |
| Logix 10668 | |
| Luma 11037 | |
| Lumatron 10037, 10668 | |
| Lumenio 10037 | |
| Lux May 10037 | |
| Luxor 11037, 10208 | |
| LXI 10178 | |
| M Electronic 10037, 10714, 10634, 10195, 10512, 11652 | |
| Madison | 10037 |
| Magnavox | 10171, 11454, 11365, 11506, 11755, 11867, 12372 |
| Magnum 10037, 10714, 10715 | |
| Manesth | 10037 |
| Manhattan | 10037, 10668, 11037 |
| Marantz | 11454, 10556, 10037 |
| Mark | 10037, 10714, 10715 |
| Master's | 10499 |
| Mastro 10698 | |
| Masuda | 10037 |
| Matsui | 10556, 10037, 10714, 10195, 11037, 10208, 11666, 11667 |
| Matsushita | 10650 |
| Maxent | 11755 |
| Maxcss | 12493 |
| Meck | 10698 |
| Mediator | 10556, 10037 |
| Television | |
| Medion | 10556, 10037, 10714, 10668, 11037, 10698, 10512, 11248, 11585, 11667, 12001, 12719 |
| Mcgatron | 10178 |
| MEI | 11037 |
| Memorex | 10150, 10178, 11037 |
| Mercury | 10037 |
| Mcrmaid 10037 | |
| Metronic | 10625 |
| Mctz | 10037, 10668, 10195, 11037, 11533 |
| MGA 10150, 10178 | |
| Micromaxx | 10037, 10714, 10668, 11037, 11324, 12001 |
| Microspot | 11614 |
| Mikomi | 11037, 11585 |
| Minato | 10037 |
| Minerva | 10195, 11248 |
| Ministry Of Sound | 11667 |
| Minoka | 10037 |
| Mirai | 11666 |
| Mitsubishi | 10150, 11250, 10178, 10556, 10037, 11037, 10512, 11171 |
| Mivar 10609 | |
| Morce | 10037 |
| Morgan's 10037 | |
| Moserbaer | 11585 |
| MTC | 10512 |
| MTlogic | 10714 |
| Mudan 10208 | |
| Multitce | 10037, 10668, 11037 |
| Multitech | 10037 |
| Myrica | 11666 |
| Myryad | 10556 |
| NAD | 10178, 10037 |
| Television | |
| Naiko 10037 | |
| Nakimura | 10037 |
| National | 10508, 10208 |
| NEC | 10178, 10653, 10508, 10499 |
| Neckermann | 10556, 10037 |
| NEI 10037, 11037 | |
| NEO | 11324 |
| Netsat 10037 | |
| NctTV | 11755 |
| Neufunk | 10556, 10037, 10714 |
| New Tech | 10556, 10037 |
| Newave | 10178 |
| Nikkai 10037 | |
| Nikkci 10714 | |
| Nikko 10178 | |
| Nokia 10208 | |
| Norcent | 11365 |
| Nordmende | 10037, 10714, 10560, 10195, 11585, 11667, 12001 |
| Normerel | 10037 |
| Nortek | 10668 |
| Novatronic | 10037 |
| Novita 11585 | |
| Nu-Tcc | 10698 |
| O.K.Linc | 11037, 11324 |
| Oceanic | 10208 |
| Odys | 12719 |
| Okano | 10037 |
| OKI | 11585, 11667 |
| Olevia | 11610, 12124 |
| Omni | 10698 |
| Onei | 11667 |
| Onidu 10653 | |
| Onimax | 10714 |
| Television | |
| Onix | 10698 |
| Onkyo 11807, 13100, 13500 | |
| Onn | 11667, 11709 |
| Onyx | 11709 |
| Opera 10037, 10714 | |
| Optimus | 10650 |
| Orbit | 10037 |
| Orion 10556, 10037, 10714, 11037, 12001 | |
| Orline 10037 | |
| Ormond | 10668, 11037 |
| Osaki 10556, 10037 | |
| Osio | 10037 |
| Osume 10037 | |
| Otto Versand | 10556, 10037, 10195, 10512 |
| Pacific | 10556, 10714, 11037, 11324 |
| Palladium | 10556, 10037, 10714 |
| Palsonic | 10037, 10698 |
| Panama | 10037 |
| Panasonic | 11480, 10037, 10650, 10508, 10208, 11636, 12170 |
| Panavision | 10037 |
| Panda 10698, 10508, 10208 | |
| Pansonic 11636 | |
| Penney | 10178 |
| Perdio | 10037 |
| Perfekt | 10037 |
| Petters 10037 | |
| Philco 10178, 10171, 10037, 11394 | |
| Philips | 10178, 10171, 11454, 10556, 10037, 10512, 10605, 10690, 11394, 11506, 11867, 12372 |
| Phocus | 10714, 11652 |
Remote Control Codes
| Television | |
| Phoenix 10037 | |
| Phonola 10556, 10037 | |
| Pioneer 10037, 10698, | 10512, 11457, 11636, 12171 |
| Plantron 10037 | |
| Playsonic 10037, 10714, | 10715, 11652 |
| Powerpoint 10037, 10698 | |
| Prinston 11037, 10715 | |
| Profitronic 10037 | |
| Proline 10037, 10625, | 10634, 11037 |
| Prosonic 10037, 10714, | 10668, 11324, 11585, 11667, 11709, 12001 |
| Protech 10037, 10668, | 11037 |
| Proton 10178 | |
| ProVision 10556, 10037 | 10714, 11324 |
| Pvision 12001 | |
| Pyc 10556, 10037 | |
| Qingdao 10208 | |
| Quasar | 10650 |
| Quelle 10037, 10668, | 10195, 11037, 10512 |
| R-Line | 10037 |
| Radiola | 10556, 10037 |
| Radiomarelli | 10037 |
| RadioShack | 10178, 10037 |
| Radiotone | 10037, 10668, 11037 |
| RCA | 10178, 11454, 10625, 10560, 10618, 11781, 12247, 12403, 12429, 12434, 12746, 12932 |
| Realistic 10178 | |
| Recor | 10037 |
| Rectiligne | 10037 |
| Redstar 10037 | |
| Television | |
| Reflex 10037, 10668, 1 | 1037 |
| Relisys | 11585 |
| Rcmotcc | 10171, 10037 |
| Reoc | 10714 |
| Revox | 10037 |
| RFT | 10037 |
| Roadstar | 10037, 10714, 10668, 11037, 10715 |
| Rolson | 12001, 12098 |
| Rowa | 10037, 10698 |
| Saba | 10625, 10714, 10560 |
| Sagem | 10618 |
| Saivod | 10037, 10668, 11037 |
| Salora | 10208, 12001 |
| Sampo | 10178, 10171, 10650, 11755 |
| Samsung | 10178, 10556, 10037, 10618, 10650, 10208, 12051 |
| Sansui 10171, 10037, 10714, 11248, 12001 | |
| Sanyo | 11037, 10508, 10208, 11142, 11365, 11585, 11667, 11974 |
| SBR | 10556, 10037 |
| Schaub Lorenz | 10714, 11324, 11363, 11667, 12001 |
| Schneider | 10556, 10037, 10714, 10668, 11037 |
| Schoentech 11037 | |
| Scotch | 10178 |
| Scott | 10178 |
| Sears | 10178, 10171 |
| Seaway | 10634 |
| Seelver 11037 | |
| SEG | 10037, 10668, 11037, 12719 |
| SEI 10037 | |
| Television | |
| Sei-Sinudyne | 10037 |
| Serie Dorada | 10178 |
| Shanghai | 10208 |
| Sharp | 10650, 10818, 11165, 11423, 11659 |
| Shintoshi | 10037 |
| Shivaki 10178, 10037 | |
| Siam | 10037 |
| Siemens 10037, 10195 | |
| Sicra | 10556, 10037 |
| Silva | 10037 |
| Silva Schneider | 10037 |
| Silver | 10715 |
| SilverCrest | 11037 |
| Sinudyne | 10037 |
| SKY | 10037, 11614, 11775 |
| Skyworth 10037, 10698 | |
| Sliding 11324 | |
| SLX | 10668 |
| Solavox 10037 | |
| Soniko | 10037 |
| Soniq | 12493 |
| Sonitron 10208 | |
| Sonneclair | 10037 |
| Sonoko 10037 | |
| Sonolor | 10208 |
| Sontcc | 10037 |
| Sony | 10810, 11505, 11167, 11651, 11825 |
| Sounddesign | 10178 |
| Soundwave | 10037, 11037, 10715 |
| Sowa | 10178 |
| Squareview | 10171 |
| Standard | 10037, 11037, 11709 |
| Starlitc 10037 | |
| Strato | 10037 |
| Television | |
| SunBriteTV | 11610 |
| Sungoo 11248 | |
| Sunny | 10037 |
| Sunstar 10037 | |
| Sunstech | 12001 |
| Sunwood | 10037 |
| Supersonic | 10208 |
| SuperTech 10556, 10037 | |
| Supra | 10178 |
| Svasa | 10208 |
| Swisstec 11614, 11775 | |
| Sylvania 10171, 11394, | 11864, 11886 |
| Symphonic | 10171, 11394 |
| Synco | 10178, 11755 |
| Syntax | 11610 |
| Sysline | 10037 |
| Tacico | 10178 |
| Talent | 10178 |
| Tashiko | 10650 |
| Tatung | 10037, 11248, 11324 |
| TCL | 10698, 12403, 12429, 12434, 13183 |
| TCM | 10714, 12001 |
| Teac | 10178, 10171, 10037, 10714, 10668, 11037, 10698, 10512, 11248, 11363, 11709, 11755 |
| Tec 10037 | |
| Tech Line 10037, 10668 | |
| Technica | 11037 |
| Technics | 10556, 10650 |
| Technika | 11667 |
| TechniSat 10556 | |
| Technisson | 10714, 11652 |
| Techno 11585 | |
Remote Control Codes
| Television | |
| Technosonic 10556, 10625, 10499, 11324 | |
| Techvision 11709 | |
| Techwood 11037, 11667 | |
| Tecnimagen 10556 | |
| Teco 10178, 10653 | |
| Tedelex 10208, 11709 | |
| Teknika 10150 | |
| TELE System 11585 | |
| Telceor 10037 | |
| Telefunken 10037, 10625, 10714, 10560, 10698, 11585, 11667 | |
| Telefusion 10037 | |
| Telegazi 10037 | |
| Telcmcistcr 10037 | |
| Telesonic 10037 | |
| Telestar 10556, 10037 | |
| Teletech 10037, 10668, 11037 | |
| Teleview | 10037 |
| Tennessee | 10037 |
| Tensai | 10037, 11037, 10715 |
| Tesla | 10556, 10037, 10714, 11037, 11652 |
| Tevion | 10556, 10037, 10714, 10668, 11037, 11248, 11585, 11667 |
| Thomson | 10037, 10625, 10560 |
| Thorn | 10037, 10499, 10512 |
| Thorn-Fcrguson | 10499 |
| TMK | 10178 |
| Tokai | 10037, 10668, 11037 |
| Tokaido | 11037 |
| Topline | 10668, 11037 |
| Toshiba 10195, 11037, | 10618, 10650, 10508, 11169, 11508, 11524, 11652, 12203 |
| Television | |
| Toyoda 11709 | |
| TRANS-continents | 10556, 10037, 10668, 11037 |
| Transonic | 10037, 10698, 10512, 11363 |
| Triad | 10556 |
| Trio | 11248 |
| Triumph | 10556, 10037 |
| TVTEXT 95 10556 | |
| Ulher 10037 | |
| Ultravox | 10037 |
| UMC | 11614, 11775 |
| Unic Line | 10037 |
| Uniden | 12122 |
| United | 10556, 10037, 10714, 11037, 10715, 11652 |
| Unitek | 11709 |
| Universal 10037, 10714 | |
| Universum 10037, 10668, 10195, 11037, 10618, 10512 | |
| Univox | 10037 |
| V7 Videoseven | 11666, 11755 |
| Vestel | 10037, 10668, 11037, 11585, 11667 |
| Vexa | 10037 |
| Victor | 10650, 10653, 11428 |
| Videocon 10037, 10508 | |
| VideoSystem | 10037 |
| Vidtech | 10178 |
| Viewsonic 11365, 11564, 11755, 12049 | |
| Vision | 10037 |
| Vistron | 11363 |
| Vivax | 11709 |
| Vizio | 11758, 12209 |
| Vortec | 10037 |
| Voxson | 10178, 10037 |
| Television | |
| VU | 11365, 12098 |
| Walker | 11667 |
| Waltham | 10037, 10668, 11037 |
| Wansa | 12098 |
| Wards | 10178 |
| Watson 10037, 10714, | 10668, 11037 |
| Wega | 10037 |
| Welltech | 10714, 11652 |
| Weltstar | 11037 |
| Westinghouse | 11755 |
| Wharfedale 10556, 10037, 11324, 11667 | |
| White Westinghouse | 10037 |
| Wilson | 10556 |
| Windsor 10668, 11037 | |
| Windy Sam | 10556 |
| Wintel | 10714 |
| World-of-Vision | 12001 |
| Wyse | 11365 |
| Xcnius | 10634 |
| Xiahua | 10698 |
| XLogic 10698 | |
| Xrypton 10037 | |
| Yamaha | 10650, 11576 |
| Yamishi | 10037 |
| Yokan | 10037 |
| Yoko | 10037 |
| YU-MA-TU | 10037 |
| Zenith | 10178, 10037, 11365, 11423, 12358 |
| Zcepto | 11585 |
| Zonda | 10698 |
| VCR | |
| DirecTV | 20739 |
| Go Video 20614 | |
| VCR | |
| Humax | 20739 |
| Panasonic | 20614, 20616 |
| Philips | 20739 |
| ReplayTV | 20614, 20616 |
| Sonic Blue | 20614, 20616 |
| Sony | 20636 |
| TiVo | 20636, 20739 |
| PVR | |
| DirecTV | 20739 |
| Go Video 20614 | |
| Humax | 20739 |
| Panasonic | 20614, 20616 |
| Philips | 20739 |
| ReplayTV | 20614, 20616 |
| Sonic Blue | 20614, 20616 |
| Sony | 20636 |
| TiVo | 20636, 20739 |
| TV/VCR Combination | |
| Amstrad 10171 | |
| Ferguson | 10625 |
| Fidelity | 10171 |
| GoldStar | 10037 |
| Grundig | 10556, 10037, 10195 |
| LG | 10178 |
| Mitsubishi 10556 | |
| Philips | 10556, 10037 |
| Radiola | 10556 |
| Saba | 10625 |
| Sanyo | 11974 |
| Schneider | 10556, 10037 |
| Sharp | 10818 |
| Siemens | 10037 |
| Sony | 11505 |
| Teac | 10178, 10171 |
Remote Control Codes
| TV/VCR Combination | |
| Technics 10556 | |
| Thomson 10625 | |
| DVD | |
| 3D LAB 30539 | |
| Accurian 30675 | |
| Acoustic Solutions 30713 | |
| AEG 30675 | |
| AFK 31152 | |
| Aiwa 30533 | |
| Akai 30675 | |
| Albu 30539, 30713 | |
| Ambiance 33052 | |
| Amstrad 30713 | |
| Anthcm 32820 | |
| Aristona 30539, 30646 | |
| ASDA 32213 | |
| Audix 30713 | |
| Autovox 30713 | |
| Awa | 32587 |
| Basic Linc | 30713 |
| Bel Canto Design | 31571 |
| Black Diamond | 30713 |
| Blue Parade | 30571 |
| Blue Sky | 30713 |
| Brandt 30503 | |
| Bush 30713 | |
| C-Tech | 31152 |
| California Audio Labs | 30490 |
| Cambridge Audio | 32808 |
| Centrum | 30675, 30713 |
| Changhong | 30627 |
| Cinetec | 30713 |
| Clatronic | 30675 |
| Clayton | 30713 |
| Crown 30713 | |
| DVD | |
| Dantax | 30539, 30713 |
| Denon | 30490, 30634, 31634, 32258, 32748 |
| Dick Smith Electronics | 31152 |
| Digihome | 30713 |
| DigiLogic 30713 | |
| Digix Media | 31394 |
| Disney | 30675 |
| DSE | 30675, 31152 |
| Dual 30713 | |
| Durabrand | 30675, 30713 |
| Dynex | 32596 |
| Dyon | 33052 |
| cBench | 31152 |
| Elfunk 30713 | |
| Elite | 31152 |
| Emerson | 30675, 32213 |
| EuroLine 30675 | |
| Ferguson | 30713 |
| Finlux | 30741 |
| Firstline | 30713 |
| Foehn & Hirsch | 33052 |
| Funai | 30675 |
| GE | 30522 |
| GFM 30675 | |
| Global Sphere | 31152 |
| Go Video | 30741 |
| GoldStar 30741 | |
| Goodmans | 30713, 31152 |
| GPX 30741 | |
| Grandin | 30713 |
| Grundig | 30539, 30713 |
| H & B | 30713 |
| Haaz 31152 | |
| Hanseatic | 30741 |
| DVD | |
| Harman/Kardon | 30582, 31229, 33228 |
| Henss | 30713 |
| Hitachi | 30573, 30713, 31664 |
| Hocher | 30713 |
| HotMedia | 31152 |
| Humax | 30646 |
| Inno Hit | 30713 |
| Insignia 30741, 30675, | 32428, |
| 32596 | |
| Integra | 30503, 30571, 30627, |
| 31612, 31634, 32147 | |
| Irradio 30646 | |
| JVC | 30503, 30539, 30623, |
| 30867, 31597, 31602, | |
| 32855 | |
| Kendo | 30713 |
| Kennex | 30713 |
| Kenwood | 30490, 30534 |
| Lenco 30713, 33052 | |
| Lcxicon | 32545 |
| LG | 30741, 31602 |
| Limit | 33052 |
| Lodos 30713 | |
| Loewe 30539, 30741, 3 | 32474, |
| 32783 | |
| Logik | 30713 |
| Lumatron | 30741, 30713 |
| Lumatron | 30741 |
| Luxman | 30573 |
| Luxor | 30713 |
| Magnavox | 30503, 30539, 30646, |
| 30675, 30713, 31354 | |
| Manhattan | 30713 |
| Marantz | 30539, 32414, 32432, |
| 33444 | |
| Mark 30713 | |
| Malsui | 30713 |
| DVD | |
| Maxim | 30713 |
| MDS 30713 | |
| Mcdion | 30630, 30741 |
| Memorex | 32213 |
| Metz 30571, 30713 | |
| Micromedia | 30503, 30539 |
| Micromega | 30539 |
| Microsoft | 30522, 32083 |
| Minax | 30713 |
| Mitsubishi | 30713 |
| Momitsu 33052 | |
| NAD 30741 | |
| NEC 30741, 31602 | |
| Onkyo 30503, 30627, 31612.32147, 30571, 31634 | |
| Oppo | 30575, 32545 |
| Orion | 30713 |
| Ormond | 30713 |
| Pacific | 30713 |
| Palladium | 30713 |
| Panasonic | 30503, 30490, 31579,31641, 32523, 32710,32859 |
| Pelican Accessories | 30533 |
| Philco | 30675 |
| Philips | 30503, 30539, 30646,30675, 30713, 31340,31354, 32056, 32084,32434, 32689 |
| Pionccr | 30571, 30142, 30631,31571, 32442, 32860 |
| Polk Audio | 30539 |
| Presidian | 30675 |
| ProAudio | 31394 |
| Proscan | 30522 |
| Proson | 30713 |
| Pye | 30539, 30646 |
Remote Control Codes
| DVD | |
| Radionette 30741 | |
| Radiotone 30713 | |
| RCA 30522, 30571, 32213, 32587 | |
| REC 30490 | |
| Red 32213 | |
| Redstar 31394 | |
| Roadstar 30713 | |
| Rotel 30623 | |
| Salora 30741 | |
| Samsung 30490, 30573, 30199, 30820, 31635, 32069, 32329, 32489, 33195 | |
| Sanyo 30713 | |
| Schneider 30539, 30646, 30713 | |
| Schocntech 30713 | |
| Scott 31394 | |
| SEG 30713 | |
| Semp | 30503 |
| Sharp | 30630, 30675, 30713, 32250, 32474, 32652, 32869 |
| Sherwood | 30741, 33052 |
| Shinsonic | 30533 |
| Silva Schneider | 30741 |
| SilverCrest | 31152 |
| Skantic | 30539, 30713 |
| SM Electronic | 31152 |
| Smart | 30713 |
| Sony 30533, 30864, 31033, 31070, 31431, 31516, 31633, 32180 | |
| Soundwave | 30713 |
| Star Clusters | 31152 |
| Strato | 31152 |
| Strong | 30713 |
| Supervision | 31152 |
| DVD | |
| Sylvania | 30630, 30675 |
| Symphonic | 30675 |
| Tamashi | 31394 |
| Tandberg | 30713 |
| Targa | 30741 |
| Tchibo | 30741 |
| TCL 32587 | |
| TCM 30741 | |
| Teac 30571, 30741, 30675, 31394 | |
| Technica 30713 | |
| Technics | 30490 |
| Techwood | 30713 |
| Teletech | 30713 |
| Theta Digital | 30571 |
| Thomson | 30522 |
| Toshiba | 30503, 31639, 32277, 32551, 32705, 33157 |
| Transonic 31394 | |
| TVE 30713 | |
| United | 30675, 30713, 31152 |
| Universum | 30741, 30713 |
| Urban Concepts | 30503 |
| Vcastel 30713 | |
| Victor 31597 | |
| Vizio | 32563 |
| Vtrek | 32587 |
| Waltham 30713 | |
| Wellington | 30713 |
| Weltstar | 30713 |
| Wharfedale | 30713 |
| Windsor | 30713 |
| Windy Sam | 30573 |
| Xbox | 30522, 32083 |
| XLogic 31152 | |
| DVD | |
| Yamaha | 30490, 30539, 30646, 30817, 31354, 32298, 32299 |
| Zenith | 30503, 30741 |
| Blu-ray Disc | |
| Ambiance 33052 | |
| Anthem | 32820 |
| Cambridge Audio | 32808 |
| Denon | 32258, 32748 |
| Dyon | 33052 |
| Foehn & Hirsch | 33052 |
| Funai | 30675 |
| Harman/Kardon | 33228 |
| Insignia | 30675, 32428, 32596 |
| Integra | 32147, 32900, 32910, 33100, 33101, 33500, 33501 |
| JVC | 32855 |
| Lenco 33052 | |
| Lexicon | 32545 |
| LG | 30741, 31602 |
| Limit | 33052 |
| Loewe | 32474, 32783 |
| Magnavox | 30675 |
| Marantz | 32414, 32432, 33444 |
| Momitsu | 33052 |
| Onkyo | 32147, 32900, 32910, 33100, 33101, 33500, 33501 |
| Oppo | 32545 |
| Panasonic | 31641, 32523, 32859 |
| Philips | 32084, 32434, 32689 |
| Pioneer 30142, 32442 | |
| Samsung 30199, 33195 | |
| Sharp | 32250, 32474, 32652 |
| Sherwood | 33052 |
| Blu-ray Disc | |
| Sony 31516, 32180 | |
| Sylvania | 30675 |
| Toshiba | 32551, 32705, 33157 |
| Vizio | 32563 |
| Yamaha | 32298, 32299 |
| DVD-R | |
| Accurian 30675 | |
| Aristona | 30646 |
| Denon | 30490 |
| Emerson 30675 | |
| Funai | 30675 |
| Go Video | 30741 |
| GPX | 30741 |
| Hitachi | 31664 |
| Humax | 30646 |
| Irradio | 30646 |
| JVC | 31597 |
| LG | 30741 |
| Loewe | 30741 |
| Magnavox | 30646, 30675 |
| Medion | 30741 |
| Panasonic | 30490, 31579, 32523, 32710, 32859 |
| Philips | 30646, 31340 |
| Pioneer 30631, 32860 | |
| Pye | 30646 |
| RCA 30522 | |
| Samsung 30490, 31635 | |
| Schneider 30646 | |
| Sharp | 30630, 30675, 32869 |
| Sony 31033, 31070, 31431, 31516, 31633, 32180 | |
| Sylvania | 30675 |
| Turga | 30741 |
| Toshiba | 31639, 32277, 32551 |
Remote Control Codes
DVD-R
| Victor 31597 | |
| Yamaha 30646 | |
| Zenith 30741 |
HD-DVD
| Integra 32901, 33104 33504 | |
| LG 30741 | |
| Microsoft 32083 | |
| Onkyo 32901, 33104 33504 | |
| Xbox 32083 | |
TV/DVD Combination
| Akai 11675 | |
| Black Diamond 11037, | 30713 |
| Blue Sky 11037, 30713 | |
| Bush 11037, 10698, 127 | 19, 30713 |
| Centrum 11037, 30713 | |
| Crown 11037, 30713 | |
| DMTech 12001 | |
| Dual 11037, 30713 | |
| Dynex | 12049 |
| Elfunk 11037, 30713 | |
| Emerson | 11394, 11864, 11886, 30675 |
| Ferguson 11037, 30713 | |
| Goodmans | 11037, 30713 |
| Grandin | 30713 |
| Grundig 30539 | |
| H & B | 12001 |
| Hanseatic 12001 | |
| Hitachi | 11037, 11667, 30713 |
| Insignia | 12049 |
| JVC | 12271 |
| LG 11423 | |
| Logik | 11037, 30713 |
| Luxor | 11037, 30713 |
TV/DVD Combination
| Magnavox | 12372 |
| Matsui | 11037, 30713 |
| Mcdon | 12719 |
| Nordmende | 12001 |
| Odys | 12719 |
| Panasonic | 12170 |
| Philips | 11454, 10556, 11394, 30539 |
| Powerpoint | 10698 |
| Prosonic 12001 | |
| Pvision | 12001 |
| RCA 12746, 12932 | |
| Schaub Lorenz | 12001 |
| SEG | 11037, 12719, 30713 |
| Sharp | 10818 |
| Soniq | 12493 |
| Sunstech 12001 | |
| Sylvania 10171, 11394, | 11864, 11886, 30630, 30675 |
| Teac 10698 | |
| Technica | 11037, 30713 |
| Telefunken | 10698 |
| Teletech | 11037, 30713 |
| Thomson | 10625 |
| Toshiba | 11524 |
| United 11037, 30713 | |
| Universum | 30713 |
| Vestel 11037 | |
| Viewsonic | 12049 |
| Weltstar | 11037, 30713 |
Memo
Remote Control Codes

19


SN 29401094
(C) Copyright 2012 ONKYO SOUND & VISION CORPORATION Japan. All rights reserved.
Y1112-1

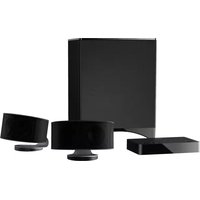
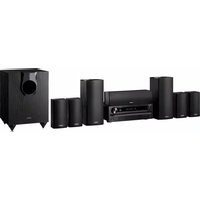
- Safety Information and Introduction
- WARNING:
- CAUTION:
- WARNING
- AVIS
- Important Safety Instructions
- En-2
- Precautions
- Power
- Preventing Hearing Loss
- Caution
- Batteries and Heat Exposure
- Handling Notes
- For U.S. models
- FCC Information for User
- NOTE:
- For Canadian Models
- Supplied Accessories
- Note
- ■Aiming the remote controller
- Table of Contents
- Connections
- Turning On & Basic Operations
- Advanced Operations
- Controlling Other Components
- Appendix
- Features
- Amplifier
- Processing
- Miscellaneous
- Front & Rear Panels
- Display
- Remote Controller
- ■Controlling the tuner
- Connecting the AV Receiver
- Connecting Your Speakers
- Speaker Configuration
- Connecting the Speaker Cables
- Tip
- ■Screw-type speaker terminals
- ■Push-type speaker terminals
- Banana Plugs
- Attaching the Speaker Cable Labels
- Speaker Connection Precautions
- Using Powered Subwoofers
- Tlp
- Bi-amping the Front Speakers
- Important:
- About AV Connections
- Connecting AV components
- AV Cables and Jacks
- HDMI
- ■ Component video
- ■Composite video
- ■Optical digital audio
- Coaxial digital audio
- ■Analog audio (RCA)
- Connecting Components with HDMI
- ■Audio Return Channel (ARC) function
- ■MHL (Mobile High-Definition Link)
- Connecting Onkyo RI Components
- ■System On/Auto Power On
- ■Direct Change
- Remote Control
- Connecting the Antennas
- Connecting the Power Cord
- Plug the power cord into an AC wall outlet.
- Turning On/Off the AV Receiver
- Turning On
- Turning Off
- ■ Smooth Operation In a Few Easy Steps (Initial Setup)
- If the "Firmware Update Available" window appears.
- Initial Setup
- Selecting the Language for the Onscreen Setup Menus
- Audyssey 2EQ: Auto Setup
- Source Connection
- Remote Mode Setup
- Network Connection
- Terminating the Initial Setup
- Playback
- Playing the Connected Component
- Screen Saver
- PLAYLIST ◀/▶
- Understanding Icons on the Display
- Playing an iPod/iPhone via USB
- Extended Mode (Music) Control
- Extended Mode (Video) control
- Standard Mode Control
- Playing a USB Device
- Listening to vTuner Internet Radio
- Press NET.
- Use ▲/▼/◄/► to select "vTuner Internet Radio" and then press ENTER.
- Use ▲/▼ to select a program and then press ENTER.
- ■ Adding vTuner Internet Radio Stations to Favorites
- Adding to My Favorites
- Adding to vTuner Internet Radio's Favorites
- Registering Other Internet Radio
- Changing the Icon Layout on the Network Service Screen
- Playing Music Files on a Server
- Windows Media Player 11 Setup
- Remote Playback
- Windows Media Player 12 Setup
- Using Remote Playback
- Listening to AM/FM Radio
- Using the Tuner
- Tuning into Radio Stations
- ■Auto tuning mode
- ■Manual tuning mode
- ■Tuning into stations by frequency
- Presetting AM/FM Stations
- ■ Selecting Presets
- ■ Deleting Presets
- Using Basic Functions
- Using the Automatic Speaker Setup
- Measurement procedure
- ① First measurement position
- ② Second measurement position
- ③ Third measurement position
- Error Messages
- Changing the Speaker Setup Manually
- Using a Powered Subwoofer
- Using the Listening Modes
- Selecting Listening Modes
- MOVIE/TV button
- MUSIC button
- GAME button
- STEREO button
- About Listening Modes
- Input Source
- Speaker Layout
- Using the Home Menu
- Press RECEIVER followed by HOME.
- Use ▶/▶ or ▲/▼ and ENTER to make the desired selection.
- Network Service
- USB
- InstaPrevue
- Setup
- Firmware Update
- Using the Sleep Timer
- Setting the Display Brightness
- Displaying Source Information
- Changing the Input Display
- Using the Music Optimizer
- Muting the AV Receiver
- Press RECEIVER followed by MUTING.
- Using Headphones
- Connect a pair of stereo headphones with a standard plug (1/4 inch or 6.3 mm) to the PHONES jack.
- On-screen Setup
- Quick Setup
- Setup menu (HOME)
- Input
- ■ Audio (→ page 44)
- Video
- Information 3
- ■Listening Mode \*4
- Using the Audio Settings of Quick Setup
- Tone Control
- Bass
- Treble
- Operating on the AV receiver
- Speaker Levels
- Subwoofer Level
- Center Level
- Audyssey®
- Audyssey
- ■ Dynamic EQ
- ■Dynamic Volume
- Late Night
- Music Optimizer
- CinemaFILTER
- Cinema Filter
- Using the Setup Menu (HOME)
- Explanatory Notes
- About the HYBRID STANDBY indicator
- Input/Output Assign
- Monitor Out
- Resolution
- HDMI Input
- ■ BD/DVD, CBL/SAT, GAME, PC, TV/CD, EXTRA1, EXTRA2
- Component Video Input
- Digital Audio Input
- Speaker Setup
- Main Menu Speaker Setup
- Speaker Settings
- Speakers Type (Front)
- Powered Zone 2
- Subwoofer
- Front
- ■Center *1 , Surround *1
- Front High 1*2*3*5
- ■Surround Back \*1^2\*3^4
- ■Surround Back Ch
- LPF of LFE
- (Low-Pass Filter for the LFE Channel)
- Double Bass
- Speaker Distance
- Unit
- ■ Left, Front High Left, Center, Front High Right, Right, Surround Right, Surround Back Right, Surround Back Left, Surround Left, Subwoofer
- Level Calibration
- ■ Left, Front High Left, Center 1, Front High Right, Right, Surround Right, Surround Back Right, Surround Back Left, Surround Left
- Subwoofer 1
- Audio Adjust
- Main Menu Audio Adjust
- Multiplex/Mono
- Multiplex
- Input Channel
- Mono
- Dolby
- ■PL IIx Music (2ch Input)
- Panorama
- Dimension
- Center Width
- PL Ilz Height Gain
- Dolby EX
- ■TrueHD Loudness Management
- DTS
- Neo:6 Music
- Center Image
- Theater-Dimensional
- ■Listening Angle
- Source Setup
- Preparation
- Main Menu Source Setup
- ■Dynamic EQ
- ■Reference Level
- Audyssey Dynamic EQ Reference Level Offset
- ■ Dynamic Volume
- About Audyssey Dynamic EQ®
- About Audyssey Dynamic Volume®
- IntelliVolume
- A/V Sync
- ENTER.
- Name Edit
- Name
- Space:
- Shift *1 :
- Back Space 2 :
- OK:
- Picture Adjust
- ■Wide Mode \*1\*6
- Picture Mode *1
- Game Mode 234
- Film Mode 24
- ■Edge Enhancement \*2\*4\*5
- Noise Reduction ^2'4'5
- Audio Selector
- Setting the Incoming Digital Signal (Fixed Mode)
- Fixed Mode
- Listening Mode Preset
- Main Menu Listening Mode Preset
- Use ▲/▼ to select the input source that you want to set, and then press ENTER.
- Use ▲/▼ to select the signal format that you want to set, and then use ◀/► to select a listening mode. Only listening modes that can be used with each input signal format can be selected (→ pages 35 to 39).
- Analog/PCM/Digital
- Mono/Multiplex Source
- 2ch Source
- ■Dolby D/Dolby D Plus/TrueHD
- DTS/DTS-ES/DTS-HD
- ■ Other Multich Source
- Volume Setup
- ■Maximum Volume
- Power On Volume
- Headphone Level
- OSD Setup
- On Screen Display
- Language
- Hardware Setup
- Tuner
- ■AM/FM Frequency Step
- HDMI Control(RIHD)
- HDMI Through
- Audio TV Out
- ■Audio Return Channel (ARC)
- LipSync
- Sub Window
- Position
- Auto Standby
- ■Auto Standby
- Network
- What's DHCP?
- What's DNS?
- MAC Address
- DHCP
- IP Address
- Subnet Mask
- Gateway
- DNS Server
- Proxy URL
- Proxy Port
- Network Standby
- Update Notice
- Remote Controller Setup
- Remote ID
- Changing the remote controller's ID
- Lock Setup
- Main Menu Lock Setup
- Zone 2
- Making Zone 2 Connections
- Connecting the Zone Speakers Directly to the AV receiver
- Connecting the Zone Speakers to an Additional Amplifier
- Controlling Zone 2 Components
- ■Operating on the AV receiver
- ■Operating on the remote controller
- Adjusting the Volume for Zone 2
- Muting Zone 2
- Press ZONE2 followed by MUTING.
- iPod/iPhone Playback via Onkyo Dock
- Using the Onkyo Dock
- RI Dock
- System Function
- System On
- Auto Power On
- Direct Change
- Other Remote Operations
- iPod Alarm
- Operating Notes
- Controlling Your iPod/iPhone
- ■With the RI Control
- ■ Without the RI Control
- Preprogrammed Remote Control Codes
- Looking up for Remote Control Codes
- Entering Remote Control Codes
- Remapping Colored Buttons
- Remote Control Codes for Onkyo Components Connected via RI
- Controlling Onkyo components without RI
- Resetting the REMOTE MODE Buttons
- Resetting the Remote Controller
- Controlling a TV
- Controlling Apple TV
- Controlling MHL-Enabled Mobile Device
- Controlling a Blu-ray Disc/DVD Player, HD DVD Player or DVD Recorder
- Troubleshooting
- Power
- - Can't turn on the AV receiver
- ■The AV receiver turns off unexpectedly
- ■The AV receiver turns off and after restoring the power, it turns off again
- Audio
- There's no sound, or it's very quiet
- ■ Only the front speakers produce sound
- ■Only the center speaker produces sound
- ■The surround speakers produce no sound
- ■The center speaker produces no sound
- ■The front high and surround back speakers produce no sound
- ■The subwoofer produces no sound
- There's no sound with a certain signal format
- Can't get 6.1/7.1 playback
- ■The speaker volume cannot be set as required
- Noise can be heard
- The Late Night function doesn't work
- ■About DTS signals
- The beginning of audio received by an HDMI IN can't be heard
- There's no picture
- There's no picture from a source connected to an HDMI IN
- ■The on-screen menus don't appear
- ■The on-screen display does not appear
- ■Reception is noisy, FM stereo reception is noisy, or the FM STEREO indicator doesn't light
- ■The remote controller doesn't work
- Can't control other components
- RI Dock for iPod/iPhone
- There's no sound
- There's no video
- The AV receiver's remote controller doesn't control my iPod/iPhone
- ■The AV receiver unexpectedly selects my iPod/iPhone as the input source
- ■iPod/iPhone doesn't work properly
- ■The Zone 2 speakers produce no sound
- Music Server and Internet Radio
- Can't access the server or Internet radio
- ■Playback stops while listening to music files on the server
- - Can't connect to the AV receiver from a Web browser
- USB Device Playback
- - Can't access the music files on a USB device
- Others
- ■ Standby power consumption
- ■The sound changes when I connect my headphones
- ■The speaker distance cannot be set as required
- How do I change the language of a multiplex source
- The RI functions don't work
- The functions System On/Auto Power On and Direct Change don't work for components connected via RI
- When performing "Automatic Speaker Setup", the measurement fails and the message "Ambient noise is too high." is displayed.
- ■The following settings can be made for the composite video inputs
- • Video Attenuation
- If the picture on your TV/monitor connected to the HDMI output(s) is unstable, try switching the DeepColor function off
- Important Note Regarding Video Playback
- ■Update via network
- ■ Update via USB storage ( → page 81)
- Limitation of liability
- Updating the Firmware via Network
- Before Starting
- Update Procedure Troubleshooting
- Case 1:
- ■Errors during an update via network
- Case 2:
- Case 3:
- Updating the Firmware via USB
- Update Procedure
- Onkyo Sound & Vision Corporation
- The Americas
- Onkyo U.S.A. Corporation
- Europe
- Onkyo Europe Electronics GmbH
- China, Hong Kong
- Onkyo China Limited
- Asia, Oceania, Middle East, Africa
- Connection Tips and Video Signal Path
- Video Connection Formats
- ■ "Monitor Out" set to "Main" or "Sub"
- ■ "Monitor Out" set to "Both"
- Signal Selection
- Audio Connection Formats
- Video Resolution Chart
- Using an RIHD-compatible TV, Player, or Recorder
- About RIHD-compatible components
- TV
- ■Players/Recorders
- Operations that can be performed with RIHD connection
- For RIHD-compatible TV
- For RIHD-compatible players/recorders
- ■How to connect and setup
- Confirm the connection and settings.
- Change each item in the "HDMI" menu according to the following settings:
- Confirm the settings.
- Operate with the remote controller.
- About HDMI
- Supported Audio Formats About Copyright
- ection
- Network/USB Features
- Connecting to the Network
- Network Requirements
- Ethernet Network
- Ethernet Router
- CAT5 Ethernet cable
- ■Internet Access (for Internet radio)
- Server Requirements
- Server playback
- Minimum system requirements for Windows Media Player 11 on Windows XP
- Operating system
- Memory: 64 MB
- ■ Remote playback
- USB Device Requirements
- Supported Audio File Formats About DLNA
- ■MP3 (.mp3 or .MP3)
- ■WMA (.wma or .WMA)
- ■WMA Lossless (.wma or .WMA)
- AAC
- (.aac/.m4a/.mp4/.3gp/.3g2/.AAC/.M4A/.MP4/.3GP or .3G2)
- ■FLAC (.flac or .FLAC)
- ■Ogg Vorbis (.ogg or .OGG)
- ■LPCM (Linear PCM)
- License and Trademark Information
- dts-hd
- \*MHL
- Specifications
- Amplifier Section
- Video Section
- Tuner Section
- General
- Video Inputs
- Video Outputs
- Audio Inputs
- Audio Outputs
- Memo
- ONKYO
- Using Internet Radio
- Common Procedures in Internet Radio Menu
- Using Multiple Accounts
- Pandora® internet radio –Getting Started (U.S. only)
- Use ▲/▼ to select "I have a Pandora Account" or "I'm new to Pandora" and then press ENTER.
- To play a station, use ▲/▼ to select the station from your station list, and then press ENTER.
- Create a New Station:
- ■Menu Items
- I like this song:
- I don't like this song:
- Why is this song playing?:
- Don't play the song for a month:
- Create station from this artist:
- Delete this station:
- Create station from this song:
- Rename this station:
- Bookmark this artist:
- Bookmark this song:
- Add to My Favorites:
- PANDORA
- Using Rhapsody (U.S. only)
- Use ▲/▼ to select "Sign in to your account" and then press ENTER.
- ■ Using the keyboard screen
- Use ▲/▼ to select the menu, then press ENTER.
- Use ▲/▼ to select a channel, and press ENTER or ▶ to start playback.
- Menu Items
- Using the SiriusXM Internet Radio (North American only)
- ((SiriusXM))
- Using Last.fm Internet Radio
- Recommended Radio:
- Artist Radio:
- My Library:
- Tag Radio:
- Use ▲/▼ to select menu and then press ENTER. Search Station:
- Top Artists Station:
- Top Tags Station:
- Personal Station:
- Profile:
- Account Info:
- Sign Out:
- Use ▲/▼ to select a station, and press ENTER or ▶ to start playback.
- I Love this track:
- Ban this track:
- ■ Using scrobbling control
- Using Slacker Personal Radio
- Rate Song as Favorite:
- Ban Song:
- Ban Artist:
- Mark Favorite:
- Unmark Favorite:
- Add song to Library:
- Delete song from Library:
- Using MP3tunes
- Creating an Account on your Computer
- Playing Contents on the AV Receiver
- Search:
- Delete this station :
- Create station from this song :
- Rename this station :
- Bookmark this artist :
- Bookmark this song :
- Add album to My Library :
- Add channel to My Channels :
- Add track to My Library:
- Add album to My Library:
- Add playlist to My Library:
- Add channel to My Channels:
- Press MENU while the Users screen is displayed.
- Remote Control Codes
- While holding down the REMOTE MODE button to which you want to assign a code, press and hold down [DISPLAY] (about 3 seconds).
- Notes:
- Within 30 seconds, use the number buttons to enter the 5-digit remote control code.
Brand : ONKYO
Model : HT-RC460
Category : Home Theater