
CMXGWAS020737 - Pressure washer Craftsman - Free user manual and instructions
Find the device manual for free CMXGWAS020737 Craftsman in PDF.


| Brand | Craftsman |
| Model | CMXGWAS020737 |
| Product Type | Gas Pressure Washer |
| Max Outlet Pressure | 2800 PSI (193 BAR) |
| Max Flow Rate | 2.3 GPM (8.7 L/min) |
| Rated Pressure | 2400 PSI (159 BAR) @ 2.1 GPM |
| Water Supply Temperature | 41°F – 100°F (5°C – 38°C) |
| Engine Type | Briggs & Stratton (see engine manual) |
| Pump Type | Axial Cam Pump with Stainless Steel Pistons |
| High Pressure Hose Length | 25 ft (7.6 m) |
| Spray Tips Included | 4 Quick-Connect: Low Pressure (Black), 40° (White), 15° (Yellow), 0° (Red) |
| Automatic Cool Down System | Yes (protects pump when water exceeds 125°F) |
| Detergent Siphoning System | Yes, with check ball |
| Weight (approx.) | 50 lbs (22.7 kg) |
| Wheel Size | 10 inches (25.4 cm) |
| Accessory Tray | Yes, for storage of gun, hose, and tips |
| Safety Features | Trigger lock, pressure relief button, thermal relief |
| Warranty (Consumer Use) | 24 months (frame: 60 months) |
| Warranty (Commercial Use) | 3 months (frame: 3 months) |
Frequently Asked Questions - CMXGWAS020737 Craftsman
User questions about CMXGWAS020737 Craftsman
0 question about this device. Answer the ones you know or ask your own.
Ask a new question about this device
Download the instructions for your Pressure washer in PDF format for free! Find your manual CMXGWAS020737 - Craftsman and take your electronic device back in hand. On this page are published all the documents necessary for the use of your device. CMXGWAS020737 by Craftsman.
USER MANUAL CMXGWAS020737 Craftsman
Copyright © 2018. Briggs & Stratton Corporation
CRAFTSMAN ^® is a registered trademark of Stanley Black & Decker, Inc., used under license.
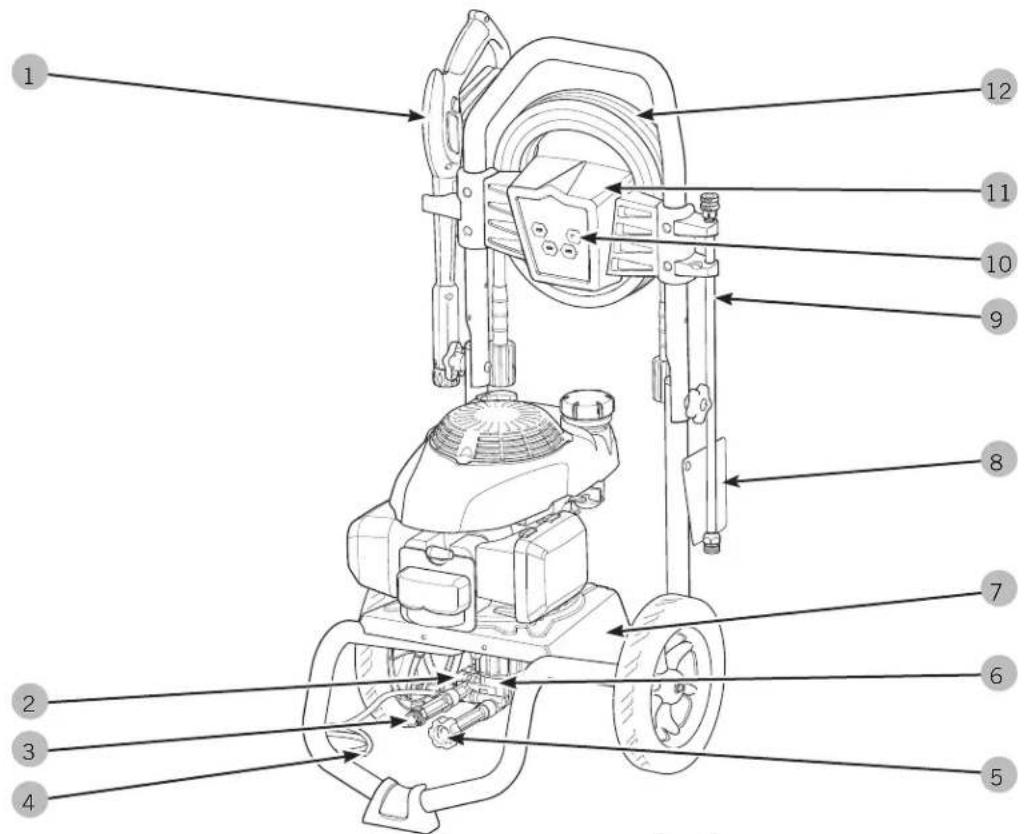
1 - Spray Gun
2 - Automatic Cool Down System
3 - High Pressure Outlet
4 - Detergent Siphoning Tube
5 - Water Inlet
6 - Pump
7 - Identification Label
8 - Warning/Operating Instructions Tag
9 - Nozzle Extension with Quick Connect
10 - Spray Tips
11 - Accessory Tray
12 - High Pressure Hose
For the location of all engine features and controls, see the engine operator's manual.

Read this manual carefully and become familiar with your pressure washer. Know its applications, its limitations, and any hazards involved.
Every effort has been made to ensure that information in this manual is accurate and current. However, we reserve the right to change, alter, or otherwise improve the product and this document at any time without prior notice.
You can contact Craftsman Customer Service by phone at (888) 331-4569, or on the Internet at www.Craftsman.com. For engine related questions, call American Honda Motor Company, Inc. at (800) 426-7701 or visit www.honda-engines.com for a dealer locator.
To ensure prompt and complete warranty coverage, register your product online at www.Craftsman.com/registration.
Operator Safety
Definitions: Safety Symbols and Meanings
The safety alert symbol indicates a potential personal injury hazard. A signal word (DANGER, WARNING, or CAUTION) is used with the alert symbol to designate a degree or level of hazard seriousness. A safety symbol may be used to represent the type of hazard. The signal word NOTICE indicates information considered important, but not hazard-related.
⚠️ DANGER indicates a hazard which, if not avoided, will result in death or serious injury.
⚠ WARNING indicates a hazard which, if not avoided, could result in death or serious injury.
⚠️ CAUTION indicates a hazard which, if not avoided, could result in minor or moderate injury.
NOTICE indicates information considered important, but not hazard-related.

Operator's Manual

Hearing Protection

Toxic Fumes
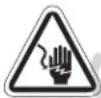
Electrical Shock

Slippery Surface

Fall

Fluid Injection
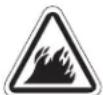
Fire
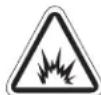
Explosion
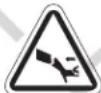
Kickback

Projectile
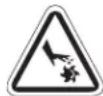
Moving Parts

Flying Objects
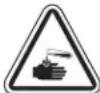
Chemical Burn
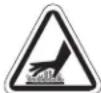
Hot Surface
⚠ WARNING This product can expose you to chemicals including gasoline engine exhaust, which is known to the State of California to cause cancer, and carbon monoxide, which is known to the State of California to cause birth defects or other reproductive harm. For more information go to www.P65Warnings.ca.gov.
⚠ WARNING This product contains lead and lead compounds, known to the state of California to cause birth defects or other reproductive harm. Wash your hands after handling this product. Cancer and Reproductive Harm - www.P65Warnings.ca.gov
⚠ WARNING POISONOUS GAS HAZARD. Engine

exhaust contains carbon monoxide, a poisonous gas that could kill you in minutes. You CANNOT smell it, see it, or Even if you do not smell exhaust fumes, you will be exposed to carbon monoxide gas. Chemicals or detergents could be harmful if or ingested, resulting in death, serious nausea, fainting or poisoning.
- Operate this product ONLY outside far away from windows, doors and vents to reduce the risk of carbon monoxide gas from accumulating and potentially being drawn towards occupied spaces.
- Install battery-operated carbon monoxide alarms or plug-in carbon monoxide alarms with battery back-up according to the manufacturer's instructions. Smoke alarms cannot detect carbon monoxide gas.
- DO NOT run this product inside homes, garages, basements, crawlspaces, sheds, or other partially-enclosed spaces even if using fans or opening doors and windows for ventilation. Carbon monoxide can quickly build up in these spaces and can linger for hours, even after this product has shut off.
- ALWAYS place this product downwind and point the engine exhaust away from occupied spaces.
If you start to feel sick, dizzy, or weak while using this product, get to fresh air RIGHT AWAY. See a doctor. You may have carbon monoxide poisoning.
- Use a respirator or mask whenever there is a chance that vapors may be inhaled when using chemicals.
- Read all instructions with mask so you are certain the mask will provide the necessary protection against inhaling harmful vapors when using chemicals.
WARNING


Fuel and its vapors are extremely flammable and explosive which could cause burns, fire or explosion resulting in death or serious injury.
WHEN ADDING OR DRAINING FUEL
- Turn pressure washer engine OFF and let it cool at least 2 minutes before removing fuel cap. Loosen cap slowly to relieve pressure in tank.
- Fill or drain fuel tank outdoors.
- DO NOT overfill tank. Allow space for fuel expansion.
- If fuel spills, wait until it evaporates before starting engine.
- Keep fuel away from sparks, open flames, pilot lights, heat, and other ignition sources.
- Check fuel lines, tank, cap and fittings frequently for cracks or leaks. Replace if necessary.
• DO NOT light a cigarette or smoke.
WHEN STARTING EQUIPMENT
- Ensure spark plug, muffler, fuel cap, and air cleaner are in place.
• DO NOT crank engine with spark plug removed.
WHEN OPERATING EQUIPMENT
- DO NOT operate this product inside any building, carport, porch, mobile equipment, marine applications, or enclosure.
- DO NOT tip engine or equipment at angle which causes fuel to spill.
• DO NOT spray flammable liquids.
WHEN TRANSPORTING, MOVING OR REPAIRING EQUIPMENT
- Transport/move/repair with fuel tank EMPTY or with fuel shutoff valve OFF (0).
- DO NOT tip engine or equipment at angle which causes fuel to spill.
- Disconnect spark plug wire.
WHEN STORING FUEL OR EQUIPMENT WITH FUEL IN TANK
- Store away from furnaces, stoves, water heaters, clothes dryers, or other appliances that have pilot light or other ignition source because they could ignite fuel vapors.
WARNING

NING Starter cord kickback (rapid retraction) will pull hand and arm toward engine faster than you can let go which could cause broken bones, fractures, bruises, or sprains resulting in serious injury.
- NEVER pull starter cord without first relieving spray gun pressure.
- When starting engine, pull cord slowly until resistance is felt and then pull rapidly to avoid kickback.
- After each starting attempt, where engine fails to run, always point spray gun in safe direction, press red button and squeeze spray gun trigger to release high pressure.
- Firmly grasp spray gun with both hands when using high pressure spray to avoid injury when spray gun kicks back.
WARNING

NING The high pressure stream of water that this equipment produces could cut through skin and its underlying tissues, resulting in serious injury and possible amputation.
Spray gun traps high water pressure, even when engine is stopped and water is disconnected, which could result in serious injury.
- If cut by fluid, call physician immediately. DO NOT treat as a simple cut.
- DO NOT allow CHILDREN to operate pressure washer.
- NEVER repair high pressure hose. Replace it.
- NEVER repair leaking connections with sealant of any kind. Replace o-ring or seal.
- NEVER connect high pressure hose to nozzle extension.
- Keep high pressure hose connected to pump and spray gun while system is pressurized.
- ALWAYS point spray gun in safe direction, press red button and squeeze spray gun trigger to release high pressure, every time you stop engine.
- NEVER aim spray gun at people, animals, or plants.
• DO NOT secure spray gun in open position. - DO NOT leave spray gun unattended while machine is running.
- NEVER use a spray gun which does not have a trigger lock or trigger guard in place and in working order.
- Always be certain spray gun, nozzles and accessories are correctly attached.
WARNING


exhaust heat/gases could ignite combustibles, structures or damage fuel tank causing a fire, resulting in death or serious injury.
Contact with muffler area could cause burns resulting in serious injury.
- DO NOT touch hot parts and AVOID hot exhaust gases.
- Allow equipment to cool before touching.
- Keep at least 5 ft. (1.5 m) of clearance on all sides of pressure washer including overhead.
- It is a violation of California Public Resource Code, Section 4442, to use or operate the engine on any forest-covered, brush-covered, or grass-covered land unless the exhaust system is equipped with a spark arrester, as defined in Section 4442, maintained in effective working order. Other states or federal jurisdictions may have similar laws.
Contact the original equipment manufacturer, retailer, or dealer to obtain a spark arrester designed for the exhaust system installed on this engine.
- Replacement parts must be the same and installed in the same position as the original parts.
WARNING
Use of pressure washer could create


puddles and slippery surfaces causing you to fall resulting in death or serious injury.
Kickback from spray gun could cause you to fall resulting in death or serious injury.
- Operate pressure washer from a stable surface.
- The cleaning area should have adequate slopes and drainage to reduce the possibility of a fall due to slippery surfaces.
- Be extremely careful if you must use the pressure washer from a ladder, scaffolding, or any other similar location.
- Firmly grasp spray gun with both hands when using high pressure spray to avoid injury when spray gun kicks back.
WARNING
Chemical Burn Hazard.

Chemicals could cause burns resulting in death or serious injury.
- DO NOT use caustic liquid with pressure washer.
- Use ONLY pressure washer safe detergents/soaps. Follow all manufacturers instructions.
WARNING
Risk of eye or bodily injury.


Spray could splash back or propel objects resulting in serious injury.
- Always wear indirect vented (chemical splash) safety goggles marked to comply with ANSI Z87.1 when using or in vicinity of this equipment.
- NEVER substitute safety glasses or dry-condition goggles for indirect vented safety goggles.
- Always wear protective clothing such as a long-sleeved shirt, long pants and close-toed shoes.
- NEVER operate pressure washer when barefoot or wearing sandals or shorts.
WARNING
Starter and other rotating parts could

entangle hands, hair, clothing, or accessories resulting in serious injury.
- NEVER operate pressure washer without protective housing or covers.
- DO NOT wear loose clothing, jewelry or anything that could be caught in the starter or other rotating parts.
- Tie up long hair and remove jewelry.
WARNING
Risk of electrocution.

Contact with power source could cause electric shock or burn resulting in death or serious injury.
• NEVER spray near power source.
WARNING
Unintentional sparking could cause


fire or electric shock resulting in death or serious injury.
WHEN ADJUSTING OR MAKING REPAIRS TO YOUR PRESSURE WASHER
- Disconnect the spark plug wire from the spark plug and place the wire where it cannot contact spark plug.
WHEN TESTING FOR ENGINE SPARK
- Use approved spark plug tester.
- DO NOT check for spark with spark plug removed.
CAUTION
Excessively high operating speeds could result in minor injury. Excessively low speeds impose a heavy load.
- DO NOT tamper with governor spring, links or other parts to increase engine speed. Pressure washer supplies correct rated pressure and flow when running at governed speed.
- DO NOT modify pressure washer in any way.
NOTICE High pressure spray could damage fragile items including glass.
- DO NOT point spray gun at glass when using red (0°) spray tip.
• NEVER aim spray gun at plants.
NOTICE Improper treatment of pressure washer could damage it and shorten its life.
- If you have questions about intended use, ask dealer or contact qualified service center.
- NEVER operate units with broken or missing parts, or without protective housing or covers.
- DO NOT by-pass any safety device on this machine.
• DO NOT tamper with governed speed. - DO NOT operate pressure washer above rated pressure.
- DO NOT modify pressure washer in any way.
- Before starting pressure washer in cold weather, check all parts of the equipment to be sure ice has not formed there.
- NEVER move machine by pulling on hoses. Use handle provided on unit.
- This equipment is designed to be used with Briggs & Stratton authorized parts ONLY. If equipment is used with parts that DO NOT comply with minimum specifications, user assumes all risks and liabilities.
Specifications
Max Outlet Pressure ....
2800 PSI (193 BAR)* @ 2.1 GPM (7.9 liters/min)
Max Flow Rate
2.3 GPM (8.7 liters/min)* @ 2400 PSI (159 BAR)
Water Supply Temperature
41^ F ( 5^ C) - 100^ F ( 38^ C)
* This pressure washer is rated in accordance to the Pressure Washer Manufacturers Association (PWMA) standard PW101-2010 (Testing and Rating Performance of Pressure Washers).
Features and Controls (Fig. A)

Read this Operator's Manual and safety rules before operating your pressure washer. Compare the illustrations with your pressure washer, to
familiarize yourself with the locations of various controls and adjustments. Save this manual for future reference.
This high quality residential system features 10" (25.4 cm) wheels, axial cam pump with stainless steel pistons, automatic cool down system, detergent siphoning system, nozzle extension with quick connect fitting, a variety of spray tips, heavy duty 25 ft. (7.6 m) hose, and more.
1 - Spray Gun: Controls the application of water onto cleaning surface with trigger device. Includes trigger lock.
2 - Automatic Cool Down System: Cycles water through pump when water reaches above 125^ F ( 51^ C). Warm water will discharge from pump onto ground. This system prevents internal pump damage.
3 - High Pressure Outlet: Connection for high pressure hose.
4 - Detergent Siphoning Tube: Use to siphon pressure washer safe detergents into the low pressure stream.
5 - Water Inlet: Connection for garden hose.
6 - Pump: Develops high pressure.
7 - Identification Label: Provides model and serial number of pressure washer. Please have these readily available if calling for assistance.
8 - Warning/Operating Instructions Tag: Identifies hazards and proper procedure to start/stop pressure washer.
9 - Nozzle Extension with Quick Connect: Allows you to switch between four different spray tips.
10 - Spray Tips: Detergent, 0°, 15° and 40°: for various high pressure cleaning applications.
11 - Accessory Tray: Provides convenient storage for standard and optional accessories, such as brushes, turbo wands, etc.
12 - High Pressure Hose: Connect one end to water pump and the other end to spray gun.
Assembly

Read entire operator's manual before you attempt to assemble or operate your new pressure washer.
Your pressure washer requires some assembly and is ready for use after it has been properly serviced with the recommended oil and fuel.
If you have any problems with the assembly of your pressure washer, please call the pressure washer helpline at (888) 331-4569. If calling for assistance, please have the model, revision, and serial number from the identification label available.
Unpack Pressure Washer
- Remove the parts bag, accessories, and inserts included with pressure washer.
- Open carton completely by cutting each corner from top to bottom.
- Ensure you have all included items prior to assembly.
Items in the carton include:
- Main Unit
- Handle
- High Pressure Hose
- Spray Gun
- Nozzle Extension with Quick Connect Fitting
- Plastic Accessory Tray
- Oil Pouch
- Parts Bag (which includes the following):
- Operator's Manual
- Bag of 4 Multi-Colored Quick Connect Spray Tips
- Handle/Accessory Tray Fastening Hardware Kit (which includes):
- Carriage Bolts (2)
- Plastic Knobs (2)
- Tree Clips (4)
To prepare your pressure washer for operation, you will need to perform these tasks:
- Attach handle and accessory tray to main unit.
- Add oil to engine crankcase.
- Add fuel to fuel tank.
- Connect high pressure hose to spray gun and pump.
- Connect water supply to pump.
- Attach nozzle extension to spray gun.
- Select/attach quick connect spray tip to nozzle extension.
ENGLISH
Attach Handle and Accessory Tray (Fig. B, C)
- Place handle 1 onto handle supports connected to main unit. Make sure holes in handle align with holes on handle supports.
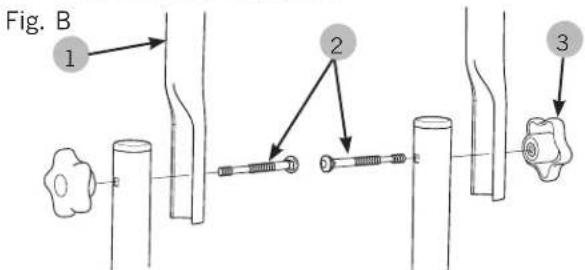
- Insert handle carriage bolts 2 through holes from inside of unit and attach a plastic knob 3 from outside of unit. Tighten by hand.
NOTICE By loosening both knobs to the middle section of the attachment bolt, the upper handle can fold forward to store flat atop the cold engine. DO NOT fold the handle down while the engine is hot.
- Place accessory tray 4 over holes 5 on handle (viewing from front of unit). Push the tree clips 6 into the holes until they sit flat against the accessory tray.
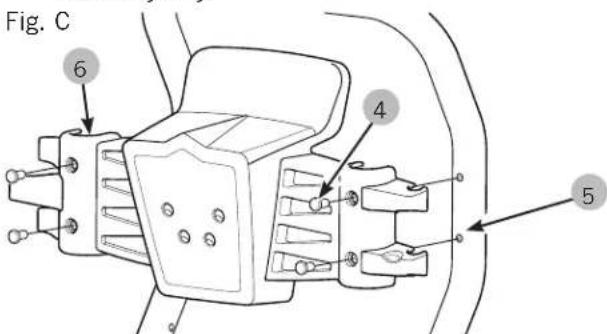
- Insert supplied accessories in spaces provided in accessory tray. See How to Use Accessory Tray.
Add Engine Oil and Fuel
- Place pressure washer on a level surface.
NOTICE Any attempt to crank or start the engine before it has been properly filled with the recommended oil will result in equipment failure.
• Refer to engine manual for oil and fuel fill information.
- Damage to equipment resulting from failure to follow this instruction will void warranty.
- Refer to engine operator's manual and follow oil and fuel recommendations and instructions.
NOTICE Check oil often during engine break-in. Refer to engine operator's manual for recommendations.
Lubricate O-Rings (Fig. D)
Lubrication of o-rings is extremely important for installation and operation. The use of a lubricant (petroleum or synthetic grease) during assembly helps seat o-rings properly and provides an improved seal. It also helps protect the o-ring from damage by abrasion, pinching or cutting and extends the life of the o-ring.
NOTICE ALWAYS apply a small amount of lubricant on o-rings prior to assembling the garden hose to the pump 7, high pressure hose 8, spray gun 9, and nozzle extension 10.
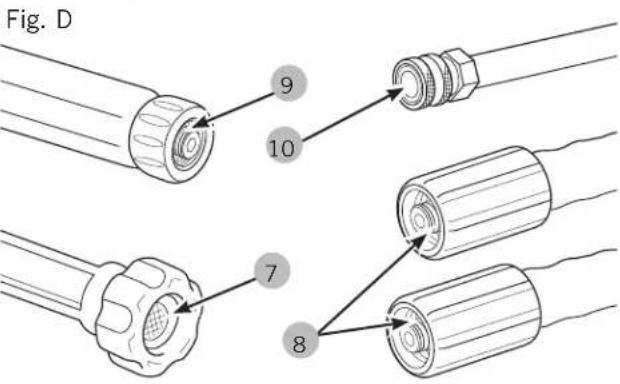
Lubricate all connections shown below, following these instructions:
- Inspect and clean connecting surfaces prior to lubrication and assembly.
- Use lubricants sparingly during assembly; a light film is all that is required.
- Use a small brush or cotton swab to apply grease directly to o-rings where they are not accessible (QC fitting, M22 fitting).
Connect Hose and Water Supply to Pump (Fig. E, F, G, H)
NOTICE DO NOT run the pump without the water supply connected and turned on.
- Damage to equipment resulting from failure to follow this instruction will void warranty.
NOTICE Remove and discard the shipping caps from the pump's high pressure outlet and water inlet before attaching hoses.
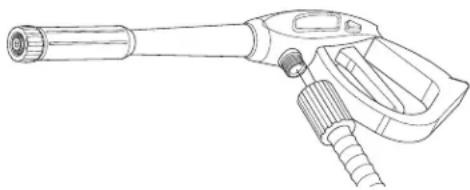
- Uncoil high pressure hose and attach one end of hose to base of spray gun. Tighten by hand.
Fig. E
natural_image
Line drawing of a handheld electric shaver with nozzle and handle (no text or symbols)⚠ WARNING The high pressure stream of water

that this equipment produces could cut through skin and its underlying tissues, resulting in serious injury and possible
amputation.
- NEVER connect high pressure hose to nozzle extension.
- Keep high pressure hose connected to pump and spray gun while system is pressurized.
-
Always be certain spray gun, nozzles and accessories are correctly attached.
-
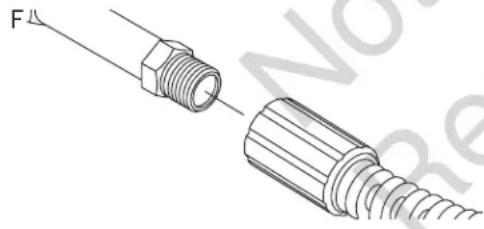
Attach other end of high pressure hose to high pressure outlet on pump. Tighten by hand.
Fig.
natural_image
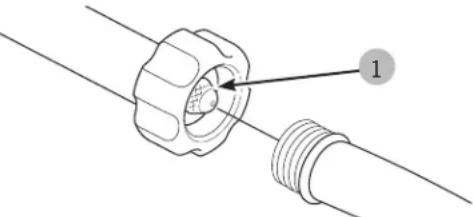
Technical illustration of two threaded fasteners with a connector labeled F (no text or symbols present)- Before connecting garden hose to water inlet, inspect inlet screen 1. Clean screen if it contains debris or have it replaced if damaged. DO NOT run pressure washer if inlet screen is damaged.
Fig. G
natural_image
Technical diagram of a mechanical connector with threaded end and nut (no text or symbols)- Run water through your garden hose for 30 seconds to clean out any debris.
NOTICE DO NOT siphon standing water for the water supply. Use ONLY cold water (less than 100^ F).
NOTICE Using a One Way Valve (vacuum breaker or check valve) at pump inlet could cause pump or inlet connector damage.
- There MUST be at least ten feet of unrestricted garden hose between the pressure washer inlet and any device, such as a vacuum breaker or check valve.
-
Damage to equipment resulting from failure to follow this instruction will void warranty.
-
Connect the garden hose (not to exceed 50 ft. in length) to the water inlet. Tighten by hand.
⚠ WARNING Risk of eye injury. Spray could splash back or propel objects resulting in serious injury.
- Always wear indirect vented (chemical splash) safety goggles marked to comply with ANSI Z87.1 when using or in vicinity of this equipment.
-
NEVER substitute safety glasses or dry-condition goggles for indirect vented safety goggles.
-
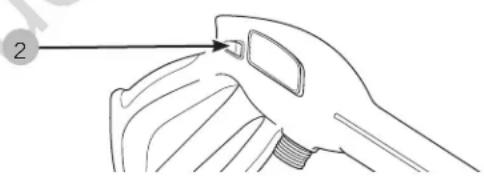
Turn ON the water, press red button 2 on the gun and squeeze the trigger to purge the pump system of air and impurities.
Fig. H
natural_image
Line drawing of a hand holding a spray gun with a numbered label (no text or symbols on the diagram itself)Checklist Before Starting Engine
Review the unit's assembly to ensure you have performed all of the following.
- Be sure to read the Operator Safety and Operation sections before using pressure washer.
- Make sure handle is in place and secure.
- Check that oil has been added to proper level in the engine crankcase.
- Add proper fuel to fuel tank.
- Check for properly tightened hose connections.
- Check to make sure there are no kinks, cuts, or damage to high pressure hose.
- Provide a proper water supply at an adequate flow.
ENGLISH
Operation
If you have any problems operating your pressure washer, please call the pressure washer helpline at (888) 331-4569.
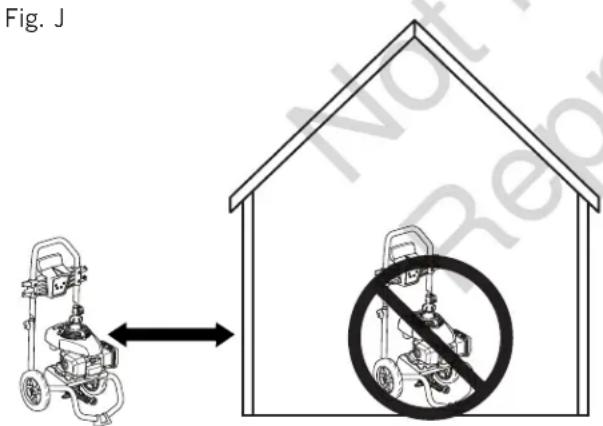
Pressure Washer Location (Fig. J)
Carbon Monoxide Poisoning
⚠ WARNING POISONOUS GAS HAZARD. Engine exhaust contains carbon monoxide, a poisonous gas that could kill you in minutes. You CANNOT smell it, see it, or taste it. Even if you do not smell exhaust fumes, you could still be exposed to carbon monoxide gas.

- Operate this product ONLY outside far away from windows, doors and vents to reduce the risk of carbon monoxide gas from accumulating and potentially being drawn towards occupied spaces.
- Install battery-operated carbon monoxide alarms or plug-in carbon monoxide alarms with battery back-up according to the manufacturer's instructions. Smoke alarms cannot detect carbon monoxide gas.
- DO NOT run this product inside homes, garages, basements, crawlspaces, sheds, or other partially-enclosed spaces even if using fans or opening doors and windows for ventilation. Carbon monoxide can quickly build up in these spaces and can linger for hours, even after this product has shut off.
- ALWAYS place this product downwind and point the engine exhaust away from occupied spaces.
If you start to feel sick, dizzy, or weak while using this product, get to fresh air RIGHT AWAY. See a doctor. You may have carbon monoxide poisoning.
Risk of Fire Clearances
⚠ WARNING Exhaust heat/gases could ignite combustibles, structures or damage fuel tank causing a fire, resulting in death or serious injury.
- Keep at least 5 ft. (1.5 m) clearance on all sides of pressure washer including overhead.
How to Start Your Pressure Washer (Fig. K, L, M)
To start your pressure washer for the first time, follow these instructions step-by-step. This starting information also applies if you have let the pressure washer sit idle for at least a day.
- Place pressure washer near an outside water source capable of supplying water at a flow rate greater than 3.3 gallons (12.5 l) per minute and no less than 20 PSI (1.3 BAR) at pressure washer end of garden hose. DO NOT siphon supply water.
- Check that high pressure hose is tightly connected to spray gun and pump. See Assembly section.
- Make sure unit is in a level position.
- Connect garden hose to water inlet on pressure washer pump.
NOTICE DO NOT run the pump without the water supply connected and turned on.
- Damage to equipment resulting from failure to follow this instruction will void warranty.
- Turn ON water, point gun in a safe direction, press red button and squeeze trigger to purge pump system of air and impurities.
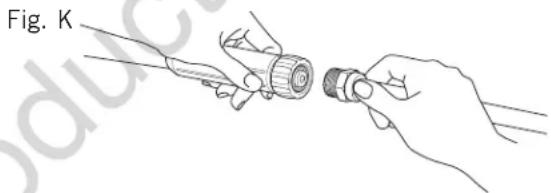
- Attach nozzle extension to spray gun. Tighten by hand.
natural_image
Line drawing of hands holding a tool with a circular component, labeled Fig. K (no text or symbols on the diagram itself)- Choose spray tip you want to use, pull back on collar of nozzle extension, insert spray tip and release collar. Tug on spray tip to make sure it is securely in place. See How to Use Spray Tips.
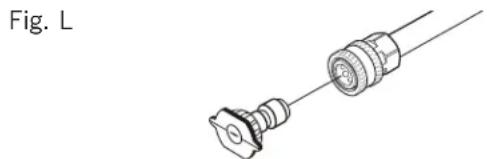
natural_image
Technical line drawing of a mechanical component with two cylindrical parts connected by a rod (no text or symbols)NOTICE Before starting the pressure washer, be sure you are wearing safety goggles as described below.
⚠ WARNING Risk of eye injury.
Spray could splash back or propel objects resulting in serious injury.
- Always wear indirect vented (chemical splash) safety goggles marked to comply with ANSI Z87.1 when using or in vicinity of this equipment.
-
NEVER substitute safety glasses or dry-condition goggles for indirect vented safety goggles.
-
When starting engine, position yourself as recommended and start engine according to instructions given in engine operator's manual. Also see operating instructions tag located on the pressure washer.
Fig. M
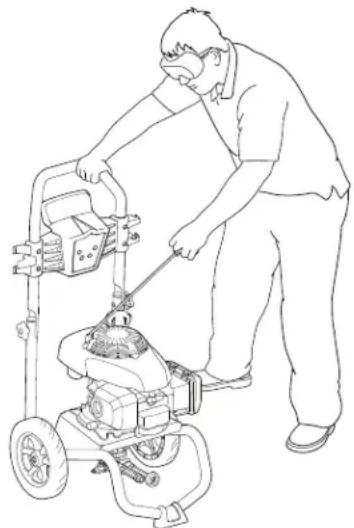
natural_image
Line drawing of a person using a lawn mower to adjust equipment (no text or symbols)⚠ WARNING Starter cord kickback (rapid retraction)

will pull hand and arm toward engine faster than you can let go which could cause broken bones, fractures, bruises, or sprains
resulting in serious injury.
- NEVER pull starter cord without first relieving spray gun pressure.
- When starting engine, pull cord slowly until resistance is felt and then pull rapidly to avoid kickback.
- After each starting attempt, where engine fails to run, always point spray gun in safe direction, press red button and squeeze spray gun trigger to release high pressure.
- Firmly grasp spray gun with both hands when using high pressure spray to avoid injury when spray gun kicks back.
⚠ WARNING The high pressure stream of water

that this equipment produces could cut through skin and its underlying tissues, resulting in serious injury and possible
amputation.
Spray gun traps high water pressure, even when engine is stopped and water is disconnected, which could result in serious injury.
- DO NOT allow CHILDREN to operate pressure washer.
- Keep high pressure hose connected to pump and spray gun while system is pressurized.
- NEVER aim spray gun at people, animals, or plants.
• DO NOT secure spray gun in open position. - DO NOT leave spray gun unattended while machine is running.
- NEVER use a spray gun which does not have a trigger lock or trigger guard in place and in working order.
- Always be certain spray gun, nozzles and accessories are correctly attached.
WARNING


Exhaust heat/gases could ignite combustibles, structures or damage fuel tank causing a fire, resulting in death or serious injury.
Contact with muffler area could cause burns resulting in serious injury.
- DO NOT touch hot parts and AVOID hot exhaust gases.
- Allow equipment to cool before touching.
- Keep at least 5 ft. (1.5 m) of clearance on all sides of pressure washer including overhead.
- It is a violation of California Public Resource Code, Section 4442, to use or operate the engine on any forest-covered, brush-covered, or grass-covered land unless the exhaust system is equipped with a spark arrester, as defined in Section 4442, maintained in effective working order. Other states or federal jurisdictions may have similar laws.
Contact the original equipment manufacturer, retailer, or dealer to obtain a spark arrester designed for the exhaust system installed on this engine.
- Replacement parts must be the same and installed in the same position as the original parts.
How to Stop Your Pressure Washer
- Release spray gun trigger and let engine idle for two minutes.
- Turn engine off according to instructions given in engine operator's manual.
- ALWAYS point gun in a safe direction, press red button and squeeze spray gun trigger to release retained high water pressure.
⚠ WARNING The high pressure stream of water

that this equipment produces could cut through skin and its underlying tissues, resulting in serious injury and possible
amputation.
Spray gun traps high water pressure, even when engine is stopped and water is disconnected, which could result in serious injury.
- Keep high pressure hose connected to pump and spray gun while system is pressurized.
- ALWAYS point spray gun in safe direction, press red button and squeeze spray gun trigger to release high pressure, every time you stop engine.
ENGLISH
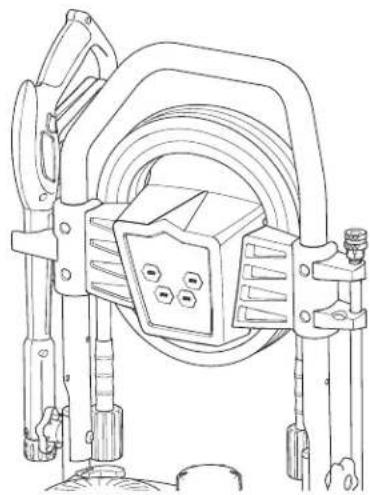
How to Use Accessory Tray (Fig. N)
The unit is equipped with an accessory tray with places to store your spray gun, nozzle extension, high pressure hose and quick connect spray tips.
- Place nozzle extension in slots on left side of accessory tray (viewing from rear of unit) and snap in.
Fig. N
natural_image
Technical line drawing of a mechanical device with no visible text or symbols- Place spray gun through grooves on right side of accessory tray.
- Insert multi-colored spray tips in holes provided on front of accessory tray.
- Wrap high pressure hose and hang on hook of accessory tray.
How to Use Spray Tips (Fig. P)
The quick-connect on the nozzle extension allows you to switch between four different quick connect spray tips. Spray tips can be changed while pressure washer is running once spray gun trigger is locked. The spray tips vary the spray pattern as shown.
Follow these instructions to change spray tips:
- Pull back collar on quick-connect and pull current spray tip off. Store spray tips in holes provided on the accessory tray. that this equipment produces could cut through skin and its underlying tissues, resulting in serious injury and possible amputation.
WARNING
The high pressure stream of water

-
NEVER exchange spray tips without the trigger lock being engaged on the spray gun.
• DO NOT twist spray tips while spraying. -
Select desired spray tip:
Fig. P

Low Pressure
Use to apply detergent
High Pressure
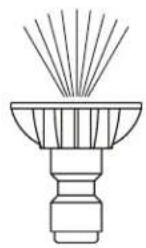
40° White
2400 PSI
2.3 GPM
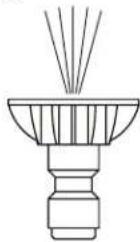
15° Yellow
2600 PSI
2.2 GPM
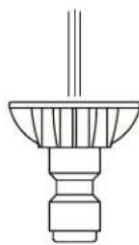
0° Red
2800 PSI
2.1 GPM
- For delicate rinse, for gentle cleaning of cars/trucks, boats, RV's, patio furniture, lawn equipment, etc., select white 40° spray tip.
- For general rinsing, ideal for most all purpose cleaning such as home siding, brick patios, wood decks, driveways and sidewalks, garage floors, etc., select yellow 15° spray tip.
- For maximum rinsing, for stubborn or hard to reach surface such as second story surfaces, paint removal, oil stains, rust removal or other stubborn substances (tar, gum, grease, wax, etc.), select red 0° spray tip.
-
To apply detergent, applies project specific cleaners to help break down stubborn dirt and grime on a variety of surfaces, select black detergent spray tip.
-
Pull back on collar, insert new spray tip and release collar. Tug on spray tip to make sure it is securely in place.
Usage Tips
- For most effective cleaning, keep spray tip from 8 to 24 inches (20 to 61 cm) away from cleaning surface.
- If you get spray tip too close, especially using a high pressure spray tip, you may damage surface being cleaned.
- DO NOT get closer than 6 inches (15 cm) when cleaning tires.
Applying Detergent
⚠ WARNING Chemical Burn Hazard.

Chemicals could cause burns resulting in death or serious injury.
- DO NOT use caustic liquid with pressure washer.
- Use ONLY pressure washer safe detergents/soaps. Follow all manufacturers instructions.
To apply detergent, follow these steps:
- Review use of spray tips.
- Prepare detergent solution as required by job.
- Place end of detergent siphoning tube into detergent container.
NOTICE Make sure the tube is fully submerged in detergent while applying detergent.
NOTICE Contact with the hot muffler could damage detergent siphoning tube.
- When inserting the siphon into a detergent solution bottle, route the tube so as to keep it from inadvertently contacting the hot muffler.
- Make sure black spray tip is installed.
NOTICE Detergent cannot be applied with the high pressure spray tips (White, Yellow or Red).
- Make sure garden hose is connected to water inlet. Check that high pressure hose is connected to spray gun and pump. Turn on water.
NOTICE You must attach all hoses before you start the engine.
- Starting the engine without all the hoses connected and without the water turned ON could damage the pump.
- Damage to equipment resulting from failure to follow this instruction will void warranty.
- Start engine following instructions How to Start Your Pressure Washer.
- Apply detergent to a dry surface, starting at lower portion of area to be washed and work upward, using long, even, overlapping strokes.
- Allow detergent to "soak in" for 3-5 minutes before washing and rinsing. Reapply as needed to prevent surface from drying. DO NOT allow detergent to dry on (prevents streaking).
NOTICE You must flush the detergent siphoning system after each use by placing the siphoning tube into a bucket of clean water, then run the pressure washer in low pressure for 1-2 minutes.
Pressure Washer Rinsing
For Rinsing:
- Remove black spray tip from nozzle extension.
- Select and install desired high pressure spray tip following instructions How to Use Spray Tips.
- Keep spray gun a safe distance from area you plan to spray.
⚠ WARNING Kickback from spray gun could cause
you to fall resulting in death or serious injury.

- Operate pressure washer from a stable surface.
- Be extremely careful if you must use the pressure washer from a ladder, scaffolding, or any other similar location.
-
Firmly grasp spray gun with both hands when using high pressure spray to avoid injury when spray gun kicks back.
-
Apply a high pressure spray to a small area and then check surface for damage. If no damage is found, you can assume it is okay to continue rinsing.
-
Start at top of area to be rinsed, working down with same overlapping strokes as you used for cleaning.
Cleaning Detergent Siphoning Tube
If you used the detergent siphoning tube, you must flush it with clean water before stopping the engine.
- Place detergent siphoning tube in a bucket full of clean water.
- Remove high pressure spray tip from nozzle extension.
- Select and install black detergent spray tip following instructions How to Use Spray Tips.
- Flush for 1-2 minutes.
- Shut off engine following instructions How to Stop Pressure Washer and turn off water supply.
- ALWAYS point spray gun in a safe direction, press red button and squeeze spray gun trigger to release retained high water pressure.
⚠ WARNING The high pressure stream of water

that this equipment produces could cut through skin and its underlying tissues, resulting in serious injury and possible
amputation.
Spray gun traps high water pressure, even when engine is stopped and water is disconnected, which could result in serious injury.
- Keep high pressure hose connected to pump and spray gun while system is pressurized.
- ALWAYS point spray gun in safe direction, press red button and squeeze spray gun trigger to release high pressure, every time you stop engine.
Automatic Cool Down System (Thermal Relief)
If you run the engine on your pressure washer for 3-5 minutes without pressing the trigger on the spray gun, circulating water in the pump can reach temperatures above 125°F (51°C). The system engages to cool the pump by discharging the warm water onto the ground.
ENGLISH
Maintenance
General Recommendations
Regular maintenance will improve the performance and extend the life of the pressure washer. See any qualified dealer for service.
The pressure washer's warranty does not cover items that have been subjected to operator abuse or negligence. To receive full value from the warranty, the operator must maintain the pressure washer as instructed in this manual, including proper storage as detailed in Winter Storage and Long Term Storage.
NOTICE Should you have questions about replacing components on your pressure washer, please call (888)
331-4569 for assistance.
- Some adjustments will need to be made periodically to properly maintain your pressure washer. Check the spray gun and nozzle extension assembly for wear.
- All maintenance in this manual and the engine operator's manual should be made at least once each season.
- Once a year you should clean or replace the spark plug, clean or replace the air filter. A new spark plug and clean air filter assure proper fuel-air mixture and help your engine run better and last longer. Please refer to your engine operator's manual for more details.
Before Each Use
- Check engine oil level.
- Clean debris.
- Check water inlet screen for damage.
- Check high pressure hose for leaks.
- Check detergent siphoning tube for damage.
- Check spray gun and nozzle extension for leaks.
- Rinse out garden hose to flush out debris.
Pump Oil
DO NOT attempt any oil maintenance on this pump. The pump is pre-lubricated and sealed from the factory, requiring no additional maintenance for the life of the pump.
Common Service Parts
PumpSaver 6039
O-Ring Maintenance Kit 705001
Water Inlet Screen B2384GS
Engine Oil Bottle ..... 100005 or 100028
Fuel Stabilizer 100120 or 100117
Pressure Washer Maintenance
Clean Debris
Daily or before use, clean accumulated debris from pressure washer. Keep linkage, spring and controls clean. Keep area around and behind muffler free from any combustible debris. Inspect cooling air slots and openings on the pressure washer. These openings must be kept clean and unobstructed.
pressure washer parts should be kept clean to reduce the risk of overheating and ignition of accumulated debris.
- Use a damp cloth to wipe exterior surfaces clean.
NOTICE Improper treatment of pressure washer could damage it and shorten its life.
- DO NOT insert any objects through cooling slots.
- Use a soft bristle brush to loosen caked on dirt, oil, etc.
- Use a vacuum cleaner to pick up loose dirt and debris.
Check and Clean Inlet Screen
Examine the screen on the pump's water inlet. Clean it if the screen is clogged or replace it if screen is damaged.
Check High Pressure Hose
The high pressure hose can develop leaks from wear, kinking, or abuse. Inspect the hose each time before using it. Check for cuts, leaks, abrasions or bulging of cover, damage or movement of couplings. If any of these conditions exist, replace the hose immediately.

WARNING The high pressure stream of water that this equipment produces could cut through skin and its underlying tissues, resulting in serious injury and possible
amputation.
- NEVER repair high pressure hose. Replace it.
- Replacement hose rating MUST equal or exceed maximum pressure rating of unit.
Check Detergent Siphoning Tube
Examine the detergent tube and clean if clogged. The tube should fit tightly on the barbed fitting. Examine the tube for leaks or tears. Replace tube if damaged.
Detergent Siphoning Check Ball
Occasionally check ball in detergent siphoning system may become stuck from storage, dried soap, or minerals in water. The check ball can be freed by performing the following:
NOTICE Before performing this procedure, be sure you are wearing safety goggles as described below.

WARNING Risk of eye injury. Spray could splash back or propel objects resulting in serious injury.
- Always wear indirect vented (chemical splash) safety goggles marked to comply with ANSI Z87.1 when using or in vicinity of this equipment.
-
NEVER substitute safety glasses or dry-condition goggles for indirect vented safety goggles.
-
Shut off engine and turn off water supply.
- ALWAYS point spray gun in a safe direction, press red button and squeeze spray gun trigger to release retained high water pressure.
WARNING The high pressure stream of water that this equipment produces could cut through skin and its underlying tissues, resulting in serious injury and possible amputation.
Spray gun traps high water pressure, even when engine is stopped and water is disconnected, which could result in serious injury.
- Keep high pressure hose connected to pump and spray gun while system is pressurized.
-
ALWAYS point spray gun in safe direction, press red button and squeeze spray gun trigger to release high pressure, every time you stop engine.
-
Remove detergent siphoning hose from barbed fitting on pump.
-
Using a firm, blunt object 7/64" in diameter or smaller, by at least 1" long, such as an Allen wrench, slowly insert the object into the barbed fitting until you meet resistance. This resistance is the check ball.
-
Slowly push down until you feel the ball move slightly, push no more than 1/8". Slight pressure may be required to free the ball.
-
Repeat steps 4 and 5 if necessary.
-
Reinstall detergent siphoning hose onto barb fitting.
-
Treat with PumpSaver as described in Protecting the Pump during storage to prevent reoccurrence.
Check Spray Gun
Examine the hose connection to the spray gun and make sure it is secure. Test the trigger by pressing the red button and making sure the trigger "springs back" into place when you release it. You should not be able to press the trigger without pressing the red button. Replace spray gun immediately if it fails any of these tests.
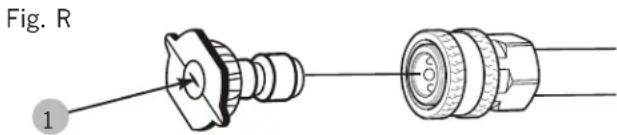
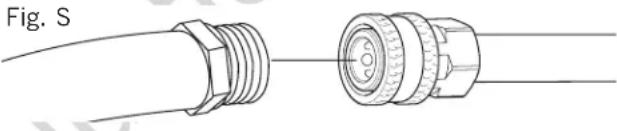
Spray Tip Maintenance (Fig. R, S)
A pulsing sensation felt while squeezing the spray gun trigger may be caused by excessive pump pressure. The principal cause of excessive pump pressure is a spray tip clogged or restricted with foreign materials, such as dirt, etc. To correct the problem, immediately clean the spray tip following these instructions:
- Shut off engine and turn off water supply.
- ALWAYS point spray gun in a safe direction, press red button and squeeze spray gun trigger to release retained high water pressure.
WARNING The high pressure stream of water that this equipment produces could cut through skin and its underlying tissues, resulting in serious injury and possible amputation.
Spray gun traps high water pressure, even when engine is stopped and water is disconnected, which could result in serious injury.
- Keep high pressure hose connected to pump and spray gun while system is pressurized.
-
ALWAYS point spray gun in safe direction, press red button and squeeze spray gun trigger to release high pressure, every time you stop engine.
-
Remove spray tip from end of nozzle extension.
-
Use a small paper clip to free any foreign material clogging or restricting spray tip 1.
- Remove nozzle extension from spray gun.
- Using a garden hose, remove additional debris by back flushing water through nozzle extension. Back flush between 30 to 60 seconds.
natural_image
Technical line drawing of a connector with threaded ends and a close-up view showing internal components (no text or symbols)- Reinstall spray tip into nozzle extension.
- Reconnect nozzle extension to spray gun.
- Make sure garden hose is connected to water inlet. Check that high pressure hose is connected to spray gun and pump. Turn on water.
- Start engine following instructions How to Start Your Pressure Washer.
- Test pressure washer by operating with each quick connect spray tip.
O-Ring Maintenance
Purchase an O-Ring/Maintenance Kit, model 705001 by contacting the nearest authorized service center. It is not included with the pressure washer. This kit includes replacement o-rings, rubber washer and water inlet filter. Refer to the instruction sheet provided in the kit to service your unit's o-rings.
⚠ WARNING The high pressure stream of water that this equipment produces could cut through skin and its underlying tissues, resulting in serious injury and possible amputation.
- NEVER repair leaking connections with sealant of any kind. Replace o-ring or seal.
ENGLISH
Engine Maintenance
See the engine operator's manual for instructions on how to properly maintain the engine.
⚠️ CAUTION Avoid prolonged or repeated skin contact with used motor oil.
- Used motor oil has been shown to cause skin cancer in certain laboratory animals.
- Thoroughly wash exposed areas with soap and water.

KEEP OUT OF REACH OF CHILDREN. DON'T POLLUTE. CONSERVE RESOURCES. RETURN USED OIL TO COLLECTION CENTERS.
Inspect Muffler and Spark Arrester
Inspect the muffler for cracks, corrosion, or other damage. Remove the spark arrester, if equipped, and inspect for damage or carbon blockage. If replacement parts are required, make sure to use only original equipment replacement parts.
WARNING
Exhaust heat/gases could ignite combustibles, structures or damage fuel tank causing a fire, resulting in death or serious injury.
Contact with muffler area could cause burns resulting in serious injury.
- DO NOT touch hot parts and AVOID hot exhaust gases.
- Allow equipment to cool before touching.
- Keep at least 5 ft. (1.5 m) of clearance on all sides of pressure washer including overhead.
- It is a violation of California Public Resource Code, Section 4442, to use or operate the engine on any forest-covered, brush-covered, or grass-covered land unless the exhaust system is equipped with a spark arrester, as defined in Section 4442, maintained in effective working order. Other states or federal jurisdictions may have similar laws.
Contact the original equipment manufacturer, retailer, or dealer to obtain a spark arrester designed for the exhaust system installed on this engine.
- Replacement parts must be the same and installed in the same position as the original parts.
After Each Use
Water should not remain in the unit for long periods of time. Sediments or minerals can deposit on pump parts and freeze pump action. Follow these procedures after every use:
- Shut off engine, turn off water supply, point gun in a safe direction, press red button and squeeze trigger to relieve trapped pressure, and let engine cool.
WARNING
NING The high pressure stream of water that this equipment produces could cut through skin and its underlying tissues, resulting in serious injury and possible
amputation.
Spray gun traps high water pressure, even when engine is stopped and water is disconnected, which could result in serious injury.
- Keep high pressure hose connected to pump and spray gun while system is pressurized.
-
ALWAYS point spray gun in safe direction, press red button and squeeze spray gun trigger to release high pressure, every time you stop engine.
-
Disconnect hose from spray gun and high pressure outlet on pump. Drain water from hose, gun, and nozzle extension. Use a rag to wipe off the hose.
- Place the spray gun, nozzle extension and high pressure hose in the accessory tray.
- Empty pump of all pumped liquids by pulling recoil handle about six times. This should remove most liquid in pump.
- Store unit in a clean, dry area.
- If storing for more than 30 days, see Long Term Storage on next page.
WARNING
Fuel and its vapors are extremely flammable and explosive which could cause burns, fire or explosion resulting in death or serious injury.


WHEN STORING FUEL OR EQUIPMENT WITH FUEL IN TANK
- Store away from furnaces, stoves, water heaters, clothes dryers, or other appliances that have pilot light or other ignition source because they could ignite fuel vapors.
Winter Storage
NOTICE You must protect your unit from freezing temperatures.
- Failure to do so will permanently damage your pump and spray gun rendering your unit inoperable.
- Freeze damage is not covered under warranty.
To protect the unit from freezing temperatures:
- Follow steps 1-4 in the previous section After Each Use.
NOTICE Store spray gun indoors and keep from freezing.
- Use pump saver, Model 6039, to treat pump. This minimizes freeze damage and lubricates pistons and seals.
- If pump saver is not available, connect a 3 ft. (1 m) section of garden hose to water inlet adapter. Pour RV-antifreeze (antifreeze without alcohol) into hose. Pull recoil handle twice. Disconnect 3 ft. (1 m) hose.
- Store unit in a clean, dry area.
Long Term Storage
If you do not plan to use the pressure washer for more than 30 days, you must prepare the engine and pump for long term storage.
Protect Fuel System
Fuel can become stale when stored over 30 days. Stale fuel causes acid and gum deposits to form in the fuel system or on essential carburetor parts. To keep fuel fresh, use Briggs & Stratton Advanced Formula Fuel Treatment & Stabilizer, available wherever Briggs & Stratton genuine service parts are sold.
There is no need to drain gasoline from the engine if a fuel stabilizer is added according to instructions. Run the engine for 2 minutes to circulate the stabilizer throughout the fuel system before storage.
If gasoline in the engine has not been treated with a fuel stabilizer, it must be drained into an approved container. Run the engine until it stops from lack of fuel. The use of a fuel stabilizer in the storage container is recommended to maintain freshness.
Storing the Engine
See the engine operator's manual for instructions on how to properly prepare the engine for storage.
Protecting the Pump
To protect the pump from damage caused by mineral deposits or freezing, use PumpSaver, Model 6039, to treat pump. This prevents freeze damage and lubricates pistons and seals.
NOTICE PumpSaver is available as an optional accessory. It is not included with the pressure washer. Contact the nearest authorized service center to purchase PumpSaver.
NOTICE You must protect your unit from freezing temperatures.
- Failure to do so will permanently damage your pump and spray gun rendering your unit inoperable.
- Freeze damage is not covered under warranty.
To use PumpSaver, make sure the pressure washer is turned off and disconnected from supply water. Read and follow all instructions and warnings given on the PumpSaver container.
Other Storage Tips
- DO NOT store fuel from one season to another unless it has been treated as described in Protect Fuel System.
- Replace fuel container if it starts to rust. Rust and/or dirt in fuel can cause problems if it's used with this unit.
- Cover unit with a suitable protective cover that does not retain moisture.
⚠ WARNING Storage covers could cause a fire resulting in death or serious injury.

- DO NOT place a storage cover over a hot pressure washer.
-
Let equipment cool for a sufficient time before placing the cover on the equipment.
-
Store unit in a clean and dry area.
CRAFTSMAN WARRANTY POLICY
LIMITED WARRANTY
Craftsman® is a registered trademark of Stanley Black & Decker Inc. and is used under license to Briggs & Stratton. Briggs & Stratton warrants that, during the warranty period specified below, it will repair or replace, free of charge, any part that is defective in material or workmanship or both. Transportation charges on product submitted for repair or replacement under this warranty must be borne by purchaser. This warranty is effective for and is subject to the time periods and conditions stated below. For warranty service, find the nearest Authorized Service Dealer in our dealer locator map at BRIGGSANDSTRATTON.COM. The purchaser must contact the Authorized Service Dealer, and then make the product available to the Authorized Service Dealer for inspection and testing.
There is no other express warranty. Implied warranties, including those of merchantability and fitness for a particular purpose, are limited to the warranty period listed below, or to the extent permitted by law. Liability for incidental or consequential damages are excluded to the extent exclusion is permitted by law. Some states or countries do not allow limitations on how long an implied warranty lasts, and some states or countries do not allow the exclusion or limitation of incidental or consequential damages, so the above limitation and exclusion may not apply to you. This warranty gives you specific legal rights and you may also have other rights which vary from state to state or country to country.**
WARRANTY PERIOD
Item Consumer Use Commercial Use
Equipment 24 months 3 months
Engine* See Engine Operator's Manual
Frame 60 months 3 months
* Applies to Briggs & Stratton engines only. Warranty coverage of non-Briggs & Stratton engines is provided by that engine manufacturer. Emissions-related components are covered by the Emissions Warranty Statement.
** In Australia - Our goods come with guarantees that cannot be excluded under the Australian Consumer Law. You are entitled to a replacement or refund for a major failure and for compensation for any other reasonably foreseeable loss or damage. You are also entitled to have the goods repaired or replaced if the goods fail to be of acceptable quality and the failure does not amount to a major failure. For warranty service, find the nearest Authorized Service Dealer in our dealer locator map at BRIGGSandSTRATTON.COM, or by calling 1300 274 447, or by emailing or writing to salesenquires@briggsandstratton.com.au, Briggs & Stratton Australia Pty Ltd, 1 Moorebank Avenue, NSW, Australia, 2170.
The warranty period begins on the date of purchase by the first retail or commercial consumer. “Consumer use” means personal residential household use by a retail consumer. “Commercial use” means all other uses, including use for commercial, income producing or rental purposes. Once a product has experienced commercial use, it shall thereafter be considered as a commercial use product for purposes of this warranty.
Save your proof of purchase receipt. If you do not provide proof of the initial purchase date at the time warranty service is requested, the manufacturing date of the product will be used to determine the warranty period. Product registration is not required to obtain warranty service on Briggs & Stratton products.
ABOUT YOUR WARRANTY
Warranty service is available only through Briggs & Stratton Authorized Service Dealers. This warranty covers only defects in materials or workmanship. It does not cover damage caused by improper use or abuse, improper maintenance or repair, normal wear and tear, or stale or unapproved fuel.
Improper Use and Abuse - The proper, intended use of this product is described in the Operator's Manual. Using the product in a way not described in the Operator's Manual or using the product after it has been damaged will not be covered under this warranty. Warranty coverage will also not be provided if the serial number on the product has been removed or the product has been altered or modified in any way, or if the product has evidence of abuse such as impact damage or water/chemical corrosion damage.
Improper Maintenance or Repair - This product must be maintained according to the procedures and schedules provided in the Operator's Manual, and serviced or repaired using genuine Briggs & Stratton parts or equivalent. Damage caused by lack of maintenance or use of non-original parts is not covered by warranty.
Normal Wear and Tear - Like most mechanical devices, your unit is subject to wear even when properly maintained. This warranty does not cover repairs when normal use has exhausted the life of a part or the equipment. Maintenance and wear items such as filters, belts, cutting blades, and brake pads (except engine brake pads) are not covered by warranty due to wear characteristics alone, unless the cause is due to defects in material or workmanship.
Stale or Unapproved Fuel - In order to function correctly, this product requires fresh fuel that conforms to the criteria specified in the Operator's Manual. Engine or equipment damage caused by stale fuel or the use of unapproved fuels (such as E15 or E85 ethanol blends) is not covered by warranty.
Other Exclusions - This warranty excludes damage due to accident, abuse, modifications, alterations, improper servicing, freezing or chemical deterioration. Attachments or accessories that were not originally packaged with the product are also excluded. There is no warranty coverage on equipment used for primary power in place of utility power or on equipment used in life support applications. This warranty does not include used, reconditioned, second-hand, or demonstration equipment or engines. This warranty also excludes failures due to acts of God and other force majeure events beyond the manufacturer's control.
Troubleshooting
| Problem Cause Correction | ||
| Pump has following problems: failure to produce pressure, erratic pressure, chattering, loss of pressure, low water volume. | 1. Low pressure spray tip installed.2. Inadequate water supply.3. Clogged inlet hose screen.4. Spray tip is obstructed.5. Connections leak.6. High pressure hose or spray gun leaks. | 1. Replace with high pressure spray tip.2. Provide adequate water flow.3. Check and clean inlet hose screen.4. Clean spray tip.5. Tighten connections or replace o-ring.6. Replace. |
| Detergent fails to mix with spray. | 1. High pressure spray tip installed.2. Check ball stuck in detergent siphoning system.3. Detergent tube is clogged or cracked. | 1. Replace with low pressure spray tip.2. Free check ball. See Detergent Siphoning Check Ball.3. Clean or replace detergent tube. |
| Engine lacks power; will not start; starts and runs rough or shuts down during operation. | 1. Engine switch set to OFF (O) position.2. Out of fuel.3. Dirty air cleaner.4. Spark plug wire not connected to spark plug. | 1. Set engine switch to ON (I) position.2. Fill fuel tank.3. Clean or replace air cleaner.4. Connect wire to spark plug. |
For assistance with your product, visit our website www.Craftsman.com.
ENGLISH
Notes
Fig. A
193 BAR (2800 PSI)* @ 7.9 LPM (2.1 GPM)
Caudal máxima.
8.7 LPM (2.3 GPM)* @ 159 BAR (2400 PSI)
Temperatura del suministrode agua 5^ (41°F) - 38^ (100°F)
natural_image
Line drawing of a spray gun with handle and nozzle (no text or symbols)ADVERTENCIA
natural_image
Technical line drawing of two threaded fasteners with no text or symbolsnatural_image
Technical diagram of a mechanical connector with threaded end and labeled component (no text or symbols beyond label)natural_image
Line drawing of a hand holding a spray gun with a numbered label (2) pointing to the handle (no text or symbols on the diagram itself)natural_image
Illustration of hands holding a connector with a bulb, labeled Fig. K (no text or symbols on the diagram itself)natural_image
Technical line drawing of a mechanical connector assembly (no text or symbols)natural_image
Line drawing of a person using a power tool on a lawn mower (no text or symbols)natural_image
Technical line drawing of a mechanical device with hoses and a central housing (no text or symbols)natural_image
Diagram of a connector with threaded ends and a central hub, labeled Fig. S (no text or symbols on the diagram itself)CRAFTSMAN ^® is a registered trademark of Stanley Black & Decker, Inc., used under license.

- Operator Safety
- Definitions: Safety Symbols and Meanings
- WARNING
- WHEN ADDING OR DRAINING FUEL
- WHEN STARTING EQUIPMENT
- WHEN OPERATING EQUIPMENT
- WHEN TRANSPORTING, MOVING OR REPAIRING EQUIPMENT
- WHEN STORING FUEL OR EQUIPMENT WITH FUEL IN TANK
- WHEN ADJUSTING OR MAKING REPAIRS TO YOUR PRESSURE WASHER
- WHEN TESTING FOR ENGINE SPARK
- CAUTION
- Specifications
- Features and Controls (Fig. A)
- Assembly
- Unpack Pressure Washer
- Items in the carton include:
- To prepare your pressure washer for operation, you will need to perform these tasks:
- ENGLISH
- Attach Handle and Accessory Tray (Fig. B, C)
- Add Engine Oil and Fuel
- Lubricate O-Rings (Fig. D)
- Lubricate all connections shown below, following these instructions:
- Connect Hose and Water Supply to Pump (Fig. E, F, G, H)
- Checklist Before Starting Engine
- Operation
- Pressure Washer Location (Fig. J)
- Carbon Monoxide Poisoning
- Risk of Fire Clearances
- How to Start Your Pressure Washer (Fig. K, L, M)
- How to Stop Your Pressure Washer
- How to Use Accessory Tray (Fig. N)
- How to Use Spray Tips (Fig. P)
- Follow these instructions to change spray tips:
- Usage Tips
- Applying Detergent
- To apply detergent, follow these steps:
- Pressure Washer Rinsing
- For Rinsing:
- Cleaning Detergent Siphoning Tube
- Automatic Cool Down System (Thermal Relief)
- Maintenance
- General Recommendations
- Before Each Use
- Pump Oil
- Common Service Parts
- Pressure Washer Maintenance
- Clean Debris
- Check and Clean Inlet Screen
- Check High Pressure Hose
- Check Detergent Siphoning Tube
- Detergent Siphoning Check Ball
- Check Spray Gun
- Spray Tip Maintenance (Fig. R, S)
- O-Ring Maintenance
- Engine Maintenance
- Inspect Muffler and Spark Arrester
- After Each Use
- Winter Storage
- To protect the unit from freezing temperatures:
- Long Term Storage
- Protect Fuel System
- Storing the Engine
- Protecting the Pump
- Other Storage Tips
- CRAFTSMAN WARRANTY POLICY
- LIMITED WARRANTY
- WARRANTY PERIOD
- Item Consumer Use Commercial Use
- ABOUT YOUR WARRANTY
- Notes
- ADVERTENCIA
Brand : Craftsman
Model : CMXGWAS020737
Category : Pressure washer