
32S307WH - Television TESLA - Free user manual and instructions
Find the device manual for free 32S307WH TESLA in PDF.


| Product Type | LED Television |
| Screen Size | 32 inches (80 cm) |
| Display Resolution | 1366 x 768 (HD Ready) |
| Aspect Ratio | 16:9 |
| Refresh Rate | 60 Hz |
| Dimensions (with stand) | 732 x 483 x 176 mm |
| Dimensions (without stand) | 732 x 430 x 75 mm |
| Weight (with stand) | 4.2 kg |
| Weight (without stand) | 4.0 kg |
| Power Consumption (typical) | 55 W |
| Standby Power Consumption | < 0.5 W |
| Power Supply | AC 100-240V, 50/60Hz |
| Connectivity | 2x HDMI, 1x USB, 1x AV, 1x VGA, 1x RF, 1x Headphone |
| Wall Mount | VESA 200 x 100 mm |
| Speaker Power | 2 x 8 W |
| Operating System | Linux-based Smart TV (proprietary) |
| Main Features | USB media playback, Teletext, Sleep timer, EPG |
| Cleaning | Wipe with dry soft cloth; do not use chemicals |
| Safety | Do not expose to moisture; ensure ventilation |
| Spare Parts & Repairability | Contact authorized service center for spare parts |
Frequently Asked Questions - 32S307WH TESLA
User questions about 32S307WH TESLA
0 question about this device. Answer the ones you know or ask your own.
Ask a new question about this device
Download the instructions for your Television in PDF format for free! Find your manual 32S307WH - TESLA and take your electronic device back in hand. On this page are published all the documents necessary for the use of your device. 32S307WH by TESLA.
USER MANUAL 32S307WH TESLA
Please read these instructions before operating your set and retain them for future reference.
AL
UDHËZIM PËR PËR
WARNINGS AND PRECAUTIONS....4
PANEL BUTTONS 10
TERMINALS.... 10
REMOTE CONTROL FUNCTIONS 11
RECORDER (REC) 14
ELECTRONIC PROGRAM GUIDE (EPG) 15
MENU SETTINGS.... 16
Menu Operation (DTV Mode) 16
Picture 16
Sound 16
Channel....16
Option.... 18
Lock 19
USB CONTROL 20
USB Menu....20
Play Movie 21
Play Music....22
Browse Photo 23
TROUBLESHOOTING.... 24
SPECIFICATIONS.... 25
LICENSE.... 26
Note
- The graphics and data in this manual are only for reference.
- You TV's OSD may be slightly different with that shown in this manual.
- The information in this document is subject to change without notice. The manufacturer accepts no liability for damage resulting directly or indirectly from faults, incompleteness or discrepancies between the user manual and the product described.
- In dry environment due to static electricity, the product may restart and return to the main OSD interface, USB player interface or the previous source mode. It is normal and please continue to operate the TV as your will.
WARNINGS AND PRECAUTIONS
Read all of the instruction before operating the set. Keep the instruction for later use.
Important Safety Instructions
- Read these instructions - All the safety and operating instructions should be read before this product is operated.
- Keep these instructions – The safety and operating instructions should be retained for future reference.
- Read all warnings - All warnings on the appliance and in the operating instructions should be adhered to.
- Follow all instructions - All operating and use instructions should be followed.
- Do not use this apparatus near water - The appliance should not be used near water or moisture - for example, in a wet basement or near a swimming pool, and the like.
- Clean only with dry cloth.
- Do not block any ventilation openings. Install in accordance with the manufacturer's instructions.
- Do not install near any heat sources such as radiators, heat registers, stoves, or other apparatus (including amplifiers) that produce heat.
- Do not defeat the safety purpose of the polarized or grounding plug. A polarized plug has two blades with one wider than the other. A grounding plug has two blades and a third grounding prong. The wide blade or the third prong is provided for your safety. If the provided plug does not fit into your outlet, consult an electrician for replacement of the obsolete outlet.
- Protect the power cord from being walked on or pinched particularly at the plugs, convenience receptacles, and at the point where they exit from the apparatus.
- Only use attachments/accessories specified by the manufacturer.
- Use only with the cart, stand, tripod, bracket, or table specified by the manufacturer, or sold with the apparatus. When a cart or rack is used, use caution when moving the cart/apparatus combination to avoid injury from tip-over.
- Unplug the apparatus during lightning storms or when unused for long periods of time.
- Refer all servicing to qualified personnel. Servicing is required when the apparatus has been damaged in any way, such as power supply cord or plug is damaged, liquid has been spilled or objects have fallen into the apparatus, the apparatus has been exposed to rain or moisture, does not operate normally, or has been dropped.
- CAUTION: These servicing instructions are for use by qualified service personnel only. To reduce the risk of electric shock, do not perform any servicing that contained in the operating instructions unless you are qualified to do so.
- Do not install this equipment in a confined or building-in space such as a book case or similar unit, and remain a well ventilation conditions at open site. The ventilation should not be impeded by covering the ventilation openings with items such as newspaper, tablecloths, curtains etc.
- Caution - To prevent electric shock hazard, replace grille.
- Please refer the information on exterior bottom enclosure for electrical and safety information before installing or operating the apparatus.
- To reduce the risk of fire or electric shock, do not expose this apparatus to rain or moisture.
- The apparatus shall not be exposed to dripping or splashing and that no objects filled with liquids, such as vases, shall be placed on the apparatus.

- For the terminals marked with symbol of “ 14 ” may be of sufficient magnitude to constitute a risk of electric shock. The external wiring connected to the terminals requires installation by an instructed person or the used of ready-made leads or cords.
- To prevent injury, this apparatus must be securely attached to the floor/wall in accordance with the installation instructions.
- Danger of explosion if battery is incorrectly replaced. Replace only with the same or equivalent type.
- The battery (battery or batteries or battery pack) shall not be exposed to excessive heat such as sunshine, fire or the like.
- LExcessive sound pressure from earphones and headphones can cause hearing loss. Listening to music at high volume levels and for extended durations can damage one's hearing. In order to reduce the risk of damage to hearing, one should lower the volume to a safe, comfortable level, and reduce the amount of time listening at high levels. (Only for German).
- The mains plug/appliance coupler/direct plug-in adapter is used as disconnect device, the disconnect device shall remain readily operable.
- When not in use and during movement, please take care of the power cordset, e.g. tie up the power cordset with cable tie or something like that. It shall be free from sharp edges and the like that can cause abrasion of the power cordset. When put into use again, please make sure the power cordset being not damaged, If any damages found, please look for the service person to replace the power cordset specified by the manufacturer or have the same characteristics as the original one.
- Attention should be drawn to environmental aspects of battery disposal.
- No naked flame sources, such as lighted candles, should be placed on the apparatus. To prevent the spread of fire, keep candles or other open flames away from the apparatus at all times.
- The mains plug/appliance coupler/direct plug-in adapter is used as disconnect device, the disconnect device shall remain readily operable. Using cabinets or stands recommended by the manufacturer of the television.
- When not in use and during movement, please take care of the power cordset, e.g. tie up the power cordset with cable tie or something like that. It shall be free from sharp edges and the like that can cause abrasion of the power cordset. When put into use again, please make sure the power cordset being not damaged, If any damages found, please look for the service person to replace the power cordset specified by the manufacturer or have the same characteristics as the original one.
- Attention should be drawn to environmental aspects of battery disposal.
- No naked flame sources, such as lighted candles, should be placed on the apparatus. To prevent the spread of fire, keep candles or other open flames away from the apparatus at all times.
- If the apparatus have the symbol ☐ in its rating label and the power cord has two pins, it means that the equipment is a Class II or double insulated electrical appliance. It has been designed in such a way that it does not require a safety connection to electrical earth.
Warning for Apparatus containing COIN / BUTTON CELL BATTERIES
(Below instruction only used for the apparatus containing a user-replaceable coin/button cell battery)
WARNING
Do not ingest the battery, Chemical Burn Hazard
(The remote control supplied with) This product contains a coin/button cell battery. If the coin/button cell battery is swallowed, it can cause severe Internal burns in just 2 hours and can lead to death.
Keep new and used batteries away from children. If the battery compartment does not close securely, stop using the product and keep it away from children.
If you think batteries might have been swallowed or placed inside any part of the body, seek immediate medical attention.

CAUTION
RISK OF ELECTRIC SHOCK DO NOT OPEN

- This lightning flash with arrowhead symbol within an equilateral triangle is intended to alert the user to the presence of non-insulated "dangerous voltage" within the product's enclosure that may be of sufficient magnitude to constitute a risk of electric shock.
- To reduce the risk of electric shock. Do not remove cover (or back). No user serviceable parts inside. Refer to qualified service personnel.
- The exclamation point within an equilateral triangle is intended to alert the user to the presence of important operating and maintenance instructions in the literature accompanying the appliance
- The following information are recommended to be included as far as applicable where applicable:
| ~ | Refers to alternating current (AC) |
| --- | Refers to direct current (DC) |
| Refers to ClassII equipment | |
| Refers to stand-by | |
| I | Refers to pow er ON. |
| Refers to dangerous voltage |
WEEE Directive

Correct Disposal of this product. This marking indicates that this product should not be disposed with other household wastes throughout the EU. To prevent possible harm to the environment or human health from uncontrolled waste disposal, recycle it responsibly to promote the sustainable reuse of material resources. To return your used device, please use the return and collection systems or contact the retailer where the product was purchased. They can take this product for environmental safe recycling.
Positioning of the TV Set
- Install Display on solid horizontal surface such as a table or desk. For ventilation, leave a space of at least 10cm free all around the set. To prevent any fault and unsafe situations, please do not place any objects on top of the set. This apparatus can be used in tropical and/or moderate climates.
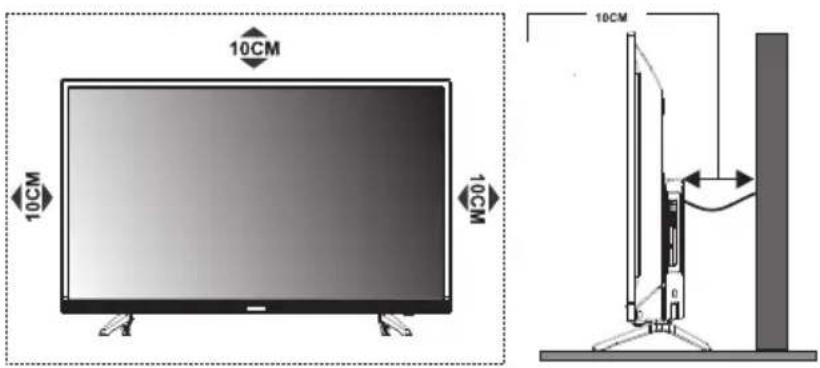
Note: The pictures are for reference only.
- Never place a television set in an unstable location. A television set may fall, causing serious personal injury or death. Many injuries, particularly to children, can be avoided by taking simple precautions such as:
• Using cabinets or stands recommended by the manufacture of the television.
- Only using furniture that can safely support the television.
- Ensuring the television is not overhanging the edge of the supporting furniture.
- Not placing the television on tall furniture (for example, cupboards or bookcases) without anchoring both the furniture and the television set to a suitable support.
- Not placing the television set on cloth or other materials that may be located between the television set and supporting furniture.
• Educating children about the dangers of climbing on furniture to reach the television or its controls.
If your existing television set is being retained and relocated, the same considerations as above should be applied (Only for the TV with mass exceed 7 kg)
Mounting on a Wall
An optional wall mount can be used with your television. Consult with your local dealer for a wall mount that supports the VESA standard used by your TV model. Carefully attach the wall mount bracket at the rear of the TV. Install the wall mount bracket on a solid wall perpendicular to the floor. If you are attaching the TV to other building materials, please contact qualified personnel to install the wall mount. Detailed instructions will be included with the wall mount. Please use a wall mount bracket where the device is adequately secured to the wall with enough space to allow connectivity to external devices.
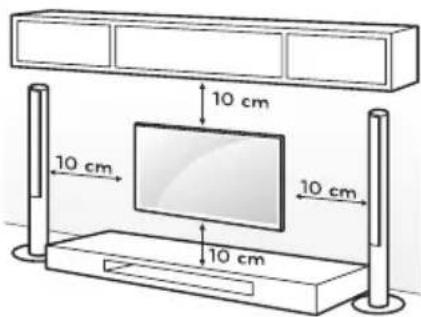
CAUTION
- Disconnect the power before moving or installing the TV. Otherwise electric shock may occur.
- Remove the stand before installing the TV on a wall mount by performing the stand attachment in reverse.
- If you install the TV on a ceiling or slanted wall, it may fall and result in severe injury. Use an authorized wall mount and contact the local dealer or qualified personnel. Otherwise it is not covered by the warranty.
- Do not over tighten the screws as this may cause damage to the TV and void your warranty.
- To prevent injury, this apparatus must be securely attached to the floor/wall in accordance with the installation instructions.
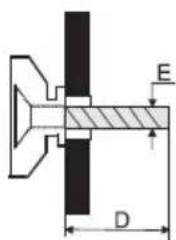
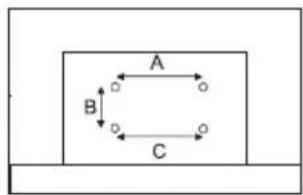
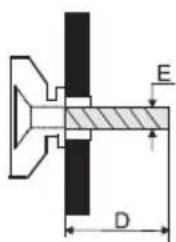
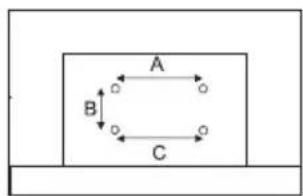
- Use the screws and wall mounts that meet the following specifications. Any damages or injuries by misuse or using an improper accessory are not covered by the warranty.
| Model Size: 32" Top Down | ||||
| Screw | Diameter (mm) "E" M4 M4 | |||
| Depth (mm)"D" | Max 9 9 | |||
| Min 6 6 | ||||
| Quantity 2 2 | ||||
| VESA (AxBxC) 100x100x100 | ||||
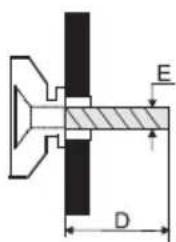
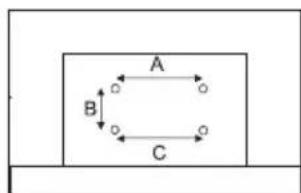
Note:
1) The pictures are for reference only.
2) For the TV sets with terminals towards the wall, in order to leave enough space to use the terminals, a rubber cushion is needed together with the screw to fix the wall mount. It is a small hollow pillar whose internal diameter is 8mm, external diameter is 18mm and height is 30mm.
Operating Environment
- Do not install this equipment in a confined space such as a bookcase or similar unit.
- Do not use the set near damp, and cold areas, protect the set from overheating.
- Keep away from direct sunlight.
- Do not use the set near dust place.
- Do not attach candle to accessible opening area, to avoid flammable foreign material from entering the TV.
Precautions For Using Remote Control
- Use the remote control by pointing it towards the remote sensor. The items between the remote control and the remote sensor will interfere the normal operation.
- Do not make remote control vibrate violently. Also, do not splash liquid on the remote control, also do not put the remote control in high humidity place.
- Do not place remote control under direct sunlight which will cause deformation of the unit by heat.
- When the remote sensor is under direct sunlight or strong lighting, the remote control will do not work. If so please change the lighting or TV's position, or operate the remote control closer to the remote sensor.
Precautions For Using Battery
Improper using of the battery will cause leakage. So please do as the following methods and use carefully.
- Please note the batteries' polarity, to avoid short circuit.
- When the battery's voltage is insufficient which affect the use range, you should replace new battery. Remove the batteries from the remote control unit if you do not intend to use it for a long time.
- Do not use different types of batteries (for example, Manganese and Alkaline batteries) together.
- Do not put the battery into fire, and charge or decompose the battery.
- Please dispose batteries abide by relevant environmental protection regulation.
- WARNING: The batteries (battery pack or batteries installed) shall not be exposed to excessive heat such as sunshine, fire or the like.
Install Remote Control Battery
Place two AAA size batteries in the remote controls battery compartment, making sure to match the polarity markings inside the compartment.
PANEL BUTTONS
Rocker Button
Note: The images are intended for reference only.
Bottom view
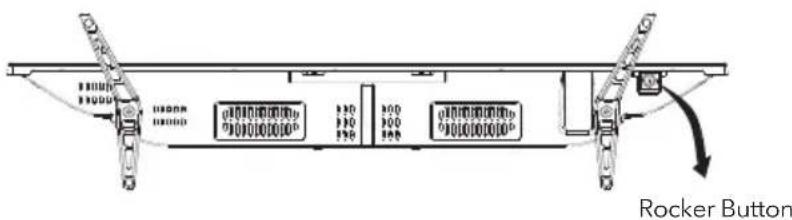
Press middle button:
- In standby mode, press it to turn on the TV;
- Without OSD, short press it to access source menu; long press to turn the TV to standby;
- With OSD, short press it to confirm a selection; long press it to return or exit.
Push left: decrease volume or go to left.
Push right: increase volume or go to right.
Push forward: channel up or go to above.
Push backward: channel down or go to below.
TERMINALS
Note: Please select the terminals according to your actual TV set.
| 1 Video & Audio L/R | Connect audio and video signal from signal source such as DVD. |
| 2 HDMI1/MHL &HDMI2 | Connect HDMI input signal from signal source such as DVD. HDMI1 supports MHL function. |
| 3 DIGITAL AUDIO | Use a SPDIF cable to output the TV audio signal to a compatible audio receiver. |
| 4 EARPHONE | Audio output, speakers will be muted when earphone is plugged. |
| 5 USB USB port | |
| 6 LNB/AIR/CABLE | Connect a coaxial cable to receive signal from the antenna, cable or satellite. |
| 7 SERVICE | Debugging interface only for professional technician. |
| 8 CI CI card port. |
REMOTE CONTROL FUNCTIONS
Remote Control
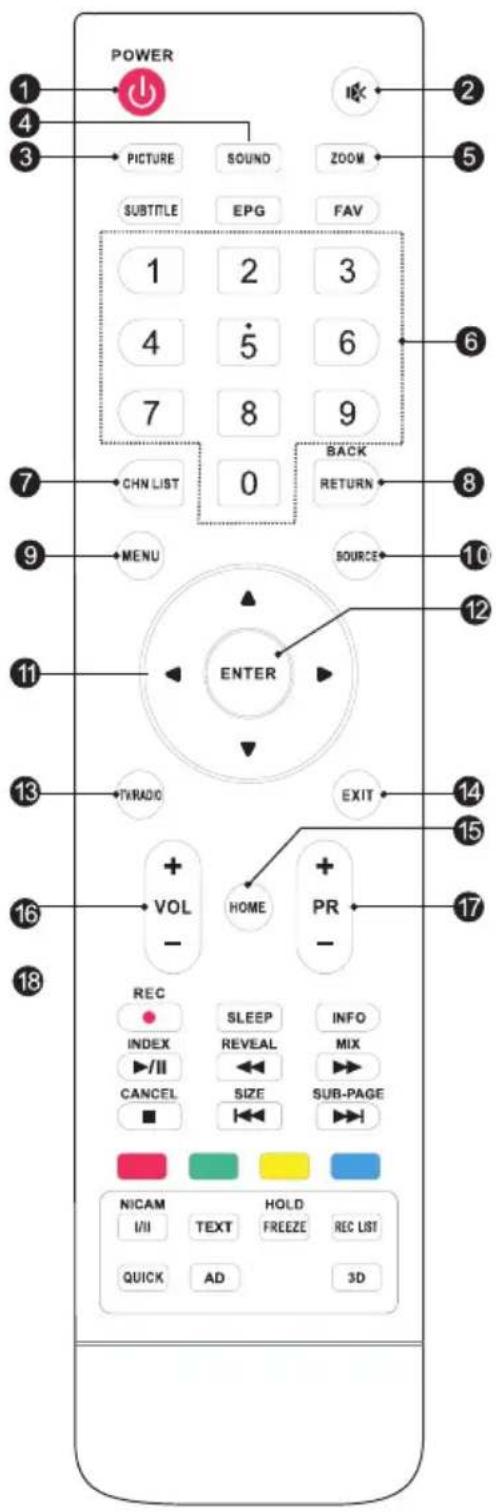
-
POWER ( ⏻ ) Press to turn the TV on or to put it in standby.
-
MUTE (☒) Press to mute or restore the volume.
-
PICTURE Change picture mode.
-
SOUND Change sound mode.
-
Zoom Change aspect ratio.
-
Numeric buttons Choose channel directly.
-
CHN LIST Press to enter the channel list.
-
RETURN (BACK) Press to go back to a previously viewed channel.
-
MENU Open the menu options.
-
SOURCE Select the input source mode.
-
Up/Down/Left/Right (▲ /▼/◄ /►)
Navigate through the menu.
-
ENTER Confirm the selection.
-
TV/RADIO Switch between TV and radio.
-
EXIT Exit the current menu.
-
HOME Enter the home desktop. If your TV don't have HOME function, this button will not work.
-
Volume Up/Down (VOL+/VOL-)
Adjust the volume level.
- Program Up/Down (PR+/PR-)
Change programs up or down.
- SLEEP Select the sleep time, such as 10min, 20min etc.
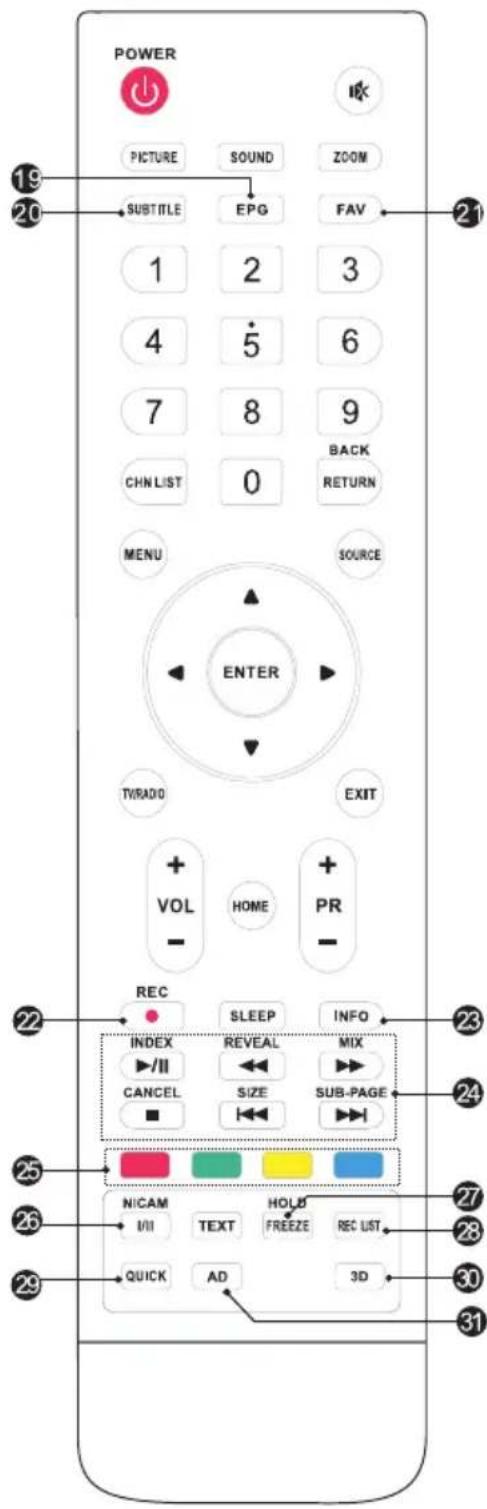
-
EPG Press to display the current EPG information in DTV mode.
-
SUBTITLE Enable/disable subtitles in DTV/USB mode.
-
FAV. (Favorite Channel)
Press to view your assigned favourite channels. Press Up/Down buttons to move through your assigned favourite channels. Press ENTER to confirm.
-
Record (REC) Press to record the current programme (available in DTV mode only).
-
INFO Display information about current source.
-
USB Play Control Buttons Play & Pause (▶/II)
Press to pause playback, then press again to continue playback.
Stop (☐)
Press to stop playback.
Fast Backward Button (◀)
Press to fast reverse.
Fast Forward (▶)
Press to fast forward.
Previous (1)
Press to play the previous file.
Next (▶)
Press to play the next file.
-
Color buttons Press to execute the prompt function in TV or DTV mode.
-
NICAM Press to select desired sound output depending on the broadcasting channel.
-
FREEZE (HOLD) Freeze the picture on the screen (Not available in USB mode).
-
REC LIST Display the recording file list.
-
QUICK No function.
-
3D No function.
-
AD (Audio Description) Press to turn on audio description, a narrator will describe what is happening on the screen for blind or visually impaired viewers. press again will turn it off (Only available in DTV mode).
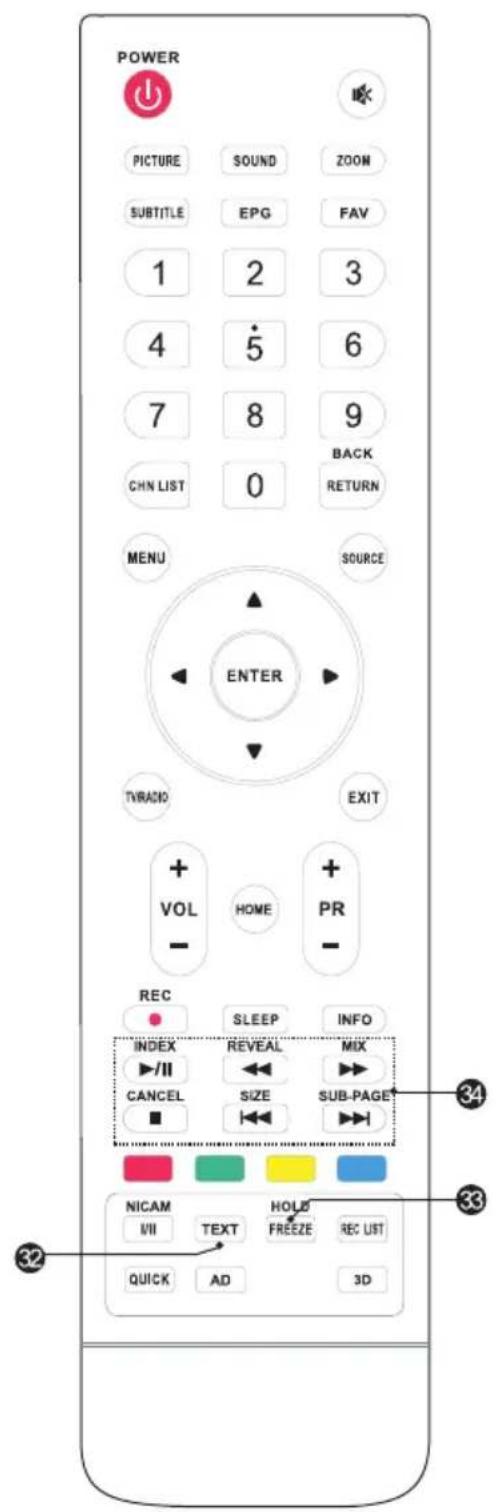
TELETEXT BUTTONS
- TEXT Press to enter or exit the teletext menu.
33. HOLD
Press to hold the teletext page on screen without update and changes. Press again to release the hold state.
34. Other Buttons
SIZE Enlarge the teletext display: Press this button once to enlarge upper half of the screen. Press this button again to enlarge lower half of the screen. Press this button again to resume to normal screen size.
REVEAL Press this button to display concealed information, such as solutions to riddles or puzzles. Press again to remove the information from the display.
MIX
Press this button to superimpose the teletext over the TV program. Press again to return to normal teletext mode.
SUB-PAGE
Press this button to enter or exit subpage mode (if subpage is available). Press Red / Green buttons to select the desired subpage.
INDEX Press this button to display index page.
CANCEL
Press this button to return to TV program temporarily while searching for a Teletext page. When the search is done, the page number will be displayed on the upper left of the screen. Press again to return to the Teletext page.
RECORDER (REC)
IMPORTANT NOTES:
- For any type of recording with this television, you must have connected an external device to the appropriate USB port at the back of the television to record on.
- The USB device must be FAT32 format.
- For the first time using the USB device to record on the this TV, suggest to format the USB device on the TV before you start the recording.
- Make sure you are watching DTV program.
- Use high-quality mobile device to record HD programs, otherwise the videos will be jammed during the playback.
- Back up all of the data in the USB storage device in case data was lost due to an unexpected accident. We do not assume any liability for the losses by misuse or malfunction. Data backup is consumer's responsibility.
Instant one-touch recording and playback
- Please insert the an external high-speed storage device, and make sure the device has enough free space.
- Select the TV program and channel you wish to record.
- Press REC button to enter into REC mode and start recording. REC control bar on the screen shows as below, you can select the appropriate settings as your desire.

-
If the REC function can not be realized, try to format your USB device.
-
If you wish to stop the recording, press [ ■ ] button and the recording will stop.
Note: (A) During the record mode, you cannot change channels or select another function. (B) If the signal is interrupted or removed while in record, the recording will stop until the signal is established. This may cause you to lose program content.
Timer recording
There are two ways to set the timer to record a television program.
If you know the programming details:
- Go to the channel that will broadcast the program you want to record.
- Press the EPG button on your remote control to bring up the EPG interface. The channel you are watching will be highlighted on the screen that appears.
-
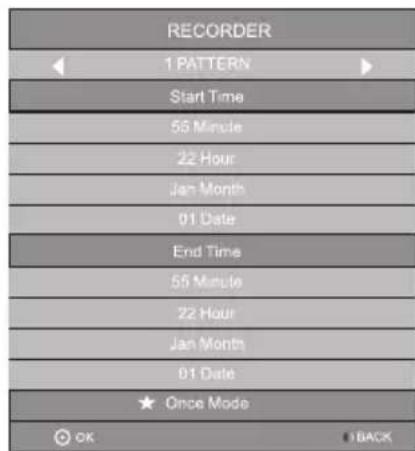
Press the RED button on the remote control, then enter into the program details on the recorder menu by pressing ▲/▼ to select an item and /▲to change the setting. For example, if the program starts at 8:30pm on the same day, enter: 30 in the space for MINUTES, 20 in the space for HOURS (a 24 hour clock applies), and then the relevant date. Use the same method for entering the finish time.
-
Choose the appropriate recording mode: once, every day or weekly.
-
Press ENTER to confirm your selection. A schedule of all your recordings (the schedule list) will appear. See EPG function for more on the schedule.
If you are browsing the EPG, Follow the steps on EPG function page.
ELECTRONIC PROGRAM GUIDE (EPG)
EPG stands for Digital Electronic Program Guide. It is supplied by the program providers and offers information about the programs to be broadcast. You can access it in digital mode by pressing the EPG button on the remote control.
-
Press the EPG button to bring up the EPG interface. The second bar from the top will display the current date and time. On the list below, the channel you are currently watching will be highlighted.
-
Before you can view any EPG information, you have to 'activate' every channel for which you want to view program information. To do this, use the ▲/▼ buttons to select a channel, then press ENTER to confirm.
-
To check programs to be broadcast on a future date, scroll up with the ▲ button to the date field. Use the ▶ button to select the date you want to check.
-
Press the Index ( ) button to scroll up to the top bar in the display, then press the button to select the channel List. The second bar will then display one of your available channels.
-
Go to the channel and use the ◀/▶buttons to select the channel for which you want to view information. After a brief moment, the program information will appear.
-
Use the ▲/▼buttons to scroll through the time slots.
-
Press MENU button to exit the EPG menu.
Recorder
Press the RED button to display the recorder menu (right). See detailed information about the different ways of recording with the television onto a USB device.
Info
Press the GREEN button to show information about the selected program.
Schedule
Press the YELLOW button to display the Schedule List. Press ▲/▼to select an event, press the RED button to delete an Event.
Remind
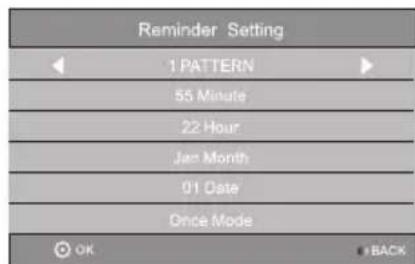
Press the BLUE button to display a reminder menu.
Press ▲/▼to select an item and /▲to change the setting.
Press ENTER to add the reminder event to the schedule list. An updated schedule list will be shown.
MENU SETTINGS
Menu Operation (DTV Mode)
Press "MENU" key to enter the main menu.
Press the [◀]/[ ]guide key to select desired item.
Press "ENTER" key to enter the item.
Press [▲] / [▼] and ENTER buttons to select the submenus.
Press "MENU" key to exit the item.
Note: Some options may be not available under some sources.
Picture
Picture Mode: Select the automatic picture control mode. Choices are Dynamic, Standard, Mild and User.
Color Temperature: Select the overall color tone of the picture. Choices are Cool, Medium, Warm and User.
Aspect Ratio: Select the aspect ratio (display proportions) according to your video signal type or preference. Choices are 16: 9/4: 3/Just Scan /Zoom1/ Zoom2.
Noise Reduction: Eliminates noise in the picture. Choices are Off/Low/Middle/High.
MPEG NR: Eliminates noise generated while creating digital picture signals. Choices are Off/Low/Middle/High.
Sound
Sound Mode: Select your favorite sound mode for each input. Choices are Standard/Music/Movie/Sports/User.
Bass: Adjusts the lower frequency of the sound.
Treble: Adjusts the higher frequency of the sound.
Balance: Control the sound balance between the right and left loudspeaker.
Auto Volume: Adjust the volume corresponding to the input audio level. Contain On and Off.
Surround Sound: Helps to create rich and wider sound from stereo sound sources.
AD Switch (Only available in DTV mode): Turn on the Audio description, you can activate the setting of AD volume. When turn on the audio description, a narrator will describe what is happening on the screen for blind or visually impaired viewers.
SPDIF Mode (May not be available): Select the SPDIF mode: Auto or PCM.
Channel
Auto Tuning
Select DVB-T or DVB-C and press ENTER button to go to the next step. Select country or scan type and then search and store programmes automatically. If you want to stop the auto search, press MENU button or EXIT button and exit dialog box will pop out.
- Press ◀ to confirm exit.
- Press ▶ to continue searching.
Advanced Tuning
Access the satellite settings essential for programme searching through DVB-S source.
Satellite Dish Settings (Step 1-3, refer to Fig. 1)
A set of satellite dish settings must be configured for each wanted satellite before performing a channel scan.
Satellite - Select the satellite for this TV.
LNB Type - Make sure the LNB type is appropriate for your dish.
LNB Power - Enable or disable power supply for the LNB.
22KHz - Select the 22KHz to set 22K switch to ON/OFF. Use auto mode to switch 22KHz on or off depending on the LNB type.
DiSEqC1.0/1.1 - Select the DiSEqC mode for the selected LNB.
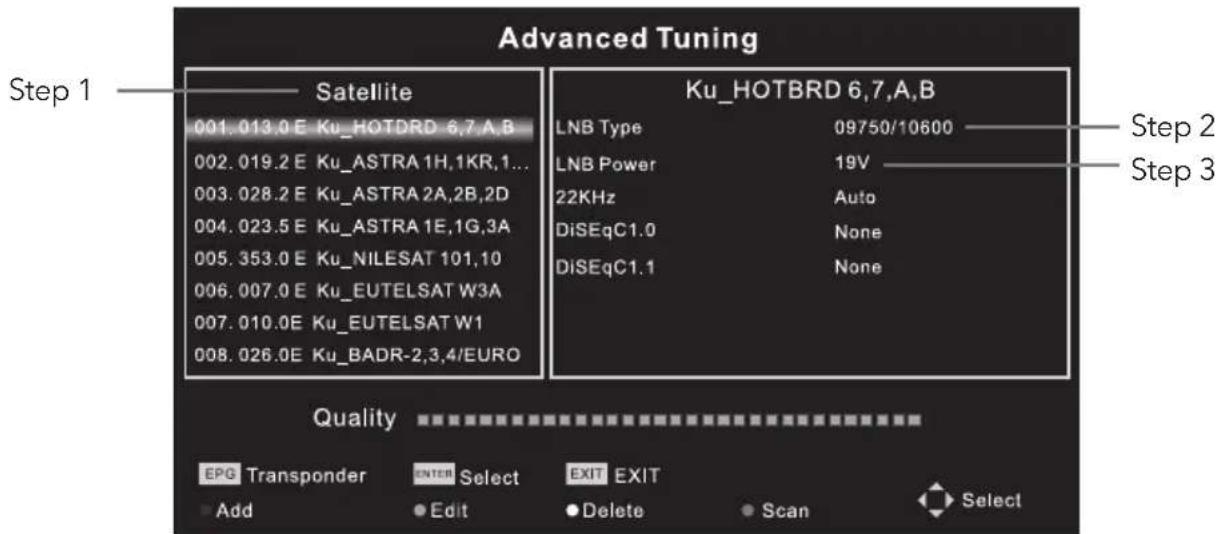
Fig. 1
Step 1: Highlight Satellite and press ENTER to access the satellite list and select the desired one.
Step 2: Highlight LNB Type and press ENTER to select the LNB type.
Step 3: Make sure that 22KHz, DiSEqC1.0/1.1 switch corresponds to the selected satellite.
After completing the above steps, press the blue button to search for the channels.
DTV Manual Tuning
Search and store programmes manually.
Channel → DTV Manual Tuning
Select the source type (DVB-T or DVB-C) and search digital programmes manually. In the
Channel menu, select DTV Manual Tuning and press ENTER button to access.
-
Press ◀ or ▶ to select channel number and then press ENTER to start the search.
-
The search stops when programme is found and this program will be stored in the current channel position. If you want to stop the search, press the MENU button.
ATV Manual Tuning
First select the source type of ATV. Then select ATV Manual Tuning in the Channel menu and press ENTER button to access.
-
Highlight and press ▲ or ▼ tto select Storage To 1 (or any other number), Sound System or Channel number. Then select Search and press ENTER to start the search.
-
Press ▶ for the unit to search towards higher frequency;
-
Press ◀ for the unit to search towards lower frequency;
-
The search stops when programme is found. This programme will be stored in the current channel position. If you want to stop the search, press the MENU button.
Fine-Tune
Use it to make small adjustments to tuning of each individual channel. Fine-tune is not necessary under normal conditions. However, in area with poor broadcast conditions, where adjustments are necessary to improve picture and sound, use the fine-tune option.
- Select the channel that you want to fine tune.
- In Channel menu, select ATV Manual Tuning and press ▼ to highlight Fine-Tune.
- Press ◀ or ▶ to fine-tune until the best possible picture and sound are obtained.
Program Edit
Edit the programmes. You can press colour buttons on the remote control to skip programmes, rename and delete programmes or move programmes, and add programmes to the favourite list by pressing FAV button.
Signal Information
Display of the current DTV channel information.
CI Information
Allowing the user to select from the CAM-provided menu. Select the CI menu according to the menu PC Card.
5V Antenna Power
This option is only available with DVB-T source. Select On to supply power to the TV antenna. Select Off to turn off this function.
Software Update (OAD) (only for some regions)
Select On to allow the TV to update the system software over the air. Choosing Off will turn off this function.
OAD Tuning (only for some regions)
When software update (OAD) is off, this option is disabled. Choosing OAD scan involves scanning channels to find the OAD update information.
LCN ON/OFF (Only for some regions)
When tuning programs, select ON, the channel list is sorted according to LCN; select OFF, the channel list is sorted according to the default order.
Option
OSD Language
Select the OSD language.
Audio Languages / Subtitle Languages (Note 1)
Select the desired language.
TTX Language
Select TTX language for different regions.
Time
Can setup Auto Sync, Clock, Time Zone, Summer Time, Sleep Timer and Auto Sleep.
HDMI CEC
Press to enter submenus.
HDMI CEC - Turn on or off the HDMI CEC function.
Auto Standby - Turn the TV to standby automatically.
Device List - When HDMI CEC is on, check the list of devices connected to the TV.
REC File System (Note1)
If you want to use this function, you must have received a digital program and connected a USB disk.
EWS Local Postal Codes(Only for some regions)
The Emergency Warning System defined by DVB provides the necessary mecha
Restore Default
Restore user setting to default.
Software Update (USB)
Connect USB device storing the software that has to be upgraded to upgrade the TV system.
Note:
-
Audio Languages/ Subtitle languages /REC File System only works under DVB-S /DVB-C / DVB-T mode.
-
User data on this TV will lose completely after operating the feature of Restore Deafault.
-
Do not power off the TV during the software upgrading process, otherwise the TV may not work, and the customer should be responsible.
Lock
Lock System
Input the initial password (0000) to access this feature. Choose "on" and the features "Set password", "Block programme" and "Parental guidance" will be activated. Choose "off" and the above mentioned three features will become inactive. If you forget the password, you can also input the super password (8899) to enter into the lock system.
Set Password
Reset the password.
Block Programme
Block the desired programmes.
Parental Guidance
Choose the programmes appropriate for children to watch.
Hotel Mode (Only for some regions)
Only for hotel use.
USB CONTROL
USB Menu
Press Source menu and select USB button. You can play movie, music and photo files from your USB storage devices.
- Connect USB storage device to USB input terminal and select the types of media on the home page: MOVIE, MUSIC and PHOTO.
- Press [ENTER] button, the screen will show the connected USB device. Press [ENTER] button again to view the file folders and files.
- Press [◀]/[▶] or [▲]/[▼] to select folder. Press [ENTER] to open folders and select files, then press [ENTER] to tick them. Highlight the one you want to play first, press [▶/II] to start playing. To start playing directly, select a file and press [▶/II].
- Press [■] to stop playing and return to upper lever folder.
- Continuously press [RETURN] to go back to upper lever folder.
- Use the above steps to select and play another media type.
Reminder When Using the USB Player
- Some USB storage devices may not be compatible to operate smoothly with this TV.
- Back up all of the data in the USB storage device in case data was lost due to an unexpected accident. We do not assume any liability for the losses by misuse or malfunction. Data backup is consumer's responsibility.
- For large file sizes, the loading speed may be slightly longer.
- The recognition speed of a USB storage device may depend on each device.
- When connecting or disconnecting the USB storage device, make sure the TV is not in USB mode otherwise the USB storage device or the files stored in it may be damaged.
- Please use only a USB storage device which is formatted in FAT16, FAT32, NTFS file system provided with the Windows operating system. In case of a storage device formatted as a different utility program which is not supported by Windows, it may not be recognized.
- When using a USB Hard Disk Drive which requires electric power source, ensure its power does not exceed 500mA. If the power of the USB hard Disk exceeds 500mA, the TV system will be changed into standby mode, you must pull out the USB hand Disk and restart the TV system.
- An "Unsupported File" message will be displayed if the file format is unsupported or the file is corrupted.
- FHD big picture needs longer time to process, which is not caused by the TV. Please be patient to wait.
- This TV may not support some multimedia files changed and upgraded as the change of encoding format or other technical advances.
Play Movie
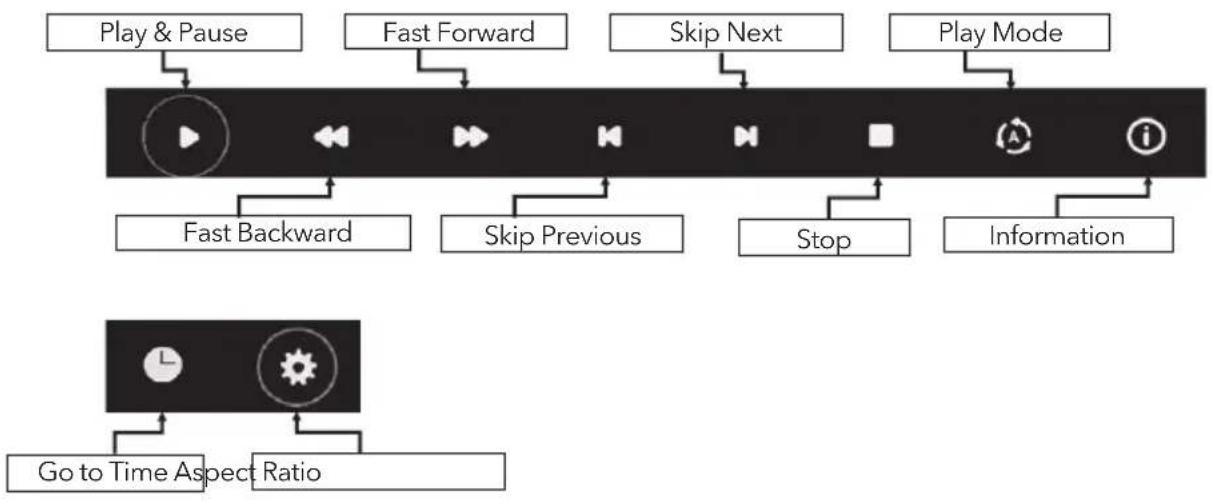
Press [ INFO ]/ [ ▼ ] to display/ exit from the below Menu Bar. Press USB control buttons on the remote control to do relevant operations.
Movie Control Bar
flowchart
graph TD
    A["Play & Pause"] --> B["Play Mode"]
    C["Fast Forward"] --> B
    D["Skip Next"] --> B
    E["Fast Backward"] --> B
    F["Skip Previous"] --> B
    G["Stop"] --> B
    H["Information"] --> B
    I["Go to Time Aspect Ratio"] --> J["Play Mode"]
    style A fill:#f9f,stroke:#333
    style C fill:#f9f,stroke:#333
    style D fill:#f9f,stroke:#333
    style E fill:#f9f,stroke:#333
    style F fill:#f9f,stroke:#333
    style G fill:#f9f,stroke:#333
    style H fill:#f9f,stroke:#333
    style I fill:#ccf,stroke:#333
Play & Pause/Stop/Prev./Next
Press [▶/II] to play or pause the playing; press [■] to stop playing; press [H]/[▶] no play the previous or the next video file. You can also press [◀]/[▶] to highlight one of the four icons and, after pressing [ENTER], the TV will respond accordingly.
Fast Reverse / Fast Forward
Press and hold [◀]/[▶] for several seconds to reach the desired point, then press [▶/II] button to start playing from the new position.
Play Mode
Highlight the corresponding icon and press [ ENTER ] to switch to another play mode.
Information
Highlight the corresponding icon and press [ ENTER ] to view the information of the playing video.
Go to time
Skip to specific point by entering time information. Highlight the corresponding icon and press [ ENTER ] to go to "Input search time" screen. Press [◀] / [▶] to move the cursor and use the number buttons to insert the time. Press [ ENTER ], the TV will start playing from the set time.
Aspect Ratio
Highlight the option and press [ ENTER ] to select the display mode.
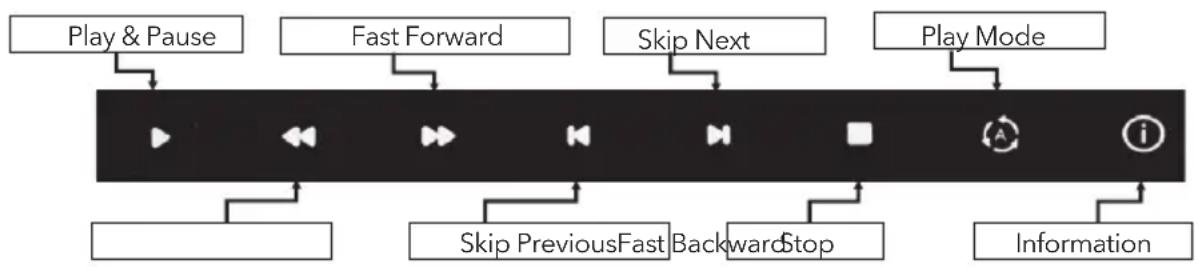
Play Music
Press [ INFO ] / [ ▼ ] to display / exit from the below Menu Bar. Press USB control buttons on the remote control to perform the relevant operations.
MUSIC CONTROL BAR
flowchart
graph TD
    A["Play & Pause"] --> B["Play"]
    C["Fast Forward"] --> D["Slow"]
    E["Skip Next"] --> F["Slow"]
    G["Play Mode"] --> H["Action Icon"]
    I["Information"] --> J["Stop Button"]
    K["Skip PreviousFast"] --> L["Backward"]
    M["Backward Stop"] --> N["Stop"]
Play & Pause / Stop / Previous / Next
Press [▶/Ⅱ] to play or pause the playing; press [■] to stop playing; press [◀]/[▶] to play the previous or the next music file. You can also press [◀]/[▶] to highlight the corresponding icon on the control bar and, after pressing [ENTER], the TV will respond accordingly.
Fast Forward / Fast Backward
Press and hold [◀] / [▶] for several seconds to reach the desired point, then press [▶/II] on the remote control to start playing from the new position.
Play Mode
Highlight the icon and press [ ENTER ] to switch to another play mode.
Information
Highlight the corresponding icon and press [ ENTER ] to check the information of the playing music.
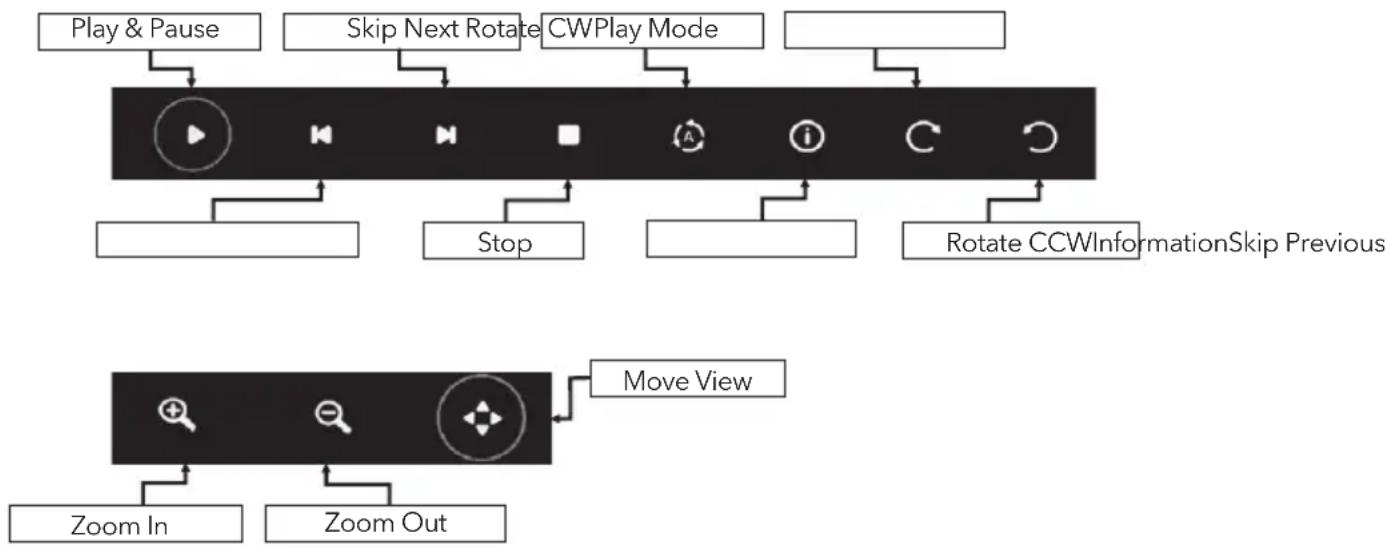
Browse Photo
Press [ INFO ] / [ ▼ ] to display / exit from the below Menu Bar. Press USB control buttons on the remote control to perform the relevant operations.
PHOTO CONTROL BAR
flowchart
graph TD
    A["Play & Pause"] --> B["Action Box"]
    C["Skip Next Rotate"] --> D["Action Box"]
    E["CWPlay Mode"] --> F["Action Box"]
    G["Stop"] --> H["Action Box"]
    I["Rotate CCWInformationSkip Previous"] --> J["Action Box"]
    K["Move View"] --> L["Action Box"]
    M["Zoom In"] --> N["Action Box"]
    O["Zoom Out"] --> P["Action Box"]
Play & Pause / Stop / Previous / Next
Press [▶/II] to play or pause the playing; press [■] to stop playing; press [H]/[ ] to play the previous or the next picture. You can also press [◀]/[ ▶] to highlight the corresponding icon on the control bar and, after pressing [ENTER], the TV will respond accordingly.
Play Mode
Highlight the icon and press [ ENTER ] to switch to another play mode.
Rotate
Highlight the corresponding icon on the menu bar and press [ ENTER ] to rotate the picture 90 degrees clockwise or counter clockwise.
Info.
Highlight the corresponding icon and press [ ENTER ] to check the information regarding the viewed photo.
Zoom In / Zoom Out
Highlight the corresponding icon on the menu bar and press [ ENTER ] to zoom in / zoom out of the image.
Move View
When the image is magnified, use this function for convenient check. Highlight this icon, press [ ENTER ] button, then press left/right/up/down button to move the image.
Note:
Move function (☐) is only available when image is enlarged.
TROUBLESHOOTING
Before calling a service technician, review following information for possible causes and solutions for the problem you are experiencing.
NO PICTURE, NO SOUND
- Check if the fuse or circuit breaker is working.
- Plug another electrical device into the outlet to make sure it is working or turned on.
- Poor power plug contact with the outlet.
- Check the signal source.
NO COLOR
- Change the colour system.
- Adjust the saturation.
- Try another channel. Black-white program may be received.
REMOTE CONTROL DOES NOT WORK
- Change the batteries.
- Batteries are not installed correctly.
- Main power is not connected.
NO PICTURE, NORMAL SOUND
- Adjust the brightness and contrast.
- Broadcasting failure may happen.
NORMAL PICTURE, NO SOUND
- Press the volume up button to increase volume.
- Volume is set to mute, press MUTE to restore sound.
- Change the sound system.
- Broadcasting failure may happen.
UNORDERLY RIPPLES ON THE PICTURE
It is usually caused by local interference, such as cars, daylight lamps and hair dryers. Adjust the antenna to minimize the interference.
BLANK SCREEN IN PC MODE
(only for models with PC terminals)
Perhaps the TV cannot recognize the PC set resolution. Choosing the best resolution or other standard resolutions for the Windows system is recommended. Set refresh rate to 60Hz.
If the antenna is located in the fringe area of television signal where the signal is weak, the picture may be marred by dots. When the signal is extremely weak, it may be necessary to install a special antenna to improve the reception.
- Adjust the position and orientation of the indoor/outdoor antenna.
- Check the connection of antenna.
- Fine tune the channel.
- Try another channel. Broadcasting failure may happen.
IGNITION
Black spots or horizontal streaks appear, or the picture flutters or drifts. This is usually caused by interference from car ignition system, neon lamps, electric drills, or other electrical appliance.
GHOST
Ghosts are caused by the television signal which follows two paths. One is the direct path, the other is reflected off tall buildings, hills, or other objects. Changing the direction or position of the antenna may improve the reception.
This interference produces moving ripples or diagonal streaks, and in some cases, loss of contrast in the picture. Detect and remove the radio interference source.
Note:
If the problem persists after applying the solutions, please contact your local support centre.
SPECIFICATIONS
ENG
| Screen size - diagonal 81cm | |
| Screen resolution 1366x768 | |
| Rated power consumption 60W | |
| Dimensions (W x H x D) with stand 733.4 X 480 X 167.7mm | |
| Dimensions (W x H x D) without stand 733.4 X 438.5 X 85.1mm | |
| Net weight with stand: 4.0kg | |
| Net weight without stand: 3.9kg | |
| Environment(only for Tropical climates zone): | Working temperature: 5°C~45°CWorking humidity: 20%~80%Storage temperature: -15°C~50°CStorage humidity: 10%~90% |
| Environment(only for Moderate climates zone) | Working temperature: 5°C~35°CWorking humidity: 20%~80%Storage temperature: -15°C~45°CStorage humidity: 10%~90% |
ACCESSORIES
| No. Name Quantity | |
| 1 Remote Control 1 | |
| 2 Battery 2 | |
| 3 Stand 2 | |
| 4 Screw 2 | |
| 5 AC Line Cord 1 | |
| 6 User Manual 1 | |
| 7 Stand Installation 1 | |
| 8 Warranty Card 1 |
Note: For some models, AC Line Cord may be already connected with the TV set and can't be removed.
LICENSE

Manufactured under license from Dolby Laboratories. Dolby, Dolby Audio and the double-D symbol are trademarks of Dolby Laboratories.

The terms HDMI and HDMI High-Definition Multimedia Interface, and the HDMI logo are trademarks or registered trademarks of HDMI Licensing LLC in the United States and other countries.

Përmbajtja
PARALJMËRIME DHE MASA PARAPRAKE 28
BUTONI 34
TERMINALI 34
FUNKSIONET E TELEKOMANDËS 35
REGJISTRUES (REC).... 38
ELECTRONIC PROGRAM GUIDE (EPG) 39
MENU KONTROLLI.... 40
Menu Operimi (DTV Mode).... 40
Fotografia....40
Zëri 40
Kanali....40
Opsione 42
Bllokimi 43
USB KONTROLLI 44
USB Menu.... 44
If your existing television set is being retained and relocated, the same considerations as above should be applied (Only for the TV with mass exceed 7 kg)
Montimi në mur
| Model Size: 32" Top Down | ||||
| Screw | Diameter (mm) "E" M4 M4 | |||
| Depth (mm)"D" | Max 9 9 | |||
| Min 6 6 | ||||
| Quantity 2 2 | ||||
| VESA (AxBxC) 100x100x100 | ||||
flowchart
graph TD
    A["A"] --> B["B"]
    B --> C["C"]
    C --> A
Shënim:
- Program Lartë/Poshtë(PR+/PR-)
Important Safety Instructions
- Pročitajte ova uputstva – Prije upotrebe uređaja treba pročitati sva bezbjednosna uputstva i uputstva za upotrebu.
- Čuvajte ova uputstva - Bezbjednosna i uputstva za upotrebu treba sačuvati za buduću upotrebu.
- Obratite pažnju na upozorenja - Treba se pridržavati svih upozorenja istaknutih na uređaju i u uputstvima za korištenje.
- Pratite uputstva - Treba pratiti sva operativna i uputstva za korištenje.
- Ne koristite ovaj aparat blizu vode – Uređaj ne bi trebalo koristiti blizu vode ili izvora vlage, na primjer, u vlažnom podrumu, blizu bazena i slično.
- Čistiti isključivo suhom tkaninom.
- Ne blokirati otvore za ventilaciju. Instalirati u skladu s uputstvima proizvođača.
- Ne postavljajte uređaj blizu izvora toplote kao što su radijatori, grijalice, peći ili slični aparati (uključujući i pojačala) koji proizvode toplotu.
- Ne zanemarujte bezbjednosnu svrhu polarizovanog ili uzemljenog utikača. Polarizovani utikač ima dva jezička, pri čemu je jedan širi od drugog. Uzemljeni utikač ima dva jezička i pin za uzemljenje. Široki jezičak ili treći pin postoje zbog vaše bezbjednosti. Ukoliko isporučeni utikač ne odgovara vašoj utičnici, obratite se električaru radi zamjene zastarjele utičnice.
- Zaštite kabl za napajanje od gaženja i nagnječenja, naročito kod utikača, utičnice i na mjestu gdje izlazi iz aparata.
- Koristiti isključivo pribor/dodatke određene od strane proizvođača.
- Koristiti samo na polici s točkićima, postolju, tronošcu, nosaču ili stolu koji su određeni/označeni od strane proizvođača ili onima koje se prodaju uz uređaj. Pri upotrebi kolica ili stalka treba paziti, naročito prilikom pomjeranja stalka i aparata zajedno kako bi se izbjegle povrede uslijed prevrtanja.
- Isključiti aparat tokom grmljavine ili ukoliko se ne koristi duži vremenski period. Za sve popravke obratite se kvalificiranom osoblju. Popravka je potrebna u slučaju
- oštećenja bilo koje vrste, kao što je oštećenje kabla za napajanje ili utikača, ukoliko se tekućina prospe na uređaj ili neki predmet upadne u njega, ako je uređaj bio izložen kiši ili vlazi, ako ne funkcioniše normalno ili je ispušten prilikom nošenja.
- UPOZORENJE: Ova uputstva za servisiranje su samo za kvalificirano servisno osoblje. Da bi se smanjio rizik od električnog udara niko osim za to kvalificiranih osoba ne bi trebalo da obavlja servisiranje koje nije opisano u uputstvu za upotrebu.
- Opremu nemojte instalirati u ograničenim ili ograđenim prostorima kao što su police za knjige i slični komadi namještaja; uređaju je potrebno otvoreno mjesto sa slobodnim protokom vazduha. Ventilacija ne bi smjela biti onemogućena prekrivanjem ventilacionih otvora predmetima poput novina, stolnjaka, zavjesa i slično.
- Oprez - Potrebno je zamijeniti rešetke da bi se spriječio strujni udar.
- Molimo da prije instalacije i upotrebe aparata obratite pažnju na informacije o električnoj bezbjednosti na dnu kućišta.
- Aparat ne izlagati kiši ili vlazi kako bi se spriječio rizik od požara ili električnog udara.
- Aparat ne bi smeo da bude izložen kapanju ili prskanju i na njemu ne bi trebalo da stoje predmeti, kao što su vaze, koji su ispunjeni tečnošću

- Priključci označeni simbolom "§" mogu biti dovoljno visokog napona da predstavljaju rizik od električnog udara. Instalaciju spoljnog ožičenja povezanog na ovakve
- priključke treba da obavi stručno lice ili treba koristiti gotove vodove ili kablove.
- Aparat se mora pričvrstiti na pod/zid na bezbjedan način u skladu s uputstvima za postavljanje kako bi se spriječilo povređivanje.
- Postoji opasnost od eksplozije ako je baterija nepravilno zamijenjena. Bateriju zamijeniti istim ili odgovarajućim tipom baterija.
- Bateriju (jednu bateriju ili više baterija ili pakovanje baterija) ne izlagati prekomjernoj toploti kao što su sunčeva svjetlost, vatra i slično.
- Pretjerano glasan zvuk iz slušalica može uzrokovati gubitak sluha. Slušanje glasne muzike tokom dužeg vremenskog perioda može oštetiti sluh. Da biste smanjili rizik od oštećenja sluha trebalo bi da smanjite jačinu zvuka na bezbjedan, ugodan nivo i smanjite vremenske periode provedene u slušanju glasne muzike. (Samo za Njemačku).
- Mrežni utikač i utičnica treba da budu lako dostupni ukoliko se koriste za isključivanje uređaja.
- Kada ne koristite uređaj ili ga pomjerate, vodite računa o kablovima, npr. uvežite ih vezicama za kablove ili nečim sličnim. Pazite da ne dođu u dodir s oštrim ivicama ili nečim sličnim što bi moglo izazvati njihovo oštećenje. Prilikom ponovne upotrebe provjerite da li su kablovi oštećeni. Ukoliko primjetite bilo kakva oštećenja pozovite servisera kako bi oštećene kablove zamijenio onima koje proizvođač preporučuje u specifikaciji ili nekim drugim koji posjeduju iste funkcije kao i originalni.
- Prilikom odlaganja baterija treba obratiti pažnju na zaštitu životne sredine.
- Uređaju ne treba pristupati s otvorenim plamenom, npr. upaljenom svijećom. Kako biste spriječili širenje požara, uvijek držite svijeće ili druge izvore vatre dalje od ovog proizvoda.
- Ako uređaj ima simbol ☐ u klasnim oznakama i kabl za napajanje ima dva jezička, to znači da se radi o opremi klase II ili duplo izolovanom električnom aparatu koji je tako dizajniran da ne zahtjeva bezbjednosno povezivanje na električno uzemljenje.
Upozorenje za aparate koji sadrže OKRUGLE/DUGME BATERIJE
flowchart
graph TD
    A["A"] --> B["B"]
    B --> C["C"]
    C --> A
Napomena:
1) Slike služe samo kao ilustracija.
2) Za postavljanje TV uređaja s terminalima okrenutim ka zidu potreban je i gumeni jastuk uz šraf prilikom fiksiranja postolja na zidu kako bi se obezbedilo dovoljno prostora za upotrebu terminala. To je mali šupalj stub čiji je unutrašnji prečnik 8 mm, spoljašnji 18 mm, a visina 30 mm.
Radno okruženje
- Ukoliko funkcija snimanja ne radi, formatirajte vaš USB uređaj.
- Ako želite da zaustavite snimanje, pritisnite tipku [■] i snimanje će se zaustaviti.
Napomena: (A) Tokom režima snimanja ne možete mijenjati kanale ili birati druge funkcije. (B) Ako se signa prekida ili nestaje tokom snimanja, snimanje će se zaustaviti dok se signal ponovo ne uspostavi. Ovo može uzrokovati gubljenje programskog sadržaja.
Snimanje s tajmerom
Postoje dva načina za podešavanje tajmera za snimanje televizijskog programa.
Ukoliko znate detalje programiranja:
- Idite na kanal koji će emitovati program koji želite da snimite.
- Pritisnite tipku EPG na daljinskom upravljaču da biste postavili EPG interfejs. Kanal koji gledate biće istaknut na ekranu koji se pojavi.
-
Pritisnite tipku RED na daljinskom upravljaču i uđite u detalje programa u meniju za snimanje pritiskom na ▲/▼ da biste izabrali stavku ◀/► da biste promijenili podešavanja. Na primjer, ako program počinje u 20:30 istog dana, unesite: 30 u prostor MINUTI, 20 u prostor SATI (pojavit će se 24-časovni sat), a zatim odgovarajući datum. Na isti način unesite vrijeme završetka snimanja.
-
Koristite odgovarajući režim snimanja: jednom, svakog dana ili sedmično.
- Pritisnite ENTER da biste potvrdili vaš izbor. Pojavit će se raspored svih vaših snimanja (lista snimaka). Za više podataka pogledajte funkciju EPG u rasporedu.
Ako pretražujete EPG, pratite sljedeće korake na stranici funkcije EPG.
ELEKTRONSKI PROGRAMSKI VODIČ (EPG)
EPG je skraćenica za digitalni elektronski programski vodič (Digital Electronic Program Guide). Ovu uslugu nude distributeri televizijskog programa i ona daje informacije o programima koji će biti emitirani. Funkciji možete pristupiti iz digitalnog režima tako što ćete pritisnuti tipku EPG na daljinskom upravljaču.
- Pritisnite tipku EPG kako bi pristupili EPG interfejsu. U drugoj traci od vrha prikazat će se podaci o trenutnom datumu i vremenu. Na listi ispod biće označen program koji se trenutno prati.
- Prije nego što vidite bilo koje EPG informacije treba da 'aktivirate' sve one kanale za koje želite da vidite programske informacije. Da biste ovo uradili, koristite /tipke za biranje kanala ▲/▼a zatim pritisnite ENTER da biste potvrdili.
- Za provjeru programa koji će se emitovati u budućnosti, idite nagore tipkom ▲ do polja za datum. Koristite tipku da biste izabrali datum koji želite da provjerite.
- Pritisnite tipku Index (▶/II) da biste se pomjerili nagore do gornje trake na ekranu, zatim pritisnite ▶tipku da izaberete listu kanala. Druga traka će pokazivati neki od dostupnih kanala.
- Idite na kanal i koristite tipke ◀/▶da biste izabrali kanal za koji želite da vidite informacije. Posle kratkog vremena pojavit će se informacije o programu.
- Koristite tipke ▲/▼da prodete kroz termine.
- Pritisnite tipku MENU da izadete iz EPG menija.
Snimač
Pritisnite CRVENU tipku za prikaz menija snimača (desno). Pogledajte detaljne informacije o različitim načinima snimanja s TV uređaja na USB uređaj.
Info
Pritisnite ZELENU tipku za prikaz informacija o izabranom programu.
Raspored
Pritisnite ŽUTU tipku za prikaz liste rasporeda. Pritisnite ▲/▼ za izbor događaja, pritisnite CRVENU tipku za brisanje događaja.
Podsjetnik
NEMA SLIKE, NEMA ZVUKA
- Provijerite da li radi osigurač ili sklopka.
- Uključite neki drugi električni uređaj u utičnicu kako biste se uverili da utičnica radi i da je pod naponom.
- Loš kontakt utikača sa utičnicom.
- Provijerite izvor signala.
NEMA BOJA
- Promenite sistem boja.
- Podesite zasićenost.
- Provijerite situaciju na nekom drugom kanalu. Možda primate crno-beli program.
- Zamjenite baterije.
- Baterije nisu postavljene na odgovarajući način.
- Uređaj nije povezan na napajanje.
DALJINSKI UPRAVLJAČ NE RADI
NEMA SLIKE, NORMALAN ZVUK
- Podesite osvetljenost i kontrast.
- Možda je došlo do prekida u emitovanju programa.
NORMALNA SLIKA, NEMA ZVUKA
| Veličina modela: 32" Gore Dolje | ||||
| Vijak | Promjer (mm) "E" M4 M4 | |||
| Dubina (mm)"D" | Max 9 9 | |||
| Min 6 6 | ||||
| Količina 2 2 | ||||
| VESA (AxBxC) 100x100x100 | ||||
flowchart
graph TD
    A["A"] --> B["B"]
    B --> C["C"]
    C --> A
Napomena:
-
Ukoliko funkcija snimanja ne radi, formatirajte vaš USB uređaj.
-
Ako želite zaustaviti snimanje, pritisnite tipku [■] i snimanje će se zaustaviti.
NEMA SLIKE, NEMA ZVUKA
NEMA SLIKE, NORMALAN ZVUK
Pritisnite srednji gumb:
-
Če funkcija REC ne deluje, poskusite formatirati svojo napravo USB.
-
Če želite prekiniti snemanje, pritisnite tipko [■] in snemanje bo zaustavljeno.
flowchart
graph TD
    A["A"] --> B["B"]
    B --> C["C"]
    C --> A
Napomena:
1 Slike služe samo kao ilustracija.
2) Za postavljanje TV uređaja s terminalima okrenutim ka zidu potreban je i gumeni jastuk uz šraf prilikom fiksiranja postolja na zidu kako bi se obezbedilo dovoljno prostora za upotrebu terminala. To je mali šupalj stub čiji je unutrašnji prečnik 8 mm, spoljašnji 18 mm, a visina 30 mm.
Radno okruženje
- Ne postavljajte ovu opremu u ograničeni prostor kao što su police za knjige ili njima sličan nameštaj. Ne koristite uređaj u blizini vlažnih i hladnih područja i štitite ga od pregrejavanja. Držati dalje od direktne sunčeve svetlosti.
- Uređaj ne koristiti blizu prašnjavih mesta.
- Ne stavljajte sveće na pristupačne otvorene delove kako zapaljivi materijal ne bi dospeo u unutrašnjost TV uređaja.
Mere opreza prilikom upotrebe daljinskog upravljača
- Koristite daljinski upravljač tako što ćete ga usmeriti ka senzoru za daljinsko upravljanje. Predmeti koji se nađu između daljinskog upravljača i senzora ometaće normalan rad.
- Ne dozvolite da daljinski upravljač bude izložen snažnim vibracijama. Osim toga, ne polivajte daljinski upravljač i ne ostavljajte ga na mestima koja su izložena velikoj vlazi.
- Ne izlažite daljinski upravljač direktnom uticaju sunca koje može uzrokovati njegovo deformisanje usled visokih temperatura.
- Daljinski upravljač neće funkcionisati kada je izložen direktnoj sunčevoj svetlosti ili jakom osvetljenju. Ukoliko se ovo desi, promenite osvetljenje ili poziciju TV uređaja ili približite daljinski upravljač senzoru.
Mere opreza prilikom upotrebe baterije
- Ukoliko funkcija snimanja ne radi, formatirajte vaš USB uređaj.
- Ako želite da zaustavite snimanje, pritisnite taster [■] i snimanje će se zaustaviti.
Napomena: (A) Tokom režima snimanja ne možete menjati kanale ili birati druge funkcije. (B) Ako se signal prekida ili nestaje tokom snimanja, snimanje će se zaustaviti dok se signal ponovo ne uspostavi. Ovo može uzrokovati gubljenje programskog sadržaja.
Snimanje timerom
Postoje dva načina za podešavanje tajmera za snimanje televizijskog programa.
Ukoliko znate detalje programiranja:
- Idite na kanal koji će emitovati program koji želite da snimite.
- Pritisnite taster EPG na daljinskom upravljaču da biste postavili EPG interfejs. Kanal koji gledate biće istaknut na ekranu koji se pojavi.
-
Pritisnite crveno taster na daljinskom upravljaču i udite u detalje programa u meniju za snimanje pritiskom na ▲/▼da biste izabrali stavku i ▲/▼da biste promenili podešavanja. Na primer, ako program počinje u 20:30 istog dana, unesite: 30 u prostor MINUTI, 20 u prostor SATI (pojaviće se 24-časovni sat), a zatim odgovarajući datum. Na isti način unesite vreme završetka snimanja.
-
Koristite odgovarajući režim snimanja: jednom, svakog dana ili sedmično.
-
Pritisnite ENTER da biste potvrdili vaš izbor. Pojaviće se raspored svih vaših snimanja (lista snimaka). Za više podataka pogledajte funkciju EPG u rasporedu.
NEMA SLIKE, NEMA ZVUKA
- Proverite da li su osigurač i prekidač ispravni.
- Uključite neki drugi električni uređaj u utičnicu kako biste proverili da li je uključena i ispravna.
- Proverite kontakt utikača i utičnice.
- Proverite izvor signala.
NEMA BOJE
- Proverite sistem boje.
- Podesite zasićenje boje.
- Proverite sliku na drugom kanalu.
DALJINSKI UPRAVLJAČ NE RADI
- Promenite baterije.
- Baterije nisu pravilno postavljene.
- Glavno napajanje nije povezano.
NEMA SLIKE, NORMALAN ZVUK
- Podesite osvetljenje i kontrast.
- Emitovanje može biti neuspešno.
NORMALNA SLIKA, NEMA ZVUKA
- Pritisnite taster za pojačavanje zvuka da biste pojačali zvuk.
- Zvuk je isključen, pritisnite MUTE da biste ga povratili.
- Promenite sistem zvuka.
- Emitovanje može biti neuspešno.
TALASI NA SLICI
Obično ih izazivaju lokalne smetnje kao što su kola, lampe ili fenovi za kosu. Podesite antenu da biste minimalizovali smetnje.
PRAZAN EKRAN U PC REŽIMU RADA (samo za modele s PC terminalima)
Moguće je da TV uređaj ne prepoznaje rezoluciju računara. Predlažemo da promenite na najbolju rezoluciju ili drugu standardnu rezoluciju sistema Windows. Podesite učestalost osvežavanja na 60 Hz.
SNEŽNE TAČKICE I SMETNJE
Ako se antena nalazi u području u kom je televizijski signal slab slika može biti poremećena tačkicama. Kada je signal ekstremno slab može biti neophodno instalirati specijalnu antenu da bi se poboljšao prijem.
- Podesite poziciju i orijentaciju unutrašnje/spoljašnje antene.
- Proverite konekciju antene.
- Fino podešavanje kanala.
- Probajte drugi kanal. Emitovanje može biti neuspešno.
PALJENJE
Pojavljuju se crne tačke ili horizontalne pruge ili slika leluja i pomera se. Ovo je obično uzrokovano smetnjama od sistema paljenja kola, neonskim lampama, električnim bušilicama ili drugim električnim uređajima.
DUH
Duhove uzrokuje telefizijski signal koji ima dva puta. Prvi je direktan put, drugi se reflektuje o visoke zgrade, brda i druge predmete. Prijem možete poboljšati menjanjem pravca ili položaja antene.
SMETNJE U RADIO FREKVENCIJI
Ove smetnje uzrokuju talasanja ili dijagonalne pruge i, u nekim slučajevima, gubljenje kontrasta na slici. Otkrijte šta je u pitanju i uklonite izvor radio interferencije.
Napomena:
- UDHËZIM PËR PËR
- Note
- WARNINGS AND PRECAUTIONS
- Important Safety Instructions
- Warning for Apparatus containing COIN / BUTTON CELL BATTERIES
- WARNING
- CAUTION
- WEEE Directive
- Positioning of the TV Set
- Mounting on a Wall
- Note:
- Operating Environment
- Precautions For Using Remote Control
- Precautions For Using Battery
- Install Remote Control Battery
- PANEL BUTTONS
- Rocker Button
- Bottom view
- Press middle button:
- TERMINALS
- REMOTE CONTROL FUNCTIONS
- Remote Control
- TELETEXT BUTTONS
- HOLD
- Other Buttons
- MIX
- SUB-PAGE
- CANCEL
- RECORDER (REC)
- IMPORTANT NOTES:
- Instant one-touch recording and playback
- Timer recording
- If you know the programming details:
- ELECTRONIC PROGRAM GUIDE (EPG)
- Recorder
- Info
- Schedule
- Remind
- MENU SETTINGS
- Menu Operation (DTV Mode)
- Picture
- Sound
- Channel
- Auto Tuning
- Advanced Tuning
- Satellite Dish Settings (Step 1-3, refer to Fig. 1)
- DTV Manual Tuning
- ATV Manual Tuning
- Fine-Tune
- Program Edit
- Signal Information
- CI Information
- 5V Antenna Power
- Software Update (OAD) (only for some regions)
- OAD Tuning (only for some regions)
- LCN ON/OFF (Only for some regions)
- Option
- OSD Language
- Audio Languages / Subtitle Languages (Note 1)
- TTX Language
- Time
- HDMI CEC
- REC File System (Note1)
- EWS Local Postal Codes(Only for some regions)
- Restore Default
- Software Update (USB)
- Lock
- Lock System
- Set Password
- Block Programme
- Parental Guidance
- Hotel Mode (Only for some regions)
- USB CONTROL
- USB Menu
- Reminder When Using the USB Player
- Play Movie
- Movie Control Bar
- Play & Pause/Stop/Prev./Next
- Fast Reverse / Fast Forward
- Play Mode
- Information
- Go to time
- Aspect Ratio
- Play Music
- MUSIC CONTROL BAR
- Play & Pause / Stop / Previous / Next
- Fast Forward / Fast Backward
- Browse Photo
- PHOTO CONTROL BAR
- Rotate
- Info.
- Zoom In / Zoom Out
- Move View
- TROUBLESHOOTING
- NO PICTURE, NO SOUND
- NO COLOR
- REMOTE CONTROL DOES NOT WORK
- NO PICTURE, NORMAL SOUND
- NORMAL PICTURE, NO SOUND
- UNORDERLY RIPPLES ON THE PICTURE
- BLANK SCREEN IN PC MODE
- (only for models with PC terminals)
- IGNITION
- GHOST
- SPECIFICATIONS
- ACCESSORIES
- LICENSE
- Përmbajtja
- Montimi në mur
- Shënim:
- Upozorenje za aparate koji sadrže OKRUGLE/DUGME BATERIJE
- Napomena:
- Radno okruženje
- Snimanje s tajmerom
- Ukoliko znate detalje programiranja:
- ELEKTRONSKI PROGRAMSKI VODIČ (EPG)
- Snimač
- Raspored
- Podsjetnik
- NEMA SLIKE, NEMA ZVUKA
- NEMA BOJA
- DALJINSKI UPRAVLJAČ NE RADI
- NEMA SLIKE, NORMALAN ZVUK
- NORMALNA SLIKA, NEMA ZVUKA
- Pritisnite srednji gumb:
- Mere opreza prilikom upotrebe daljinskog upravljača
- Mere opreza prilikom upotrebe baterije
- Snimanje timerom
- NEMA BOJE
- TALASI NA SLICI
- PRAZAN EKRAN U PC REŽIMU RADA (samo za modele s PC terminalima)
- SNEŽNE TAČKICE I SMETNJE
- PALJENJE
- DUH
- SMETNJE U RADIO FREKVENCIJI
Brand : TESLA
Model : 32S307WH
Category : Television