VS-570F - Flash Bolt - Free user manual and instructions
Find the device manual for free VS-570F Bolt in PDF.


| Product Type | On-camera and wireless TTL automatic and manual flash |
| Compatible Cameras | Fujifilm (also compatible with Canon and Nikon TTL metering systems) |
| Guide Number | 141 ft / 43 m at 50mm focal length, ISO 100 |
| Flash Coverage | 24mm–105mm (18mm with built-in diffuser) |
| Flash Duration | 1/1,000 – 1/20,000 second |
| Recycle Time | 0.5–9 seconds with AA Ni-MH batteries |
| Manual Power Levels | 1/1, 1/2, 1/4, 1/8, 1/16, 1/32, 1/64 |
| Wireless Transmission | Optical pulse (master/slave) |
| Wireless Range | Up to 33 ft (10 m) front; 16–23 ft (5–7 m) sides |
| Slave Modes | Instant sync, skip one pre-flash, skip two pre-flashes |
| Power Source | 4 AA batteries (lithium, Ni-MH, or alkaline); optional external power pack |
| Tilt Range | 0°, 45°, 60°, 75°, 90° upward |
| Swivel Range | Left 0°–180°, Right 0°–120° |
| Display | 1.8-inch backlit LCD |
| Dimensions | 2.5 x 3.9 x 4.7 in (65 x 100 x 120 mm) |
| Weight | 9.2 oz (260 g) without batteries |
| Sync Modes | Front-curtain (default), rear-curtain (second-curtain) via camera setting |
| Zoom Control | Automatic or manual, 7 positions: 24mm, 28mm, 35mm, 50mm, 70mm, 85mm, 105mm |
| Built-in Features | Reflector panel, diffuser panel, test button, power-saving mode, wireless ready indicator |
| Firmware Upgrade | Via dedicated socket and online instructions |
| Warranty | One-year limited warranty |
Frequently Asked Questions - VS-570F Bolt
User questions about VS-570F Bolt
0 question about this device. Answer the ones you know or ask your own.
Ask a new question about this device
Download the instructions for your Flash in PDF format for free! Find your manual VS-570F - Bolt and take your electronic device back in hand. On this page are published all the documents necessary for the use of your device. VS-570F by Bolt.
USER MANUAL VS-570F Bolt
natural_image
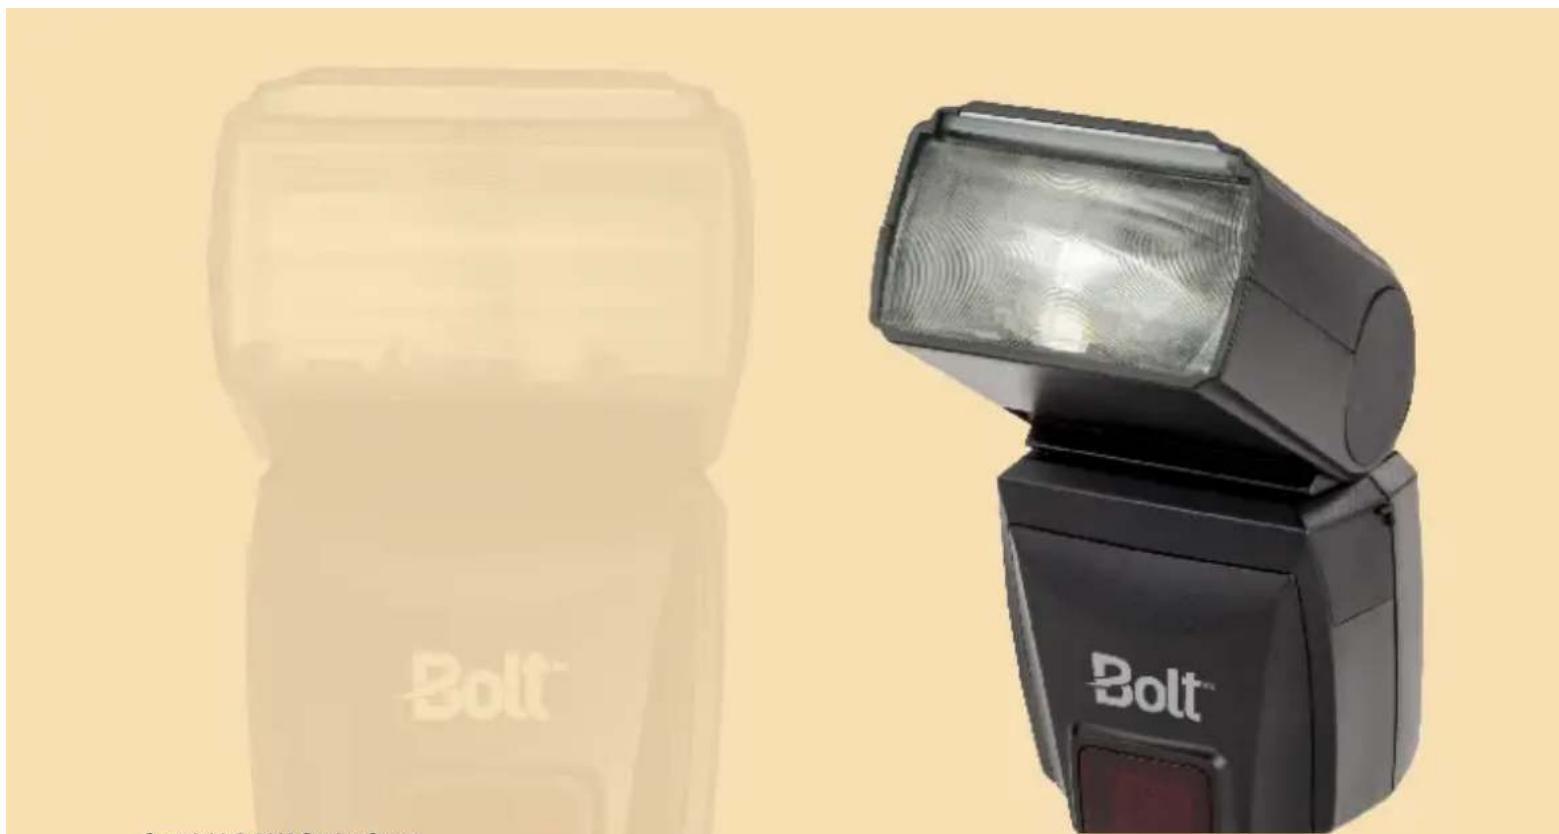
Close-up of a Bolt-branded flash unit with no visible text or symbols on its bodyVS-570F for Fujifilm
WIRELESS TTL FLASH
User's Manual
natural_image
Two black Bolt flash units shown side by side against a plain background (no text or symbols on the devices themselves)Copyright © 2016 Gradus Group.
Bolt and other names of Bolt products are trademarks of Gradus Group. Other product and corporate names mentioned herein are trademarks of their respective holders.
Introduction
Thank you for choosing the Bolt VS-570F Wireless TTL Flash. This advanced digital flash unit puts creative control in your hands with a broad range of automatic and manual features. It can be used as both an on-camera flash and an optical wireless master or slave. Among the benefits you'll enjoy:
- Compatible with Fujifilm, Canon, and Nikon metering systems
• Optical wireless TTL control
• Automatic and manual zoom from 24mm to 105mm - Tilt and swivel head: 90^ up, 120^ right, and 180^ left
• 1.8-inch backlit LCD - Seven manual flash levels: full to 1/64 power
- Rear-curtain sync
• Built-in reflector and diffuser panels
• Automatic power-saving function - Upgradeable firmware
Contents
Overview 6-9
Warnings 10–11
Installing Batteries 12
Mounting the Flash 13–14
Turning on the Flash and Firing a Test....15
Extended Interface....16
Using the Automatic TTL Flash Mode 17
Using Flash Exposure Compensation....18
Using the Manual Flash Mode....18-19
Controlling Flash Coverage (Zoom) 20-22
Bouncing Your Flash....23–24
Using Rear- or Second-Curtain Synchronization 25
Using the VS-570F as a Wireless TTL Slave....26-27
Using Your VS-570F as a Wireless Manual Flash....28-29
Positioning Remote Flash Units 30-31
Upgrading the Firmware on the VS-570F....31
Troubleshooting 32-33
FCC Notices....33
Specifications 34
Guide Number Chart 35
One-Year Limited Warranty 36
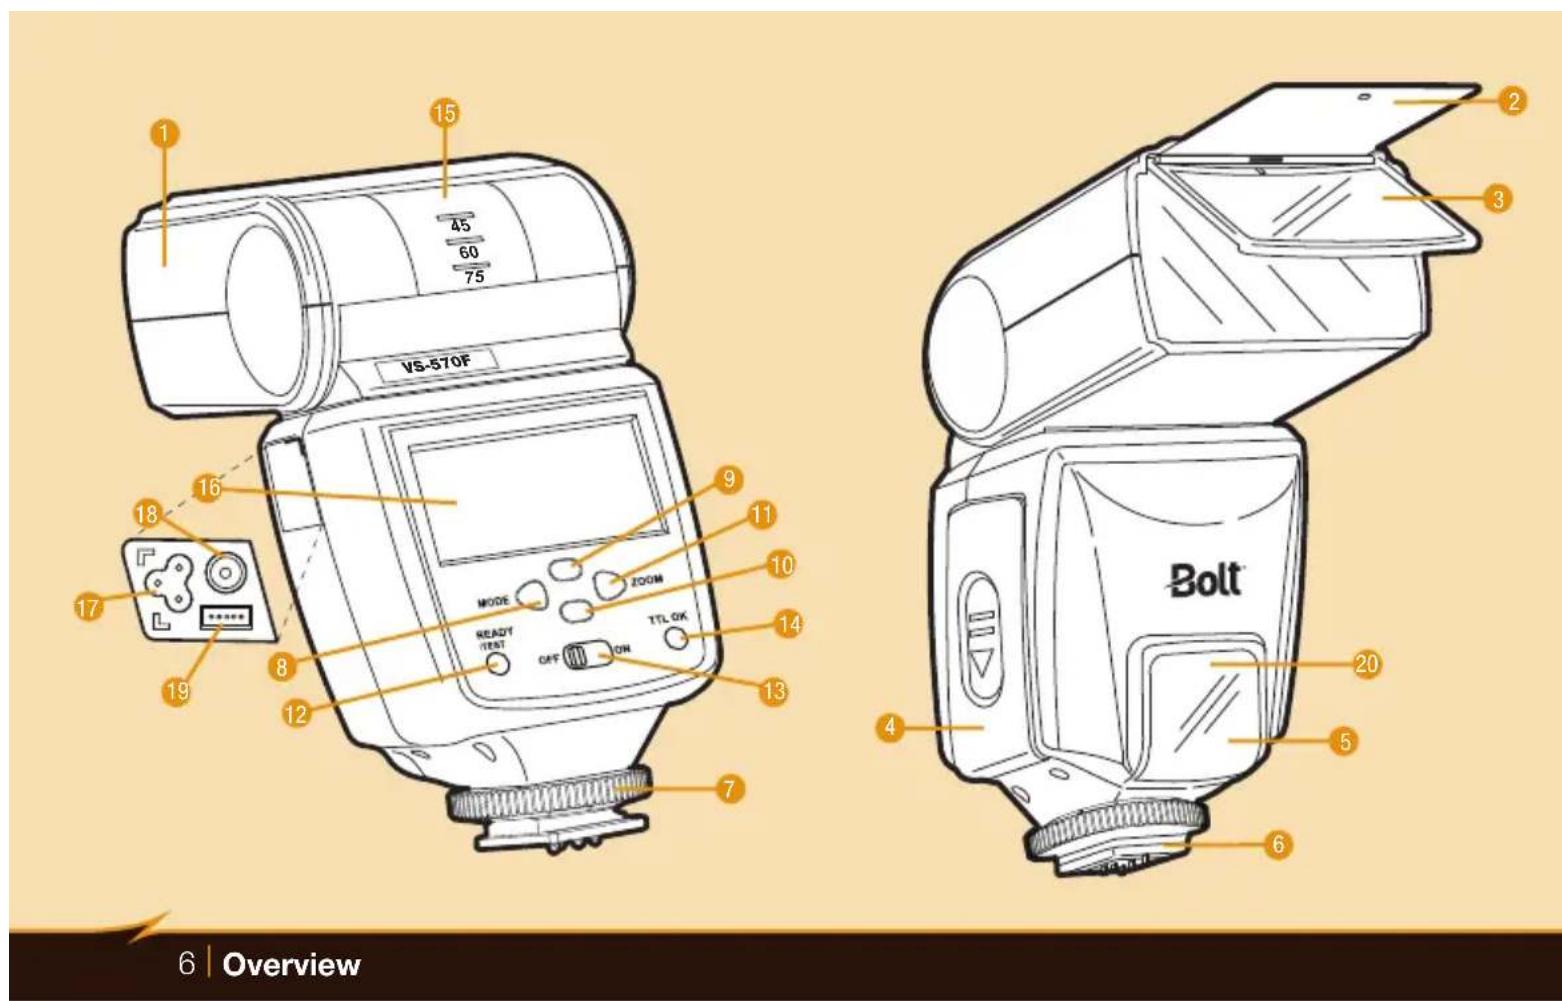
Overview
- Flash head
- Reflector panel
- Diffuser panel
- Battery compartment cover
- Wireless sensor (optical)
- Mounting foot
- Mounting foot lock
- Mode button
- Up button
- Down button
- Zoom position button
- Ready light / Test button
- Power switch
-
Automatic exposure confirmation light
-
Flash head position indicator
- LCD
- External power socket
- PC sync socket
- Firmware upgrade socket
- Wireless ready indicator light
natural_image
Line drawing of a 3D object resembling a container or mechanical part, with no visible text or symbols.Overview
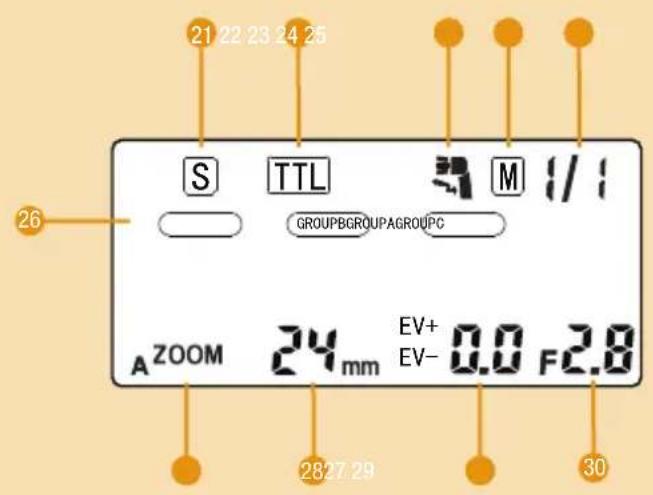
- Slave mode
- TTL mode
- Wireless TTL mode
- Manual mode
- Manual flash output
- Groups
- Zoom mode
- Zoom position
- Flash compensation value
- Camera aperture (f-stop)
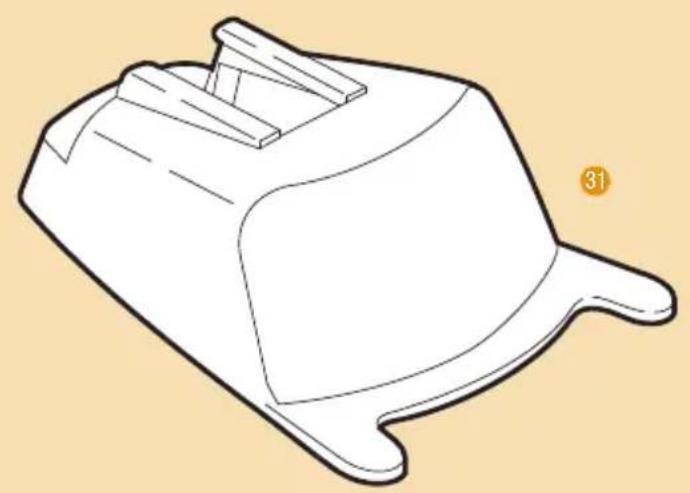
- Stand / Tripod mount
Warnings
Before using your VS-570F, please read the following safety notices carefully and thoroughly to ensure safe use, and to help prevent damage to your flash or injury to yourself or others.
- Do not fire the flash at close range directly into the eyes of people or animals. This can cause damage to the retina and may even lead to blindness.
- To avoid overheating and damaging your flash unit, please wait for at least 10 minutes after 20 continuous flashes at full power.
- Do not disassemble or attempt to repair this product yourself. There are high-voltage components inside that can produce a hazardous electric shock.
- Keep this product and its batteries out of reach of children.
- Use only the power sources specified in this manual.
• Always switch the flash off before changing the batteries. - Always install AA batteries of the same type, brand, and age. Do not combine different types or brands, or old and new batteries. This could cause batteries to leak, overheat, or explode.
- Install batteries in the proper orientation, according to the indicator in the battery chamber. Installing batteries in the reverse orientation could cause them to leak, overheat, or explode.
-
Do not use or store the VS-570F in flammable conditions (such as environments containing flammable gases or liquid chemicals). This could damage the flash, start a fire, or cause an electric shock.
-
Do not clean the VS-570F with agents containing corrosive or flammable substances such as paint thinner, benzene, or nail polish remover.
- This product is not water resistant. Keep it away from rain, snow, humidity, and general moisture.
- Should the VS-570F get damaged, do not touch any exposed interior metal parts. If touched, they may generate an electric shock or cause a malfunction. Promptly remove the batteries and take the product to an authorized service center for repair.
- If you detect excessive heat, smoke, or a burning smell coming from the flash, immediately stop operation and remove the batteries to prevent the product from igniting or melting. Take the product to an authorized service center for repair.
- Do not drop or otherwise cause a strong physical impact to the VS-570F, as this could cause a malfunction that may cause it to explode or ignite.
- Remove all batteries from the VS-570F before long-term storage in order to prevent the product from igniting or leaking corrosive liquids.
- Do not store or use this product at temperatures above 104^ (40°C).
- Keep the metal contacts in the battery compartment clean and free of corrosion and dirt. Do not touch them with your fingers. Corrosive elements on the contacts can damage the VS-570F and prevent it from functioning properly. Contacts may be cleaned with isopropyl alcohol on a cotton swab.
- Dispose of used batteries properly. Never heat them or throw them into a fire, as this could cause the batteries to leak corrosive liquids, generate heat, or explode.
Installing Batteries
The VS-570F can be powered by four AA batteries of several types:
- Lithium (1.5 V)
• Nickel-metal hydride (NiMH) (1.2 V) - Alkaline (1.5 V)
Note: For the fastest recycle times and longest battery life, lithium or NiMH batteries are recommended.
To install batteries, make sure the VS-570F is turned off and follow these steps:
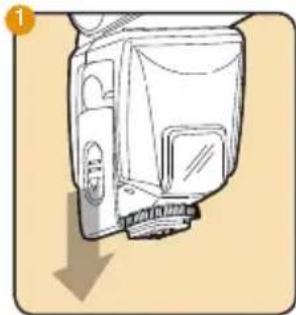
- Press on the battery compartment cover and slide it in the direction of the arrow to remove it.
- Insert batteries in the orientations indicated by the illustration inside the compartment.
- Replace the battery compartment cover by pressing and sliding it into place in the opposite direction of the arrow on the cover.
natural_image
Diagram of a device with a downward arrow indicating motion or force (no text or symbols present)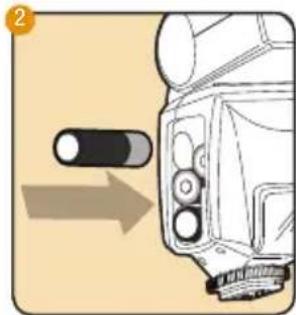
natural_image
Diagram of a camera with an arrow pointing to the left side of the lens (no text or symbols present)Important! Replace all four batteries at the same time. Do not mix battery types or brands, or use old and new batteries together.
Mounting the Flash
To mount the flash on your camera, make sure the VS-570F is turned off and follow these steps:
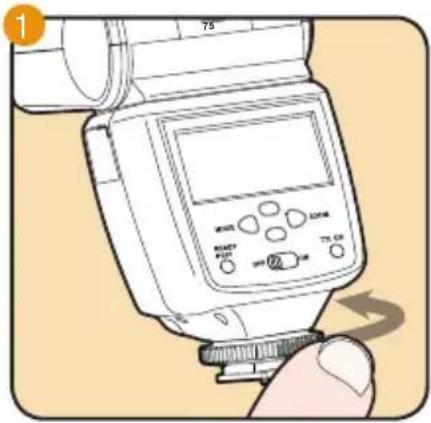
- Turn the mounting foot lock counterclockwise to loosen it.
- Slide the mounting foot all the way into your camera's hot shoe.
- Turn the mounting foot lock clockwise until snug.
Do not overtighten.
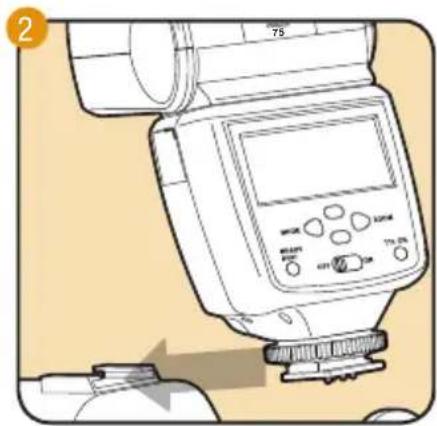
To dismount the flash from your camera, make sure the VS-570F is turned off and follow these steps:
- Turn the mounting foot lock counterclockwise to loosen it.
- Slide the mounting foot out of your camera's hot shoe.
Mounting the VS-570F on the included stand:
You can mount the VS-570F on the included stand in the same way you would mount it on your camera. This allows you to set the flash up on a flat surface or to attach it to a tripod head, light stand, or clamp that has a compatible 1/4"-20 screw mount.
Turning On the Flash and Firing a Test
To turn the flash on, simply slide the power switch to the On position.
When the flash is ready to fire, the Ready light will glow red. If the flash is mounted on your camera, a flash icon will also appear in the camera's viewfinder.
To fire a test flash, press the Ready light / Test button.
Automatic power-saving function: After 3 minutes of inactivity, the flash will automatically enter power-saving mode to conserve battery life. The LCD will display a single OFF indicator, and the Ready light will turn off. To reactivate the VS-570F, simply press any button on the control panel, or tap your camera's shutter-release button. During long periods of inactivity, it is recommended that you use the power switch to turn the flash off completely.
LCD illumination: When a button is pressed, the LCD will be illuminated for about 5 seconds.
Extended Interface
You can connect your VS-570F to an external power source or PC sync via the extended interface on the side of the flash.
External power source: An external power source, such as the Bolt Cyclone Battery Pack, can greatly increase the battery life of your flash and reduce the recycle time in between flashes.
Important: When an external power source is plugged into the flash, the AA batteries must still be in the flash in order for it to operate.
PC Sync: You can synchronize your VS-570F with a camera by running a PC cord between your camera and the VS-570F's PC sync socket. This lets you position the flash away from the camera, thus giving you more lighting options.
Note: The PC sync socket on the VS-570F is only for synchronous signal input, and not output.
To access the extended interface, follow these steps:
- Pull back the contact cover on the side of the flash.
- Plug the cable into the corresponding socket.
A. For an external power source, plug the Bolt B0-1011 power cable (sold separately) into the external power source socket.
B. For PC sync, plug a PC cord into the PC sync socket.
Using the Automatic TTL Flash Mode
When the VS-570F is mounted on a compatible camera, it can set the appropriate flash level automatically, in conjunction with the camera's through-the-lens (TTL) metering system. To use the automatic mode, mount the flash on the camera and follow these steps:
- Each time you turn the flash on, it will be in automatic mode. This will be confirmed by the TTL mode indicator on the LCD. If the flash has been set to another mode, press the Mode button repeatedly to cycle through the flash modes until "TTL" or is shown on the LCD.
- Make sure your camera is set on a programmed or automatic mode, or on a priority mode such as aperture priority.
- Press the shutter-release button on your camera halfway to ensure that the camera is communicating with the flash. The camera's aperture setting will be displayed on the flash LCD, and a flash icon will appear in the camera's viewfinder.
- Press your camera's shutter-release button to take the picture. The Confirmation light below it will glow green momentarily to indicate that the proper exposure was attained.
The aperture indicator on the VS-570F provides readouts up to f/11, in full-stop increments. The indicator will display the f-stop closest to your current camera setting.
Note: The aperture setting may not appear with all cameras.
Using Flash Exposure Compensation
In automatic TTL mode, you can use flash exposure compensation to adjust the VS-570F's flash output incrementally, just as you would adjust exposure with the exposure compensation function on your camera.
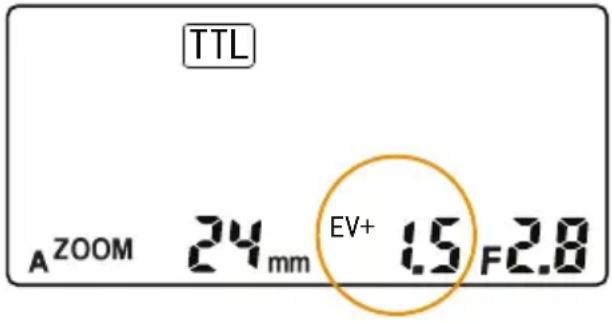
To apply flash exposure compensation, press the up or down buttons on the flash to increase or decrease flash exposure by 1/2 stop—up to 3 stops total. The LCD will display EV+ or EV- next to the exposure value to indicate whether it is increased or decreased.
Using the Manual Flash Mode
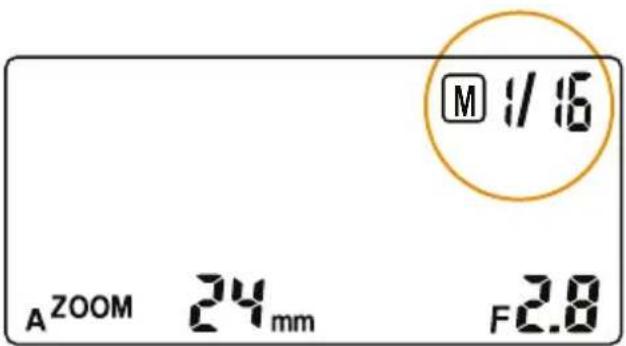
You can also set the VS-570F's flash output level manually for greater creative control over your images. Seven manual settings are available: 1/1, 1/2, 1/4, 1/8, 1/16, 1/32, and 1/64. The 1/1 setting is the full-power flash, and each successive setting halves the light output. To use the manual mode, turn the flash and camera on and follow these steps:
- Press the Mode button repeatedly to cycle through the flash modes until "M" and the flash output level indicator show on the LCD. Press the up or down buttons to set the desired flash output level. The output level will cycle through in both directions.
- Set the exposure settings you want to use on your camera. The highest shutter speed available will be your camera's flash sync speed.
- Take a test shot and check the exposure on your camera's LCD.
- Adjust your camera's exposure settings and the light output level of the flash as needed.
- Press your camera's shutter-release button to take the picture.
Note: For best results, a handheld light meter is recommended when using the manual flash mode.
To avoid overheating and damaging your flash unit, please wait for at least 10 minutes after 20 continuous flashes at full power. The flash will automatically shut off if it gets overheated.
Controlling Flash Coverage (Zoom)
The VS-570F's angle of coverage can be adjusted ("zoomed") to match the focal length of your lens, so that your image is evenly illuminated from edge to edge.
When the flash zoom setting is adjusted, the position of the reflectors inside the flash head shift in order to make the angle of coverage wider or narrower.
The available zoom positions are 24mm, 28mm, 35mm, 50mm, 70mm, 85mm, and 105mm.
Automatic zoom control: When you turn the VS-570F on, the zoom mode indicator on the LCD will show an A to indicate that it is in automatic mode and at the default 35mm position. When you press the shutter-release button on your camera halfway to initiate
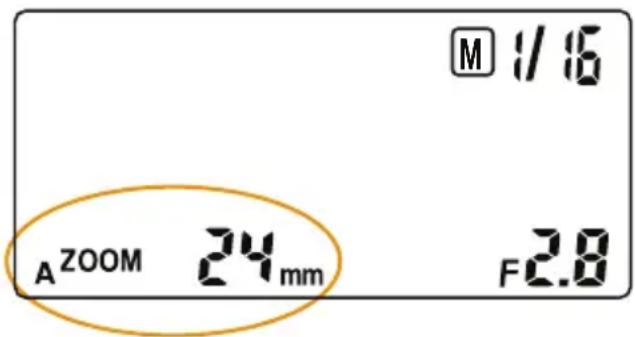
communication between the camera and the flash, the flash zoom will adjust to match the lens focal length and the closest zoom setting will be displayed on the LCD. If you zoom your lens, the flash zoom setting will change automatically.
When the flash head is angled up or swiveled to the side, the zoom position is set to 50mm. The “50mm” indicator will flash on the LCD, and the zoom can then be manually adjusted (see below).
Note: Older cameras that do not offer digital data transmission with the flash do not support the automatic flash zoom control. The manual zoom control must then be used.
Manual zoom control: To manually select a setting that corresponds to the focal length of your lens, press the Zoom button to make the M indicator for manual mode appear. Then continue to press the button to cycle through the available focal length settings.
Note: Manual zoom can also be used to achieve special effects, such as using the 105mm setting with a wide-angle lens to produce a vignette.
Using the flash with wide-angle lenses: When you have a lens wider than 24mm mounted on your camera, you can use the built-in diffuser panel to give the flash an angle of coverage equivalent to that of an 18mm lens.
To use the diffuser:
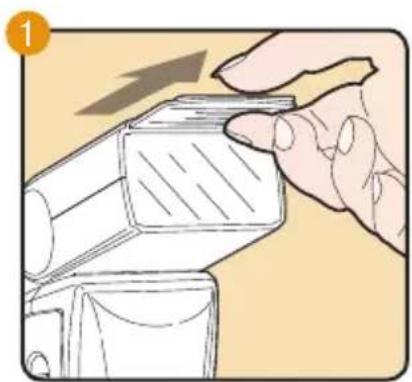
- Pull the diffuser and reflector panels out of their slot in the flash head.
- Push the reflector back in, and let the diffuser lay flat against the flash lens.
The diffuser also softens the light, providing an alternative when no surface is available for bouncing
the flash (see Bouncing Your Flash on page 23).
natural_image
Illustration of a hand pressing down on a mechanical component (no text or symbols visible)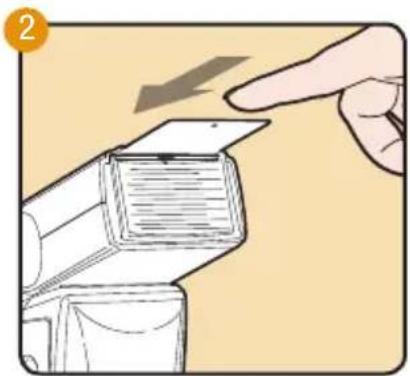
natural_image
Illustration of a hand interacting with a device, showing a finger pressing down on a screen (no text or symbols present)Bouncing Your Flash
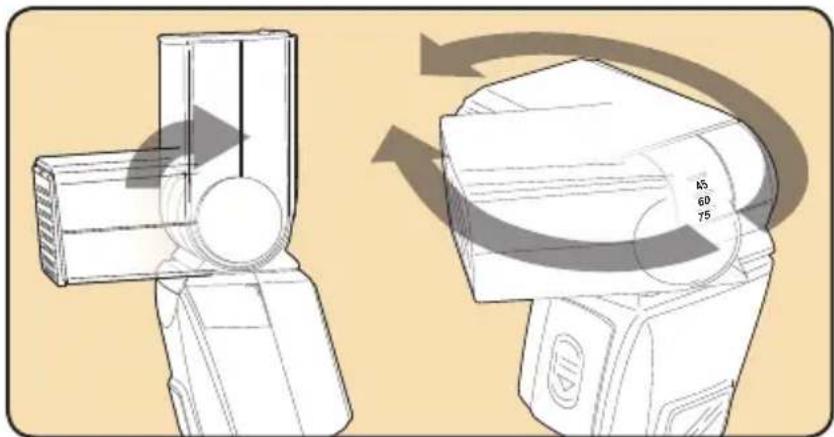
Using flash to directly illuminate a subject often creates harsh, unnatural, and unattractive shadows. To avoid this, the flash can be tilted or swiveled, allowing you to aim your flash at a large white or neutral-colored surface, such as a ceiling, a wall, or a reflector. The light will bounce off of the larger surface before striking your subject to provide softer, more natural illumination.
The VS-570F flash head can be tilted up at 45^ , 60^ , 75^ , and 90^ angles to the lens. It can also be swiveled horizontally 180^ to the left and 120^ to the right.
When bouncing your flash, you may need to adjust your exposure settings, since the level of light falling on your subject will be reduced. The farther away the bounce surface and your subject are, the more illumination will be reduced.
natural_image
Technical illustration of a mechanical device with two views showing internal components and rotation arrows (no text or symbols)Tip: Bouncing your flash off of colored surfaces can create a color cast in your images. Bouncing off of a white or neutral-colored surface will not alter the color of the light, while bouncing off of a gold-toned surface can give portraits a warmer look. Other colors, while usually not desirable, can be used for creative effects.
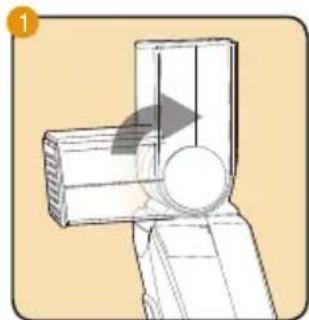
Creating catchlights: Catchlights are the reflections that appear in people's eyes in photographs. Without catchlights, eyes can have a dull, lifeless look. To create catchlights in your subjects' eyes when bouncing your flash, follow these steps:
- Position the flash head at the 90° angle (pointing straight up) to bounce your flash off the ceiling or an overhead reflector.
- Pull the built-in reflector and diffuser panels all the way out of their slot in the flash head. Push the diffuser back in while leaving the reflector extended.
natural_image
Diagram of a mechanical joint or bracket with an arrow indicating direction (no text or symbols present)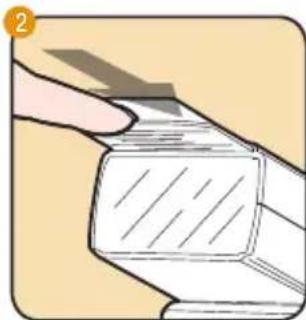
natural_image
Illustration of a hand holding a rectangular object with a diagonal hatching, no text or symbols presentUsing Rear- or Second-Curtain Synchronization
When you photograph a moving subject with a slow (1/30 second or longer) shutter speed and a flash, the flash will freeze the moving subject, and the long exposure will cause motion blur and light trails to appear in the image, especially in low light.
This “slow-sync” flash technique, also referred to as “dragging the shutter,” can be applied in two different ways: The flash can be synchronized with the camera’s shutter release so that it fires at the beginning of the period when the shutter opens, or it can fire near the end of that period.
The former is called “front-curtain” or “first-curtain” flash sync, and the latter is called “rear-curtain” or “second-curtain” sync. Front-curtain sync causes motion blur and light trails to appear in front of moving subjects, while rear-curtain sync makes them appear behind moving subjects. That means rear-curtain sync creates a more realistic impression of movement.
The VS-570F supports rear-curtain sync modes on cameras that offer the setting. Consult your camera's manual to find out how to activate it. Use your camera's manual or shutter-priority mode to control the amount of blurring and light trails you capture by varying the shutter speed.
Using the VS-570F as a Wireless TTL Slave
You can set the VS-570F as a wireless TTL slave for both the Nikon and Canon TTL systems. This enables you to use a Nikon or Canon wireless TTL master to control the VS-570F as a slave flash unit.
To set the wireless TTL slave mode, follow these steps:
- Make sure the master flash or controller on your camera is turned on and set to automatic TTL mode.
-
Select the appropriate group and channel on the master unit. Consult the master's manual for more information on this topic.
-
Press the VS-570F's Mode button repeatedly to cycle through the flash modes until the Wireless TTL mode icon appears on the LCD. Use the up or down navigation buttons to select Nikon or Canon TTL slave modes.
A. For Nikon TTL slave mode, the N-TTL indicator will appear onscreen. Press the Mode button to confirm, and the LCD will display i-TTL.
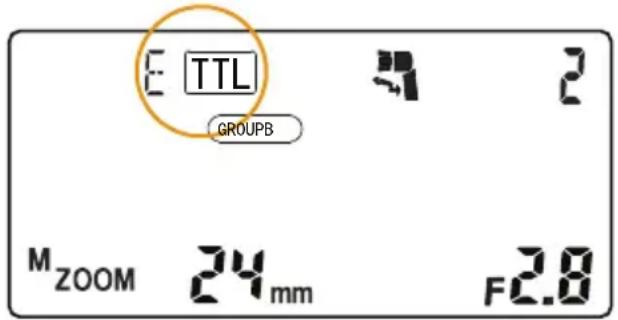
B. For Canon TTL slave mode, the C-TTL indicator will appear onscreen. Press the Mode button to confirm, and the LCD will display E-TTL.
- Use the up or down navigation buttons to select the channel and group. The flash will cycle through channel 1, groups A through C; then channel 2, groups A through C; and so on.
A. When using a single slave flash, set it to the same group and channel as the master. B. When using multiple slave flashes, select the same group and channel for all units in
the same light position. For example, if your setup includes three slave flashes, you can set two as a main light on channel 1, group A, and set the third as a fill light on channel 1, group B.
- If desired, adjust the flash coverage angle by pressing the Zoom button repeatedly.
- Make sure that the red light on the front of the VS-570F is blinking. This indicates that the unit is ready to fire in wireless TTL slave mode.
Using Your VS-570F as a Wireless Manual Flash
For even greater creative control, you can set the output levels of your remote flash units manually.
Using the optical slave feature, the VS-570F can be set to fire whenever it detects a signal from the masterflash. This works optically—when the VS-570F “sees” another flash firing, it will instantaneously fire along with it.
Setting the remote flash units manually: To set a VS-570F flash unit to function as a slave with the output level selected manually, follow these steps:
- In Manual mode, use the up and down buttons to select the power output (1 through 1/64).
- Press the Mode button once to enter Slave mode. The slave mode [S] icon will appear on the LCD display.
- Set the slave mode as desired (See Setting the slave mode on page 29).
- If desired, adjust the flash coverage angle by pressing the Zoom button repeatedly.
- Make sure that the master flash on your camera is on and set to the appropriate mode. If you don't want the master flash to illuminate a subject in front of the camera, tilt the head upward.
Setting the slave mode:
Depending on your camera and flash settings, the master flash may emit more than one burst of light in quick succession (called a “pre-flash”). Pre-flash is used to help the camera meter and/or focus, and is done automatically by the camera. If the slave flash is not set correctly, it may be triggered by the pre-flash and fire before the camera’s shutter opens. In order to ensure that the VS-570F fires at the correct time, there are three different slave modes available: modes 0, 1, and 2. To select the correct slave mode, follow these steps:
- Make sure the flash is in slave mode.
- Press the Up and Down buttons to cycle through the slave mode options on the LCD.
A. In mode 0, the flash will fire on the first (or only) burst of light. Use this mode when the master flash is set to manual.
B. In modes 1 and 2, the slave will ignore either one or two pre-flashes, respectively. Use these modes when the master flash is set to TTL or automatic modes. Whether the master emits one pre-flash or two will depend on the camera and settings—always take a test exposure to ensure that the slave is set correctly.
Important! Some cameras, when set to red-eye reduction, will emit a series of quick flashes lasting a second or more. This may not work properly with any slave mode. We suggest you avoid using red-eye reduction when using the VS-570F as a slave.
Positioning Remote Flash Units
You can create a professional lighting setup by positioning remote units singly or in groups to function as main, fill, accent, and other lights. Metering your scene with a handheld light meter and setting your light ratios to achieve specific looks will give you a professional level of creative control.
When positioning wireless slaves to light a subject, keep in mind the following:
- The effective communication range between master and remote flash units is approximately 33 feet (10 meters) in the front position, and approximately 16 to 23 feet (5 to 7 meters) at both sides. These ranges may vary, depending on the ambient light.
- The flash head should not be aimed directly into the camera lens.
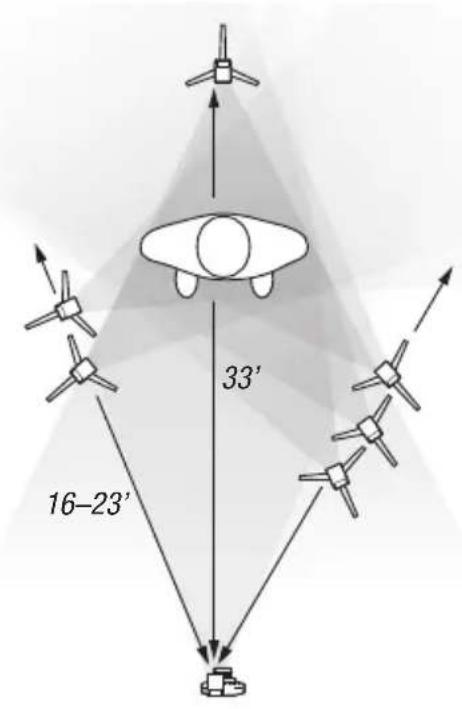
- The wireless sensors are located on the front of the VS-570F. Make sure that sensor is facing the master flash and that there is no obstruction between the two units.
- When photographing outdoors or in bright ambient light, the sensors can be overwhelmed by ambient light, which will lower their sensitivity.
- To avoid creating interference between flash units, using more than three in a single group is not recommended.
Upgrading the Firmware on the VS-570F
In order to ensure compatibility with future cameras, the VS-570F's firmware may be updated. This can be done to ensure proper communication with new cameras, or to add new features.
Visit www.boltflashes.com/firmware to check if a new firmware version has been released. Follow the online instructions to upgrade.
Troubleshooting
| Problem Solution | |
| The flash is stuck in the camera hot shoe. | Make sure that the mounting foot lock is released (Page 13). |
| The flash is turned on but won’t fire. | Make sure that fresh batteries are installed and in the proper orientation (Page 12). |
| The flash is set up as a wireless TTL slave but won’t fire. | Make sure that the master flash is within the transmission range and the wireless sensor on the slave is pointing toward the master flash. Remove any obstructions in the line of sight between the two (Page 30).The ambient light may be too high (Page 31). |
| The flash is set up as a manual (optical) slave, but the light is not noticeable in the picture. | Make sure that the flash is set to the appropriate slave mode (Page 29). |
| The edges of images look dark. Make sure that the flash zoom setting corresponds to the focal length of your lens (Page 20). | |
| There’s a whining sound coming from the flash. | This is normal and does not indicate a malfunction. When the flash becomes warm from continuous use, vibrations inside the unit may cause this sound. It will dissipate as the unit cools. |
FCC Compliance
This device complies with Part 15 of the FCC Rules. Operation is subject to the following two conditions:
- This device may not cause harmful interference.
- This device must accept any interference received, including interference that may cause undesired operation.
Specifications
Type: On-camera and wireless TTL automatic and manual flash
Compatible cameras: Fujifilm cameras
Guide number (at 50mm focal length, ISO 100): 141 feet / 43 meters
Flash coverage: 24mm–105mm (18mm with diffuser panel)
Flash duration: 1/1,000–1/20,000 second
Flash recycle time: 0.5–9 seconds (AA Ni-MH)
Manual mode power output: 1/1, 1/2, 1/4, 1/8, 1/16, 1/32, 1/64
Wireless transmission method: Optical pulse
Wireless transmission range: Up to 33 feet (10 meters)
Slave timing modes: Instant sync, skip one pre-flash, skip two pre-flashes
Power source: 4 AA lithium, Ni-MH, or alkaline batteries; optional external power source
Tilt positions: 0^ , 45^ , 60^ , 75^ , 90^
Swivel range: Right 0°–120°, Left 0°–180°
Dimensions: Approx. 2.5" × 3.9" × 4.7" (65 × 100 × 120 mm)
Weight: Approx. 9.2 oz. (260 g) without batteries
Guide Number Chart*
| Zoom Position GN - Meters GN - Feet | |
| 24mm 34 112 | |
| 28mm 36 118 | |
| 35mm 38 125 | |
| 50mm 43 141 | |
| 70mm 45 148 | |
| 85mm 47 154 | |
| 105mm 50 164 | |
*at ISO 100
One-Year Limited Warranty
This BOLT product is warranted to the original purchaser to be free from defects in materials and workmanship under normal consumer use for a period of one (1) year from the original purchase date or thirty (30) days after replacement, whichever occurs later. The warranty provider's responsibility with respect to this limited warranty shall be limited solely to repair or replacement, at the provider's discretion, of any product that fails during normal use of this product in its intended manner and in its intended environment. Inoperability of the product or part(s) shall be determined by the warranty provider. If the product has been discontinued, the warranty provider reserves the right to replace it with a model of equivalent quality and function.
This warranty does not cover damage or defect caused by misuse, neglect, accident, alteration, abuse, improper installation or maintenance. EXCEPT AS PROVIDED HEREIN, THE WARRANTY PROVIDER MAKES NEITHER ANY EXPRESS WARRANTIES NOR ANY IMPLIED WARRANTIES, INCLUDING BUT NOT LIMITED TO ANY IMPLIED WARRANTY OF MERCHANTABILITY OR FITNESS FOR A PARTICULAR PURPOSE. This warranty provides you with specific legal rights, and you may also have additional rights that vary from state to state.
To obtain warranty coverage, contact the BOLT Customer Service Department to obtain a return merchandise authorization ("RMA") number, and return the defective product to BOLT along with the RMA number and proof of purchase. Shipment of the defective product is at the purchaser's own risk and expense.
For more information or to arrange service, visit www.boltflashes.com or call Customer Service at 212-594-2353.

BOLT™
A Gradus Group Brand
Product warranty provided by the Gradus Group.
www.gradusgroup.com
BOLT is a registered trademark of the Gradus Group. © 2016 Gradus Group LLC. All Rights Reserved.
GG1
97263
- VS-570F for Fujifilm
- Introduction
- Contents
- Overview
- Warnings
- Installing Batteries
- The VS-570F can be powered by four AA batteries of several types:
- To install batteries, make sure the VS-570F is turned off and follow these steps:
- Mounting the Flash
- Mounting the VS-570F on the included stand:
- Turning On the Flash and Firing a Test
- Extended Interface
- To access the extended interface, follow these steps:
- Using the Automatic TTL Flash Mode
- Using Flash Exposure Compensation
- Using the Manual Flash Mode
- Controlling Flash Coverage (Zoom)
- To use the diffuser:
- Bouncing Your Flash
- Using Rear- or Second-Curtain Synchronization
- Using the VS-570F as a Wireless TTL Slave
- To set the wireless TTL slave mode, follow these steps:
- Using Your VS-570F as a Wireless Manual Flash
- Setting the slave mode:
- Positioning Remote Flash Units
- When positioning wireless slaves to light a subject, keep in mind the following:
- Upgrading the Firmware on the VS-570F
- FCC Compliance
- Specifications
- One-Year Limited Warranty
Brand : Bolt
Model : VS-570F
Category : Flash