RR-16-A - Remote control Bolt - Free user manual and instructions
Find the device manual for free RR-16-A Bolt in PDF.


| Product Type | Remote Control for Compatible Flashes and Monolights |
| Model | RR-16-A (Receiver) |
| Transmitter Frequency | 433 MHz |
| Effective Range | Approx. 150 ft (50 m) |
| Number of Channels | 16 |
| Number of Groups per Channel | 16 |
| Max Sync Speed | 1/250 sec |
| Transmitter Power | 2 AA batteries |
| Receiver Power | 5V from flash/monolight USB port |
| Transmitter Weight (without batteries) | 2.3 oz (65 g) |
| RR-16-A Receiver Weight | 0.7 oz (20 g) |
| RR-16-B Receiver Weight | 0.4 oz (12 g) |
| Transmitter Dimensions (body only) | 3.75 x 2 x 1.5 in (95 x 50 x 37 mm) |
| Transmitter Dimensions (with antenna) | 5.4 x 2 x 1.5 in (137 x 50 x 37 mm) |
| RR-16-A Receiver Dimensions | 2.2 x 1.2 x 1 in (57 x 30 x 27 mm) |
| RR-16-B Receiver Dimensions | 2.2 x 1.1 x 0.6 in (57 x 30.5 x 15.2 mm) |
| Controls per Group | Raise/Lower Flash Power, Model/AF Assist Light On/Off, Audio Alert On/Off |
| Global Controls | Test Fire (all groups) |
| Power Adjustment Increments | 1/10 stop (decimal mode) or 1/3 stop (fraction mode) |
| Warranty | One-Year Limited Warranty |
| Key Features | 16 channels, 16 groups, wireless control up to 150 ft, DIP switch channel selection, group-specific adjustments |
Frequently Asked Questions - RR-16-A Bolt
User questions about RR-16-A Bolt
0 question about this device. Answer the ones you know or ask your own.
Ask a new question about this device
Download the instructions for your Remote control in PDF format for free! Find your manual RR-16-A - Bolt and take your electronic device back in hand. On this page are published all the documents necessary for the use of your device. RR-16-A by Bolt.
USER MANUAL RR-16-A Bolt
RT-16
Remote System for Bolt Flashes
User's Manual
Introduction
The Bolt RT-16 system allows you to control all compatible monolights and strobes from one convenient location with a reliable, easy-to-use controller.
The RT-16 is a great solution to speed up and simplify your workflow. Whether you work with a few flashes in a single setup, or in a large studio with a number of sets with many lights, you will immediately see the advantage of being able to make adjustments to your lighting without the need to maneuver into crowded, hard to reach places.
You can adjust the power level of each flash or group of flashes in 1/10 or 1/3 stop increments as well as controlling model lamps or AF assist lamps, turning alert sounds on or off and test firing and triggering your entire lighting setup, all from a central location. The RT-16 also features 16 channels to avoid interference and false triggers, along with the ability to address 16 separate groups for precision control of your lighting.
You may even find that this convenience frees you to experiment with new ideas and styles. You'll discover creative ways to use your lighting to bring out your very best work.
Warnings
Before using this product, please read the following safety instructions carefully in order to ensure your safety and the proper operation of the RT-16 system. Failure to observe these precautions could result in product malfunction, fire or explosion, electric shock or other physical injury.
- Do not disassemble or modify. Should the product break open due to accidental damage, remove the batteries and send it to an authorized repair center.
- Keep dry. Do not handle with wet hands, immerse in water, or expose to rain or snow.
- Do not use in the presence of flammable gasses.
- Keep out of reach of children. This product contains small parts that may pose a choking hazard. Should a child swallow any part of this product, consult a physician immediately.
- Turn off the transmitter or receiver immediately should a malfunction occur. Should smoke or any unusual smell come from this product, shut it off and remove the batteries immediately. Send it to an authorized repair facility for service. Continued use may result in physical injury.
-
Do not expose to high temperature. Do not leave product in a closed vehicle in the sun or other areas subject to extremely high temperature.
-
Keep away from strong magnetic fields. Strong static or magnetic fields produced by devices such as cell phones and radios may lead to malfunction.
- Observe precautions when handling batteries. Batteries may leak or explode if improperly handled.
Please observe the following precautions when using batteries with this product.
- Use only batteries listed in this manual. Do not mix new and old batteries or different brand batteries.
- Read and follow all warnings and instructions provided by the battery manufacturer.
- Do not attempt to short-circuit or disassemble batteries.
- Do not put batteries in a fire or apply direct heat to them.
- Do not attempt to install batteries in the reverse direction.
- Batteries may leak when fully discharged. To avoid damage to the product, be sure to remove the batteries if the product will not be used for an extended period of time, or if the battery power is low.
- Should fluid from damaged batteries come into contact with skin or clothing, rinse immediately with fresh water.
Features
![Bolt® RT-16 11 32 ±0.7 GROUP ON [+] 1 2 3 4 CHANNEL SET SOUND LAMP TEST](/content/2026/06/1194691/images/7f588e2949f1631079f6ec348235785c5aa7e2a6f0989b116b3b1eb0bf1084f5.jpg)
• 16 channels
- Up to 16 groups
• 433 MHz
• Effective range 150' (50 m)
- Raise or lower flash power
- Model or AF Assist light On/Off
- Audio alert On/Off
• Test flash (triggers all groups)
NOTE: All flashes that you wish to control from the RT-16 must be equipped with a RR-16-A or RR-16-B Receiver. Additional flashes may be triggered using their optical slave function if available.
Using the RT-16
Installing Batteries in Transmitter
- Remove battery cover from unit.
- Insert two AA batteries, being sure to follow illustrations inside unit to properly position the positive (+) and negative (−) terminals.
- Replace battery cover.
Attaching the RT-16 Transmitter to Your
Camera: Rotate the locking wheel counterclockwise on the RT-16 until it is in the fully open (uppermost) position. You can also connect a PC cord from your camera to the unit's 3.5mm mini sync socket.
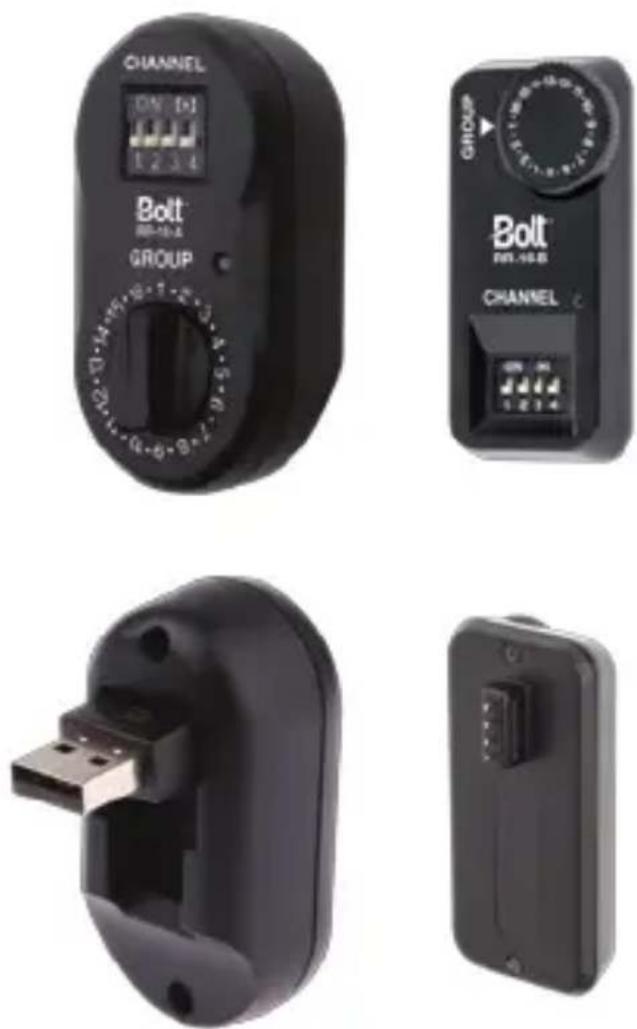
Attaching the RR-16-A Receiver to Your Compatible Flash or Monolight: Flip up
the USB connector on the RT-16 Receiver. Plug it into the USB port on your compatible flash or monolight.
Attaching the RR-16-B Receiver: Plug the connector pins into the appropriate socket on your compatible flash or monolight.
The receivers are powered directly from the flash or monolight, so no battery or external power is required. The Receivers have no On/Off switch. As soon as it is set and plugged in to an active, compatible flash or monolight, it will automatically begin to function.
Turning on the RT-16 Transmitter: To turn on the transmitter, slide the Power switch to the On position.
Setting the Channel: The RT-16 has 16 channels available for use. This allows you to avoid interference with other devices or photographers in a busy work environment, with each photographer operating on a different channel. Use the
DIP switches on the front panel of the transmitter and receiver to select the desired channel as shown on the DIP switch configuration chart.
In order for the transmitter and receiver to communicate with each other, both have to be set to the same channel.
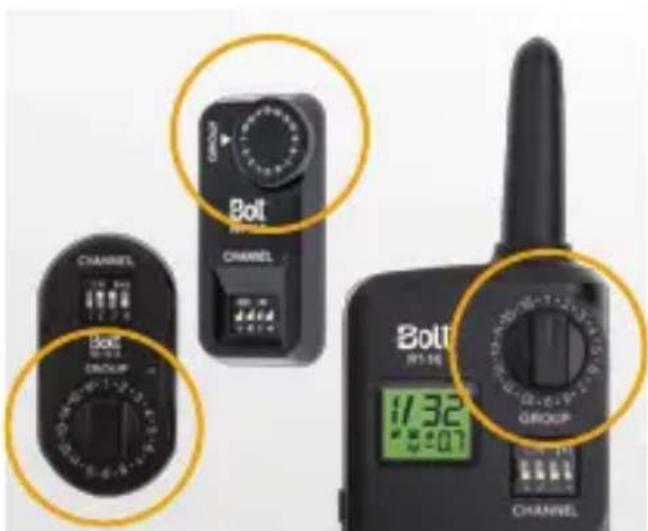
Selecting the Group on the RT-16: Use the Group Select dial to choose the group you want to adjust. A group can consist of just one flash up to any number of flashes you wish. The Group function allows you to adjust settings on specific flashes or groups of flashes from one location, without having to go to each flash and make those adjustments individually.
Group-specific controls are raising and lowering the power, turning the sound on or off, and turning the modeling/AF assist light on or off.
Selecting the Group on the Receiver: Use the Group Select dial to choose the desired group.
Adjusting Power Output: Use the + and - buttons to adjust the power of the selected group up or down.
Using the RT-16
NOTE: The transmitter's display can be switched from showing power output in decimals (generally used for monolights) to fractions (typically used for flashes). To change this setting, press and hold the Set button until the display switches.
When the display is set to decimals, the power adjustments will be in 1/10th-stop increments. When set to fractions, the adjustments will be in 1/3rd-stop increments.
Sound: Use the Sound button to turn the sound on or off for all the flashes in the selected group. ▶ will be displayed on the LCD.
Lamp: Use the Lamp button to turn the Modeling or AF-Assist Light (depending on your device) on or off for all the flashes in the selected group. 🖼will be displayed on the LCD.
NOTE: The Sound and Lamp buttons will only work if your flash or monolight supports those functions.
Test: Press the Test button to test fire all flashes in all groups.
Turning Off a Group: To turn off a group, use the - button to turn its power down all the way. The display will indicate OF.
NOTE: After making any changes to settings, whether on the RT-16 or on any connected flashes, press the SET button to confirm and sync all settings. * will be displayed on the LCD.
Changes made to flash settings will be reflected on the RT-16 display, and on each flash's display as well.
The RT-16 can also be used as a handheld central remote controller to adjust the settings on all your compatible lights, even if you use a different method to actually trigger them (e.g. a sync cord, Pocket Wizard, etc.).
Troubleshooting
-
Unable to trigger a flash by pressing the Test button or the camera's shutter release:
-
Make sure the batteries are installed properly and the transmitter is powered on.
- Check the DIP switches to see that the transmitter and receiver are set to the same channel.
-
Check if the transmitter is firmly seated in the camera's hot shoe.
-
Signal disturbance or shooting interference (lights not firing or firing irregularly):
- Try using a different channel.
- Reduced operating range, or monolights not firing.
- Check if batteries in transmitter are drained. Try replacing with fresh ones.
-
Flashes not responding to adjustments made on transmitter.
-
Check that transmitter and receiver are set to the same channel.
- Check that the transmitter and receiver are set to the same group.
- Check if the flash power is out of adjustment range (e. g. flash has 1.0-6.0 power adjustment range but remote is set to 7.0).
- Check that your flash supports the Sound or Lamp functions.
Specifications
| Transmitter Power | 2 AA batteries |
| Receiver Power | 5 V |
| Transmitter frequency | 433 MHz |
| Effective range | Approx. 150' (50 m) |
| Controls (for each group) | Raise and Lower Flash Power |
| Model Light/AF Assist On/Off | |
| Audio Alert On/Off | |
| Control (for all groups) | Test Fire |
| Max. sync speed | 1/250th sec. |
| No. of channels | 16 |
| Groups per channel | 16 |
| Weight: | |
| Transmitter (w/o batteries) | 2.3 oz. (65 g) |
| RR-16-A Receiver | 0.7 oz. (20 g) |
| RR-16-B Receiver | 0.4 oz. (12 g) |
| Dimensions: | |
| Transmitter body | 3.75" x 2" x 1.5" (95 x 50 x 37 mm) |
| Transmitter body w/Antenna | 5.4" x 2" x 1.5" (137 x 50 x 37 mm) |
| RR-16-A Receiver | 2.2" x 1.2" x 1" (57 x 30 x 27 mm) |
| RR-16-B Receiver | 2.2" x 1.1" x 0.6" (57 x 30.5 x 15.2 mm) |
DIP Switch Configurations
Channel 1 Channel 2
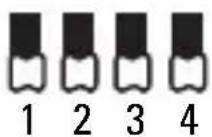
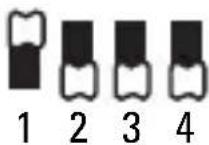
Channel 3 Channel 4
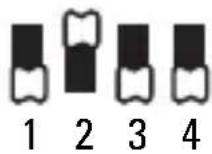
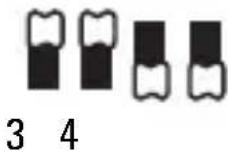
Channel 5 Channel 6
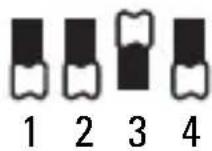
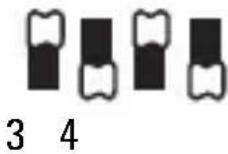
Channel 7 Channel 8
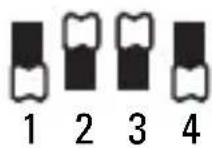
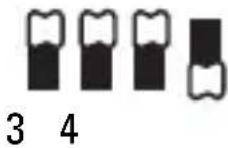
Channel 9 Channel 10
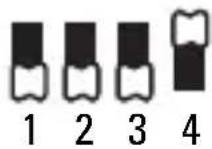
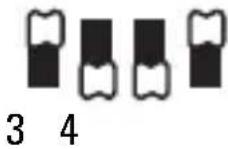
Channel 11 Channel 12
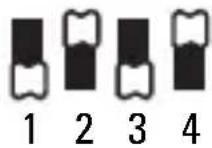
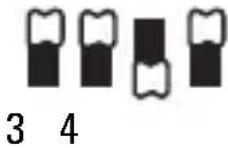
Channel 13 Channel 14
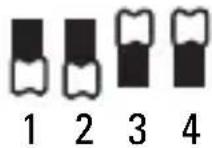
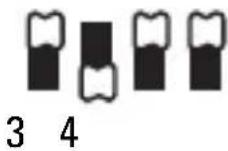
Channel 15 Channel 16
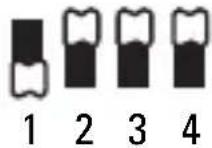
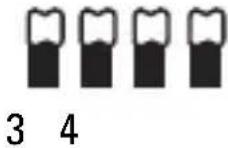
Warranty
One-Year Limited Warranty
This BOLT product is warranted to the original purchaser to be free from defects in materials and workmanship under normal consumer use for a period of one (1) year from the original purchase date or thirty (30) days after replacement, whichever occurs later. The warranty provider's responsibility with respect to this limited warranty shall be limited solely to repair or replacement, at the provider's discretion, of any product that fails during normal use of this product in its intended manner and in its intended environment. Inoperability of the product or part(s) shall be determined by the warranty provider. If the product has been discontinued, the warranty provider reserves the right to replace it with a model of equivalent quality and function.
This warranty does not cover damage or defect caused by misuse, neglect, accident, alteration, abuse, improper installation or maintenance. EXCEPT AS PROVIDED HEREIN, THE WARRANTY PROVIDER MAKES NEITHER ANY EXPRESS WARRANTIES NOR ANY IMPLIED WARRANTIES, INCLUDING BUT NOT LIMITED TO ANY IMPLIED WARRANTY OF MERCHANTABILITY OR FITNESS FOR A PARTICULAR PURPOSE.
This warranty provides you with specific legal rights, and you may also have additional rights that vary from state to state.
To obtain warranty coverage, contact the Bolt Customer Service Department to obtain a return merchandise authorization ("RMA") number, and return the defective
product to Bolt along with the RMA number and proof of purchase. Shipment of the defective product is at the purchaser's own risk and expense.
For more information, or to arrange service, visit www.boltflashes.com or call Customer Service at 212-594-2353.

BOLT™ A Gradus Group Brand
Product warranty provided by the Gradus Group.
www.gradusgroup.com
Bolt is a registered trademark of the Gradus Group. © 2015 Gradus Group LLC. All Rights Reserved
All other trademarks are the property of their respective owners. © Copyright 2015 Gradus Group
Brand : Bolt
Model : RR-16-A
Category : Remote control