
66391 - Stapler PROLINE - Free user manual and instructions
Find the device manual for free 66391 PROLINE in PDF.


| Product Type | Manual Stapler |
| Brand | Proline |
| Model | 66391 |
| Staple Size | 24/6 or 26/6 (standard) |
| Loading Capacity | Up to 150 staples |
| Paper Capacity | Up to 25 sheets (80 gsm) |
| Throat Depth | 60 mm (2.4 inches) |
| Stapling Position | Fixed anvil, permanent and temporary stapling |
| Material | ABS plastic and metal |
| Dimensions (L x W x H) | 130 x 50 x 30 mm |
| Weight | 200 g |
| Color | Black / Grey |
| Power Source | Manual operation, no batteries required |
| Main Functions | Stapling paper, documents, reports |
| Maintenance | Clean with dry cloth; avoid liquids |
| Safety Features | No sharp edges; finger grip for safe handling |
| Spare Parts | Replacement springs and pins (contact support) |
| Repairability | User-replaceable spring; professional repair for major issues |
| General Information | Compact design for home and office use |
Frequently Asked Questions - 66391 PROLINE
User questions about 66391 PROLINE
0 question about this device. Answer the ones you know or ask your own.
Ask a new question about this device
Download the instructions for your Stapler in PDF format for free! Find your manual 66391 - PROLINE and take your electronic device back in hand. On this page are published all the documents necessary for the use of your device. 66391 by PROLINE.
USER MANUAL 66391 PROLINE
natural_image
Exterior view of a PROLINE N arching tool (no text or symbols visible on body)| PL INSTRUKCJA OBSŁUGI - ZSZYWACZ PNEUMATYCZNY, 66391 | 1 |
| RO INSTRUCTIUNI DE UTILIZARE - CAPSATOR PNEUMATIC, 66391 | 6 |
| GB INSTRUCTION MANUAL - PNEUMATIC STAPLE GUN, 66391 | 11 |

Szanowny Kliencie,
GWARANCJA PRODUCENTA
(GB) MANUFACTURER (PL) PRODUCENT (RO) PRODUCATOR
PROFIX Sp. z o.o. ul. Marywilska 34, 03-228 Warszawa
(GB) Person who was authorized to develop technical documentation: (RO) Persoana împuternicită pentru pregătirea documentației tehnice:
(PL) Osoba upoważniona do przygotowania dokumentacji technicznej:
(GB) and have been manufactured in accordance with the standards:
Representative of the Board for Certification
(GB) EC/EU DECLARATION OF CONFORMITY (PL) DEKLARACJA ZGODNOŚCI WE/UE (RO) DECLARAȚIE DE CONFORMITATE CE/UE
(GB) MANUFACTURER (PL) PRODUCENT (RO) PRODUCATOR
PROFIX Sp. z o.o. ul. Marywilska 34, 03-228 Warszawa
(GB) and have been manufactured in accordance with the standards:
Representative of the Board for Certification
(GB) This declaration of conformity is issued under the sole responsibility of the manufacturer. (PL) Niniejsza deklaracja zgodności wydana zostaje na wyłączną odpowiedzialność producenta. (RO) Prezenta declarație de conformitate este emisă pe răspunderea exclusivă a producătorului.

Dear Customer,
When using the pneumatic tool (referred to further in this text as the
"tool" or "product"), please read

the Instruction manual and observe the following basic safety precautions to avoid injury or loss of life,
protection against electric shocks, injuries, explosions and danger of fire.
Tools should be operated in accordance with OHS regulations in force at the premises.
Non-observance of the following warnings and/or introduction of modifications in the construction of pneumatic tools invalidates warranty rights and releases the manufacturer from any liability for damage resulting from operating the device - to people, animals, property or the device itself.
Please keep the instruction manual and guidelines for future reference. If the device is transferred to another person, the instruction manual also needs to be provided. We are not responsible for accidents and damage occurring as a result of non-compliance with this instruction manual and safety guidelines. DISCLAIMER: We reserve the right to make changes not included in the following Instruction manual due to introducing continuous improvements in our products.
GENERAL SAFETY INSTRUCTIONS FOR THE USE OF PNEUMATIC TOOLS
Use of the tool
- The tool and recommended accessories must be used in accordance with the instruction manual. The tool and accessories must be used (with the manufacturer's instructions followed) only for their intended purpose. Use of the device for any other purpose is absolutely prohibited. As a rule, the tool should be turned on before approaching the material/area of interaction.
- Maintain order at the workplace. A cluttered workplace increases the likelihood of an accident. Work in well-ventilated rooms.
- Pay attention to the surroundings. Do not expose the tool to rain. Please remember about proper lighting. Do not direct staple guns towards people and animals. Do not allow unauthorised persons to move the spiral hose, compressor or the compressor's power cord. Do not allow such people in the work area. Unauthorised persons should not be in the work area. Keep children away from the device!
- Working condition of the tool. Check the tool and the spiral hose for completeness and damage.
- Protect yourself against electric shock. When working avoid contact of body parts and of the tool with parts carrying electrical current, e.g. elements of electrical systems, heating elements, electrical devices.
- Keep the tool out of the reach of unauthorised persons. Tools not currently in use are to be stored in a dry and closed place that is inaccessible for children. Perform any maintenance operations after disconnecting the compressed air line and tank.
- Do not overload the tool. Working with the capacities given in the technical specifications is better and safer.
- Always wear appropriate work clothing. Do not wear loose clothing or jewellery when working with the device. Protective gloves and non-slip
footwear are recommended for work. Wear a hair net with long hair.
- Do not use the spiral hose for other purposes. Do not carry the tool by the spiral hose. Protect the hose from heat, oil and sharp edges.
- Take diligent care of the tool. Remember to always keep the tool clean, as this ensures effective and safe work. Observe maintenance rules. Regularly check couplings and the spiral hose, and in the event of any damage commission the repair to an authorised service centre.
- Transport. Prior to transport the tools should be properly cleaned of used materials and dried. They can only be transported after being properly protected against contamination.
ATTENTION! Always pay attention when working. Evaluate work efficiency. Proceed in a rational manner. Alcohol consumption, taking drugs and medications, as well as illness and fatigue may impair responses. In such cases do not work using the tools.
- Check the device for any malfunctions. Check the tool diligently before every use, in particular the safety elements and parts that are suspected of damage. Assess whether they fulfill the correct and intended functions. Check that moving parts are working perfectly and that they are not blocked or damaged.
All parts must be properly installed to ensure safe device operation. If you observe any signs of improper device operation, turn it off and disconnect it from the power source immediately. Defective safety components and parts should be repaired/replaced only at an authorised service centre unless stated otherwise in the instruction manual.
ATTENTION! For your own safety use only accessories and additional devices specified in the instruction manual or recommended by the manufacturer. The use of accessories and equipment other than recommended in the instruction manual or manufacturer's catalogue may entail a risk of damage to health or property.
Only fasteners listed in the manual can be used with the staple gun. Connect to a power source as described in the instruction manual
. Use the lubricants listed in the instruction manual. Staple guns marked on top with an inverted equilateral triangle can be used only with a functioning safety mechanism (also known as a "safety yoke"). Staple guns with contact actuation or continuous contact actuation marked with the symbol "Do not use on scaffolding, ladders" are not to be used for those specific purposes, for example:
- when moving from one work area to another using scaffolding, stairs, ladders or ladder-like structures, such as roof slats,
- for sealing crates or boxes,
- for fastening transport clips, e.g. on vehicles and wagons
Use spare parts designated by the manufacturer for tool maintenance.
Repairs are to be performed by qualified personnel using original spare parts, with due regard to the information given in the instruction manual. The PROFIX repair service conducts warranty and post-warranty repairs, which guarantees the highest quality of repairs and the use of original spare parts.
Stands for attaching tools to a support, for example a work table, are designed and manufactured by the table manufacturer in a manner allowing the tool to be securely fastened according to the intended use, which avoids damage, distortion or displacement.
Tools powered by compressed air may be connected to a compressed air line with a maximum allowed pressure not exceeding their capacity by more than 10%, which can be achieved through the use of a pressure regulating valve with a pressure relief valve. When using compressed air powered staple guns special care needs to be taken not to exceed the maximum allowable pressure, Staple guns powered by compressed air should be used with the lowest pressure required
for a particular work process to avoid unnecessarily high noise levels, increased wear and the resulting failures. Always use clean dry air.
Using oxygen or flammable gases to power the staple gun increases the risk of a fire or explosion. Use quick couplings to connect to the compressed air system. The seal-less coupling must be connected to the tool in such a way that no compressed air remains inside after disconnection. Some locations for use of the tool may require additional rules and regulations (e.g. work in an area at risk of explosion).
Noise
These values are characteristic values for the tools and do not represent the noise generated in the user's vertical plane.
The noise at the point of use depends, for example, on the work environment, the workpiece, the workpiece support and the number of operations.
Depending on the workplace conditions and the form of the workpiece, it may be necessary to provide individual noise suppression measures, such as placing workpieces on sound absorbing brackets, preventing vibrations of the workpiece through clamping or a cover, adjusting the air pressure to the minimum required for the operation. In special cases hearing protection equipment may be necessary.
Vibrations.
The value is tool-specific and does not reflect the effect on the hand-arm system when using the tool.
The effect on the hand-arm system when the tool is used depends, for example, on the following: grip force, contact pressure, operating direction, energy supply control, workpiece, workpiece support.
OCCUPATIONAL HEALTH AND SAFETY
1) It is the employer's responsibility to provide this instruction manual to the tool's operator!
2) Before starting work, read the manufacturer's recommendations and the technical specifications.
3) Work, inspections, as well as maintenance, should always be performed in accordance with the applicable OHS standards.
4) Wear protective goggles and ear protection when using pneumatic tools.
5) The compressor reaches a high temperature during operation. Touching it can lead to burns.
6) The air drawn by the compressor must be free from other gases and/or vapours, as they may ignite or explode in the compressor.
7) When disconnecting the quick coupling, hold the hose coupling part with your hand to avoid injury from the hose springing up.
8) Before each operation, check for proper operation of the safety mechanism and the trigger mechanism, as well as the tightness of all nuts and bolts.
9) Do not make any modifications to the tool without the manufacturer's permission.
10) Do not disassemble or deactivate any parts of the tool, such as the safety mechanism (safety yoke).
11) Do not perform any "emergency repairs" without proper tools and equipment.
12) The tool should be serviced at regular intervals in accordance with the manufacturer's instructions.
13) Avoid weakening or damaging the tool, for example by:
- embossing labels or engraving
- unauthorised modifications
- throwing or pulling along the floor
- using the device as a hammer
- applying excessive force in any form
Never direct the tool towards yourself, other persons or animals.
Hold the tool during work to avoid injuries to the head or body in the event of possible recoil resulting from disturbances in the power sup-
ply or encountering hard points in the workpiece. Never run the tool in a free space. This will prevent any danger caused by loose-fitting couplings and excessive tool tension. Disconnect the tool from the compressed air system during transport, in particular when using ladders or adopting an unusual posture when moving. Consider the conditions at the workplace. Fasteners can penetrate through thin parts or slip off their corners and edges, putting people at risk. Do not insert fasteners near the workpiece's edges. For your own safety, use protective equipment, such as hearing and eye protection. When moving the tool always hold it by the handle, never with your finger resting on the trigger.
Use only hoses with a pressure rating exceeding the maximum working pressure of the tool,
Please maintain and follow the safety guidelines. OPERATIONS AND USE OF PNEUMATIC TOOLS
Recommendations when supplying compressed air to pneumatic tools:
- The supplied air should always be clean and dry.
- Use of filter elements that capture water and solid particles is recommended.
- Before each use check the hose and couplings for their suitability for use, as well as the tightness and correctness of the connection.
- Check the power supply device (e.g. compressor, pneumatic system) before each use.
- To take full advantage of the tool's power and efficiency, use quick couplings and conduits of the right length and diameter.
- Avoid bending the hose.
- Do not use the tools for industrial purposes.
- Do not use the tools in the food industry.
- Do not use the tools in a dusty environment.
ATTENTION! Never use oxygen or other bottled gases. This could lead to an explosion.
ATTENTION! Never exceed the permissible supply pressure! Excessive pressure causes the permissible parameters of the tool to be exceeded and may result in damage to it and/or damage to the hose, which may result in an accident.
RECOMMENDATIONS FOR WORKING WITH A PNEUMATIC TOOL:
Before starting work with the pneumatic tool, make sure that it has been connected to the power source in the correct order (see Fig. 1).
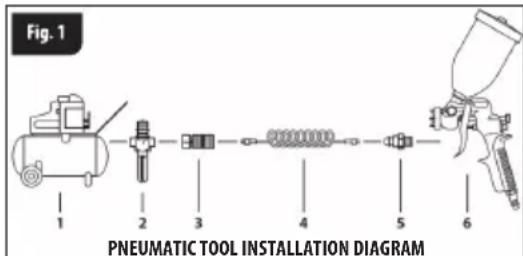
(1) Compressor
(2) Filter-pressure regulator, dehydrator, optional in-line lubricator
(3)Quick coupling
(4) Spiral hose
(5) Quick coupling
(6) Pneumatic tool (example drawing)
Do not carry out repairs, adjustments or replacement of parts when working with the tool.
Protect the tools from falls and impacts, as well as contamination with, for example: mud, water, sand, etc. and maintain in accordance with the instruction manual. Also, pay attention to maintain the compressed air supply lines in good technical condition.
RECOMMENDATIONS FOR THE USE OF SPIRAL HOSES:
Hoses should be:
- firmly attached to their couplings.
- gas-tight (in case of discovering a leak, immediately turn off the compressed air supply),
- blow through with warm air,
- connected to power sources equipped with oil removal devices and condensate pots.
- protected against mechanical damage and the influence of corrosive substances (acids, alkalis), oily substances and greases.
Use reinforced hoses in areas carrying a risk of mechanical damage. If the hose is found to have come into contact with corrosive materials, wash the hose with plenty of water and check for tightness, discoloration and/or deformation, as well as whether the hardness of the outer surface of the hose has changed. Do not use a damaged hose!
A hose contaminated from the outside with greases or oils should be carefully cleaned with dry cotton oakum.
Using a hose that is damaged and/or contaminated, as specified above, carries the risk of an accident at work.
Connect and disconnect the hose from the tool only when the air valve is closed. Do not cut off the air supply by bending the hoses!
After connecting the hose to a power source, first purge it, taking the necessary precautions to remove the dust accumulated inside and then connect the pneumatic tool.
The hoses should not touch or be in the vicinity of live electrical conductors.
DESCRIPTION OF OPERATIONS AND USE
The pneumatic staple gun is a practical tool used to connect elements to each other, e.g. when adding finishing materials to furniture, fixing insulation films in construction, in upholstery work, finishing work, etc.
The device is to be powered by compressed air with a maximum pressure of 8 bar. The staples are accelerated to a high speed in the device, which in combination with an appropriate construction of the staple gun results in effective joining of elements. At the same time, it requires the user to proceed carefully. Use quick couplings of an appropriate size and spiral hoses of a correct diameter - this will allow the tool's parameters to be used fully, including its efficiency.
WORKING DIAGRAM
OF THE PNEUMATIC STAPLE GUN,
66391 (Fig.2)
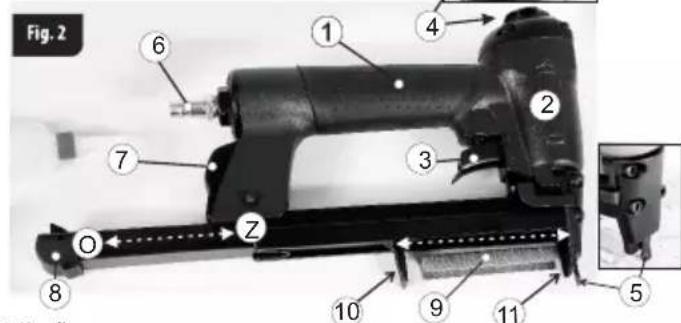
- Handle
- Head
- Trigger
- Air ejection openings with direction adjustment.
- Safety (safety yoke)
- Air inlet coupling
- Magazine release button
- Magazine latch
- Staples
10.Staple pusher
-
Staple guide
-
Magazine opening direction
Z. Magazine closing direction
ASSEMBLY DIAGRAM OF PNEUMATIC STAPLE GUN, 66391
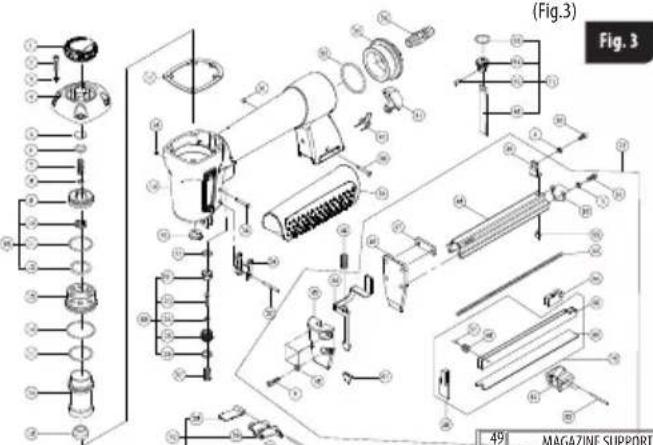
| 1 | EXHAUST COVER |
| 2 | SCREW 4*20 |
| 3 | WASHER # 4 |
| 4 | CYLINDER CAP |
| 5 | SEAL, AIR |
| 6 | O-RING 11,8*2,4 |
| 7 | FEEDER SPRING |
| 8 | WASHER |
| 9 | FIRING VALVE PISTON |
| 10 | SEAL, AIR/STOPPER |
| 11 | O-RING 26, 6*2, 4 |
| 12 | O-RING 21,3*3 |
| 13 | COLLAR |
| 14 | O-RING 35*2 |
| 15 | CYLINDR |
| 16 | BUMPER |
| 17 | GASKET |
| 18 | RING 5,5*2 |
| 19 | BODY |
| 20 | NOZZLE |
| 21 | SEAL, AIR T=2,5 |
| 22 | UPPER HOUSING |
| 23 | REMOTE CORE |
| 24 | O-RING 3, 5*1, 5 |
| 25 | TRIGGER VALVE GUIDE |
| 26 | O-RING 11*1,9 |
| 27 | FEEDER SPRING |
| 28 | RELEASING BLADE |
| 29 | TRIGGER |
| 30 | SPRING PIN 2,5*14 |
| 31 | O-RING Φ3,1*2,9 |
| 32 | O-RING 32,5*2,65 |
| 33 | TAIL COVER |
| 34 | AIR PLUG |
| 35 | PIN |
| 36 | FLAKE |
| 37 | SPRING PIN 2,5*22 |
| 38 | HANDLE GRIP |
| 39 | PIN |
| 40 | TORSION SPRING |
| 41 | CLICK LEVER |
| 42 | SLEEVE M4 |
| 43 | SIDE COVER |
| 44 | RELEASE CATCH |
| 45 | FEEDER SPRING |
| 46 | DRIVER GUIDE |
| 47 | SPACER |
| 48 | UPPER MAG. |
| 49 | MAGAZINE SUPPORT |
| 50 | SCREW 4*12 |
| 51 | SCREW 4*12, H = 6 |
| 52 | RETAINER SPRING |
| 53 | SCREW 4*6 |
| 54 | FEEDER SPRING |
| 55 | PUSHER |
| 56 | GUIDE PLATE |
| 57 | SPRING PIN 2,5×12 |
| 58 | WHEEL GUIDE |
| 59 | KOLLER |
| 60 | LOWER MAG. |
| 61 | TAIL COVER |
| 62 | SPRING PIN 2, 5*30 |
| 63 | O-RING 17,3*3 |
| 64 | PISTON HEAD |
| 65 | PIN |
| 66 | DRIVER BLADE |
| 67 | HANDLE GRIP |
| 68 | HEAD VALVE PISTON SET |
| 69 | TRIGGER VALVE SET |
| 70 | TRIGGER SET |
| 71 | PISTON SET |
| 72 | LOWER MAGAZINE SET |
| 73 | MAGAZINE SET |
OPERATIONS AND USE
Any activities aimed at getting familiar with the device and related to opening the magazine, loading staples, removing any staple jams in the device, etc. absolutely need to be performed with the air supply switched off - the hose must be disconnected from the staple gun.
The activities described below reference the drawing on page 2 of this instruction manual.
- Press the magazine release button (7) while pulling on the magazine latch (8) in direction "0" shown in Figure 2
This will move the staple pusher (10) away from the staple guide (11) and make space for the staples in the magazine.
-
Insert a pack of staples (only one type - do not mix staples of different sizes) into the magazine with the sharp parts of the staples directed downwards.
-
Close the magazine by moving the latch (8) in direction "Z" until the magazine closes (with a clearly audible click).
-
After the magazine is closed, the staple pusher (10) and the guide (11) form a slot through which accelerated staples are ejected.
-
Add a few drops (2-3) of oil (VG32) into the air inlet coupling (6) of pneumatic devices. On average, 2-3 drops of oil are assumed to be the amount required for all-day work.
It is absolutely recommended to use filters with a water trap in the compressed air supply system - water in the supply may cause corrosion of the stapler.
The use of an in-line lubricator in the compressed air supply system is recommended, as it removes the need to manually add oil.
- Connect the hose and adjust the pressure on the compressor to a maximum of 8 bar.
NOTE: Adjusting staple driving power (depth of the staple penetration in the material) is possible by adjusting the air pressure.
Therefore, it is recommended to perform a test before fastening the target elements, changing the pressure in increments of 0.5 bar, using the device in the manner described above.
- For the device to start, it is necessary for the trigger (3) and the safety (5) to work simultaneously - see Fig. 2
- Move the stapler towards the work surface (e.g. the board into which the staple is to be driven) and press it lightly to push the safety. Press the trigger.
The staple hits the work surface.
The driving of subsequent staples is possible by individual presses of the trigger, if the safety remains pushed down.
Note: Never press the safety in with your fingers – this may cause an accident!
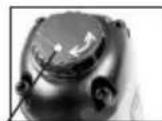
- The upper part of the head features openings for ejection of air (excess air in a given cycle) located on a rotary knob. This allows you to set the air direction, so that it does not interfere with work.
natural_image
Close-up of a mechanical component with labeled parts (S and directional arrows), no readable text or symbols beyond labelsREMOVING JAMMED STAPLES
If staples become blocked, turn off the compressor and disconnect the device from the compressed air hose (remaining air may cause an accidental start-up of
the stapler).
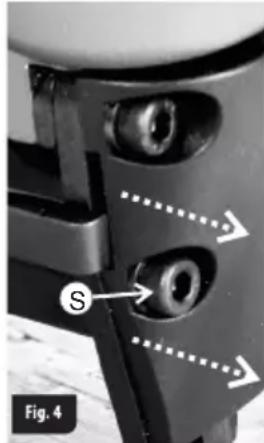
Then remove the staples from the magazine. Remove the screws "S" shown in drawing No. 4 and
remove the fuse cover. This will move the staple guide and provides access to jammed staples.
STORAGE, MAINTENANCE, REPAIR
In general, the stapler does not require special maintenance activities. Keep the stapler stored in a place that is not accessible to children, clean, protected from moisture and dust. Storage conditions should secure against possible mechanical damage and atmospheric factors. If any irregularities in the operation of the stapler are found, the magazine should be checked and cleaned with compressed air. In case of further problems, commission a repair with a PROFIX service centre. The PROFIX repair service conducts warranty and post-warranty repairs of its power tools, which guarantees the highest quality of repairs and the use of original spare parts.
TRANSPORT
Transport and store the stapler in a package that protects it against moisture, dust ingress and mechanical damage.
MANUFACTURER'S WARRANTY
The warranty does not cover damage due to normal wear, overload or improper handling and use of the tool in an unsuitable manner. To maintain the validity of this warranty, deliver a tool that has not been dismantled to the seller.
The warranty covers the replaced parts and labour for a period of 12 months from the date of purchase, confirmed by an invoice or receipt and is valid only on the territory of the Republic of Poland.
Potential defects can be removed by changing the tool or performing an appropriate repair.
Provided the purchaser adheres to the device's instruction manual, during the warranty period the manufacturer assures free repairs or replacements of a damaged device or its structural parts, which do not fulfill their function due to the manufacturer's use of improper material or assembly defects, attributable to the manufacturer.
Warranty repairs are performed in PROFIX service centres or service centres authorised to repair equipment. Repairs should only be carried out by an authorised service center, as otherwise the user's health or life may be at risk.
The warranty period, warranty conditions, as well as the addresses of service centres and repair shops are given in the warranty card.

DISPOSAL
The tools, accessories and packaging should be disposed of in
accordance with the applicable environmental protection regulations.
Do not throw tools away with household waste!
NOTES:
— PROFIX has a policy of continuous improvement of its products and therefore the company reserves the right to change product specifications without prior notice.
- Standard products and accessories may vary depending on the country of sale.
– The product specification may vary in different countries.
— A full range of products may not be available in all countries.
- Get in touch with local PROFIX distributors to determine the availability of products.
TECHNICAL SPECIFICATIONS
| Maximum air pressure 8 Bar | |
| Sound pressure level LpA, K=3dB(A) 83,4 dB(A) | |
| Sound power level LwA, K=3dB(A) 96,4 dB(A) | |
| Vibration as per ISO 8662-11 (measurement tolerance K=1,5 m/s2) ah | 1,9 m/s^2 |
| Staple type 80 | |
| Staple length 6-16 mm | |
| Staple width 12,9 mm | |
| Magazine capacity max. 100 staples |
EXPLANATION OF ICONS LOCATED ON INFORMATION DECALS ON THE DEVICE
| WEAR PROTECTIVE GLASSES! | |
| USE HEARING PROTECTION! | |
| WEAR PROTECTIVE GLOVES! | |
| PNEUMATIC TOOL WITH SAFETY YOKE | |
| DO NOT USE ON SCAFFOLDING, LADDERS | |
| DO NOT USE ANY OTHER ENERGY SOURCE EXCEPT AIR COMPRESSOR | |
| BEFORE OPERATING, READ THE INSTRUCTION MANUAL! | |
| CE | THE PRODUCT MEETS THE REQUIREMENTS OF EU DIRECTIVES |
MANUFACTURER:
PROFIX SP. Z 0.0.
ul. Marywilska 34
03-228 Warsaw, Poland
DT-C2/d_zg/0314/01 Łomna Las: 2021.04.19
(GB) EC/EU DECLARATION OF CONFORMITY (PL) DEKLARACJA ZGODNOŚCI WE/UE (RO) DECLARAȚIE DE CONFORMITATE CE/UE
(GB) MANUFACTURER (PL) PRODUCENT (RO) PRODUCATOR
PROFIX Sp. z o.o. ul. Marywilska 34, 03-228 Warszawa
Representative of the Board for Certification
(GB) This declaration of conformity is issued under the sole responsibility of the manufacturer. (PL) Niniejsza deklaracja zgodności wydana zostaje na wyłączną odpowiedzialność producenta. (RO) Prezenta declarație de conformitate este emisă pe răspunderca exclusivă a producătorului.

- GWARANCJA PRODUCENTA
- PROFIX Sp. z o.o. ul. Marywilska 34, 03-228 Warszawa
- GENERAL SAFETY INSTRUCTIONS FOR THE USE OF PNEUMATIC TOOLS
- OCCUPATIONAL HEALTH AND SAFETY
- Please maintain and follow the safety guidelines. OPERATIONS AND USE OF PNEUMATIC TOOLS
- Recommendations when supplying compressed air to pneumatic tools:
- ATTENTION! Never use oxygen or other bottled gases. This could lead to an explosion.
- RECOMMENDATIONS FOR WORKING WITH A PNEUMATIC TOOL:
- RECOMMENDATIONS FOR THE USE OF SPIRAL HOSES:
- After connecting the hose to a power source, first purge it, taking the necessary precautions to remove the dust accumulated inside and then connect the pneumatic tool.
- DESCRIPTION OF OPERATIONS AND USE
- OPERATIONS AND USE
- REMOVING JAMMED STAPLES
- STORAGE, MAINTENANCE, REPAIR
- TRANSPORT
- MANUFACTURER'S WARRANTY
- DISPOSAL
- NOTES:
Brand : PROLINE
Model : 66391
Category : Stapler