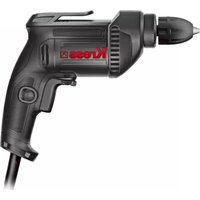
KU110K - Drill KRESS - Free user manual and instructions
Find the device manual for free KU110K KRESS in PDF.


| Product Type | Corded Drill |
| Brand | Kress |
| Model | KU110K |
| Power Supply | 230 V, 50 Hz |
| Power Consumption | 600 W |
| No-Load Speed | 0-2800 rpm |
| Max Drilling Diameter (Steel) | 13 mm |
| Max Drilling Diameter (Wood) | 30 mm |
| Chuck Type | Keyless, 13 mm |
| Variable Speed | Yes, with trigger |
| Forward/Reverse | Yes |
| Dimensions (L x W x H) | 250 x 200 x 80 mm |
| Weight | 1.5 kg |
| Main Functions | Drilling, screwdriving with adjustable torque clutch |
| Safety Features | Lock-on button, insulated gripping surface |
| Maintenance | Clean vents regularly, lubricate chuck occasionally |
| Spare Parts | Carbon brushes, chuck, power cord available |
| Repairability | Repairable by qualified personnel; exploded view in manual |
| General Information | User manual available for free download in PDF |
Frequently Asked Questions - KU110K KRESS
User questions about KU110K KRESS
0 question about this device. Answer the ones you know or ask your own.
Ask a new question about this device
Download the instructions for your Drill in PDF format for free! Find your manual KU110K - KRESS and take your electronic device back in hand. On this page are published all the documents necessary for the use of your device. KU110K by KRESS.
USER MANUAL KU110K KRESS
Hand Drill
مُنْقَاب
EN
AR
KU110K KU110K.1



PRODUCT SAFETY GENERAL POWER TOOL SAFETY WARNINGS
WARNING Read all safety warnings, instructions, illustrations and specifications provided with this power tool.
Failure to follow all instructions listed below may result in electric shock, fire and/or serious injury.
Save all warnings and instructions for future reference.
The term “power tool” in the warnings refers to your mains-operated (corded) power tool or battery-operated (cordless) power tool.
1) Work area safety
a) Keep work area clean and well lit. Cluttered or dark areas invite accidents.
b) Do not operate power tools in explosive atmospheres, such as in the presence of flammable liquids, gases or dust. Power tools create sparks which may ignite the dust or fumes.
c) Keep children and bystanders away while operating a power tool. Distractions can cause you to lose control.
2) Electrical safety
a) Power tool plugs must match the outlet. Never modify the plug in any way. Do not use any adapter plugs with earthed (grounded) power tools. Unmodified plugs and matching outlets will reduce risk of electric shock.
b) Avoid body contact with earthed or grounded surfaces, such as pipes, radiators, ranges and refrigerators. There is an increased risk of electric shock if your body is earthed or grounded.
c) Do not expose power tools to rain or wet conditions. Water entering a power tool will increase the risk of electric shock.
d) Do not abuse the cord. Never use the cord for carrying, pulling or unplugging the power tool. Keep cord away from heat, oil, sharp edges or moving parts. Damaged or entangled cords increase the risk of electric shock.
e) When operating a power tool outdoors, use an extension cord suitable for outdoor use. Use of a cord suitable for outdoor use reduces the risk of electric shock.
f) If operating a power tool in a damp location is unavoidable, use a residual current device (RCD) protected supply. Use of an RCD reduces the risk of electric shock.
3) Personal safety
a) Stay alert, watch what you are doing and use common sense when operating a power tool. Do not use a power tool while you are tired or under the influence of drugs, alcohol or medication. A moment of inattention while operating power tools may result in serious personal injury.
b) Use personal protective equipment. Always wear eye protection. Protective equipment such as dust mask, non-skid safety shoes, hard
hat, or hearing protection used for appropriate conditions will reduce personal injuries.
c) Prevent unintentional starting. Ensure the switch is in the off-position before connecting to power source and/or battery pack, picking up or carrying the tool.
Carrying power tools with your finger on the switch or energising power tools that have the switch on invites accidents.
d) Remove any adjusting key or wrench before turning the power tool on. A wrench or a key left attached to a rotating part of the power tool may result in personal injury.
e) Do not overreach. Keep proper footing and balance at all times. This enables better control of the power tool in unexpected situations.
f) Dress properly. Do not wear loose clothing or jewellery. Keep your hair and clothing away from moving parts. Loose clothes, jewellery or long hair can be caught in moving parts.
g) If devices are provided for the connection of dust extraction and collection facilities, ensure these are connected and properly used. Use of dust collection can reduce dust-related hazards.
h) Do not let familiarity gained from frequent use of tools allow you to become complacent and ignore tool safety principles. A careless action can cause severe injury within a fraction of a second.
4) Power tool use and care
a) Do not force the power tool. Use the correct power tool for your application. The correct power tool will do the job better and safer at the rate for which it was designed.
b) Do not use the power tool if the switch does not turn it on and off. Any power tool that cannot be controlled with the switch is dangerous and must be repaired.
c) Disconnect the plug from the power source and/or remove the battery pack, if detachable, from the power tool before making any adjustments, changing accessories, or storing power tools. Such preventive safety measures reduce the risk of starting the power tool accidentally.
d) Store idle power tools out of the reach of children and do not allow persons unfamiliar with the power tool or these instructions to operate the power tool. Power tools are dangerous in the hands of untrained users.
e) Maintain power tools and accessories. Check for misalignment or binding of moving parts, breakage of parts and any other condition that may affect the power tool's operation. If damaged, have the power tool repaired before use. Many accidents are caused by poorly maintained power tools.
f) Keep cutting tools sharp and clean. Properly maintained cutting tools with sharp cutting edges are less likely to bind and are easier to control.
g) Use the power tool, accessories and tool bits etc. in accordance with these instructions, taking into account the
working conditions and the work to be performed. Use of the power tool for operations different from those intended could result in a hazardous situation.
h) Keep handles and grasping surfaces dry, clean and free from oil and grease. Slippery handles and grasping surfaces do not allow for safe handling and control of the tool in unexpected situations.
5) Service
a) Have your power tool serviced by a qualified repair person using only identical replacement parts. This will ensure that the safety of the power tool is maintained.
DRILL SAFETY WARNINGS
1) Safety instructions for all operations
a) Hold the power tool by insulated gripping surfaces, when performing an operation where the cutting accessory or fasteners may contact hidden wiring or its own cord. Cutting accessory or fasteners contacting a "live" wire may make exposed metal parts of the power tool "live" and could give the operator an electric shock.
2) Safety instructions when using long drill bits
a) Never operate at higher speed than the maximum speed rating of the drill bit. At higher speeds, the bit is likely to bend if allowed to rotate freely without contacting the workpiece, resulting in personal injury.
b) Always start drilling at low speed and with the bit tip in contact with the workpiece.
At higher speeds, the bit is likely to bend if allowed to rotate freely without contacting the workpiece, resulting in personal injury.
c) Apply pressure only in direct line with the bit and do not apply excessive pressure.
Bits can bend causing breakage or loss of control, resulting in personal injury.
SYMBOL

To reduce the risk of injury, user must read instruction manual

Wear ear protection

Wear eye protection


Double insulation
COMPONENT LIST
- KEY STORAGE TAB
- ON/OFF SWITCH
- LOCK ON BUTTON
- FORWARD/REVERSE ROTATION CONTROL
- KEYLESS CHUCK
Not all the accessories illustrated or described are included in standard delivery.
TECHNICAL DATA
| KU110K KU110K.1 | ||
| Voltage 220-240V~50/60Hz | ||
| Power input 500W | ||
| No load speed 0~2800/min | ||
| Chuck capacity 10mm keyless chuck | ||
| Max.drillingcapac-ity | Wood 20mm | |
| Steel 10mm | ||
| Aluminum 10mm | ||
| Machine weight 1.2kg | ||
| Protection class | ☐/II | |
ACCESSORIES
| KU110K KU | 110K.1 | |
| Drill bit / 1 |
We recommend that you purchase your accessories from the same store that sold you the tool. Refer to the accessory packaging for further details. Store personnel can assist you and offer advice.
OPERATING INSTRUCTIONS

NOTE: Before using the tool, read the instruction book carefully.
INSERTING A TOOL INTO CHUCK
KEYLESS CHUCK
Grip rear collar of keyless chuck and rotate front collar until chuck is open sufficient for tool to be inserted. Insert the tool into the chuck. Grip rear collar and manually rotate front collar until tight. The locking mechanism is automatically released when the front collar is rotate in the opposite direction in order to remove the tool. (See Fig. A)
OPERATION
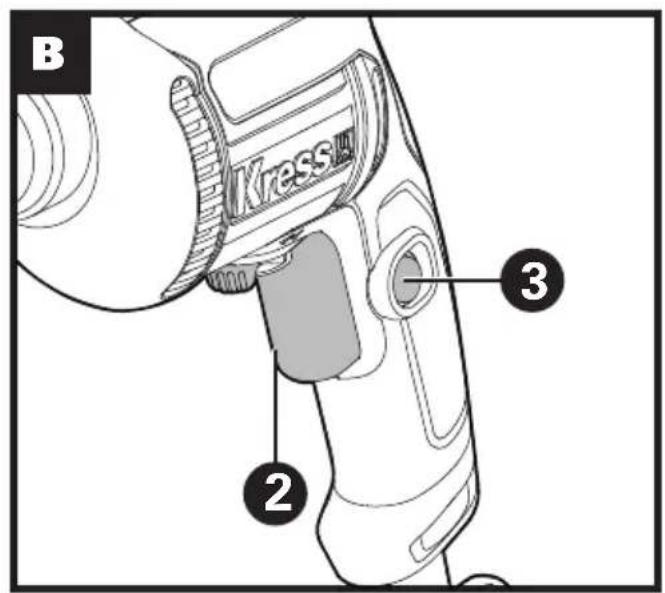
1. ON/OFF SWITCH (SEE FIG. B)
Depress to start and release to stop your tool.
2. SWITCH LOCK-ON BUTTON (SEE FIG. B)
Switch on: Depress on/off switch then lock on button, your switch is now locked on for continuous use. Switch off: To switch off your tool just depress and release the on/off switch.
3. FORWARD AND REVERSE ROTATION CONTROL (SEE FIG. C)
For drilling use forward rotation marked “◀”(lever is moved to the left). Only use reverse rotation marked “▶”(lever is moved to the right) to bound drill bits. Never change the direction of rotation when the tool is rotating, wait until it has stopped.
4. VARIABLE SPEED CONTROL
Depress on/off switch to increase or decrease the speed according to the material and accessory to be used (also possible during no load operation). Higher speed will produce a lower torque while a lower speed will produce a higher torque.
WORKING HINTS FOR YOUR DRILL
If your power tool becomes too hot set the speed to maximum and run no load for 2-3 minutes to cool the motor.
When drilling in metal, only use HSS drill bits in good condition.
Always use a magnetic bit holder when using short screwdriver bits.
Where possible use a pilot hole before drilling a large diameter hole in the metal material.
MAINTENANCE
Remove the plug from the socket before carrying out any adjustment, servicing or maintenance.
Your power tool requires no additional lubrication or maintenance. There are no user serviceable parts in your power tool.
- Wipe clean with a dry cloth after use. Note: Never use water or chemical cleaners to clean your power tool.
- Keep the motor ventilation slots clean. Keep all
working controls free of dust.
Note: Do not use it in a dusty environment.
If the supply cord is damaged, it must be replaced by the manufacturer, its service agent or similarly qualified persons in order to avoid a hazard.
ENVIRONMENTAL PROTECTION

Disposal
The machine, its accessories and packaging materials should be sorted for environmentally
friendly recycling. The plastic components are labeled for categorized recycling.

- PRODUCT SAFETY GENERAL POWER TOOL SAFETY WARNINGS
- DRILL SAFETY WARNINGS
- SYMBOL
- COMPONENT LIST
- TECHNICAL DATA
- ACCESSORIES
- OPERATING INSTRUCTIONS
- INSERTING A TOOL INTO CHUCK
- KEYLESS CHUCK
- OPERATION
- ON/OFF SWITCH (SEE FIG. B)
- SWITCH LOCK-ON BUTTON (SEE FIG. B)
- FORWARD AND REVERSE ROTATION CONTROL (SEE FIG. C)
- VARIABLE SPEED CONTROL
- WORKING HINTS FOR YOUR DRILL
- MAINTENANCE
- REMOVE THE PLUG FROM THE SOCKET BEFORE CARRYING OUT ANY ADJUSTMENT, SERVICING OR MAINTENANCE
- ENVIRONMENTAL PROTECTION
- DISPOSAL
Brand : KRESS
Model : KU110K
Category : Drill