Freshbar - Juicer Izzy - Free user manual and instructions
Find the device manual for free Freshbar Izzy in PDF.


| Product Type | Juicer (Slow Masticating) |
| Brand | Izzy |
| Model | Freshbar |
| Power Consumption | 150 W |
| Voltage | 220-240 V |
| Frequency | 50/60 Hz |
| Juice Container Capacity | 500 ml |
| Pulp Container Capacity | 1 L |
| Dimensions (W x D x H) | 25 x 20 x 40 cm |
| Weight | 4.5 kg |
| Main Material | BPA-free plastic, stainless steel auger |
| Speed Settings | 1 speed + reverse |
| Reverse Function | Yes, to clear jams |
| Cleaning | Dishwasher-safe parts, included cleaning brush |
| Safety Features | Overload protection, safety lock |
| Warranty | 2 years |
| Accessories Included | Juice cup, pulp container, cleaning brush |
| Repairability | Spare parts available; user-replaceable auger and filters |
Frequently Asked Questions - Freshbar Izzy
User questions about Freshbar Izzy
0 question about this device. Answer the ones you know or ask your own.
Ask a new question about this device
Download the instructions for your Juicer in PDF format for free! Find your manual Freshbar - Izzy and take your electronic device back in hand. On this page are published all the documents necessary for the use of your device. Freshbar by Izzy.
USER MANUAL Freshbar Izzy
natural_image
Two kitchen electric blisters with black and gray branding, one showing a side view and the other a side view (no visible text or symbols)natural_image
Diagram of a blender with three parts: top, front, and side (no text or labels)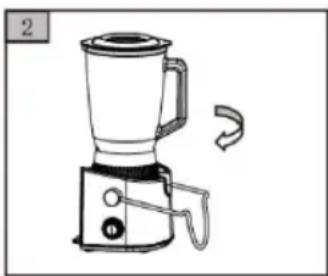
natural_image
Line drawing of a blender with handle and spout, no text or symbols present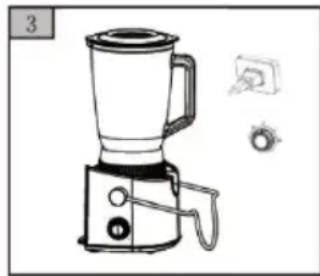
natural_image
Line drawing of a blender with handle and control knob (no text or symbols)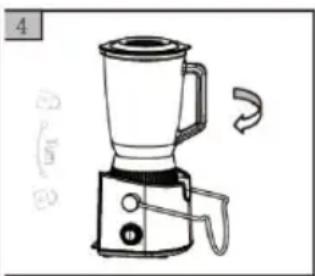
natural_image
Line drawing of a blender with handle and side arm, no text or symbols presentnatural_image
Line drawing of a toaster oven with lid and front panel, showing interior components (no text or symbols)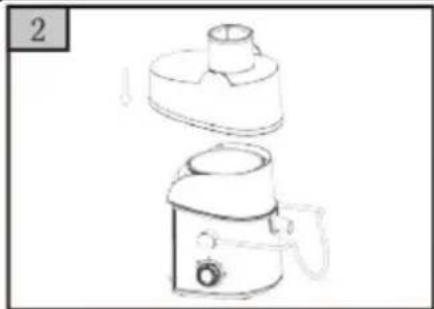
natural_image
Line drawing of a coffee maker with lid and handle (no text or symbols)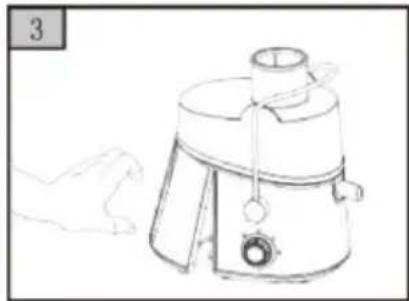
natural_image
Line drawing of a hand holding a small machine with a lid and handle (no text or symbols)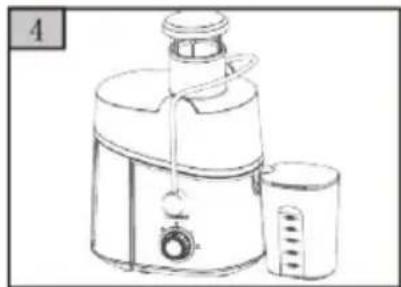
natural_image
Line drawing of a juicer with lid and side arm (no text or symbols)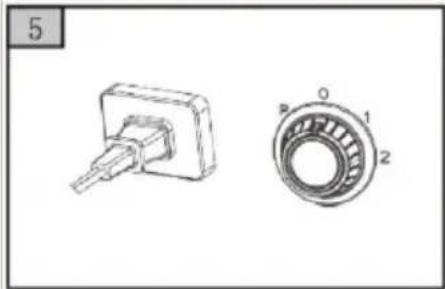
natural_image
Technical drawing of a mechanical component with two views: one showing a pin inserted into a housing, the other showing a circular bearing assembly (no text or symbols)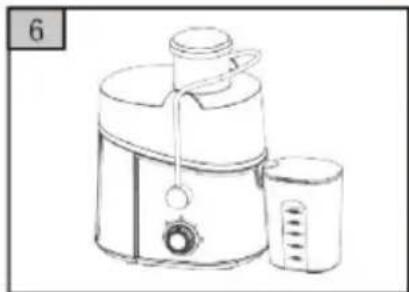
natural_image
Line drawing of a modern coffee maker with a side dish (no text or symbols)We thank you for having chosen an appliance from the IZZY range.
Safety Interlocks


Please read these instructions carefully before using the appliance and save them for future reference. Please keep the sales receipt for guarantee purposes (pls see below “Guarantee and Customer Service”)
- Make sure your electricity supply is the same as the one shown on the underside of the appliance.
- Never leave the appliance unattended when it is operating.
- Close supervision is necessary when your appliance is being us near children or infirm persons. Ensure that they do not play with the appliance.
- This appliance is not intended for use by persons with reduced physical, sensory or mental capabilities, children or those with lack of experience and knowledge, unless they have been given supervision or instruction concerning use of the appliance by a person responsible for their safety.
- Do not touch the blender's sharp blades and the juicer's metal filter. Hold the blade unit and the juicer filter away from the children.
- Do not touch the sharp blades. Keep the blade unit away from children
- Switch off and unplug:
– Before fitting or removing parts.
- After each use.
- Before cleaning.
- Never use the appliance for any other use than indicated.
• The device is intended for indoor use. Do not use the device outdoors. - The device is intended only for domestic use. Any other use will cancel the warranty.
• Always use the appliance on a secure, dry level surface. - Do not operate or place the appliance or parts in places of high humidity or where it may get wet.
• Always unplug the appliance before putting your hands or utensils in the goblet.
• Always disconnect the appliance from the socket before putting your
hands or any other object into the blender jug or juicer's feeding tube.
- Never let the power unit, cord or plug get wet.
- If the appliance does get wet, immediately remove the power cord from the wall outlet and do not put your hands in the water. Never run the wet appliance and contact one of the authorized BENRUBI service centers.
- Never operate the appliance when it is empty and never overload it during operation.
- Never place this appliance on or near a hot gas or electric burner or where it could touch a heated appliance.
- Misuse of the appliance can result in injury.
- Do not let the power cord of the appliance hang over the edge of a table or bench top or where a child could grab it. Do not let the power cord to touch any hot surface.
- Never leave the power cable wrapped during use. Unwind it completely.
- Never unplug the appliance by pulling it out of the cable. Unplu always by pulling out the plug.
- Never use highly corrosive or abstractive cleaning agents. Never use metal scouring pads for cleaning.
- Do not move the appliance when it is in operation.
- Do not touch the appliance with wet or damp hands.
- Do not use an extension power cord.
- Check the power cord periodically for possible damages.
- If the power cord or the plug of the appliance has been damaged, do not use the appliance and contact an authorized BENRUBI Service Center.
- Do not use the appliance if any of the components have been damaged. Contact one of the authorized BENRUBI service centers.
- In case of a possible damage, do not attempt to repair the appliance by yourself. Please contact one of the authorized BENRUBI servic centers.
- Any repair made by a non-unauthorized BENRUBI Service Center CANCELS THE GUARANTEE.
- Any misuse of the device cancels the warranty.
- Only use original spare parts.
- The appliance conforms to EU directive 2014/30/EU on Electromagnetic Compatibility, the 2014/35/EU Low Voltage Directive, the 2011/65/EU RoHS Directive, the directive 2009/125/EC for eco design and the EC regulation no. 1935/2004 on materials intended to contact with food.
SAVE THESE INSTRUCTIONS
Before the First Use
- Wash the parts of the appliance. See "Care and cleaning" section.
Parts of the Appliance
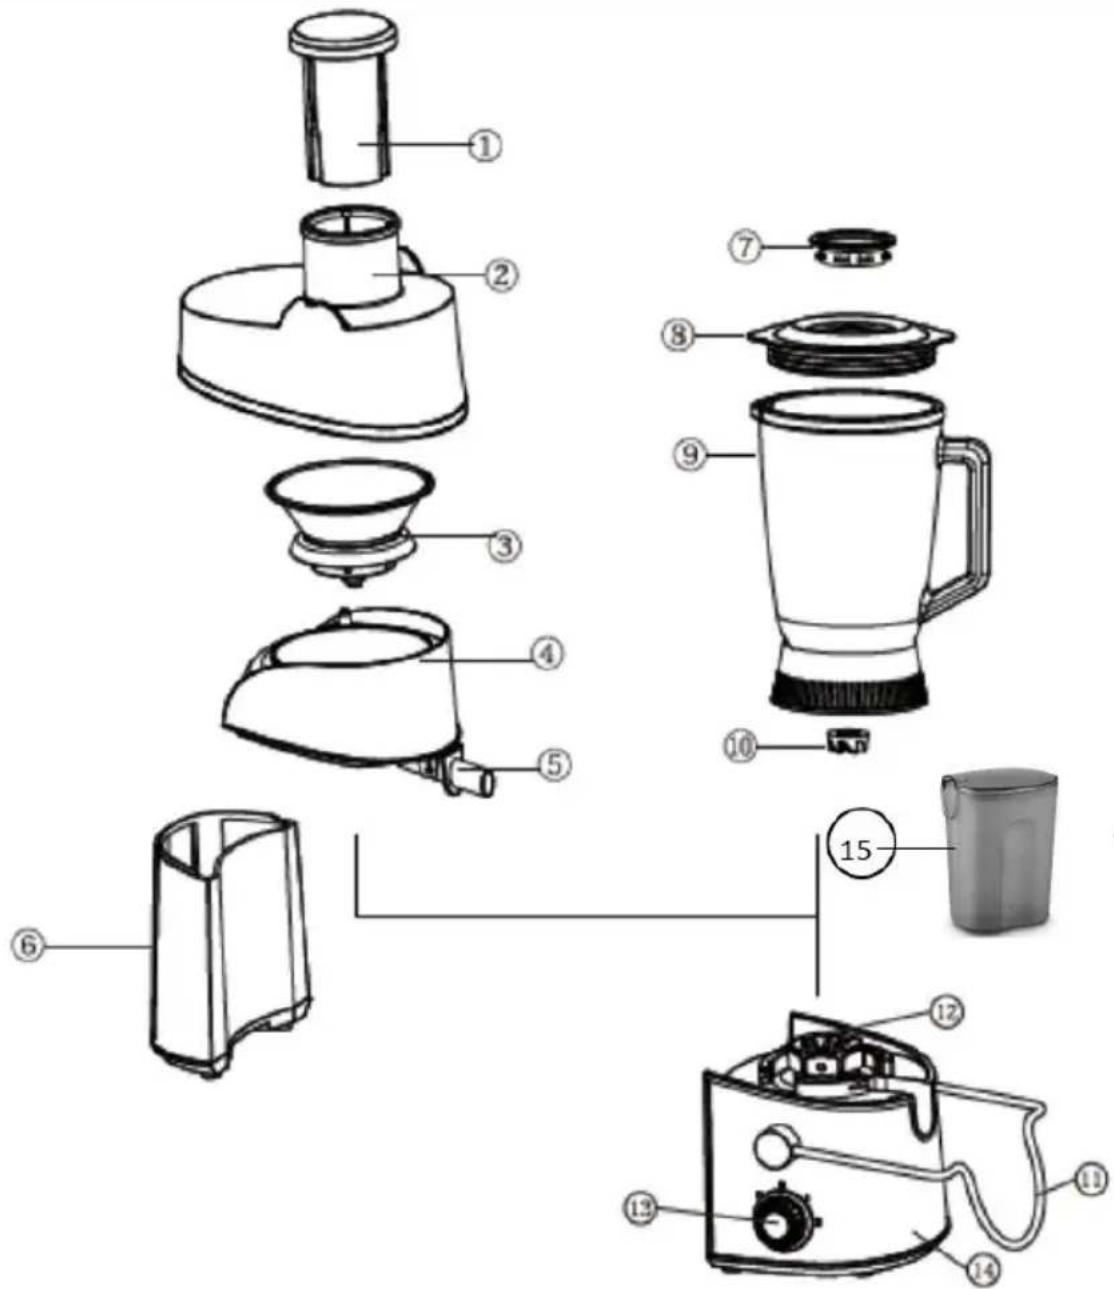
- Pusher
- Feed tube and lid
- Detachable inox filter
- Juice collector
- Pouring spout
- Pulp collector
- Lid cap
-
Blender lid
-
Blender glass jar 1,5Lt
- Jar goblet
- Safety clamp
- Motor goblet
- Speed knob
- Body
- Juice jug
BLENDER
Safety Instructions
- Never fit the blade unit to the power unit without the blender goblet or mill jar fitted.
- Only operate the blender with the lid in place.
- Do not remove the lid of the blender when in operation.
- Always take care when handling the blade assembly and avoid touching the cutting edge of the blades when cleaning.
- Only use the goblet with the blade assembly provided.
ATTENTION: Hot ingredients should be allowed to cool to room temperature before blending.
- When removing the blender from the power unit:
- Wait until the blades have completely stopped.
-
Don't accidentally unscrew the goblet from the blade assembly.
-
Never blend frozen ingredients that have formed a solid mas during freezing, break it up before adding to the goblet.
- Do not process hard spices, such as nutmeg or turmeric root as they may damage the blade.
- Do not use the blender as a storage container. Keep it empty before and after use.
Using the Blender
natural_image
Diagram of a blender with three parts: top, front, and side (no text or labels)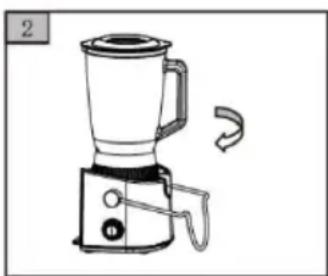
natural_image
Line drawing of a blender with handle and spout, no text or symbols present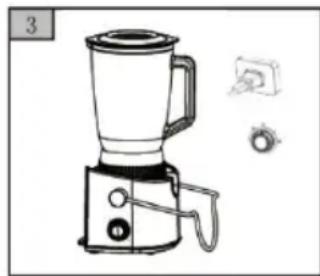
natural_image
Line drawing of a blender with handle and control panel, accompanied by a small inset image showing a button (no text or symbols)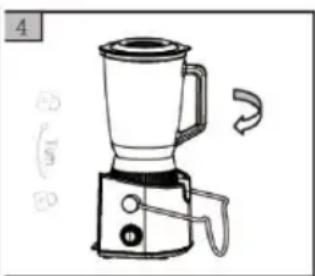
natural_image
Line drawing of a blender with handle and side arm, no text or symbols presentCaution: Make sure the appliance is turned off (position "O") and unplugged before placing the goblet on the base of the blender.
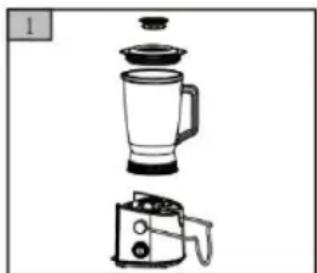
- Place the lid cap (7) on the blender lid (8) (Fig.1).
- Put the materials into the glass jar (9) and place the lid (8) in the jug (9) (Fig. 1).
- Place the glass jar (9) on the body of the appliance (14) and turn clockwise to snap into place (Fig.2).
Note: The device does not start if the jar is not installed correctly.
- Connect the appliance to the socket and turn the speed knob (13) to the desired speed (1 or
2). Turn the speed knob (13) to the "P" position to activate the pulse mode (Fig.3). - When you have finished mixing, turn the speed knob (13) to the "O" position and disconnect it from the socket.
- Remove the glass jar from the base of the appliance (Fig.4) and empty the contents.
It is recommended that you use the appliance for no more than 2 minutes continuously.
Notes:
- When you turn on the blender, always press the lid with your hand.
- Leaking will occur if the sealing ring is damaged or incorrectly fitted.
Blender Hints
• To blend dry ingredients - cut into pieces, remove the filler cap, then with the appliance running, drop the pieces down one by one. Keep your hand over the opening. For best results empty regularly.
• The processing of spices is not recommended as they may damage the plastic parts.
- When making mayonnaise, put all ingredients, except oil, into the blender. Remove the filler cap. Then, with the appliance running, add the oil slowly through the hole in the lid.
- Thick mixtures, e.g. pâtés and dips, may need scraping down. If the mixture is difficult to process, add more liquid.
JUICE EXTRACTOR
Safety Instructions
• Always check the filter (3) before each use. Do not use the juicer if the filter has been broken, has cracks, has been torn or has been damaged. Contact one of the authorized BENRUBI repa centers.
- Before turning on the appliance, make sure that the lid (2) is correctly positioned and that the locking arm (11) is correctly locked in place. Do not unlock the safety clamp (11) while appliance is in operation.
- The appliance does not work if the pulp collector (6), the lid (2) and the detachable filter (3) are not installed correctly.
CAUTION: Always use the pusher (1) to push the food into the feed tube (2) and never use your fingers.
Using the Juice Extractor
natural_image
Line drawing of a toaster oven with lid and side pan (no text or symbols)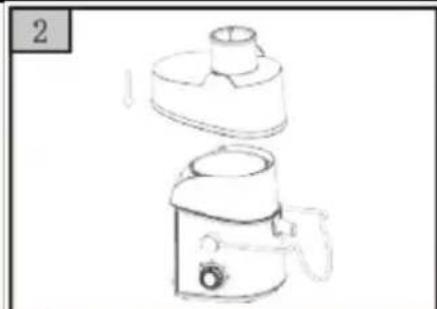
natural_image
Line drawing of a coffee maker with lid and side arm, no text or symbols present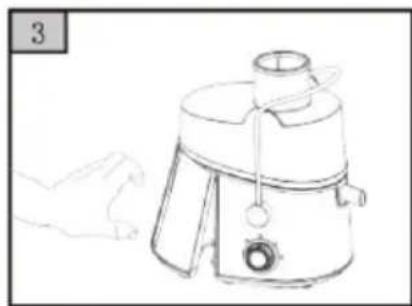
natural_image
Line drawing of a portable juice maker with handle and spout, next to a hand holding a bag (no text or symbols)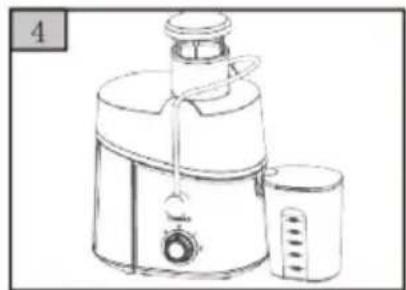
natural_image
Line drawing of a juicer with lid and side arm (no text or symbols)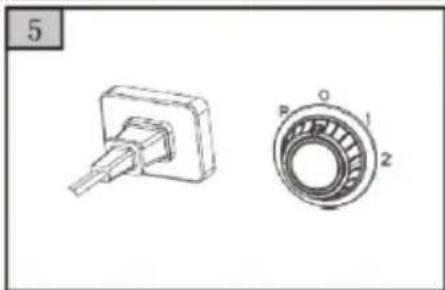
natural_image
Technical drawings of two mechanical components: a rectangular housing and a circular bearing with labeled parts (no text or symbols beyond labels)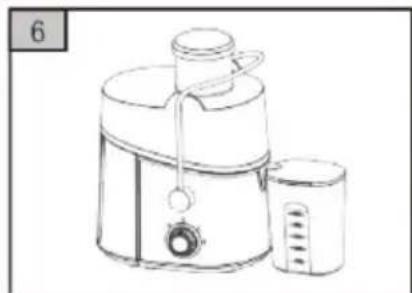
natural_image
Line drawing of a modern blender with a side panel and handle (no text or symbols)Caution: Make sure the appliance is turned off (position "O") and unplugged before assembling the juice extractor.
- Wash and cut the fruits of your choice in small pieces to fit into the feed tube (2). Peel or remove hard parts (e.g. cones, seeds, thick peels, etc.).
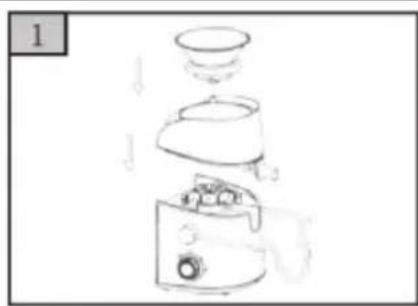
- Place the juice collector (4) on the body of the appliance (14). Place the inox filter (3) in the
juice collector until it snaps into place (Fig.1).
- Place the lid (2) on the juice collector (4) (Fig.2).
- Fit the pulp collector (6) on the back of the appliance (Fig.3).
- Lift and snap the safety clamp (11) in place. Place the juice jug (15) in front of pouring spout (5) (Fig. 4).
- Plug the appliance into the socket and place the fruits into the feed tube (2). Press lightly with the pusher (1) and turn the speed knob (13) to the speed of your selection (1 or 2) (Fig. 5).
- As soon as you finish the procedure, turn the speed knob (13) to the "O" position a disconnect it from the socket.
It is recommended that you use the appliance for no more than 2 minutes continuously.
Notes:
- Make sure that the motor of the appliance has stopped and unplug the power cord before unlocking the safety clamp and remove the lid.
Juice Extractor Hints
- Select the speed "2" for harder fruits and vegetables such as pineapple, apples, lemo oranges, carrots etc. Select "1" speed for soft fruits such as melons, watermelons, kiwis, etc.
- Choose fruits and vegetables that are fresh and mature to produce more juice.
- If the fruit you use is too mature, the filter may clog faster.
- You can add fruit or vegetables successively to the feed tube without first switching off the appliance.
- Making juice from bananas, avocados, aubergines and strawberries is difficult.
- Do not use the appliance to extract juice of fruits and vegetables that are very hard and have many fibers.
- When the juice jug is full (15), stop the operation and empty. Continue the process by placing the jug again under the pouring spout (5).
- If the pulp collector (6) is full, turn off the appliance and empty. Continue the process by putting it back in place.
Note: Juices should be consumed immediately. The taste, color and nutritional value of the juice can be changes if the juice is in contact with the air for a long time. Add a few drops of lemon to slow the discoloration.
Care and Cleaning
• Always clean the appliance after each use.
- Always turn off, disconnect from the power and disassemble the appliance before cleaning.
Accessories
- All removable parts (1, 2, 3, 6, 7, 8, 9, 15) can be washed in the dishwasher except the juice collector (4) and pouring spout (5). The juice collector with the spout should be washed with warm water and soap immediately after each use.
- Never use hard, abrasive or corrosive detergents or solvent liquids to clean the accessories.
- Do not place the accessories in sterilizing devices.
Body
- Wipe with a damp cloth. Then dry well.
- Never use hard, abrasive or corrosive detergents or solvent liquids to clean the body.
- Do not immerse the engine unit in water.
Technical Characteristics
Model: Fresh Bar 2in1
Rated voltage / Frequency: 220-240V \~50-60Hz
Power: 700 W
Blender glass jar capacity: 1.5Lt
Safe Appliance Disposal
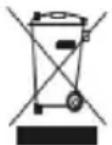
At the end of its working life, the product must not be disposed of as urban waste. It must be taken to a special local authority differentiated waste collection centre or to a dealer providing this service. Disposing of a household appliance separately avoids possible negative consequences for the environment and health deriving from inappropriate disposal and enables the constituent materials to be recovered to obtain significant savings in energy and resources.
As a reminder of the need to dispose of household appliances separately, the product is marked with a crossed-out wheeled dustbin.
Guarantee & Customer Service
- BENRUBI Company guarantees its products for any manufacturing defect or defective materials for a period of two (2) years from the date of purchase or delivery by present purchase receipt. If your product malfunctions or you find any defects, please revert to the retail location you have purchased it from or contact an authorized BENRUBI Service Centre. To find the nearest authorized BENRUBI Service Centre, visit our website www.benrubi.gr. It is in the discretion of BENRUBI Company to replace or repair the defective product.
- The warranty does not cover damages resulting from normal wear, breakage, improper installation or maintenance of the product, mishandling, abnormal working conditions, failure to implement the instructions, conversion or repair of the product by an unauthorized technician who does not belong to the BENRUBI Service Centers.
Also, the warranty does not cover the following indicative factors:
• Stains, discoloration or scratches.
- Burns due to exposure to heat or flame.
- Damage from thermal shock (sudden temperature change or change of voltage).
FOR MORE INFORMATION CONTACT:
H. BENRUBI & FILS SA
27 Aghiou Thoma str, GR15124, Maroussi – Athens
Tel.: 210 6156400, Fax: 210 6199316
e-mail: benrubi-sda@benrubi.gr

- Safety Interlocks
- Please read these instructions carefully before using the appliance and save them for future reference. Please keep the sales receipt for guarantee purposes (pls see below “Guarantee and Customer Service”)
- SAVE THESE INSTRUCTIONS
- Before the First Use
- Parts of the Appliance
- BLENDER
- Safety Instructions
- ATTENTION: Hot ingredients should be allowed to cool to room temperature before blending.
- Using the Blender
- Caution: Make sure the appliance is turned off (position "O") and unplugged before placing the goblet on the base of the blender.
- Note: The device does not start if the jar is not installed correctly.
- It is recommended that you use the appliance for no more than 2 minutes continuously.
- Notes:
- Blender Hints
- JUICE EXTRACTOR
- Using the Juice Extractor
- Juice Extractor Hints
- Care and Cleaning
- Accessories
- Body
- Technical Characteristics
- Safe Appliance Disposal
- Guarantee & Customer Service
- BENRUBI & FILS SA
Brand : Izzy
Model : Freshbar
Category : Juicer