
ZI-BHS605 - Hedge Trimmer Zipper - Free user manual and instructions
Find the device manual for free ZI-BHS605 Zipper in PDF.


| Product Type | Hedge Trimmer |
| Brand | Zipper |
| Model | ZI-BHS605 |
| Power Source | Petrol (gasoline) |
| Engine Displacement | 25.4 cc |
| Blade Length | 600 mm |
| Cutting Capacity | 25 mm |
| Weight | 5.5 kg |
| Fuel Tank Capacity | 0.5 L |
| Oil Tank Capacity | 0.3 L |
| Starting System | Recoil start |
| Vibration Damping | Yes |
| Safety Features | Dual trigger, hand guard |
| Sound Level | 95 dB(A) |
| Vibration Level | 2.5 m/s² |
| Maintenance | Air filter cleaning, spark plug replacement |
| Repairability | Spare parts available |
| Overall Dimensions (LxWxH) | 1000 x 250 x 250 mm |
Frequently Asked Questions - ZI-BHS605 Zipper
User questions about ZI-BHS605 Zipper
0 question about this device. Answer the ones you know or ask your own.
Ask a new question about this device
Download the instructions for your Hedge Trimmer in PDF format for free! Find your manual ZI-BHS605 - Zipper and take your electronic device back in hand. On this page are published all the documents necessary for the use of your device. ZI-BHS605 by Zipper.
USER MANUAL ZI-BHS605 Zipper
natural_image
Green and black utility hedges with a white water tank, shown against a white background (no text or symbols visible)CE
ZI-BHS605
EAN: 9120039233826

1 INHALT /INDEX
1 INHALT /INDEX 2
2 SICHERHEITSZEICHEN / SAFETY SIGNS / SEÑALES DE SEGURIDAD 5
13.1 Intended Use of the Machine 18
13.1.1 Prohibited Applications / Hazardous Misapplications....18
13.2 User Requirements.... 18
13.3 General Safety Instructions.... 18
13.4 Special Safety Instructions for Machine Operation 19
13.5 Safety Instructions for Machines with Combustion Engine 19
13.6 Hazard Warnings 19
14 TRANSPORT 20
15 START-UP 20
15.1 Checking the Delivery Content....20
15.2 Assembly 20
15.3 Fuel 20
15.3.1 General Requirements 20
15.3.2 Filling up with Fuel 21
16 OPERATION 21
16.1 Starting the Machine 21
16.1.1 Starting with Cold Engine....21
16.1.2 Starting with a warm Engine....22
16.2 Switching off the machine 22
16.3 Turning the Handle....22
16.4 Recommendations for Cutting 22
17 MAINTENANCE 23
17.1 Maintenance schedule 23
17.2 Measures before Starting.... 23
17.3 Cleaning the Air Filter 23
17.4 Lubricating the Gearbox 24
17.5 Setting the Idle Speed 24
17.6 Cleaning the Spark Plug.... 24
18 STORAGE 24
19 DISPOSAL 25
20 TROUBLESHOOTING 25
21 UVOD (SL) 26
22 VARNOST 27
EN CE-Conformal! - This product complies with the EC-directives.
EN Follow the instructions!
SL Upoštevajte navodila!
EN No open flame, fire, open source of ignition and smoking prohibited!
EN Warning of cutting injuries
SL Nevarnost ureznin
EN Wear safety shoes!
EN Wear tight work clothes!
SL Pri delu s strojem imejte tesno oprijeto delovno obleko!
EN Warning signs and/or stickers on the machine which are illegible or have been removed must be replaced immediately!
SL Opozorilne table in/ali nalepke na stroju, ki so nečitljive ali so bile odstranjene, je potrebno takoj zamenjati!
| No | Bezeichnung / description / Naziv / Denominación | No | Bezeichnung / description / Naziv / Denominación |
| 1 | Heckenschere / hedge trimmer BHS605 Škarje za živo mejo / Cortasetos | 4 | Werkzeug-Set inkl. Zündkerzenschlüssel / tool set incl. spark plug wrench / Komplet orodja s ključem za vžigalno svečko / Juego de herramientas incl. Ilave de bujlas |
| 2 | Messerabdeckung / blade cover /Zaščita rezila / Cubierta de la cuchilla | Bedienungsanleitung / user manual / Navodilo za delo s strojem / Instrucciones de uso | |
| 3 | Mischbehälter / mixing vessel / Mešalna posoda / Recipiente mezclador |
3.2 Komponenten / Components / Komponente / Componentes
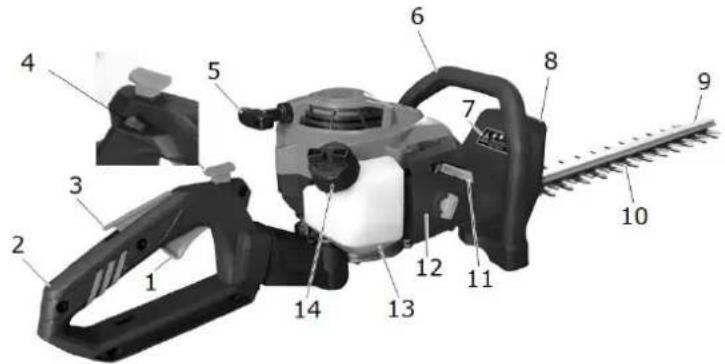
| No | Bezeichnung / description /Naziv / Denominación | No | Bezeichnung / description / Naviz / Denominación |
| 1 | Gashebel / throttle lever / Ročica za plin / Acelerador | 8 | Handschutz / hand shieldZaščita za roke / Protección para las manos |
| 2 | Hinterer Griff / rear handle / Zadnji ročaj / Empuñadura trasera | 9 | Messerbalken / blade barZapora rezila / Hoja |
| 3 | Gashebelsperre / throttle trigger lockoutZapora ročice za plin / Bloqueo del acelerador | 10 | Messer / bladeRezilo / Cuchilla |
| 4 | EIN-AUS Schalter / ON-OFF switch / Stikalo za VKLOP/IZKLOP / INTERRUPTOR DE ENCENDIDO / APAGADO | 11 | Choker-Hebel / chokeRočica za zaug / Palanca choker |
| 5 | Startergriff / starter handle / Ročica zaganjalnika / Empuñadura de arranque | 12 | Luftfilter / air filterZračni filter / Filtro de aire |
| 6 | Vorderer Griff / front handle / Sprednji ročaj / Empuñadura delantera | 13 | Kraftstofftank / fuel tankRezervoar goriva / Depósito de carburante |
| 7 | Sicherheitszeichen / safety signs / Varnostne oznake / Señales de seguridad | 14 | Kraftstofftank-Deckel / fuel tank capPokrov rezervoarja goriva / Tapa del depósito de carburante |
3.3 Technische Daten / Technical Details / Tehnični podatki / Datos técnicos
| ZI-BHS605 | |
| Motortyp / Engine type / Tip motorja / Tipo de motor | 1-Zyl. 2-Takt / 1-cyl 2-stroke1-cilindrični, 2-taktni / 1-cil. 2-tiempos 1E34F-3EA |
| Hubraum /displacement / Prostornina / Cilindrada | 25,4 cm3 |
| Motorleistung /engine power / Moč motorja / Potencia del motor | 0,7 kW |
| Motordrehzahl /engine speed / Število vrtljajev motorja / Régimen de revoluciones del motor | 7000 min-1 |
| Starter / starterZaganjalnik / Arrancador | Easy Start Seilzug / Easy Start Recoil StarterVrvični zaganjalnik Easy StartCable de mando de arranque rápido |
| Mischungsverhältnis (Benzin : Zweitaktöl) / mixing ratio (petrol : two-stroke oil)Mešalno razmerje (bencin: olje za dvotaktne motorje / Relación de mezcla (gasolina:aceite de dos tiempos) | 40:1 |
| Tankvolumen / fuel capacityProstornina rezervoarja / Volumen del depósito | 0,3 l |
| Schwertlänge / bar lengthDolžina rezila / Longitud de la espada | 746 mm |
| Schnittlänge / effective cutting lengthDolžina rezanja / Longitud de corte | 605 mm |
| max. ∅ des Schnittgutes / max. ∅ of cuttingsMaksimalni premer obdelovanca / ∅ máx. del material cortado | max. ∅ 20 mm |
| Vibrationswert vorderer Handgriff / vibration front handleVibracija sprednjega ročaja / Nivel de vibración de la empuñadura delantera | ah= 8,67 m/s2 |
| Vibrationswert hinterer Handgriff / vibration back handleVibracija zadnjega ročaja / Nivel de vibración de la empuñadura trasera | ah= 6,94 m/s2 |
| Garantierter Schallleistungspegel / guaranteed sound power levelZajamčen nivo zvočne moči LWA/ Nivel de potencia acústica garantizado | 110 dB(A) |
| Maschinenmaße / machine dimensionsDimenzije stroja / Medidas de la máquina | 1220 x 270 x 220 mm |
| Nettogewicht / net weightNeto teža / Peso neto | 5,75 kg |
Hinweis Schwingungsemissions-Wert: Der angegebene Schwingungsemissionswert ist nach einem genormten Prüfverfahren gemessen worden und kann zum Vergleich eines Werkzeugs mit einem anderen verwendet werden. Der angegebene Schwingungsemissionswert kann auch zu einer einleitenden Einschätzung der Aussetzung verwendet werden. Der Schwingungsemissionswert kann sich während der tatsächlichen Benutzung des Werkzeugs von dem Angabewert unterscheiden, abhängig von der Art und Weise, in der das Werkzeug verwendet wird.
Note Vibration emission value: The specified vibration emission value has been measured according to a standardized test procedure and can be used to compare one tool with another. The specified vibration emission value may also be used for an initial suspension assessment. The vibration emission value may differ from the declared value during actual use of the tool, depending on the manner in which the tool is used.
Priporočena vrednost emisije vibracij: Navedena vrednost emisije vibracij je izmerjena z normiranim postopkom preverjanja in se lahko uporablja za primerjavo enega orodja z drugim. Navedena vrednost emisije vibracij se lahko uporablja tudi za začetno oceno izpostavljenosti. Vrednost emisije vibracij se lahko pri dejanski uporabi stroja razlikuje od navedene vrednosti, kar je odvisno od vrste in načina uporabe stroja.
Aviso valor de emisiones de vibración: El valor de emisión de vibraciones especificado se ha medido con arreglo a un procedimiento de ensayo normalizado y se puede utilizar para comparar una herramienta con otra. El valor de emisión de vibraciones especificado se puede utilizar también para una evaluación preliminar de la suspensión. El valor de emisión de vibraciones puede diferir del valor indicado durante el uso real de la herramienta, dependiendo de la forma en la que se utilice esta.
Hinweis Geräuschangaben: Die angegebenen Werte sind Emissionswerte und müssen damit nicht zugleich auch sichere Arbeitsplatzwerte darstellen. Obwohl es eine Korrelation zwischen Emissions- und Immissionspegeln gibt, kann daraus nicht zuverlässig abgeleitet werden, ob zusätzliche Vorsichtsmaßnahmen notwendig sind oder nicht. Faktoren, welche den am Arbeitsplatz tatsächlich vorhandenen Immissionspegel beeinflussen, beinhalten die Eigenart des Arbeitsraumes und andere Geräuschquellen, d. h. die Zahl der Maschinen und anderer benachbarter Arbeitsvorgänge. Die zulässigen Arbeitsplatzwerte können ebenso von Land zu Land variieren. Diese Information soll jedoch den Anwender befähigen, eine bessere Abschätzung von Gefährdung und Risiko vorzunehmen.
Note noise emission: The values given are emission values and therefore do not have to represent safe workplace values at the same time. Although there is a correlation between emission and immission levels, it cannot be reliably deduced whether additional precautions are necessary or not. Factors influencing the actual immission level at the workplace include the nature of the workspace and other noise sources, i.e. the number of machines and other adjacent operations. The permissible workplace values may also vary from country to country. However, this information should enable the user to make a better assessment of hazard and risk.
Priporočena vrednost emisije hrupa: Navedene vrednosti so emisijske vrednosti in se jih zato ne smemo razumeti kot vrednosti, ki zagotavljajo varnost delovnega okolja. Četudi obstaja določena korelacija med emisijsko vrednostjo, na podlagi tega ne moremo z gotovstoj sprejeti odločitev o tem, ali so v posameznih primerih potrebni dodatni varnostni ukrepi all ne. Dejavnikl, kl lahko vplivajo na trenutni nivo imisije hrupa na delovnem mestu, so specifičnost delovnega prostora in drugi viri hrupa, t.j. število strojev ter drugih delovnih procesov, ki sočasno potekajo v delovnem prostoru. Dopuščene vrednosti emisije hrupa na delovnem mestu prav tako lahko variirajo od države do države. Te informacije so predvsem v pomoč uporabniku, da bi lažje ocenil tovrstno nevarnost in tveganje
Aviso sobre los valores de ruido: Los valores indicados son valores de emisión y, por lo tanto, no representan necesariamente al mismo tiempo valores seguros en el lugar de trabajo. Aunque hay una correlación entre los niveles de emisión y los de inmisión, no se puede deducir con certeza si es necesario adoptar medidas de precaución adicionales o no. Entre los factores que influyen en el nivel de inmisión real en el lugar de trabajo, se encuentran la naturaleza del espacio de trabajo y otras fuentes de ruido, es decir, el número de máquinas y otros procesos de trabajo adyacentes. Asimismo, los valores admisibles en el lugar de trabajo pueden variar de un país a otro. No obstante, esta información debe capacitar al usuario a evaluar mejor los peligros y los riesgos.
4 VORWORT (DE)
natural_image
Technical line drawing of a mechanical assembly with no visible text or symbolsThese operating instructions contain information and important instructions for the safe start-up and handling of the ZIPPER petrol hedge trimmer ZI-BHS 605, hereinafter referred to as "machine".

The manual is an integral part of the machine and must not be removed. Keep it for later use in a suitable place, easily accessible to users (operators), protected from dust and moisture, and enclose it with the machine if it is passed on to third parties!
Please pay special attention to the chapter Safety!
Due to the constant further development of our products, illustrations and contents may differ slightly. If you notice any errors, please inform us.
Subject to technical changes!
Inspect the goods immediately after receipt and note any complaints on the consignment note when accepted by the deliverer!
Transport damage must be reported separately to us within 24 hours.
ZIPPER MASCHINEN cannot be held liable for any unnoticed transport damage.
Copyright
© 2018
This documentation is protected by copyright. All rights reserved! In particular the reprint, the translation and the removal of photos and illustrations will be prosecuted.
The place of jurisdiction shall be the court responsible for ZIPPER Maschinen.
Customer Service Address
This section contains information and important notes on safe commissioning and handling of the machine.

For your safety, please read these operating instructions carefully before start-up. This will enable you to handle the machine safely and prevent misunderstandings as well as personal injury and damage to property. Also observe the symbols and pictograms used on the machine as well as the safety and hazard information!
13.1 Intended Use of the Machine
The machine is intended exclusively for the following activities: For cutting shrubs, bushes, bushes and hedges within the specified technical limits.
ZIPPER-MASCHINEN accepts no responsibility or warranty for any other use or use beyond this and for any resulting damage to property or injury.
13.1.1 Prohibited Applications / Hazardous Misapplications
- Operating the machine without adequate physical and mental fitness.
- Operating the machine without knowledge of the operating manual of the machine / engine.
- Changes to the design of the machine.
- Operating the machine in a potentially explosive environment.
- Operating the machine indoors or in closed areas.
- Operating the machine without functioning or missing protection devices.
- Remove the safety signs attached to the machine.
- Modify, circumvent or disable the safety devices of the machine.
Improper use or disregard of the explanations and instructions given in this manual will result in the expiration of all warranty and compensation claims against Zipper Maschinen GmbH.
13.2 User Requirements
The machine is designed to be operated by one person. The physical and mental suitability as well as knowledge and understanding of the operating instructions are prerequisites for operating the machine.
Please note that local laws and regulations may determine the minimum age of the operator and restrict the use of this machine!
Put on personal protective equipment before starting work with/on the machine.
13.3 General Safety Instructions
To avoid malfunctions, damage and health hazards when working with the machine, in addition to the general rules for safe working, the following points in particular must be observed:
- Check that the machine is in perfect condition before each use. Ensure that all guards are in place and working properly and that all nuts, bolts, etc. are securely tightened.
- Ensure sufficient lighting conditions in the working and surrounding areas of the machine.
• Always ensure a safe working position. - Remove setting tools from the machine before starting.
- Never leave the running machine unattended.
- Ensure that unauthorised persons maintain in safe distance from the machine and keep children away from the machine in particular.
- The machine may only be operated, serviced or repaired by persons who are familiar with it and who have been informed of the dangers arising during this work.
- Always wear suitable personal protective equipment (eye protection, ear protection, face protection, working gloves, safety shoes, tight-fitting protective clothing, etc.)!
-
Do not work on the machine if you are tired, not concentrated or under the influence of medication, alcohol or other drugs!
-
Never operate the machine in the presence of flammable liquids or gases (danger of explosion!).
- Carry out conversion, adjustment, measuring and cleaning work only when the engine is switched off.
- Only use spare parts and accessories recommended by ZIPPER machines.
13.4 Special Safety Instructions for Machine Operation
- Keep the machine away from your body when you start it and work with it.
- Do not start cutting until you have ensured that there are no other people or animals in the work area.
• Always start cutting with the cutting device running. - Move the machine so that the cut is always away from the body.
- Never cut above shoulder height.
- Never work with the hedge trimmer standing on ladders.
- When working with the machine, make sure that you do not touch any objects that could damage the cutting device, such as wires, fences, etc.
- Do not touch the ground with the cutting device running.
- Never touch the cutting device with your hands while the machine is in operation.
- Never attempt to remove objects stuck in the cutter while the engine is running.
- Prolonged continuous use of the machine may result in circulatory problems caused by vibration, especially on fingers, hands or wrists. Therefore, take regular breaks and wear suitable working gloves to reduce the vibration intensity.
- Excessive noise can cause hearing damage and temporary or permanent hearing loss. Wear hearing protection certified to health and safety regulations to limit noise exposure.
13.5 Safety Instructions for Machines with Combustion Engine
- Do not touch the engine and/or muffler during operation or immediately after switching off! These areas become hot during operation and can cause burns.
- Do not touch the spark plug connector when the engine is running (electric shock!).
- Do not operate the unit in closed areas or in rooms, unless there is adequate ventilation through exhaust fans or hoses. (Danger from carbon monoxide!)
- Do not smoke when refuelling the machine.
- Refuel the machine only in a well ventilated area.
- Do not refuel the machine as long as the engine is running or the machine is still hot.
- Do not refuel the machine near an open flame.
- Do not spill fuel when refuelling.
- Do not crank a flooded petrol engine as long as the spark plug is removed - fuel accumulated in the cylinder sprays out of the spark plug opening.
- Do not carry out an ignition spark test on petrol engines if the engine is flooded or petrol can be smelled. A stray spark could ignite the vapours.
- Do not use petrol or other types of fuel or flammable solutions to clean machine parts, especially indoors. Vapours from fuels and solutions may explode.
- Always keep the area around the muffler free of foreign substances such as leaves, paper, cardboard, etc. A hot muffler could ignite these substances and cause a fire.
- Close the filler cap after refuelling.
- Check the fuel line and tank regularly for leaks and cracks. Do not operate the machine if leaks in the fuel system are known.
- Store fuel only in designated and approved containers.
13.6 Hazard Warnings
Despite proper use, certain residual risks remain. Due to the design and construction of the machine, hazardous situations may occur when handling the machine, which are identified in these instructions as follows:
DANGER

A safety instruction designed in this way indicates an imminently hazardous situation which, if not avoided, will result in death or serious injury.
WARNING

Such a safety instruction indicates a potentially hazardous situation which, if not avoided, may result in serious injury or even death.
CAUTION

A safety instruction designed in this way indicates a potentially hazardous situation which, if not avoided, may result in minor or moderate injury.
NOTICE

A safety notice designed in this way indicates a potentially hazardous situation which, if not avoided, may result in property damage.
Irrespective of all safety regulations, your common sense and your corresponding technical suitability/training are and will remain the most important safety factor for error-free operation of the machine. Safe working depends first and foremost on you!
14 TRANSPORT
WARNING

Never transport the hedge trimmer with the cutting device running!
Always keep the hot silencer away from your body during transport. Carry the hedge trimmer only on the handles. The cutting device should point backwards during transport. When transporting over long distances, always attach the supplied blade cover. Ensure that the hedge trimmer is in a safe position during transport in the vehicle. Only place the hedge trimmer in the trunk or on a transport surface separated from the driver.
15 START-UP
15.1 Checking the Delivery Content
Check the machine immediately after unpacking for transport damage, missing parts and loose screw connections. Report any damage or missing parts to your retailer immediately. Visible transport damage must be noted on the delivery note in accordance with the warranty provisions, otherwise the goods will be deemed to have been properly accepted.
15.2 Assembly
The machine is delivered pre-assembled. Therefore, no further assembly steps are necessary before commissioning, but the fuel reservoir must be refilled.
15.3 Fuel
15.3.1 General Requirements
The machine is equipped with a two-stroke engine that requires two-stroke oil to be added to the petrol.
- Only use two-stroke oil approved for air-cooled engines, chainsaws, trimmers, etc. in a 2.5% mixture. This means that 4 litres of unleaded petrol are mixed with 0.1 litres of 2-stroke oil (mixing ratio 40:1).
- Do not use alkylate petrol as it consists of only 2% mixture and can damage the engine.
- Use a suitable, clean container for mixing.
- Shake the container with the oil well before opening and then mix oil and petrol thoroughly.
- Fuel and fuel mixtures age: Superimposed fuel and fuel mixtures can lead to starting problems. Never store the same mixture in the tank for more than 30 days. Do not use a petrol/oil mixture older than 90 days for the machine.
15.3.2 Filling up with Fuel
DANGER

Always switch off the engine before refuelling. Never fill the machine with fuel when the engine is running or while the engine is still hot – cool down time at least 2 minutes. Move more than 3 meters from the point of refuelling before restarting the engine.
Fuelling procedure:
- Unscrew fuel tank cap
- Pour the oil-fuel mixture carefully into the tank → Do not spill anything!
○ Close the tank cap tightly. → Wipe up any spilled petrol!
16 OPERATION
16.1 Starting the Machine
16.1.1 Starting with Cold Engine
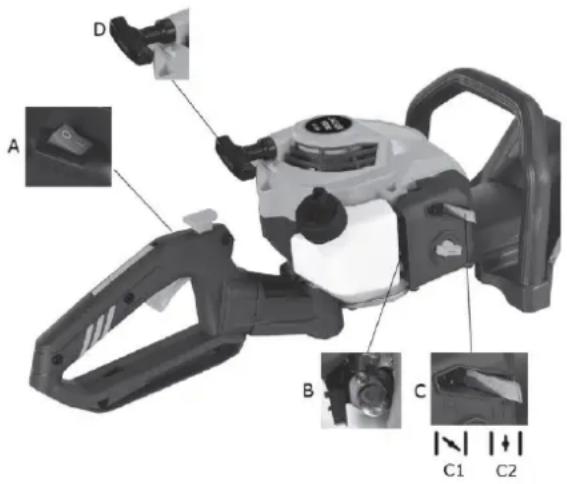
- Place the hedge trimmer on a flat, stable surface.
- Set the ON-OFF switch (A) to position "I" (ON).
- Press fuel pump (B) 8 to 10 times.
- Move the choke lever to start position (C1).
- Slowly pull out the start rope (D) until you feel a slight resistance. Then pull out the starting rope powerfully. Guide the start rope back into the engine by hand. Repeat up to 3 times until the first ignition can be heard (engine normally does not start here).
- Move the choke lever (C) to the run position (C2) = closed.
- Pull the starting rope as described (point 5) until the engine is running.
16.1.2 Starting with a warm Engine
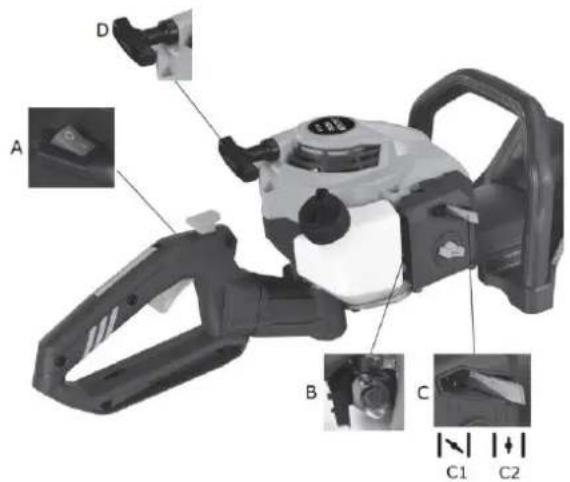
-
Set the ON-OFF switch (A) to position "I" (ON).
-
Move the choke lever (C) to run position (C2) = closed.
-
Pull start rope (D) until the engine is running.
16.2 Switching off the machine
- Release the throttle.
- Set ON-OFF switch (A) to position "0" (OFF).
16.3 Turning the Handle
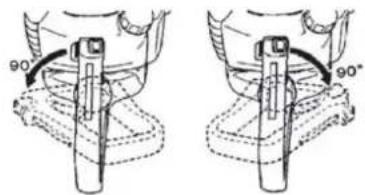
To give you the best and most ergonomic way to trim your hedge, the handle can be rotated 90 degrees to the right or left - see illustration on the left.
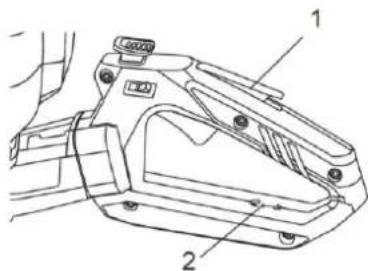
Notice: Do not press on the throttle when turning the handle!
Procedure:
Press the throttle lock (1) on the top of the rear handle. Then push the locking handle (2) downwards while simultaneously turning the handle to the left or right – see illustrations on the left.
16.4 Recommendations for Cutting
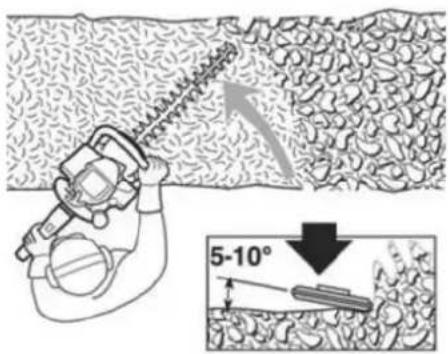
Only accelerate as much as necessary.
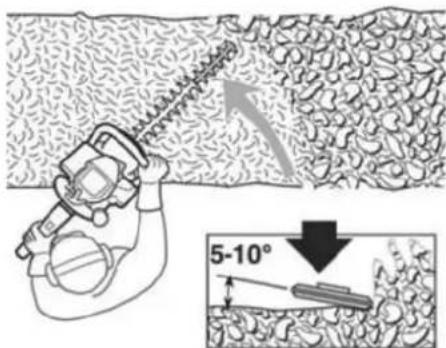
Hold the hedge trimmer at an angle of 5-10 degrees to the hedge (see illustration on the left).
→ This makes cutting easier and the result is better.
17 MAINTENANCE
WARNING

Hot surfaces and rotating machine parts while the engine is running can cause serious injury or even death. Always switch off the machine for conversion, adjustment, cleaning and maintenance work and secure it against unintentional recommissioning.
The machine is low-maintenance and only a few parts have to be serviced. Nevertheless, malfunctions or defects which could impair the safety of the user must be rectified immediately! If you are unable to carry out necessary maintenance work properly and/or do not have the required training, always consult a specialist workshop to get the problem fixed.
17.1 Maintenance schedule
The type and degree of machine wear depend to a large extent on the operating conditions. The following intervals apply when the machine is used within the specified limits:
| Motor | Assembly group/component | What to do? | Before starting | After xx operating hours | Remark | ||
| 25 | 50 | 100 | |||||
| Fuel leak | wipe up spilled fuel immediately | √ | |||||
| Fuel tank, air filter, fuel filter | check and clean | √ | √ | replace if necessary | |||
| Spark plug | cleaning and adjusting the spark plug head | √ | Distance 0,6-0,7 mm | ||||
| Airfilter | clean | √ | replace if necessary | ||||
| Trimmer | Sword, blades | check and clean | √ | ||||
| Gear box | check and lubricate | √ | grease during and after use | ||||
| Bolts, screws, nuts | tighten, replace | √ | √ | ||||
17.2 Measures before Starting
- Remove leaves, branches and dirt from the machine.
- Check the machine for loose or missing parts.
- Fasten loose parts.
- Check the air filter for contamination.
- Check the machine for leaks in the fuel system.
17.3 Cleaning the Air Filter
A dirty air filter makes it difficult to start the engine and reduces the engine power.
Procedure:
- Loosen the wing nut on the air filter housing, remove the cover and check that there is no dirt in the filter.
- If necessary, clean the air filter in warm soapy water.
- Allow the air filter to dry completely.
- Then soak the air filter with 2-stroke engine oil.
- Squeeze out excess oil.
- Insert the oil-soaked filter.
- Mount the air filter cover and tighten the wing nut.
Signs indicating a necessary air filter change:
- Engine power decreases, at the same time fuel consumption increases
- Oil consumption increases
- Starting the engine becomes more difficult
17.4 Lubricating the Gearbox
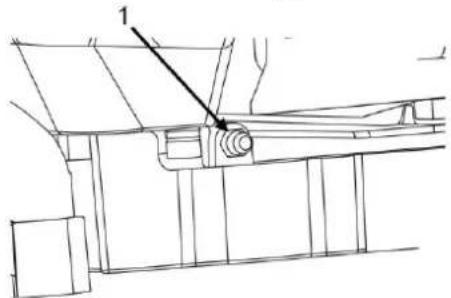
The gearbox is lubricated at the time of delivery of the machine, but must be relubricated at regular intervals (see maintenance schedule).
Lubrication is carried out via the lubrication nipple (1) on the side of the gearbox housing - see illustration on the left. Use a multi-purpose grease of class NLGI 2 or an equivalent product.
17.5 Setting the Idle Speed
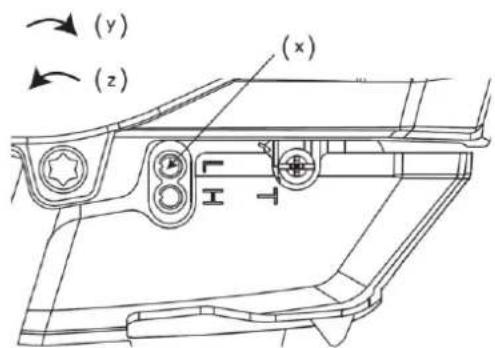
First check that the air filter is clean, as it may affect the result.
If the idle speed is correct, the cutter blade should not move when the machine is idling.
Use the idle screw (X) to adjust. Turn in direction y: Increase speed, direction z: Decrease speed.
Procedure:
- Close the idle adjustment screw while the engine is running (turn counterclockwise) until the cutting tool begins to rotate.
If the idle speed cannot be adjusted so that the cutter blade no longer moves, contact your dealer/service
centre and do not use the machine again until it has been properly adjusted or repaired.
17.6 Cleaning the Spark Plug
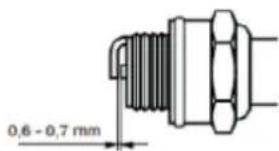
Remove the spark plug and clean it of soot and other impurities with a brush. Then check the distance between the contacts. It should be 0.6 to 0.7 mm (see illustration on the left), which is approximately the thickness of a credit card. Then reinstall the spark plug. For optimum performance, the spark plug should be replaced once a year. You will find the article number in the spare parts list.
18 STORAGE
DANGER

Observe all safety precautions for the safe storage and handling of petrol.
NOTICE

Improper storage can damage and destroy important components. Only store packed or unpacked parts under the intended ambient conditions!
In the case of a longer interruption of operation (> 30 days) or during decommissioning, observe the following points:
- Clean the machine thoroughly and keep the blades frost-free and out of the reach of children.
- Before storing the machine, empty all fuel into a container approved for petrol. Then let the engine run until it stops.
- Store the machine in a dry environment protected from frost and other weather conditions.
19 DISPOSAL

Observe the national waste disposal regulations. Never dispose of the machine, machine components or equipment in residual waste. If necessary, contact your local authorities for information on the disposal options available.
If you buy a new machine or an equivalent device from your specialist retailer, he is obliged in certain countries to dispose of your old machine properly.
20 TROUBLESHOOTING
WARNING

Hot surfaces and rotating machine parts while the engine is running can cause serious injury or even death. Always switch off the machine before carrying out troubleshooting work and secure it against unintentional restarting.
If you are unable to carry out necessary repairs properly and/or do not have the required training, always consult a specialist to get the problem fixed.
| Problem | Possible Cause | Solution |
| Engine does not start | 1. No ignition spark2. No fuel3. Engine "sunk"4. Recoil starter must be pulled tighter when the machine is new | 1. Check the spark plug.2. Press fuel pump. If the problem persists, contact your local retailer.3. Pull the starter three times with the choke-lever in closed position. If the engine does not start, set the choke-lever to "C1" and carry out the normal starting procedure. If the engine still does not start, repeat the procedure with a new spark plug.4. Contact your local retailer. |
| Engine starts but does not accelerate | 1. Carburettor should be adjusted | 1. Contact your local retailer |
| Engine starts but can only run on full power and on half choke. | 1. Carburettor should be cleaned, readjusted or replaced. | 1. Contact your local retailer |
| Engine does not run on full power and smokes heavily | 1. Check the petrol/oil mixture.2. Dirty air filter3. Carburettor should be readjusted, repaired or replaced | 1. Use fresh fuel and the correct two-stroke mixture.2. Clean or replace air filter3. Contact your local retailer |
| Engine starts, runs and accelerates but cannot run idle | 1. Carburettor should be adjusted | 1. Contact your local retailer |
| Oil leaks from the exhaust. | 1. Trimmer is not used at full power2. Check the petrol/oil mixture3. Carburettor should be adjusted | 1. Use full power2. Use fresh fuel and the correct two-stroke mixture.3. Contact your local retailer |
21 UVOD (SL)
Spoštovani kupec!
- Stikalo za VKLOP/IZKLOP (A) dajte v položaj „I“ (EIN).
- Ročico za zaug (C) dajte v položaj ZAPRTO (C2).
- Povlecite zagonsko vrvico (D), dokler motor ne začne teči.
25.2 Izklop naprave
- Spustite ročico za plin.
- Stikalo za VKLOP/IZKLOP dajte v položaj „0“ (Aus).
natural_image
Technical line drawing of a mechanical assembly with no visible text or symbols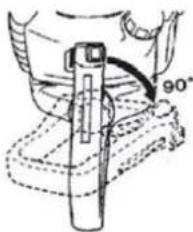
natural_image
Technical line drawing of a mechanical component with a 90-degree angle标注 (no text or symbols beyond the angle marker)Postopek:
Pritisnite na zaporo ročice za plin (1) na zgornji strani zadnjega ročaja. Nato zaporni ročaj (2) potisnite navzdol in pri tem istočasno obrnite ročaj v levo ali desno – glej sliki levo.
natural_image
Technical line drawing of a mechanical assembly with no visible text or symbolsnatural_image
Technical line drawing of a mechanical assembly with no visible text or symbols(EN) With original ZIPPER spare parts you use parts that are attuned to each other shorten the installation time and elongate your machines lifespan.
IMP OR TAN T
The installation of other than original spare parts voids the warranty!
So you always have to use original spare parts
When you place a spare parts order please use the service formular you can find in the last chapter of this manual. Always take a note of the machine type, spare parts number and partname. We recommend to copy the spare parts diagram and mark the spare part you need.
You find the order address in the preface of this operation manual.
37.1 Ersatzteilliste Trimmer / spare part list hedge trimmer / Listado de piezas de recambio retestadora
| No. | Specification | Qty. | No. | Specification | Qty. |
| 1 | Front handle | 1 | 29 | Gear case gasket | 1 |
| 2 | Washer 15*28*2 | 3 | 30 | Gear case cover | 1 |
| 3 | Front handle shock absorber spring | 2 | 31 | Screw M5*14 | 3 |
| 4 | Hexagon screw St6.3*30 | 2 | 32 | Felt gasket | 1 |
| 5 | Aluminium plate | 1 | 33 | Internal plum head tapping screw ST5*16 | 6 |
| 6 | Hexagonal flange screw M5*16 | 7 | 34 | Right decorative cover | 1 |
| 7 | Blade bar | 1 | 35 | Rear handle with | 1 |
| 8 | Double-edged blade 570 | 2 | 36 | Rotary button | 1 |
| 9 | Sliding block | 9 | 37 | Trigger control arm | 1 |
| 10 | Washer 5*8*1.5 | 8 | 38 | Throttle trigger | 1 |
| 11 | Nut M5 | 11 | 39 | Switch | 1 |
| 12 | Blade cover | 1 | 40 | Left rear handle | 1 |
| 13 | U fixed block | 1 | 41 | Left decorative cover | 1 |
| 14 | Hexagonal flange bolt M5*30 | 4 | 42 | Button spring | 1 |
| 15 | Fuel tank assy. | 11 | 43 | O-Ring 41*2.4 | 1 |
| 16 | Washer 5.5*12*1.6 | 1 | 44 | Connector | 1 |
| 17 | Clutch plate | 1 | 45 | Rear handle spring card | 1 |
| 18 | Oil cup M6 | 1 | 46 | Rear handle shock absorber sleeve | 4 |
| 19 | Gear case | 5 | 47 | Support sleeve | 2 |
| 20 | Screw M6*35 | 1 | 48 | Washer 6*22*2 | 4 |
| 21 | Bearing 6002-2RS | 1 | 49 | Throttle wire | 1 |
| 22 | Circlip for hole | 1 | 50 | Switch wire | 1 |
| 23 | Circlip | 1 | 51 | Throttle trigger torsin spring | 1 |
| 24 | Needle bearing HK0609 | 2 | 52 | Gear case cover | 1 |
| 25 | Subtraction plate | 2 | 53 | Screw M5*20 | 1 |
| 26 | Eccentric wheel connecting rod | 1 | 54 | Clutch cover | 1 |
| 27 | Eccentric wheel assembly | 1 | 55 | Gasoline engine | 1 |
| 28 | Bearing 606Z | 1 |
37.2 Explosionszeichnung Motor / Exploded View Motor / Vista de despiece motor
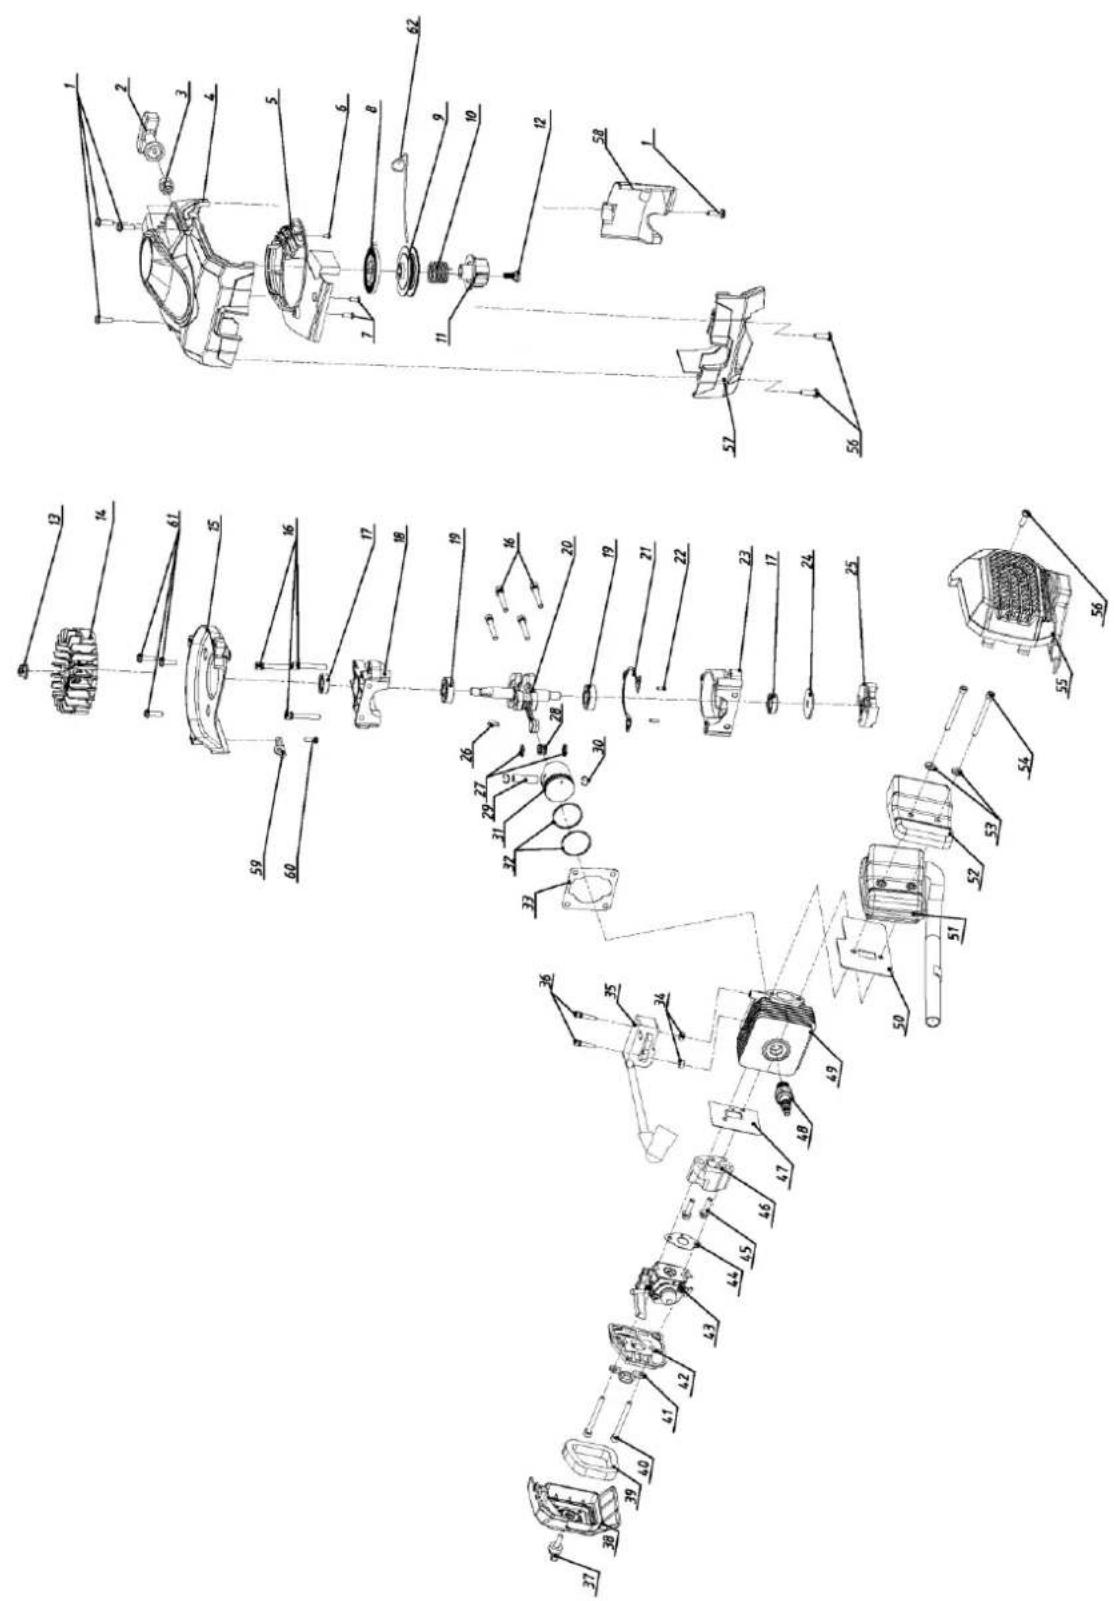
37.3 Ersatzteil-Liste Motor / spare-part list engine / Listado de piezas de recambio motor
| No. | Specification | Qty. | No. | Specification | Qty. |
| 1 | Internal plum flange screw M5*16 | 7 | 32 | Piston ring | 2 |
| 2 | Start handle | 1 | 33 | Cylinder gasket | 1 |
| 3 | New Bakelite | 1 | 34 | Insulation pad | 2 |
| 4 | Starter cover | 1 | 35 | Ignition coil | 1 |
| 5 | Air guide cover | 1 | 36 | Screw M4*20 | 2 |
| 6 | Self tapping srew ST3*8 | 1 | 37 | Air filter knob | 1 |
| 7 | Self tapping srew ST4*10 | 2 | 38 | Air filter cover | 1 |
| 8 | Starter coil spring | 1 | 39 | Air filter sponge | 1 |
| 9 | Start cord pulley | 1 | 40 | Screw M5*50 | 2 |
| 10 | Starter torsion spring | 1 | 41 | Oil baffle | 1 |
| 11 | Start dialing claw | 1 | 42 | Air filter base | 1 |
| 12 | Step self tapping screws | 1 | 43 | Carburettor | 1 |
| 13 | Inner sic angle flange nut M8*10 | 4 | 44 | Carburettor gasket | 1 |
| 14 | Fly wheel | 1 | 45 | Flange screw M5*20 | 2 |
| 15 | Fan cover | 1 | 46 | Intake pipe | 1 |
| 16 | Inner six angle combined screw M5*35 | 7 | 47 | Intake manifold gasket | 1 |
| 17 | Oil seal 12*22*7 | 2 | 48 | Spark plug | 1 |
| 18 | Front half crankcase | 1 | 49 | Cylinder | 1 |
| 19 | Bearing 12*28*8 | 2 | 50 | Muffler gasket | 1 |
| 20 | Crankshaft | 1 | 51 | Muffler | 1 |
| 21 | Crankcase gasket | 1 | 52 | Muffler heat cover | 1 |
| 22 | Pin 3*8 | 2 | 53 | Flat washer 5.5*12*16 | 2 |
| 23 | Rear half crankcase | 1 | 54 | Screw M5*55 | 1 |
| 24 | Washer 8*32*2 | 1 | 55 | Muffler cover | 1 |
| 25 | Clutch | 1 | 56 | Screw ST5*16 | 3 |
| 26 | Semicircle key | 1 | 57 | Cylinder cover | 1 |
| 27 | Thrust ring | 2 | 58 | Crankcase cover | 1 |
| 28 | Needle bearing KBK081109 | 1 | 59 | Throttle fixing plate | 1 |
| 29 | Piston pin 8*5*28 | 1 | 60 | Screw M5*12 | 1 |
| 30 | Piston pin circlip | 2 | 61 | Screw M5*14 | 3 |
| 31 | Piston | 1 | 62 | Starter rope | 1 |
Company ZIPPER Maschinen GmbH grants for mechanical and electrical components a warranty period of 2 years for amateur use; and warranty period of 1 year for professional use, starting with the purchase of the final consumer. In case of defects during this period, which are not excluded by paragraph 3, ZIPPER will repair or replace the machine at its own discretion.
2.) Report:
In order to check the legitimacy of warranty claims, the final consumer must contact his dealer. The dealer has to report in written form the occurred defect to ZIPPER. If the warranty claim is legitimate, ZIPPER will pick up the defective machine from the dealer. Returned shippings by dealers which have not been coordinated with ZIPPER, will not be accepted and refused.
3.) Regulations:
a) Warranty claims will only be accepted, when a copy of the original invoice or cash voucher from the trading partner of ZIPPER is enclosed to the machine. The warranty claim expires if the accessories belonging to the machine are missing.
b) The warranty does not include free checking, maintenance, inspection or service works on the machine. Defects due to incorrect usage of the final consumer or his dealer will not be accepted as warranty claims either. Some examples: usage of wrong fuel, frost damages in water tanks, leaving fuel in the tank during the winter, etc.
c) Defects on wear parts are excluded, e.g. carbon brushes, collection bags, knives, cylinders, cutting blades, clutches, sealings, wheels, saw blades, splitting crosses, riving knives, riving knife extensions, hydraulic oils, oil/air/fuel filters, chains, spark plugs, sliding blocks, etc.
d) Also excluded are damages on the machine caused by incorrect or inappropriate usage, if it was used for a purpose which the machine is not supposed to, ignoring the user manual, force majeure, repairs or technical manipulations by not authorized workshops or by the customer himself, usage of non-original ZIPPER spare parts or accessories.
e) After inspection by our qualified personnel, resulted costs (like freight charges) and expenses for not legitimated warranty claims will be charged to the final customer or dealer.
f) In case of defective machines outside the warranty period, we will only repair after advance payment or dealer's invoice according to the cost estimate (incl. freight costs) of ZIPPER.
g) Warranty claims can only be granted for customers of an authorized ZIPPER dealer who directly purchased the machine from ZIPPER. These claims are not transferable in case of multiple sales of the machine.
4.) Claims for compensation and other liabilities:
The liability of company ZIPPER is limited to the value of goods in all cases. Claims for compensation because of poor performance, lacks, damages or loss of earnings due to defects during the warranty period will not be accepted. ZIPPER insists on its right to subsequent improvement of the machine.
41 GARANCIJA (SL)
1.) Garancija:
We monitor the quality of our delivered products in the frame of a Quality
Management policy.
Your opinion is essential for further product development and product choice. Please let us know about your:
- Impressions and suggestions for improvement.
- experiences that may be useful for other users and for product design
- Experiences with malfunctions that occur in specific operation modes
We would like to ask you to note down your experiences and observations and send them to us via FAX, E-Mail or by post
* (Mobil)telefon / (mobile) phone International numbers with country code
Fax
2. Geräteinformationen / tool information
Seriennummer/serial number: ____*Maschinentype/machine type:
Please describe amongst others in the problem: What has cause the problem/defect, what was the last activity before you noticed the problem/defect? For electrical problems: Have you had checked you electric supply and the machine already by a certified electrician?
3. Bitte beachten
/ Additional information
INCOMPLETELY FILLED SERVICE FORMS CANNOT BE PROCESSED! FOR GUARANTEE CLAIMS PLEASE ADD A COPY OF YOUR ORIGINAL SALES / DELIVERY RECEIPT OTHERWISE IT CANNOT BE ACCEPTED. FOR SPARE PART ORDERS PLEASE ADD TO THIS SERVICE FORM A COPY OF THE RESPECTIVE EXPLODED DRAWING WITH THE REQUIRED SPARE PARTS BEING MARKED CLEARLY AND UNMISTAKABLE. THIS HELPS US TO IDENTIFY THE REQUIRED SPARE PARTS FASTLY AND ACCEL- LERATES THE HANDLING OF YOUR INQUIRY.
- INHALT /INDEX
- INHALT /INDEX 2
- SICHERHEITSZEICHEN / SAFETY SIGNS / SEÑALES DE SEGURIDAD 5
- TRANSPORT 20
- START-UP 20
- OPERATION 21
- MAINTENANCE 23
- STORAGE 24
- DISPOSAL 25
- Komponenten / Components / Komponente / Componentes
- Technische Daten / Technical Details / Tehnični podatki / Datos técnicos
- VORWORT (DE)
- Please pay special attention to the chapter Safety!
- Copyright
- Customer Service Address
- Intended Use of the Machine
- Prohibited Applications / Hazardous Misapplications
- User Requirements
- General Safety Instructions
- Special Safety Instructions for Machine Operation
- Safety Instructions for Machines with Combustion Engine
- Hazard Warnings
- DANGER
- WARNING
- CAUTION
- NOTICE
- TRANSPORT
- START-UP
- Checking the Delivery Content
- Assembly
- Fuel
- General Requirements
- Filling up with Fuel
- OPERATION
- Starting the Machine
- Starting with Cold Engine
- Starting with a warm Engine
- Switching off the machine
- Turning the Handle
- Procedure:
- Recommendations for Cutting
- MAINTENANCE
- Maintenance schedule
- Measures before Starting
- Cleaning the Air Filter
- Lubricating the Gearbox
- Setting the Idle Speed
- Cleaning the Spark Plug
- STORAGE
- DISPOSAL
- TROUBLESHOOTING
- UVOD (SL)
- Spoštovani kupec!
- Izklop naprave
- Postopek:
- IMP OR TAN T
- The installation of other than original spare parts voids the warranty!
- Explosionszeichnung Motor / Exploded View Motor / Vista de despiece motor
- 2.) Report:
- 3.) Regulations:
- 4.) Claims for compensation and other liabilities:
- GARANCIJA (SL)
- 1.) Garancija:
- Geräteinformationen / tool information
- Bitte beachten
- / Additional information
Brand : Zipper
Model : ZI-BHS605
Category : Hedge Trimmer