
QKC8D81901 - Security Camera Qian - Free user manual and instructions
Find the device manual for free QKC8D81901 Qian in PDF.


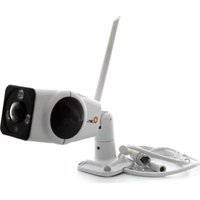
| Product Type | Security Camera |
| Brand | Qian |
| Model | QKC8D81901 |
| Dimensions (approx.) | 100 x 70 x 70 mm (camera body) |
| Weight | Approx. 300 g |
| Power Supply | DC 12V, 1A (included adapter) |
| Resolution | 1080p Full HD (1920 x 1080) |
| Night Vision | Up to 10m with IR LEDs |
| Field of View | 90° (diagonal) |
| Connectivity | Wi-Fi 2.4GHz, RJ45 Ethernet |
| Storage | MicroSD card up to 128GB, Cloud (subscription) |
| Audio | Two-way talk with built-in microphone and speaker |
| Motion Detection | PIR sensor and software-based |
| Weatherproof Rating | IP65 (outdoor use) |
| Mounting | Wall or ceiling mount included |
| Operating Temperature | -20°C to 50°C |
| Compatibility | iOS and Android apps |
| Maintenance | Clean lens with soft dry cloth; keep vents clear |
| Security | Encrypted video transmission, firmware updates |
| Spare Parts / Repairability | Contact Qian support for replacement parts; not user-serviceable |
| Warranty | 1 year limited warranty |
Frequently Asked Questions - QKC8D81901 Qian
User questions about QKC8D81901 Qian
0 question about this device. Answer the ones you know or ask your own.
Ask a new question about this device
Download the instructions for your Security Camera in PDF format for free! Find your manual QKC8D81901 - Qian and take your electronic device back in hand. On this page are published all the documents necessary for the use of your device. QKC8D81901 by Qian.
USER MANUAL QKC8D81901 Qian
natural_image
Exterior view of a security camera system with multiple surveillance cameras mounted on a black rack (no visible text or symbols)MODELO/MODEL QKC8D81901

Salida Alta Definición High Definition Output

Analógico + Digital Analogical + Digital

Monitoreo en Dispositivos Móviles Monitoring in Mobile Devices

AHD/TVI/CVI /CVBS/IP

Resolución HD 720P Resolution HD 720P

Please read carefully before using your equipment and save it for future use. (Page 15)
MANUAL DE USUARIO / USER MANUAL
7. CMS
Interface Specification
| Symbol Specification Specification | |
| DC 12V DC 12V | VDC 12V |
| / USB | USB Port, for USB drive and mouse etc |
| LAN LAN Port | LAN Port |
| HD-OUT HD-OUT | HTP-OUT Port |
| VGA VGA Port | VGA Port |
| V-OUT | AV video output, Such as the video output from DVD/Digital TV |
| AUDIO IN | Audio in,use RCA to connect audio input device such as pick-up |
| AUDIO OUT | Audio output,use RCA to connect audio output device,such as active speaker |
| BNC Analog signal | Analog input port |
| RS485 PTZ control | PTZ control |

| Network Phone | Chapp, NapWork, Email, Neil, Service |
| Mode switch Digital Network | Analog, Hybrid |
| Info Version | Hod, infdd info |
| Record Encoder | Reode, Play, Back |
| Alarm | Motion Detect, Video Blind, Video Loss Alarm Input/Output etc. |
| System Genec | Display, Batch title, Storage etc |
1. System Login
* When you start the DVR, user name is "admin", no password and then click "OK". As picture shows:

flowchart
graph TD
    A["SYSTEM LOGIN"] --> B["admin"]
    A --> C["OK"]
    B --> D["User Name:"admin" No Password""]
    C --> E["Click "OK""]
2. Format Storage
*When you install the new hard disk, you should format storage first. Right-click "Main Manu→System→General→Storage". Choose the Hard Disk, click "Format Storage". As picture shows:

3. Record Mode
*Choose "Record Mode" by right-click the mouse, the DVR records 24 hours by default. As picture shows:

4. Playback
*Right-Click and Click the " playback", choose the channel and day that you want to play. And Click the "Search", As the pictures show

5. Email Setup
*Right-Click and Click the “Network settings→Email”, Click the “Enable”, choose “SMTP Sever” that you need. “Type user name-password-Receiver”. Then Click “ok”, As the pictures show:

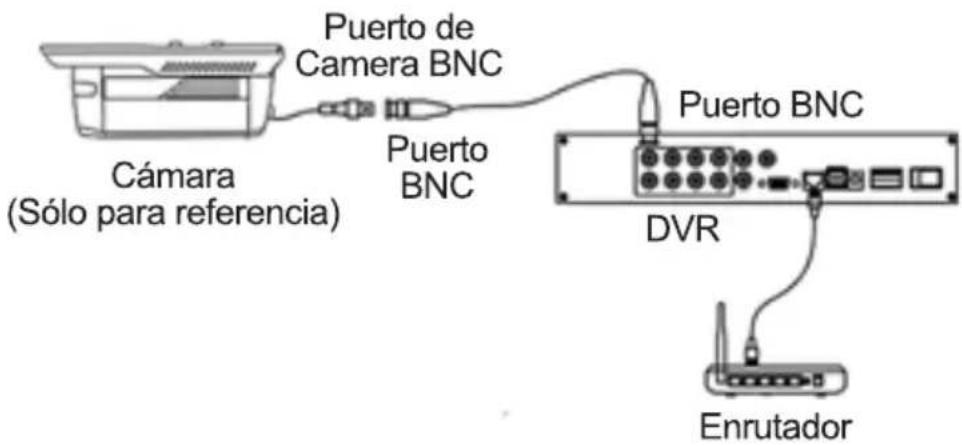
6. Network setup
- Connect internet, Right-Click and Choose the "Network settings→Network". Choose "DHCP Enable", Then Click "ok". As Pictures show:
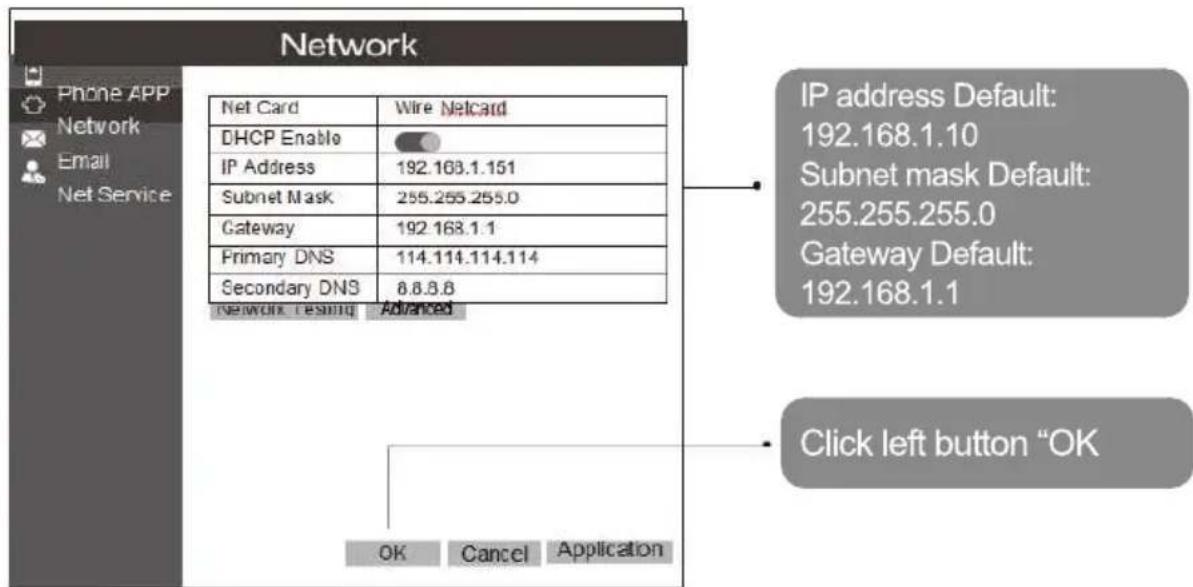
- Click "Phone APP→Cloud 1", Click "Enable" and "Register", it will auto getting the Device ID, After connected internet, Nat Satatus showing Connected, As picture show:
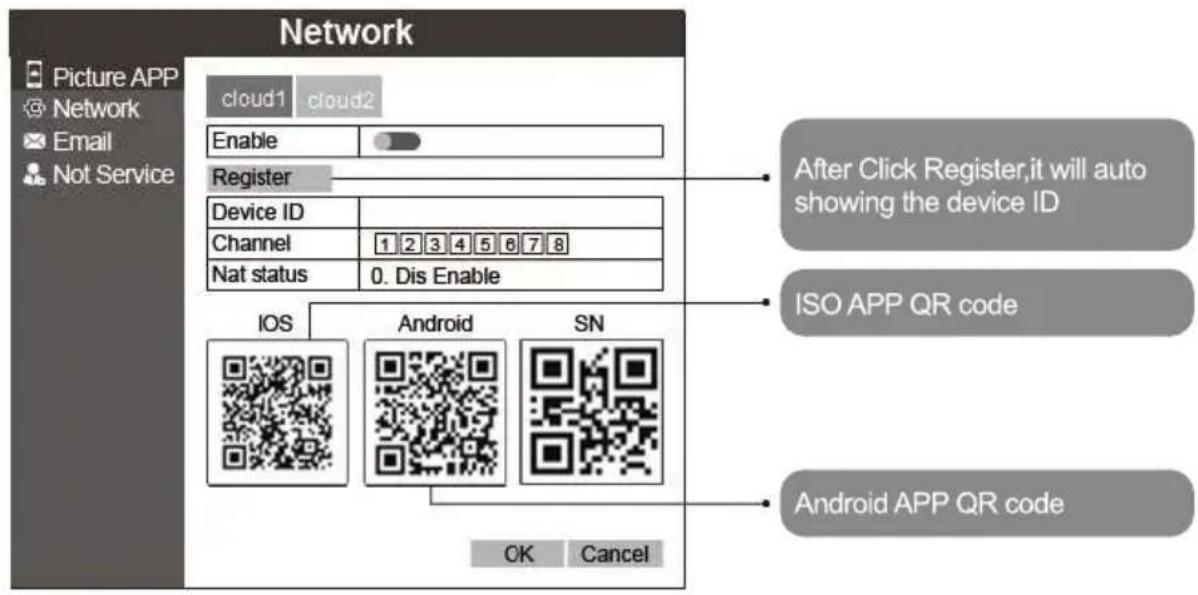
- Open the smart phone, Scan the specified QR code, download and install APP. As picture shows :

IOS APP
(Iphone users recommend using the UC browser or Wechat)

Android APP
(Android user recommend using the UC browser,
Don't use Wechat)
4. Open“Danale” app

on the phone's desktop, Follow the steps to
register an account, As picture shows:

- Use the registered account to login, Click "Add Device". As shown below:

- Click "Add" then can remote control DVR. As picture shows:

- Click "Add" then can remote control DVR. As picture shows:

7. CMS
- Input "www.cd-ipc.com/danale" to IE, Click the "CMS", to download and install this software. As picture shows:

- Open the "Danacms", input the account and password as you just registered. As picture shows:
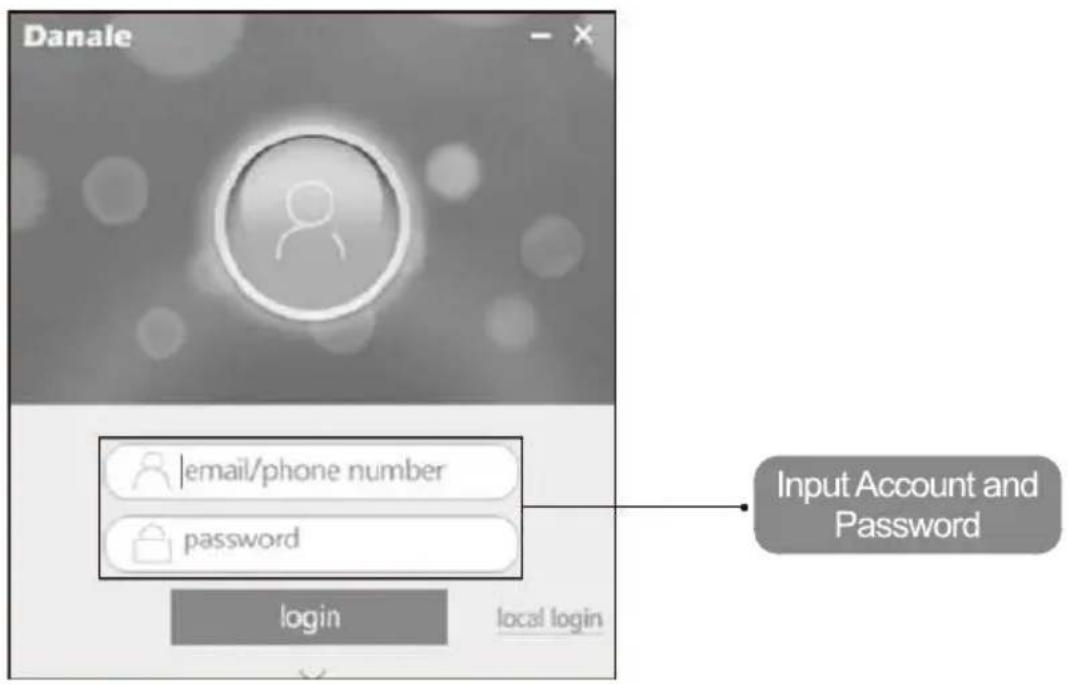
- Login successfully, enter the software main interface, click "My device". As picture shows:

- Playback: Click icon ☐, select "SD card record" can play back. If customers purchase Cloud Storage, select "Cloud Record" can paly back. As picture shows:

Q 1: The DVR can not start normally
A: 1. Non-compatible power supply.
2. Failure in the power supply.
3. Damage to the power adapter.
4. Damage to the hard disk or problem with the hard drive cable.
Q 2: Forget the password.
A: 1. Contact Qian technical support at Tel. +52 (33) 1078-3404 and / or info@qian.mx
Q 3: The DVR reboots automatically or stops working after boot up a few minutes
A: 1. The input voltage is unstable or too low.
2. The hard drive cable may be incorrectly connected, or the hard disk may be damaged.
3. Overheating of the unit, too much dust, the unit may be in an unfavorable operating environment.
Q 4: After booting, my DVR does not detect the hard drive
A: 1. Check the power connection of the hard disk in the DVR
2. Check for possible damage to the hard drive cables.
3. Check that the hard drive cables are connected correctly.
4. Damaged hard drive.
Q 5: There is no video signal on a channel, multiple channels or all channels
A: 1. The software does not match. Please update the new software.
2. The brightness option in the DVR menu is 0, restore the default setting.
3. No video input signal or the signal is too weak.
Q 6: Video files can not be found in local playback mode
A: 1. Check that hard drive cables are connected correctly.
2. Damaged hard drive.
3. Update the software.
4. The recording function is disabled.
5. Do not enable the recording function.
Q 7: There is no audio signal in the surveillance channels
A: 1. Audio disabled.
2. The audio does not match the video channel.
3. Damaged audio cable.
Q 8: Wrong date and time format
A: 1. The time settings are incorrect.
2. Badly installed internal battery.
3. Low voltage.
Q 9: The DVR can not control the PTZ camera
A: 1. PTZ camera failure.
2. Configuration, connection or installation of the wrong PTZ decoder.
- Incorrect configuration in the PTZ function of the DVR.
- PTZ decoder and DVR protocols do not match.
- Too much distance between PTZ camera and DVR.
Col. Agua Blanca Industrial, Zapopan
Col. Agua Blanca Industrial, Zapopan
Qian S.A. de C.V., will warranty this product in all its parts and workmanship for the period of 12 months, counting from the date of purchase against defects in manufacture and operation during normal and domestic use of this product.
Qian S.A. de C.V. warranty the buyer the absence of manufacturing and operation anomalies including parts and components of the product or in relation to materials.
- This policy covers only products marketed by Qian S.A. de C.V., through its authorized distributors within the Mexican Republic and United States of America.
- For the validation of this, the defective product must be presented together with this warranty policy completely filled out and stamped by the distributor that made the sale or the invoice, receipt, or proof of purchase in the place where the product was purchased, or in the National Service Center.
- Qian S.A. de C.V. may use new parts, refurbished or used in good condition to repair or replace any product at no additional cost to the consumer, as long as the warranty period specified in this policy has not been completed.
- If the product does not have repair, change a similar product or superior characteristics is generated.
- The repair time will not exceed 30 calendar days from the date of receipt of the product by Qian S.A. de C.V. or its Authorized Service Center.
- Qian S.A. de C.V. will cover shipping costs required for presentation of the product within the network of authorized service centers.
Exclusions:
Qian S.A. de C.V. will not validate this warranty policy in the following cases:
- When the product has been used under normal conditions..
- When the product had not operated according to the instructions of use that accompanies it.
- When the product has been altered or repaired by unauthorized persons
by Qian S.A. de C.V.
For warranty purposes, as well as procurement of components, consumable parts and accessories www.qian.mx can request information or contact any Authorized Service Center Qian S.A. de C.V.
Col. Agua Blanca Industrial, Zapopan
Col. Agua Blanca Industrial, Zapopan
Warnings regarding the safety of Direct Current (DC)

WARNING: Place the Kit 8 Cameras 8 Channels near a DC outlet. The DC power cord is the primary means of disconnecting your DVR Kit and cameras and should always be within reach. Connect the power cord only to grounded outlets to avoid the risk of electric shock.

WARNING: Always disconnect the DC power cord when installing or removing the DVR or camera cover.

WARNING: Do not operate the 8 Cameras 8 Channels Kit without the cover of the DVR or cameras.

WARNING: The user should not perform any type of repair of the power supply. To avoid damage to the power source, entrust your repair or replacement to only a qualified person. The user can carry out the maintenance of the rest of the components.
CONSUMPTION INPUT2VDOC


- MODELO/MODEL QKC8D81901
- MANUAL DE USUARIO / USER MANUAL
- CMS
- Interface Specification
- System Login
- Format Storage
- Record Mode
- Playback
- Email Setup
- Network setup
- Android APP
- Open“Danale” app
- Q 1: The DVR can not start normally
- Q 2: Forget the password.
- Q 3: The DVR reboots automatically or stops working after boot up a few minutes
- Q 4: After booting, my DVR does not detect the hard drive
- Q 5: There is no video signal on a channel, multiple channels or all channels
- Q 6: Video files can not be found in local playback mode
- Q 7: There is no audio signal in the surveillance channels
- Q 8: Wrong date and time format
- Q 9: The DVR can not control the PTZ camera
- Exclusions:
Brand : Qian
Model : QKC8D81901
Category : Security Camera