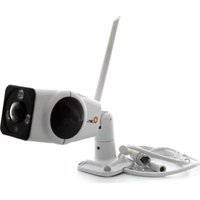
QC360X18001 - Security Camera Qian - Free user manual and instructions
Find the device manual for free QC360X18001 Qian in PDF.


| Product Type | Security Camera |
| Model | QC360X18001 |
| Brand | Qian |
| Video Resolution | 1080p Full HD |
| Night Vision | Yes, up to 30 ft |
| Field of View | 180° wide angle |
| Motion Detection | Yes, with alerts |
| Audio | Two-way audio |
| Connectivity | Wi-Fi 2.4 GHz |
| Power Supply | DC 5V, 1A (USB) |
| Dimensions | 70 x 70 x 120 mm |
| Weight | 150 g |
| Storage | MicroSD card up to 128GB |
| Compatibility | iOS, Android |
| Mounting | Indoor, on flat surface or wall |
| Weather Resistance | Indoor use only |
| Cleaning | Wipe with dry cloth |
| Security | Encrypted video transmission |
| Spare Parts | USB cable, mounting kit, manual |
| Warranty | 1 year limited |
Frequently Asked Questions - QC360X18001 Qian
User questions about QC360X18001 Qian
0 question about this device. Answer the ones you know or ask your own.
Ask a new question about this device
Download the instructions for your Security Camera in PDF format for free! Find your manual QC360X18001 - Qian and take your electronic device back in hand. On this page are published all the documents necessary for the use of your device. QC360X18001 by Qian.
USER MANUAL QC360X18001 Qian
YAN CÁMARA 360° QIAN EXTERNA

(Figura 4)
(Figura 5)
(Figura 6)
natural_image
White surveillance camera with antenna and dual-mounted screens (no visible text or symbols)
High Definition

Audio

View Nocturnal
INSTALLATION GUIDE
MOD. QC360X18001
Please read carefully before using your equipment and save it for future reference.
1. App Download
App Download
Search "QianYAN" in the AppStore install app.
Search "QianYAN" in the Google play install app
2. Add & Preview
Mode 1: AP Hotspot
- Connect power to the camera and wait. You will hear "System is starting" » "System setup is completed" » "Access Point establishing" » "Access Point established".
- Go to settings of your smartphone » Open the WLAN, connect to the camera's hotspot [MV and device ID number such as MV12345678] (Figure 1). Once it is connected, please go back to main screen.
- Add a new device as figure 2, once the connection is successful, a screen will be shown (Figure 3). Now you can watch live video.
* Some functions are not supported by AP mode. Please use Station mode for full functions.
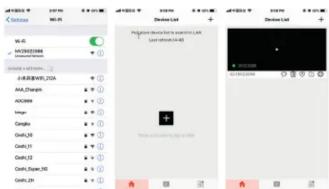
(Figure 1)
(Figure 2)
(Figure 3)
Mode 2: Station mode/Internet Wifi Connection
Router is required. Make sure your router is working well.
- Make sure you are on AP mode and can watch live video.
- Select Device on top of the screenshot and choose a device (ID number of the camera) from the list (Figure 4).
- Select Network settings. You will see AP mode was ticked. Change to tick on Station mode. Now you will see the list of local Wi-Fi devices (Figura 5).
- Select the name of your router, enter Wi-Fi password of your router and press Confirm button.
- You will see "Network Configuration is successful" message. Please press OK, then go to set the WiFi of your smartphone to connect same wifi with your device, now your smartphone and device all connected in a same WiFi (Figura 6).
- You will hear "Wi-Fi connecting" » "Wi-Fi connected" from the device.
- Once the connection is successful, a screen will be shown (Figure 3). Now you can watch live video.
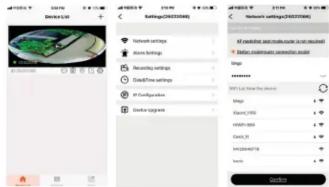
(Figure 4)
(Figure 5)
(Figure 6)
3. Function Introduction
A. Preview real-time monitoring on Panoramic Camera
1. Screenshot: you can make a screenshot for Monitoring picture.
2. Audio: you can hear the voice which from monitor environment.
3. Hold to talk: you can talk with the people who is in monitor environment
by holding this button.
4. Setup Mode: Rotation of Monitor Screen for 180 degrees.
5. Mode: you can watch the monitor picture via 5 modes. (Figure 7)
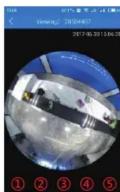
Mode 1

Mode 2

Mode 3

Mode 4

Mode 5
[Figure 7]
① Screenshot
④ Setup Mode
② Voice ③ Hold to talk
⑤ Mode
B) Playback
Choose the device ID and click "Search for file" (Figure 8) » Choose files to play or download (Figure 9, Figure 10).
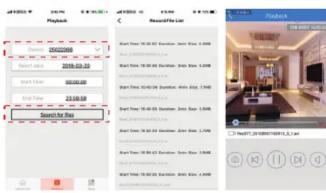
(Figure 8)
(Figure 9)
(Figure 10)
C) Device information settings
-
Network setting: AP mode and Sration mode can be switched.
-
Recording settings: Auto Record, Alarm video, Video resolution can be set
up. SD card can be managed, including check saving status and format data.
- Alarm settings: Arming and Disarming switch, motion alarm, alarm area
voice prompt language can be set up.
-
Static IP configuration: Automatic configure, manually configure can be set up
-
Device Upgrade: View, test, update the device system version.
D) More functions

-
App notification: Notification settings of receiving alarm messages.
-
Photo: View, delete, share photos and record.
-
Software password: Open, close and modify the software password
-
About: View the software version.
4. Reset
Make sure that power is connected. Press Reset button on the camera for than 5 seconds. You will hear "Restore factory's default setting" » "Access Point establishing" » "Access Point established".
-
Delet or Modify Device

-
Information: See, save the image
of the alarm.
-
Delete: Delete the device in the list.
-
Alarm
-
Edit: Edit the information on the
device and set the access password.
- Configuration: Configur
Disclaimer
There are many factors related to unsatisfied operations of the camera such as different wired/wireless network environments, different network companies, different performance and reliability of connected network and Micro SD cards, etc. So this camera is subject to errors and omissions and does not guarantee the consistency or accuracy of videos, phostos and recordings acquired from the camera.
GUARANTEE POLICY
Qian.mx will guarantee this product in all its components and labor during the period of 12 months, counting from the date of consolidation project any manufacturing and operation did not during the normal and domestic use of this product.
Qian.mx guarantees the buyer the absence of manufacturing and operation anomalies including parts and components of the product or in relation to motorisation.
-
This policy covers only products marketed by Qian.mx, through its authorized distributors within the Mexican Republic.
-
To make the guarantee effective, it will be necessary to present this policy in original with the information required in the following table together with the product in physical form and with all the accessories that make it up:
-
In case of loss of the policy it will be necessary to present the original invoice with the serial number of the product.
-
Qian.mx may use new parts, restored or used in good condition to repair or replace any product, without additional cost to the consumer, as long as the warranty period stimulated in this policy has not been remitiated.
-
In case the product has no repair, the change will be generated by a similar product or with superior characteristics.
-
The repair time will not be longer than 30 calendar days from the date of receipt of the product by Qian.mx or its
-
Qian.mx will cover the shipping costs required for the presentation of the product within the network of authorized
service centers.
Qian.mx will not validate this guarantee policy in the following cases:
- When the product has been used in conditions other than normal.
- With the product has been added in repairs by an electrocave positive by dian-mix
To make the warranty valid, as well as the purchase of components, consumable parts and accessories, you can request
Distribution at www.qianit.ink of contact and authorized service other public
Headquarters: Colz. José Guadaluna Sello #3/50-A, Col. Arua Rivera Industrial, Zuwanan, Jalince, Mówire, C.P. AS216

Brand : Qian
Model : QC360X18001
Category : Security Camera