
DC-W80 - Document Camera Lumens - Free user manual and instructions
Find the device manual for free DC-W80 Lumens in PDF.


| Product Type | Document Camera |
| Brand | Lumens |
| Model | DC-W80 |
| Dimensions (Extended) | 306 x 140 x 373 mm |
| Dimensions (Closed) | 137 x 140 x 270 mm |
| Weight | 1.35 kg |
| Power Supply | USB powered (USB Type-B) with internal battery |
| Battery Charging Time | Approximately 10.5 hours for full charge |
| Supported Resolutions | 1920x1080 (default), 3840x2160, 1280x720, 1024x768; up to 60 fps in high-speed mode (1080P only) |
| Connectivity | Wi-Fi (Access Point or Client), HDMI output, USB Type-B |
| Operating Modes | Wi-Fi Mode, HDMI Mode, USB Mode |
| Main Functions | Auto tune, freeze, zoom, image rotation (0°/90°/180°/270°/flip/mirror), LED lamp (3 brightness levels), partial enlarged mode, brightness adjustment |
| Software Compatibility | Lumens Ladibug (Windows 7+, macOS 10.12+) |
| Wi-Fi Security | WPA/WPA2 encryption; default password 88889999 |
| Control | On-device control panel buttons and web interface (default IP 192.168.0.1, login admin/9999) |
| Safety Features | Kensington security lock slot, overheat protection, FCC Class B compliant |
| Maintenance | Clean with dry cloth; avoid alcohol or solvents; refer to manual for firmware updates |
| Spare Parts / Repairability | No user-serviceable parts; servicing by licensed personnel only; includes reset button to factory defaults |
Frequently Asked Questions - DC-W80 Lumens
User questions about DC-W80 Lumens
0 question about this device. Answer the ones you know or ask your own.
Ask a new question about this device
Download the instructions for your Document Camera in PDF format for free! Find your manual DC-W80 - Lumens and take your electronic device back in hand. On this page are published all the documents necessary for the use of your device. DC-W80 by Lumens.
USER MANUAL DC-W80 Lumens
User Manual - English

natural_image
Line drawing of a desk lamp with adjustable arm and base (no text or symbols)[Important]
To download the latest versions of the Quick Start Guide, multilingual user manual, software, driver, etc., please visit Lumens
https://www.MyLumens.com/support
Table of Contents
Copyright Information......3
Chapter 1 Safety Instructions ....4
Chapter 2 Package Contents .... 5
Chapter 3 Product Overview ...... 6
3.1 Overview....6
3.2 Extension angle....6
3.3 Notes for Operation 7
3.4 I/O functions Introduction 7
3.5 Description of LED indicator....8
3.6 Relative position of the presenter and document....9
Chapter 4 Installation and Connections .... 10
4.1 Machine Size.... 10
4.2 Installation and setup 10
4.3 Connecting to a computer and use Lumens™ software (Wi-Fi mode)11
4.4 Connect to a projector, monitor or HDTV (HDMI mode) 11
4.5 Connecting to a computer and use Lumens™ software (USB Mode)12
4.6 Installing Application Software....12
Chapter 5 Start Using....13
5.1 Direct Use (HDMI Mode) 13
5.2 Use with Ladibug (Wi-Fi Mode)....14
5.3 Use with Ladibug (USB Mode) 16
Chapter 6 Introductions to Control Panel Buttons....17
Chapter 7 Descriptions of Major Functions....18
7.1 I would like to automatically adjust the image to have the best brightness and focusing performance.... 18
7.2 I would like to freeze the live image 18
7.3 I would like to turn on/off the lamp....18
7.4 I would like to zoom in/out images 18
7.5 I would like to adjust the brightness 18
7.6 I would like to rotate the image....19
7.7 I would like to enlarge a part of the image 19
Chapter 8 Wi-Fi Connection Setting....20
8.1 Network connection....20
8.2 Log in to the web page 20
8.3 Web Page Menu Function Description....21
Chapter 9 Set DC-W80 as an AP 30
9.1 Connection Diagram....30
9.2 Device Requirements....30
9.3 Setting DC-W80....30
Chapter 10 DIP Switch Setting....33
10.1 Description of DIP 33
10.2 Resolution Switch ....33
Chapter 11 Troubleshooting....34
Supplier's Declaration of Conformity 47 CFR § 2.1077 Compliance Information....35
Copyrights © Lumens Digital Optics Inc. All rights reserved.
Lumens is a trademark that is currently being registered by Lumens Digital Optics Inc.
Copying, reproducing or transmitting this file is not allowed if a license is not provided by Lumens Digital Optics Inc. unless copying this file is for the purpose of backup after purchasing this product.
In order to keep improving the product, Lumens Digital Optics Inc. hereby reserves the right to make changes to product specifications without prior notice. The information in this file is subject to change without prior notice.
To fully explain or describe how this product should be used, this manual may refer to names of other products or companies without any intention of infringement.
Disclaimer of warranties: Lumens Digital Optics Inc. is neither responsible for any possible technological, editorial errors or omissions, nor responsible for any incidental or related damages arising from providing this file, using, or operating this product.
Always follow these safety instructions when setting up and using the DC-W80 Document Camera:
1 Operation
1.1 Please use the product in the recommended operating environment, away from water or source of heat
1.2 Do not place product in tilted position or unstable trolley, stand or table.
1.3 Please clean the dust on the power plug prior to usage. Do not insert the product's power plug into a multiplug to prevent sparks or a fire.
1.4 Do not block the slots and openings in the case of DC-W80 Document Camera. They provide ventilation and prevent the DC-W80 Document Camera from overheating.
1.5 Do not open or remove covers, otherwise it may expose you to dangerous voltages and other hazards. Refer all servicing to licensed service personnel.
1.6 Unplug the DC-W80 Document Camera from the wall outlet and refer servicing to licensed service personnel when the following situations happen:
■ If the power cords are damaged or frayed.
■ If liquid is spilled into the product or the product has been exposed to rain or water.
2 Installation
2.1 For security considerations, please make sure the standard hanging rack you bought is in line with UL or CE safety approbations and installed by technician personnel approved by agents.
3 Storage
3.1 Do not place the product where the cord can be stepped on as this may result in fraying or damage to the lead or the plug.
3.2 Unplug the product during thunderstorms or if it is not going to be used for an extended period.
3.3 Do not place the product or accessories on top of vibrating equipment or heated objects.
4 Cleaning
4.1 Disconnect all the cables prior to cleaning and wipe the surface with a dry cloth. Do not use alcohol or volatile solvents for cleaning.
5 Batteries (for products or accessories with batteries)
5.1 When replacing batteries, please only use similar or the same type of batteries.
5.2 When disposing of batteries or products, please adhere to the relevant instructions in your country or region for disposing of batteries or products.
■ Precautions
 | This symbol indicates that this equipment may contain dangerous voltage which could cause electric shock. Do not remove the cover (or back). No user-serviceable parts inside. Refer servicing to licensed service personnel. |  | This symbol indicates that there are important operating and maintenance instructions in this User Manual with this unit. |
■ FCC Warning
This equipment has been tested and found to comply with the limits for a Class B digital device, pursuant to part 15 of the FCC Rules. These limits are designed to provide reasonable protection against harmful interference in a residential installation. This equipment generates, uses and can radiate radio frequency energy and, if not installed and used in accordance with the instructions, may cause harmful interference to radio communications. However, there is no guarantee that interference will not occur in a particular installation. If this equipment does cause harmful interference to radio or television reception, which can be determined by turning the equipment off and on, the user is encouraged to try to correct the interference by one or more of the following measures:
- Reorient or relocate the receiving antenna.
- Increase the separation between the equipment and receiver.
- Connect the equipment into an outlet on a circuit different from that to which the receiver is connected.
- Consult the dealer or an experienced radio/TV technician for help.
Notice :
The changes or modifications not expressly approved by the party responsible for compliance could void the user's authority to operate the equipment.
Chapter 2 Package Contents
DC-W80

natural_image
Line drawing of a desktop desk lamp with adjustable arm and base (no text or symbols)USB cable (USB 2.0)

natural_image
Line drawing of a USB cable with two connectors (no text or symbols)Quick Installation Guide

natural_image
Generic document icon with no text or symbols3.1 Overview

3.2 Extension angle

< Caution > Please only operate in the extended angles as illustrated. Improper usage may damage the machine.
3.3 Notes for Operation

3.4 I/O functions Introduction
Front View

Back View
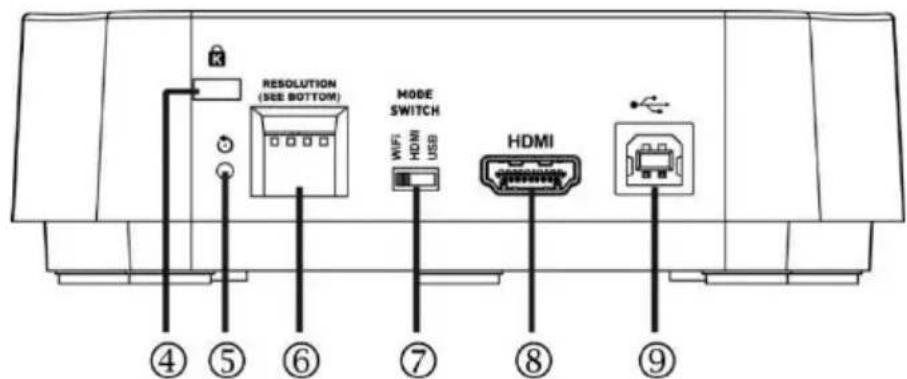
| NO. | Item | Function Descriptions |
| 1 | Power LED Indicator | Display the status of the machine. Please refer to3.5Description of LED indicator |
| 2 | Wi-Fi LED Indicator | Display the status of the Wi-Fi. Please refer to3.5Description of LED indicator |
| 3 | Battery LED Indicator | Display the status of the battery. Please refer to3.5Description of LED indicator |
| 4 | Kensington safety lock | Lock hole of safety lock |
| 5 | Reset Button | Press the button for initialization to reset to original factory settings. |
| 6 | DIP Switch Setting | Adjust the resolution setting. The default is 1920*1080/30 fps.To switch the setting, please refer to Chapter 10 DIP Switch Setting |
| 7 | Mode Switch Button | Switch Modes: Wi-Fi / HDMI / USB |
| 8 | HDMI output port | Connect to HDMI output signal source |
| 9 | USB Type-B port | The USB port is for connecting to the USB port of the computer which provides USB signal images and power |
3.5 Description of LED indicator
| Name | Indicator Status | |
Power  | Flickering blue light: Startup in progress, initializationBlue light stays lit: Startup completedFlickering red light: A startup failure or error has occurredPink light stays lit: Already powered on, indicating low power and need to connect to the USB cable for charging | |
Wi-Fi  | Blue light stays lit: Switched to the Wi-Fi Mode and the startup is completedNo Light: In another operating mode | |
Battery  | Indicator light is greenAfter connecting the USB cable and the flickering indicator light will indicate that it is chargingPress “Battery Check”  on to display the battery level on to display the battery level → Battery level ≥ 75% → Battery level ≥ 75% → Battery level 50% ~ 75% → Battery level 50% ~ 75% → Battery level 25% ~ 50% → Battery level 25% ~ 50% → Battery level 3% ~ 25% → Battery level 3% ~ 25% → Battery level < 3% → Battery level < 3% | |
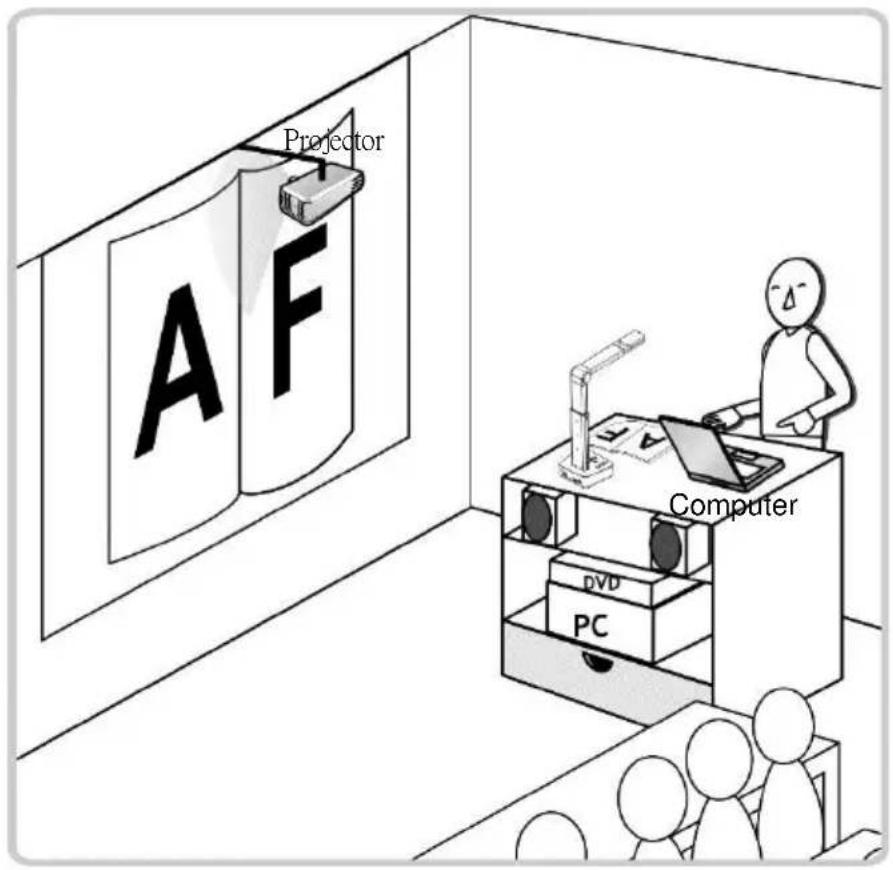
3.6 Relative position of the presenter and document

natural_image
Illustration of a person reading a book with an open book labeled 'AF' under a desk lamp (no text or symbols on the diagram itself)Chapter 4 Installation and Connections
4.1 Machine Size
■ Length x Width x Height: Extended - 306 x 140 x 373 mm
Closed - 137 x 140 x 270 mm
■ Weight: 1.35 kg
4.2 Installation and setup
- Please set up the DIP switch setting first. Refer to Chapter 10 DIP Switch Setting.
- Please confirm that the product is switched to the desired mode (Wi-Fi/HDMI/USB)
Wi-Fi Mode
HDMI Mode
USB Mode
4.3 Connecting to a computer and use Lumens™ software (Wi-Fi mode)
![RESOLUTION [NEW MODE] NODE SWITCH HDMI MODE SWITCH WIFI HDMI USB Computer](/content/2026/05/993458/images/0ace3b10c8a579dad6823ac8d3119d5ab3d2f3ec1d183befbf8530f764f9017d.jpg)
※Please download the relevant software from Lumens website. For more information on the connection method, please refer to Chapter 8 Wi-Fi Connection Setting.
4.4 Connect to a projector, monitor or HDTV (HDMI mode)

4.5 Connecting to a computer and use Lumens™ software (USB Mode)

flowchart
graph TD
    A["Computer"] -->|USB Cable| B["Projector"]
    B -->|HDMI Cable| C["USB Cable"]
    C --> D["Resolution (USB BUTTON)"]
    D --> E["MODE SWITCH"]
    E --> F["USB"]
    style A fill:#f9f,stroke:#333
    style B fill:#ccf,stroke:#333
    style C fill:#cfc,stroke:#333
    style D fill:#fcc,stroke:#333
    style E fill:#cff,stroke:#333
    style F fill:#ffc,stroke:#333
4.6 Installing Application Software
The application software installed on the computer enables you to:
▶ Control DC-W80.
▶ Capture and record images.
➢ Annotate the image, highlight important details and save it.
▶ Support the full screen function.
4.6.1 System Requirements
■ Windows System: Windows 7 or later
- Chrome system
■ Mac System: Mac OS X 10.12 and above
5.1 Direct Use (HDMI Mode)

- Charge for a recommended 10.5 hours prior to first-time operation. The device is fully charged when all the power bars are full and the green light is constant on.
- Place an object to be displayed under the camera.
- Turn on the power connection method. and adjust the operation mode according to the
- Adjust the support arm and lens to the appropriate positions.
- Press [AUTO TUNE] button to optimize the image.
- You are ready to teach/present.
5.2 Use with Ladibug (Wi-Fi Mode)
5.2.1 Network Connection
Switch DC-W80 to Wi-Fi mode, and Wi-Fi LED light turns blue. Open the Wi-Fi network list on the computer, and choose
[DC-W80_5G_XXXXXX] (XXXXXX: last six digits of the MAC address).
Enter the connection password (default password: 88889999) to enable the connection.
5.2.2 Use Ladibug to connect to DC-W80

- Open Ladibug, click 📄 to open the [Search Window], and select [Wireless Document Camera].

- Click Lanes select a DC-W80 in the list after the search is completed.

- Log in as an Admin or a Viewer. The default password for Admin is 9999.
- After connecting to DC-W80 by clicking [Log In], you can start using it.

5.3 Use with Ladibug (USB Mode)
- Switch to USB mode, and use a USB cable to connect DC-W80 and the computer.
- Open Ladibug, click 📄 to open the [Search Window], and select [USB Document Camera].

- You can start using DC-W80.
Chapter 6 Introductions to Control Panel Buttons

| Icon | Function Descriptions |
 | Turn on and off➢ Short press: power on (under stand by)➢ Press for 1 second: turn off (under power on)➢ Press for 10 seconds: force to turn off |
 | Battery level check |
 Auto Tune Auto Tune | Automatically adjust the image to have the best brightness and focusing performance |
| ◀,▶,▲,▼ | Left, right, up, down buttons, used for moving in a direction at the partial enlarged mode |
 | Enable/Disable the partial enlarged mode |
 | Adjust the brightness of the image |
 | Zoom in/out images |
 | Rotate image: 0°/90°/180°/270°/Vertical flip/Horizontal flip |
 | LED lamp mode toggle switch: off / brightness 1 / brightness 2 / brightness 3Brightness 3 is the brightest state |
 Freeze Freeze | Freeze the current image to remain temporarily on the screen. Press again to defreeze |
7.1 I would like to automatically adjust the image to have the best brightness and focusing performance

➢ Press [Auto Tune]
for the best brightness and focusing performance.
7.2 I would like to freeze the live image
➢ Press FREEZE to freeze the current image on the screen. Press again to lift the freeze.
7.3 I would like to turn on/off the lamp
The default state of the lamp is off, press are three levels of brightness.

to turn it on or off. There
7.4 I would like to zoom in/out images
➢ Press to Zoom in the image.
➢ Press to zoom out the image.
7.5 I would like to adjust the brightness
➢ Press to make it brighter.
➢ Press to make it darker.
7.6 I would like to rotate the image
Press

to rotate the image. (The sequence of switching is: 0°/90°/
180°/270°/Vertical flip/Horizontal flip)
7.7 I would like to enlarge a part of the image
- Press to activate the partial enlarged mode.
- Press [▲], [▼], [◀], or [▶] to move and view the partial enlarged images.
- Press to exit the partial enlarged mode.
8.1 Network connection
8.1.1 Switch to the Wi-Fi mode and the Wi-Fi LED indicator will be displayed in blue.
8.1.2 Open the wireless network list on the computer.
8.1.3 Select the [DC-W80_5G_XXXXXX] (XXXXXX: last 6-digits of the MAC address) in the network list, and input the password for connection (default: 88889999) to start the connection.
8.2 Log in to the web page
8.2.1 Open the web browser and enter the default IP address [192.168.0.1] in the address bar.
8.2.2 Enter the login account [admin] and default password [9999], and click Login.
8.2.3 After the login, you can do the live preview and configure the settings on the web page.
8.3 Web Page Menu Function Description
8.3.1 Login Screen
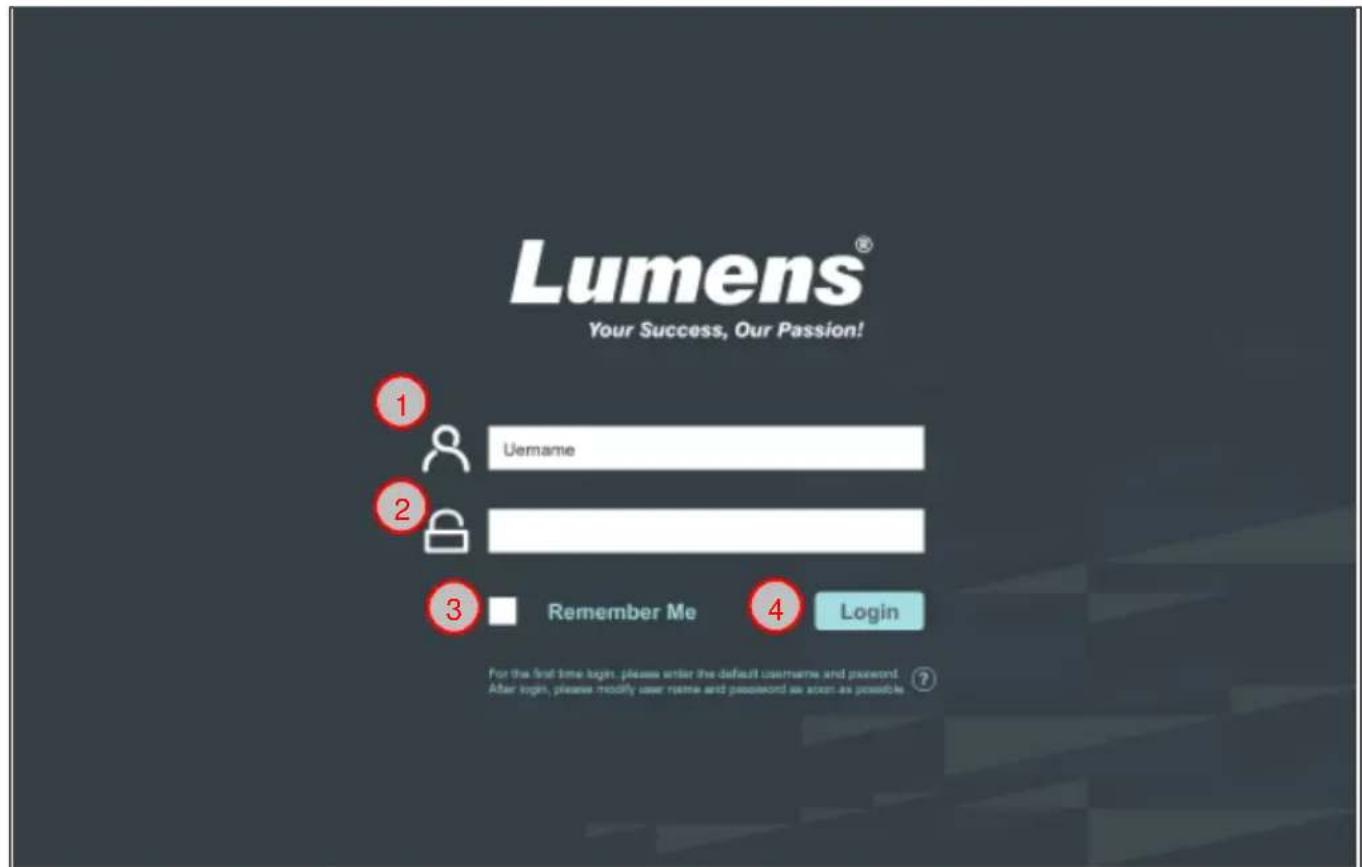
| No | Item | Function Descriptions |
| 1 | User Login Account | Enter user login account (default: admin) |
| 2 | User Password | Enter user password (default: 9999) |
| 3 | Remember user account and password | Save user login account and password to the browser. When you log in next time, there is no need to re-enter them |
| 4 | Login | Log into the administrator screen on the website |
8.3.2 Live Viewing

| No | Item | Function Descriptions |
| 1 | Preview window | Display the screen currently captured by DC-W80 |
| 2 | Automatic Image Optimization | Automatically adjust the image to have the best brightness and focusing performance |
| 3 | Freeze the image | Freeze the current image on the screen |
| 4 | Lamp mode toggle switch | Click lamp mode toggle switch: off / brightness 1 / brightness 2 / brightness 3 |
| 5 | Rotate the image | Rotate the image: 0° / 90° / 180° / 270° / Flip / Mirror. |
| 6 | Image Mode toggle switch | Select Photo/Text/Gray Mode |
| 7 | Logout | Log out of the web page |
| 8 | Fold/Expand Function Bar | Click to fold/expand the Function Bar on the left |
8.3.3 Wi-Fi Setting (Access Point Mode)

| No | Item | Function Descriptions |
| 1 | Wi-Fi Mode | Select Access Point or Client Mode |
| 2 | Wi-Fi 5G/2.4G | Switch between 5G / 2.4G under Wi-Fi Access Point mode |
| 3 | Device Name | Device name of wireless network |
| 4 | Channel | Select the channel based on different regions |
| 5 | Security | Wi-Fi encryption setting |
| 6 | Password | Password to connect to this Wi-Fi SSID / : Click the icon to hide/display the password |
| 7 | Save | Click the save your settings |
| 8 | Cancel | Click to cancel the modified settings |
8.3.4 Wi-Fi Setting (Client Mode)

| No | Item | Function Descriptions |
| 1 | Wi-Fi Mode | Select Access Point or Client Mode |
| 2 | Scan | Scan nearby wireless network devices |
| 3 | Disconnection | Disconnect from current wireless network device |
| 4 | Remove | Remove the selected wireless network device from the list |
| 5 | Connect to Other Wi-Fi Device | Click to show the following window. Enter the SSID and the password of the wireless device to be connected to perform the connection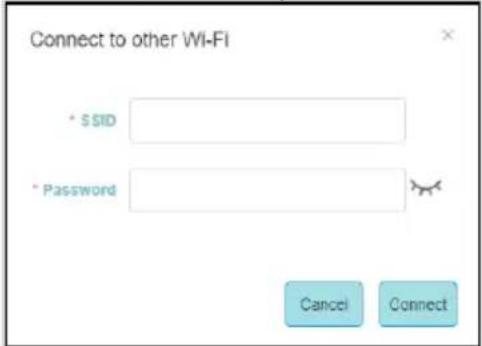 |
| 6 | Wi-Fi Device List | Display the currently found Wi-Fi wireless devices |
| 7 | SSID | Device name of the wireless network |
| 8 | 2.4G/5G frequency band | Show that the wireless network device is in the 2.4G or 5G frequency band |
| 9 | Connect | Click this button and enter the password of thewireless device to be connected for connection |
| 10 | Encryption | The current encryption setting of the wireless network device |
| 11 | Signal Status | Show the degree of the Wi-Fi signal |
8.3.5 System Information-Network
![Lumens Document Camera System / Network Live View Wi-Fi Settings System Network Device and Account Stream Maintenance About Wi-Fi Mode Wi-Fi Access Point Modify IP Assignment DHCP IP Address 192.168.0.1 Subnet Mesk 255.255.255.0 Gateway 192.168.0.254 Primary DNS Server 8.8.8.8 Secondary DNS Server 0.0.0.0 DHCP Range 192.168.0.2 - 253 Function Descriptions Display the current network setting information of this DC-W80. Click the [Modify] button, and it will jump to the Wi-Fi settings page, where you can make modifications.](/content/2026/05/993458/images/02f849ebc3e16df40cbef4b1e02757cb5bd2db908577357e87aca71cf18956be.jpg)
8.3.6 System Information-Device

Function Descriptions
Display current device name of this DC-W80 and login settings.
You can modify the device name, user name, and password. Click [Save] to store your change, or click [Cancel] to cancel the modified settings.
8.3.7 Streaming Parameter

| No | Item | Function Descriptions |
| 1 | Resolution | Show or set the RTSP output resolution and fps |
| 2 | Bitrate (kbps) | Show or set the RTSP Bit rate (0 ~ 20000) |
| 3 | Port Number | Set the RTSP port (100 ~ 10000) |
| 4 | Audio Setting | Turn on/off RTSP audioCheck to turn on/off RSTP audio |
| 5 | RTSP URL | Show current RTSP URL connection |
| 6 | Save | Click to save settings |
| 7 | Cancel | Click to cancel the modified settings |
8.3.8 Maintenance

| No | Item | Function Descriptions |
| 1 | Reset to the default value | Select the reset button to resume the factory default setting as the web page setting |
| 2 | Reboot | Click the reboot button and reboot the device |
| 3 | Error Code | In the event of an error, an error code log will be established |
| 4 | Clean | If an error code appears, the user may try to click the Clean button to confirm if the error will repeat itself. |
8.3.9 Maintenance-Upgrade
| Lumens Document Camera Maintenance / Upgrade | ||
| Live View Wi-Fi Settings System Stream Maintenance Operation Upgrade About | ||
| No | Item | Function Descriptions |
| 1 | Current software version | Display the current software version of DC-W80 |
| 2 | Upgrade file path | Click Choose File to select the software file to be updated, and the selected file name will be displayed after selection |
| 3 | Start Update | Click to start upgrade the software |
8.3.10 About

Function Descriptions
Display the related manufacturing information of this device, including device name, firmware version, MAC address, serial number, and others.
With this connection method, multiple DC-W80s can be controlled via the DC-W80 on the host side.
9.1 Connection Diagram

flowchart
graph TD
    A["DC-W80 (Host)"] --> C["Computer"]
    B["DC-W80 (Client)"] --> C["Computer"]
    D["..."] --> C["Computer"]
    E["..."] --> C["Computer"]
9.2 Device Requirements
■ More than two DC-W80s
■ One computer
■ One router (depends on the network environment)
9.3 Setting DC-W80
9.3.1 Setting the Host DC-W80
a. Turn on the host DC-W80
b. Open the wireless network list, and connect to [DC-W80_5G_XXXXXX] (XXXXXX: last six digits of the MAC address). Enter the password
(default password: 88889999) to enable the connection.
c. Open the web browser and enter the default IP address [192.168.0.1].
d. Enter the login account [admin] and the default password [9999], and click login.
e. Enter [Wi-Fi Settings] and [Device and Account] pages to modify [SSID] and [Device Name] of the AP.
SSID: DC-W80_5G_AP (user-defined)
Device Name: DC-W80_5G_AP (user-defined)

f. Click [Save] to apply the changes.
9.3.2 Setting Client DC-W80s
a. Turn on client DC-W80s
[Note] For initial setting, please turn on only one client DC-W80 at a time.
b. Open the wireless network list, and connect to [DC-W80_5G_XXXXXX] (XXXXXX: last six digits of the MAC address). Enter the password (default: 88889999) to enable the connection.
c. Open the web browser and enter the default IP address [192.168.0.1].
d. Enter the login account [admin] and the default password [9999], and click login.
e. Enter the [Device and Account] page to modify the [Device Name]. Device Name: DC-W80_5G_Client (user-defined)

f. Go to the [Wi-Fi Settings] page and select the [Wi-Fi Mode] as [Client].
g. Find the SSID of the AP in the list, and click [Connect] to enter the password.
| SSID | 2.4G / 5G | Connect | Encryption | Quality |
| DC-W80_AP_42F31E | 5G | Connect | WPA / WPA2 |
h. Click [Connect] to enable the connection.
9.3.3 Get Started
a. Open the wireless network list, and connect to [DC-W80_AP_XXXXXX]. Enter the password (default: 88889999) to complete the network connection with DC-W80 AP.
b. Open Ladibug.

c. Click 📄 to open[Search Window], and select [Wireless Document Camera]
d. Click to search for a DC-W80 that can be connected. After the search is complete, click on a DC-W80 in the list for connection and start the operation.
e. To switch to another DC-W80, please open the [Search Window] again and click other DC-W80s.
10.1 Description of DIP
| DIP | Function Descriptions |
| DIP1 & DIP2 | Output Resolution |
| DIP3 | OFF (Normal mode): 30/25 fps, applicable to general sceneON (High-speed mode): 60/50 fps, applicable to support rapidly changing scene(Only applicable to 1080P) |
| DIP4 | OFF: 60HzON: 50Hz |
10.2 Resolution Switch
| Resolution | 60Hz | 50Hz |
| 1920 x 1080 |  (Default Values) (Default Values) |  |
| 3840 x 2160 |  | 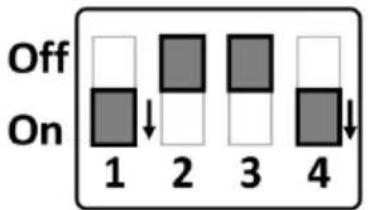 |
| 1280 x 720 |  |  |
| 1024 x 768 |  |  |
This chapter describes problems you may encounter while using DC-W80. If you have questions, please refer to related chapters and follow all the suggested solutions. If the problem still occurred, please contact your distributor or the service center.
| No. | Problems | Solutions |
| 1 | Boot without power signal | Please press the battery level check button to confirm there is still power. Refer to3.5 Description of LED indicatorin this manual. If there is no power left, please charge the device by connecting the USB cable. |
| 2 | There is no image output from DC-W80 | 1. Check the power.2. Check all cable connections. Refer toChapter 4 Installation and Connectionsin this manual.3. Check if DIP switch is properly set. Please refer toChapter 10 DIP Switch Settingfor related settings. |
| 3 | Unable to focus | Probably the document is too close. Press [ZOOM -] on thecontrol panel. Or pull the document away from the lens. And then press [Auto Focus] button. |
| 4 | When the device is turned on, the LED floodlight is off. | The default setting of the LED floodlight is “OFF”, please use the control panel to set the LED floodlight as “ON”. |
| 5 | LadibugTMand other applications cannot be used simultaneously | LadibugTMand other applications cannot be used simultaneously. Only one application can be executed at a time. Please close the currently running applications and then execute the application to be used. |
| 6 | The output image is too bright, too dark, or vague. | Press [AUTO TUNE] button to automatically adjust the image to have the best brightness and focusing performance. |
| 7 | The operating steps in the manual are not applicable to the machine. | The operating steps in the manual may be not applicable to the machine due to improvement in functions.Please confirm the firmware of your machine and go to check for any updated version on the Lumens website.https://www.mylumens.com/support |
Supplier's Declaration of Conformity 47 CFR § 2.1077 Compliance Information
Manufacturer : Lumens Digital Optics Inc.
Product Name : DC-W80
Model Number : 4K Document Camera
Responsible Party – U.S. Contact Information
Supplier : Lumens Integration, Inc.
4116 Clipper Court, Fremont, CA 94538, United States
e-mail : support@mylumens.com
FCC Compliance Statement
This device complies with Part 15 of the FCC Rules. Operation is subject to the following two conditions: (1) This device may not cause harmful interference, and (2) this device must accept any interference received, including interference that may cause undesired operation.



- User Manual - English
- [Important]
- Table of Contents
- Copyright Information......3
- Chapter 1 Safety Instructions ....4
- Chapter 2 Package Contents .... 5
- Chapter 3 Product Overview ...... 6
- Chapter 4 Installation and Connections .... 10
- Chapter 5 Start Using....13
- Chapter 6 Introductions to Control Panel Buttons....17
- Chapter 7 Descriptions of Major Functions....18
- Chapter 8 Wi-Fi Connection Setting....20
- Chapter 9 Set DC-W80 as an AP 30
- Chapter 10 DIP Switch Setting....33
- Chapter 11 Troubleshooting....34
- Operation
- Installation
- Storage
- Cleaning
- Batteries (for products or accessories with batteries)
- ■ Precautions
- ■ FCC Warning
- Notice :
- Chapter 2 Package Contents
- Overview
- Extension angle
- Notes for Operation
- I/O functions Introduction
- Description of LED indicator
- Relative position of the presenter and document
- Chapter 4 Installation and Connections
- Machine Size
- Installation and setup
- Connecting to a computer and use Lumens™ software (Wi-Fi mode)
- Connect to a projector, monitor or HDTV (HDMI mode)
- Connecting to a computer and use Lumens™ software (USB Mode)
- Installing Application Software
- System Requirements
- Direct Use (HDMI Mode)
- Use with Ladibug (Wi-Fi Mode)
- Network Connection
- Use Ladibug to connect to DC-W80
- Use with Ladibug (USB Mode)
- Chapter 6 Introductions to Control Panel Buttons
- I would like to automatically adjust the image to have the best brightness and focusing performance
- I would like to freeze the live image
- I would like to turn on/off the lamp
- I would like to zoom in/out images
- I would like to adjust the brightness
- I would like to rotate the image
- I would like to enlarge a part of the image
- Network connection
- Log in to the web page
- Web Page Menu Function Description
- Login Screen
- Live Viewing
- Wi-Fi Setting (Access Point Mode)
- Wi-Fi Setting (Client Mode)
- System Information-Device
- Function Descriptions
- Streaming Parameter
- Maintenance
- Maintenance-Upgrade
- About
- Connection Diagram
- Device Requirements
- Setting DC-W80
- Setting the Host DC-W80
- Setting Client DC-W80s
- Get Started
- Description of DIP
- Resolution Switch
- Supplier's Declaration of Conformity 47 CFR § 2.1077 Compliance Information
- Responsible Party – U.S. Contact Information
- FCC Compliance Statement
Brand : Lumens
Model : DC-W80
Category : Document Camera