DC136 - Document Camera Lumens - Free user manual and instructions
Find the device manual for free DC136 Lumens in PDF.


| Product Type | Document Camera |
| Brand | Lumens |
| Model | DC136 |
| Connectivity | USB 3.0 (Type B to Type A) |
| Power Supply | Via USB connection to computer, no separate power adapter needed |
| Software Compatibility | Lumens Ladibug (Windows and Mac) |
| Control Panel Buttons | LAMP, FREEZE, CAPTURE, AUTO TUNE |
| Image Capture | Yes, via Ladibug software |
| Auto Focus | Yes, via AF button on both sides of the lens |
| LED Lamp | Toggle on/off via LAMP button |
| Microscope Compatibility | Optional adapter (eyepiece diameter 28 mm) |
| Video Conferencing Support | Skype, Zoom, Teams, Google Meet |
| Mounting | VESA compatible (75x75 mm), optional base |
| Cleaning | Disconnect cables, wipe with a dry cloth; do not use alcohol or volatile solvents |
| Safety | Do not open covers; refer all servicing to licensed personnel |
| Spare Parts | Microscope adapter (optional), VESA base (optional) |
| Repairability | No user-serviceable parts inside; contact distributor or service center |
| Package Contents | DC136 unit, USB 3.0 cable, 4-Step Instruction Card |
| Operating Environment | Away from water or heat; use on a stable, level surface |
| Regulatory Compliance | FCC Class A, ICES-003, EN55032 |
Frequently Asked Questions - DC136 Lumens
User questions about DC136 Lumens
0 question about this device. Answer the ones you know or ask your own.
Ask a new question about this device
Download the instructions for your Document Camera in PDF format for free! Find your manual DC136 - Lumens and take your electronic device back in hand. On this page are published all the documents necessary for the use of your device. DC136 by Lumens.
USER MANUAL DC136 Lumens
User Manual - English
natural_image
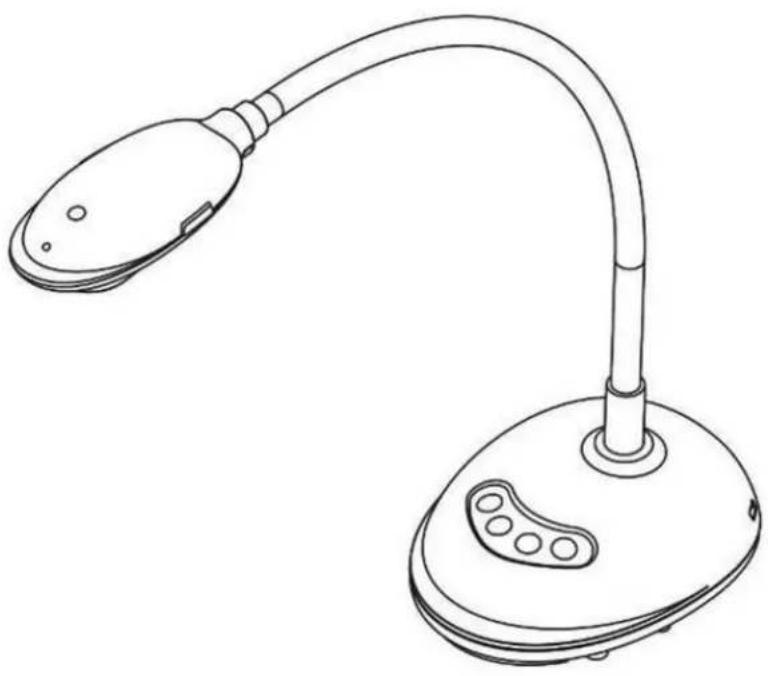
Line drawing of a desk lamp with adjustable arm and base (no text or symbols)[Important]
To download the latest version of Quick Start Guide, multilingual user manual, software, or driver, etc., please visit Lumens https://www.MyLumens.com/support
Table of Contents
Chapter 1 Package Contents....2
Chapter 2 Product Overview .... 3
2.1 Description of LED Indicator....3
2.2 Relative Operation Position ....4
Chapter 3 Installation and Connections .... 5
3.1 Connecting to a computer....5
3.2 Connecting to an Interactive Whiteboard (IWB)....5
3.3 For use with VESA Installation Base....5
3.4 Installing Application Software....6
Chapter 4 Start Using....7
Chapter 5 Function Menu ....8
5.1 Function Descriptions of Control Panel Button ....8
Chapter 6 Descriptions of Major Functions ...... 9
6.1 Control the Camera....9
6.2 Use Skype for Video Conference....9
Chapter 7 Connecting to Microscope....10
Chapter 8 Troubleshooting.... 11
Chapter 9 Safety Instructions....12
Copyright Information.... 14
Chapter 1 Package Contents
DC136

natural_image
Line drawing of a desktop desk lamp with adjustable arm and base (no text or symbols)USB 3.0 cable (Type B to Type A, 2M)

natural_image
Line drawing of a USB cable with connector (no text or symbols)4-Step Instruction Card

Chapter 2 Product Overview

2.1 Description of LED Indicator
- Enable the image, and LED indicator will light up
- Display the image, and LED indicator will light up
- Disable the image, and LED indicator is OFF
2.2 Relative Operation Position

Correct use

natural_image
Line drawing of a desk lamp illuminating an open book with letters 'AF' (no text or symbols on the lamp itself)Incorrect use
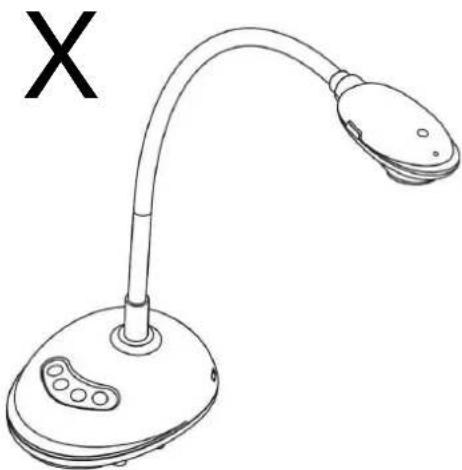
natural_image
Line drawing of a desktop desk lamp with adjustable arm and base (no text or symbols)Chapter 3 Installation and Connections
3.1 Connecting to a computer
×Use USB to connect to the computer to start using, and no need to connect the power supply.

3.2 Connecting to an Interactive Whiteboard (IWB)

flowchart
graph TD
    USB_Cable["USB Cable"] --> Projector["PROJECTOR"]
    Projector --> VGA_Cable["VGA Cable"]
    VGA Cable --> USB_Cable["USB Cable"]
    USB Cable --> Computer["COMPUTER"]
    Projector --> IWB["IWB"]
3.3 For use with VESA Installation Base
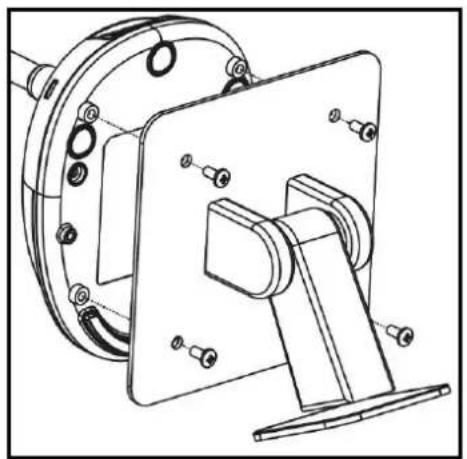
- Please purchase the standard VESA installation base
- Please use appropriate screws: Screw length = 5 mm + base thickness (H1); M4 screw (P=0.7)
natural_image
Technical line drawing of a mechanical assembly with mounting flanges and a central component (no text or symbols)➢ VESA bolt pitch 75*75mm
➢ VESA base thickness (H1)
➢ Screw length = 5 mm + base thickness (H1)
▶ M4 screw (P=0.7)
3.4 Installing Application Software
The Lumens Ladibug software installed on the computer enables you to:
▶ Control the DC136.
▶ Capture and record images.
➢ Annotate the image, highlight important details and save it.
▶ Support the full screen function.
※ Please refer to the software user manual for installation steps and software operation.
■ Windows: Ladibug 4K Software User Manual
■ MAC: Ladibug 3.0 Software User Manual
Chapter 4 Start Using

- After installing Ladibug software, double-click the icon to open the software to view the images and control DC136
POWER Frequency setting page will display during the first use, please complete the settings following the instructions on the screen.

-
Place an object to be displayed under the camera.
-
Press [AUTO TUNE] AUTO or AUTO button to optimize the image.
-
You are ready to teach/present.
※Please download Ladibug software from Lumens website.
*When connected to a computer via a USB cable, DC136 can also be used with video software, such as Skype and Zoom.
Chapter 5 Function Menu
5.1 Function Descriptions of Control Panel Button

flowchart
graph LR
    A["LAMP"] --> B["FREEZE"]
    B --> C["CAPTURE"]
    C --> D["AUTO TUNE"]
| Icon | Name | Function Descriptions |
 | LAMP | Turn on/off LED indicator. |
 | FREEZE | Freeze the current image to remain temporarily on the screen. Press again to defreeze. |
 | CAPTURE | Capture the image to the computer. |
 | AUTO TUNE | Automatically adjust the image to have the best brightness and focusing performance. |
6.1 Control the Camera
- Please download Lumens Ladibug software at Lumens website.
- Please refer to Ladibug Software User Manual for software-related functions.
6.2 Use Skype for Video Conference
Please refer to Chapter 3 Installation and Connections to finish connecting the
computer. Start Skype, select a contact, and press to start the video conference.
If it doesn't work, please refer to the following steps to setup the camera:
- Start Skype -> [Setting] -> [Audio & Video]
- Select [Lumens DC136 Video Camera]
- Select [Lumens DC136 Audio]
After the setting is completed, the video conference is ready to begin.
※It can also be used with Zoom, Teams, Google Meet, and other video software
*If the image of the video software is opposite to the actual image (mirror image), please use Lumens
Ladibug software to rotate the image
Chapter 7 Connecting to Microscope
※Microscope adapters are optional. Please contact Lumens sales to purchase them
- Attach the microscope adapter to the microscope.
- Connect the lens with the microscope adapter

natural_image
Line drawing of a microscope with an adjustable arm and base, showing mechanical components (no text or symbols)- If the image is not clear
3.1 Press the [FOCUS] button on both sides of the lens to activate the auto focus.
Chapter 8 Troubleshooting
This chapter describes problems you may encounter while using DC136. If you have questions, please refer to related chapters and follow all the suggested solutions. If the problem still occurred, please contact your distributor or the service center.
| No. | Problems | Solutions |
| 1. | Boot without power signal | Ensure that the USB cable is connected. |
| 2. | No screen with Ladibug software | 1. Change the USB cable2. Please try the USB port on the back of the computer or other USB port.3. Make sure no other application software has DC136 images open at the same time. If other software is already using DC136 images, Ladibug software cannot output the screen. |
| 3. | Unable to focus | Probably the document is too close. Please pull the document away from the lens, and then press the [AF] button on both lateral sides of the lens. |
| 4. | DC136 cannot operate normally | The machine cannot operate normally probably because the power supply of the USB port at the front end of the computer is insufficient. Try to connect to a USB port at the rear end or a USB Hub with a power adapter. |
| 5. | Output screen flicker | The presetting value of Ladibug current frequency is 60 (Hz). If current frequency of your local country is 50 (Hz), output screen flicker may occur during the use of Ladibug.Please refer to the Camera Settings section of the Software Manual to change the Power frequency setting to 50 Hz. |
| 6. | When the function of Time Lapse is executing, Preview screen remains still | Connecting USB Hub may result in insufficient bandwidth, which makes the machine unable to operate normally; therefore, it is advised that the machine shall be connected to the computer directly through USB cable instead of USB Hub. |
| 7. | When using the video software, the image screen is opposite to the actual one (mirror image) | Please use Lumens Ladibug software to rotate the image.Please refer to Ladibug Software User Manual for software-related functions. |
Chapter 9 Safety Instructions
English
Always follow these safety instructions when setting up and using this Product:
1 Operation
1.1 Please use the product in the recommended operating environment, away from water or source of heat
1.2 Do not place the product on a tilted or unstable trolley, stand or table.
1.3 Do not block the slots and openings in the case of the product. They provide ventilation and prevent the product from overheating.
1.4 Do not open or remove covers, otherwise it may expose you to dangerous voltages and other hazards. Refer all servicing to licensed service personnel.
1.5 Unplug the product from the wall outlet and refer servicing to licensed service personnel when the following situations happen:
■ If the USB port becomes damaged or frayed.
■ If liquid is spilled into the product or the product has been exposed to rain or water.
2 Installation
2.1 For security considerations, please make sure the standard hanging rack you bought is in line with UL or CE safety approbations and installed by technician personnel approved by agents.
3 Storage
3.1 Do not place the product where the cord can be stepped on as this may result in fraying or damage to the lead or the plug.
3.2 Remove the USB cable during thunderstorms or when the product is not used for a long time.
3.3 Do not place this product or accessories on top of vibrating equipment or heated objects.
4 Cleaning
4.1 Disconnect all the cables prior to cleaning and wipe the surface with a dry cloth. Do not use alcohol or volatile solvents for cleaning.
■ Precautions
 | This symbol indicates that this equipment may contain dangerous voltage which could cause electric shock. Do not remove the cover (or back). No user-serviceable parts inside. Refer servicing to licensed service personnel. |  | This symbol indicates that there are important operating and maintenance instructions in this User Manual with this unit. |
■ FCC Warning (A)
This equipment has been tested and found to comply with the limits for a Class A digital device, pursuant to part 15 of the FCC Rules. These limits are designed to provide reasonable protection against harmful interference when the equipment is operated in a commercial environment.
Notice :
The changes or modifications not expressly approved by the party responsible for compliance could void the user's authority to operate the equipment..
This equipment has been tested and found to comply with the limits for a Class A digital device, pursuant to part 15 of the FCC Rules. These limits are designed to provide reasonable protection against harmful interference when the equipment is operated in a commercial environment.
■ IC Warning
This digital apparatus does not exceed the Class A limits for radio noise emissions from digital apparatus as set out in the interference-causing equipment standard entitled "Digital Apparatus," ICES-003 of Industry Canada.
■ EN55032 CE Warning
Operation of this equipment in a residential environment could cause radio interference.
Warning: Operation of this equipment in a residential environment may cause radio interference
Français
Copyrights © Lumens Digital Optics Inc. All rights reserved.
Lumens is a trademark that is currently being registered by Lumens Digital Optics Inc.
Copying, reproducing or transmitting this file is not allowed if a license is not provided by Lumens Digital Optics Inc. unless copying this file is for the purpose of backup after purchasing this product.
In order to keep improving the product, the information in this file is subject to change without prior notice.
To fully explain or describe how this product should be used, this manual may refer to names of other products or companies without any intention of infringement.
Disclaimer of warranties: Lumens Digital Optics Inc. is neither responsible for any possible technological, editorial errors or omissions, nor responsible for any incidental or related damages arising from providing this file, using, or operating this product.


- Table of Contents
- Chapter 1 Package Contents....2
- Chapter 2 Product Overview .... 3
- Chapter 3 Installation and Connections .... 5
- Chapter 4 Start Using....7
- Chapter 5 Function Menu ....8
- Chapter 6 Descriptions of Major Functions ...... 9
- Chapter 7 Connecting to Microscope....10
- Chapter 8 Troubleshooting.... 11
- Chapter 9 Safety Instructions....12
- Copyright Information.... 14
- Chapter 1 Package Contents
- Chapter 2 Product Overview
- Description of LED Indicator
- Relative Operation Position
- Chapter 3 Installation and Connections
- Connecting to a computer
- Connecting to an Interactive Whiteboard (IWB)
- For use with VESA Installation Base
- Installing Application Software
- Chapter 4 Start Using
- Chapter 5 Function Menu
- Function Descriptions of Control Panel Button
- Control the Camera
- Use Skype for Video Conference
- Chapter 7 Connecting to Microscope
- Chapter 8 Troubleshooting
- Chapter 9 Safety Instructions
- English
- Operation
- Installation
- Storage
- Cleaning
- ■ Precautions
- ■ FCC Warning (A)
- ■ IC Warning
- ■ EN55032 CE Warning
- Français
Brand : Lumens
Model : DC136
Category : Document Camera