
PS753 - Document Camera Lumens - Free user manual and instructions
Find the device manual for free PS753 Lumens in PDF.


| Product Type | Document Camera |
| Brand | Lumens |
| Model | PS753 |
| Maximum Resolution | 3840 x 2160 (4K UHD) at 30 fps |
| Image Sensor | CMOS (not specified, but typical) |
| Optical Zoom | Not specified (digital zoom up to 20x) |
| Illumination | LED arm lamp and backlight |
| Connectivity | HDMI input and output, VGA output, USB 2.0 Type A (2) and Type B, Ethernet (RJ45), RS-232, Audio input/output |
| Power Supply | DC12V via included power adapter |
| Internal Storage | Built-in memory (for images), USB disk support up to 4 TB |
| Image Formats | JPEG |
| Video Recording | Yes, via USB disk |
| Network Functions | RTSP streaming, web browser control |
| Control Methods | Control panel, remote control, Ladibug software |
| Additional Features | Auto Tune, PIP (image comparison), Mask/Spotlight, Annotation, Slide Show, Time Lapse Capture |
| Microscope Adapter | Included (supports eyepieces sizes 28mm, 31mm, 33mm, 34mm) |
| Package Contents | PS753, Quick Installation Guide, 4-Step Instruction Card, Power Adapter, Power Cord, VGA cable, HDMI cable x2, USB 2.0 cable, Audio cable, Microscope Adapter, Remote Control with Holder |
| Safety Certifications | FCC Class A, IC, CE |
| Cleaning | Disconnect cables, wipe with dry cloth |
Frequently Asked Questions - PS753 Lumens
User questions about PS753 Lumens
0 question about this device. Answer the ones you know or ask your own.
Ask a new question about this device
Download the instructions for your Document Camera in PDF format for free! Find your manual PS753 - Lumens and take your electronic device back in hand. On this page are published all the documents necessary for the use of your device. PS753 by Lumens.
USER MANUAL PS753 Lumens
User Manual - English

natural_image
Line drawing of a desktop computer with adjustable arm and screen (no text or symbols)[Important]
To download the latest versions of the Quick Start Guide, multilingual user manual, software, driver, etc., please visit Lumens https://www.MyLumens.com/support
Table of Contents
Chapter 1 Package Contents....2
Chapter 2 Product Overview....3
2.1 Relative Operation Position....3
Chapter 3 Installation and Connections ....4
3.1 System diagram 4
3.2 Installing Application Software 5
Chapter 4 Start Using ....6
Chapter 5 Control Panel/Remote Control and Setting Menu ....7
5.1 Functions of control panel and remote control 7
5.2 Setting Menu....9
Chapter 6 Descriptions of Major Functions .... 14
6.1 Automatically adjust the image to have the best brightness and focusing performance......14
6.2 Switch Image Sources....14
6.3 Make text clearer and photos more colorful....14
6.4 Rotate Image....14
6.5 Capture Image....14
6.6 Record....14
6.7 View captured/recorded images....15
6.8 Delete captured/recorded images....15
6.9 Adjust the output volume....15
6.10 Automatically delete the stored images whenever it is turned off (Auto Erase)....15
6.11 Enlarge a part of the image (PAN)....15
6.12 I would like to use the MASK and Spotlight function....15
6.13 Play the slides (Slide Show)....16
6.14 Use a USB disk....16
6.15 Image comparison (to compare live images with stored image files (PIP))....17
6.16 Lock/Unlock keys....17
6.17 Change the power on image....17
Chapter 7 Network Function Settings Description....18
Chapter 8 Connecting to Microscope .... 28
Chapter 9 Packing the Machine....29
Chapter 10 DIP Switch Setting .... 30
Chapter 11 Troubleshooting....31
Chapter 12 Safety Instructions.... 33
Supplier's Declaration of Conformity 47 CFR § 2.1077 Compliance Information ....35
Appendix 1 Power frequency for each country in the world.... 36
Appendix 2 Resolution Comparison....38
Copyright Information 40
Chapter 1 Package Contents
| PS753 | Quick Installation Guide | 4-Step Instruction Card | Power Adapter |
 |  |  |  |
| Power Cord | VGA cable | HDMI cable * 2 | USB 2.0 cable |
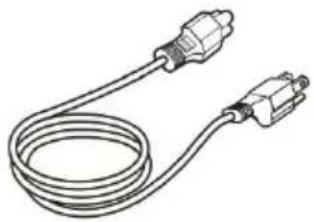 |  |  |  |
| Appearance may vary depending on country/region | |||
| Audio Cable | Microscope Adapter | Remote Control Holder | Remote Control |
 |  |  | 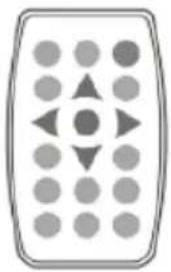 |
Chapter 2 Product Overview

- Remote sensor
- Camera arm
- Auxiliary floodlight and lamp arm
- Input/output port
-
Control panel
-
Lens
- Remote Control Holder
- DIP Switch Setting
- Backlight
2.1 Relative Operation Position
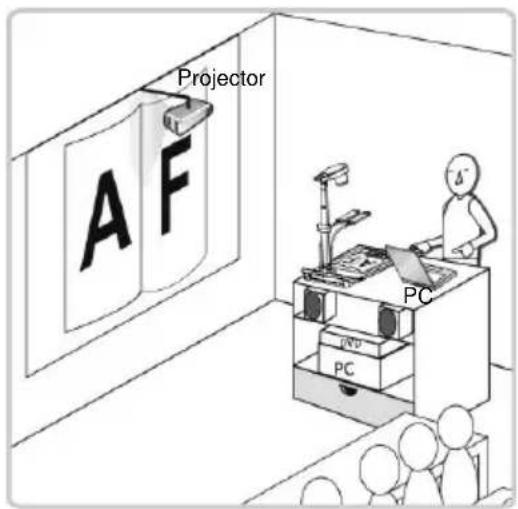
Chapter 3 Installation and Connections
3.1 System diagram
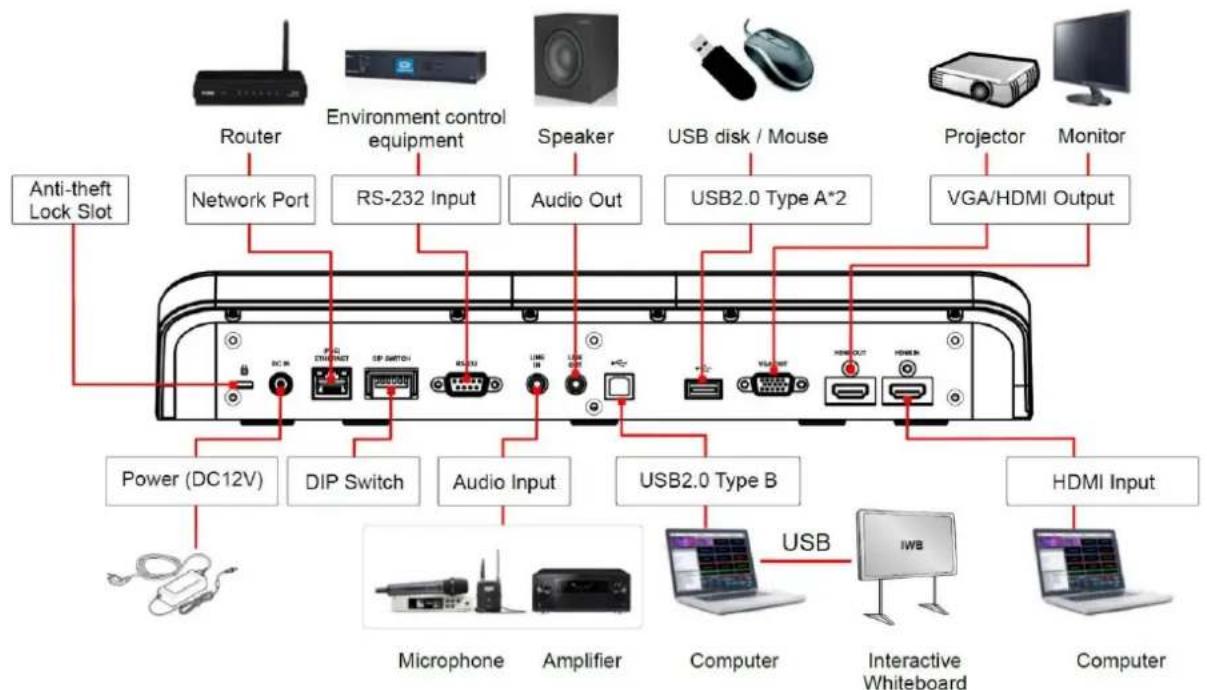
※ Press the [SOURCE] button to switch between PS753 real-time image and HDMI IN image sources
3.2 Installing Application Software
The Lumens Ladibug application software installed on the computer enables you to:
▶ Control the PS753.
▶ Capture and record images.
➢ Annotate the image, highlight important details and save it.
▶ Support the full screen function.
※ Please refer to Ladibug™ software user manual for software installation steps and operation.
■ Windows: Ladibug 4K Software User Manual
■ MAC: Ladibug 3.0 Software User Manual

※ Please adjust to the local voltage frequency of 50/60 Hz. For the frequency in actual use, please refer to Appendix 1 power frequency for each country in the world in the manual.
- Remove the lens cap.
- Pull up the camera and the camera arm. The camera should aim at the center of the presenter.
- Pull up the lamp arm to a proper position.
- Place an object to be displayed under the camera.
- Press [POWER] on the remote control or control panel to power on.
- Press control panel [AUTO TUNE] button to optimize the image. You are ready to teach/present.
- Each time the lens is moved, press [AUTO TUNE] on the remote control or control panel to refocus.
■ According to your request, you can adjust the camera head slightly to aim at the center of the documents when the anchor of lens was reached.
■ When using the remote control, aim at the remote sensor on the PS753, and press the power button.
■ Once PS753 is turned on, the LED on the control panel will flash a few times and stay lit. Please contact your distributor if the LED does not light up.
Chapter 5 Control Panel/Remote Control and Setting Menu
5.1 Functions of control panel and remote control
| Icon | Name | Function Descriptions | Operation |
 | Power | Power on and offPress and hold for 5 ~ 10 seconds to turn off | Remote control/ Control panel |
 , , | Arrow Key | Move up, down, left or right to select the needed function | Remote control/ Control panel |
 | AUTO TUNE | Automatically adjust the image to have the best brightness and focusing performance | Remote control/ Control panel |
 | BRT+/- | Adjust the brightness of the image | Remote control/ Control panel |
 | CAPTURE /DEL | Capture and save images to USB disk (priority) or internal memory card while displaying live imagesDelete files from the USB disk (priority) or internal memory card while reading the stored files (in Playback mode) | Remote Control |
 | ENTER | Activate/Enter functions | Remote Control |
 | LAMP | Lamp mode toggle switch (Arm lamp/Backlight/Off the lamp) | Remote control/ Control panel |
 | MASK | Activate Mask/Spotlight mode | Remote Control |
 | MENU | Activate the setting menu/exit the menu | Remote control/ Control panel |
 | PAN | Enable/Disable the partial enlarged mode | Remote Control |
 | PIP | Image comparison (to compare live images with stored image files) | Remote Control |
 | PLAYBACK | Read files in the USB disk (priority) or internal memory card | Remote control/ Control panel |
 | RECORD | Record motion images | Remote Control |
 | ROTATE | Rotate the image 0°/180°/Vertical flip/Horizontal flip/90°/270° | Remote Control |
 | SOURCE | Switch the input source between live image (default) or HDMI image | Remote control/ Control panel |
 | ZOOM +/- | Increase or decrease the image size | Remote control/ Control panel |
5.2 Setting Menu
5.2.1 Main menu
Press [MENU] on the remote control or control panel to display the setting menu.

 | Auto TuneAutomatically adjust the image to have the best brightness and focusing performance. | PlayackPreview the photos or videos stored in the USB disk (priority) or internal memory card. | |
 | PANEnable/Disable the partial enlarged mode. | Manual FocusManual Focus. | |
 | LAMPLamp mode toggle switch. | RotateScreen rotation 0°/180°/Vertical flip/Horizontal flip/90°/270°. | |
 | PIPCompare live images with stored images. | SettingsSet up various functions. | |
 | BrightnessAdjust the brightness of the image. | Photo/TextSelect Photo/Text/Gray Mode. | |
 | MaskActivate the mask mode. | AnnotationAnnotate or mark the image. | |
 | ZoomIncrease or decrease the image size. | ModeSelect image mode. | |
 | SpotlightActivate the spotlight mode. | ExitExit the setting menu. |
5.2.2 Setting menu
| 1st Level Major Items | 2nd Level Minor Items | Function Descriptions |
| Capture | Capture Mode | Use the left and right arrow keys to select the capture modeSingle Capture/Time Lapse/Record/Off |
| Capture Time | Use the left and right arrow keys to select the capture time. The setting range is 1 ~ 72 hours※ This will be active only when capture mode is set to time lapse | |
| Capture Interval | Use the left and right arrow keys to select the capture interval. The setting range is 3 ~ 5 minutes※ This will be active only when capture mode is set to time lapse | |
| Image Quality | Use the left and right arrow keys to select the image quality for the captured images and recorded videos | |
| Date & Time | Set SNTP server and manually set system time | |
| Stream | Select Ethernet or USB function※ Ethernet/USB may only choose one, because they cannot be output at the same time | |
| Storage | Slide Show | Show the photos or videos stored in the USB disk (priority) or internal memory card in slide mode |
| Delay | Use the left and right arrow keys to select the delay timeThe range is 0.5 seconds ~ 10 seconds, use manual mode to switch manually | |
| Copy To USB Disk | Use the left and right arrow keys to select, and then press [ENTER] to confirm to copy files from internal memory card to USB disk | |
| Delete All | Use the left and right arrow keys to select, press [ENTER] to confirm the deletion of all images from the USB disk (priority) or internal memory card | |
| Format | Use the left and right arrow keys to select, and then press [ENTER] to format the USB disk (priority) or internal memory card | |
| Control | Auto Exposure | Regardless of outside environment, the machine will adjust the brightness to the optimal condition |
| Auto White Balance | Regardless of outside light or color, the machine will adjust the color to the optimal condition; Press [ENTER] to execute | |
| Audio Out Volume | Use the left and right arrow keys to adjust the volume | |
| Audio In Levels | Use the left and right arrow keys to adjust the volume | |
| Audio Source | Built-in microphone/Line in | |
| Zoom Limit | Set the Zoom magnification | |
| Auto Power On | Powers on automatically when connected to power supply | |
| IP Address | Display the IP address (If it is not connected to a router, the default IP is 192.168.100.100) | |
| Advanced | Language | Support multi-language (default is English) |
| Lock Down | Enable/Disable lock downSelect [Enable] to set the password. | |
| Auto Erase | Enable/Disable Auto EraseWhen [On] is selected, the stored images will automatically be deleted when the system is turned off | |
| Preset Load | Load the stored settingsUse the left and right arrow keys to select, and then confirm by pressing [ENTER] | |
| Preset Save | Store the value of the current image modeUse the left and right arrow keys to select, and then confirm by pressing [ENTER] | |
| Splash Screen Settings | Launch [Splash Screen Settings] window | |
| Factory Reset | Use the left and right arrow keys to select, and then confirm by pressing [ENTER] to restore the factory defaults | |
| Firmware Version | Show the firmware version |
5.2.3 Mask Mode setting menu
| Function Items | Function Descriptions |
| Live | Press [ENTER] to return to the live image. |
| Transparency | Use the left and right arrow keys to adjust the transparency of the mask. |
| Step | Use the left and right arrow keys to select the step of the mask. |
| V Size | Use the left and right arrow keys to select the vertical height of the mask. |
| H Size | Use the left and right arrow keys to select the horizontal length of the mask. |
| Exit | Press [ENTER] to confirm your selection and exit the mask mode setting menu. |
5.2.4 Spotlight Mode setting menu
| Function Items | Function Descriptions |
| Live | Press [ENTER] to return to the live image. |
| Shape | Use the left and right arrow keys to select the shape of the spotlight zone. |
| Transparency | Use the left and right arrow keys to adjust the transparency of the border in the spotlight mode. |
| Step | Use the left and right arrow keys to select the step of the spotlight zone. |
| V Size | Use the left and right arrow keys to adjust the height of the spotlight zone. |
| H Size | Use the left and right arrow keys to adjust the width of the spotlight zone. |
| Exit | Press [ENTER] to confirm your selection and exit the spotlight mode setting menu. |
5.2.5 Splash Screen Setting
| Function Items | Function Descriptions |
| Power On Image Setting | Select to default/custom power on image |
| Power On Logo Show Time | Set the duration of displaying the power on logo that can be adjusted between 4 ~ 30 seconds |
| Power On Image Select | Power On Image Select※ Only pictures in JPEG format are supported |
| Exit | Press [ENTER] to confirm your selection and exit splash screen setting window |
5.2.6 Annotation Tools
After connecting the mouse via USB, right-click to activate the drawing function of the setting menu
When the mouse stays at the right side of the screen, the mouse annotation menu can be activated
※ Choose either USB screen or Mouse Annotation. If you want to use Mouse Annotation function, please remove the USB cable.
| Icon | Description | Icon | Description |
 | Custom tool 1 |  | Clear all |
 | Custom tool 2 |  | Open setting menu of the annotation tool |
 | Eraser |  | Exit the annotation tool |
6.1 Automatically adjust the image to have the best brightness and focusing performance
Press [AUTO TUNE] AUTON the remote control or control panel to adjust to the optimal brightness and focal length.
6.2 Switch Image Sources
The default image source is Live Image. Press [SOURCE] to change the setting, and the output screen will switch between Live Image (default)/HDMI IN.
6.3 Make text clearer and photos more colorful
- Go to the setting menu, select [Photo/Text] > [Photo/Text/Gray].
■ [Photo] (default): for viewing photos or text with photos, making photos more colorful.
■ [Text]: for viewing text files, making the text clearer.
■ [Gray]: for viewing black & white photos which will make the grayscale differentiation distinct.
- Press [MENU] to exit.
6.4 Rotate Image
■ Remote control: Press [ROTATE] key to rotate the screen.
■ Control panel: Go to the setting menu, select [Rotate] to change the rotation method.
※ The following functions are not available when the image is rotated: PAN/PIP/Recording.
6.5 Capture Image
Press [CAPTURE/DEL] to capture and save images.
※ You cannot capture images when the capture mode is set to [Disable]. If it is set to [Continuous], you can capture images continuously by pressing [CAPTURE/DEL] , or press again to exit.
※ To change the quality of images, go to the setting menu [Settings] > [Capture] > [Image Quality] to do the setting.
6.6 Record
※ Connect USB disk to PS753 to start recording images.
※ You may not be able to capture or record images when [Capture Image] mode is set to [Disable].
- Press [RECORD] to record videos.
-
Record sounds with the built-in microphone of the control panel.
-
Press [RECORD] again to stop recording.
6.7 View captured/recorded images
- Press [PLAYBACK] ▶ to show the thumbnails of all stored files.
- Select the thumbnail you want to play and press [ENTER] to play.
- When playing the video, press [FREEZE] to pause/play the video or press [ENTER] to stop playing.
- Press [▶] or [◀] to select the next or previous audio/video file.
- Press [▲] or [▼] to adjust the volume of the video.
※ An external speaker must be connected to AUDIO OUT to play sound when you use VGA OUT.
6.8 Delete captured/recorded images
- Press [PLAYBACK] ▶ to show the thumbnails of all stored files.
- After selecting the file to be deleted, press [CAPTURE/DEL] to show the [Delete File] window.
- Select [Yes], press [ENTER] to delete the selected file.
6.9 Adjust the output volume
※ Volume control is intended to control the external audio output equipment only.
In PLAYBACK mode, Press [▲] or [▼] to adjust the volume of the video.
6.10 Automatically delete the stored images whenever it is turned off (Auto Erase)
- Go to the setting menu, select [Settings] > [Advanced] > [Auto Erase] > [On].
- Press [MENU] to exit.
6.11 Enlarge a part of the image (PAN)
- Enable the partial enlarged mode.
■ Remote control: Press [PAN] to enable the partial enlarged mode.
■ Control panel: Go to the setting menu, select [PAN] and press
[ENTER] for execution.
- Press [▲], [▼], [◀], or [▶] to move and view the partial enlarged images.
- Press [MENU] to exit the partial enlarged mode.
6.12 I would like to use the MASK and Spotlight function
6.12.1 Use the mask or spotlight mode
■ Use remote control:
- Press [MASK] key to enter the Mask/Spotlight mode menu. Press [◀] or [▶] to select mode.
- Press [ENTER] to enter the Mask or Spotlight mode.
-
Press [▲], [▼], [◀], or [▶] to move the zone position.
-
Press [MASK] again to return to the live image.
■ Use control panel:
- Go to the setting menu, select [Mask] and press [ENTER] to enter the Mask or Spotlight mode.
- Press [▲], [▼], [◀], or [▶] to move the zone position.
- Go to the setting menu, select [Live image], and press [ENTER] to return to the live image.
6.12.2 I would like to set the size of Mask/Spotlight function
In Mask/Spotlight mode, use the remote control or control panel:
- Go to the setting menu, select the item to be changed.
■ Mask mode: [Transparency/Step/V Size/H Size].
■ Spotlight mode: [Shape/Transparency/Step/V Size/H Size].
(For details, please refer to 5.2 Setting Menu.)
- Press [MENU] to exit the Setting Menu and return to Mask/Spotlight mode.
6.13 Play the slides (Slide Show)
6.13.1 Setting delay time
- Go to the setting menu, select [Settings] > [Storage] > [Delay], and select the delay time.
- Press [MENU] to exit.
6.13.2 Playing/Pausing/Stopping the slide show
※ Upper limit: The maximum size of single photo is 7 MB.
-
Go to the setting menu, select [Settings] > [Storage] > [Slide Show] > [ENTER] for execution.
-
Press [ENTER] again to pause/play.
6.14 Use a USB disk
Insert the USB disk and a [Copy To USB disk] dialog box will appear, and you are asked whether to copy files from PS753 to the USB disk.
Press [▶] or [◀] to select.

6.15 Image comparison (to compare live images with stored image files (PIP))
This function will compare and contrast a live image with a stored image.

flowchart
graph LR
    A["C1"] --> B["C2"]
    B --> C["C3"]
    C --> D["C4"]
    E["C5"] --> F["C6"]
    F --> G["C7"]
    G --> H["C8"]
    I["Image: Virus particles"] --> J["→"]
    J --> K["Image: Virus particles with label '0'"]
    J --> L["Image: Virus particles with label '1'"]
    J --> M["Image: Virus particles with label '2'"]
-
Open the thumbnail screen.
-
Remote control: Press [Playback] to access the thumbnail screen, and select the image files to be compared.
■ Control panel: Press [MENU] to go to the setting menu, select [PIP], and choose the image files to be compared. -
Press [▲], [▼], [◀], or [▶] to move the live image.
- Repeat Step 1 to change other image files.
- Press [MENU] to exit.
6.16 Lock/Unlock keys
Press[ENTER] [LAMP] buttons on the panel for 2 seconds to enable the Lock function.
Repeat the action again to unlock.
※ This function is only valid for the panel buttons, the remote control can still operate normally. When turning off with the remote control, the lock function will be released automatically after rebooting.
6.17 Change the power on image
- Go to the setting menu, select [Settings] > [Advanced] > [Splash Screen Settings].
- Select [Default/Custom].
2.1 If you select [Custom], you can set the [Power On Logo Show Time] and [Select Splash Screen].
※ The power on image file must be less than 5 MB and in JPEG format.
※ To save the file, please follow the instruction below:
■ File path: \DCIM\100MEDIA, for example: J:\DCIM\100MEDIA
■ File name: four English letters+ four numbers, for example: LUMN0001.JPG
- Press [▼] to [Exit] and press [ENTER] to exit.
Chapter 7 Network Function Settings Description
7.1 Connecting Camera to Internet
Two common connection methods are shown below
- Connecting via switch or router

flowchart
graph LR
    A["PS753"] -->|Network cable| B["Switch or router"]
    B -->|Network cable| C["Computer"]
- To connect directly through network cable, the IP address of the computer should be changed so that it is on the same network segment as the camera
E.g.: The factory-preset default IP address of PS753 is 192.168.100.100. The computer IP address must be set with the same network segment, such as 192.168.100.101, so that the computer can be connected correctly with the camera

natural_image
Illustration of a desktop desk lamp with a stand and cable, no visible text or symbolsPS753
Network cable

natural_image
Exterior view of a desktop computer tower and monitor (no visible text or labels)Computer
- Change network settings

7.2 Using the Browser to View the Images
- DHCP is enabled by default. You can view the IP location from Menu > Settings > Control.

- Open the browser, and enter the IP address in the address bar (If it is not connected to a router, the default IP is 192.168.100.100)
192.168.4.28

- Enter the account and password to view the images and control PS753

7.3 Using RTSP Player to View the Images
■ RTSP connections can be made using free software, e.g.: VLC, Quick Time, PotPlayer, etc
■ RTSP connection address formats are as follows: rtsp://camera IP:8557/h264
■ Example:
Open the VLC software, select [Media] > [Open Network Streaming], and enter the URL:
rtsp://192.168.4.28:8557/h264


7.4 Web Page Menu Function Description
7.4.1 Login Screen

| No | Item | Function Descriptions |
| 1 | User Login Account | Enter user login account (default: admin) |
| 2 | User Password | Enter user password (default: 9999)* For the first-time login, please refer to7.4.4System Settingsto change the default password |
| 3 | Remember user account and password | Save user login account and password to the browser. When you log in next time, there is no need to re-enter them |
| 4 | Login | Log into the administrator screen on the website |
7.4.2 Live View-1
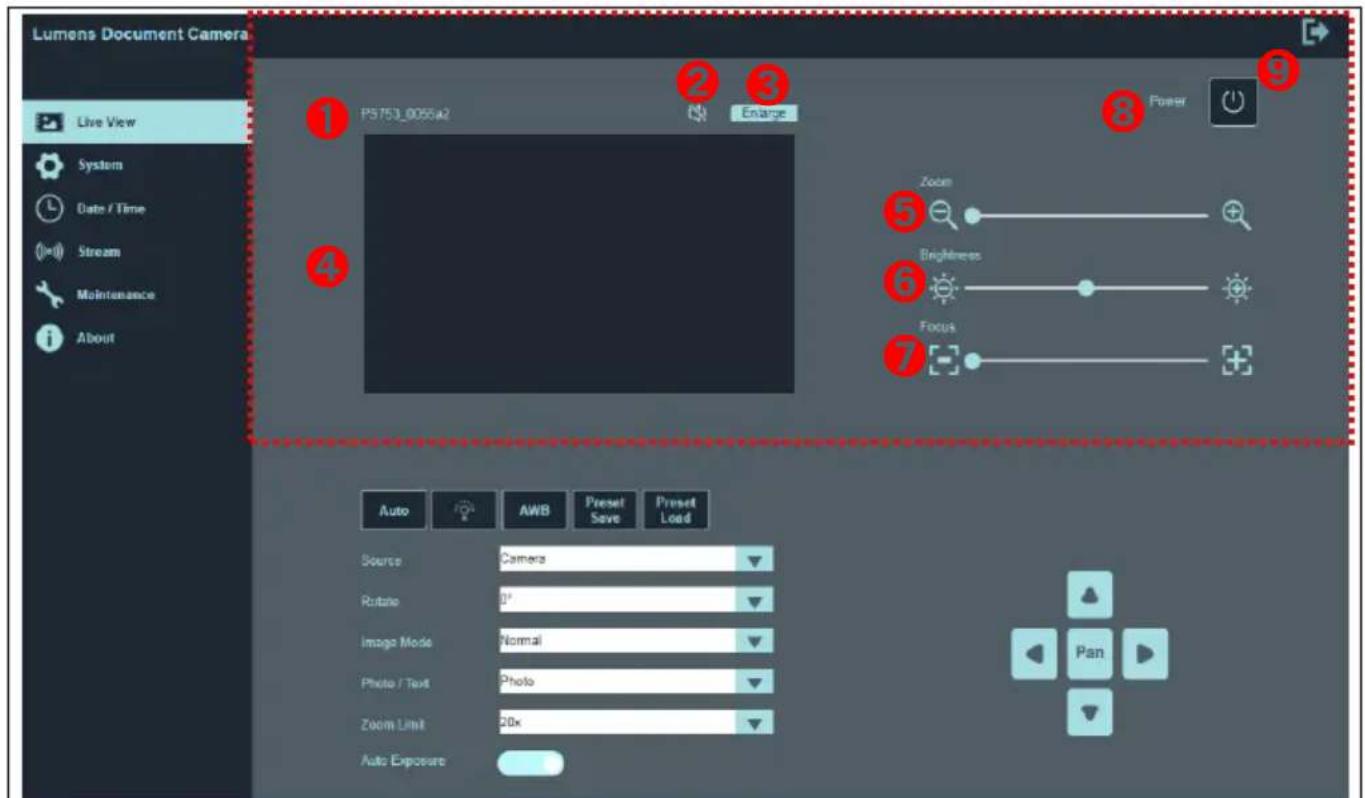
| No | Item | Function Descriptions |
| 1 | Camera ID | Display the device name |
| 2 | Mute | Turn on/off web audio output |
| 3 | Enlarge | Switch the preview window to full screen |
| 4 | Preview window | Display the screen currently captured by PS753 |
| 5 | Zoom | Zoom in/out images |
| 6 | Brightness | Brightness |
| 7 | Focus | Tune the focus |
| 8 | Power | Enable/Disable PS753 |
| 9 | Logout | Log out of the web page |
7.4.3 Live View-2

| No | Item | Function Descriptions |
| 1 | Auto Tune | Automatic Image Optimization; automatically adjust the image to have the best brightness and focal length |
| 2 | Lamp | Click lamp mode toggle switch: off / brightness 1 / brightness 2 / brightness 3 |
| 3 | AWB | Execute Auto White Balance once |
| 4 | Preset Save | Store the value of the current image mode |
| 5 | Preset Load | Load the stored settings |
| 6 | Source | Camera/HDMI In screen switching |
| 7 | Rotate | Rotate the image: 0°/90°/270°/Flip/Mirror |
| 8 | Image Mode | Normal/Film/Slide/Microscope |
| 9 | Photo / Text | Select Photo/Text/Gray Mode |
| 10 | Zoom Limit | Set the Zoom magnification |
| 11 | Auto Exposure | Enable/disable auto exposure |
| 12 | Pan | Turn on/off partial digital enlargeArrow keys can move the screen |
7.4.4 System settings

| No | Item | Function Descriptions |
| 1 | Device and Account | Display the current device name of PS753 and web login settings.You can change the device name, user account and password, click [Save] to save the settings, and click [Cancel] to cancel the changes.※ The name is limited to 1 - 12 characters※ Please use a camera name by mixing uppercase and lowercase letters or numbers. Do not use “/” and “space” or special symbols |
| 2 | IP Address | Ethernet Setting.When it is set to Static IP, the setting can be modified. |
7.4.5 Date/Time Settings
| Lumens Document Camera | ||
| Live View System Date / Time Stream Maintenance About | Date and Time Device Current Date and Time 2021/05/26 10:23:43 Time Zone: GMT+08 Taipei, Beijing, Chon... Setting Mode: NTP Service NTP Server URL: pool.ntp.org Apply | |
| No | Item | Function Descriptions |
| 1 | Device Current Date and Time | Display the current system time |
| 2 | Time Zone | Set the Time Zone. |
| 3 | Setting Mode | Select NTP Service/Manually Set Turn on Manually Set and choose to synchronize with the computer or set the date/time manually. Setting Mode: Manually Set Sync with PC Set Date: 01/01/2021 Set Time: 08:00 AM |
| 4 | NTP Server URL | NTP service to display this item Connect to a NTP server to correct time |
| 5 | Apply | Apply your settings |
7.4.6 Streaming Setting

| No | Item | Function Descriptions |
| 1 | Stream | Switch Ethernet or USB function※ Ethernet/USB may only choose one, because they cannot be output at the same time |
| 2 | Video Resolution | Show or set the RTSP output resolution and fps |
| 3 | Bitrate | Display or set the bit rate of RTSP |
| 4 | Enable Audio | Turn on/off RTSP audio |
| 5 | Audio Source | Select the audio source |
| 6 | Audio In Levels | Adjust the volume |
| 7 | RTSP URL | Display current RTSP URL |
| 8 | Edit | Enter Edit mode |
7.4.7 Maintenance

| No | Item | Function Descriptions |
| 1 | Firmware Upgrade | Select the firmware file, and click [Upgrade] to update the firmware※ Update takes about 1 - 2 minutes※ Please do not operate or turn off the power of the device during the update to avoid firmware update failure |
| 2 | Factory Reset | Restore the factory default (software) |
| 3 | Reboot | Restart |
| 4 | Error Code | Display system Error code※ When an error code appears, the user may try to clear and confirm if the error will repeat itself |
| 5 | Clean | Clear Error code |
Chapter 8 Connecting to Microscope
1 Mount the microscope adapter onto the microscope
※ Please choose an appropriate microscope adapter for eyepieces size of ∅ 28 mm, ∅ 31 mm, ∅ 33 mm, and ∅ 34 mm.
2 The lens of PS753 connects with the microscope adapter
For eyepieces of ∅ 33 mm or ∅ 34 mm, only one microscope adapter (with the greatest diameter) is needed.
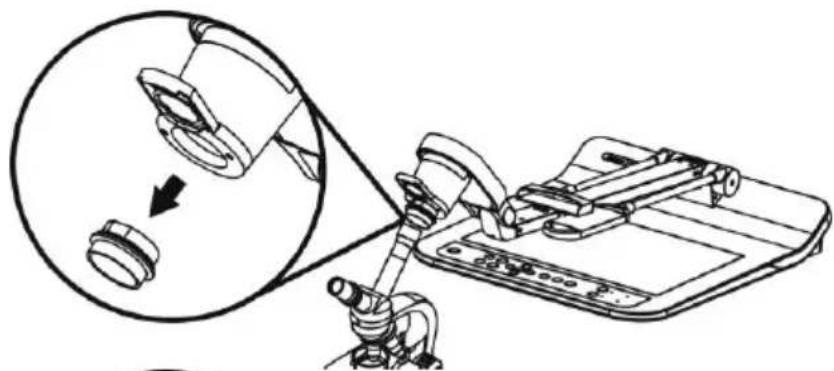
natural_image
Technical line drawing of a mechanical assembly with a magnified inset showing a component being inserted (no text or symbols present)For eyepieces of ∅ 28 mm or ∅ 31 mm, fit one microscope adapter with the greatest diameter along with another appropriate one.

3 Select the [Microscope] mode
- Press [MENU] to enter the Service Menu, and select [Image Mode] > [Microscope].
4 If the image is not clear
■ Please adjust the focus of microscope
■ Press [AUTO TUNE] AUTO activate the auto focus
5 Please reset to normal mode after using the microscope.
- Press [MENU] to enter the Service Menu, and select [Image Mode] > [Normal].
Chapter 9 Packing the Machine
- Put the remote control back to the holder.
- Fold back the camera head to align with the arm.
- Turn the two lamp arms and the arm of camera head down and adjust them to be parallel with the platform.
- Put the lens cap on the camera head.
- Finally, fold the machine as in the following figure.
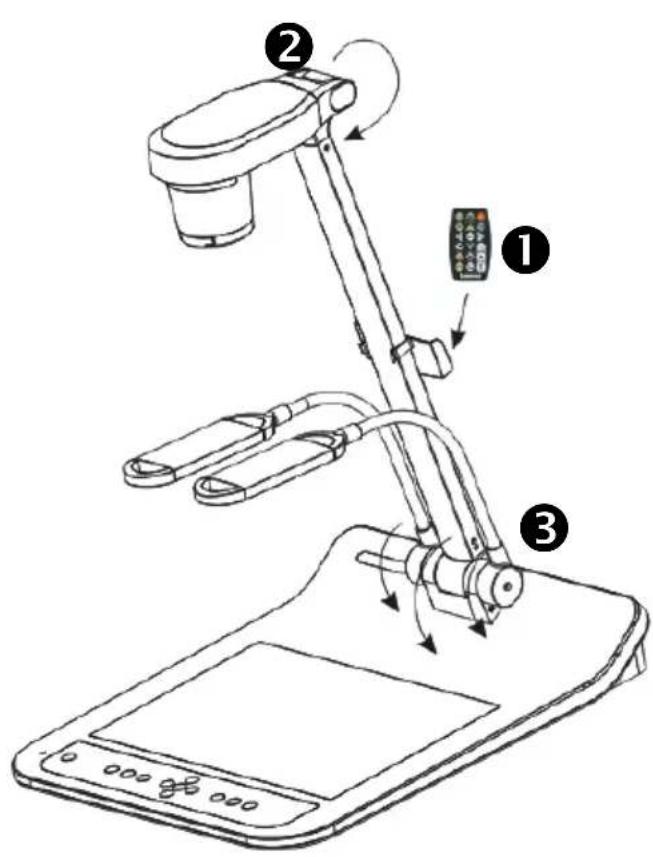

Chapter 10 DIP Switch Setting
※ You should unplug and reconnect the power cord, and then restart the PS753 for all DIP switching to take effect.
- Description of DIP
| DIP | Function Descriptions |
| 1 | Output Resolution |
| 2 | |
| 3 | OFF (Normal mode): 30 fps, applicable to general sceneON (High-speed mode): 60 fps, applicable to support rapidly changing scene (4K resolution not available) |
| 4 | OFF: 60 HzON: 50 Hz |
| 5 | Reserved, no function |
| 6 | Reserved, no function |
- HDMI Resolution
| Resolution | 60Hz | 50Hz |
| 1920 x 1080 |  |  |
| 3840 x 2160 |  |  |
| 1280 x 720 |  |  |
| 1024 x 768 |  |  |
※ For the corresponding resolution of RTSP/UVC, please refer to Appendix 2 Resolution Comparison.
Chapter 11 Troubleshooting
This chapter describes problems you may encounter while using PS753. If you have questions, please refer to related chapters and follow all the suggested solutions. If the problem still occurred, please contact our distributors or service center.
| No. | Problems | Solutions |
| 1 | Boot without power signal | Make sure you have plugged in the power cord. |
| 2 | There is no image output from PS753 | 1. Check the power.2. Check all cable connections. Refer to Chapter 3 Installation and Connections in this manual.3. Check the [Source], refer to 6.2 Switch Image Sources of Chapter 6 Descriptions of Major Functions.4. Check the settings for the source of the projector. Please refer to the user manual of the projector.5. Check if DIP switch is properly set. Please refer to Chapter 10 DIP Switch Setting in this manual for related settings. |
| 3 | No Ethernet/USB Image Output | Ethernet/USB may only choose one, because they cannot be output at the same time.Please switch the streaming settings on the setting menu or web page■ Setting Menu: [Settings] > [Capture] > [Streaming] > [Ethernet/USB]■ Web page: [Stream] > [Stream] > [Ethernet/USB] |
| 4 | Unable to focus | Probably the document is too close. Press the [ZOOM -] button or pull away the distance between the lens and the document, and then press [AUTO TUNE] auto-focus. |
| 5 | The image is incomplete | Check the Auto Image setting of your projector.Please refer to the user manual of the projector or check for the DIP Switch resolution setting. |
| 6 | No screen with Ladibug software | 1. Change the USB cable.2. Please try the USB port on the back of the computer or other USB port.3. Please close the currently running applications and then start Ladibug software.If other software is already using PS753 images,Ladibug software cannot output the screen. |
| 7 | When PS753 is turned on, the auxiliary floodlight do not light | Please press [Lamp] to switch the lamp source. |
| 8 | PS753 fails to store images or react | 1. Check to see if the stored data have reached the maximum size of the USB disk (priority) or internal memory.2. Please make sure if the capture function is set to continuous mode or the time for capture is set to be long. |
| 9 | The output image is too bright, too dark, or vague | Press [AUTO TUNE] button to automatically adjust the image to have the best brightness and focusing performance.1. Check to see if the stored data have reached the maximum size of the USB disk. |
| 10 | Unable to record images | 2. The recording function is not supported in the internal memory. Please make sure that USB disk is inserted.The operating steps in the manual may be not applicable to the machine due to improvement in functions. Check to see if the Firmware version of your machine is up-to-date. |
| 11 | The operating steps in the manual are not applicable to the machine | 1. Please go to Lumens official website to check whether the latest version is available for update.https://www.MyLumens.com/support2. Firmware version confirmation steps: Go to the setting menu, and select [Settings] > [Advanced] > [Firmware Version]. |
| 12 | How to unlock the locked device | 1. Go to the setting menu and select [Settings] > [Advanced] > [Lock Down].2. Cancel the password setting function. |
| 13 | When using the USB cable to connect to a computer, HDMI IN screen output is not available through USB | After using the USB cable to connect to a computer, only Live Image output is available. |
| 14 | The output image is not clear with water ripples | Please refer to theAppendix 1in the manual to confirm the applicable voltage frequency, and reset it according to the instruction inChapter 10 DIP Switch Setting.1. The USB disk with the capacity of 4 G and above is recommended (up to 4 TB supported).2. Make sure the file is saved at the specified path:\DCIM\100MEDIA.(E.g.: J:\ DCIM\100MEDIA)3. Make sure the file is named appropriately, e.g. four English letters + four numbers. (E.g.: LUMN0001.JPG) |
| 15 | The data in the USB disk cannot be read |
Always follow these safety instructions when setting up and using the Document Camera:
1 Operation
1.1 Please use the product in the recommended operating environment, away from water or source of heat.
1.2 Do not place the product on a tilted or unstable trolley, stand or table.
1.3 Do not block the slots and openings in the case of the product. They provide ventilation and prevent the product from overheating.
1.4 Do not open or remove covers, otherwise it may expose you to dangerous voltages and other hazards. Refer all servicing to licensed service personnel.
1.5 Unplug the product from the wall outlet and refer servicing to licensed service personnel when the following situations happen:
■ If the USB port becomes damaged or frayed.
■ If liquid is spilled into the product or the product has been exposed to rain or water.
2 Installation
2.1 For security considerations, please make sure the standard hanging rack you bought is in line with UL or CE safety approbations and installed by technician personnel approved by agents.
3 Storage
3.1 Do not place the product where the cord can be stepped on as this may result in fraying or damage to the lead or the plug.
3.2 Remove the USB cable during thunderstorms or when the product is not used for a long time.
3.3 Do not place this product or accessories on top of vibrating equipment or heated objects.
4 Cleaning
4.1 Disconnect all the cables prior to cleaning and wipe the surface with a dry cloth. Do not use alcohol or volatile solvents for cleaning.
5 Batteries (for products or accessories with batteries)
5.1 When replacing batteries, please only use similar or the same type of batteries
5.2 When disposing of batteries or products, please adhere to the relevant instructions in your country or region for disposing of batteries or products
■ Precautions
 | This symbol indicates that this equipment may contain dangerous voltage which could cause electric shock. Do not remove the cover (or back). No user-serviceable parts inside. Refer servicing to licensed service personnel. |  | This symbol indicates that there are important operating and maintenance instructions in this User Manual with this unit. |
■ FCC Warning (A)
This equipment has been tested and found to comply with the limits for a Class A digital device, pursuant to part 15 of the FCC Rules. These limits are designed to provide reasonable protection against harmful interference when the equipment is operated in a commercial environment.
Notice :
The changes or modifications not expressly approved by the party responsible for compliance could void the user's authority to operate the equipment.. This equipment has been tested and found to comply with the limits for a Class A digital device, pursuant to part 15 of the FCC Rules. These limits are designed to provide reasonable protection against harmful interference when the equipment is operated in a commercial environment.
■ IC Warning
This digital apparatus does not exceed the Class A limits for radio noise emissions from digital apparatus as set out in the interference-causing equipment standard entitled "Digital Apparatus," ICES-003 of Industry Canada.
Operation of this equipment in a residential environment could cause radio interference. Warning: Operation of this equipment in a residential environment may cause radio interference
Supplier's Declaration of Conformity 47 CFR § 2.1077 Compliance Information
Manufacturer : Lumens Digital Optics Inc.
Product Name : PS753
Model Number : Document Camera
Responsible Party – U.S. Contact Information
Supplier : Lumens Integration, Inc.
4116 Clipper Court, Fremont, CA 94538, United States
e-mail : support@mylumens.com
FCC Compliance Statement
This device complies with Part 15 of the FCC Rules. Operation is subject to the following two conditions: (1) This device may not cause harmful interference, and (2) this device must accept any interference received, including interference that may cause undesired operation.
Appendix 1 Power frequency for each country in the world
Appendix 2 Resolution Comparison
| Dip Switch | HDMI Output | Mode | FPS | RTSP | UVC | ||
| H264 | H264 | MJPEG | YUV | ||||
| 1920x1080 60Hz | Normal | 30 | 3840x2160 | 3840x2160 | NA | NA | |
| 1920x1080 (Default) | 1920x1080 | 1920x1080 | |||||
| 1280x720 | 1280x720 | 1280x720 | |||||
| 640x360 | NA | 640x360 | 640x360 | ||||
| 1920x1080 50Hz | Normal | 25 | 3840x2160 | 3840x2160 | NA | NA | |
| 1920x1080 (Default) | 1920x1080 | 1920x1080 | |||||
| 1280x720 | 1280x720 | 1280x720 | |||||
| Dip Switch | HDMI Output | Mode | FPS | RTSP H264 | H264 | UVC MJPEG | YUV |
| 60 Hz | 640x360 | NA | 640x360 | 640x360 | |||
| 1280x720 | Normal | 25 | 3840x2160 | 3840x2160 | NA | ||
| 1920x1080 | 1920x1080 | 1920x1080 | NA | ||||
| 50 Hz | 1280x720 | 1280x720 | 1280x720 | ||||
| 640x360 | 640x360 | 640x360 | 640x360 | ||||
| 60 | NA | 1920x1080 | |||||
| 1280x720 | NA | NA | |||||
| 1280x720 | High | 1920x1080 | 1920x1080 | 1920x1080 | NA | ||
| 60 Hz | Speed | 30 | 1280x720 | 1280x720 | 1280x720 | NA | |
| 640x360 | NA | 640x360 | 640x360 | ||||
| 50 | NA | 1920x1080 | |||||
| 1280x720 | NA | NA | |||||
| 1280x720 | High | 1920x1080 | 1920x1080 | 1920x1080 | NA | ||
| 50 Hz | Speed | 25 | 1280x720 | 1280x720 | 1280x720 | NA | |
| 640x360 | NA | 640x360 | 640x360 | ||||
| 1024x768 | Normal | 30 | 1024x768 | 1024x768 | 1024x768 | NA | |
| 60 Hz | 640x480 | NA | 640x480 | 640x480 | |||
| 1024x768 | Normal | 25 | 1024x768 | 1024x768 | 1024x768 | NA | |
| 60 Hz | 640x480 | NA | 640x480 | 640x480 | |||
| 60 | NA | 1024x768 | NA | NA | |||
| 1024x768 | High | 1024x768 | 1024x768 | 1024x768 | NA | ||
| 60 Hz | Speed | 30 | 640x480 | NA | 640x480 | 640x480 | |
| NA | 1024x768 | NA | NA | ||||
| 1024x768 | High | 1024x768 | 1024x768 | 1024x768 | NA | ||
| 60 Hz | Speed | 25 | 640x480 | NA | 640x480 | 640x480 | |
Copyrights © Lumens Digital Optics Inc. All rights reserved.
Lumens is a trademark that is currently being registered by Lumens Digital Optics Inc.
Copying, reproducing or transmitting this file is not allowed if a license is not provided by Lumens Digital Optics Inc. unless copying this file is for the purpose of backup after purchasing this product.
In order to keep improving the product, Lumens Digital Optics Inc. hereby reserves the right to make changes to product specifications without prior notice. The information in this file is subject to change without prior notice.
To fully explain or describe how this product should be used, this manual may refer to names of other products or companies without any intention of infringement.
Disclaimer of warranties: Lumens Digital Optics Inc. is neither responsible for any possible technological, editorial errors or omissions, nor responsible for any incidental or related damages arising from providing this file, using, or operating this product.



- User Manual - English
- [Important]
- Table of Contents
- Chapter 2 Product Overview
- Relative Operation Position
- Chapter 3 Installation and Connections
- System diagram
- Installing Application Software
- Chapter 5 Control Panel/Remote Control and Setting Menu
- Functions of control panel and remote control
- Setting Menu
- Main menu
- Mask Mode setting menu
- Spotlight Mode setting menu
- Splash Screen Setting
- Annotation Tools
- Automatically adjust the image to have the best brightness and focusing performance
- Switch Image Sources
- Make text clearer and photos more colorful
- Rotate Image
- Capture Image
- Record
- View captured/recorded images
- Delete captured/recorded images
- Adjust the output volume
- Automatically delete the stored images whenever it is turned off (Auto Erase)
- Enlarge a part of the image (PAN)
- I would like to use the MASK and Spotlight function
- Use the mask or spotlight mode
- ■ Use control panel:
- I would like to set the size of Mask/Spotlight function
- Play the slides (Slide Show)
- Setting delay time
- Playing/Pausing/Stopping the slide show
- Use a USB disk
- Image comparison (to compare live images with stored image files (PIP))
- Lock/Unlock keys
- Change the power on image
- Chapter 7 Network Function Settings Description
- Connecting Camera to Internet
- Using the Browser to View the Images
- Using RTSP Player to View the Images
- Web Page Menu Function Description
- Login Screen
- Live View-2
- System settings
- Date/Time Settings
- Streaming Setting
- Maintenance
- Chapter 8 Connecting to Microscope
- Chapter 9 Packing the Machine
- Chapter 10 DIP Switch Setting
- Chapter 11 Troubleshooting
- Operation
- Installation
- Storage
- Cleaning
- Batteries (for products or accessories with batteries)
- ■ Precautions
- ■ FCC Warning (A)
- Notice :
- ■ IC Warning
- Supplier's Declaration of Conformity 47 CFR § 2.1077 Compliance Information
- Responsible Party – U.S. Contact Information
- FCC Compliance Statement
- Appendix 1 Power frequency for each country in the world
Brand : Lumens
Model : PS753
Category : Document Camera