242-106 - Saw Meec Tools - Free user manual and instructions
Find the device manual for free 242-106 Meec Tools in PDF.


| Product Type | Crosscut and Mitre Saw |
| Brand | Meec Tools |
| Model | 242-106 |
| Power Input | 850 W |
| Voltage | 230-240 V AC, 50 Hz |
| No-Load Speed | 5000 rpm |
| Saw Blade Diameter | 190 mm |
| Arbor Hole | 25.4 mm |
| Blade Thickness | 2.4 mm |
| Number of Teeth | 24 |
| Bevel Angle Range | 0° to 45° |
| Mitre Angle Range | -45° to +45° |
| Max Cutting Width (0° bevel / 0° mitre) | 105 mm |
| Max Cutting Depth (0° bevel / 0° mitre) | 48 mm |
| Weight | 6 kg |
| Protection Rating | IP20 |
| Safety Class | II (Double insulated) |
| Sound Power Level (LwA) | 106 dB(A) |
| Vibration Level | 6.5 m/s² |
| Dust Extraction | Dustbag included |
| Carbon Brushes Lifespan | Approx. 50 hours or 10,000 starts/stops |
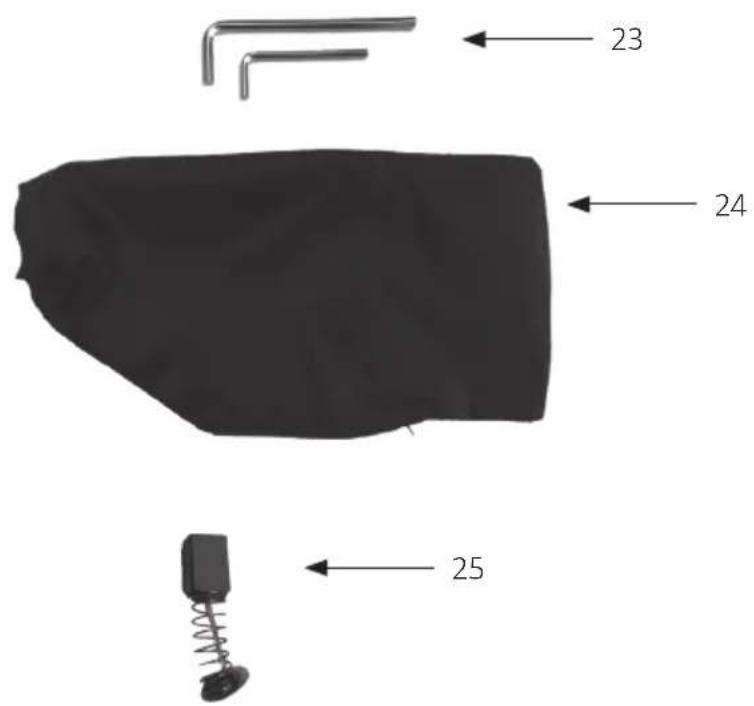
| Included Accessories | Dustbag, hex key, carbon brushes |
Frequently Asked Questions - 242-106 Meec Tools
User questions about 242-106 Meec Tools
0 question about this device. Answer the ones you know or ask your own.
Ask a new question about this device
Download the instructions for your Saw in PDF format for free! Find your manual 242-106 - Meec Tools and take your electronic device back in hand. On this page are published all the documents necessary for the use of your device. 242-106 by Meec Tools.
USER MANUAL 242-106 Meec Tools
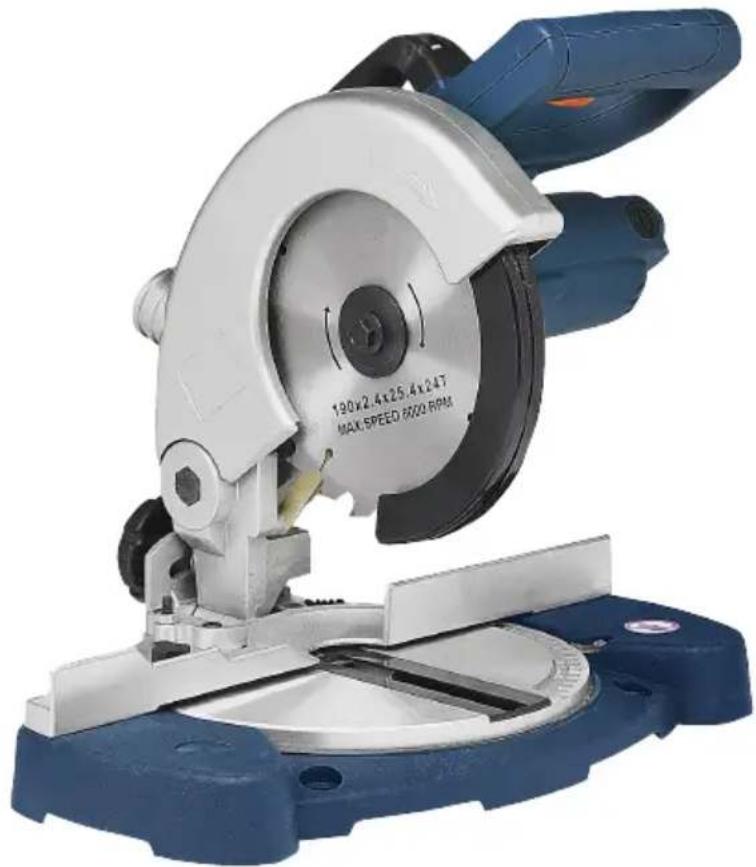
natural_image
Close-up of a blue and silver cutting tool with a visible speed label (190x2.4x25.4x247) and 'MAX. SPEED 800 RPM' text, mounted on a base platform.Care for the environment!
Must not be discarded with household waste! This product contains electrical or electronic components that should be recycled. Leave the product for recycling at the designated station e.g. the local authority's recycling station.
Jula reserves the right to make changes. In the event of problems, please contact our service department. www.jula.com
Tillverkare/ Produsent/ Produenci/ Manufacturer Jula AB, Box 363, 532 24 SKARA
Distributör/ Distributør/ Dystrybutor/ Distributor Jula Poland Sp. z o.o., ul.
This product was CE marked in year -06
Innstiling for fasesaging. 32
Sage 32
SAFETY INSTRUCTIONS....55
Safety 55
Special safety instructions for crosscut and mitre saws ..... 58
Other risks 58
Symbols 59
TECHNICAL DATA 59
DESCRIPTION 60
BEFORE USE 62
Intended use 62
Preparations....62
Mounting on a worktable 62
USE....63
Adjustment for mitre sawing 63
Adjustment for mitre sawing .64
Sawing 64
Connecting the dustbag....64
Fine-adjustment of the 90^ angle. 65
Fine-adjustment of the 45^ angle .66
Fine-adjustment of the fence....67
MAINTENANCE 68
Changing the saw blade .68
Replacing the carbon brushes 69
Cleaning....69
Storage....70
Transport 70
SÄKERHETSANVISNINGAR
natural_image
Mechanical assembly diagram showing a cutting tool and base components with mounting holes (no text or symbols)HANDHAVANDE
WARNING!
natural_image
Mechanical device with circular components and a magnified inset showing internal components (no visible text or symbols)INSTÄLLNING FÖR FASSÅGNING
natural_image
Mechanical assembly diagram showing a motor and gear assembly with a close-up inset of internal components (no text or symbols)SÅGA
natural_image
Close-up of a sewing machine needle stitching fabric, with a black cloth partially visible (no text or symbols)FINJUSTERING AV 90° VINKEL
natural_image
Close-up of a mechanical component with a highlighted circular feature (no visible text or symbols)natural_image
Close-up of a precision measurement tool with a circular inset highlighting a small object (no visible text or symbols)FINJUSTERING AV 45° VINKEL
natural_image
Close-up of a car's dashboard and steering wheel assembly (no visible text or symbols)FINJUSTERING AV ANHÅLL
natural_image
Mechanical component diagram showing a 90-degree angle标注 (no text or symbols beyond the angle marker)Vy uppifrån
natural_image
Mechanical device with two circular features, no visible text or symbolsUNDERHÅLL
WARNING!
natural_image
Two industrial cutting machines side by side, one with a blade and circular head, the other with a dial and pointer (no visible text or symbols)natural_image
Industrial robotic device with mechanical components and a circular housing (no visible text or symbols)Min. 6,35 mm
natural_image
Mechanical spring assembly with a cylindrical component and vertical alignment line (no text or symbols)natural_image
Industrial machine with blade and fan components (no visible text or symbols)SIKKERHETSANVISNINGER
natural_image
Mechanical assembly diagram showing a cutting tool and base components with mounting holes (no text or symbols visible)BRUK
ADVARSEL!
INNSTILLING FOR GJÆRSAGING
- Løsne den fremre låsebryteren.
- Roter sagbordet slik at viseren peker på ønsket vinkel horisontalt.
- Stram til låsebryteren.
natural_image
Mechanical device with circular components and a magnified inset showing a measurement tool (no visible text or symbols)INNSTILING FOR FASESAGING
natural_image
Mechanical assembly diagram showing a motor and gear assembly with a close-up inset of internal components (no text or symbols)SAGE
natural_image
Close-up of a sewing machine with a black fabric cover and mechanical components (no visible text or symbols)FINJUSTERING AV 90° VINKEL
natural_image
Close-up of a precision measurement tool with a circular inset highlighting a small component (no visible text or symbols)FINJUSTERING AV 45° VINKEL
natural_image
Close-up of a mechanical optical instrument with a circular inset showing a component (no visible text or symbols)natural_image
Close-up of a car's wheel assembly with a circular component, no visible text or symbolsFINJUSTERING AV ANLEGG
natural_image
Pure mechanical cross-section diagram without any text or symbolsSett ovenfra
natural_image
Mechanical device with two circular features, no visible text or symbolsVEDLIKEHOLD
ADVARSEL!
natural_image
Two industrial cutting machines side by side, one with blade and handle, the other with a circular dial and pointer (no visible text or symbols)natural_image
Mechanical robotic device with a circular head and mechanical components (no visible text or symbols)Min. 6,35 mm
natural_image
Mechanical component with spring and housing, no visible text or symbolsnatural_image
Industrial machine with blade and control panel (no visible text or symbols)ZASADY BEZPIECZEŃSTWA
natural_image
Mechanical assembly diagram showing a cutting tool and base components with mounting holes (no text or symbols)OBSŁUGA
OSTRZEŻENIE!
natural_image
Mechanical device with circular components and a magnified inset showing a measurement tool (no text or symbols visible)natural_image
Mechanical assembly diagram showing a motor and gear assembly with a close-up inset of internal components (no text or symbols)CIECIE
natural_image
Close-up of a sewing machine needle with a black fabric cover, no visible text or symbolsPRECYZYJNA REGULACJA KĄTA 90°
natural_image
Close-up of a mechanical assembly with a highlighted circular component (no visible text or symbols)natural_image
Close-up of a precision measurement tool with a circular inset highlighting a small object (no visible text or symbols)PRECYZYJNA REGULACJA KATA 45°
natural_image
Close-up of a mechanical optical instrument with a circular annotation highlighting a component (no visible text or symbols)natural_image
Close-up of a mechanical component with a circular annotation highlighting a feature (no visible text or symbols)PRECYZYJNA REGULACJA OGRANICZNIKA
natural_image
Pure mechanical cross-section diagram without any text, numbers, or symbolsWidok z góry
natural_image
Mechanical device with a cutting tool and mounting bracket, showing no visible text or symbols.KONSERWACJA
OSTRZEŻENIE!
natural_image
Two industrial cutting machines side by side, one with blade and handle, the other with a circular blade and tool (no visible text or symbols)natural_image
Industrial robotic arm with mechanical components and a circular base (no visible text or symbols)Min. 6,35 mm
natural_image
Mechanical diagram showing a spring attached to a block with a vertical dimension line (no text or symbols)natural_image
Industrial machine with blade and control panel (no visible text or symbols)SAFETY INSTRUCTIONS
Read the User Instructions carefully before use.
Save them for future reference.
WARNING: Always unplug the power cord from the mains before servicing and adjusting the product.
NOTE:
- Working with wood can be dangerous if it is not done properly.
- Use your common sense and pay careful attention when working with the saw to reduce the risk of personal injury.
- Safety equipment such as clamps, safety glasses and hearing protection cannot compensate for poor judgment, carelessness or failure to pay attention.
- Remember that you are responsible for your own safety. The saw has been designed for a specific purpose.
- We strongly recommend that you do not modify the saw, and only use it for what it is intended to be used for.
- Do not use the saw if you are unsure if it can, or should, be used for what you want to do.
SAFETY
WARNING:
Always take basic safety precautions when using this tool to reduce the risk of fire, electric shock or personal injury. Read all the instructions before using the product and save them for future reference.
-
Keep the workplace clean. Cluttered areas and tables invite accidents.
• Take the working environment into consideration. -
Do not expose tools to rain.
- Do not use tools in damp or wet areas.
- Keep the workplace well lit.
- Do not use tools near flammable liquids or gases.
- Avoid electric shock. Avoid body contact with earthed objects such as water pipes, radiators, cookers and refrigerators.
- Keep other people at a distance. Do not allow persons, especially children, who are not involved in the work to touch the saw or its extension cord. Keep them at a safe distance from the workplace.
- Store the saw in a safe place. When tools are not in use, store them in a dry and locked room out of the reach of children.
- Do not overload the saw. It does the job better and safer at the rate for which it is intended.
-
Use the right tools.
-
Do not try to force a small tool to do work that requires a more powerful tool.
- Do not force a tool or an accessory to do work it is not intended to be used for; do not use, for example, a circular saw to cut branches or wood.
- Wear suitable clothing.
— Do not wear loose-fitting clothing or jewellery, it can get caught in rotating parts.
– Non-slip shoes are recommended when working outdoors.
- Wear a hair net or the equivalent if you have long hair.
– Always use personal safety equipment.
- Wear safety glasses.
- Use a dust filter or safety mask in dusty conditions.
- Do not mistreat the power cord. Do not pull the power cord, pull the plug instead when unplugging it from the mains. Make sure that the power cord does not come into contact with hot surfaces, oil or sharp edges.
- Never use the saw if the power switch is damaged.
- Secure the workpiece properly. When possible, use clamps or a vice to secure the workpiece. This is safer than holding the workpiece in one hand.
- Do not overreach. Make sure you always have a firm footing and good balance.
-
Keep tools in good condition.
-
Make sure that they are clean and that the edges are sharp for optimal effect and safe results.
– Follow the recommendations in the manual for maintenance. - Check the power cord regularly. A damaged power cord must be replaced by an authorised service technician.
- Check all extension cords regularly to make sure they are not damaged.
- Make sure that the handle and controls are dry, clean and free from oil and grease, etc.
- Pull out the plug before servicing.
- Remove all service tools. Make a habit of checking that all service tools are removed from the saw before connecting it to the mains.
- Avoid accidental starting.
- Do not carry a tool with one finger on the power switch when the power cord is plugged in.
- Use the correct extension cords.
- When using extension cords outdoors, only use those intended for outdoor use.
- Use extension cords with a sufficient cross-sectional area and unwind the entire cord.
- Use your common sense and be careful.
- Think before doing something, so that you can do it safely.
- Do not use the saw if you are tired, on under the influence of medication, etc.
- Before starting the saw, check the following:
– That all the guards and other parts are undamaged and in working order.
– That all moving parts can rotate freely and are correctly aligned.
– That no moving parts can fasten.
– That no faults have occurred.
- Other circumstances that can affect the work.
- Use the recommended accessories.
- Using non-recommended accessories can result in accidents or the risk of personal injury.
– Repairs must be carried by an authorised technician.
- Check that the saw corresponds to local safety requirements.
- The saw must always be repaired by an expert using original spare parts, otherwise the saw can cause accidents or the risk of personal injury.
SPECIAL SAFETY INSTRUCTIONS FOR CROSSCUT AND MITRE SAWS
- Never use damaged or deformed saw blades.
- Only use saw blades recommended by the manufacturer.
- Never use saw blades made of high speed steel.
- Use saw blades suitable for the material to be sawed.
- Never saw in other materials than those specified for the blade.
- Check that the saw blade has the correct speed rating.
- When moving the saw, use the carry handle.
- Only use the saw if the guards are in place and working properly.
- Keep the floor free from sawdust and waste wood.
- Only use spacers and blade flanges that fit the particular saw.
- Do not remove pieces that have fastened or been cut off before the blade has stopped. Wear safety gloves.
- Before sawing, make sure the saw is standing on a stable surface. If necessary, fix the saw to a workbench or the equivalent.
- When sawing, always secure the workpiece; for example, with a clamp.
- Use a table, roller support, or the equivalent as a support when working with long workpieces.
OTHER RISKS
- Even if the saw is used exactly according to this description, it is impossible to eliminate all conceivable risks. The design and use of the saw can cause the following risks factors when using the saw.
- Contact with the saw blade where it is not protected by the guard.
- Contact with the rotating saw blade (cut injury).
- The workpiece pr parts of it can kick back towards the user (kickback).
– The saw blade can break.
– Tungsten carbide bits can come loose and eject.
– Hearing impairment can occur if ear protection is not worn. - Toxic dust can be harmful in poorly ventilated rooms.
SYMBOLS
 | Read the User Instructions carefully before use. |
 | Wear ear protection.Risk of hearing impairment.Always wear ear protection when working with the saw. |
 | Wear safety glasses.Protect your eyes from flying splinters. |
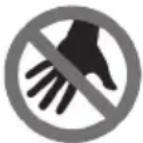 | Be careful, keep your hands away from the saw blade.Risk of injury on contact with rotating saw blade, even at low speed. |
 | Safety class II. The product is double insulated and does not need to be earthed. |
TECHNICAL DATA
| Voltage 230–240 VAC, 50 Hz | |
| Rated output 850 W | |
| Speed (no load) 5000 rpm | |
| Saw blade ∅ 190 mm, centre hole∅ 25.4 mm, thickness 2.4 mm, 24 saw teeth | |
| Bevel angle 0° to 45° | |
| Mitre angle -45° to +45° | |
| Bevel angle 0° /Mitre angle 0° Max cutting width 105 / Max cutting depth 48 mm | |
| Bevel angle 45° /Mitre angle 0° Max cutting width 70 / Max cutting depth 48 mm | |
| Bevel angle 0° /Mitre angle 45° Max cutting width 105 / Max cutting depth 20 mm | |
| Bevel angle 45° /Mitre angle 45° Max cutting width 70 / Max cutting depth 20 mm | |
| Max size of workpiece 130 x 45 mm | |
| Suitable thickness of saw blade 2,4 mm | |
| Weight | 6 kg |
| Protection rating | IP20 |
| Safety class | II |
| Sound power level, LwA | 106 dB(A), K= 3 dB |
| Sound pressure level LpA | 93 dB(A), K= 3 dB |
| Vibration level | 6,5 m/s2, K= 1,5 m/s2 |
Always wear ear protection.
The declared vibration value, which has been measured by a standardised test method, can be used to compare different tools with each other and for a preliminary assessment of exposure.
WARNING:
The actual vibration level when using power tools may differ from the specified maximum value, depending on how the saw is used. It is therefore necessary to determine which safety precautions are required to protect the user, based on an estimate of exposure in actual operating conditions (taking into account all stages of the work cycle, e.g. the time when the saw is switched off and when it is idling, in addition to the start-up time).
DESCRIPTION
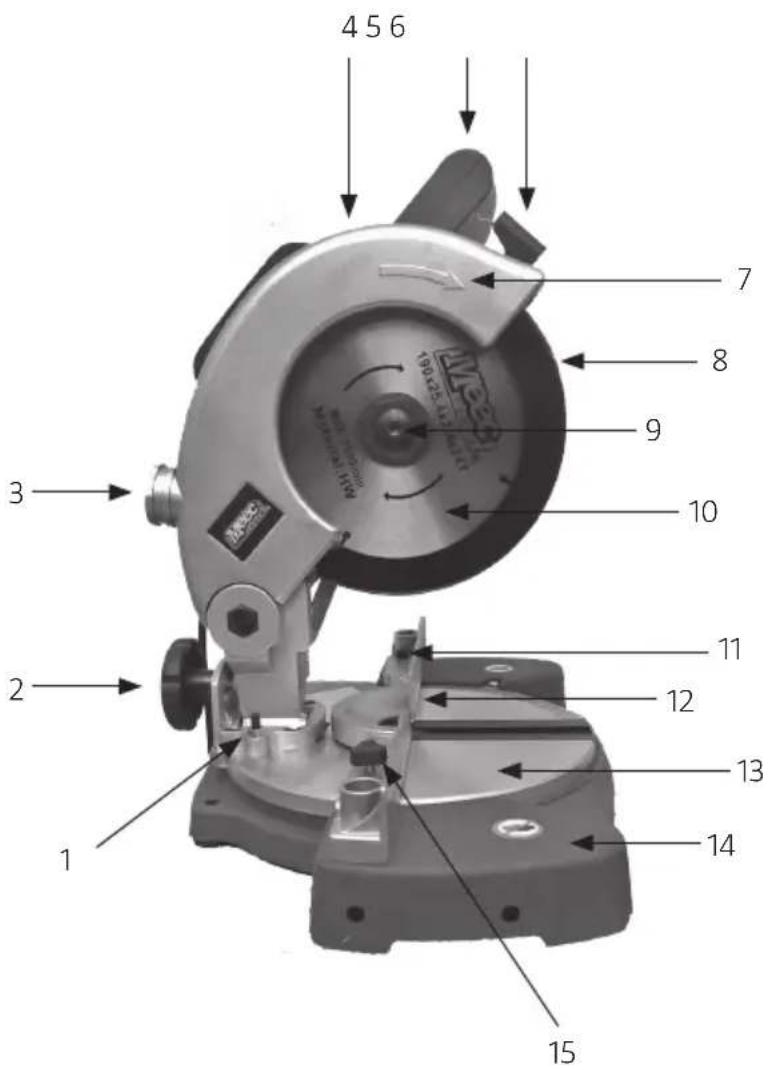
- Set screw 45^
- Back lock knob
- Sawdust ejector
- Top blade guard
- Handle
- Release lever
- Direction of rotation
- Bottom blade guard
- Locking screw
- Blade
- Fence adjuster screw
- Fence
- Table
- Baseplate
- Front lock knob
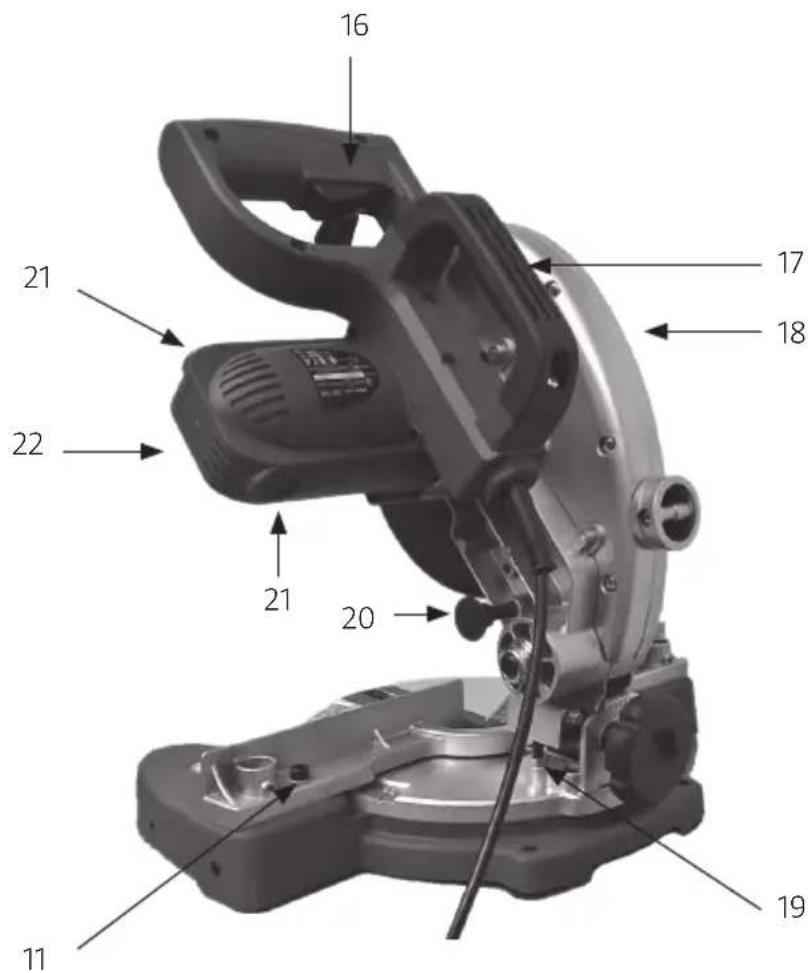
- Power switch
- Carry handle
- Saw
- Set screw 90°
- Locking pin
- Cover for carbon brushes
- Motor
- Hex key
- Dustbag
- Carbon brushes
BEFORE USE
WARNING: Make sure the saw is not connected to the mains before doing any work on the actual saw.
INTENDED USE
- The saw is intended for stationary use for straight ripping and cross-cutting in wood.
- The saw can be used for sawing hard and soft wood, as well as fibreboard and chipboard.
- Mitre sawing at angles of -45^ to +45^ is possible, as is bevel sawing from 0^ to 45^ .
PREPARATIONS
- Check that the mains voltage matches the rated voltage for the saw.
- Place the saw on a level, stable surface.
MOUNTING ON A WORKTABLE
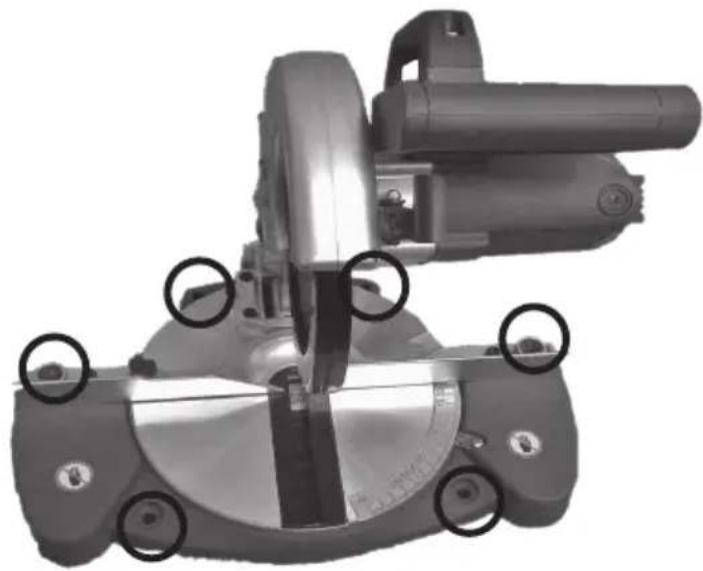
To guarantee ensure safe use the saw should be mounted on a level and stable worktable.
- Fit the baseplate to a worktable by using suitable bolts.
Use the pattern of holes shown in the diagram.
natural_image
Mechanical assembly diagram showing a cutting tool and base components with mounting holes (no text or symbols visible)USE
WARNING:
- Never saw several workpieces at the same time.
- Make sure the sawn-off piece of wood can be removed from the side, away from the saw blade. If not, it may catch on the blade and fling out.
- Switch off the saw immediately and unplug the power cord if there is a problem during the work. Check, and have the saw repaired if necessary before using it again.
• Always switch off the saw before rectifying problems. - Never try to remove splinters, pieces of wood or jammed workpieces when the saw blade is rotating.
- When possible, use clamps or a vice to properly secure the workpiece. This is safer than holding the workpiece in one hand.
- Do not place your hands where they might suddenly slip and come into contact with the blade.
- Always keep the workpiece firmly held against the baseplate and the fence guide, for example by using clamps, to prevent the workpiece from turning or twisting.
- Secure round workpieces such as dowels etc. with suitable devices, for example by using clamps.
NOTE: It is possible to combine cross-cutting and mitre sawing, see Technical data for different combinations.
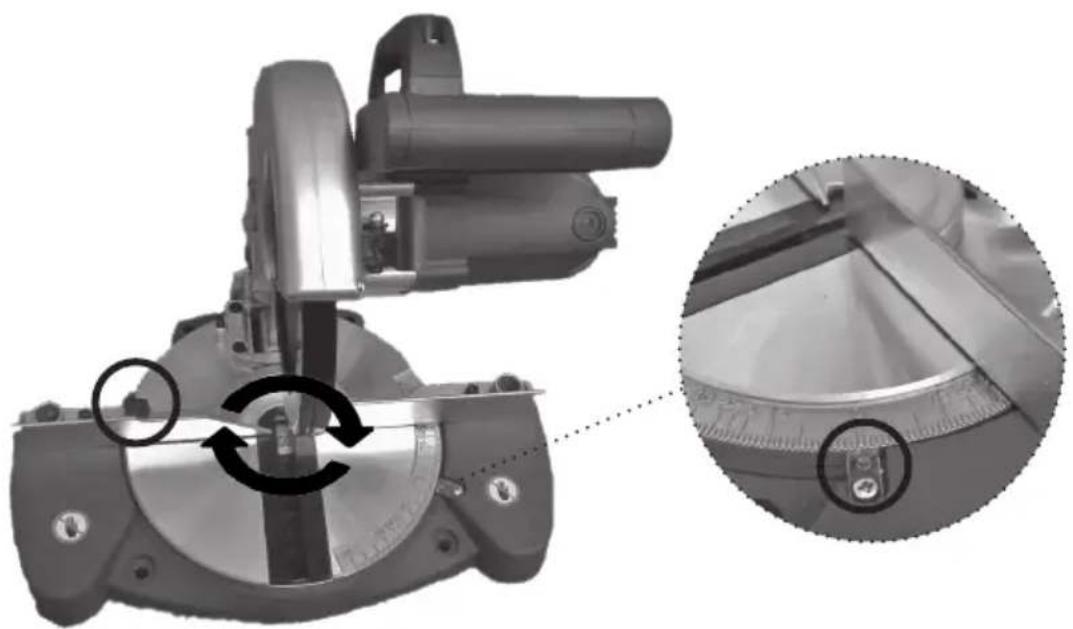
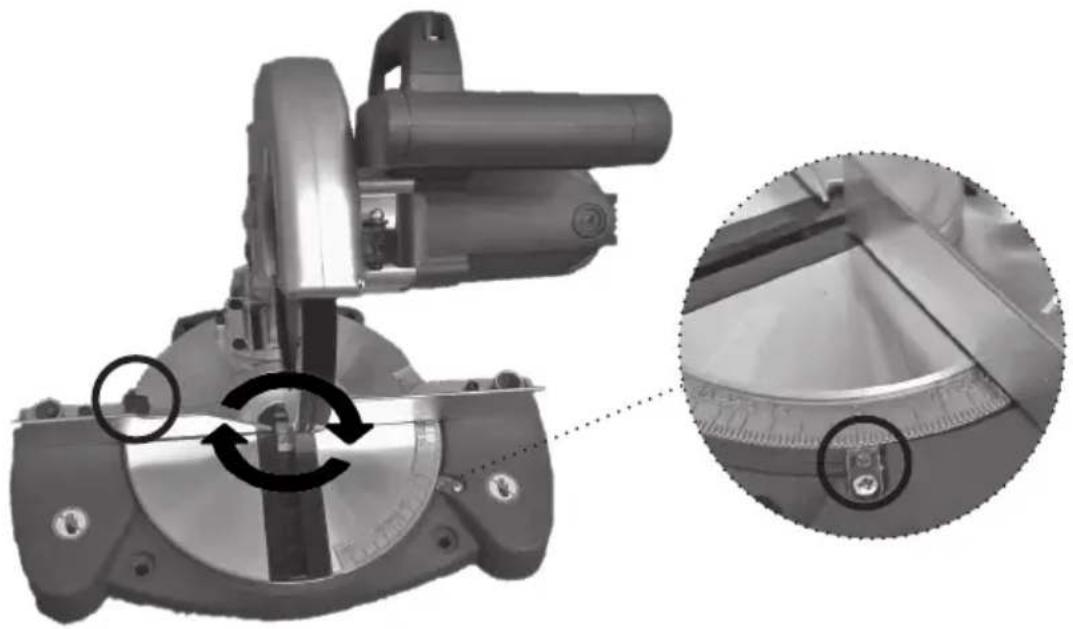
ADJUSTMENT FOR MITRE SAWING
- Loosen the front lock knob.
- Turn the saw table so that the pointer points at the required angle in the horizontal plane.
- Tighten the lock knob.
natural_image
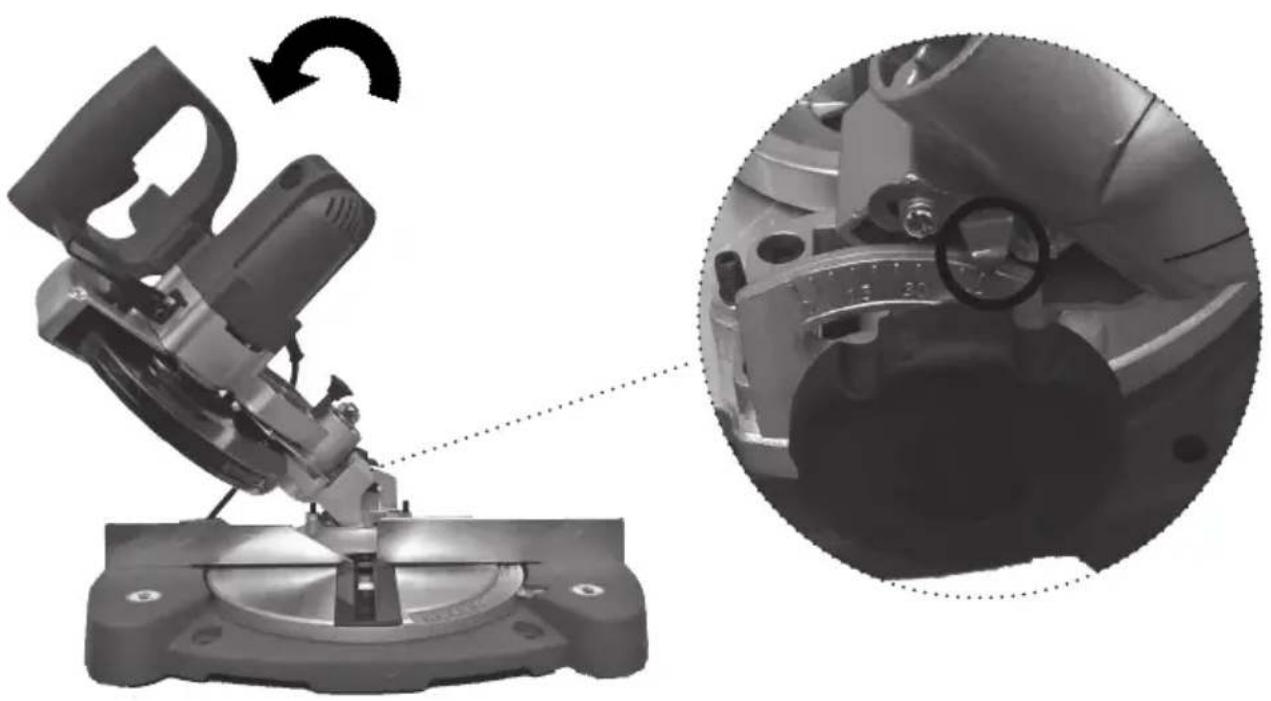
Mechanical device with circular components and a magnified inset showing internal components (no visible text or symbols)ADJUSTMENT FOR MITRE SAWING
-
Loosen the back lock knob.
-
Angle the saw to change the angle in the vertical plane, so that the pointer points at the required angle.
-
Tighten the lock knob.
natural_image
Mechanical assembly diagram showing a motor and gear assembly with a close-up inset of internal components (no text or symbols)SAWING
- Place the workpiece flat on the table, with one edge firmly pressed against the fence. If the workpiece is curved, place the convex side against the fence, otherwise the workpiece may break and lock the blade.
- Connect the plug to the power outlet.
- Start the saw by gripping the control handle and pressing the power switch. Keep the power switch pressed and wait until the saw reaches top speed before starting to saw the workpiece.
- Press the release lever with your thumb and pull down the saw. Give the saw time to saw through the workpiece, do not put extra pressure on the blade.
- When the crosscut is ready, lift up the saw with the handle and check the return movement as this saw has a return spring. Do not remove the workpiece until the blade has completely stopped.
- Switch off the saw by releasing the power switch in the handle.
CONNECTING THE DUSTBAG
NOTE:
- Dust extraction prevents the accumulation of large amounts of dust, prevents getting lots of dust in air, and simplifies disposal.
• Use the dustbag to collect up all the dust.
• Make sure to empty the bag in good time. Check and clean the dustbag after using the saw.
- The dust extractor can get blocked with sawdust and fragments of the workpience. If there is a blockage:
- Make sure the saw is not plugged into the mains.
- Wait until the blade has stopped.
- Check why there is a blockage, and remove the blockage.
-
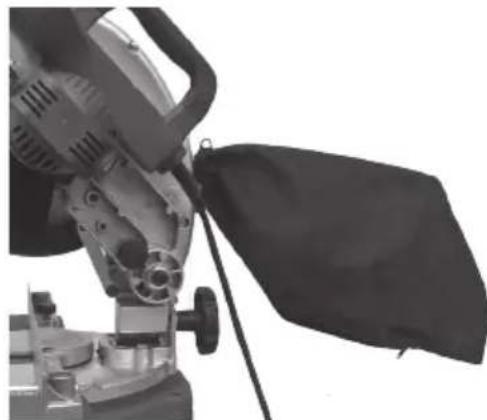
Press the clip on the dustbag and push it on the sawdust ejector. The clip must grip the slot in the ejector.
-
Make sure the dustbag does not touch any moving parts on the saw when sawing.
natural_image
Close-up of a sewing machine needle stitching fabric, with a black cloth partially visible (no text or symbols)FINE-ADJUSTMENT OF THE 90° ANGLE
-
Press the release lever and pull down the saw with the handle to the table. Lock with the locking pin.
-
Loosen the back lock knob.
-
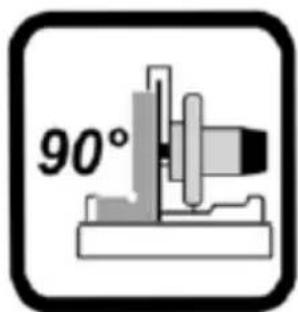
Place the set square (90°) between the blade and the table.
-
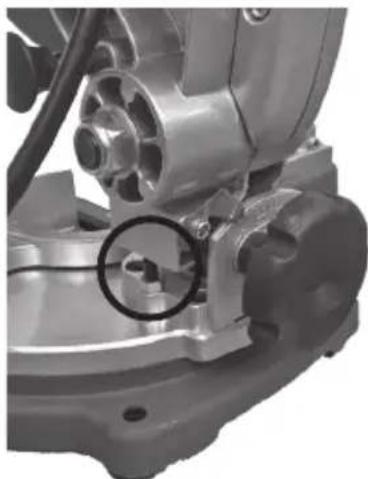
Undo the nut for the set screw with a spanner (supplied separately).
View from front
natural_image
Close-up of a mechanical component with a highlighted circular feature (no visible text or symbols)-
Turn the set screw clockwise or anticlockwise so that the angle between the blade and the table is 90^ .
-
Fix the set screw by tightening the nut.
-
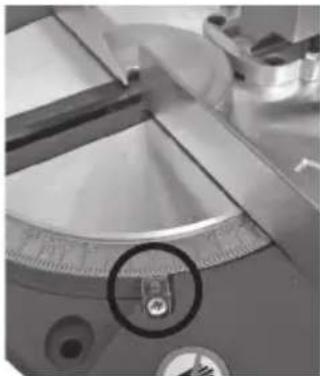
Undo the crosshead screw holding the mitre angle scale pointer, and adjust the pointer so that it points to zero. Tighten the screw.
natural_image
Close-up of a precision measurement tool with a circular inset highlighting a small component (no visible text or symbols)FINE-ADJUSTMENT OF THE 45° ANGLE
-
Press the release lever and pull down the saw with the handle to the table. Lock with the locking pin.
-
Loosen the back lock knob.
-
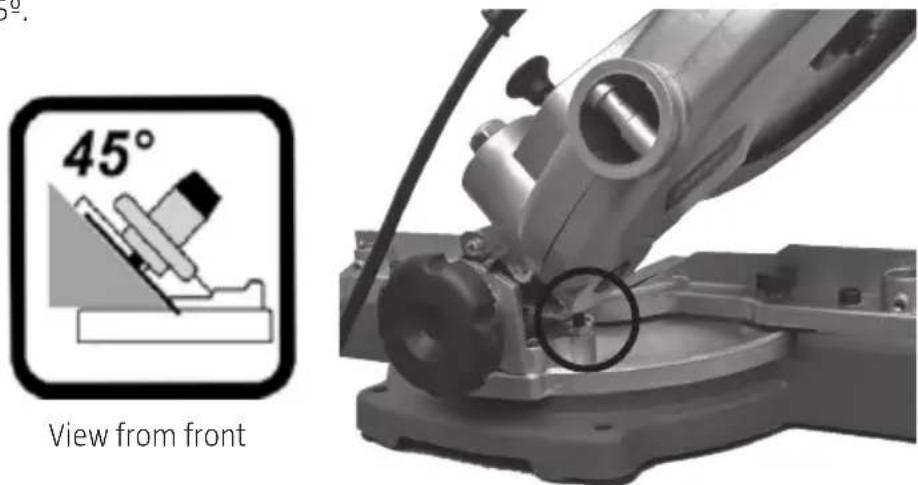
Place the set square (45°) between the blade and the table.
-
Undo the nut for the set screw with a spanner (supplied separately).
-
Turn the set screw clockwise or anticlockwise so that the angle between the blade and the table is 45^ .
-
Fix the set screw by tightening the nut.
-
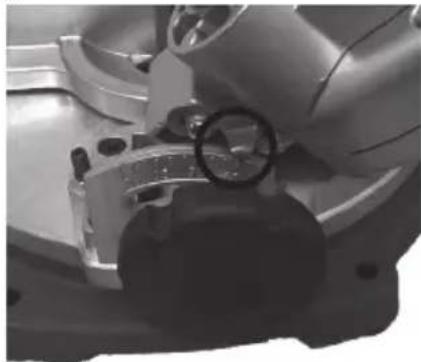
Undo the crosshead screw holding the mitre angle scale pointer, and adjust the pointer so that it points to 45^ . Tighten the screw.
natural_image
Close-up of a car's dashboard and steering wheel assembly (no visible text or symbols)FINE-ADJUSTMENT OF THE FENCE
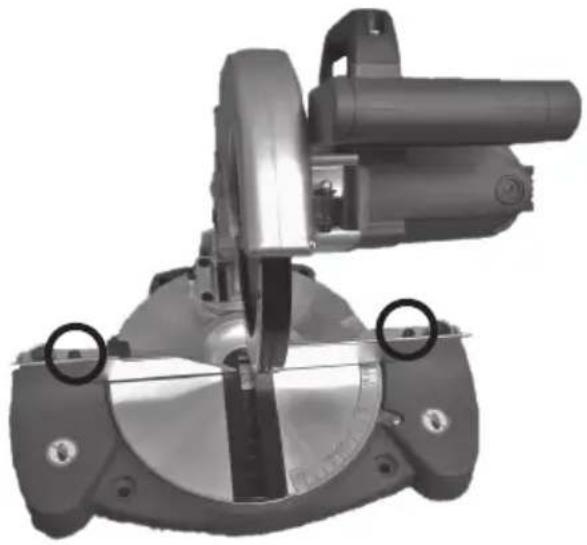
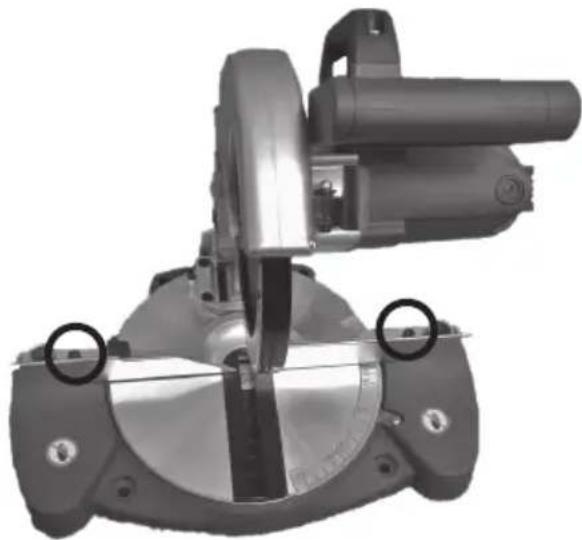
- Press the release lever and pull down the saw with the handle to the table. Lock with the locking pin.
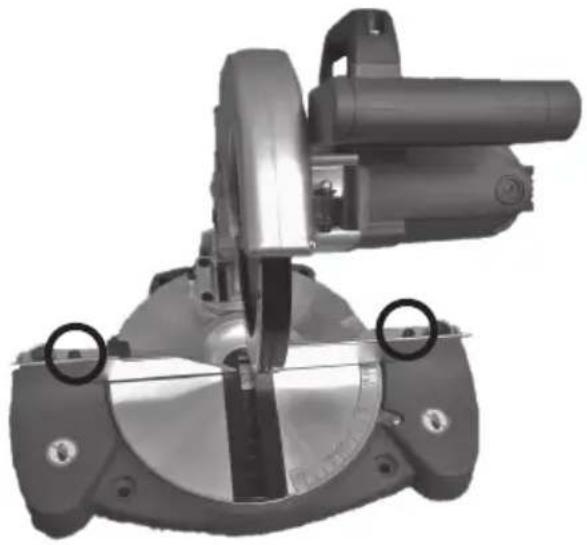
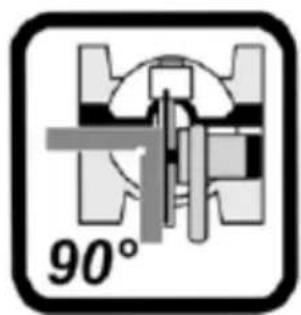
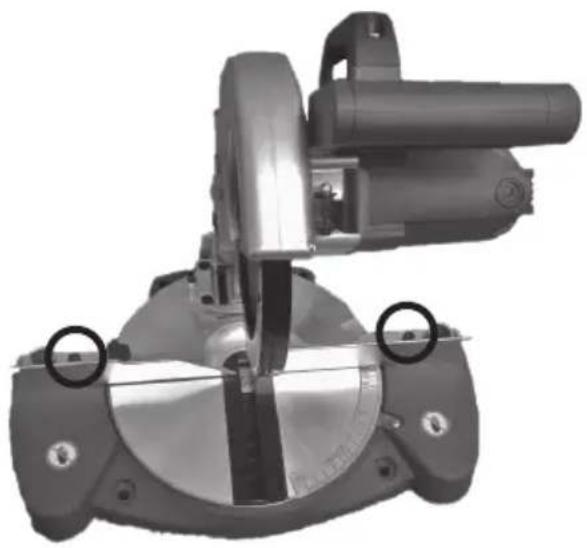
- Place the set square (90°) with the long side against the fence as shown.
- Check that the blade is at a 90° angle in relation to the fence.
- If this position needs adjusting, undo the two set screws on the fence guide with a hex key and adjust the fence at right angles to the blade.
- After adjusting, tighten the two set screws with the hex key.
natural_image
Cross-sectional diagram of a mechanical component with 90-degree angle标注 (no readable text or symbols)View from above
natural_image
Mechanical component with two circular features, no visible text or symbolsMAINTENANCE
WARNING:
- Make sure the saw is not connected to the mains before maintenance, cleaning and other servicing.
• Always keep the saw and the ventilation openings clean to ensure safe use.
• The saw must only be repaired by an authorised service centre. - If the power cord gets damaged it should be immediately replaced by an authorised service centre.
- Only use approved spare parts and accessories for servicing.
CHANGING THE SAW BLADE
NOTE:
- Never use a larger blade than what is specified in the technical data to avoid the risk of it touching the blade guards.
- Never use a blade that is so thick that the outer blade washer comes into contact with the flat surfaces on the spindle – there is a risk that the blade screw will not lock the blade correctly on the spindle.
- Wear safety gloves.
TIP: To prevent the blade rotating while undoing and refitting the locking screw, place a spare piece of wood under the blade, undo the release lever and pull down the blade with the handle against the piece of wood. This will brake the rotation of the blade against the piece of wood.
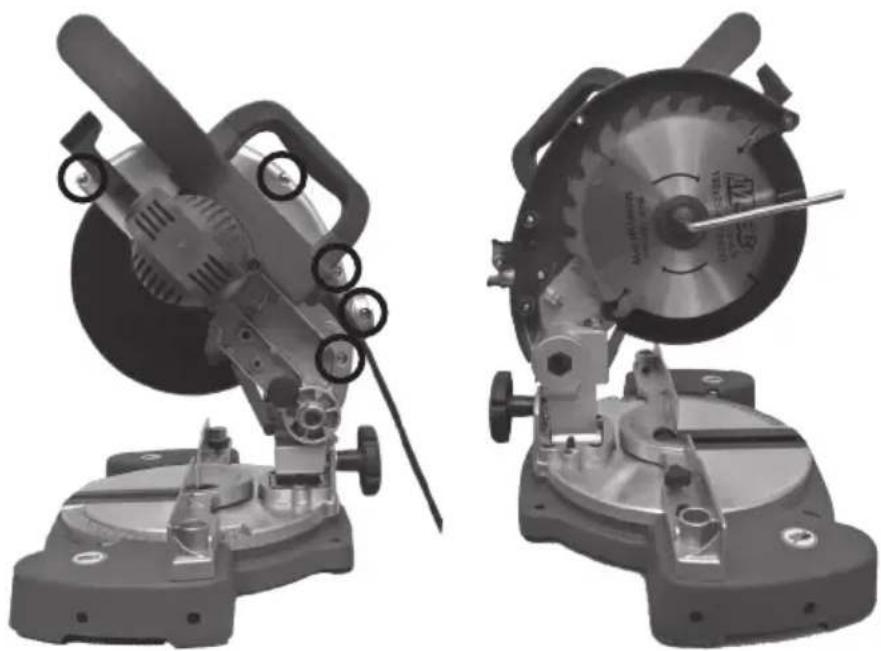
- Lift up the saw with the handle as far as it will go.
- Remove the outer guard by undoing the five screws with a Phillips screwdriver.
natural_image
Two industrial cutting machines side by side, one with blade and handle, the other with a circular blade and tool (no visible text or symbols)- Undo the locking screw clockwise with a hex key. Take off the blade.
- Fit the new blade in the reverse order to the above. NOTE: Make sure that the blade rotates in the same direction as the marking on the top guard.
- Check that the blade rotates freely and does not touch any part of the saw.
REPLACING THE CARBON BRUSHES
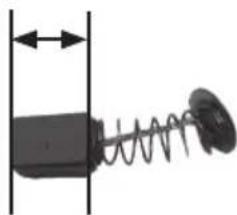
The lifespan of the carbon brushes depends on how hard the motor is run. Replace the carbon brushes after approx. 50 working hours or after 10000 starts/stops.
Check the carbon brushes as follows:
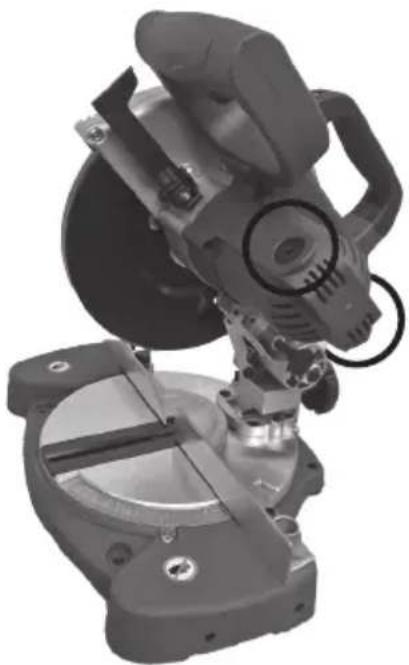
- Remove both covers with a Phillips screwdriver, one on each side of the motor.
- The carbon brushes are inside the covers, pull out the carbon brushes.
natural_image
Industrial robotic device with mechanical components and a dial indicator (no visible text or symbols)Min. 6,35 mm
natural_image
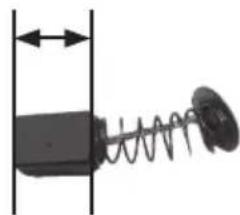
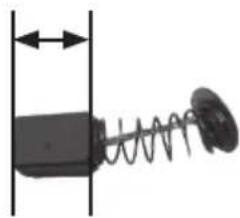
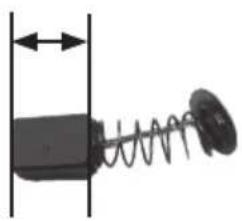
Mechanical spring assembly with a coiled spring and housing (no text or symbols)- Check the length of the carbon brushes (min 6.35 mm).
- Replace both carbon brushes if either of them is less than 6.35 mm, or if a spring or shunt wire is burned or otherwise damaged.
CLEANING
- Vacuum clean the saw and clean the casing with a damp cloth, without using strong solvent, and dry thoroughly.
- Clean the saw regularly.
• Empty the dustbag.
STORAGE
- Store tools, instructions and any accessories in the original packaging. This means you always have all the information and all the parts easily accessible.
• Store the saw in a dry place.
TRANSPORT
-
Switch off the saw and unplug the power cord.
-
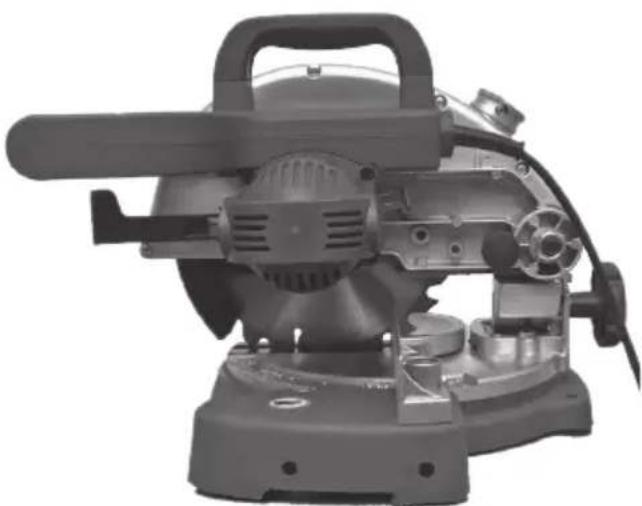
Press the release lever and pull down the saw with the handle to the table. Lock with the locking pin.
-
Lift the saw with the carry handle during transport. Use the original packaging or other suitable protection during transport.
natural_image
Industrial machine with blade and control panel (no visible text or symbols)- SAFETY INSTRUCTIONS....55
- TECHNICAL DATA 59
- DESCRIPTION 60
- BEFORE USE 62
- USE....63
- MAINTENANCE 68
- SÄKERHETSANVISNINGAR
- HANDHAVANDE
- WARNING!
- INSTÄLLNING FÖR FASSÅGNING
- SÅGA
- FINJUSTERING AV 90° VINKEL
- FINJUSTERING AV 45° VINKEL
- FINJUSTERING AV ANHÅLL
- UNDERHÅLL
- SIKKERHETSANVISNINGER
- BRUK
- ADVARSEL!
- INNSTILLING FOR GJÆRSAGING
- INNSTILING FOR FASESAGING
- SAGE
- FINJUSTERING AV ANLEGG
- VEDLIKEHOLD
- ZASADY BEZPIECZEŃSTWA
- OBSŁUGA
- OSTRZEŻENIE!
- CIECIE
- PRECYZYJNA REGULACJA KĄTA 90°
- PRECYZYJNA REGULACJA KATA 45°
- PRECYZYJNA REGULACJA OGRANICZNIKA
- KONSERWACJA
- SAFETY INSTRUCTIONS
- Read the User Instructions carefully before use.
- WARNING: Always unplug the power cord from the mains before servicing and adjusting the product.
- NOTE:
- SAFETY
- WARNING:
- SPECIAL SAFETY INSTRUCTIONS FOR CROSSCUT AND MITRE SAWS
- OTHER RISKS
- BEFORE USE
- INTENDED USE
- PREPARATIONS
- MOUNTING ON A WORKTABLE
- USE
- ADJUSTMENT FOR MITRE SAWING
- SAWING
- CONNECTING THE DUSTBAG
- FINE-ADJUSTMENT OF THE 90° ANGLE
- FINE-ADJUSTMENT OF THE 45° ANGLE
- FINE-ADJUSTMENT OF THE FENCE
- MAINTENANCE
- CHANGING THE SAW BLADE
- REPLACING THE CARBON BRUSHES
- CLEANING
- STORAGE
- TRANSPORT
Brand : Meec Tools
Model : 242-106
Category : Saw