
FJWA369TBIS - Range hood FRIGIDAIRE - Free user manual and instructions
Find the device manual for free FJWA369TBIS FRIGIDAIRE in PDF.


| Product Type | Under-Cabinet Range Hood |
| Brand | Frigidaire |
| Model | FJWA369TBIS |
| Width | 36 inches |
| Depth | 18 inches |
| Height | 6 inches (approximate) |
| Weight | 26 lbs |
| Power Supply | 120V / 60Hz |
| Airflow (CFM) | 600 CFM |
| Noise Level | 65 dB (normal speed) |
| Control Type | Electronic push-button with LED indicators |
| Lighting | LED strip light, 2 x 3W |
| Filter Type | Aluminum mesh, washable |
| Number of Filters | 2 filters |
| Venting Type | Ducted (top or rear) |
| Duct Size | 6 inches round |
| Material | Stainless steel |
| Installation Type | Under-cabinet, hardwired |
| Energy Star Certified | Yes |
| Motor Type | Centrifugal, single motor |
| Filter Indicator Light | Yes |
| Dishwasher Safe Filters | Yes |
| Heat Sensor | Not specified |
| Remote Control | No |
| Warranty | 1-year limited (parts and labor) |
Frequently Asked Questions - FJWA369TBIS FRIGIDAIRE
User questions about FJWA369TBIS FRIGIDAIRE
0 question about this device. Answer the ones you know or ask your own.
Ask a new question about this device
Download the instructions for your Range hood in PDF format for free! Find your manual FJWA369TBIS - FRIGIDAIRE and take your electronic device back in hand. On this page are published all the documents necessary for the use of your device. FJWA369TBIS by FRIGIDAIRE.
USER MANUAL FJWA369TBIS FRIGIDAIRE
natural_image
Line drawing of a stainless steel kitchen range hood (no text or symbols)Read all instructions prior to using appliance and keep this manual for future reference.
natural_image
Line drawing of a hand using a dropper to test a small object on a conical base (no text or symbols)ESP
natural_image
Line drawing of a hand holding a small object above a triangular base (no text or symbols)Importante
natural_image
Diagram of a mechanical setup with a base and two vertical supports, no text or symbols presentImportante
natural_image
Isometric diagram of a mechanical component with a downward arrow indicating motion or assembly (no text or symbols)natural_image
Technical line drawing of a mechanical assembly with a bracket and base mount (no text or symbols)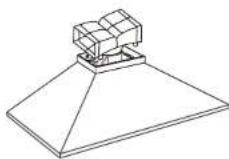
natural_image
Simple line drawing of a vertical structure with an upward arrow, no text or symbols presentnatural_image
Technical line drawing of a vertical structure with an upward arrow, no text or symbols presentnatural_image
Diagram of a mechanical setup with a container and base, no visible text or symbols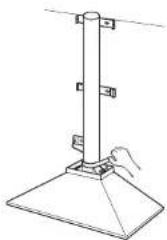
natural_image
Simple line drawing of a pole with a hand placing a base, no text or symbols present13
14
Cómo usar
Panel de control
flowchart
graph TD
    ESP --> A["Circle"]
    ESP --> B["Circle"]
    ESP --> C["Circle"]
    ESP --> D["Circle"]
    ESP --> E["●"]
    ESP --> F["●●"]
    ESP --> G["●●●"]
natural_image
Simple diagram showing a downward arrow inside a circle, no text or symbols presentImportante
No utilice alcohol.
Welcome to the world of simple handling and no worries.
Thank you for choosing Frigidaire for your range hood brand. Our range hoods are developed with high technical and quality standards, with features to offer you even more comfort.
Read all instructions before using this appliance. This book contains valuable information about operation, care and service. Keep it in a safe place.
You expect all this from Frigidaire...and we deliver.
Your kitchen never looked so good.
Environmental Advices
This product can not be treated as household waste. Instead shall be handed over to the applicable collection point for the recycling of electrical and electronic equipment. By ensuring this product is disposed of correctly, you will help prevent potential negative consequences for the environment and human health, which could otherwise be caused by inappropriate waste handling of this product. For more detail information about recycling of this product, please contact your local city office, your household waste disposal service or the shop where you purchased the product.

Contents
Safety 23
Description 26
Installation 27
Operation 35
Care and cleaning 36
Tips and advices 39
Electric diagram 41
Technical informations 42
Important
Read all instructions before using this appliance.
Save these instructions for future reference.
Approved for residential appliances.
For residential use only.
Do not attempt to install or operate your appliance until you have read the safety precautions in this manual.
The manufacturer waives all liability for failure to observe the instructions for the appropriate installation, maintenance and use of the extractor hood. The manufacturer waives all liability for damages due to negligence and the unit warranty will be automatically canceled due to incorrect maintenance.

Safety
For children
Avoid accidents. After unpacking the range hood, keep packaging materials out of reach, especially from children. Do not allow children to handle the range hoo, even when it is disconnected.
For the user / installer
To reduce the risk of fire, electric shock, or injury to persons, observe the following:
a) Use this unit only in the manner intended by the manufacturer. If you have questions, contact the manufacturer.
b) Before servicing or cleaning the unit, switch power off at service panel and lock service panel disconnecting means to prevent power from being switched an accidentally. When the service disconnecting means connat be locked, securely fasten a prominent warning device, such as a tag, to the service panel.
c) Installation work and electrical wiring must be done by qualified person(s) in accordance with all applicable codes & standards, including fire-rated construction.
d) Sufficient air is needed for proper combustion and exhausting of gases through the flue (Chimney) of fuel burning equipment to prevent back- drafting. Follow the heating equipment
manufacturers guideline and safety standards local code authorities.
e) When cutting or drilling into wall or ceiling, do not damage electrical wiring and other hidden utilities.
f) Ducted systems must always be vented to the outdoors.
To reduce risk of fire and to properly exhaust air, be sure to duct air outside - do not vent exhaust air into spaces within walls, ceilings, attics, crawl spaces, or garages.
To reduce the risk of fire, use only metal duct work.
Install this hood in accordance with all requirements specified.
To reduce the risk of fire or electric shock, do not use this hood with any external solid state speed control device.
Automatically operated device - to reduce the risk of injury disconnect from power supply before servicing.
This unit is equpeed with integral disconnecting switch located inside the blower housing.
To reduce the risk of a range top grease fire.
a) Never leave surface units unattended at high settings. Boilovers cause smoking and greasy spillovers that may ignite. Heat oils slowly on low or medium settings.
b) Always turn hood ON when cooking at high heat or when flambeing food (i.e. crepes suzette, cherries jubilee, peppercorn beef flambe').
c) Clean ventilating fans frequently. Grease should not be allowed to accumulate on fan or filter.
d) Use proper pan size. Always use cookware appropriate for the size of the surface element.
To reduce the risk of injury to persons, in the event of a range top grease fire, observe the following:
a) Smother flames with a close-fitting lid, cookie sheet, or other metal tray, then turn off the gas burner or the electric element. Be careful to prevent burns. If the flames do not go out immediately, evacuate and call the fire department.
b) Never pick up a flaming pan - you may be burned.
c) Do not use water, including wet dishcloths or towels - a violent steam explosion will result.
d) Use an extinguisher only if:
- You know you have a class ABC extinguisher, and you already know how to operate it.
- The fire is small and contained in the area where it started.
- The fire department is being called.
- You can fight the fire with your back to an exit.
OPERATION
Always leave safety grills and filters in place. Without these components, operating blowers could catch onto hair, fingers and loose clothing.
The manufacturer declines all responsibility in the event of failure to observe the instructions given here for installation, maintenance and suitable use of the product. The manufacturer further declines all responsibility for injury due to negligence and the warranty of the unit automatically expires due to improper maintenance.
Electrical requirements
Observe all governing codes and ordinances.
It is the customer's responsibility:
To contact a qualified electrical installer.
To assure that the electrical installation is adequate and in conformance with local codes and ordinances.
If codes permit and a separate ground wire is used, it is recommended that a qualified electrician determine that the ground path is adequate.
Do not ground to a gas pipe.
Check with a qualified electrician if you are not sure range hood is properly grounded.
Do not have a fuse in the neutral or ground circuit.
Save Installation Instructions for electrical inspector's use.
The range hood must be connected with copper wire only.
The range hood should be connected directly to the fused disconnect (or circuit breaker) box through metal electrical conduit.
Wire sizes must conform to the requirements of the local codes and ordinances.
Before installing the hood
- For the most efficient air flow exhaust, use a straight run or as few elbows as possible. Vent unit to outside of building, only.
- At least two people are necessary for installation.
- The hood is fitted with screws and drywall anchors suitable for most surfaces, consult a qualified installer, check if they perfectly fit with your cabinet/wall.
- Do not use flex ducting.
- Cold weather installations should have an additional backdraft damper installed to minimize backward cold air flow and a nonmetallic thermal break to minimize conduction of outside temperatures as part of the ductwork. The damper should be on the cold air side of the thermal break.
The break should be as close as possible to where the ducting enters the heated portion of the house.
25
- Make up air: local building codes may require the use of make-up air systems when using ducted ventilation systems greater than specified CFM of air movement. The specified CFM varies from locale to locale.
Important
Ventilation duct should have exit towards outside of the building.
Description
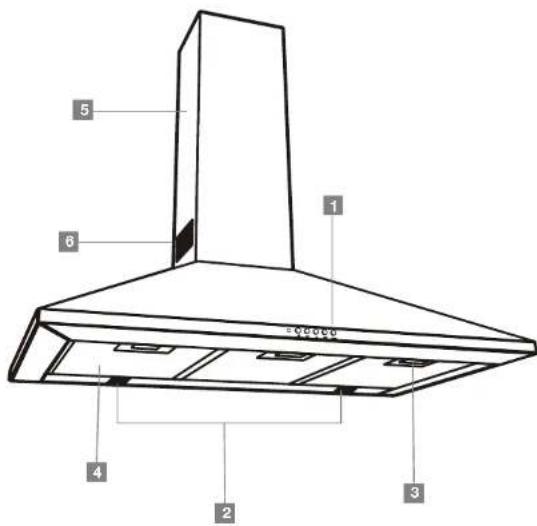
1 Control panel
2 Lamps
3 Grease filter Handle
4 Grease filter
5 Duct covers
6 Louver holes
26
Installation
Installing the hood
For the most efficient air flow exhaust, use a straight run or as few elbows as possible.
On average 2 to 3 hours are necessary to complete installation (without considering cut to be done on wall and or on cabinet, installation of ducts, conduit and electrical connections to the mains).
The hood is fitted with screws and drywall anchors suitable for most surfaces, consult a qualified installer, check if they perfectly fit with your cabinet/wall.
Do not use flex ducting.
COLD WEATHER installations should have an additional backdraft damper installed to minimize backward cold air flow and a nonmetallic thermal break to minimize conduction of outside temperatures as part of the ductwork. The damper should be on the cold air side of the thermal break.
The break should be as close as possible to where the ducting enters the heated portion of the house.
Make up air: Local building codes may require the use of make-up air systems when using ducted ventilation systems greater than specified CFM of air movement. The specified CFM varies from locale to locale. Consult your HVAC professional for specific requirements in your area.
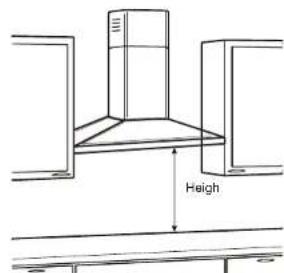
Typical installation: Min installation height from the range top to the bottom of the hood is 30" if a gas range is used or 24" to 30" if an electric range is used. These hoods are not recommended to be used over indoor grills.
The hood may be installed onto a wall and vented to the outdoors, or it can be installed for recirculating operation (recirculating accessories are supplied with the hood).
This hood can be installed over any electric and gas cooktop/range.
It can not be installed over any professional cooktop / range.
Important
Vent unit to outside of building, only.
Installing preparation
Advance planning:
- Determine the exact location of the vent hood.
- Plan the route for venting exhaust to the outdoors.
- Use the shortest and straightest duct route possible.
• Install a wall cap with damper or roof cap at the exterior opening. Order the wall or roof cap and any transition needed in advance. - Use 8" round metal ductwork only.
Wall framing for adequate support:
This vent hood is heavy. 'Adequate structure and support must be provided in all types of installations. Thehood must be secure to vertical studs in the wall, or to a horizontal support.
The vent hood should be on site before final framing and wall finishing. This will help to accurately locate the duct work and electrical service.
Installation will be easier if the vent hood is installed before the cooktop and countertop are installed.
Important
Remove carton carefully, Wear gloves to protect against sharp edges..
Remove the protective film covering the product before putting into operation.


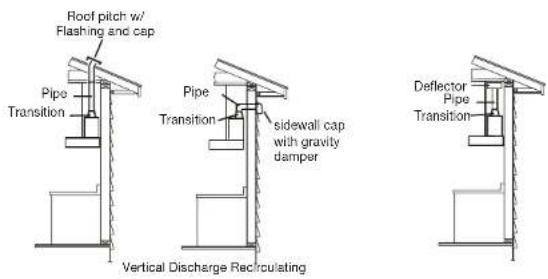
Examples of possible ducting
ENG
Ductwork installation guidelines
For safety reasons, ducting should vent directly outdoors (not into an attic, underneath the house, into the garage or into any enclosed space).
Keep duct runs as short and straight as possible.
Duct fittings (elbows and transitions) reduce air flow efficiency.
Back to back elbows and "S" turns give very poor delivery and are not recommended.
A short straight length of duct at the inlet of the remote blower gives the best delivery.
Transition to duct from the integral blower or remote duct transition as close to the downdraft as is possible.
The use of flexible metal round duct should only be used when no other duct fitting exists. Limit use to short lengths and do not crush when making corners.
Ductwork and wiring locations
- Determine the exact location of the vent hood.
- Follow the image with dimension below to define the height.
• Installation height: 762mm (30") gas cooktop/range or 610mm (24") to 762mm (30") electric cooktop/range. - Use a level to draw a horizontal straight pencil line on the wall, which is your desired installation height.
• Find the centerline of the cooktop. Use a level to draw a vertical straight pencil line on the wall.
Important
Check to be sure the line is perfectly perpendicular.
ENG
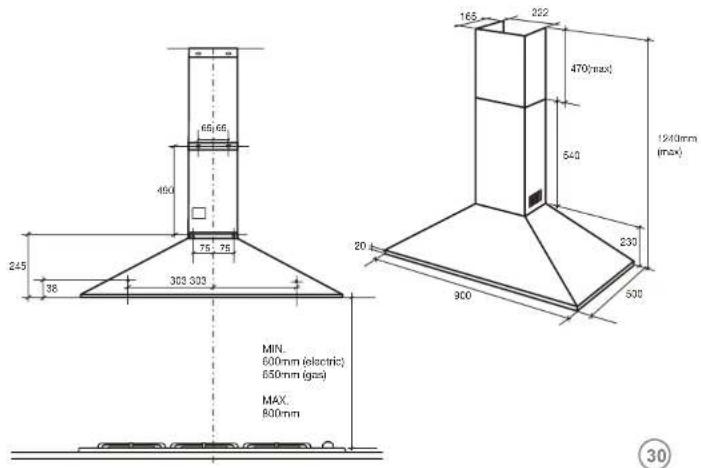
INSTALLATION SEQUENCE
1. Mounting the duct cover bracket
The duct cover bracket should be installed against the back wall and flush with the ceiling. This bracket will hold the telescopic duct cover in place at the top.
Use dimensions from following image to determine cooker hood body position.
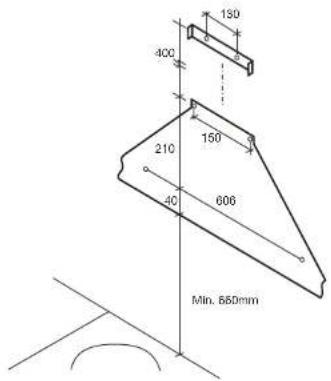
- Assemble internal exhaust duct base according to the following image.
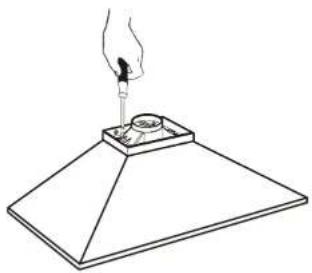
natural_image
Line drawing of a hand using a dropper to test a small object on a base (no text or symbols)- Plug in and install cover flue mounting brackets.
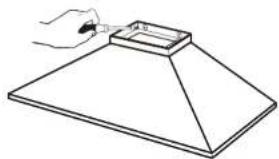
natural_image
Simple line drawing of a 3D geometric shape with a hand holding a small object, no text or symbols present.Important
Framing must be capable of supporting 45kg (100 lb).
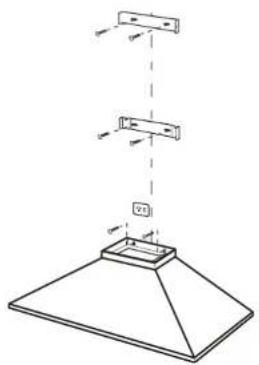
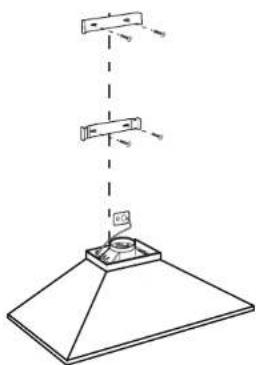
natural_image
Diagram of a mechanical setup with a base and two vertical supports, no text or symbols presentImportant
2 people are required to lift and position the hood onto the mounting screws.
Place the template on the wall along the horizontal line, make sure the template is leveled and centered with the centerline.
31
32
4. Recirculation kit installation
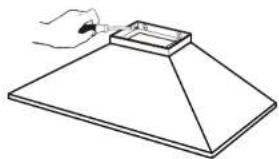
Install the T conector on top of the exhaust duct base. Charcoal filters are already installed on the product at each side of the motor.
5. Install bottom section of telescopic flue cover
First fit the bottom section of the telescopic flue as shown on the following image.
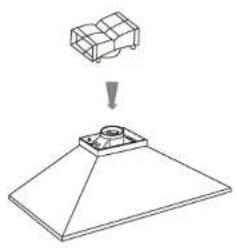
natural_image
Diagram showing a 3D object with a small protrusion and an arrow pointing downward, no text or symbols present.Installation vented
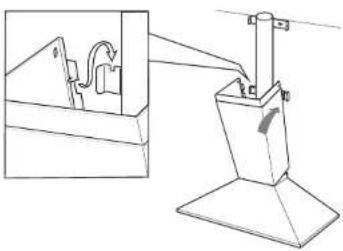
natural_image
Technical line drawing of a mechanical assembly with a bracket and base mount (no text or symbols)Installation with recirculation
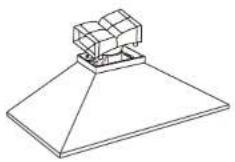
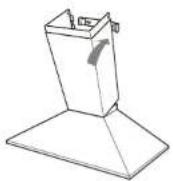
6. Install top section of telescopic flue cover
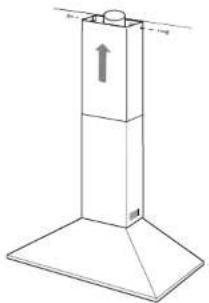
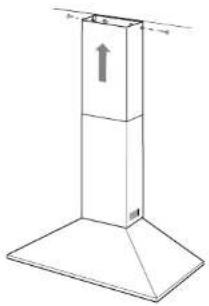
Install the top section and fix shown on the following image.
Installation vented
natural_image
Technical line drawing of a vertical tower structure with an upward arrow indicator (no text or symbols)Installation with recirculation
natural_image
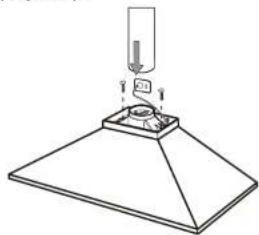
Technical line drawing of a vertical tower structure with an upward arrow indicator (no text or symbols)7. Installation verted outdoor (opcional)
If you not use recirculation, you should install the exhaust duct to the base of the hood. Use tape to seal the connexion between the flexible duct and the base.
Then, follow steps 5 and 6 for verted installation. Take out the charcoal filter assembled on the motor (see charcoal filters on page 37).
natural_image
Diagram of a mechanical assembly with a base and top component, no text or symbols present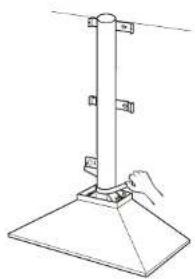
natural_image
Line drawing of a pole structure with a hand placing a component (no text or symbols)34
Operation
Control panel

flowchart
graph TD
    A["●"] --> B["○"]
    C["■"] --> D["○"]
    E["■"] --> F["○"]
    G["●"] --> H["○"]
    I["●"] --> J["○"]
    K["●"] --> L["○"]
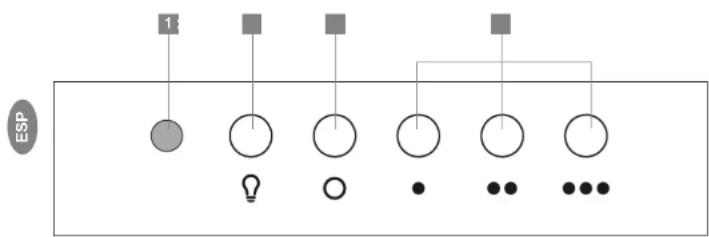
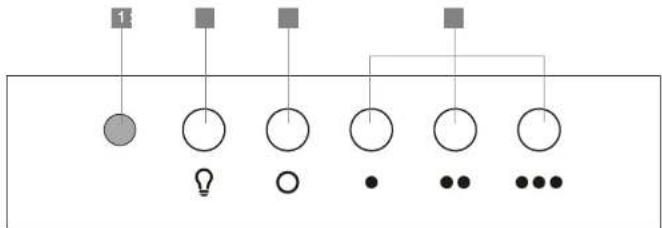
1 On/Off light of the motor
2 Light switch
3 Off button of the motor
4 Motor speed control switch
Control buttons
1. Motor control light:
The motor control light will turn on when the motor is working.
2. Light switch:
Press the light switch to turn the light on, when light off. Press the light switch to turn the light off, when light is on.
3. Off button of the motor
Press to turn off the motor
4. Speed control:
These buttons will turn on and increase/decrease the motor speed. To operate at the 2nd and 3rd speeds, the first speed must be activated.
35
Care and cleaning
Do not apply any type of cleaning product directly to the hood control during the cleaning of the cooker hood.
The efficiency of the range hood system depends on the cleanliness of the intake and filters. The frequency of cleaning depends on the amount and type of cooking.
Do not use the ventilating system without the filters in place or with grease-laden filters or surfaces.
Do not use any abrasive product.
Grease filters
These filters retain the grease
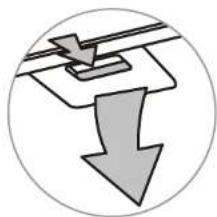
Filters should be cleaned once per month with not abrasive detergent.
It can be washed manually or in the dishwasher in low temperature and mild cycle.
natural_image
Simple diagram showing a downward arrow inside a circle, with no text or symbols present.Important
Do not use alcohol.
To avoid risk of fire and explosion do not use flammable liquids or solvents.
Be sure the entire hood (including the filters and light bulbs) has cooled and grease has solidified before attempting to clean any part of the appliance.
36
Replace lights
If the halogen lamps need replacing, they must be replaced by lamps with an aluminium reflector, never dichroic lamps, to avoid unnecessary overheating in the lamp holders.
Charcoal Filters
- If the model is not vented to the outside, the air will be recirculated through disposable charcoal filters that help remove smoke and odors. The charcoal filters cannot be cleaned.
• They must be replaced. - The charcoal filters should be replaced every 4-6 months (depending on hood usage).
To replace the charcoal filters please follow the following steps:
• Take out the grease filter.
- Unscrew the metallic cover.
- There is one charcoal filter in each side of the motor.
- Turn the charcoal filter to unlock it and take it out.
- Install the new filter and turn it to lock it.
- Assemble the metall cover and the grease filter.
Important
DO NOT rinse, or put charcoal filters in an automatic dishwasher.
Charcoal filters are not included with the hood.
They must be ordered from your supplier.
Order the needed kit specifying your hood model and width size.
Cleaning
Always use the mildest cleaner that will do the job. Use clean, soft cloths, sponges or paper towels.
Rub stainless steel finishes in the direction of the grain. Wipe area dry to avoid water marks.
After cleaning, place all parts in their proper positions before using.
The cleaners recommended below indicate a type and do not constitute an endorsement. Use all products according to package directions.
Hood Surface
Painted Surfaces: For general care, wipe the outside of the hood with sudsy water or household cleaners, rinse well and dry with a clean soft cloth to avoid water marks.
Stainless Steel Surfaces: Wipe and dry stainless steel in the same direction as the grain. Avoid using too much pressure, which may mar the surface. To remove finger prints and give added shine. Do not allow any cleaning compounds to remain in contact with stainless steel for extended periods.
Plastic surfaces: Wipe with a moist soapy sponge.
Aluminum Mesh Filters: Clean filters in the dishwasher or by agitating in sudsy water. Ensure that there is no soil trapped in the fine mesh. Dry the filters before reinstalling them.
Anodized Aluminum surfaces: top cap is not removable. Wash top and underside with hot sudsly water. Rinse and wipe dry. First to a clean sponge or paper towel and wipe clean.
Important
Do not use powdered cleansers or steel wool pads.
Tips and advices
- Continuous use of the fan system while cooking helps keep the kitchen comfortable and less humid.
- It also reduces cooking odors and soiling moisture that create a frequent need for cleaning.
- Turn the blower on before starting to cook.
- Use a rear burner when browning or pan frying meat.
- Open a window or inside door slightly.
- Clean the filters and the wall behind the filters frequently.
- The blower should be turned on for a few minutes before cooking in order to establish air currents upward through the hood. Thus when heat, smoke, moisture, grease and cooking odors are produced, they will be carried outside instead of drifting into other rooms.
- Use the low speeds for normal use and the higher speeds for strong odors or fumes.
Drafts across the range or cooktop will cause the escape of heat, smoke, moisture, grease and cooking odors from the hood. Such drafts should be prevented in so far as possible. - The best job of ventilation in the kitchen is done where the only air currents are those created by the blower itself.
- For Gas Cooktops, a lower blower speed should be used if:
- the gas flame is being distorted by the air movement.
• the burner continually sparks (clicks)
• the burner flame repeatedly blows out.
- Do not connect the hood to chimneys, ventilation pipes or hot air pipes. Before connecting any pipes, consulting municipal ordinances on exhaust air and request permission from the person in charge of the building. Be sure there is adequate ventilation, even in cases where the hood is to be used simultaneously with another product.
- Never leave frying food unattended since grease can overheat and catch fire. The risk of fire is even greater in the case of used oil.
- Never use the hood in areas where devices with exhaust pipes connected to the outside are already operating unless perfect ventilation can be guaranteed.
- To avoid the possibility of fire, adhere strictly to all of the recommendations included here and to the periodic cleaning of the grease filters.
- During climatic conditions causing electrical interference, it is possible that the device may stop working. By switching the device OFF an ON the device will resume normal operation safety.
- If the supply cord of this equipment is damaged, it must only be replaced by manufacturer or it's service agent or similarly qualified person in order to avoid a hazard.
- Never have a lighted flame under the extractor hood.
- The appliance must be placed such a way, that the supply plug is accessible.
- The hood must be installed at a minimum distance of 65 cm from the stovetop.
From the Electrolux Group.
The Electrolux Group is the world's largest producer of powered appliances for kitchen, cleaning and outdoor use. More than 55 million Electrolux Group products (such as refrigerators, cookers, washing machines, vacuum cleaners, chain saws and lawn mowers) are sold each year to a value of approx. USD 14 billion in more than 150 countries around the world.
- Importante
- Cómo usar
- Welcome to the world of simple handling and no worries.
- Environmental Advices
- Contents
- Important
- Safety
- For children
- For the user / installer
- OPERATION
- Electrical requirements
- Before installing the hood
- Description
- Installation
- Installing the hood
- Installing preparation
- Advance planning:
- Wall framing for adequate support:
- Ductwork installation guidelines
- Ductwork and wiring locations
- INSTALLATION SEQUENCE
- Mounting the duct cover bracket
- Recirculation kit installation
- Install bottom section of telescopic flue cover
- Install top section of telescopic flue cover
- Installation verted outdoor (opcional)
- Control panel
- Control buttons
- Motor control light:
- Light switch:
- Off button of the motor
- Speed control:
- Care and cleaning
- Grease filters
- Replace lights
- Charcoal Filters
- To replace the charcoal filters please follow the following steps:
- Cleaning
- Hood Surface
- Tips and advices
- From the Electrolux Group.
Brand : FRIGIDAIRE
Model : FJWA369TBIS
Category : Range hood