
GLHV30T4KC - Range hood FRIGIDAIRE - Free user manual and instructions
Find the device manual for free GLHV30T4KC FRIGIDAIRE in PDF.
| Product Type | Under Cabinet Range Hood |
| Brand | FRIGIDAIRE |
| Model | GLHV30T4KC |
| Power Supply | 120 VAC, 60 Hz, 15 or 20 A |
| Weight (30" model) | 34 lbs (approximately 15.4 kg) |
| Weight (36" model) | 38.5 lbs (approximately 17.5 kg) |
| Connection Diameter | 4 3/4 inches |
| Required Exhaust Duct Diameter | 4 inches |
| Recommended Installation Height Above Electric Cooktop | Minimum 18.5 inches |
| Recommended Installation Height Above Gas Cooktop | Minimum 25.6 inches |
| Functions | Air extraction, recirculation possible with charcoal filter (optional) |
| Controls | Touch pad with fan on/off and light functions |
| Lighting | Fluorescent lamp Philips PL‑S type, max 9 W |
| Filters | Anodized aluminum grease filters (dishwasher safe) |
| Filter Maintenance | Wash grease filters at least once a month |
| Charcoal Filter Replacement | Once a year under normal use |
| Safety | Automatic power shut-off when drawer is closed (microswitch), grounding required |
| Warranty | One-year full warranty (parts and labor) |
| Intended Use | Residential use only, do not install above gas barbecues |
| Materials | Stainless steel, white or black finish depending on model |
Frequently Asked Questions - GLHV30T4KC FRIGIDAIRE
User questions about GLHV30T4KC FRIGIDAIRE
0 question about this device. Answer the ones you know or ask your own.
Ask a new question about this device
Download the instructions for your Range hood in PDF format for free! Find your manual GLHV30T4KC - FRIGIDAIRE and take your electronic device back in hand. On this page are published all the documents necessary for the use of your device. GLHV30T4KC by FRIGIDAIRE.
USER MANUAL GLHV30T4KC FRIGIDAIRE
READ AND SAVE THESE INSTRUCTIONS
Contents
Product Registration 2
Important Safety Instructions 3
Installation 4-6
Use and Care 7
Hood Cleaning 8
Lights Replacement 8
Warranty 10
Range Hood
Product Registration
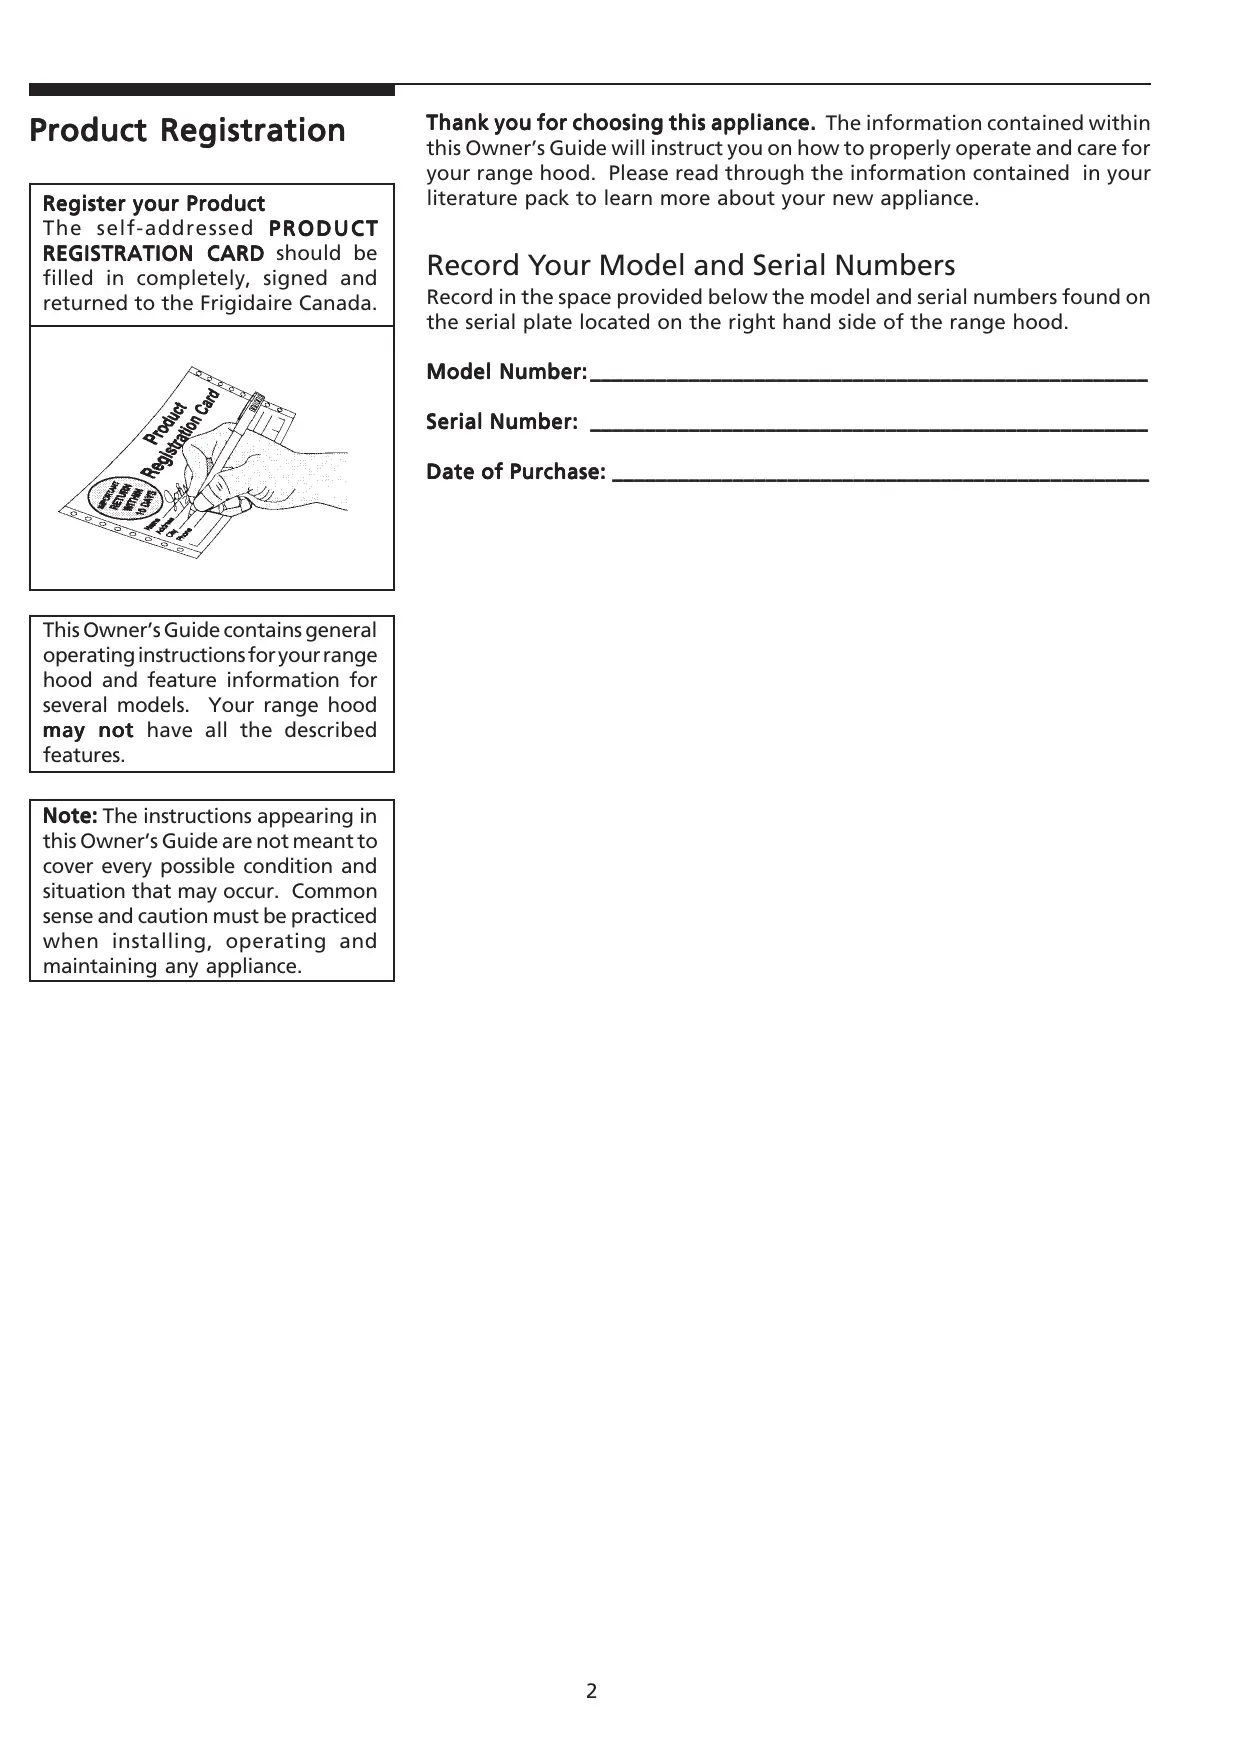
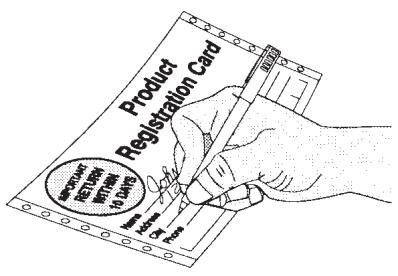
Register your Product
The self-addressed PRODUCT REGISTRATION CARD should be filled in completely, signed and returned to the Frigidaire Canada.
This Owner's Guide contains general operating instructions for your range hood and feature information for several models. Your range hood may not have all the described features.
Note: The instructions appearing in this Owner's Guide are not meant to cover every possible condition and situation that may occur. Common sense and caution must be practiced when installing, operating and maintaining any appliance.
Thank you for choosing this appliance. The information contained within this Owner's Guide will instruct you on how to properly operate and care for your range hood. Please read through the information contained in your literature pack to learn more about your new appliance.
Record Your Model and Serial Numbers
Record in the space provided below the model and serial numbers found on the serial plate located on the right hand side of the range hood.
Model Number:
Serial Number:
Date of Purchase:
Important Safety Instructions
READ AND SAVE THESE INSTRUCTIONS
Take care when using cleaning agents or detergents.
Suitable for use in household cooking area
CAUTION - To reduce risk of fire and to properly exhaust air, be sure to duct air outside – Do not vent exhaust air into spaces within walls or ceilings or into attics, crawl spaces, or garages.
CAUTION - For General Ventilating Use Only. Do Not Use To Exhaust Hazardous Or Explosive Materials And Vapors.
WARNING - TO REDUCE THE RISK OF FIRE, ELECTRIC SHOCK, OR INJURY TO PERSONS, OBSERVE THE FOLLOWING:
a. Use this unit only in the manner intended by the manufacturer. If you have questions, contact the manufacturer.
b. Before servicing or cleaning unit, switch power off at service panel and lock the service disconnecting means to prevent power from being switched on accidentally. When the service disconnecting means cannot be locked, securely fasten a prominent warning device, such as a tag, to the service panel.
WARNING - TO REDUCE THE RISK OF A RANGE TOP GREASE FIRE:
a. Never leave surface units unattended at high settings. Boilovers cause smoking and greasy spillovers that may ignite. Heat oils slowly on low or medium settings.
b. Always turn hood ON when cooking at high heat or when cooking flaming foods.
c. Clean ventilating fans frequently. Grease should not be allowed to accumulate on fan or filter.
d. Use proper pan size. Always use cookware appropriate for the size of the surface element.
WARNING - TO REDUCE THE RISK OF INJURY TO PERSONS IN THE EVENT OF A RANGE TOP GREASE FIRE, OBSERVE THE FOLLOWING:
a. SMOTHER FLAMES with a close-fitting lid, cookie sheet, or metal tray, then turn off the burner. BE CAREFUL TO PREVENT BURNS. If the flames do not go out immediately, EVACUATE AND CALL THE FIRE DEPARTMENT.
b. NEVER PICK UP A FLAMING PAN - You may be burned.
c. DO NOT USE WATER, including wet dishcloths or towels – a violent steam explosion will result.
d. Use an extinguisher ONLY if:
- You know you have a Class ABC extinguisher, and you already know how to operate it.
- The fire is small and contained in the area where it started.
- The fire department is being called.
- You can fight the fire with your back to an exit.
WARNING - TO REDUCE THE RISK OF FIRE, ELECTRIC SHOCK, OR INJURY TO PERSONS, OBSERVE THE FOLLOWING:
a) Installation work and electrical wiring must be done by qualified person(s) in accordance with all applicable codes and standards, including fire-rated construction.
b) Sufficient air is needed for proper combustion and exhausting of gases through the flue (chimney) of fuel burning equipment to prevent back drafting. Follow the heating equipment manufacturer's guideline and safety standards such as those published by the National Fire Protection Association (NFPA), and the American Society for Heating, Refrigeration and Air Conditioning Engineers (ASHRAE), and the local code authorities.
c) When cutting or drilling into wall or ceiling, do not damage electrical wiring and other hidden utilities.
d) Ducted fans must always be vented to the outdoors.
WARNING - TO REDUCE THE RISK OF FIRE, USE ONLY METAL DUCTWORK.

WARNING
Electrical Shock Hazard - Can result in serious injury or death.
Disconnect appliance from electric power before servicing.
If equipped, the fluorescent light bulb contains small amounts of mercury which must be recycled or disposed of according to Local, State, and Federal Codes.
IMPORTANT: Save these Instructions for the Local Electrical Inspector's use.
INSTALLER: Please leave these Instructions with this unit for the owner.
OWNER: Please retain these instructions for future reference.
Safety Warning: Turn off power circuit at the service entrance and lock out panel, before wiring this appliance.
Requirement: 120 VAC,60 Hz 15 or 20 A
Dimensions
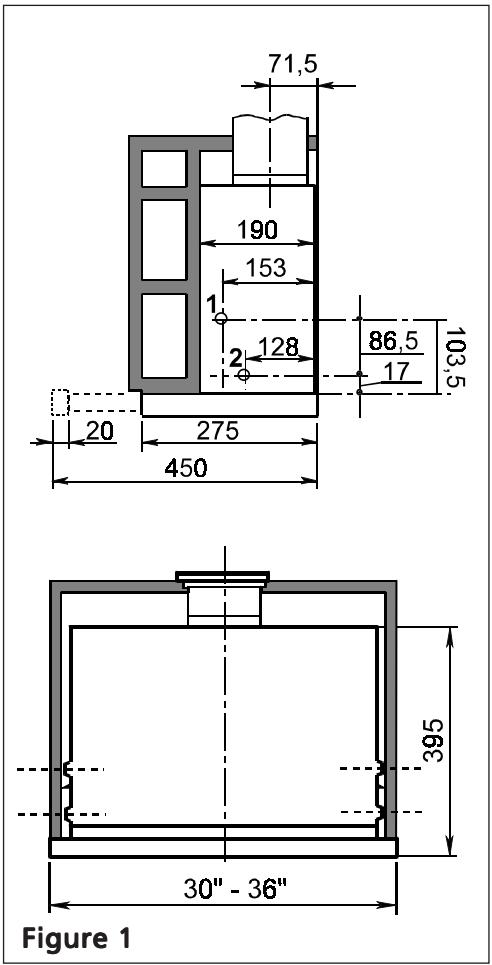
Weight: 30" Model 34 lbs - 36" Model 38,5 lbs
Diameter of Transition 4" ^3/_4
Diameter of exhaust Duct required 4^ _4^3 / 4
Considerations before installing Hood
- For the most efficient air flow exhaust, use a straight run or as few elbows as possible.
CAUTION: Vent unit to outside of building, only. - If allowed in your area, use metallic flex ducting only to connect rigid duct directly to transitions.
- COLD WEATHER installations should have an additional backdraft damper installed to minimize backward cold air flow and a nonmetallic thermal break to minimize conduction of outside temperatures as part of the ductwork. The damper should be on the cold air side of the thermal break. The break should be as close as possible to where the ducting enters the heated portion of the house.
- Hood installation height above cooktop is the users preference. The lower the hood above the cooktop, the more efficient the capturing of cooking odors, grease and smoke. We recommends the hood be installed 18,5" minimum above an electric cooktop or 25,6" minimum above a gas cooktop. Be sure that your hood model fits your installation.
Installation
Tools required for installation
Screw driver (pozidrive n°2)
Electric drill
with twist bit 2mm and 6mm
Pre-Installation consideration
The hood can be installed to be used in the following ways:
- External exhausting version
- Recycling version (with carbon filter to be ordered from your supplier)

External Exhausting Version
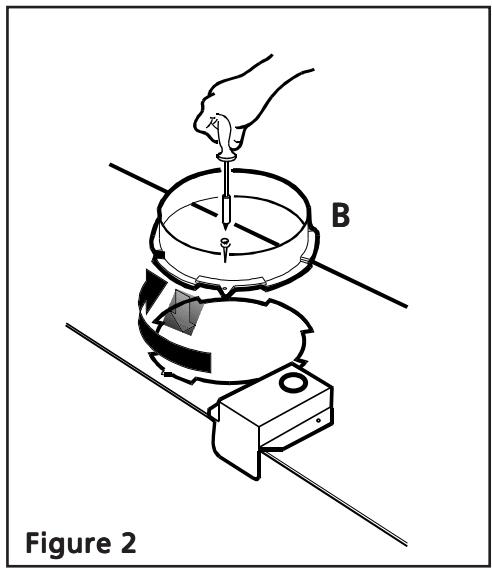
The air is expelled outside by means of a pipe to be connected to the coupling ring B (Figure 2).
In horizontal runs, the duct must be slightly slanted (about 10^ ) and directed upwards to vent the air easily from the room to the outside.
A non-return smoke valve is supplied as an optional to be mounted on the coupling flange.
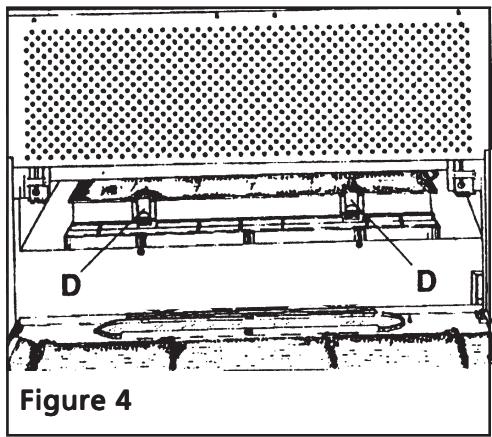
Recycling version
The air is filtered through a carbon filter and recycled into the room. If the hood has no filter ask for one from the technical assistance service or the manufacturing company, specifying the hood model.
To install the filter, insert it in the place provided and use the two hooks D to fasten it (Figure 4).
The filtered air is discharged above the wall cabinet through the baffle E, to be fastened by means of two screws provided directly on the vertical of the outlethole of the hood (if necessary fit a duct 0120mm from the coupling flange to the upper edge of the hole provided on the top side of the cupboard (Figure 3).
Installation
Figure 5
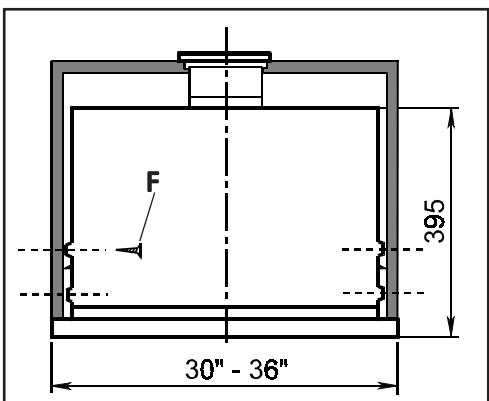
Figure 6
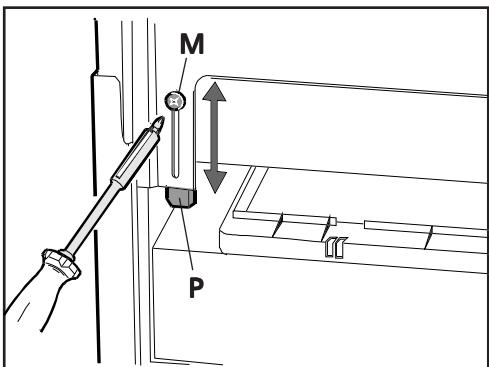
Figure 7

Fastening the hood to the wall cabinet
Fit the drilling template, which comes with the hood, on the inner right side of the cabinet making sure side "A" coincides with back part.
Make at least two 2 mm. diameter holes at points 1-2 (Figure 5).
Perform the same operations on the inner left side.
Use screws F (4.5x16) to fasten the hood to the cabinet (Figure 6).
Attention! While mounting the hood on the wall cabinet be sure once the hood has been fastened, to allow the wiring compartment to be easily and safely reachable, in order to make eventual safety inspections and/or maintenance operations.
Box adjustment
The hood can be installed in cabinets with different depths; the front of the box must always be in line with the cabinet.
For alignment, adjust the back stops of the box.
For box adjustment, loosen screws M, slide the square plates P as necessary, and tighten screws M (Figure 7).
Ensure that the drawer, when fully retracted, turns OFF all power by acting positively on the rear microswitch.
Wiring to Power Supply
WARNING!
ELECTRICAL GROUNDING INSTRUCTIONS
THIS APPLIANCE IS FITTED WITH AN ELECTRICAL JUNCTION BOX WITH 3 WIRES, ONE OF WHICH (GREEN/YELLOW) SERVES TO GROUND THE APPLIANCE. TO PROTECT YOU AGAINST ELECTRIC SHOCK, THE GREEN AND YELLOW WIRE MUST BE CONNECTED TO THE GROUNDING WIRE IN YOUR
HOME ELECTRICAL SYSTEM, AND IT MUST UNDER NO CIRCUMSTANCES BE CUT OR REMOVED.
Warning: Turn off power circuit at the service panel before wiring this unit. 120 VAC, 15 or 20 Amp circuit required.
a. Remove j-box cover as shown in Figure 8.
b. Remove the knockout and install the strain relief (conduit) connector (1/2") in junction box.
c. Run 3 wires; black, white and green (#16 AWG) in 1/2 conduit from service panel to junction box.
d. Connect black wire from service panel to black or red in junction box, white to white and green to green-yellow. See Figure 8.
e. Close junction box cover, check all light bulbs to make sure they are secure in their sockets, then turn power on in service panel and check lights and blower operation per Care & Use section of this manual and install filters.
f. Make sure to leave this manual for the home owner.
Use and Care Control Pad Functions
READ THE INSTRUCTIONS CAREFULLY BEFORE USING THE RANGE HOOD. For satisfactory use of your hood, become familiar with the various functions of the hood as described below
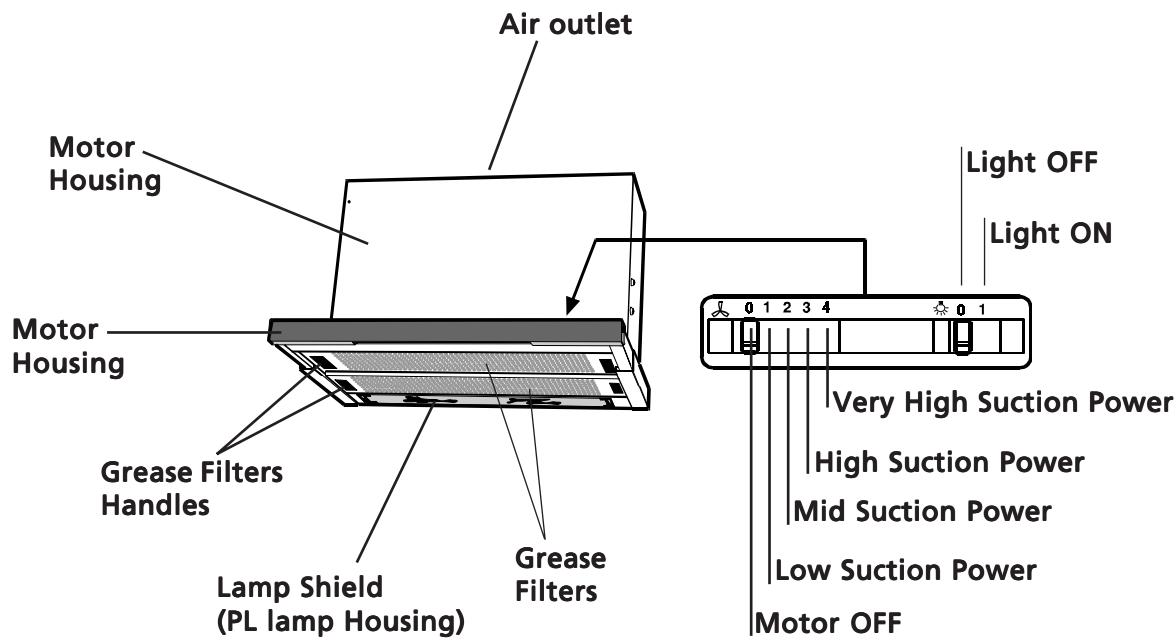
Figure 9
Operating Instructions
The blower should be turned on for about 5 minutes before cooking in order to establish air currents upward through the hood.
Use the low speeds for normal use and the higher speeds for strong odors or fumes.
Minimize cross drafts which will reduce the effectiveness of the hood.
Hood Cleaning
Be sure lights are cool before cleaning the hood.
To Clean Filters
- The metal grease filters will last forever. They are made of anodized aluminum
- It is recommended that the filters be washed at least once a month; they can be washed by hand or in the dishwasher.
- Drain water through edge holes and let each filter dry thoroughly before replacing it.
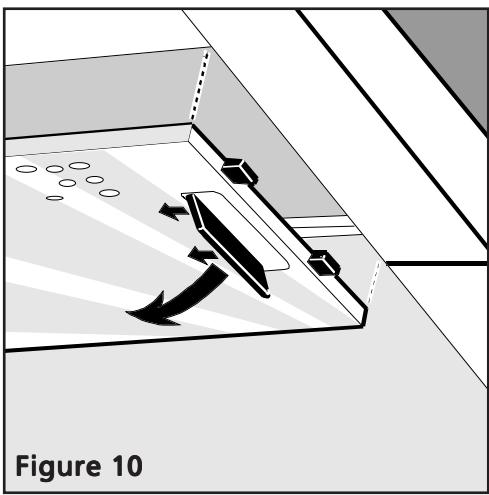
To Remove The Metal Grease Filters
- Turn blower and lights off.
- Push simultaneously the two handles S first upwards, then towards the center and extract the filters Figure 10.
To Replace The Metal Grease Filters
- Reverse procedure.
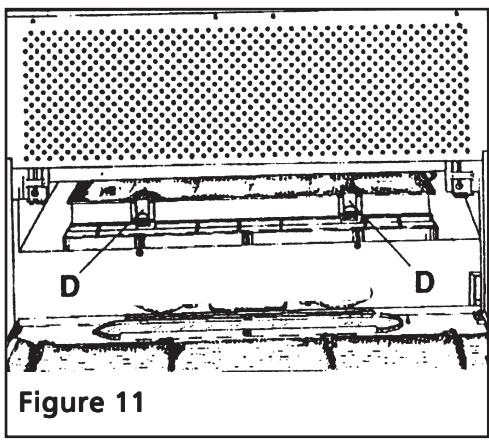
To Replace The Carbon Filter
- The Carbon Filter must be replaced once a yera in normal use.
- To dismount push the two locks D and extract it from its housing.
To Clean Hood Surface
- For general care, wipe the outside of the stainless steel, white, black or glass hood with sudsy water or household cleaners such as Fantastic® or Formula 409^® , rinse well and dry with clean soft cloth to avoid water marks.
- Wipe and dry brushed stainless steel in the same direction as the grain.
- Do not use abrasive products.
- To remove finger prints and give added shine use spray cleaners such as Stainless Steel Magic® and Shimmer®.
Lights replacement
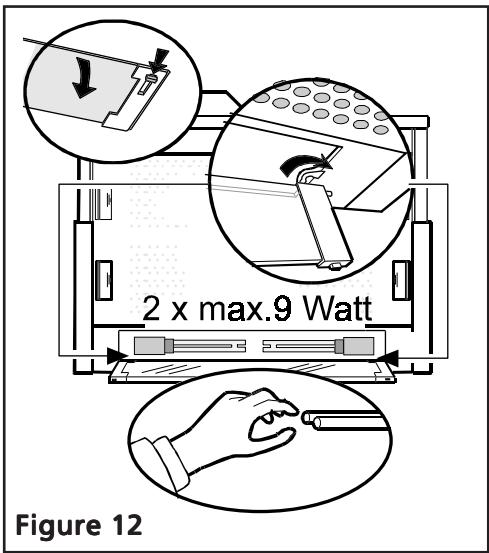
NOTE: Turn blower and lights off. Make sure the lights are cool. If new lights do not operate be sure lights are inserted correctly before calling service.
- Remove the light shield Q by pushing simultaneously the two unlocking buttons (Figure 12); for safety reasons make sure to remove the light shield from its suspension slides G .
- Pull out fluorescent tube and replace with Philips Type PL-S 9 Watt maximum.
- Refit the light shield.
RANGE HOOD WARRANTY
Your range hood is protected by this warranty
| WARRANTY PERIOD | THROUGH OUR AUTHORIZED SERVICERS, WE WILL: | THE CONSUMER WILL BE RESPONSIBLE FOR: | |
| FULL ONE-YEAR WARRANTY | One year from original purchase date. | Pay all costs for repairing or replacing any parts of this apppliance which prove to be defective in materials or workmanship. | Costs of service calls that are listed under NORMAL RESPONSIBILITIES OF THE CONSUMER.* |
| LIMITED WARRANTY (Applicable to the State of Alaska) | Time periods listed above. | All of the provisions of the full and limited warranties above and the exclusions listed below apply. | Costs of the technician's travel to the home and any costs for pick up and delivery of the appliance required because of service. |
In the U.S.A., your appliance is warranted by Electrolux Home Products North America, a division of White Consolidated Industries, Inc. We authorize no person to change or add to any of our obligations under this warranty. Our obligations for service and parts under this warranty must be performed by us or an authorized Electrolux Home Products North America servicer. In Canada, your appliance is warranted by WCI Canada, Inc.
*NORMAL This warranty applies only to products in ordinary household use, and the consumer is responsible for the RESPONSIBILITIES items listed below:
OF
THE
CO
NSU
- Proper use of the appliance in accordance with instructions provided with the product.
- Proper installation by an authorized servicer in accordance with instructions provided with the appliance and in accordance with all local plumbing, electrical and/or gas codes.
- Proper connection to a grounded power supply of sufficient voltage, replacement of blown fuses, repair of loose connections or defects in house wiring.
- Expenses for making the appliance accessible for servicing, such as removal of trim, cupboards, shelves,etc., which are not a part of the appliance when it was shipped from the factory.
- Damages to finish after installation.
- Replacement of light bulbs and/or fluorescent tubes (on models with these features).
EXCLUSIONS
This warranty does not cover the following:
- CONSEQUENTIAL OR INCIDENTAL DAMAGES SUCH AS PROPERTY DAMAGE AND INCIDENTAL EXPENSES RESULTING FROM ANY BREACH OF THIS WRITTEN OR ANY IMPLIED WARRANTY. NOTE: Some states do not allow the exclusion or limitation of incidental or consequential damages, so this limitation or exclusion may not apply to you.
- Service calls which do not involve malfunction or defects in workmanship or material, or for appliances not in ordinary household use. The consumer shall pay for such service calls.
- Damages caused by services performed by servicers other than Electrolux Home Products North America or its authorized servicers; use of parts other than genuine Electrolux Home Products parts; obtained from persons other than such servicers; or external causes such as abuse, misuse, inadequate power supply or acts of God.
- Products with original serial numbers that have been removed or altered and cannot be readily determined.
IF YOU NEED SERVICE
Keep your bill of sale, delivery slip, or some other appropriate payment record. The date on the bill establishes the warranty period should service be required. If service is performed, it is in your best interest to obtain and keep all receipts. This written warranty gives you specific legal rights. You may also have other rights that vary from state to state. Service under this warranty must be obtained by contacting Electrolux Home Products:
This warranty only applies in the 50 states of the U.S.A., Puerto Rico, and Canada. Product features or specifications as described or illustrated are subject to change without notice. All warranties are made by Electrolux Home Products North America, a division of White Consolidated Industries, Inc. In Canada, your appliance is warranted by WCI Canada, Inc.
03-U-RH-02

- Contents
- Range Hood
- Product Registration
- Register your Product
- Record Your Model and Serial Numbers
- Important Safety Instructions
- READ AND SAVE THESE INSTRUCTIONS
- WARNING
- Dimensions
- Considerations before installing Hood
- Installation
- Tools required for installation
- Pre-Installation consideration
- External Exhausting Version
- Recycling version
- Fastening the hood to the wall cabinet
- Box adjustment
- Wiring to Power Supply
- WARNING!
- ELECTRICAL GROUNDING INSTRUCTIONS
- Use and Care Control Pad Functions
- Operating Instructions
- Hood Cleaning
- To Clean Filters
- To Remove The Metal Grease Filters
- To Replace The Metal Grease Filters
- To Replace The Carbon Filter
- To Clean Hood Surface
- Lights replacement
- RANGE HOOD WARRANTY
- *NORMAL This warranty applies only to products in ordinary household use, and the consumer is responsible for the RESPONSIBILITIES items listed below:
- OF
- THE
- CO
- NSU
- EXCLUSIONS
- This warranty does not cover the following:
- IF YOU NEED SERVICE
Brand : FRIGIDAIRE
Model : GLHV30T4KC
Category : Range hood