JGV011695 - Barbecue Jocel - Free user manual and instructions
Find the device manual for free JGV011695 Jocel in PDF.


| Product Type | Gas Barbecue |
| Brand | Jocel |
| Model | JGV011695 |
| Dimensions (L x W x H) | 120 x 60 x 110 cm |
| Weight | 15 kg |
| Fuel Type | Liquid Propane (LPG) |
| Number of Burners | 3 main burners |
| Side Burner | Yes, 1 side burner |
| Warming Rack | Yes, included |
| Cooking Area | 2500 cm² |
| Material | Stainless steel and cast iron |
| Ignition | Electronic push-button ignition |
| Temperature Gauge | Built-in dial thermometer |
| Grease Management | Removable drip tray |
| Safety Features | Gas shutoff valve and lid lock |
| Cleaning | Hand wash with mild soap; avoid abrasive cleaners |
| Warranty | 1 year limited warranty |
| Spare Parts Availability | Contact Jocel authorized service centers |
Frequently Asked Questions - JGV011695 Jocel
User questions about JGV011695 Jocel
0 question about this device. Answer the ones you know or ask your own.
Ask a new question about this device
Download the instructions for your Barbecue in PDF format for free! Find your manual JGV011695 - Jocel and take your electronic device back in hand. On this page are published all the documents necessary for the use of your device. JGV011695 by Jocel.
USER MANUAL JGV011695 Jocel
natural_image
Circular diagram with three orange arrows forming a cycle, no text or symbols present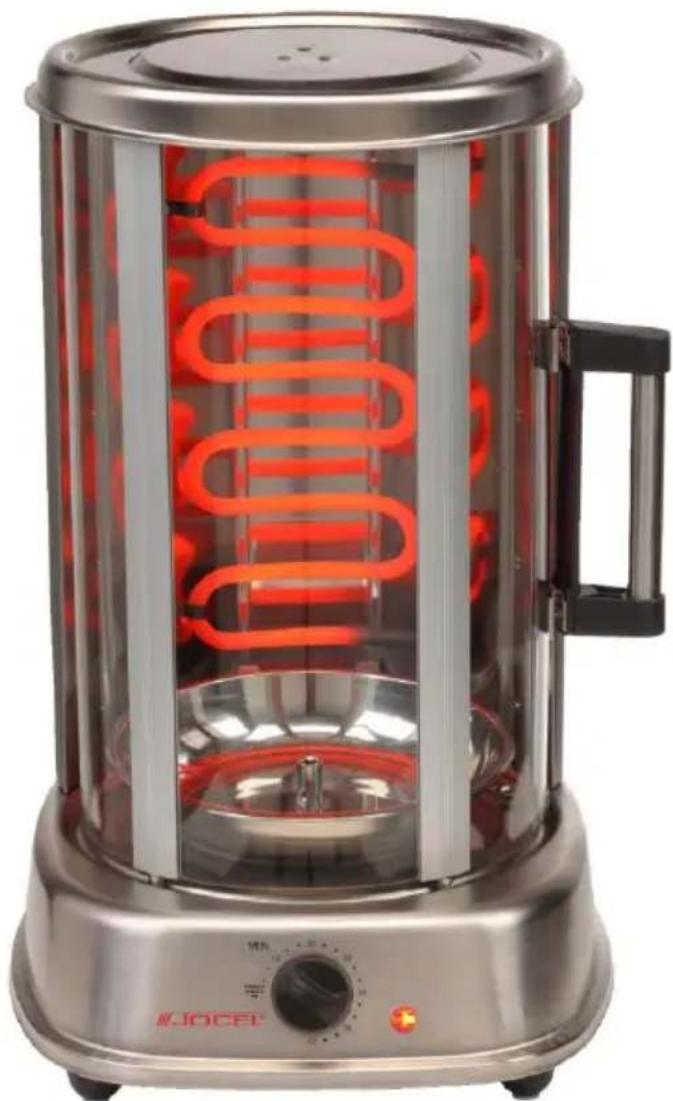
natural_image
Exterior view of a modern electric heater with a coiled orange heating element (no text or symbols visible)JGV011695
Please read carefully this Instruction Manual
A: Parte superior
B: Base
C: Resistência
D: Pega da porta
E: Porta de vidro
F: Temporizador
G: Luz Piloto
natural_image
Hand holding a smartphone lock with two arrows indicating downward motion (no text or symbols visible)natural_image
Illustration of a stainless steel grater with various kitchen utensils and control panel designs (no text or symbols)natural_image
Three technical diagrams showing structural arrangements: a vertical rod, a grid-like structure with arrows, and a circular base (no text or symbols)natural_image
Exterior view of a modern electric heater with two circular metal enclosures (no text or symbols visible)natural_image
Hand holding a black hard-shell device with two red arrows pointing downward, next to a vertical panel (no text or symbols visible)natural_image
Illustration of a stainless steel steamer with multiple side-view diagrams showing various kitchen utensils and dish arrangements (no text or symbols present)natural_image
Three technical diagrams showing a wire rod, a grid structure with arrows, and a circular base (no text or symbols)natural_image
Modern kitchen grater with three-tiered dish arrangement and control panel (no visible text or symbols)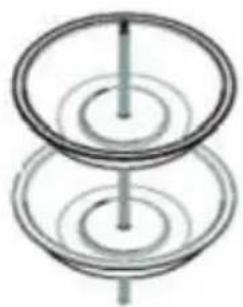
natural_image
Pure diagram of a three-tiered circular structure with no text or symbolsTelef. 00 351 252 910351
Fax: 00 351 252 910367
E-mail: assistencia@jocel.pt
http://www.jocel.pt
SEDE:
Rua Alto do Curro, n.º 280
4770-569 S. COSME DO VALE
V.N. de FAMALICÃO
Telef: 252 910 350/2
Fax: 252 910 368/9
email: jocel@jocel.pt
http://www.jocel.pt
When using electric appliances please follow the below safety:
- Carefully read this manual before using this appliance.
- The temperatures of accessible surfaces are liable to get hot during use. Do not touch hot surfaces. Use handles or knobs. Do not store or place any other item on top of the grill.
- Children must be supervised to ensure they do not play with the appliance.
- Do not immerse appliance in water. Do not immerse any part of this appliance or supply cord in water.
- Do not use the appliance with damage the power cord or if it has been damaged or dropped.
- The use of accessory attachments not supplied with the appliance may cause hazard or injury.
- Do not use outdoors.
- Do not put the appliance on top or near electric hobs.
- Don't let the cable hanged or in touch with hot surfaces.
- Always leave a space of 10 to 15 cm around the appliance.
- Torn off the appliance before cleaning. Wait until the appliance is cold before taking out or put inside accessories or before cleaning.
- To disconnect, turn the TIMER control to "Off", then remove the plug. Always hold the plug, never pull the cord.
- Extreme caution must be used when moving an appliance containing hot oil or other hot liquids or when removing drip pan or disposing of hot grease or other hot liquids
- Do not use metal scouring pads for cleaning, they can release some metal parts that in touch with electrical components may cause hazard.
-
Do not cover or place the unit near flammable materials such as curtains or carpets during its operation as it can cause fire. Do not place any object on top of the appliance when it is in use or when it is hot.
-
Be very careful when you use containers that are not metal or glass.
- Be very careful when removing the drip tray of hot grease or other liquids drip tray.
- Never use accessories not recommended.
- The device is switched off when the TIMER is in the "OFF" position. Where not use the grill unplug it from the mains.
- Always protect your hands when removing or introducing foods to grill while hot.
- Do not use the appliance for other purposes which they have not been provided. This appliance is not a toy. Do not let children play with the appliance.
- Do not allow children to use the appliance.
- Vigilance is required when children are around, do not let them play with the grill.
- Repairs must be done by a Qualified Technician. Never attempt to repair the unit yourself.
- Check regularly that the power cord of the appliance is intact. Do not use the appliance if the power cord is damaged. Contact Technical Support for a replacement power cord.
- This appliance is not suitable for use with external timer or a control separated system.
- This unit cannot be used by children or persons whose physical, sensory or mental capabilities are limited. This appliance lacks experience or knowledge unless they have received some instructions or are supervised by a person responsible for their safety.
- If the power cord is damaged it must be replaced by the Technical Service in order to prevent danger to the user.
SAVE THESE INSTRUCTIONS
A: Top housing
B: Base
C: Heating Element
D: Door Handle
E: Glass Door
F: Timer
G: Indicator light
H: Rotisserie Spit
I: Fork
J: Spear
K: Upper Support (spear)
L: Bottom Support (spear)
M: Drip tray
Included Accessories:
1 Rotisserie spit, 2 Forks, 7 Skewer, 2 Supports, 2 Trays, 1 Drip tray, 2 Fish Baskets
BEFORE FIRST USE
Read all instructions in this manual carefully. The information included in this book will guide you through the versatility of your grill.
Place your grill on a level surface such as a countertop or table. Be sure the sides, back and top of the grill are at least four inches away from any walls, cabinets or objects on the counter or table. Remove all stickers from the grill. Remove Drip Pan, Rotisserie Spit, Forks and Spits and wash them in warm, soapy water or in the dishwasher. Dry thoroughly before placing in the oven.

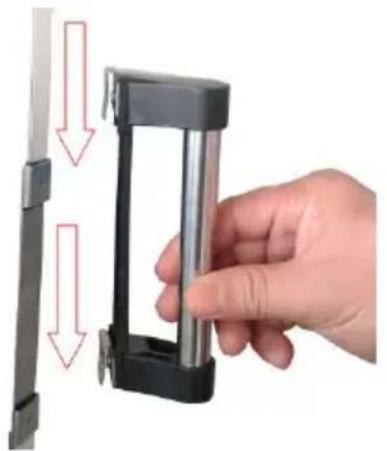
The door handle is removable, in order to let you take it out and clean the inside of unit. Before you use the oven, please assembly the handle yourself by the following assembly instruction picture.
natural_image
Hand holding a black hard-shell device with two arrows pointing downward (no text or symbols visible)When you are ready to use the grill, be sure that the TIMER Control is in the "Off" position and unplugged. We recommend a trial run to familiarize yourself with your grill and to eliminate any protective substance or oil that may have been used for packing and shipping. Plug the cord into a 220-240V outlet. Set the TIMER Control to "20" minutes. A small amount of smoke and odor may be detected. This is normal.
To avoid scratching, marring, discoloration or fire hazard, do not store anything on top of the oven, especially during operation.
OPERATION

Caution: Appliance surfaces are hot during and after use! Do not place anything on top of this appliance. Always wear protective, insulated oven mitts when handling, inserting or removing items from the hot grill. Never attempt to use your Rotisserie without the drip pan in place.

The unit will not start until you close the door well and the inner light is off.
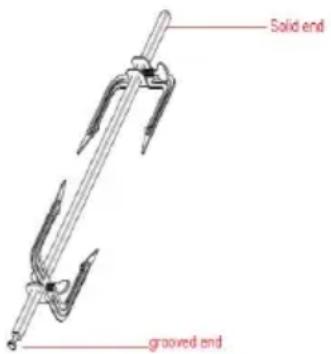
- Place one rotisserie fork on the end of the rotisserie spit opposite the point with the tines facing the center and tighten the screw slightly.
- Slide the pointed end of the rotisserie spit through the center of the food to be cooked.
- Place the other rotisserie fork on the other end of the rotisserie spit with the tines facing the roast.
- Adjust the roast so that it is centered on the rotisserie spit. Make sure the forks are secure on the roast and on the spit and tighten the screws.
- When cooking poultry, it may be necessary to secure legs and wings to the body with butchers twine to make the roast as compact as possible for smooth movement of the rotisserie spit.
-
Season or baste the roast as desired.
-
IMPORTANT! Place the round drip pan into the receptacle at the bottom of the oven to catch the drippings.
- Put the solid end of the rotisserie spit in the drive socket on located in the center of the drip pan.
- Place the grooved end on the spit support located on the top interior of the oven.
- Close the glass door and the inner light will turn off automatically.
- Set the TIMER Control to the time according to RECIPE. If more than 1 hour, set to half the time, check and then set to the remaining time as required.
- When the roast is done, turn the TIMER Control to "OFF" and unplug the oven.

The grill sides and top are hot, use oven mitts or temperature resistant gloves when removing the chicken. You can also use a carving fork and set of tongs to remove the roast.
-
Remove the rotisserie from the top by lifting up and out towards you. Pull the bottom part of the spit out of the drip pan receptacle and place onto a carving station.
-
Place the roast on a cutting board or platter and allow standing for 10-15 minutes, this allows the juices to redistribute throughout the roast making for a moister, flavor full roast.
-
Using a pot holder, loosen the screws on the rotisserie forks and remove the rotisserie spit from the roast. Carefully remove the rotisserie forks and carve the roast.
USING THE GRILL WITHT THE SKEWER SET

Caution: Appliance surfaces are hot during and after use! Do not place anything on top of this appliance. Always wear protective, insulated oven mitts when handling, inserting or removing items from the hot grill. Never attempt to use your Rotisserie without the drip pan in place.

The unit will not start until you close the door well and the inner light is off.
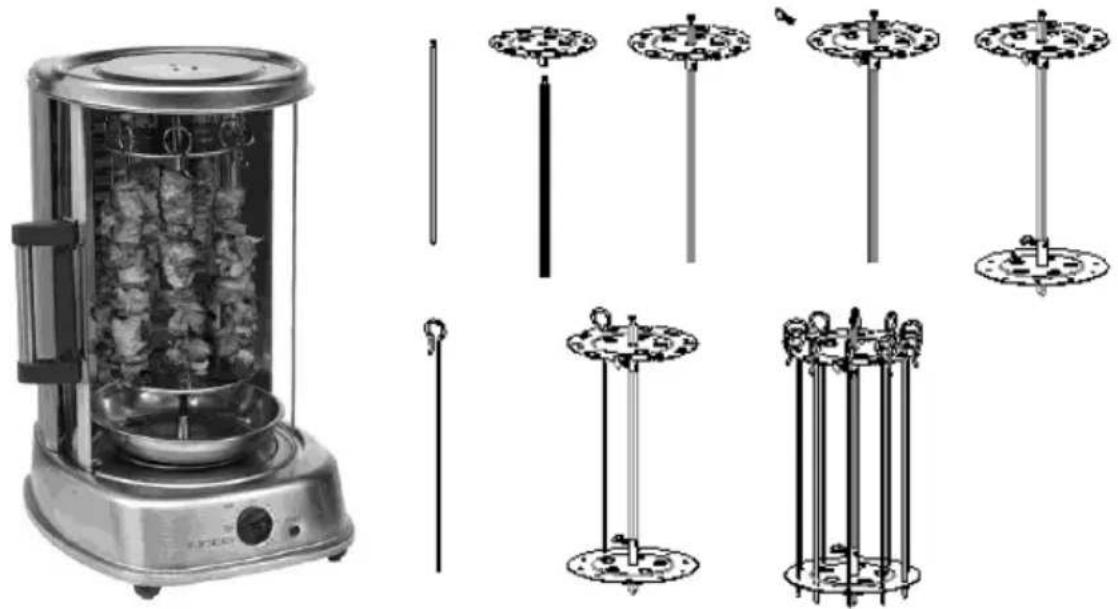
- Assemble the skewer set with following the below steps.
natural_image
Technical illustration of a stainless steel grater with various mechanical components and a separate view of its internal structure (no text or symbols present)-
Place the round drip pan into the receptacle at the bottom of the oven to catch the drippings.
-
Put the solid end of the rotisserie spit in the drive socket on located in the center of the drip pan.
-
Place the grooved end on the spit support on located on the top interior of the grill.
-
Close the glass door well and the inner light will turn off automatically.
-
Set the TIMER Control to the time according to RECIPE. If more than 1 hour, set to half the time, check and then set to the remaining time as required.
-
When the roast is done, turn the TIMER Control to "OFF" and unplug the grill.
-
The grill sides and top are hot, use oven mitts or temperature resistant gloves when removing the Kebab.

Caution: Appliance surfaces are hot during and after use! Do not place anything on top of this appliance. Always wear protective, insulated oven mitts when handling, inserting or removing items from the hot grill. Never attempt to use your Rotisserie without the drip pan in place.
The grill comes with 2 pieces of Fish Basket, please follow the instructions for use.

Caution: Appliance surfaces are hot during and after use! Do not place anything on top of this appliance. Always wear protective, insulated oven mitts when handling, inserting or removing items from the hot grill. Never attempt to use your Rotisserie without the drip pan in place.

The unit will not start until you close the door well and the inner light is off.
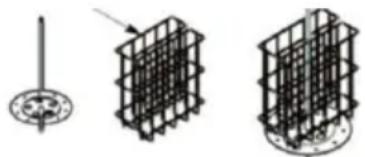
- Assembly the fish basket with following the below steps.
natural_image
Three technical diagrams showing a wire-like structure with a central circular element and two grid-like structures (no text or symbols)- Place the bottom support on the end of the rotisserie spit opposite the point and tighten the screw slightly. It is as the holder of the basket, and then let the spit go through the grid that bulged out of the basket.
- Put fish or other roast into the baskets. Make sure the roast will not touch sides or top of grill.
- Place the round drip pan into the receptacle at the bottom of the oven to catch the drippings.
- Put the solid end of the rotisserie spit in the drive socket on located in the center of the drip pan.
- Place the grooved end on the spit support on located on the top interior of the grill.
- Close the door and the inner light is off automatically.
- Set the TIMER Control to the time according to recommended Recipe. If more than 1 hour, set to half the time, check and then set to the remaining time as required.
- When the roast is done, turn the TIMER Control to "OFF" and unplug the grill.
USING THE GRILL WITH THE FOOD TRAY
The grill comes with 2 pieces of SS Food Tray, please follow the instructions for use.

Caution: Appliance surfaces are hot during and after use! Do not place anything on top of this appliance. Always wear protective, insulated oven mitts when handling, inserting or removing items from the hot grill. Never attempt to use your Rotisserie without the drip pan in place.

The unit will not start until you close the door well and the inner light is off.
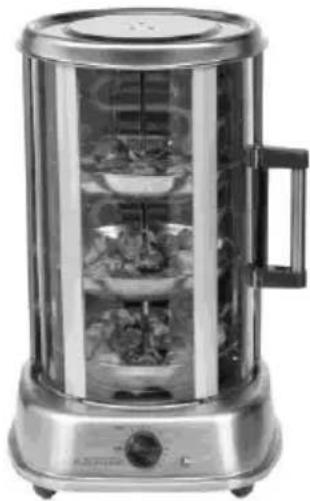
- Assembly the food tray with following the below steps.
natural_image
Modern kitchen grater with three-tiered dish arrangement and control panel (no visible text or symbols)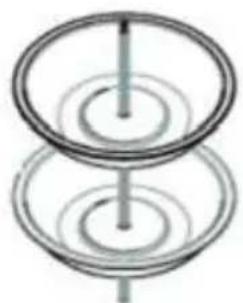
natural_image
Pure diagram of a multi-tiered circular structure with no text or symbols-
Place the round drip pan into the receptacle at the bottom of the oven.
-
Place the food tray into the rotisserie spit and tighten the screw slightly.
-
Put the solid end of the rotisserie spit in the drive socket on located in center of the food tray.
-
Place the grooved end on the spit support on located on the top interior of the grill.
-
Close the door and the inner light is off automatically.
-
Set the TIMER Control to the time according to RECIPE. If more than 1 hour, set to half the time, check and then set to the remaining time as required.
-
When the roast is done, turn the TIMER Control to "Off" and unplug the grill.
RECIPE COOKING TIME
Chicken, duck: 30 a 45 minutes
Steak, Kebab: 45 a 60 minutes
Skewer Meats: 20 a 30 minutes
Fish: 20 a 30 minutes
Vegetables: 15 a 20 minutes
- Turn the TIMER Control to "OFF" and unplug before cleaning.
- Allow the grill and all accessories to cool completely before cleaning.
- Clean the outside of the grill with a damp cloth and dry thoroughly. Clean stubborn stains with a nonabrasive liquid cleaner. Do not use metal scouring pads or abrasive cleaners that will scratch the surface.
- Clean the glass door with a cloth or sponge dampened with warm, soapy water and dry thoroughly.
- Wash the drip pan in hot, sudsy water or in the dishwasher. Clean stubborn stains with a nylon or polyester mesh pad and a mild, nonabrasive cleaner. Rinse and dry thoroughly. If crumbs and spills have accumulated on the bottom of the grill wipe with a damp cloth and dry thoroughly.
- The walls on the inside of the grill allow food particles or spatters during use to be easily wiped clean. Remove heavy spatter after use with a nylon or polyester mesh pad, sponge or cloth dampened with warm water. Blot dry with a paper towel or soft, dry cloth.
- The Rotisserie spit, forks (without screws attached), skewer, supports, tray, fish basket can be placed in the dishwasher or washed in warm soapy water. Hand wash the screws in warm soapy water and dry thoroughly.
TECHNICAL
Voltage: 220-240V-50/60Hz
Power: 1500W
Capacity: 21 litros
Correct Disposal of this product
(Waste Electrical & Electronic Equipment)
(Applicable in the European Union and other European countries with separate collection systems)
This marking shown on the product or its Literature, indicates that it should not be disposed with other household wastes at the end of its working life. To prevent possible harm to the environment or human health from uncontrolled waste disposal, please separate this from other types of wastes and recycle it responsibly to promote the sustainable reuse of material resources. Household users should contact either the retailer where they purchased this product or their local authority office, for details of where and how they can take this item for environmentally safe recycling.
GENERAL WARRANTY TERMS
- The warranty is valid only on presentation of invoice of purchase.
- This WARRANTY is limited exclusively to parts substitution ineffective due to faulty manufacture, made in our workshops.
- The elimination of several faults of the scope of the guarantee is made for repair or replacement of defective parts, according to the discretion of our technical services. Defective parts are our property.
- Are not covered under warranty damage caused by transportation, neglect or poor use, improper assembly or installation, as well as external influences such as: lightning strikes or power, flooding, humidity, etc..
- Lose warranty, all appliances that are not being used according to the instructions, or connected to FEEDING NETWORKS not guarantee a constant voltage of 220/240V.
- The warranty does not cover damages for personal injury or damage caused directly or indirectly in any capacity whatsoever.
- This warranty terminates when it is found to have been undergoing repairs, alterations or interventions by any person not authorized by Jocel.
THE WARRANTY EXPIRES
- With the modification or disappearance of the nameplate of the appliance.
- Exceeded the period of 2 years for home appliances and 06 months for industrial appliances, warranty expires and assistance will be made by charging the costs of manpower, according to current fees.
TECHNICAL ASSISTANCE
For technical assistance request, our services are available through the following contacts:
Telef. 00 351 252 910351
Fax: 00 351 252 910367
E-mail: assistencia@jocel.pt
http://www.jocel.pt
SEDE:
Rua Alto do Curro, n.º 280
4770-569 S. COSME DO VALE
V.N. de FAMALICÃO
Telef: 252 910 350/2
Fax: 252 910 368/9
email: jocel@jocel.pt
http://www.jocel.pt
DECLARATION OF CONFORMITY
CE
We declare on our own responsibility that the machine indicated below
Product VERTICAL GRILL
Brand JOCEL
Model JGV011695
Complies with the following European directives and standards implementation
Low Voltage
2006/95/CE
EN 60335-1: 2012;
EN 62233:2008
EN 60335-2-9:2003+A1:
2004+A2:2006+A12:2007+
A13:2010
Electromagnetic Compatibility
2004/108/CE
EN 55014-1:2006+A1:2009
EN 55014-2:1997/+A1:2001
/+A2:2008
EN 61000-3-2:2006/+A1:
2009/+A2:2009
EN 61000-3-3:2008
Food contact materials
Regulation
1935/2004
Country of Origin: R.P.C.
- SAVE THESE INSTRUCTIONS
- BEFORE FIRST USE
- OPERATION
- USING THE GRILL WITHT THE SKEWER SET
- The unit will not start until you close the door well and the inner light is off.
- USING THE GRILL WITH THE FOOD TRAY
- RECIPE COOKING TIME
- TECHNICAL
- Correct Disposal of this product
- (Waste Electrical & Electronic Equipment)
- GENERAL WARRANTY TERMS
- THE WARRANTY EXPIRES
- TECHNICAL ASSISTANCE
- DECLARATION OF CONFORMITY
- CE
Brand : Jocel
Model : JGV011695
Category : Barbecue