
PL71PHB - Monitor Pyle - Free user manual and instructions
Find the device manual for free PL71PHB Pyle in PDF.


| Product Type | Pair of Adjustable Headrest Monitors |
| Screen Size | 7" TFT-LCD |
| Resolution | 1440 x 234 |
| Aspect Ratio | 16:9 Widescreen |
| Contrast Ratio | 300:1 |
| Brightness | 350 cd/m² |
| Viewing Angle | Up/Down: 160°, Left/Right: 160° |
| Response Time | 25 ms |
| Video Input Systems | AV1, AV2; PAL/NTSC compatible |
| Power Supply | 12V DC (Red: switched +12V ACC, Black: ground) |
| Dimensions (each monitor) | 10" W x 7.5" H x 4.5" D |
| Mounting Post Adjustment | 4 3/4" - 7 1/2" spacing |
| Post Diameter | 1/2" and 3/8" (dual diameter) |
| Built-in Speaker | Yes, mini speaker |
| Remote Control | Full function wireless IR remote |
| IR Headphone Support | Built-in IR transmitter for wireless IR headphones |
| OSD Menu | English |
| Operating Temperature | -20°C to +50°C |
| Accessories Included | 2 monitors, 2 remote controls, 2 assembling sticks, AV input line, power wire, user manual |
Frequently Asked Questions - PL71PHB Pyle
User questions about PL71PHB Pyle
0 question about this device. Answer the ones you know or ask your own.
Ask a new question about this device
Download the instructions for your Monitor in PDF format for free! Find your manual PL71PHB - Pyle and take your electronic device back in hand. On this page are published all the documents necessary for the use of your device. PL71PHB by Pyle.
USER MANUAL PL71PHB Pyle
Pair of Adjustable Headrest with Built-in 7" TFT-LCD Monitors

Warning
▶ Read this manual before using this product.
This product is composed of precision components and should not be dissembled Service must be performed by a factory authorized technician.
▶ Protect the product from moisture and shock.
Attentions:
- When connect the electric power wires, you should make clear about the positive and negative electrode (the red one is positive and the black is negative). If you wrongly connected the fuse in the filter box will be broken protectively. Please replace the fuse in same parameter.
- Because the LCD screen is the main component It should be paid attention to be damp-proof.
- The device must be installed firmly to prevent falling of device that will possibly cause injury and device-broken.
- The connecting-point of direct current (12V) should connect on the Main line of storage battery as possible as it can, for keeping this device in normal operation and be away from the large voltage drop influence.
- There is high voltage cluster in this machine, if you are the professional person, should never to take part the machine if malfunction and contact the dealer in time.
UNIVERSAL HEADREST WITH PRE-INSTALLED MONITOR OWNER'S MANUAL
Congratulations on your purchase of this headrest monitor system. The product is designed and built to deliver excellent video quality and long lasting high performance. For best results please consult a professional mobile electronics installer for application advice or troubleshooting. Please read these instructions thoroughly before installation.
Installation Instructions
- Remove the existing headrest from the seat.
- Adjust the posts of the new headrest to fit the holes in the seat where the headrest will be installed. The post can be moved together or apart: grasp one post in each hand, move the posts in opposing directions (like they were walking) while pushing them toward each other or away from each other.
- Insert the cable in the proper hole. Insert the posts into the holes in the seat and carefully work the headrest into position. Make sure the cable is not pinched.
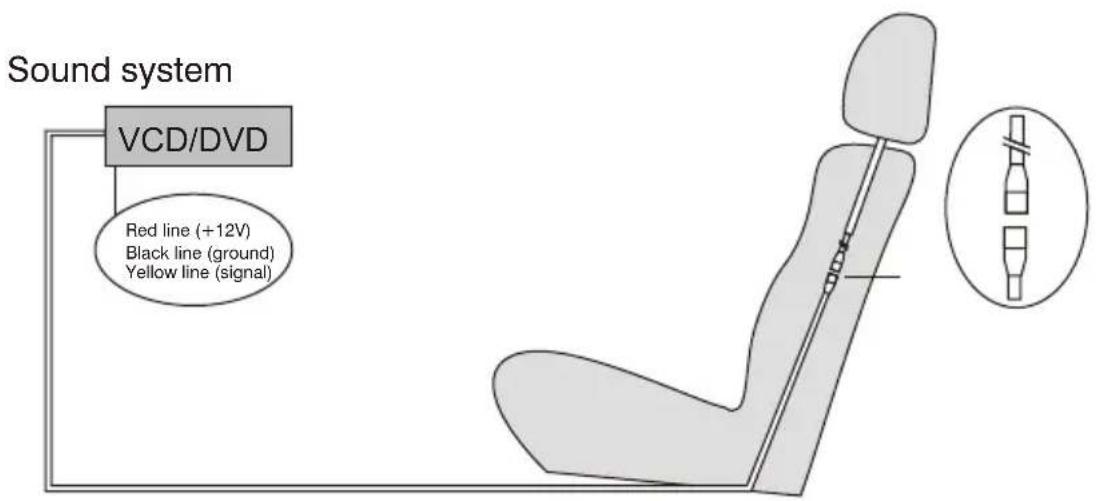
- Run the cable down the seat and out to the location of the video source unit (such as a DVD player).
- Connect the wires as indicated:
a. Red: Connect to a switched (+) 12 volt source (ACC). Use a lead that has (+) 12V when the ignition is on or in the ACC position so the monitors turn off when the key is in the off position. Wiring the monitors "hot" could cause your battery to run down when the engine is not running.
b. Black: Connect to a good chassis ground.
c. Reversing the polarity of the red and black leads will damage the monitor.
d. Connect the video input connector to the video output from the source unit (i.e.DVD player).
e. Test the system.
Install the Pillow
How to use the adapter tubes

natural_image
Simple line drawing of two cylindrical objects with flanges, no text or symbols presentSince the spacing of the mounting holes can vary on different vehicles we supply two adapter tubes (12mm diameter). Use these tubes when the headrest mounting holes in your seat are too large for the posts of the headrest monitor.
Monitor Controls and Features
The monitor is designed to operate in ambient temperature from -20^ to +50^ . Do not bump or press on the screen as this may damage the unit, keep the unit away from moisture. Where are the specifications?
The specifications of this product are subject to our modification without notice.

- V2 in (Alternate video input)
- Earphone jack
- Positive adjustment
-
Negative adjustment
-
Activation of menu indicator
- 16:9/4:3 mode select
- Power on/off
- IR remote window
Remote Contorl

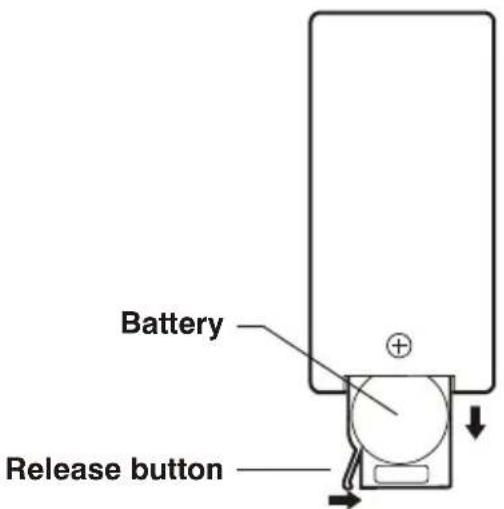
Changing the battery in the remote control
The remote battery is held in a small "drawer" on one edge of the remote. To open this drawer, press and hold the small button on the edge of this drawer (as shown below) and slide the drawer out.
Insert a new battery and push the drawer back fully into the remote.
Installation Diagram

Specification
* Screen Size: 7" TFT-LCD Monitor
* Built-in Mini Speaker
* Aspect Ratio: 16:9 Wide Screen
* 1440 x 234 Resolution
* Contrast Ratio: 300:1
* Brightness: 350cd/m2
* Viewing Angle: U/D: 160°, L/R: 160°
* Response Time: 25ms
* Video Input Systems: AV1, AV2
* PAL/NTSC Compatible
* Full Function Wireless Remote Control
* English OSD Menu
* Built-In IR Transmitter for Wireless IR Headphones
* Adjustable Mourning Posts From 4 3/4" - 7 1/2"
* Dual Diameter Mounting Posts (1/2" 3/8")
* Dimensions: 10" W x 7.5" H x 4.5 D
* Sold as: Pair
Troubleshooting
If you experience operation or performance problems with this product, compare your installation with the electrical wiring diagram on the previous page. If problems persist, read the following troubleshooting tips which may help eliminate the problems.
SYMPTOM
No picture or sound.
No picture.
CAUSE
Power cord is not properly connected.
Video input cables not properly connected.
Video input source is not operating properly.
Video signal not present.
Contrast and/or brightness is set improperly.
REMEDY
Check that power connections are properly made and all fuses are in functioning condition.
Check all cables.
Replace or repair video source (DVD player, video game, etc.)
Check all cables. If necessary, repair or replace video source.
Adjust contrast and brightness levels to see if picture appears.
Accessories
| 7" TFT LCD Pillow Monitor | 2 |
| Wireless Remote Control | 1 |
| Assembling Stick | 2 |
| AV Input Line | 1 |
| Power Wire | 1 |
| User's Manual | 2 |
Thank you for purchasing the headrest TFT LCD color monitor. To enjoy the features of this device and to ensure years of trouble-free operation, please read this manual carefully and follow the instructions.
WARNING:
Hazard do not operate this unit unless vehicle is parked in safe and legal area.
- Warning
- Attentions:
- UNIVERSAL HEADREST WITH PRE-INSTALLED MONITOR OWNER'S MANUAL
- Installation Instructions
- Install the Pillow
- How to use the adapter tubes
- Monitor Controls and Features
- Remote Contorl
- Changing the battery in the remote control
- Installation Diagram
- Specification
- Troubleshooting
- SYMPTOM
- CAUSE
- REMEDY
- Accessories
- WARNING:
Brand : Pyle
Model : PL71PHB
Category : Monitor