
XT-32S7100F - Television SANYO - Free user manual and instructions
Find the device manual for free XT-32S7100F SANYO in PDF.


| Product Type | 32-inch LED LCD Television |
| Screen Size | 32 inches (81 cm diagonal) |
| Resolution | 1366 x 768 (HD Ready) |
| Display Technology | LED-backlit LCD |
| Dimensions (W x H x D) | Approx. 73.5 x 47.2 x 18.5 cm (with stand) |
| Weight | Approx. 4.2 kg (with stand) |
| Power Consumption | Typical 50W, Standby <0.5W |
| Power Supply | AC 100-240V, 50/60Hz |
| Connectivity | 2x HDMI, 1x USB, 1x AV, 1x VGA (PC), Coaxial audio out, Headphone jack |
| Audio | 2 x 8W speakers |
| Remote Control | Infrared remote included |
| Wall Mount | VESA 200x100 mm compatible |
| Additional Features | DVB-T2/C/S2 tuner, USB media playback, EPG, Sleep timer |
| Cleaning Instructions | Wipe screen with soft dry cloth; do not use liquids or abrasive cleaners |
| Safety Warnings | Do not expose to rain or moisture; keep away from heat sources |
| Spare Parts Availability | Contact Sanyo authorized service center for remote, stand, or power board |
| Repair Service | Refer to user manual or visit support website for service locations |
| Documentation Included | User manual, quick start guide, warranty card |
Frequently Asked Questions - XT-32S7100F SANYO
User questions about XT-32S7100F SANYO
0 question about this device. Answer the ones you know or ask your own.
Ask a new question about this device
Download the instructions for your Television in PDF format for free! Find your manual XT-32S7100F - SANYO and take your electronic device back in hand. On this page are published all the documents necessary for the use of your device. XT-32S7100F by SANYO.
USER MANUAL XT-32S7100F SANYO
Thank you for purchasing this Sanyo product.
Please read these instructions carefully before operating this
Product and retain them for future reference.
The images shown in this manual are for illustrative purposes only.

To obtain a more detailed Electronic Copy of this
Manual or much further contents, go to product page at our website www.sanyoappliance.in
E-mail: helpline@sanyoappliance.in

Need help? Please Call at Toll Free No. 1800 419 5088
Chapter 1: Introduction
Safety Precautions 3
Use Environment 4
Cleaning 4
Hanging the TV Set on the Wall 4
Base Installation 4
Standard accessories 5
Optional accessories 5
Basic connection 6
Power connection and aerial.... 6
External Equipment....7
Remote Control Functions 9
Buttons on the TV 10
Chapter 2: General Operation
Switching on 11
Switching off 11
Antenna.... 12
Manual Tuning Set-up.... 12
Setting the Sound System.... 12
Programme Edit.... 12
Chapter 3: Advanced Functions
Adjusting the Picture 13
Adjusting the Sound 13
Timer....13
Settings....14
Lock....14
Selecting a Signal Input 15
Multimedia 15
PC Settings 16
Chapter 4: Other Information
Troubleshooting 17
Specifications 18
Safety Precautions
Warning
Handling the mains plug and lead
Insert the mains plug fully into the socket outlet. (If the mains plug is loose, it could generate heat and cause fire.) Ensure that the mains plug is easily accessible.
Do not touch the mains plug with a wet hand. (This may cause electrical shock.)
Do not use any mains lead other than that provided with this TV. (This may cause fire or electrical shock.)
Do not damage the mains lead. (A damaged lead may cause fire or electrical shock.)
- Do not move the TV with the lead plugged in the socket outlet.
- Do not place a heavy object on the lead or place the lead near a high-temperature object.
- Do not twist the lead, bend it excessively or stretch it.
- Do not pull on the lead. Hold onto the mains plug body when disconnecting the lead.
- Do not use a damaged mains plug or socket outlet.
If you find any abnormality, remove the mains plug immediately!
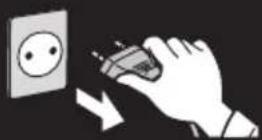
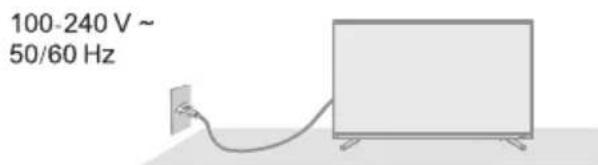
• Mains plug types vary between countries.
Power source
• This TV is designed to operate on:
• 100-240 V \~ 50/60 Hz
• Table-top use / Wall Hanging
Do not use External Voltage Stabilizer with the TV Set
• Inferior Quality stabilizer may cause damage to the TV.
• Warranty is not valid if external stabilizer is used
Do not remove covers and NEVER modify the TV yourself
- Do not remove the rear cover as live parts are accessible when it is removed. There are no user serviceable parts inside. (High-voltage components may cause serious electrical shock.)
- Have the TV checked, adjusted, or repaired at your Sanyo service center.
Do not expose to direct sunlight and other sources of heat
- Avoid exposing the TV to direct sunlight and other sources of heat.

To prevent the spread of fire, keep candles or other open flames away from this product at all times
Do not expose to rain or excessive moisture
• To prevent damage which might result in electric shock or fire, do not expose this TV to rain or excessive moisture. This TV must not be exposed to dripping or splashing water and objects filled with liquid, such as vases, must not be placed on top of or above the TV.
Do not insert foreign objects into the TV
- Do not allow any objects to drop into the TV through the air vents. (Fire or electrical shock may result.)
Do not place the TV on sloped or unstable surfaces, and ensure that the TV does not hang over the edge of the base
• The TV may fall off or tip over.
Use only the dedicated pedestals / mounting equipment
• Using an unapproved pedestal or other fixtures may make the TV unstable, risking injury. Be sure to ask your Sanyo service center to perform setup
- When mounting the product on a wall or ceiling, be sure to install the product according to the method recommended by the manufacturer. This is a safety feature.
Use Environment
- Do not place the set on an unstable cart, stand, or table.
- Place the set on a place that allows good ventilation.
- Do not use the set near damp, and cold areas. Protect the set from overheating.
- Keep the set away from direct sunlight.
- Apparatus shall not be exposed to dripping or splashing and no objects filled with liquids, such as vases, shall be placed on the apparatus.
- Do not use the set near dust place.
Cleaning
- Clean the set by wiping the screen and the cabinet with a soft, clean cloth or some special liquid cleaner.
- Do not apply excessive force to the screen when cleaning.
- Do not use water or other chemical cleaner to clean the screen as this may damage the surface of the TV screen.
Hanging the TV Set on the Wall
Warning: This operation requires two people.
To ensure a safe installation, observe the following safety notes:
- Check that the wall can support the weight of the TV set and wall mount assembly.
- Follow the mounting instructions provided with the wall mount.
• The TV set must be installed on a vertical wall. - Make sure to use only screws suitable for the material of the wall.
• Make sure that the TV set cables are placed so that there is no danger of tripping over them.
All other safety instructions about our TV sets are also applicable here.
Note.
Graphics contained within this operating instructions are for presentation only.
WARNING:
The batteries shall not be exposed to excessive heat such as sunshine, fire or the like.
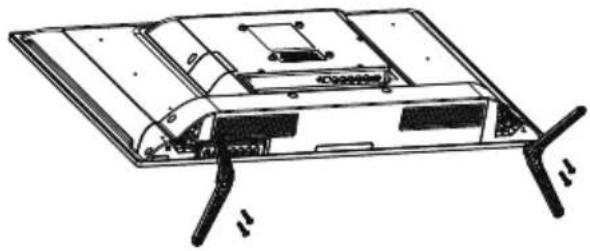
Base Installation
natural_image
Technical line drawing of a flat electronic device with internal components and connectors (no text or symbols)To fix the double support base on the unit by screws, the installation is completed.
Standard accessories
Remote Control
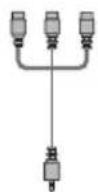
AV Out Cable
Pedestal
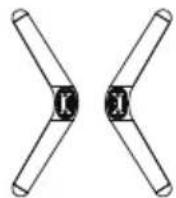
Screws

4 screws M4x12
Battery
AAA size, 2 pcs)

Operating Instructions
• Accessories may not be placed all together. Take care not to throw them away unintentionally.
- This product contains possibly dangerous parts (such as plastic bags), that can be breathed in or swallowed by young children accidentally. Keep these parts out of reach of young children.
Optional accessories
Please contact your Sanyo service center to purchase the recommended optional accessories. For additional details, please read the manual of the optional accessories.
Wall-hanging bracket
Please contact your Sanyo service center to purchase the recommended wall-hanging bracket.
• Holes for wall-hanging bracket installation
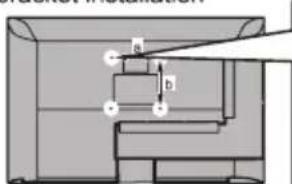
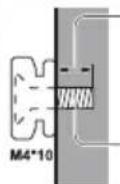
Depth of screw
8 mm
Screw for fixing the TV onto the wall-hanging bracket
(View from the side)
Rear of the TV
- 32" class
a: 100mm
b: 100mm
Warning
Failure to use a Sanyo bracket or choosing to mount the unit yourself will be done at the risk of the consumer.
Always be sure to ask a qualified technician to carry out set up. Incorrect fitting may cause equipment to fall, resulting in injury and product damage. Any damage resulting from not having a professional installer mount your unit will void your warranty.
- When any optional accessories or wall hanging brackets are used, always ensure that the instructions provided are followed fully.
- Do not mount the unit directly below ceiling lights (such as spotlights or halogen lights) which typically give off high heat. Doing so may warp or damage plastic cabinet parts.
Take care when fixing wall brackets to the wall. Wall mounted equipment shall not be grounded by metal within the wall. Always ensure that there are no electrical cables or pipes in the wall before hanging bracket.
• To prevent fall and injury, remove the TV from its fixed wall position when it is no longer in use.
Basic Connection
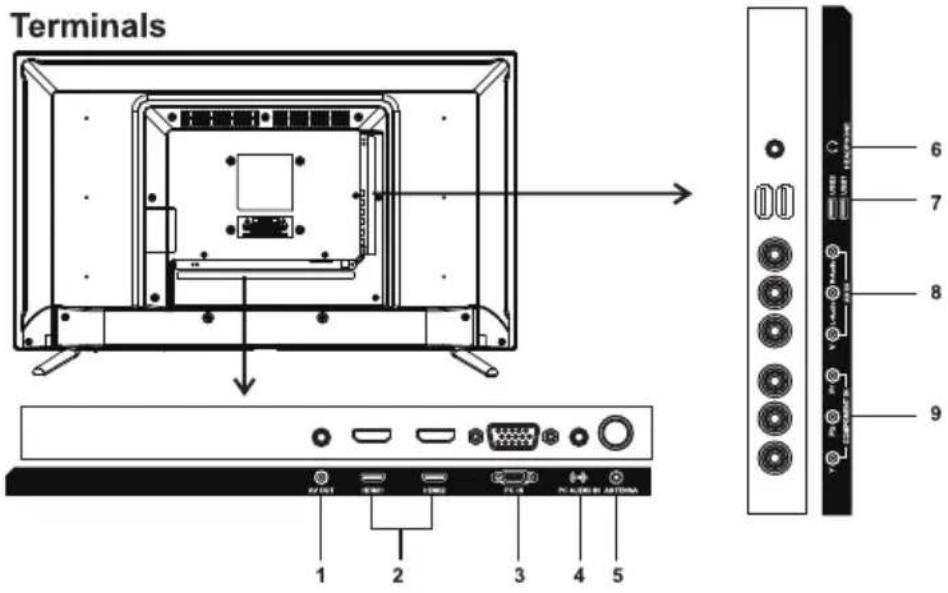
1 AV OUT → (P.8)
2 HDMIx2 (P.7)
3 PC → (P.8)
4 PC AUDIO IN → (P.8)
5 ANTENNA (See below)
6 HEADPHONE → (P.8)
7 USBx2 (P.7)
8 AV IN (P.7)
9 COMPONENT IN → (P.8)
Power connection and aerial
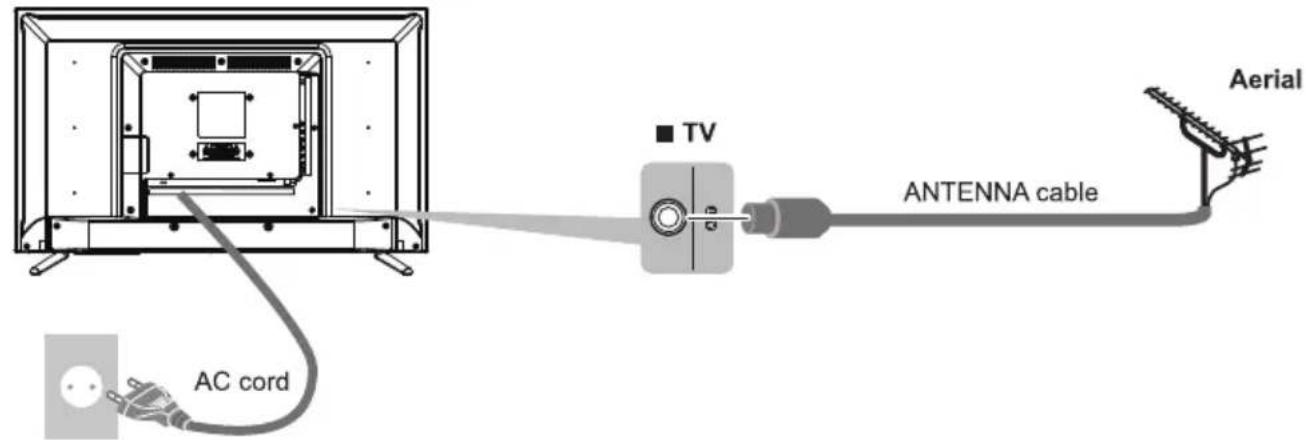
100-240 V \~ 50/60 Hz
Note
- Do not place the RF cable under the TV.
- To obtain optimum quality picture and sound, an aerial, the correct cable(75 ohm coaxial), and the correct terminating plug are required.
- If a communal aerial system is used, you may require the correct connection cable and plug between the wall aerial socket and the TV.
- Your local Television Service Centre or dealer may be able to assist you in obtaining the correct aerial system for your particular area and the accessories required.
- Any matters regarding aerial installation, upgrading of existing systems or accessories required, and the costs incurred, are the responsibility of you, the Customer.
External Equipment
These diagrams show our recommendations for connection of your TV to various pieces of equipment.
- Check the type of terminals and cable plugs are correct when connecting.
- Please also read the manual of the equipment being connected.
- Keep the TV away from electronic equipment (video equipment, etc.) or equipment with an infrared sensor.
Otherwise, distortion of image / sound may occur or operation of other equipment may be interfered.
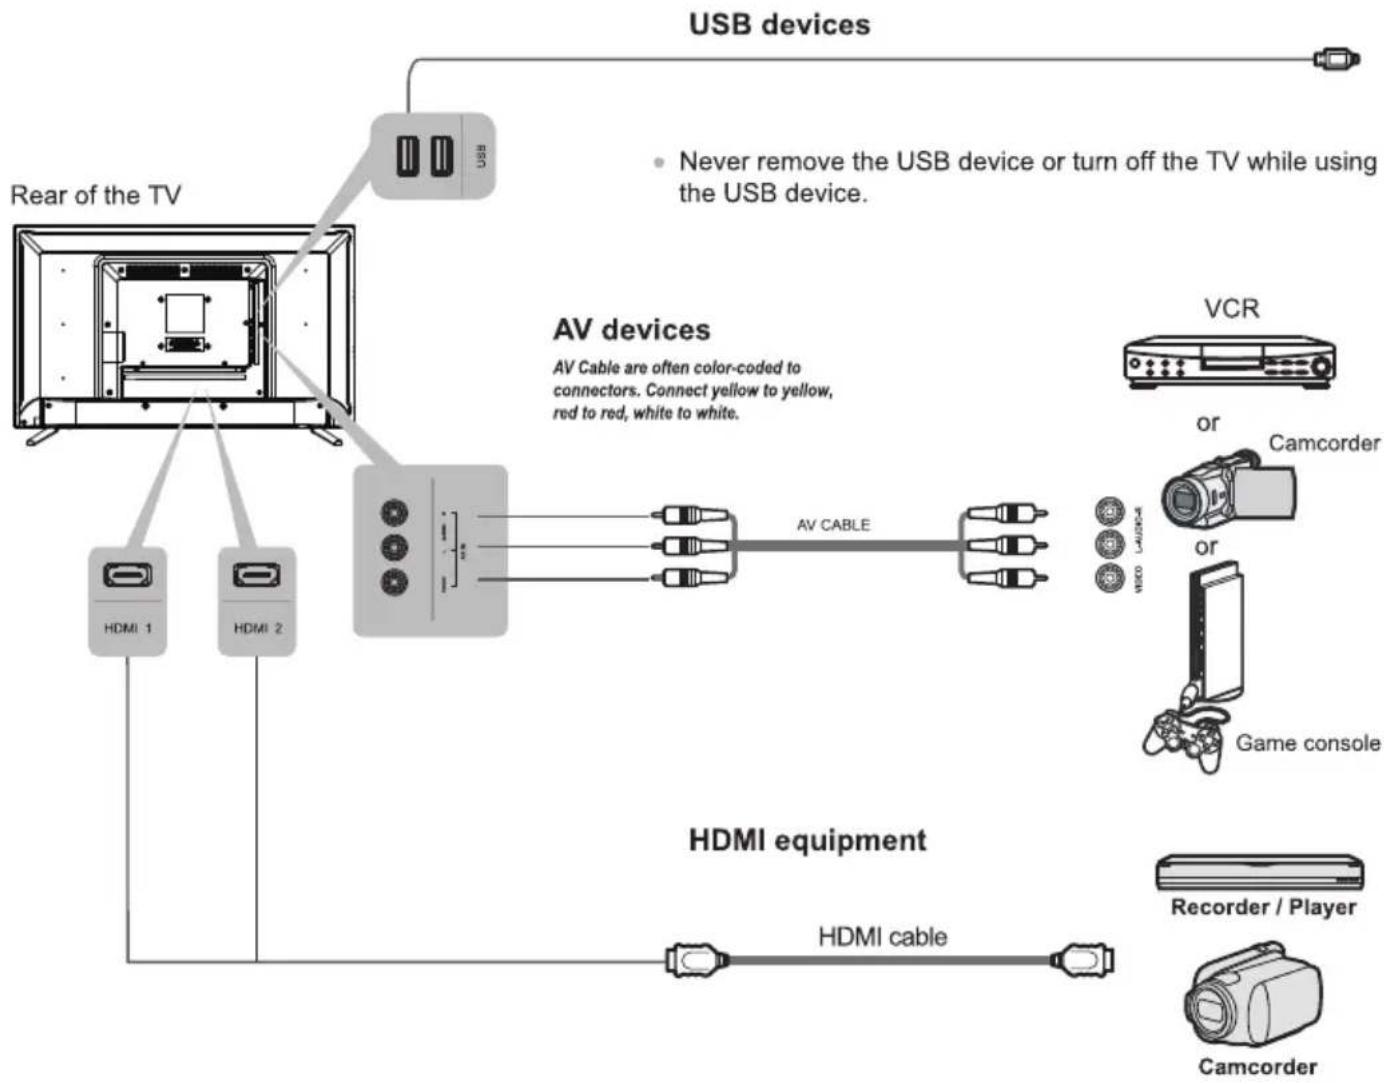
flowchart
graph TD
    A["Rear of the TV"] --> B["USB device"]
    B --> C["AV cable"]
    C --> D["VCR"]
    D --> E["or Camcorder"]
    E --> F["Game console"]
    F --> G["or"]
    G --> H["LC/DAURO"]
    H --> I["HDMI 1"]
    H --> J["HDMI 2"]
    K["Recorder / Player"] --> L["HDMI cable"]
    M["Camcorder"] --> N["HDMI cable"]
    style A fill:#f9f,stroke:#333
    style B fill:#ccf,stroke:#333
    style K fill:#cfc,stroke:#333
    style M fill:#fcc,stroke:#333
Note: If your device has an HDMI connection, we recommend you use that to get the best quality possible.
- If the external device has a DVI output only, use a DVI to HDMI adapter cable to connect to the HDMI terminal. Connect the audio cable to the PC AUDIO IN jack on the TV.
External Equipment
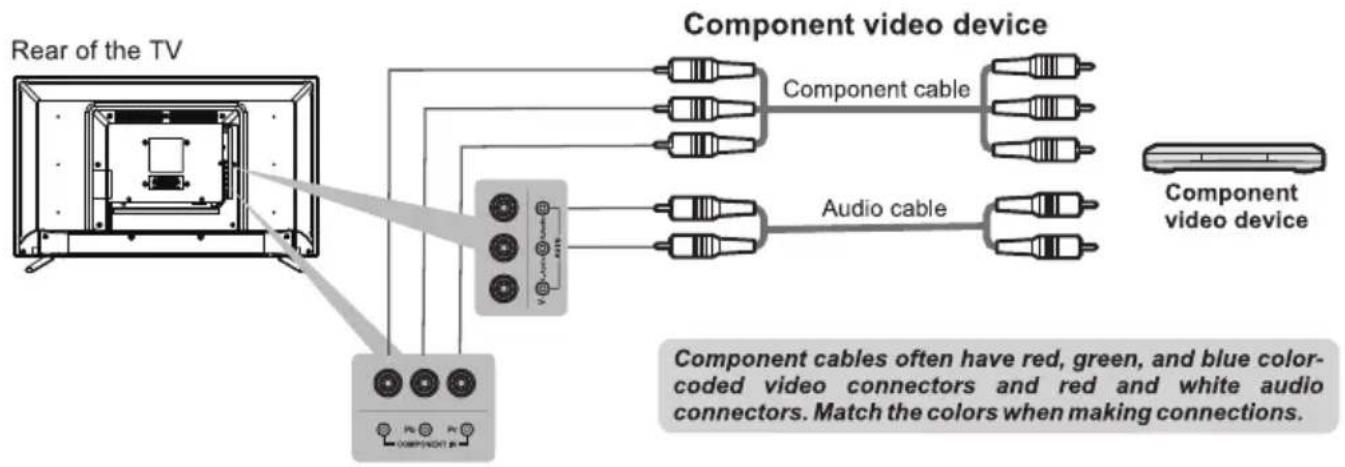
flowchart
graph TD
    A["Rear of the TV"] --> B["Component video device"]
    B --> C["Component cable"]
    B --> D["Audio cable"]
    C --> E["Component video device"]
    D --> E
    B --> F["Component cable with red, green, blue color-coded connectors and red and white audio connectors. Match the colors when making connections."]
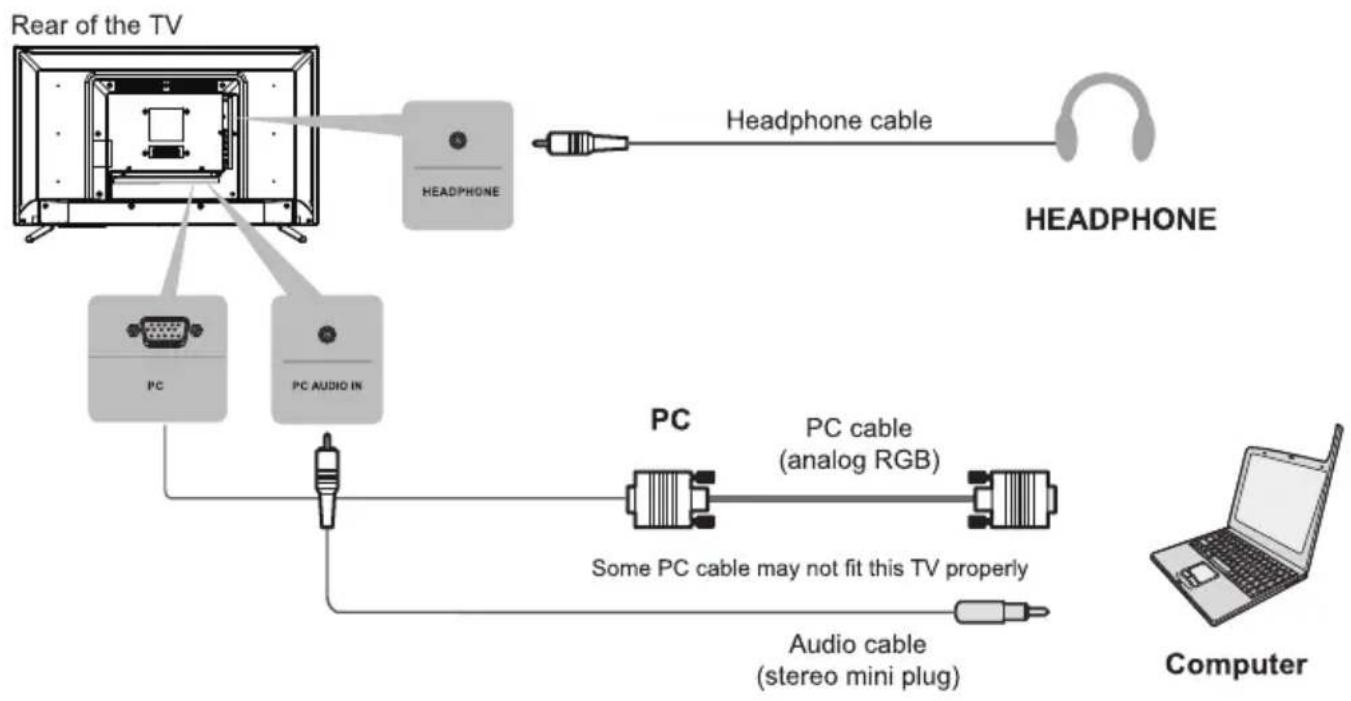
flowchart
graph TD
    A["Rear of the TV"] --> B["PC"]
    A --> C["PC AUDIO IN"]
    B --> D["HEADPHONE"]
    C --> D
    D --> E["Headphone cable"]
    E --> F["HEADPHONE"]
    G["Computer"] --> H["Audio cable (stereo mini plug)"]
    H --> I["Some PC cable may not fit this TV properly"]
    I --> J["PC cable (analog RGB)"]
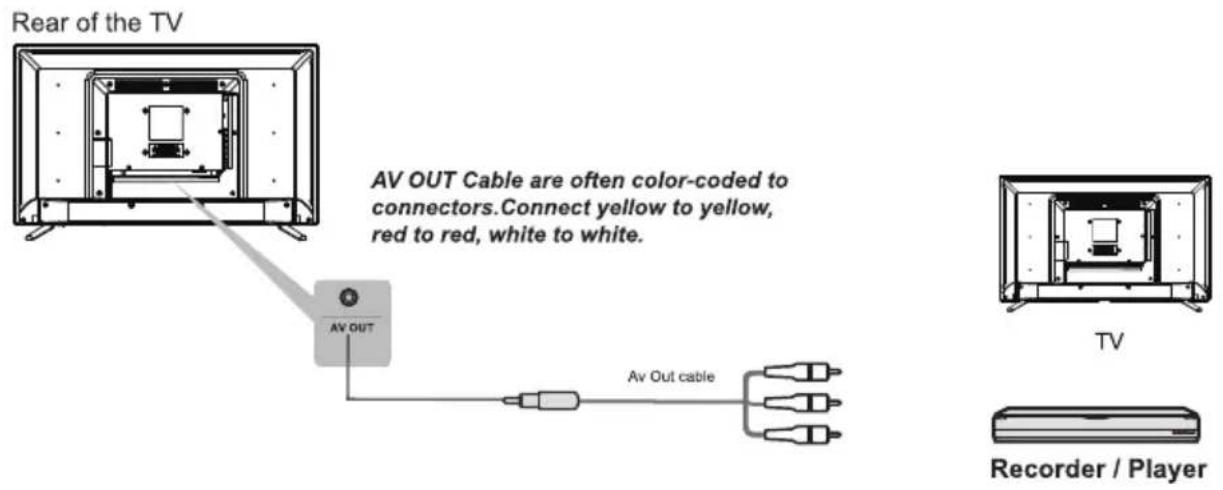
Remote Control Functions
Most of your television's functions are available via the menus that appear on the screen. The remote control supplied with your set can be used to navigate through the menus and to configure all the general settings.
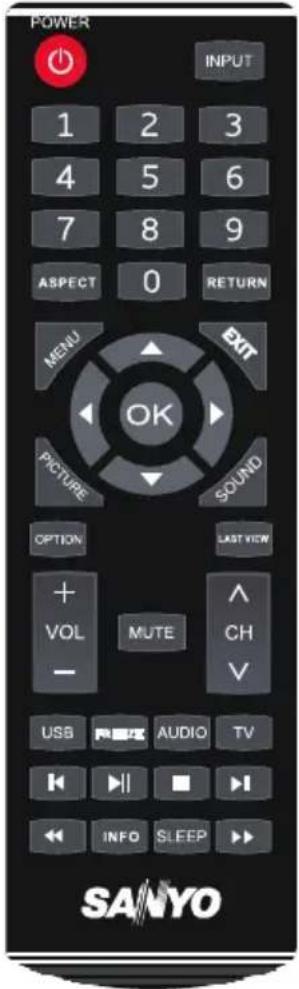
| POWER ⏻ | (On/Off button) Turns the TV on or off. |
| INPUT | when short press opens the Input ▲/▼ to select the desired option, then press Input button to exit. |
| 0-9 | (numeric buttons) Enters channel numbers. |
| ASPECT | Aspect Ratio: Selects the picture size 4:3, 16:9, Zoom1, Zoom2. Note:Some options may not be selectable for certain signal sources. |
| RETURN | Exit the menu and return to the previous menu. |
| MENU | Brings up the menu system. |
| PICTURE | Toggles through the picture preset settings: Vivid, Sports Standard, Cinema,Soft and User. |
| EXIT | Exits the menu system. |
| SOUND | Toggles through the sound modes: Music,Cinema,Standard,Speech and User |
| ▲▼◀▶ | (up, down, left and right direction buttons) Highlights different items in the menu system and adjusts the menu controls. |
| OK | Confirms your selection. |
| OPTION | Not supported. |
| LAST VIEW | Returns you to the previous channel in TV mode. |
| VOL +/- | Increases or decreases the TV's volume. |
| CH <> | Scans up or down through the current channel list. |
| MUTE 📁 | (MUTE) Reduces the TV's volume to its minimum level. Press again to restore the volume. |
| USB | Goes to the USB menu. |
| FREEZE | This key will function to freeze. |
| AUDIO | Press to select your desired audio mode in USB mode. |
| TV | Press to access to the TV mode. |
| ►/II | This key will function as play & pause in USB mode. |
| ■ | This key will function as stop in USB mode. |
| INFO | Displays the status information. |
| SLEEP | Sets the TV to turn off after a given amount of time. |
| ◀◀ | This key will function as backward play in USB. |
| ►► | This key will function as forward play in USB. |
| ◀◀ | This key will function as previous song, video, picture in USB. |
| ►I | This key will function as next song, video, picture in USB. |
Buttons on the TV
Take a certain model for an example:
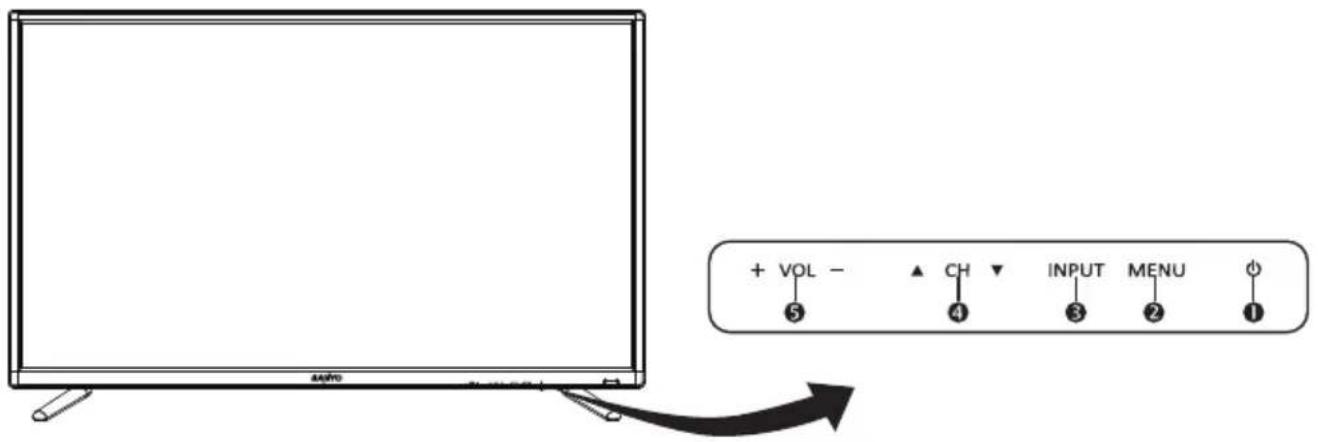
- POWER button
Turns the TV on or standby. (Note: for some models, the POWER button turns the TV on or off.)
- MENU button
Brings up the main menu or press to return to the previous menu.
- INPUT button
Press to select signal source.
- CHANNEL DOWN/UP button
Scans up/down through the channel list. In the menu system, they act like the up/down direction buttons on the remote and adjust menu controls.
Note: The location and names of the function buttons and power button on the TV may vary according to TV model.
- VOLUME DOWN/UP button
Increases/decreases the volume. In the menu system, they act like the right/left direction buttons on the remote and adjust menu controls. (Note: In some menus, VOLUME UP also acts like the OK button on the remote.)
Switching on
Follow the instructions on this page on how to switch on your TV set and the remote control before going on to following pages describing how to use the channel set-up procedure.
- Insert two AAA batteries in the remote control.
Precautions on using batteries:
- Only use the battery types specified.
- Make sure you use the correct polarity.
- Do not mix new and used batteries.
- Do not use rechargeable batteries.
- Do not expose batteries to excessive heat such as sunshine, fire or the like, throw them in a fire, recharge them or try to open them, as this could cause them to leak or explode.
- Remove the batteries from the remote control if you are not using it for a long period of time.
natural_image
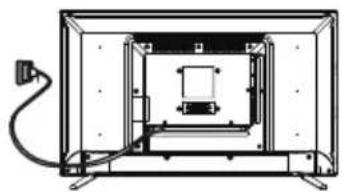
Technical line drawing of a mechanical assembly or enclosure with internal components and wiring (no text or symbols)- Your TV set should only be connected to an AC supply. It must not be connected to a DC supply. If the plug is detached from the cable, do not, under any circumstances, connect it to a mains socket, as there is a risk of electric shock.
Note: The figures are for representation only. The location of the power socket at the back of the television might differ depending on the model.
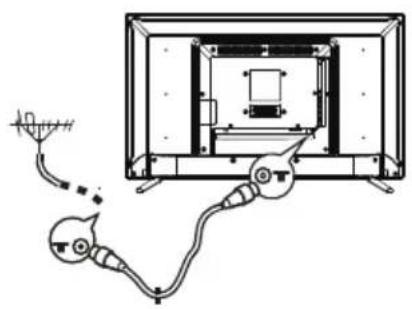
- Connect an outside aerial to the ANTENNA IN socket at the back of the TV set.
The aerial socket (75 OHM - VHF / UHF / cable) can be used for connecting an external aerial or other equipment fitted.
- When powered on, the TV will be turned on directly or be in standby. Note: For some models, switch the TV on by pressing the power button.
If the power indicator lights up, the TV set is in standby mode. Press the ⏻ button on the remote control or on the TV set to turn on the TV.
natural_image
Diagram of a TV set with antenna and cable connections (no text or labels)Switching off
- To put the TV set into standby mode, press the ⏻ button on the remote control or on the TV, the TV set remains powered up, but with low energy consumption.
- To switch off the TV set, unplug the mains socket from the mains outlet. Note: For some models, press the power button to switch off the TV set.
Menu Function
The following instructions will introduce how to access and operate the main menu of the TV. Please note that some function might be unavailable in certain input source.
Antenna
Press MENU button to display the main menu. Press up or down button to select Antenna in the main menu. Press OK button or right button to enter sub-menu.
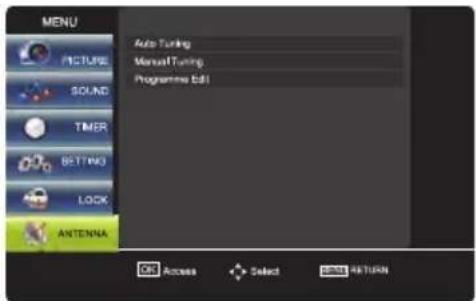
The Antenna menu allows you to select all the settings required to be able to search for and store all the channels you can receive. You also may edit those channels.
Auto Tuning: Searches and stores the active channel automatically.
Manual Tuning: Manually searches and stores the channel in analog mode that have not been stored after automatic tuning.
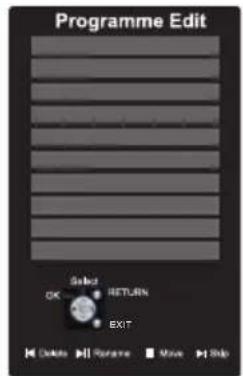
Programme Edit: Delete, Rename, Move or Skip a channel.
Manual Tuning Set-up
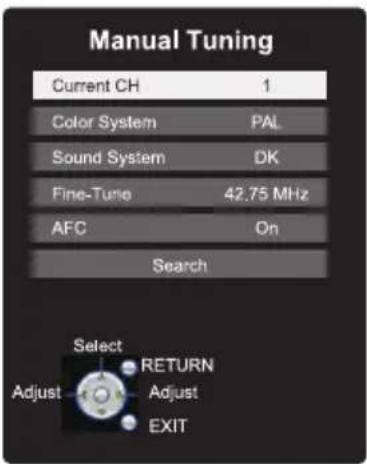
- Activate the Channel menu and press the up or down direction button to select the Manual Tuning option.
-
Press the right direction or OK button to enter the Manual Tuning menu.
-
Select the Current Channel option and press the left or right direction button to select a channel number to store the channel that will be found.
- Press the up or down direction button to select the Search option to search manually.
- Press RETURN key to return or Exit to close the menu.
Color System: use the left or right direction button to select your desired color system.
(Note: The available color system might differ depending on the model).
Setting the Sound System
- Activate the Channel menu and press the up or down direction button to select the Sound System option.
- Press the left or right direction button to select an appropriate sound system: DK, BG and I.
- Press RETURN to return or Exit to close the menu.
Fine-Tune
If the picture is not clear you can fine tune the channel.
- Activate the Channel menu and press the up or down direction button to select the Fine-Tune option.
- Press the left or right direction button to fine tuning.
- Press Return key to return or Exit to close the menu.
Programme Edit
You can use this function to Delete, Rename, Move, Skip the channel.
- Activate the Programme menu and press the up or down direction button to select the Programme Edit option.
- Press the right direction or OK button to enter the Programme Edit menu.
Adjusting the Picture
The menus for adjusting the picture are used to obtain the best picture setting according to your preference, the type of programme you are watching and the ambient lighting. Press up or down button to select Picture in the main menu. Press OK button or right button to enter sub-menu.
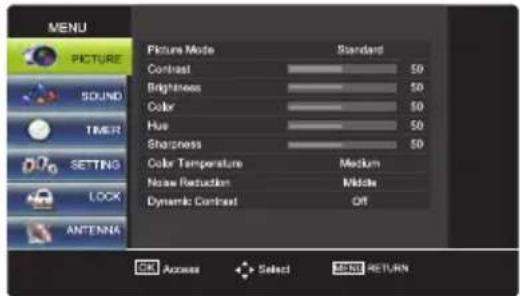
Note: Some options may be not available for certain signal sources.
Picture Mode: Use the up and down direction button to select Picture Mode, then press the left or right direction button to select the picture preset settings: Vivid, Sport, standard, Cinema, Soft, User
Contrast: Adjusts the difference between the light and dark areas of the picture.
Brightness: Adjusts the brightness of the picture.
Color: Adjusts the richness of color.
Hue: Adjusts the balance between the red and green.
Note: Hue is available to be adjusted only when the system of the video signal is NTSC.
Sharpness: Adjusts the crispness of the edges in the picture.
Color Temperature: Adjusts the color temperature of the picture. Options include Medium, Warm and Cool. Cool is for a more blue palette of picture colors; Warm is for a more red palette of picture colors; Medium is between the two.
Noise Reduction: Options include: Off, Low, Middle and High.
Dynamic Contrast: Turns on this option to adjust the contrast automatically.
Adjusting the Sound
Press MENU button to display the main menu.
Press down or up button to select Sound in the main menu. Press OK button or right button to enter sub-menu.
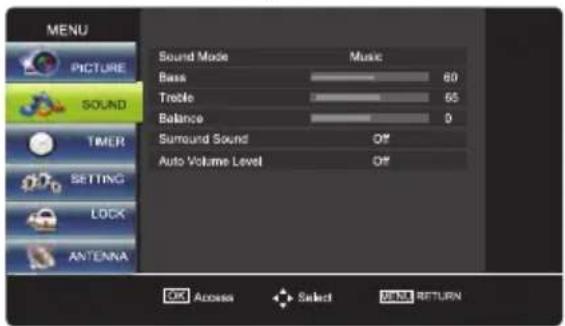
The Sound menu allows you to adjust each option for your listening pleasure.
Sound Mode: Options include Music, Cinema, Standard Speech and User.
Bass: Adjusts the bass frequency settings.
Treble: Adjusts the Treble frequency settings.
Balance: Adjusts the volume between the left and right speaker. Sets to ? n the normal condition.
Surround sound: Options include Off and On.
Auto Volume Level: Options include Off and On.
Timer
Press MENU button to display the main menu.
Press down or up button to select Timer in the main menu. Press OK button or right button to enter sub-menu.
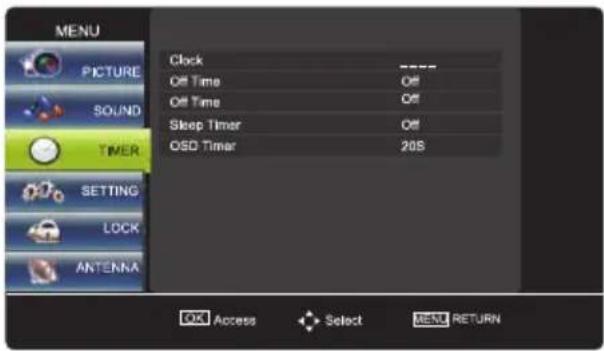
Clock: Sets the current time.
Off time: Options include Off, Once and Every Day.
On time: Options include Off, Once and Every Day.
Sleep Timer: Sets a period of time after which the TV set goes into standby mode.
OSD Timer: No action menu display time.
Note: When there is no signal, TV goes into stand-by mode after 10 minutes automatically
Settings
Press MENU button to display the main menu. Press down or up button to select Settings in the main menu. Press OK button or right button to enter sub-menu.
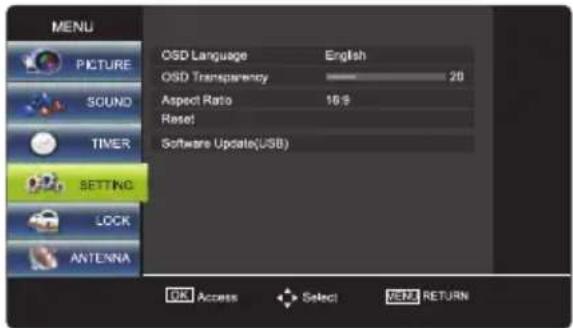
- Press down or up button to select the option that you want to adjust in the Settings menu.
- Press left or right button to adjust or OK button enter.
- After finishing your adjustment, Press RETURN button to save and return back to the previous menu.
OSD Language: English.
OSD Transparency: Adjust the transparency of OSD.
Aspect Ratio: Selects the picture size: 4:3,16:9, Zoom1, Zoom2.
Note: Some options may be not selectable for certain signal sources.
Reset: Press left button selecting Yes to restore factory default.
Software Update(USB): Update the software by USB with downloading software.
Lock
Press MENU button to display the main menu. Press down or up button to select Lock in the main menu. Press OK button or right button to enter sub-menu.
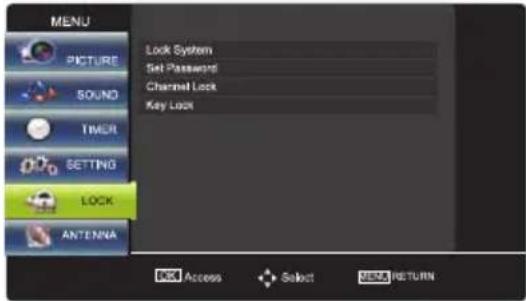
This function allows you to effectively stop anyone without the correct password from watching TV. When you select the Lock System is On, the menu is changed, the options include Set Password, Block program.
Lock System: On/Off.
Set Password: Sets a new password for operating TV. the default password is 0000
Channel Lock: Lock the program you set.
Key Lock: Lock buttons on the TV.
Selecting a Signal Input
Press the input button on the remote control to switch the inputs.
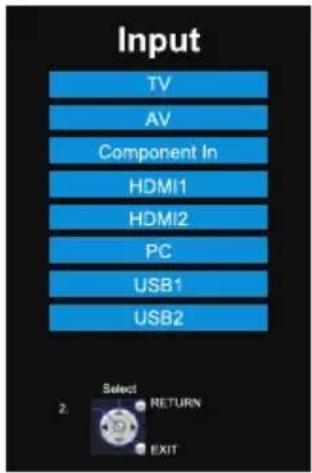
Selecting a Signal Source
- Press the up or down direction button to select your desired source.
(Note: The available source might differ depending on the model.)
- Press the OK button to confirm the selection.
Multimedia
Connect a USB device to a USB socket and press 86% key on remote to enter USB input mode.
You can also select USB input by selecting input AV button. In USB state, if no USB device connected, the USB interface will be displayed.
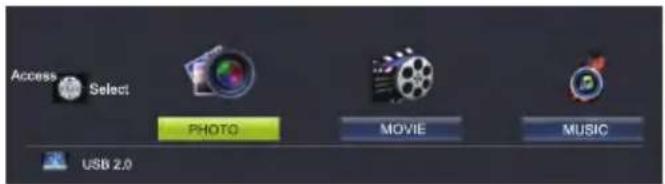
Photo:
-
Select Photo Icon, then press the OK button to enter the USB device.
-
Press the up, down, left or right direction button to select your desired picture file and press OK to show.
-
When showing pictures, you can press OK the button to display the play console. For the play console, press the left or right direction button to select an icon, then press the OK button to confirm.
The play console includes: Play/Pause, Prev, Next, Stop, Repeat Mode, Music On/Off, Playlist, Info., Rotate(clockwise), Rotate(anticlockwise), Zoom In, Zoom Out, Move View.
- Select the Stop icon in play console, and press OK or press Exit to return.
Movie :
-
Select Movie Icon, then press the OK button to enter the USB device.
-
Press the up, down, left or right direction button to select a movie file, then press OK to play it.
-
When playing a movie, you can press the OK button to display the play console. For the play console, press the left or right direction button to select an icon, then press the OK button to confirm.
The play console includes:Play/Pause,FB,FF,Prev.,Next,Stop,Repeat Mode,AB Repeat setting,Playlist,Info.,Slow Forward,Step Forward,Goto Time,Zoom In,Zoom Out,Aspect Ratio and Move View.
- Select the Stop icon in play console, and press OK or press Exit to return.
Music :
-
Select Music Icon, then press the OK button to enter the USB device.
-
Press the up, down, left or right direction button to select your desired music file and press OK to play it.
-
When playing music, press the OK button to display the play console. For the play console, press the left or right direction button to select an icon, then press the OK button to confirm.
The play console includes: Play/Pause, FB, FF, Prev., Next, Stop, Repeat Mode, Mute, Playlist, Info. and Goto Time.
-
While playing music, press ◀ to FB, ▶ to Play/Pause, ■ to Stop, ▶ to FF.
-
Select the Stop icon in play console, and press OK or press Exit to return.
Notes:
- Some non-standard mobile storage device may not be recognized. Please change to use the standard device.
- This system supports the following file formats:
| Meida | File Text | Codec | |
| Video | Audio | ||
| Movie | .avi | MJPEG, Xvid, MPEG-2, MPEG-4, H.264 | MP3, AAC, MP2, PCM, |
| .mp4 | MPEG-2, MPEG-4, H.264 | ||
| .ts / .trp | MPEG-2, H.264 | ||
| .mkv / .mov | MPEG-4, H.264 | ||
| .mpg | MPEG-1, MPEG-2 | ||
| .dat | MPEG-1 | MP2 | |
| .vob | MPEG-2 | ||
| .rm / .rmvb | RV8, RV9, RV10 | COOK | |
| Music | .mp3 | / | MP3 |
| .m4a | / | AAC | |
Note: For coding files, there are many kinds nonstandard coding method, so this system can not be guaranteed to support the file formats using any coding method.
Notes:
- Under the following conditions, this system cannot decode the file and the file cannot be play normally: -The parameters of file, such as the pixel of picture, code rate of audio and video file, sampling rate of audio file, exceed the limit of the system; -The format of file is not matched or the file is harmed. Note: The code rate of this system does not support exceed 20Mbps.
- Hot plug: Do not disconnect when the system is reading or transmitting data, avoid damaging the system or the device.
- Pay attention to the power supply of the device when you are using a mobile hard disk or a digital camera. If the power supply is not sufficient or not stable, you may encounter problems during operating or can not operate at all. In this case, please restart the device, or unplug the device and plug it again, and ensure that its power supply is normal.
-
The system supports standard USB1.1 and USB2.0 devices, such as standard U-disks, MP3 players, mobile hard disks, etc..
-
For obtaining better audio and video quality, It is suggested to use the external device which accords with USB2.0 standard.
- When playing the video with high compression ratio, these phenomenons, such as picture standstill and menu long time response, are normal.
- For some USB device with power supply, such as large size hard disk, MP4, etc., Suggests using it with power to avoid electric power shortage. The parameters of file, such as the pixel of picture, code rate of audio and video file, sampling rate of audio file, exceed the limit of the system.
PC Settings
Display the menu by pressing the MENU button. Press the up or down direction button to select the PC icon and press the OK button to enter the PC menu.
Note: This function is only available in PC mode.
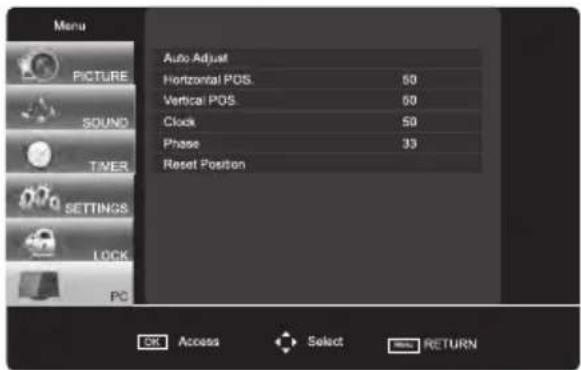
Auto Adjust: Press the right direction or OK button to adjust the picture's position, phase and clock automatically. The menu will auto exit when finishing the adjusting. Note: This function is only available in PC mode.
H Position (Horizontal Pos.): Adjusts the picture's position left or right.
V Position (Vertical Pos.): Adjusts the picture's position upward or downward.
Clock: Adjusts the clock sync of the picture.
Phase: Adjusts the picture if there is flicker of screen letters, color misalignment, or blurring.
Reset Position
Press the OK button to restore the default position.
Press Return key to return to menu or Exit key to close the menu.
Troubleshooting
Most problems you encounter with your TV can be corrected by consulting the following troubleshooting list.
No picture, no sound
- Check if the fuse or circuit breaker is working.
- Plug another electrical device into the outlet to make sure it is working or turned on.
- Power plug is in a bad contact with the outlet.
- Check the signal source.
No color
- Change the color system.
- Adjust the saturation.
- Try another channel. Black-white program may be received.
Remote control does not work
- Change the batteries.
- Batteries are not installed correctly.
- Main power is not connected.
No picture, normal sound
- Adjust the brightness and contrast.
- Broadcasting failure may happen.
Normal picture, no sound
- Press the Vol+ button to increase volume.
- Volume is set to mute, press the mute button to restore sound.
- Change the sound system.
- Broadcasting failure may happen.
Unorderly ripples on the picture
It is usually caused by local interference, such as cars, daylight lamps and hair driers. Adjust the antenna to minimize the interference.
Blank screen in PC mode
Perhaps the TV can not recognize the resolution set by the PC. Suggest to change to the best resolution or other standard resolutions of the Windows system.
Snowy dots and interference
If the antenna is located in the fringe area of a television signal where the signal is weak, the picture may be marred by dots. When the signal is extremely weak, it may be necessary to install a special antenna to improve the reception.
- Adjust the position and orientation of the indoor/outdoor antenna.
- Check the connection of antenna.
- Fine tune the channel.
- Try another channel. Broadcasting failure may happen.
Ignition
Black spots or horizontal streaks appear, or the picture flutters or drifts. This is usually caused by interference from car ignition system, neon lamps, electric drills, or other electrical appliance.
Radio frequency interference
This interference produces moving ripples or diagonal streaks, and in some case, loss of contrast in the picture. Find out and remove the radio interference source.
For India only
Declaration of Conformity with the requirements of the e-waste (Management and Handling) Rules, 2011 (adopted by Notification S.O.1035(E) of Ministry of Environment and Forests)
The Product is in conformity with the requirements of Rule 13 of the e-waste Rules. The content of hazardous substance with the exemption of the applications listed in SCHEDULE II of the e-waste
Rules:
- Lead (Pb) – not over 0.1% by weight;
- Cadmium (Cd) - not over 0.01% by weight;
- Mercury (Hg) – not over 0.1% by weight;
- Hexavalent chromium (Cr6+) – not over 0.1% by weight;
- Polybrominated biphenyls (PBBs) – not over 0.1% by weight;
- Polybrominated diphenyl ethers (PBDEs) – not over 0.1% by weight.

* For the purpose of recycling to facilitate effective utilization of resources, please return this product to a nearby authorized collection center, registered dismantler or recycler, or Sanyo service center when disposing of this product.
Sanyo Toll Free No.1800 419 5088
Specifications
| Model No. | XT-32S7100F | |
| Power Source | 100 – 240 V ~ 50/60 Hz | |
| Power Consumption | Power Rating | 55 W |
| Standby condition | < 0.5 W | |
| Display panel | Visible screen size | 80 cm |
| Number of pixels | 2,073,600 (1920(W) x 1080 (H)) | |
| Dimensions ( LxBxH ) | 72.9 cm x 46.9 cm x 19.0 cm(With Pedestal)72.9 cm x 43.2 cm x 8.8 cm(TV only) | |
| Net weight | 4.2 kg Net (With Pedestal)4.0 kg Net (TV only) | |
| Gross Weight | 6.5 kg | |
| Sound | Speaker | 16 Ω |
| Audio output | 16 W ( 8 W + 8 W ) | |
| TV System | PAL/SECAM, BG/DK/I, NTSC(AV) | |
| Connection terminals | AV IN | AUDIO L - R RCA PIN Type x 1 |
| VIDEO RCA PIN Type x 1 | ||
| Component In | AUDIO L - R (Shared with AV In) | |
| Component Y Pb Pr | ||
| HDMI input | HDMI connector x 2 | |
| PC | PC(15 pins) x 1 | |
| PC AUDIO IN | PC AUDIO IN connector x 1 | |
| USB | USB 2.0 TYPE A Connector x 2 (DC 5 V, MAX. 500 mA) | |
| ANTENNA | Aerial connector x 1 | |
| AV OUT | AV OUT x 1 | |
| HEADPHONE | HEADPHONE x 1 | |
Note
- Design and Specifications are subject to change without notice. Weight and Dimensions shown are approximate.
- Chapter 1: Introduction
- Chapter 2: General Operation
- Chapter 3: Advanced Functions
- Chapter 4: Other Information
- Safety Precautions
- Warning
- Handling the mains plug and lead
- Power source
- Do not use External Voltage Stabilizer with the TV Set
- Do not remove covers and NEVER modify the TV yourself
- Do not expose to direct sunlight and other sources of heat
- Do not expose to rain or excessive moisture
- Do not insert foreign objects into the TV
- Do not place the TV on sloped or unstable surfaces, and ensure that the TV does not hang over the edge of the base
- Use only the dedicated pedestals / mounting equipment
- Use Environment
- Cleaning
- Hanging the TV Set on the Wall
- Note.
- WARNING:
- Base Installation
- Standard accessories
- Optional accessories
- Wall-hanging bracket
- Note
- External Equipment
- Remote Control Functions
- Buttons on the TV
- Switching on
- Switching off
- Menu Function
- Antenna
- Manual Tuning Set-up
- Setting the Sound System
- Fine-Tune
- Programme Edit
- Adjusting the Picture
- Adjusting the Sound
- Timer
- Settings
- Lock
- Selecting a Signal Input
- Selecting a Signal Source
- Multimedia
- Photo:
- Movie :
- Music :
- Notes:
- PC Settings
- Reset Position
- Troubleshooting
- No picture, no sound
- No color
- Remote control does not work
- No picture, normal sound
- Normal picture, no sound
- Unorderly ripples on the picture
- Blank screen in PC mode
- Snowy dots and interference
- Ignition
- Radio frequency interference
- For India only
- Rules:
Brand : SANYO
Model : XT-32S7100F
Category : Television