
DBU-31 - CD Player DAEWOO - Free user manual and instructions
Find the device manual for free DBU-31 DAEWOO in PDF.


| Product Type | CD Player |
| Brand | Daewoo |
| Model | DBU-31 |
| Dimensions (W x H x D) | approx. 430 x 100 x 300 mm |
| Weight | approx. 3.5 kg |
| Power Supply | AC 120V/60Hz or 230V/50Hz (selectable) |
| Power Consumption | approx. 15 W |
| Disc Compatibility | CD, CD-R, CD-RW |
| Playback Modes | Play, Pause, Stop, Skip, Repeat (1/All), Program, Random |
| Audio Output | Stereo RCA (Line Out), Headphone Jack 3.5mm |
| Remote Control | Included (battery type: CR2025 or AAA) |
| Display | LED or LCD track/time display |
| Maintenance | Clean lens with CD lens cleaner; wipe exterior with dry cloth |
| Safety | Do not expose to moisture or liquids; keep away from heat sources |
| Spare Parts | Remote control, power cord |
| Reparability | Refer to qualified service personnel for repairs |
| Manual | 33 pages (EN, ES, PT) |
Frequently Asked Questions - DBU-31 DAEWOO
User questions about DBU-31 DAEWOO
0 question about this device. Answer the ones you know or ask your own.
Ask a new question about this device
Download the instructions for your CD Player in PDF format for free! Find your manual DBU-31 - DAEWOO and take your electronic device back in hand. On this page are published all the documents necessary for the use of your device. DBU-31 by DAEWOO.
USER MANUAL DBU-31 DAEWOO
DAEWOO INTERNATIONAL
natural_image
DAEWOO International portable radio with digital display and control knobs (no visible text or symbols on device body)ADVERTENCIA
ETIQUETA DE PRODUCTO LÁSER DE CLASE 1:
natural_image
Line drawing of a portable electronic device with a rotating lever and scroll (no text or symbols)natural_image
Line drawing of a portable radio device with directional arrows indicating rotation (no text or symbols)REPRODUCIR / PAUSA ▶II
REPRODUCIR / PAUSA ▶II
natural_image
DAEWOO International portable radio with digital display and control buttons (no visible text or symbols on device body)WARNING
TO PREVENT FIRE OR SHOCK HAZARD DO NOT EXPOSE THIS APPLIANCE TO RAIN OR MOISTURE.
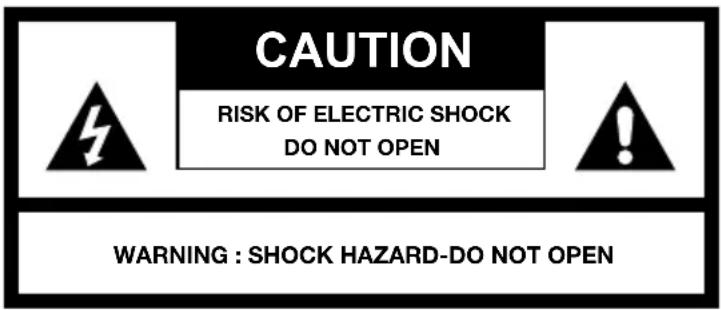

LIGHTNING FLASH WITH ARROWHEAD SYMBOL -
within an equilateral triangle, is intended to alert the user to the presence of uninsulated dangerous voltage within the products enclosure that may be of sufficient magnitude to constitute a risk of electric shock to persons.

EXCLAMATION POINT - within an equilateral triangle, is used to indicate that a specific component shall be replaced only by the component specified in that documentation for safety reason.
The following label has been affixed to the unit, listing the proper procedure for working with the laser beam:
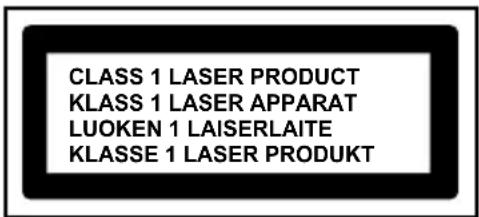

CLASS 1 LASER PRODUCT LABEL -
This label is attached to the place as illustrated to inform that the apparatus contains a laser component.
WARNING LABEL INFORMING OF RADIATION -
This label is placed inside the unit. As shown in the illustration. To warn against further measures on the unit. The equipment contains a laser radiating laser rays according to the limit of laser product of class 1.
SAFETY INSTRUCTIONS
- READ INSTRUCTIONS - All the safety and operating instructions should be read before the appliance is operated.
- RETAIN INSTRUCTIONS - The safety and operating instruction should be retained for future reference.
- HEED WARNINGS - All warnings on the appliance and in the operating instructions should be adhered to.
- FOLLOW INSTRUCTIONS - All operating instructions should be followed.
- WATER AND MOISTURE - The appliance should not be used near water, for example, near a bathtub, washbowl, .tnemesab tew a ni ro loop gnimmiws ,butyrdnual ,knis nehctil
- VENTILATION - The appliance should be situated so that its location or position does not interfere with its proper ventilation. Do not place on bed, sofa, rug or similar surface that may block the ventilation openings, in a built-in installation, such as a bookcase or cabinet that may impede the flow of air through the ventilation openings.
- HEAT - The appliance should be situated away from heat sources such as radiators, stoves, or other appliances (including amplifiers) that produce heat.
- POWER SOURCE - The appliance should be connected to power supply only of the type described in the operating instructions or as marked on the appliance.
- POWER CORD PROTECTION - Power supply cords should be routed so that they are not likely to be walked on or pinched by items placed upon or against them.
- POWER LINES - An outdoor antenna should be located away from power lines.
- OBJECT and LIQUID ENTRY - Care should be taken so that objects do not fall and liquids are not spilled into the enclosure through openings.
- ESD WARNING - The display does not function properly or no reaction to operation of any the control may due to the electrostatic discharge. Switch off and unplug the set. Reconnect after a few seconds.
- DAMAGE REQUIRING SERVICE - The appliance should be serviced by qualified service personnel when:
a. The power-supply cord or plug has been damaged.
b. Objects have fallen into, or liquid has been spilled into the appliance enclosure.
c. The appliance has been exposed to rain.
d. The appliance has been dropped, or the enclosure damaged.
e. The appliance does not appear to operate normally.
- SERVICING - The user should not attempt to service the appliance beyond that described in the user operating instructions. All other servicing should be referred to qualified service personnel.
Notes:
a. Dirty or scratched CD may cause a skipping problem. Clean or replace the CD.
b. If an error display or malfunction occurs, disconnect the AC cord and remove all the batteries. Then turn the power back on.
BEFORE OPERATION
Notes: CONCERNING COMPACT DISCS.
Since dirty, damaged or warped discs may damage the appliance, care should be taken of the followings items:
a. Usable compact discs. Use only compact disc with the mark shown below.
b. CD compact disc only with digital audio signals.
POWER SOURCES
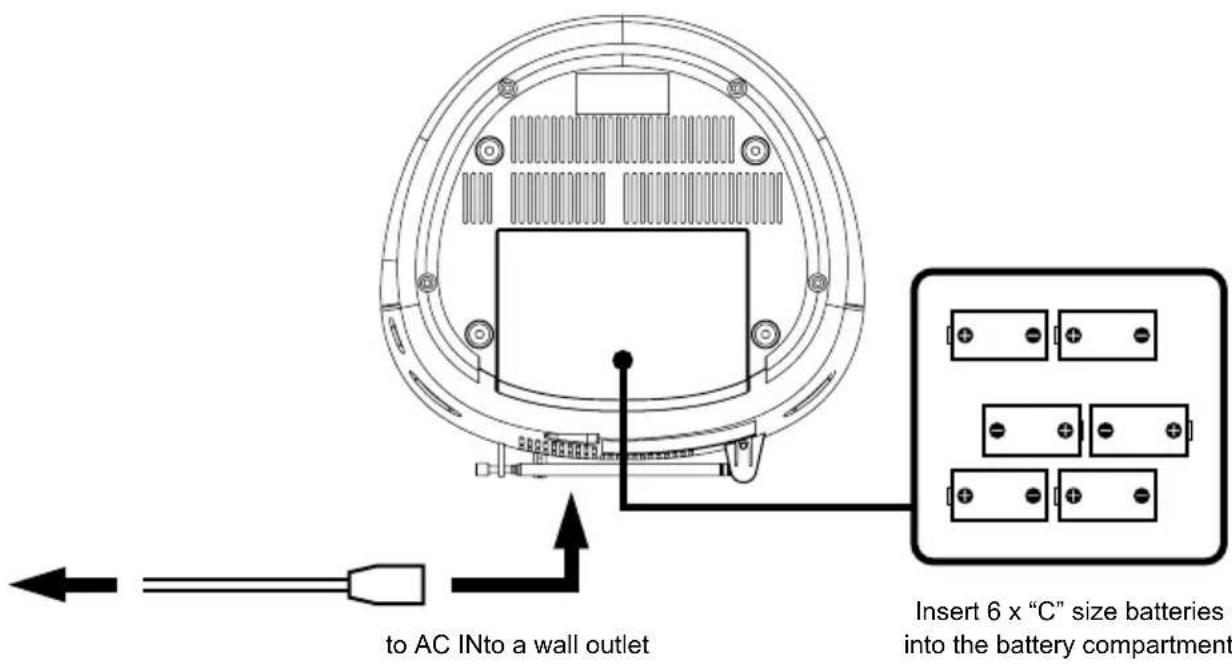
AC POWER
You can power your portable system by plugging the detachable AC power cord into the AC inlet at the back of the unit and into a wall AC power outlet. Check that the rated voltage of your appliance matches your local voltage. Make sure that the AC power cord is fully inserted into the appliance.
BATTERY POWER
Insert 6 x “C” size batteries into the battery compartment. Be sure that the batteries are inserted correctly to avoid damage to the appliance. Always remove the batteries when appliance will not be used for a long period of time, as this will cause leakage to the batteries and subsequently damage to your set.
Notes:
- Use batteries of the same type. Never use different types of batteries together.
- To use the appliance with batteries, disconnect the AC power cord from it.
LOCATION OF CONTROL
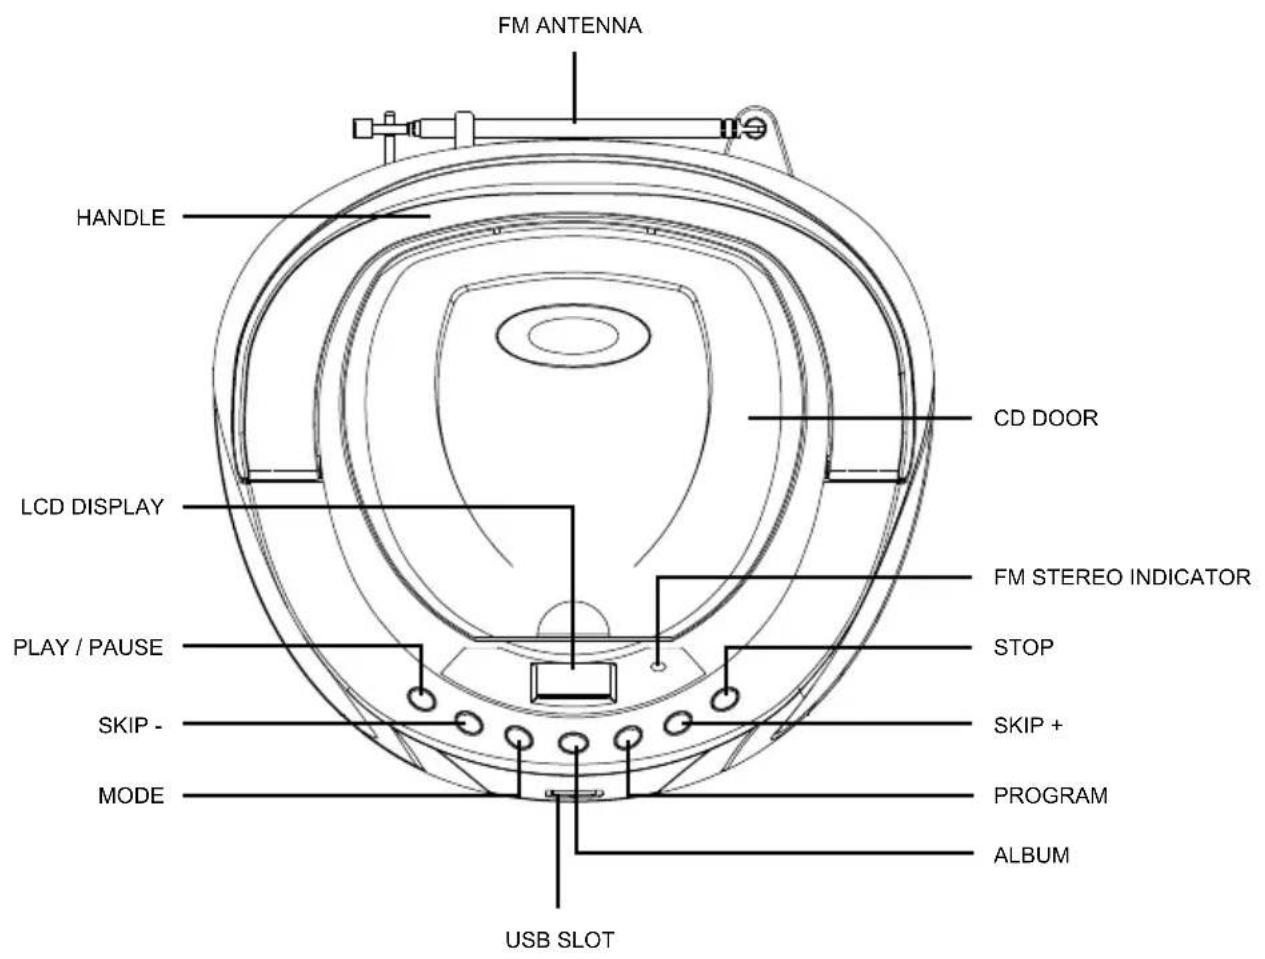
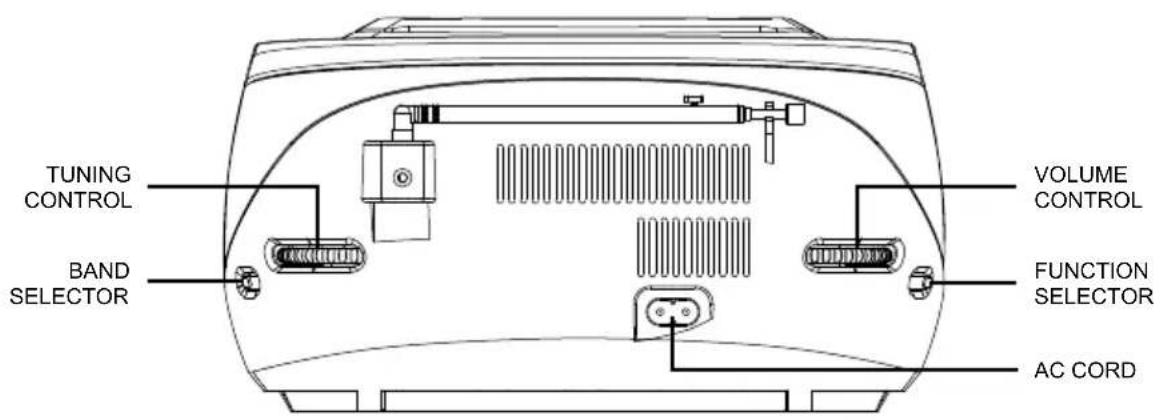
RADIO OPERATION
GENERAL OPERATION
- Set the "FUNCTION" selector to "RADIO" mode.
- Select desired band by using the "BAND" selector.
- Adjust radio frequency to your desired station by using the "TUNING" control.
- Adjust the "VOLUME" control to the desired level.
FM / FM-STEREO RECEPTION
- Set the "BAND" selector to FM mode for MONO reception.
- Set the "BAND" selector to FM ST. mode for FM STEREO reception. The Stereo indicator light up to show FM ST. mode.
FOR BETTER RECEPTION
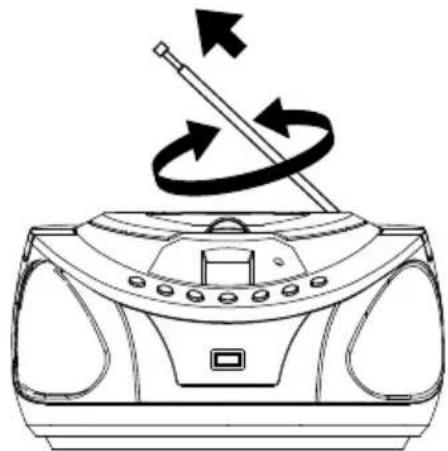
- Reorient the antenna for better reception.
natural_image
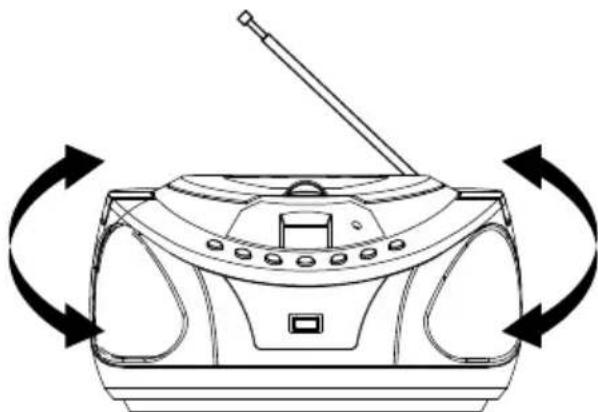
Line drawing of a portable radio device with a rotating pointer and scroll (no text or symbols)- Reorient the appliance to get better AM reception.
natural_image
Line drawing of a portable radio device with directional arrows indicating rotation (no text or symbols)CD / MP3 OPERATION
GENERAL OPERATION
PLAY / PAUSE ▶Press to start playing CD / MP3 disc.
Press again to stop playing CD / MP3 operation temporarily.
Press again to resume playback.
SKIP + ▶▶& Press to go to the next track or back to the previous track.
SKIP - Press and hold while playing until you find the point of the sound.
STOP ■ Press to stop all CD / MP3 operation.
PLAYBACK
- Set the "FUNCTION" selector to "CD / MP3 / USB" mode.
- Open the CD door and place a CD / MP3 disc with the label up in the CD compartment.
- Close the CD door.
- Focus search is performed if disc is inside.
Playback will start automatically from the frist track. - Adjust the "VOLUME" control to the desired level.
- Press the "PLAY / PAUSE" button when you want to stop playback temporarily.
- Press the "STOP" button when finished.
PROGRAM
Be sure to press the "STOP" button before use.
- Press the "PROGRAM" button, the display will show "P01" and flash.
- Select desired track by using the "SKIP +" or "SKIP -" button. (You may select a desired album by pressing the "ALBUM" button).
- Press the "PROGRAM" button again to confirm desired track into the program memory.
- Repeat step 2 and 3 to enter additional tracks into the program memory.
- When all the desired tracks have been programmed, press the "PLAY / PAUSE" button to play the disc in the order you have programmed.
- Press the "STOP" button twice to terminate programmed playback.
MODE
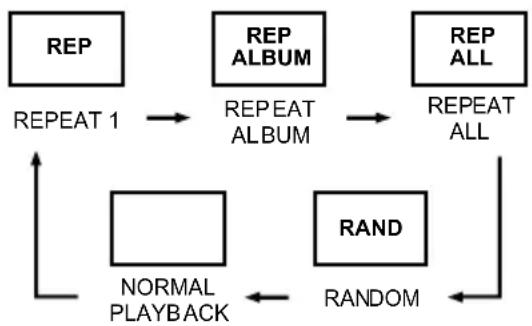
Press the "MODE" button before or during playing CD / MP3 disc, each press switches the mode function as follows:
1 - REPEAT 1
2 - REPEAT ALBUM (*MP3 ONLY)
3 - REPEAT ALL
4 - RANDOM
5 - NORMAL PLAYBACK
flowchart
graph TD
    A["REP"] -->|REPEAT 1| B["REP ALBUM"]
    B -->|REPEAT ALBUM| C["REP ALL"]
    C -->|REPEAT ALL| D["NORMAL PLAYBACK"]
    D --> E["RAND"]
    E --> F["RANDOM"]
    F --> D
USB OPERATION
GENERAL OPERATION
PLAY / PAUSE ▶Press to start playing tracks from the USB device.
Press again to stop playing USB operation temporarily.
Press again to resume playback.
SKIP + ▶▶& Press to go to the next track or back to the previous track.
SKIP - Press and hold while playing until you find the point of the sound.
STOP ■ Press to stop all USB operation.
PLAYBACK
- Plug or slot in USB device to the port. (Make sure no disc on disc tray)
- Set the "FUNCTION" selector to "CD / MP3 / USB" mode.
- Press and hold the "PLAY / PAUSE" button for a few seconds to entry USB mode.
- Playback will start automatically from the first track.
- Press the "STOP" button when finished.
- Press the "PLAY / PAUSE" button again, playback will start from the first track.
PROGRAM, MODE
The operation of PROGRAM, MODE are as the same as that of CD / MP3. Please refer to CD / MP3 OPERATION.
OTHER FEATURES
CLOCK SETTING
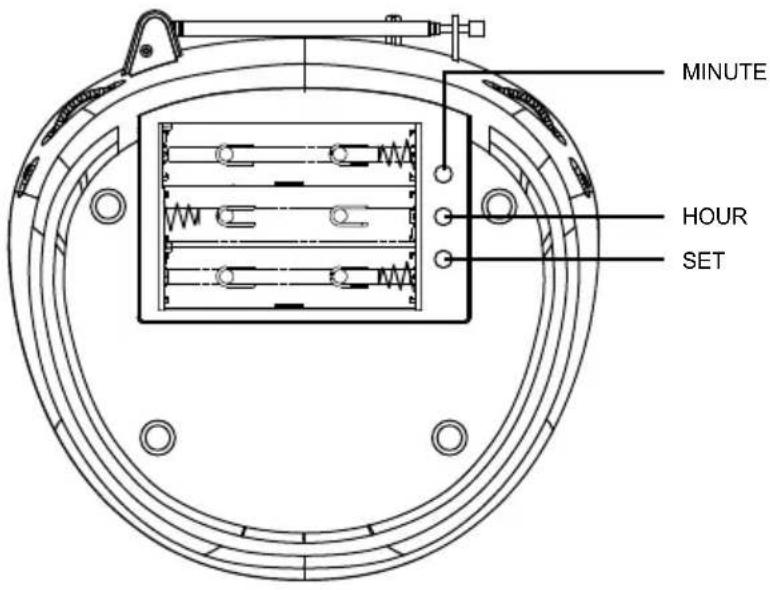
Remove the battery compartment cover then you can find the clock setting buttons.
- Press the "SET" button. (Do not release "SET" button during time setting)
- Press the "HOUR" button to set hour.
- Press the "MIN" button to set minute.
- Release all button to confirm setting. Confirmed setting will appear on the display.
Declaration of Conformity
Flamagas, S.A. declares product DBU-31 complies with the essential protective requirements and objectives of:
• EMC Directive 2004/108/EC
• Low Voltage Directive 2006/95/EC
To check the entirely declaration of conformity of this model, visit www.electronicaflamagas.com


Warranty
This device has 2 years warranty from the buying date against all manufactured defective problems. Batteries are not related to this warranty.
The non-fulfilment of the instructions or cautions use in this manual implies automatically a cancellation of the warranty.
It is necessary to show the buying invoice to validate this warranty.
Exclusive importer Flamagas S.A., www.flamagas.com
DAEWOO INTERNATIONAL
MANUAL DE INSTRUÇÕES DBU-31
natural_image
DAEWOO International portable radio with digital display and control buttons (no visible text or symbols on device body)AVISO
ETIQUETA DE PRODUTO LASER DE CLASSE 1:
RECEPÇÃO FM / FM ESTÉREO
natural_image
Line drawing of a portable electronic device with a rotating lever and scroll (no text or symbols)natural_image
Line drawing of a portable radio device with directional arrows indicating rotation (no text or symbols)- DAEWOO INTERNATIONAL
- ADVERTENCIA
- REPRODUCIR / PAUSA ▶II
- WARNING
- LIGHTNING FLASH WITH ARROWHEAD SYMBOL -
- CLASS 1 LASER PRODUCT LABEL -
- WARNING LABEL INFORMING OF RADIATION -
- SAFETY INSTRUCTIONS
- Notes:
- BEFORE OPERATION
- Notes: CONCERNING COMPACT DISCS.
- POWER SOURCES
- AC POWER
- BATTERY POWER
- LOCATION OF CONTROL
- RADIO OPERATION
- GENERAL OPERATION
- FM / FM-STEREO RECEPTION
- FOR BETTER RECEPTION
- CD / MP3 OPERATION
- PLAYBACK
- PROGRAM
- MODE
- USB OPERATION
- PROGRAM, MODE
- OTHER FEATURES
- CLOCK SETTING
- Declaration of Conformity
- Warranty
- MANUAL DE INSTRUÇÕES DBU-31
- AVISO
- ETIQUETA DE PRODUTO LASER DE CLASSE 1:
- RECEPÇÃO FM / FM ESTÉREO
Brand : DAEWOO
Model : DBU-31
Category : CD Player