
NPB-261 - CD Player Naxa - Free user manual and instructions
Find the device manual for free NPB-261 Naxa in PDF.


| Product Type | CD Player |
| Brand | Naxa |
| Model | NPB-261 |
| Disc Compatibility | CD, CD-R, CD-RW |
| Playback Modes | Program, Repeat, Random |
| Audio Outputs | Stereo RCA, Headphone Jack |
| Power Supply | AC 120V / 60Hz |
| Dimensions (W x D x H) | 8.5 x 6.5 x 2.5 inches |
| Weight | 2.5 lbs |
| Remote Control | Included |
| Display | LED Display |
| Anti-Skip Protection | Yes |
| Programmable Tracks | Up to 20 tracks |
| Headphone Output | 3.5mm Jack |
| Care Instructions | Clean with dry cloth; avoid moisture and extreme temperatures |
| Safety Warnings | Use only supplied power adapter; keep away from water and heat sources |
| Spare Parts Availability | Contact Naxa customer service for replacement remote, power cord, and adapters |
| Warranty | 1 year limited warranty |
| Country of Origin | China |
| Energy Consumption | 10W max |
Frequently Asked Questions - NPB-261 Naxa
User questions about NPB-261 Naxa
0 question about this device. Answer the ones you know or ask your own.
Ask a new question about this device
Download the instructions for your CD Player in PDF format for free! Find your manual NPB-261 - Naxa and take your electronic device back in hand. On this page are published all the documents necessary for the use of your device. NPB-261 by Naxa.
USER MANUAL NPB-261 Naxa
MP3/CD Boombox with Bluetooth®
MODEL: NPB-261
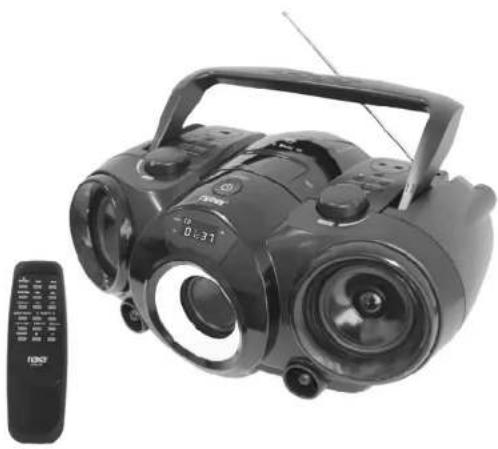
natural_image
Black portable electronic device with dual speakers and a remote control unit (no visible text or symbols)IMPORTANT: Please read before using and keep for future reference.
IMPORTANT NOTES
INTRODUCTION
- Thank you for buying this product.
- Please read through these operating instructions, so you will know how to operate your equipment properly. After you finished reading the Instructions manual, put it in a safe place for future reference.
CAUTION
Use of controls or adjustment or performance of procedures other than those specified herein may result in hazardous radiation exposure.
DANGER
CLASS 1 LASER PRODUCT LUOKAN 1 LASERLAITE KLASS 1 LASERAPPARAT
This Compact disc player is classified as a Class 1 LASER PRODUCT. THE CLASS 1 LASER PRODUCT label is located on the rear exterior.
NOTE: The manufacturer is not responsible for any radio or TV interference caused by unauthorized modifications.
- Avoid installing the unit in locations described below:
- Places exposed to direct sunlight or close to heat radiating appliances such as electric heaters, or other equipment that radiate too much heat.
-
Places subject to constant vibration.
• Unventilated or dusty places.
• Humid or moist places. -
Operate buttons and switches as instructed in the manual.
- Before turning on the power for the first time, make sure that the power cord is properly installed.
- Store the unit in a cool area to avoid damage from heat.
CAUTION: TO REDUCE THE RISK OF ELECTRIC SHOCK, DO DOT REMOVE THE COVER (OR BACK). DO NOT OPEN THE UNIT. FOR SERVICE, PLEASE REFER TO QUALIFIED SERVICE PERSONNEL.
WARNING:
Remove batteries if exhausted or if they will not be used for a long period.
The incorrect use of batteries can cause electrolyte leakage and will corrode the compartment or cause the batteries to burst. Therefore:
■ Do not mix battery types, e.g., alkaline with zinc carbonate.
■ When inserting new batteries, replace all batteries at the same time.
LOCATION OF CONTROLS


NAMES OF CONTROLS
- Antenna
- Handle
- USB port
- FUNCTION button
- MEM/DIR/10 - button
- MEM/DIR/10 + button
- MEM/P-MODE button
- EQ/LIGHT button
- VOLUME dial
- AUX IN jack
- Headphone Input Jack
- BAND/ID3 button
-
PLAY/PAUSE/PAIR button
-
STOP button
- NEXT/FWD button
- PREV/REV button
- TUNING dial
- POWER button (standby)
- Display
- Speaker
- Heat emission vent
- Air tube
- AC power input
- Subwoofer
- Voltage selector
- Battery compartment
REMOTE HANDSET

- STANDBY key
- MUTE key
- PAIR key
- FUNCTION key
- VOLUME+ key
- VOLUME-key
- BAND/ID3 key
- DIRECTORY+ key
- DIRECTORY-key
- MEMORY/PLAY MODE key
- MEMORY+/10+ key
- MEMORY-/10-key
- FM STEREO/MONO key
- NEXT/FORWARD and TUNING+ key
- PREVIOUS/REVERSE and TUNING key
- EQUALIZER/LIGHT key
- PLAY/PAUSE key
- STOP key
- Remote transmitter
- Battery compartment (on the rear)
REPLACING THE REMOTE CONTROL BATTERIES
- Slide the cover of the battery compartment [20] open.
- Remove the old batteries and install two new "AAA" batteries (not included). Make sure you match the "+" and "-" polarity markings inside the compartment when you install the batteries.
- Replace the cover.
To operate the unit with the remote control, point the remote transmitter [19] of the remote control at the IR sensor on the front display panel of the unit. Press the buttons on the remote control to use it. The remote works best at a distance of no further than 20 to 23 feet and within 30 degrees to either side of the sensor. Bright sunlight or other lighting conditions in the room can interfere with the remote control. If remote operation is unsatisfactory or stops working entirely, try using a new battery in the remote or try darkening the room.

POWER SOURCE
This unit is designed to operate on AC or DC electrical systems.
AC OPERATION
Plug one end of the power cord into the AC power input on the unit; plug the other end into a household AC outlet. (Battery operation will be disabled automatically when AC power is used).
DC OPERATION
Open the BATTERY DOOR [26] on the bottom of the unit. Load 8 pieces of UM-1/D size batteries (not included) into the compartment, taking care to match the +/- polarities marked inside the compartment.
CAUTION:
Remove batteries if they are empty or not being used for a long period of
time.
Batteries contain chemical substances and should be disposed of properly.
Check your local regulations before throwing batteries in the trash.
BASIC FUNCTION
Press the POWER button [18] to turn the unit on or off.
SETTING THE FUNCTION MODE
There are 5 function modes; press the FUNCTION button [4] to change modes. The 5 modes are:
• TUNER: Listen to AM or FM radio broadcasts.
• CD: Play compact discs (CD-audio or CD-MP3).
• USB: Play MP3s from USB memory sticks.
- BT (Bluetooth®): Stream audio from wireless players with Bluetooth®.
- AUX: Play audio from devices connected to the AUX Input Jack.
The current function mode will be shown on the display [19] when you turn on the boombox.
ADJUSTING THE VOLUME
Rotate the VOLUME dial [9] on the unit to increase or decrease volume. You may also use the remote control to adjust the system volume.
Press the EQ/LIGHT button [8] during playback to change equalizer presets. The presets are: FLAT, CLASSIC, ROCK, POP, JAZZ and DBBS (bass boost).
Choose a preset that best matches the style of music that is playing; the presets have been calibrated to enhance your audio enjoyment.
ID3 (show tag) System
Some MP3 files are encoded with information such as the name of the artist, the title, and the album. Together, this information is called an "ID3 tag".
Press the BAND/ID3 button [12] to turn the ID3 tag display on or off. When the ID3 tag display is on, the unit will display tag information in the order shown below.

HEADPHONE JACK
To use headphones with your Boombox, lower the volume before connecting them to the 3.5mm headphone input jack [11]. Once connected, slowly adjust the volume to a comfortable level.
The speakers will be disabled when headphones are connected.
CAUTION: LISTENING WITH HEADPHONES AT HIGH VOLUME LEVELS MAY CAUSE PERMANENT HEARING LOSS.
PARTY LIGHT
Press and hold the EQ/LIGHT button [8] to turn the lights off or on.
RADIO OPERATION
Listen to AM or FM radio broadcasts. Press the FUNCTION button [4] until the display [19] reads TUNER.
- Press the BAND/ID3 button [12] to select the AM or FM band.
- To optimize reception when listening to stations on the FM band, extend the telescopic antenna to its full length. To optimize reception for AM band stations, gently move the unit around, or position the unit in an open place.
TUNING TO A RADIO STATION
If you know the station frequency that you want to tune to directly:
- Tune to a station by rotating the TUNING dial [17]. The station frequency is shown on the display [19].
To tune to a preset station:
- To tune to the next preset station, press the MEM/DIR/10+ button [6].
- To tune to the previous preset, press the MEM/DIR/10-button [5].
AUTO PRESET MEMORY / SCAN
To scan for stations within reception range and save them to preset memory automatically, press and hold the PLAY/PAUSE/PAIR button [13]. After the unit is finished scanning, the unit will automatically tune to preset number 1 (P01).
Choose which stations to save in preset memory instead of scanning automatically.
- Use the TUNING dial [17] to tune to the station that you want to save as a preset (e.g., 93.10).
- Press the MEM/P-MODE button [7]. "P01" will flash on the display to indicate that you are saving the station as Preset Memory 01. (To change the preset memory number, press the MEM/DIR/10+ [6] or MEM/DIR/10- [5] buttons.)
- Press the MEM/P-MODE button [7] to finish saving the station (e.g., P01 is now set to 93.10).
- To save another station, repeat steps 1 to 3. You may save up to 20 FM stations and 20 AM stations.
CD MODE (CD and MP3 Discs)
Play CDs with audio or MP3 files. Press the FUNCTION button [4] to select "CD" mode.
SUPPORTED DISC FORMATS
This unit can play all digital audio CD/MP3, finalized digital audio CD-Recordable (CD-R) discs, finalized digital audio CD-Rewritable (CD-RW) discs, and CD-DA formatted digital audio CD/CD-R/CD-RW discs.
LOADING A DISC
- Press PUSH TO OPEN on the CD door to open it; the display [19] will read "OPEN".
- Place the compact disc into the tray with the label side facing up.
- Close the CD door; the display will flash "TOC READ", and then show the total number of playable tracks on the disc. Playback will start automatically.
- To remove the CD, press the POWER button [18] to turn the unit off. Wait for the CD to stop spinning completely! Press PUSH TO OPEN on the CD door to open it. Remove the CD carefully taking care to handle it by its sides.
Notes:
- Make sure the disc is completely stopped before opening the CD door.
- To ensure good system performance, wait until the unit reads the disc completely before doing anything else.
- If the disc is unreadable or if no disc is loaded in the tray, the display will read "NO DISC".
PLAYING A DISC
Playback starts automatically from Track 1 after a compact disc has been loaded and read by the boombox.
- To pause playback, press the PLAY/PAUSE/PAIR button [13]. The current track time will flash on the display.
• To resume playback, press the PLAY/PAUSE/PAIR button [13] again.
• To stop playback, press the STOP button [14].
To skip tracks
Press the NEXT/FWD [15] or PREV/REV [16] buttons to skip to the next or previous track, respectively. Track numbers are shown on the display.
To scan quickly to a point in a track
Press and hold the NEXT/FWD [15] or PREV/REV [16] buttons to quickly scan forward or in reverse through a track. The track time is shown on the display.
To skip tracks quickly (for MP3 discs, only)
To skip 10 tracks at a time, press the MEM/DIR/10+ button [6] to skip forward 10 tracks. Press the MEM/DIR/10- button [5] to skip backwards 10 tracks.
To select a desired folder (for MP3 discs, only)
To select a track in a folder, press and hold the MEM/DIR/10+ [6] button each time to skip to the next folder. Press and hold the MEM/DIR/10- button [5] to skip to the previous folder.
PROGRAMING TRACKS
You can create a custom play list from your disc when playback is stopped. You can program up to 20 tracks for a CD disc and 99 tracks for an MP3 disc
- While play is stopped, press the MEM/P-MODE button [7]. The display will flash PROG and show "P01".
- Use the NEXT [15]/PREV [16] buttons to select the first track to be saved to the program list, then press the MEM/P-MODE button [7] to save. The display will now show the next program number (e.g., "P02").
- Repeat step 2 to save more tracks to the program list until all tracks have been programmed.
- Press the PLAY/PAUSE/PAIR button [13] to start playing the program list from the beginning. The display will show which track is currently playing.
- Press the STOP button [14] on unit to stop program playback. To clear the program, open the CD compartment lid, making sure that the disc has stopped spinning completely before you do so.
REPEAT/RANDOM/INTRO PLAY MODE (P-MODE)
To change the playback mode, press the MEM/P-MODE button [7] during playback; the display will show the current play mode (P-MODE). Play modes include repeat, random, and intro.
• N: Repeat the current track.
• NALL: Repeat all tracks.
- NDIR: Repeat all of the tracks in the current directory/folder (MP3 playback only).
• RAN: Play tracks in random order.
• INTRO: Play the first 10 seconds of each track.
To return to normal playback, press the MEM/P-MODE button [7] until there are no P-MODE indicators on the display. P-MODE is also canceled when you stop playback.
USB MODE
Play MP3 files from USB memory sticks. Press the FUNCTION button [4] to select "USB" mode.
PLAYING MP3s FROM USB MEMORY
- Connect the USB memory stick to the USB port [3] found on the top of the unit. The display will show the total number of playable tracks on the USB device. Playback will start automatically from Track 1.
- To pause playback, press the PLAY/PAUSE/PAIR button [13]. The current track time will flash on the display. To resume playback, press the PLAY/PAUSE/PAIR button [13] again.
- To stop playback, press the STOP button [14].
To learn more about programming playlists and repeat/random/intro playback modes, please refer to the "CD MODE" section of this manual.
NOTICE:
To prevent harmful interference, always connect USB devices directly to the unit. Do not use a USB extension cable to connect USB devices to the unit.
Bluetooth MODE
Stream audio wirelessly from players with Bluetooth. Press the FUNCTION button [4] to select "BT" (Bluetooth) mode.
Wireless players with Bluetooth may include laptops, tablets, smartphones, and more. Make sure that your player has its Bluetooth radio enabled and that it is set to be discoverable.
CONNECTING A DEVICE FOR THE FIRST TIME (PAIRING)
Before using a wireless device with Bluetooth, you will need to establish a connection between It and the Boombox. This process is called "pairling" and you will only have to do it once. Once two devices are paired, they will automatically connect when they detect each other.
- When you set the Boombox to "BT" mode and it does not detect a paired device, it will automatically switch to pairing mode. (The blue PAIR indicator will blink when the boombox is in pairing mode.)
- On your wireless device, go to its Bluetooth settings menu.
- Have your wireless device "search for devices". Select the boombox (NPB-261) when it is found. Enter the passkey "0000" if the device asks for one.
- When pairing is complete, the boombox will emit a soft tone, the display will read "BT" and the blue PAIR indicator will light a steady blue. If a connection cannot be made, the PAIR indicator will flash once every 2 seconds. (Press the PLAY/PAUSE/PAIR button [13] to try again.)
The boombox will automatically connect to your wireless device next time as long as it has Bluetooth enabled, is within range, and is set to be visible to paired devices.
Note:
There are many different Bluetooth enabled devices out there; we cannot provide instructions for all of them. Please refer to your device manufacturer's instructions or website to learn more about connecting with Bluetooth.
AUX-IN MODE
Play audio from devices connected to the AUX input jack. Press the FUNCTION button [4] to select "AUX" mode.
- Connect your audio device to the 3.5mm AUX IN jack [10] found on the top of the unit with a 3.5mm AUX cable.
- Set the volume level of the connected audio device to approximately 80%. Make additional adjustments to the volume level by turning the VOLUME dial [9] of the unit.
- Control playback with your audio device.
SPECIFICATIONS
GENERAL
Power Requirement AC110/220V -60/50Hz
DC 12V UM-1/D x 8pcs
Power consumption 32 Watts
Dimensions.... 460 (L) X 200 (D) X 342 (H) mm
Operation temperature....+5°C-+35°C
RECEIVER SECTION
Receiving Bands AM/FM.ST
Frequency Range...... AM:530-1710KHz
FM 87.5 - 108 MHz
COMPACT DISC SECTION
Optical Pickup 3-Beam Laser
Frequency Response 100Hz - 16KHz
AUDIO SECTION
Power output 8W X 2 + 20W
ACCESSORIES
Instruction Booklet....1
AC Cord 1
Note: Specifications are subject to change for continuous improvement without prior notice.
SUPPORT
If you have problems with your device, please consult the Instructions in this manual, as well as the latest news, alerts, and documentation which can be found by visiting us on the web at www.naxa.com. If you need further assistance, please contact Naxa Technical Support.
NAXA Technical Support
2320 East 49th St.
Vernon, CA 90058
http://www.naxa.com/naxa_support/


- MP3/CD Boombox with Bluetooth®
- IMPORTANT NOTES
- INTRODUCTION
- CAUTION
- DANGER
- WARNING:
- NAMES OF CONTROLS
- REPLACING THE REMOTE CONTROL BATTERIES
- POWER SOURCE
- AC OPERATION
- DC OPERATION
- CAUTION:
- BASIC FUNCTION
- SETTING THE FUNCTION MODE
- ADJUSTING THE VOLUME
- ID3 (show tag) System
- HEADPHONE JACK
- PARTY LIGHT
- RADIO OPERATION
- TUNING TO A RADIO STATION
- AUTO PRESET MEMORY / SCAN
- CD MODE (CD and MP3 Discs)
- SUPPORTED DISC FORMATS
- LOADING A DISC
- Notes:
- PLAYING A DISC
- To skip tracks
- To scan quickly to a point in a track
- To skip tracks quickly (for MP3 discs, only)
- To select a desired folder (for MP3 discs, only)
- PROGRAMING TRACKS
- REPEAT/RANDOM/INTRO PLAY MODE (P-MODE)
- USB MODE
- PLAYING MP3s FROM USB MEMORY
- NOTICE:
- Bluetooth MODE
- CONNECTING A DEVICE FOR THE FIRST TIME (PAIRING)
- Note:
- AUX-IN MODE
- SPECIFICATIONS
- GENERAL
- RECEIVER SECTION
- COMPACT DISC SECTION
- AUDIO SECTION
- ACCESSORIES
- SUPPORT
Brand : Naxa
Model : NPB-261
Category : CD Player