
Water Machine Basic 283000 - Water dispenser PRINCESS - Free user manual and instructions
Find the device manual for free Water Machine Basic 283000 PRINCESS in PDF.


| Product Type | Water dispenser (countertop) |
| Model | Water Machine Basic 283000 |
| Brand | Princess |
| Water Types | Room temperature and cold still water |
| Installation | Direct connection to mains water supply |
| Minimum Water Pressure | 1.5 bar (150000 Pa) |
| Maximum Water Pressure | 3.5 bar (350000 Pa); above requires pressure reducer |
| Power Supply | Electrical (plug to mains) |
| Cooling Method | Compressor-based refrigeration |
| Temperature Range | 5°C to 10°C (adjustable via thermostat knob) |
| Filter Type | Replaceable cartridge filter (positioned on back) |
| Filter Replacement | Every 4000 liters or 12 months |
| Dimensions (Approx.) | Not specified; typical countertop dispenser |
| Weight (Approx.) | Not specified; estimate 10-15 kg |
| Ventilation Clearance | At least 7 cm around sides, 7-10 cm above |
| Storage Temperature | 5°C to 35°C, vertical position |
| Maximum Humidity | 80% without condensation |
| Cleaning | Non-corrosive detergents, damp cloth; avoid solvents |
| Sanitization Frequency | Every 6 months or at filter change |
| Warranty | 24 months from purchase date |
| Certifications | TUV, IECEE CB Scheme |
| Intended Use | Indoor domestic, office, or laboratory |
Frequently Asked Questions - Water Machine Basic 283000 PRINCESS
User questions about Water Machine Basic 283000 PRINCESS
0 question about this device. Answer the ones you know or ask your own.
Ask a new question about this device
Download the instructions for your Water dispenser in PDF format for free! Find your manual Water Machine Basic 283000 - PRINCESS and take your electronic device back in hand. On this page are published all the documents necessary for the use of your device. Water Machine Basic 283000 by PRINCESS.
USER MANUAL Water Machine Basic 283000 PRINCESS
natural_image
Symbolic emblem of a crown with a vertical line above it, enclosed in an oval frame (no text or numbers present)PRINCESS®
natural_image
Close-up of a hand inserting a white cylindrical device into a mechanical device (no visible text or symbols)Fig. 1
natural_image
Close-up of a white plastic component with a circular yellow top, mounted on a metal panel (no visible text or symbols)Fig.2
natural_image
Close-up of a hand pressing a white plastic knob with a blue arrow indicating rotation (no text or symbols visible)natural_image
Two industrial gas fittings: a metallic spray bottle and a blue CO2 gas can (no visible text or symbols on the main objects)Fig. 5
natural_image
Close-up of a metallic cylindrical gas regulator with a blue label (no visible text on the device itself)Fig. 6
Instructions for use
MACHINE DESCRIPTION
Water Machine apparatus are drinking water fountain connected directly to the water main.
There are two main models:
□ Water Machine Plus: supplies n. 2 waters: room temperature water + cold carbonated water
□ Water Machine Basic: supplies n.2 waters: room temperature water + cold water
ENVIRONMENTAL CONDITIONS
While waiting for installation, the apparatus must be stored in a vertical position (see arrow on the packaging, if wrapped) at a temperature of between 5° and 35°C. Maximum humidity without condensation, 80%.
POSITIONING
The machine can be positioned in an internal, domestic, office or laboratory-type room, etc., on a level surface sufficiently resistant to support its weight or on the special accessory unit.
There should be electrical and water supplies near to the machine which correspond to the specifications supplied by the manufacturer. Ensure aperimeter space of at least 7 cm for adequate ventilation; for the upper part, there should be a space of at least 7-10 cm.
If the apparatus has been transported or placed in a non-vertical position, its efficiency will have been compromised.
List of additional features for the different model of Water Machine:
| ACCESSORY DESCRIPTION | BASIC | PLUS | |
 | Connection Kit | ||
 | Pressure CO2 Reducer | ||
 | CO2 Cylinder monouse 600 gr. | ||
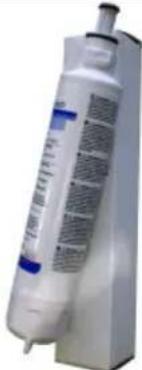 | Filter | ||
After positioning the machine, proceed to the operations of connecting the supply. Comply with the national regulations in force in the country of installation and common sense.
1. WATER CONNECTIONS
At the moment of connecting the dispenser, if the pressure of the main is higher of 3.5 bar (350000 Pa) install the water pressure reducer (optional) checking that it is calibrated at 3 – 3.5 bar (300000-350000 Pa).
Proceed as follows:
a. a water shut-off cock must be inserted at the junction point.
The mains water supply must guarantee:
- that it is not subject to high pressure surges;
- min. pressure 1,5 bar (150000 Pa);
Avoid temporary connections
b. Only use pipe fittings certified for foodstuffs like those supplied (for food use) with the apparatus.
Proceed as follows:
- connect the water inlet coupling to the shut-off cock of the water mains;
- join the supply pipe (supplied) to the quick release water inlet on the machine.
Position the end of the cold water outlet pipe in a suitable recipient (or put the container under the distribution spout in the Top Count version), open the water and flush through with at least 10 litres to clean out the pipes and filter.
If the water supply line has to be longer than 4-5 m, it should be made with a pipe of a larger section and the pipe supplied only used to join the apparatus and any accessories
2. ELECTRICAL CONNECTIONS
Observe the general installation, preparation and start-up regulations for electrical plants in force in the country in which the apparatus is installed. Pay special attention to the earthling system.
In order to ensure the safety of people and the apparatus, respect the following rules.
Warning
Check that the features of the power supply are compatible with the technical data of the apparatus.
Use of extensions, adapters or joins in the cable are prohibited.
After checking that the features of the electrical installation satisfy the indications of the manufacturer, proceed as described:
A) Consult the paragraph "First start-up" (page 18) before inserting the (male) plug into the electrical socket.
B) The apparatus must be positioned so that the plug connecting it to the electrical system is easily accessible during normal use.
FILTER
Is essential the use of a filter for the Water machine correct functioning.
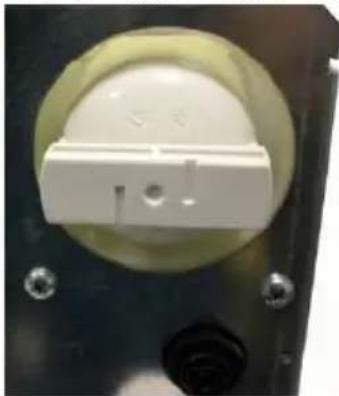
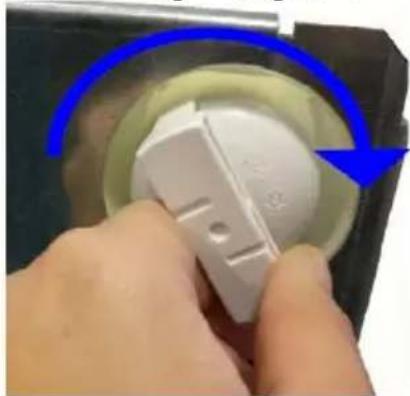
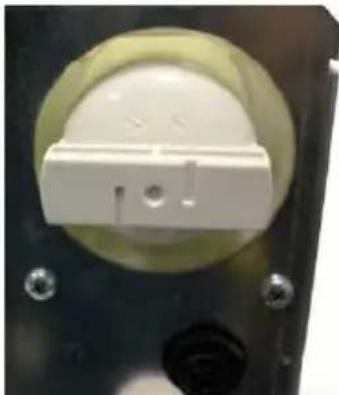
The filter have to be positioned on the back side of the machine as in the following images.

natural_image
Close-up of a hand inserting a white cylindrical device into a mechanical housing, with a blue arrow indicating direction (no text or symbols visible)Fig. 1
natural_image
Close-up of a white dome-shaped component mounted on a black metal frame, with mounting holes and a small inset showing a screw (no text or symbols visible)Fig.2

natural_image
Close-up of a hand holding a white plastic push-button switch with a blue circular arrow indicating rotation (no text or symbols visible)Fig.3
Fig. 1 – Filter Insertion
Fig. 2 – Complete Insertion
Fig. 3 – Rotation for fasten the filter
For filter substitution do the previous practice on the contrary.
The filter have to be replaced after 4000 liter use or after 12 month from the first start-up.
Every time the filter is changed it is a good idea to note the date of replacement or to write it directly on the new filter in indelible ink.
[Photos reproduced on this manual are only indicative. This photos refers to various model so some components con be different or in a different position].
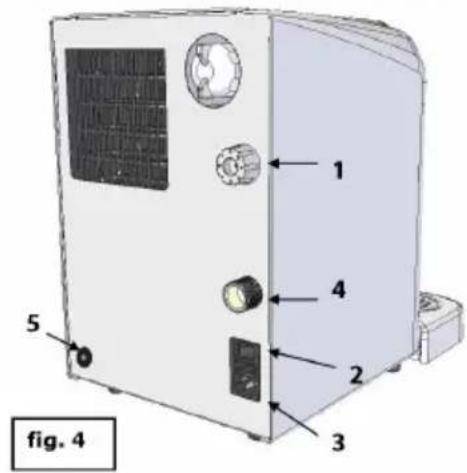
1) Electromechanical thermostat with knob
2) On/off switch
3) Electrical power supply
4) Inlet Coupling for water from the main water supply
5) Inlet Coupling for CO2 (only for PLUS version) *
* In Basic version a plastic top is put in.
Electromechanical thermostat functioning
By rolling the knob in a clockwise direction right to the end the thermostat will reach a position in which the water is chilled to the extreme cold temperature.
By rolling the knob in a counterclockwise direction the thermostat will reach a position in which the water is chilled to the lowest temperature.
Warning: by forcing further and in a counterclockwise direction the knob rotation one may eliminate definitely the refrigerating loop functioning
FIRST START UP
It is important to identify the model of the fountain before starting, and to scrupulously follow the specific start-up procedures for the specific model. Failure to do so may result in serious damage to the equipment.
After making the water and electrical connections, proceed as follows:
N.B. The following description (from 1 to 11) refers to Water Machine Plus model
- place a container under the supply tap (or the supply spout in the Top Count version);
- open the water shut-off cock;
- plug into the electrical supply;
- open the room temperature water tap;
- open the CO2gas (see the paragraph "Use of the equipment", page 20);
- switch on the machine;
-
wait until the pump stops working;
-
let flow 3-5 litres of room temperature water to clean completely the circuits from the solution of sanitization;
- dispense the water using the carbonated water button for 3-5 litres; pay attention to let flow as a maximum one litre at a time;
- wait for about two minutes after the pump has stopped and then repeat the operation for several times;
- wait for about 1 hour before dispensing carbonated cold water;
NOTE Water pump doesn't work if the pressure CO_2 reducer is in closed position. To dispense carbonated water always make sure that the pressure CO_2 reducer is open. If the pressure reducer is closed the pump doesn't work and the machine will dispense cold still water.
For Water Machine Basic model it is necessary to proceed as follows:
Following the operations from 1 to 5 and then:
- open the cold water tap and let flow at least 5 litres of water.
DESCRIPTION OF THE EQUIPMENT
Water Machine is an apparatus to chill drinking water to install on the counter.
USE OF THE EQUIPMENT
In order to switch on the machine use the button to the rear of the apparatus (picture 4, page 18).
The temperature is regulated by rotating the knob back the machine. By rotating the knob in a clockwise direction the water temperature will be reduced. By rotating the knob in a counterclockwise direction the water temperature increases. The complete knob rotation determines a different temperature set in with a variable range between a minimum of 5^ C and a maximum of 10^ C.
WATER MACHINE PLUS WITH COLD CARBONATED WATER
Opening the CO₂ Cylinder
natural_image
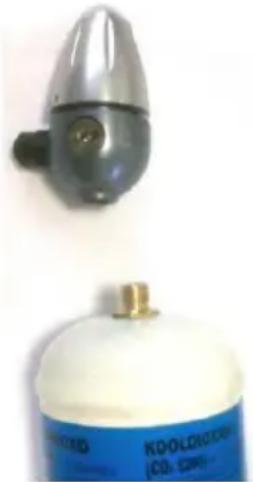
Two gas collection containers: a metallic cylindrical device and a white gas cylinder labeled 'KoOLDIOTON CO2 (200)'.Fig. 5

natural_image
Close-up of a metallic cylindrical device with a black handle and blue label (no readable text or symbols on the device itself)Fig. 6
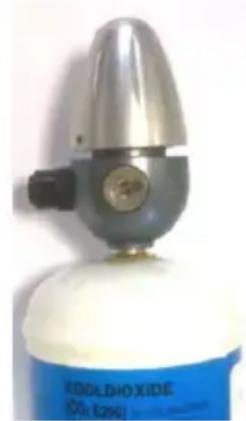
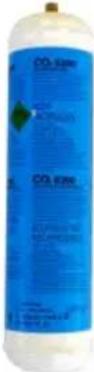
a) Hold the pressure reducer (Fig. 5) firmly with one hand. With the other hand, tighten the CO_2 gas bottle as much as possible, keeping mono-use CO_2 gas bottles in a vertical position (Fig. 6).
b) At this stage, pay close attention to the tube connected to the pressure reducer which must never be pulled or compressed.
Any gas leak during this operation is normal. However, a continuous leak after the bottle has been completely tightened is NOT normal. Make sure that you have tightened the bottle properly!
WARNING. Exposure to the CO_2 jet may cause burns due to the very low temperature of the gas.
c) Position the bottle in the most appropriate housing, if possible near to the fountain.
About 1 hour after tightening the bottle, the apparatus is ready to dispense water. The correct position for the installation and removal of the bottle is the vertical one with the pressure reducer above and the bottle underneath.
NOTE
In addition to being linked to reaching the optimal temperature of the refrigerator, the quality of carbonation also depends on the physical characteristics of the water used. It takes about 1,5 hours to obtain optimal carbonation (without extracting either cold or carbonated water in the meantime) from the time of connection of the fountain to the electricity supply.
All maintenance operations, whether ordinary or extraordinary, must be carried out with the equipment switched off and the electricity and water supplies deactivated. In particular, it is opportune that, at every change of filter, the reading of the litre counter (if installed) and the date of the replacement are recorded.
The following list is a guide to the scheduled operations which should be carried out on the apparatus, according to the frequency suggested.
| Part of the apparatus | Type of operation | Frequency of operation | |||
| Daily Weekly | Every 6 months | Annual | |||
| Front and bodywork | Cleaning sanitisation | ● | |||
| Distribution spout | ● | ||||
NOTE
The times given in the table are indicative and refer to normal conditions of use. Always, refer to the hygiene regulations of the location (local and/or national). The frequency of the intervention is directly proportional to how much the machine has to work, that is, the quality of the mains drinking water supply.
CLEANING
Scrupulous cleaning is essential to keep the apparatus in good condition. General cleaning of the machine must be carried out with the machine off, using non-corrosive detergents, diluted in water and with a sponge or damp cloth. Do not use solvent- or alcohol-based products. The level of protection of the electrical apparatus ensures protection from splashes; please avoid water contact with electrical connections, switches, buttons, etc.
The holes on the frame at the back of the machine can be cleaned using a dry brush.
SANITISATION OF THE APPARATUS
The apparatus must be sanitised from time to time (completely every 6 months of use) to avoid possible bacterial contamination.
You can buy sanification kit from authorized reseller.
SANITISATION OF THE FOUNTAIN TERMINAL
If the apparatus is left unused for a long period, the following procedure must be followed when it is turned on again:
a) flush through with at least 5 litres of water;
b) sanitise the fountain at each change of water filter, or when the apparatus has been unused or not supplied for one or more weeks;
c) to sanitise, put a sanitising product in the coil of the fountain;
d) sanitise the fountain spout by loosening it and immersing it in a liquid food sanitiser for 10-15 minutes. Rinse the items, fit them back into the ring-nut and tighten them.
| PROBLEMS CAUSES SOLUTIONS | ||
| The fountain does not supply water | Main water tap closed Open the tap | |
| Mains water connection pipe compressed or constricted | Correct the path. Remove any obstruction or constriction | |
| No electricity supply | Check that the plug is correctly inserted in the socket on the back of the fountain | |
| The fountain supplies little water | The filter is blocked | Replace the Filter. Contact qualified staff. |
| Low water pressure at inlet | Contact the technical assistance service | |
| The fountain does not cool very much | Check position of thermostat | Lower the temperature by turning the thermostat knob |
| The rear ventilation grill could be blocked by dust | Move the fountain, removing the rear part away from the wall | |
| The perimetral space for an adequate ventilation is not enough | Move away the dispenser from the wall. | |
GARANZIA / WARRANTY
he device is guaranteed from material/manufacturing flaw for 24 month since the date of purchasing. The warranty right have to be established by a receipt/ fiscal document issued from an authorised retailer, furnished at the moment of buying and have to report the machine model, the date of purchasing and the retailer business name.
The warranty don't cover damage coming from a wrong or not adequate use of the device, from reparations realized by authorized staff and from potential falls of the machine. Warranty do not cover potential indirect damages to objects/human beings caused by a device abnormal functioning.
INSTRUCTIONS FOR THE END USER
If this symbol is represented on the disposal device and/or on the user manual comply with the following indications:
- at the end of his life the device have to be sell off in a eco-friendly way, so that the equipment and his components can be reused and recovered as widely as possible.
- Don't dispose of the device throwing it away as a common garbage without a separate collection: consign it to a

authorized retailer or a gathering place.
- Contact the local council for further information on available modality of delivery and collections.
To sell off the device even if is still functioning or it can be repaired easily make sure that the water dispenser can be reused.
For further information on this subject please visite our web-site:
www.princess.nl
European directives in force:
- 2002/95/CE
- 2002/96/CE
TUV certificate n. Z1 11 05 76844 002 IEC-IECEE CB SCHEME certificate n. DE 3 - 14574

PRINCESS HOUSEHOLD APPLIANCES BV
LIESBOSLAAN, 57 4813 EB BREDA NL TEL. +31765217716


- PRINCESS®
- Instructions for use
- MACHINE DESCRIPTION
- ENVIRONMENTAL CONDITIONS
- POSITIONING
- WATER CONNECTIONS
- Proceed as follows:
- ELECTRICAL CONNECTIONS
- Warning
- FILTER
- Electromechanical thermostat functioning
- FIRST START UP
- N.B. The following description (from 1 to 11) refers to Water Machine Plus model
- For Water Machine Basic model it is necessary to proceed as follows:
- DESCRIPTION OF THE EQUIPMENT
- USE OF THE EQUIPMENT
- WATER MACHINE PLUS WITH COLD CARBONATED WATER
- NOTE
- CLEANING
- SANITISATION OF THE APPARATUS
- SANITISATION OF THE FOUNTAIN TERMINAL
- GARANZIA / WARRANTY
- INSTRUCTIONS FOR THE END USER
- PRINCESS HOUSEHOLD APPLIANCES BV
Brand : PRINCESS
Model : Water Machine Basic 283000
Category : Water dispenser