
EC-1530 - Cash register EC Line - Free user manual and instructions
Find the device manual for free EC-1530 EC Line in PDF.


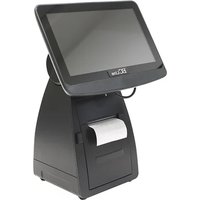
| Product Type | All-in-One Touch POS Terminal |
| Brand | EC Line |
| Model | EC-1530 |
| Power Supply | 100-240V AC, 50/60Hz |
| Display Type | LCD Touch Screen (resistive) |
| Touch Technology | Resistive touch (RS232, PS/2, USB interfaces) |
| Connectivity Ports | USB, Serial (COM1/2A/56), Parallel (LPT), VGA, PS/2 (Mouse & Keyboard), LAN |
| BIOS | AMI BIOS, UEFI 2.0 compliant |
| Operating System Support | Windows (driver provided for touch screen) |
| Safety Features | Safe voltage range; do not open chassis; disconnect power before connecting devices; keep away from liquids |
| Installation | BIOS setup preconfigured; touch screen driver installation via setup.exe; PS/2 or RS232 interface driver options |
| Maintenance | Keep clean, dry, away from dust, moisture, and direct sunlight |
| Troubleshooting | Common faults: no boot, no display, auto restart, touch issues; see manual for detailed steps |
| Spare Parts / Repairability | Contact qualified service technician or place of purchase; do not attempt self-repair |
| Warranty | Contact place of purchase for warranty service |
Frequently Asked Questions - EC-1530 EC Line
User questions about EC-1530 EC Line
0 question about this device. Answer the ones you know or ask your own.
Ask a new question about this device
Download the instructions for your Cash register in PDF format for free! Find your manual EC-1530 - EC Line and take your electronic device back in hand. On this page are published all the documents necessary for the use of your device. EC-1530 by EC Line.
USER MANUAL EC-1530 EC Line
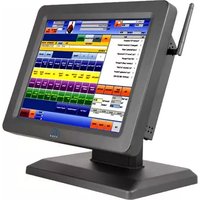
All-in-one Touch POS Terminal
Table of Contents
Chapter I: Overview 2
1.1.The Structure of the Manual....2
1.2. Safety Information : 2
1.3 Electromagnetic compatibility statement: 4
Chapter II: Installation Guide....4
2.1 EC-1530 Appearances: 4
2.2 The front panel Function definition: 5
2.3 The rear panel I/O signs and description: 5
Chapter III: Instructions for use....6
3.1 Motherboard BIOS settings: 6
3.2 Touch screen driver installation: 9
Chapter IV: Common Faults and exclusion....19
Chapter I: Overview
Dear customer:
Thank you for purchasing the EC Line All - In One touch POS devices, we are committed to continuously improve the product quality and provide better after-sales service. In order to take full advantage of our devices, we strongly recommend that you take the time to read this manual before diving into software solution.
1.1 The Structure of the Manual
This manual is divided into parts and chapters in order to help you better focus on the key topics.
You are not required to have prior knowledge of any point of sale to use this manual. This Manual contains an overview of the installation guide, instructions for use, Common Faults and exclusion, the main technical indicators content and the product warranty commitments. You can access to appropriate help by browse the topics
- Tunr off the power before connecting any devices (except USB device) to the terminal.
- Do not attempt to open the chassis. You may be hurt by electric shock. For service, call your place of purchase.
- Please do not leave any item or liquid into the product, do not place any objects into the ventilation holes of this product, it may cause short-circuit of the internal components and cause a fire or electric shock.
- In accordance with the relevant explanation in national standards GB/T9813-2000 microcomputers general specification. After the computer is below the temperature of 10 ° C of environment storage, please place the machine in room temperature (10-35 ° C) conditions for more than two hours to avoid damage from low temperature. In the meantime please do not remove the packaging and allow the computer to restore the natural temperature, and avoid heating up too fast to cause the computer to generate the occurrence of frost and condensation that might bring electrical damage.
- Strict compliance with the electrical appliance standard;
● Safe use voltage range: 100V \~ 240V & 50Hz/60Hz; - Verify that the power outlet is available to connect to a reliable ground;
- Keep the device clean, dry, away from dust, moisture and direct sunlight;
- Do not share the same power outlet with high-power electrical appliances, keep distance from high level magnetic interference;
● Turn off the POS machine after use to extend using life;
- Do not the use sharp points, draw, cut the touch screen to ensure the normal use of it;
- Before plug / unplug the communication cable or connect to an external device, please turn off the power supply;
● Non-professional and technical personnel is not allowed to open the machine, otherwise take upon the consequences;
When the following occurs:
● Liquid penetrate into the body of POS machines
● POS machines accidental damage
● POS machines produces a burning smell
● POS machines shows sudden abnormal
Immediately disconnect the cash register power supply, unplug the power cord, and immediately contact a qualified service technician to deal with.
1.3 Electromagnetic compatibility statement:
- This product is in full compliance with the relevant requirements of the national standards (GB/9254-1998) "The limits and measurement methods of radio disturbance characteristics of information technology equipment" for Class B products.
- This product is in full compliance with the relevant requirements of the the People's Republic of China's national standards of (GB/17625.1-2003) "Electromagnetic Compatibility Limits for harmonic current emission limits" for Class B products.
2.2 The rear panel I/O signs and description:
AT the rear panel of the POS device you will see a row of the external device connection interface, such as: power outlet, the parallel connector, serial socket, USB interface, detailed as follows:

POWER key: turn on/off the pos
MOUSE: To connect mouse device
KB: To connect the keyboard device
LPT: 25DB parallel port, external printing, or other communications equipment
VGA: VGA signal output interface
COM 12A56: External serial devices such as movies for machines printers
Chapter III: Instructions for use
3.1 Motherboard BIOS settings:
The POS device has a BIOS (Basic Input Output System) chip on the motherboard. Every time you start the POS devices, the system will first run the BIOS self - test program, to check the main components of the system to ensure it is working properly.
The newly assembled POS devices must process the BIOS settings to inform the entire system configuration of the POS device, so your POS device had done the BIOS settings in the factory, please do not change the parameters in the BIOS to avoid system exception if there is no special need.
In the following situations, you need to run the BIOS setup program:
- Error message appears on the screen during the system self-test, and requested to enter the BIOS setup program.
a. Press F1 to run setup
b. Press F2 to load default values and continue
- When the self - test does not appear the information above, if you want to change the factory default settings based on customer characteristics, boot by DEL to enter the BIOS interface. If the message disappears before you respond to, you can turn off the machine or press the Reset button on the front panel, and restart the computer, you can also press the
+ + to restart.
When The POS device is booting, the BIOS runs the self - test program, the self-test
Step 1: Select Load Default Settings to restore optimized default settings
CMOS Setup Utility- copyright (c)1985-2008
| BIOS Setup Utility- copyright (c)1985-2008MainAdvancedchipset |
| BootSecruitySave&Exit↑↓→←:Move +/-:Value Enter:Select F10:Save and Exit |
| F1: General Help F9: Load Ddefault Settings Esc:Exit |
Step 2: Select “main”
Standard CMOS Features
| Bios information | Item Help | |
| BIOS Vendor | American megatrends | |
| Core Version | 4.6.4.0 | |
| Compliency | UEFI Z.0 | While entering setup BIOS auto detects the Presence of SATA Device. This displays The status of auto Detection of SATA devices |
| Project Version | PT00C000X64 | |
| Bulit Date andTime | 11/24/2011/14:29:44 | |
| Not detected | ||
| System time (hh:mm:ss) | 11 : 33 : 23 | |
| System date (mm:dd:yy) | Tue 01/01/2012 | |
| Access Level | Eglish | |
| Administrator | ||
↑ ↓ → ←: Move +/-: Value Enter : select F10: Save and Exit
F9 : load Defaults Settings F1:General Help Esc : Exit
Step 3: Select the Advanced settings
WARNING: setting wrong values in the below sections may cause system to Malfunction
Advanced setup
| CPU ConfigurationIDE Configuration Configure CPUUSB ConfigurationCOM/LPT ConfigurationHardware monitorPower management | |
| ↑ ↓ → ←: Move +/-:Value Enter : select F10:Save and ExitF9 : load Defaults Settings F1:General Help Esc : Exit |
Step 4: Select Boot
| Boot Configuration | |
| Bootup NumLock State | On |
| Display Logo | Disabled |
| Boot Option Priorities | |
| BOOT OPTION | SATA:ST3800···. |
| Hard Drive BBS Priorities | |
| ↑ ↓ → ←: Move +/-:Value Enter : select F10:Save and ExitF9 : load Defaults Settings F1:General Help Esc : Exit |
Step 5: Select the menu item Security
| Supervision Password:Not installedUser Passwrod :Not InstalledChange Supervisor PasswordChange User PasswordClear User PasswordBoot Setor Virus Protection DislabledFlash Write Protection Enabled | Help Item | ||
| Install or change e password |
Step 6: Select the menu unit exit
| North Bridge Configuration | Help Ttem | |
| Memory Frequency | 800MHZ | |
| Total Memory | 2048MB | Configure North |
| Share Memory Size | 8MB | Bridge features |
| DVMT Mode Select | DVMT Mode | |
| DVMT/FIXED Memory | 256MB | |
| South Bridge Configuration | |
| HD Audio controller | Enabled |
| USB Function | Enabled |
| On board LAN2 Controller | Auto |
| LAN Boot Rom | Disabled |
| ↑ ↓ → ←: Move +/-:Value Enter : select F10:Save and ExitF9 : load Defaults Settings F1:General Help Esc : Exit |
Step7: Select the Save& exit
| Exit option Item Specific | |
| Help | |
| Save Change and Exit | |
| Discard Change and Exit | Exit system |
| Discard Change | setup with |
| Load Optimal Default | |
| ↑ ↓ → ←: Move +/-:Value Enter : select F10:Save and ExitF9 : load Defaults Settings F1:General Help Esc : Exit |
3.2 Touch screen driver installation:
Step 1: Open the installer directory to find the setup.exe file, double-click the installation, when apply CD-ROM installation, the path is shown below.

Step 2: Double-click the installation as the following figure shows, click Next to proceed to the next installation.

Step 3: Install In progress
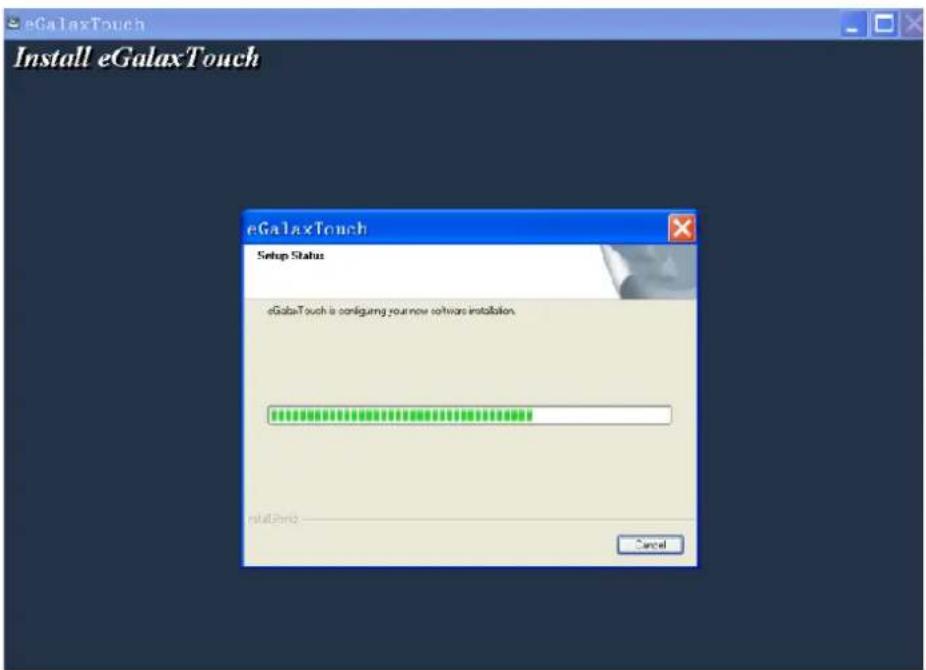
Step 4: Tick "install PS / 2 interface driver" and click Next to proceed installation.

Step 5: If the touch interface is RS232, tick "install RS232 interface driver" and click Next to proceed installation.
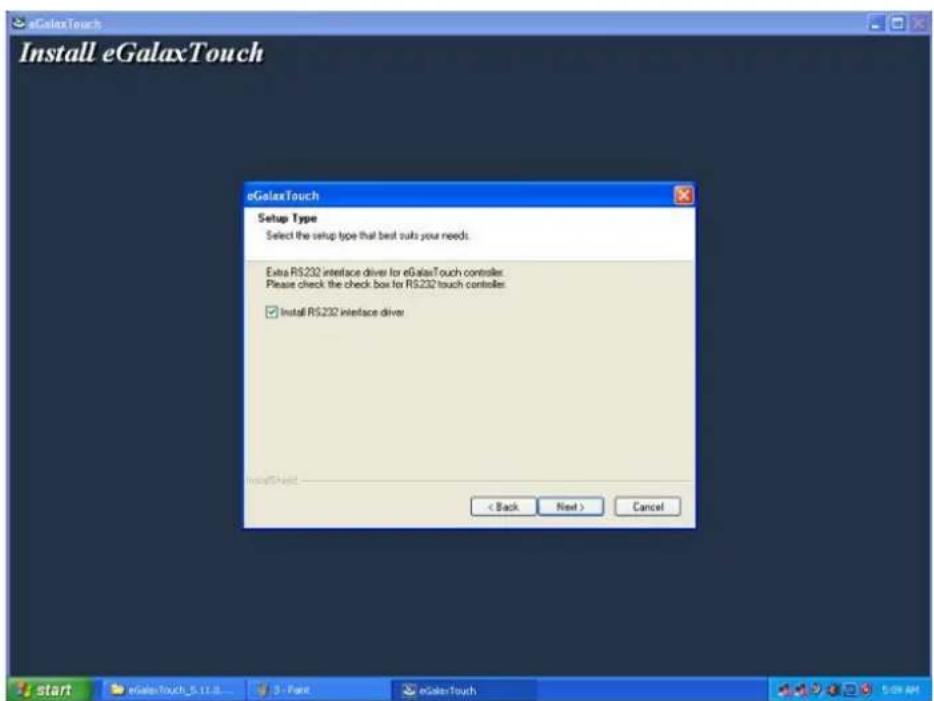
Step 6: When choosing the calibrations, select NONE, click Next to proceed installation.

Step 7: When installing USB touch, please connect the USB controller and USB cable

Step 8: When there are two or more touch screen, please tick "Support multi-monitor system".

Step 9: Select the destination location to store the driver, the default path is C:\Program Files \eGalaxtouch; we use the default path here, click Next to proceed to installation.

Click Next to proceed to installation

Step 10: Check the projects to create a desktop shortcut icon in the following figure

After install the driver successfully, identify the USB controller card and RS232 control card as the following two figures shows.


Related touch function setting

Touch calibration

Touch device line test

Touch screen setting

Touch device edge correction setting
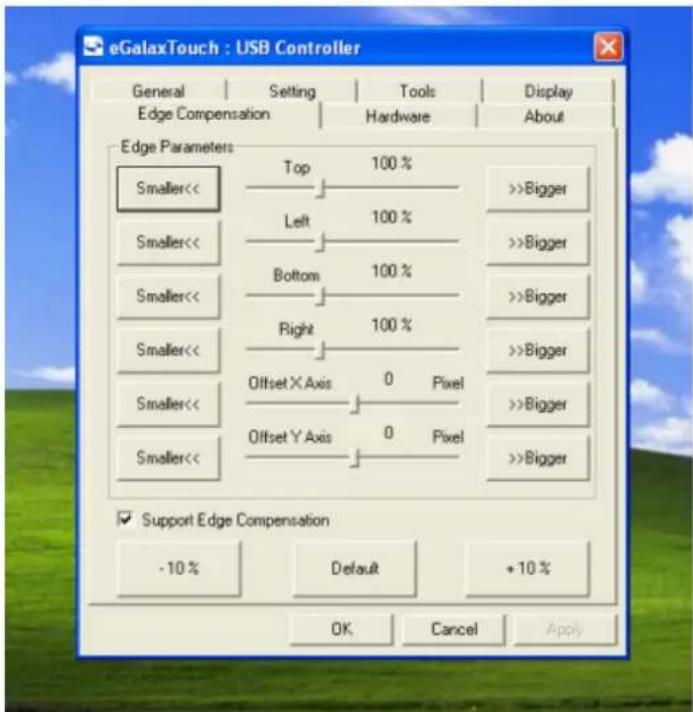
Touch device hardware information display

Chapter IV: Common Faults and exclusion
1. POS device does not boot
If the POS devices cannot boot after repeated pressing of the power switch (POWER) when connect to the power, the POS device power light remains off, the fan does not
4) If the POS device does not boot after a sudden power failure or illegal shutdown, unplug the adapter from the POS device, and press the power button (POWER) for several times, then plug the adapter and boot again.
(5) If the adapter light blinks or go off, unplug the adapter immediately and do not plugged in again, then contact with our products service center.
2. No display after start up
When the POS normal boots, you will hear the BIOS beeping and the sound of the entering theme, if the display remain in blank screen, the LCD switch might not be off, switch the LCD on.
3. The POS device automatically restart (or shutdown)
If POS device is frequently automatic shutdown or auto-boot in operating (or just start up),
(1) Check the power supply is connected normally; make sure the plug is not loose and contacts are in good condition;
(2) Check the AC 220V is stable;
(3) Virus may cause this problem if the hardware parts are normal, immediately antivirus to restore the system.
(4) A sudden power failure or illegal shutdown may cause this problem, press F8 to use safe mode to enter the system and debug.
(5) If you added or replace any hardware or an external device to occur this problem, recover the hardware or remove it.
(6) If the above steps do not resolve this problem, reinstall the operating system.
4. POS device is not available to access internet (slow response)
(1) Make sure the external network cable is well connected;
(2) Check if the green light is on and the orange light blinks at the internet port while the POS device is working. If not, there might be the external cable problems, please re-check the external network cable is connected;
(3) Check the network connection icon in the Toolbar, if the icon cannot be found, so network card driver might not be installed properly, reinstall the driver (according to
the driver installation instructions");
(4) Check the IP address is set correctly (according to the "Driver Installation Instructions"), If you do not know how to. Please apply "Obtain an IP address automatically".
(5) Not available to access internet or the network speed is very slow, it may be too many pages opened or affected by viruses, so please clean the virus immediately.
5. Mouse or keyboard is not working.
Restart the POS device after connecting mouse and keyboard, or may cause abnormal use or crash phenomenon to the mouse and keyboard.
(1) Check the mouse and keyboard are normal; replace the damaged ones;
(2) Check the drivers of mouse and keyboard are correctly installed, if not, reinstall the driver. See “the motherboard driver installation”.
6. The touch screen does not respond
When the touch POS device does not have any reaction;
- Remove the touch driver and then install it again Remove the touch driver and then install it again.
- Execute the "eGalaxTouch on the desktop, check if the COM Port is normally.
- Disconnect the touch cable from COM port, and plug in other RS-232C devices to confirm if the COM port is working correctly.
- Check the touch flat 5P cable, which is connected the touch panel and touch control board.
- The touch panel and touch control board themselves may be defective. In this case, need to replace these defective components.
7. When touch the screen of POS device, the cursor pulse in a fixed position.
(1) Check the cursor if there is anything suppressing on the touch screen;
(2) The power supply or other high frequency equipment affect the screen or controller, make sure that the touch screen is away from the high-voltage equipment;
(3) The touch screen driver is not installed correctly, install the driver (please refer to the "Touch Screen Setup") and run a 25-point calibration.
8. Touch screen is not accurate
Please run the touch screen calibration program with a 25-point recalibration, we
also recommend you to do this after change the monitor resolution or refresh rate. When running the calibration, press the center of calibration point to avoid in accuracy.
9. The cursor moves opposite to the touch movement
(1) Please run the 4/9/25 point calibration;
(2) The touch screen driver is not installed properly, reinstall the driver.
10. The cursor fixed at the edge of LCD, or pulse in a fixed position
(1) The touch region of the screen has been suppressed by something.
(2) Check the edges of the LCD if there is anything inserted in or the front frame is being squeezed;
(3) Make sure the touch screen is clean without anything pasted on.
(4) If the above steps do not solve the problem, please contact the products and services center in our company.
11. The cursor in the touch screen can only move in a small area or resistive touch screens are inaccurate.
(1) This situation usually occurs in the first time installing the driver, please run the touch screen calibration program. We also recommend you to do this after change the monitor resolution (Start - Programs);
(2) Run the touch screen calibration program to do a 25-point recalibration.
12. POS display is not clear or water ripples appears
(1) Re-set in the display properties
(2) The screen display resolution is set in the best condition (1024 * 768);
(3) Power supply or other high frequency devices affect the screen or machine; keep the distance between the POS device and the high frequency devices.
13. Can not connect to the printer
(1) Make sure the printer is normal;
(2) Check the printer and POS devices are connected;
(3) Check the driver of printer is installed;
(4) Try to find the printer hardware in the POS device properties, if found, please re-install the correct printer driver;
(5) In the POS device properties if the printer hardware is not found, please re-check printers and POS device is connected and the printer is available.
(6) If the above steps do not resolve this problem can only reinstall the operating system.
14. USB external device can not be used
(1) Check the external USB device is normal;
(2) Check the BIOS USB2.0J is enabled;
(3) The cable of USB external device should not be too long. Otherwise, the USB device can not be found due to the insufficient supply;
(4) Re-install the USB driver (see "motherboard driver installation").

- Table of Contents
- Chapter I: Overview
- The Structure of the Manual
- When the following occurs:
- Electromagnetic compatibility statement:
- The rear panel I/O signs and description:
- Chapter III: Instructions for use
- Motherboard BIOS settings:
- Touch screen driver installation:
- Chapter IV: Common Faults and exclusion
- POS device does not boot
- No display after start up
- The POS device automatically restart (or shutdown)
- POS device is not available to access internet (slow response)
- Mouse or keyboard is not working.
- The touch screen does not respond
- When touch the screen of POS device, the cursor pulse in a fixed position.
- Touch screen is not accurate
- The cursor moves opposite to the touch movement
- The cursor fixed at the edge of LCD, or pulse in a fixed position
- The cursor in the touch screen can only move in a small area or resistive touch screens are inaccurate.
- POS display is not clear or water ripples appears
- Can not connect to the printer
- USB external device can not be used
Brand : EC Line
Model : EC-1530
Category : Cash register