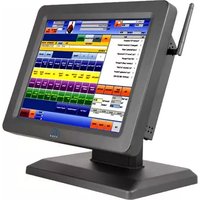
EC-1200 - Cash register EC Line - Free user manual and instructions
Find the device manual for free EC-1200 EC Line in PDF.


| Product Type | Cash register / POS terminal |
| Model | EC-1200 (also known as WT-100) |
| Processor | Intel Atom D525 (1.8 GHz, dual-core) |
| Memory | 1 GB DDR3 SO-DIMM (upgradeable to 4 GB, 2 slots) |
| Storage | 2.5-inch SATA HDD, 160 GB |
| Display | 15-inch TFT LCD, 1024 x 768 resolution |
| Touch Technology | 5-wire resistive touch (PS/2 interface) |
| Ethernet | Gigabit Ethernet (10/100/1000 BASE-T) |
| I/O Ports | 6 COM ports, 1 VGA, 1 RJ-11 cash drawer (+24V), 1 parallel, 8 USB 2.0, 1 RJ-45 LAN, PS/2 |
| Power Supply | AC 100-240V, DC 12V / 7.5A, 90W adapter |
| Dimensions (W x H x D) | 360.00 mm x 336.45 mm x 230.65 mm |
| Operating Temperature | 0°C to +40°C |
| Storage Temperature | -20°C to +60°C |
| Humidity | 15% to 80% |
| Certifications | KC, CE/FCC, CCC, VCCI, BSMI, Class A |
| Supported Operating Systems | Windows 7, Windows XP, Linux (Ubuntu), POSReady 2009, POSReady 7 |
| Cash Drawer Connection | RJ-11 connector, supports +24V cash drawers |
| Optional Peripherals | MSR (3-track), VFD customer display, WiFi module via Mini-PCIe |
| Maintenance & Cleaning | Use dry cloth; avoid liquids; disconnect power before cleaning |
| Safety Precautions | Disconnect power before servicing; avoid static discharge; use only specified battery (CR2032) |
| Spare Parts / Repairability | Upgradable hard drive, RAM, replaceable CMOS battery; service by qualified personnel |
Frequently Asked Questions - EC-1200 EC Line
User questions about EC-1200 EC Line
0 question about this device. Answer the ones you know or ask your own.
Ask a new question about this device
Download the instructions for your Cash register in PDF format for free! Find your manual EC-1200 - EC Line and take your electronic device back in hand. On this page are published all the documents necessary for the use of your device. EC-1200 by EC Line.
USER MANUAL EC-1200 EC Line
natural_image
Illustration of a flat-screen monitor with a blank screen and support base (no text or symbols)Copyright
This publication, including all photographs, illustrations and software, is protected under international copyright laws, with all rights reserved. Neither this manual, nor any of the material contained herein, may be reproduced without written consent of the author.
Disclaimer
The information in this document is subject to change without notice. The manufacturer makes no representations or warranties with respect to the contents hereof and specifically disclaims any implied warranties of merchantability or fitness for any particular purpose. The manufacturer reserves the right to revise this publication and to make changes from time to time in the content hereof without obligation of the manufacturer to notify any person of such revision or changes.
Trademark recognition
All product names used in this manual are the properties of their respective owners and are acknowledged.
Federal Communications Commission (FCC)
This equipment has been tested and found to comply with the limits for a Class A digital device, pursuant to Part 15 of the FCC Rules. These limits are designed to provide reasonable protection against harmful interference in a residential installation. This equipment generates, uses, and can radiate radio frequency energy and, if not installed and used in accordance with the instructions, may cause harmful interference to radio communications. However, there is no guarantee that interference will not occur in a particular installation. If this equipment does cause harmful interference to radio or television reception, which can be determined by turning the equipment off and on, the user is encouraged to try to correct the interference by one or more of the following measures:
Reorient or relocate the receiving antenna.
Increase the separation between the equipment and the receiver.
Connect the equipment onto an outlet on a circuit different from that to which the receiver is connected.
Consult the dealer or an experienced radio/TV technician for help.
Shielded interconnect cables and a shielded AC power cable must be employed with this equipment to ensure compliance with the pertinent RF emission limits governing this device. Changes or modifications not expressly approved by the system's manufacturer could void the user's authority to operate the equipment.
Declaration of conformity
This device complies with part 15 of the FCC rules. Operation is subject to the following conditions:
This device may not cause harmful interference, and
This device must accept any interference received, including interference that may cause undesired operation.
Korea Communications Commission (KCC)
KCC-REM-PTP-WT-100
A급 기기
(업무용 방송통신기자재)
This manual is intended for system administrators who are familiar with setting up a new system and installing an operating system.
The manual consists of the following sections:
Chapter 1 Getting Started: This section covers unpacking and checking the package contents, and identifying components. Information on connecting peripheral devices, and powering on is also provided.
Chapter 2 BIOS Setup Utility: The BIOS chapter provides information on navigating and changing settings in the BIOS Setup Utility.
Chapter 3 Upgrading Components: This section provides information on upgrading components.
Appendix: The appendix covers troubleshooting, information on having the WT-100 serviced, and technical specifications.
Safety information
Before installing and using the WT-100, take note of the following precautions:
- Read all instructions carefully.
- Do not place the unit on an unstable surface, cart, or stand.
- Do not block the slots and opening on the unit, which are provided for ventilation.
- Do not push objects in the ventilation slots as they may touch high voltage components and result in shock and damage to the components.
- Only use the power source indicated on the marking label. If you are not sure, contact your dealer or the Power Company.
- The unit uses a three-wire ground cable, which is equipped with a third pin to ground the unit and prevent electric shock. Do not defeat the purpose of this pin. If your outlet does not support this kind of plug, contact your electrician to replace your obsolete outlet.
- Do not place anything on the power cord. Place the power cord where it will not be in the way of foot traffic.
- Follow all warnings and cautions in this manual and on the unit case.
- When replacing parts, ensure that your service technician uses parts specified by the manufacturer.
- Avoid using the system near water, in direct sunlight, or near a heating device.

WARNING
The system uses a 3V CR2032 battery mounted on the mainboard to keep time. There is a risk of explosion if the wrong battery type is used when replacing. Dispose of used batteries according to local ordinance regulations.

CAUTION
The USB ports can be damaged if care is not taken when connecting devices. Ensure USB devices are correctly inserted.
Plugging a phone line into the LAN port (RJ-45 connector) can damage the connector. Take care only plug an RJ-45 connector into the LAN port.
Revision history
Version 1.0, February 2012
TABLE OF CONTENTS
CHAPTER 1 GETTING STARTED....1
Unpacking the machine ....1
Checking the package contents 2
Identifying components ....3
Connecting peripheral devices....6
Connecting a cash drawer 7
Powering the machine on and off....8
CHAPTER 2 BIOS SETUP....9
About the Setup Utility 9
Entering the Setup Utility 10
BIOS navigation keys ....10
Using BIOS 11
Main Screen....12
Advanced Settings 13
IDE Configuration ....14
Primary/ Secondary IDE Master ....15
CPU Configuration....16
MPS Configuration....17
SuperIO Configuration....18
Hardware Health Configuration 19
ACPI Configuration....20
USB Configuration....21
Boot Settings Configuration 22
Boot Device Priority 23
Hard Disk Drives....24
Boot Settings Configuration....25
Chipset Settings....26
North Bridge Chipset Configuration....27
South Bridge Chipset Configuration 28
Security Settings 29
Exit Menu 30
CHAPTER 3 UPGRADING COMPONENTS ....33
Safety and precautions 33
Before you begin 34
Upgrading the hard drive....35
APPENDIX 37
Troubleshooting 37
Tips for Troubleshooting....37
The Power-On Self Test 37
Beep Errors at POST 37
Beep Message Errors at POST 38
General Problems ....39
Having the WT-100 Serviced 40
Specifications....41
This chapter describes the procedures from unpacking the WT-100, to powering it on. The following topics are described.
• Unpacking the machine on page 1
• Checking the package contents on page 2
• Identifying components on page 3
• Connecting peripheral devices on page 6
• Connecting a cash drawer on page 7
• Powering the machine on and off on page 8
Unpacking the machine
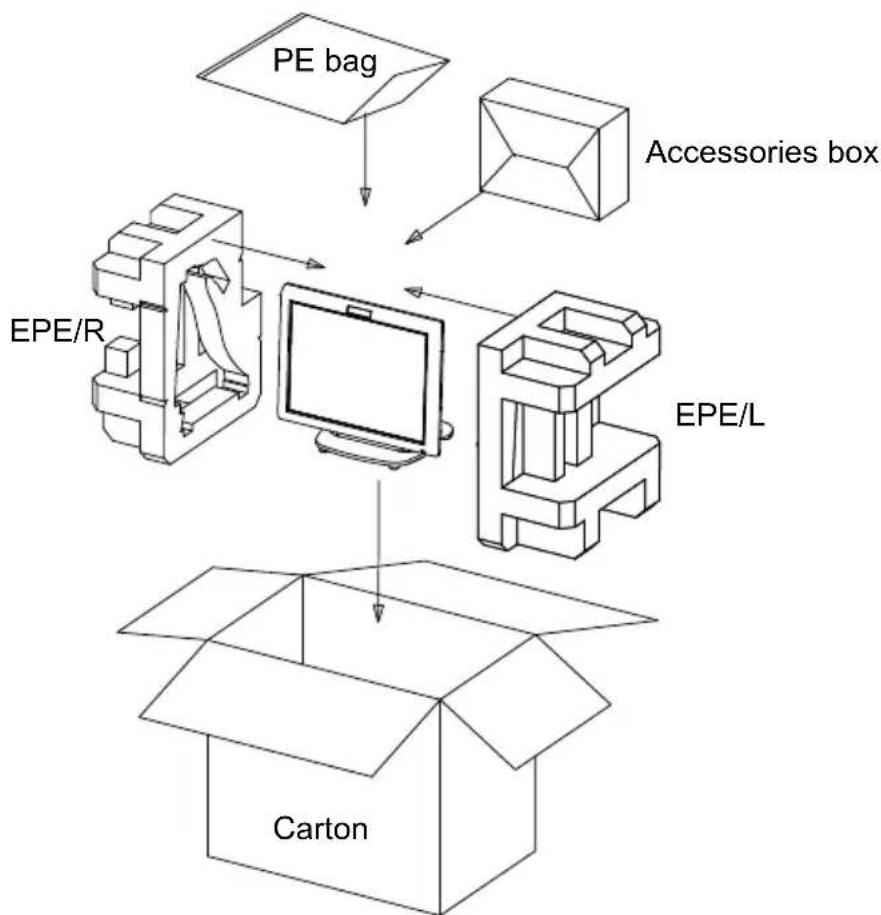
The machine and cable accessories are packed in a cardboard carton with foam padding for protection during shipping.
flowchart
graph TD
    A["PE bag"] --> B["Accessories box"]
    C["EPE/R"] --> D["Computer"]
    E["EPE/L"] --> D
    F["Carton"] --> D
    D --> G["Box"]
Figure 1.1 Unpacking the machine
Carefully unpack the machine and keep the packing materials. If you need to ship it in the future, repack it as shown in Figure 1.1.
Checking the package contents
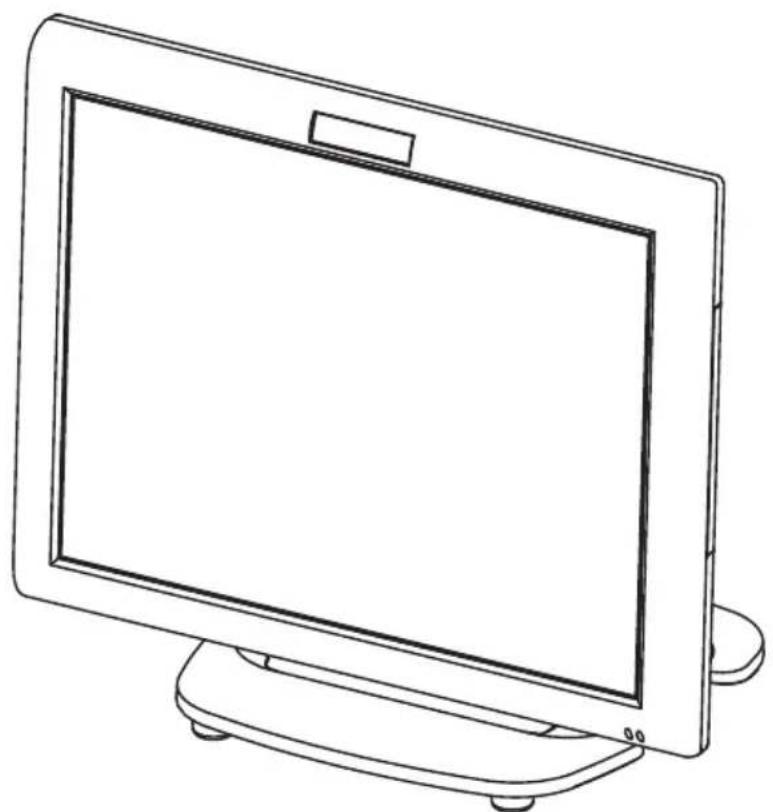
After you unpack the device check that the following items are included.
natural_image
Line drawing of a flat-screen monitor mounted on a stand (no text or symbols)WT-100

natural_image
Concentric circles diagram with no text or symbolsDriver CD with drivers and the user manual PDF file.

natural_image
Line drawing of a rectangular electronic device with a cable and connector (no text or symbols)Adapter

natural_image
Line drawing of a single electrical outlet with a coiled cable (no text or symbols)Power Cable
If any item is missing or appears damaged, contact your dealer immediately.
Identifying components
This section describes the parts and connectors on the machine.
Front-right view

Figure 1.2 Front-right view
| Component Description | |
| 1 15-inch TFT LCD | |
| 2 LED Power Indicator/ HDD Indicator | |
| 3 IO Panel Cover | |
| 4 IO Panel | |
| 5 Power Button | |
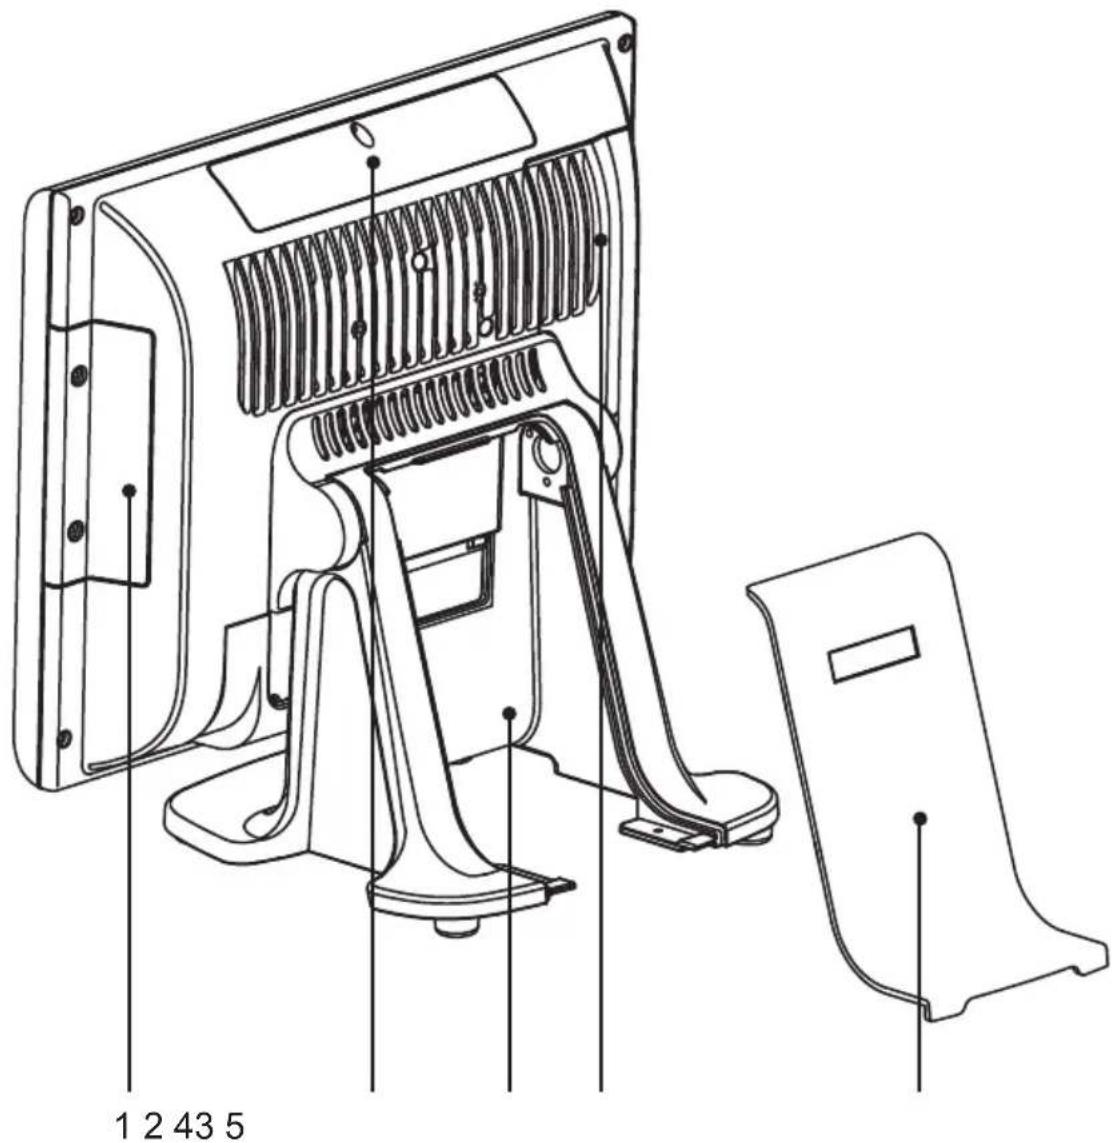
Figure 1.3 Rear view
| Component Description | |
| 1 MSR (optional) Slot | |
| 2 VFD Customer Display (optional) Slot | |
| 3 Cable Compartment | |
| 4 HDD Compartment | |
| 5 Cable Compartment Cover |

Figure 1.4 WT-100 I/O connectors
| Connector Description | |
| 1 COM 4 port | |
| 2 VGA port | |
| 3 COM 1 port | |
| 4 USB ports | |
| 5 RJ-11 cash drawer port | |
| 6 DC 12V input connector | |
| 7 PS/2 port | |
| 8 COM 3 port | |
| 9 COM 2 port | |
| 10 LAN jack | |
| 11 Parallel port | |
| 12 DC 12V output connector (for 2nd LCD Monitor) | |
Connecting peripheral devices
Peripheral devices such as a printer or scanner can be connected to the machine. Refer to the user manual of the device you are connecting for instructions on installing drivers where needed.

Figure 1.5 Connecting peripheral devices

Do not plug a phone line into the RJ-45 (ADSL or router) connector. Doing so can damage the connector.
Connecting a cash drawer
Refer to the following to connect a cash drawer.

IMPORTANT
The cash drawer RJ-11 connector is DC+24V. Ensure the cash drawer to be connected matches this power specification.
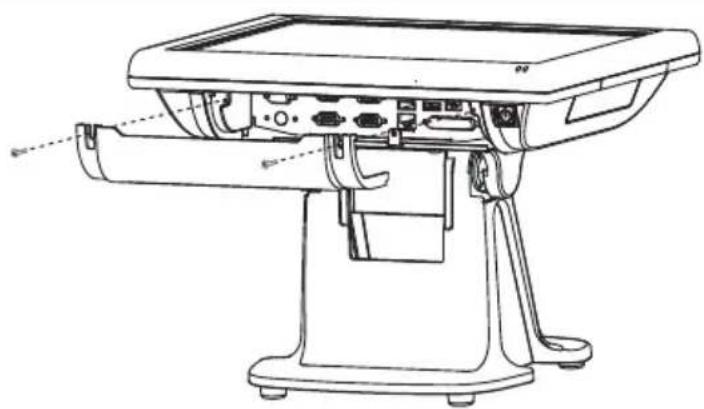
| 1. Flip up the LCD panel2. Remove two screws from the IO panel cover and remove the cover. You can find the I/O panel is at the bottom of the LCD panel. |  |
| 3. Connect the RJ-11 cable from the cash drawer to the RJ-11 connector on the I/O Panel.4. Return the LCD panel back to the original position. |  Cashdrawer Cashdrawer |
Powering the machine on and off
Refer to the following to power on and off the machine.
- Flip up the LCD panel
- Remove two screws from the IO panel cover and remove the cover. You can find the I/O panel is at the bottom of the LCD panel.
natural_image
Technical line drawing of a kitchen appliance with handle and control panel (no text or symbols)- Connect the adapter to the power cable, and then insert the power plug into an electrical outlet (AC100 - 240 V).

Using adaptor higher than 12V/7.5A may damage the system.

natural_image
Diagram of an electronic device showing connections between ports and a power strip (no text or symbols)-
Press the power button, it's at the bottom right of the machine. The power LED turns on.
-
To turn off the machine, shut down the operating system: the main power turns off automatically.

natural_image
Line drawing of a hand holding a flat-screen monitor (no text or symbols)
You may need to force power off the machine, for example if the operating system you are using does not support power down by the OS or if the system crashes or hangs. To force power off, long press the power button for five seconds.
The primary function of the BIOS (Basic Input and Output System) is to identify and initiate component hardware. The BIOS parameters are stored in non-volatile BIOS memory (CMOS). CMOS contents don't get erased when the computer is turned off. The following topics are described in this chapter.
• About the Setup Utility on page 9
• Main Screen on page 12
• Advanced Settings on page 13
• Boot Settings Configuration on page 22
• Chipset Settings on page 26
• Security Settings on page 29
- Exit Menu on page 30
About the Setup Utility
The BIOS Setup Utility enables you to configure the following items:
• Hard drives, diskette drives, and peripherals
• Video display type and display options
• Password protection from unauthorized use
• Power management features
This Setup Utility should be used for the following:
- When changing the system configuration
- When a configuration error is detected and you are prompted to make changes to the Setup Utility
- When trying to resolve IRQ conflicts
- When making changes to the Power Management configuration
- When changing the User or Supervisor password
Entering the Setup Utility
When you power on the system, BIOS enters the Power-On Self Test (POST) routines. POST is a series of built-in diagnostics performed by the BIOS. After the POST routines are completed, the following message appears:
Press DEL to run Setup
Press the delete key
| Main Advanced Boot Chipset Security Exit | |
| System Overview | |
| AMIBIOS Product Name : UT-100 Version :08.60.16 Build Date:12/06/11 ID :1AAAA000 | |
| Processor Intel (R) Atom (TM) CPU DS25 @ 1.80GHz Speed :1800MHz Count :1 | |
| System Memory Size :1023MB | |
| System Time [0 :11:10] System Date [Sun 02/05/2012] | |
| + Select Screen ↑1 Select Item +- Change Field Tab Select Field F1 General Help F10 Save and Exit ESC Exit |
Figure 2.1 Main BIOS screen
BIOS navigation keys
The BIOS navigation keys are listed below.
| Key Function | |
| ← → Select screens | |
| ↑ ↓ Select items | |
| + – Modifies the selected field’s values | |
| Enter Go to sub screen | |
| F1 Displays a screen that describes all key functions | |
| F10 Saves the current configuration and exits Setup | |
| Esc Exits the current screen | |
Using BIOS
When you start the Setup Utility, the main screen appears. The main screen of the Setup Utility displays a list of the options that are available. A highlight indicates which option is currently selected. Use the cursor arrow keys to move the highlight to other options. When an option is highlighted, execute the option by pressing
Some options lead to pop-up dialog boxes that prompt you to verify that you wish to execute that option. Other options lead to dialog boxes that prompt you for information.
Some options (marked with a triangle ▶) lead to sub screens that enable you to change the values for the option. Use the cursor arrow keys to scroll through the items in the sub screen.
Main Screen
This screen includes System BIOS Information, Processor, System memory and displays the System Time and System Date.
| Main Advanced Boot Chipset Security Exit | |
| System Overview | |
| AMIBIOS Product Name : UT-100 Version :08.00.16 Build Date:12/06/11 ID :1AAAA000 | |
| Processor Intel (R) Atom (TM) CPU DS25 @ 1.80GHz Speed :1800MHz Count :1 | |
| System Memory Size :1023MB | |
| System Time [0 :11:10] System Date [Sun 02/05/2012] | |
| + Select Screen ↑1 Select Item +- Change Field Tab Select Field F1 General Help F10 Save and Exit ESC Exit |
Figure 2.2 Main Screen
System Overview
This screen displays System BIOS Information, Processor, System memory, System Time and System Date.
System Time/ System Date
The System Time and System Date items show the current date and time held by the machine. If you are running a Windows OS, these items are automatically updated whenever you make changes to the Windows Time and Date Properties utility.
Advanced Settings
This setup screen includes sub-menus for IDE Configuration, USB Configuration, ACPI Configurations, MPS Configurations, Super IO Configurations and Hardware Health Configuration.
| Main Advanced Boot Chipset Security Exit | |
| Advanced Settings WARNING: Setting wrong values in below sections may cause system to malfunction. ►IDE Configuration ►CPU Configuration ►MPS Configuration ►SuperIO Configuration ►Hardware Health Configuration ►ACPI Configuration ►USB Configuration Spread Spectrum [Enabled] Onboard Lan Boot ROM [Disabled] | Configure the IDE device(s). + Select Screen ↑1 Select Item Enter Go to Sub Screen F1 General Help F10 Save and Exit ESC Exit |
Figure 2.3 Advanced Settings Screen
Spread Spectrum
When the motherboard clock generator pulses, the extreme values (spikes) of the pulses creates EMI (Electromagnetic Interference). The Spread Spectrum function reduces the EMI generated by modulating the pulses so that the spikes of the pulses are reduced to flatter curves. If you do not have any EMI problem, leave the setting at Disabled for optimal system stability and performance.
Onboard LAN Boot ROM
This feature allows users to enable or disable the onboard Lan boot ROM to boot system.
IDE Configuration
| IDE Configuration | Options | |
| Configure SATA as SATA Run Mode Configuration | [IDE] [Enhanced] | IDE AHCI Disabled |
| Primary IDE Master Secondary IDE Master | : [Hard Disk] : [Not Detected] | |
| Hard Disk Write Protect | [Disabled] | |
| Select Screen ↑↓ Select Item ← Change Option F1 General Help F10 Save and Exit ESC Exit | ||
Figure 2.4 IDE Configuration sub-menu
Hard Disk Write Protect
This item will be effective only if the device is accessed through BIOS.
Primary/ Secondary IDE Master
| Primary IDE Master | Select the type of device connected to the system. | |
| Device :Hard Disk Vendor :UDC UD1600BEUT-2ZZCTO Size :160.0GB LBA Mode :Supported Block Mode:16Sectors PIO Mode :4 Async DMA :MultiWord DMA-2 Ultra DMA :Ultra DMA-6 S.M.A.R.T.:Supported | ||
| Type | Date | + Select Screen ↑1 Select Item +- Change Option F1 General Help F10 Save and Exit ESC Exit |
Figure 2.5 Primary/Secondary IDE Master sub-menu
Type
Select [Auto] to automatically detect hard disk drive. If auto detection is successful, the BIOS Setup automatically fills in the correct values for the remaining fields on this sub-menu. If the auto detection fails, it may due to that the hard disk is too old or too new. If the hard disk was already formatted on an older system, the BIOS Setup may detect incorrect parameters. In these cases, select [User] to manually enter the IDE hard disk drive parameters.
LBA/Large Mode
This allows user to select the LBA/Large mode for a hard disk > 512 MB under DOS and Windows; for Netware and UNIX user, select [Off] to disable the LBA/Large mode.
Block (Multi-Sector Transfer)
Set this item to [On] will enhance hard disk performance by reading or writing more data during each transfer.
PIO Mode
This item is used to select the IDE PIO (Programmable I/O) mode program timing cycles between the IDE drive and the programmable IDE controller. As the PIO mode increases, the cycle time decreases.
DMA Mode
This allows user to select the Direct Memory Access (DMA) mode.
S.M.A.R.T.
This item is used to enable monitoring of hard disks that support the S.M.A.R.T. (Self-Monitoring And Reporting Technology) feature, which can allow the hard disk to report, under some circumstances, impending failures of the hard disk.
32Bit Data Transfer
It allows user to enable 32-bit access to maximize the IDE hard disk data transfer rate.
CPU Configuration
| Configure advanced CPU settings Module Version:3F.1C | Disabled for WindowsXP |
| Manufacturer:Intel Intel(R) Atom(TM) CPU D525 @ 1.80GHz Frequency :1.80GHz FSB Speed :800MHz Cache L1 :48 KB Cache L2 :1024 KB Ratio Actual Value:9 Max CPUID Value Limit [Disabled] Execute-Disable Bit Capability [Enabled] Hyper Threading Technology [Enabled] | Select Screen 1↓ Select Item ← Change Option F1 General Help F10 Save and Exit ESC Exit |
Figure 2.6 CPU
Configuration sub-menu
Max CPUID Value Limit
When enabled, the processor will limit the maximum CPUID input value to 03h when queried, even if the processor supports a higher CPUID input value. When disabled, the processor will return the actual maximum CPUID input value of the processor when queried.
Execute-Disable Bit Capability
This feature is used to protect certain system memory data regions from insertion and execution of potentially harmful code.
Hyper Threading Technology
This feature allows a single processor to execute two or more separate threads concurrently. When hyper-threading is enabled, multi-threaded software applications can execute their threads in parallel, thereby improving their performance.
MPS Configuration
| MPS Configuration MPS Revision [1.4] | Select MPS Revision. • Select Screen ↑↓ Select Item ← Change Option F1 General Help F10 Save and Exit ESC Exit |
Figure 2.7 MPS
Configuration sub-menu
MPS Revision
This item allows user to select the version of the Multi-Processor Specification (MPS).
SuperIO Configuration
| Configure Win627 Super IO Chipset | Allows BIOS to Select Parallel Port Base Addresses. | |
| Parallel Port Address | [378] | |
| Parallel Port Mode | [ECP & EPP] | |
| EPP Version | [1.9] | |
| ECP Mode DMA Channel | [DMA3] | |
| Parallel Port IRQ | [IRQ7] | |
| Serial Port1 Address | [3F8/IRQ4] | |
| Serial Port2 Address | [2F8/IRQ3] | |
| Serial Port3 Address | [3E8] | |
| Serial Port3 IRQ | [IRQ5] | |
| Serial Port4 Address | [2E8] | |
| Serial Port4 IRQ | [IRQ10] | |
| Serial Port5 Address | [4F8] | |
| Serial Port5 IRQ | [IRQ11] | |
| Serial Port6 Address | [4E8] | |
| Serial Port6 IRQ | [IRQ5] | |
| Serial Port1 Voltage select | [No Extrn Voltage] | |
| Serial Port2 Voltage select | [No Extrn Voltage] | |
| Watch Dog Degree | [Second] | |
| Watch Dog Timer | [000] | |
Figure 2.8 SuperIO Configuration sub-menu
Parallel Port Address
This item allows user to select the I/O address for the parallel port.
Parallel Port Mode
This item allows user to select the parallel port mode.
EPP Version
This item allows user to select the version of EPP.
ECP Mode DMA Channel
These items are used to assign the DMA channel for the ECP mode.
Parallel Port IRQ
This item allows user to select the IRQ for the parallel port.
Serial Port1/2/3/4/5/6 Address
These items are used to assign the I/O address for the serial port 1/2/3/4/5/6.
These items are used to assign the IRQ for the serial port 3/4/5/6.
Serial Port1/2 Voltage select
These items are used to select the voltage for the serial port 1/2.
Watch Dog Degree
This item allows you to select the degree for the Watch Dog function.
Watch Dog Timer
When select any time period, the Watchdog Timer will be enabled after that time period passes, every time the system boots up. It will monitor the time taken for each task performed by the operating system. Any timeout will cause it to reboot the computer.
Hardware Health Configuration
| Hardware Health Configuration | Enables Hardware Health Monitoring Device. | |
| H/U Health Function | [Enabled] | |
| Chassis Intrusion | [Disabled] | |
| U83627 FAN Control | [Always On] | |
| Hardware Health Event Monitoring | ||
| SYS Temperature1 | :31°C/87°F | |
| CPU Temperature | :30°C/85°F | |
| SYS Temperature2 | :33°C/91°F | |
| JCFan1 Speed | :N/A | Select Screen |
| JSFan1 Speed | :N/A | Select Item |
| CPU UCore | :1.064 U | Change Option |
| UTT | :1.064 U | General Help |
| +3.3Vin | :3.419 U | Save and Exit |
| +5Vin | :5.179 U | ESC Exit |
| +12Vin | :12.464 U | |
Figure 2.9 Hardware Health Configuration sub-menu
H/W Health Function
This function is used to enable/ disable the Hardware Health Event Monitoring, that gives you an overview of the Temperature, fan speed and voltage information.
Chassis Intrusion
This function allows you to enable/ disable chassis intrusion, that can latch a chassis intrusion event even when the system is turned off, as long as battery or standby power is still present.
W83627 FAN Control
This function allows you to turn on/off the fan or set the target temperature to control the fan.
ACPI Configuration
| ACPI Settings | Select the ACPI state used for System Suspend. | |
| Suspend mode | [S1 (PED)] | |
| ACPI APIC support | [Enabled] | |
| Resume On RTC Alarm | [Disabled] | |
| Wake On Lan# | [Enabled] | |
| Soft-Off by PUR-BTTN | [Instant-Off] | |
| ← Select Screen ↑↓ Select Item ← Change Option F1 General Help F10 Save and Exit ESC Exit | ||
Figure 2.10 ACPI Settings sub-menu
Suspend mode
Use this item to define how the system suspends. In the default, S1(POS), the suspend mode is equivalent to a software power down. If you select S3(STR), the suspend mode is a suspend to RAM - the system shuts down with the exception of a refresh current to the system memory.
ACPI APIC support
This item allows user to enable or disable the APIC (Advanced Programmable Interrupt Controller) function.
Resume On RTC Alarm
This function is for setting the Date and Time for your computer to boot up. During Disabled, you cannot use this function. During Enabled, Choose the Date and Time:
RTC Alarm Date (Days) Choose which day the system will boot up.
System Time the system will boot up.

NOTE
If you have change the setting, you must let the system boot up until it goes to the operating system. Then, power off the system. This function will work the next time you power on.
Wake On Lan#
During Enabled, the system will boot up if there's an incoming call from LAN.
Soft-Off by PWR-BTTN
Under ACPI (Advanced Configuration and Power management Interface) you can create a software power down. In a software power down, the system can be resumed by Wake Up Alarms. This item lets you install a software power down that is controlled by the normal power button on your system. If the item is set to Instant-Off, then the power button causes a software power down. If the item is set to Delay 4 Sec. then you have to hold the power button down for four seconds to cause a software power down.
USB Configuration
| USB Configuration Module Version - 3.0.0-14.4 USB Devices Enabled : 1 Keyboard Legacy USB Support [Enabled] USB 2.0 Controller Mode [HiSpeed] BIOS EHCI Hand-Off [Enabled] | Enables support for legacy USB. AUTO option disables legacy support if no USB devices are connected. + Select Screen ↑↓ Select Item +- Change Option F1 General Help F10 Save and Exit ESC Exit |
Figure 2.11 USB
Configuration sub-menu
Legacy USB Support
When enabled, the BIOS will enable legacy support for USB keyboards, mice and floppy drives. You will be able to use these USB devices even with operating systems that do not support USB.
USB 2.0 Controller Mode
This item is used to select the speed mode of USB 2.0 controller.
BIOS EHCI Hand-Off
This item allows you to enable support for operating systems without an EHCI hand-off feature.
Boot Settings Configuration
This screen allow you to configure the boot options.
| Boot Settings Configuration | Specifies the Boot Device Priority sequence. |
| ► Boot Device Priority ► Hard Disk Drives ► Boot Settings Configuration Typematic Rate [Fast] | |
| Select Screen ↑1 Select Item Enter Go to Sub Screen F1 General Help F10 Save and Exit ESC Exit |
Figure 2.12 Boot Settings screen
Typematic Rate
This item allows you to specify the typematic rate.
Boot Device Priority
Use this screen to specify the order in which the system checks for the device to boot from.
| Boot Device Priority | Specifies the boot sequence from the available devices. A device enclosed in parenthesis has been disabled in the corresponding type menu. + Select Screen ↑↓ Select Item +- Change Option F1 General Help F10 Save and Exit ESC Exit | |
| 1st Boot Device | (SATA:PM-MDC VD1609) | |
| Select Screen ↑↓ Select Item +- Change Option F1 General Help F10 Save and Exit ESC Exit | ||
Figure 2.13 Boot Device Priority sub-menu
1st Boot Device
Set the boot device options to determine the sequence in which the computer checks which device to boot from.
Hard Disk Drives
Use this screen to view the hard disk drives in the system.
| Boot | |
| Hard Disk Drives | Specifies the boot sequence from the available devices. |
| 1st Drive [SATA:PM-WBC WD1608] | |
| Select Screen ↑↓ Select Item ← Change Option F1 General Help F10 Save and Exit ESC Exit | |
Figure 2.14 Hard Disk Drives sub-menu
1st Drive
Use this item to view the hard disk drives in the system.
Boot Settings Configuration
| Boot Settings Configuration | |
| Quick Boot [Enabled] Bootup Num-Lock [On] Hit 'DEL' Message Display [Enabled] Wait For 'F1' If Error [Enabled] | Allows BIOS to skip certain tests while booting. This will decrease the time needed to boot the system. + Select Screen ↑↓ Select Item •- Change Option F1 General Help F10 Save and Exit ESC Exit |
Figure 2.15 Boot Settings Configuration sub-menu
Quick Boot
Enabling this setting will cause the BIOS power-on self test routine to skip some of its tests during booting for faster system boot.
Bootup Num-Lock
This setting is to set the Num Lock status when the system is powered on. Setting to [On] will turn on the Num Lock key when the system is powered on. Setting to [Off] will allow users to use the arrow keys on the numeric keypad.
Hit 'DEL' Message Display
Enable this value to allow the Hit "DEL" to enter Setup Message Display to be modified.
Wait for 'F1' If Error
When Enabled, the BIOS will halt the boot sequence when a error is detected. You will need to press the 'F1' button at this point. It brings you to the BIOS setup menu where you can adjust the settings to fix the problem.
Chipset Settings
This screen allow you to configure the North Bridge and South Bridge chipset options.
| Main Advanced Boot Chipset Security Exit | |
| Advanced Chipset Settings WARNING: Setting wrong values in below sections may cause system to malfunction. ► North Bridge Configuration ► South Bridge Configuration | Configure North Bridge features. ← Select Screen ↑1 Select Item Enter Go to Sub Screen F1 General Help F10 Save and Exit ESC Exit |
Figure 2.16 Chipset Settings screen
North Bridge Chipset Configuration
| North Bridge Chipset Configuration | Options | |
| PCI MMIO Allocation: 4GB To 3072MB DRAM Frequency [Auto] Configure DRAM Timing by SPD [Enabled] | Auto Max MHz | |
| Initiate Graphic Adapter [IGDI] Internal Graphics Mode Select [Enabled, 8MBI] | ||
| DUMT Mode Select [DUMT Model] DUMT/FIXED Memory [256MB] | ||
| Boot Display Device [CRT + LUDS] Flat Panel Type [1024 X 758 18BIT] Backlight Control [40.0%] | Select Screen 11 Select Item - Change Option F1 General Help F10 Save and Exit ESC Exit | |
Figure 2.17 North Bridge Chipset Configuration sub-menu
DRAM Frequency
This item specify the DRAM frequency of the system.
Configure DRAM Timing By SPD
Choose Enabled, will automatically configure the DRAM Timing depending on the "DRAM Frequency" selection. Choose Disabled, to customize the setup.
Internal Graphics Mode Select
This feature controls the amount of system memory that is allocated to the integrated graphic process when the system boot up.
DMVT Mode Select
Dynamic Video Memory Technology (DVMT) allows the system to dynamically allocate memory resources according to the demands of the system at any point in time, that improves the efficiency of the memory allocated to either system or graphics processor. This item allows you to select the DVMT operating mode.
DMVT/FIXED Memory
This item allows you to set the maximum amount of system memory that can be allocated as graphics memory.
Boot Display Device
If you connect an external display to this machine, you can use this setting to turn off the LCD and only use the external display. To use dual displays this must be set to CRT+LVDS.
Backlight Control
This feature allows you to adjust the backlight of the LCD monitor.
South Bridge Chipset Configuration
| South Bridge Chipset Configuration | Options | |
| USB 2.0 Controller | [Enabled] | Enabled Disabled |
| Audio HDA Controller | [Enabled] | |
| SMBUS Controller | [Enabled] | |
| Mini PCIE Port | [Auto] | |
| Restore on AC Power Loss by IO [Power Off] | ||
| Power Type | [ATX] | |
| Select Screen ↑1 Select Item ← Change Option F1 General Help F10 Save and Exit ESC Exit | ||
Figure 2.18 South Bridge Chipset Configuration sub-menu
USB 2.0 Controller
The USB 2.0 Controller item allows USB 2.0 functionality.
Audio HDA Controller
This item allows the High Definition Audio interface integrated in the Southbridge functionality.
SMBUS Controller
This item allows SMBUS controller to monitor the system temperature and voltage.
Mini PCIE Port
This item allows you to enable/ disable the Mini PCIe port.
Restore on AC Power Loss by IO
This item sets the system status after restore on AC power loss.
Power Type
This allows you the select the power type.
Security Settings
This screen allows you to configure the system security settings.
| Main Advanced Boot Chipset Security Exit | |
| Security Settings | Install or Change the password. |
| Supervisor Password :Not Installed User Password :Not Installed | |
| Change Supervisor Password Change User Password | |
| Boot Sector Virus Protection [Disabled] | |
| Select Screen 11 Select Item Enter Change F1 General Help F10 Save and Exit ESC Exit | |
Figure 2.19 Security Settings screen
Supervisor/ User Password
Indicates whether a supervisor/ user password has been set. If the password has been installed, Installed displays. If not, Not Installed displays.
Change Supervisor/ User Password
These items can be used to install a password. A Supervisor password takes precedence over a User password, and the Supervisor can limit the activities of a User. To install a password, follow these steps:
- Highlight the item Set Supervisor/ User Password on the Security menu and press
. - The password dialog box appears.

- If you are installing a new password, type in the password. You can type up to eight alphanumeric characters. Symbols are ignored. The Set Supervisor/ User Password item differentiates between upper and lower case characters. Press
after you have typed in the password. To confirm the password, type the password again and press . To clear the password, leave the dialog box blank, press , when the confirm box appears, press again. - Write the passwords down and keep them in a safe place.
Boot Sector Virus Protection
When Enabled, the message will appear when a write is attempted to the boot sector.
Exit Menu
This screen allows you to load the optimal or failsafe default values, and save or discard changes.
| Main Advanced Boot Chipset Security Exit | |
| Exit Options Save Changes and Exit Discard Changes and Exit Discard Changes Load Optimal Defaults Load Failsafe Defaults | Exit system setup after saving the changes. F10 key can be used for this operation. - Select Screen ↑1 Select Item Enter Go to Sub Screen F1 General Help F10 Save and Exit ESC Exit |
Figure 2.20 Exit Menu screen
Save Changes and Exit
Highlight this item and press
Discard Change and Exit
Highlight this item and press

NOTE
If you have made settings that you do not want to save, use the "Discard Charge and Exit" item and press OK to discard any changes you have made.
Discard Change
Highlight this item and press
Load Optimized Defaults
This option opens a dialog box that lets you load optimized defaults for all appropriate items in the Setup Utility. The optimized defaults place demands on the system that may be greater than the performance level of the components, such as the CPU and the memory. You can cause fatal errors or instability if you load the optimized defaults when the hardware does not support them. If you only want to load setup defaults for a specific option, select and display that option, and then press
Follow these instructions to load the optimized defaults:
- From the Exit screen, scroll to Load Optimized Defaults.
- Press
to open the Load Optimized Defaults screen. - Select
. - Press
to load the defaults.
Load Failsafe Defaults
This option opens a dialog box that lets you load fail-safe defaults for all appropriate items in the Setup Utility. The fail-safe defaults place no great demands on the system and are generally stable. If the system is not functioning correctly, try loading the fail-safe defaults as a first step in getting the system working properly again. If you only want to load fail-safe defaults for a specific option, select and display that option, and then press
Follow these instructions: to load the fail-safe defaults:
- From the Exit screen, scroll to Load Failsafe Defaults.
- Press
to open the Load Setup Failsafe Defaults screen. - Select
. - Press
to load the defaults.
This chapter describes how to upgrade components for the WT-100. The following topics are described.
• Safety and precautions on page 33
• Before you begin on page 34
• Upgrading the hard drive on page 35
Safety and precautions
Computer components and electronic circuit boards can be damaged by discharges of static electricity.
Working on computers that are still connected to a power supply can be extremely dangerous. Follow these guidelines to avoid damage to the computer or injury to yourself.
• Always disconnect the unit from the power outlet.
- Leave all components inside the static-proof packaging that they ship with until they are ready for installation.
- After replacing optional devices, make sure all screws, springs, or other small parts are in place and are not left loose inside the case. Metallic parts or metal flakes can cause electrical shorts.

CAUTION
Only qualified personnel should perform repairs on the WT-100. Damage due to unauthorized servicing is not covered by the warranty. If you are not confident of installing a hard drive or CompactFlash card, we recommend that you refer the job to qualified personnel.

WARNING
If the LCD breaks and fluid gets onto your hands or into your eyes, immediately wash with water and seek medical attention.

WARNING
The inverter card has high voltage. Do not touch the inverter card while power is connected to the machine. Unplug the power cord before attempting to replace any part.

CAUTION
To prevent static damage to components, wear a grounded wrist strap. Alternatively, discharge any static electricity by touching the bare metal chassis of the unit case, or the bare metal body of any other grounded appliance.

CAUTION
Hold electronic circuit boards by the edges only. Do not touch the components on the board unless it is necessary to do so. Do not flex or stress the circuit board. Do not hold components such as a processor by its pins; hold it by the edges.
Before you begin
Make sure you have a stable, clean working environment. Dust and dirt can get into components and may cause malfunction. Adequate lighting and proper tools can prevent you from accidentally damaging the internal components.
Most of the electrical and mechanical connections can be disconnected by using your fingers. It is recommended that you do not use needle-nosed pliers to disconnect connectors as these can damage the soft metal or plastic parts of the connectors.

CAUTION
To prevent scratching the case of the machine, make sure the worktop surface is clean and flat.
Upgrading the hard drive
Refer to the following to remove and replace the hard drive.
| 1. Turn off the device properly through the operating system.2. Disconnect the power cord from the power outlet.3. Remove the screw form the hard drive compartment cover and slide the cover to the right as it shown on the picture. |  |
| 4. Remove the screw from the hard drive tray.5. Slide the hard drive disk up as it shown on the picture. | 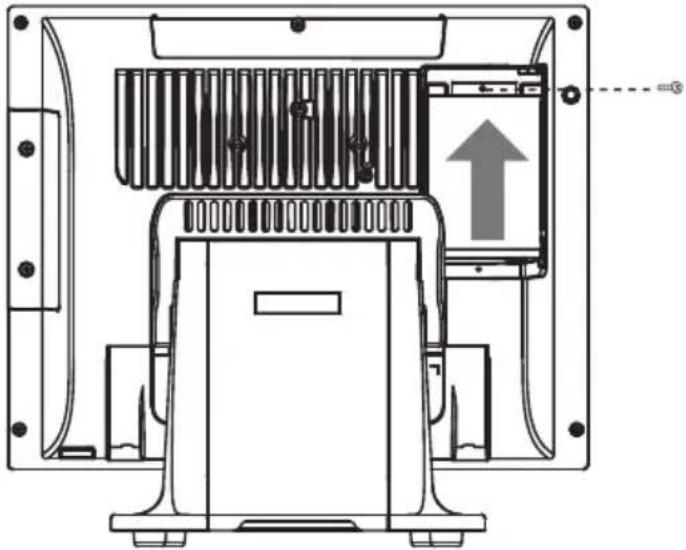 |
| 6. Remove the hard drive tray.7. Disconnect the power cable and SATA cable from the hard drive.8. Remove the four screws, then remove the hard drive out from the tray. |  |
To replace the hard drive, reverse the above procedure.
This appendix describes locating and solving problems that you may encounter while using the WT-100 POS.
Troubleshooting
Often after time spent troubleshooting, the problem is traced to something as simple as a loose connection. Check the following before proceeding to the problem-specific solutions.
Tips for Troubleshooting
In each problem-specific section, try the steps in the order suggested. This may help you to solve the problem more quickly. Try to pin point the problem and thus avoid replacing non-defective parts. For example, if you replace batteries and the problem remains, put the original batteries back and go to the next step.
Keep a record of the steps you take when troubleshooting: The information may be useful when calling for technical support or for passing on to service personnel.
• Use some other electrical device to confirm that the electrical outlet is working.
- Ensure all connections are securely attached.
The Power-On Self Test
The Power-On Self Test (POST) runs every time you turn on or reset the computer. The POST checks memory, the mainboard, the display, the keyboard, the disk drives, and other installed options.
If failure is detected in an area other than the mainboard (such as the keyboard or an adapter card), an error message is displayed on the screen and testing is stopped.
If your system does not successfully complete the POST, but displays a blank screen, have the WT-100 serviced.
Beep Errors at POST
There are two kinds of beep codes in the BIOS.
- Video error - a single long beep followed by three short beeps indicates a video error, the screen can not be initialized and no information can be displayed.
- DRAM error - a single long beep indicates that a DRAM error has occurred.
Beep Message Errors at POST
If the BIOS detects an error during the POST, a message is displayed. Refer to the following table for a list of the errors that display.

WARNING
The system uses a 3V CR2032 battery (CMOS battery) mounted on the mainboard to keep time. There is a risk of explosion if the wrong battery type is used when replacing. Dispose of used batteries according to local ordinance regulations.
ERROR MESSAGE CAUSE SOLUTION
| CMOS BATTERY HAS FAILED | The CMOS battery is depleted. Replace the battery. |
| CMOS CHECKSUM ERROR | The battery may be weak. Replace the battery. |
| The CMOS may be corrupt. Have the WT-100 serviced. | |
| HARD DISK(S) FAIL (80) HDD reset failed. Have the WT-100 serviced. | |
| HARD DISK(S) FAIL (40) | HDD controller diagnostics failed. Have the WT-100 serviced. |
| HARD DISK(S) FAIL (20) HDD initialization error. Have the WT-100 serviced. | |
| HARD DISK(S) FAIL (10) Unable to recalibrate fixed disk. Have the WT-100 serviced. | |
| KEYBOARD IS LOCKED OUT - UNLOCK THE KEY | The keyboard is locked and the key-board controller is pulled low. Have the WT-100 serviced. |
| KEYBOARD ERROR OR NO KEYBOARD PRESENT | A keyboard is not detected. Make sure the keyboard is attached correctly and no key is pressed during boot. |
| MANUFACTURING POST LOOP | System keeps rebooting because the keyboard controller is pulled low for testing purposes. Have the WT-100 serviced. |
| BIOS ROM CHECKSUM ERROR - SYSTEM HALTED | The ROM address is incorrect. Have the WT-100 serviced. |
| MEMORY TEST FAIL | The memory card is not correctly installed or is damaged. Have the WT-100 serviced. |
General Problems
Refer to the following general problems you may encounter.
| PROBLEM SOLUTION | |
| The display screen is dark. Make sure that the WT-100 is not in suspend mode. | |
| An incorrect date and time are displayed. Correct the date and time using the DOS DATE and TIME commands or the options in the Setup Utility. (You can also set the date and time in Windows by double clicking the clock on the task bar or in the control panel.) If the date and time become incorrect after a short time, the CMOS battery may be depleted. Replace the battery. | |
| The following message appears at boot up:“Invalid system disk, Replace the disk, and then press any key” | Ensure that an operating system is installed.Check the boot sequence in the BIOS setup utility. |
| You hear irregular beeps during operation of the computer and the system halts. | Have the WT-100 serviced. |
| An unidentified message is displayed. Reboot the computer and run the BIOS Setup Utility. Confirm the Setup Utility parameters. If the same message is displayed after booting up again, have the WT-100 serviced. | |
| You cannot operate the printer. Check the printer cable connection. Ensure that the printer power switch is turned on. Confirm that the printer is on-line. | |
| You cannot use a mouse or keyboard. Check the cable connection. Check the mouse or keyboard with another computer to see if it works. If the same problem occurs, replace the mouse or keyboard. | |
| The screen is blank and you don’t hear any beeps. Check that the AC adapter is connected to the WT-100 and the power cord is plugged into a working electrical outlet. Check that the power is on. (Press the power switch again for confirmation.) | |
| The screen is blank and you hear a continuous beep, or two or more beeps. | Have the WT-100 serviced. |
| Only the cursor appears. Reinstall the operating system, and power on the WT-100. | |
| Audio problems Ensure the audio cable is not defective.The mute is off. | |
Having the WT-100 Serviced
If you are unable to solve the problem, you should have the terminal serviced. Pack the terminal in the original carton. (See “Unpacking the WT-100” on page 1.) Include a description of the problem and a checklist of the steps you took when trying to fix the problem. The information may be useful to the service personnel. Return the terminal to the place you purchased it.
Specifications
| Item WT-100 | |
| CPU Type Intel | ^ AtomTM processor D525 (1M L2 Cache, 1.80 GHz, dual core) |
| LCD 15” Active TFT color LCD, resolution 1024 x 768 | |
| Touch 5-wire Resistive touch (PS2 interface) | |
| Memory 204pin DDR3 SO-DIMM 1GB (2 DIMM Sockets up to 4 GB) | |
| Ethernet IEEE 802.3 10/100/1000 BASE-T Gigabit Ethernet | |
| Storage Internal 2.5” type SATA HDD 160GB x 1 | |
| I/O Interface | 6 * COM ports (COM1~4 at back I/O, COM5 Reserved, COM6 for VFD) |
| 1 * DB-15 VGA port | |
| 1 * RJ11 port for 2 cash drawer(+24V) | |
| 1 * RJ-45 LAN port with activity and link LEDs | |
| 1 * Parallel port | |
| 8 * USB 2.0(4 in the back, One for Mini-PCI-e, One for MSR+RFID reader, Two Reserved) | |
| 1 * DC +12V power adaptor connector | |
| Expansion Options | 1 * Mini PCI-e, Support WiFi Module |
| Optional Peripherals | 3 tracks magnetic reader |
| Customer display module (2 x 20 VFD) | |
| Operation System | Windows 7, Windows XP, Linux (ubuntu), POSReady 2009, POSReady 7 |
| Power Supply | AC100~240V/DC12V, 7.5A, 90 watt power adaptor |
| Dimensions Physical: | 360.00mm(W) x 336.45mm(H) x 230.65mm(D) |
| Operating Temp | 0°C ~ +40°C |
| Storage Temperature | -20°C ~ +60°C |
| Humidity 15%~80% | |
| Certification | KC, CE/FCC, CCC, VCCI, BSMI, Class A |
* specification subject to change without prior notice


- Copyright
- Disclaimer
- Trademark recognition
- Federal Communications Commission (FCC)
- Declaration of conformity
- Korea Communications Commission (KCC)
- Safety information
- Revision history
- TABLE OF CONTENTS
- CHAPTER 1 GETTING STARTED....1
- CHAPTER 2 BIOS SETUP....9
- CHAPTER 3 UPGRADING COMPONENTS ....33
- APPENDIX 37
- Unpacking the machine
- Checking the package contents
- Identifying components
- Front-right view
- Connecting peripheral devices
- Connecting a cash drawer
- Powering the machine on and off
- About the Setup Utility
- Entering the Setup Utility
- Press DEL to run Setup
- BIOS navigation keys
- Using BIOS
- Main Screen
- System Overview
- System Time/ System Date
- Advanced Settings
- Spread Spectrum
- Onboard LAN Boot ROM
- IDE Configuration
- Hard Disk Write Protect
- Primary/ Secondary IDE Master
- Type
- LBA/Large Mode
- Block (Multi-Sector Transfer)
- PIO Mode
- DMA Mode
- S.M.A.R.T.
- 32Bit Data Transfer
- CPU Configuration
- Max CPUID Value Limit
- Execute-Disable Bit Capability
- Hyper Threading Technology
- MPS Configuration
- MPS Revision
- SuperIO Configuration
- Parallel Port Address
- Parallel Port Mode
- EPP Version
- ECP Mode DMA Channel
- Parallel Port IRQ
- Serial Port1/2/3/4/5/6 Address
- Serial Port1/2 Voltage select
- Watch Dog Degree
- Watch Dog Timer
- Hardware Health Configuration
- H/W Health Function
- Chassis Intrusion
- W83627 FAN Control
- ACPI Configuration
- Suspend mode
- ACPI APIC support
- Resume On RTC Alarm
- Wake On Lan#
- Soft-Off by PWR-BTTN
- USB Configuration
- Legacy USB Support
- USB 2.0 Controller Mode
- BIOS EHCI Hand-Off
- Boot Settings Configuration
- Typematic Rate
- Boot Device Priority
- 1st Boot Device
- Hard Disk Drives
- 1st Drive
- Quick Boot
- Bootup Num-Lock
- Hit 'DEL' Message Display
- Wait for 'F1' If Error
- Chipset Settings
- North Bridge Chipset Configuration
- DRAM Frequency
- Configure DRAM Timing By SPD
- Internal Graphics Mode Select
- DMVT Mode Select
- DMVT/FIXED Memory
- Boot Display Device
- Backlight Control
- South Bridge Chipset Configuration
- USB 2.0 Controller
- Audio HDA Controller
- SMBUS Controller
- Mini PCIE Port
- Restore on AC Power Loss by IO
- Power Type
- Security Settings
- Supervisor/ User Password
- Change Supervisor/ User Password
- Boot Sector Virus Protection
- Exit Menu
- Save Changes and Exit
- Discard Change and Exit
- Discard Change
- Load Optimized Defaults
- Load Failsafe Defaults
- Safety and precautions
- Before you begin
- Upgrading the hard drive
- Troubleshooting
- Tips for Troubleshooting
- The Power-On Self Test
- Beep Errors at POST
- Beep Message Errors at POST
- General Problems
- Having the WT-100 Serviced
Brand : EC Line
Model : EC-1200
Category : Cash register