SAP 813 - Air conditioner Saivod - Free user manual and instructions
Find the device manual for free SAP 813 Saivod in PDF.


| Product type | Portable air conditioner |
| Brand | Saivod |
| Model | SAP 813 |
| Cooling capacity | 12000 BTU/h |
| Power consumption (cooling) | 1150 W |
| Voltage / Frequency | 220-240 V ~ 50 Hz |
| Refrigerant type | R410A |
| Airflow rate (high speed) | 350 m³/h |
| Dehumidification capacity | 1.5 L/h |
| Noise level (high speed) | 52 dB(A) |
| Dimensions (W x D x H) | 470 x 380 x 720 mm |
| Net weight | 28 kg |
| Operating modes | Cool, Fan, Dehumidify, Auto |
| Fan speeds | 3 (Low, Medium, High) |
| Temperature control | 16°C – 30°C |
| Timer function | 1-24 hours on/off |
| Remote control | Included (battery type: AAA) |
| Air filter type | Washable mesh filter |
| Self-evaporation system | Yes (partial condensation drain required) |
| Window kit included | Yes (slider kit) |
| Maintenance | Clean filter every 2 weeks; clean condenser coils annually |
| Safety features | Auto restart after power failure; overload protection |
| Spare parts | Remote control, filter, drain hose (available from manufacturer) |
Frequently Asked Questions - SAP 813 Saivod
User questions about SAP 813 Saivod
0 question about this device. Answer the ones you know or ask your own.
Ask a new question about this device
Download the instructions for your Air conditioner in PDF format for free! Find your manual SAP 813 - Saivod and take your electronic device back in hand. On this page are published all the documents necessary for the use of your device. SAP 813 by Saivod.
USER MANUAL SAP 813 Saivod
natural_image
Line drawing of a portable air conditioner unit with control panel and ventilation grille (no text or symbols)natural_image
Diagram of a cable connector with coiled cable and connectors (no text or symbols)(Fig. 2)
natural_image
Simple line drawing of a device with a cross symbol between two ports (no text or labels)(Fig. 3)
natural_image
Technical line drawing of a mechanical assembly with a cylindrical component and housing (no text or symbols)(Fig. 4)
Advertencia
(Fig. 6)
natural_image
Line drawing of a portable air conditioner unit with control panel and ventilation grille (no text or symbols)natural_image
Diagram of a coiled cable or pipe connection with a connector, labeled (Fig. 2), showing no text or symbols beyond the label.Erros de instalação
natural_image
Simple line drawing of a vehicle with a cross symbol indicating no change or failure, no text or labels present.(Fig. 3)
natural_image
Pure technical line drawing of a mechanical or fluid system with no text, numbers, or symbols(Fig. 4)
Atenção
natural_image
Line drawing of a portable air conditioner unit with control panel and ventilation grille (no text or symbols)Thank you for choosing super quality air conditioner. Please be sure to read this user's manual carefully before using the machine. Any problem, please contact the professional service for help.
CONTENTS
IMPORTANT SAFEGUARDS....3
PLACEMENT AND INSTALLATION....4
PARTS NAME......6
CONTROL PANEL....7
REMOTE CONTROL....8
OPERATION METHODS....9
WATER DRAINAGE....10
MAINTENANCE....10
TROUBLE SHOOTING.... 11
IMPORTANT SAFEGUARDS
Please read following safeguards carefully before using the machine:
- This machine just for domestic use, please don't use it in any other places.
- Please use this machine indoor not outdoor, and place it in a dry environment.
- Don’t use the machine when any damage in power cord, plug or machine itself. Any damage, please contact professional serviceman for help. If need to lengthen power cord, extended cord can be used, but please don’t let the power cord scatter on the work area.
- Please make the machine far from heat sources and power supply, and avoid direct sunlight.
- Please turn-off the machine first before pull out the plug.
- Please pull out the plug when the machine is under cleaning, parts-replacement or leaving unused.
- Please clean the machine based on the instruction in user's manual.
- Please make sure using voltage meet requirements, the damages caused by connection error is out of the scope of warranty.
- Don’t let little children touch the machine.
- Don't run the machine when no one there, even if a short leave, please turn-off it.
- Don't tug power cord when pulling out plug or moving the machine.
- Don't put the machine on a place with water or other liquid.
- Don't spatter water or oil into machine.
- Don't put hard objects between fan blades.
- Don’t repair the machine by yourself. Dealing with problems by non-professional person may cause danger, even power cord replacement must be done by professional electrician.
- Only use accessories from suppliers, otherwise danger and damages of the machine may be caused.
Note :
- Place the machine on flat ground, and keep it far from around things at least 50cm.
- Make sure the socket can be reached from machine location.
- Keep the machine stand upright so that compressor can work well.
- Don't run the machine near to gasoline or any other flammable liquids.
- Make sure free access of air-inlet and air-outlet.
- Don’t use spraying agent (such as pesticides, paint) or other flammable materials, otherwise plastic deformation, or even electric damage of the machine may be caused.
- This appliance is not intended for use by persons (including children) with reduced physical, sensory or mental capabilities, or lack of experience and knowledge, unless they have been given supervision or instruction concerning use of the appliance by a person responsible for their safety.
- Children should be supervised to ensure that they do not play with the appliance.
- If the supply cord is damaged, it must be replaced by the manufacturer, its service agent or similarly qualified persons in order to avoid a hazard.
- The refrigerant used in this appliance is fluorinated greenhouse gases, which can be harmful to environment and can be responsible for the global warming if it leaks into atmosphere.
• CE) N 842/2006:
R410A is a kind of fluorinated greenhouse gases covered by the Kyoto Protocol. Its total global warming potential(GWP) is 1975.--
Power supply
• Make sure no damage in plug.
- Don't use connector instead of plug.
- Insert plug into socket first, then turn on socket switch, press key “POWER” to run machine.
Please safekeep this user's manual.
Placement and Installation
Placement
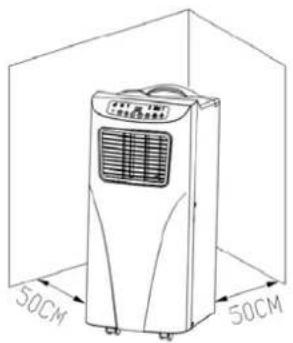
- Place the machine on flat and dry ground, and keep it far from around things at least 50 ~cm . (fig.1)
(fig.1)
Installation
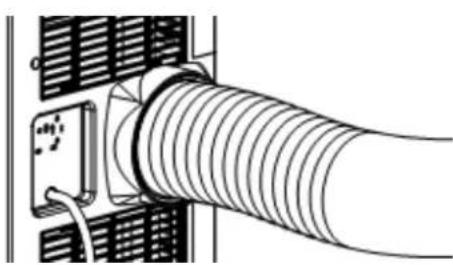
- Spin adapter into exhaust pipe first, then spin the exhaust pipe into exhaust connector (counter-clockwise) (fig.2)
- Put adapter into window sealplate, adjust window open width in order sealplate match window well, and the length of sealplate is adjustable.
natural_image
Diagram of a coiled cable or hose assembly with a connector, no text or symbols present(fig.2)
Installation Errors
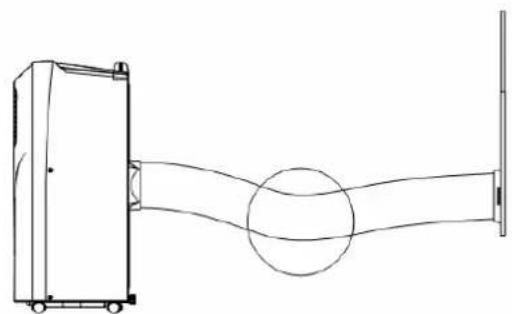
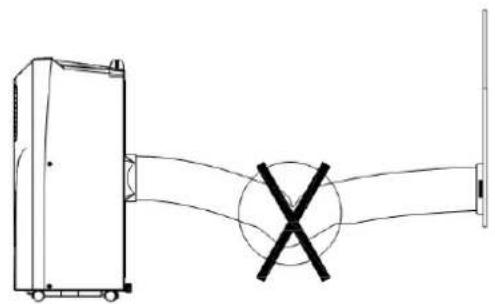
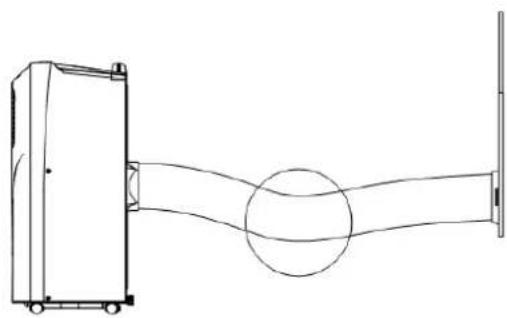
- Free access of exhaust pipe is important, installation errors will bring bad influence of machine.
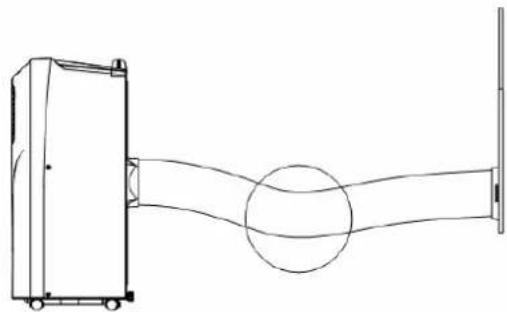
- Avoid exhaust-pipe with sharp bend. (fig.3)
- Make sure air in exhaust pipe can run smoothly. (fig.4)
natural_image
Simple line drawing of a device with a circular symbol and a cross mark, no text or labels present.(fig.3)
natural_image
Technical line drawing of a mechanical assembly with a cylindrical component and housing (no text or symbols)(fig.4)
Warning
Length of exhaust pipe according to the machine features, please don't replace or lengthen it freely, otherwise errors will be easily caused.
Note: extreme length of unfolding exhaust pipe is 1500mm, please shorten the length as much as possible and keep it level as much as possible when installing
Parts Name
Front side(fig.5)
- Handle
- Control Panel
- Air-outlet
- Fan blade
- Castor
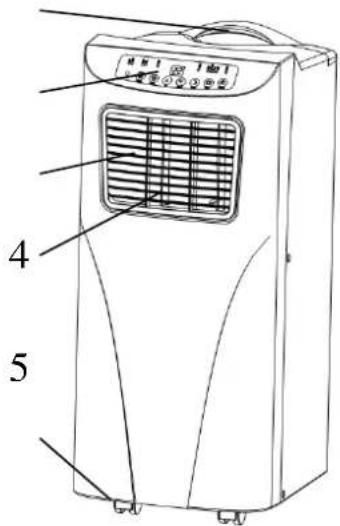
fig.5
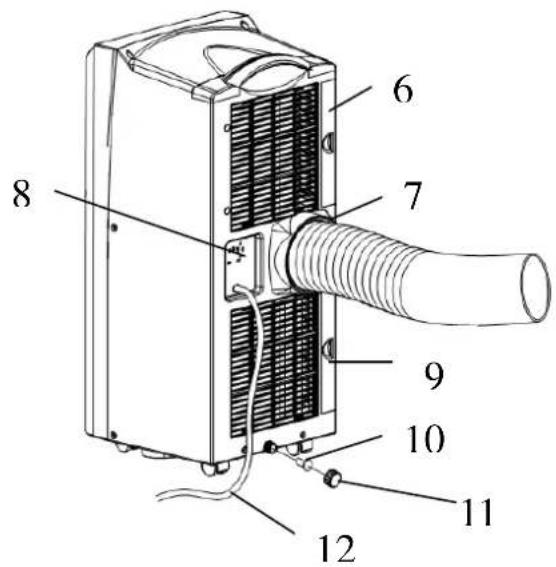
Back Side (fig.6)
- Filter frame upper
- Exhaust Connector
- Power Cord Location
- Filter frame lower
- Rubber plug
- Plug cap
12.Power Cord
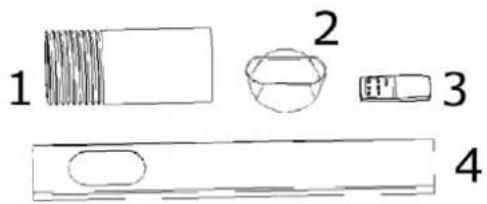
Check packing accessories, read user's manual to get how to use them. (fig.4)
natural_image
Hand-drawn sketch of four basic geometric shapes: rectangle, hexagon, and rectangular prism (no text or symbols)(fig.4)
-
Exhaust Pipe
-
Adapter
-
Remote control
-
Sealplate
Control Panel
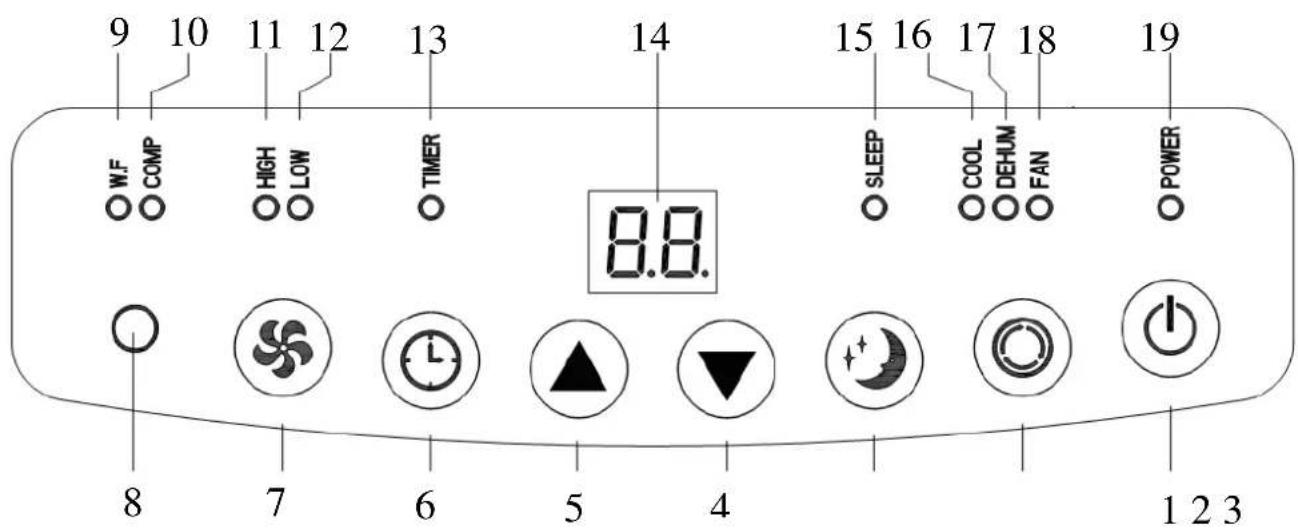
-
Power button
-
Mode button
-
Sleep button
-
Down button
-
Up button
-
Timer button
-
Fan button
-
Receiver for remote control
-
"Water Full" indicator
-
Indicator for compressor
-
High fan speed indicator
-
Low fan speed indicator
-
Timer mode indicator
-
Display window
-
Sleep mode indicator
-
Cooling mode indicator
-
Dehumidify mode indicator
-
Fan mode indicator
19.Power indicator
- POWER: press this key to turn on/off machine. After machine turns on, default value is cooling mode with low fan speed.
- MODE: after machine turns on, press this key to select cooling, dehumidifying and fan mode.
- FAN: after machine turns on, press this key to select fan speed (high and low).
- DOWN: under cooling mode, press this key to downward setting temperature from 16\~31°C.
- UP: under cooling mode, press this key to upward temperature from 16\~31°C.
- SLEEP: under cooling mode, press this key to turn on/off sleeping function.
- TIMER: under power-on or standby mode, press this key to setup on/off time from 1\~24.
Remote Control
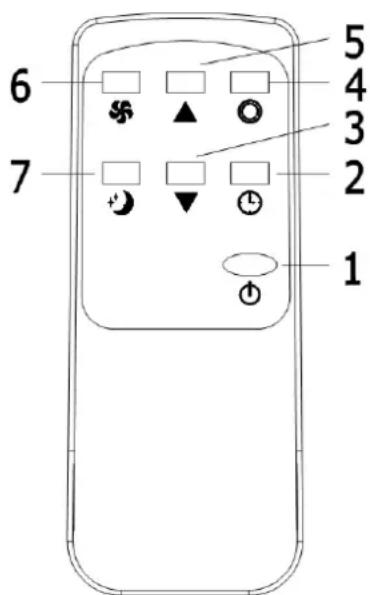
-
Power
-
Timer
-
Down
-
Mode
-
Up
-
Fan
-
Sleep
Operation Methods
Cooling mode
- After machine turns on, default value is cooling mode with 22^ and low fan speed.
- Press “MODE” to select cooling mode, cooling mode indicator turns on.
- Press “UP” or “DOWN” to adjust temperature (from 16°C to 31°C).
- Press “FAN” to select high or low fan speed.
Fan mode
- Press “MODE” to select fan mode, fan mode indicator turns on.
- Press “FAN” to select high speed or low speed.
- Temperature and sleeping function cannot be setup.
Timer mode
- Under standby mode, press “TIMER” to setup the power-on time. Timer indicator turns on.
- Under power-on mode, press “TIMER” to setup power-off timer. Timer indicator turns on.
Dehumidifying mode
- Press “MODE” to select dehumidifying mode, dehumidifying mode indicator turns on.
- Under dehumidifying mode, sleeping function cannot be setup, and fan speed is low.
Sleeping mode
- Press key “SLEEP” enter into sleeping mode, default value of fan speed is low.
- When sleeping mode turns on, under cooling mode, the first one hour later, setting temperature will go up 1°C, the second one hour later, setting temperature will go up another 1°C, and then keep the same.
- Sleeping mode is invalid under dehumidifying and fan mode. Under water full, machine standby and mode conversion, sleeping mode will be cancelled.
Compressor protection
- Three minutes later after power on / restart, compressor starts to run.
Water Drainage
This machine with auto-water-evaporating system. Condensed-water cycle to cool down the condenser, which will not only improve cooling efficiency, but also save energy.
- If inner water tank is full, “W.F” indicator will flashed on the screen, machine enter into standby mode, buzzer shouts, compressor stops and all keys is invalid till machine recovers to be normal.
- Pull out the plug to drain out water, power off the machine and restart it, the machine will runs normally.
Maintenance
Note: in order to avoid electric shocks, please power-off the machine and pull out plug before maintenances or repairs.
Cleaning
- Please pull out plug before cleaning.
- Use soft semi-dry cloth to clean the machine. Don’t use chemical agents, such as benzene, alcohol, gasoline and so on; otherwise the machine surface will be damaged, or even the machine itself.
- Don't spatter water into the machine.
Filter
- Clean the filters every two weeks, if filters are blocked by dust, machine efficiency will be reduced.
- Clean the filters in warm water with neutral detergent, then dry the cleaned filters on a shady place.
Note: Don't run the machine without filters.
Season Cleaning
If the machine will be unused for a long time, please do as following :
• Pull out drainage plug to flow out water.
- Let the machine runs under fan mode for 2 hours to dry out the machine internal
• Turn off machine and pull out plug.
- Clean and dry filters, then reinstall them.
• Pull out exhaust pipe for safekeeping.
- Put the machine into plastic bag, and place it on a dry place.
Trouble Shooting
Please contact professional serviceman without delay in following situation
| Trouble | Cause | Solution |
| Machine cannot work | Power off Power on | |
| water-full indicator turns on Drain water out | ||
| Machine auto-restarts frequently | Direct sunlight Draw the curtains | |
| Door and windows are open, many heat sources in the room. | Close the door and windows, move out heat sources. | |
| Filters are too dirty. Clean or replace filters | ||
| Air-inlet or air out-let is blocked | Remove blockage | |
| Too noisy Machine is not put on flat ground. | Place it on flat and solid ground, avoiding shaking | |
| Compressor cannot work | Compressor time-delay protection turns on | Wait for 3 minutes, then restart the machine after temperature reduces. |
Note: when abnormal situations are occurred, turn off machine and pull out plug, then contact with professional electrician for help.
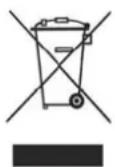
THE DISPOSAL OF ELECTRICAL AND ELECTRONIC EQUIPMENT WASTE PRODUCTS ON THE PART OF FINAL USERS IN THE EUROPEAN UNION"
This symbol on the product or on the container indicates that this product cannot be eliminated with the general waste. The user is responsible for eliminating this kind of waste by throwing them away at a “recycling point” specifically for electrical and electronic waste. Selective collection and electrical equipment recycling contribute to preserve natural resources and warrant waste recycling to protect environment and health. In order to receive further information about electrical and electronic waste collecting and recycling, contact your Local Council, the service of household waste or the establishment where the product was acquired.
- Advertencia
- Erros de instalação
- Atenção
- CONTENTS
- IMPORTANT SAFEGUARDS
- Please read following safeguards carefully before using the machine:
- Note :
- Power supply
- Please safekeep this user's manual.
- Placement and Installation
- Placement
- Installation
- Installation Errors
- Warning
- Parts Name
- Front side(fig.5)
- Back Side (fig.6)
- Remote Control
- Operation Methods
- Cooling mode
- Fan mode
- Timer mode
- Dehumidifying mode
- Sleeping mode
- Compressor protection
- Water Drainage
- Maintenance
- Cleaning
- Filter
- Season Cleaning
- Trouble Shooting
- THE DISPOSAL OF ELECTRICAL AND ELECTRONIC EQUIPMENT WASTE PRODUCTS ON THE PART OF FINAL USERS IN THE EUROPEAN UNION"
Brand : Saivod
Model : SAP 813
Category : Air conditioner