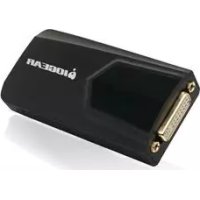
IOGEAR GBU421WM - Network card / adapter

GBU421WM - Network card / adapter IOGEAR - Free user manual and instructions

Find the device manual for free GBU421WM IOGEAR in PDF.

📄 74 pages English EN Download 💬 AI Question 10 questions ⚙️ Specs
Notice IOGEAR GBU421WM - page 6
Pick your language and provide your email: we'll send you a specifically translated version.
Product Type Wireless Network Adapter (Bluetooth 4.0)
Brand IOGEAR
Model GBU421WM
Interface USB 2.0 (backward compatible with USB 1.1)
Bluetooth Version 4.0
Wireless Range Up to 10 meters (33 feet)
Frequency Band 2.4 GHz ISM
Data Transfer Rate Up to 24 Mbps
Dimensions (L x W x H) 0.7 x 0.4 x 0.2 inches (18 x 10 x 5 mm)
Weight 0.1 oz (3 g)
Power Source USB bus-powered (5V DC, 100 mA max)
LED Indicators 1 (Bluetooth status)
Operating Temperature 32°F to 104°F (0°C to 40°C)
Storage Temperature -4°F to 140°F (-20°C to 60°C)
Operating Humidity 20% to 80% (non-condensing)
Supported Operating Systems Windows 7/8/10, Mac OS X 10.6 or later
Key Functions Connect Bluetooth devices (keyboards, mice, headsets, smartphones)
Maintenance & Cleaning Wipe with a dry, soft cloth. Do not use liquids or abrasives.
Safety Precautions Do not expose to moisture, extreme temperatures, or direct sunlight.
Spare Parts & Repairability Not user-serviceable. No spare parts available. Replacement recommended if faulty.
Certifications FCC, CE, RoHS
Package Contents GBU421WM adapter, Quick Start Guide

Frequently Asked Questions - GBU421WM IOGEAR

How do I install the IOGEAR GBU421WM Bluetooth adapter?
Plug the adapter into an available USB port. Your operating system should automatically detect and install the drivers. If not, download the latest drivers from IOGEAR's support website.
What operating systems are supported?
The GBU421WM supports Windows 7/8/10 and Mac OS X 10.6 or later. It may also work on Linux with built-in Bluetooth stack.
Can I connect multiple Bluetooth devices at once?
Yes, you can pair up to 7 Bluetooth devices simultaneously, depending on the device types and bandwidth requirements.
What is the maximum range of this adapter?
The typical range is up to 10 meters (33 feet) in open air. Walls and obstacles can reduce the range.
Is the adapter compatible with Bluetooth 5.0 devices?
The adapter uses Bluetooth 4.0. While it can connect to Bluetooth 5.0 devices, it will operate at Bluetooth 4.0 speeds and features.
Why is my device not detected?
Ensure the adapter is properly inserted and the device is in pairing mode. Try a different USB port or restart your computer. Update drivers if needed.
How do I pair a Bluetooth device?
Open Bluetooth settings on your computer, turn on Bluetooth, and select 'Add Bluetooth or other device'. Put your device in pairing mode and select it from the list.
Does the adapter require external power?
No, the adapter is powered directly from the USB port. No external power supply is needed.
Can I use this adapter with a desktop computer?
Yes, as long as the desktop has an available USB port. It works with both laptops and desktops.
How do I clean the adapter?
Unplug the adapter and wipe it with a dry, soft cloth. Avoid using liquids, sprays, or abrasive materials.

User questions about GBU421WM IOGEAR

0 question about this device. Answer the ones you know or ask your own.

Ask a new question about this device

The email remains private: it is only used to notify you if someone responds to your question.

No questions yet. Be the first to ask one.

Download the instructions for your Network card / adapter in PDF format for free! Find your manual GBU421WM - IOGEAR and take your electronic device back in hand. On this page are published all the documents necessary for the use of your device. GBU421WM by IOGEAR.

USER MANUAL GBU421WM IOGEAR

natural_image Solid gray rectangular shape with no text, symbols, or discernible features.

Welcome

Thank you for purchasing one of the most feature-rich Bluetooth ^ to USB adapters available. IOGEAR's Bluetooth ^ to USB adapters are first-rate wireless connectivity accessories designed to help reduce the frustration of dealing with cable glut in your home or office. These adapters allow computers with USB connections to become Bluetooth enabled computers. They comply to Bluetooth ^ 2.1 and USB 1.1 specifications, and provide users with a 2.1Mbps data rate. They also enable wireless Personal Area Network (PAN) connectivity to Bluetooth enabled devices such as PDA's, printers, cellular phones, computers, etc.

We hope you enjoy using your IOGEAR Bluetooth® 2.1 USB Micro Adapter, another connectivity solution from IOGEAR.

Table of Contents

Package Contents 5

Overview 6

Features 8

Requirements 9

Introduction 10

Installation-Windows XP 11

Installation – Windows Vista / 7 14

Initial Bluetooth Configuration Wizard - Windows XP 18

Initial Bluetooth Configuration Wizard – Windows Vista 22

Software Un-installation 24

Installation - Mac OS X 25

Connect to Bluetooth Enabled Cellular Phone / PDA 28

Windows XP 28

Windows Vista 32

Windows 7 36

Connect to a Bluetooth Enabled Printer 39

Windows XP 39

Windows Vista 43

Windows 7 47

Connect to Network Access 50

Windows XP 50

Windows Vista 53

Windows 7 57

Pairing 60

Installation-Windows XP Service Pack 2 / Windows Vista

Service Pack 1 62

Specifications 66

Technical Support 67

Federal Communications Commission (FCC) Statement 68

CE Statement 70

Limited Warranty 71

Contact 72

Package Contents

This package contains:

1 Bluetooth ^® 2.1 USB Micro Adapter
1 Driver CD
1 Quick Start Guide
1 Warranty Card / Registration Card

The Bluetooth Installation CD contains the following:

Bluetooth drivers for Windows 2000/XP/Vista/7

User Manual for IOGEAR Bluetooth® 2.1 USB Micro Adapter

* If any items are damaged or missing, please contact your dealer.

Overview

Bluetooth is a low-power wireless networking standard which uses short radio waves to allow electronic devices to communicate with each other without using cables.

The following applications are supported by Bluetooth® technology:

Synchronize your Bluetooth PDA with your computer.

Send your business card to anyone who has a Bluetooth device.

Send or receive files to or from anyone who has a Bluetooth enabled device.

Chat with anyone who has a Bluetooth enabled computer.

Play a one-on-one serial game without a cable.

Send an e-mail without being wired to the network.

Dial up to the Internet on your computer over your Bluetooth cellular phone.

Send a fax from your computer over your Bluetooth cellular phone.

Transfer data between your cell phone and PC.

Most Bluetooth-enabled devices have the capability to act as:

A Bluetooth server - these devices provide one or more services, such as access to the Internet, or to other Bluetooth devices.

A Bluetooth client - these devices use the service(s) provided by Bluetooth servers.

Most Bluetooth devices that can act as both server and client, and can often do both at the same time.

Features

Eliminates cables between your computers•

Controls and communicates with Bluetooth enabled devices

Enables wireless Personal Area Network (PAN) connectivity

Bluetooth specification 2.1 compliant

USB specification 1.1 compliant

Up to 10 meter (30 feet) wireless working distance for Bluetooth ^2.1 USB Micro Adapter.

Up to 2.1 Mbps data rate•

Small form factor makes it easy to carry and place•

Crisp, easy, and fast installation and setup

Built-in security to assure the privacy of your communication – Pairing, Encryption, and Authentication

PC and Mac compatible•

Requirements

System Requirements

Hardware Requirements:

• Available USB port

Operation System:

For PC: Windows 2000/XP/Vista/7

For Mac: OS X v10.3.9 or later

Introduction

IOGEAR®'s Bluetooth® 2.1 USB Micro Adapter is a Class 2 device with a wireless working distance of up to 30 feet (10 meters). This device allows any computer with USB connections to become a Bluetooth™ enabled computer. It complies with Bluetooth 2.1 and USB 1.1 specifications, and provides users with a 2.1 Mbps data transfer rate at ranges up to 30 feet. It also enables wireless Personal Area Network (PAN) connectivity to Bluetooth™ enabled devices such as PDA's, printers, cellular phones, computers, etc. The Wireless Bluetooth™ to USB adapter is compatible with both PC and Mac. It is easy to install and use, and very portable. Another great solution from IOGEAR® for home and mobile networking needs.

Bluetooth® 2.1 USB Micro Adapter is a class 2 device with a wireless working distance of 30 feet (10 meters).

Installation-Windows XP

Windows XP Service Pack 2

The Microsoft Bluetooth stack comes included with Service Pack 2 for Windows XP. If you already have Service Pack 2 installed, you may choose not to install drivers from the installation CD and instead use the Microsoft Bluetooth drivers. For XP without Service Pack 2 installed, please follow below steps to install WIDCOMM Bluetooth Software.

Do NOT plugged IOGEAR Bluetooth adapter 1. into the computer before installing the software. Insert the IOGEAR installation CD into your CD-ROM drive. The auto-start feature will bring up the setup installation window to begin the driver installation. Click on OK to start the installation. If the auto-start feature does not bring up the setup installation window, simply browse to your CD drive, double click on the "Setup.exe" and run the setup file. Please follow the on-screen instructions to install the drivers.
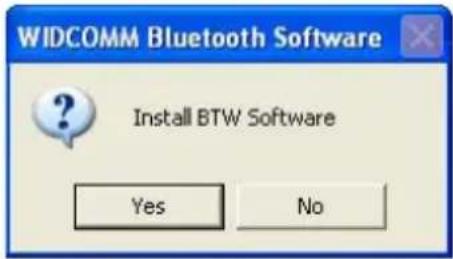
WIDCOMM Bluetooth Software Install BTW Software Yes No

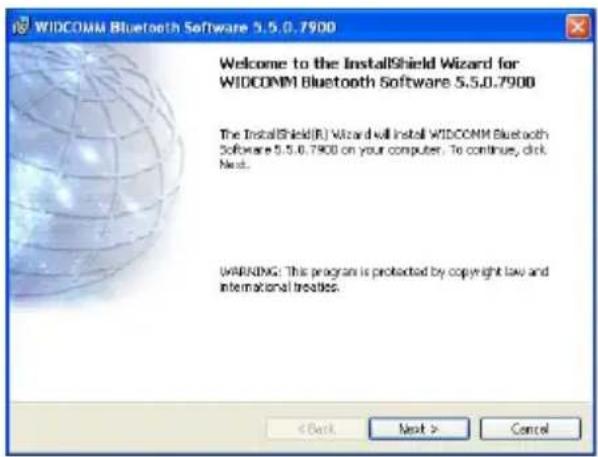
2. Click on Next to continue

WIDCOMM Bluetooth Software 5.5.0.7900 Welcome to the InstallShield Wizard for WIDCOMM Bluetooth Software 5.5.0.7900 The InstallShield(R) Wizard will install WIDCOMM Bluetooth Software 5.5.0.7900 on your computer. To continue, click. Next. WARNING: This program is protected by copyright law and international treaties.

3. Select "I accept the terms in the license agreement" and click Next to continue
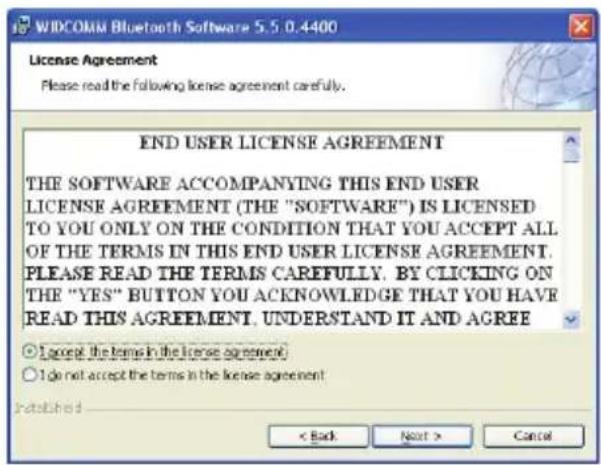
WIDCOMM Bluetooth Software 5.5 0.4400 License Agreement Please read the following license agreement carefully. END USER LICENSE AGREEMENT THE SOFTWARE ACCOMPANYING THIS END USER LICENSE AGREEMENT (THE "SOFTWARE") IS LICENSED TO YOU ONLY ON THE CONDITION THAT YOU ACCEPT ALL OF THE TERMS IN THIS END USER LICENSE AGREEMENT. PLEASE READ THE TERMS CAREFULLY, BY CLICKING ON THE "YES" BUTTON YOU ACKNOWLEDGE THAT YOU HAVE READ THIS AGREEMENT, UNDERSTAND IT AND AGREE ○ I accept the terms in the license agreement ○ I do not accept the terms in the license agreement < Back Next > Cancel

During the install, a "Bluetooth Device not 4. Found" window will appear. DO NOT plug in the Bluetooth adapter at this time, simply click Cancel to proceed with the driver installation without connecting the Bluetooth device.
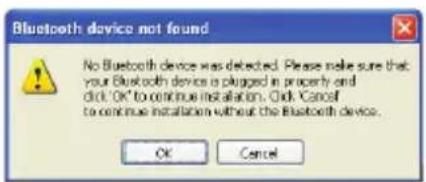
Bluetooth device not found No Bluetooth device was detected. Please make sure that your Bluetooth device is plugged in properly and did. OK to continue installation. Click Cancel to continue installation without the Bluetooth device. OK Cancel

Once the driver installation has completed, 5. click Finish. You may plug in the Bluetooth Micro Adapter now and it will take up to few minutes for your computer to load all correct drivers. It is recommended to restart your computer after setup is completed.
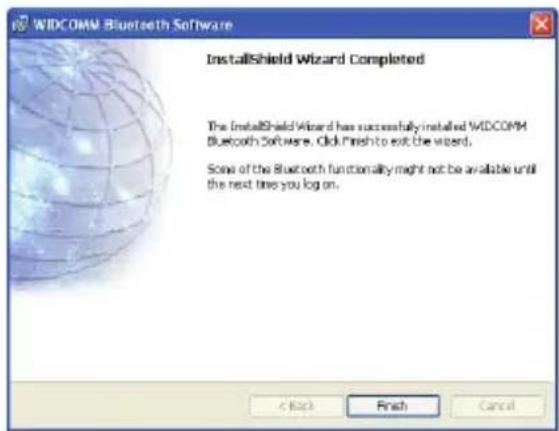
WIDCOMM Bluetooth Software InstallShield Wizard Completed The InstallShield Wizard has successfully installed WIDCOMM Bluetooth Software. Click Finish to exit the wizard. Some of the Bluetooth functionality might not be available until the next time you log on.

Installation – Windows Vista / 7

Make sure the IOGEAR Bluetooth adapter is 1. NOT plugged into the computer before installing the software. Insert the IOGEAR installation CD into your CD-ROM drive. The auto-start feature will bring up the auto play options for the installation CD. Simply click on Run setup. exe to start the installation.
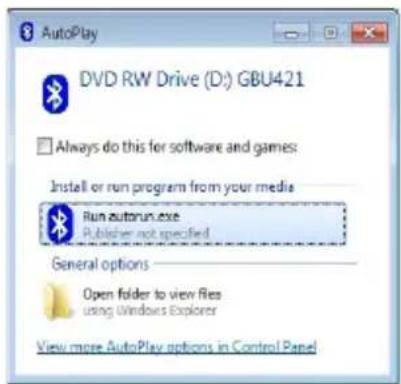
AutoPlay DVD RW Drive (D:) GBU421 Always do this for software and games: Install or run program from your media Run autobrun.exe Publisher not specified General options Open folder to view files using Windows Explorer View more AutoPlay options in Control Panel

To begin the Widcomm Bluetooth Software 2. installation, simply click on Yes to start.
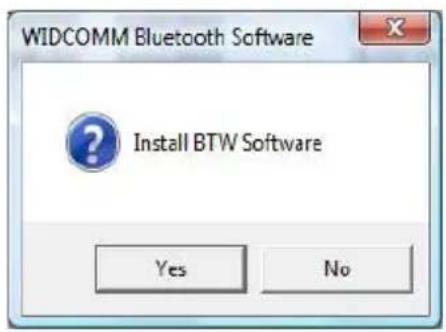
WIDCOMM Bluetooth Software Install BTW Software Yes No

Plug in your Bluetooth Micro Adapter to 3, continue with the installation.
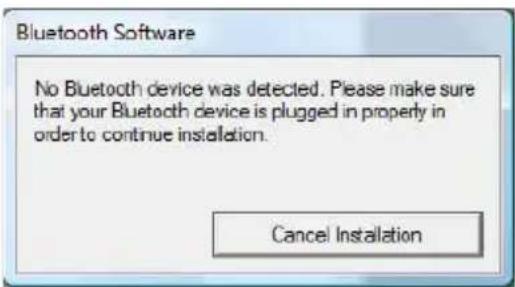
Bluetooth Software No Bluetooth device was detected. Please make sure that your Bluetooth device is plugged in properly in order to continue installation. Cancel Installation

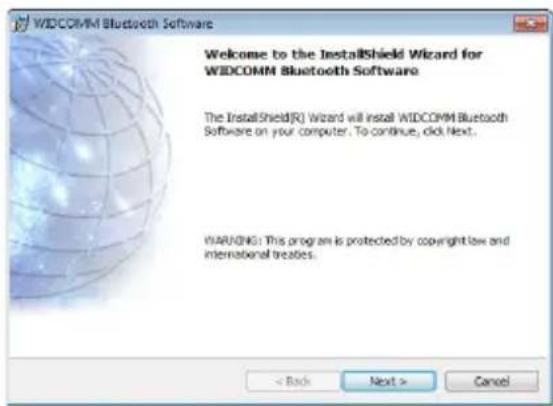
Click on 4. Next to continue.

WIDCOMM Bluetooth Software Welcome to the InstallShield Wizard for WIDCOMM Bluetooth Software The InstallShield(R) Wizard will install WIDCOMM Bluetooth Software on your computer. To continue, click Next. WARNING: This program is protected by copyright law and international treaties.

Select 5. I accept the terms in the license agreement and click on Next to continue.
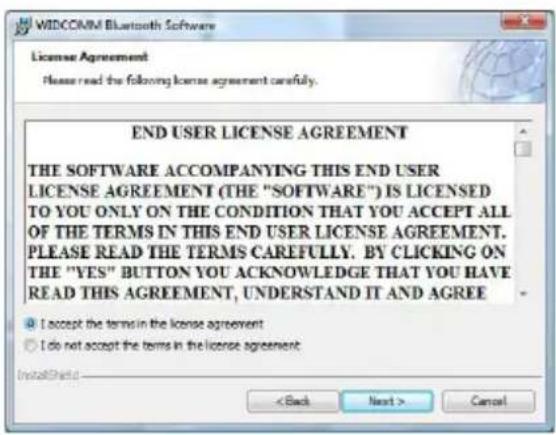
WIDCOMM Bluetooth Software License Agreement Please read the following license agreement carefully. END USER LICENSE AGREEMENT THE SOFTWARE ACCOMPANYING THIS END USER LICENSE AGREEMENT (THE "SOFTWARE") IS LICENSED TO YOU ONLY ON THE CONDITION THAT YOU ACCEPT ALL OF THE TERMS IN THIS END USER LICENSE AGREEMENT. PLEASE READ THE TERMS CAREFULLY. BY CLICKING ON THE "YES" BUTTON YOU ACKNOWLEDGE THAT YOU HAVE READ THIS AGREEMENT, UNDERSTAND IT AND AGREE ● I accept the terms in the license agreement ○ I do not accept the terms in the license agreement < Back Next > Cancel

Follow through the guidance provided by 6. the installation wizard. When the installation wizard is completed, click on Finish to end the installation.

It is recommended to restart your computer after setup is completed.
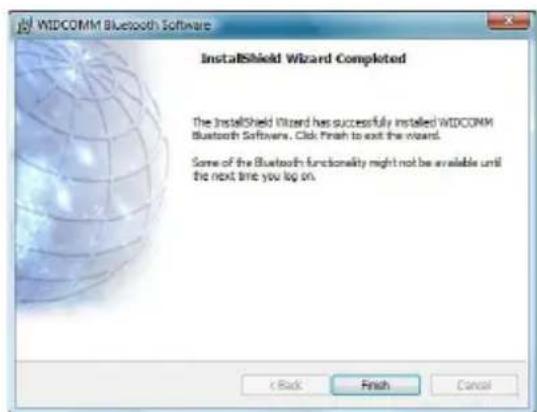
WIDCOMM Bluetooth Software InstallShield Wizard Completed The InstallShield Wizard has successfully installed WIDCOMM Bluetooth Softwares. Click Finish to exit the wizard. Some of the Bluetooth functionality might not be available until the next time you log on. Back Finish Cancel

Click 7. Finish to complete the installation
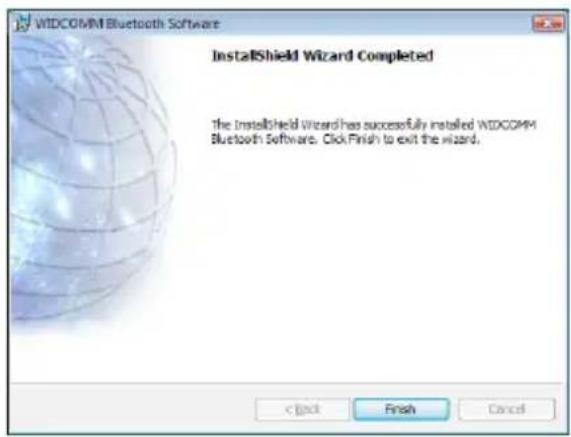
WIDCOMM Bluetooth Software InstallShield Wizard Completed The InstallShield Wizard has successfully installed WIDCOMM Bluetooth Software. Click Finish to exit the wizard. OK Finish Cancel

Initial Bluetooth Configuration Wizard – Windows XP

Double click on the Bluetooth icon in the 1. system tray. This will start the "Initial Bluetooth Configuration Wizard".

2:00 PM

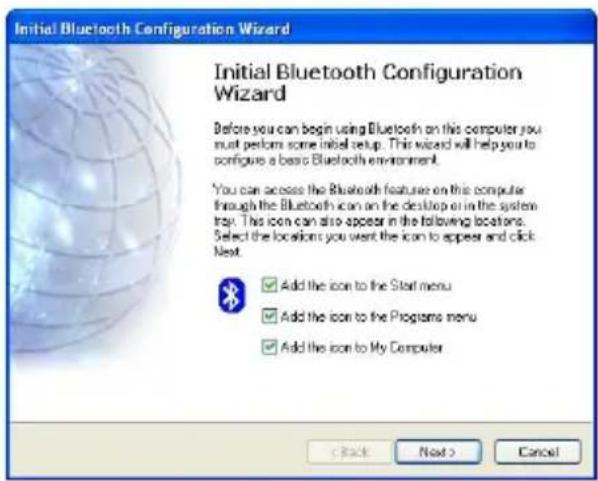
Click 2. Next to continue.

Initial Bluetooth Configuration Wizard Initial Bluetooth Configuration Wizard Before you can begin using Bluetooth on this computer you must perform some initial setup. This wizard will help you to configure a basic Bluetooth environment. You can access the Bluetooth features on this computer through the Bluetooth icon on the desktop or in the system tray. This icon can also appear in the following locations. Select the locations you want the icon to appear and click Next. Add the icon to the Start menu Add the icon to the Programs menu Add the icon to My Computer < Back Next > Cancel

Enter a unique name for this computer. This 3. name will be displayed to other Bluetooth devices. Select a computer type from the drop-down menu and click Next.
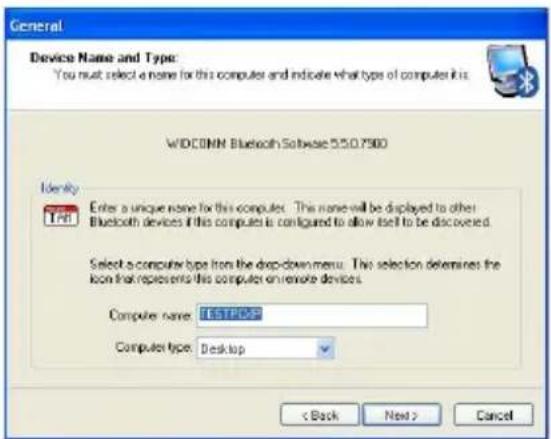
General Device Name and Type: You must select a name for this computer and indicate what type of computer it is. WDCOMN Bluetooth Software 550.7900 Identity Enter a unique name for this computer. This name will be displayed to other Bluetooth devices if this computer is configured to allow itself to be discovered. Select a computer type from the drop-down menu. This selection determines the icon that represents this computer on remote devices. Computer name: TESTPOPS Computer type: Desktop < Back Next > Cancel

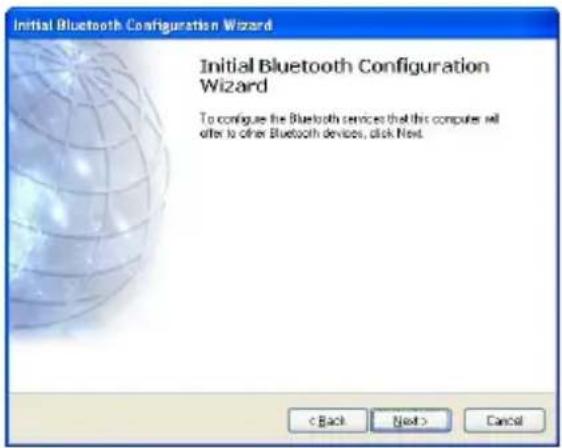
Click 4. Next to continue.

Initial Bluetooth Configuration Wizard Initial Bluetooth Configuration Wizard To configure the Bluetooth services that this computer will offer to other Bluetooth devices, click Next. < Back Next > Cancel

Select the services that you would like your 5. computer to offer to the Bluetooth devices. Click Next to proceed.

The Bluetooth software will install the selected 6. services. This process may take a while.

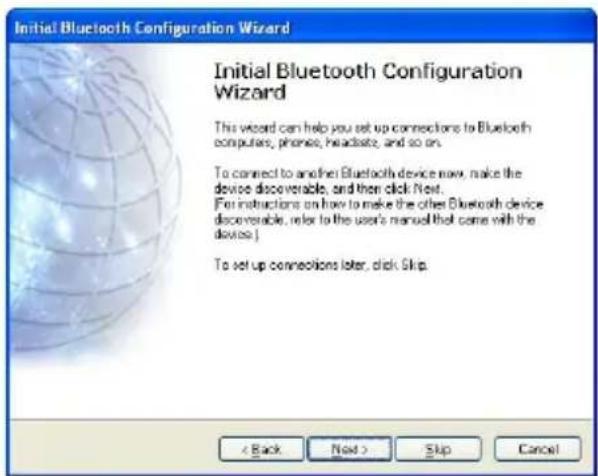
If you wish to setup a Bluetooth device now, 7. click Next to continue to start the pairing process of your computer and the Bluetooth device. Otherwise, click Skip and click Finish on the final screen to end the Bluetooth wizard.
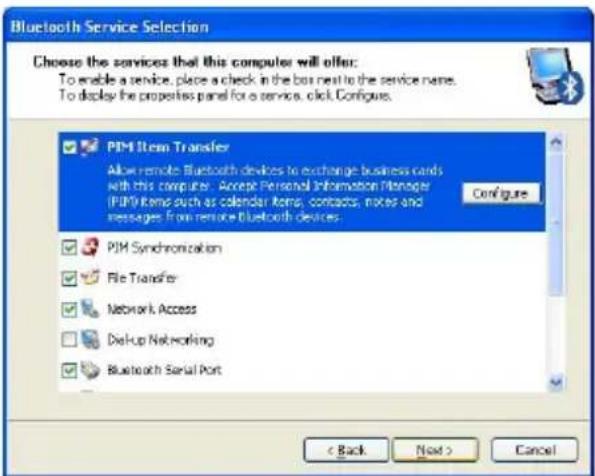
Bluetooth Service Selection Choose the services that this computer will offer: To enable a service, please check in the bus next to the service name. To display the properties panel for a service, click. Configure. PIM Item Transfer Allow remote Bluetooth devices to exchange business cards with this computer. Accept Personal Information Manager (PIM) items such as calendar items, contacts, notes and messages from remote Bluetooth devices. Configure PIM Synchronization File Transfer Network Access DisUp Networking Bluetooth Serial Port < Back Next > Cancel

Initial Bluetooth Configuration Wizard Initial Bluetooth Configuration Wizard This wizard can help you set up connections to Bluetooth computers, phones, headsets, and so on. To connect to another Bluetooth device now, make the device discoverable, and then click Next. For instructions on how to make the other Bluetooth device discoverable, refer to the user's manual that come with the device > To set up connections later, click Skip. < Back Next > Skip Cancel

  1. After the Bluetooth Configuration Wizard ends, the My Bluetooth Places window will show up.

For Windows XP, the My Bluetooth Places window will show up as this.

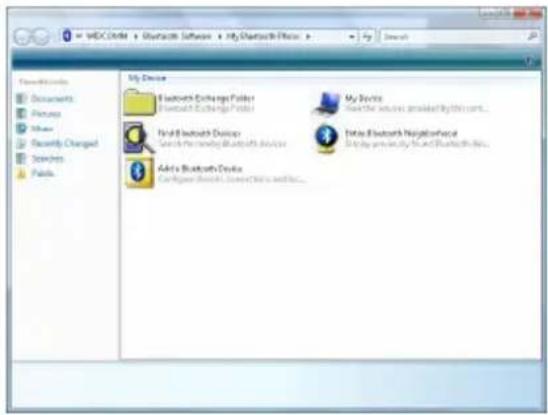
For Windows Vista, the My Bluetooth Places window will show up as this
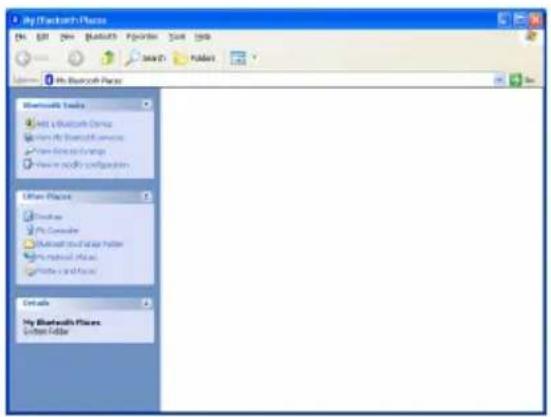
My Bluetooth Places File Edit View Bluetooth Procedure Set Help My Bluetooth Places Bluetooth Tools Add My Bluetooth Devices Remove My Bluetooth Services Remove Wireless Networks Remove wireless configuration Urban Places Connections Play Console Bluetooth Host/Host Player Play Physical Files Play User Files Details My Bluetooth Places Custom Editor

My Device Bluetooth Exchange Folder Bluetooth Exchange Folder Find Bluetooth Devices Search the following Bluetooth devices Adobe's Bluetooth Device Configure Bluetooth Devices and Web... My Device Enter the wireless provider by this.com... Enter Bluetooth Neighborhood Display generation file and Bluetooth files...

Initial Bluetooth Configuration Wizard – Windows Vista

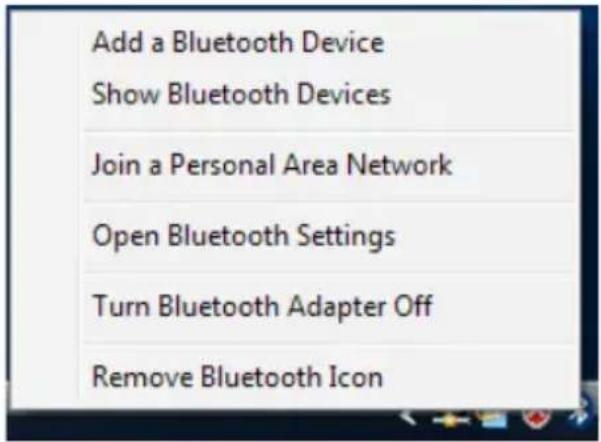
Right click on the Bluetooth Icon.1. Select "Open Bluetooth Settings"2.
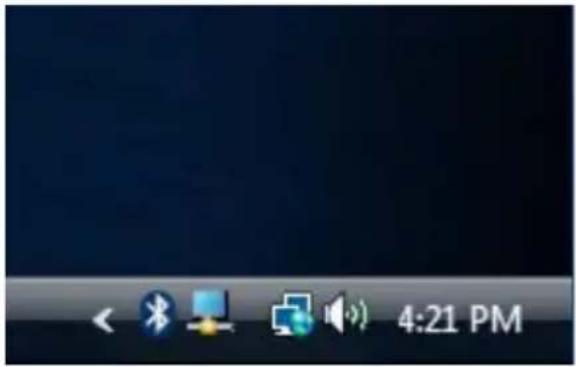
4:21 PM

Add a Bluetooth Device Show Bluetooth Devices Join a Personal Area Network Open Bluetooth Settings Turn Bluetooth Adapter Off Remove Bluetooth Icon

Next, check the box labeled "Allow Bluetooth 3. devices to find this computer".

*Note: Uncheck the box if you do not want Bluetooth devices to find your computer. Click OK.
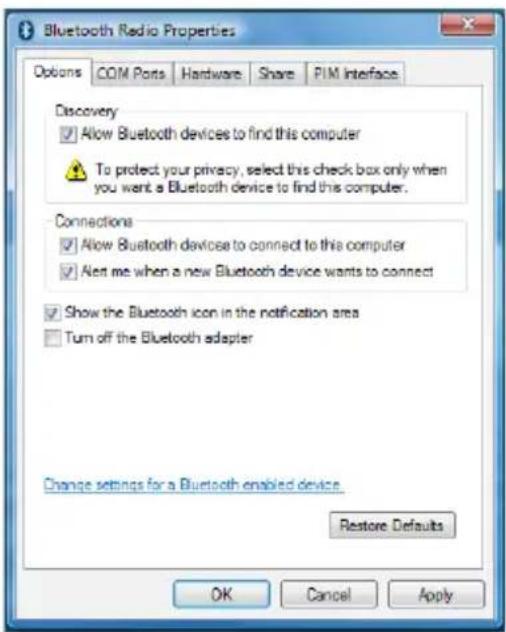
Bluetooth Radio Properties Options COM Ports Hardware Share PIM Interface Discovery ✓ Allow Bluetooth devices to find this computer ⚠️ To protect your privacy, select this check box only when you want a Bluetooth device to find this computer. Connections ✓ Allow Bluetooth devices to connect to this computer ✓ Alert me when a new Bluetooth device wants to connect ✓ Show the Bluetooth icon in the notification area □ Turn off the Bluetooth adapter Change settings for a Bluetooth enabled device. Restore Defaults OK Cancel Apply

Software Un-installation

Windows XP Service Pack 2

First, unplug the IOGEAR USB Bluetooth ^® .2.1

USB Micro Adapter from your computer

Go to Control Panel (Start > Settings > Control 2. Panel)

Click on 3. Add or Remove Programs

Click on IOGEAR Bluetooth Software and click 4. on [Remove]

When the uninstall is complete, restart your 5. computer

Windows Vista / 7

First, unplug the IOGEAR Bluetooth® 2.1 USB Micro Adapter from your computer

Go to Control Panel (Start > Control Panel)2.

Double click on Programs and Features.3.

Click on Widcomm Bluetooth Software and 4. click on [Uninstall]

When the uninstall is complete, restart your 5. computer

Installation - Mac OS X

Use of the IOGEAR Bluetooth adapter requires 1. MAC OS X v10.3.9 or later. There is no need to install any additional software, as Apple provides all required Bluetooth drivers
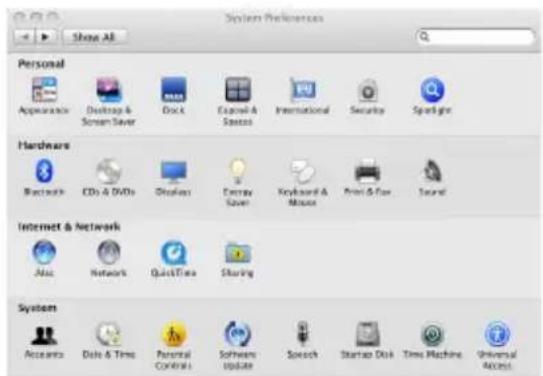
System Preferences Show All Personal Appearance Desktop & Screen Saver Dock Email & Stover International Security Spotlight Hardware Bluetooth CDs & DVDs Displays Array Saver Keyboard & Mouse Print & Fox Sound Internet & Network Mac Network QuickTime Sharing System Access Data & Time Personal Controls Software update Speech Startup Disk Time Machine Universal Access

Simply plug in your Bluetooth adapter into an available USB port on your computer, and go to System Preferences.

Click on the Bluetooth icon and make sure the 2. box next to Discoverable is checked (in 10.3 and 10.4 this will be on the Settings tab). To connect and pair with a Bluetooth device, click on Set Up New Device.(in 10.3 and 10.4 this will be on the Devices tab).
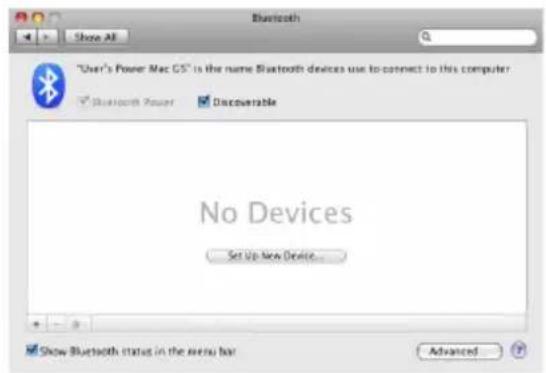
"User's Power Mac OS" is the name Bluetooth devices use to connect to this computer Bluetooth Power Discoverable No Devices Set Up New Device... Show Bluetooth status in the menu bar Advanced...

If you have already connected a device under 3.10.5 the Bluetooth window will look like this. Instead of clicking the Set Up New Device button, click the button with a plus (+) symbol below the device list.
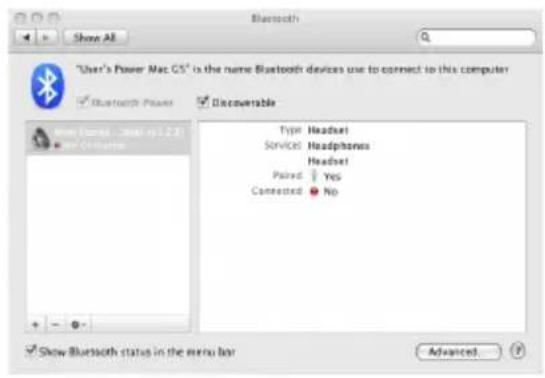
"User's Power Mac GS" is the name Bluetooth devices use to connect to this computer Bluetooth Power Discoverable Type: Headset Services: Headphones Headset Paired: Yes Connected: No Show Bluetooth status in the menu bar Advanced...

This will initiate the Bluetooth Setup Assistant; 4. click Continue to proceed.
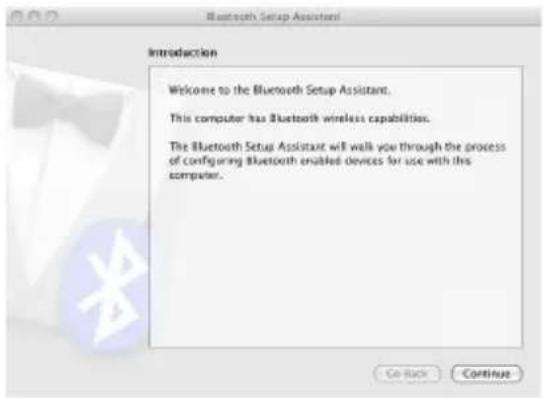
Introduction Welcome to the Bluetooth Setup Assistant. This computer has Bluetooth wireless capabilities. The Bluetooth Setup Assistant will walk you through the process of configuring Bluetooth enabled devices for use with this computer.

On this window, you can select what type of 5. Bluetooth device you want to setup. Please make your choice below and then click Continue.
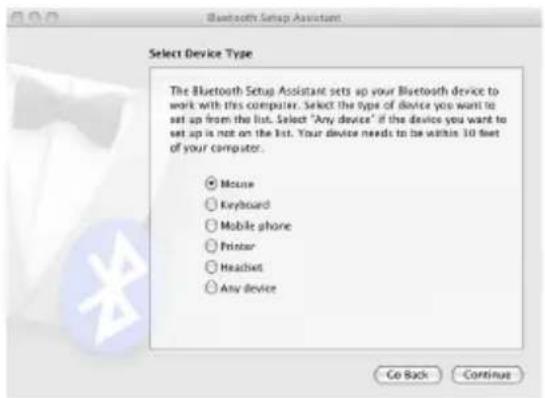
Bluetooth Setup Assistant Select Device Type The Bluetooth Setup Assistant sets up your Bluetooth device to work with this computer. Select the type of device you want to set up from the list. Select "Any device" if the device you want to set up is not on the list. Your device needs to be within 10 feet of your computer. Mouse Keyboard Mobile phone Printer Headset Any device Go Back Continue

Your computer will search for Bluetooth devices 6. in your area and display them in a list. Select the device you wish to communicate with and then click Continue to pair/connect to your device. Please refer to the Apple website for further 7. information on Apple Bluetooth support at www.apple.com.
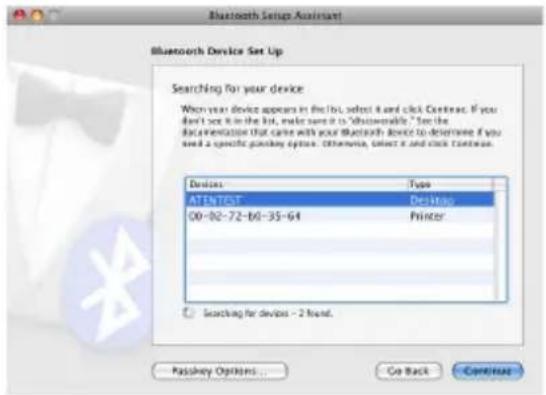
Bluetooth Setup Assistant Bluetooth Device Set Up Searching for your device When your device appears in the list, select it and click Continue. If you don't see it in the list, make sure it is "disseverable." See the documentation that came with your Bluetooth device to determine if you need a specific gamma-ray option. Otherwise, select it and click continue. Devices Type ATENTERT Desktop 00-02-72-60-35-64 Printer Searching for devices - 2 found. Passkey Options... Go Back Continue

Connect to Bluetooth Enabled Cellular Phone / PDA

Windows XP

Double click on the Bluetooth icon in the 1. system tray.
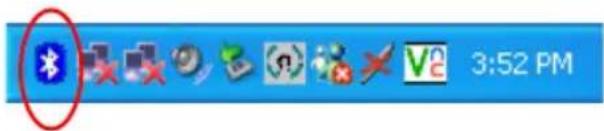
3:52 PM

Next, click on 2. Add a Bluetooth Device to connect your Bluetooth enabled cellular phone to your computer.
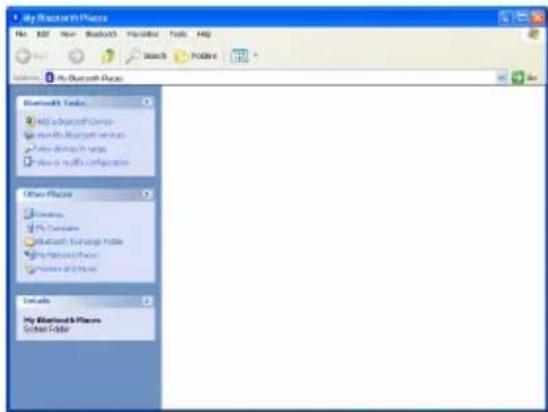
My Blackbox Path File Edit View Blackbox Format Tools Help My Blackbox Path Add to Blackbox Path Add to Blackbox Path Delete to Blackbox Path Delete to Blackbox Path Other Paths Connections My Documents Microsoft Exchange Path My Personal Paths My Personal Paths Details My Blackbox Path Edit Path

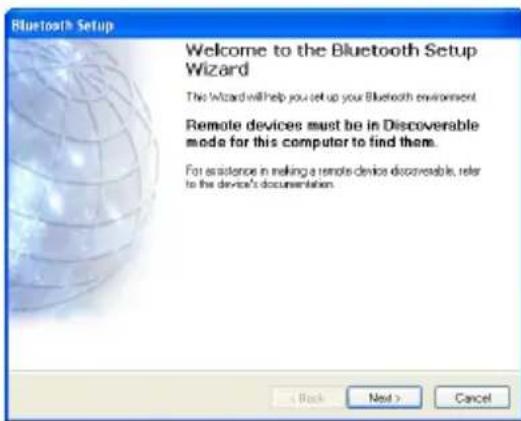
  1. Click Next to continue.

Bluetooth Setup Welcome to the Bluetooth Setup Wizard This Wizard will help you set up your Bluetooth environment. Remote devices must be in Discoverable mode for this computer to find them. For assistance in making a remote device discoverable, refer to the device's documentation.

  1. The Bluetooth Setup Wizard will search and find available Bluetooth enabled devices around your computer. Select the phone of your choice and click Next to continue.
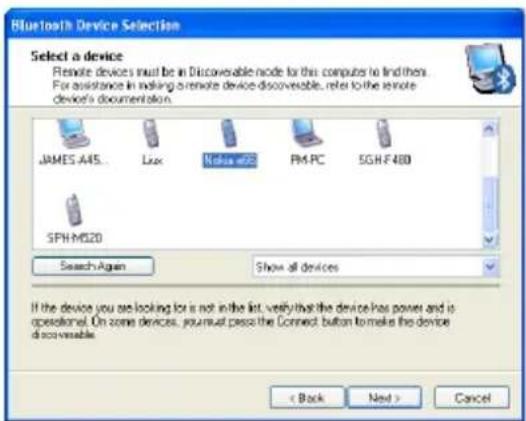
Bluetooth Device Selection Select a device Remote devices must be in Discoverable node for this computer to find them. For assistance in making a remote device discoverable, refer to the remote device's documentation. JAMES A45... Lax Nokia e22 PM-PC SGH-F480 SPH-M520 Search Again Show all devices If the device you see looking for is not in the list, verify that the device has power and is operational. On some devices, journal pass to the Connect button to make this device discoverable. < Back Next > Cancel

You will be prompted with a six digits PIN code 5. on your screen. Enter this PIN code to your Bluetooth enabled cellular phone now.
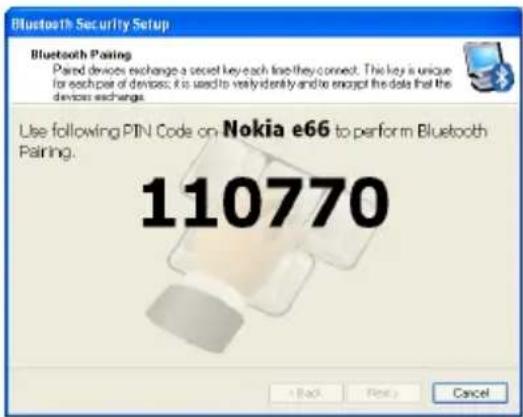
Bluetooth Security Setup Bluetooth Pairing Paired devices exchange a secret key each line they connect. This key is unique for each pair of devices; it is used to verify identity and to encrypt the data that the devices exchange. Use following PIN Code on Nokia e66 to perform Bluetooth Pairing. 110770 + Back Next Cancel

You will be asked to select the services that 6. are available provided on your phone. It is recommended to leave all services checked. Click Finish to continue.
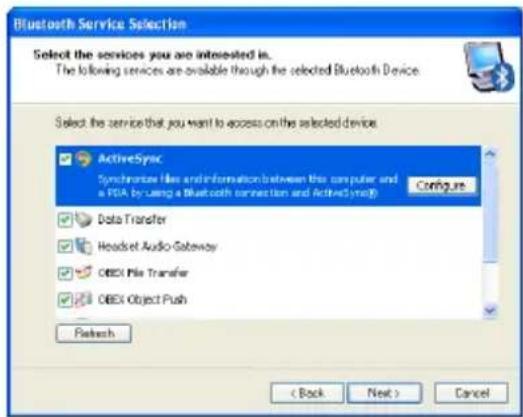
Bluetooth Service Selection Select the services you are interested in. The following services are available through the selected Bluetooth Device. Select the service that you want to access on the selected device ActiveSync Synchronize Files and Information between this computer and a PDA by using a Bluetooth connection and ActiveSync(B) Configure Data Transfer Headset Audio-Gateway OBEX File Transfer OBEX Object Push Refresh < Back Next > Cancel

You will then see the selected services 7. installing to your computer. After the installation completes, you will see all available services listed in My Bluetooth Places. You can double click on any of these services to activate them or you can also right click on specific service and find out more options provided by the service.
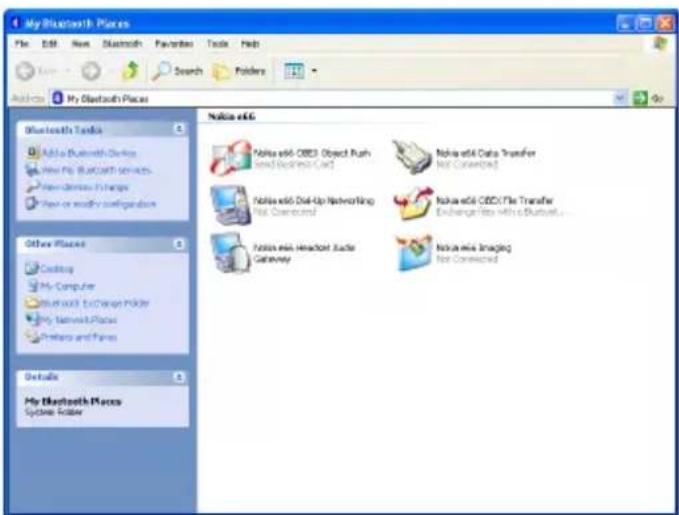
My Bluetooth Places File Edit New Bluetooth Favorites Tools Help Add to "My Bluetooth Places" Bluetooth Topics Add to Bluetooth Devices New My Bluetooth Services New Devices in Range New or more's configuration Other Places Coding My Computer Bluetooth Exchange Manager My Network Places Preters and Frames Details My Bluetooth Places System Folder Notice addG Notice add OBS Object Push Read (Copyright Card) Notice add Data Transfer Not Connected Notice add Do-Up Networking Not Connected Notice add OBS File Transfer Exchange files with a Bluetooth... Notice add Headset Audio Cathaway Notice add Imaging Not Connected

Windows Vista

Click on the Bluetooth icon in the system tray 1. and select Add a Bluetooth Device.
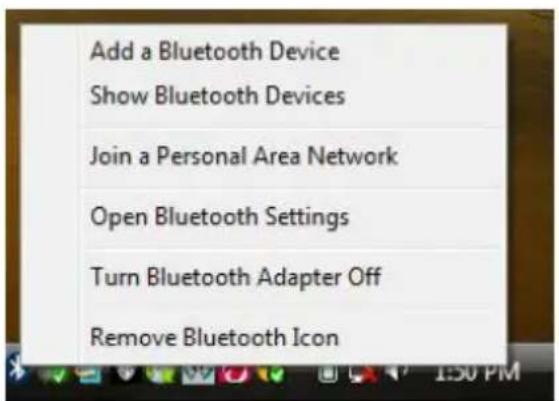
Add a Bluetooth Device Show Bluetooth Devices Join a Personal Area Network Open Bluetooth Settings Turn Bluetooth Adapter Off Remove Bluetooth Icon

Make sure to set your Bluetooth enabled 2. phone on pairing mode and the software will start scanning for all available Bluetooth enabled devices. Once found, your phone will appear in below window. Select your phone and click on Next to continue.
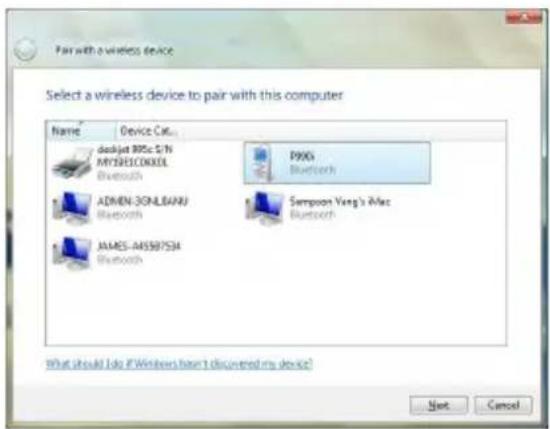
Pair with a wireless device Select a wireless device to pair with this computer Name Device C#.\ dodjet RPCs 679 MYBSECORDEL Bluetooth P995 Bluetooth ADMIN-30NLEBAU Bluetooth Simpson Yang's Mac Bluetooth JAMES-AMSB754 Bluetooth What should I do if Windows have I discovered my device? Next Cancel

The Bluetooth software will generate a pairing 3. key which will display in below window. Type in this pairing key into your Bluetooth enabled phone to accept the pairing request and click on Next to continue. Please make sure to put in the pairing key to your Bluetooth enabled phone within 30 seconds, otherwise, you will need to start this process over again.
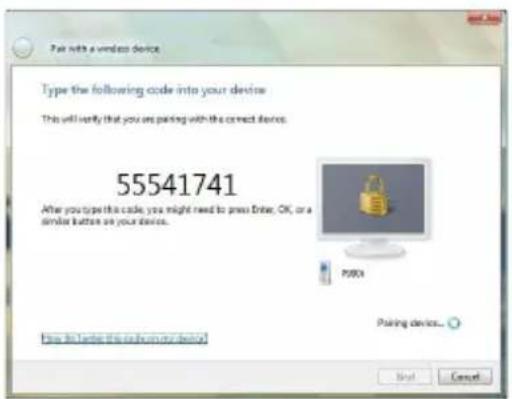
Pair with a wireless device Type the following code into your device This will notify that you are packing with the correct device. 55541741 After you type this code, you might need to press Enter, OK, or a similar button on your device. P9001 Packing device... Next Cancel

Click on 4. Close to complete the pairing process.
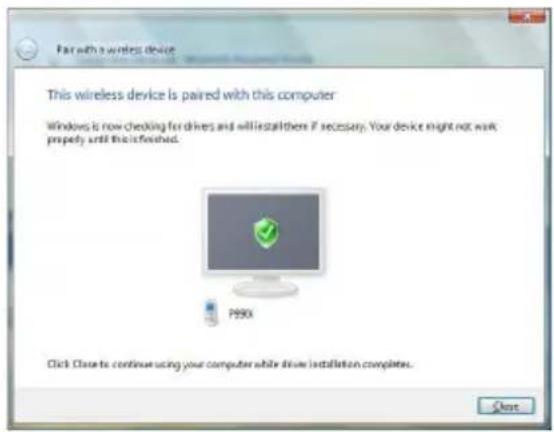
Pain with a wireless device This wireless device is paired with this computer Windows is now checking for drives and will install there if necessary. Your device might not walk properly until this is finished. P950 Click Close to continue using your computer while drive installation completes.

Once the pairing process is completed, you 5. can interact with your Bluetooth enabled phone in different ways according to the available choices appearing in the control window.
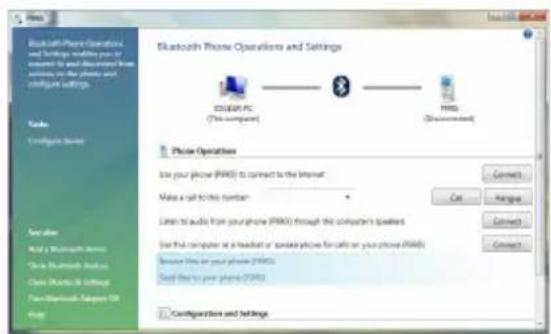
Bluetooth Phone Operations and Settings enables you to support to and download from mails on the phone and configure settings. Radio Configure Books Scan Use disk ACM by Bluetooth Devices Drive Bluetooth Devices Close Bluetooth Windows Take Bluetooth System 10 Help Bluetooth Phone Operations and Settings EDUER PC (This computer) PRG (Environment) Phone Operations Use your phone (PRG) to connect to the Internet: Make a call-to-file number - Listen to audio from your phone (PRG) through this computer's speakers Use that computer at a breakfast or telephone phone for calls or your phone (PRG) Remove lines to your phone (PRG) Send lines to your phone (PRG) Configuration and Settings

You will be asked to select the services that 6. are available provided on your phone. It is recommended to leave all services checked. Click Finish to continue.
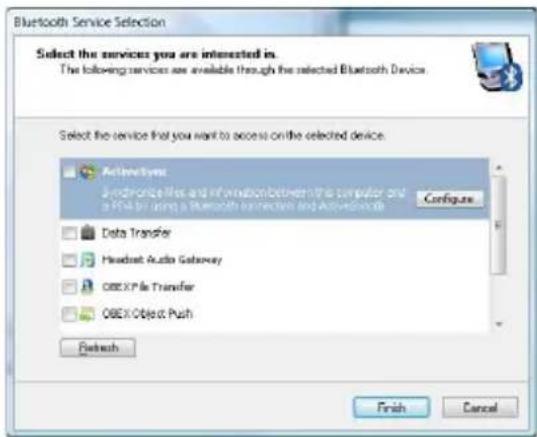
Bluetooth Service Selection Select the services you are interested in. The following services are available through the selected Bluetooth Device. Select the service that you want to access on the selected device. ActiveSystems A network files and information between the computer and a PDA by using a Bluetooth connection and ActiveSystems Configure Data Transfer Headset Audio Gateway OBEX File Transfer OBEX Object Push Refresh Finish Cancel

You will then see the selected services 7. installing to your computer. After the installation completes, you will see all available services listed in My Bluetooth Places. You can double click on any of these services to activate them or you can also right click on specific service and find out more options provided by the service.
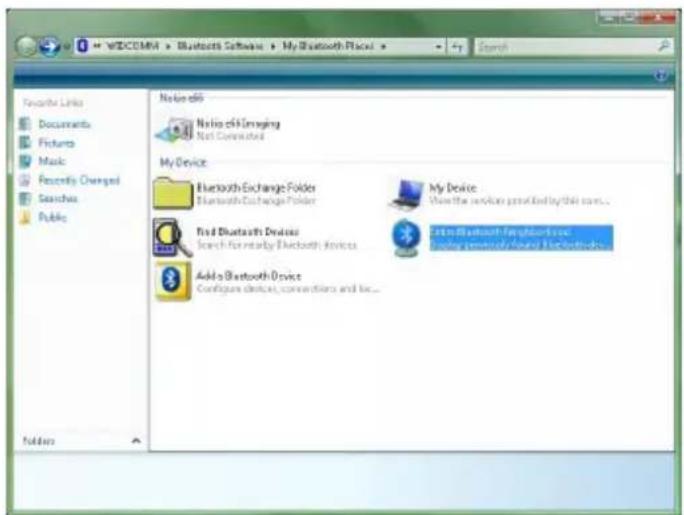
WIDCOMI > Bluetooth Software > My Bluetooth Place > Search Favorite Links Documents Pictures Music Recently Changed Searches Public Notes:65 Notes of 64 Imaging Not Connected My Device Bluetooth Exchange Folder Bluetooth Exchange Folder My Device Show the services provided by this com... Find Bluetooth Devices Search for mostly Bluetooth Devices Find Bluetooth Features Add a Bluetooth Device Configure devices, connections and loc... Edit Bluetooth Features Display regularly found Bluetooth devices.

Windows 7

Click on the up-arrow icon located in the 1. system tray and click on the Bluetooth icon to begin.
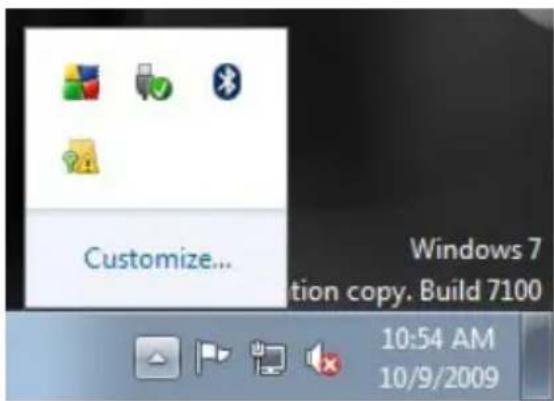
Customize... Windows 7 tion copy. Build 7100 10:54 AM 10/9/2009

Click on 2. Add a Device to continue.
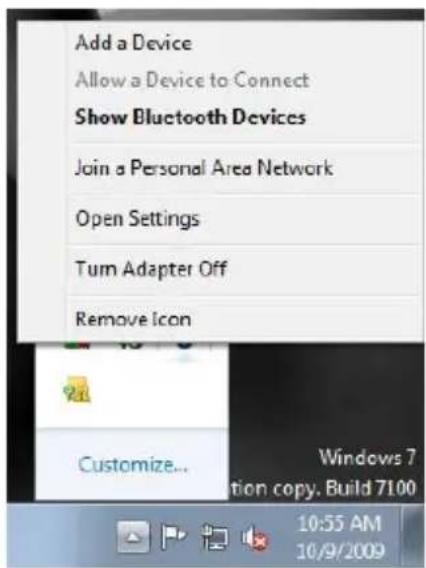
Add a Device Allow a Device to Connect Show Bluetooth Devices Join a Personal Area Network Open Settings Turn Adapter Off Remove Icon Customize... Windows 7 tion copy. Build 7100 10:55 AM 10/9/2009

Make sure to set your Bluetooth enabled 3. phone on pairing mode and the software will start scanning for all available Bluetooth enabled devices. Once found, your phone will appear in below window. Select your phone and click on Next to continue.
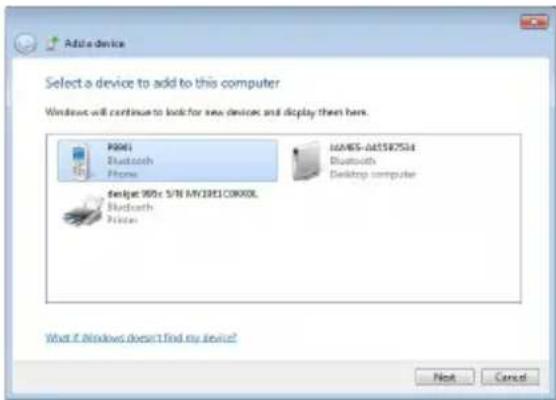
Add a device Select a device to add to this computer Windows will continue to look for new devices and display then here. P001 Bluetooth Phone 16485-061587534 Bluetooth Desktop computer design: 90% S/N MY3RE1C00XOL Bluetooth Printer What if Windows doesn't find my device? Next Cancel

The Bluetooth software will generate a pairing 4. key which will display in below window. Type in this pairing key into your Bluetooth enabled phone to accept the pairing request and click on Next to continue. Please make sure to put in the pairing key to your Bluetooth enabled phone within 30 seconds, otherwise, you will need to start this process over again.
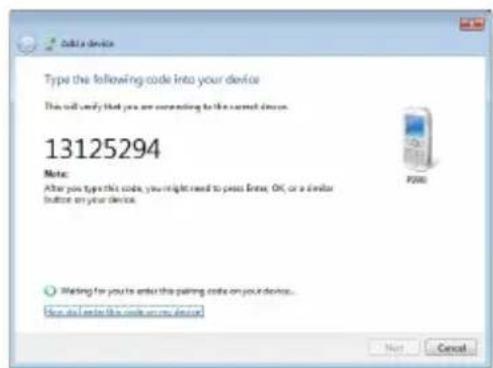
Type the following code into your device This will verify that you are progressing to the current device. 13125294 Note: After you type this code, you might need to press Enter, OK, or a similar button on your device. Waiting for you to enter this pairing code on your device... Now do you order this code on your device.

Click on 5. Close to complete the pairing process.
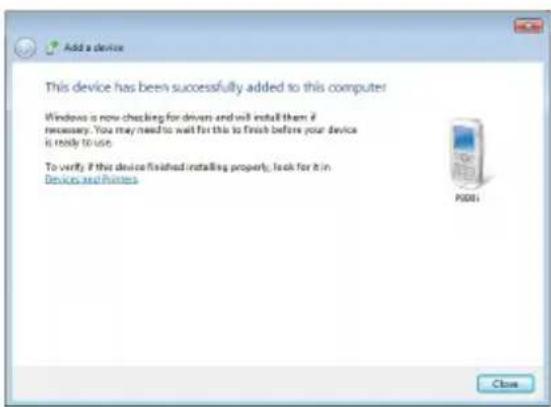
Add a device This device has been successfully added to this computer Windows is now checking for drivers and will install them if necessary. You may need to wait for this to finish before your device is ready to use. To verify if this device finished installing property, look for it in Devices and Frames P981 Close

Once the pairing process is completed, you 6. can interact with your Bluetooth enabled phone in different ways according to the available choices appearing in the control window.
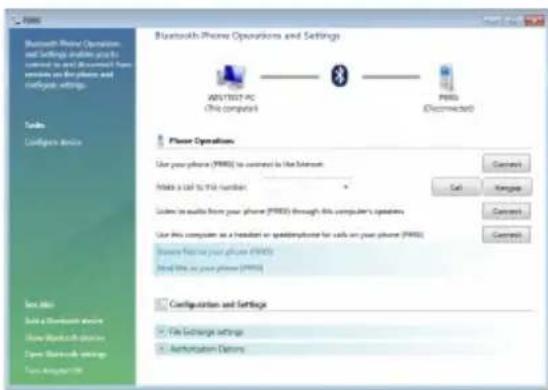
Bluetooth Phone Operations and Settings APUTTEST PC (This computer) PRRS (Disconnected) Phone Operations Use your phone (PRRS) to control in the Internet. Make a call to this number. Listen to audio from your phone (PRRS) through this computer's operation Use this computer as a breakfast or instantphone for calls on your phone (PRRS) Choose free use your phone (PRRS) Find free use your phone (PRRS) Configuration and Settings File Exchange settings Authentication Details

Connect to a Bluetooth Enabled Printer

Note: If this is a new printer you are setting up, you will need to install the driver and software of your printer prior to completing the pairing process. Please follow the printer setup wizard to setup your printer.

Windows XP

Double click on the Bluetooth icon in the 1. system tray.

3:52 PM

  1. Click Next to begin pairing with the Bluetooth enabled printer.
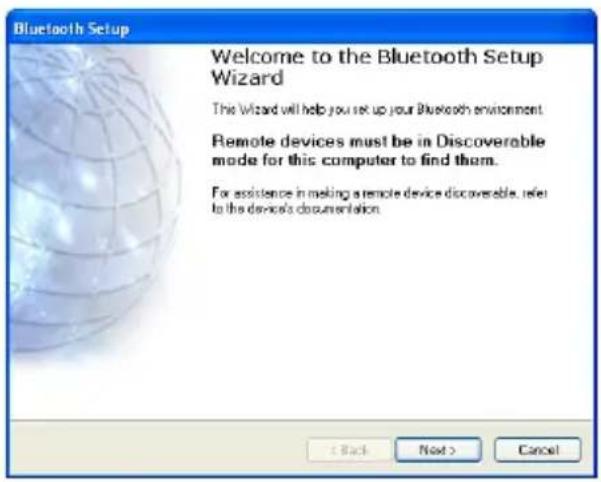
Bluetooth Setup Welcome to the Bluetooth Setup Wizard The Wizard will help you set up your Bluetooth environment. Remote devices must be in Discoverable mode for this computer to find them. For assistance in making a remote device discoverable, refer to the device's documentation.< Back Next > Cancel

The Bluetooth software will search for available 3. Bluetooth devices around your computer. Select the printer and click on Next to continue.

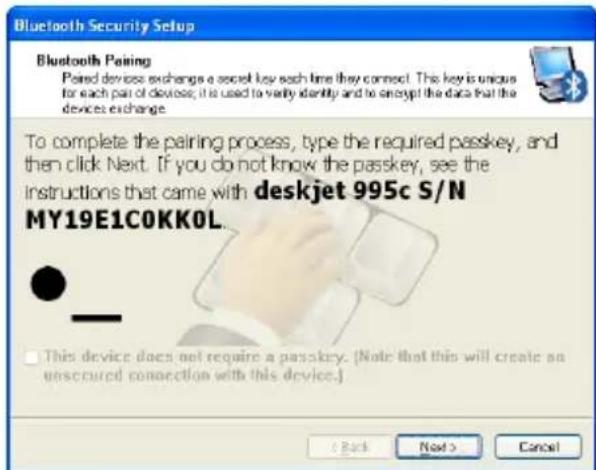
Type in the correct Passkey of the printer. 4. Please refer to the original user manual of the device for further details and instructions on entering the Passkey. Press Next when done.
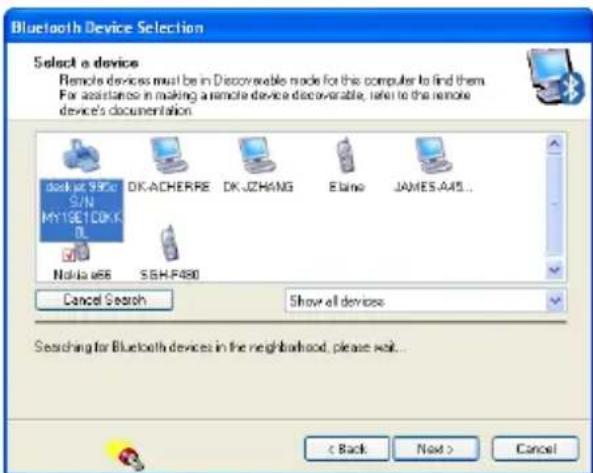
Bluetooth Device Selection Select a device Remote devices must be in Discoverable mode for this computer to find them. For assistance in making a remote device discoverable, select to the remote device's documentation. DASH USIC S/N MYSETCDK DL Nokia u66 DK-ACHERRE DK-UZHANG Ebara JAMES-A45... SBH-F880 Cancel Search Show all devices Searching for Bluetooth devices in the neighborhood, please wait... < Back Next > Cancel

Bluetooth Security Setup Bluetooth Pairing Pared devices exchange a secret key each time they connect. This key is unique for each pair of devices; it is used to verify identity and to encrypt the data that the devices exchange. To complete the pairing process, type the required passkey, and then click Next. If you do not know the passkey, see the instructions that came with deskjet 995c S/N MY19E1C0KK0L. This device does not require a passkey. (Note that this will create an unsecured connection with this device.) < Back Next > Cancel

Make sure both services are selected and 5. click on Finish to complete the pairing process.
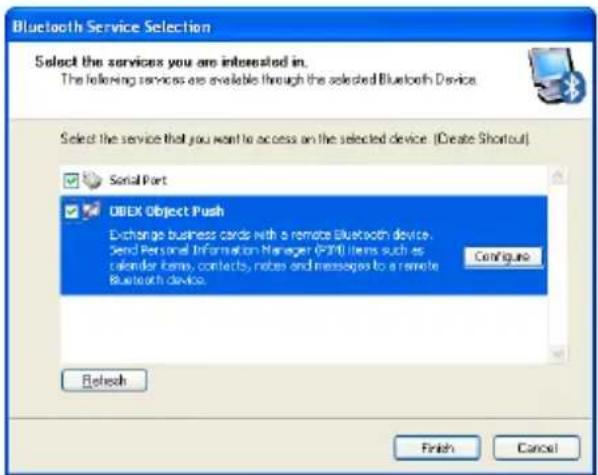
Bluetooth Service Selection Select the services you are interested in. The following services are available through the selected Bluetooth Device. Select the service that you want to access on the selected device (Create Shortcut) Serial Port DBEX Object Push Exchange business cards with a remote Bluetooth device. Send Personal Information Manager (FNT) items such as calendar items, contacts, notes and messages to a remote Bluetooth device. Configure Refresh Finish Cancel

If your printer is already setup, click on 6. Start, then Settings, then Printers and Faxes. Right click on the printer and select Properties. Click on Ports tab when you see the properties window. Now, click on Add Port... to connect to the printer.
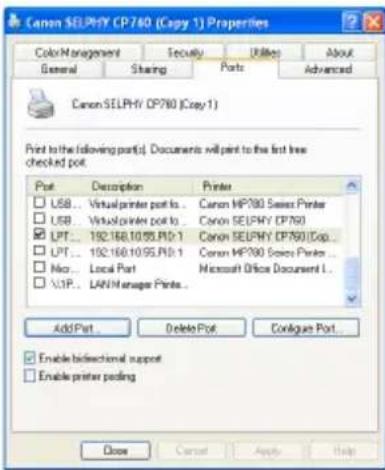
Canon SELPHY CP780 (Copy 1) Properties Color Management Security Utilities About General Sharing Ports Advanced Canon SELPHY CP780 (Copy 1) Print to the following port(s). Documents will print to the first line checked port. Port: Desription Printer USB...Virtual printer port to... Canon HP780 Series Printer USB...Virtual printer port to... Canon SELPHY CP780 LPT...192.168.10.95.PD-1 Canon SELPHY CP780 (Cop... LPT...192.168.10.95.PD-1 Canon HP780 Series Printer Nio...Local Port Microsoft Office Document L... XIP...LAN Manager Ports... Add Port Delete Port Configure Port... Enable bidirectional support Enable printer posting Close Cancel Apply Help

Select the printer from the list and click on 7.

Connect to complete the connection.
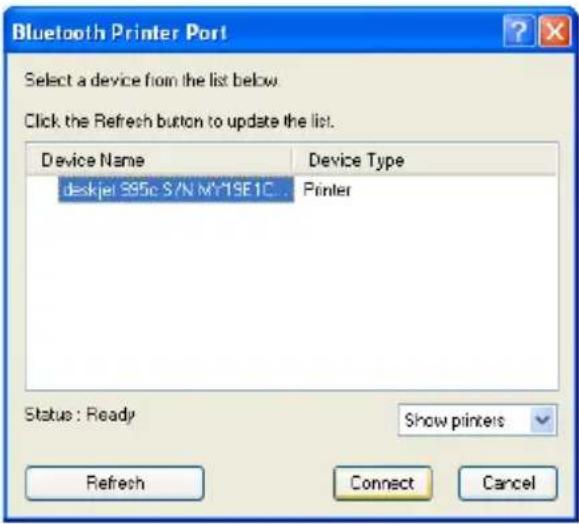
Bluetooth Printer Port Select a device from the list below. Click the Refresh button to update the list. Device Name Device Type deskjet 395c S/N MY19E1C... Printer Status : Ready Show printers Refresh Connect Cancel

Note: If this is a new printer you are setting up, you will need to install the driver and software of your printer prior to completing the pairing process. Please follow the printer setup wizard to setup your printer.

Windows Vista

Click on the Bluetooth icon in the system tray 1. and select Add a Bluetooth Device.
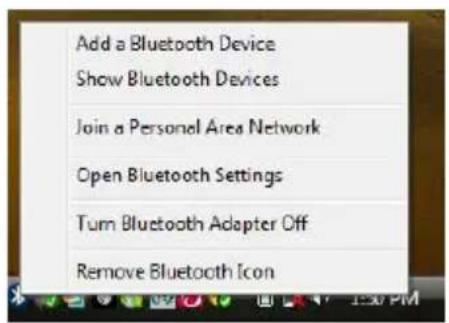
Add a Bluetooth Device Show Bluetooth Devices Join a Personal Area Network Open Bluetooth Settings Turn Bluetooth Adapter Off Remove Bluetooth Icon

Make sure to set your Bluetooth enabled 2. printer on pairing mode and the software will start scanning for all available Bluetooth enabled devices. Once found, your printer will appear in below window. Select your printer and click on Next to continue.
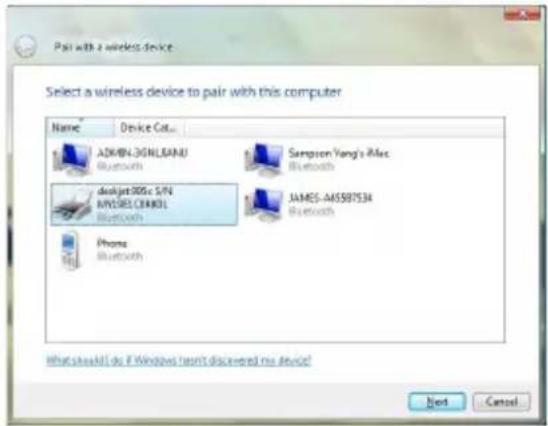
Pair with a wireless device Select a wireless device to pair with this computer Name Device Cat... ADMIN3-3GHLJIANJ Bluetooth Sampson Yang's Mac Bluetooth desktop025c S/N MYORES CERIKOL Bluetooth JAMES-A65987534 Bluetooth Phone Bluetooth What should do if Windows haven't discovered my device? Next Cancel

Depending on the Bluetooth configuration of 3. your Bluetooth enabled printer, there are three pairing options to choose from. For detail pairing instructions, please consult the original user manual of your Bluetooth enabled printer. In this user manual, we will select Enter the device's pairing code and click on Next to continue.
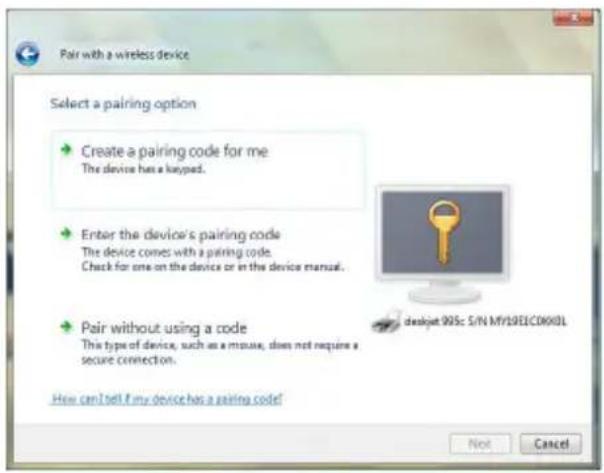
Pair with a wireless device Select a pairing option Create a pairing code for me The device has a keypad. Enter the device's pairing code The device comes with a pairing code. Check for one on the device or in the device manual. Pair without using a code This type of device, such as a mouse, does not require a secure connection. How can I tell if my device has a pairing code? Next Cancel

Enter the pre-defined pairing code assigned 4. by your Bluetooth enabled printer and click on Next to continue.
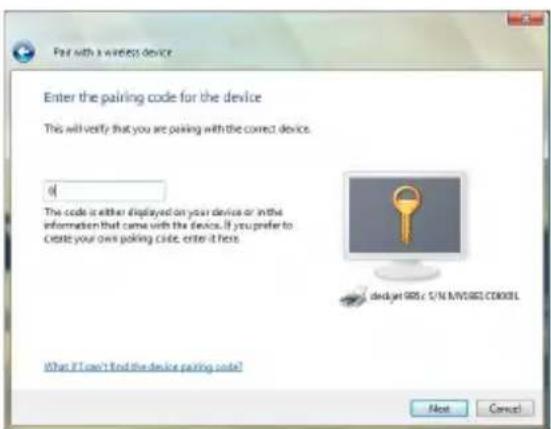
Par with a wireless device Enter the pairing code for the device This will verify that you are passing with the correct device. if The code is either displayed on your device or in the information that came with the device. If you prefer to Create your own poking code, enter it here. devJet GPS c S/N MY0801 CD003L What if I can't find the device passing code? Next Cancel

Click on 5. Close to complete the pairing process.
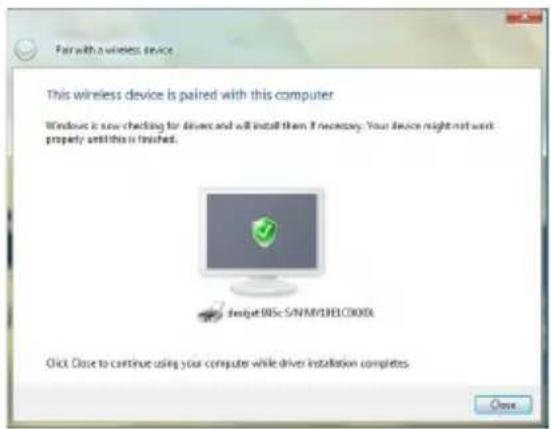
Pair with a wireless device This wireless device is paired with this computer Windows is now checking for drivers and will install them if necessary. Your device might not work properly and this is finished. Simbot SIMSIN/MLBEC000X Click Close to continue using your computer while driver installation completes.

If your printer is already setup, 6. click on the Vista logo, then select

Control Panel. Double click on

Printers icon and access the list of printer installed on your system. Right click on the printer select

Properties. Select Ports tab and click on Add Port... to create the connection to the printer.
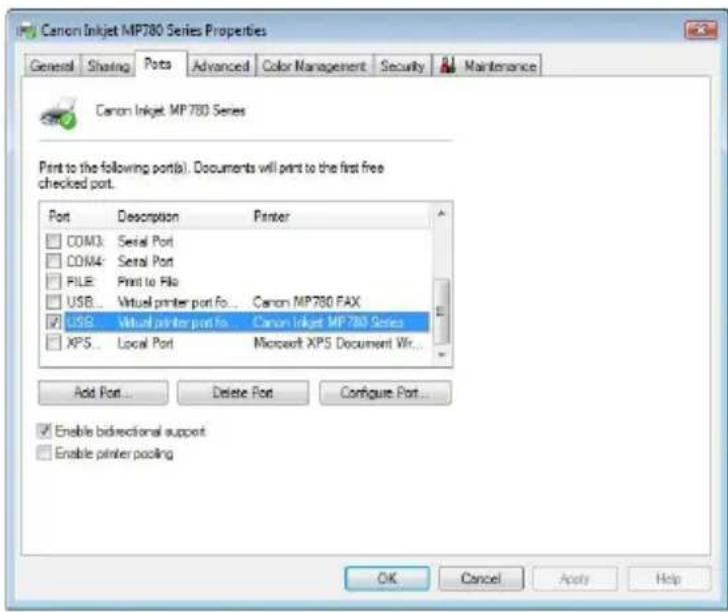
Canon Inkjet MP780 Series Properties General Sharing Ports Advanced Color Management Security Maintenance Canon Inkjet MP780 Series Print to the following port(s). Documents will print to the first free checked port. Port Description Printer COM3: Serial Port COM4: Serial Port FILE: Print to Flo USB... Virtual printer port Fo... Canon MP780 FAX USB... Virtual printer port Fo... Canon Inkjet MP780 Series XPS... Local Port Microsoft XPS Document Wtr... Add Port... Delete Port Configure Port... Enable bidirectional support Enable printer pooling OK Cancel Apply Help

Windows 7

Note: If this is a new printer you are setting up, you will need to install the driver and software of your printer prior to completing the pairing process. Please follow the printer setup wizard to setup your printer.

Click on the up-arrow icon located in the 1. system tray and click on the Bluetooth icon to begin.
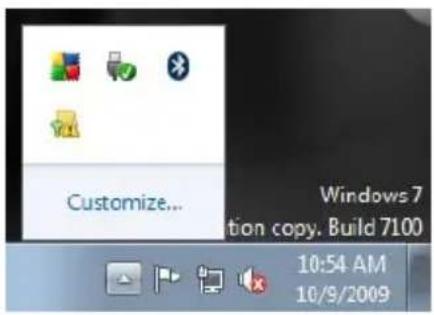
Customize... Windows 7 tion copy. Build 7100 10:54 AM 10/9/2009

Click on 2. Add a Device to continue.
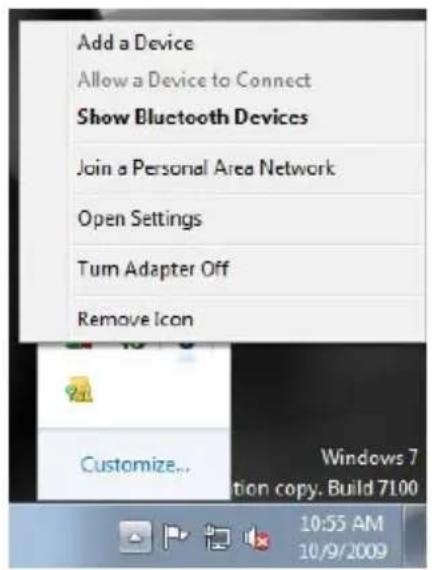
Add a Device Allow a Device to Connect Show Bluetooth Devices Join a Personal Area Network Open Settings Turn Adapter Off Remove Icon Customize... Windows 7 tion copy. Build 7100 10:55 AM 10/9/2009

Make sure to set your Bluetooth enabled 3. printer on pairing mode and the software will start scanning for all available Bluetooth enabled devices. Once found, your printer will appear in below window. Select your printer and click on Next to continue.
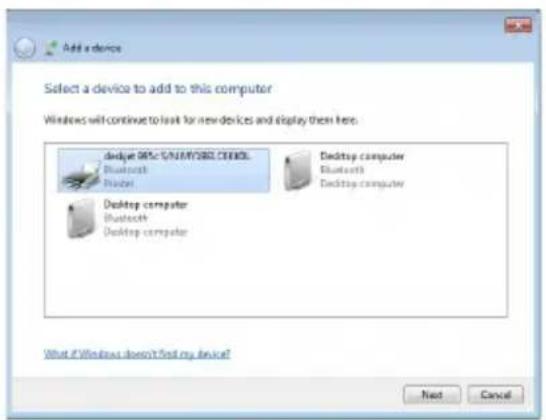
Add a device Select a device to add to this computer Windows will continue to look for new devices and display them here. dodge DSL+52/03/2001.CN/BL Bluetooth Radiator Desktop computer Bluetooth Desktop computer Desktop computer What if Windows doesn't find my device? Next Cancel

Depending on the Bluetooth configuration of 4. your Bluetooth enabled printer, there are three pairing options to choose from. For detail pairing instructions, please consult the original user manual of your Bluetooth enabled printer. In this user manual, we will select Enter the device's pairing code and click on Next to continue.
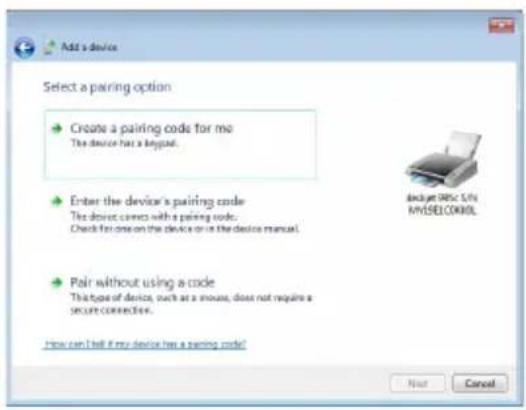
Add a device Select a pairing option Create a pairing code for me The device has a keypath. Enter the device's pairing code The device comes with a pairing code. Check for one on the device or in the device manual. Pair without using a code This type of device, such as a mouse, does not require a secure connection. How can I tell if my device has a pairing code? Next Cancel

Enter the pre-defined pairing code assigned 5. by your Bluetooth enabled printer and click on Next to continue.
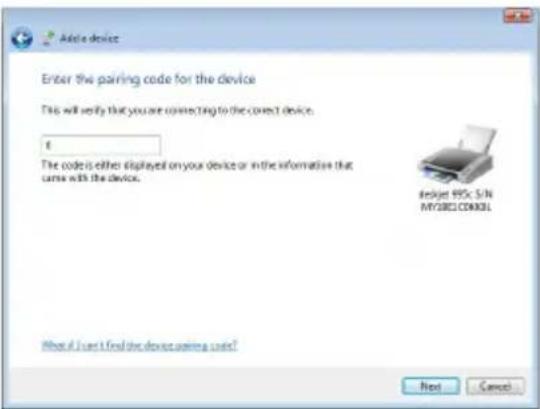
Adobe device Enter the pairing code for the device This will verify that you are connecting to the correct device. € The code is either displayed on your device or in the informative that units with the device. Budget PPP S/N MY2801 CERRKL What if I can't find the device pairing code? Next Cancel

Click on 6. Close to complete the pairing process
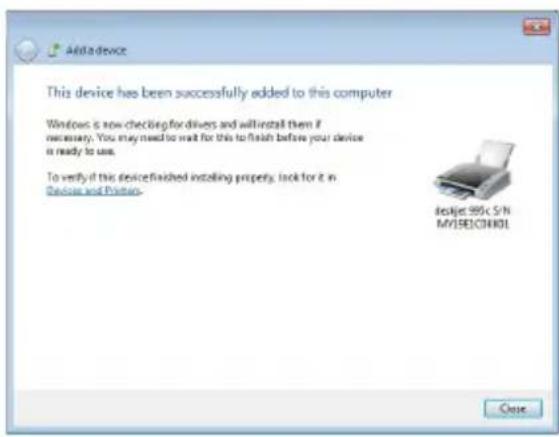
Add device This device has been successfully added to this computer Windows is now checking for drivers and install them if necessary. You may need to wait for this to finish before your device is ready to use. To verify if this device finished installing property, lock for it in Device and Printer- File: 95c S/N MYBECN01

Connect to Network Access

Windows XP

Double click on the Bluetooth icon in the 1. system tray.
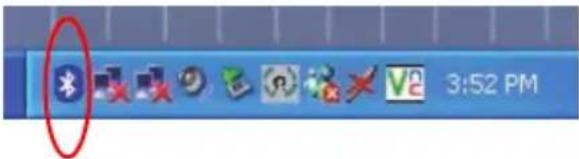
3:52 PM

  1. Click Next to begin pairing with the Bluetooth device.
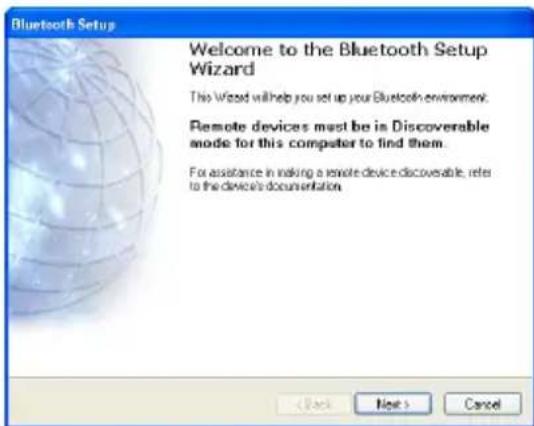
Bluetooth Setup Welcome to the Bluetooth Setup Wizard This Wizard will help you set up your Bluetooth environment. Remote devices must be in Discoverable mode for this computer to find them. For assistance in making a remote device discoverable, refer to the device's documentation < Back Next > Cancel

Select the device that you want to connect, 3. and click Next to continue.
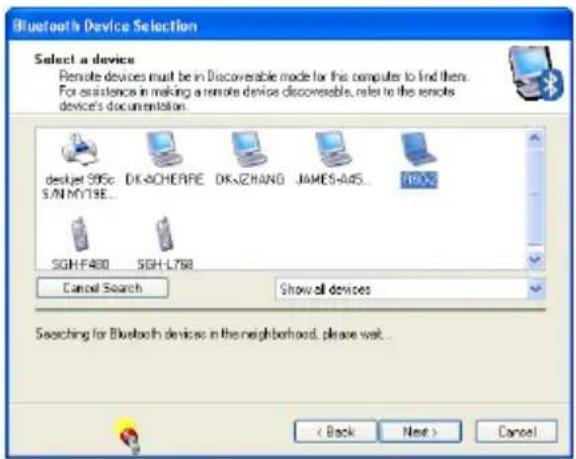
Bluetooth Device Selection Select a device Remote devices must be in Discoverable mode for this computer to find then. For persistence in making a remote device discoverable, refer to the remote device's documentation. deskjet 595c S/NMY19E... DK-CHERRE DK-ZHANG JAMES-AWS... FISU... SGH-F480 SGH-L768 Cancel Search Show all devices Searching for Bluetooth devices in the neighborhood, please wait... < Back Next > Cancel

Now you should also see the same Passkey 4. shows up in a window on the other Bluetooth device that you are connecting to. Verify both systems have the same Passkey then click Next to continue.
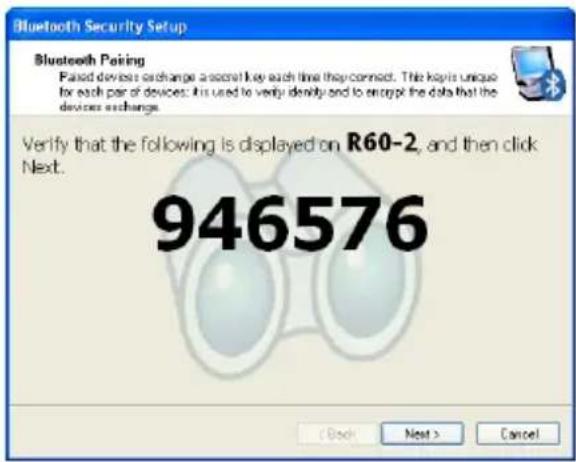
Bluetooth Security Setup Bluetooth Pairing Fixed devices exchange a secret key each time they connect. This kapi is unique for each pair of devices: it is used to verify identity and to encrypt the data that the devices exchange. Verify that the following is displayed on R60-2, and then click Next. 946576 < Back Next > Cancel

Check the services that are available on 5. the device and click Finish to complete the pairing process.
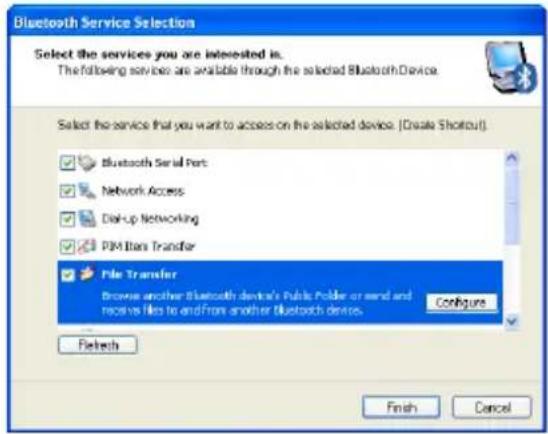
Bluetooth Service Selection Select the services you are interested in. The following services are available through the selected Bluetooth Device. Select the service that you want to access on the selected device. (Create Shortcut) Bluetooth Serial Port Network Access Disk-up Networking PIM Biton Transfer File Transfer Browse another Bluetooth device's Public Folder or send and receive files to and from another Bluetooth device. Configure Configure Refresh Finish Cancel

Now you can double click on the Network 6. Access icon to start the connection. Once the connection is established, the Network Access icon will turn green indicating that it is now connected.
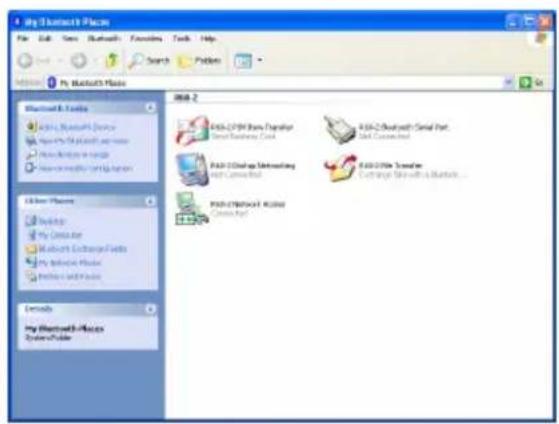
My Watchbox Files File Edit Tools Bluetooth Favorites Tools Help Search Pattern My Watchbox Files Hi-Stop Files My Watchbox Files Hi-Stop Files My Watchbox Files Hi-Stop Files Hi-Stop Files Hi-Stop Files Hi-Stop Files Hi-Stop Files Hi-Stop Files Hi-Stop Files Hi-Stop Files Hi-Stop Files Hi-Stop Files Hi-Stop Files Hi-Stop Files Hi-Stop Files Hi-Stop Files Hi-Stop Files Hi-Stop Files Hi-Stop Files Hi-Stop Files Hi-Stop Files Hi-Stop Files Hi-Open Hi-Open Hi-Open Hi-Open Hi-Open Hi-Open Hi-Open Hi-Open Hi-Open Hi-Open Hi-Open Hi-Open Hi-Open Hi-Open Hi-Open Hi-Open Hi-Open Hi-Open Hi-Open Hi-Open Hi-Open Hi-Open Hi-Open Hi-Open Hi-Open Hi- Open Hi- Open Hi- Open Hi- Open Hi- Open Hi- Open Hi- Open Hi- Open Hi- Open Hi- Open Hi- Open Hi- Open Hi- Open Hi- Open Hi- Open Hi- Open Hi- Open Hi- Open Hi- Open Hi- Open Hi- Open Hi- Open Hi- Open Hi- Open Hi- Open Hi- 3.0.1.2.1.2.1.2.1.2.1.2.1.2.1.2.1.2.1.2.1.2.1.2.1.2.1.2.1.2.1.2.1.2.1.2.1.2.1.2.1.2.1.2.1.2.1.2.1.2.1.2.1.3.0.1.2.1.2.1.2.1.2.1.2.1.2.1.2.1.2.1.2.1.2.1.2.1.2.1.2.1.2.1.2.1.2.1.2.1.2.1.2.1.2.1.2.1.2.1.2.1.2 30000000000000000000000000000000000000000000000000000000000000000000000000000000000000000000000000000

Windows Vista

Click on the Bluetooth icon in the system tray 1. and select Add a Bluetooth Device.
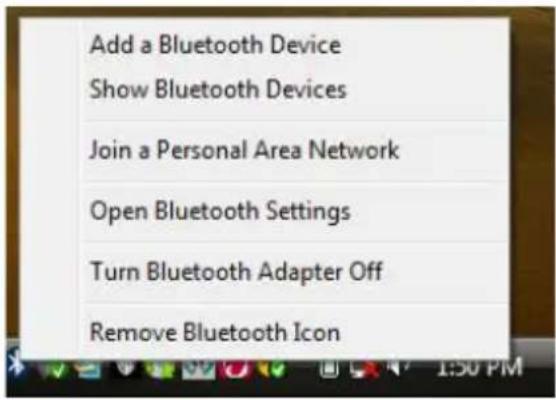
Add a Bluetooth Device Show Bluetooth Devices Join a Personal Area Network Open Bluetooth Settings Turn Bluetooth Adapter Off Remove Bluetooth Icon

The software will start scanning for all available 2. Bluetooth enabled devices. Once found, the other Bluetooth enabled computer will appear in below window. Select the computer and click on Next to continue.
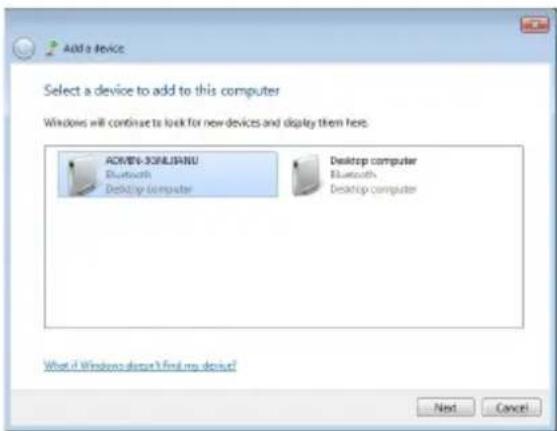
Add a device Select a device to add to this computer Windows will continue to look for new devices and display them here. ACOS-3081/6492 Bluetooth Desktop computer Desktop computer Bluetooth Desktop computer What if Windows doesn't find my device? Next Cancel

  1. The Bluetooth software will generate a pairing key which will display in below window. Type in this pairing key into the other Bluetooth enabled computer to accept the pairing request and click on Next to continue. Please make sure to put in the pairing key to your Bluetooth enabled computer within 30 seconds, otherwise, you will need to start this process over again. The Bluetooth Setup Wizard will search and find available Bluetooth enabled devices around your computer. Select the device of your choice and click Next to continue.
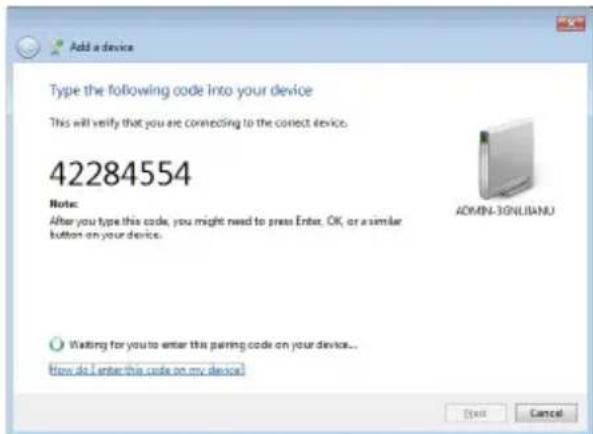
Add a device Type the following code into your device This will verify that you are connecting to the correct device. 42284554 Note: After you type this code, you might need to press Enter, OK, or a similar button on your device. ADMIN-3GNLUBANU Waiting for you to enter this pairing code on your device... How do I enter this code on my device. Next Cancel

  1. Once the pairing process is completed, you can interact with your Bluetooth enabled computer in different ways according to the available choices appearing in the control window.
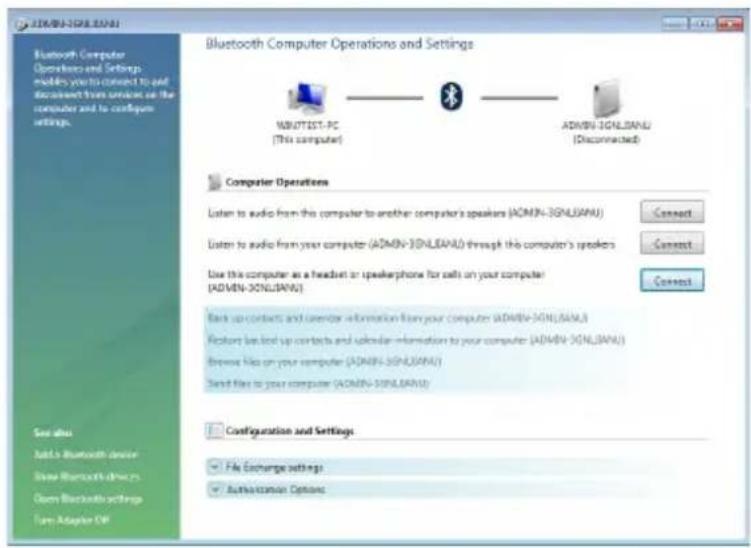
Bluetooth Computer Operations and Settings MBUTTEST-PC (This computer) ADMIN-3GNLJIANU (Disconnected) Computer Operations Listen to audio from this computer to another computer's speakers (ADMIN-3GNLJIANU) Connect Listen to audio from your computer (ADMIN-3GNLJIANU) through this computer's speakers Use this computer as a headset or speakerphone for calls on your computer (ADMIN-3GNLJIANU) Back up contacts and container information from your computer (ADMIN-3GNLJIANU) Restore the next up contacts and calendar information to your computer (ADMIN-3GNLJIANU) Browse files on your computer (ADMIN-3GNLJIANU) Send files to your computer (ADMIN-3GNLJIANU) Configuration and Settings File Exchange settings Authentication Options

Click on the Bluetooth icon located in the 5. system tray and select Join a Personal Area Network.
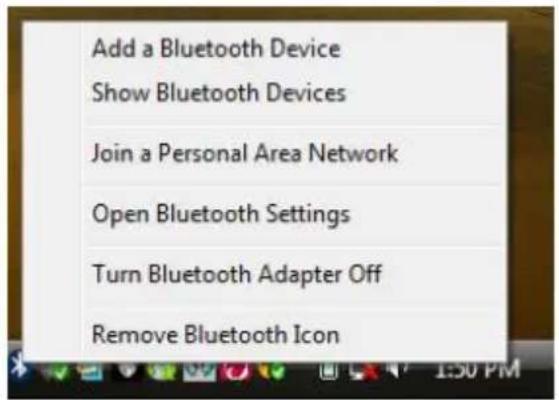
Add a Bluetooth Device Show Bluetooth Devices Join a Personal Area Network Open Bluetooth Settings Turn Bluetooth Adapter Off Remove Bluetooth Icon

Select the Bluetooth device that you want to 6. establish the network connection with, then click on Connect to start the connection.
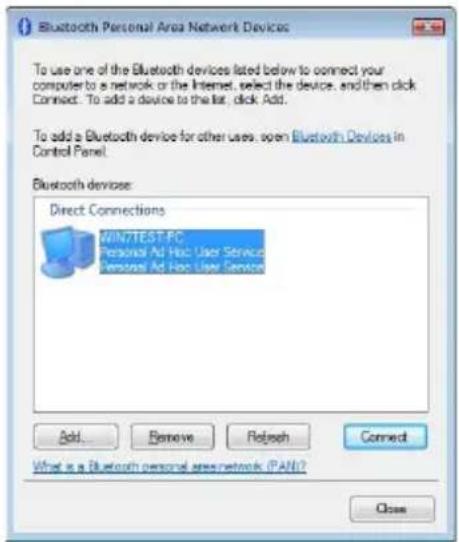
Bluetooth Personal Area Network Devices To use one of the Bluetooth devices listed below to connect your computer to a network or the Internet, select the device, and then click Connect. To add a device to the list, click Add. To add a Bluetooth device for other users, open Bluetooth Devices in Control Panel. Bluetooth devices: Direct Connections WIN7TEST-FC Personal Ad Hoc User Service Personal Ad Hoc User Service Add... Remove Refresh Connect What is a Bluetooth personal area network (PANI)? Close

Windows 7

Click on the up-arrow icon located in the 1. system tray and click on the Bluetooth icon to begin. Click on Add a Device to continue.
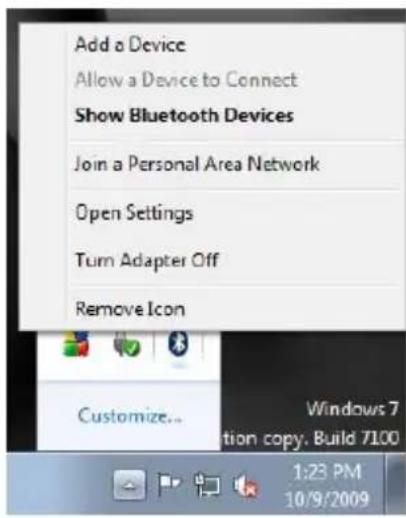
Add a Device Allow a Device to Connect Show Bluetooth Devices Join a Personal Area Network Open Settings Turn Adapter Off Remove Icon Customize... Windows 7 tion copy, Build 7100 1:23 PM 10/9/2009

The software will start scanning for all available 2. Bluetooth enabled devices. Once found, the other Bluetooth enabled computer will appear in below window. Select the computer and click on Next to continue.
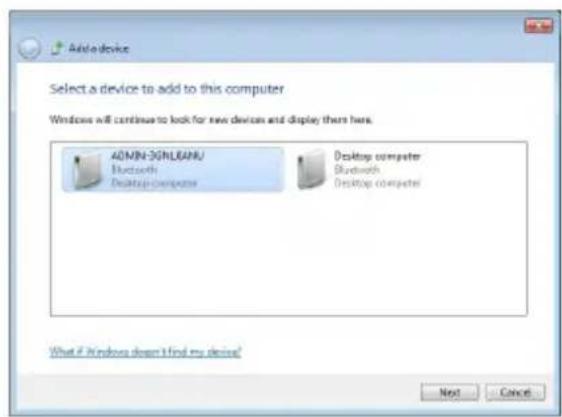
Add device Select a device to add to this computer Windows will continue to look for new devices and display there here. ADMIN-3GMLBANU Bluetooth Desktop-computer Desktop-computer Bluetooth Desktop-computer What if Windows doesn't find my device? Next Cancel

The Bluetooth software will generate a pairing 3. key which will display in below window. Type in this pairing key into the other Bluetooth enabled computer to accept the pairing request and click on Next to continue. Please make sure to put in the pairing key to your Bluetooth enabled computer within 30 seconds, otherwise, you will need to start this process over again.
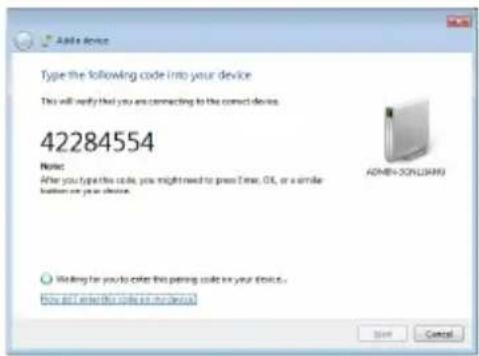
Adobe Device Type the following code into your device This will verify that you are connecting to the correct device. 42284554 Note: After you type this code, you might need to press Time, Oil, or a similar button on your device. ADMIN+SOPLINUM Writing for you to select this permission code on your device. How did we see this code on our device. Start Cancel

Once the pairing process is completed, you 4. can interact with your Bluetooth enabled computer in different ways according to the available choices appearing in the control window.
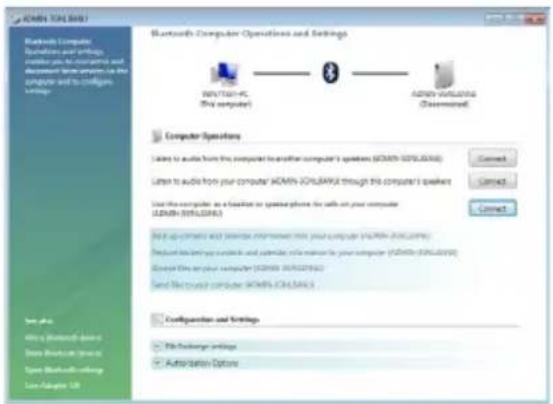
VMware ITALBXP Bluetooth Computer Operations and Settings WINNT-PL ( this computer) ADMIN-VIRUSICS Disseemed Computer Operations Listen to audio from the computer to another computer's speaker (GBM70.021538) Listen to audio from your computer HDMI 2016/04/2016 through the computer's speaker Use the computer as a location for space phone for calls on your computer GBM70.021538 Find applications and password information more your computer than you can use Product this tool via available and calendar, or make it easier for your computer (GBM70.021538) Send file on your computer (GBM70.021538) Send file on your computer (GBM70.021538) Configuration and Settings File Exchange settings Auto Station Options

Click on the up-arrow icon located in the 5. system tray and click on the Bluetooth icon to begin. Click on Join a Personal Area Network to continue.
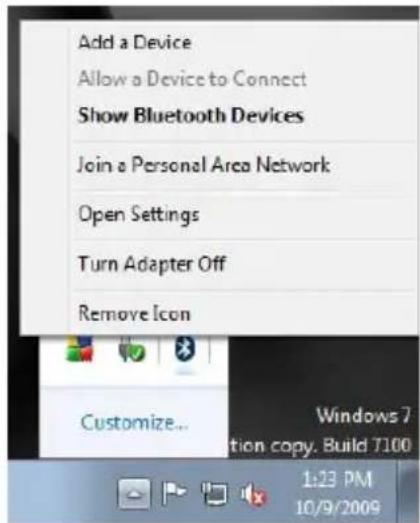
Add a Device Allow a Device to Connect Show Bluetooth Devices Join a Personal Area Network Open Settings Turn Adapter Off Remove Icon Customize... Windows 7 tion copy. Build 7100 1:23 PM 10/9/2009

Right click on the computer that you want to 6. establish the network connection with, select Connect using then Direct connection to create the connection.
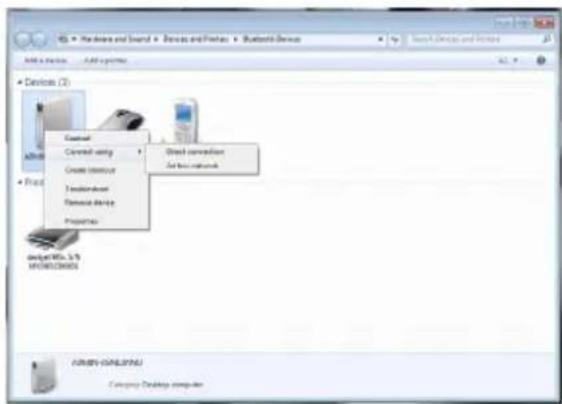
Windows 3.5/8 Microsoft Windows Control Control using Create server Transmitter Remote device Properties Direct conversion Active network ADEN POWER Category Desktop computer

Pairing

What is "Pairing?"

Pairing is a Bluetooth function that enables Bluetooth devices to remain permanently linked to another.

What "Pairing" means in terms of security?

As mentioned, Pairing allows devices to permanently link with each other. The pass key authentication will also be perpetuated in Pairing, meaning that devices will not ask for a pass key once they are paired. Paired devices will remain linked, even if other paired devices are turned off. Once a paired device turns back on, it is ready to be used and service requests will not ask for the pass key again. The built-in 128 bit security encryption of Bluetooth assures the privacy of your paired devices. Note: If devices are unpaired, it is necessary to enter a pass key each time a service request is made from or to another Bluetooth device.

Pairing Devices

In My Bluetooth Places, click on Search devices in range.

Right click on the Bluetooth device and select "Add Bluetooth Device".

If the Passkey is prompted by the software, then enter the Passkey to your Bluetooth device.

Otherwise, please consult the original user manual of your Bluetooth device for further instructions and details.

The device is now paired with your computer.

Unpairing Devices

In My Bluetooth Places, click on View devices in range.

Right click on the Bluetooth device and select "Unpair Device".

Installation-Windows XP Service Pack 2 / Windows Vista Service Pack 1

Windows XP Service Pack-Bluetooth Stack

If you are running Windows XP with Service Pack 2 or Windows Vista with Service Pack 1, you may use the Bluetooth drivers provide by Microsoft. Keep in mind, however, that this Bluetooth stack has limited Bluetooth profiles support. For more information, please visit the Microsoft website at www.microsoft.com.

To use the Microsoft Bluetooth stack, simply 1. plug in your IOGEAR Bluetooth adapter into an available USB port on your computer. Windows will automatically detect the Bluetooth device and install all necessary drivers.

You will then see a Bluetooth icon on your tray 2. bar that allows you to perform all Bluetooth operations, as shown below:

3:32 PM

Optionally, you can find this in 3. Control Panel >Bluetooth Devices.
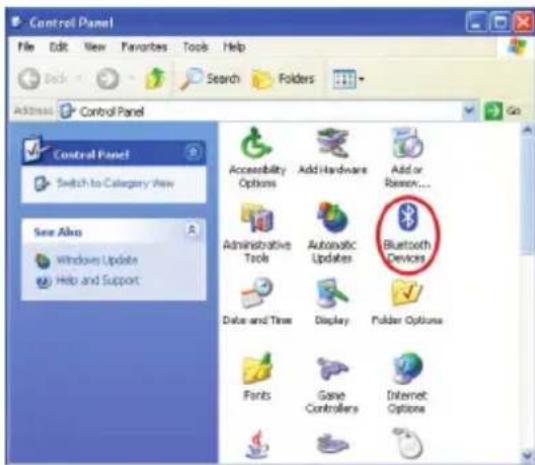
Control Panel File Edit View Favorites Tools Help Back Search Folders Address Control Panel Control Panel Switch to Category View See Also Windows Update Help and Support Accessibility Options Add Hardware Add or Administrative Tools Automatic Updates Bluetooth Data and Time Display Folder Options Fonts Game Controllers Internet Options

To connect with your Bluetooth devices, 4. simply right-click on the Bluetooth icon on the tray bar and select Add a Bluetooth Device.
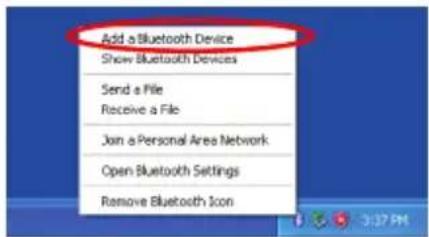
Add a Bluetooth Device Show Bluetooth Devices Send a File Receive a File Join a Personal Area Network Open Bluetooth Settings Remove Bluetooth Icon

Make sure to set your Bluetooth device 5. "discoverable" mode and click Next to continue.
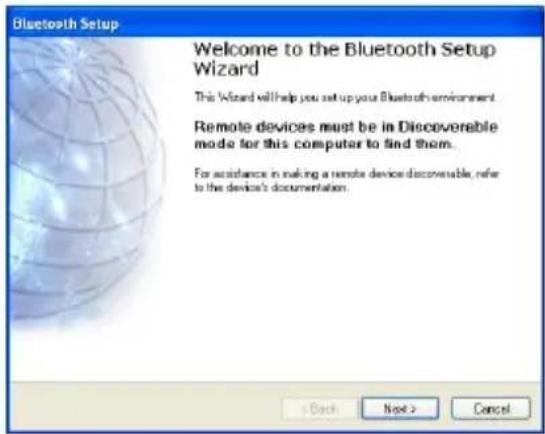
Bluetooth Setup Welcome to the Bluetooth Setup Wizard This Wizard will help you set up your Bluetooth environment. Remote devices must be in Discoverable mode for this computer to find them. For accordance in making a remote device discoverable, refer to the device's documentation.

Your computer will search for all the Blu-6. etooth devices in your area and list them in the middle pane. Select the desired device, and click Next to continue.
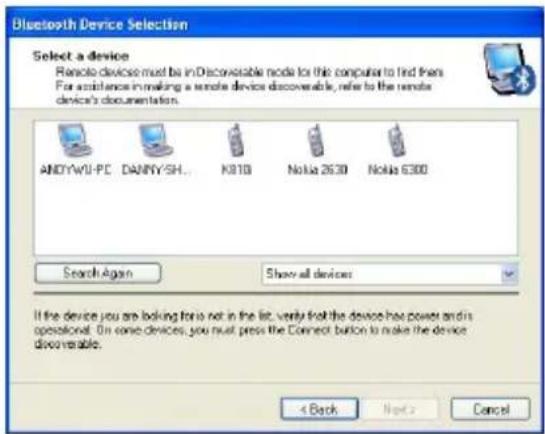
Bluetooth Device Selection Select a device Remote device must be in Decovable node for this computer to find them For assistance in making a remote device discoverable, refer to the remote device's documentation. ANDYAWU-PC DANNY/SH... K810 Nokia 2630 Nokia 6300 Search Again Show all devices If the device you are looking for is not in the list, verify that the device has power and its operational. On some devices, you must press the Connect button to make the device discoverable. 4 Back Next > Cancel

Please consult the user manual of your Blu-7. etooth device to see if you need a Passkey to pair/establish a connection. In most cases, you can type in a 4 digits Passkey when you see this screen to pair with your Bluetooth devices.
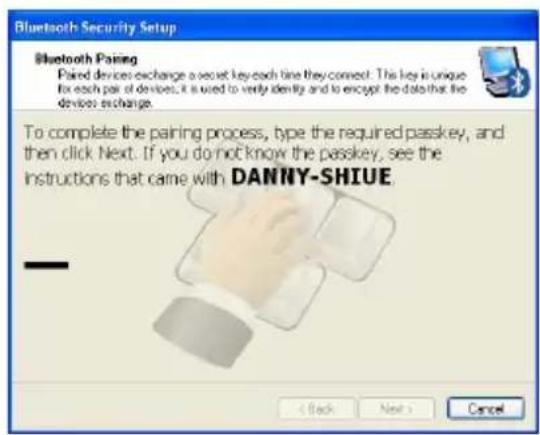
Bluetooth Security Setup Bluetooth Pairing Paired devices exchange a secret key each time they connect. This key is unique for each pair of devices, it is used to verify identity and to encrypt the data that the device exchange. To complete the pairing process, type the required passkey, and then click Next. If you do not know the passkey, see the instructions that came with DANNY-SHIUE. < Back Next > Cancel

Your Bluetooth device will then connect to 8. the IOGEAR Bluetooth adapter and you can select the services you need. To finish the process, click Finish to complete.
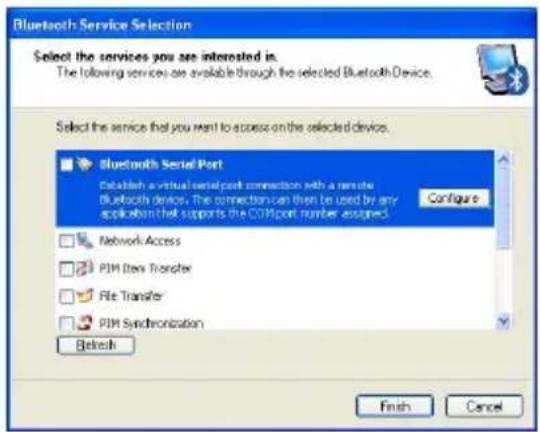
Bluetooth Service Selection Select the services you are interested in. The following services are available through the selected Bluetooth Device. Select the service that you want to access on the selected device. Bluetooth Serial Port Establish a virtual serial port connection with a remote bluetooth device. The connection can then be used by any application that supports the COM port number assigned. Configure Network Access PJM Data Transfer File Transfer PJM Synchronization Refresh Finish Cancel

Specifications

GBU421

Connectors USB Type A

Data Rate 2.1 Mbps

Frenquency Band 2.402 GHz - 2.4835GHz Unlicensed ISM band

Humidity 10% - 90% non-condensing

Interface USB

Modulation GFSK (Gaussian Frenquency Shift Keying)

Operating Temperature 0°C - 50°C

Security Pairing, Encryption, Authentication

Sensitivity Minimum - 76dB

Transmission Power 4dBm max with power control (Class 2)

Weight 0.4 oz.

Technical Support

If you need technical support, please check out our IOGEAR Tech Info Library (T.I.L.) at www.iogear.com/support for the latest tips, tricks, and troubleshooting. The IOGEAR T.I.L. was designed to provide you with the latest technical information about our products. Most of the answers to your questions can be found here, so please try it out before contacting technical support.

Technical support is available Monday through Friday from 8:00 am to 5:00 pm PST and can be reached at (949) 453-8782 and (866) 946-4327 or by email support@iogear.com.

Federal Communications Commission (FCC) Statement

15.21

You are cautioned that changes or modifications not expressly approved by the part responsible for compliance could void the user's authority to operate the equipment.

15.105(b)

This equipment has been tested and found to comply with the limits for a Class B digital device, pursuant to part 15 of the FCC rules. These limits are designed to provide reasonable protection against harmful interference in a residential installation. This equipment generates, uses and can radiate radio frequency energy and, if not installed and used in accordance with the instructions, may cause harmful interference to radio communications. However, there is no guarantee that interference will not occur in a particular installation. If this equipment does cause harmful interference to radio or television reception, which can be determined by turning the equipment off and on, the user is encouraged to try to correct the interference by one or more of the following measures:

Reorient or relocate the receiving antenna.

Increase the separation between the equipment and receiver.

- Connect the equipment into an outlet on a circuit different from that to which the receiver is connected. Consult the dealer or an experienced radio/TV technician for help.

Operation is subject to the following two conditions:

this device may not cause interference and1.

  1. this device must accept any interference, including interference that may cause undesired operation of the device.

FCC RF Radiation Exposure Statement:

This equipment complies with FCC radiation exposure limits set forth for an uncontrolled environment. End users must follow the specific operating instructions for satisfying RF exposure compliance. This transmitter must not be co-located or operating in conjunction with any other antenna or transmitter.

CE Statement

This device has been tested and found to comply with the requirements set up in the council directive on the approximation of the law of member states relating to EMC Directive 89/336/EEC, Low Voltage Directive 73/23/EEC and R&TTE Directive 99/5/EC.

Limited Warranty

IN NO EVENT SHALL THE DIRECT VENDOR'S LIABILITY FOR DIRECT, INDIRECT, SPECIAL, INCIDENTAL OR CONSEQUENTIAL DAMAGES RESULTING FROM THE USE OF THE PRODUCT, DISK OR ITS DOCUMENTATION EXCEED THE PRICE PAID FOR THE PRODUCT.

The direct vendor makes no warranty or representation, expressed, implied, or statutory with respect to the contents or use of this documentation, and especially disclaims its quality, performance, merchantability, or fitness for any particular purpose.

The direct vendor also reserves the right to revise or update the device or documentation without obligation to notify any individual or entity of such revisions, or updates. For further inquires please contact your direct vendor.

Contact

IOGEAR

19641 DaVinci

Foothill Ranch, CA 92610

P 949.453.8782

F 949.453.8785

Visit us at: www.iogear.com

© 2011 IOGEAR®. All Rights reserved. Part No. M1204-a

IOGEAR and the IOGEAR logo are trademarks or registered trademarks of IOGEAR, Inc. Microsoft and Windows are registered trademarks of Microsoft Corporation. IBM is a registered trademark of International Business Machines, Inc. IOGEAR makes no warranty of any kind with regards to the information presented in this document. All information furnished here is for informational purposes only and is subject to change without notice. IOGEAR assumes no responsibility for any inaccuracies or errors that may appear in this document.

IOGEAR GBU421WM - IOGEAR - 1

natural_image Cartoon character with green leaf-like head and smiling expression (no text or symbols)

About Us

IOGEAR GBU421WM - About Us - 1

FUN

IOGEAR offers connectivity solutions that are innovative, fun, and stylish, helping people enjoy daily life using our high technology products.

IOGEAR GBU421WM - FUN - 1

GREEN

IOGEAR is an environmentally conscious company that emphasizes the importance of conserving natural resources. The use of our technology solutions helps reduce electronic waste.
Manual assistant
Powered by Anthropic
Waiting for your message
Product information

Brand : IOGEAR

Model : GBU421WM

Category : Network card / adapter