
Pivot Xplore Dreamz - Stroller Evenflo - Free user manual and instructions
Find the device manual for free Pivot Xplore Dreamz Evenflo in PDF.


| Product Type | Modular Stroller with Bassinet and Toddler Seat |
| Brand | Evenflo |
| Model | Pivot Xplore Dreamz |
| Dimensions (Unfolded) | 37.0 x 25.5 x 41.5 inches |
| Dimensions (Folded) | 29.0 x 25.5 x 14.0 inches |
| Weight | 26.5 lbs |
| Weight Capacity (Toddler Seat) | 50 lbs |
| Weight Capacity (Bassinet) | 20 lbs |
| Age Range | Newborn to 50 lbs (approx. 4 years) |
| Seat Orientation | Parent-facing and world-facing |
| Folding Mechanism | One-hand compact fold |
| Recline Positions | Multiple recline positions including flat for bassinet |
| Canopy | Extra-large multi-panel canopy with peek-a-boo window |
| Wheels | All-terrain wheels with front swivel and rear suspension |
| Brake | One-step foot brake |
| Harness | 5-point harness with adjustable height |
| Storage | Large storage basket with easy access |
| Accessories Included | Bassinet, toddler seat, parent organizer, child tray |
| Cleaning Instructions | Hand wash seat pad and canopy with mild soap; air dry |
| Safety Certifications | JPMA certified, meets ASTM F833 standards |
| Warranty | 1-year limited warranty |
Frequently Asked Questions - Pivot Xplore Dreamz Evenflo
User questions about Pivot Xplore Dreamz Evenflo
0 question about this device. Answer the ones you know or ask your own.
Ask a new question about this device
Download the instructions for your Stroller in PDF format for free! Find your manual Pivot Xplore Dreamz - Evenflo and take your electronic device back in hand. On this page are published all the documents necessary for the use of your device. Pivot Xplore Dreamz by Evenflo.
USER MANUAL Pivot Xplore Dreamz Evenflo
Up to 55 lbs (25 kg) / Seat
Up to 33 lbs (14.9 kg) / Bassinet
Up to 39 in. (99 cm) / Seat
Minimum age: 6 months / Bassinet
Vagoneta
Hasta 25 kg (55 lb) / Asiento
Hasta 14,9 kg (33 lb) / Moisés
Hasta 99 cm (39 in) / Asiento
natural_image
Illustration of a baby stroller with a front view and side profile (no text or symbols)Read all instructions before assembly and use of product. KEEP INSTRUCTIONS FOR FUTURE USE.
Identification of Parts. 7
Choosing Mode of Use 8
Assembling Your Product .....9–16
Using Your Canopy 16
Converting From Stroller to Wagon Mode....17
Attaching The Bassinet Insert....18–19
Removing The Bassinet Insert 19
Using Your Brakes....20
Using Storage Basket . . . . . . . . . . . . . . . . . . . . . . . . . . . . . . . . . . . . . . . . . . . . . . . . . . . . . . . . . . . 20
Using Parent's Handle....21
Securing Your Child.22
Folding Your Product. 24-25
Care and Maintenance 25
Limited Warranty 26
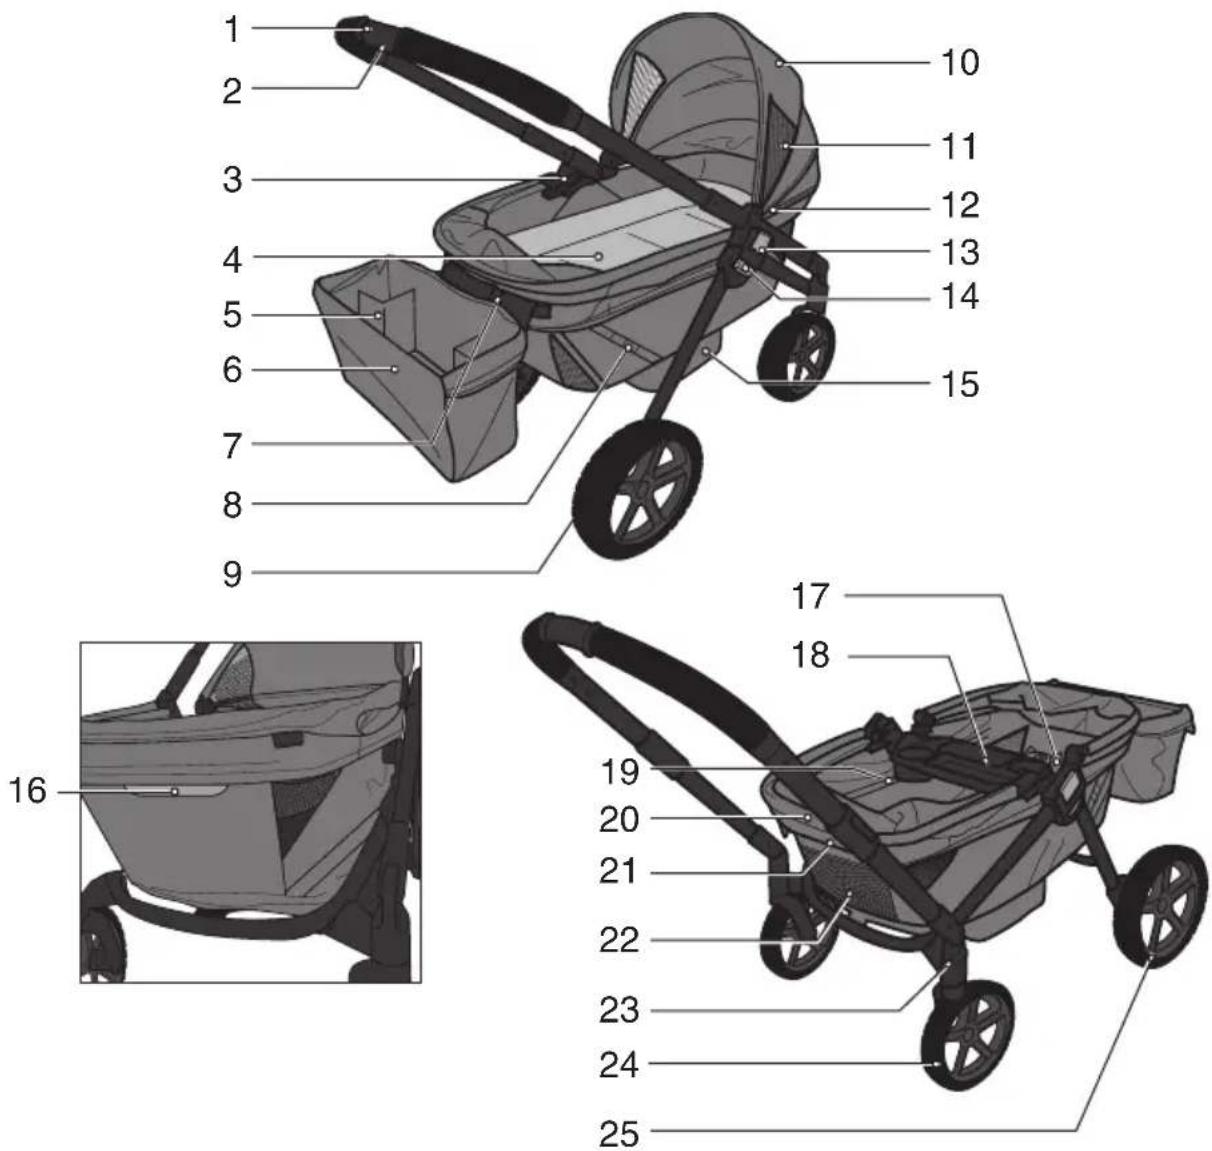
- Parent's Handle
- Adjustable Handle Button
- T-slot Brackets
- Bassinet Insert
- Basket Cupholder
- Storage Basket
- Bassinet Insert Hook (Behind Storage Basket)
- Parent Storage Strap
- Brakes
- Canopy
- Airflow Window
- Canopy Extension Zipper
-
Parent's Handle Flip Release
-
Fold Release Levers
- Footwell
- Easy Entry Release Lever
- 3-Point Child's Harness
- Child's Tray
- Bassinet Attachment Zipper
- Additional Storage Basket Mount
- Seatback Flap
- Storage Pouch
- Handle Mounts
- Swivel Wheel
- All Terrain Rear Wheels
WARNING
READ AND FOLLOW ALL WARNINGS AND INSTRUCTIONS! FAILURE TO DO SO COULD RESULT IN SERIOUS INJURY OR DEATH!
- NEVER leave children unattended. ALWAYS keep children in view while in the product.
- Adult assembly required. Take care when unpacking and assembling; contains small parts and some items with sharp edges.
- To prevent a possible choking hazard, remove and discard packing material before using this product.
- Avoid serious injury from falling or sliding out. ALWAYS use waist restraint.
- DO NOT carry or roll product on stairs or escalators with child in it.
- DO NOT hang items on parent's handle or place them on the canopy as they can tip product over and injure child.
- ALWAYS exercise care when going over curbs or steps, and never use product for anything other than transporting your child. Use at a normal walking pace only; faster strolling can cause a loss of control and injury to the child.
- DO NOT place hot liquids in storage pockets. Spills can burn you or your child.
•DO NOT use product if any parts are missing or broken. - DO NOT allow child to climb on, into or out of product unless easy entry release lever is released by parent.
- DO NOT allow child to stand on the footwell. Product may tip over and injure child.
- DO NOT allow child to climb on, into or out of product unassisted.
- DO NOT carry additional children, goods, or accessories in or on this product except as advised in these instructions. The product is intended for use with one or two children and to accommodate only the additional weights in storage as listed in these instructions.
- To avoid tipping, always remove the heavier weight child from a seating position before removing the lighter weight child.
- DO NOT allow child to push or pull product in any mode.
- DO NOT allow child to sit, stand or climb over the storage basket or child's tray.
- DO NOT step on parent's handle in wagon mode.
- DO NOT enable easy entry when the front seat is occupied.
- DO NOT allow child to stand while product is in motion.
- DO NOT allow child to jump on seat or footwell.
- ALWAYS ensure product is in a fully locked position before using.
- Care must be taken when folding and unfolding product or changing handle modes to prevent finger injury to you or your child in hinge areas. Make sure child is not in the seat or near the product when folding or unfolding.
- DO NOT exceed the maximum weight limits.
WARNING
READ AND FOLLOW ALL WARNINGS AND INSTRUCTIONS! FAILURE TO DO SO COULD RESULT IN SERIOUS INJURY OR DEATH!
- NEVER leave product on a hill or incline, even with brakes set, to avoid product from tipping.
- To avoid accidental rolling, ALWAYS set brakes when product is not being used.
- Use in bassinet mode only when child is lying down and sleeping. Only use bassinet mode with children at least 6 months old. Discontinue use of bassinet mode when infant has reached 33 lbs (14.9 kg).
• Infants have suffocated:
- In gaps between extra padding and side of bassinet/cradle, and on soft bedding
- Use only the pad provided by manufacturer. NEVER add a pillow, comforter, or another mattress for padding.
- To reduce the risk of SIDS, pediatricians recommend healthy infants be placed on their backs to sleep, unless otherwise advised by your physician.
- When child is awake they must be secured with harness.
- Do not leave child unattended while the bassinet is being used.
•AVOIDSTRANGULATION:
- DO NOT suspend strings or toys from the canopy.
- DO NOT place product anywhere near cords from window blinds, draperies, phone, etc.
- DO NOT place items with a string around your child's neck such as hood strings or pacifier cords.
- DO NOT suspend strings over a bassinet or cradle or attach strings to toys.
- If not properly secured, the child may slip into leg openings and strangle.
- When making adjustments to the product, ALWAYS ensure that all parts of the body are clear of any moving parts of the product particularly when switching modes.
- The canopy is not intended to provide complete UV protection.
- Sharp or heavy objects placed in pockets may cause damage to the product, or injury to the child.
- Contact Evenflo ParentLink at 1-800-233-5921 (USA) or 800-706-1200 (Mexico) with any questions regarding use of your product.
- To avoid product instability and tip-overs, DO NOT load storage pockets with over 1 lb (0.45 kg), and storage basket with over 10 lbs (4.5 kg).
- To avoid serious injury, NEVER use the product in any other configuration other than what is shown in the instruction manual. This product can be used in multiple configurations as a stroller, wagon, and bassinet (see pg. 8).
Child Requirements
Wagon - Only use the product with a child who is capable of sitting upright unassisted and maintains good neck control.
Maximum weight: 55 lbs (25 kg) in each seat.
Maximum height: 39 inches (99 cm)
Bassinet - Only use when child is sleeping.
Minimum age: 6 months
Maximum weight: 33 lbs (14.9 kg)
IMPORTANT: Read instructions carefully before use. Save these instructions for future reference. It is very important to assemble the product according to these instructions. If you are missing parts, do not use product and call
Evenflo ParentLink at 1-800-233-5921 (U.S.A.) or 800-706-1200 (Mexico)
to order replacement parts.
For additional use configurations with optional accessories, you can refer to the manuals that are provided with the Pivot Xplore Accessories, which are sold separately. These include but are not limited to: infant car seat adapters for car seats and a toddler seat option.
Registration Information
Please register this product so we can reach you if there is a safety alert or recall. We will not sell, rent, or share your personal information. To register your product, please complete and mail the card that came with it or visit our online registration at www.evenflo.com/registerproduct.
For future reference, record the Model Number and Date of Manufacture below. You can find this information on one of the rear product legs.
Model Number: ____
Date of Manufacture: ____
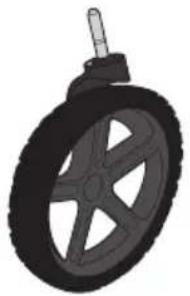
natural_image
Illustration of a black and white wheeled vehicle with a handle (no text or symbols)Left Front Wheel Assembly (Green Indicator)
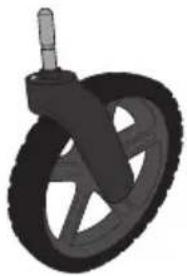
natural_image
Illustration of a black and white bicycle steering wheel with a handle (no text or symbols)Right Front Wheel Assembly (Yellow Indicator)
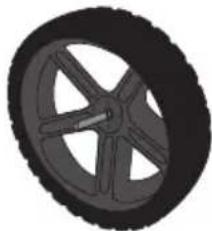
natural_image
Illustration of a car wheel with five spokes (no text or symbols)(2) Rear Wheel
natural_image
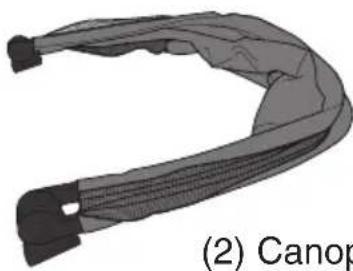
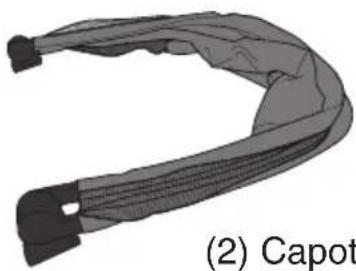
Diagram of a U-shaped cable or strap with black connectors, labeled (2) Canop at the bottom (no other text or symbols)(2) Canopy
natural_image
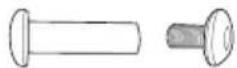
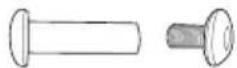
Simple line drawing of a bent pipe or elbow joint (no text or symbols)(2) Nuts & Bolts
(1 Spare
Included)
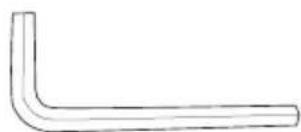
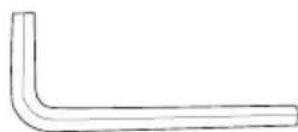
(2) Hex Wrench
natural_image
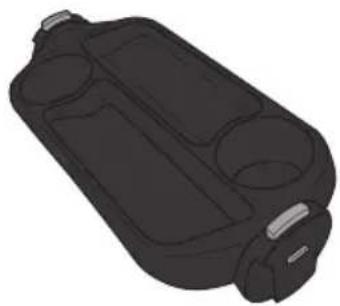
3D rendering of a black plastic container with internal compartments and side ports (no text or symbols)Child's Tray
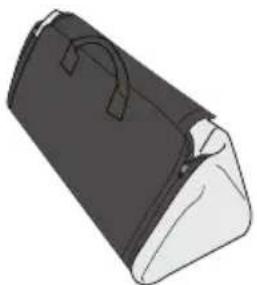
natural_image
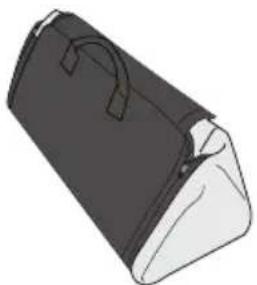
Illustration of a dark gray and white bag with a handle, no text or symbols present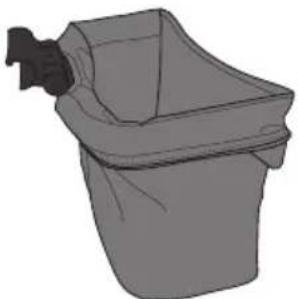
natural_image
Illustration of a gray plastic bin with a black handle attachment (no text or symbols)Storage BasketBassinet In
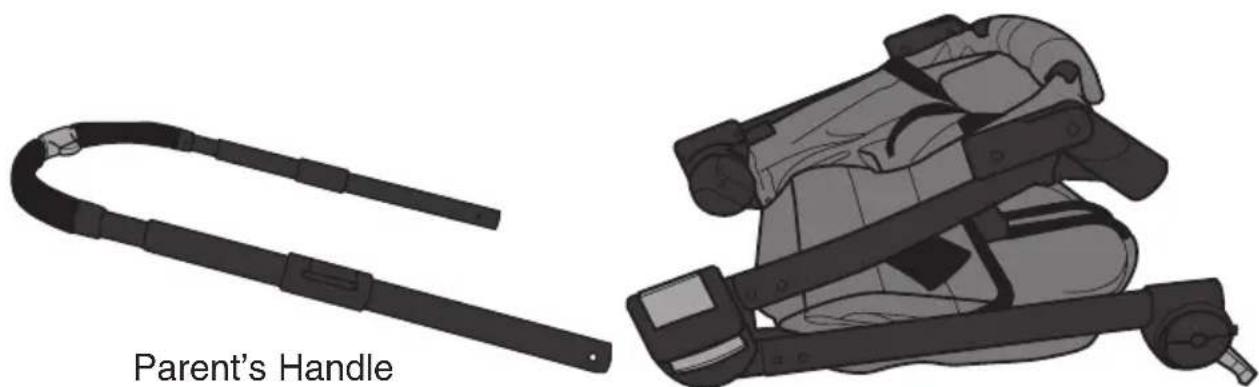
natural_image
Illustration of a child's backpack with a U-shaped handle and a camera, labeled 'Parent's Handle' (no other text or symbols)Frame
YOUR PRODUCT CAN BE USED IN THREE DIFFERENT MODES:
STROLLER MODE, WAGON MODE OR BASSINET MODE.
After the frame and the wheels have been assembled, you can choose to set the product up in Stroller Mode, Wagon Mode or Bassinet Mode.
Follow instructions on pages 9–16.
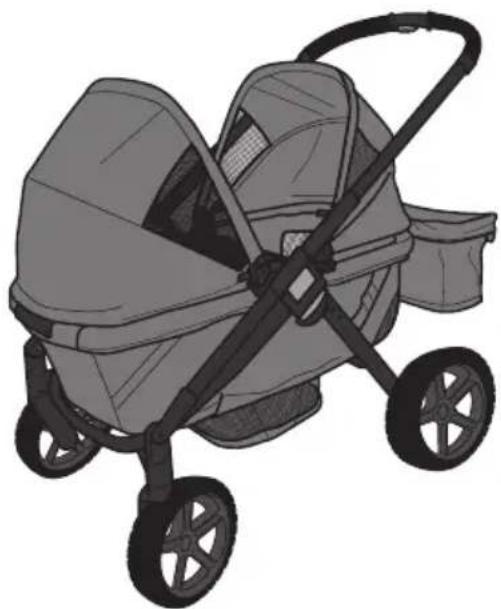
natural_image
Illustration of a two-wheeled baby stroller with black arms and wheels (no text or symbols)Stroller Mode
Push in stroller mode – Have full view of your kids
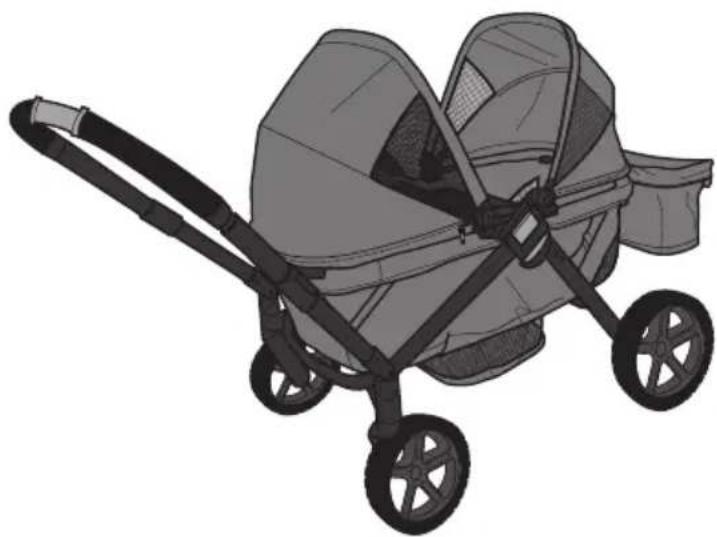
natural_image
Illustration of a two-wheeled baby stroller with black arms and wheels (no text or symbols)Wagon Mode
Pull in wagon mode – Great for uphill and all-terrain excursions
natural_image
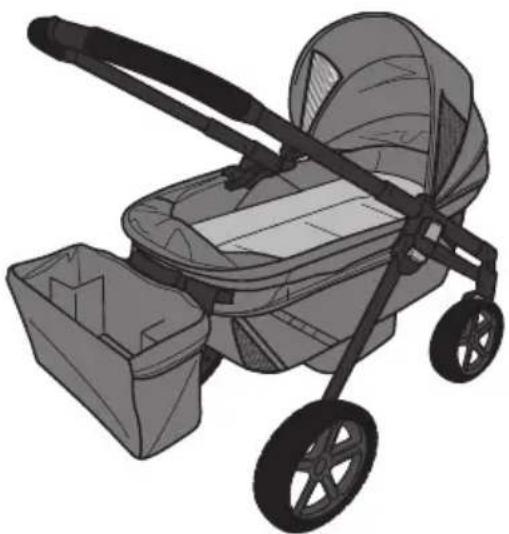
Illustration of a baby stroller with two wheels and a bucket, no text or symbols presentBassinet Mode
Quilted sleep insert for naps on the go.
Note: To protect flooring, place a protective covering (cardboard, towel, small rug or blanket) beneath the product during assembly.
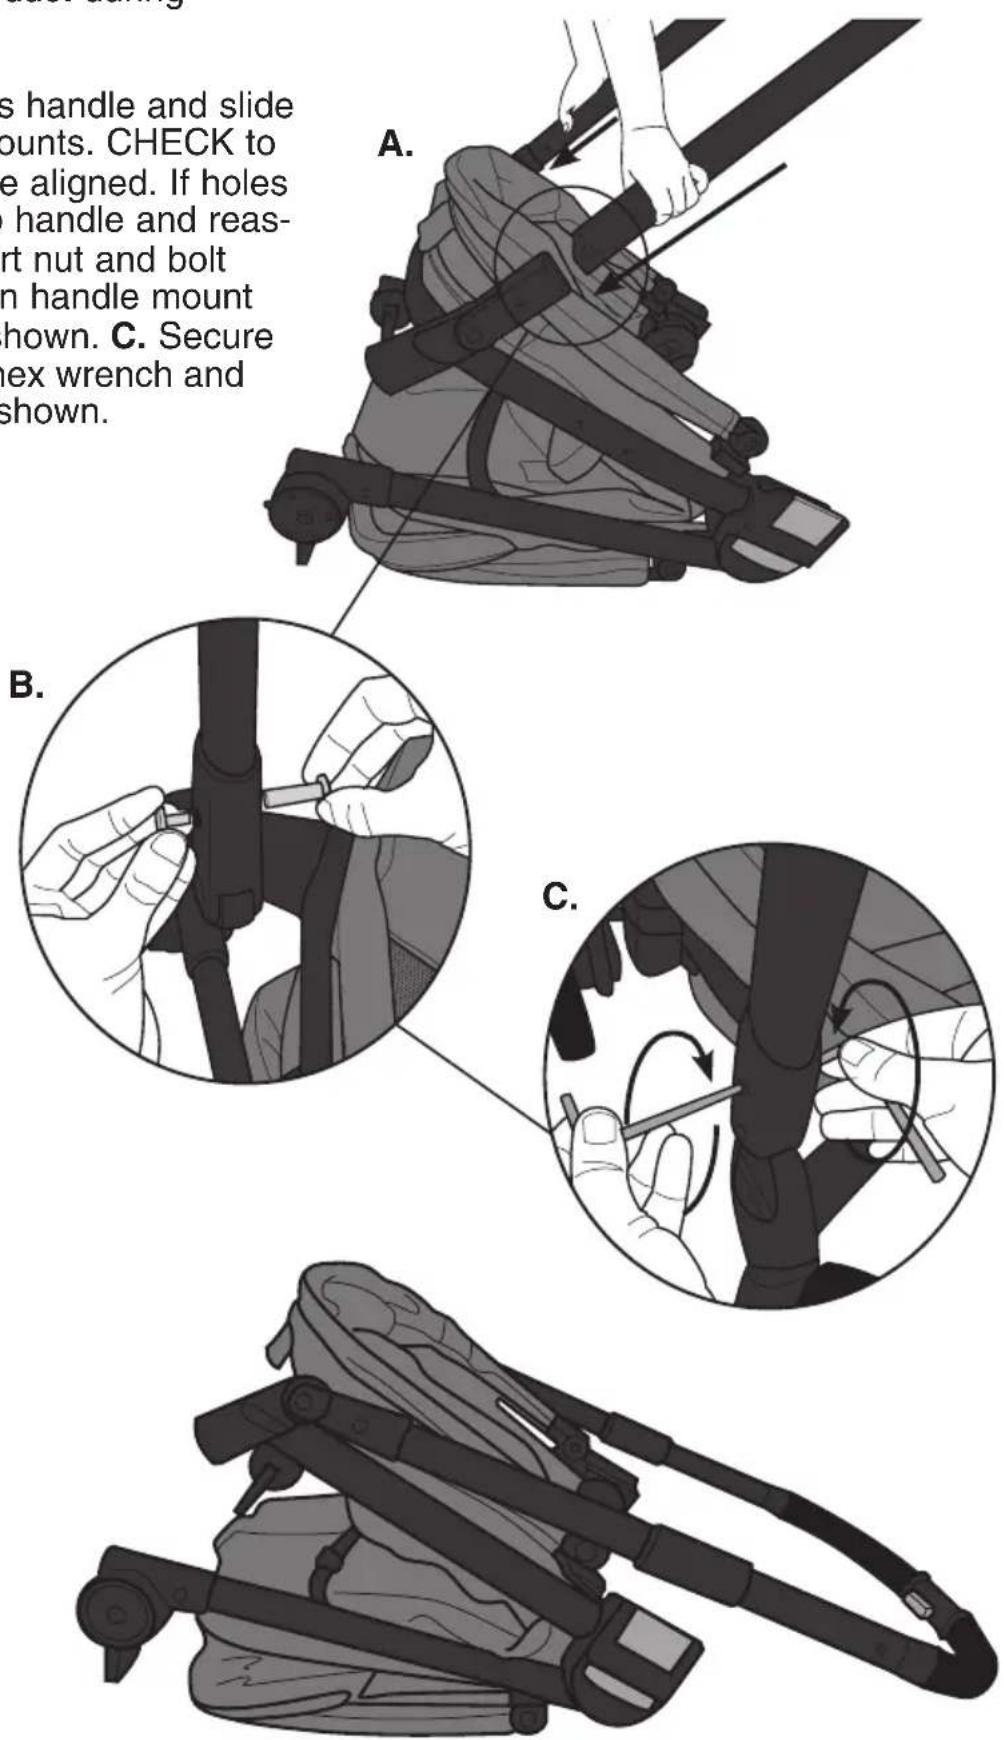
A. Align parent's handle and slide it into handle mounts. CHECK to ensure holes are aligned. If holes do not align, flip handle and reassemble. B. Insert nut and bolt through holes on handle mount and handle as shown. C. Secure to frame using hex wrench and nuts & bolts as shown.
WARNING
To avoid injury to fingers or hands, care must be taken when opening and closing the product to prevent injury in hinge areas.
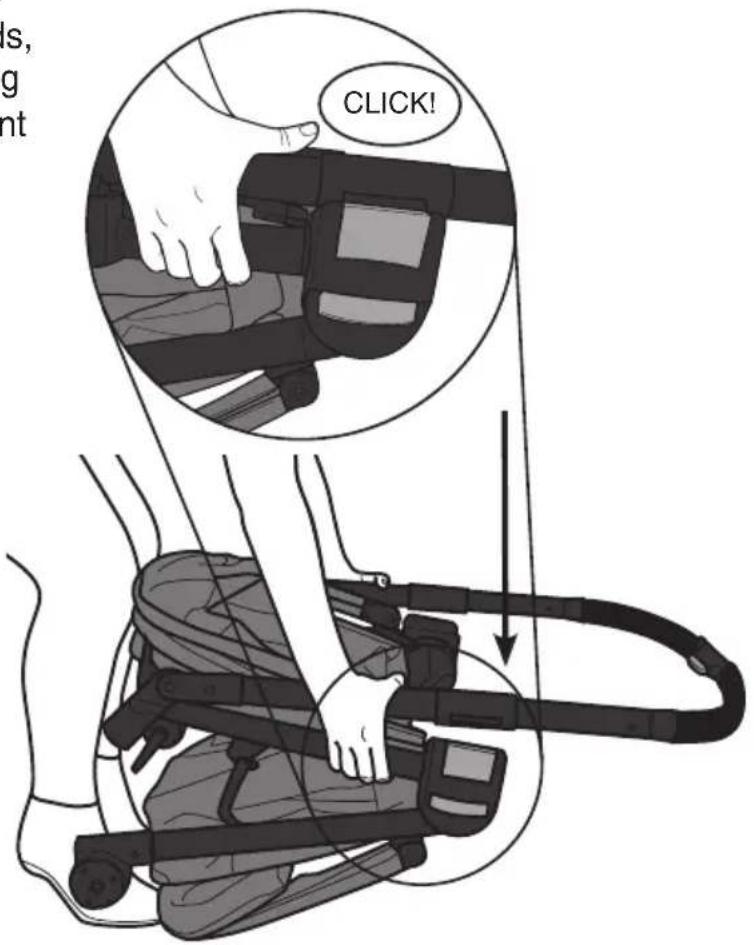
- Lock parent's handle onto handle mount by pushing on both sides until each side clicks into place.
- Pull on parent's handle to ensure both sides are locked in place.
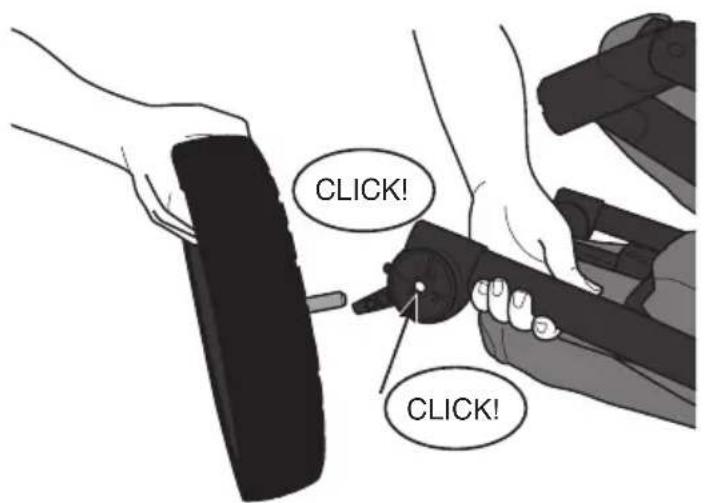
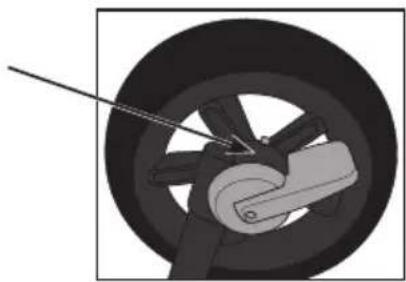
- To attach all-terrain rear wheels, push wheel onto rear leg tube until it clicks into place. Repeat on other side.
Pull on wheels to make sure both of them are securely attached.
To remove, press tab on underside of wheel mount and pull wheel off product.
natural_image
Mechanical assembly diagram showing a wheel with a gear and lever mechanism (no text or symbols)- Locate left and right front wheel assemblies. The left wheel will be marked with a green colored dot. To attach front left wheel, match green colored dot with green colored dot on frame. Line up metal pin with hole in front wheel mount and push on to frame as shown until it clicks into place.
Repeat process on right side, matching yellow colored dots.
Pull on wheels to make sure both of them are securely attached. Lift parent's handle straight up.
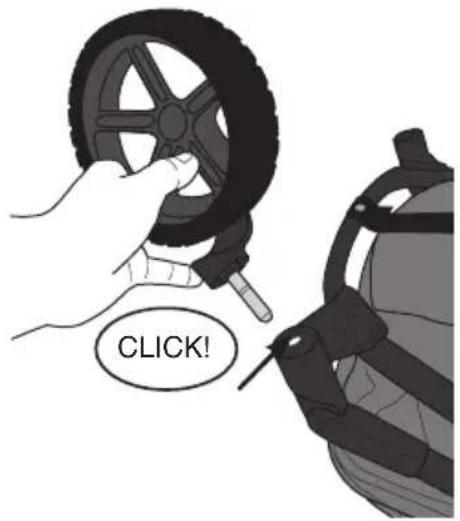
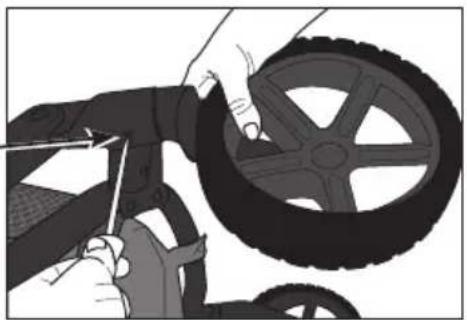
To remove, insert flat-head screwdriver into slot and pull wheel off product.
natural_image
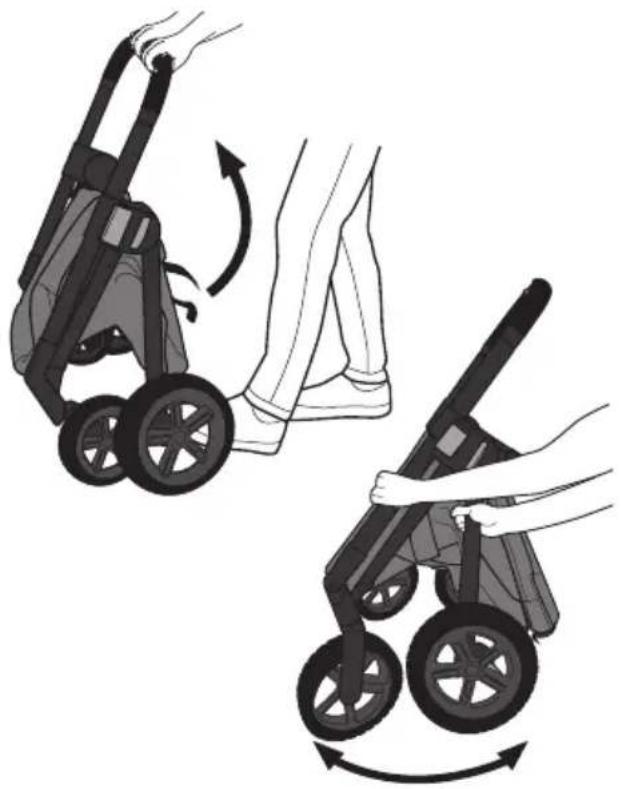
Illustration of a car being adjusted for a tire wheel, showing hands and tools (no text or symbols)- While holding handle up, lock both rear wheels (See pg. 20). Next, spread front and rear wheels apart until product is in self-standing mode.
natural_image
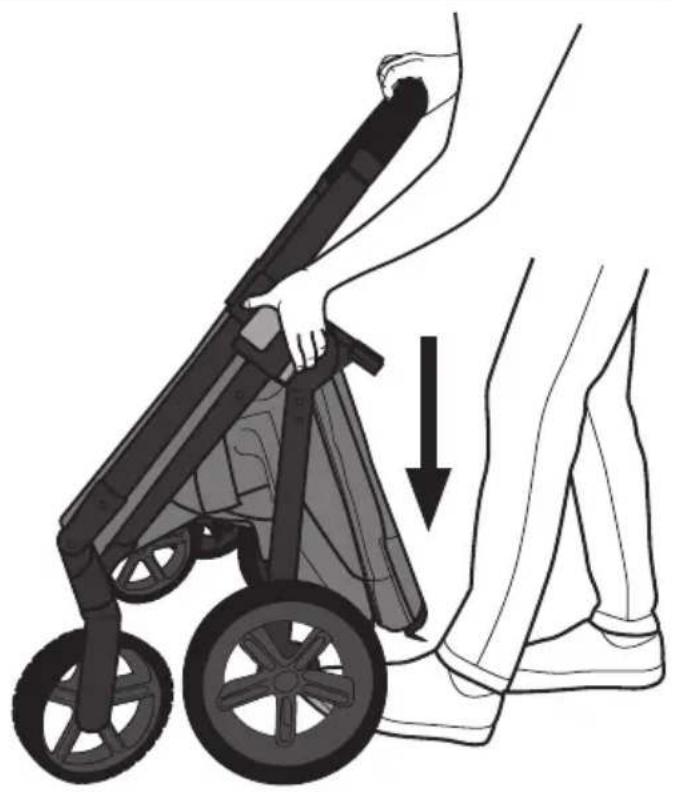
Illustration of two stroller models with hands operating, showing body positioning and rotation (no text or symbols)- While holding the parent's handle with your right hand, squeeze fold release lever with your left hand. Holding fold release lever in, press down with your right hand.
natural_image
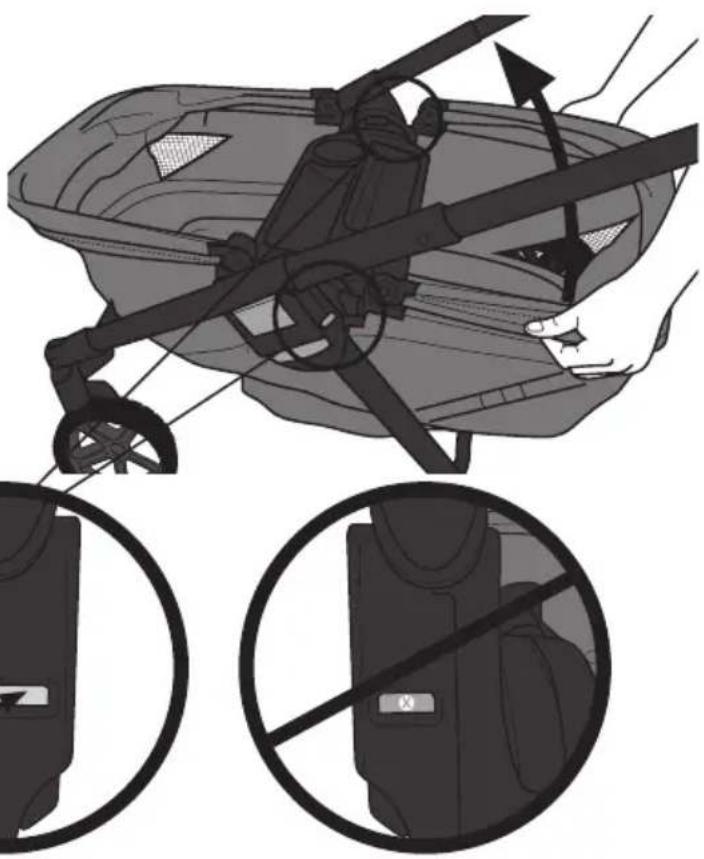
Illustration of a person pushing a stroller with a hand adjusting the seat (no text or symbols)- Lift back of product frame until both sides click in place and the lock indicators show GREEN.
NOTE: Both lock indicators MUST show green to ensure product is locked into place securely.
natural_image
Illustration of a person using a cable to lift a vehicle, with two circular insets showing the same device (no text or symbols present)Lock Indicator MUST be GREEN
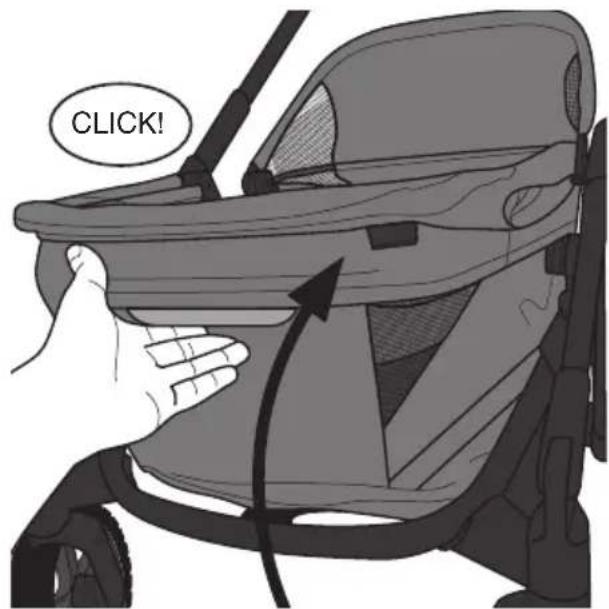
- Next, lift front of frame until both sides click in place. Press on frame to make sure it is securely locked in place.
ENGLISH
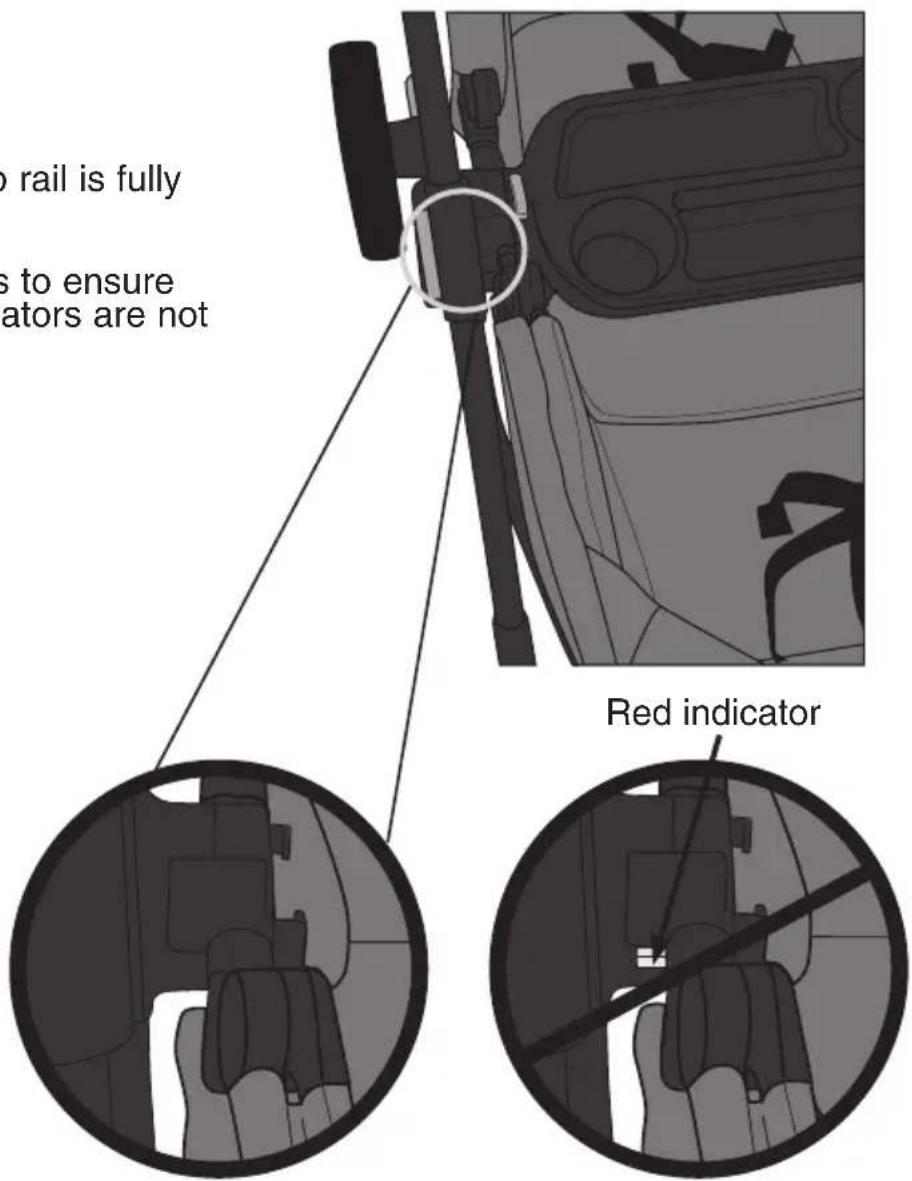
- Check that the top rail is fully latched.
Check both sides to ensure that the red indicators are not visible.
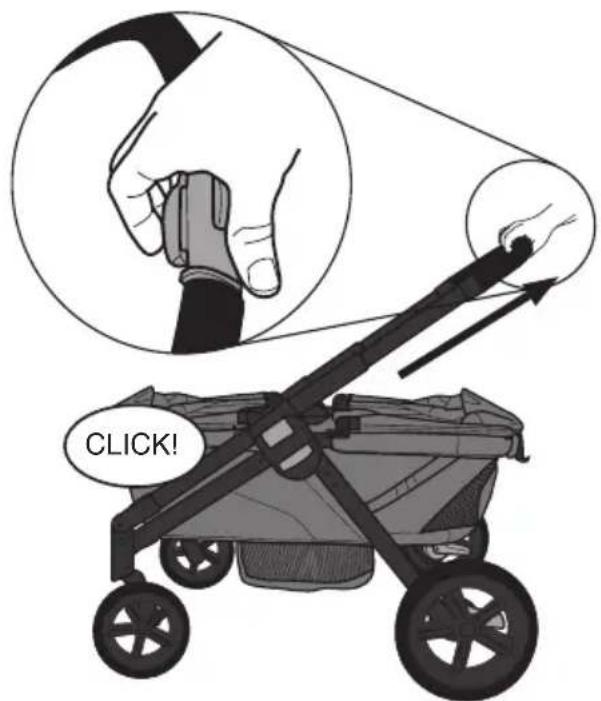
- Squeeze adjustable handle button and pull to fully extend parent handle until it CLICKS into place at your most comfortable position.
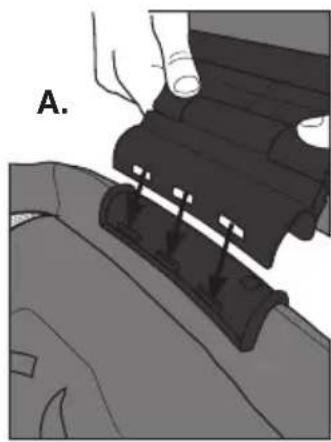
- To attach storage basket, lift seatback flaps. Align locator teeth on basket and basket mount and push down on sides of basket until storage basket is securely in place A. Reassemble seatback flaps, lower canopy and basket B.
natural_image
Illustration of a hand holding a black mechanical component, labeled 'A.' (no text or symbols on the diagram itself)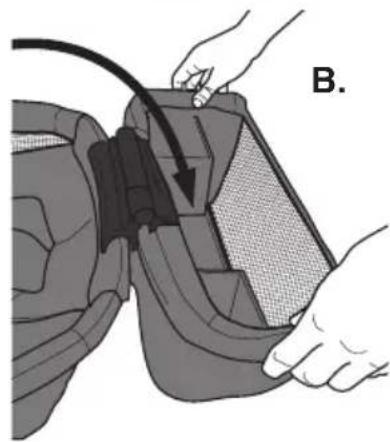
natural_image
Illustration of a hand holding a cable inserted into a device, with no visible text or symbolsTo remove storage basket, lift seatback flaps. Lift mount up and forward.
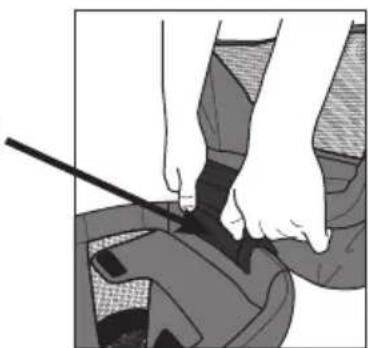
natural_image
Illustration of hands using a tool to adjust or install a mechanical component (no text or symbols visible)- To store bassinet insert on stroller wagon, flip up storage basket and place handle of bassinet insert on hook. Flip storage basket back in place.
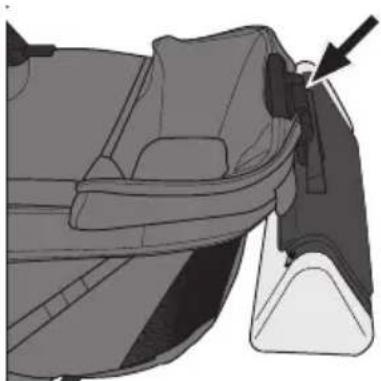
natural_image
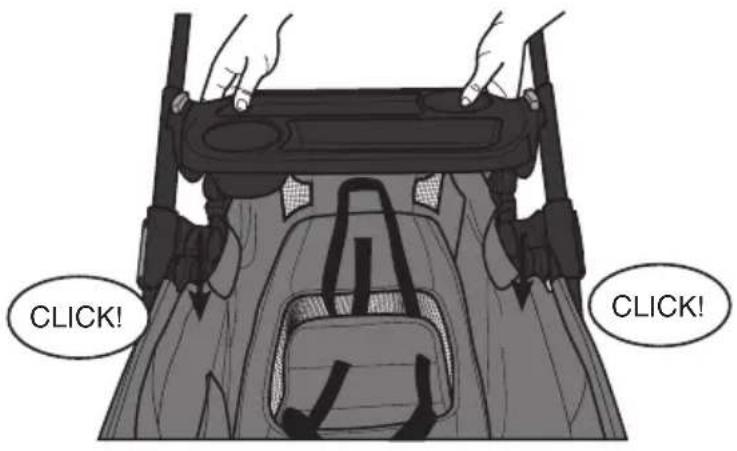
Mechanical component diagram showing a bracket with a black arrow pointing to a detail (no text or symbols present)- To attach child tray, align t-slots on both sides. Push tray until both sides CLICK in place.
Pull up on tray to make sure it is locked into place.
To remove, press down on gray buttons on either side of child's tray and lift tray up.
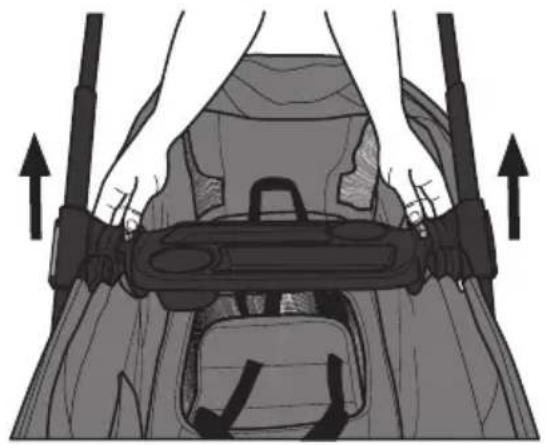
natural_image
Illustration of a person wearing a helmet with two upward arrows indicating motion or pressure (no text or symbols present)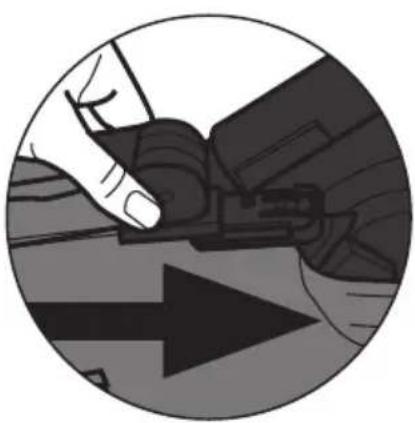
natural_image
Illustration of a hand using a tool to adjust or install a mechanical component, with no visible text or symbols.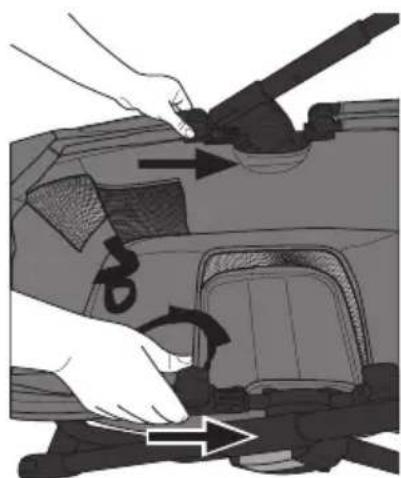
natural_image
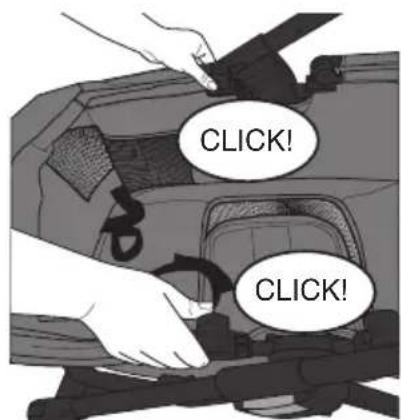
Illustration of a hand using a tool to adjust or install a car body panel, with no visible text or symbols.- To attach canopy, slide canopy onto canopy track on the frame until it CLICKS into place.
Repeat on other side.
Pull back on canopy to make sure it is locked into place.
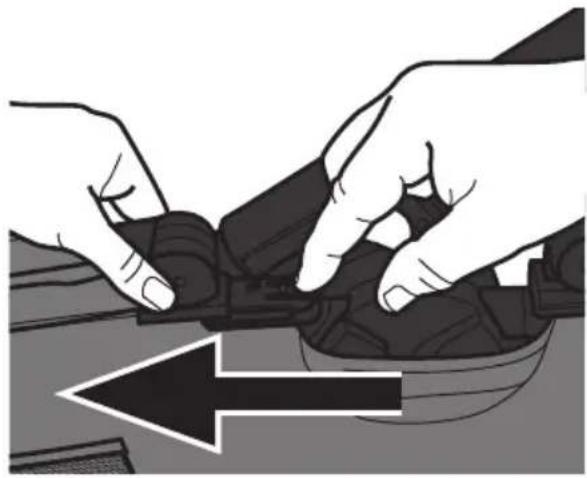
To remove canopy, press on tab and slide canopy back as shown.
Repeat on other side.
natural_image
Illustration of hands installing or adjusting a mechanical component with a black arrow indicating direction (no text or symbols present)USING YOUR CANOPY
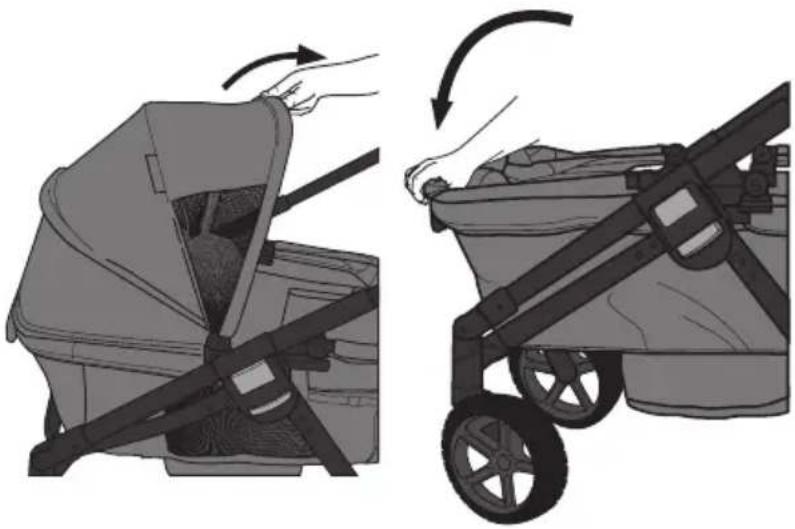
- To extend canopy, pull it up as shown.
To close, push canopy down as shown.
natural_image
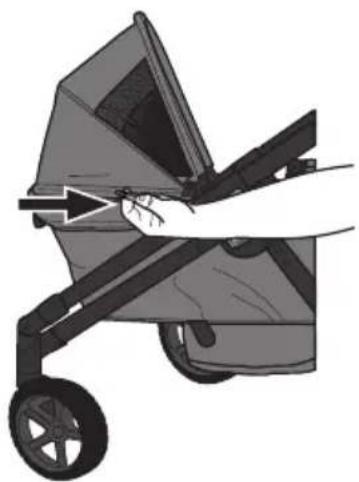
Illustration of a two-step stroller mechanism showing hand positioning and wheel shift (no text or symbols)- The canopy can be used as 2 or 3 panels. To shorten canopy length, locate zipper at bottom and zip fully around canopy.
natural_image
Illustration of a baby stroller with hand gripping the seat (no text or symbols)
WARNING
To avoid injury to fingers or hands, care must be taken when opening and closing the product to prevent injury in hinge areas.
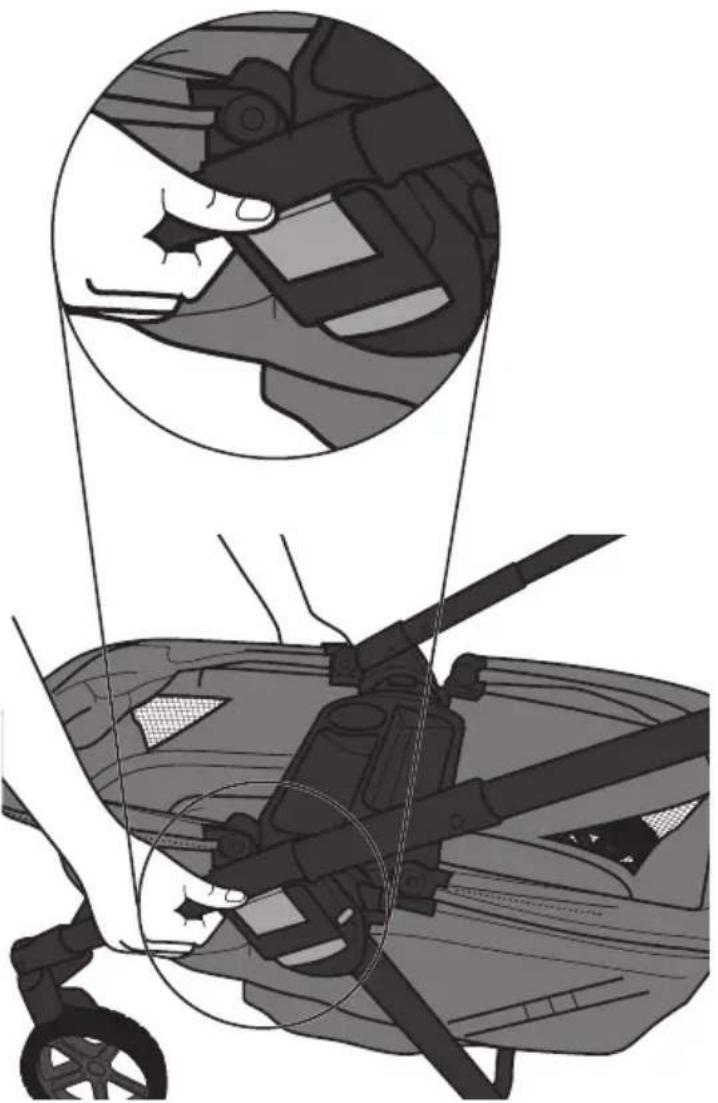
- To convert from stroller to wagon mode, lock both rear wheels (See p. 20).
From front of product, locate parent's handle flip release. While rotating out, lift handle up. Rotate parent's handle to wagon mode.
natural_image
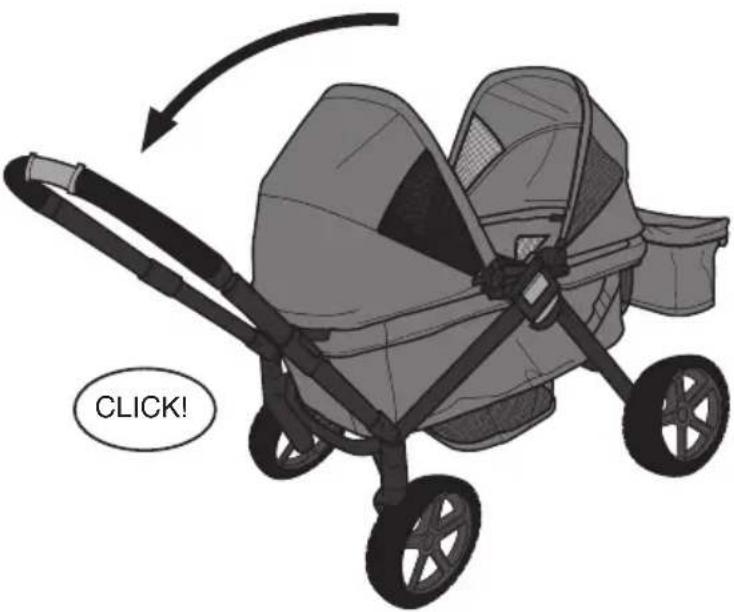
Illustration of a person adjusting a car interior with a magnified inset showing the hand and seat area (no text or symbols)- Squeeze adjustable handle button and push to fully retract parent's handle until it locks in place in the lowest position.
WARNING
Use in bassinet mode only when child is lying down and sleeping. Only use bassinet mode with children at least 6 months old. Discontinue use of bassinet mode when infant has reached 33 lbs (14.9 kg).
Follow the instructions to unfold stroller wagon (pg. 12). Ensure child tray is removed and no adapters are in t-slots.
- Unzip both sides and pull hook and loop flap to fully unfold.
- Rotate support bar at bottom of bassinet.
- Place bassinet insert in stroller wagon, aligning the cloud icons on the side of the wagon as shown.
- Zip the bassinet insert completely to the wagon to cover stroller wagon seats.
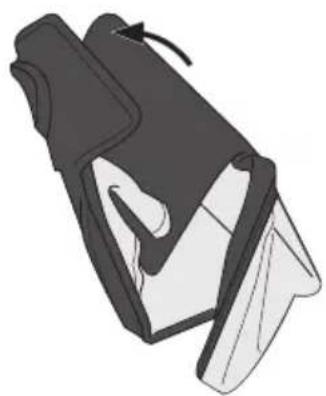
natural_image
Illustration of a mechanical component with a curved arrow indicating rotation (no text or symbols)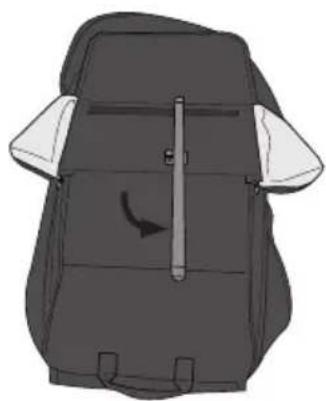
natural_image
Illustration of a backpack with a curved arrow indicating rotation (no text or symbols)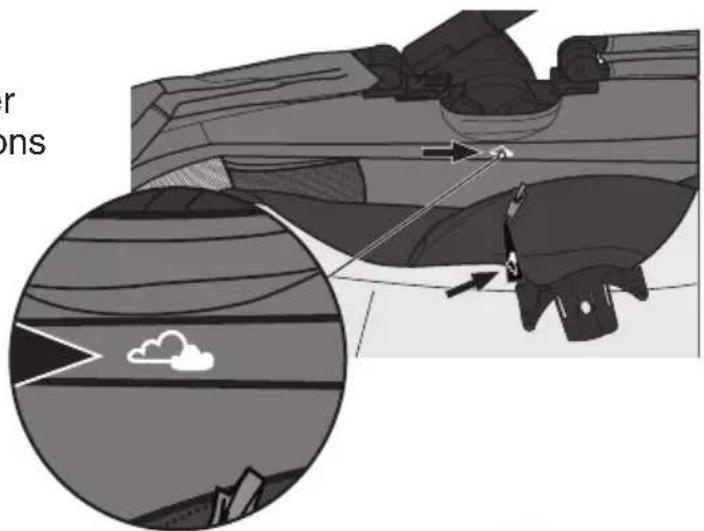
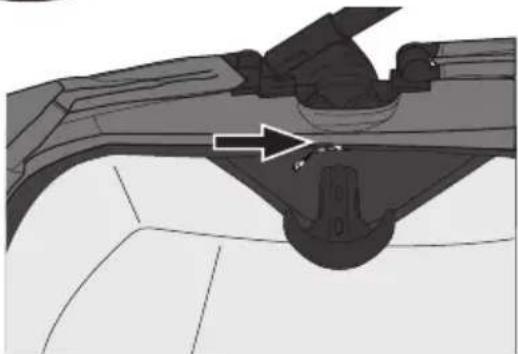
natural_image
Mechanical component diagram showing a bracket with an arrow indicating a specific part (no text or symbols present)- Attach the bassinet brackets to the t-slots on both sides of the stroller wagon. Push bassinet brackets into slots until both sides CLICK into place.
NOTE: Child tray cannot be installed when bassinet is in place.
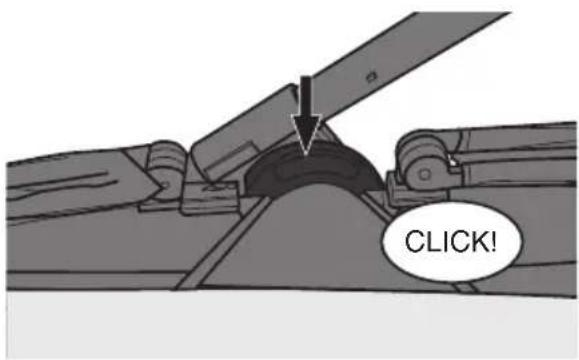
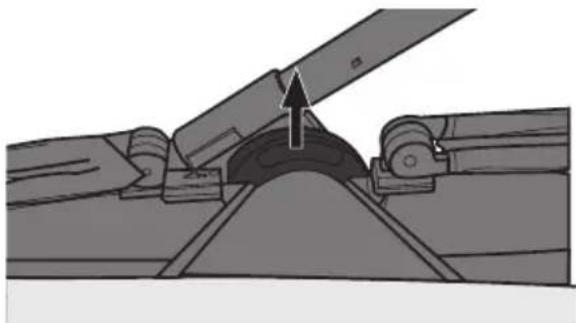
REMOVING THE BASSINET INSERT
-
Pull brackets up from t-slots on both sides of the stroller wagon.
-
Unzip the bassinet insert and remove from the stroller wagon.
-
Turn support bracket at bottom of bassinet insert as shown.
-
Fold bassinet insert and zip both sides. Attach hook and loop flap to complete.
natural_image
Mechanical assembly diagram showing a lever mechanism with an upward arrow indicating motion (no text or symbols present)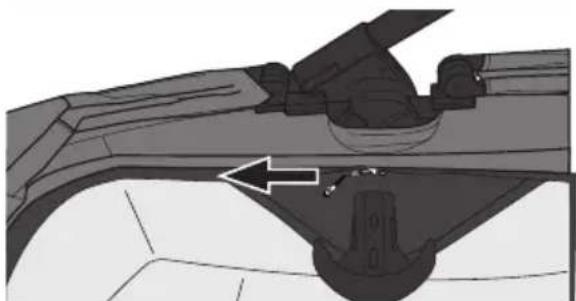
natural_image
Mechanical component diagram showing a bracket and mounting bracket assembly (no text or symbols)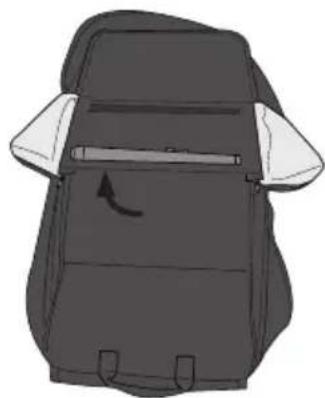
natural_image
Illustration of a backpack with a side panel and arrow indicating rotation (no text or symbols)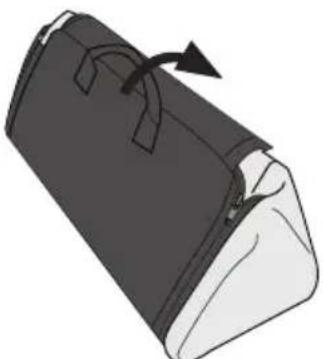
natural_image
Illustration of a bag with a handle and arrow indicating rotation (no text or symbols)WARNING
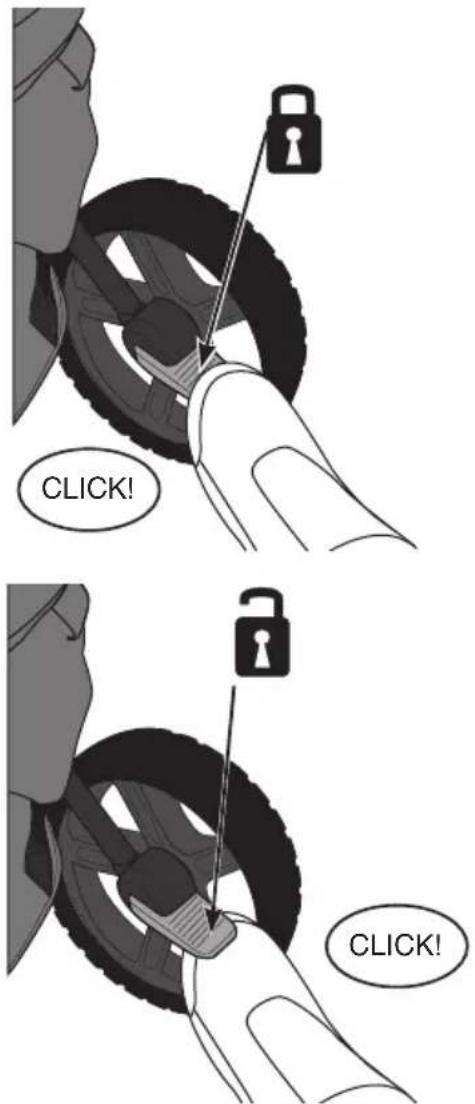
To avoid serious injury, always lock brakes. Make sure brakes are on by trying to push the product.
To lock, push lever DOWN at bottom of brake as shown.
To unlock, push lever UP at top of brake as shown.
USING STORAGE BASKET
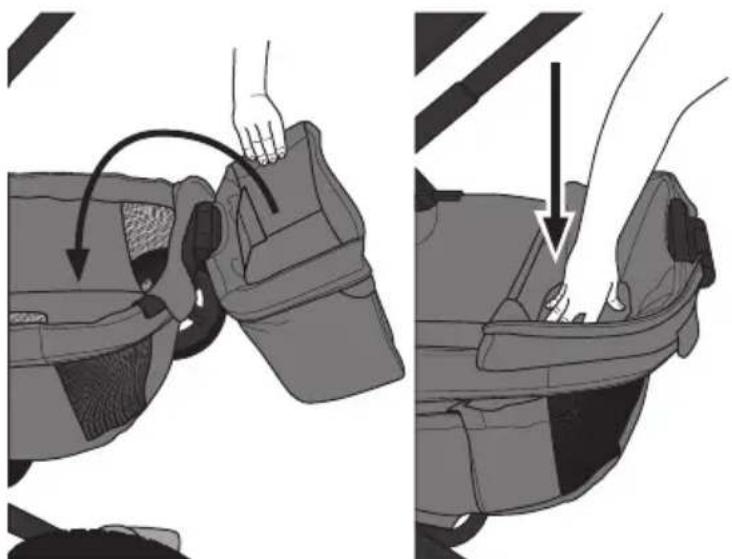
Storage basket can be used on either back or front of product.
When riding with only one child, flip storage basket and push basket fabric down into itself to reverse use. This mode can be used on either the front or back of the product. Storage basket includes two collapsible cup holders. Simply push out to use.
NOTE: Cup holders will not work when storage basket is flipped over and used inside stroller wagon.
natural_image
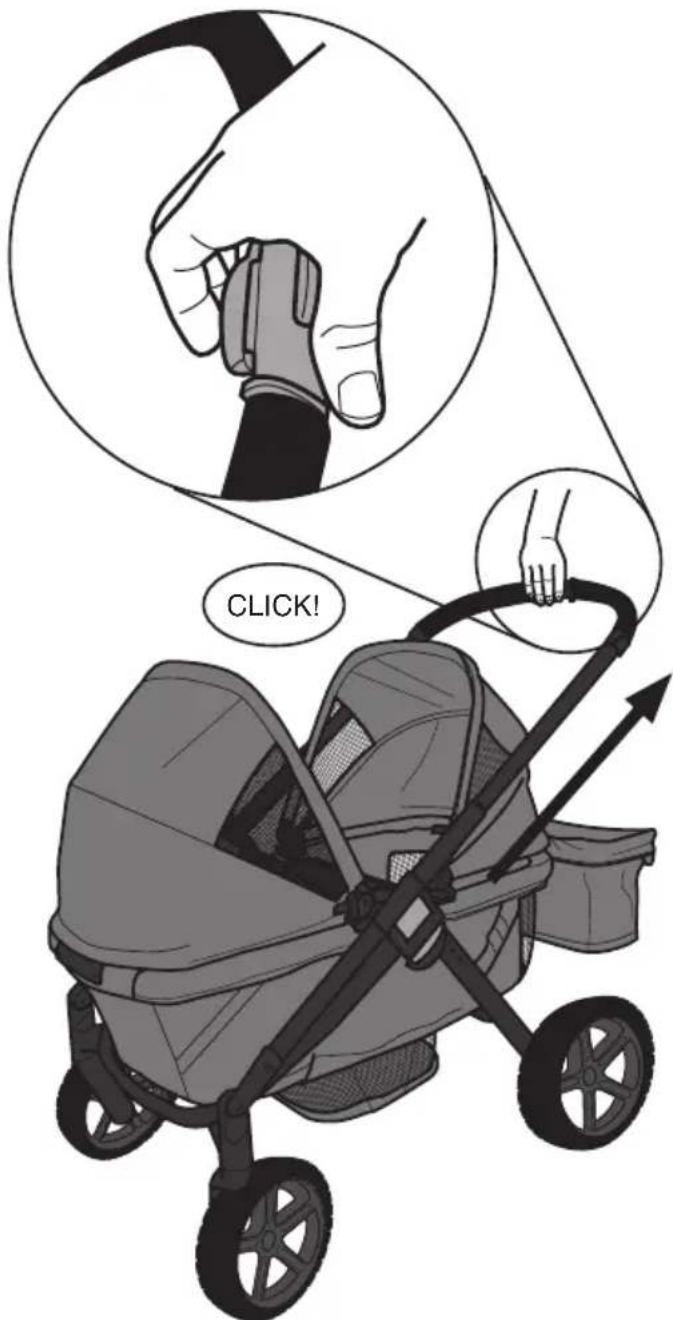
Illustration of a car seatbelt buckle being adjusted for a hand, showing the seatbelt and seatbelt spine (no text or symbols present)To extend parent's handle, squeeze button on handle and pull handle out until it locks into one of the three height positions. To lower parent's handle, squeeze button and push handle down until it locks into position.
NOTE: In wagon mode, it is recommended the parent's handle is used all the way down.
WARNING
To avoid serious injury from falling or sliding out, ALWAYS use waist restraint.
For easy entry into stroller wagon, stand in front of product and squeeze easy entry release lever. Lower front of stroller wagon down.
Once child enters stroller wagon, lift front of stroller wagon back up until it clicks into place.
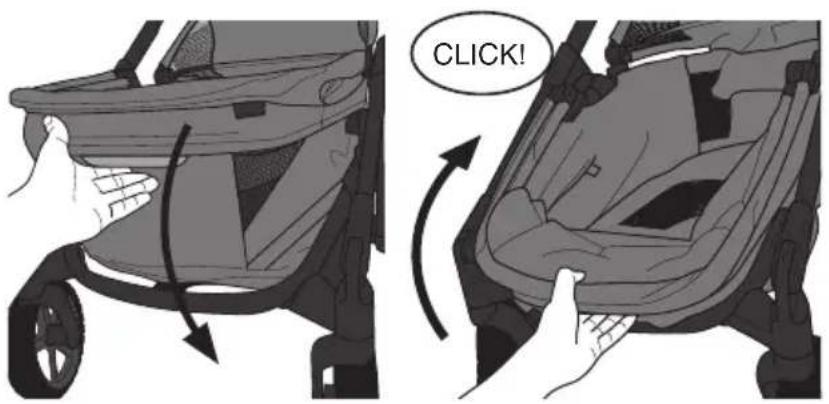
NOTE: Check that the top rail is fully latched and that the red indicators are not visible (See pg. 13).
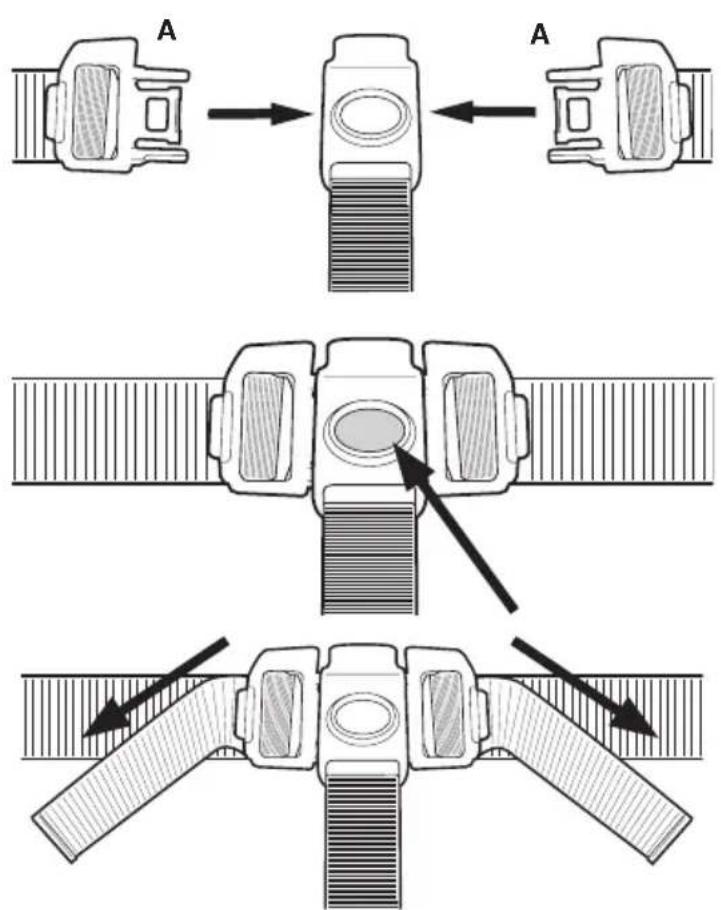
To attach waist straps to crotch buckle, insert buckles A into crotch strap as shown.
To unlock harness, push the button on the crotch buckle.
To tighten, pull the free end of the straps as shown.

WARNING
To avoid injury to fingers or hands, care must be taken when opening and closing the product to prevent injury in hinge areas.
- Make sure parent's handle is in stroller mode position by pushing it into frame lock until it clicks into place.
IMPORTANT: Bassinet Insert MUST be removed prior to folding. Refer to pg. 19 for removal steps.
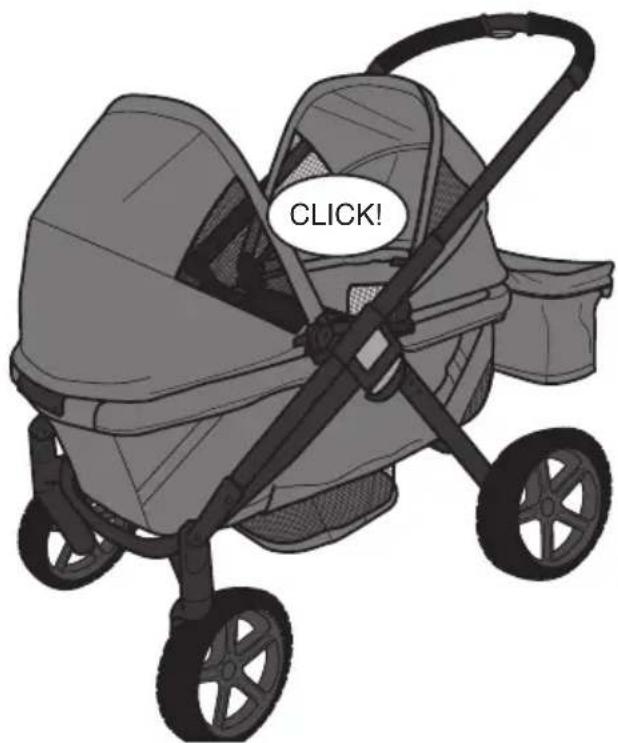
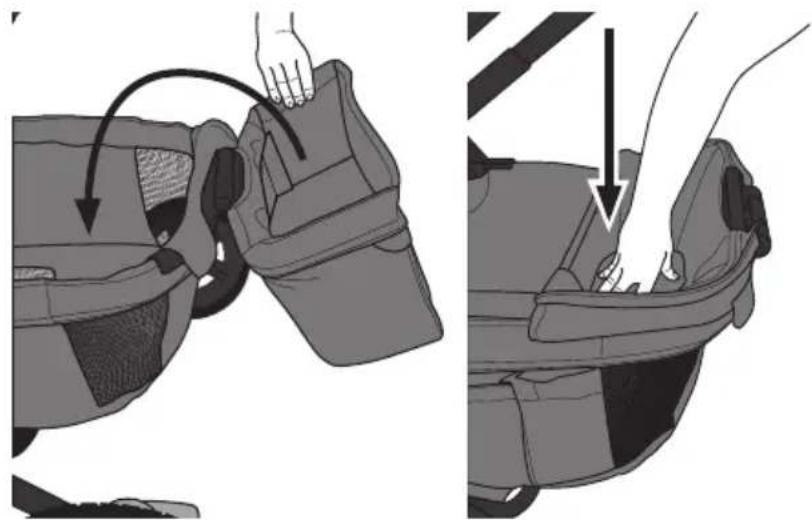
- Flip basket inside out.
natural_image
Illustration of a car seatbelt being adjusted for a hand, showing the grip and seat area (no text or symbols)- Adjust handle to lowest position.
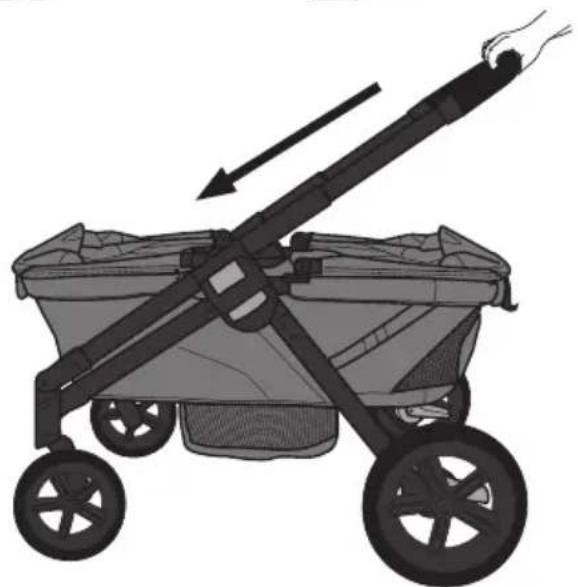
natural_image
Illustration of a two-wheeled baby stroller with a hand pulling the basket (no text or symbols)- Lower front of stroller wagon down using easy entry release lever.
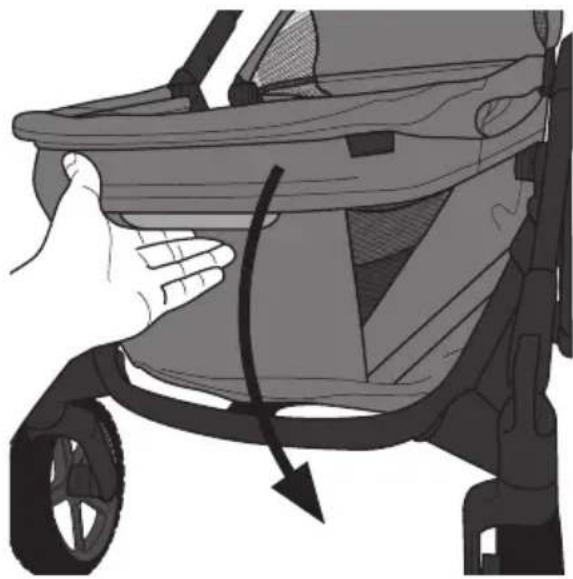
natural_image
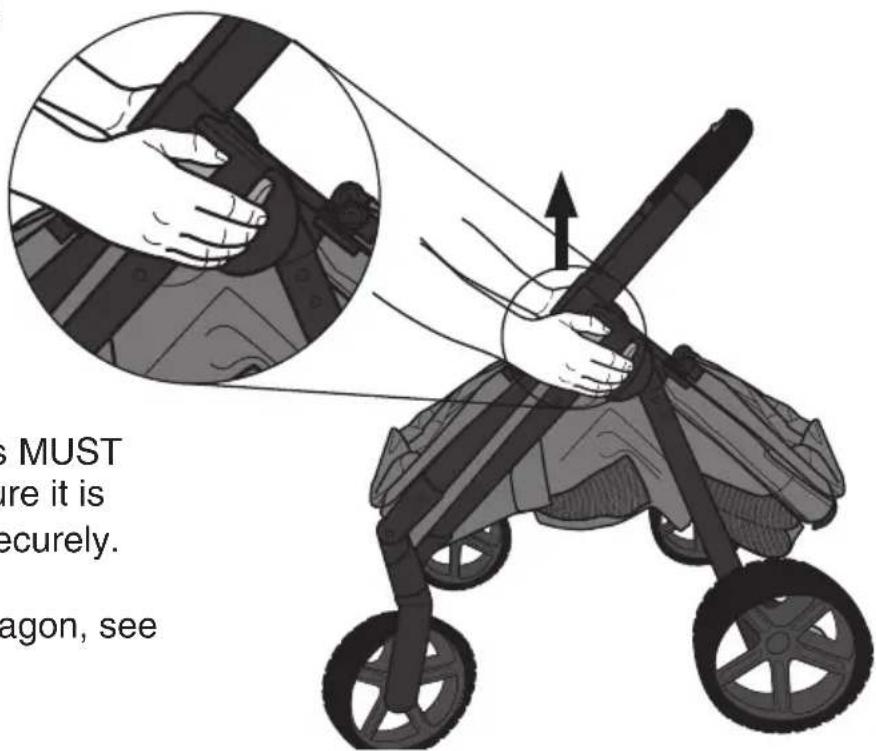
Illustration of a hand adjusting the backrest of a stroller, showing the wheel and seat area (no text or symbols)- Standing in front of product, squeeze fold release lever on both sides of frame and pull up into self-standing position.
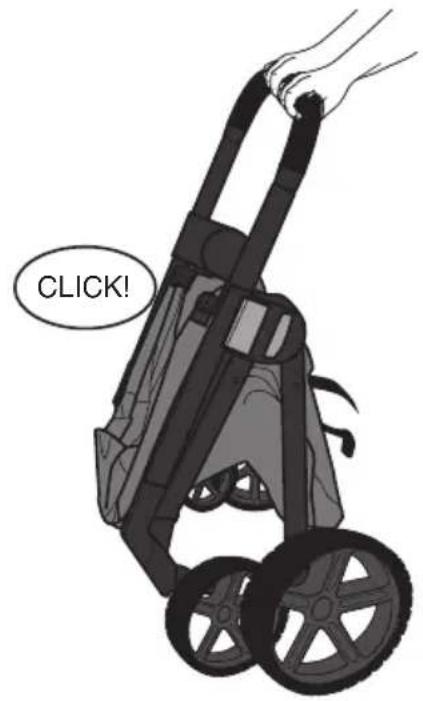
Walk around to the back, lean the stroller wagon on its rear wheels, squeezing the fold release lever marked "unlock" once more for compact fold.
Both lock indicators MUST show green to ensure it is locked into place securely.
To unfold stroller wagon, see pg. 12.
- Next, lift front of stroller wagon frame until both sides click in place. Press on frame to make sure it is securely locked in place.
natural_image
Illustration of a hand holding a stroller with two wheels, no text or symbols presentCARE AND MAINTENANCE
- Clean minor spills and stains on cloth or plastic surfaces with cold water and mild soap. Air dry.
- Metal and plastic parts can be wiped clean with a soft damp cloth and dried with a soft cloth. DO NOT use abrasive cleaners or solvents.
Limited Warranty
For a period of 90 days from the original purchase of this Product, Evenflo warrants to the original end user (“Purchaser”) this Product (including any accessories) against defects in material or workmanship. Evenflo’s sole obligation under this express limited warranty shall be, at Evenflo’s option, to repair or replace any Product that is determined to be defective by Evenflo and determined to be covered by this warranty.
Repair or replacement as provided under this warranty is the exclusive remedy of the Purchaser. Proof of purchase in the form of a receipted invoice or bill of sale evidencing that the Product is within the warranty period must be presented to obtain warranty service. This express limited warranty is extended by Evenflo ONLY to the original Purchaser of the Product and is not assignable or transferable to subsequent purchasers or end users of the Product. For warranty service, contact Evenflo's ParentLink Consumer Resource Center at 1-800-233-5921 or www.evenflo.com.
EXCEPT TO THE EXTENT PROHIBITED BY APPLICABLE LAW, ANY IMPLIED WARRANTY OF MERCHANTABILITY OR FITNESS FOR A PARTICULAR PURPOSE ON THIS PRODUCT IS HEREBY DISCLAIMED. EVENFLO SHALL NOT BE LIABLE FOR ANY INCIDENTAL, CONSEQUENTIAL, SPECIAL OR PUNITIVE DAMAGES OF ANY KIND FOR BREACH OF THE EXPRESS LIMITED WARRANTY ON THIS PRODUCT, OR ANY WARRANTY IMPLIED BY OPERATION OF LAW. OTHER THAN THE EXPRESS LIMITED WARRANTY SET FORTH ABOVE, THERE ARE NO OTHER WARRANTIES THAT ACCOMPANY THIS PRODUCT AND ANY ORAL, WRITTEN OR ANY OTHER EXPRESS REPRESENTATION OF ANY KIND IS HEREBY DISCLAIMED.
ParentLink®
answers. advice. affirmation.™
www.evenflo.com • USA: 1-800-233-5921, 8 AM – 5 PM E.T.
• México: 800-706-1200
Advertencias 4–5
natural_image
Illustration of a black and white wheeled vehicle with a handle (no text or symbols)natural_image
Illustration of a black and white bicycle steering wheel with a handle (no text or symbols)natural_image
Illustration of a car wheel with five spokes (no text or symbols)(2) Rueda trasera
natural_image
3D rendered image of a curved, segmented object labeled (2) Capot, with no visible text or symbols on the object itself.(2) Capota
natural_image
Simple line drawing of a bent pipe or elbow joint (no text or symbols)natural_image
3D rendering of a black plastic container with internal compartments and side ports (no text or symbols)Charola infantil
natural_image
Illustration of a dark gray and white bag with a handle, no text or symbols present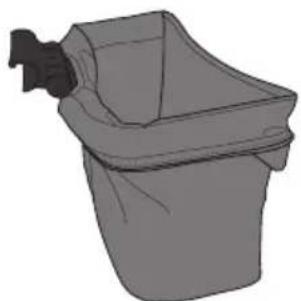
natural_image
Simple line drawing of a trash bin with a handle (no text or symbols)Canasta de almacenalinserto
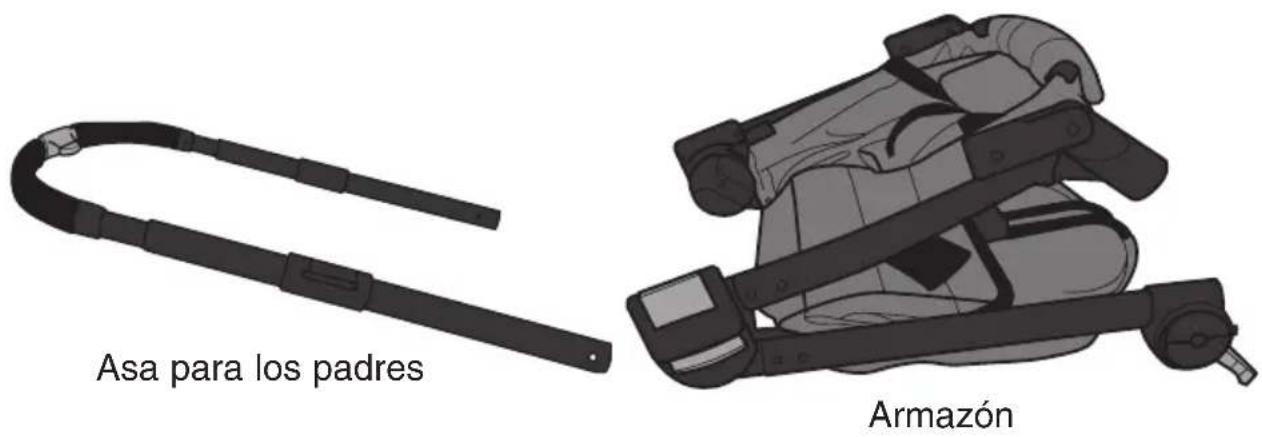
natural_image
Illustration of a two-wheeled baby stroller with black arms and wheels (no text or symbols)Modo Carriola
natural_image
Illustration of a two-wheeled baby stroller with black frame (no text or symbols)Modo vagoneta
natural_image
Illustration of a baby stroller with two wheels and a bucket, no text or symbols presentModo de moisés
natural_image
Mechanical assembly diagram showing a wheel with a bracket and a tool inserted, no text or symbols presentnatural_image
Illustration of a stroller with hands operating the wheel, showing body positioning and motion sequence (no text or symbols)natural_image
Diagram of a car's seatbelt mechanism showing hand positioning and steering wheel (no text or symbols)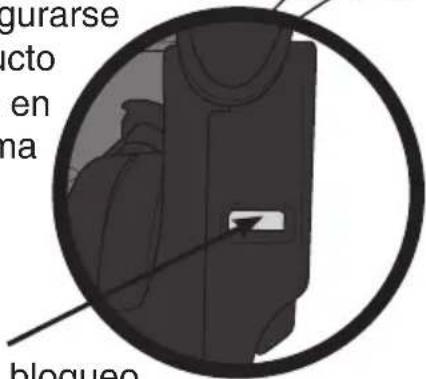
natural_image
Illustration of a hand holding a black plastic clip attached to a garment, with no visible text or symbols.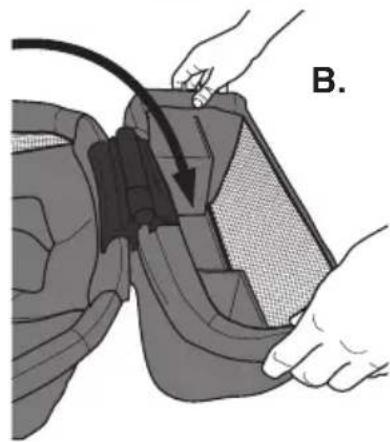
natural_image
Illustration of a hand holding a cable inserted into a device, with no visible text or symbolsnatural_image
Illustration of hands using a tool to adjust or install a mechanical component (no text or symbols visible)natural_image
Mechanical component diagram showing a seat and arm assembly with an arrow pointing to a specific part (no text or symbols present)natural_image
Illustration of a person wearing a helmet with two upward arrows indicating motion or pressure (no text or symbols present)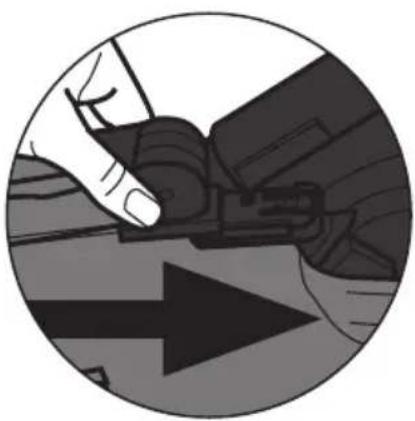
natural_image
Close-up of hands operating a mechanical component, no visible text or symbols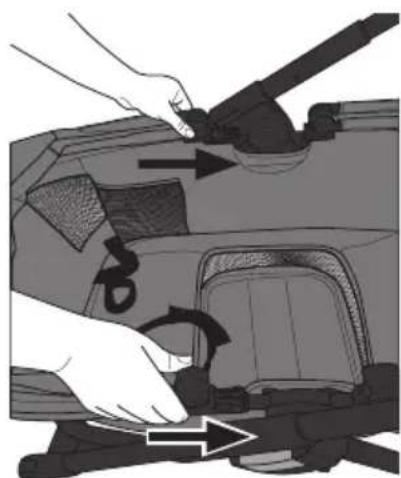
natural_image
Illustration of a hand using a tool to adjust or install a car interior panel, with no visible text or symbols.natural_image
Illustration of hands installing or adjusting a mechanical component with an arrow indicating direction (no text or symbols present)USO DE LA CAPOTA
natural_image
Illustration of a stroller being lifted by hand, showing the blade and wheel assembly (no text or symbols)natural_image
Illustration of a baby stroller with hand gripping the seat (no text or symbols)ADVERTENCIA
natural_image
Illustration of a car interior with hand positioning and overhead assembly (no text or symbols)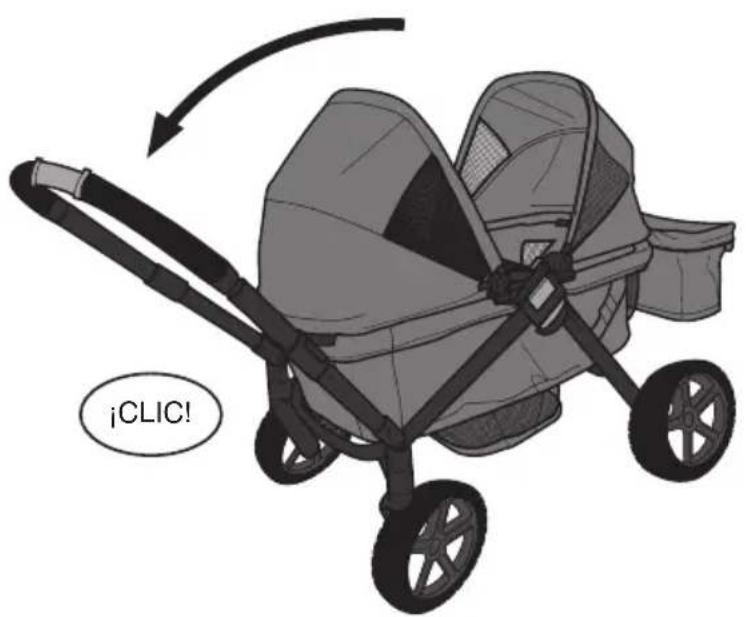
ADVERTENCIA
natural_image
Illustration of a mechanical component with a curved arrow indicating rotation (no text or symbols)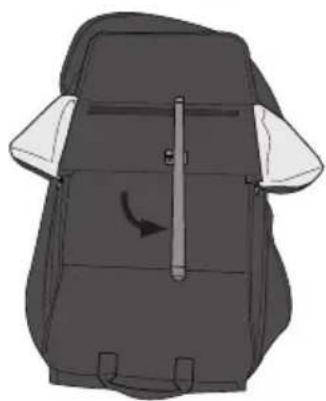
natural_image
Illustration of a backpack with a curved arrow indicating rotation (no text or symbols)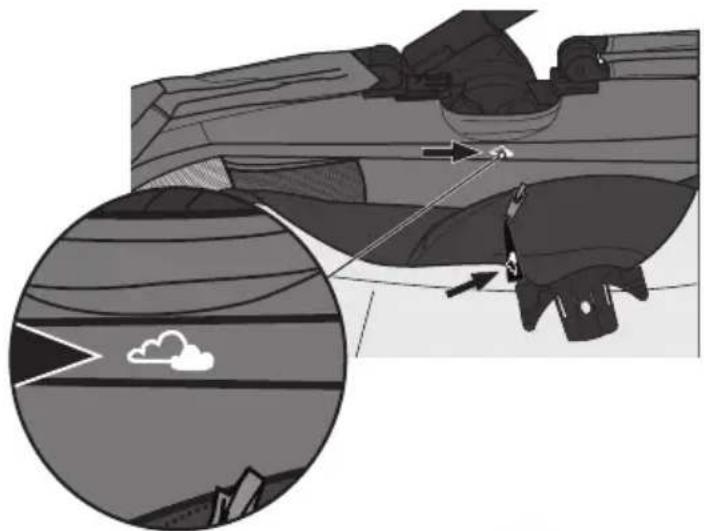
natural_image
Diagram showing a car interior with a cloud icon and directional arrows, no readable text or symbols present.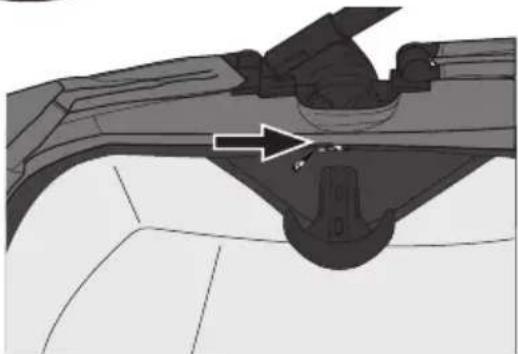
natural_image
Mechanical component diagram showing a bracket with an arrow indicating a specific part (no text or symbols present)natural_image
Mechanical assembly diagram showing a lever pressing a component (no text or symbols visible)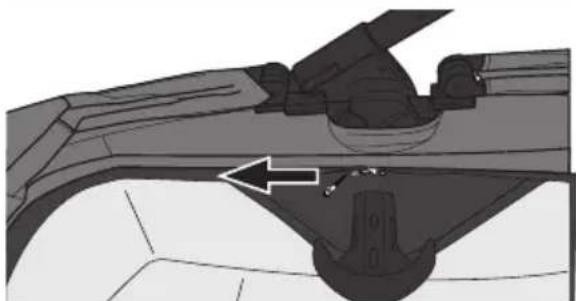
natural_image
Mechanical component diagram showing a bracket and mounting bracket assembly (no text or symbols)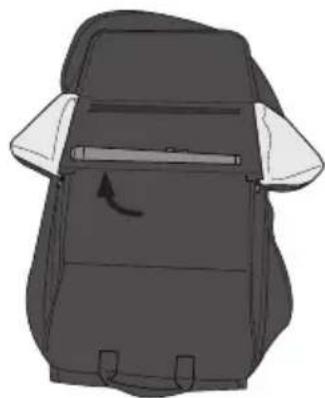
natural_image
Illustration of a backpack with a side panel and a curved arrow indicating rotation (no text or symbols)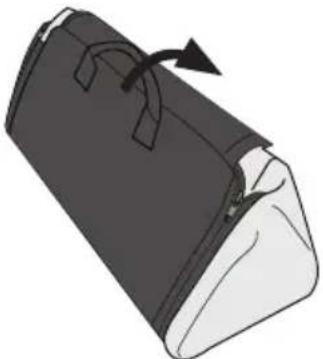
natural_image
Illustration of a bag with a handle and arrow indicating direction (no text or symbols)ADVERTENCIA
natural_image
Illustration of a car seatbelt buckle being adjusted for a hand, showing the seatbelt and seat (no text or symbols present)natural_image
Illustration of a two-wheeled baby stroller with black handle and wheels (no text or symbols)natural_image
Illustration of a car seatbelt buckle being adjusted for a hand, showing the seatbelt being lifted (no text or symbols present)natural_image
Illustration of a two-wheeled baby stroller with a hand pulling the basket (no text or symbols)natural_image
Illustration of a hand adjusting the front wheel of a stroller, showing the wheel's side panel and handle (no text or symbols present)answers. advice. affirmation.™
www.evenflo.com
- Vagoneta
- WARNING
- READ AND FOLLOW ALL WARNINGS AND INSTRUCTIONS! FAILURE TO DO SO COULD RESULT IN SERIOUS INJURY OR DEATH!
- Child Requirements
- Registration Information
- YOUR PRODUCT CAN BE USED IN THREE DIFFERENT MODES:
- STROLLER MODE, WAGON MODE OR BASSINET MODE.
- USING YOUR CANOPY
- USING STORAGE BASKET
- CARE AND MAINTENANCE
- Limited Warranty
- ParentLink®
- USO DE LA CAPOTA
- ADVERTENCIA
Brand : Evenflo
Model : Pivot Xplore Dreamz
Category : Stroller