
Clover - Stroller Evenflo - Free user manual and instructions
Find the device manual for free Clover Evenflo in PDF.


| Product Type | Travel System Stroller |
| Brand | Evenflo |
| Model | Clover |
| Maximum Child Weight | 50 lbs (22.7 kg) |
| Maximum Child Height | 40 inches (101.6 cm) |
| Modes of Use | Stroller Mode, Comfort Mode (up to 6 months), Infant Car Seat Mode (compatible with Evenflo SafeMax, LiteMax, LiteMax Sport) |
| Canopy | Pull-forward with window; visor on select models; not UV-protective |
| Harness | 5-point adjustable shoulder and waist straps; buckle cover optional |
| Child Tray | Removable, swivel feature; maximum load 1 lb (0.45 kg) |
| Parent Tray | Covered storage compartment and cell phone holder; maximum load 2 lbs (0.9 kg) |
| Storage Basket | Rear main basket; maximum load 10 lbs (4.5 kg) |
| Brakes | Rear-wheel locking brakes; press down to lock, pull up to unlock |
| Folding | Two-step fold with side frame lock; stroller must be in Stroller Mode |
| Wheels | Front swivel wheels (2); rear wheels (2) with axle assembly and hubcaps |
| Adjustable Handle | Push-button adjustable handle on both sides |
| Seat Recline | Multi-position recline strap with squeeze button |
| Footrest and Leg Rest | Foldable leg rest with hook-and-loop strap for Comfort Mode flaps |
| Care Instructions | Wipe clean with mild soap and water; air dry; no abrasive cleaners |
| Warranty | 90-day limited warranty from date of purchase (original purchaser only) |
| Registration | Recommended for safety alerts; register at www.evenflo.com/registerproduct |
| Customer Support | Evenflo ParentLink: 1-800-233-5921 (USA), 1-937-773-3971 (Canada), 01-800-706-12-00 (Mexico) |
Frequently Asked Questions - Clover Evenflo
User questions about Clover Evenflo
0 question about this device. Answer the ones you know or ask your own.
Ask a new question about this device
Download the instructions for your Stroller in PDF format for free! Find your manual Clover - Evenflo and take your electronic device back in hand. On this page are published all the documents necessary for the use of your device. Clover by Evenflo.
USER MANUAL Clover Evenflo
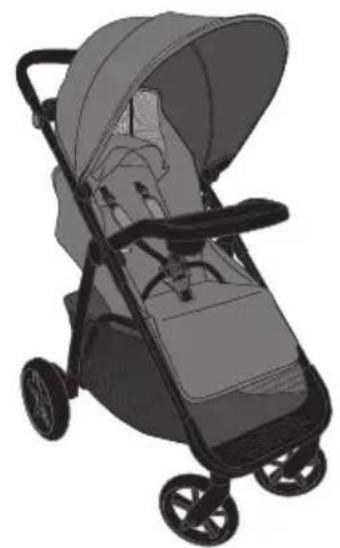
Stroller/Travel System
natural_image
Illustration of a baby stroller with open hood and mesh backrest (no text or symbols)STROLLER
Up to 50 lbs (22.7 kg)
Up to 40 in. (101.6 cm)
CARRIOLA
Hasta 22,7 kg (50 lb)
Hasta 101,6 cm (40 pulg)
Read all instructions before assembly and use of product.
KEEP INSTRUCTIONS FOR FUTURE USE.
Identification of Parts.... 7
Features 8
Choosing Mode of Use 10
Assembling Your Stroller.... 11
Using Your Stroller 15
Using your Stroller with Recommended Infant Car Seats 26
Clover Use Configurations.... 28
Care and Maintenance 29
Limited Warranty 29
WARNING! DEATH or SERIOUS INJURY can occur.
Read and follow all warnings and instructions. Failure to do so could result in serious injury or death.
- Only use Evenflo SafeMax™, LiteMax™ or LiteMax™ Sport infant car seats with this stroller. Other infant car seats or carriers are not designed to fit the stroller frame and if used with this stroller, may result in serious injury to your child.
- NEVER leave child unattended. ALWAYS keep child in view while in the stroller.
- Adult assembly required. Take care when unpacking and assembling; contains small parts and some items with sharp edges.
- To prevent a possible choking hazard, remove and discard packing material before using this product.
- Avoid serious injury from falling or sliding out. ALWAYS use waist restraint.
- DO NOT carry or roll stroller on stairs or escalators with child in it.
- DO NOT hang items on handle bar or place them on the canopy as they can tip stroller over and injure child.
- Be sure stroller is fully assembled and locked in unfolded position before using.
- ALWAYS exercise care when going over curbs or steps, and never use stroller for anything other than transporting your child. Push stroller at a normal walking pace only; faster strolling can cause a loss of control and injury to the child.
- DO NOT place hot liquids in cup holder. Spills can burn you or your child.
- To avoid serious injury from child falling out of stroller, DO NOT raise, recline or convert seat to Comfort Mode with child in stroller.
- DO NOT use stroller if any parts are missing or broken.
• DO NOT allow child to climb on, into, out of, or around stroller. - DO NOT allow child to stand on the footrest. Stroller may tip over and injure child.
WARNING! DEATH or SERIOUS INJURY can occur.
- DO NOT carry additional children, goods, or accessories in or on this stroller except as advised in these instructions. The stroller is intended for use with one child and to accommodate only the additional weights in storage as listed in these instructions.
- Care must be taken when folding or unfolding stroller to prevent finger injury to you or your child in hinge areas. Make sure child is not in the seat or near the stroller when folding or unfolding.
- NEVER leave stroller on a hill or incline, even with brakes set. Stroller may tip, injuring the child.
- To avoid accidental rolling, ALWAYS set brakes when stroller is not being pushed.
- AVOID STRANGULATION:
- DO NOT suspend strings or toys from the canopy.
-DO NOT place stroller anywhere near cords from window blinds, draperies, phone, etc.
-DO NOT place items with a string around your child's neck such as hood strings or pacifier cords.
- If not properly secured, the child may slip into leg openings and strangle.
- When making adjustments to the stroller, ALWAYS ensure that all parts of the child's body are clear of any moving parts of the stroller.
- The canopy is not intended to provide UV protection.
- Sharp or heavy objects placed in pockets may cause damage to the stroller, or injury to the child.
- To ensure safety for your baby, please refer to the manufacturer's instructions for the use of your recommended infant car seats and keep all instructions available for reference.
- To avoid stroller instability and tip-overs, DO NOT load child tray with over 1 lb (0.45 kg), parent tray with over 2 lbs (0.90 kg) and the main cargo basket with over 10 lbs (4.5 kg).
- DO NOT lift stroller by using the infant car seat handle when installed on stroller.

WARNING!
DEATH or SERIOUS INJURY can occur.
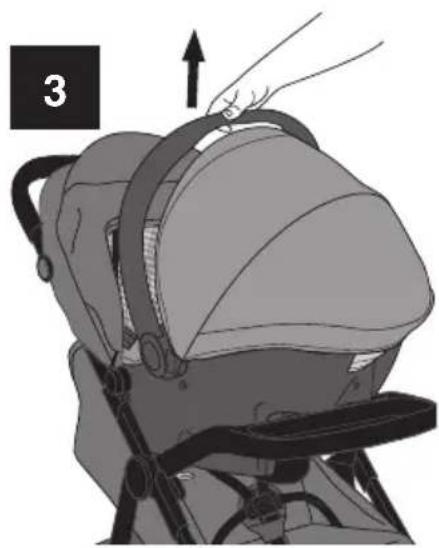
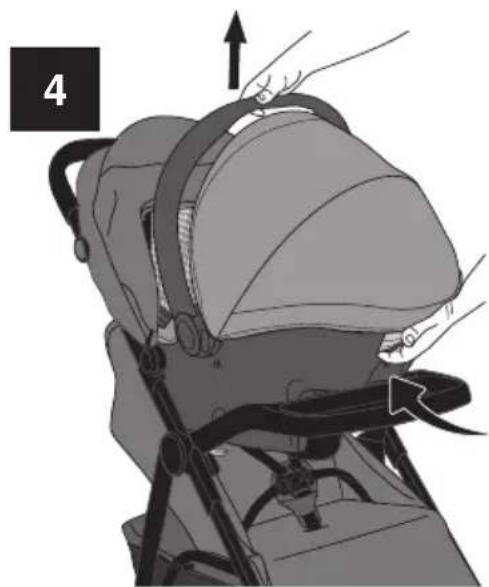
- Make sure the infant car seat is securely snapped onto the car seat mounts.
• DO NOT use Comfort Mode with a child over 6 months of age. - ALWAYS remove child tray when using stroller in Comfort Mode.
- ALWAYS thread lower harness strap under webbing when child is in Comfort Mode.
- NEVER attach infant car seat with child in Comfort Mode.
- NEVER use seat in the Comfort Mode position unless the seat is set up in Comfort Mode as per the instructions.
- NEVER use the stroller in any configuration other than what is shown in the instruction manual.
If unable to securely attach the infant car seat to this stroller, remove the car seat and contact Evenflo ParentLink at 1-800-233-5921 (U.S.A.), 1-937-773-3971 (Canada), or 01-800-706-12-00 (Mexico).
Important Information
Child Requirements
• Maximum weight: 50 lbs (22.7 kg), Maximum height: 40 inches (101.6 cm)
• Comfort Mode: Intended for a child up to 6 months of age.
- Stroller Mode (in upright position): Intended for a child who is capable of sitting upright unassisted.
IMPORTANT: Read instructions carefully before use. Save these instructions for future reference. It is very important to assemble the stroller according to these instructions. If you are missing parts, do not use stroller and call Evenflo ParentLink at 1-800-233-5921 (U.S.A.), 1-937-773-3971 (Canada), or 01-800-706-12-00 (Mexico) to order replacement parts.
Registration Information
Please register this product so we can reach you if there is a safety alert or recall. We will not sell, rent, or share your personal information. To register your product, please complete and mail the card that came with it or visit our online registration at www.evenflo.com/registerproduct.
For future reference, record the Model Number and Date of Manufacture below. You can find this information on one of the rear stroller legs.
Model Number: ____ Date of Manufacture: ____
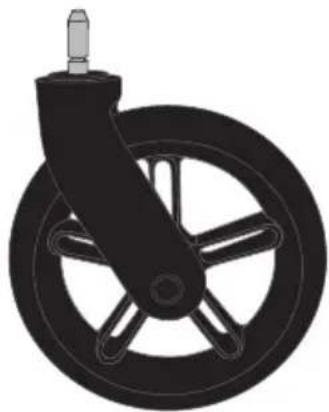
natural_image
Illustration of a black bicycle steering wheel with five spokes (no text or symbols)Front Wheel (2)
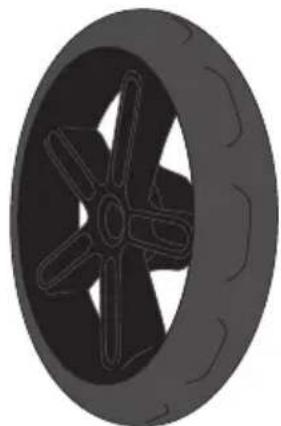
natural_image
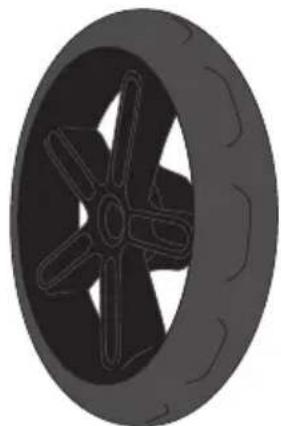
Top-down illustration of a car wheel with six blades (no text or symbols)One Rear Wheel (Unassembled)
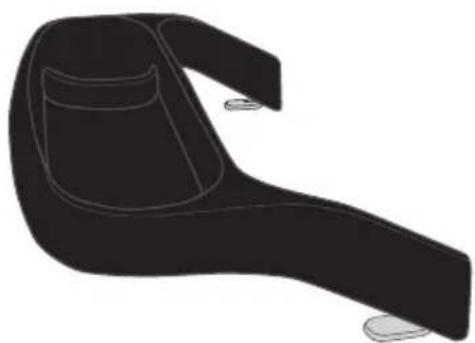
natural_image
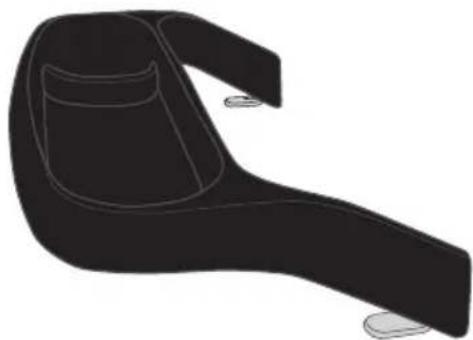
3D rendered model of a black ergonomic chair or seat with two circular buttons at the base (no text or symbols)Child Tray
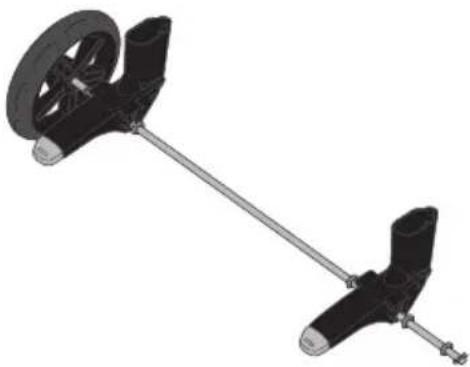
natural_image
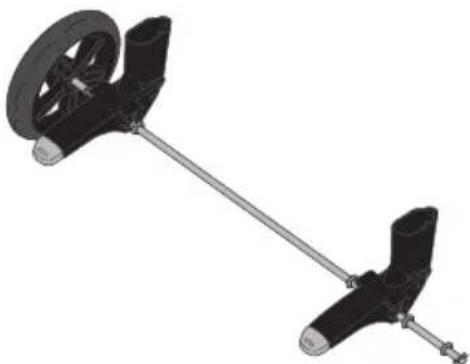
Mechanical device with two articulated arms and a central wheel (no text or symbols visible)Rear Axle Assembly (1 Wheel Pre-Assembled)
natural_image
Illustration of a mechanical device with layered components and mounting brackets (no text or symbols)Frame
Rear Wheel Hub Caps (1 Cap Pre-Assembled)
Features
FRONT
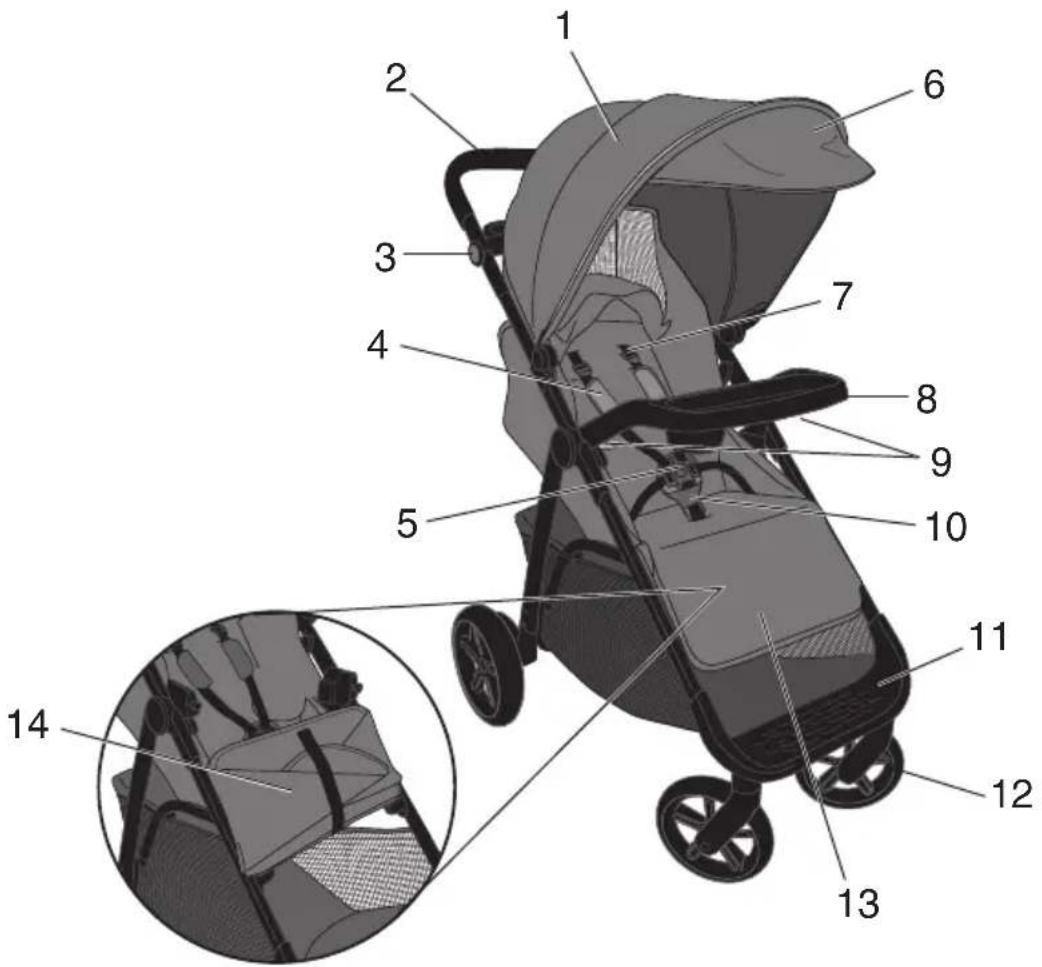
- Canopy
- Parent's Handle
- Adjustable Handle Buttons*
- Harness Covers
- Buckle
- Canopy Visor*
-
Shoulder Straps
-
Child Tray
- Child Tray Release levers
- Buckle Cover*
- Footrest
- Swivel Wheel
- Leg Rest
- Comfort Mode Flaps
REAR
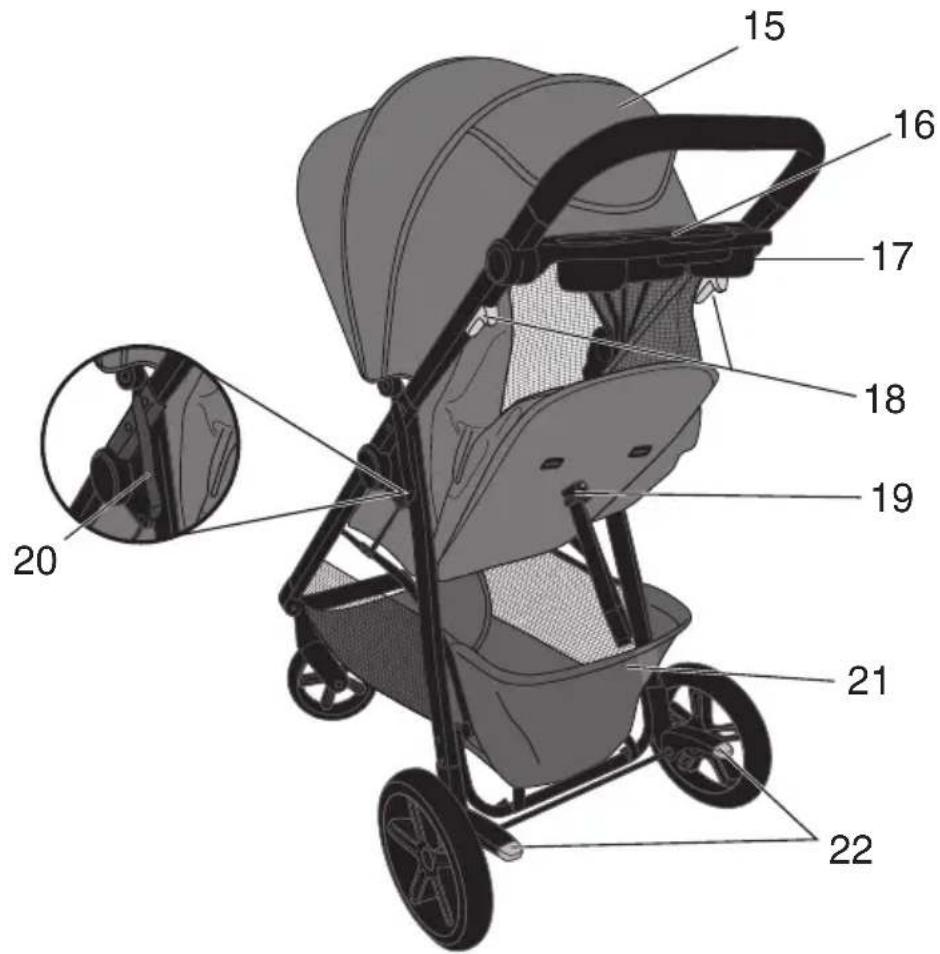
- Canopy Window
- Cell Phone Holder*/ Covered Storage*
- Parent Tray*
- Fold Release Levers
-
Multi Position Recline Strap
-
Side Frame Lock
- Storage Basket
- Brakes
Choosing Mode of Use
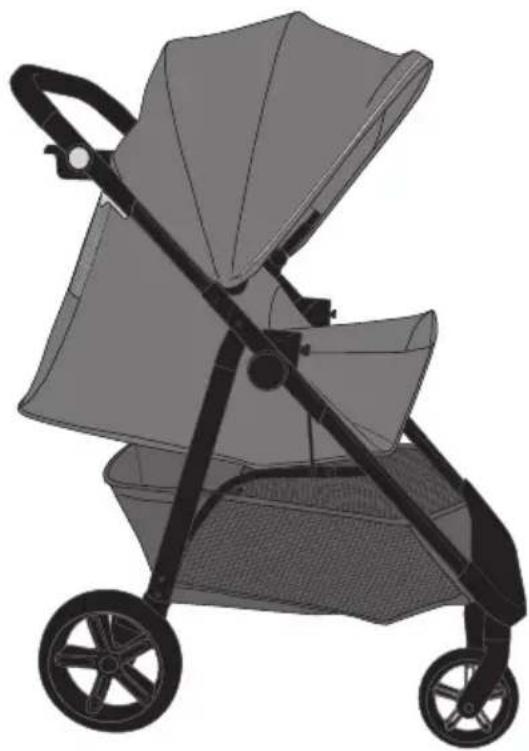
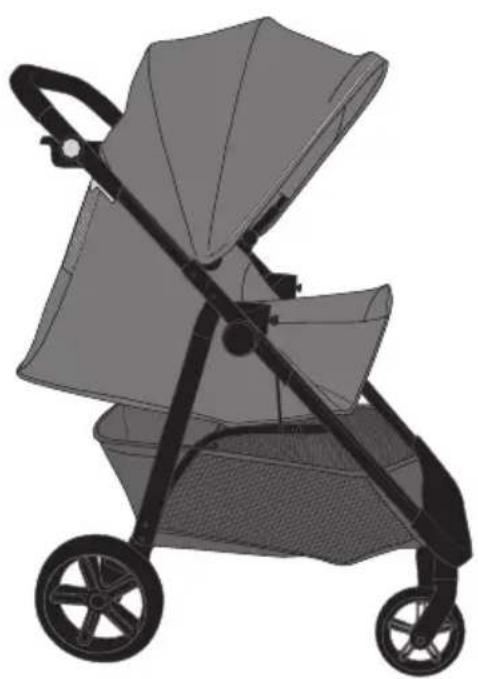
Your stroller can be used in two different modes: Comfort Mode or Stroller Mode.
Your stroller is shipped in Stroller Mode. You will need to follow the instructions completely to make sure you set up your stroller in your preferred mode of use.
After the frame and the wheels have been assembled, you can choose to set the stroller up in Comfort Mode (see p. 22) or Stroller Mode (see p. 24).
natural_image
Illustration of a two-wheeled baby stroller with black handle and mesh basket (no text or symbols)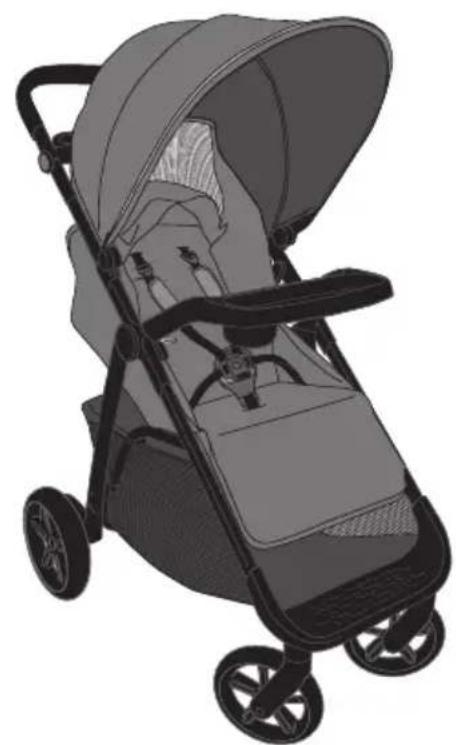
natural_image
Illustration of a baby stroller with black frame and gray body, no text or symbols presentStroller ModeComfort Moc
WARNING! DEATH or SERIOUS INJURY can occur.
Care must be taken when folding or unfolding stroller to prevent hand or finger injury in hinge areas.
FRAME
natural_image
Diagram of a mechanical device with layered components and a directional arrow indicating movement (no text or symbols)Side Frame Lock
To protect flooring, place a protective covering beneath the stroller during assembly.
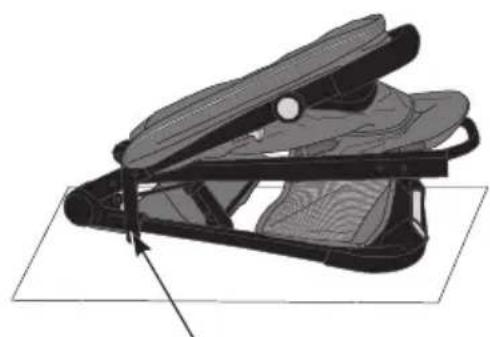
Unlatch side frame lock. Continue holding the lock open while unfolding the stroller.
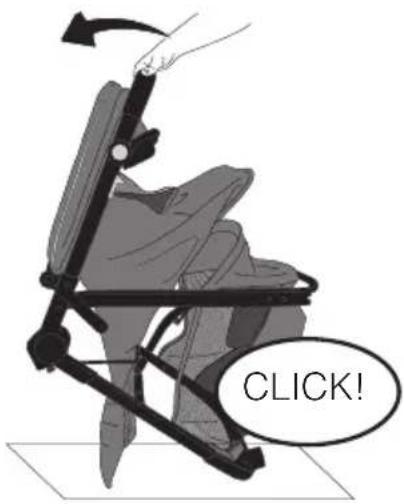
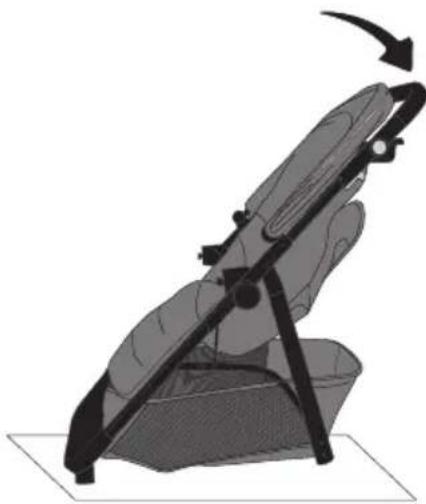
Grab the parent's handle and pull upward until the stroller opens fully with an audible click.
natural_image
Illustration of a hand holding a device with a curved arrow indicating rotation (no text or symbols)Make sure the stroller locks in the open position by pushing down on the parent's handle.
Assembling Your Stroller
FRONT WHEEL ASSEMBLY
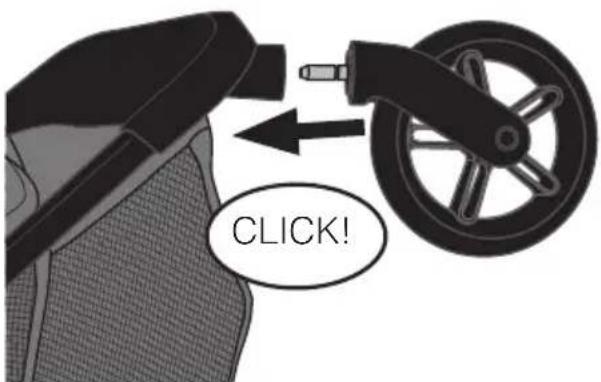
To attach front wheels, turn stroller over so front leg tube is positioned as shown and insert front wheel until it clicks into place. Repeat on other side.
Pull on wheels to make sure both of them are securely attached.
REAR WHEEL ASSEMBLY
natural_image
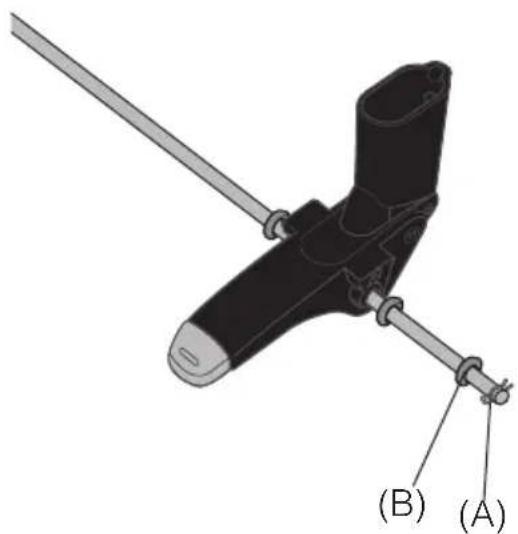
Mechanical component diagram showing a lever and pin assembly (no text or symbols)To attach rear wheel, remove the hairpin (A) and one washer (B) from the axle assembly.
natural_image
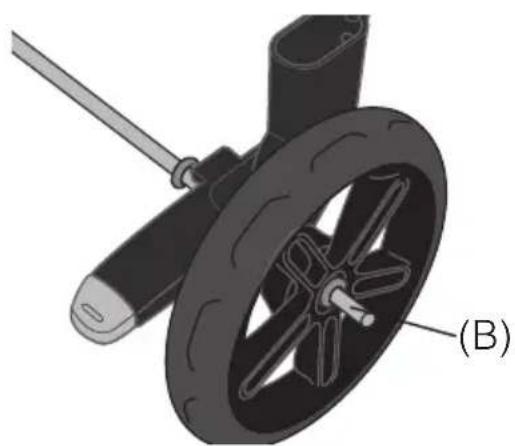
Mechanical component diagram showing a wheel with a shaft and labeled (B), no text or symbols present.Attach wheel, then re-attach washer (B) to the axle.
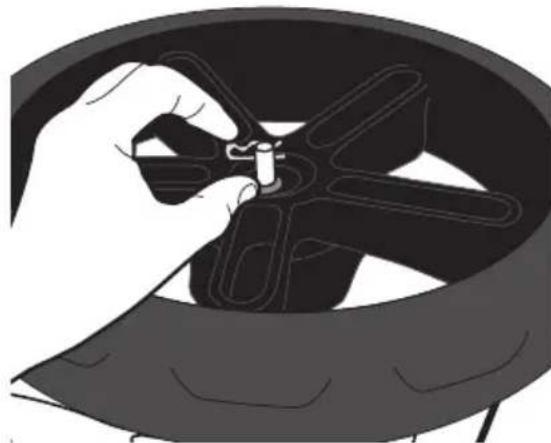
natural_image
Illustration of a hand adjusting a black plastic wheel component (no text or symbols visible)Push straight side of pin through axle hole. Pin will separate around the axle.
NOTE: Use needle nose pliers to hold pin for easier assembly.
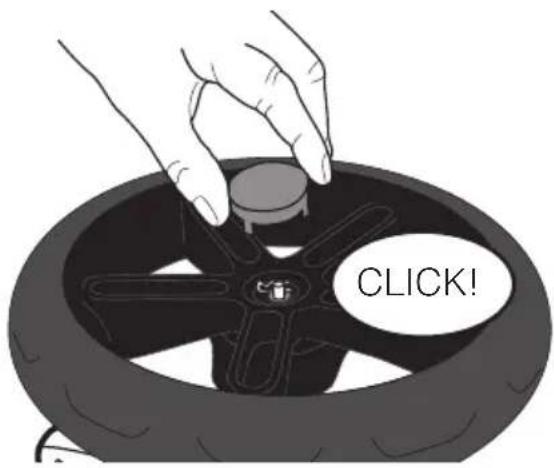
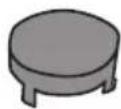
Attach hubcap to wheel until it clicks into place once the washer and hairpin are attached.
Brake levers point toward
rear of stroller
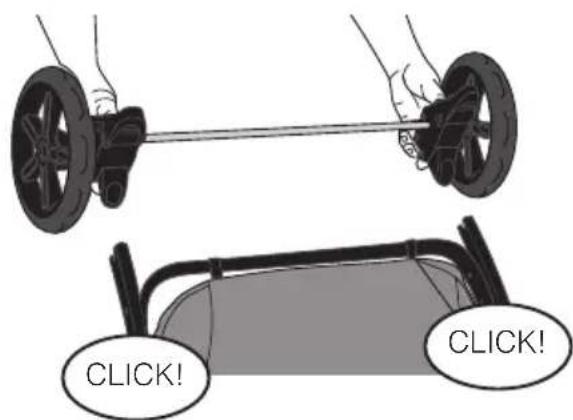
To attach rear wheel assembly to stroller, turn stroller over so back tube is positioned as shown. Push wheels onto rear leg tubes until they click into place.
Pull on wheels to make sure both of them are securely attached.
Assembling Your Stroller
CHILD TRAY
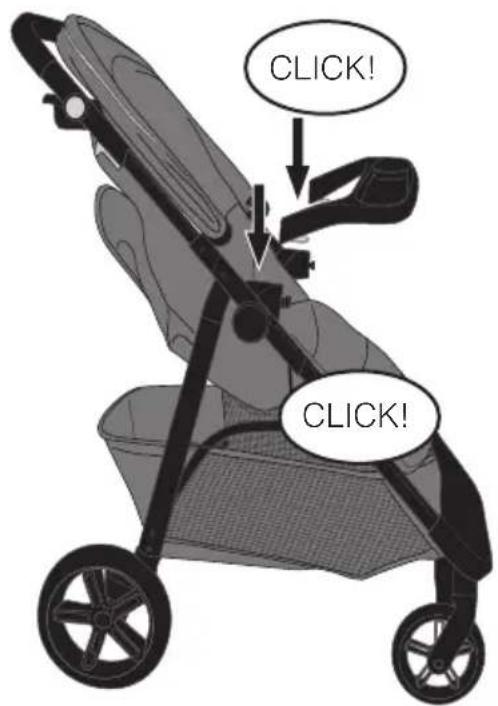
To attach child tray, slide tray onto tabs on both sides of the stroller until they click into place.
Pull up on both sides of tray to make sure it is securely attached.
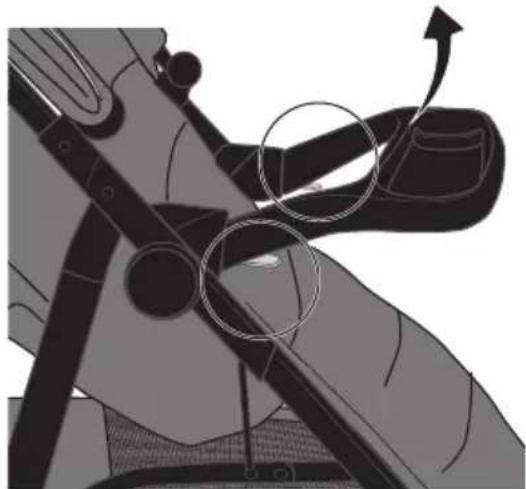
natural_image
Illustration of a hand holding a bicycle, showing steering wheel and gear mechanism (no text or symbols)To remove child tray, squeeze levers under both sides of tray and pull up from stroller.
CANOPY
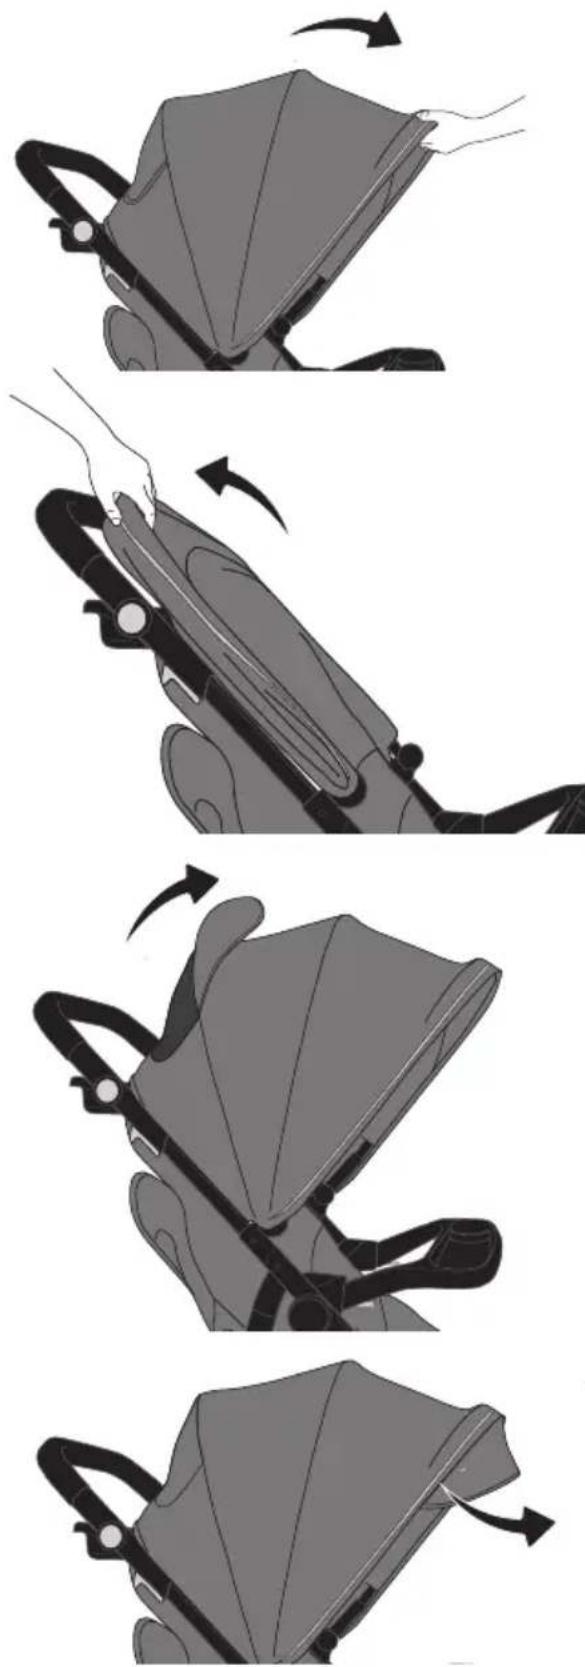
To open canopy, pull forward.
To close, push to the rear of stroller.
To access canopy window, pull flap forward as shown.
To access canopy visor, if included, pull flap forward as shown.*
*Not all features are available on all models. Styles may vary.
WARNING! DEATH or SERIOUS INJURY can occur.
Always lock both brakes. Make sure brakes are on by trying to push the stroller.
BRAKES
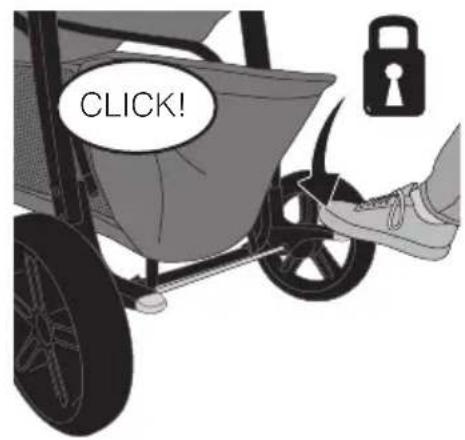
To lock, press lever DOWN on both rear wheels.
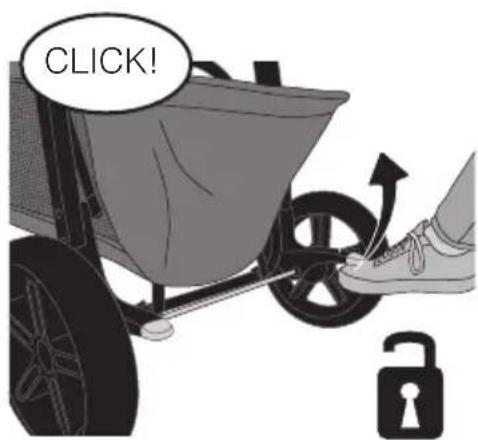
To unlock, pull lever UP on both rear wheels.
HARNESS
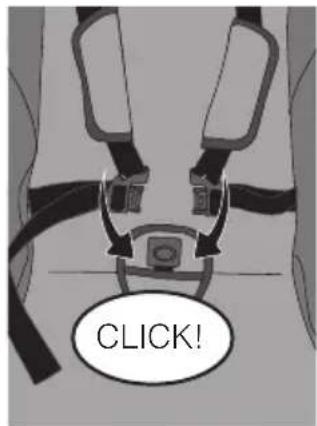
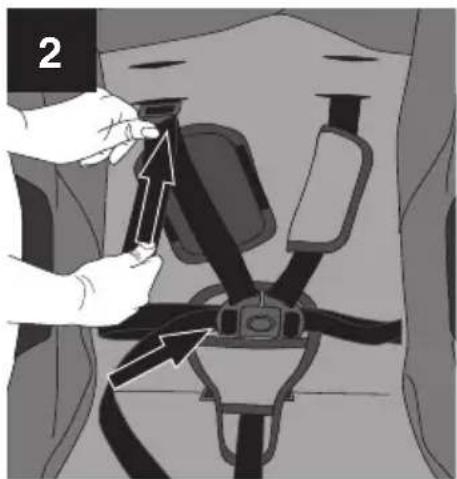
To secure harness, click harness connectors into the center buckle.
natural_image
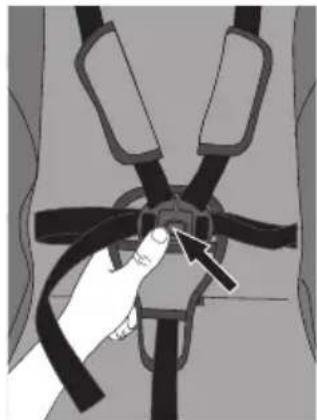
Illustration of a hand adjusting a black safety harness with a key inserted (no text or symbols)To unlock harness, push the button on the center buckle.
natural_image
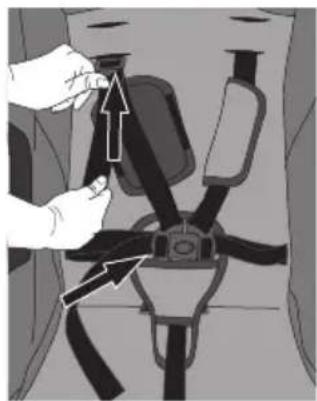
Illustration of a hand adjusting a seatbelt buckle (no text or symbols visible)To adjust harness around your child, tighten shoulder and waist straps as shown.
Repeat with other harness strap.
natural_image
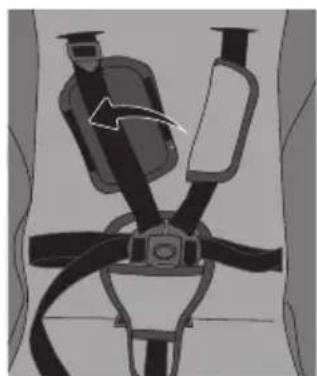
Mechanical diagram showing a belt buckle assembly with no visible text or symbolsWrap harness covers, if available, around the harness straps as shown.*
Using Your Stroller
HARNESS
natural_image
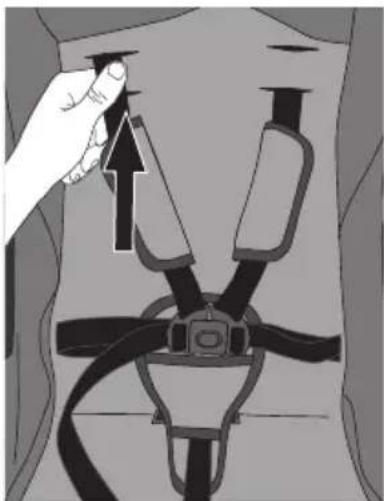
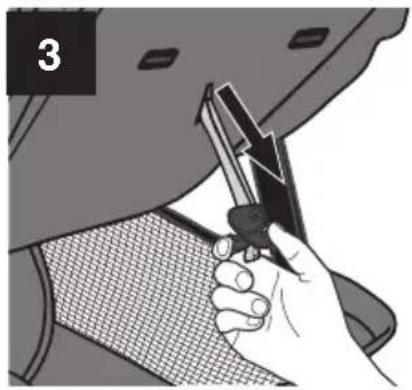
Illustration of a hand adjusting a seatbelt buckle (no text or symbols present)To change shoulder strap height positions, reach one hand behind stroller and push retainer out to the front of the seat then reinsert into the desired set of slots that are closest to your child's shoulder. MAKE SURE retainer goes through boards and fabric.
Repeat with other harness strap.
When re-inserting harness straps, MAKE SURE to always place harness straps at the same height setting.
HARNESS - COMFORT MODE (NO BUCKLE COVER)
natural_image
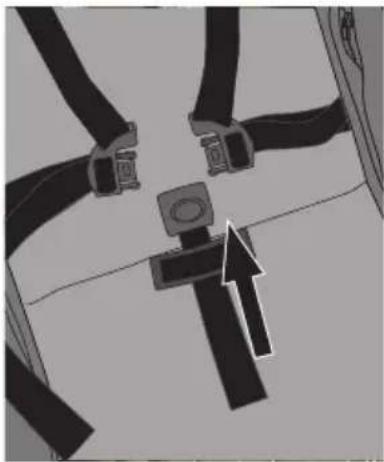
Diagram of a car seatbelt with a belt switch and arrow indicating direction (no text or symbols)When using buckle strap in Comfort Mode with no buckle cover, adjust buckle strap to highest position and thread under comfort mode webbing.
HARNESS - COMFORT MODE (WITH BUCKLE COVER)
natural_image
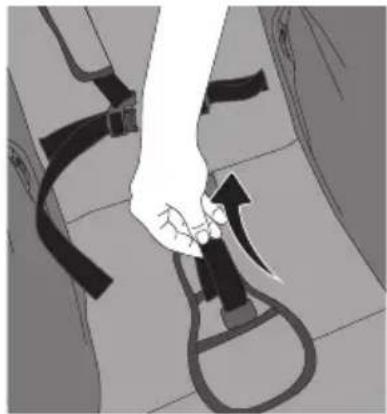
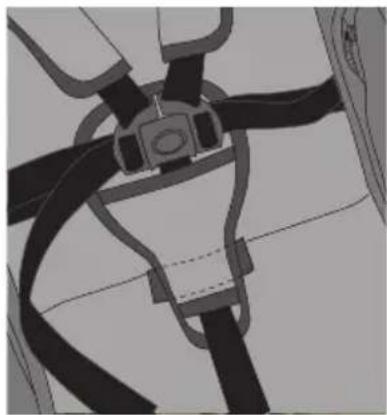
Illustration of a hand using a grip to lift a car, showing the grip and seat (no text or symbols)When using buckle strap in Comfort Mode with buckle cover*, adjust buckle strap to highest position.
Flip buckle cover forward and pull buckle strap from top half of buckle cover.
natural_image
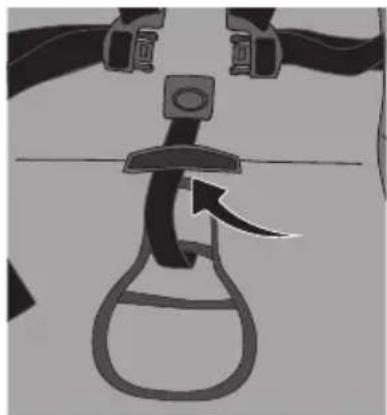
Diagram of a mechanical clamp or clamping device with a curved arrow indicating motion (no text or symbols present)Thread buckle strap under Comfort Mode webbing and rethread through top half of buckle cover.
natural_image
Technical illustration of a car seatbelt assembly (no text or symbols)WARNING! DEATH or SERIOUS INJURY can occur.
Care must be taken when folding or unfolding stroller to prevent hand or finger injury in hinge areas.
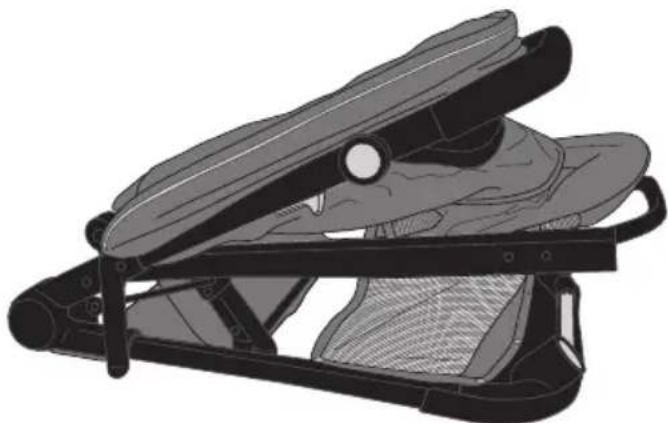
FOLDING STROLLER
IMPORTANT: Stroller cannot be folded in Comfort Mode.
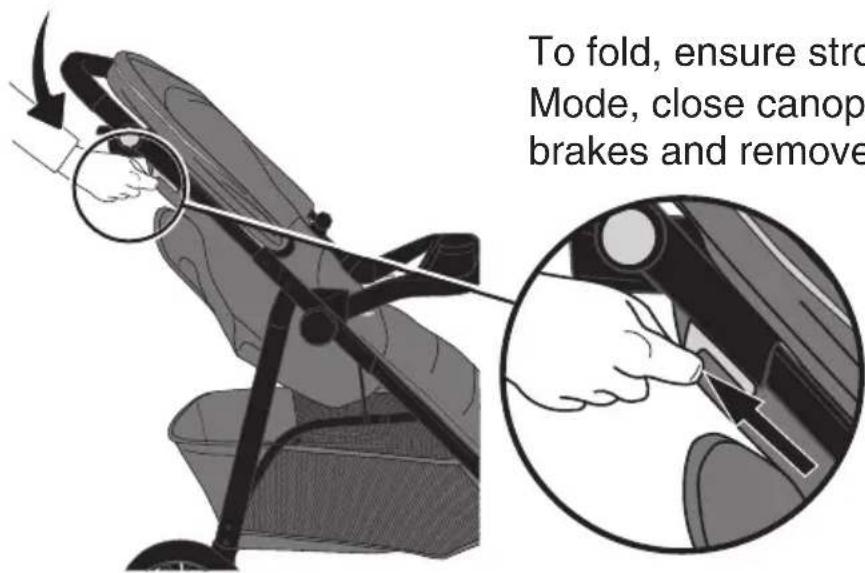
To fold, ensure stroller is in Stroller Mode, close canopy, lock both rear brakes and remove your child.
Pull up on levers on both sides of handles as shown.
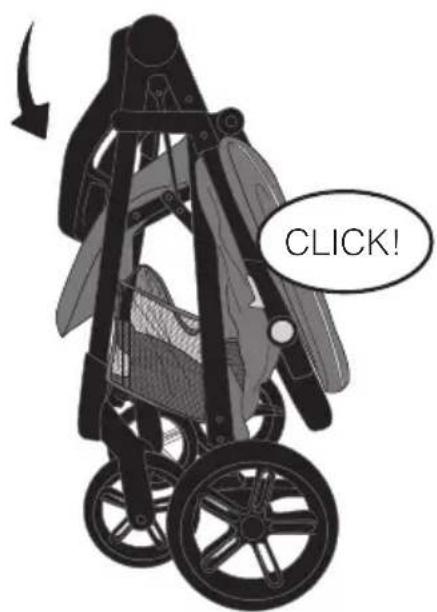
Rotate handles down until the side frame lock clicks into place. Completely fold the stroller in order for the side frame lock to fully engage.
ACCESSORIES\*
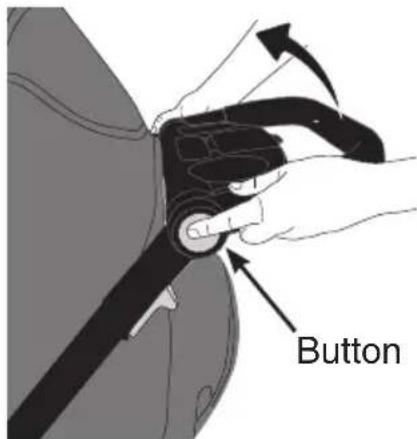
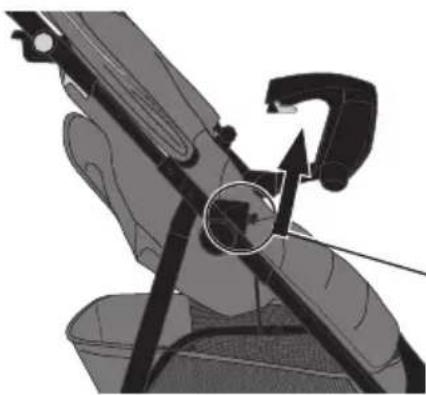
Adjustable Handle
Press adjustable handle buttons on both sides and rotate handle as shown.
natural_image
Close-up of a hand holding a tool with a circular component and directional arrows indicating motion (no text or symbols)Swivel Child Tray
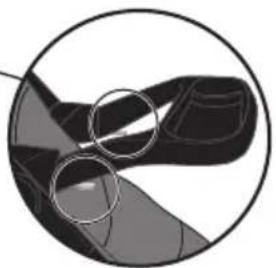
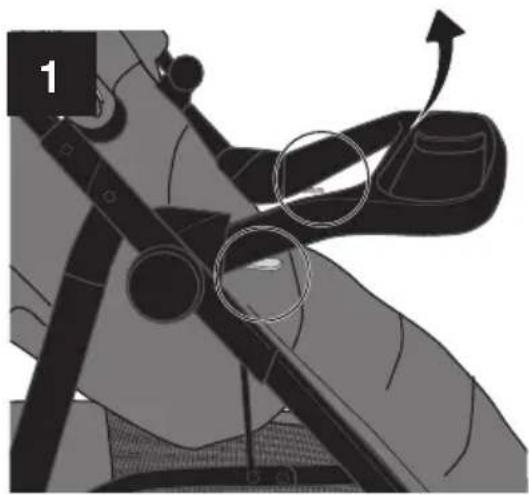
To swivel child tray, push lever under one side of tray and pull up from stroller.
natural_image
Abstract diagram of a hand holding a device, enclosed in a circular frame with two white circles highlighting areas (no text or symbols)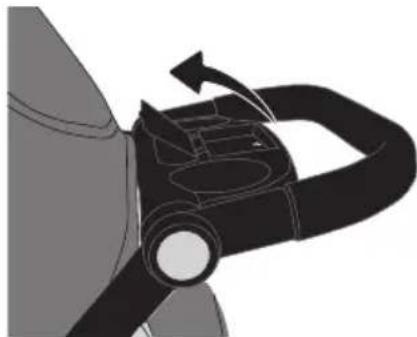
natural_image
Diagram of a mechanical device with a curved handle and internal components, showing motion direction (no text or symbols)Covered Storage
To access covered storage, pull up center panel of parent tray.
natural_image
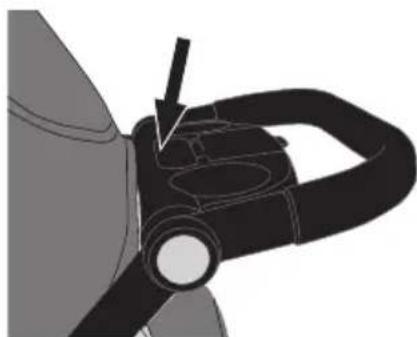
Close-up of a mechanical component with a black arrow pointing to a section (no visible text or symbols)Cell Phone Holder
To access the cell phone holder, place cell phone in parent tray behind covered storage.
Using Your Stroller
FROM STROLLER MODE TO COMFORT MODE
natural_image
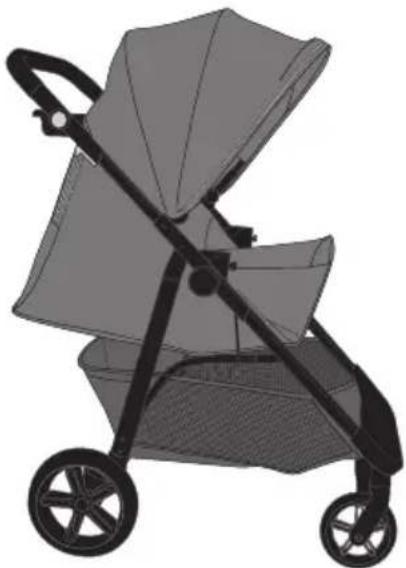
Illustration of a baby stroller with four wheels and a canopy cover (no text or symbols)If you are in Stroller Mode as shown, follow these steps to convert to Comfort Mode.
natural_image
Illustration of a hand holding a bicycle with a curved arrow indicating motion (no text or symbols)Remove child tray by squeezing levers under both sides of the tray and pull up from stroller.
natural_image
Close-up of a car seatbelt buckle being adjusted for a hand (no text or symbols visible)Adjust shoulder and waist strap to desired position. Repeat with other harness straps.
*Not all features are available on all models. Styles may vary.
natural_image
Illustration of a hand using a tool to adjust or install a car seatbelt (no text or symbols visible)To recline seat, squeeze button and pull down the recline strap on the rear of seat.
natural_image
Mechanical assembly diagram showing a gear shift mechanism with arrows indicating motion (no text or symbols)Undo the hook and loop strap beneath leg rest to unfold flaps.
natural_image
Diagram of a car interior showing a hand pressing down the seatbelt with an arrow indicating rotation (no text or symbols present)Fully zip Comfort Mode flaps on both sides of stroller.
natural_image
Medical illustration showing a laparoscopic device inserted into a patient's neck area, with no visible text or symbols.Thread buckle strap through Comfort Mode webbing. See p. 18 for harness adjustment information.
*Not all features are available on all models. Styles may vary.
FROM COMFORT MODE TO STROLLER MODE
natural_image
Illustration of a two-wheeled baby stroller with black handle and wheels (no text or symbols)If you are in Comfort Mode as shown, follow these steps to convert to Stroller Mode.
natural_image
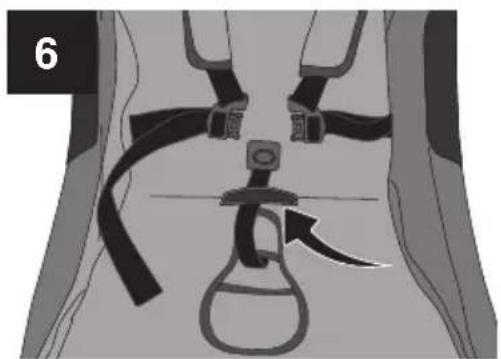
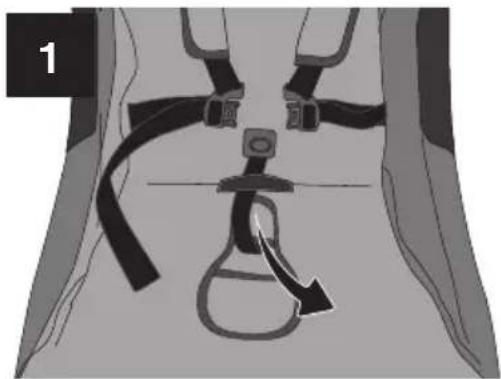
Medical illustration showing a catheter insertion into a patient's neck area (no text or labels)Remove buckle strap from Comfort Mode webbing. See p. 18 for harness adjustment information.
natural_image
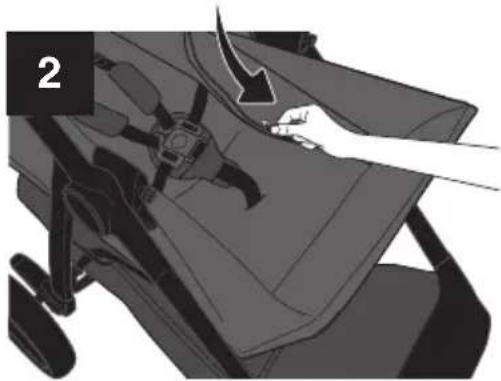
Mechanical assembly diagram showing a hand pressing down on a car seatbelt component (no text or symbols visible)Unzip Comfort Mode flaps from both sides of stroller.
natural_image
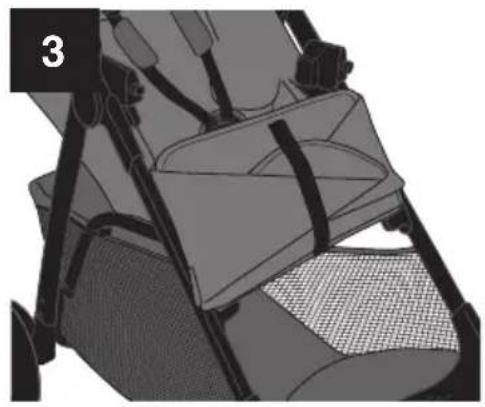
Mechanical component diagram showing a cam and seat assembly (no text or symbols)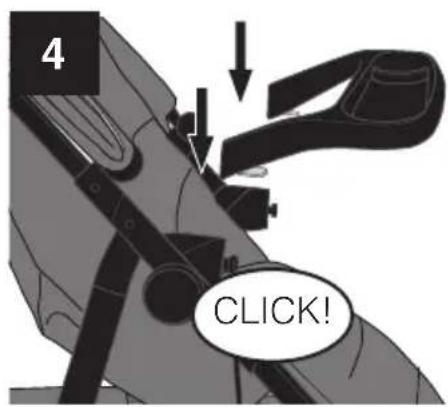
natural_image
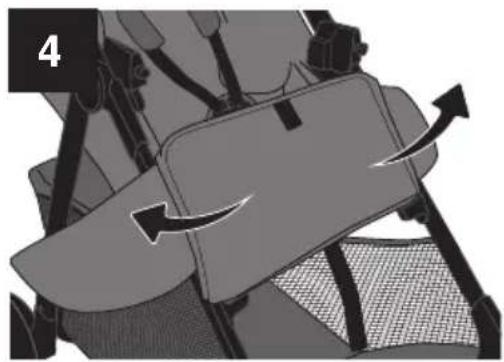
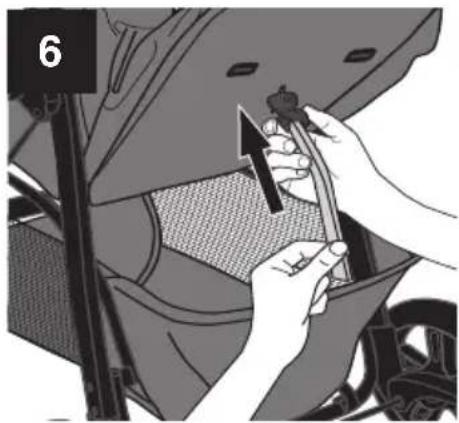
Illustration of hands installing or adjusting a component on a vehicle wheel (no text or symbols visible)Fold and store flaps beneath leg rest using hook and loop strap.
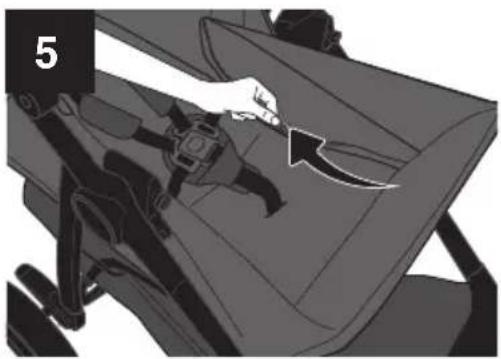
Attach child tray by sliding tray onto tabs on both sides of the stroller until they click into place.
Pull up on both sides of tray to make sure it is securely attached.
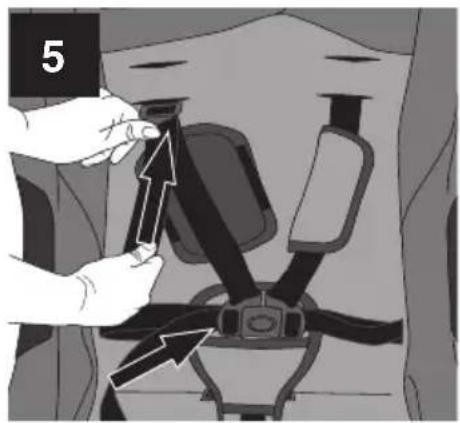
Adjust waist and shoulder strap height to desired position. Repeat with other harness strap.
Hold recline strap in one hand, squeeze recline adjuster and push until the seat is in desired position.
Release adjuster and confirm position by pushing on seatback from inside stroller.
WARNING! DEATH or SERIOUS INJURY can occur.
- Make sure the infant car seat is securely a ttached into the seat mounts on both sides of the stroller before placing child in the seat.
- Only use Evenflo SafeMax™, LiteMax™ and LiteMax™ Sport infant car seats with this stroller. Other infant car seats or carriers are not designed to fit the stroller frame and if used with this stroller, may result in serious injury to your child.
- To ensure safety for your baby, please refer to the manufacturer's instructions for the use of your recommended infant car seats and keep all instructions available for reference.
- DO NOT lift stroller by using the infant car seat handle when installed on stroller.
- DO NOT use infant car seat without child tray attached.
If unable to securely attach your infant car seat to this stroller, remove the car seat and contact Evenflo ParentLink at 1-800-233-5921 (USA), 1-937-773-3971 (Canada), or 01-800-706-12-00 (Mexico).
natural_image
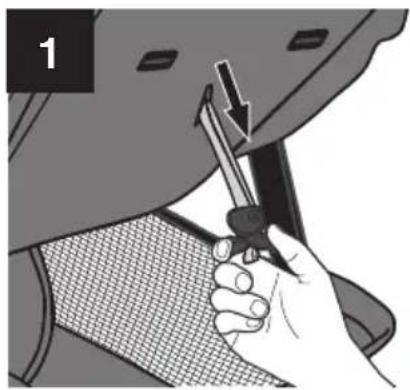
Hand holding a tool applying material to a car's seat area, no text or symbols visibleBefore inserting infant car seat onto stroller, child tray MUST be attached (see p. 14).
To attach infant car seat to stroller seat, fully recline stroller by squeezing button on the recline strap and lowering the backrest.
Using Your Stroller with Recommended Infant Car Seats
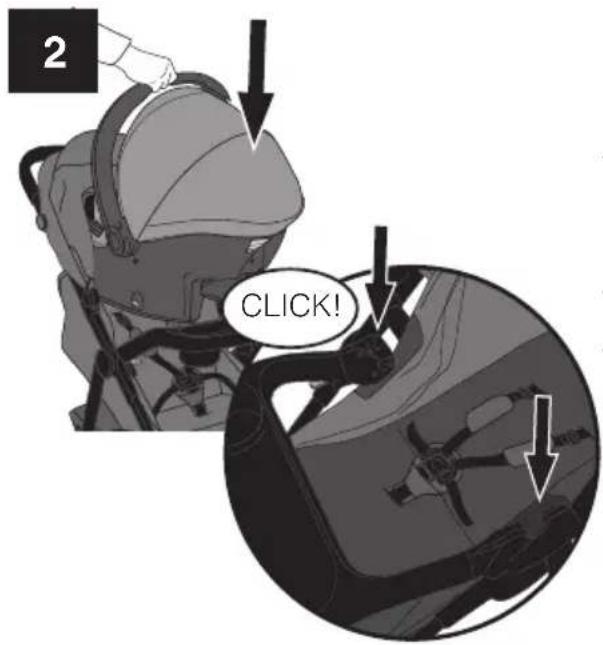
Insert infant car seat into stroller parent-facing until it latches into the infant car seat attachment points as shown.
The infant car seat MUST be facing the parent when installed.
natural_image
Illustration of a person wearing a stroller with a hand adjusting the seat area (no text or symbols)Pull up on the infant car seat to make sure it is securely attached to the stroller.
natural_image
Illustration of a person wearing a seatbelt with hands adjusting the seatbelt (no text or symbols present)To remove, squeeze handle on rear of seat and pull infant car seat up off of the stroller.
Clover Use Configurations
natural_image
Illustration of a two-wheeled stroller with a canopy and front basket (no text or symbols)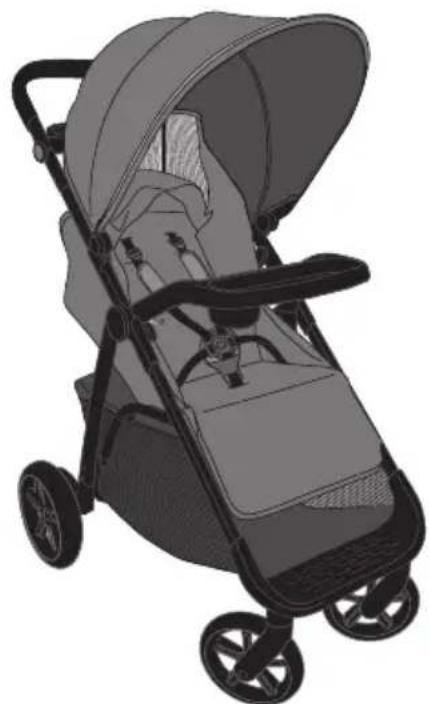
natural_image
Illustration of a baby stroller with black frame and wheels (no text or symbols)Stroller ModeComfort Mode
natural_image
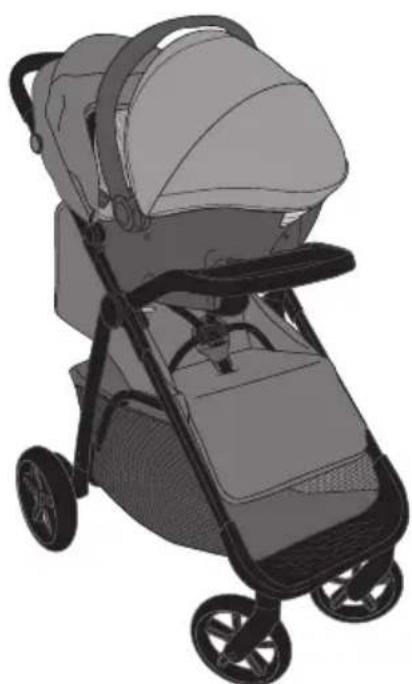
Illustration of a baby stroller with black frame and wheels (no text or symbols)Infant Car Seat Mode
Care and Maintenance
- Clean minor spills and stains on cloth or plastic surfaces with cold water and mild soap. Air dry.
- Metal and plastic parts can be wiped clean with a soft damp cloth and dried with a soft cloth. DO NOT use abrasive cleaners or solvents.
Limited Warranty
For a period of 90 days from the original purchase of this Product, Evenflo warrants to the original end user (“Purchaser”) this Product (including any accessories) against defects in material or workmanship. Evenflo’s sole obligation under this express limited warranty shall be, at Evenflo’s option, to repair or replace any Product that is determined to be defective by Evenflo and determined to be covered by this warranty.
Repair or replacement as provided under this warranty is the exclusive remedy of the Purchaser. Proof of purchase in the form of a receipted invoice or bill of sale evidencing that the Product is within the warranty period must be presented to obtain warranty service. This express limited warranty is extended by Evenflo ONLY to the original Purchaser of the Product and is not assignable or transferable to subsequent purchasers or end users of the Product. For warranty service, contact Evenflo's ParentLink Consumer Resource Center at 1-800-233-5921 or www.evenflo.com.
EXCEPT TO THE EXTENT PROHIBITED BY APPLICABLE LAW, ANY IMPLIED WARRANTY OF MERCHANTABILITY OR FITNESS FOR A PARTICULAR PURPOSE ON THIS PRODUCT IS HEREBY DISCLAIMED. EVENFLO SHALL NOT BE LIABLE FOR ANY INCIDENTAL, CONSEQUENTIAL, SPECIAL OR PUNITIVE DAMAGES OF ANY KIND FOR BREACH OF THE EXPRESS LIMITED WARRANTY ON THIS PRODUCT, OR ANY WARRANTY IMPLIED BY OPERATION OF LAW. OTHER THAN THE EXPRESS LIMITED WARRANTY SET FORTH ABOVE, THERE ARE NO OTHER WARRANTIES THAT ACCOMPANY THIS PRODUCT AND ANY ORAL, WRITTEN OR ANY OTHER EXPRESS REPRESENTATION OF ANY KIND IS HEREBY DISCLAIMED.
Índice
Advertencias.... 31
natural_image
Illustration of a black bicycle steering wheel with six spokes (no text or symbols)Ruedas delanteras (2)
natural_image
Top-down illustration of a car wheel with six blades (no text or symbols)Una rueda trasera (sin montar)
natural_image
3D rendered illustration of a black ergonomic chair or seat with a pocket and seat patches (no text or symbols)Charola infantil
natural_image
Mechanical device with two black components and a connecting rod (no text or symbols visible)natural_image
Technical illustration of a mechanical device with layered components (no text or symbols)Armazón
natural_image
Illustration of a two-wheeled baby stroller with black handle and mesh basket (no text or symbols)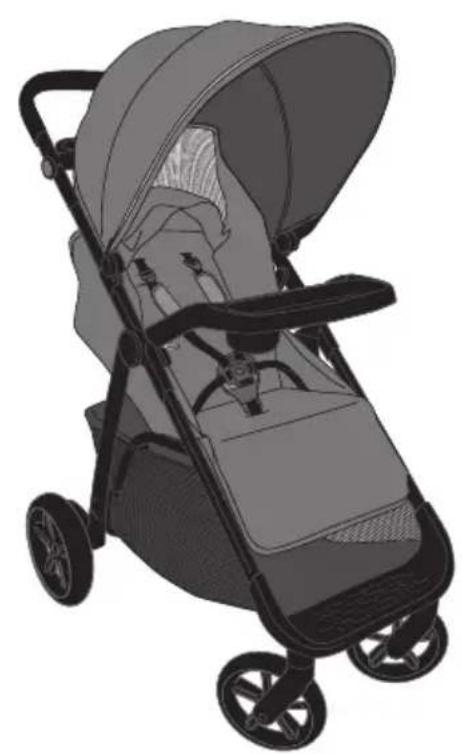
natural_image
Illustration of a baby stroller with open hood and black handle (no text or symbols)natural_image
Diagram of a mechanical clamp or clamping device with layered components and a base plate (no text or symbols)natural_image
Illustration of a person using a handheld device with a curved arrow indicating rotation (no text or symbols)natural_image
Mechanical device with labeled parts (A) and (B), showing a lever and handle assembly (no text or symbols beyond labels)natural_image
Mechanical component diagram showing a wheel with a shaft and labeled (B), no text or symbols present.natural_image
Illustration of a hand adjusting a wheel rim with a star-shaped component (no text or symbols)natural_image
Illustration of a hand holding a bicycle, showing steering wheel and gear mechanism (no text or symbols)natural_image
Four-step illustration of a hand gripping a device, showing mechanical adjustment and rotation (no text or symbols)natural_image
Illustration of a hand adjusting a seatbelt buckle (no text or symbols present)natural_image
Close-up of a car seatbelt buckle being adjusted for a hand (no text or symbols visible)natural_image
Mechanical diagram showing a belt buckle assembly with no visible text or symbolsnatural_image
Illustration of a hand adjusting a seatbelt buckle (no text or symbols present)natural_image
Diagram of a vehicle seatbelt with a directional arrow indicating movement (no text or symbols)natural_image
Illustration of a hand using a belt drive a rope, showing the rope being pulled (no text or symbols present)natural_image
Diagram of a climbing rope with a curved hook and arrow indicating direction (no text or symbols)natural_image
Diagram of a car seatbelt mechanism (no text or labels)natural_image
Diagram of a car interior showing a hand valve mechanism with an arrow indicating rotation (no text or symbols present)natural_image
Diagram of a mechanical device with a handle and lever mechanism (no text or symbols)natural_image
Illustration of a baby stroller with four wheels and a canopy cover (no text or symbols)natural_image
Mechanical diagram showing a hand operating a lever with a curved arrow indicating motion (no text or symbols present)natural_image
Illustration of a person adjusting a seatbelt with arrows indicating fastening (no text or symbols present)natural_image
Illustration of a hand using a tool to adjust or install a component on a car surface (no text or symbols visible)natural_image
Mechanical assembly diagram showing a gear shift mechanism with arrows indicating motion (no text or symbols)natural_image
Diagram of a car interior showing a hand pressing down the seat area with an arrow indicating motion (no text or symbols present)natural_image
Medical illustration showing a laparoscopic device inserted into the lumbar spine (no text or labels)natural_image
Illustration of a two-wheeled baby stroller with black handle and wheels (no text or symbols)natural_image
Medical illustration showing a catheter insertion into a patient's neck area (no text or labels)natural_image
Mechanical assembly diagram showing a hand pressing down on a car seatbelt component (no text or symbols visible)natural_image
Mechanical component diagram showing a cam and seat assembly with no visible text or symbolsnatural_image
Illustration of hands installing or adjusting a component on a vehicle wheel (no text or symbols visible)natural_image
Illustration of a hand using a tool to adjust or install a car body panel (no text or symbols visible)natural_image
Illustration of a person wearing a seatbelt with a hand adjusting the seat area (no text or symbols)natural_image
Illustration of a person wearing a seatbelt with hands adjusting the seatbelt (no text or symbols present)natural_image
Illustration of a two-wheeled stroller with a canopy and wheels (no text or symbols)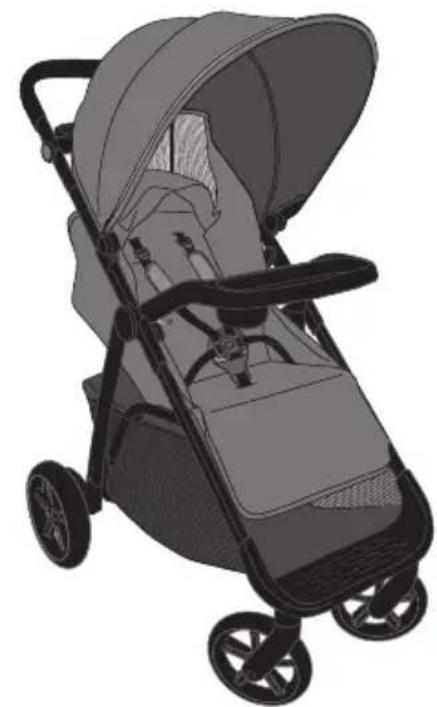
natural_image
Illustration of a baby stroller with open lid and black frame (no text or symbols)natural_image
Illustration of a baby stroller with two wheels and a canopy cover (no text or symbols)answers. advice. affirmation
- www.evenflo.com • USA: 1-800-233-5921 8 AM – 5 PM E.T.
- Canada: 1-937-773-3971 • México: 01-800-706-12-00
- STROLLER
- CARRIOLA
- WARNING! DEATH or SERIOUS INJURY can occur.
- WARNING!
- DEATH or SERIOUS INJURY can occur.
- Important Information
- Child Requirements
- Registration Information
- Features
- FRONT
- REAR
- Choosing Mode of Use
- Your stroller can be used in two different modes: Comfort Mode or Stroller Mode.
- FRAME
- Assembling Your Stroller
- FRONT WHEEL ASSEMBLY
- REAR WHEEL ASSEMBLY
- CHILD TRAY
- CANOPY
- BRAKES
- HARNESS
- Using Your Stroller
- HARNESS - COMFORT MODE (NO BUCKLE COVER)
- HARNESS - COMFORT MODE (WITH BUCKLE COVER)
- FOLDING STROLLER
- ACCESSORIES\*
- Adjustable Handle
- Swivel Child Tray
- Covered Storage
- Cell Phone Holder
- FROM STROLLER MODE TO COMFORT MODE
- FROM COMFORT MODE TO STROLLER MODE
- Using Your Stroller with Recommended Infant Car Seats
- Clover Use Configurations
- Care and Maintenance
- Limited Warranty
- Índice
Brand : Evenflo
Model : Clover
Category : Stroller