
TT-12 - Document Camera Elmo - Free user manual and instructions
Find the device manual for free TT-12 Elmo in PDF.


| Product Type | Document Camera |
| Model | TT-12 |
| Brand | Elmo |
| Dimensions (Set Up) | W355 x D373.5 x H426.5 mm |
| Dimensions (Folded) | W195 x D294 x H469 mm |
| Weight | Approx. 3.2 kg (main body only) |
| Power Source | DC 12V via AC adapter (AC100-240V) |
| Power Consumption | 17.5 W |
| Lens | f = 4.0–48.0 mm (12x optical zoom), F3.2–3.6 |
| Digital Zoom | 8x |
| Image Sensor | 1/2.8" CMOS, total pixels 2144x1588, effective 1920x1536 |
| Frame Rate | 30 fps |
| Focus | Auto / Manual / Zoom Sync |
| White Balance | Auto / One-Push / Manual |
| Image Modes | Text 1/2/3, Graphics 1/2 |
| Output Resolutions | 1080p, 720p, SXGA (1280x1024), WXGA (1280x800), XGA (1024x768), NTSC/PAL |
| Connectivity | RGB IN/OUT, HDMI OUT, Composite VIDEO OUT, Audio Line OUT, Mic/Line IN, USB Device (Mini-B), USB Host (Type A), SD card slot |
| Illumination | White LED (switchable ON/OFF) |
| Shooting Area (Max @1080p) | 420 x 233 mm |
| Special Functions | Highlight, Mask, Scroll, Compare Picture, Picture-in-Picture, Mosaic, Marker Mask, Microscope mode, Image Rotation, Color/B&W, Posi/Nega |
| Storage Media | SD card (up to 32GB, not SDXC), USB flash drive (up to 32GB) |
| Included Accessories | Remote control (with battery), stage, anti-glare sheet, dust cover, Image Mate CD-ROM, instruction manual CD-ROM, RGB cable, AC adapter, power cord |
| Cleaning | Use a soft, dry cloth. Do not use liquid or aerosol cleaners. |
| Safety | Unplug before cleaning; avoid water, heat, and unstable surfaces; use only recommended attachments |
Frequently Asked Questions - TT-12 Elmo
User questions about TT-12 Elmo
0 question about this device. Answer the ones you know or ask your own.
Ask a new question about this device
Download the instructions for your Document Camera in PDF format for free! Find your manual TT-12 - Elmo and take your electronic device back in hand. On this page are published all the documents necessary for the use of your device. TT-12 by Elmo.
USER MANUAL TT-12 Elmo
Please read this instruction manual carefully before using this product and keep it for future reference.
Read Instructions
All the safety and operating instructions should be read before the appliance is operated.
■ Retain Instructions
The safety and operating instructions should be retained for future reference.
■ Heed Warnings
All warnings on the product and in the operating instructions should be adhered to.
■ Follow Instructions
All operating and use instructions should be followed.
■ Cleaning
Unplug this product from the wall outlet before cleaning. Do not use liquid cleaners or aerosol cleaners. Use a damp cloth for cleaning.
■ Attachments
Do not use attachments not recommended by the product manufacturer as they may cause hazards.
■ Water and Moisture
Do not use this product near water - for example, near a bath tub, wash bowl, kitchen sink, or laundry tub, in a wet basement, or near a swimming pool, and the like.
Placement
Do not place this product on an unstable cart, stand, tripod, bracket, or table. The product may fall, causing serious injury to a child or adult, and serious damage to the product. Use only with a cart, stand, tripod, bracket, or table recommended by the manufacturer, or sold with the product. Any mounting of the product should follow the manufacturer's instructions, and should use a mounting accessory recommended by the manufacturer.
Ventilation
Slots and openings in the cabinet are provided for ventilation and to ensure reliable operation of the product and to protect it from overheating, and these openings must not be blocked or covered. The openings should never be blocked by placing the product on a bed, sofa, rug, or other similar face. This product should not be placed in a built-in installation such as a bookcase or rack unless proper ventilation is provided or the manufacturer's instructions have been adhered to.
■ Power Sources
This product should be operated only from the type of power source indicated on the marking label. If you are not sure of the type of power supply to your home consult your appliance dealer or local power company. For products intended to operate from battery power, or other sources, refer to the operating instructions.
■ Grounding or Polarization
This product may be equipped with either a polarized 2-wire AC line plug (a plug having one blade wider than the other) or a 3-wire grounding type plug, a plug having a third (grounding) pin. The 2-wire polarized plug will outlet, try reversing the plug. If the plug still fails to fit, contact your electrician to replace your obsolete outlet. Do not defeat the safety purpose of the polarized plug. The 3-wire grounding type plug will fit into a grounding type power outlet. This is a safety feature. If you are unable to insert the plug into the outlet, contact your electrician to replace your obsolete outlet. Do not defeat the safety purpose of the grounding type plug.
■ Power-Cord Protection
Power-supply cords should be routed so that they are not likely to be walked on or pinched by items placed upon or against them, paying particular attention to cords at plugs, convenience receptacles, and the point where they exit from the product.
Lightning
For added protection for this product during a lightning storm, or when it is left unattended and unused for long periods of time, unplug it from the wall outlet and disconnect the antenna or cable system. This will prevent damage to the product due to lightning and power-line surges.
■ Overloading
Do not overload wall outlets, extension cords, or integral convenience receptacles as this can result in a risk of fire or electric shock.
■ A product and cart combination should be moved with care. Quick stops, excessive force, and uneven surfaces may cause the product and cart combination to overturn.
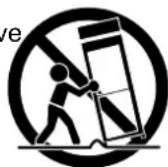
■ Object and Liquid Entry
Never push objects of any kind into this product through openings as they may touch dangerous voltage points or short-out parts that could result in a fire or electric shock. Never spill liquid of any kind on the product.
Servicing
Do not attempt to service this product yourself as opening or removing covers may expose you to dangerous voltage or other hazards. Refer all servicing to qualified service personnel.
■ Damage Requiring Service
Unplug this product from the wall outlet and refer servicing to qualified service personnel under the following conditions:
- When the power-supply cord or plug is damaged.
- If liquid has been spilled, or objects have fallen into the product.
- If the product has been exposed to rain or water.
- If the product does not operate normally by following the operating instructions. Adjust only those controls that are covered by the operating instructions as an improper adjustment of other controls may result in damage and will often require extensive work by a qualified technician to restore the product to its normal operation.
- If the product has been dropped or damaged in any way.
- When the product exhibits a distinct change in performance - this indicates a need for service.
■ Replacement Parts
When replacement parts are required, be sure the service technician has used replacement parts specified by the manufacturer or have the same characteristics as the original part. Unauthorized substitutions may result in fire, electric shock or other hazards.
■ Safety Check
Upon completion of any service or repairs to this product, ask the service technician to perform safety checks to determine that the product is in proper operating condition.
Heat
The product should be situated away from heat sources such as radiators, heat registers, stoves, or other products (including amplifiers) that produce heat.

CAUTION
RISK OF ELECTRIC SHOCK DO NOT OPEN

CAUTION: TO REDUCE THE RISK OF ELECTRIC SHOCK, DO NOT REMOVE COVER (OR BACK). NO USER-SERVICEABLE PARTS INSIDE. REFER SERVICING TO QUALIFIED SERVICE PERSONNEL.

SA 1965
The lightning flash with arrowhead symbol, within an equilateral triangle, is intended to alert the user to the presence of uninsulated “dangerous voltage” within the product’s enclosure that may be of sufficient magnitude to constitute a risk of electric shock to persons.

SA 1966
The exclamation point within an equilateral triangle is intended to alert the user to the presence of important operating and maintenance (servicing) instructions in the literature accompanying the product.
WARNING:
TO REDUCE THE RISK OF FIRE OR ELECTRIC SHOCK, DO NOT EXPOSE THIS PRODUCT TO RAIN OR MOISTURE.
The connection of a non-shielded equipment interface cable to this equipment will invalidate the FCC Certification or Declaration of this device and may cause interference levels which exceed the limits established by the FCC for this equipment. It is the responsibility of the user to obtain and as shielded equipment interface cable with this device. If this equipment has more than one interface connector, do not leave cables connected to unused interfaces. Changes or modifications not expressly approved by the manufacturer could void the user's authority to operate the equipment.
FOR UNITED STATES USERS:
INFORMATION
This equipment has been tested and found to comply with the limits for a Class B digital device, pursuant to Part 15 of the FCC Rules. These limits are designed to provide reasonable protection against harmful interference in a residential installation. This equipment generates, uses, and can radiate radio frequency energy and, if not installed and used in accordance with the instructions, may cause harmful interference to radio or television reception. However, there is no guarantee that interference will not occur in a particular installation. If this equipment does cause interference to radio and television reception, which can be determined by turning the equipment off and on, the user is encouraged to try to correct the interference by one or more of the following measures.
- Reorient or relocate the receiving antenna.
- Increase the separation between the equipment and receiver.
- Connect the equipment into an outlet on a circuit different from that to which the receiver is connected.
- Consult the dealer or an experienced radio/TV technician for help.
USER-INSTALLER
CAUTION:
Your authority to operate this FCC verified equipment could be voided if you make changes or modifications not expressly approved by the party responsible for compliance to Part 15 of the FCC rules.
WARNING:
Handling the cord on this product or cords associated with accessories sold with this product, will expose you to lead, a chemical known to the State of California to cause birth defects or other reproductive harm.
Wash hands after handling.
BEFORE YOU USE
■ Be sure to use the power cord and the AC adapter attached to this product.
■ Be sure to use the power cord applicable to your local power specifications. If the product was sold in Japan, use the AC adapter sold with the product with 100 VAC and 50 or 60 Hz.
■When storing the product, do not leave it under direct sunlight or by heaters. It may become discolored, deformed, or damaged.
■ Do not place this product in any humid, dusty, salt bearing wind, or vibrating locations.
Only use it under the following environmental conditions:
Temperature: 0°C - 40°C (32°F - 104°F)
Humidity: 30% - 85% (No condensation)
■ Use a soft, dry cloth for cleaning.
Do not use any volatile solvent such as thinner or benzene.
■ Do not point the camera lens directly at the sun. It may be damaged and you may not be able to take pictures.
■ Luminescent and Black Spots
There may be some pixels that do not properly operate due to the use of CMOS Area Image Sensors made-up of many pixels.
Though luminescent or black spots may be found on the screen, it is a phenomenon peculiar to the CMOS Area Image Sensors and is not a malfunction.
■ Follow the guidelines below to prevent the unit from dropping or overturning.
- Use the product on a stable base, desk, or table. Do not place the product on an unstable base or slanted surface.
- Place or wire the unit to prevent the AC adapter cord or video cable from pulling.
- Carry the product by holding the lower part of the main unit in both hands. Never hold the product by the column or the camera head.
■ Pay careful attention when using (including setting-up and storing) or transferring the product to prevent the camera head from receiving any shocks.
■ Do not look directly into the LED light. If you look directly into it at point-blank range, your eyes may be injured.
■ Some type of SD card/USB flash drive can be used.
■ Transfer the data from the SD card onto a device such as a PC to save a backup copy. Malfunction of the product or repairs to it may cause the data saved in the SD card to be deleted.
If this product is used for longer than the warranty period, its performance and quality may deteriorate due to the lifetime of its parts. To purchase replacement parts, consult the dealer from whom you purchased this product or our branch/office near your location.
■ Battery precautions:
- If this product is not going to be used for a long time, take the batteries out of the remote control.
- Do not use rechargeable batteries (e.g., Ni-Cd (NiCad batteries)).
- Do not use new and old batteries or batteries of different types together.
- Do not try to recharge or short-circuit the batteries.
- When disposing of used batteries, follow the instructions of your local government.
- Insert from one side and pay particular attention to the polarity (+/- directions).
- Be sure to use AAA batteries.
If any liquid from a battery leaks onto your skin or clothes, flush the area with clean water immediately. If it gets into your eye, flush immediately with clean water and then contact a doctor.
■ Precautions regarding the remote control strap
To prevent unexpected accidents, please note the following points.
- This strap is for the remote control only and should not be used for any other purposes.
- Do not wrap the strap around parts of your body such as your neck, arm, or finger.
- Do not leave it within reach of small children.
- For safety reasons, the break-away section of the strap has been designed to separate if too much force is applied. Therefore, please avoid any overly strenuous movements and do not apply excessive force.
- The strap length adjustment feature is designed to be simple and supportive. Excessive force or strenuous movements may change the length.
- Do not use excessive force when adjusting the strap. This could damage the strap.
■ About using microphones
Connecting microphones other than electret condenser microphones (microphones for PCs and so on) could cause a malfunction to occur. If you are concerned about this product's operating noise when using the built-in microphone, we recommend using an external microphone.
■ About the audio input port
When the input is set to use an external microphone, voltage is supplied to the input port. Set to "Audio in" from the main Menu when connecting line-output equipment.
Menu
Some functions may not be set or operated depending on the mode or the menu settings being used.
Record/Play
- Before recording an important scene, make sure to do a test recording to confirm that the camera is working properly.
- The maximum length of continuous recording is 60 minutes.
- Movie files that are recorded with this camera or converted by the proprietary software can only be played with this camera.
Copyright
Do not commercially use or transfer movies or audio files recorded with the camera without the permission of the copyright holder except for personal use.
Do not use the camera in locations where recording movies or audio files are prohibited.
IMPORTANT SAFEGUARDS....i
BEFORE YOU USE ...... vi
Contents 2
1. BUNDLED ITEMS ...... 4
2. BASIC OPERATIONS .... 5
2-1 Document Camera....5
Part Names 5
Operating panel....6
Rear panel and cable connection 7
Side panel....10
Moving Parts of the Document Camera.... 11
2-2 Supplied Accessories.... 12
Remote Control 12
Preparation of Remote Control.... 12
Operation of the remote control 12
Receiving signal from the remote control 12
Remote Control Strap 13
Stage.... 13
Anti-glare sheet.... 13
Dust cover.... 13
Image Mate CD-ROM 13
Instruction manual CD-ROM....13
2-3 Shooting Images.... 14
Setting up the main unit.... 14
Connecting the AC cord 14
Connecting the video cable.... 15
Turning the power ON/OFF 15
Adjusting the size 16
Adjusting the brightness.... 17
Automatic brightness adjustment 17
Manual brightness adjustment.... 18
Turning the illumination ON/OFF 19
Image selection 20
Pausing the image 20
2-4 Setting Changes 21
Changing a Setting 21
List of the Menus....21
Descriptions of Each Menu.... 22
Main Unit 22
Camera Controls [Second Layer] 22
Preferences [Second Layer] 24
Support Function.... 25
Support Function Setting 26
Details of Each Function 28
Highlight Function 28
Mask Function.... 30
Scroll Function 31
Compare Picture Function 32
Picture in Picture Function 33
Mosaic Function 35
Marker Mask Function.... 36
3. ADVANCED OPERATIONS ...... 37
3-1 Using an SD card/USB flash drive.... 37
Saving images 38
Picture 38
Movie....39
Displaying the stored data.... 41
Thumbnail display (list of pictures/movies).... 41
Displaying a picture full-screen 45
Playing a movie full-screen....50
3-2 Saving data stored on an SD card to PC via USB cable 53
3-3 Presentation using a USB-connected PC with the supplied software 55
3-4 Using the ELMO Wireless Slate/Tablet (CRA-1) with the equipment 56
Connecting the ELMO Wireless Slate/Tablet (CRA-1) 56
Basic operations....57
Selecting how to use the pen tablet from the tablet menu 59
Writing to camera images....60
Menu descriptions 60
Using as a whiteboard....64
Menu descriptions 64
Using the SD card 66
Menu descriptions 67
3-5 Displaying enlarged images using a microscope 70
Procedure 70
Exiting the Microscope mode 72
4. TROUBLE SHOOTING....74
4-1 Symptoms and Confirmation 74
5. SPECIFICATIONS....76
5-1 General 76
5-2 Main Camera 77
5-3 Illumination Device....78
5-4 Trademarks · License....79
1 BUNDLED ITEMS
The items below are included with this product. If any item is missing, contact the dealer from whom you purchased this product.

2 BASIC OPERATIONS
2-1 Document Camera
Fart Names
Operation of the main unit:


| No Name | |
| 1 | Illumination switch P.19 |
| 2 | Illumination P.19 |
| 3 | Built-in mic |
| 4 | Zoom dial P.16 |
| 5 | AF button |
| 6 | Operating panel P.6 |
| 7 | Rear panel P.7 |
| 8 | Side panel P.10 |
| 9 | Remote control sensor P.12 |
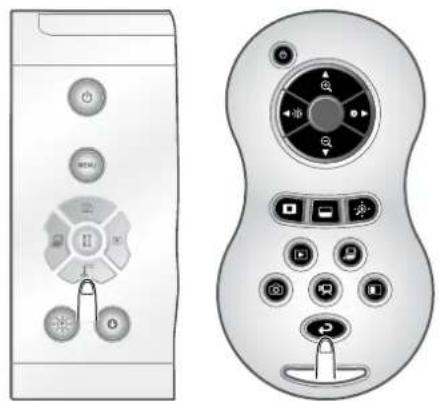
Operating panel
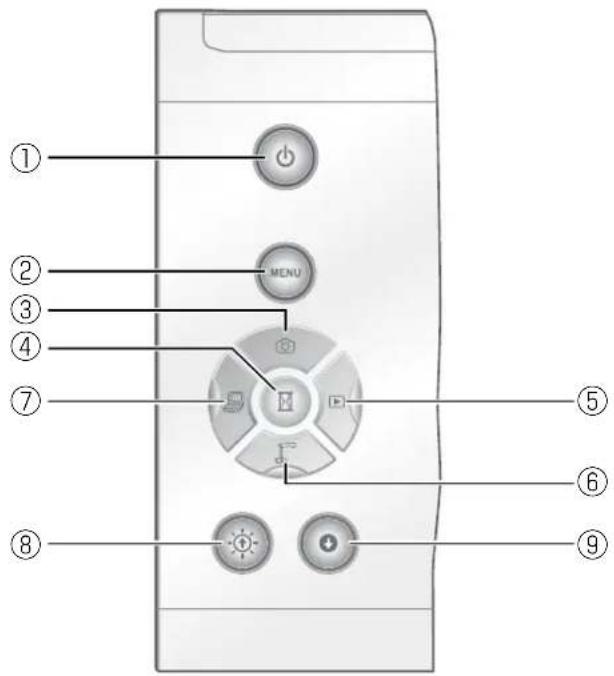
| MarkFunction | |||
| 1 |  | To turn the power ON/OFF.Power ON: Blue lightPower OFF (standby status): Red lightNotePress and hold for more than 2 seconds to turn the power OFF. | |
| 2 |  | To show/hide the menu on screen.P21 | |
| 3 |  | To save the still image on the SD card/USB flash drive.P38 | |
| 4 |  | To pause the camera image. Press this button again to restart. | |
| 5 | Image select |  | To switch the screen to images stored on the SD card/USB flash drive.The LED is lit when the [ ] button is selected.P20 |
| 6 |  | To switch the screen to camera image.The LED is lit when the [ ] button is selected.P20 | |
| 7 |  | To switch the screen to the image input to RGB IN.The LED is lit when the [ ] button is selected.P20 | |
| 8 | Brightness Adjust |  | To brighten the camera image.P17 |
| 9 |  | To darken the camera image.P17 | |
Fear panel and cable connection


| Mark Function | ||
| 1 |  | Plug-in for the AC adapter. (A cable is supplied with this product.) |
| 2 |  A A | To output audio line . (An audio cable is not supplied with this product.) |
| 3 |  HDMI OUT HDMI OUT | To output digital images. (HDMI cable is not supplied with this product.) |
| 4 |  RGB OUT RGB OUT | To output analog RGB images. (Analog RGB cable is supplied with this product.) |
| 5 |  N N | When the [ ] button is selected in Image Select, the image input to [ ] terminal can be output from the [ ] terminal. (A cable is supplied with this product.) |
| 6 |  VIDEO VIDEO | To output video images. (RCA cable is not supplied with this product.) |
| 7 | ### | To connect to a PC. (USB cable is supplied with this product.) |
① To connect the AC adapter.
Before inserting the AC adapter in an outlet, connect the DC plug of the supplied AC adapter to the [DCIN REV] terminal on the rear panel.
② To connect the unit to a device (speaker with amplifire etc) with an audio line input terminal.
Connect a commercially available audio cable to the [AUDIO OUT] terminal on the rear panel.
③ To connect the unit to a device with an HDMI input terminal.
Connect a commercially available HDMI cable to the [HDMI OUT] terminal on the rear panel.

- Please use the monitor corresponding to the input of the image (resolution) or 720p or more.
It doesn't operate with the cable that doesn't conform to the HDMI standard. - Elmo does not guarantee operation for all HDMI-compatible monitors.
④ To connect the unit to a device with an analog RGB input terminal.
Connect the RGB cable to the [RGB OUT] terminal on the rear panel.
Only 1 RGB cable is supplied with the product.
⑤ To connect the unit to a device with an analog RGB output terminal.
Connect the RGB cable to the [RGB/IP] terminal on the rear panel.
Only 1 RGB cable is supplied with the product.
■ Specifications of the [RGB IN] terminal
Signal allocation

Video signal
Horizontal synchronized signal
Vertical synchronized signal
Analog 0.7V (p-p) 75Ω terminated
TTL level (Positive/negative polarity)
TTL level (Positive/negative polarity)
DSUB 15P shrink terminal (Female)
Pin assignment
| Pin No. | Name Pin No. Name |
| 1 | Video signal (Red) 6 GND (Re |
| 2 | Video signal (Green) |
| 3 | Video signal (Blue) |
| 4 | N.C |
| 5 | GND |
| Pin No. Name | e |
| ) 11 GND | |
| 7 | GND (Green) |
| 8 | GND (Blue) |
| 9 | N.C |
| 10 | GND |
| 12 | N.C |
| 13 | Horizontal synchronized signal |
| 14 | Vertical synchronized signal |
| 15 | N.C |
⑥ To connect the unit to a device with a composite video input terminal.
Connect a commercially available RCA pin plug video cable to the [VIDEO] terminal on the rear panel.
⑦ To connect a PC with the USB cable.
Connect the supplied USB cable to the [ψ] terminal on the rear panel.

Note
- If the displayed image is off-center, adjustment of the horizontal and vertical position should be made from the connected device.
- In some cases, vertical stripes may appear on the display device. This can be reduced by adjusting the "clock phase" function of the connected device.
- When using a PC with an external output mode, set the PC to the external output mode after pressing the [ ] button on the operating panel.
- We recommend using a USB 2.0 compliant USB cable.
- If you plug into the USB cable with the power on, the PC may not recognize the device.
- Depending on the PC's USB environment or the peripheral equipment using the USB 2.0 compliant cable, image transfer may be disrupted.
• Operation is not guaranteed for all environments.
Side panel
Note
- Move the switch in ① according to the specification of the display device.

| MarkFunction | |||||
| 1 |  | To switch the output image type.Left switch: To switch the output terminal.Right switch: To switch the resolution. | |||
  | Resolution | Left switch | Right switch | Output image | |
| 1080 P (1920 × 1080) | □□ | □ | HDMI OUT | ||
| 720P (1280 × 720) | □□ | □ | |||
| SXGA (1280 × 1024) | □ | □ | RGB OUT | ||
| WXGA (1280 × 800) | □ | □ | |||
| XGA (1024 × 768) | □□ | □ | |||
| NTSC/PAL VIDEO OUT | □□□ | □□ | |||
| (NTSC/PAL is changed in the menu setting.) | |||||
| 2 |  | To insert an SD card (commercially available).Push the card again to remove the SD card. | |||
| 3 |  | To connect a wireless pen Tablet (commercially available) P56 or a USB flash drive (commercially available) P37 | |||
| 4 | MIC | Plug-in for an mic and line input. (A mic cable is not supplied with this product.) (The mic is only for the electret capacitor mic.) | |||
| 5 |  | Security slot. | |||
Note
- The same image is output to [RGB OUT] and [HDMI OUT].
- When [VIDEO OUT] is output [RGB OUT], [HDMI OUT] is not output. When [RGB OUT], [HDMI OUT] is output [VIDEO OUT] is not output.
- When the HDMI monitor is connected, the output image (resolution) is automatically changed based on information form the connected monitor. Even if [RGB OUT] is selected, it is not reflected.
- We recommend that you change the output image (resolution) with the power supply turned off (standby status). In case you wish to change the output image (resolution) by looking at the output image with the power supply turned on, make sure to set the output image to camera image and hide all menus beforehand. We do not guarantee proper operation when the output image (resolution) was changed in any other condition than specified above.
- Depending on the monitor you use, edge of the screen may not be displayed when OSD menu is shown on the VIDEO output. This is not a malfunction. Set the monitor to Underscan mode (if available).
Nobing Parts of the Document Camera
This unit can be moved as shown below.

flowchart
graph TD
    A["Device with 45° angle"] --> B["Actuator with 120°/180° rotation"]
    B --> C["Assembly of robotic arm with 180° rotation"]
    C --> D["Assembly of robotic arm with 120°/180° rotation"]
    D --> E["Assembly of robotic arm with 180° rotation"]
    E --> F["ELMO device with 180° rotation"]
    F --> G["Assembly of robotic arm with 120°/180° rotation"]
    G --> H["Assembly of robotic arm with 180° rotation"]
BASIC
OPERATIONS
2-2 Supplied Accessories
Remote Control
Preparation of Remote Control
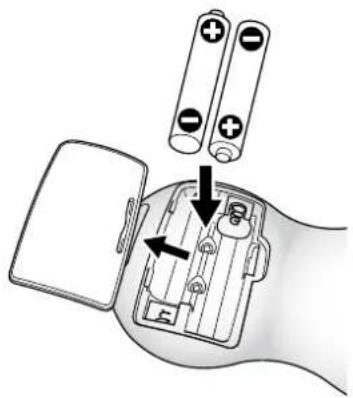
Remove the battery case cover at the back of the remote control and install 2 batteries. (TYPE AAA)
natural_image
Diagram of a battery pack with two batteries and an open case, showing internal components and arrows indicating movement (no text or symbols)WARNING
Children may ingest small batteries; always keep batteries safe and out of reach.
If a battery is swallowed, consult a doctor immediately as this could result in asphyxiation or be an obstacle to digestion, etc.
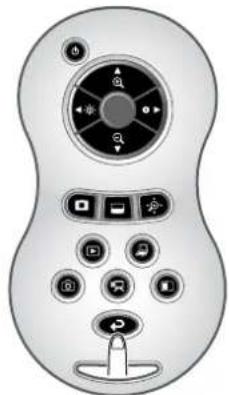
Operation of the remote control
When a camera image is displayed
When data in an SD card/USB flash drive is displayed

Receiving signal from the remote control
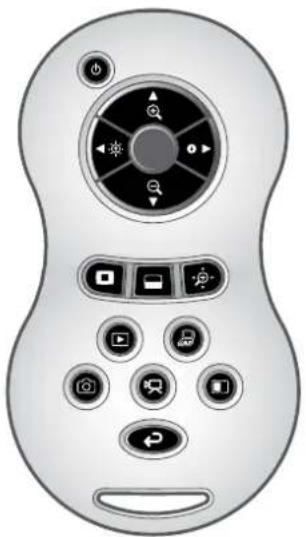
Point the infrared light lens of the remote control at the infrared sensor, and press the button of the desired function.
Receivable range
Distance: Within approx. 7m from the front of the infrared sensor
Angle: Within 30° up, down, left, and right of the infrared sensor
natural_image
Front view of a remote control device with various function buttons and display (no text or symbols visible)
- The receivable range may be reduced when the main unit is placed in direct sunlight, near an inverter fluorescent light or in any other unfavorable conditions. Depending on the light source conditions, the sensor may fail to receive any infrared light. In such cases, relocate the main unit or shield the light source.

Remote Control Strap
The strap can be fastened to the remote control as shown below.
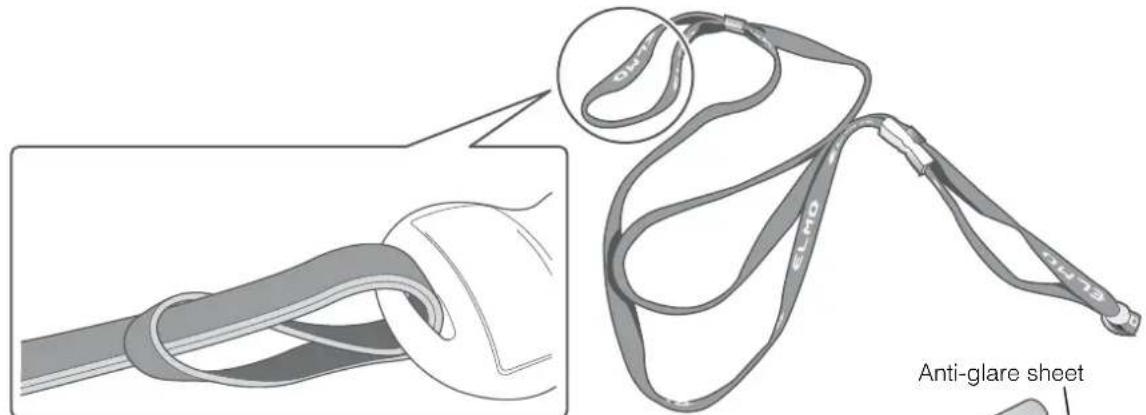
Stage
Use with the main unit to indicate the shooting range.

Anti-glare sheet
Place it on the document to reduce the amount of reflection.
■ist cover
Cover the main unit when storing to keep it clean.
How to fold the main unit

Image Mate CD-ROM
The CD-ROM contains the software for connecting to a PC.
Follow the instructions in the separate Installation Manual.
Dust cover

Instruction manual CD-ROM
The CD-ROM contains the Instruction manual.
2-3 Shooting Images

Setting up the main unit
Set up the main unit as shown in the figure above. Then connect the main unit to a projector or a PC monitor, and turn on the power of the main unit. P.15
Connecting the AC cord
Connect the AC cord and the AC adapter. Then connect the AC adapter to the [120]_IN12 terminal at the rear panel of the document camera, and insert the AC cord into an outlet.

Connecting the video cable
① Move the switch on the side panel according to the specification of the display device. P.10
② Use the cable corresponding to the switch position specified in ① to connect the document camera to the display device.

CAUTION
Before connecting the main unit to other devices, be sure to turn OFF the power for all of the devices.
Turning the power ON/OFF
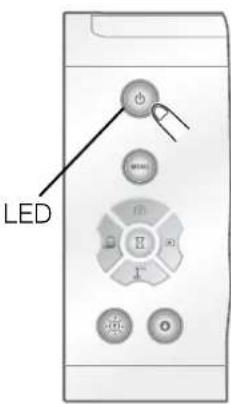
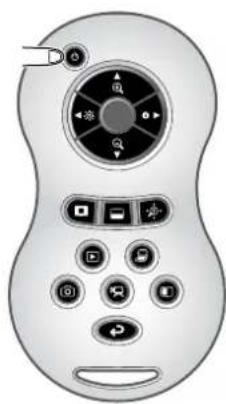
- Press the [] on the operating panel or the [] button on the remote control to turn the power ON.
(After the [ ⏻ ] Button flashes blue, it is illuminated a few seconds later.) - Hold down the [ ⏻ ] button on the operating panel or the [ ⏻ ] button on the remote control for two seconds or more to turn the power OFF.
(The LED around the [ ⏻ ] button is illuminated in red.)

LED
natural_image
Front view of a stylized mobile phone control panel with buttons and display (no text or symbols visible)
Note
- Do not operate this device while it is flashing.
Adjusting the size
The display range of the document can be adjusted by rotating the zoom dial on the main unit or by pressing the [ 🔍 / ] 🔍 is on the remote control.
• ZOOM-IN + : The object can be shown in large size.
• ZOOM-OUT 🔒 : The object can be shown in small size.
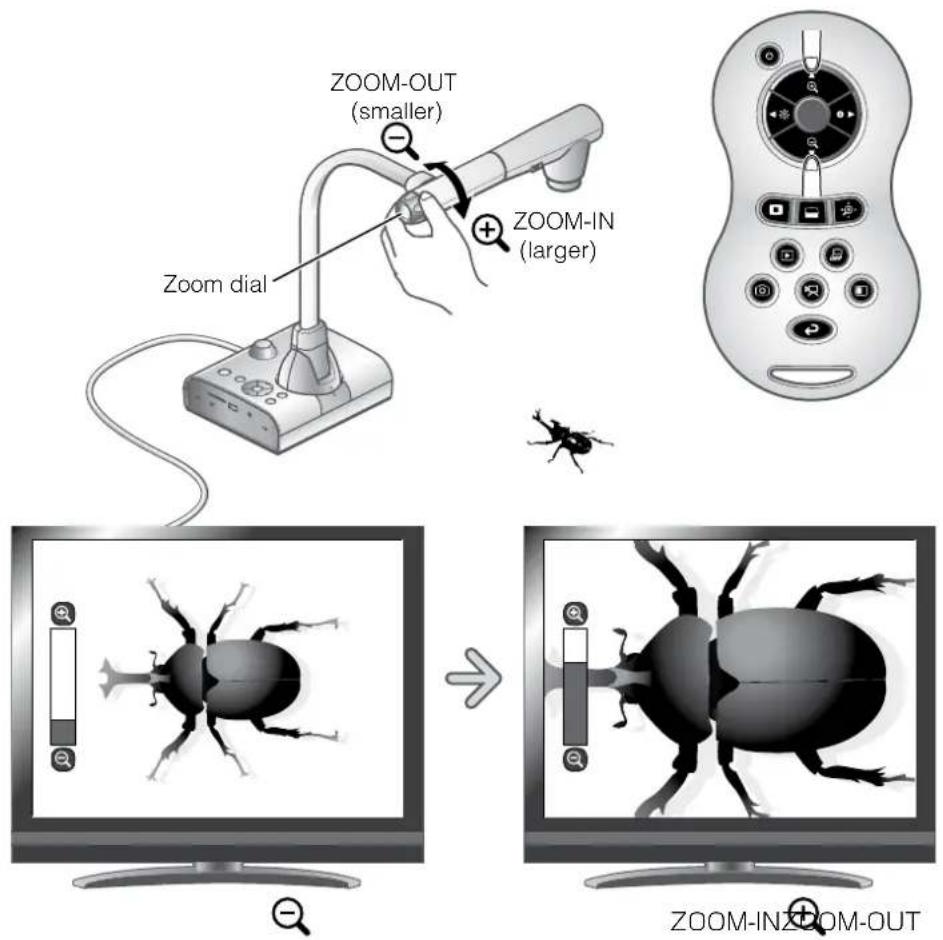

Note
- Zoom ratio: Optical 12x, Digital 8x
- When the optical zoom reaches 12x, it automatically shifts to digital zoom.
- Within the digital zoom range, the image quality is degraded.
- ON/OFF of the digital zoom can be set from the setting menu.
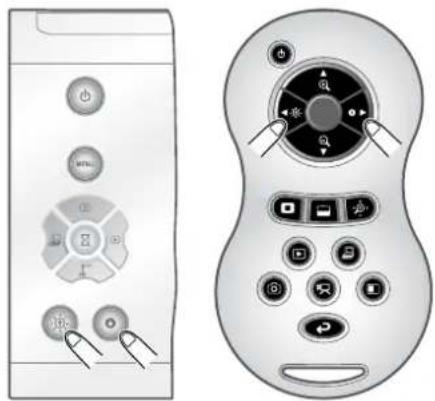
Adjusting the brightness
Press the [ / button on the operating panel or the
[◀※ / ▶▶▶▶▶▶▶▶▶▶▶▶▶▶▶▶▶▶▶▶▶▶▶▶▶▶▶▶▶▶▶▶▶▶▶▶▶▶▶▶▶▶▶▶▶▶▶▶▶▶▶▶▶▶▶▶▶▶▶▶▶▶▶▶▶▶▶▶▶▶▶▶▶▶▶▶▶▶▶▶▶▶▶▶▶▶▶▶▶▶▶▶▶▶▶▶▶▶▶▶▶>
The following two adjustment modes can be set by selecting [Brightness] from the menu on the screen.
natural_image
Diagram showing two computer monitors: one with control buttons and one with a rotary dial (no text or symbols)BASIC OPERATIONS
Automatic brightness adjustment
([MENU] →[ICON] →[ICON] →[Auto])
To ensure a constant degree of brightness, the brightness of the image changes automatically according to the brightness of the shooting environment. Use the [◎/] button on the operating panel or the [◀※/] buttons on the remote control to change the automatic brightness adjustment.


Brightness of the screen is the same
Manual brightness adjustment

Use the [ /- ] buttons on the operating panel or the
[◀※ / ▶●●●●●●●●●●●●●●●●●●●●●●●●●●●●●●●●●●●●●●●●●●●●●●●●●●●●●●●●●●●●●●●●●●●●●●●●●●●●●●●●●●●●●●●●●●●●●●


flowchart
graph TD
    A["Sun"] --> B["Light bulb with scale"]
    C["Moon"] --> D["Light bulb with scale"]
    B --> E["Computer monitor"]
    D --> F["Computer monitor"]
    style A fill:#f9f,stroke:#333
    style C fill:#f9f,stroke:#333
    style E fill:#ccf,stroke:#333
    style F fill:#ccf,stroke:#333
Brightness of the screen is different
Note
• Factory setting is set to [Auto].
- By setting [ [MENU] →[ [I] →[On], the setting details are displayed on the screen.
- To return to the factory settings, press the [√] buttons on the operating panel at the same time, or select [Rst Brightness] from the menu.
- In places where the object is exposed to bright sunlight (e.g. near a window), or extremely bright lights, the brightness of the screen may not dim sufficiently, even when the [ ] button on the operating panel or the [ ] button on the remote control is pressed.
In such cases, to adjust the amount of light, close the curtains or move the object away from the light.

Turning the illumination ON/OFF
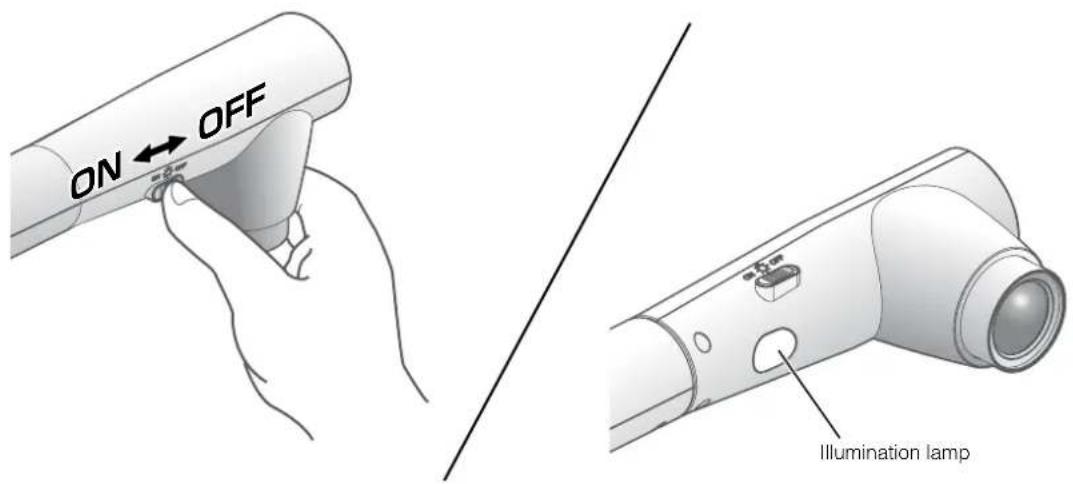
The illumination light can be turned ON/OFF by sliding the illumination light switch.
• [ON] : The illumination light turns on.
• [OFF]: The illumination light turns off.
CAUTION
• To take shots of people, turn the illumination light switch to OFF.
• Make sure that the light from the illumination light does not shine directly into your eyes.
- This product is equipped with a high-brightness LED light. You can safely use the light to light up objects, however its brightness will gradually diminish with long-term use. This is not a malfunction of the light, but a feature of LED performance.
- Do not touch the illumination light while it is on as it may become very hot.
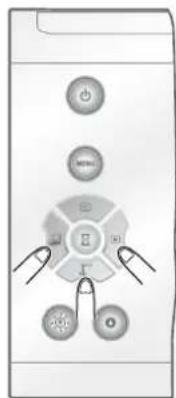
Image selection
Select the image as described below.

natural_image
Front view of a handheld electronic device with control buttons and display (no readable text or symbols)Camera image:
[ ] button on the operating panel or
[ ] on the remote control.
Image input to the [RCU P] terminal:
[ ] button on the operating panel or [ ] button on the remote control.
Image stored on the SD card/USB flash drive:
[ ] button on the operating panel or [ ] button on the remote control.

Note
- When using a PC with an external output mode, set the PC to the external output mode after pressing the [ ] button on the operating panel or the [ ] button on the remote control.
- Image of the [ ] terminal is output from the [ ] terminal only. As to [ ] terminal and [ ] terminal, press the [ ] button on the operating panel or the [ ] button on the remote control to display the camera image on the screen.
using the image
Press the [ ] button on the operating panel to pause the camera image. Press the button again to cancel the pause.
2-4 Setting Changes
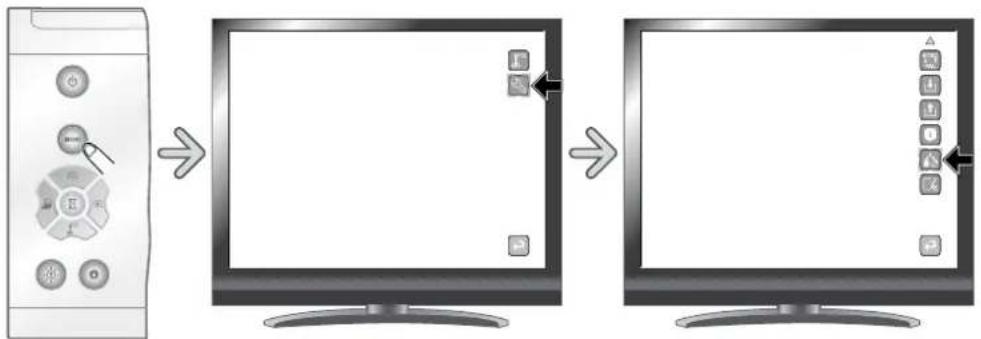
Various settings for this unit are changed through the menu (characters and icons) displayed on the screen.
Changing a Setting
① Press the [ ] button on the operating panel to display the menu on the screen, and then use the

buttons to move the cursor to the icon you want to operate or set.
② Press the [] button to select the function to be changed.

List of the Menus

flowchart
graph TD
    A["MENU"] --> B["Press"]
    B --> C["Main unit settings"]
    C --> D["Press [Select"]]
    D --> E["Main unit settings"]
    E --> F["Support Function"]
    F --> G["P.25"]
    F --> H["P.25"]
    F --> I["P.25"]
    F --> J["P.25"]
    F --> K["P.25"]
    F --> L["P.25"]
    F --> M["P.25"]
    F --> N["P.25"]
    F --> O["P.25"]
    F --> P["P.25"]
    F --> Q["P.25"]
    F --> R["P.25"]
    F --> S["P.25"]
    F --> T["P.25"]
    F --> U["P.25"]
    F --> V["P.25"]
    F --> W["P.25"]
    F --> X["P.25"]
    F --> Y["P.25"]
    F --> Z["P.25"]
    F --> AA["P.25"]
    F --> AB["P.25"]
    F --> AC["P.25"]
    F --> AD["P.25"]
    F --> AE["P.25"]
    F --> AF["P.25"]
    F --> AG["P.25"]
    F --> AH["P.25"]
    F --> AI["P.25"]
    F --> AJ["P.25"]
    F --> AK["P.25"]
    F --> AL["P.25"]
    F --> AM["P.25"]
    F --> AN["P.25"]
    F --> AO["P.25"]
    F --> AP["P.25"]
    F --> AQ["P.25"]
    F --> AR["P.25"]
    F --> AS["P.25"]
    F --> AT["P.25"]
    F --> AU["P.25"]
    F --> AV["P.25"]
    F --> AW["P.25"]
    F --> AX["P.25"]
    F --> AY["P.25"]
    F --> AZ["P.25"]
    F --> BA["P.25"]
    F --> BB["P.25"]
    F --> BC["P.25"]
    F --> BD["P.25"]
    F --> BE["P.25"]
    F --> BF["P.25"]
    F --> BG["P.25"]
    F --> BH["P.25"]
    F --> BI["P.25"]
    F --> BJ["P.25"]
    F --> BK["P.25"]
    F --> BL["P.25"]
    F --> BM["P.25"]
    F --> BN["P.25"]
    F --> BO["P.25"]
    F --> BP["P.25"]
    F --> BQ["P.25"]
    F --> BR["P.25"]
    F --> BS["P.25"]
    F --> BT["P.25"]
    F --> BU["P.25"]
    F --> BV["P.25"]
    F --> BW["P.25"]
    F --> BX["P.25"]
    F --> BY["P.25"]
    F --> BZ["P.25"]
    F --> CA["P.25"]
    F --> CB["P.25"]
    F --> CC["P.25"]
    F --> CD["P.25"]
    F --> CE["P.25"]
    F --> CF["P.25"]
※ To go back a layer or to hide the menu, select [] and press the [] button.
Descriptions of Each Menu
Main Unit
| Icon Name Function | ||
 | Camera Controls To display the setting menu for camera image. | |
 | Preferences To display the preference menu for various functions. | |
 | Exit To hide the menu. | |

Camera Controls [Second Layer]
| Icon Name | Selection Item | Factory Setting | Function | |
![Elmo TT-12 - Camera Controls [Second Layer] - 1](/content/2026/05/985015/images/82c82aa5200308cd1f5943a912bf4d9217b43da8f8eb0e041c8b783141b25e24.jpg) | Brightness | Auto | To maintain constant brightness of the image, the brightness of the image changes automatically according to the brightness of the shooting environment. Press the [ * / ] buttons on the operating panel or the [ * / ] buttons on the remote control to change the brightness. P.17 | |
| Manual | Press the [ * / ] buttons on the operating panel or the [ * / ] buttons on the remote control to change the level of brightness. The brightness of the image will not change automatically in response to the brightness of the shooting environment. | |||
![Elmo TT-12 - Camera Controls [Second Layer] - 2](/content/2026/05/985015/images/c328d6f313e00e8039b8fb8923f0a1daaeb3881a25ec89c72d0561b630425215.jpg) | Rst Brightness | Reset To reset the brightness setting. | ||
| Exit To go back one layer in the menu. | ||||
![Elmo TT-12 - Camera Controls [Second Layer] - 3](/content/2026/05/985015/images/e2908e488214594faca071c5f189c1decab5b70a90c74bd2a03f2963c842d6e0.jpg) | AF Mode★What is AF?A function to automatically focus the camera. | Auto | To constantly auto focus. You do not need to press the AF button on the main unit or the [ ●] button on the remote control. The focus changes automatically as the object changes. | |
| Manual | To auto focus only once when the AF button on the main unit or the [ ●] button on the remote control is pressed.AF![Elmo TT-12 - Camera Controls [Second Layer] - 4](/content/2026/05/985015/images/1e5fea900be724264fd571a080af8d6b88d63fd67bfad1f95884abbdfb950531.jpg) | |||
| Zoom Sync To auto focus only once after zooming. | ||||
![Elmo TT-12 - Camera Controls [Second Layer] - 5](/content/2026/05/985015/images/88d6ddbd85134ad5c41a9e3e80c3ae2a4a0abfe138606a831853841bfe827733.jpg) | Focus | Near | To focus manually. | |
| Far | ||||
| Exit To go back one layer in the menu. | ||||
| Icon Name | Selection Item | Factory Setting | Function | |
![Elmo TT-12 - Camera Controls [Second Layer] - 6](/content/2026/05/985015/images/f74f466b5b97882d855fd4445fbcbfe5b1f19db387ac37ce8d631b909e68aaba.jpg) | White Balance | Auto | √ | To constantly adjust the white balance. The white balance is adjusted automatically to ensure a more natural color according to the characteristics of the object. |
| ★What is White Balance?A function to adjust any area of white color and ensure it is projected accurately as white. This allows colors to be seen naturally according to the characteristics of the object. | One-Push | To automatically adjust the white balance only once when this setting is selected. | ||
| Manual To manually adjust the [R-Gain] and the [B-Gain]. | ||||
![Elmo TT-12 - Camera Controls [Second Layer] - 7](/content/2026/05/985015/images/409c152f77a877ce135221ce2c787af9c4651d84d3500d4c95892e43cfdea32d.jpg) | R-Gain | Up To adjust the R-Gain of the camera image when the down | one layer | white balance is set to Manual. Use [Up] or [Down] to increase or decrease the red color. |
| Down | ||||
| Exit To go back | in the menu. | |||
![Elmo TT-12 - Camera Controls [Second Layer] - 8](/content/2026/05/985015/images/66c6626590c111a514f66988aad734a7a7a5cb80c78b952313fea04a08afa08d.jpg) | B-Gain | Up | To adjust the B-Gain of the camera image when the white balance is set to Manual. Use [Up] or [Down] to increase or decrease the blue color. | |
| Down | ||||
| Exit To go back | in the menu. | |||
![Elmo TT-12 - Camera Controls [Second Layer] - 9](/content/2026/05/985015/images/2998406e1f99ee9e9313938ede922d8d6320461dc5e61dbf545cee34ab6f6328.jpg) | Digital Zoom | Valid | √ | To set the digital zoom to Valid/Invalid. |
| Invalid | ||||
![Elmo TT-12 - Camera Controls [Second Layer] - 10](/content/2026/05/985015/images/ed2d380480f5a34e0730b157f3e9bec97d16c3b7e40cab398d01ed6aa88aeaf5.jpg) | Image Mode | Text 1 | √ | To clearly reproduce black & white documents including such features as characters and lines. The effect intensifies as the number increases. |
| Text 2 | ||||
| Text 3 | ||||
| ★What is Image Mode?A special effect to project a clear image. | Graphic 1 | To clearly reproduce photographs and color documents. | ||
| Graphic 2 | The image could be improved if used with a DLP projector.(The effect depends on the projector used.) | |||
![Elmo TT-12 - Camera Controls [Second Layer] - 11](/content/2026/05/985015/images/7f4deed3b9146c0f81330903dfc40bc48f6240106d4c96a7d568c78a80348638.jpg) | Edge Effect | Low | √ | To emphasizes the outline of images. Enabled only when [Graphic1] is selected for the Image Mode ( ) |
| Medium | ||||
| High | ||||
![Elmo TT-12 - Camera Controls [Second Layer] - 12](/content/2026/05/985015/images/3b3360910125eee250285cf620a8c3467976b1327ff1220e3efbd11b74c6a02a.jpg) | Gamma | Low | To change the characteristics of the image. Enabled only when [Graphic1] is selected for the Image Mode ( ) . The setting can be changed according to user preference. | |
| ★What is Gamma?An image characteristic unique to image I/O devices. | Medium | √ | ||
| High | ||||
![Elmo TT-12 - Camera Controls [Second Layer] - 13](/content/2026/05/985015/images/60c6aa3d032256442efeffa7576a6bd3ddcecd426e2dba857b65c7662a055bdd.jpg) | Exit To go back one layer in the menu. | |||
![Elmo TT-12 - Camera Controls [Second Layer] - 14](/content/2026/05/985015/images/32bc5fcb3beb7dd74ddbc96406ca373672f2d772676eec2c9238fb439f44ee25.jpg)
Preferences [Second Layer]
| Icon Name | Selection Item | Factory Setting | Function | |
![Elmo TT-12 - Camera Controls [Second Layer] - 15](/content/2026/05/985015/images/a8c363235721dd0c11b018de2535ed2670aca4fad388bd54d358a37f827b6040.jpg) | USB Mode | Mass Storage | To send the data on the SD card loaded in the device to the PC. | |
| ★What is USB Mode?Functions described on the right can be used by connecting the document camera to a PC with the USB cable. | Application | ✓ | To control this device from a PC using special soft-ware. | |
![Elmo TT-12 - Camera Controls [Second Layer] - 16](/content/2026/05/985015/images/af87fee9f3a104aa694b96227129fc570c2859309be378f25d1262aac9b978bc.jpg) | Flickerless | 60Hz | Japan/U.S. | To reduce fluorescent light flickering due to the power supply frequency. Select the same value as used for the power supply frequency. |
| 50Hz Others | ||||
![Elmo TT-12 - Camera Controls [Second Layer] - 17](/content/2026/05/985015/images/3d732e3de29a8f36b7a63bfa7b53f2de010c2503f97920720babcae518966599.jpg) | Video Format | NTSC | Japan/U.S. | Video output NTSC from the [ ] terminal on the rear panel. |
| ★What is Video Format?A radio wave system used for analog TV broadcasting.Countries use different systems, and analog TVs are sold according to the system. | PAL Others | Video output PAL from the [ ] terminal on the rear panel. | ||
![Elmo TT-12 - Camera Controls [Second Layer] - 18](/content/2026/05/985015/images/025dd4fad069337f2de3a5ea876d78982d70166de144cda146a9f91862611554.jpg) | Movie Quality | Low | To set the quality of the movie to record.Medium | |
| High | ✓ | |||
![Elmo TT-12 - Camera Controls [Second Layer] - 19](/content/2026/05/985015/images/fe6796500cbb1690885c88901e93bec647693ee1dc060b1c4939dbd766c3253b.jpg) | Volume | Up | To set the volume of the audio line output and the HDMI output. | |
| Down | ||||
| Exit | ||||
![Elmo TT-12 - Camera Controls [Second Layer] - 20](/content/2026/05/985015/images/222322d2f256fbf0d28d3651918b3249dcf35bf9214a0a84567d25c06723e9ac.jpg) | Audio Selector | Built-in mic | ✓ | To select the source of the audio input.Mic-in |
| Line-in | ||||
![Elmo TT-12 - Camera Controls [Second Layer] - 21](/content/2026/05/985015/images/62641336b12d3328b49bb2f59d735e87e5c820b08663df1f8371dd3e9eb929dd.jpg) | Select Memory | SD Card | ✓ | To select where to save still images/movies, when both SD card and USB flash drive are inserted. |
| USB Flash Drive | ||||
![Elmo TT-12 - Camera Controls [Second Layer] - 22](/content/2026/05/985015/images/af7f7c4973eb8285e65cf66280fe96b13b6eba97083ca9bbfdebadda2479f498.jpg) | Reset All | Yes | To reset various settings to factory settings. | |
| No | ||||
![Elmo TT-12 - Camera Controls [Second Layer] - 23](/content/2026/05/985015/images/0166a748a9c9cc67289b689ef581f0ba8f3aba754ec5aa039acb57a9747e32d7.jpg) | Language | Japanese Japanese To display the menu in Japanese. | ||
| English Others | To display the menu in English. | |||
![Elmo TT-12 - Camera Controls [Second Layer] - 24](/content/2026/05/985015/images/b8e4e4f68cb71f9a4f2057caccee3eaf94b803e386ffd8d58ad6f0fa755d0c6d.jpg) | Guide | ON | ✓ | The device's operating status and an explanation of the icons is displayed on the screen. |
| OFF | The device's operating status and an explanation of the icons is not displayed on the screen. | |||
![Elmo TT-12 - Camera Controls [Second Layer] - 25](/content/2026/05/985015/images/69aa676978609cd24c3d3244aa20a0279995dba73576013e21e6900e04a2fae4.jpg) | 1 | To save the current setting as the preset setting of the selected number. | ||
| 2 | ||||
| 3 | ||||
| Exit To go back one layer in the menu. | ||||
![Elmo TT-12 - Camera Controls [Second Layer] - 26](/content/2026/05/985015/images/d4e487cab826fb981be8b64c8d39da3b3caa100df33ba61eee370eb0449af7a2.jpg) | 1 | To call the setting saved for the selected number.2 | ||
| 3 | ||||
| Exit To go back one layer in the menu. | ||||
![Elmo TT-12 - Camera Controls [Second Layer] - 27](/content/2026/05/985015/images/b7a6370ce99a29028df37ba6cecbd4bcc3463d0976068d1a29f730348b75f08e.jpg) | Exit To go back one layer in the menu. | |||
Support Function
| Icon Name Function | ||
![Elmo TT-12 - Camera Controls [Second Layer] - 28](/content/2026/05/985015/images/c860c017ff4ba37c6b0d50af00f1870e0a5aa31078e8f1ec3c5a13c5764efd4f.jpg) | Highlight To highlight and draw attention to a particular section of the image. | P.28 |
![Elmo TT-12 - Camera Controls [Second Layer] - 29](/content/2026/05/985015/images/ef43a2182f00128119e4de6b6a75de4cca3e55c1a133086b7cad2ba36d1364e3.jpg) | Mask To mask a section of the image. | P.30 |
![Elmo TT-12 - Camera Controls [Second Layer] - 30](/content/2026/05/985015/images/042439184939b86abda2d502b5730c4bca54c82dbcbf04c583ee9d3b73b159c1.jpg) | Scroll To expand to a set size and allow scrolling of the enlarged section. | P.31 |
![Elmo TT-12 - Camera Controls [Second Layer] - 31](/content/2026/05/985015/images/c4014d7613495034a9be914fadbc40ff7d3f50413c0e1ae6d4fb9b8a9b6577f0.jpg) | Compare Picture | To display a still image and live image together. The still image is displayed on the left side of the screen, and the camera image on the right. P.32 |
![Elmo TT-12 - Camera Controls [Second Layer] - 32](/content/2026/05/985015/images/526e72f9bc686203d45bf83d72b80ef4a1b8fbc7da441cdcfbf1779f6be996db.jpg) | PIP (Picture in Picture) | To display either a still image or a Camera image while displaying the other. The image is displayed at the bottom right of the Screen. P.33 |
![Elmo TT-12 - Camera Controls [Second Layer] - 33](/content/2026/05/985015/images/ca6e43f37f7ebf52431808e04d2d45de3574fd3969ecee35f9979bc1ed895c9a.jpg) | Mosaic | To apply a mosaic effect to the image. P.35 |
![Elmo TT-12 - Camera Controls [Second Layer] - 34](/content/2026/05/985015/images/7090e17ca7f0248e51de47d158a2f6899661875ca2cb3b5f48b34e49c773ba8d.jpg) | Marker Mask | A filter to blacken a color section of the image. For instance, this can be used to temporarily hide colored text, so students can be questioned about the hidden text. P.36 |
![Elmo TT-12 - Camera Controls [Second Layer] - 35](/content/2026/05/985015/images/9b7bbef62f37e1002a30b3b87e8df65c29793a8677078cefac6b89ed27c5c84b.jpg) | Microscope | For use with a microscope. P.70 |
![Elmo TT-12 - Camera Controls [Second Layer] - 36](/content/2026/05/985015/images/45b91f7f5663a4b87d7b8f889da33ed94053ff5933b7e9d8779aacccf09db7e7.jpg) | Image Rotation | To rotate the image by 180°. |
![Elmo TT-12 - Camera Controls [Second Layer] - 37](/content/2026/05/985015/images/31d41d77b1926c0ba4df186edc34aeccfcce6362c79e585623636c6da9ab0f7c.jpg) | Color/B&W | To display an image in color. |
| To display an image in black & white. | ||
![Elmo TT-12 - Camera Controls [Second Layer] - 38](/content/2026/05/985015/images/f3e67297a898337d3ec9a8cc2b4983017b5a6d3023dde14fe47282b51cbc6ee1.jpg) | Posi/Nega | To output a positive image. |
| To output a negative image. | ||
Support Function Setting
Highlight
| Icon Name Selection Item Function | ||||
 | Darkness |  | Darken | To set the darkness of a dark section. The dark section becomes darker when [+] is selected, and becomes more visible when [1] is selected. |
 | Lighten | |||
| Exit | ||||
 | Size |  | Lengthen Height (stretch) | To change the size of the highlighted display area. |
 | Shorten Height | |||
 | Lengthen Width (stretch) | |||
 | Shorten Width | |||
| Exit | ||||
| Exit | ||||
Mask
| Icon Name Function | |
| Exit |
Scroll
| Icon Name Function | ||
 | x2 To set the digital zoom magnification to 2x when the Scroll icon is selected. | |
 | x3 To set the digital zoom magnification to 3x when the Scroll icon is selected. | |
 | x4 To set the digital zoom magnification to 4x when the Scroll icon is selected. | |
| Exit | ||
Compare Picture
| Icon Name Function | ||
| Prev Picture To show the previous picture. | ||
| Next Picture To show the next picture. | ||
| Exit | ||

PIP
| Icon Name Function | ||
| [&WD] | Prev Picture To show the previous picture. | |
| [&WD] | Next Picture To show the next picture. | |
 | Change Window To switch the sub screen and the main screen. | |
| Exit | ||

Mosaic
| Icon Name Function | |||
 | Coarse To make the mosaic pattern coarser. | ||
 | Fine To make the mosaic pattern finer. | ||
| Exit | |||

Marker Mask
| Icon Name Function | |
| Exit |

Microscope
| Icon Name Function | |
| Exit |
Details of Each Function
Highlight Function
This is a function to highlight a particular section of the image.
Use this function to draw attention to a section.
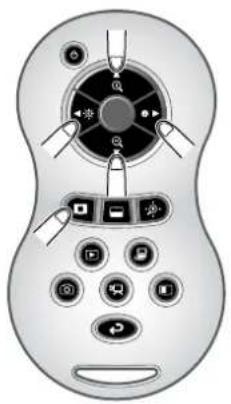
Highlight operations
When you press the [ ] button on the remote control or [ ] on the menu while a camera image or a Play mode is displayed, the highlight function uses the darkness and size set previously.
You can move the highlighted area using the [ ] buttons on the remote control.
The highlight display is cleared when you press the [☐] button on the remote control or [☐] on the menu again.
natural_image
Diagram of a stylized cell with labeled buttons and ports (no text or symbols)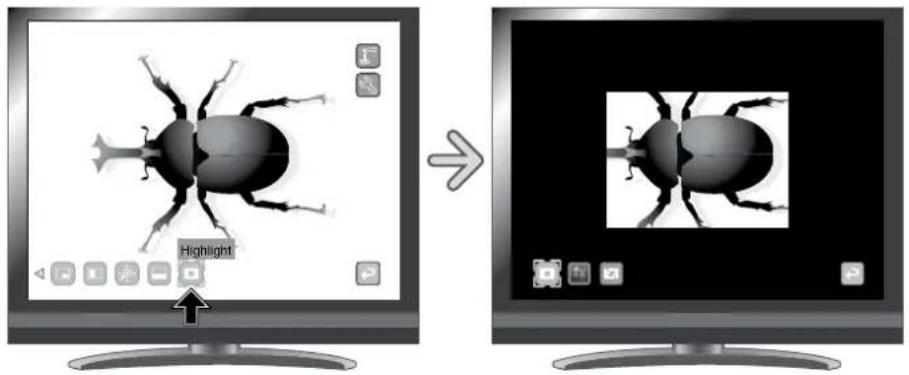
Note
- The Highlight function cannot be used when the [ ] button is selected in the Image Selection.
- Highlighted image cannot be captured.
Setting operations
You can change the darkness of a particular section by changing the setting of [ ] on the menu while the section is highlighted.

natural_image
Computer monitor displaying a black beetle illustration with no visible text or symbols on the image itself.BASIC OPERATIONS
You can also change the size of the highlighted display area by changing the setting of [ ] on the menu.

Mask Function
This is a function to mask a section of an image.
Mask operations
When you press the [ ] button on the remote control or [ ] on the menu while a camera image or a Play mode is displayed, the mask effect is applied with the darkness set previously.
You can move the masked area using the [◀] buttons on the remote control.
The mask display is cleared when you press the [ ] button on the remote control or [ ] on the menu again.

natural_image
Diagram of a stylized human head with control buttons and a circular dial (no text or symbols)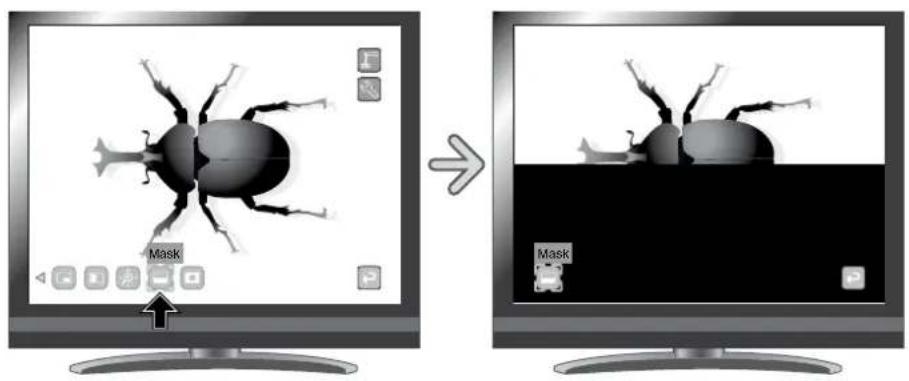
Note
- The Mask function cannot be used when the [] button is selected in the Image Selection.
- Masked image cannot be captured.
Scroll Function
The image expands to the digital zoom set previously, and the enlarged screen can be scrolled.
Scroll operations
When you press the [Button on the remote control or [ ] on the menu
while a camera image or a Play mode is displayed, the image expands to the
digital zoom set previously.
You can scroll the enlarged image by using the [◀] buttons on the remote control.
Digital zoom is canceled when you press the [icon] button on the remote control or [icon] on the menu again.

natural_image
Top-down view of a stylized mobile phone with control buttons and display screens (no text or symbols visible)BASIC
OPERATIONS

natural_image
Computer monitor displaying a black beetle illustration with no visible text or symbols on the image itself.Normal Digital zoom

Scroll


Note
- The Scroll function cannot be used when the [] button is selected in the Image Selection.
- When digital zoom has already been performed from the zoom dial on the main unit or the zoom buttons on the remote control, digital zoom is released and the scroll function works at the magnification ratio currently set.
- Cannot use digital zoom while scrolling.
- Within the digital zoom range, the image quality deteriorates.
Digital zoom setting operations
You can change the digital zoom ratio to either x2, x3, or x4 by selecting [ ], [ ], or [ ] on the onscreen menu while the scroll function is working.

natural_image
Black-and-white illustration of a computer monitor displaying a stylized cartoon character (no text or symbols visible)Compare Picture Function
To display the camera image and the picture stored on the SD card/USB flash drive together.
Compare Picture operations
When you press the [ ] button on the remote control or [ ] on the menu, while a camera image or a play mode is displayed, the camera image is displayed at the right side of the screen and the picture stored on the SD card/USB flash drive is displayed at the left side of the screen.
The Compare Picture function is cleared when you press the [ ] button on the remote control or [ ] on the menu again.

Camera image Camera imagePicture
Changing the still Picture
You can change the picture displayed on the screen to an other picture stored on the SD card/USB flash drive by selecting [ ◀ ] or [ ] on the menu, while the compare picture function is working.

natural_image
Illustration of a beaker being heated by a screen, showing liquid level and reaction step (no text or symbols)Note
- The Compare Picture Function cannot be used when the [] button is selected in the Image Selection.
- When using the Compare Picture Function, the image cannot be captured.
Picture in Picture Function
To display either a picture stored on the SD card/USB flash drive or a camera image at the bottom right of the screen.
Picture in Picture Operations
When you press the [] on the menu, while a camera image is displayed, the picture stored on the SD card/USB flash drive is displayed at the bottom right of the screen.
When you press the [☐] on the menu, while the picture stored on the SD card/USB flash drive is displayed, a camera image is displayed at the bottom right of the screen.
The Picture in Picture effect is cleared when you press the [ ] on the menu again.

Changing the still picture
You can change the picture displayed on the screen to an other picture stored on the SD card/USB flash drive by selecting [ ◀ ] or [ ] on the menu, while the picture in picture function is working.

natural_image
Illustration of a beaker being painted with a pipette, displayed on a monitor (no text or symbols)Switching the subscreen and the main screen.
You can switch the subscreen and the main screen by selecting [] on the menu. While the Picture in Picture function is working.

Camera image Picture Picture Camera image

Note
- The Picture in Picture function cannot be used when the [ ] button is selected in the image selection.
- When using the Picture in Picture function, the image cannot be captured.
- When digital zoom is used, the still screen is displayed only at 12x optical zoom magnification.
- Cannot use digital zoom while using PIP function.
Mosaic Function
To apply a mosaic effect to the image. You can change the extent of mosaic.
Mosaic Operations
When you press the [ ] on the menu, while a camera image or a Play mode is displayed, the mosaic effect is applied. The mosaic effect is cleared when you press the [ ] on the menu again.
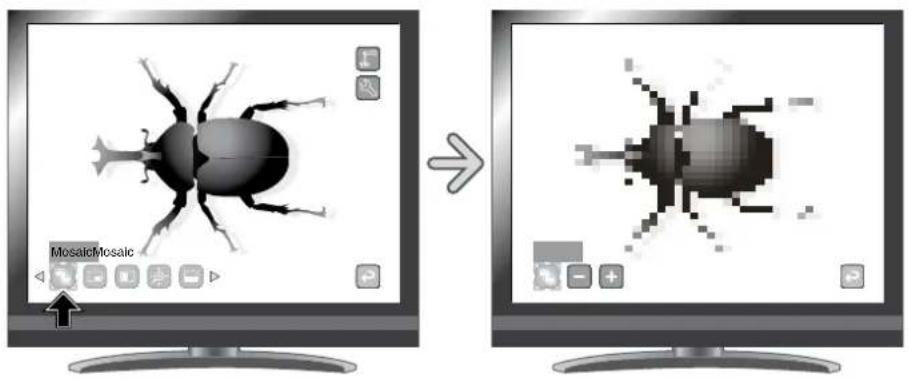
Mosaic setting Operations
You can change the extent of mosaic by selecting [ ]+ or [ - ] on the menu.
While the mosaic function is working.
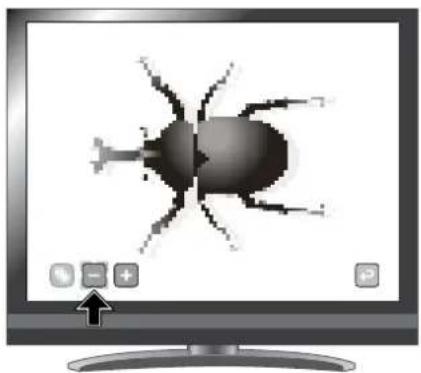
natural_image
Computer monitor displaying a pixelated image of an insect, no text or symbols presentNote
- The Mosaic function cannot be used when the []P button is selected in the image selection.
- When using the Mosaic function, the image cannot be captured.
Marker Mask Function
This is a filter to blacken the color section of an image.
For instance, this can be used to temporarily hide colored text, so students can be questioned about the hidden text.
Marker Mask operations
Press [] on the menu to blacken the color section in the image.

Note
- The Marker Mask function can be used only when the [ ] button is selected in the image selection.
- When using the Marker Mask function, the image cannot be captured.
- The proper effect of this function may not be obtained depending on the material used.
With this equipment, you can save a camera image as a picture or movie on an SD card or USB flash drive. You can also display the data stored on the SD card or USB flash drive on the screen.
Before you begin, insert a commercially available SD card or USB flash drive into the corresponding slot on the side panel.

Note
- SD card
- The SDXC card cannot be used.
- Formatting the SD card with this product before you use is recommended.
- Using the SD card to record movies is recommended.
- Using the SD card class 6 or higer is recommended.
- USB flash drive
- Supports the USB flash drive up to 32GB.
- Formatting the USB flash drive with this product before you use is recommended.
- It may take some time to recognize the memory card after inserting it or to save images to the memory card.
- Please do not remove the memory card while recording, playing or using education support function when the main unit is accessing the memory card.
Note
- Formatting the SD card/USB flash drive.
When you need to format the SD card/USB flash drive, insert it into this product and excute formatting.
① Press the [ ] button on the operating panel or [ ] button on the remote control to switch the output image to Play mode.
②Press the [阀门] button on the operating panel to display the menu.
③From the menu, select [] to switch the menu.
④ Select [ ] from the menu.
⑤Select [] to start formatting. If you do not want to format, select [] NO .
Saving images
Picture
Basic operations
① Press the [ ] button on the operating panel or the [ ] button on the remote control.
natural_image
Illustration of a remote control panel with buttons and display screen (no text or symbols)② Make sure that the menu is not displayed on the screen and press the [ ] button on the operating panel or the [ ] button on the remote control.
If the menu is displayed on the screen, do the above-operation after hiding the menu by pressing the [MENU] on the operating panel.

natural_image
Two remote control panels: one with a remote control knob and buttons, the other with a stylized phone interface (no text or symbols visible)③ Saving begins when [ ] appears on the screen.

natural_image
Front view of a flat-screen monitor with a small icon on the screen (no text or symbols visible)-Saving-
Movie
Basic operations
① Press the [] button on the operating panel or the
[ ] button on the remote control.

natural_image
Front view of a remote control device with control buttons and display (no text or symbols visible)② Press the [ ] button on the remote control.

natural_image
Front view of a stylized remote control device with buttons and display (no text or symbols visible)③ Recording begins when [ ] appears at the top left of the screen. When you press the [ 🔍 ] button again on the remote control, recording stops and [ 🔍 ] disappears.

natural_image
Illustration of a flat-screen monitor with a circular icon on the top left corner (no text or symbols on the screen)- Recording -
Note
- Even if the output image is set to HDMI and the resolution is set to 1080p, it is recorded with 720p.
- Use a memory card with a faster read/write speeds (in case of SD card: Class 4 or better), or the image quality may deteriorates.
- How to select the destination to save when both SD card and USB flash drive are inserted. While the camera image is displayed on the screen, select [SD Card] or [USB Flash Drive] in the

flowchart
graph LR
    A["Control Panel"] --> B["Display State"]
    B --> C["Control Panel with Display Icon"]
    C --> D["Display State with Display Icon"]
■splaying the stored data
Thumbnail display (list of pictures/movies)
Basic operations
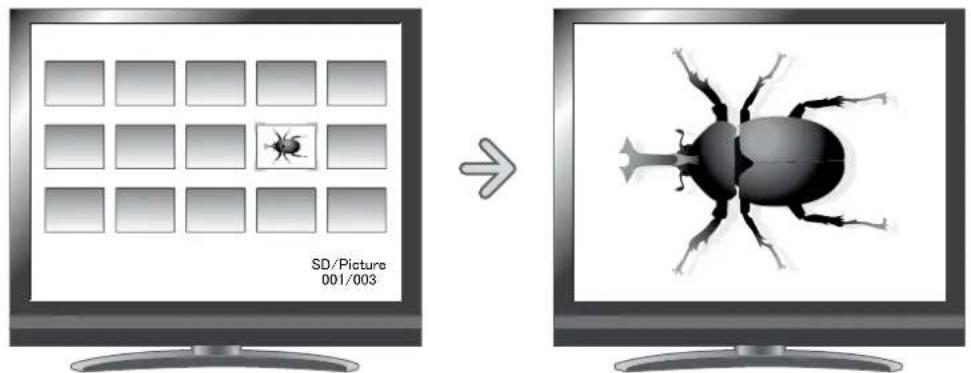
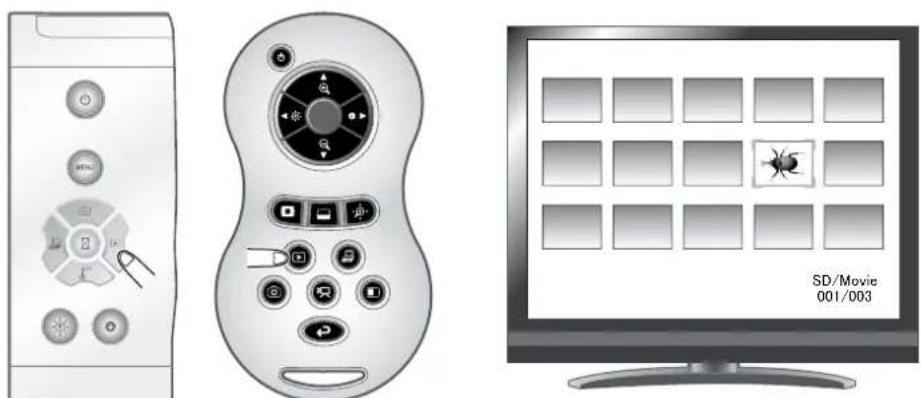
① Press the [ ] button on the operating panel or the [ ▶ ] button on the remote control to display the thumbnails (list of pictures/movies).

natural_image
Two remote control panels: one with a remote control interface and the other with a device dial (no text or symbols visible)ADVANCED OPERATIONS


How to move the cursor
(1) You can move the cursor using the [ ] or
[●] button on the operating panel or the

| button on the remote control.
(2) You can display the selected picture/movie full-screen by pressing the [ Ⓗ ] button on the operating panel or the [ Ⓞ ] button on the remote control.


natural_image
Illustration of a stylized remote control device with buttons and a central rotary knob (no text or symbols)

natural_image
Front view of a stylized remote control device with control buttons and navigation icons (no text or symbols)
natural_image
Computer monitor displaying a grid of blank square tiles with an insect icon in the top-left corner (no text or symbols on tiles)

natural_image
Illustration of a beetle displayed on a monitor (no text or symbols)Changing settings
You can display the Thumbnail Menu by pressing the [MENU] button on the operating panel while the thumbnails are displayed on the screen.
- Move the cursor using the button on the operating pan
- Press the [ ] button on the operating panel to select the menu item.


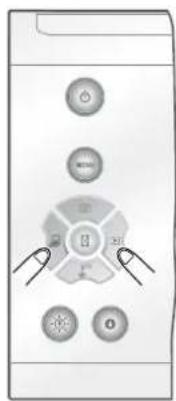
[ ] button: Moves the cursor left [ ] button: Moves the cursor right

natural_image
Close-up of a computer control panel with circular buttons and a cursor pointer (no readable text or symbols)If you press [ ▷ ], the next set of menu icons appears.

CAUTION
Pressing the [] or [] button on the operating panel while the menu icons are hidden allows you to navigate among the images.
You can not operate the menu from the remote control.
Menu descriptions
Thumbnail display
| Icon Name Selection Item Function | |||
| Prev Page To move to the previous thumbnail page. | |||
| Next Page To move to the next thumbnail page. | |||
 | SD Card | To switch between the memory to/from which images are stored/displayed. | |
 | USB Flash Drive | It can be switched with the [ ] button on the remote control too. | |
 | Movie | To switch the data displayed as thumbnails between movies and pictures. | |
 | Picture | It can be switched with the [ ] button on the remote control too. | |
 | Next Menu To move to the next menu page. | ||
 | Memory Lock | Lock/Unlock | To lock (set as protected) or unlock (set as unprotected) the selected image. It can be switched with the [ ] button on the remote control too. |
| Lock All To lock (set as protected) all thumbnail images. | |||
| Unlock All | To unlock (set as unprotected) all thumbnail images. | ||
 | Delete | YES Yes To delete the selected image. | |
| NO No To cancel deletion. | |||
 | Format | YES Yes To format the USB flash drive or SD card. | |
| NO No To cancel formatting. | |||
 | Prev Menu To move to the previous menu page. | ||
Displaying a picture full-screen
You can display a picture you selected from the thumbnails (list of pictures/movies) full-screen.
Basic operations
① Show in the Thumbnail Menu the icon for displaying the list of pictures.
Press the [MENU] button on the operating panel to display the Thumbnail Menu.
Then, the current status of the selection is displayed at the button right of the screen.

(1) If you see [ ] in the menu, the list of pictures has already been displayed.
(2) If you see [ ] in the menu, press the [ ] or [ ] button on the operating panel to move the cursor to [ ] and then press the [ ] button.
You can display the list of pictures.
Or a list of images can be displayed with the
[ ] button on the remote control.
(3) Press the [MENU] button again to hide the Thumbnail Menu.


② Select the picture you want to display full-screen.
Press the [💡] or [ ] button on the operating panel or the [ ] but run on a remote control to move the cursor.

③ Select the picture you want to display full-screen.
Press the [ ] button on the operating panel or the [ ] button on the remote control.

In this status, press the [←→] on the remote control to display another image in the thumbnail list.
④ To return to the thumbnail display, press the [] button on the operating panel or the [] button on the remote control.

Changing settings
While a picture is displayed full-screen, you can display the Picture Menu and Support Function Menu by pressing the [MENU] button on the operating panel.
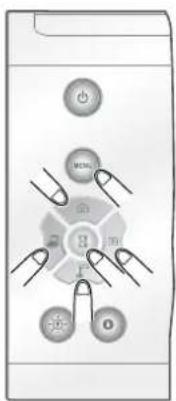

Move the cursor using the [ ] button.
button on the operating panel and select a menu item with the
Menu descriptions
Picture Display Menu
| Icon Name | Selection Item | Function | |
 | Delete | Yes | To delete the image displayed on the screen (You can not delete the image if it is protected). |
| No To cancel deletion. | |||
| Exit Exit the current menu. | |||
 | Memory Lock | To lock (set as protected) or unlock (set as unprotected) the selected image. | |
 | Exit To return to the previous level of menu. | ||
Support Function
| Icon Name Function | ||
 | Highlight To highlight part of the image you want to emphasize. | P.28 |
 | Mask To mask part of the image. | P.30 |
 | Scroll | To enlarge the image to the size you specify, allowing you to move within the enlarged area. P.31 |
 | Compare Picture | To display the still image captured when this icon is selected on the left, and display the camera image on the right. P.32 |
 | PIP (Picture in Picture) | To display a Camera image while displaying a still image saved in the memory card. The Camera image is displayed at the bottom right of the screen. P.33 |
 | Mosaic | To apply the mosaic effect to the image. P.35 |
 | Marker Mask | To apply a filter to a colored area to cover it with the black marker.This function allows you to temporarilyhide selected color characters and question the students. |
 | Image Rotation To rotae | a still image saved in the memory card by 90°. |
Highlight
| Icon Name Selection Item Function | ||||
 | Darkness |  | Darken | To set the darkness of the darkened (not highlighted) area. [+] makes the dark area less transparent and harder to see through, and [ ]makes the area more transparent and easier to see through. |
 | Lighten | |||
| Exit | ||||
 | Size |  | Lengthen Height (stretch) | To change the size of the highlighted area. |
 | Shorten Height | |||
 | Lengthen Width (stretch) | |||
 | Shorten Width | |||
| Exit | ||||
| Exit | ||||
Mask
| Icon Name Function | |
| Exit |
Scroll
| Icon Name Function | ||
 | ×2 To set the digital zoom magnification to x2 when the Scroll icon is selected. | |
 | ×3 To set the digital zoom magnification to x3 when the Scroll icon is selected. | |
 | ×4 To set the digital zoom magnification to x4 when the Scroll icon is selected. | |
| Exit | ||

Compare Picture
| Icon Name Function | ||
| Prev Picture To show the previous picture. | ||
| Next Picture To show the next picture. | ||
| Exit | ||

PIP
| Icon Name Function | ||
| Prev Picture To show the previous picture. | ||
| Next Picture To show the next picture. | ||
| Change Window To switch the sub screen and the main screen. | ||
| Exit | ||

Mosaic
| Icon Name Function | ||
| Coarse To make the mosaic pattern coarser. | ||
| Fine To make the mosaic pattern finer. | ||
| Exit | ||

Marker Mask
| Icon Name Function | |
| Exit |
Playing a movie full-screen
You can play a selected movie from the thumbnails (list of pictures/movies) full-screen.

Basic operations
① Show in the Thumbnail Menu the icon for displaying the list of movies.
Press the [MENU] button on the operating panel to display the Thumbnail Menu.
Then, the current status of the selection is displayed at the button right of the screen.

(1) If you see [ ] in the menu, the list of movies has already been displayed.
![(2) If you see [ ] in the menu, press the [ ] or [ ] button on the operating panel to move the cursor to [ ] and then press the [ ] button.](/content/2026/05/985015/images/9de3579afb528c257b210fbdf56bc07a4362340d38840b2ba8a7a9aa7c533cab.jpg)
You can display the list of movies. Or a list of images can be displayed with the
[ ] button on the remote control.
(3) Press the [ ☑] button again to hide the Thumbnail Menu.

natural_image
Two computer control panels: one with a keypad and button, the other with a remote control interface (no text or symbols visible)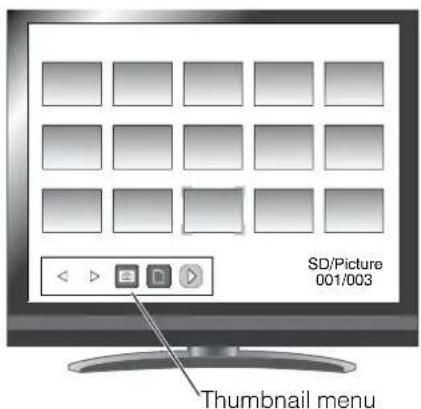
② Select the movie you want to display full-screen.
Press the [icon] or [button] button on the operating panel or the [ ] button on the remote control to move the cursor.

natural_image
Illustration of a remote control panel, a stylized remote with control buttons, and a monitor displaying a small spider icon (no text or symbols on the main components)③ Select the movie you want to display full-screen.
Press the [ ] button on the operating panel or the [ ] button on the remote control.
The movie automatically starts to play.
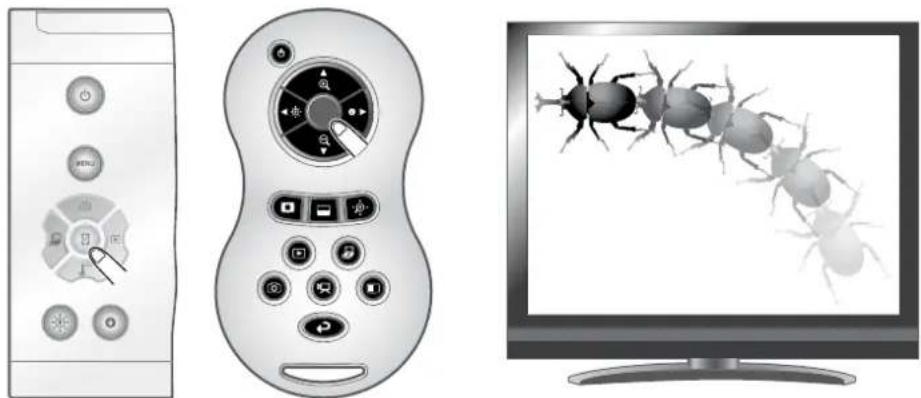
natural_image
Illustration of remote control, remote device with control panel, and computer monitor displaying a close-up of an insect (no text or symbols)④ To return to the thumbnail display, press the [] button on the operating panel or the [] button on the remote control.
natural_image
Illustration of a remote control device, a stylus, and a monitor displaying a small insect icon (no text or symbols on the devices themselves)Changing settings
You can display the Movie Menu by pressing the [MENU] button on the operating panel while a movie is displayed full-screen.
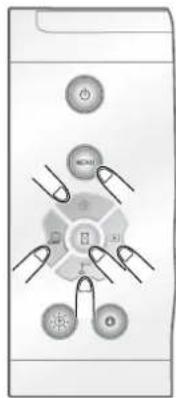
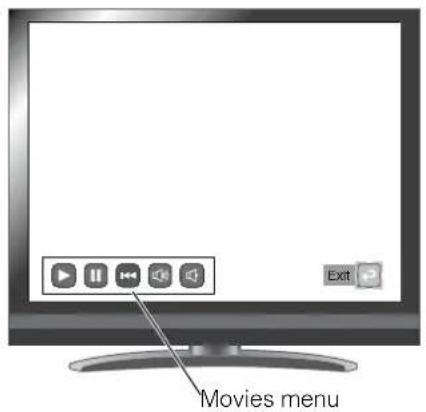
Move the cursor using the [ ] button on the operating panel and select a menu item with the [ ] button.
Menu descriptions
Movie Play Menu
| Icon Name Function | ||
 | Play | To play/stop/cueing the movie. |
 | Pause | |
 | Cueing | |
 | Up | To set the output audio volume. |
 | Down | |

Note
- You may not be able to display image data other than that saved in this product or converted using the conversion function of the software supplies.
- File Converter cannot convert movies.
- You cannot display pictures other than DCF system compliant files.
- Movie files that have the file name other than "MVI_ * * * * cannot be displayed.
- Only picture files and movie files that are saved under the folder ¥DCIM¥100_ELMO on the memory card can be playback.
- Use the File Converter of the supplied Image Mate software to convert the image files taken with a digital camera to the files viewable with the unit.
3-2 Saving data stored on an SD card to PC via USB cable

natural_image
Illustration of a desktop computer with an open device and connected to a laptop (no text or symbols present)CAUTION
- Set [ ] (USB Mode) to [Mass Storage] from the Preferences menu on the screen.

- Insert the SD card with the label facing up. Forcing it into the slot with the wrong side up may cause a malfunction.
By connecting this equipment to a PC via USB, you can save the image data stored on the SD card to the PC.
The operating system (OS) for the connected PC should be Microsoft Windows 2000 (SP4 or later), Windows XP (SP2 or later), Windows Vista or Windows 7.
① Turn on the equipment and the PC.
② Connect the equipment to the PC with the supplied USB cable.

Note
- When you connect the equipment to the PC for the first time, the required drivers are installed automatically using the plug-and-play function of Windows. From the second time and thereafter, the drivers are not installed again.
③ The equipment is recognized as a removable disk. You can view the image data on the SD card with the viewer software of the PC.
- The image data is stored as JPEG files in the following folders:
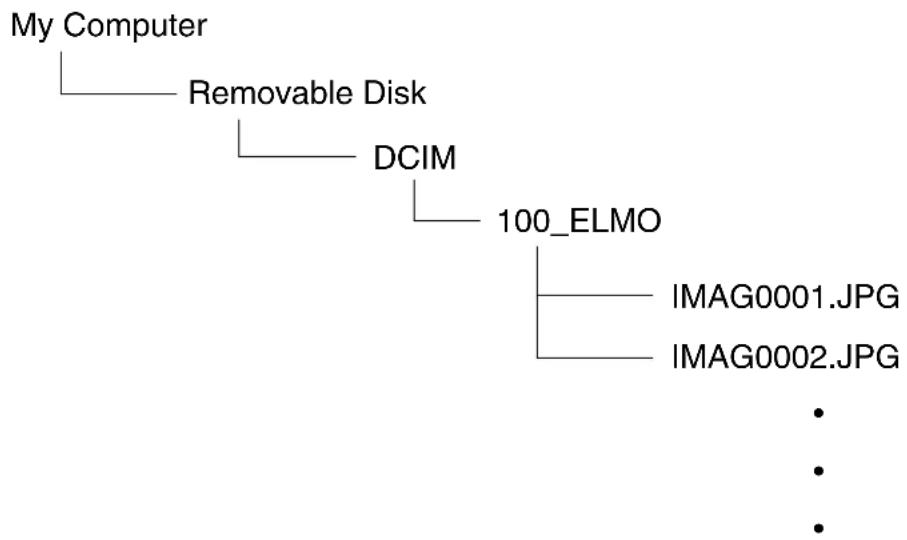
flowchart
graph TD
    A["My Computer"] --> B["Removable Disk"]
    B --> C["DCIM"]
    C --> D["100_ELMO"]
    D --> E["IMAG0001.JPG"]
    D --> F["IMAG0002.JPG"]
CAUTION
- You can not save, delete, lock, unlock, or format the images from the PC.
- The image files are not stored with the correct date and time.
- Do not connect/disconnect the USB cable while operating the equipment using the operating panel or remote control. This may cause a malfunction.
- While the equipment is in the USB-connection mode, do not switch [←] (USB Mode) to another mode from the Preferences menu on the screen.
- We recommend using a USB 2.0-compliant USB cable.

Note
- Depending on the USB environment used by the PC or any peripheral devices, image transfer may be disrupted.
- Operation is not guaranteed for all environments.
- If [USB Mode] has been set to [Mass Storage] and the equipment is connected to the PC, you can not save, delete, lock or unlock the pictures and movies using the equipment, or format the SD card.
- Make sure to disconnect the USB cable before switching [USB Mode] from the OSD menu.
3-3 Presentation using a USB-connected PC with the supplied software
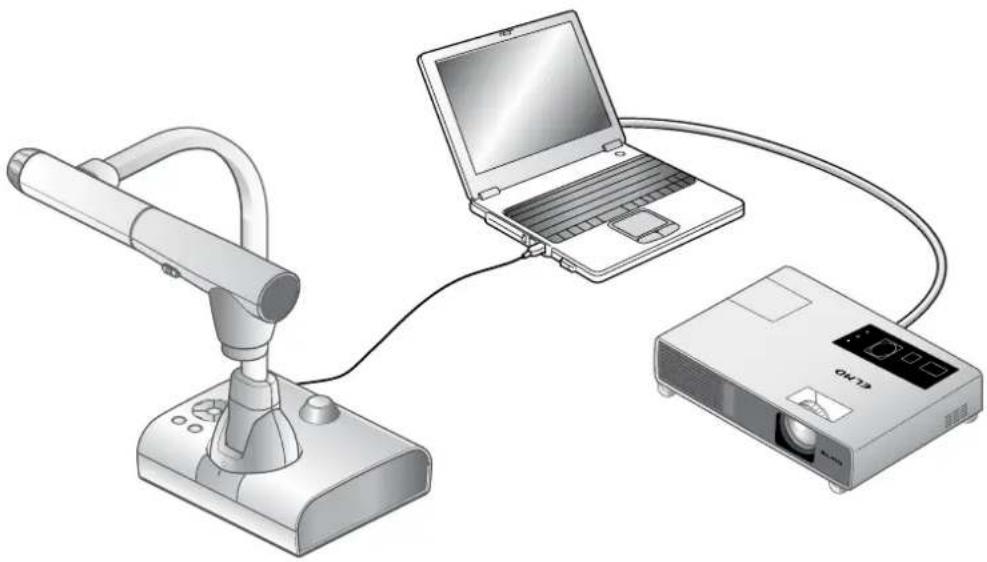
natural_image
Illustration of a desktop computer setup with a monitor, laptop, and projector connected by cables (no text or symbols)Note
- Set [USB Mode] to [Application] from the Preferences menu on the screen.
"Image Mate" is available from the supplied CD-ROM.
By using the "Image Mate" software for controlling this equipment included in the CD-ROM, you can perform the following tasks:
- Transfer movie/picture data to the PC
- Operate the product from the PC
For information on the requirements of the connected PC, OS types and the software guides, see the "Image Mate" installation manual and the "HELP folder" on the CD-ROM.
CAUTION
- Do not connect/disconnect the USB cable while operating the equipment using the operating panel or remote control. This may cause a malfunction.
• We recommend using a USB 2.0-compliant USB cable.
Note
- Depending on the USB environment used by the PC or any peripheral device, image transfer may be disrupted.
• Operation is not guaranteed for all environments. - Make sure to disconnect the USB cable before switching [USB Mode] from the OSD menu.
3-4 Using the ELMO Wireless Slate/Tablet (CRA-1) with the equipment
By using the separately sold wireless pen tablet with this equipment, you can add comments or draw on camera images directly.
You can also directly perform such operations as zooming in/out.

Connecting the ELMO Wireless Slate/Tablet (CRA-1)
① Set up the equipment as shown in the figure above and connect to the projector. Then turn on the equipment.
② Connect the dedicated wireless adapter supplied with the pen tablet to the equipment.
③ Turn on the pen tablet.
Basic operations
- Draw

natural_image
Simple line drawing of a pen with an arrow indicating left motion (no text or symbols)Touch the tablet and move
- Move the cursor 3. Select a menu button
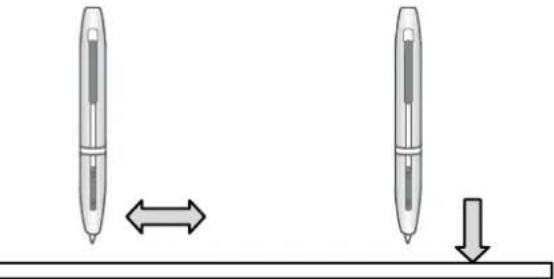
natural_image
Two identical pens aligned horizontally with bidirectional arrows and a downward arrow on a horizontal surface (no text or symbols)Lift from the tablet and move
Touch the menu button
● Drawing lines
Touch the tip of the pen to the surface of the tablet and move the pen.
If [ ] or [ ] has been selected, the pen will draw a line. Use this function to draw/erase lines.
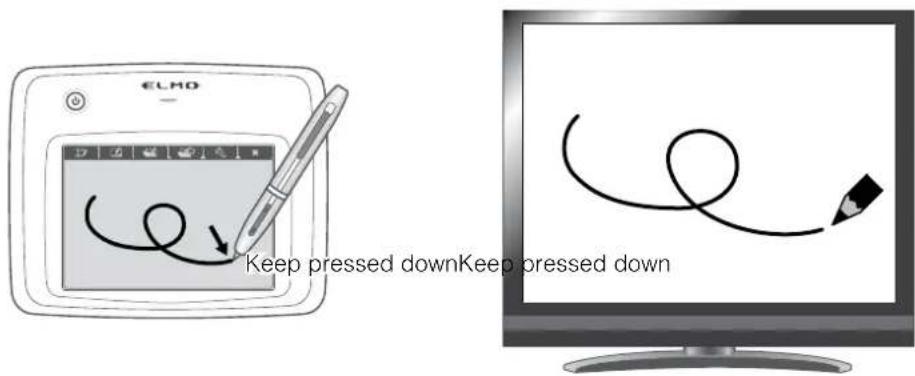
● Moving the cursor
Move the pen slightly above the surface of the tablet.
The cursor on the screen moves as the pen moves. Use this function to move the cursor.

- Selecting a menu button
Move the pen slightly above the surface of the tablet to move the cursor and then touch the pen within the working area on the tablet.
Use this function to select a menu button.

CAUTION
Press the tablet lightly with the pen; do not press hard.

Note
- Hold the pen as upright as possible; holding the pen at an angle may result in a failure of the tablet to recognize the pen.
- If the pen is not used for a while, the power saving mode is activated. Touch the tip to reactivate the pen before you use it again.
The working area on the tablet corresponds to the whole screen.

Selecting how to use the pen tablet from the tablet menu
To use the pen tablet, touch a function key at the top of the tablet and select a mode according to the situation described in the table below:

| Icon Name | Function | |
| Write to/work with camera images (Camera Mode) | Display an image on the document camera as a background, and draw on it with the pen tablet. P.60 | |
| Write on a white screen (Whiteboard Mode) | Display a white image as a background, and draw on it using the pen tablet. P.64 | |
| Work with/write to stored data (Play Mode) | Display images stored on the SD card.You can draw on the displayed image only when it is a still picture.You can not draw on a movie with the pen tablet. P.66 | |
| Setting | Specify settings for the pen tablet(the settings are common to all modes). | |
Writing to camera images
You can draw on camera images.

natural_image
Illustration of a digital drawing tablet and a computer monitor displaying a spider illustration (no text or symbols on the graphics)Menu descriptions
Pressing [ ] or [ ] switches the menu pages.

- Main Menu 1
| Icon Name Function | ||
 — — | Pen1 | To select Pen1.The initial color setting is Red.You can change the settings for the pen in the Setting menu. |
 — — | Pen2 | To select Pen2.The initial color setting is Black.You can change the settings for the pen in the Setting menu. |
 | Clear Screen | To erase anything drawn on the screen.If you need to erase a part of a drawing, move the cursor to the section to be erased, and touch the section with the pen while pressing the pen Erase button. |
 | Capture | To capture the image currently displayed on the screen as a picture and save it on the SD card.This feature captures only the displayed camera image and your comments/ drawings; the cursor and menu icons are not captured. |
 — — | Rec | To record the image currently displayed on the screen as a movie and save it on the SD card.This does not record the lines drawn with the tablet, the menu icons, or the cursor. |
 | Setting To specify the settings for Pen and Eraser. | |
 | Next To go to Main Menu 2. | |
- Main Menu 2
| Icon Name Function | ||
 | Zoom In To enlarge the size of the camera image. | |
 | Zoom Out To reduce the size of the camera image. | |
 | AF To enable autofocus operation. | |
 | Brighten To brighten the camera image. | |
 | Darken To darken the camera image. | |
 | Next To go to Main Menu 1. | |

Setting Menu
| Icon Name | Selection Item | Default Function | ||
 | Pen1 Color | Red | To set the pen color to red. | |
 | Blue To set the pen color to blue. | |||
 | Black To set the pen color to black. | |||
 | Pen1 Thickness | Thin To decrease the pen thickness. | ||
 | Medium | To set the pen thickness to medium width. | ||
 | Thick To increase the pen thickness. | |||
 | Pen2 Color | Red To set the pen color to red. | ||
 | Blue To set the pen color to blue. | |||
 | Black | To set the pen color to black. | ||
 | Pen2 Thickness | Thin To decrease the pen thickness. | ||
 | Medium | To set the pen thickness to medium width. | ||
 | Thick To increase the pen thickness. | |||
 | Erase Area | Narrow To decrease the area of partial erasure. | ||
 | Medium | To set the area of partial erasure to the medium range. | ||
 | Wide To increase the area of partial erasure. | |||
 | Exit To return to the previous level of menu. | |||
Support Function Menu
| Icon Name Function | ||
 | Show | To show/hide the Support Function Menu. |
 | Hide | |
 | Menu To change Support Function Menu. | |
 | Next Picture To move to the next picture page. | |
 | Prev Picture To move to the prev picture page. | |
 | Highlight To highlight part of the image you want to emphasize. | P.28 |
 | Mask To mask part of the image. | P.30 |
 | Scroll | To enlarge the image to the size you specify, allowing you to move within the enlarged area. |
 | Compare Picture | To display the still image captured when this icon is selected on the left, and display the camera image on the right. |
 | PIP (Picture in Picture) | In Camera mode, a still image saved in the memory card is displayed at the bottom right of the screen.In Playback mode, a Camera image is displayed at the bottom right of the screen. |
 | ||
 | Mosaic | To apply the mosaic effect to the image. |
 | Marker Mask | To apply a filter to a colored area to cover it with the black marker.You can use this to temporarily hide color characters and question the students about the contents. |
 | Microscope | You can use it to view images using a microscope. |
 | Image Rotation | To rotate a Camera image by 180° in Camera mode.To rotate a still image saved in the memory card by 90° in Playback mode. |
 | Color/B&W | To output color camera images.* |
| To output black and white camera images.* | ||
 | Posi/Nega | To output positive camera images.* |
| To output negative camera images.* | ||
*: Camera mode only.
Using as a whiteboard
You can draw on any blank white images or areas used as a background.
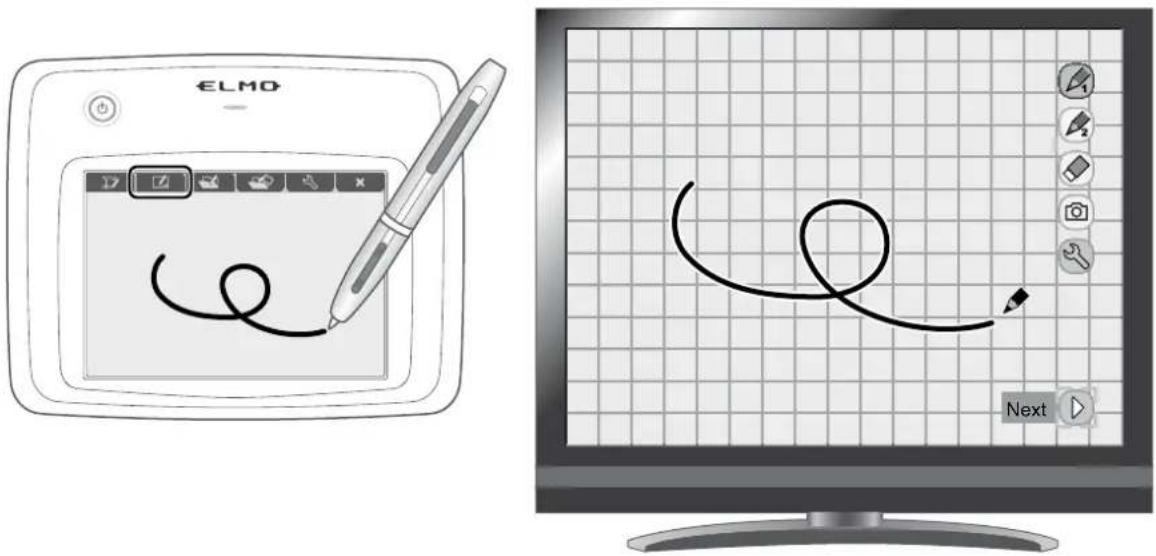
Menu descriptions
Main Menu
| Icon Name Function | ||
 | Pen 1 | To select Pen 1.The initial color setting is Red.You can change the settings for the pen in the Setting menu. |
 | Pen 2 | To select Pen 2.The initial color setting is Black.You can change the settings for the pen in the Setting menu. |
 | Clear Screen | To erase anything drawn on the screen.If you need to erase a part of a drawing, move the cursor to the section to be erased, and touch the section with the pen while pressing the pen Erase button. |
 | Capture | To capture the image currently displayed on the screen as a picture and save it on the SD card.This feature captures only the displayed camera image and your comments/drawings; the cursor and menu icons are not captured. |
 | Setting To specify the settings for Pen and Eraser. | |
 | Next | |

Setting Menu
| Icon Name Selection Item Default Function | ||||
 | Pen 1 Color | Red | To set the pen color to red. | |
 | Blue To set the pen color to blue. | |||
 | Black To set the pen color to black. | |||
 | Pen 1 Thickness | Thin To decrease the pen thickness. | ||
 | Medium | To set the pen thickness to medium width. | ||
 | Thick To increase the pen thickness. | |||
 | Pen 2 Color | Red To set the pen color to red. | ||
 | Blue To set the pen color to blue. | |||
 | Black | To set the pen color to black. | ||
 | Pen 2 Thickness | Thin To decrease the pen thickness. | ||
 | Medium | To set the pen thickness to medium width. | ||
 | Thick To increase the pen thickness. | |||
 | Erase Area | Narrow To make the area of partial erasure smaller. | ||
 | Middle | To set the area of partial erasure to the medium range. | ||
 | Wide To increase the area of partial erasure. | |||
 | Exit To return to the previous level of menu. | |||
Using the SD card
You can display a picture or movie stored on the SD card and use the tablet to draw or write on it.

- Thumbnail display

When you select an image from the thumbnails, the selected image is displayed on the screen.
Menu descriptions
Thumbnail Mode
| Icon Name | Selection Item | Function | |
| Prev Page To move to the previous thumbnail page. | |||
| Next Page To move to the next thumbnail page. | |||
 | USB Flash Drive | ||
 | Movie | To switch the data displayed as thumbnails between movies and pictures. | |
 | Picture | ||
 | Next Menu To move to the next menu page. | ||
 | Memory Lock | Lock/Unlock | To lock (set as protected) or unlock (set as unprotected) the selected image. |
| Lock All To lock (set as protected) all thumbnail images. | |||
| Unlock All | To unlock (set as unprotected) all thumbnail images. | ||
 | Delete | Yes To delete the selected image. | |
| No To cancel deletion. | |||
 | Format | Yes To format the SD card. | |
| No To cancel formatting. | |||
 | Prev Menu To move to the previous menu page. | ||
Single Mode
• Picture Display Menu 1
| Icon Name Function | ||
 | Pen 1 | To select Pen 1.The initial color setting is Red.You can change the settings for the pen in the Setting menu. |
 | Pen 2 | To select Pen 2.The initial color setting is Black.You can change the settings for the pen in the Setting menu. |
 | Clear Screen | To erase anything drawn on the screen.If you need to erase a part of a drawing, move the cursor to the section to be erased, and touch the section with the pen while pressing the pen Erase button. |
 | Capture | To capture the image currently displayed on the screen as a picture and save it on the SD card.This feature captures only the displayed camera image and your comments/drawings; the cursor and menu icons are not captured. |
 | Setting To specify the settings for Pen and Eraser. | |
 | Next To go to Menu 2. | |
- Picture Display Menu 2
| Icon Name | Selection Item | Function | ||
 | Delete | Yes | To delete the image displayed on the screen (You can not delete the image if it is protected). | |
| No To cancel deletion. | ||||
| Exit Exit the current menu. | ||||
 | Memory Lock | To lock (set as protected) or unlock (set as unprotected) the selected image. | ||

Setting Menu (when Setting Menu is selected)
| Icon Name | Selection Item | Default Function | ||
 | Pen 1 Color | Red | To set the pen color to red. | |
 | Blue To set the pen color to blue. | |||
 | Black To set the pen color to black. | |||
 | Pen 1 Thickness | Thin | To decrease the pen thickness. | |
 | Medium | To set the pen thickness to medium width. | ||
 | Thick | To increase the pen thickness. | ||
| Icon Name Selection Item Default Function | ||||
 | Pen 2 Color | Red To set the pen color to red. | ||
 | Blue To set the pen color to blue. | |||
 | Black | ✓ To set the pen color to black. | ||
 | Pen 2 Thickness | Thin To decrease the pen thickness. | ||
 | Medium | ✓ To set the pen thickness to medium width. | ||
 | Thick To increase the pen thickness. | |||
 | Erase Area | Narrow To decrease the area of partial erasure. | ||
| Medium | ✓ To set the area of partial erasure to the medium range. | |||
| Wide To increase the area of partial erasure. | ||||
 | Exit To return to the previous level of menu. | |||
- Movie Play Menu
| Icon Name Function | ||
 | Play/Stop | To play/stop/Cueing the movie. |
 | Pause | |
 | Cueing | |
 | Up | To set the output audio volume. |
 | Down | |
3-5 Displaying enlarged images using a microscope
By attaching the separately sold microscope attachment lens to a microscope, you can display the enlarged image through the document camera lens.

Procedure
① Change the setting of this equipment for using a microscope.
Press the [WENI] button.

Press [ ]
② Set the microscope.
Place the object you want to view, such as a prepared slide, on the microscope and then look into the microscope to adjust the focus and brightness.
③ Attach the microscope attachment lens.
- Att ach the guide ring to the microscope attachment lens and cover the eyepiece with it.
Set the microscope attachment lens
- Match the centers of the microscope attachment lens and eyepiece, and use the three screws to evenly tighten the lenses against each other.
CAUTION
If the screws are screwed too tightly, the microscope eyepiece or tube may be damaged.

④ Adjust the angle of the microscope and the equipment to fit each other.
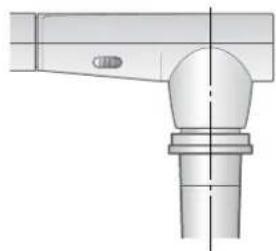
natural_image
Technical line drawing of a mechanical component with a flanged base and cylindrical shaft (no text or symbols)
natural_image
Technical line drawing of a mechanical pipe fitting with a curved handle (no text or symbols)⑤ Adjust the brightness.
Adjust the brightness with the mirror or the light on the microscope.
⑥ Adjust the display range.

⑦ Focus a camera.
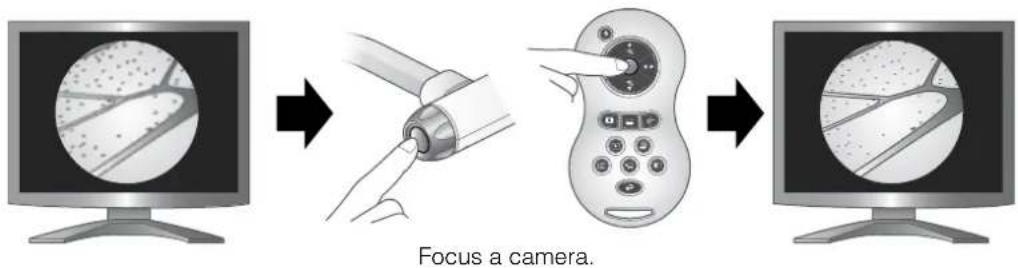
Eiting the Microscope mode
Change the setting of the equipment.
Press the [MENU] button.

Press [ ]
Note
- Depending on the type of eyepiece, you may not be able to view the object clearly even after adjusting the zoom.
- We recommend using a WF type eyepiece. If you do not use a WF type, we recommend using an eyepiece of 10x or less.
- Adjust the focus manually when it is hard to focus automatically.
- If the equipment is not tall enough to allow you to attach the microscope attachment lens, you can increase its height by placing an object such as a thick book underneath or by fitting the leg attachment (sold separately).


- You can use the microscope attachment lens when the external diameter of the eyepiece is 20 to 28mm.
- Use the thinner guide ring for Microscope Lens Attachment. There are two types of rings included in the package; the thicker one is not used here.
4 TROUBLE SHOOTING
4-1 Symptoms and Confirmation
Check the following items. If any abnormality is found, consult the dealer from whom you purchased this product or our nearest branch/office.
| Symptom Possible | cause/remedy |
| No image is displayed. | The cable is not correctly connected.The AC adapter is disconnected from the wall outlet.The AC adapter is disconnected from the power supply socket of the unit.The power is not ON. (Blue light)Zoom is set at the TELE side, displaying only the white/black part of the document.If you turn the power ON immediately after turning it OFF, the unit may not start. Wait for several seconds after turning the power OFF, and then turn it back ON.The slide switch is not set to the correct image output (RGB/HDMI/VIDEO). Set the "RGB/HDMI/VIDEO Switch" correctly.P.10Reconnect the AC adapter. |
| The output image (resolution) changes automatically. | When the HDMI monitor is connected, the output image (resolution) is automatically changed based on information from the connected monitor. |
| No image is displayed from the USB. | No image is output from USB, when USB mode is set to mass Storage or in Play mode. Switch the USB mode from Mass Storage to Application by referring to the "Function Setting Menu". When using Play mode, change the output image to Camera image. |
| The image is out of focus. | The document (object) is too close to the lens. Move the document (object) slightly away from the lens.Auto focus may have difficulty in adjusting correctly. Focus on an image manually by referring to "Manual focus". |
| The video output image is scrambled or unclear. | Video output is set to [NTSC]. If this product is set to the NTSC system and connected to a monitor specially designed for the PAL system, the video image may not be normally output but be scrambled or be displayed in black and white. Set the video output system to PAL. |
| The image is too dark. | · The intensity of the lighting is insufficient. Press the [ *] button on the operating panel or the [ *button on the remote control to adjust the brightness. |
| The image is striped. | · This may be interference fringes between dots of printed matter and TV scanning lines or CMOS pixels. Changing the shooting range may help the problem.· Vertical stripes may appear on an LCD projector image. Manually adjusting the dot clock at the projector side may help the problem. |
| Images on the SD card/USB flash drive are not displayed. | · Remove the SD card/USB flash drive, wait a few seconds and reinsert. |
| The image does not move. | · Camera image is set to [Pause]. Press the Pause button on the operating panel again to restart. |
| The remote control does not work. | · Battery power is low. Replace the batteries with new ones.· The incorrect remote control is being used. Use the supplied remote control. |
| After inserting the SD card/USB flash drive, operations cannot be performed. | · The SD card/USB flash drive is not being read correctly. Use the SD card/USB flash drive after formatting it twice as described below.First, format the card using a computer. Second, format the card using the main unit. |
| Drawing speed of the tablet is too slow. | · Drawing speed may become slow depending on the resolution setting of the unit. This is not a malfunction. |
About the light (LED lighting)
- The brightness of the light will diminish with long-term use. If its brightness has significantly diminished, consult the dealer from whom you purchased this product or our nearest branch/office for replacement.
About long-term usage of this product
- Due to the lifetime of its parts, if this product is used for longer than the warranty period, its performance and quality may deteriorate. In this case, we will replace the parts for a charge. Consult the dealer from whom you purchased this product or our nearest branch/office.
5 SPECIFICATIONS
5-1 General
| Item Specifications | |
| Power source 12VDC | (AC adapter AC100 - 240V) |
| Power consumption | 17.5W |
| Outside dimensions | W355 x D373.5 x H426.5mm (W14.0 x D14.7 x H16.8 in)(When setup) |
| W195 x D294 x H469mm (W7.7 x D11.6 x H18.5 in)(When folded) | |
| Weight Approx. 3.2kg | (7.1 lbs) (Main body only) |
| Input selection Main/ | External |
| Output terminal | RGB output Mini Dsub 15P connector, female x 1 |
| Composite video output RCA pin jack/75 Ω unbalanced x 1(NTSC/PAL) | |
| HDMI output terminal x 1 | |
| Line Out terminal 3.5mm stereo minijack x 1 | |
| Input terminal | RGB input Mini Dsub 15P connector, female x 1 |
| Mic In/Line Out terminal (shared) 3.5mm stereo minijack x 1 | |
| Ext. control terminal | USB device (2.0 compliant) Mini-B receptacle x 1 |
| MemoryInterface | SD card slot x 1 |
| USB host (2.0 compliant) Type A receptacle x 1 | |
※ Use pin plug for RCA pin in accordance with EIAJ RC-6703.
- Line input

- External mike input

5-2 Main Camera
| Item Specifications | ||||
| Lens | f = 4.0mm - 48.0mm (12x zoom) F3.2 - 3.6 | |||
| Frame rate 30fps | ||||
| Shooting area | Max. Min. | |||
| 1080p | 420mm x 233mm 48.5mm | x 27.5mm | ||
| 720p | 420mm x 233mm 48.5mm | x 27.5mm | ||
| SXGA | 420mm x 334mm 48.5mm | x 38.5mm | ||
| WXGA | 420mm x 259mm 48.5mm | x 30.5mm | ||
| XGA | 420mm x 313mm 48.5mm | x 36.5mm | ||
| Limit of focus adjustment | From lens surface:50mm (2.0 in) -∞(f=4.0mm - 23.4mm)200mm (7.9 in x) -∞(f=23.4mm and higher) | |||
| Optical zoom 12X | ||||
| Digital zoom 8X | ||||
| Focus Auto/Manual/Zoom Sync | ||||
| Image pick-up element | 1/2.8" CMOS | |||
| Total pixels Horizontal | 2144, Vertical 1588 | |||
| Effective pixels Horizontal | 1920, Vertical 1536 | |||
| Synchronized signal | Internal | |||
| Resolution | Analog RGB Horizontal 800TV lines or more Vertical800TV lines or more | |||
| Video output Horizontal 500TV lines or more | ||||
| Analog RGB output | Analog RGB output 0.7 V (p-p)75 Ω unbalancedSynchronized signalSXGA : Positive polarityWXGA : Horizontalnegative polarity,Vertical positivepolarityXGA : Negative polarity1080p : Positive polarity720p : Positive polarity | SXGA: 1280x1024@60HzHorizontal frequency: 63.981kHzVertical frequency: 60.020HzWXGA: 1280x800@60HzHorizontal frequency: 49.306kHzVertical frequency: 59.910HzXGA: 1024x768@60HzHorizontal frequency: 48.363kHzVertical frequency: 60.004Hz1080p: 1920x1080@60HzHorizontal frequency: 67.50kHzVertical frequency: 60.00Hz720p: 1280x720@60HzHorizontal frequency: 45.00kHzVertical frequency: 60.00Hz | ||
| Item Specifications | |
| HDMI output | Image output1080p720p |
| Audio outputPCM 44.1kHz sampling frequency | |
| Composite video output | Compliant with NTSC/PAL |
| White Balance Auto/One-Push/Manual | |
| Video output selection switch | Provided (NTSC/PAL) |
| Brightness Control Auto (W/Level adjustment)/Manual | |
| Posi/Nega conversion | Provided |
| Color/B&W selection | Provided |
| Image rotation Provided (0°/180°) | |
| Image Mode | Text1/Text2/Text3/Graphics1/Graphics2 |
| Gamma setting Provided (Only for graphic mode) | |
| Edge Effect Provided (Only for graphic mode) | |
| Pause Provided | |
| Still Image storage Provided | |
| Movie storage Provided | |
| Slide Show Provided | |
| Flicker connection 60Hz/50Hz | |
5-3 Illumination Device
| Item Specifications | |
| Illumination light White LED |
5-4 Trademarks · License
ELMO is a registered trademark of ELMO Co., Ltd.
SD ^TM , are the registered trademarks of SD-3C, LLC respectively.
HDMI ^® , High-Definition Multimedia Interface are the registered trademarks of HDMI Licensing LLC.
This product is based on the work of the Independent JPEG Group.
All other company/product names described in this manual are trademarks or registered trademarks of their respective companies.
This product is licensed under the AVC Visual Patent Portfolio License (AVC Video), for the personal and a non-commercial use of a consumer to
(i) Play AVC Video that was recorded by a consumer engaged in a personal and a non-commercial activity and/or,
(ii) Play AVC Video that was obtained from a video provider licensed from MPEG-LA and LLC
and it admitted to use only in personal and a non-commercial purpose.
- When you play AVC Video recorded by the personal and non-commercial purpose.
- When you play AVC Video offered by the provider licensed from MPEG-LA, LLC to provide AVC Video.
Additional information including that relating to promotional and commercial uses may be obtained from MPEG-LA, LLC.
WARNING
Unauthorized recording of copyrighted slide films, materials, photographs, etc. may infringe on the rights of copyright owners and be contrary to copyright laws.
6X1VHWAC4 R1 Xx
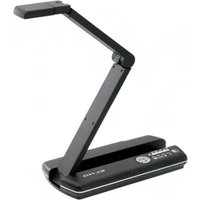


- Read Instructions
- ■ Retain Instructions
- ■ Heed Warnings
- ■ Follow Instructions
- ■ Cleaning
- ■ Attachments
- ■ Water and Moisture
- Placement
- Ventilation
- ■ Power Sources
- ■ Grounding or Polarization
- ■ Power-Cord Protection
- Lightning
- ■ Overloading
- ■ Object and Liquid Entry
- Servicing
- ■ Damage Requiring Service
- ■ Replacement Parts
- ■ Safety Check
- Heat
- CAUTION
- WARNING:
- TO REDUCE THE RISK OF FIRE OR ELECTRIC SHOCK, DO NOT EXPOSE THIS PRODUCT TO RAIN OR MOISTURE.
- FOR UNITED STATES USERS:
- INFORMATION
- USER-INSTALLER
- CAUTION:
- Wash hands after handling.
- BEFORE YOU USE
- IMPORTANT SAFEGUARDS....i
- Contents 2
- BUNDLED ITEMS ...... 4
- BASIC OPERATIONS .... 5
- ADVANCED OPERATIONS ...... 37
- TROUBLE SHOOTING....74
- SPECIFICATIONS....76
- BUNDLED ITEMS
- BASIC OPERATIONS
- 2-1 Document Camera
- Fart Names
- Operating panel
- Fear panel and cable connection
- Note
- Side panel
- Nobing Parts of the Document Camera
- 2-2 Supplied Accessories
- Remote Control
- Preparation of Remote Control
- Operation of the remote control
- Receiving signal from the remote control
- Receivable range
- Remote Control Strap
- Stage
- Anti-glare sheet
- ■ist cover
- Image Mate CD-ROM
- Instruction manual CD-ROM
- 2-3 Shooting Images
- Setting up the main unit
- Connecting the AC cord
- Connecting the video cable
- Turning the power ON/OFF
- Adjusting the size
- Adjusting the brightness
- Automatic brightness adjustment
- Manual brightness adjustment
- Turning the illumination ON/OFF
- Image selection
- Camera image:
- Image input to the [RCU P] terminal:
- Image stored on the SD card/USB flash drive:
- using the image
- 2-4 Setting Changes
- Changing a Setting
- List of the Menus
- Descriptions of Each Menu
- Main Unit
- Camera Controls [Second Layer]
- Support Function Setting
- Details of Each Function
- Highlight Function
- Highlight operations
- Setting operations
- Mask Function
- Mask operations
- Scroll Function
- Scroll operations
- Digital zoom setting operations
- Compare Picture Function
- Compare Picture operations
- Changing the still Picture
- Picture in Picture Function
- Picture in Picture Operations
- Switching the subscreen and the main screen.
- Mosaic Function
- Mosaic Operations
- Mosaic setting Operations
- Marker Mask Function
- Marker Mask operations
- - SD card
- - USB flash drive
- Saving images
- Picture
- Basic operations
- Movie
- ■splaying the stored data
- Thumbnail display (list of pictures/movies)
- How to move the cursor
- Changing settings
- Menu descriptions
- Displaying a picture full-screen
- Picture Display Menu
- Support Function
- Playing a movie full-screen
- Movie Play Menu
- 3-2 Saving data stored on an SD card to PC via USB cable
- 3-3 Presentation using a USB-connected PC with the supplied software
- 3-4 Using the ELMO Wireless Slate/Tablet (CRA-1) with the equipment
- Connecting the ELMO Wireless Slate/Tablet (CRA-1)
- ● Drawing lines
- ● Moving the cursor
- - Selecting a menu button
- Selecting how to use the pen tablet from the tablet menu
- Writing to camera images
- Using as a whiteboard
- Using the SD card
- Single Mode
- 3-5 Displaying enlarged images using a microscope
- Procedure
- ③ Attach the microscope attachment lens.
- ④ Adjust the angle of the microscope and the equipment to fit each other.
- ⑤ Adjust the brightness.
- Eiting the Microscope mode
- TROUBLE SHOOTING
- 4-1 Symptoms and Confirmation
- About the light (LED lighting)
- About long-term usage of this product
- SPECIFICATIONS
- 5-3 Illumination Device
- 5-4 Trademarks · License
- WARNING
Brand : Elmo
Model : TT-12
Category : Document Camera