
i-Pochette CO-10 - Document Camera Elmo - Free user manual and instructions
Find the device manual for free i-Pochette CO-10 Elmo in PDF.


| Product Type | Document Camera |
| Model | i-Pochette CO-10 |
| Brand | Elmo |
| Lens | F3.0, f=3.39mm |
| Image Sensor | 1/4" UXGA CMOS |
| Output Resolutions | XGA (1024×768), SXGA (1280×1024), WXGA (1280×800) |
| Digital Zoom | 6× (RGBHV and PAL/NTSC) |
| Built-in Storage | 16 images |
| Capture Function | Yes |
| Freeze Function | Yes |
| Auto Focus | Yes |
| Input Selection | Camera, PC, Internal Memory |
| Connectors | USB Type B, RGB IN (HD-15P), RGB OUT (HD-15P), VIDEO (RCA), DC IN 12V |
| Video Output Mode | RGB or Video (switchable) |
| Power Supply | AC 100-240V, DC 12V adapter included |
| Power Consumption | Standby: 4.7W; On: 5.6-5.7W |
| Dimensions (folded) | 262mm × 142mm × 37mm (10.3 × 5.6 × 1.5 in) |
| Dimensions (operating) | 446mm × 142mm × 338mm (17.6 × 5.6 × 13.3 in) |
| Weight | 1.3 kg (2.87 lbs) |
| Included Accessories | AC cord, AC adapter, C-Video cable, RGB cable, USB cable, microscope adapter, carrying bag, CD-ROM, quick start guide |
| Cleaning | Use a damp cloth; do not use liquid cleaners or aerosols |
| Environmental Limits | Temperature 0-40°C (32-104°F); Humidity 30-85% (no condensation) |
| Safety | No user-serviceable parts; refer servicing to qualified personnel |
Frequently Asked Questions - i-Pochette CO-10 Elmo
User questions about i-Pochette CO-10 Elmo
0 question about this device. Answer the ones you know or ask your own.
Ask a new question about this device
Download the instructions for your Document Camera in PDF format for free! Find your manual i-Pochette CO-10 - Elmo and take your electronic device back in hand. On this page are published all the documents necessary for the use of your device. i-Pochette CO-10 by Elmo.
USER MANUAL i-Pochette CO-10 Elmo
Please read this instruction manual carefully before using this product and keep it for future reference.
Contents
IMPORTANT SAFEGUARDS 2
BEFORE YOU USE 6
1 Package Content......8
2 Part names and Functions ......9
2.1 Name of each part 9
2.2 Functions....10
3 Installation and Connections....15
3.1 System diagram.... 15
3.2 Setting up....16
3.3 Connecting devices 17
3.4 Start using the i-Pochette 19
4 Operation Procedure....20
4.1 Presentation using printed materials, etc. 20
4.2 Presentation using the supplied software with the USB-connected PC21
4.3 Presentation using a Microscope. 22
4.4 How to switch image sources....23
4.5 How to zoom in /out of images 23
4.6 How to use the auto focus....23
4.7 How to adjust the brightness 23
4.8 How to capture images....23
4.9 How to view captured images....24
4.10 How to freeze images....24
4.11 How to delete captured images....24
5 Troubleshooting 25
6 Specifications....26
- Read Instructions All the safety and operating instructions should be read before the appliance is operated.
■ Retain Instructions The safety and operating instructions should be retained for future reference.
■ Heed Warnings All warnings on the product and in the operating instructions should be adhered to.
■ Follow Instructions All operating and use instructions should be followed.
■ Cleaning Unplug this product from the wall outlet before cleaning. Do not use liquid cleaners or aerosol cleaners. Use a damp cloth for cleaning.
■ Attachments Do not use attachments not recommended by the product manufacturer as they may cause hazards.
■ Water and Moisture Do not use this product near water – for example, near a bath tub, wash bowl, kitchen sink, or laundry tub, in a wet basement, or near a swimming pool, and the like. - Placement Do not place this product on an unstable cart, stand, tripod, bracket, or table. The product may fall, causing serious injury to a child or adult, and serious damage to the product. Use only with a cart, stand, tripod, bracket, or table recommended by the manufacturer, or sold with the product. Any mounting of the product should follow the manufacturer's instructions, and should use a mounting accessory recommended by the manufacturer.
■ Ventilation Slots and openings in the cabinet are provided for ventilation and to ensure reliable operation of the product and to protect it from overheating, and these openings must not be blocked or covered. The openings should never be blocked by placing the product on a bed, sofa, rug, or other similar surface. This product should not be placed in a built-in installation such as a bookcase or rack unless proper ventilation is provided or the manufacturer's instructions have been adhered to.
■ Power Sources This product should be operated only from the type of power source indicated on the marking label. If you are not sure of the type of power supply to your home consult your appliance dealer or local power company. For products intended to operate from battery power, or other sources, refer to the operating instructions.
■ Grounding or Polarization This product may be equipped with either a
polarized 2-wire AC line plug (a plug having one blade wider than the other) or a 3-wire grounding type plug, a plug having a third (grounding) pin. The 2-wire polarized plug will fit into the power outlet only one way. This is a safety feature. If you are unable to insert the plug fully into the outlet, try reversing the plug. If the plug still fails to fit, contact your electrician to replace your obsolete outlet. Do not defeat the safety purpose of the polarized plug. The 3-wire grounding type plug will fit into a grounding type power outlet. This is a safety feature. If you are unable to insert the plug into the outlet, contact your electrician to replace your obsolete outlet. Do not defeat the safety purpose of the grounding type plug.
■ Power-Cord Protection Power supply cords should be routed so that they are not likely to be walked on or pinched by items placed upon or against them, paying particular attention to cords at plugs, convenience receptacles, and the point where they exit from the product.
■ Lightning For added protection for this product during a lightning storm, or when it is left unattended and unused for long periods of time, unplug it from the wall outlet and disconnect the antenna or cable system. This will prevent damage to the product due to lightning and power-line surges.
■ Overloading Do not overload wall outlets, extension cords, or integral convenience receptacles as this can result in a risk of fire or electric shock.
■ combination should be moved with care.
Quick stops, excessive force, and uneven surfaces may cause the product and cart combination to overturn.
■ d in Object and Liquid Entry Never push objects of any kin this product through openings as they may touch dangerous voltage points or short-out parts that could result in a fire or electric shock. Never spill liquid of any kind on the product.
■ Servicing Do not attempt to service this product yourself as opening or removing covers may expose you to dangerous voltage or other hazards. Refer all servicing to qualified service personnel.
■ m Damwagle Requiring Service Unplug this product fro servicing to qualified service personnel under the following conditions:
- When the power-supply cord or plug is damaged.
- If liquid has been spilled, or objects have fallen into the product. If the product has been exposed to rain or water.
- allowing the operating not operate normally by f

instructions. Adjust only those controls that are covered by the operating instructions as an improper adjustment of other controls may result in damage and will often require extensive work by a qualified technician to restore the product to its normal operation.
- If the product has been dropped or damaged in any way.
- When the product exhibits a distinct change in performance this indicates a need for service.
■ Repla enterprastataPartsQVined, replace the
service technician has used replacement parts specified by the manufacturer or have the same characteristics as the original part. Unauthorized substitutions may result in fire, electric shock or other hazards.
■ roSafetysCheck Upon completion of any service or repairs to this p
the service technician to perform safety checks to determine that the product is in proper operating condition.
■ tedHeatyTheproductschurolesbserities
radiators, heat registers, stoves, or other products (including amplifier) that produce heat.

CAUTION
RISK OF SHOCKELECTRIC
DO NOT OPEN

CAUTION:
TO REDUCE THE RISK OF ELECTRIC SHOCK, DO NOT REMOVE COVER (OR BACK).
NO USER-SERVICEABLE PARTS INSIDE.
REFER SERVICING TO QUALIFIED SERVICE PERSONNEL.

SA 1965
The lightning flash with arrowhead symbol, within an equilateral triangle, is intended to alert the user to the presence of uninsulated "dangerous voltage" within the product's enclosure that may be of sufficient magnitude to constitute a risk of electric shock to persons. This marking is located at the bottom of product.

SA 1966
The exclamation point within an equilateral triangle is intended to alert the user to the presence of important operating and maintenance (servicing) instructions in the literature accompanying the product.
WARNING: TO REDUCE THE RISK OF FIRE OR ELECTRIC SHOCK, DO NOT EXPOSE THIS PRODUCT TO RAIN OR MOISTURE.
THIS IS A CLASS A PRODUCT. IN A DOMESTIC ENVIRONMENT THIS PRODUCT MAY CAUSE RADIO INTERFERENCE IN WHICH CASE THE USER MAY BE REQUIRED TO TAKE ADEQUATE MEASURES.
WARNING : Handling the cord on this product or cords associated with accessories sold with this product, will expose you to lead, a chemical known to the State of California to cause birth defects or other reproductive harm. Wash hands after handling.
FOR UNITED STATES USERS: INFORMATION
This equipment has been tested and found to comply with the limits for a Class A digital device, pursuant to Part 15 of the FCC Rules. These limits are designed to provide reasonable protection against harmful interference when the equipment is operated in a commercial environment. This equipment generates, uses, and can radiate radio frequency energy and, if not installed and used in accordance with the instruction manual, may cause harmful interference to radio communications. Operation of this equipment in a residential area is likely to cause harmful interference in which case the user will be required to correct the interference at his own expense.
USER-INSTALLER CAUTION:
Your authority to operate this FCC verified equipment could be voided if you make changes or modifications not expressly approved by the party responsible for compliance to Part 15 of the FCC rules.
■ c bss. The power cord the rated electrical conditi applicable to the local power specifications is asted. Be power cord applicable to your local power specifications.
■ s Prodcteandethirec ay be t sunlight or by heaters, or it m discolored, deformed or damaged.
■ thDopnod keep any hum ating id, dusty, salt bearing wind or vibr location. Use it under the following environmental conditions:
Temperature: 0°C - 40°C (32°F-104°F)
Humidity: 30% - 85% (No condensation)
■ lealsing. Soft, tsychols for c not use any volatile solvent thinner or benzene.
■ mEarlehsdirectly point the ca into the sun, or the camera may damaged.
■ ckS pointscent and Bla
There may be some pixels that do not properly operate due to the use of CCD Area Image Sensors made-up of many pixels. Though luminescent or black spots may be found on the screen, it is a phenomenon peculiar to the Sensors and is not a malfunction.
■ Follow the guidelines below to prevent the unit from dropping or overturning.
- Use the product on a stable base, desk or table. Do not place the product on unstable base or slant place.
- Place or wire the unit to prevent the AC adapter cord or video cable from pulling.
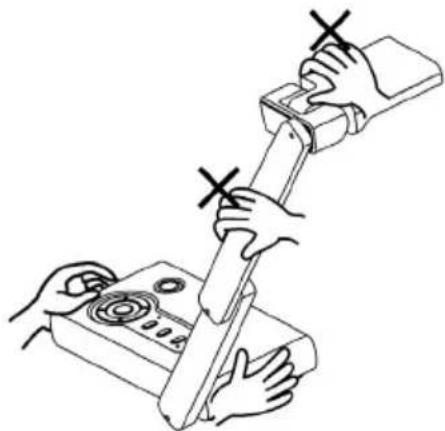
- Carry the product holding the lower part of the main unit held in your both hands. Never hold the product by the column or the camera head.
■ Use (including set-up and storage) or transfer with your closest attention to prevent the camera head from shocking. When a magnetic sheet is brought close to a cathode ray tube (Braun tube), a speaker, a CD-player, a DVD, or cellular phone, etc, the normal operation may be interrupted or failure may occur.
If this product is used for longer than the warranty period, its performance and quality may deteriorate due to the lifetime of its parts. In this case, we will replace the parts for a charge. Consult the seller from whom you have purchased this product or our branch/office near your location.
1 Package Content
i-Pochette Quick Start Guide CD

natural_image
Line drawing of a flat electronic device with a circular button and mounting bracket (no text or symbols)

natural_image
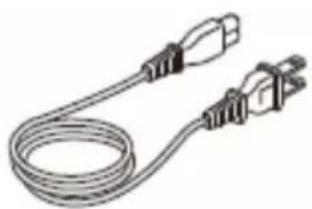
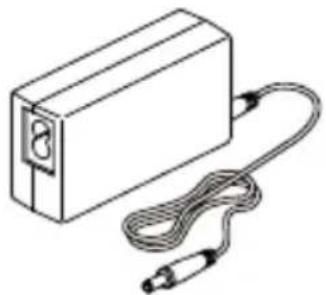
Simple line drawing of a circular object with concentric rings (no text or symbols)Power Cord AC Adapter Microscope Adapter
natural_image
Coiled electrical plug with two terminal connectors (no text or symbols visible)Appearance may vary with country/region.
natural_image
Line drawing of a rectangular electronic device with a coiled cable and connector (no text or symbols)
natural_image
Simple line drawing of a cylindrical mechanical component with a central hole and two small protrusions (no text or symbols)C-Video Cable RGB Cable USB Cable

natural_image
Line drawing of a coiled audio jack with two connectors (no text or symbols)
natural_image
Coiled black cable with two connectors, no text or symbols visible
natural_image
Coiled cable with two connectors (no text or symbols visible)Carrying Bag

natural_image
Line drawing of a closed-top bag with handles and a visible brand logo (no text or symbols on the bag itself)2.1 Nombre part
Appearance
- Camera head
- Camera column
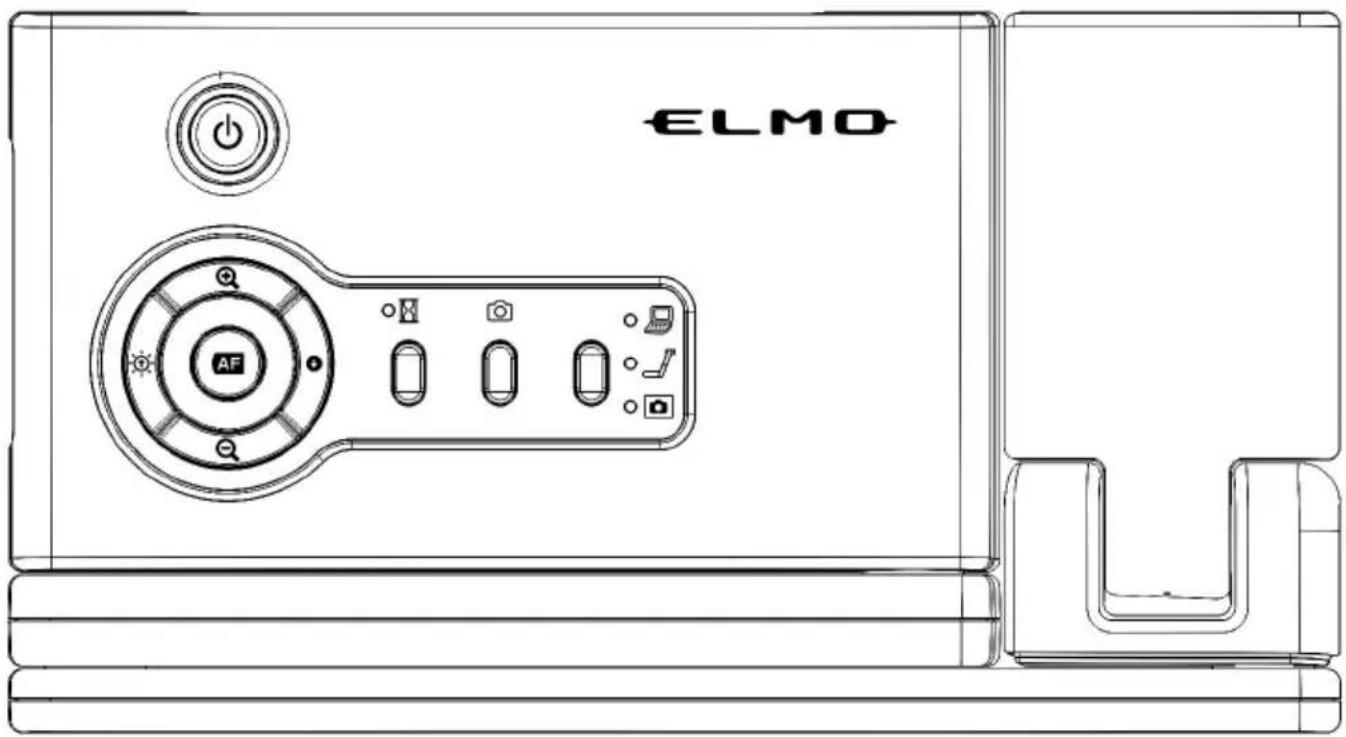
- Power button
- Functions buttons
- Rear panel

2.2 Functions
2.2.1 Functions buttons
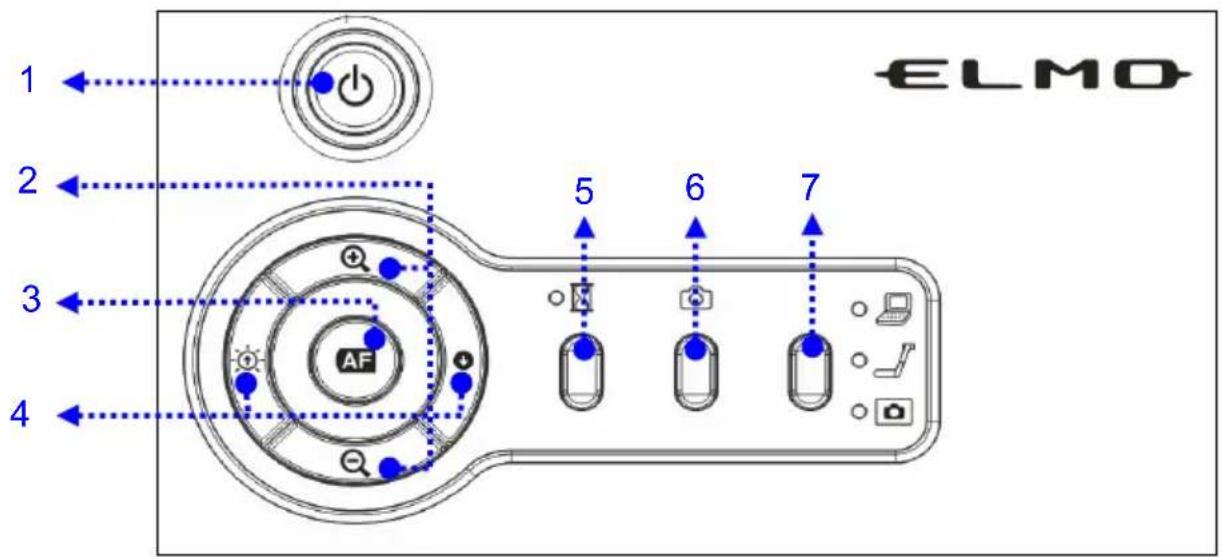
| No | Name | Function | |
| 1 |  | To turn ON/OFF the power.Power ON : Blue light turns on.Power OFF standby : Red light turns on. | |
| 2 |  | Increase the image size. | |
 | Decrease the image size. | ||
| 3 |  | 1.Automatically adjust focal length on an object.2.Enter : Playback full image in Playback mode.3.Enter : Go back thumbnail in Full image mode. | |
| 4 |  | 1.To brighten the camera image.2.Full image forward, cycling in full image mode.3.Left cursor in Thumbnail mode. | |
 | 1.To darken the camera image.2.Full image back, cycling in full image mode.3.Right cursor in Thumbnail mode. | ||
| 5 |  | Freeze the current image to temporarily stay on the screen. | |
| 6 |  | Capture the image to the internal memory. |
| 7 |  | Switch between different sources of signals:1. Computer2. Camera3. Internal memory |
| 8 |  | Clear all captured images in memory mode.NotePress the first then press together. |
| 9 |  | Enter to the Service MenuNotePress the first then press together for 5 seconds. |
2.2.2 Rear Panel

| No | Name | Function |
| 1 | DC | IN 12 V Plug-in for the AC adapter. |
| 2 | VIDEO | To output image from the RCA pin-jack terminal to the NTSC/PAL-system monitor (e.g., TV monitor). |
| 3 | RGB OUT | To output analog video signal to the projector, the PC. monitor or other RGB input device. |
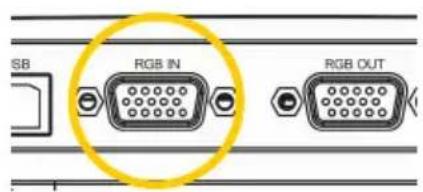
| 4 | RGB IN | To output the image input to this terminal, when [PC] is selected. |
| 5 | USB | To transfer image or control the main unit using the software contained in the supplied Utility Software CDROM by connecting with the PC. |
2.2.3 Side Panel

| No | Name Function | |
| 1 | VIDEO / RGB | To switch the RGB (default) or Video mode.VIDEO / RGBVideo mode:  VIDEO / RGBRGB mode: VIDEO / RGBRGB mode:   RGB output is not supported once VIDEO output is enabled. RGB output is not supported once VIDEO output is enabled. The unit must be turned OFF to change the mode. The unit must be turned OFF to change the mode. |
| 2 | XGA / SXGA / WXGA / | To switch the resolution : XGA (default) / SXGA / WXGA mode.  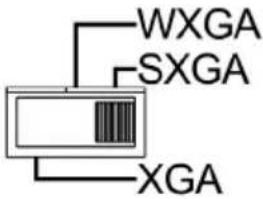 NoteThe unit must be turned OFF to change the mode. NoteThe unit must be turned OFF to change the mode. |
| 3 | Security slot |
2.2.4 Bottom panel
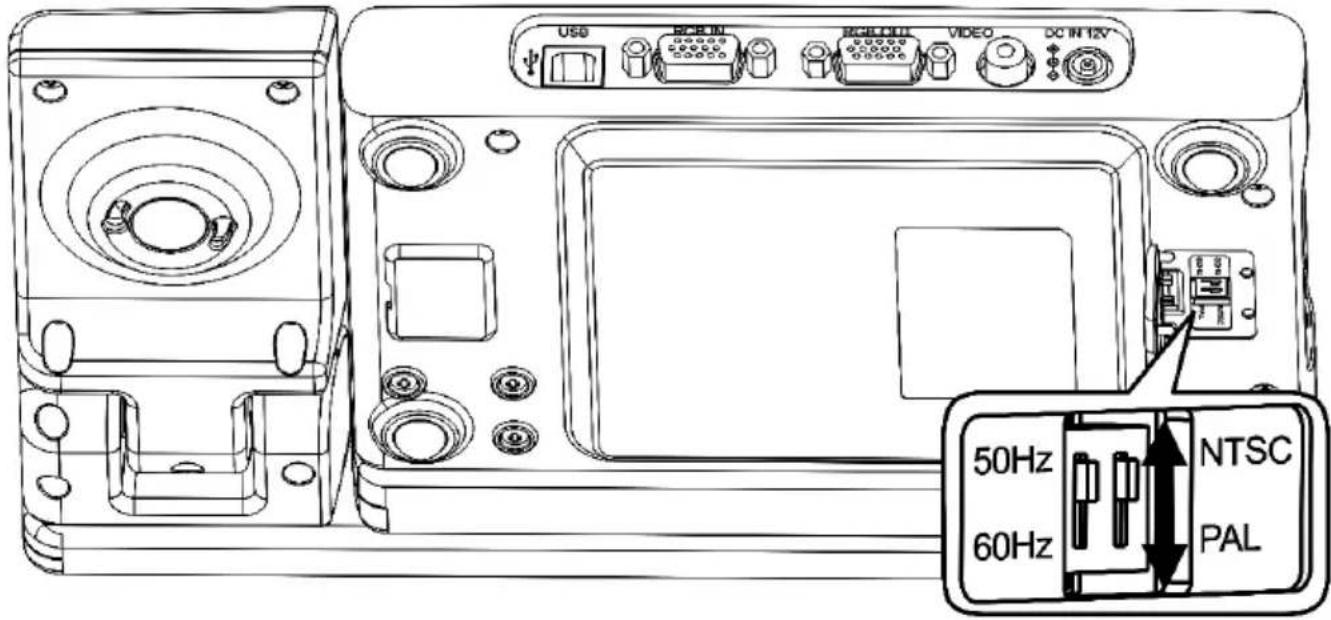
| No | Name Function | |||
| 1 | 50Hz, 60HzNTSC, PAL | ToTSC(default) or PAL mode. | ||
| 50Hz60Hz |  | NTSCPAL | ||
| 50Hz60Hz |  | NTSCPAL | ||
| PAL:NoteThe unit must be turned OFF to change the mode. | ||||
| 2 | To switch the 60Hz (default) or 50 Hz output mode. | |||
| 50Hz60Hz |  | NTSCPAL | ||
| 50Hz60Hz |  | NTSCPAL | ||
| 50HzNoteThe unit must be turned OFF to change the mode. | ||||
3 d Connections Installation an
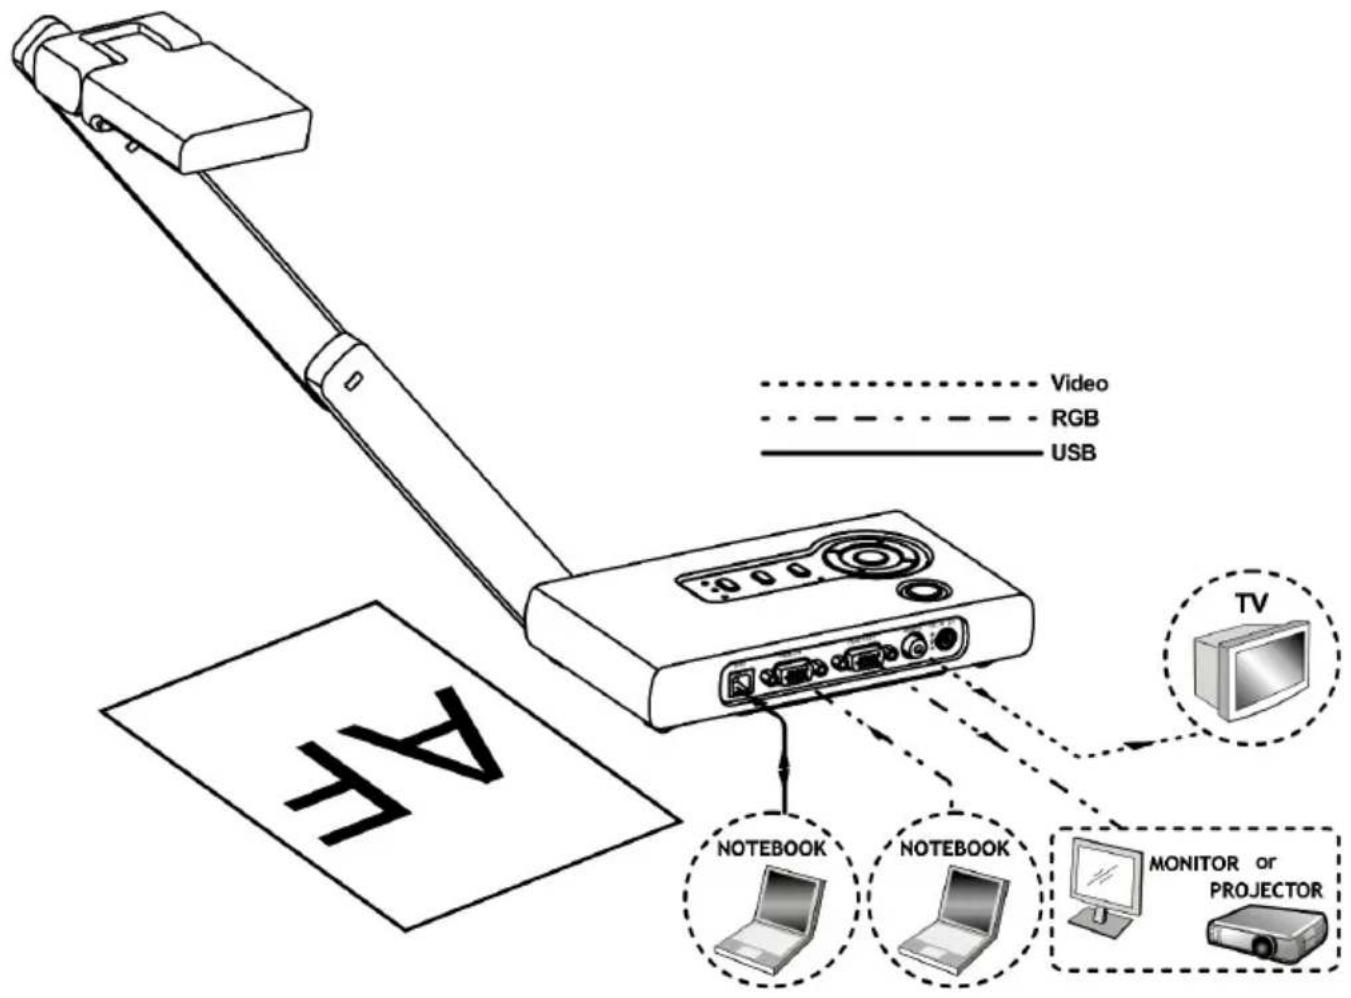
3.1 System diagram
3.2 Setting up

Note
Be sure to hold the lower part of the main unit in both hands when carrying the unit. Never hold the column or the camera head. Pay attention to prevent the camera head from knocking against the desk or the like.
natural_image
Line drawing of hands using a tool to adjust or install a device (no text or symbols present)1 Turn the column to the direction

Note
Never turn the column to the opposite direction. The column will be broken by forcibly removed. Please be attention on your fingers in the columns.
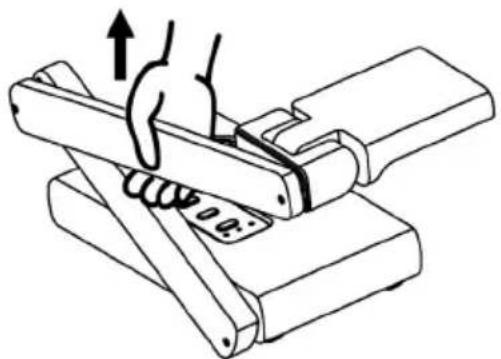
natural_image
Line drawing of a hand pressing down on a mechanical component (no text or symbols)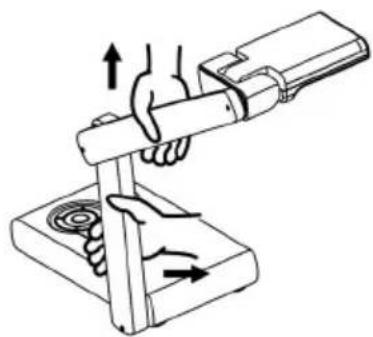
natural_image
Illustration of a hand using a tool to lift a cylindrical object, with arrows indicating motion (no text or symbols)2 Turn the camera head

Note
Proper set up position of the camera head.

natural_image
Illustration of a hand operating a mechanical lever with rotating arrows indicating motion (no text or symbols)
3.3 Connecting devices
3.3.1 Step 1: Plugging in the power outlet
Connect the DC plug of the supplied AC adapter to the [DC IN 12V] terminal on the rear panel before inserting the AC adapter in an outlet.


Note
ithAquanetries/cegfi prosver cord may vary w
Hold the plug of cable to plug/unplug the power plug/the AC adapter or video cable.
3.3.2 Step 2: Connecting with components
Connecting to a projector or monitor
- Connect the RGB OUT on the i-Pochette to the RGB IN on the projector or monitor using the supplied RGB cable.

Connecting to a TV
- Using the supplied video cable to connect VI DEO of i-Pochette to a C-Video of TV.

2. Switch to Video mode.

3. Adjust switch setting
■ NTSC mode: USA, Canada, Mexico, Panama, Chile, Japan, Taiwan, Korea and Philippines.

■ PAL mode Country/region not listed above:
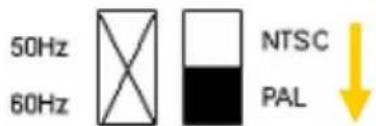

Note
DIP Switch setting will not be available until restarting the i-Pochette.
Connecting to a computer
- Use supplied RGB cable to connect RGB IN connector on i-Pochette to the RGB OUT connector on the computer.

● Using the USB Cable
Use supplied USB cable to connect USB connector on i-Pochette to the USB connector on the computer.

3.4 Start using the i-Pochette
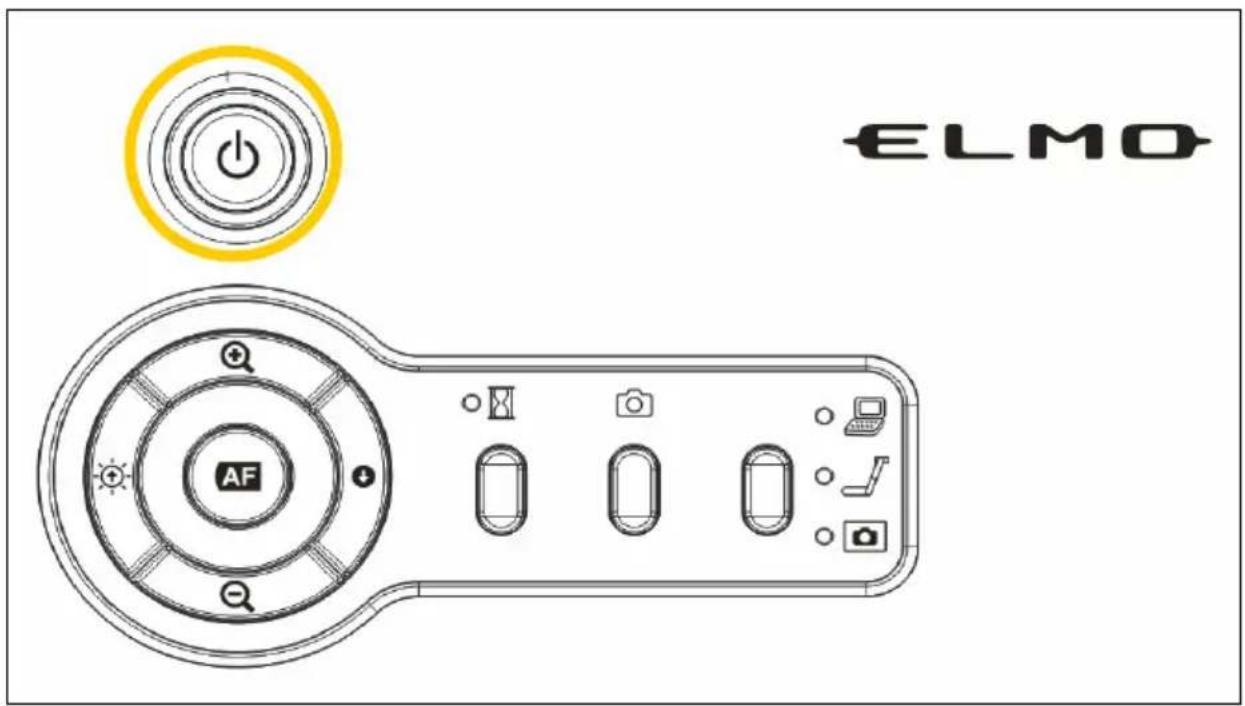
- Turn the power button of the main unit ON.
- Once i-Pochette is turned on, the LED on the control panel will flash a few times and stay lit. Please contact your distributor if the LED is not on.
4.1 Pre aterials, etc. sentation using printed m

natural_image
Illustration of a projector connected to a device via a stand, with an open book and a separate printer nearby (no text or symbols visible)4.1.1 Setting the main unit:
Set the main unit as shown in the above figure, connect the main unit to the projector or the PC monitor, and then turn the power button of the main unit ON.
4.1.2 Adjusting the size:
Place an object, adjust the position of the object with the zoom buttons ( + -) so that the objective part fits the screen size.
4.1.3 Adjusting the focus
Press the AF button to focus the camera on the object.
4.1.4 Adjusting the brightness
Press the and buttons on the main unit to adjust image brightness

Note
When connecting to other devices, be sure to turn OFF the power of all the devices.
4.2 Presentation using the supplied software with the USB-connected PC

4.2.1 Install "Image Mate" Software
"Image Mate" can be found on the supplied CD-ROM.
The "Image Mate" and TWAIN driver "Image Mate TWAIN" software for controlling this device can be found on the CD-ROM and allows you to perform the following functions.
- Transfer moving/still images to the PC
• @eira product from the PC
For information such as PC hardware requirements, OS type, software guides, and the "Image Mate", see the "HELP folder" on the CD-ROM.

Note
Wheatingdon is in operation, do not connect/disconnect the USB cable, or malfunction will be caused to this product.
▶ IeTbenbSiRt with USB2.0 is recommended.
➢ nWheDIP switch is set to the VIDEO, the image cannot be output from the USB. Refer to "OUTPUT (DIP switch)" on page 13 to switch the image output to the RGB.
Depending on the USB environment used by the PC or peripheral units, the image transfer could be disturbed.
4.3 Presentation using a Microscope.

natural_image
Line drawing of a microscope and its articulated arm assembly (no text or symbols)4.3.1 Setting a microscope
Place an object such as a prepared slot microscope. Adjust focus by checking with eyes at the microscope side.
4.3.2 Setting the main unit
Connect the main unit to a projector or a PC monitor. Then turn the power switch of the main unit ON.
4.3.3 Adjusting the size
Place an object, adjust the position of the object with the zoom buttons ( + -) so that the objective part fits the screen size.
4.3.4 Adjusting the focus
Press the AF button to focus the camera on the object.
4.3.5 Adjusting the brightness
Press the and buttons on the main unit to adjust image brightness.

Note
Pay attention to prevent the lens from knocking on a microscope.
4.4 How to switch image sources
Live image is the default of image source. Press source button on the control panel to change:
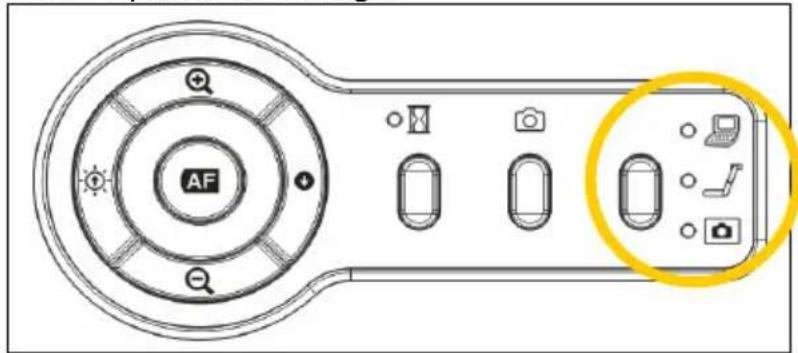
- Camera (default)
- Computer
- Internal memory
4.5 How to zoom in /out of images
- Press ⚠ on the control panel to zoom in.
- Press ☒ on the control panel to zoom out.
4.6 Howto use the auto focus
- Press AF on the control panel.
4.7 How to adjust the brightness
- Press to make it brighter.
- Press ↓ to make it darker.
4.8 How to capture images
- Press on tr the con ol panel.

Max of 16 images to store then, overwrite previous image.
4.9 How to view captured image
- Press source button on the control panel to switch to camera mode to display captured images.
- Press + or - or ↑ or ↓ to select the thumbnail you want you view.
- Press AF for the full-screen display of the image.
- Press AF to exit at thumbnail mode.
4.10 How to freeze images
- Press to freeze the current image on the screen. Press again to unfreeze.
4.11 How to delete captured images
- Press ☒ and ⏻ together in memory mode to delete all captured photos the storage.

Note
Press the 📂 first then press ⏻ together.
5 Troubleshooting
This chapter describes problems you may encounter while using i-Pochette. If you have questions please refer to what relates suggested solutions. If the problem still needed, pl se contact our distributors or service center.
| No. | Sym m pto Solutions | |
| 1 | Boot without power | Make sure you have plugged in the power cord. |
| 2 | No image output from the i-Pochette | 1. Check the power.2. Check the connection, Refer toUser Manual 3 Installation and Connections.3. Check the source, refer toUser Manual 4.4 I would like to switch image sources.4. Check the settings for the source of theprojector. For the appropriate input selection of the projector, refer to theprojector'suser manual.5. Check if DIP Switch is properly set. Refer toUser Manual 2.2.3Side Panelfor related settings. |
| 3 | Unable to focus | Probably the document is too close. Press on the control panel. Or pull away the distance between document and lens, then pressAF. |
| 4 | The image is incomplete | Check theAuto Imagesetting of your projector. Please refer to the user manual of the projector. |
6 Specifications
■ General
| Item Specification | |
| Lens : F3.0,f=3.39mm | |
| Sen 1/4" sor : UXGA CMOS Image Sensor | |
| IO connector : | Rear of PlatformUSB : Type BRGB IN : HD-15P, FemaleRGB OUT : HD-15P, FemaleVIDEO : RCA JackDC IN 12V |
| Side of PlatformLock :Security SlotXGASXGA/WXGA SwitchVIDEO/RGB Switch | |
| Dimension | Fold : 262mm(L) 142mm(W) 37mm(H) / 10.3inch(L) 5.6inch(W) 1.5 inch(H) |
| Operat 446mm(L) 142mm(W) 338mm(H) / 17.6 inch(L) 5.6 inch(W) 13.3 inch(H) | |
| Weight 1.3Kg / (A)Power adapter AC 100-240V DC1 Consumption | 2.87 lbs |
| Standby : 0.062A-0.1A4.7W (AC adapter included) | |
| Power On : 0.072-0.116A5.6W-5.7W (AC adapter included) | |
■ Performance
| Item Specification | |
| Output Mode | XGA: 60Hz 1024 * 768SXGA: 60Hz 1280 * 1024WXGA: 60Hz 1280 * 800 |
| USB | USB2.0 HS |
| Built-in Storage | 16 images |
| Digital Zoom | RGBHV: 6X (Digital zoom)PAL/NTSC: 6X( Digital zoom) |
English - 26
| Input Selection Camera/PC/ Memory | |
| AF | Yes |
| AWB | Yes |
| AE | Yes |
| Capture | Yes |
| Freeze | Yes |
| Max Shooting Area | in XGA Min : <= 53x40mm |
| Min Shooting Area | A Max : >=340mm x 255mm in XG |
■ Supplied Accessories
| Name Quantity | |
| AC Cord | 1 |
| AC Adapter | 1 |
| C-Video Cable | 1 |
| Analog RGB Cable | 1 |
| USB Cable | 1 |
| Microscope Adapter | 1 |
| Carrying Bag(Body) | 1 |
| CD-ROM | 1 |
| Quick Start Guide | 1 |
ご注意
Unarthgbrizedideccording of cop films,smaterialayphotograp infryrighbowlmersights of cop andyde copyright laws.
AVERTISSEMENT
6-14, Meizen-cho, Mizuho-ku, Nagoya, 467-8567, Japan


- Contents
- IMPORTANT SAFEGUARDS 2
- BEFORE YOU USE 6
- Package Content......8
- Part names and Functions ......9
- Installation and Connections....15
- Operation Procedure....20
- Troubleshooting 25
- Specifications....26
- FOR UNITED STATES USERS: INFORMATION
- USER-INSTALLER CAUTION:
- Package Content
- Nombre part
- Appearance
- Functions
- Functions buttons
- d Connections Installation an
- System diagram
- Setting up
- Note
- Turn the column to the direction
- Turn the camera head
- Connecting devices
- Step 1: Plugging in the power outlet
- Step 2: Connecting with components
- Connecting to a projector or monitor
- Connecting to a TV
- Switch to Video mode.
- Adjust switch setting
- Connecting to a computer
- Start using the i-Pochette
- Pre aterials, etc. sentation using printed m
- Setting the main unit:
- Adjusting the size:
- Adjusting the focus
- Adjusting the brightness
- Presentation using the supplied software with the USB-connected PC
- Install "Image Mate" Software
- Presentation using a Microscope.
- Setting a microscope
- Setting the main unit
- Adjusting the size
- Adjusting the focus
- Adjusting the brightness
- How to switch image sources
- How to zoom in /out of images
- Howto use the auto focus
- How to adjust the brightness
- How to capture images
- How to view captured image
- How to freeze images
- How to delete captured images
- Troubleshooting
- Specifications
- ご注意
- AVERTISSEMENT
Brand : Elmo
Model : i-Pochette CO-10
Category : Document Camera