
TT-02RX - Camera Elmo - Free user manual and instructions
Find the device manual for free TT-02RX Elmo in PDF.


| Product Type | Document Camera |
| Dimensions (Setup) | W350 x D370.5 x H411.5 mm (13.8 x 14.6 x 16.2 in) |
| Dimensions (Folded) | W195 x D254.5 x H444.5 mm (7.7 x 10.0 x 17.5 in) |
| Weight | Approx. 2.9 kg (6.4 lbs) main body only |
| Power Source | 12V DC via AC adapter (AC 100-240V) |
| Power Consumption | 15W (including AC adapter) |
| Lens | f=3.85-20.02 mm, 5.2x optical zoom, F2.8-3.2 |
| Digital Zoom | 8x |
| Image Sensor | 1/3" CMOS, approx. 1.49M total pixels |
| Resolution (Analog RGB) | Horizontal: 800 TV lines, Vertical: 800 TV lines |
| Output Terminals | RGB OUT (Mini Dsub 15P), VIDEO OUT (RCA), USB (Type B) |
| Input Terminal | RGB IN (Mini Dsub 15P) |
| Memory Slot | SD/SDHC card slot (up to 4 GB, max 2048 images) |
| Focus System | Auto (one-shot) / Manual / Zoom Sync |
| White Balance | Auto / One-Push / Manual |
| Image Modes | Text1-3, Graphics1-2, Color/B&W, Posi/Nega |
| Special Functions | Highlight, Mask, Scroll, PinP (Picture in Picture), Image Rotation |
| Illumination | White LED lamp (ON/OFF switch) |
| Operating Temperature | 0°C to 40°C (32°F to 104°F) |
| Humidity | 30% to 85% (non-condensing) |
| Cleaning Instructions | Use a soft, dry cloth; do not use solvents like thinner or benzene |
| Safety Notes | Do not disassemble; unplug if smoke/odor; keep away from water; use only supplied AC adapter |
| Supplied Accessories | AC adapter, AC cord, RGB cable (2m), stage, magnetic strip, anti-glare sheet, dust cover, manual, Image Mate CD-ROM, USB cable (1.8m), remote control with AAA batteries, strap, microscope attachment |
| Repairability | Contact dealer for repairs; do not attempt self-service |
Frequently Asked Questions - TT-02RX Elmo
User questions about TT-02RX Elmo
0 question about this device. Answer the ones you know or ask your own.
Ask a new question about this device
Download the instructions for your Camera in PDF format for free! Find your manual TT-02RX - Elmo and take your electronic device back in hand. On this page are published all the documents necessary for the use of your device. TT-02RX by Elmo.
USER MANUAL TT-02RX Elmo
Please read this instruction manual carefully before using this product and keep it for future reference.
MODE D'EMPLOI
natural_image
Line drawing of a robotic arm mounted on a base (no text or symbols)TT-02 RX
Document Camera
INSTRUCTION MANUAL
Please read this instruction manual carefully before using this product and keep it for future reference.
Follow these guidelines to use the product safely.
These "IMPORTANT SAFEGUARDS" indicate important points that should be followed to use this product safely and correctly and prevent damage to the product or other property and injury to you and others.
Read carefully before operating the product and retain for future reference.
Read the manual after making sure that you understand the meaning of the following displays and symbols.

Warning
This symbol indicates information that, if ignored, could possibly result in serious personal injury or even death due to incorrect handling.

Attention
This symbol indicates information that, if ignored, could possibly result in personal injury or damage to property due to incorrect handling.
Symbols Used in this Manual
 | Name: CautionMeaning: Indicates that the user must, without fail, pay careful attention to any sentences or illustrations marked with a Caution symbol. |
 | Name: ProhibitedMeaning: Indicates that the user must pay careful attention to any sentences or illustrations marked with a Prohibited (do not do) symbol. |
 | Name: Do not use in a bathroom or shower cubicleMeaning: Indicates that using the product in a bathroom or shower cubicle could result in injuries through a fire or electric shock, and is strictly prohibited. |
 | Name: Do not touchMeaning: Indicates that touching the area could result in injuries through electric shock, and is strictly prohibited. |
 | Meaning: Do not disassembleMeaning: Indicates that disassembling the product could result in injuries through electric shock, and is strictly prohibited. |
 | Name: CompulsoryMeaning: Indicates that the user must pay careful attention to any sentences or illustrations marked with a Compulsory (must do) symbol. |
 | Name: Unplug the power plug and the AC adapterMeaning: Indicates that the user must unplug the AC adapter. |
⚠ Warning
If for any reason smoke comes out of the product, or you notice any unusual odors or sounds, immediately turn off the power switch on the product and then unplug the power plug and AC adapter.
Continuing to use the product while it is operating unusually could result in a fire or electric shock. Check that smoke is no longer coming out of the product, and then contact your local dealer to request maintenance.
Do not attempt to service this product yourself.

If for any reason liquid is spilled into the product, immediately turn off the power switch on the product and then unplug the power plug and AC adapter.
Contact your local dealer immediately. Continuing to use the product in this condition could result in a fire or electric shock.

If for any reason foreign objects enter the product, immediately turn off the power switch on the product and then unplug the power plug and AC adapter.
Contact your local dealer immediately. Continuing to use the product in this condition could result in a fire or electric shock.
(Be extra careful if there are children in the area when using the product.

If for any reason there is a breakdown causing no images to be projected, turn off the power switch on the product and then unplug the power plug and AC adapter.
Then contact your local dealer to request maintenance. Continuing to use the product in this condition could result in a fire or electric shock.

If for any reason the product is dropped or the cabinet is damaged, turn off the power switch on the product and then unplug the power plug and AC adapter. Then contact your local dealer. Continuing to use the product in this condition could result in a fire or electric shock.
If the power plug or AC adapter cord is damaged (e.g. if the inside of the cord is exposed or broken), contact your local dealer and request a replacement.
Continuing to use the product in this condition could result in a fire or electric shock.

Do not remove the back panel, cabinet, or cover from this product.
Doing so may expose you to dangerous voltage and could result in electric shock.
Contact your local dealer for any internal inspections, maintenance, or repair.

Do not modify this device.
This could result in a fire or electric shock.

⚠ Warning
| Warning | |
| Do not place this product on an uneven surface or unstable stand. It could fall or topple over and result in an injury. |  |
| Be sure to use the power plug or AC adapter supplied with the product. This could result in a fire or electric shock. |  |
| Do not spill water or insert any foreign objects into this product. This could result in a fire or electric shock. Pay particular attention when using the product in rainy weather, during a snowfall, on the coast, or on a water front. |  |
| Do not place any heavy objects on the power plug or AC adapter, and do not place this product on top of the cord.The cord could be damaged and result in a fire or electric shock. (If the cord is covered by a carpet, there are times when you may not notice that a heavy object has been placed on the cord.) |  |
| Do not damage, process, pinch, twist, pull, or heat the power plug or AC adapter.The cord could be damaged and result in a fire or electric shock. |  |
| Do not use in a bathroom or shower cubicle.This could result in a fire or electric shock. |  |
| If there is dust on the prongs of the power plug or the connector surface, turn off the power switch on the product, unplug the power plug, and then remove the dust.The drop in insulation for the power plug could result in a fire. |  |
| Do not touch the product, connector cable, power plug, or AC adapter during a thunder storm. This could result in an electric shock. |  |
| Keep batteries out of children's reach as there is a danger they could be swallowed.If a battery is swallowed, consult a doctor immediately as this could result in suffocation or an obstacle to digestion etc. |  |
Attention
Whenever moving the product, turn off the power switch on the product and then unplug the power plug and AC adapter. Move after checking that the external connection cord is disconnected. Otherwise, the cord could be damaged and result in a fire or electric shock.
For safety reasons, if this product is not used for a long time, be sure to unplug the power plug and the AC adapter. Otherwise, it could result in a fire.
Do not disconnect the power plug or AC adapter by pulling the cord. Otherwise, the cord could be damaged and result in a fire or electric shock. Disconnect by pulling the power plug or AC adapter.
If the product is placed on a stand with casters, make sure the caster's brakes are on. It could result in an injury if it moves and falls.
Do not place the product in a damp or dusty location. This could result in a fire or electric shock.
Do not place the product in a location where it could be exposed to smoke, steam, or water droplets such as on a kitchen counter or near a humidifier. This could result in a fire or electric shock.
Do not sit on, or place any heavy objects on, this > on this product. Be extra careful if there are any small children in the area when using the product. It could result in an injury if it breaks.
Do not place the power plug or AC adapter cables next to a heater. The cord covering could melt and result in a fire or electric shock.
Do not connect or disconnect the power plug or AC adapter with wet hands. Failure to do so could result in an electric shock.
Make sure the power plug is securely inserted into the socket. If it is not inserted correctly, it could generate excess heat and dust could enter which could result in a fire. Also, touching a prong of the power plug could result in electric shock.
If the power plug is loose in the electrical outlet, even when it is fully inserted, excess heat could be generated and result in a fire. Contact a licensed electrician to replace the faulty outlet.





BEFORE YOU USE
■ Be sure to use the power cord applicable to your local power specifications. If the product was sold in Japan, use the AC adapter sold with the product with 100 VAC and 50 or 60 Hz.
■ When storing the product, do not leave it under direct sunlight or by heaters. It may become discolored, deformed, or damaged.
■ Do not place this product in any humid, dusty, salt bearing wind, or vibrating locations.
Only use it under the following environmental conditions:
Temperature: 0^ C - 40^ C (32°F - 104°F)
Humidity: 30% - 85% (No condensation)
■ Use a soft, dry cloth for cleaning.
Do not use any volatile solvent such as thinner or benzene.
■ Do not point the camera lens directly at the sun. It may be damaged and you may not be able to take pictures.
■ Luminescent and Black Spots
There may be some pixels that do not properly operate due to the use of CMOS Area Image Sensors made-up of many pixels. Though luminescent or black spots may be found on the screen, it is a phenomenon peculiar to the CMOS Area Image Sensors and is not a malfunction.
■ Follow the guidelines below to prevent the unit from dropping or overturning.
- Use the product on a stable base, desk, or table. Do not place the product on an unstable base or slanted surface.
- Place or wire the unit to prevent the AC adapter cord or video cable from pulling.
- Carry the product by holding the lower part of the main unit in both hands. Never hold the product by the column or the camera head.
■ Pay careful attention when using (including setting-up and storing) or transferring the product to prevent the camera head from receiving any shocks.
■ Do not bring any magnetic media such as FDs, magnetic cards, magnetic tapes, prepaid cards, MOs, or MDs near to the magnetic strip. The data on the recorded media could be corrupted.
■ When a magnetic strip is brought close to a cathode ray tube (Braun tube), a speaker, a CD-player, a DVD player, or a cellular phone, etc., normal operation may be interrupted or failure may occur.
■ Do not look directly into the LED light. If you look directly into it at point-blank range, your eyes may be injured.
■ Transfer the data from the SD card onto a device such as a PC to save a backup copy. Malfunction of the product or repairs to it may cause the data saved in the SD card to be deleted.
If this product is used for longer than the warranty period, its performance and quality may deteriorate due to the lifetime of its parts. To purchase replacement parts, consult the dealer from whom you purchased this product or our branch/office near your location.
■ Battery precautions:
If this product is not going to be used for a long time, take the batteries out of the remote control.
Do not use rechargeable batteries (e.g., Ni-Cd (NiCad batteries)).
Do not use new and old batteries or batteries of different types together.
Do not try to recharge or short-circuit the batteries.
When disposing of used batteries, follow the instructions of your local government.
Insert from one side and pay particular attention to the polarity (+/- directions).
Be sure to use AAA batteries.
If any liquid from a battery leaks onto your skin or clothes, flush the area with clean water immediately. If it gets into your eye, flush immediately with clean water and then contact a doctor.
■ Precautions regarding the remote control strap
To prevent unexpected accidents, please note the following points.
- This strap is for the remote control only and should not be used for any other purposes.
- Do not wrap the strap around parts of your body such as your neck, arm, or finger.
- Do not leave it within reach of small children.
- For safety reasons, the break-away section of the strap has been designed to separate if too much force is applied. Therefore, please avoid any overly strenuous movements and do not apply excessive force.
- The strap length adjustment feature is designed to be simple and supportive. Excessive force or strenuous movements may change the length.
- Do not use excessive force when adjusting the strap. This could damage the strap.
IMPORTANT SAFEGUARDS ....2
BEFORE YOU USE 7
Contents 9
1. PART NAMES AND FUNCTIONS ...... 11
PART NAMES 11
Appearance 11
Functions 12
Operating Panel 12
Rear panel 14
Side panel 15
Remote Control 16
Functions 17
OSD (On Screen Display) 19
Camera Mode OSD Menu 21
SD Mode OSD Menu 25
SD Menu 26
2. SETTING UP 28
Setting Up 28
Connecting the AC adapter and Video cable 30
3. STORING ....32
Storing 32
Presentation using printed materials, etc. 34
Presentation using printed materials, etc. (Using the stage) 35
Presentation using an SD card (commercially-available) 36
Transferring images from the SD card to a USB-connected PC ....40
Presentation using the supplied software with a USB-connected PC .....42
Presentation using a Microscope ....43
Presentation using a Microscope (Installing the attachment supplied) ..... 45
Shooting a 3-D object ....47
Shooting a wall surface or distant view 48
5. VARIOUS FUNCTIONS AND OPERATIONS 49
Zoom 49
Focus 50
Auto Focus 50
Manual focus ....51
Zoom Sync Focus 51
Illumination lamp 52
Adjusting the brightness ....53
Automatic brightness adjustment 53
Manual brightness adjustment 53
Image selection ....54
White Balance 55
How to use [Auto] 55
How to use [One-Push] 55
How to use [Manual] ....55
Save/call settings 56
How to save settings ....56
How to call settings ....57
Highlight Function 58
Highlight settings 58
Highlight operations ....59
Mask Function 60
Mask settings 60
Mask operations 60
Scroll Function 61
Digital zoom settings 61
Scroll operations 61
PinP (Picture in Picture) Function 62
PinP operations 62
Using a Desktop Recorder (Optional) 63
Connecting the desktop recorder 63
Operating the desktop recorder by remote control 63
6.TROUBLE SHOOTING 64
Symptoms and Confirmation 64
7.SPECIFICATIONS 66
General 66
Main Camera 66
Illumination Device 67
Supplied Accessories 68
1 PART NAMES AND FUNCTIONS
PART NAMES

| No Name No Name | |
| (1) Camera head (9) Side panel | |
| (2) Illumination lamp switch (10) | |
| (3) Zoom dial | P.49 |
| (4) AF Button | P.50 |
| (5) Camera column (13) Remote contro | |
| (6) Operating panel | P.12 |
| (7) Stage positioning | P.35 |
| (8) Rear panel | P.14 |
| P.15 | |
| Magnetic strip P.35 | |
| (11) Stage | P.35 |
| (12) Anti-glare sheet | P.35 |
| P.16 | |
| (14) | Microscope attachment P.45 |
| (15) Image Mate CD-ROM | |
Functions
Operating Panel

| Name Function | Name Function | ||||||
| (1) | POWER(POWER ON/OFF standby status) | To turn the power ON/OFF.Power ON:Blue lampPower OFF standby status:Red lamp | (7) | Image select | SD(SD mode) | To switch the output image to images stored on the SD card.The SD Mode LED is lit in SD Mode.P.54 | |
| (2) | OSD Operation | MENU | To show/hide the OSD menu.The LEDs for operation buttons are not lit during OSD menu display.P.19 | (8) | (CAMERA) | To switch the output image to camera image.The LED is lit in CAMERA mode.P.54 | |
| (3) |  (Direction) (Direction) | To select an OSD menu item. | (9) | (PC) | To switch the output image to the image input to RGB IN.The LED is lit in PC mode.P.54 | ||
| (4) |  | To decide the OSD item. | (10) | Brightness Adjust | ∅ | To brighten the camera image.P.53 | |
| (5) |  | To pause the camera image.Press this button again to restart. | (11) | ∅ | To darken the camera image.P.53 | ||
| (12) | SD mode operation | ∅ | Single Display: Return to the previous image | ||||
| (6) | [WSKZ](Image save) | To save the image on the SD card. | 4x4 Display: Move the cursor to the previous image | ||||
| (7) | Image select |  (SD mode) (SD mode) | To switch the output image to images stored on the SD card.The SD Mode LED is lit in SD Mode.P.54 |
| (8) |  (CAMERA) (CAMERA) | To switch the output image to camera image.The LED is lit in CAMERA mode.P.54 | |
| (9) |  (PC) (PC) | To switch the output image to the image input to RGB IN.The LED is lit in PC mode.P.54 | |
| (10) | Brightness Adjust |  | To brighten the camera image.P.53 |
| (11) | ↓ | To darken the camera image.P.53 | |
| (12) | SD mode operation |  | Single Display: Return to the previous image4x4 Display: Move the cursor to the previous image |
| (13) |  | Single Display: Move to the next image4x4 Display: Move the cursor to the next image | |
| (14) |  | Change between Single Display and 4x4 Display. | |
Rear panel
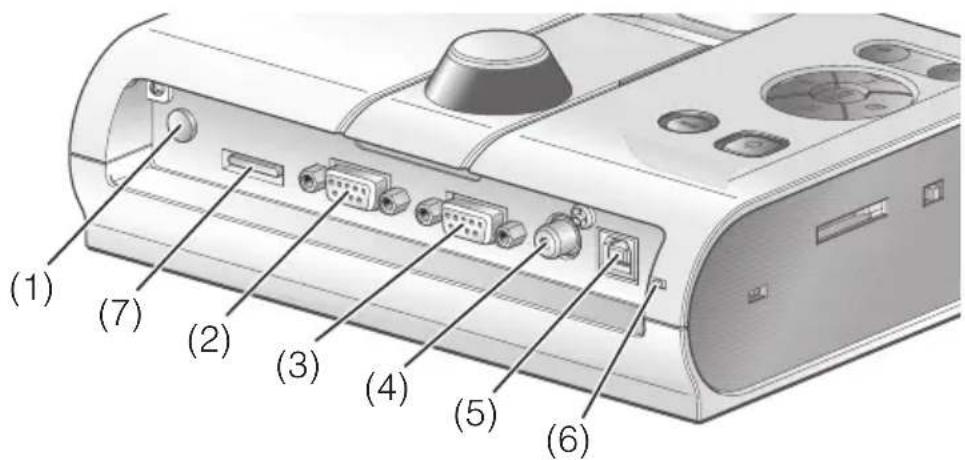
| Name Function | |||
| (1) | DC IN 12V(Power Socket) | ◇-◇DC IN 12V | Plug-in for the AC adapter. |
| (2) | RGB OUT(Analog RGB Output Terminal) |  RGB OUT RGB OUT | To output analog video signal to a projector, a PC monitor, or other RGB input device.P.30 |
| (3) | RGB IN(Analog RGB Input Terminal) |  RGB IN RGB IN | To output the image input to this terminal when [PC] is selected by Image select button.P.30 |
| (4) | VIDEO OUT(Composite Video Output Terminal) |  VIDEO OUT VIDEO OUT | To output images to an NTSC/PAL-system monitor (e.g. TV monitor).P.31 |
| (5) | USB(2.0 Compliant) |  USB USB | To transfer image to a PC or control the main unit from a PC using the Image Mate software.P.42 |
| (6) | RESOLUTION(Change Resolution Switch) | To change the resolution of the output analog image.SXGA: 1280×1024WXGA: 1280×800XGA: 1024×768 | |
| (7) | RECORDER(Recorder Terminal) | Terminal to connect the optional desktop recorder via a dedicated cable. By connecting to the desktop recorder, you can record camera images. Refer to the manual for the optional desktop recorder for more details. | |
Side panel

natural_image
Illustration of a Elmo device with ports and connectors (no text or symbols on the device body)(1)(2)(3)
| Name Function | ||
| (1) | (SD Card Slot) | To insert an SD card.Push the card again to remove the SD card. |
| (2) | Security slot | |
| (3) | RGB/VIDEO Switch To change | the output image between RGB and VIDEO.• Factory setting: RGB |

Note
- Only one image can be output at a time; either [RGB OUT] or [VIDEO OUT]. ([RGB OUT] and [VIDEO OUT] cannot be output simultaneously.)
- When the RGB/VIDEO switch is set to [VIDEO], the image input to [RGB IN] is not output from [RGB OUT].
(Unable to use the [PC] button on the main unit in [VIDEO].)
(Unable to record or playback from the optional desktop recorder in [VIDEO].) - If the RGB/VIDEO switch is set to [VIDEO] in [PC] mode, image mode is automatically changed to [CAMERA] mode.
■ Remote Control
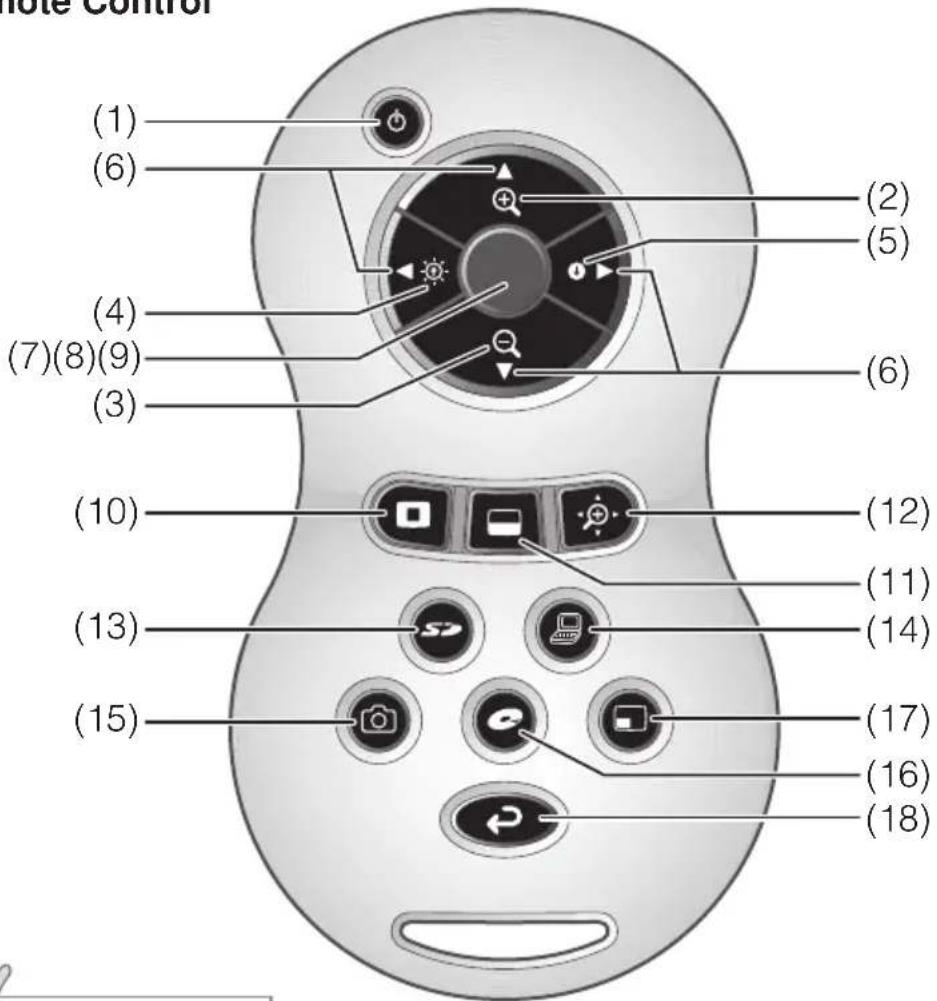
- Remove the battery case cover by pressing down [ ] mark part in the direction as indicated by the arrow and install 2 batteries. (Type AAA)
- Insert from (-) side and pay particular attention to the polarity (+ / - directions).
- Do not use new and old batteries or batteries of different types together.
- Be sure to use AAA batteries.
- Replace the batteries with new ones at least once a year.
- Use the supplied batteries only for an initial operation check. The operating life is not guaranteed.

Warning
Because there is a chance that small batteries could be ingested, be sure to keep them out of the reach of children. If a battery is swallowed, consult a doctor immediately as this could result in suffocation or an obstacle to digestion etc.
Functions
| Name Function | Function Name Function | ||
| (1) |  (POWER ON/OFF standby status) (POWER ON/OFF standby status) | To turn the power ON/OFF. | |
| (2) | ZOOM |  (TELE) (TELE) | To zoom in. |
| (3) |  (WIDE) (WIDE) | To zoom out. | |
| (4) | BRIGHT NESS(Bright-ness adjust) |  (Bright) (Bright) | To brighten the camera image. |
| (5) |  (Dark) (Dark) | To darken the camera image. | |
| (6) | SD mode/highlight/mask/scroll operations |    | To move forward/backward through the images saved in SD mode.Highlight mode: To move highlighted area.Mask mode: To move masked area.Scroll mode: To scroll displayed image.PinP mode: To move the small screen.Recorder mode: To move the cursor in the OSD menu of the recorder. |
| (7) | AF(Auto Focus) |  | To automatically focus the camera. |

Note
*1 This function can only be used in SD mode.
*2 This function can only be used in camera mode/SD mode. (Cannot be used in conjunction with other functions.)
*3 Cannot be used when the desktop recorder is not connected.
| (8) | SD Mode operations | Change between SD image single display and 4x4 display. *1 | |
| (9) | Recorder Mode operations | To decide the OSD cursor for the recorder. | |
| (10) | (Highlight) | To highlight part of the image displayed. *2 | |
| (11) | (Mask) | To mask an area of the output image. *2 | |
| (12) | (Scroll) | To enlarge the image currently displayed and move up, down, left, and right. *2 | |
| (13) | (SD mode) | To switch the output image to SD mode.P.54 | |
| (14) | PC | To switch the output image to the image input to RGB IN.P.54 | |
| (15) | (Capture) | To save the image on the SD card.P.37 | |
| (16) | (Recorder) | To operate an optional desktop recorder. *3 | |
| (17) | PinP(Picture in Picture) | To display a still image as a small picture while displaying a camera image. | |
| (18) | Back | To return the output image to camera image. | |
Point the infrared emitting part of the remote control at the infrared sensor located on the front of the camera main unit, press the button for desired function.
Receivable Range
Distance: Within approx. 7m from the front of the infrared sensor
Angle: Within 30^ up, down, left, and right from the infrared sensor

Note
- The receivable range may be reduced when the main unit is placed in direct sunlight, near an inverter fluorescent lamp or in any other unfavorable surroundings. Depending on the conditions of fluorescent lamps, etc., the sensor may fail to receive the infrared light. In such cases, relocate the main unit or shield the sun light or fluorescent lamp.
OSD (On Screen Display)
The menu items displayed on the monitor or the projection screen are referred to as "OSD (On Screen Display)".
OSD Basic Operations

Press the [MENU] button on the front panel to display the OSD menu, and then use the [] buttons to move the cursor to the icon you want to operate or set.

Press the [Enter] button on the front panel to select function to be adjusted.
![[MENU] button [↑] button Move the cursor up [←] button Move the cursor left [→] button Move the cursor right [Enter] button [↓] button Move the cursor down Front operating panel Back](/content/2026/05/985013/images/1fd0d3342a612cce75db5acbe5430167668723a72ffb931b5a34740fcbf00542.jpg)
■ Adjusting the setting value

Use the [] buttons on the front panel to adjust the setting value.

Press the [Enter] button again on the front panel to adjust the value, as indicated on the level bar.

Front operating panel

■ Camera Mode OSD Menu
Change the image mode to [CAMERA] mode by Image Selection and press the "MENU" button to display the OSD menu. P.54
■ Top menu
| Icon | Name | Selection Item | Function |
 | Image Setting | Image Setting Menu | To display the menu for the adjustment of camera image. |
 | Function Setting | Function Setting Menu | To display the menu for the setting of functions. |
 | Back - To hide | the OSD menu. |
■ Image Setting Menu
| Icon | Name | Conditions | Selection Item | Function |
 | Brightness | Auto √ | To automatically adjust the brightness of the image according to the object. You can adjust the level of auto adjustment. | |
| Manual | To set the camera image to a fixed brightness. | |||
 | Reset Brightness | Brightness [Auto] | To reset the amount of auto adjustment to the default setting. | |
| HZGY] | AF Mode | Push √ | Press the AF button to automatically focus. | |
| Zoom Sync | The focus is automatically adjusted when zooming. | |||
 | Focus Use the level bar to fine-tune the focus. | |||
 | White Balance | Auto √ | To automatically adjust the white balance. | |
| One-Push | To set the white balance to a fixed setting after carrying out automatic correction. | |||
| Manual | To manually adjust the [R-Gain] and [B-Gain]. | |||
 | R-Gain | Color [Manual] | - | Use the level bar to adjust the [R-Gain] for the camera image. Use [↑] or [↓] to increase or decrease the red Color. |
 | B-Gain | Color [Manual] | - | Use the level bar to adjust the [B-Gain] for the camera image. Use [↑] or [↓] to increase or decrease the blue Color. |
 | Image Mode | Text1 √ | To clearly reproduce black & white subjects such as characters and lines. Use when shooting materials such as documents or text based data. The effect grows stronger as the number is increased. | |
| Text2 | ||||
| Text3 | ||||
| Graphics1 | To Clearly reproduce color subjects. Use when shooting materials such as color figures and photo based data. | |||
| Graphics2 | The image could be improved if used with DLP projector. | |||
* The "✓" symbol indicates the factory settings.
| Icon | Name | Conditions | Selection Item | Function |
 | Edge Effect | Image Mode [Graphics1] | Low √ | Emphasizes the outline of images making them crisper and clearer. |
| Middle | ||||
| High | ||||
 | Gamma | Image Mode [Graphics1] | Low | To change the tone reproduction characteristics of the image. (The effect grows stronger as the number is increased.) |
| Middle √ | ||||
| High | ||||
 | Image Rotation | Off √ | Turn ON to rotate the camera image by 180°. | |
| On | ||||
 | Microscope | Off √ | SET to enter Microscope mode. | |
| Set | ||||
 | Color/B&W | Color √ | To output a color camera image. | |
| B&W | To output a black & white camera image. To make the image easier to view, select this when shooting black & white documents etc. | |||
 | Posi/Nega | Posi √ | To output a positive camera image. | |
| Nega To output | a negative camera image. | |||
 | Back To return to the top menu. | |||
* The "✓" symbol indicates the factory settings.
■ Function Setting Menu
| Icon | Name Selection Item Function | ||
 | USB Mode | Mass Storage | After connecting to a PC via a USB, data on the SD card loaded in device can be sent to the PC. |
| Application ( √ *) | After connecting to a PC via a USB, it is possible to take control of device and import images from PC. | ||
 | Flickerless | 60Hz | To reduce fluorescent lamp flickering due to the power supply frequency. Select the same value as used for the power supply frequency. |
| 50Hz | |||
 | Video Format | NTSC Video output NTSC. | |
| PAL Video output PAL. | |||
 | Highlight | Darkness - | To set the darkness of the masked section using the level bar, except when using the Highlight display. |
| Size - To set the size of the Highlight display. | |||
 | Mask Darkness | - | To set the darkness of the masked section using the level bar. |
 | Scroll | x2 √ (*) | To set the digital zoom magnification for scroll display to 2x, 3x, or 4x. |
| x3 | |||
| x4 | |||
 | Preset | 1 | To store preset settings in the memory of the selected number. |
| 2 | |||
| 3 | |||
| Power On | The preset settings stored here are automatically called the next time the power is turned on. | ||
| Exit | Exits without saving settings. | ||
* The "√" symbol indicates the factory settings.
● The default settings for Flicker Correction and Video Format differ depending on the region.
[North America Specifications]
Flicker Correction - 60Hz, Video Format - NTSC
[European Specifications]
Flicker Correction – 50Hz, Video Format – Pal

Note
- Selecting [Power On] or [Default] from [Call] provides the factory settings when the power is turned on. However, for items with (*) in the [Factory Settings] column, the last status set is maintained.
| Icon | Name Selection Item Function | ||
 | Call | 1 | To call the setting saved in the memory of the selected number. |
| 2 | |||
| 3 | |||
| Power On | Current settings are returned to the Power On status. (*) | ||
| Default | Current settings are returned to the De-fault status. (*) | ||
| Exit Exits without calling settings. | |||
 | Guide | On √ (*) | When turned on, the device's operating status and an explanation of the icons is displayed on the screen. |
| Off | |||
 | Language | Japanese To display the OSD menu in Japanese. | |
| English √ (*) | To display the OSD menu in English. | ||
 | Back | To return to the OSD menu display top menu. | |
* The "✓" symbol indicates the factory settings.

Note
- Selecting [Power On] or [Default] from [Call] provides the factory settings when the power is turned on. However, for items with (*) in the [Factory Settings] column, the last status set is maintained.
SD Mode OSD Menu
After using Image select to change the output image to SD Mode, press the "MENU" button to display the OSD menu. P.54
■ OSD Top menu
| Icon | Name Selection Item Function | ||
 | SD SD Menu | To display the setting menu for SD im-ages. | |
 | Slide Show Slide Show Menu | To display the setting menu for Slide Show. | |
 | Back - | Hides the OSD menu display. | |
SD Menu
On this menu, when any item except for [Back] is selected, a [Yes] or [No] confirmation message is displayed. Select [Yes] to perform the operation, or [No] to cancel.
| Icon | Name Selection Item Function | ||
 | Delete | Current | To delete the image currently displayed. (Locked images cannot be deleted.) Select [Yes] to format or [No] to cancel. |
| All | To delete all images stored on the SD card. (Locked images cannot be deleted.) Select [Yes] to format or [No] to cancel. | ||
| Exit Exit without deleting anything. | |||
 | Lock | Current | To lock the image currently displayed. (Locked images cannot be deleted.) |
| All | To lock all images stored on the SD card (Locked images cannot be deleted.) | ||
| Exit Exit without locking anything. | |||
 | Unlock | Current | To unlock the image currently being displayed. |
| All | To unlock all images stored on the SD card. | ||
| Exit Exit without unlocking anything. | |||
 | Format Media | To format an SD card. When this item is selected, a confirmation message is displayed. Select [Yes] to format or [No] to cancel.When formatting, all of the data on the SD card, including locked images, are deleted. Check before formatting the card. | |
 | Back | To return to the OSD menu display top menu. | |
■ Slide Show Menu
| Icon | Name Selection Item Function | ||
 | Start Slide Show | To start a slide show. | |
 | Interval | 5sec √ | The image changes at the interval set when a slide show is performed. |
| 10sec | |||
| 15sec | |||
| 30sec | |||
 | Select | All √ | To use all images stored on the SD card for the slide show. |
| Locked Only | To use only locked images from the images stored on the SD card for the slide show. | ||
 | Repeat | Off √ | The slide show only shown once. |
| On The slide show is repeated. | |||
 | Order | Forward √ | To give a slide show in ascending order of serial No. |
| Backward | To give a slide show in descending order of serial No. | ||
 | Back | To return to the OSD menu display top menu. | |
* The "√" symbol indicates the factory settings.
2 SETTING UP
Setting Up

Note
- Carry the product by holding the lower part of the main unit in both hands. Never hold the product by the column or the camera head.
- Pay attention to prevent the camera head from knocking against a desk or any hard object.

natural_image
Illustration of a desk lamp with a curved arm and two 'X' symbols indicating no text or symbols on the lamp itself (no text or symbols present)1 Turn the camera column in the direction shown in the figure.

Note
- Never turn the column in the opposite direction.
- Be sure to hold the column when turning it. Never hold the camera head.

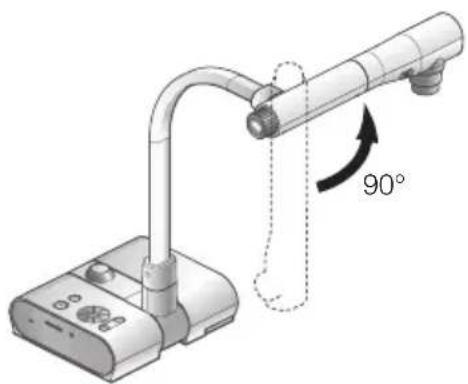
2 Rotate the camera head.

Note
- Proper set up position of the camera head is as shown in the figure on the right. Never apply excessive force to the camera.

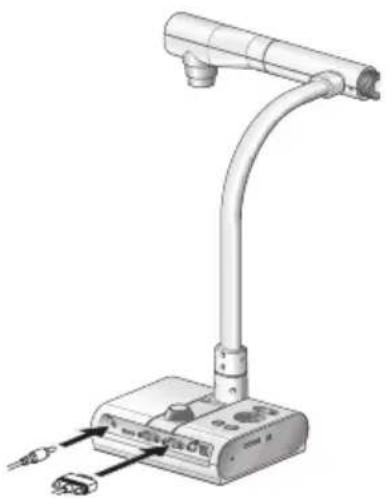
After connecting the RGB cable, and connecting the AC adapter to the DC IN 12V (Power Socket), plug the AC adapter into the wall socket. P.30 (The [POWER] button is illu minated red.)
natural_image
Illustration of a desktop computer with a curved arm and connector base (no text or symbols)SETTING UP

Press the [POWER] button on the operating panel or the remote control. After the [POWER] button flashes blue, [Power On] is illuminated a few seconds later.)

natural_image
Illustration of a handheld electronic device with a curved arm and control panel (no text or symbols)
Note
- Do not operate this device while it is flashing.

natural_image
Close-up of a circular device dial with directional arrows and control buttons (no text or symbols visible)Connecting the AC adapter and Video cable
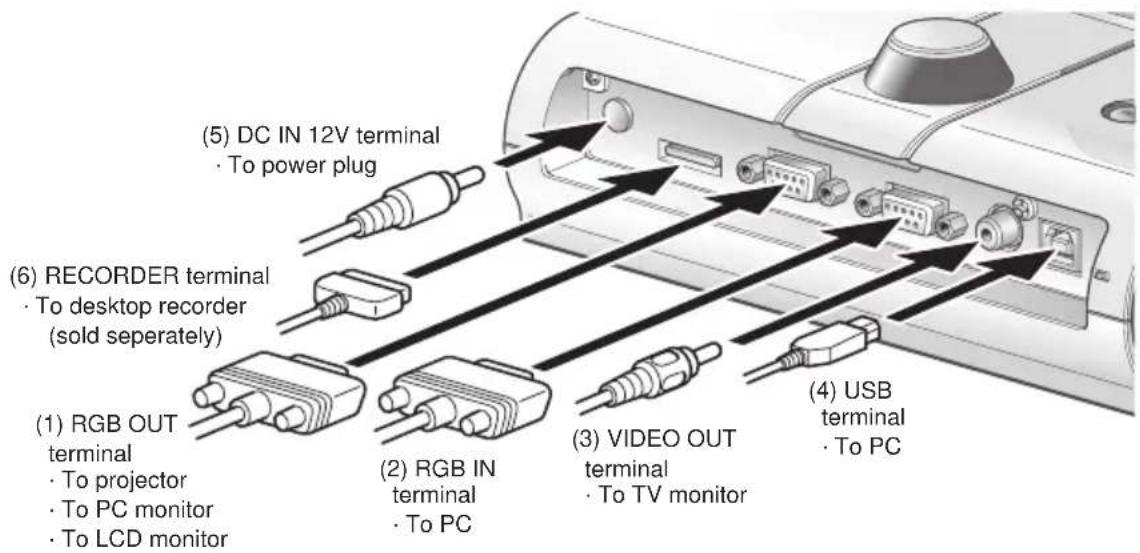
(1) To connect the unit to any device with an analog RGB input.
Connect the supplied RGB cable from the [RGB OUT] terminal on the rear panel of the unit to the RGB input terminal of the display device.
- If the displayed image is off-center, adjustment of the horizontal and vertical position should be made manually from the connected display device.
- In some cases, vertical stripes may appear on the display device. This can be mitigated by manually adjusting the "clock phase" function of the display device. Check the User's manual of your specific display device for the proper procedure.
(2) To connect the unit to any device with an analog RGB output.
Connect the supplied or commercially available analog RGB cable to the [RGB IN] terminal on the rear panel of the unit.

Note
- When using a laptop PC with external output mode capability, set the laptop PC to external output mode after pressing the manual operation button [PC] on the main unit.
■ Specifications of the analog RGB input terminal of this product
Signal allocation

Video signal: Analog 0.7V (p-p) with 75Ω terminated Horizontal synchronized signal: TTL level (Positive/negative polarity) Vertical synchronized signal: TTL level (Positive/negative polarity)
DSUB 15P shrink terminal (Female)
Pin assignment
| Pin No. | Name Pin No. |
| 1 | Video signal (Red) |
| 2 | Video signal (Green) |
| 3 | Video signal (Blue) |
| 4 | N.C |
| 5 | GND |
| ame Pin No. Name | |
| 6 GND | (Red) 11 GND |
| 7 GND | (Green) 12 |
| 8 | GND (Blue) |
| 9 | N.C |
| 10 | GND |
| N.C | |
| 13 | Horizontal synchronized signal |
| 14 | Vertical synchronized signal |
| 15 | N.C |
(3) To connect the unit with a composite video input terminal.
Connect a commercially available RCA pin plug video cable to the [VIDEO OUT] terminal on the rear panel.
(4) To connect the PC with a USB cable.
Connect the supplied or commercially available USB cable to the [USB] terminal on the rear panel.

Note
• We recommend using a USB 2.0 compliant USB cable.
- If you plug into a USB connector with the power on, the PC may not recognize this device.
- Depending on the USB environment used by the PC or peripheral equipment using the USB 2.0 compliant cable, image transfer may be disrupted.
• Operation is not guaranteed for all environments.
(5) To connect the AC adapter.
Connect the DC plug of the supplied AC adapter to the [DC IN 12V] terminal on the rear panel before inserting the AC adapter in an outlet.

Note
- Only one image can be output at a time; either [RGB OUT] or [VIDEO OUT]. For more information on switching the image output, refer to "RGB/Video Switch". P.15
- To protect the unit and peripheral devices, unplug the power plug and the AC adapter, and turn off all other devices before connecting the video cable.
- When plugging in or unplugging the power plug, the AC adapter, or video cable, hold the plug of the cable.
3 STORING
Storing
1 Press the [POWER] button on the operating panel or the remote control.
(Hold down the [POWER] button for approximately two seconds or more. The lamp changes from blue to red and the power switches off.)

natural_image
Illustration of a handheld electronic device with a curved arm and control panel (no text or symbols)Note
- Before storing the main unit, be sure to turn the power off.

natural_image
Close-up of a circular device control panel with directional arrows and function buttons (no text or symbols)2 Unplug the AC adapter from the wall socket. Then, disconnect the AC adapter and the video cable.
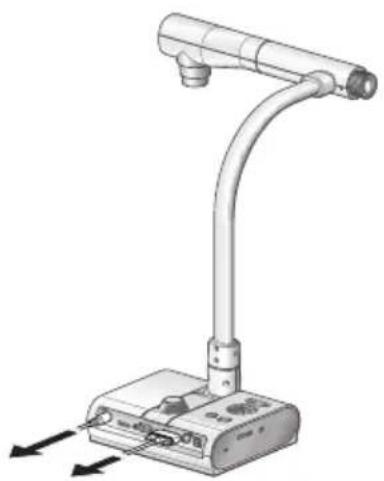
natural_image
Illustration of a desktop computer with a curved arm and two directional arrows indicating movement (no text or symbols)3 Turn the camera head in the direction shown in the figure.

natural_image
Diagram of a medical or industrial device with a 90-degree angle indicator, showing no text or symbols beyond the angle label.
Turn the camera column in the direction shown in the figure.


Note
- Never turn the column in the opposite direction.
- Be sure to hold the column when turning it. Never hold the camera head.
- Proper storage position for the camera head is shown in the figure above. Never apply excessive force to the camera.
- Pay attention to prevent the camera head from knocking against a desk or any hard object.
- Unplug the power cord and the AC adapter when the unit is not being used.
- Turn off the illumination lamp switch when folding the main unit.
Presentation using printed materials, etc.

natural_image
Illustration of a projector setup with a mounted device and a separate projector unit (no text or symbols visible)■ Setting the main unit
Set the main unit as shown in the figure above. Then connect it to a projector or a PC monitor, and turn on the power for the main unit.
■ Adjusting the size
Place an object on the stage, and then adjust the zoom dial on the main unit or the zoom buttons [ ✉ / - ] on the remote control so that the part you want to shoot fits the screen size. P.49
■ Adjusting the focus
Press the [AF] button on the main unit or on the remote control to focus the camera on the object. P.50
■ Adjusting the brightness
Press the [BRIGHTNESS ⚙️]/[BRIGHTNESS ↓] buttons on the operating panel or on the remote control to adjust the image brightness. P.53
■ Turning the illumination lamp ON/OFF
Move the illumination lamp switch on the main unit to the left/right to turn it ON/OFF.
Note
- Before connecting the main unit to other devices, be sure to turn off the power for all of the devices.
- When copying B&W characters or documents etc., use TEXT1 to 3 from the OSD (Camera image) as the image mode.
A better image may be produced by selecting Graphics1 mode with DLP projector.
- When connected to a DLP projector, select the image mode according to the displayed image as both text and photos can be beautifully reproduced by switching to Graphics2 mode.
Presentation using printed materials, etc.
(Using the stage)

You can give an effective presentation by using the supplied stage, magnetic strip, and anti-glare sheet.
■ Setting the main unit
Attach the stage to the main unit in the specified position as shown in the figure above. Then connect the main unit to a projector or a PC monitor, and turn on the power for the main unit.
- To prevent the printed materials, etc. from moving, use the supplied magnetic strip to properly fix the printed materials, etc. on the stage.
■ Adjusting the size
Place an object on the stage, and then adjust the zoom dial on the main unit or the zoom buttons [ + / - ] on the remote control so that the part you want to shoot fits the screen size. P.49
■ Adjusting the focus
Press the [AF] button on the main unit or on the remote control to focus the camera on the object. P.50
■ Adjusting the brightness
Press the [BRIGHTNESS ⚙️]/[BRIGHTNESS ↓] buttons on the operating panel or on the remote control to adjust the image brightness. P.53
■ Turning the illumination lamp ON/OFF
Move the illumination lamp switch on the main unit to the left/right to turn it ON/OFF.

Note
- When shooting glossy documents etc., the images may be hard to see due to glare etc. In this case, place the supplied Anti-glare sheet on the reflecting section to reduce the amount of reflection and make the image easy to see.
Presentation using an SD card (commercially-available)

Note
- Before starting, insert a commercially available SD card into the SD card slot on the side panel. Push the card again to remove the SD card.
- Insert the SD card with the label facing up. Forcing it into the slot in the wrong orientation may cause a malfunction.
- Before loading or unloading the SD card or turning the power off, be sure to select the camera image by pressing the camera button [ ] on the operating panel, and confirm that the output image has been switched to camera image. Otherwise, the SD card contents could be damaged or the camera could malfunction.
- The SD card is composed of parts vulnerable to static electricity. Therefore, due to static electricity, the SD card could malfunction or its contents could be destroyed. When handling the SD card, take care to avoid static electricity.
- You may not be able to display image data other than that saved in this product or converted using the conversion function of the software supplied. Also, images of 7MBs or more cannot be displayed.
- When displaying image data in an unsupported format, [ ] or [ ] is displayed on the output screen.
- If you try displaying image data on an SD card without inserting an SD card, a black screen with the message [n] is displayed.
• After using the SD card, do not leave it inserted in this product; be sure to remove it. - We recommend using SD cards (512MB, 1GB, and 2GB) made by Panasonic, and SDHC cards (up to 4GB) made by Panasonic.
The resolution for the stored images is 1280x1024 (for SXGA output), 1280x800 (for WXGA output), and 1280x960 (for XGA output).
This product can store up to 2048 images.
- ELMO is not liable for any damage caused by the loss of the data in the SD card or passive damage.
- When an SD card is inserted, "Card Reading" is displayed on the screen, and to allow this device to check the contents of the SD card, it may take some time between inserting the card and the JPEGs being displayed and captured.
In that case, please wait a short time before performing any of the operations mentioned above.
- When an SD card is inserted and then the power to the main unit is turned on, it may take a while before operations can be performed on the main unit.
- Please wait a short time until the power switch on the main unit lights blue before performing any operations.
■ Saving the image
(1) Press the [ ] button on the operating panel or the [ ] button on the remote control to switch the output image to the camera image.
(2) Make sure that the OSD is not displayed, and then press the [operating panel or on the remote control.
(3) Saving begins when the [icon] mark is displayed on the screen. Saving is complete when the symbol disappears.

Note
- Zoomed images cannot be saved during digital zooming. However, images which are zoomed to the maximum [ZOOM-IN⊕] limit within the range of the optical zoom can be saved.
- Image data cannot be recorded with the correct date and time.
- Be sure to try shooting and confirm that the images are saved correctly beforehand. If images cannot be saved normally due to some problem with this camera or the SD card, ELMO is not liable to compensate for such failure.
- The [O] mark is only displayed on the screen when [Function Setting] → [Guide] is set to ON from the Camera OSD menu.
- When the SD card is write-protected, images cannot be saved in the SD card.
- If the SD card is full when recording, an [X] mark is displayed on the screen. Delete any unnecessary images or use another SD card.
- Never remove the SD card while it is reading or writing data. This may cause malfunctions to occur.
- Do not turn off the power to this product while reading or writing to an SD card. This may cause malfunctions to occur.
■ Displaying the image
There are two display modes for SD images. You can use Single display to display one image only, or 4 x 4 display to display 16 images.
- Single display
(1) Make sure that the OSD is not displayed, and then press the [ ] button on the operating panel or on the remote control. The output image changes to SD mode, and the images stored on the SD card are displayed as single images.
(2) Make sure that the OSD is not displayed, and then press the [ ] button on the operating panel or the [▶] button on the remote control to change to the next image. Press the [○] button on the operating panel or the [◀] button on the remote control to return to the previous image.
(3) You can zoom in or out of the image being displayed by using the zoom dial on the main unit, and you can reset zoom in/out by using the AF button on the main unit.

Note
- When an SD image is enlarged, the Scroll function cannot be used. If you want to use the Scroll function, press the AF button to reset the image enlargement, and then scroll.
- Changing display mode
(1) During Single display in SD Mode, make sure that OSD is not displayed, and then press the [ ] button on the operating panel or the [AF] button on the remote control to change the display from Single display to 4 x 4 display.
(2) Press the [↓] and [-●] buttons on the operating panel or the [ ] and [ ] buttons on the remote control to move the image selection cursor.
(3) Press the [ ] button on the operating panel or the [AF] button on the remote control to display the image selected with the image selection cursor in Single display.
■ Deleting, locking, and unlocking images
(1) Make sure that the OSD is not displayed, and then press the [SD] button on the operating panel or on the remote control. The output image changes to SD mode, and the images stored on the SD card are displayed as single images. When you want to work in 4 x 4 display, press the [X] button on the operating panel or the [AF] button on the remote control to change to 4 x 4 display.
(2) Use the [↓]/[·buttons on the operating panel to select the image you want to delete.
In Single display, the image you want to delete is displayed. In 4 x 4 display, use the image selection cursor to select the image you want to delete.
(3) Press the [MENU] button on the operating panel to display the SD Mode OSD menu.
- Deleting images
From the OSD menu, select [SD] → [Delete].
To delete the image currently selected, select [Current]. To delete all images, select [All]. Select [Yes] to start deleting. (If you do not want to delete, select [No].)
- Locking images
From the OSD menu, select [SD] → [Lock].
To lock the image currently selected, select [Current]. To lock all images, select [All].
- Unlocking images
From the OSD menu, select [SD] → [Unlock].
To unlock the image currently selected, select [Current]. To unlock all images, select [All].
■ Formatting the SD card
When you need to format the SD card, insert the SD card into this product, and execute formatting.
(1) Make sure that the OSD is not displayed, and then press the [SD] button on the operating panel or on the remote control to switch the output image to SD mode.
(2) Press the [MENU] button on the operating panel to display the SD Mode OSD menu.
(3) From the OSD menu, select [SD] → [Format Media].
(4) Select [Yes] to start formatting. (If you do not want to format, select [No].
■ Slide Show
(1) Make sure that the OSD is not displayed, and then press the [ ] button on the operating panel or on the remote control to switch the output image to SD mode.
(2) Press the [MENU] button on the operating panel to display the SD Mode OSD menu.
(3) From the OSD menu, select [Slide Show] → [Start Slide Show].
(4) When any button (excluding the [POWER ⏻] button) on the operating panel or the remote control is pressed, the slide show stops.
- You can set Interval, Repeat, or Order from the Slide Show menu of the OSD.

Note
- When [Mass Storage] is set from [Function Setting] → [USB Mode] on the OSD menu and the product is connected to a PC, you cannot delete, lock, or unlock SD images or format an SD card.
- Do not turn off the power while formatting the SD card.
- Make sure to use this product for formatting the SD card. If you have already formatted the SD card with a computer, format it again using the main unit.
Transferring images from the SD card to a USB-connected PC

natural_image
Diagram of a robotic device connected to a laptop via cable, showing internal components and a close-up of a device (no text or symbols present)Note
- Set [USB Mode] to [Mass Storage] on the OSD Camera settings menu.
- Insert the SD card with the label facing up. Forcing it into the slot in the wrong orientation may cause a malfunction.
When this product is connected to a PC via USB, image data on the SD card can be transferred to the PC.
The Operating System (OS) for the connected PC should be Microsoft Windows 2000 (SP4 or later) / XP (SP2 or later) / Vista.
(1) Turn on the power supply to this product and to the PC.
(2) Connect this product to the PC with the supplied USB cable.

Note
- When this product is connected to the PC for the first time, the required drivers are installed automatically using the plug-and-play function of Windows. From the second time and thereafter, the drivers are no longer installed.
(3) This product is recognized as a removable disk. You can view the image data on an SD card on the PC's viewer software.
- The image data is stored in JPEG format in the following folders:

flowchart
graph TD
    A["My Computer"] --> B["Removable disk"]
    B --> C["DCIM"]
    C --> D["100_ELMO"]
    D --> E["IMAG0001.JPG"]
    D --> F["IMAG0002.JPG"]

Note
- An SD card set in this product cannot be saved, deleted, locked, unlocked, or formatted with image data from the PC.
- Image data cannot be recorded with the correct date and time.
- When the operating panel or the remote control is in operation, do not connect or disconnect the USB cable, as this could cause the product to malfunction. This may cause malfunctions to occur.
- Do not switch [USB Mode] on the OSD when this product is in USB-connection.
- We recommend using a USB 2.0 compliant USB cable.
- Depending on the USB environment used by the PC or peripheral equipment using the USB 2.0 compliant cable, image transfer may be disrupted.
• Operation is not guaranteed for all environments. - When [USB Mode] has been set to [Mass Storage] and a USB cable has been connected to the PC, an SD card cannot be deleted, locked, unlocked, formatted, and saved with image data on this device.
Presentation using the supplied software with a USB-connected PC
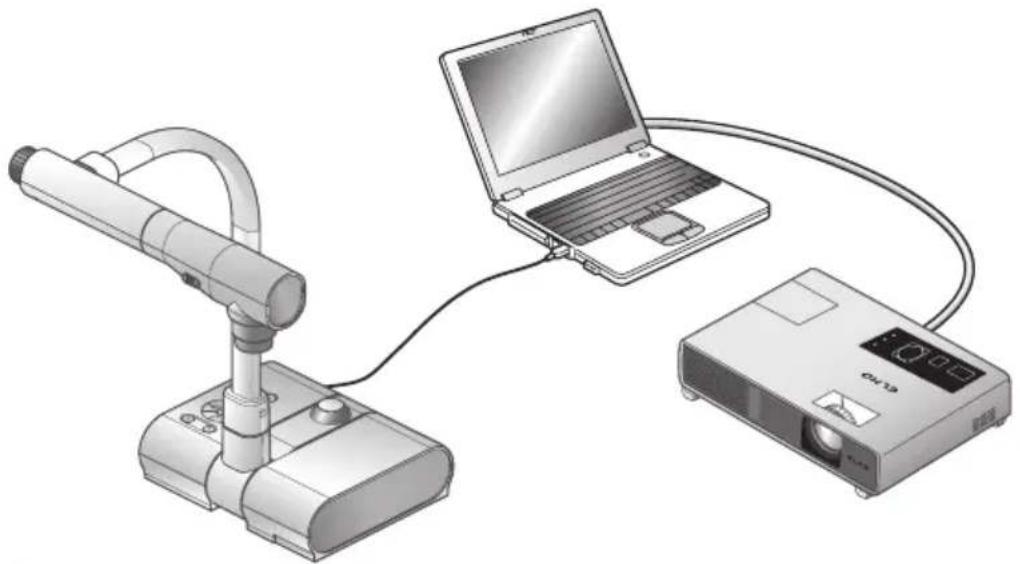
natural_image
Illustration of a medical device connected to a laptop and a projector (no text or symbols present)Note
- Set [USB Mode] to [Application] on the OSD.
"Image Mate" can be found on the supplied CD-ROM.
The "Image Mate" and TWAIN driver "Image Mate TWAIN" software for controlling this device can be found on the CD-ROM and allows you to perform the following functions.
- Transfer moving/still images to the PC
- Operate this product from the PC
For information such as PC hardware requirements, OS type, software guides, and the "Image Mate" installation manual, see the "HELP folder" on the CD-ROM.
Note
- When the operating panel or the remote control is in operation, do not connect or disconnect the USB cable, as this could cause the product to malfunction.
• We recommend using a USB 2.0 compliant USB cable. - Depending on the USB environment used by the PC or peripheral equipment using the USB 2.0 compliant cable, image transfer may be disrupted.
• Operation is not guaranteed for all environments.
Presentation using a Microscope

■ Setting up a microscope
Place an object such as a prepared slide on the microscope, and then look into the microscope and adjust the focus. Install the supplied microscope attachment. P.45
■ Setting the main unit
Connect the main unit to a projector or a PC monitor and then turn on the power for the main unit.
■ Changing to Microscope mode
From the OSD, select [Microscope] → [Set].

Note
- Be careful not to hit the main unit lens with the microscope attachment.
- When changing to microscope mode, [Graphics1] is automatically selected as the [Image Mode].
■ Adjusting the focus
The [AF] button on the main unit or on the remote control focuses the camera on the object.
■ Adjusting the brightness
Adjust the brightness with the mirror on the microscope.
■ Adjusting Zoom
By rotating the zoom dial on the main unit, you can adjust the size of the zoomed image.
■ Closing microscope mode
From the OSD, select [Microscope] → [Off].

Note
- To return to Regular mode after using the microscope, set [Set] [Off] in the OSD.
- When setting [Set] → [Off] in the OSD, [Image Mode] returns to the [Image Mode] selected before changing to the microscope mode.
- In Microscope Mode, the brightness does not change even if you press the [BRIGHTNESS ⚙️]/[BRIGHTNESS ⏻] button on the operating panel.
Presentation using a Microscope (Installing the attachment supplied)
1 Place the object you want to view on the microscope, and then look into the microscope and adjust the focus and brightness.

Note
- The image may appear darker when viewed through this unit than when viewed with the naked eye. When adjusting the microscope's brightness, avoid direct sunlight and adjust the microscope's mirror to increase the brightness. If it is not bright enough, you can use a desk lamp etc. to increase the brightness.
2 Cover the eyepiece with the microscope attachment.

Note
- Do not attach the microscope attachment to the lens of the main unit.
3 Fix the centers of the cross and the eyepiece with the screws matching the both centers.
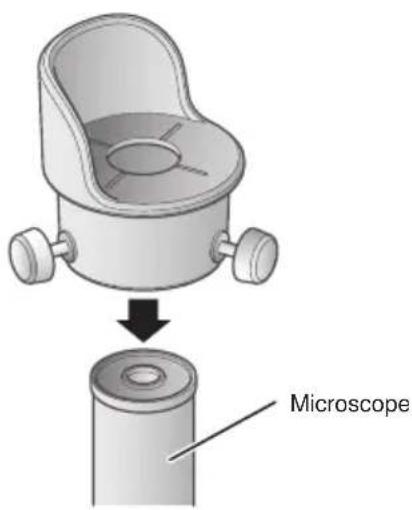
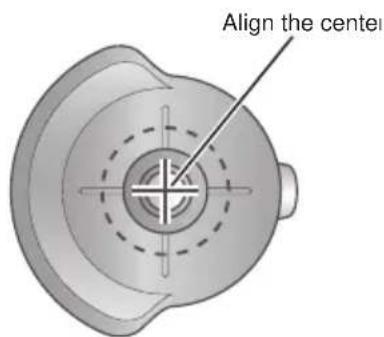

Horizontally slide the microscope attachment and the lens for the main unit together.

natural_image
Technical illustration of two mechanical components with no visible text or symbols
Slide in from the side and adjust the lens for the main unit to the top surface of the microscope attachment.

natural_image
Technical diagram of a mechanical device with directional arrows indicating movement or force (no text or symbols present)
Note
- The microscope attachment can be used when the eyepiece is 20 to 28 ~mm . When using an eyepiece of a different size, shoot without using the microscope attachment.
Shooting a 3-D object
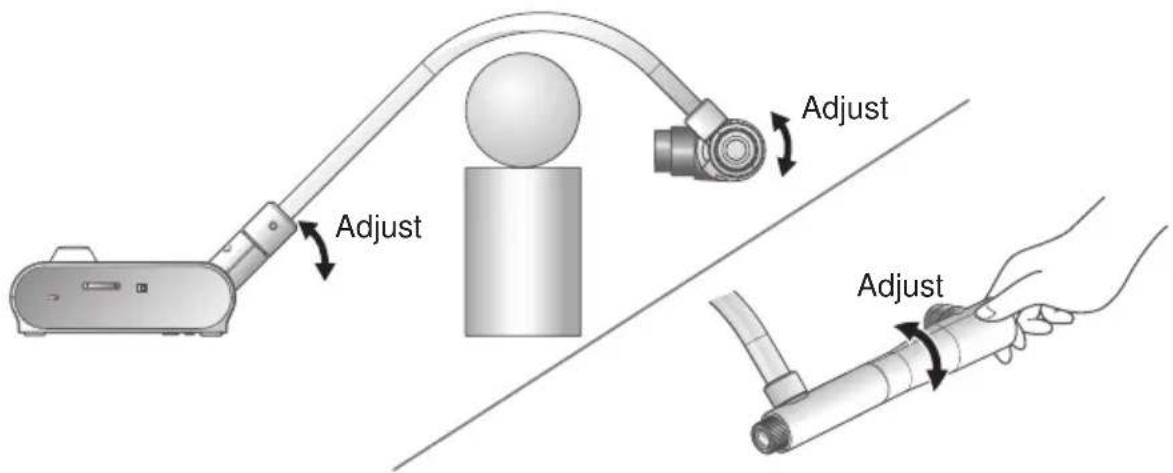
By adjusting the angle of the camera column and the camera head, a 3-D object can be shot from the side.
■ Setting the main unit
Connect the main unit to a projector or a PC monitor, and then turn on the power for the main unit. Adjust the angle of the camera column and the camera head as shown in the above figure to shoot the 3-D object.
■ Adjusting the size
Adjust the zoom dial on the main unit or the zoom buttons [ + / - ] on the remote control so that the part of the object you want to shoot fits the screen size.
■ Adjusting the focus
Press the [AF] button on the main unit or on the remote control to focus the camera on the object. In cases where the object cannot be brought into focus, select [Focus] from the OSD and use [Manual] to focus. P.50

Note
- The focus can be achieved from 50mm -∞
■ Adjusting the brightness
Press the [BRIGHTNESS -] and [BRIGHTNESS buttons on the main unit to adjust the image brightness. P.53
■ Turning the illumination lamp ON/OFF
Move the illumination lamp switch on the main unit to the left/right to turn it ON/OFF.
Shooting a wall surface or distant view
natural_image
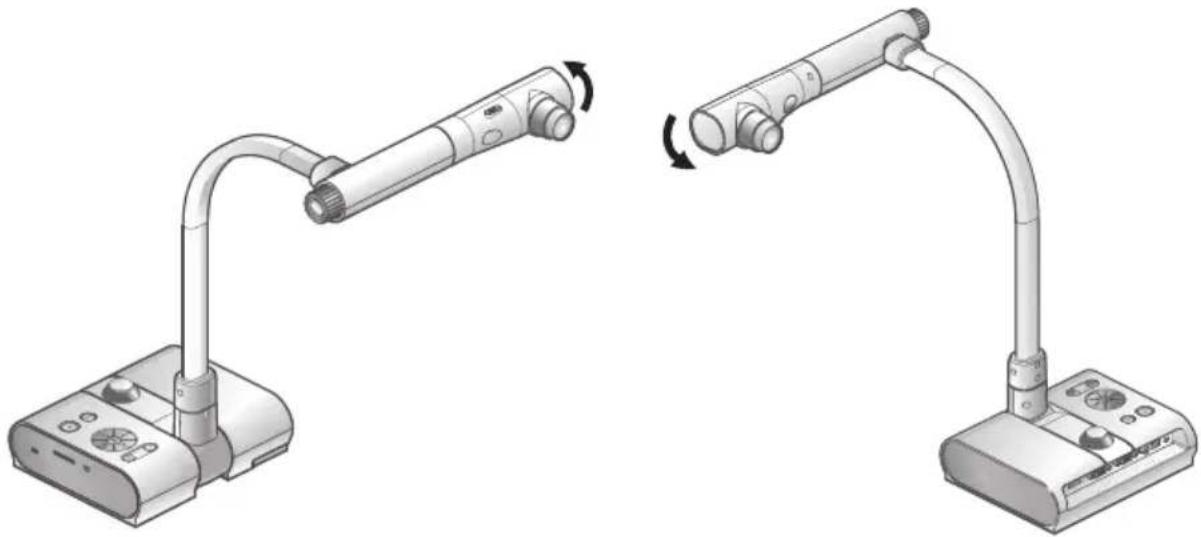
Illustration of a desktop computer with two articulated arms and a device, showing rotational motion (no text or symbols)Forward shooting Backward shooting
When the camera head is set horizontally, you can shoot walls, distant views, etc.
Note
- To shoot an object in front of the main unit, set [Image Rotation] to [On] in the OSD to rotate the image by 180^ .
- Camera head rotation angle: Forward shooting : 110° from the normal downward shooting position; Backward shooting: 110° from the normal downward shooting position.
- Focus range
50mm - ∞ from lens top - To take shots of people, turn off the illumination lamp switch.
(Make sure that the light from the illumination lamp does not shine directly into their eyes.)
5 VARIOUS FUNCTIONS AND OPERATIONS
Zoom

The display range of the document can be adjusted by rotating the zoom dial on the main unit or by pressing the zoom buttons on the remote control.
- WIDE (ZOOM-OUT ☐) : Object can be shown in small size.
- TELE (ZOOM-IN ☐) : Object can be shown in large size.

Note
- Zoom ratio: Optical 5.2x, Digital 8x
- Within the digital zoom range, the image quality is degraded.
- In SD mode, SD images can be digitally zoomed (enlarged/reduced).
Focus

■Auto Focus
Press the [AF] button to automatically focus. This unit provides a one-shot auto-focus system. Once the camera is focused, the auto focus operation is released, and then the focus position is maintained.
Note
- The objects listed below may not be brought into focus by the auto focus. In such cases, use the manual focus.
- Low contrast objects
- Objects with fine repeated patterns, such as lateral stripes and criss-cross stripes
- Objects glittering or reflecting strong light
- Objects with a bright background or excessive contrast
- Objects that are entirely dark
- Objects located near and far away at the same time
- Objects in motion
- Focus range
50mm - ∞ (2.0 in x) from lens top - In SD mode, digital zoom settings for SD images can be reset.
■ Manual focus
You can change the focus position by pressing the [ ] and [ ] buttons on the main unit after selecting [Focus] from the OSD menu.
Use this function (manual focus) to focus on any part of a 3-D object.


■Zoom Sync Focus
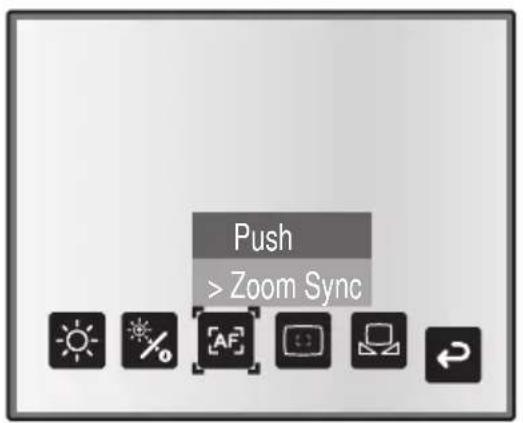
You can automatically adjust the focus by selecting [AF Mode] → [Zoom Sync] from the OSD menu and operating zoom dial on the main unit and the zoom buttons on the remote control.


natural_image
Close-up of a circular mechanical or electrical component with directional arrows and control buttons (no text or symbols visible)VARIOUS FUNCTIONS AND OPERATIONS
Illumination lamp

By sliding the illumination lamp switch, the illumination lamp can be turned ON/OFF.
• [ON] : The illumination lamp lights.
• [OFF] : The illumination lamp goes out.
Note
- To take shots of people, turn off the illumination lamp switch.
(Make sure that the light from the illumination lamp does not shine directly into their eyes.) - This product is equipped with a high-brightness LED lamp. You can safely use the lamp to light up objects, however its brightness will gradually degrade with long-term usage. This is not a malfunction of the lamp, but a feature of the LED performance.
- Do not touch the illumination lamp while it is on as the temperature may be too high.
Adjusting the brightness
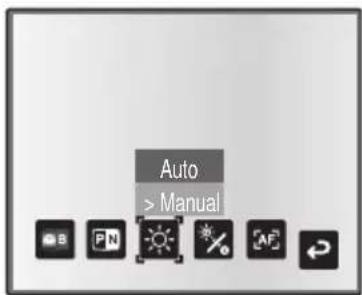
Press the [BRIGHTNESS]or [BRIGHTNESS ↓] buttons on the operating panel or on the remote control to adjust image brightness. The following two adjustment modes can be set by selecting [Brightness] from the OSD menu.


natural_image
Front view of a stylized remote control device with control buttons and display icons (no text or symbols visible)■Automatic brightness adjustment
([Brightness] → [Auto] in the OSD) The brightness of the image changes automatically according to the brightness of the object.

natural_image
Simple horizontal bar with a star and dot at the bottom (no text or symbols)■ Manual brightness adjustment
([Brightness] → [Manual] in the OSD)
The brightness of the image is fixed to the specified level.

Note
• Factory setting is set to [Auto].
- Manual adjustment fixes the brightness and does not adjust to changes in brightness of the object.
- When the brightness becomes dark, the frame rate slows, and the image may become hard to see.
- By setting [Guide] to [On] in the OSD menu, the setting details are displayed on the screen.
• To go back to the factory settings, press the [BRIGHTNESS] and

[BRIGHTNESS ↓] buttons on the operating panel at the same time, or set [Reset Brightness] from the OSD menu.
- In places where the object is exposed to bright sunlight (e.g. near a window), or extremely bright lights, the brightness of the screen may not dim sufficiently, even when the [BRIGHTNESS ↓] button is pressed.
In such cases, adjust the amount of light by closing the curtains or moving the source of the light.

natural_image
Close-up of a circular device control panel with directional arrows and function buttons (no text or symbols visible)Image selection


You can switch to camera image by pressing the [icon] button on the operating panel or the [◀] button on the remote control, switch to the image input to the analog RGB input terminal [RGB IN] by pressing on the operating panel or the [icon] button on the remote control, and switch to images saved on the SD card by pressing the [icon] button on the operating panel or on the remote control.
By connecting PCs and other devices to the analog RGB input terminal [RGB IN], you can switch output images without disconnecting cables.
Note
- The operating panel and remote control [4] buttons cannot be used when the RGB/VIDEO Switch is set to VIDEO.
- When using a laptop PC equipped with external output selection, set the output mode of the PC to "external" after pressing the [ ] button on the operating panel or the remote control.
- Enters [CAMERA] mode when the output is [RGB OUT] and [VIDEO] is set for [PC] mode.
White Balance
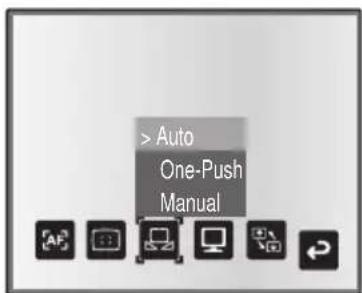
■How to use [Auto]
Adjust the white balance automatically according to the color status of the document.
Factory setting: Auto
■How to use [One-Push]
To be used when the color balance of the image is lost. Shoot a sheet of white paper and then set [White Balance] → [One-Push] from the OSD menu. The white balance for the color temperature is then fixed.

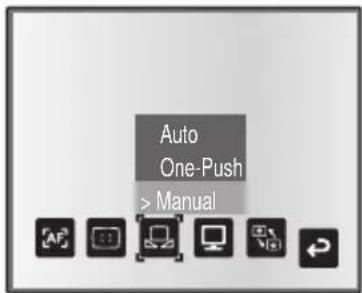
■How to use [Manual]
Setting [White Balance] → [Manual] from the OSD menu fixes the white balance to allow [R-Gain] and [B-Gain] for the OSD to be adjustable.

![Elmo TT-02RX - ■How to use [Manual] - 3](/content/2026/05/985013/images/4c5f651ce8a4ad9dff2fc9a3aa6afcffbb53e5e6efd82200ed586857e01715a1.jpg)
Note
- The color temperature that can be automatically followed ranges from approx. 3000K to 8000K.
- By setting [Guide] to [On] in the OSD menu, the setting details are displayed on the screen.
Save/call settings
The operation status of the unit can be saved to or called from the memory. The unit saves 4 states (1 to 3 and Power ON) under the following storage conditions.
- Current zoom ratio (The range of the optical zoom) • Status of white balance
- Brightness
- Image Mode Settings
- Intensity of red color (when selecting [White Balance] + → [Manual])
- Intensity of blue color (when selecting [White Balance] + → [Manual])
- Edge enhancement (in Graphics mode) • Posi/Nega settings
- Gamma value setting (in Graphics mode) • Color/B&W switch settings
- Status of image rotation • AF Mode/Zoom Sync settings
Note
- The saved conditions are saved even if the power is turned off.
■How to save settings
Select [Preset] → [1] to [3] from the OSD menu to save current unit configuration as the selected number. (Excluding USB Mode settings)
Select [Preset] → [Power On] from the OSD menu to save the settings that are called when the power is turned on for the main unit. (Excluding USB Mode settings)

Note
- The status of a presentation given with a microscope cannot be saved.
- The status of image rotation can be only be saved in [1] to [3].
- Zoomed areas cannot be saved during digital zooming. However, when saving the settings in digital zoom mode, when the zoom size of view is at the maximum position [ZOOM-IN ☐] the area within the range of the optical zoom can be saved.
■How to call settings
Select [Call] → [1] to [3] from the OSD menu to call the settings for the selected number.
Select [Call] → [Power On] from the OSD menu to call the settings for when the power is turned on.
Select [Call] → [Default] from the OSD menu to call the factory settings. (Excluding USB Mode settings)


Note
- Unable to operate the zoom dial on the front operation panel or the remote control while calling settings.
Highlight Function
It you want to draw attention to a particular section of the output image, you can use Highlight display.
■ Highlight settings
From the Camera Mode OSD Menu select [Function Setting] → [Highlight]. When [Darkness] is selected the level bar is displayed, and you can then set the darkness for the areas outside the highlighted section with the [icon] and [button]. Also, when you select [Size], you can adjust the size of the highlighted section vertically by using the [icon] and [button] buttons on the operating panel, and you can adjust the size horizontally using the [icon] and [button] buttons.

natural_image
Simple geometric shapes: a white rectangle and a black rectangle on a gray background (no text or symbols)
natural_image
Simple gray square with a white center, no text or symbols present.
■ Highlight operations
When you press the [☐] button on the remote control while the output image is Camera Image or SD Mode, the highlight display uses the darkness and size set previously.
You can move the highlighted area using the [▲], [▼[]. ◀nd [ ] buttons on the remote
control. The highlight display is cleared when you press the [ ] button on the remote control again.


Note
- The Highlight function cannot be used when the output image is PC.
- In the optical zoom range, the highlight size remains the same. In the digital zoom range, the highlight size expands and contracts depending on the magnification ratio.
- Cannot perform a capture of a highlighted image.
- When the highlight size is selected from the OSD menu, the highlight size currently displayed returns to the initial settings.
Mask Function
You can mask a section of the output image.
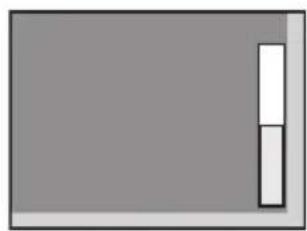
■ Mask settings
From the Camera Mode OSD Menu select [Function Setting] → [Mask]. When [Darkness] is selected the level bar is displayed, and you can then set the darkness for the areas outside the highlighted section with the [☐] and [☐] buttons.
natural_image
Simple geometric diagram with a gray rectangle and a vertical white rectangle on the right side (no text or symbols)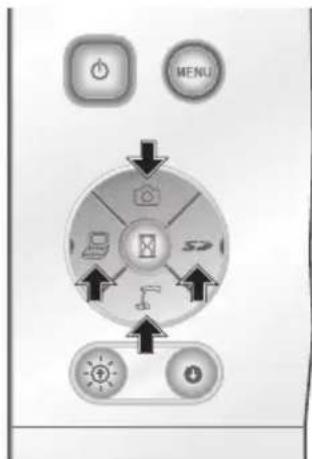
■ Mask operations
When you press the [ ] button on the remote control while the output image is Camera Image or SD Mode, the mask display uses the darkness set previously.
You can move the masked area using the [ ▲], [ ], and [ ] buttons on the remote control.
The mask display is cleared when you press the [☐] button on the remote control again.

Note
- The mask function cannot be used when the output image is PC.
- In the optical zoom range, the mask size remains the same. In the digital zoom range, the mask size expands and contracts depending on the magnification ratio.
- Cannot mask the entire output image.
Scroll Function
The image expands to the digital zoom set previously, and the screen can be scrolled.
■ Digital zoom settings
From the Camera Mode OSD Menu, select [Function Setting] → [Scroll], and set the digital zoom ratio to x2, x3, or x4.
■ Scroll operations
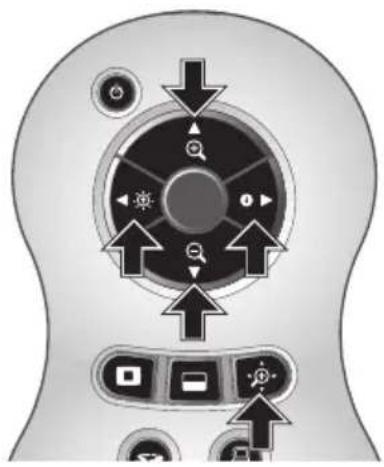
When you press the [••] button on the remote control while the output image is Camera Image or SD Mode, the image expands to the digital zoom set previously.
You can scroll the enlarged image by using the [▲], [▼, [ ], ▶r [ ] buttons on the remote control. Digital zoom is canceled when you press the [●] button on the remote control.
natural_image
Diagram of a device control panel with directional arrows and function buttons (no text labels)
Note
- The Scroll function cannot be used when the output image is PC.
- When digital zoom has already been performed from the zoom dial on the main unit or the zoom buttons on the remote control, digital zoom is released and the scroll function works at the magnification ratio currently set.
- Cannot use digital zoom while scrolling.
- Within the digital zoom range, the image quality is degraded.
PinP (Picture in Picture) Function
When you press this button, you can display a quarter-size still image on a live camera display.
■ PinP operations
If you press the [☐] button on the remote control while the output image is Camera Image, a quarter-size still image is displayed at the bottom left of the screen.
By using the [▲], [▼], [·], and [ ] buttons on the remote control, you can move the still image to the bottom left, top left, top right, and bottom right. PinP display is canceled when you press the [☐] button on the remote control.


Note
- PinP can only be used when the output image is Camera image. It cannot be used during SD mode or PC mode.
- When the output image is digitally zoomed, the still screen is at the edge of the optical zoom image.
- Cannot use digital zoom while using PinP function.
Using a Desktop Recorder (Optional)
By connecting the optional desktop recorder to the main unit with a dedicated cable, you can record camera images from the main unit with the desktop recorder, and output video playback for the desktop recorder from the analog RGB output terminal of the main unit.
■Connecting the desktop recorder
(1) Turn off the power supply to the desktop recorder and to this product.
(2) Connect this product to the desktop recorder using the cable supplied with the desktop recorder.
(3) Turn on the power supply to the desktop recorder and to this product.

natural_image
Illustration of a medical imaging device with a monitor, cable, and adjustable arm (no text or symbols)■Operating the desktop recorder by remote control
(1) Connect the desktop recorder to this product and press the [ 🔒] button on the remote control.
(2) Operate the desktop recorder by using the [] , [] , [] , [] , and [● MENU] buttons on the remote control.


Note
- Refer to the manual for the optional desktop recorder for operating details.
- Cannot use the remote control while using the desktop recorder.
6 TROUBLE SHOOTING
Symptoms and Confirmation
Check the following items. If any abnormality is found, consult the dealer from whom you purchased this product or our nearest branch/office.
| Symptom Possible cause/counter measure | |
| No image is displayed. | The cable is not correctly connected.The AC adapter is disconnected from the wall outlet.The AC adapter is disconnected from the power supply socket of the presenter.The power is not on. (Blue lamp)Zoom is set at the TELE side, displaying only the white/black part of the document.If you turn the power on immediately after turning it off, the unit may not start. Wait for several seconds after turning the power off, and then turn it back on.The slide switch is not set to the correct image output (RGB/VIDEO). In such case, set the dip switch correctly by referring to "RGB/VIDEO Switch".P.15 |
| No image is displayed from the USB. | No image is output from USB during USB Mode (Mass Storage) or SD Mode. Check whether or not it is set to Mass Storage or SD mode. Switch the USB mode from Mass Storage to Application referring to "Function Setting Menu". When using SD mode, change the output image to Camera image.P.24 |
| The image is out of focus | The document (object) is too close to the lens.Zoom is set at the TELE side after focusing at a wide angle (WIDE side). Focus to its maximum limit at the TELE side.Some auto focus may be difficult to adjust. Focus on an image manually referring to "Manual focus".P.51 |
| The video output image is disarrayed. | Video output is set to [PAL]. If this product is set to the PAL system and connected to a monitor specially designed for the NTSC system, the video image may not be normally output but be disarrayed or in black and white. Check if the video output system is PAL. |
| The image is too dark. | The intensity of the lighting is insufficient. Press the [BRIGHTNESS button] button on the operating panel or on the remote control to adjust the brightness. |
| The image is striped. | This may be interference fringes between dots of printed matter and TV scanning lines or CMOS pixels. Changing the projection range may mitigate the trouble.Vertical stripes may appear on an LCD projector image. Manually adjusting dot clock at projector side may mitigate the trouble. |
| Images on the SD card are not displayed | Remove the SD card and then reinsert it after a few seconds. |
| The image does not move. | Camera image is set to [Pause]. Press the Pause button on the operating panel again to unpause. |
| The remote control does not work. | Battery performance is reduced. Replace the batteries with new ones.The incorrect remote control is being used. Use the supplied remote control. |
| After inserting the SD card, operations cannot be performed. | The SD card is not being read correctly.Use the SD card after formatting it twice as described below.First, format the card using a computer. Second, format the card using the main unit. |
About the lamp (LED lighting)
The brightness of the lamp will degrade with long-term usage. If its brightness has been degraded greatly, consult the seller from whom you have purchased this product or our branch/office near your location for replacement.
About long-term usage of this product
If this product is used for longer than the warranty period, its performance and quality may deteriorate due to the lifetime of its parts. In this case, we will replace the parts for a charge. Consult the dealer from whom you purchased this product or our nearest branch/office.
7 SPECIFICATIONS
General
| Item Specifications | |
| Power source 12VDC (AC adapter AC100 - 240V) | |
| Power consumption 15W (AC adapter included) | |
| Outside dimensions | W350 x D370.5 x H411.5mm (W13.8 x D14.6 x H16.2 in)(When setup) |
| W195 x D254.5 x H444.5mm (W7.7 x D10.0 x H17.5 in)(When folded) | |
| Weight Approx. 2.9kg (6.4 lbs) (Main body only) | |
| Input selection Main/External | |
| Output terminal RGB output Mini Dsub 15P connector, female x 1 | |
| Input terminal Input terminal RGB input Mini Dsub 15P connector female x 1 | |
| Recorder terminal Dedicated connector | |
| Ext. control terminal USB (2.0 compliant) Type B receptacle x 1 | |
| Memory Interface SD card slot x 1 | |
*Use pin plug for RCA pin in accordance with EIAJ RC-6703.
Main Camera
| Item Specifications | |
| Lens f = 3.85mm - 20.02mm (5.2-times zoom) F2.8 - 3.2 | |
| Frame rate Max. 30 frames/sec. | |
| Shooting area SXGA : | Max 417x331mm Min. 92x74mmWXGA : Max 417x246mm Min. 92x56mmXGA : Max 417x309mm Min. 92x69mm |
| Limit of focus adjustment | 50mm -∞(2.0 in x) from lens top |
| Optical zoom 5.2X | |
| Digital zoom 8X | |
| Focus | Auto/Manual |
| Image pick-up element | 1/3" CMOS |
| Total pixels | Horizontal 1384, Vertical 1076 ... Approx. 1,490,000 pixels |
| Effective pixels | Horizontal 1329, Vertical 1049 |
| Synchronized signal | Internal |
| Resolution | Analog RGB Horizontal 800TV lines or more Vertical 800TV lines or moreVideo output Horizontal 500TV lines or more |
| Item Specifications | ||
| Analog RGB output An | alog RGB output 0.7 V(p-p)75 Ω unbalancedSynchronized signalSXGA: Positive polarityWXGA: Horizontal negative polarity,Vertical positive polarityXGA: Negative polarity | SXGA: 1280x1024@60HzHorizontal frequency: 63.981kHzVertical frequency: 60.020HzWXGA:1280x800@60HzHorizontal frequency: 49.306kHzVertical frequency: 59.910HzXGA:1024x768@60HzHorizontal frequency: 48.363kHzVertical frequency: 60.004Hz |
| Composite video output | Compliant with NTSC/PAL | |
| White balance Full auto | /One-push/Manual | |
| Video output selection switch | Provided (NTSC/PAL) | |
| Brightness Control Auto | (W/Level adjustment)/Manual | |
| Posi/Nega conversion | Provided | |
| Color/B&W selection P | Provided | |
| Image rotation Provided | (0°/180°) | |
| Mode | Text1/Text2/Text3/Graphics1/Graphics2 | |
| Gamma setting Provided | (Only for graphic mode) | |
| Edge Enhancement Provided | (Only for graphic mode) | |
| Pause Provided | ||
| Image storage Provided | (SD card) | |
| Slide Show | Provided (SD image data) | |
Illumination Device
| Illumination lamp | White LED |
Supplied Accessories
| Name Quantity | |
| AC adapter 1 | |
| AC cord 1 | |
| Analog RGB cable (Dsub 15P connector) (2m) 1 | |
| Stage 1 | |
| Magnetic strip 1 | |
| Anti-glare sheet 1 | |
| Dust cover 1 | |
| INSTRUCTION MANUAL 1 | |
| Image Mate CD-ROM 1 | |
| Image Mate Installation Manual 1 | |
| USB cable (1.8m) 1 | |
| Remote control (infrared wireless type) 1 | |
| AAA batteries 2 | |
| Remote control strap 1 | |
| Microscope attachment | 1 |
| Microscope attachment screw | 3 |
*The above specifications are subject to change without notice.
Trademarks
ELMO is a trademark of ELMO Co., Ltd.
VESA is the registered trademark of Video Electronics Standards Association.
SD : SD card is a trademark.
All other company/product names described in this manual are trademarks or registered trademarks of their respective companies.


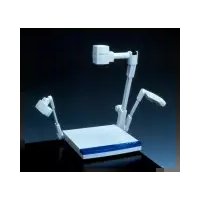
- MODE D'EMPLOI
- TT-02 RX
- INSTRUCTION MANUAL
- Follow these guidelines to use the product safely.
- Warning
- Attention
- ⚠ Warning
- BEFORE YOU USE
- IMPORTANT SAFEGUARDS ....2
- Contents 9
- PART NAMES AND FUNCTIONS ...... 11
- SETTING UP 28
- STORING ....32
- VARIOUS FUNCTIONS AND OPERATIONS 49
- PART NAMES AND FUNCTIONS
- Functions
- Operating Panel
- Rear panel
- Side panel
- Note
- Receivable Range
- OSD (On Screen Display)
- OSD Basic Operations
- ■ Adjusting the setting value
- ■ Camera Mode OSD Menu
- SD Mode OSD Menu
- SD Menu
- SETTING UP
- Setting Up
- Connecting the AC adapter and Video cable
- To connect the unit to any device with an analog RGB input.
- To connect the unit to any device with an analog RGB output.
- ■ Specifications of the analog RGB input terminal of this product
- To connect the unit with a composite video input terminal.
- To connect the PC with a USB cable.
- To connect the AC adapter.
- STORING
- Storing
- Presentation using printed materials, etc.
- ■ Setting the main unit
- ■ Adjusting the size
- ■ Adjusting the focus
- ■ Adjusting the brightness
- ■ Turning the illumination lamp ON/OFF
- (Using the stage)
- Presentation using an SD card (commercially-available)
- ■ Saving the image
- ■ Displaying the image
- ■ Deleting, locking, and unlocking images
- ■ Formatting the SD card
- ■ Slide Show
- Transferring images from the SD card to a USB-connected PC
- Presentation using the supplied software with a USB-connected PC
- Presentation using a Microscope
- ■ Setting up a microscope
- ■ Changing to Microscope mode
- ■ Adjusting Zoom
- ■ Closing microscope mode
- Presentation using a Microscope (Installing the attachment supplied)
- Shooting a 3-D object
- Shooting a wall surface or distant view
- VARIOUS FUNCTIONS AND OPERATIONS
- Zoom
- Focus
- ■Auto Focus
- ■ Manual focus
- ■Zoom Sync Focus
- Illumination lamp
- Adjusting the brightness
- ■Automatic brightness adjustment
- ■ Manual brightness adjustment
- Image selection
- White Balance
- ■How to use [Auto]
- ■How to use [One-Push]
- ■How to use [Manual]
- Save/call settings
- ■How to save settings
- ■How to call settings
- Highlight Function
- ■ Highlight settings
- ■ Highlight operations
- Mask Function
- ■ Mask settings
- ■ Mask operations
- Scroll Function
- ■ Digital zoom settings
- ■ Scroll operations
- PinP (Picture in Picture) Function
- ■ PinP operations
- Using a Desktop Recorder (Optional)
- ■Connecting the desktop recorder
- ■Operating the desktop recorder by remote control
- TROUBLE SHOOTING
- Symptoms and Confirmation
- About the lamp (LED lighting)
- About long-term usage of this product
- SPECIFICATIONS
- Trademarks
Brand : Elmo
Model : TT-02RX
Category : Camera