
TAZ Pro S - 3D Printer LulzBot - Free user manual and instructions
Find the device manual for free TAZ Pro S LulzBot in PDF.


| Product Type | 3D Printer |
| Brand | LulzBot |
| Model | TAZ Pro S |
| Build Volume | 280 x 280 x 285 mm |
| Layer Resolution | 0.05 – 0.5 mm |
| Extruder | Dual extrusion system (E3D Hemera) |
| Max Nozzle Temperature | 300 °C |
| Heated Bed Temperature | 120 °C |
| Print Speed | Up to 200 mm/s |
| Supported Filaments | PLA, ABS, PETG, Nylon, Polycarbonate, TPU, composite materials |
| Connectivity | USB, SD card, Ethernet, Wi-Fi (optional) |
| Dimensions (Printer) | 610 x 540 x 645 mm |
| Weight | 22 kg |
| Power Supply | 100-240 V AC, 50/60 Hz, 480 W |
| Safety Features | Enclosed build chamber, thermal runaway protection, filament run-out sensor, automatic bed leveling |
| Maintenance | Replaceable nozzles, PTFE tube, and bed sheets; self-leveling bed reduces manual calibration |
| Spare Parts & Repairability | Modular design, open-source hardware, spare parts available online |
| Software | Cura LulzBot Edition, OctoPrint compatible |
| Warranty | 1 year limited warranty |
Frequently Asked Questions - TAZ Pro S LulzBot
User questions about TAZ Pro S LulzBot
0 question about this device. Answer the ones you know or ask your own.
Ask a new question about this device
Download the instructions for your 3D Printer in PDF format for free! Find your manual TAZ Pro S - LulzBot and take your electronic device back in hand. On this page are published all the documents necessary for the use of your device. TAZ Pro S by LulzBot.
USER MANUAL TAZ Pro S LulzBot
Welcome to the LulzBot Community
Thank you for choosing the LulzBot® TAZ Pro S Printer. This Quick Start Guide will familiarize you with the proper use and operation of your LulzBot TAZ Pro S. By the time you finish, you will have completed a calibration test on your new printer.

Complete documentation is available online at LulzBot.com/downloads. If you have questions while setting up your LulzBot TAZ Pro S, please contact our technical support team by emailing Support@LulzBot.com or by calling 1 (970) 377-1111 ext. 2. Learn more at LulzBot.com/Support.

Read the included User Safety Sheet completely before beginning the Quick Start Guide.
1 LulzBot TAZ Pro S Key Components

2 | LulzBot TAZ Pro S
Extruder 1 Filament Guide Tube
Filament Run Out Sensor
Extruder 1 Filament Holder
Extruder 2 Filament Holder*
Modular Print Bed
Automatic Calibration Cube
* Optional Pro Dual Extruder available at LulzBot.com

natural_image
3D printer model with XYZ coordinate axes (X, Y, Z) shown as colored arrows on a beige surface, no text or symbols present.Cartesian Coordinate System
The LulzBot TAZ Pro S can move on three linear axes: X, Y, and Z.
Tool Head Key Components

4 | LulzBot TAZ Pro S

Filament Path
Quick Release Lever
Filament Tension Knob

natural_image
Close-up of a green and black robotic arm with a white QR code tag, no visible text or symbols on the device itself.Extruder Heat Sink Fan
Extruder Heater Block
Extruder Heater Cartridge
Extruder Nozzle
i
Your LulzBot TAZ Pro S M175 Extruder automatically calibrates in three ways: using the washers at each corner of the modular print bed system, the automatic calibration cube, and by leveling the X-axis gantry before each print. These features ensure the highest quality printing possible without the need for manual calibration.
!
Do not use metal to clean the nozzle on your tool head. Metal will short the self-leveling function and can blow an internal fuse or damage your printer.
2
Unpack your LulzBot TAZ Pro S Desktop 3D Printer
2.1 Place printer box on its side and carefully open the top of the box. Use the two black straps wrapped around the printer to remove it from the box. Once it has been removed, open the straps by pulling on the tabs.

2.2 After removing the protective cardboard from the printer, remove all additional contents.
USB Cable
USB Flash Drive
Tool Kit
Power Cord
1.75mm Guide Tube
2.85mm Guide Tubes
1.75mm PLA Filament Sample
2.3 Stand the printer up and carefully remove the packaging foam from the top of the printer A. Remove the central foam B by peeling it away starting at the side closest to the tool head. Confirm all items on the included Packing List have been removed from the box.


Save all of the provided packaging materials and box! In the case that warranty service is needed, the 3D printer must be shipped in its original packaging.

natural_image
Abstract 3D black geometric shapes inside a red circular border (no text or symbols)2.4 Slide the modular print bed up out of the lower foam as you tilt the Y-axis assembly away from the tool head. Lift the Y-axis assembly out of the lower foam, then lower the bed and remove it from the printer frame. Once the modular print bed is clear, lift the printer from the final piece of packaging foam.

natural_image
3D printer labeled 'LULPEST TRZ PRO' with red arrows indicating movement or assembly (no readable text beyond branding)3 Assemble your LulzBot TAZ Pro S Desktop 3D Printer
3.1 The operating area for your LulzBot TAZ Pro S is 32.76 inches by 28 inches (83.2 cm by 72 cm). Place your printer in an area with enough space to function without encountering any obstructions.
natural_image
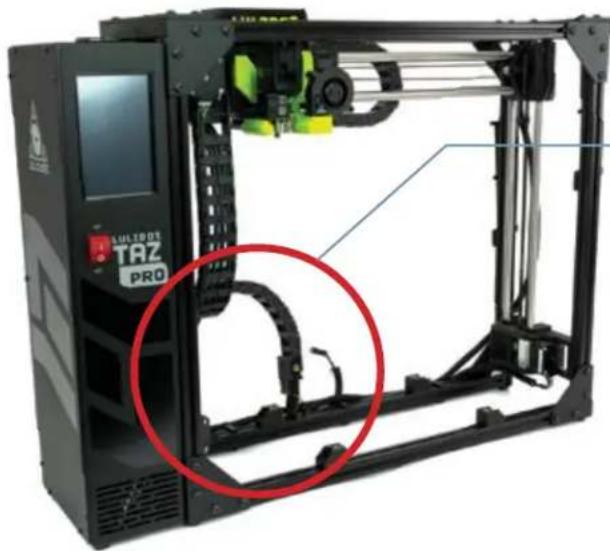
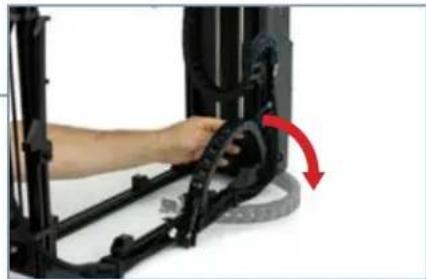
3D printer internal structure with highlighted frame and green component, no visible text or symbols3.2 Move the Y-axis cable chain into place by grasping the base of the cable chain and rotating it back and downward 90° away from the machine until it snaps into place.
natural_image
Close-up of a hand adjusting a mechanical frame with a red arrow indicating rotation (no text or symbols visible)If the Y-axis cable chain does not rotate back and downward easily, loosen the screw at the base of the cable chain to allow for easier adjustment.
3.3 Unscrew and save the four (4) thumbscrews from the mounting brackets.
3.4 Place the Y-axis assembly on the frame with the LulzBot logo on the front right corner of the modular print bed. Line up the four mounting brackets.
3.5 Slide the modular print bed to the back and screw in the front two thumbscrews until they are finger tight. Slide the modular print bed to the front and screw in the back two thumbscrews until they are finger tight.

natural_image
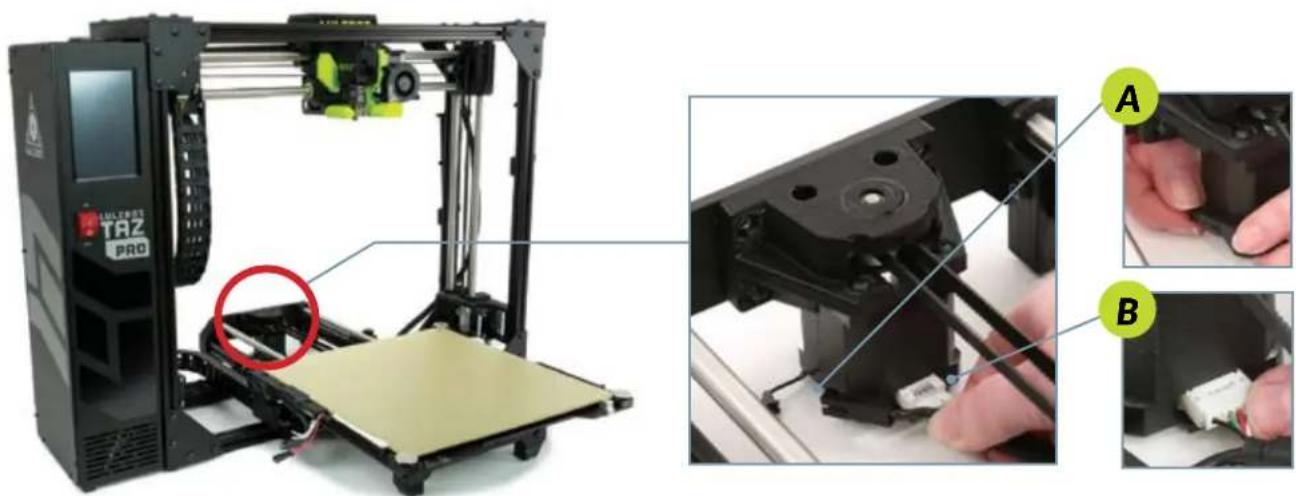
Close-up of hands operating a TRZ 3D printer on a rail track, showing part assembly and inspection (no text or symbols visible)3.b Connect the Y-axis stepper motor to the wiring harness by first joining the black connectors A, followed by plugging the white connector B into the stepper motor.
natural_image
3D printer assembly line showing internal components and a highlighted part (no text or symbols visible)3.7 Connect the three sets of wire connectors underneath the bed as shown below, starting with the small two pin connection A, then the small three pin connection B, then the large heater connection C.

natural_image
Close-up of a hand inserting a USB into a device (no visible text or symbols)
natural_image
Close-up of hands inserting a USB into a device (no visible text or symbols)
natural_image
Close-up of hands installing a black plastic clip into a device (no text or symbols visible)3.8 Once all connections are in place, locate the bed power harness retention clip in your tool bag. Press the two prongs of the clip into the two holes on the heater connection.

natural_image
Close-up of a black plastic component with four pins, connected to a close-up of its internal wiring (no text or symbols visible)3.9 Align the end of the Y-axis cable chain under the modular print bed as shown. Once in place, secure the cable chain to the bed using the included 4mm hex key and the captive inset screw on the modular print bed. Turn the 4mm hex key counter-clockwise until you feel the threads seat (to prevent stripping the threads), then while holding the cable chain level, turn the 4mm hex key clockwise to screw on the cable chain.

natural_image
Close-up of hands using a tool to adjust or install a mechanical component, with a red circle highlighting the part (no visible text or symbols)Captive Inset Screw

natural_image
Close-up of a hand holding a black mechanical component with wires and connectors, no visible text or symbolsi
During the printer startup cycle, the X-axis will move to the top of the frame and make contact with the left and right limit switches in order to level the X-axis. Make sure the print area is free of obstructions. This process also completes before each print.
3.10 Verify that the power switch on the front of the TAZ Pro S is in the OFF position.
3.11 Plug in the included USB cable, connecting the TAZ Pro S to a computer.
3.12 Plug in the AC power connection.
3.13 Flip the power switch to the ON position to turn on the TAZ Pro S.


Setting up Cura LulzBot Edition
4.1 Cura LulzBot Edition is the recommended software to control your LulzBot TAZ Pro S. It includes built-in support for compatible materials optimized for use with the TAZ Pro S. Find installation instructions, troubleshooting information, and more at LulzBot.com/Cura.
Already have Cura LulzBot Edition? Update now to get additional material support and new slicing profiles. Expert help and advice is available at LulzBot.com/Support.

The LulzBot TAZ Pro S is compatible with Cura LulzBot Edition version 3.6.22 and later. If you have an older version of Cura LulzBot Edition installed, you will need to download the latest version at LulzBot.com/Cura in order to use your LulzBot TAZ Pro S.
There may be later versions of Cura LulzBot Edition available with added features and functionality. We recommend checking for updates regularly.
4.2 Launch Cura LulzBot Edition. The Add Printer menu will automatically appear. Select LulzBot TAZ Pro and M175 | 0.5mm, then click Add Printer. Existing users should select the Settings drop-down menu, Printer, then Add Printer. On the next menu that appears, click Finish to complete the printer setup. Cura LulzBot Edition is now ready for use with your LulzBot TAZ Pro S.

4.3 New firmware is continuously being developed to add new functionality and ensure your LulzBot TAZ Pro S is creating the best quality prints. With the USB cable connected to your printer and a computer with Cura LulzBot Edition installed, update the printer firmware by clicking the Settings drop-down menu and selecting Printer, then Manage Printers. With LulzBot TAZ Pro/M175 | 0.5mm highlighted, click Upgrade Firmware and follow the prompts to install the latest firmware.
4.4 The first print model, octo_gear_v1.stl, will automatically load onto Cura LulzBot Edition's virtual print bed the first time you run Cura LulzBot Edition with your LulzBot TAZ Pro S.

If the first print model is not present in the virtual print bed, you can download it from download.LulzBot.com/3D_Models/TAZ_Workhorse_Samples/octo_gear_v1.stl or from the included SD card, then load it onto the virtual print bed using the Open File button in the main Cura interface.
4.5 Locate the included sample coil of 1.75mm PLA filament. We strongly recommend using the included PLA sample filament for your first print.

Filament is the term for the materials your LulzBot TAZ Pro S uses to 3D print objects. The included sample filament, PLA, is made from natural renewable resources. PLA and other types of filament can be purchased at LulzBot.com/filament.
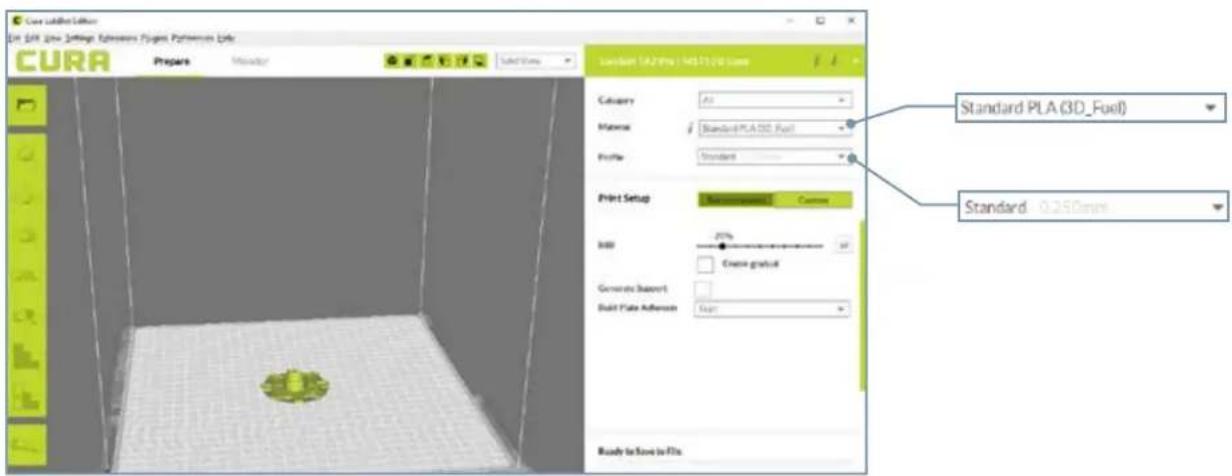
4.b In the Prepare sidebar on the right side of the screen, confirm that Standard PLA (3D_Fuel) is selected for Material and Standard is selected for the Profile to be used for printing.
5 Preparing your LulzBot TAZ Pro S to Print

Your LulzBot TAZ Pro S was tested for quality assurance before being packaged. You will need to remove the remaining filament left in the tool head from this process before loading new filament for your next print. Follow these steps below to remove or change the filament.
5.1 Press the Menu button
5.2 Press the Change Filament button
5.3 Press the 180C (PLA) button to heat the hot end to the appropriate filament removal temperature.


HOT SURFACE BURN HAZARD. CONTACT MAY CAUSE BURN. DO NOT TOUCH THE HOT END. The hot end on the extruder is now heating up to 180°C (356°F) and can burn your skin if you touch it.

5.4 Once the hot end reaches the appropriate filament removal temperature, press the Continuous button in the Unload column to start retracting filament. Once the filament stops moving, pull it out of the idler. Press the Continuous button again to stop the extruder.


natural_image
3D printer labeled 'LULZBOT' with green and black components, no visible text or symbols beyond brandingThe hot end is heated to 180°C (356°F) and can burn your skin.
5.5 Remove the blue tape holding the filament holders in place along the right side of the printer and rotate one down into place. Once in position, place the included PLA filament on the filament holder.

The filament holders may need to be adjusted to accommodate larger spools of filament. Use the included 4mm hex key to loosen the screw at the base of the filament holder, move it to the appropriate position, and re-tighten.

natural_image
Black 3D printer with green and yellow components, showing internal structure and a red arrow indicating motion (no text or symbols on the device itself)5.b Obtain the clear filament feed guide tube for 1.75mm filament from the additional contents you removed from the box earlier. Insert the larger end of the feed guide into the top of the LulzBot Green filament sensor marked 1. (Keep the other two included 2.85mm guide tubes in a safe place for future use with the optional Pro Dual Extruder.)

natural_image
Close-up of a transparent plastic tube with a small black connector at the bottom (no text or symbols visible)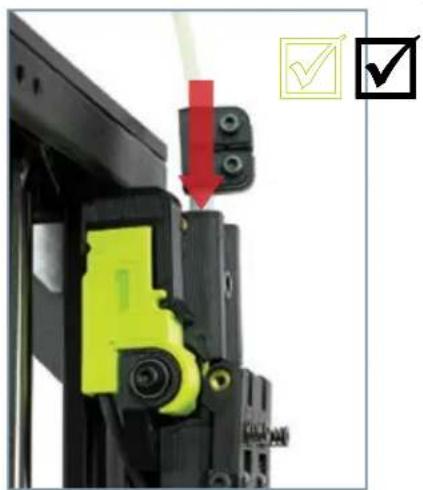
natural_image
Close-up of a mechanical assembly with a green and yellow component, red arrow indicating direction, and checkmarks (no text or symbols)
natural_image
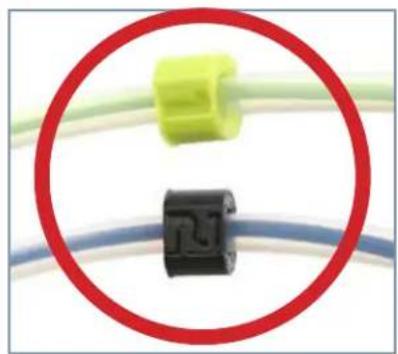
Two plastic components, one yellow and one black, placed on a blue wire with a red circle highlighting them (no text or symbols visible)5.7 Feed the included sample coil of 1.75mm PLA filament into and through the bottom of the LulzBot Green filament sensor marked 1.
5.8 The rear black filament sensor marked 2, is only used with the TAZ Pro Dual Extruder option.


Note that Sensor 1 is used when your TAZ Pro S is equipped with a single extrusion tool head. Filament sensors 1 and 2 correspond to Extruder 1 and Extruder 2 on Dual Head equipped models of the TAZ Pro. Each filament sensor must go to the correct extruder in order for your TAZ Pro S to function properly.
5.9 Locate the filament tension knob and filament feed path where the loaded filament was removed during step 5.4. Filament feeds down this path and into the hot end for printing.

Filament Feed Path
Filament Tension Knob

The hot end is still heated to 180°C (356°F) and can burn your skin.
i
During printing, dual hardened-steel extruder gears push filament down into the hot end. Correct tension is important for keeping filament flowing properly during the printing process. Tighten the filament tension knob clockwise all the way in and then loosen it by rotating counterclockwise.
SETTING FILAMENT TENSION

natural_image
Close-up of a mechanical component with red curved arrows indicating motion or rotation (no text or symbols)STEP 1: Turn Clockwise until finger-tight.

natural_image
Close-up of a mechanical component with red curved arrows indicating rotational motion (no text or symbols)STEP 2:
Turn Counterclockwise:
• 1 to 2 full turns for PLA, ABS, and other hard filament.
• 3 to 4 full turns for NinjaFlex, Nylon, and other flexible filament.
!
Do not force the filament tension knob tight. Using excessive force will damage the laser sintered nylon that holds the metal insert in place.
i
Having the idler tension too loose or too tight will cause issues with print quality and potentially cause jamming in the extruder.
5.9 Push the filament by hand completely through the feed tube until it exits near the filament guide tube holder on the top of the extruder. Straighten the filament slightly and place your thumb on the filament tension knob and pull the lever away from the filament feed path. Feed the included sample coil of 1.75mm PLA filament into the extruder.

The filament must be inserted into the dual hob gears for filament to extrude properly. If it is difficult to feed filament into the filament feed path, trimming the filament at a 45^ angle may help.

natural_image
Close-up of hands assembling a 3D printer with a highlighted part (no text or symbols visible)LulzBot TAZ Pro S
5.11 Select Extruder 1 and press the Load/Extrude - Continuous button and let filament advance until it extrudes smoothly and consistently as shown. Press the Load/Extrude - Continuous button again to stop extruding.
5.12 Once filament is extruding, insert the filament guide tube into the quick connect on the top of the extruder.


natural_image
Simple diagram showing a curved line intersecting a circular loop, with a red arrow pointing to it (no text or symbols)
natural_image
Close-up of a hand adjusting a green tool on a 3D printer or mechanical device (no visible text or symbols)
After removing filament, a small residual amount remains in the hot end that needs to be cleared out through the process of purging as detailed above. This purging process helps to remove any residual material left in the hot end.

Starting Your First Prints

If you need to make changes to your model, use the Prepare sidebar at the top left corner of Cura. Once changes are made, Cura will automatically begin implementing the changes, also known as re-slicing.

The X-Axis gantry may shift after your 3D printer is powered off. Every time the LulzBot TAZ Pro S powers on, it will attempt to auto-home. Verify that the X-axis and print bed are clear before turning your machine on. Failure to do so could result in damage to the printer or other equipment.

Your LulzBot TAZ Pro S can be operated without a USB tether to a computer by using the touchscreen LCD and included flash drive. Once models are sliced and a .gcode file is saved they may also be saved to the included flash drive by clicking Save to File in the lower right corner of Cura. Once saved, models may be printed directly from the flash drive by plugging it into the slot located on the top of the touchscreen LCD, pressing the USB Drive button, and selecting the model you would like to print.
b.1 Your 3D printer is now ready to print! Click on the Monitor button at the top of the main Cura interface. This will change the sidebar on the right side of the screen to show printer information and controls.

Before starting a print, check that your printer is ready. The hot end is still hot, use caution:
- Confirm that all packaging has been removed from your LulzBot TAZ Pro S
- Verify that the 3D printer is in a well-ventilated area, on a flat and level surface, and has 30cm (12in) clearance in all directions.
30 | LulzBot TAZ Pro S
b.2 Click the Connect button under Manual Control to connect to the LulzBot TAZ Pro S.
b.3 Once connected, the top status bar will change from USB device available to Connected via USB and the current hot end and print bed temperatures will be displayed.
b.4 Click Start Print at the bottom of the Monitor sidebar to start your first 3D print.

LulzBot TAZ Pro S | 31
b.5 Your 3D printer will first move the tool head to the top left corner of the build area and allow the hot end to reach probing temperature. Depending on ambient temperature, this can take one to three minutes.

Always watch your LulzBot TAZ Pro S start the printing process to visually ensure proper functionality. Ensure material is adhering to the print bed and the printer is functioning normally before leaving the printer unattended.

natural_image
3D printer with a highlighted internal component, no visible text or symbols on the device itself.b.b Once the hot end reaches its wiping temperature, the tool head will move to the wiper pad, cleaning the nozzle of residual filament. After the nozzle has been cleaned, your LulzBot TAZ Pro S will heat to probing temperature and conduct an automated self-leveling sequence by touching each of the four bed corners. When the leveling process is complete, the printing process will commence.

If probing fails to detect one of the bed corners, the printer will attempt self-cleaning again, then repeat probing. If this fails three times, or if the bed corner is visibly pushed down during probing, the printer requires manual nozzle cleaning. (Refer to the Maintenance section at the end of this guide for details on nozzle cleaning.)
DO NOT use metal to clean the nozzle.

natural_image
Close-up of a 3D printer with green and yellow components, showing paper roll and mechanical arms (no visible text or symbols)b.7 After your LulzBot TAZ Pro S is finished 3D printing, the tool head and print bed will automatically move into the cooling position with the tool head in the top left of the build area and the print bed fully in the back position.

Your print bed is now cooling. Do not attempt to remove your 3D printed object before the print bed moves forward. Attempting to do so could either burn your skin on the hot end or print bed, damage your printer or print bed surface, or damage your 3D printed object.

natural_image
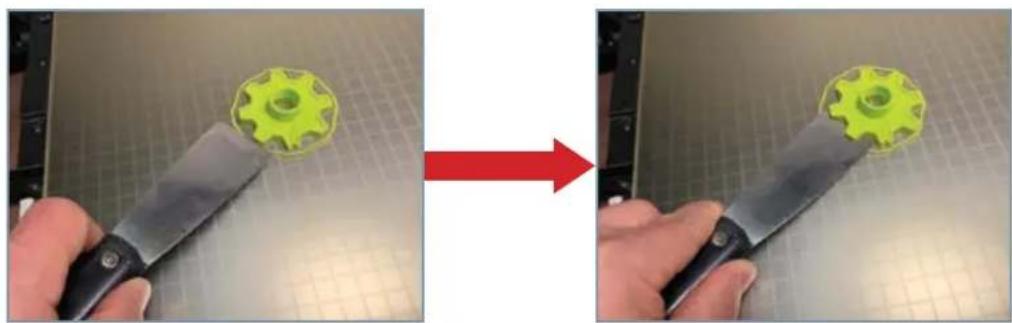
Exterior view of a 3D printer assembly with green motion capture and a yellow base plate (no visible text or symbols)b.8 Once finished cooling to the proper removal temperature, the tool head will move to the top right and the print bed will move forward. Once the print bed has stopped moving, remove your first print by gently sliding a thin, flexible object under each side, then under the center of the print, until it separates from the bed.
natural_image
Two-panel image showing a hand holding a green gear-shaped tool, before and after applying a red arrow to a grid-patterned surface (no text or symbols)
If using a sharp object, exercise caution when using it. The blade can cut, gouge, or cause other damage to the print surface. Caution should also be exercised to avoid causing personal injury during the print removal process. Avoid prying prints up and away from the bed.
b.9 Now that your first print is complete, your TAZ Pro S is ready to go to work! For more projects, ideas, and ready-to-print models, visit download.lulzbot.com/3D_Models/.

natural_image
Green plastic gear with eight teeth and central bore (no text or symbols)7 Maintenance and Care
There is a small length of PLA filament remaining in the hot end after your first sample print. You can remove the remaining filament by following the steps in Section 5.4. Use this process whenever changing the filament to ensure a clean switch between different filaments and to avoid extrusion issues due to print temperature differences.
When using a filament other than PLA for future prints, there may be a difference in the temperature required for purging the residual filament in the hot end and printing with the new filament. When changing filament, choose a temperature that splits the difference between the two required printing temperatures. The chart on the next page lists printing temperatures for some of the most popular filament available for your LulzBot TAZ Pro S.

natural_image
Close-up of a small, glowing green object on a plain beige surface with a black horizontal bar at the bottom (no text or symbols visible)LulzBot TAZ Pro S | 37
Printing, Part Removal, and Bed Preparation
| Filament | Purging Temperature (°C) | Part Removal Temperature (°C) | Print Bed Preparation(See maintenance section for more information) |
| ABS, HIPS 220 50 Isopropyl alcohol wipe | |||
| PLA 180 45 Isopropyl alcohol wipe | |||
| PETg 220 50 PVA glue stick | |||
| Bridge, PCTPE, Nylon 910 220 50 PVA glue stick | |||
| Ninjaflex, PolyFlex, TPU 200 Fully Cooled Plain Glass or PVA glue stick | |||
| PA-CF 220 50 Isopropyl alcohol wipe | |||
| PolyCast 180 45 Isopropyl alcohol wipe |
Your LulzBot TAZ Pro S Desktop 3D Printer is capable of printing advanced and expert level 1.75 mm filament materials including: PLA, ABS, TPU, PC-ABS, Polycarbonate, PVA, and more. In addition, new materials are frequently being added to our catalog, each thoroughly tested to develop the profiles included in Cura LulzBot Edition. Shop our full range of 1.75 mm materials at LulzBot.com/filament.
Important Information About Your 3D Printer
Customer Feedback
Why keep a good thing secret? Share your LulzBot LOVE with the world! Tell coworkers, peers, friends, and family. Share your experience by writing a review or sharing your LulzBot TAZ Pro S projects on social media. Tag your projects with LulzBot on Instagram, Facebook, Twitter, and LinkedIn.
Not happy? We're here to help. Contact our friendly customer support team. We'd love to solve your problem and get you printing again! Check out the Warranty and Support section for details.
Warranty and Support
Your machine comes with a limited one-year warranty and customer support period including USA-based technical support available via email at Support@LulzBot.com or by phone at 1 (970) 377-1111 ext 2. For more information, please visit LulzBot.com/Support.
Extended warranties of one, two, and three years may be purchased to further protect your investment. Email Sales@LulzBot.com or call 1 (970) 377-1111 ext 1 for more information.
Warranty and customer support cover electrical, mechanical, and motion systems on the printer. Material issues are not covered by LulzBot customer support. Material questions and concerns should be directed to the material manufacturer. For more information about the warranty on your LulzBot 3D Printer, visit www.LulzBot.com/content/shipping-standard-warranty-and-return-policies
Source Files
This product runs with free software because we support your right to see how it works, make modifications, and share your modifications with others. Find the source files online at Download.LulzBot.com.
LCD Controller and USB Flash Drive Printing
Your LulzBot TAZ Pro S can be operated without a USB connection to a computer by using the LCD Controller and included USB Flash Drive. Once a .gcode file is saved to the included USB flash drive, plug it into the port located on the top of the electrical box, press the USB Drive button from the Main Menu, and select the model you want to print.
Maintaining Your LulzBot TAZ Pro S Desktop 3D Printer
Make sure that the hot end and print bed are at room temperature before beginning any cleaning or maintenance unless otherwise noted.
Print Bed
Adhesion to your LulzBot TAZ Pro S modular heated print bed is the foundation of a great 3D print.
The bed can be used in three supported configurations: PEI, PEI with glue stick, or plain glass. Your LulzBot TAZ Pro S ships with the PEI surface facing up since it's the most commonly used print surface. Refer to the chart at the beginning of Section 7 of this guide for bed preparation for specific materials.
Following these tips will help you get the most out of your print bed:
PEI: Oil on your skin and accumulated dust can negatively affect print adhesion to PEI. For optimal performance, lightly wipe the print bed and corner washers with a dry lint free cloth between prints. To deep clean the PEI print surface and corner washers, wipe with diluted Isopropyl Alcohol (1:10 IPA to water ratio) and a clean lint free cloth.
Always wait for the PEI print surface to cool to removal temperature before attempting to remove 3D printed objects. Treated appropriately, PEI is extremely durable, but note that even well-treated PEI will not last forever. It will need to be replaced periodically and is considered a consumable item. Replacement Glass/PEI Print Surfaces can be purchased at LulzBot.com
Bare Glass: The ability to print on bare glass is especially useful for TPU filament like Ninjaflex. To use the glass surface, unscrew each corner washer holding the print bed in place with the supplied 2mm hex key, then flip the print surface and place it back on the heater bed with the glass side up. Screw in each corner washer to hold the bed in place. Using care not to over-tighten, make sure that the washers are flat and parallel with the surface of the glass. If you do not wish to use the bare glass surface when printing with TPU filament, it is highly recommended to use a PVA glue stick on the PEI surface.
PEI with Glue Stick: For some filament types, a polyvinyl alcohol (PVA) glue stick, such as Elmer's® brand glue stick, is necessary for bed adhesion and/or part release. Apply the glue stick in light, even coats.
Periodically remove accumulated glue with a damp paper towel to maintain a flat, smooth base for your 3D prints.

natural_image
Hand pressing a white paper on a 3D printer (no visible text or symbols)
natural_image
Close-up of a hand holding a beige sheet over a flat surface, with no visible text or symbols.Electronics Box Cleaning: ⚠ Unplug the power cord and USB cable before beginning any maintenance on the LulzBot TAZ Pro S control box.
Remove filament from the filament holder and unscrew the ten screws holding the control box panel in place. Then remove the panel to gain access to the control box. Using compressed air, clear the fans, power supply, and area around the control board of any dust or debris that may have collected inside.
Nozzle Wiping Pad: A clean nozzle tip is critical for the performance of your LulzBot TAZ Pro S. Ensuring metal-to-metal contact in the leveling sequence is critical. If you are experiencing leveling failures or have noticed prints starting too close to the bed, your nozzle wiping pad may require attention.
▲ Never use metal to clean your nozzle.
The wiping pad is reversible and replaceable. To remove a pad, pry up on it with the dental pick or tweezers from the supplied LulzBot TAZ tool kit. Then, either flip the pad over (if the other side is unused) or replace the pad with one of the spares included in the tool kit. Wiper Pads need to be replaced periodically and are considered a consumable item. Additional pads can be purchased at LulzBot.com
Smooth Rod Cleaning: Wipe down the smooth rods on the X, Y, and Z axes using a clean, dry lint free cloth. The bushings that allow movement along the smooth rods are self-lubricating.
▲ Never apply lubricant to the smooth rods.

WARNING - Electric shock can kill.
ALWAYS disconnect the printer by unplugging the power cord before attempting to enter the electronics box enclosure.
Failure to follow warnings could result in personal injury, death, or property damage.

natural_image
Close-up of a hand using a power tool to test or inspect a component (no visible text or symbols)Print Area Cleaning: With regular use, dust and debris can collect underneath the printer and may cause interference with the Y-axis motion. Periodically clean and dust the area underneath and surrounding the printer to prevent this. Make sure that the hot end and print bed are at room temperature before beginning any cleaning or maintenance unless otherwise noted.
Maintaining Your LulzBot TAZ Pro S Desktop 3D Printer

HOT SURFACE BURN HAZARD. CONTACT MAY CAUSE BURN. DO NOT TOUCH THE HOT END.
The hot end on the extruder can quickly heat up beyond 180°C (356°F) and can burn your skin if you touch it.
Tool Head Cleaning: While the dual drive gears of the M175 extruder usually remain clean, you should inspect the drive gears from time to time by turning the filament tension knob all the out (counterclockwise) and removing it from the quick release lever. The quick release lever will open, exposing the dual drive hob gears. Use compressed air to clear any residual filament from the tool head and reassemble. Reset the tool head tension as described in Section 5 of this Quick Start Guide after reassembly.
Check all fans on the tool head to ensure that they are functioning properly during printing. Note that the extrusion cooling fan on the front of the tool head may not turn on while printing the first few layers on the print bed depending on the filament used. While the printer is off, blow out all fans with compressed air to clear any build up of dust or debris.
The nozzle and heater block are coated to reduce the accumulation of filament. However, if you notice an accumulation of filament on the nozzle and heater block, it can be cleaned by heating the hot end up to 205°C (401°F) and then carefully wiping the affected areas using the maroon Scotch-Brite ^™ scrubbing pad from your TAZ Pro S tool kit.

Do not use metal to clean the nozzle on your tool head. Metal will short the self leveling function and can blow an internal fuse or damage your printer.

natural_image
Green cartoon octopus illustration with open mouth and raised arms (no text or symbols)Notes
Grow With Your LulzBot TAZ Pro S Desktop 3D Printer
Your LulzBot TAZ Pro S is capable of printing with a wide selection of tool heads in both 1.75mm and 2.85mm from LulzBot's Universal Tool Head System, including the original 2.85mm TAZ Pro Dual Extruder. Let your TAZ Pro S grow with your printing needs. To order additional tool heads for your TAZ Pro S, visit LulzBot.com/toolheads today!
Keep your printer running at its best with maintenance items, parts, and accessories available at LulzBot.com.

natural_image
Four views of industrial 3D printing machines with visible wiring and components, no text or symbols present.LulzBot.com | sales@LulzBot.com | +1-970-377-1111 ext 1

LulzBot® TAZ Pro S Quick Start Guide v.1.0 (11/02/2020)
CC BY-SA 4.0 International© LulzBot 2020
LulzBot® is a Registered Trademark of FAME 3D, LLC.

DC-MN0021 - 11/02/2020


- Welcome to the LulzBot Community
- LulzBot TAZ Pro S Key Components
- Cartesian Coordinate System
- Tool Head Key Components
- i
- !
- 2
- Unpack your LulzBot TAZ Pro S Desktop 3D Printer
- Assemble your LulzBot TAZ Pro S Desktop 3D Printer
- Setting up Cura LulzBot Edition
- Preparing your LulzBot TAZ Pro S to Print
- STEP 2:
- Starting Your First Prints
- Maintenance and Care
- Printing, Part Removal, and Bed Preparation
- Important Information About Your 3D Printer
- Customer Feedback
- Warranty and Support
- Source Files
- LCD Controller and USB Flash Drive Printing
- Maintaining Your LulzBot TAZ Pro S Desktop 3D Printer
- Print Bed
- HOT SURFACE BURN HAZARD. CONTACT MAY CAUSE BURN. DO NOT TOUCH THE HOT END.
- Notes
- Grow With Your LulzBot TAZ Pro S Desktop 3D Printer
Brand : LulzBot
Model : TAZ Pro S
Category : 3D Printer