
Bio - 3D Printer LulzBot - Free user manual and instructions
Find the device manual for free Bio LulzBot in PDF.


| Product Type | Desktop FDM 3D Printer |
| Brand | LulzBot |
| Model | Bio |
| Build Volume | 300 x 300 x 300 mm |
| Filament Diameter | 2.85 mm |
| Nozzle Diameter | 0.5 mm (interchangeable) |
| Heated Bed | Yes, up to 120°C |
| Maximum Extruder Temperature | 290°C |
| Printing Speed | Up to 200 mm/s |
| Supported Materials | PLA, ABS, PETG, TPU, Nylon, Polycarbonate, and more |
| Connectivity | USB, SD Card, Ethernet |
| Display | Full-color touchscreen |
| Leveling | Auto bed leveling |
| Dimensions (Printer) | 550 x 500 x 600 mm |
| Weight | 15 kg (33 lbs) |
| Power Supply | AC 100-240V, 50/60 Hz, 250W |
| Noise Level | < 50 dB |
| Operating Temperature | 15-30°C |
| Safety Features | Thermal runaway protection, enclosed electronics, CE certified |
| Spare Parts & Repairability | Open-source design, easily replaceable hotend and motion components |
| Maintenance | Regular nozzle cleaning, belt tension check, lubrication of rods |
| Included Accessories | Filament sample, SD card, tools for assembly |
| Warranty | 1 year limited warranty |
Frequently Asked Questions - Bio LulzBot
User questions about Bio LulzBot
0 question about this device. Answer the ones you know or ask your own.
Ask a new question about this device
Download the instructions for your 3D Printer in PDF format for free! Find your manual Bio - LulzBot and take your electronic device back in hand. On this page are published all the documents necessary for the use of your device. Bio by LulzBot.
USER MANUAL Bio LulzBot
START HERE
YOUR
IMAGINATION
BUILT BY
LULZBOT®

Welcome to the LulzBot Community
Thank you for choosing the LulzBot® Bio Printer. This Quick Start Guide will familiarize you with the proper use and operation of your FRESH™ Certified LulzBot Bio. By the time you finish, you will have completed a calibration test on your new printer.
Your LulzBot Bio is a FRESH™ (Freeform Reversible Embedding of Suspended Hydrogels) Certified bioprinting platform that enables the fabrication of soft, biological scaffolds for applications in tissue engineering and regenerative medicine.

Complete documentation is available online at LulzBot.com/downloads. If you have questions while setting up your LulzBot Bio, please contact our technical support team by emailing Support@LulzBot.com or by calling 1 (701) 809-0800 x 2. Learn more at LulzBot.com/Support.

Read the included User Safety Sheet completely before beginning the Quick Start Guide.
1 LulzBot Bio Printer Key Components


2
Unpack your LulzBot Bio Printer
2.1 Open the top of the box (labeled OPEN), then carefully remove the top piece of protective foam and other included materials. Grasp the handle located under the front left of the frame as shown and place your LulzBot Bio on a flat and level surface. Ensure there is 15cm (6 in.) of clearance in every direction.

Be sure the space above the printer is kept clear so that the syringe pump can move up freely during operation.
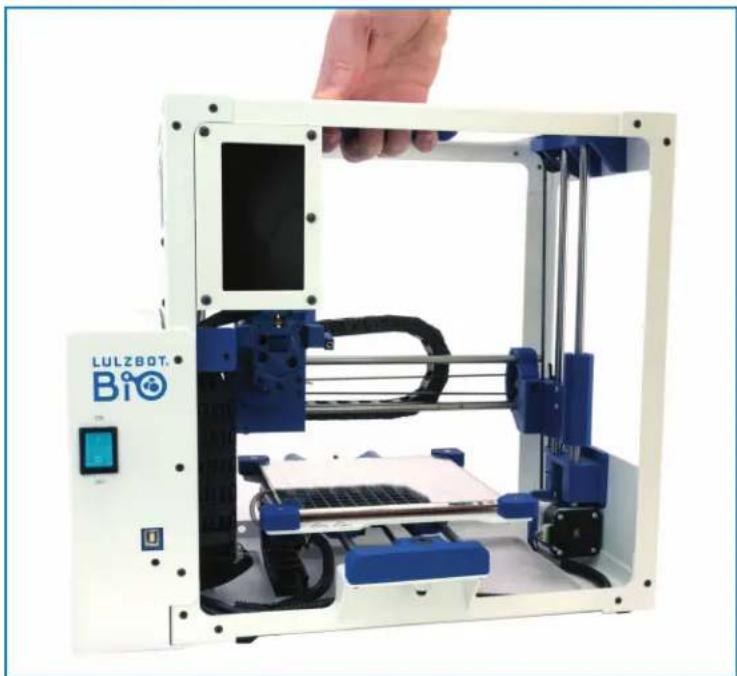
natural_image
White LULZBOT printer with blue internal components and a hand adjusting its part (no visible text or symbols on the device body)2.2 Remove all remaining packaging foam and confirm all items on the included packing list have been removed from the box. Save all of the provided packaging materials in the event that the printer needs to be transported or shipped for warranty service in the future.


Save the box and all provided packaging materials! In the event that warranty service is necessary, the Bio printer must be shipped in its original packaging.

natural_image
3D rendered mechanical component enclosed in a red circle (no text or symbols visible)3 Connect and Power On Your LulzBot Bio Printer
3.1 Verify that the power switch on the front of the LulzBot Bio is in the OFF position.
3.2 Plug in the included USB cable, connecting the LulzBot Bio to a computer.
3.3 Plug in the AC power connection.
3.4 Flip the power switch to the ON position to turn on the LulzBot Bio.

flowchart
graph TD
    A["ON OFF"] --> B["3.1"]
    B --> C["3.2"]
    C --> D["3.3"]
    D --> E["3.4 OFF"]
    style A fill:#fff,stroke:#000
    style B fill:#fff,stroke:#000
    style C fill:#fff,stroke:#000
    style D fill:#fff,stroke:#000
    style E fill:#fff,stroke:#000

The included USB cable must be plugged in before the LulzBot Bio is powered on. Plugging in after the printer is powered on will restart the printer.
3.5 Ensure that the top of the printer is unobstructed, the print bed is clear and there is no syringe installed on the tool head.
3.b Every time the LulzBot Bio powers on, it will attempt to auto-home. Verify that the syringe plunger and print bed are clear then press YES when prompted on the LCD screen.
3.7 After auto-homing, your LulzBot Bio will re-home the syringe plunger and level the x-axis gantry. Verify that the syringe plunger and print bed are clear then press YES when prompted on the LCD screen.
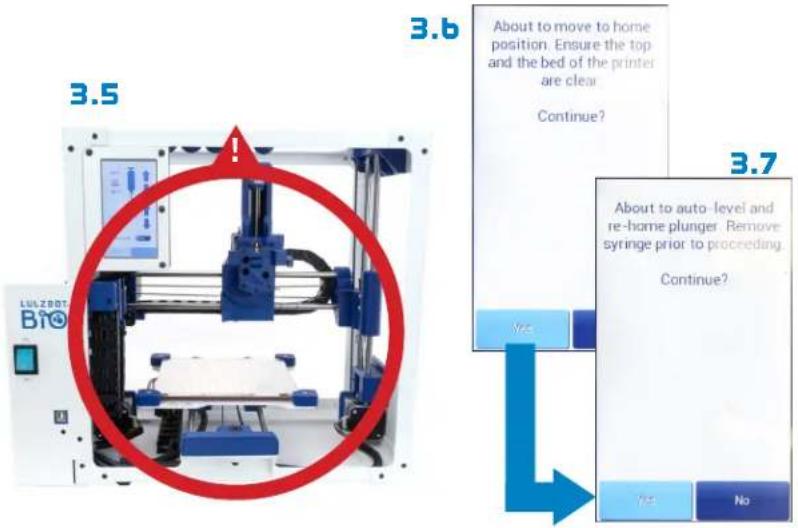
Always remove the syringe from your LulzBot Bio before the auto-homing and auto-leveling processes. Failure to do so could result in damage to the printer or other equipment. It is recommended that unless printing, the syringe should always be removed after a print.

Setting up Cura LulzBot Edition
4.1 Cura LulzBot Edition is the recommended software to control your LulzBot Bio. It includes built-in support for compatible materials that are optimized for use with the Bio. Find installation instructions, troubleshooting information, and more at LulzBot.com/Cura.
Already have Cura LulzBot Edition? Update now to get additional material support and new slicing profiles. Expert help and advice are available at LulzBot.com/Support.

There may be later versions of Cura LulzBot Edition available at LulzBot.com/Cura, with added features and functionality. We recommend checking for updates regularly.

The LulzBot Bio is compatible with Cura LulzBot Edition version 3.6.22 and later. If you have an older version of Cura LulzBot Edition installed you will need to download the latest version in order to use your LulzBot Bio.
4.2 Launch Cura LulzBot Edition. If this is your first time using Cura LulzBot Edition, the Add Printer menu will automatically appear. Select LulzBot Bio, then click Add Printer. Existing users should select the Settings drop-down menu, Printer, then Add Printer. On the next menu that appears, click Finish to complete the printer setup. Cura LulzBot Edition is now ready for use with your LulzBot Bio.

4.3 New firmware is consistently being developed to add new functionality and ensure your LulzBot Bio is creating the best quality prints. Update the printer firmware now by clicking the Settings drop-down menu and selecting Printer, then Manage Printers... With LulzBot Bio highlighted, click Upgrade Firmware and select Automatically Upgrade Firmware. Follow the prompts to install the latest firmware.
4.4 The first print model, Right_Coronary_Artery_Tree.stl, will automatically load into Cura LulzBot Edition's virtual print bed the first time you run Cura LulzBot Edition with your LulzBot Bio.

If the First Print model is not present in the virtual print bed, you can download it from download.LulzBot.com/Bio/1.0/sample_prints/Right_Coronary_Artery_Treestl or the included SD card, then load it into the virtual print bed using the Open File button in the main Cura interface.
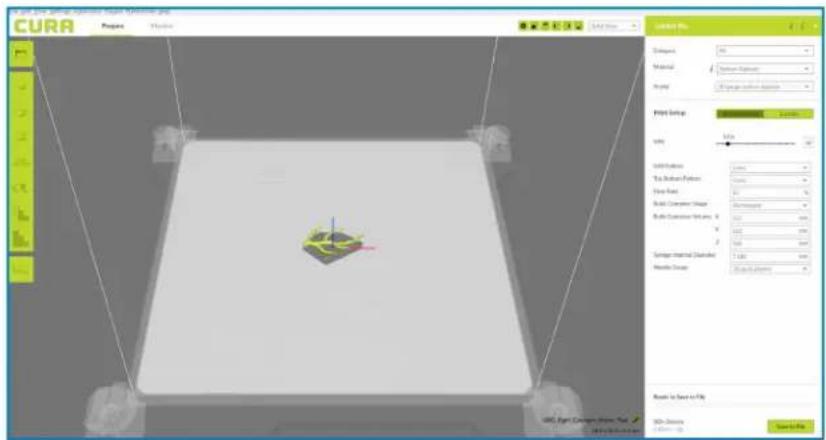
4.5 In the Prepare sidebar on the right side of the screen, confirm that Sodium Alginate is selected for material and 30 gauge sodium alginate is selected for the profile.

5 Preparing Your LulzBot Bio to Print
5.1 Locate the included samples of Sodium Alginate and LifeSupport™. We strongly recommend using the included sample materials for your first Bio print.
5.2 Follow the visual guides at LulzBot.com/lulzbot-bio-quick-start-guide or use the QR codes below to prepare the included materials for printing.

LifeSupport™ Video
Scan the QR
code to open the
video link on your
device.

Sodium Alginate Video
Scan the QR
code to open the
video link on your
device.

Your LulzBot Bio is developed and built to print a variety of materials. Each material may have different preparation and printing steps. Always consult manufacturer instructions before printing with a new material.

Some materials may take minutes or hours to mix and prepare. Fully prepare all materials before moving on to the next step.
5.2 To transfer the LifeSupport™ to the included petri dish, scoop with a spatula, or tap the container to dislodge and pour it in. Once the LifeSupport™ has been transferred, firmly tap the petri dish against a flat surface to settle the LifeSupport™ in place with no bubbles suspended in the material.
5.3 Apply three pea-sized amounts of vacuum grease to the bottom of the petri dish, then place the petri dish firmly at the center of the print bed. This holds the petri dish in place during the printing process.

Be careful when tapping any glass containers to avoid cracking or breaking.

natural_image
Close-up of a gloved hand holding a small cylindrical object on a surface (no visible text or symbols)5.2 Tap firmly to settle LifeSupport™
natural_image
Close-up of gloved hands holding a syringe and test tube (no visible text or symbols)5.3 Apply vacuum grease

natural_image
Close-up of a small cylindrical object on a light surface, possibly a container or lid, with no visible text or symbols.Place petri dish
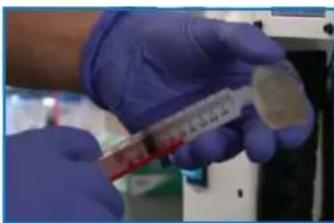
5.5 Before attaching a dispensing needle to the syringe, load it with sodium alginate. Push out any air bubbles that may appear while loading the syringe. Bubbles that appear in the Sodium Alginate while mixing can be removed with a centrifuge.

natural_image
Close-up of a gloved hand holding a pipette over a blue liquid in a beaker, with lab equipment and a PBS container in the background (no visible text or symbols)5.5 Load syringe with sodium alginate

The syringe must be free of air bubbles in order to print successfully. If air bubbles are present, flip the needle upside down, put a finger over the tip, and pull back to create a vacuum. Then release your finger to move the bubble to the top of the syringe. Slowly compress the syringe until all of the air is pushed out, then proceed to fill the syringe normally.
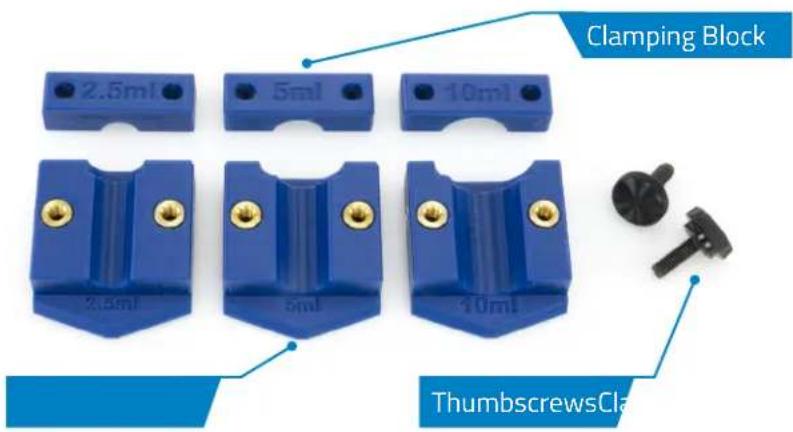
5.b Choose the correct size syringe clamp for your syringe. Each pair of clamps is marked 2.5ml, 5ml, and 10ml. Your Bio comes with a 2.5ml syringe, the 5ml and 10ml syringes are optional. All three Gastight syringe sizes are available at LulzBot.com.
5.7 Set the clamp base on a flat surface. Place the loaded syringe on the clamp base. Line up the top flanges of the syringe barrel with the indents on the top of the clamp base.

natural_image
Close-up of a blue mechanical device with a transparent tube and metallic rod, showing a close-up inset (no text or symbols visible)5.8 Put the clamp block over the top of the syringe, aligning the holes in the clamp block with the brass inserts on the clamp base.
5.9 The clamp thumbscrews should be threaded into the brass inserts of the clamp block. Tighten clamp thumbscrews clockwise to secure the clamp block evenly.

DO NOT OVERTIGHTEN the clamp block. You may damage the syringe or the clamp assembly!

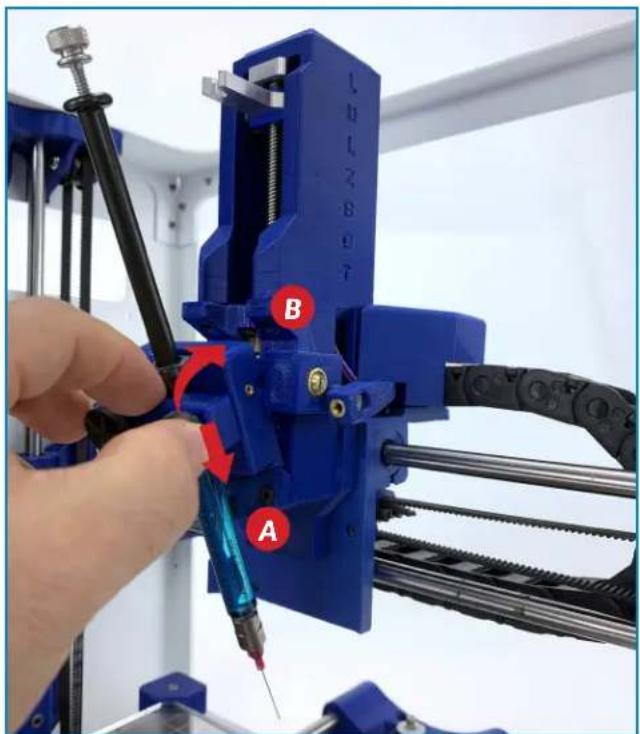
5.10 Place the assembled syringe and clamp into the syringe pump cradle by sliding the "V" shaped bottom in (A), then push the syringe clamp toward the syringe pump cradle until it "pops" into place (B).
5.11 Using the touchscreen LCD, move the plunger connection on the syringe pump down until it is in contact with the plunger A. Use the syringe thumbscrew to securely fasten them B.
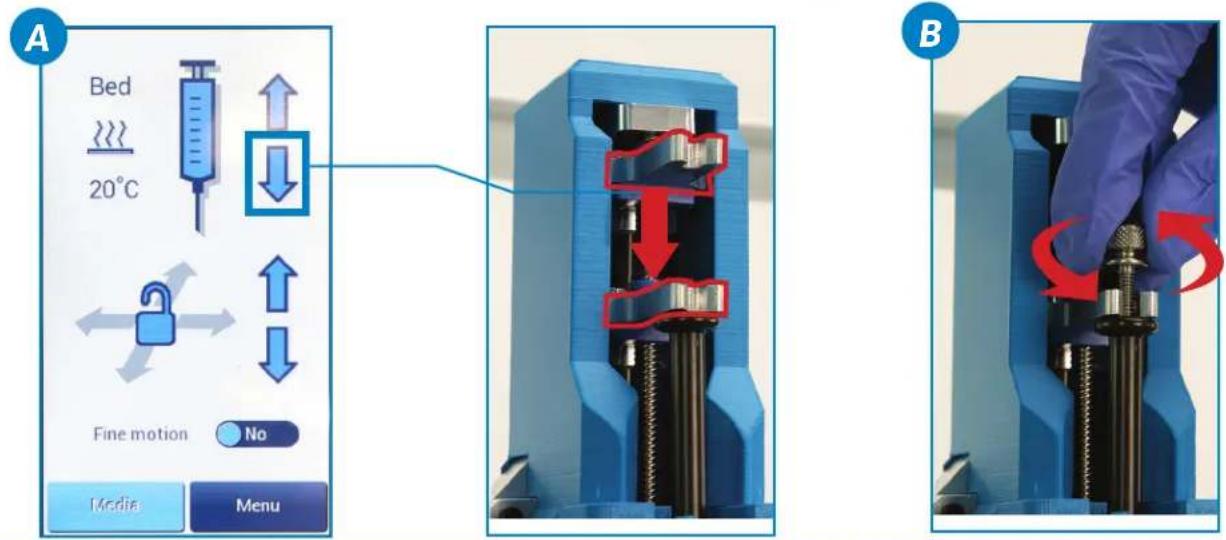

If needed, turn fine motion on by using the button on the LCD screen to show the speed of the syringe pump.
5.12 Hold a paper towel under the syringe, then continue moving the plunger down in order to prime the syringe for printing. This will release a few drops of material and clear the needle of possible air bubbles.

Always use caution when handling the syringe and needle. Though it is blunted, it may still cause injury. Always dispose used needles safely in a sharps container.

5.13 Manually center the needle above the petri dish by moving the syringe pump and print bed carefully into place by hand A. Using the touchscreen LCD controls, move the syringe pump down until the needle is just inside the LifeSupport™ material in the petri dish B.

5.14 Move the print bed back until the needle tip is clearly visible when looking at the side of the petri dish A. Switch to fine control using the button on the LCD screen, then continue to move the syringe pump down until the needle is roughly 1 mm above the bottom of the petri dish B. Once the needle is in position, move the bed forward until the needle is in the center of the petri dish C.

When a print is started, the printer uses its current position as the home position and bases the placement of the print on that position.

natural_image
Close-up of a laboratory procedure showing a syringe dispensing liquid into a glass vial, with a blue circle highlighting the liquid (no text or symbols visible)
natural_image
Close-up of a blue laboratory instrument dispensing liquid into a glass jar, with a blue arrow pointing to the liquid and a magnified inset showing a circular detail (no text or symbols visible)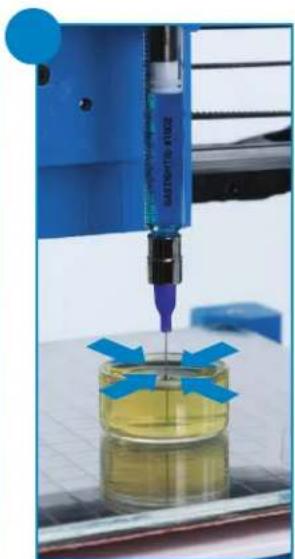
natural_image
Close-up of a 3D printer dispensing liquid into a glass jar with blue arrows indicating process (no visible text or symbols)LulzBot Bio | 21

Starting Your First Print
i
If you need to make changes to your model, use the Prepare sidebar in Cura. Once changes are made, Cura will automatically begin implementing the changes (also known as re-slicing).
i
Confirm that your model fits fully within the dimensions of the petri dish. If it is too large, the needle will make contact with the petri dish, causing it to move and the print to fail. Print dimensions can be found in Cura by selecting the print and clicking on the Scale button on the left side of the window while in Prepare mode. If a model is too large to fit in the current container, switch to a container of the appropriate size.
i
Your LulzBot Bio can be operated without a USB tether to a computer by using the touchscreen LCD and included SD card. Once models are sliced and a .gcode file is saved they may also be saved to the included SD card by clicking Save to File. Once saved, models may be printed directly from the SD card by plugging it into the slot located on the left side of the touchscreen LCD, pressing the SD card button, and selecting the model you would like to print.
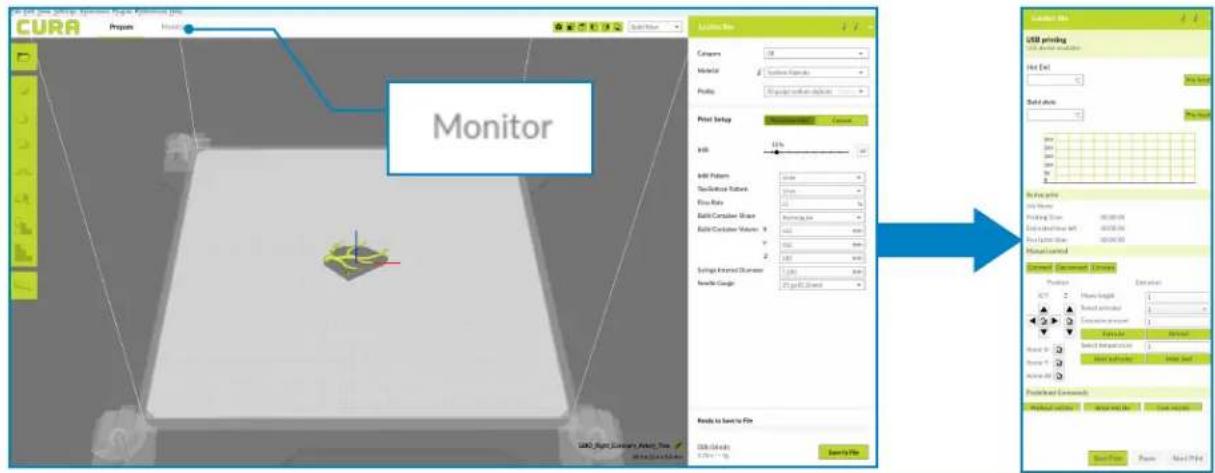
b.1 Your LulzBot Bio is now ready to print! Click on the Monitor button at the top of the main Cura interface. This will change the sidebar on the right side of the screen to show printer information and controls.

Before starting a print, check that your printer is ready:
- Confirm that all packaging has been removed from your LulzBot Bio
- Verify that the printer is on a flat and level surface, and has at least 15 centimeters (6 inches) of clearance in all directions.
b.2 Click the Connect button under Manual Control to connect to the LulzBot Bio.
b.3 Once connected, the top status bar will change from USB device available to Connected via USB and the current hot end and print bed temperatures will be displayed.
b.4 Click Start Print at the bottom of the Monitor sidebar to start your first 3D print.

Always watch your LulzBot Bio start the printing process to visually ensure proper functionality.

b.5 After your LulzBot Bio is finished printing, the syringe pump will lift out of the petri dish and the print bed will move into the finished position. Using the LCD menu, increase the bed temperature to 70°C and liquefy the LifeSupport™ material. This may take up to 45 minutes.

Your print bed is now heating. Do not attempt to remove the petri dish before the LifeSupport™ material has fully melted. Attempting to do so could disrupt the melting process or damage the print.

Some materials may require special equipment or sterile environments for part removal and post-removal care. Always consult material instructions before part removal.

natural_image
3D printer assembly line with blue control panel and green sensor, no visible text or symbols on the device itself.b.b Once the LifeSupport™ has been fully liquefied, the print can be slowly and carefully transferred to a suspension media. Sodium Alginate uses a suspension media composed of 1% wt/vol CaCl₂ in deionized water. Other materials may require different post-print care. Always consult the material instructions when printing with other materials.

natural_image
Petri dish containing a single light blue branching biological structure (no text or symbols visible)b.7 If the LifeSupport™ material has not been completely melted away, it may solidify again once it cools down in the suspension media. Feel free to transfer and re-transfer the print to fresh suspension media if it is necessary.
b.8 Now that your first print is complete, your LulzBot Bio is ready for use! For more projects, ideas, and ready-to-print models, visit http://download.LulzBot.com/bio/1.0/sample_prints/.
i
A small amount of material remains in your syringe after your first sample print. Remove the syringe by unscrewing the thumbscrew, then remove the clamp from the syringe pump. To remove the syringe clamp, hold the syringe clamp with your left hand and turn the clamp release lever clockwise (away from you). Remove the syringe from the syringe clamp by removing the two clamp thumbscrews. After removing and disposing of the needle, clean thoroughly the syringe, petri dish, and print bed. The needles are single-use, but the syringe and petri dish can be reused multiple times with regular cleaning.
7 Maintenance and Care
Make sure that the print bed is at room temperature before beginning any cleaning or maintenance unless otherwise noted.
Print Bed
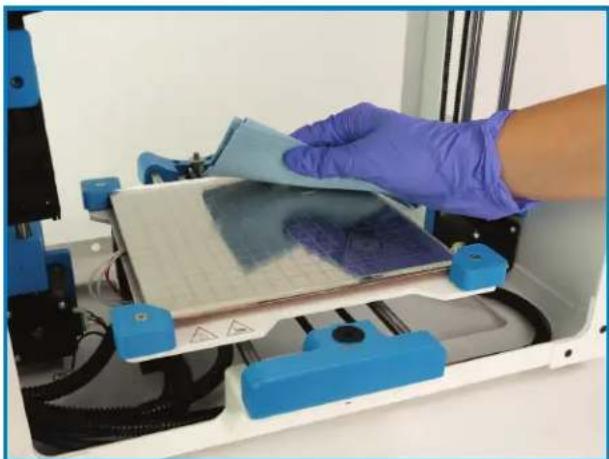
Thoroughly clean the vacuum grease from the print surface after every print. To clean the print surface, wipe with diluted Isopropyl Alcohol (1:10 IPA to water ratio) and a clean, lint-free cloth.

WARNING -
Electric shock can kill.
ALWAYS disconnect the printer by unplugging the power cord before attempting to enter the electronics box enclosure.
Failure to follow warnings could result in personal injury, death, or property damage.
natural_image
Person in blue gloves handling a flexible material on a 3D printer (no visible text or symbols)Print Area Cleaning
With regular use, dust and debris can collect underneath the printer and may cause interference with the Y-axis motion. Periodically clean and dust the area underneath and surrounding the printer to prevent this.
Smooth Rod Cleaning
The LulzBot Bio is equipped with hardened steel rods and linear ball bearings. Every 30 days, It is important to wipe down the rods on the X, Y, and Z axes using a clean, dry, lint-free cloth and lubricate them with 1 drop of SuperLube® Multi-Use Synthetic Oil with PTFE per rod to prevent rusting and marring due to friction.
Electronics Box Cleaning
⚠ Unplug the power cord and USB cable before beginning any maintenance on the LulzBot Bio's control box.
Unscrew the screws holding the control box in place and gently slide the control box away from the frame, being careful not to pull on wires traveling between the frame and control box. Using compressed air, clear the fans, power supply, and area around the control board of any dust or debris that may have collected inside.

Improper maintenance of rods and bearings can lead to rusting, marring, and damage to your printer. Follow the recommended maintenance guidelines for smooth rod maintenance.
NOTES:
NOTES:
Important Information About Your 3D Printer
Customer Feedback
Why keep a good thing secret? Share your LulzBot LOVE with the world! Tell coworkers, peers, friends, and family. Share your experience by writing a review or sharing your LulzBot Bio projects on social media. Tag your projects with LulzBot on Instagram, Facebook, Twitter, and LinkedIn.
Not happy? We're here to help. Contact our friendly customer support team, we'd love to solve your problem and get you printing again! Check out the Warranty and Support section for details.
Warranty and Support
Your machine comes with a limited one-year warranty and customer support period including USA-based technical support available via email at Support@LulzBot.com or by phone at 1 (701) 809-0800 x 2. For more information, please visit LulzBot.com/Support.
Extended warranties of one, two, and three years may also be purchased to further protect your investment. Email Sales@LulzBot.com or call 1 (701) 809-0800 x 1 for more information.
Warranty and customer support cover electrical, mechanical, and motion systems on the printer. Material issues are not covered by LulzBot customer support. Material questions and concerns should be directed to the material manufacturer. For more information about the warranty on your LulzBot 3D Printer, visit www.LulzBot.com/content/shipping-standard-warranty-and-return-policies
Source Files
This product runs with free software because we support your right to see how it works, make modifications, and share your modifications with others. Find the source files online at Download.LulzBot.com.
Certification
Your LulzBot Bio is a FRESH™ (Freeform Reversible Embedding of Suspended Hydrogels) Certified bioprinting platform that enables the fabrication of soft, biological scaffolds for applications in tissue engineering and regenerative medicine. FRESH™ Certification is a patented bioprinting process licensed to FluidForm™ 3D Bioprinting.

natural_image
Blue abstract logo resembling a stylized eye or tag with circular elements (no text or symbols)LulzBot® Bio Quick Start Guide v.1.3 (01/17/2022)
CC BY-SA 4.0 International①ulzBot 2021
LulzBot® is a Registered Trademark of FAME 3D, LLC.
LifeSupport™ and the FRESH™ acronym are Trademarks of FluidForm™ 3D Bioprinting.

DC-MS0100 - 01/17/2022


- YOUR
- IMAGINATION
- BUILT BY
- LULZBOT®
- Welcome to the LulzBot Community
- LulzBot Bio Printer Key Components
- 2
- Unpack your LulzBot Bio Printer
- Connect and Power On Your LulzBot Bio Printer
- Setting up Cura LulzBot Edition
- Preparing Your LulzBot Bio to Print
- Starting Your First Print
- i
- Maintenance and Care
- Print Bed
- Print Area Cleaning
- Smooth Rod Cleaning
- Electronics Box Cleaning
- NOTES:
- Important Information About Your 3D Printer
- Customer Feedback
- Warranty and Support
- Source Files
- Certification
Brand : LulzBot
Model : Bio
Category : 3D Printer