
BL-1 - Label printer Tach-It - Free user manual and instructions
Find the device manual for free BL-1 Tach-It in PDF.


| Product Type | Label Printer |
| Brand | Tach-It |
| Model | BL-1 |
| Dimensions (approx.) | 150 x 100 x 80 mm |
| Weight (approx.) | 300 g |
| Power Source | AC adapter or 6 AA batteries |
| Print Technology | Thermal transfer |
| Max Label Width | 12 mm |
| Print Resolution | 180 dpi |
| Print Speed | 10 mm/s |
| Font Styles | Multiple (bold, italic, size) |
| Keyboard | QWERTY layout |
| Display | LCD, 2 lines |
| Languages Supported | English, French, German, Spanish |
| Main Functions | Print labels, barcode, date stamp, memory for templates |
| Maintenance | Clean print head with alcohol; replace label roll |
| Safety | Keep away from water; use only recommended power adapter |
| Spare Parts | Label rolls, print head, AC adapter |
| Repairability | Print head replaceable; user-serviceable |
| Manual | Available for free download in PDF |
Frequently Asked Questions - BL-1 Tach-It
User questions about BL-1 Tach-It
0 question about this device. Answer the ones you know or ask your own.
Ask a new question about this device
Download the instructions for your Label printer in PDF format for free! Find your manual BL-1 - Tach-It and take your electronic device back in hand. On this page are published all the documents necessary for the use of your device. BL-1 by Tach-It.
USER MANUAL BL-1 Tach-It
Portable Labeler Manual
2015.07,Ver2.0
1 Specifications
| Product | Portable Labeler | |
| Size and weight | (WxLxH) 145*420*82 mm / 760 g (Battery pack included) | |
| Usable | Label | Diameter (max) 120mm / Core (min) 25 mm / Width (max) 29 mm |
| Label | Width 8~29 mm (*Refer to the label roll's width)/ Length 15~60 mm | |
| Battery pack | -Type: Lithium-Ion battery / Capacity: 2600 mAh / Voltage: 14.8V- Duration: About 8 hours (*It may differ depending on the working condition.)- Weight: 217 g | |
| Charger | Input: AC 100~240 V, 50/60Hz / Output: DC16.8V, 2A | |
| Charging holder | Exclusive for the label click's battery pack/ Blue lamp is on when charging 80% | |
2 Components

Portable Labeler
3 Product layout
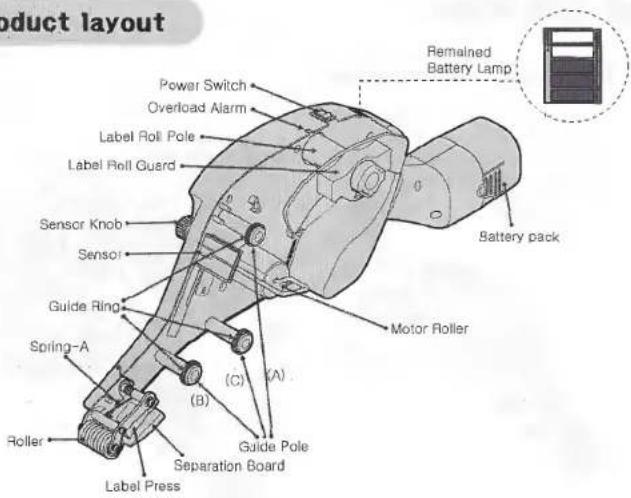
4 Caution ( ⚠️ )
- Make sure the power switch is turned off when not in use. (If the power switch is turned on, the battery runs out even when not in use.)
- If you don't use the labeler for a long time, turn off the power switch after fully charging or detach the battery from the main body, and then store it. (Even though the over-discharge protection circuit is built in the battery pack, it may not be charged after completely discharging due to the long term disuse.)
- Be careful not to fall any material in the charging holder when the charger is connected while turning on the power switch.
5
How to use
1) Installing the label roll
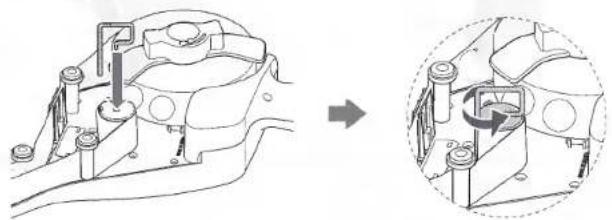
Put a label roll into the "label roll pole", and then install and turn the "label roll guard" to the right to hold. (If you fix the label roll too strong, it may be overloaded. Make some space to turn around smoothly.)

② Remove some labels (about 170 mm) and pass the label between the "guide pole-A" and two little poles, and then through the "sensor". (If you don't remove some labels at the end of the label roll, it's hard to take out the labels from the "motor roller".)

natural_image
Illustration of a mechanical device being adjusted for assembly (no text or symbols present)Portable Labeler
③ Pass the label below the "guide pole-B", and between the "Label Press" and the "Separation Board", and then above the "guide pole-C".

natural_image
Illustration of a mechanical assembly being adjusted, showing a component being processed (no text or symbols present)4 Roll the label around the motor roller and fix it with the "fixing loop", and turn it once counterclockwise. Be careful not to twist the label.
natural_image
Technical line drawing of a mechanical component before and after assembly (no text or symbols)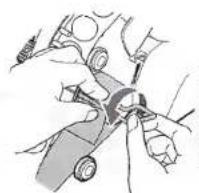
!
Hold and turn the label and the "fixing loop" together with two hands as the label may slip out if you hold and turn only the "fixing loop" at the first time.
⑤ Adjust the "guide ring" on the "guide pole-A, B, C" properly to the label's width.

natural_image
Mechanical assembly diagram showing a bracket and a close-up of a bolt with directional arrows (no text or symbols)6 Adjust the output length of the label.

natural_image
Mechanical assembly diagram showing a valve mechanism and a close-up of the internal component (no text or symbols)- Turn on the power switch and operate the labeler once (by lifting up the roller) to check the output length of the label.

Output length of the label
- If the label is short or long, loosen the "sensor knob" and move the sensor forward (for short) or backward (for long), and then fasten the "sensor knob" to fix. (The output length of the label depends on how much you move the sensor. The proper length is 2\~5 mm longer from the Separation Board, but you can adjust the proper length according to the work.)
Portable Labeler
2) Labeling
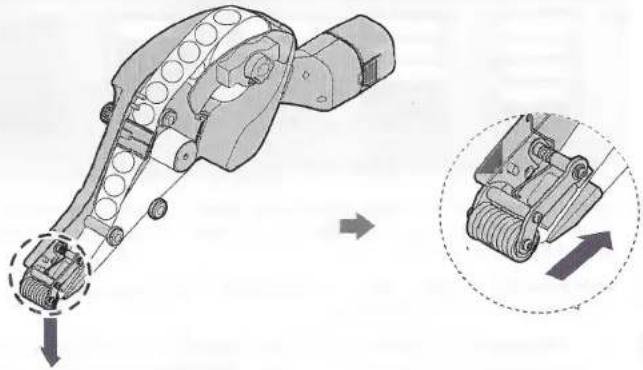
Hold the labeler and place the "roller" on the surface that you want to stick a label. And press and move the labeler.
natural_image
Mechanical assembly diagram showing a disassembly of a mechanical component with a magnified inset illustrating the motion (no text or labels present)
- Be careful not to press the labeler too strong when you stick a label.
- Keep the surface and the "roller" parallel when you stick a label.
- Stick a label naturally according to the speed of the output label. (If you just press or stick too late, the label may be folded or slipped out from the line.)
- The more label is coiled around the "motor roller", the longer label comes out and the output speed of the label gets faster. If you have any trouble with this, please remove the coiled label and then use.
3) Removing the label
① Pull out the "fixing loop". (You may easily remove the label when you remove the fixing loop first.)
② Remove the coiled label from the "motor roller".
4) Charging
Check the remained battery on the "Remained Battery Lamp" before charging.

Below 20%
(Charging needed)
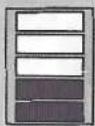
20\~40%

40\~60%

60\~80%
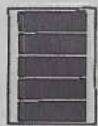
Over 80%
① Connect the plug of the charger to an outlet, and then connect the charger adapter to the "charging holder". (The green lamp of the charger is on, and the blue lamp of the charging holder is on.)
② While pressing the bumpy parts on the rear side of the "battery pack", detach the "battery pack" from the main body.
③ Secure the detached "battery pack" into the charging holder with proper direction. (The green lamp of the charger turns into red, and the blue lamp of the charging holder turns into red when it starts charging.)
When the charging level is 80 %, the red lamp of the charging holder turns into blue. (If you don't detach the "battery pack" from the charging holder, it keeps charging.)
When the charging level is over 90 %, the red lamp of the charger turns into green (while the blue lamp of the charging holder is on).
6 Detach the "battery pack" after charging and attach it to the main body of the labeler to use.

- Avoid using in hot and humid places, and use indoor.
- You can't charge in following conditions.
: When the connection is not right
: When the battery is broken or completely discharged - Do not disassemble the "battery pack" arbitrarily.
- Use only the exclusive charger for this labeler.
- Do not make short circuit of the terminal of the "charging holder" and the "battery pack".
Portable Labeler
6
Troubleshooting
| Problem | Solution | |
| The labeler is not working. | 1. Make sure the power switch is turned on. | |
| 2. Check the remained battery. ▶ Charge the battery if necessary, and then use. | ||
| 3. Check the "roller" if it moves up and down properly. ▶ If it doesn't move properly, please contact us. | ||
| 4. Check whether the "overload alarm" blinks or not. ▶ If it blinks, find the cause of overload and remove it. And then turn off the power switch and turn on again. | ||
| Unable to stop the output label. | 1. Make sure the label passes through sensor. | |
| 2. Check the green lamp of the sensor. | ||
| Normal ON | When the label is on the sensor | |
| OFF | When the paper without a label is on the sensor | |
| Make the lamp is in normal by adjusting the sensitivity controller on the sensor. (When turning the sensitivity controller clockwise = High level of sensitivity) ex) If the green lamp is off when the label passes through the sensor, turn the sensitivity controller clockwise at a time until the lamp is on. ▶ If the green lamp keeps turned on continuously, check inside of the sensor if there is any material. | ||
| Unable to charge the battery pack | 1. Check if the "battery pack" secures into the charging holder completely. | |
| 2. Check if there is any material in the terminal of the charging holder and the battery pack. | ||
| 3. Check if the plug or the adapter of the charger is connected properly. | ||
Portable Labele

| No. | Parts Name |
| 1 | BODY-A |
| 2 | BODY-B |
| 3 | LABEL GUARD |
| 4 | ROLLER-30 |
| 5 | ROLLER AXLE-30 |
| 6 | ROLLER ASSY-A30 |
| 7 | ROLLER ASSY-B30 |
| 8 | ROLLER ASSY-C30 |
| 9 | ROLLER ASSY-D30 |
| 10 | ROLLER ASSY-E |
| 11 | ROLLER ASSY-F |
| 12 | SPRING-A |
| 13 | SPRING-B |
| 14 | LABEL PRESS |
| 15 | SENSOR KNOB |
| 16 | HARNESS-A(MAIN SENSOR) |
| 17 | HARNESS-B(S-SENSOR) |
| 18 | HARNESS-C(POWER) |
| 19 | HARNESS-D(RED LED) |
| 20 | HARNESS-E(BAR LED) |
| 21 | PCB |
| 22 | GUIDE RING |
| 23 | GUIDE POLE |
| 24 | LABEL ROLL POLE-30 |
| 25 | Separation Board-30 |
| 26 | FIXING LOOP-30 |
| 27 | MOTOR-30 |
| 28 | CLIP |
| 29 | BATTERY PACK |
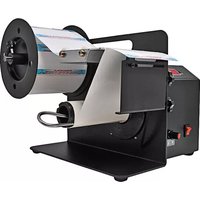
Brand : Tach-It
Model : BL-1
Category : Label printer