
StuckUp - Battery charger Scosche - Free user manual and instructions
Find the device manual for free StuckUp Scosche in PDF.


| Product Type | Wireless Charging Car Mount |
| Brand | Scosche |
| Model | StuckUp |
| Compatible Devices | Smartphones with Qi wireless charging |
| Mounting Options | Dash mount (adhesive) and vent mount |
| Wireless Charging Standards | Qi |
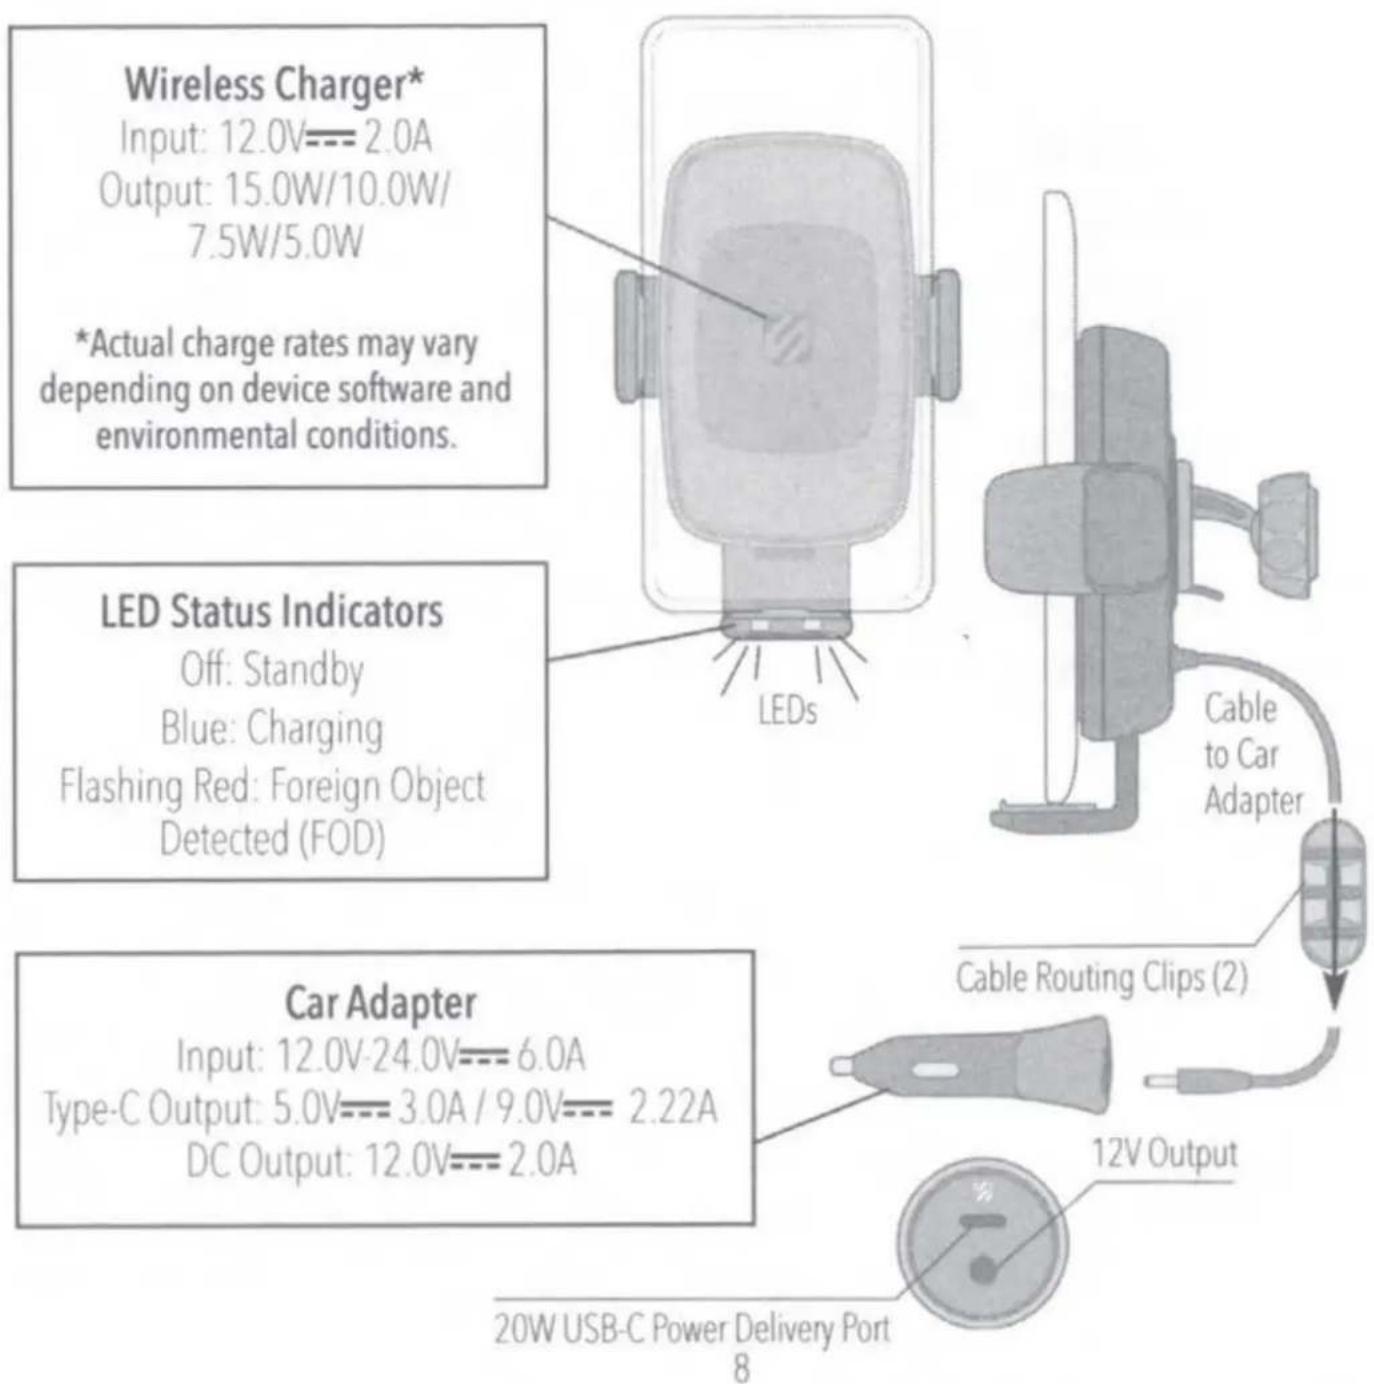
| Input Power | 12V DC from car adapter |
| Output Power (Wireless) | Up to 10W |
| Dimensions (Approx.) | 4.5 x 3.0 x 1.5 inches |
| Weight (Approx.) | 6.5 oz |
| Cable Length | 4 ft (car adapter cord) |
| Mount Adjustment | Ball joint for angle and rotation (dash mount); rotation only (vent mount) |
| Side Support Arms | Adjustable with release button |
| Bottom Support | Adjustable with release button |
| Included Accessories | Universal charging mount, T-notch/ball adapter, dash mount pad, vent mount, car adapter, cable routing clips (2), cleaning wipe |
| Care Instructions | Clean with dry cloth; avoid harsh chemicals |
| Safety Certifications | FCC Part 15, Industry Canada |
| Operating Temperature | -20°C to 60°C |
| Warranty | 1 year limited |
| Designed In | Oxnard, California, USA |
Frequently Asked Questions - StuckUp Scosche
User questions about StuckUp Scosche
0 question about this device. Answer the ones you know or ask your own.
Ask a new question about this device
Download the instructions for your Battery charger in PDF format for free! Find your manual StuckUp - Scosche and take your electronic device back in hand. On this page are published all the documents necessary for the use of your device. StuckUp by Scosche.
USER MANUAL StuckUp Scosche
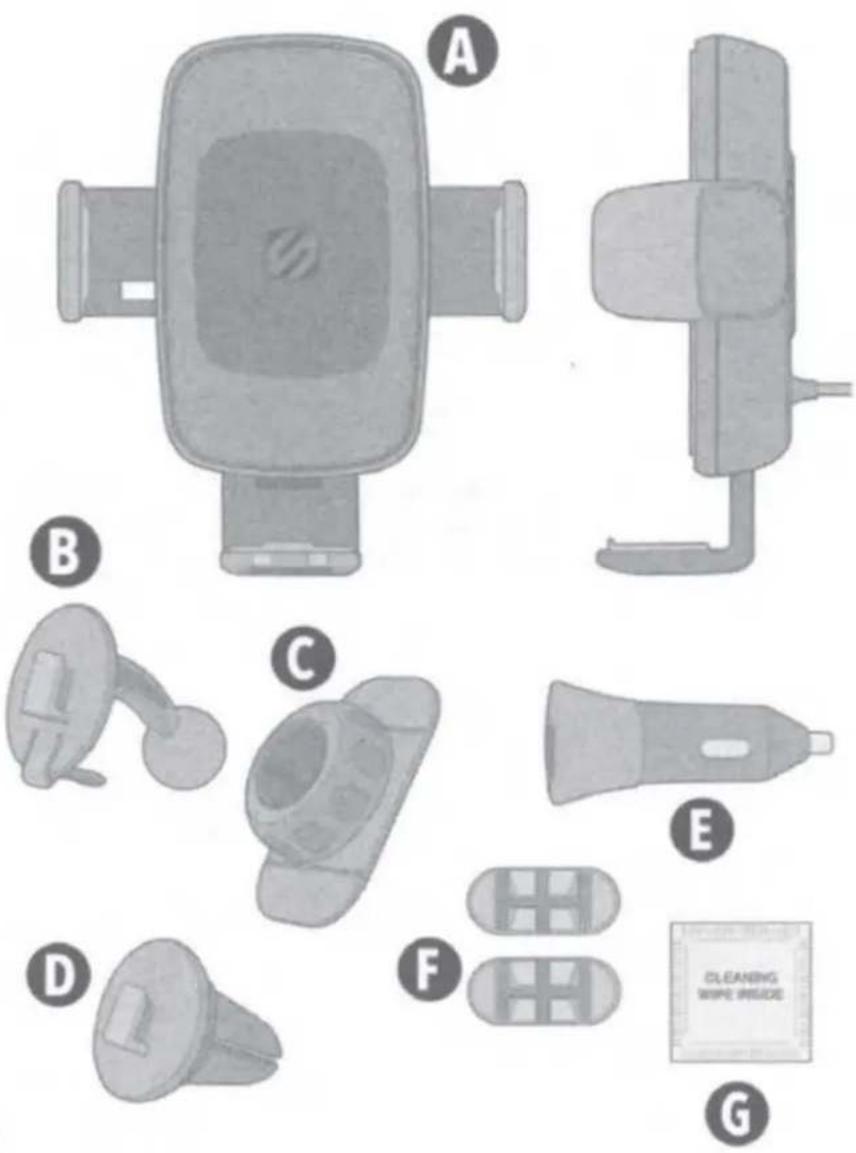
A. Universal Wireless Charging Mount
B. T-Notch/Ball Adapter
C. Dash Mount
D. Vent Mount
E. Car Adapter
F. Cable Routing Clips (2)
G. Cleaning Wipe
English 2-10
DEVICE SETUP
(EN)
SECTION A - Universal Charging Phone Mount Overview
SECTION B - Dash Mount Assembly & Installation
SECTION C - Vent Mount Assembly & Installation
SECTION D - Mount Adjustment
SECTION E - Connection & Charging
(EN)
SECTION A
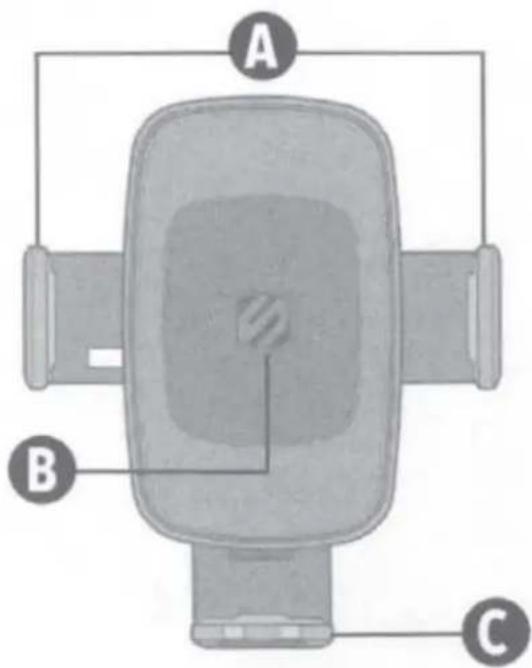
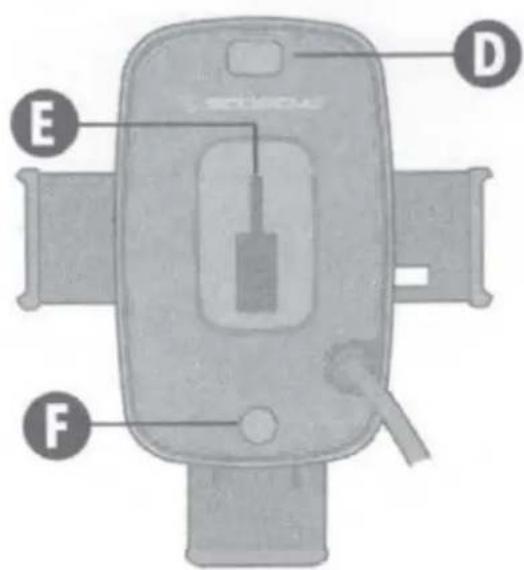
Universal Wireless Charging Phone Mount
A. Side Support Arms
B. Wireless Charging Area
C. Bottom Support
D. Side Support Release Button
E. T-Notch Opening
F. Bottom Support Release Button
SECTION B
(EN)
Dash Mount
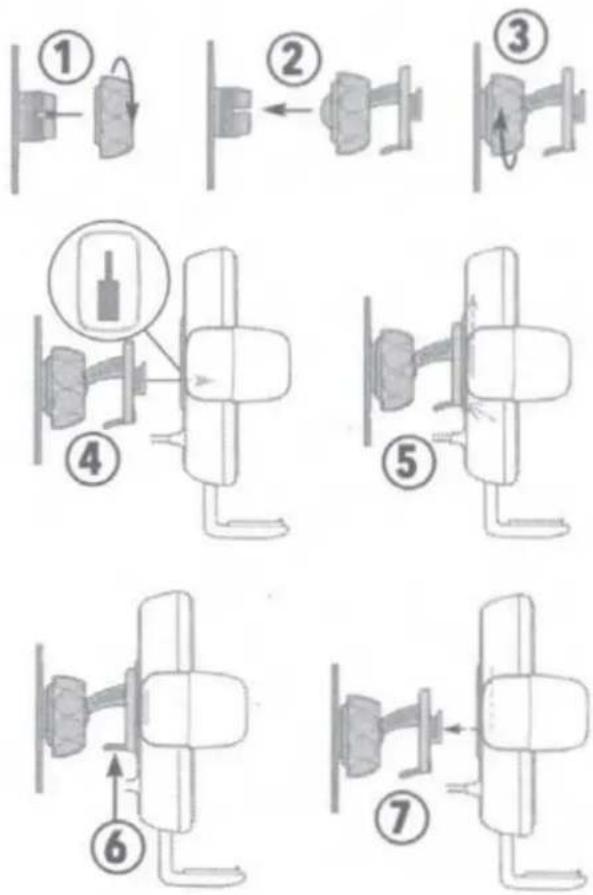
Assembly
-
Remove collar from ball-joint socket.
-
Place collar over ball end of t-notch/ball adapter, then place ball end in socket.
-
Tighten collar onto socket.
-
Place t-notch hitch in opening.
-
Slide up to lock in place.
Removal
-
Press lever to release t-notch.
-
Slide down to remove.
Installation
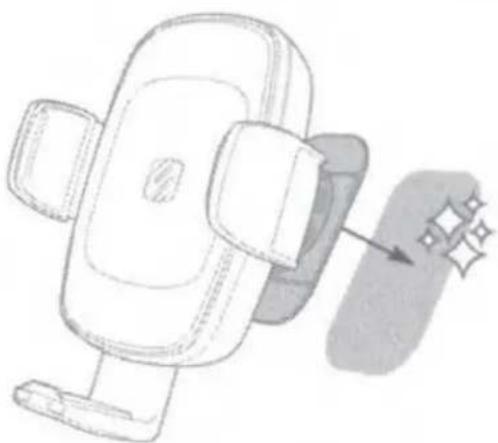
Clean the mounting surface using supplied wipe*. Remove backing from adhesive base, place mount in position and press firmly.
*Supplied cleaning wipe may cause discoloration of certain plastics, vinyls and painted surfaces. It is recommended to test in an inconspicuous area first.
natural_image
Illustration of a car seat with a small object nearby (no text or symbols)(EN)
Vent Mount
Assembly
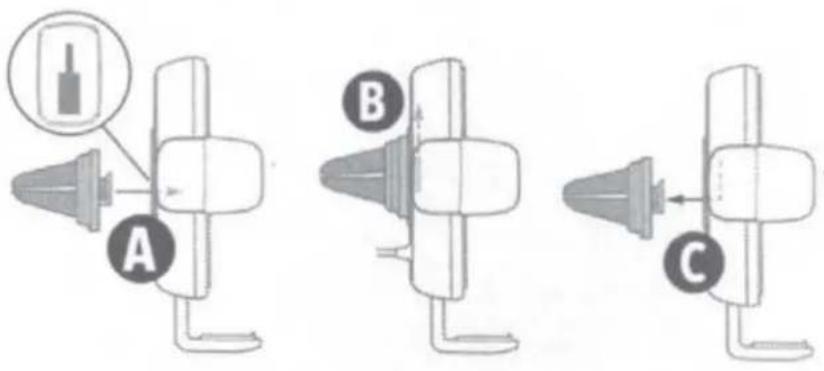
Insert t-notch hitch on vent mount into opening on back of mount head (A), and slide upward (B).
Slide vent mount down to remove (C).
Installation
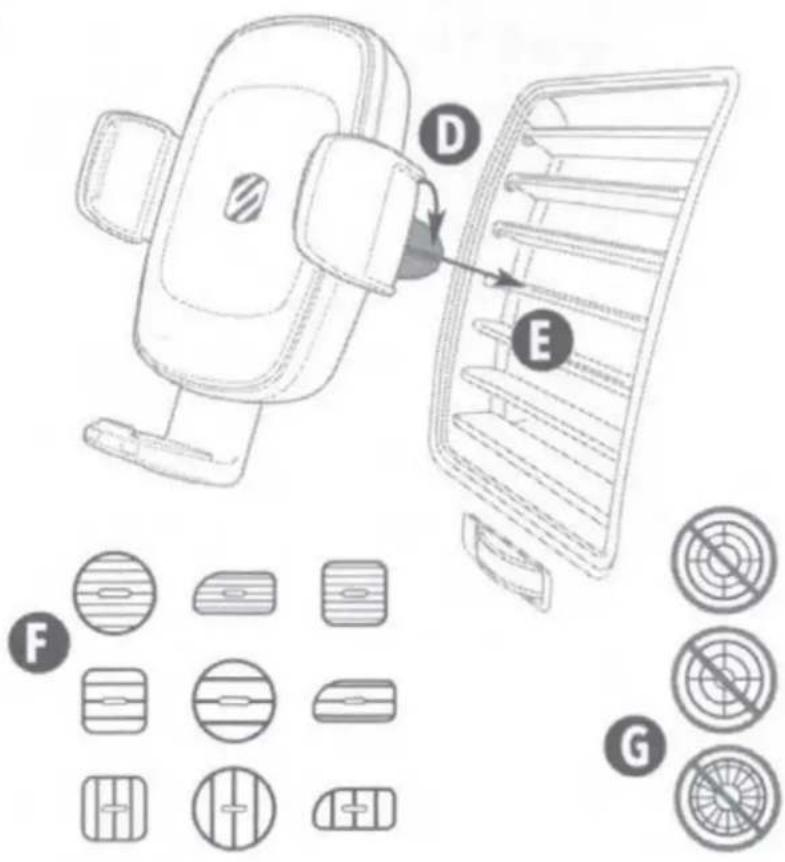
Rotate vent clips on mount (D) to align with vent (E).
Note: Works with many vent designs (F). Not compatible with curved or circular vents (G).
SECTION C
SECTION D
(EN)
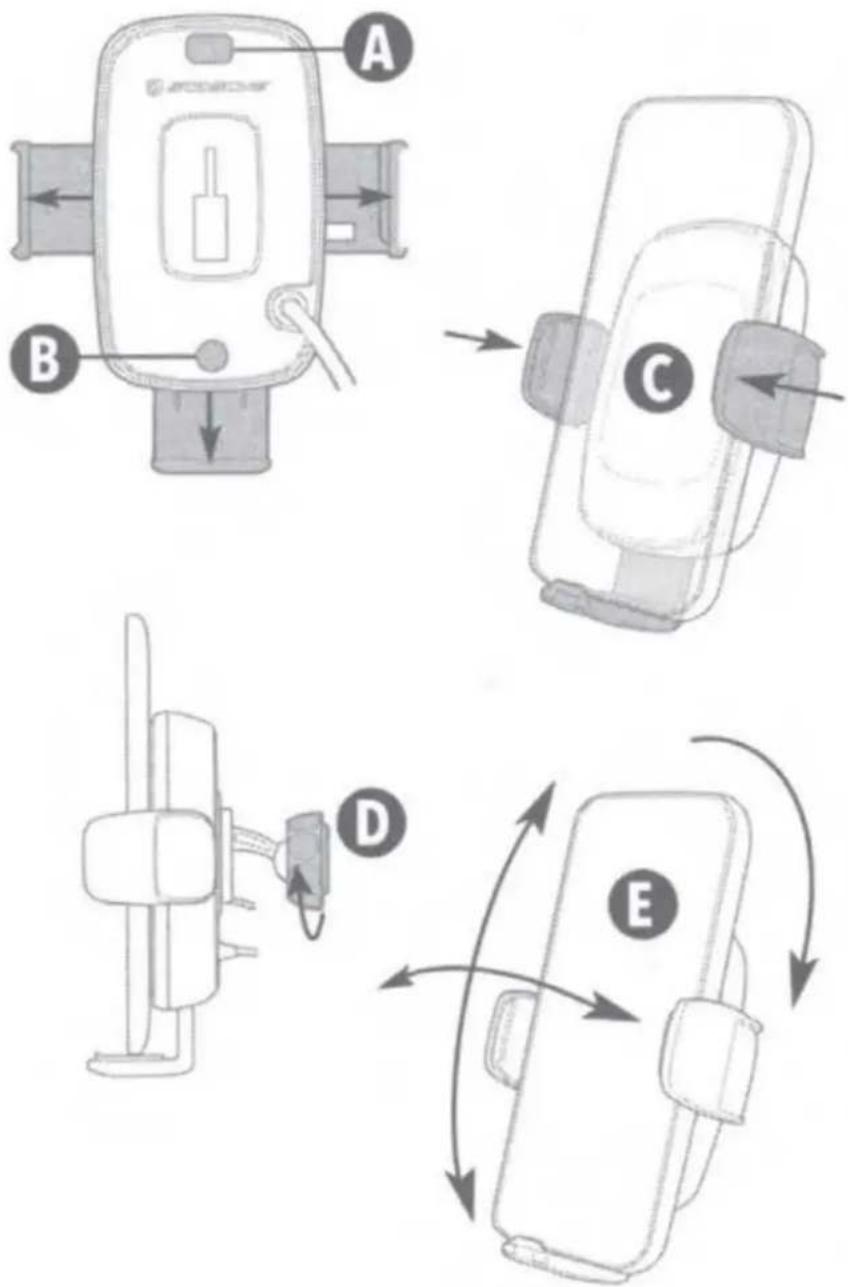
Press the side & bottom support release buttons (A & B) to fully open the Universal Mount.
Place the device in the mount and manually press the side supports inward to secure the device (C).
Note: The bottom support may also be adjusted manually to raise the device in the mount, if needed.
Press the side support release button to remove the device.
Loosen the ball-joint collar on the Dash Mount (D) to adjust mount angle or rotate mount (E).
Note: Vent mount may be rotated only.
flowchart
graph TD
    A["Device A"] --> B["Device B"]
    B --> C["Device C"]
    C --> D["Device D"]
    D --> E["Device E"]
    E --> F["Device F"]
    style A fill:#f9f,stroke:#333
    style B fill:#ccf,stroke:#333
    style C fill:#cfc,stroke:#333
    style D fill:#fcc,stroke:#333
    style E fill:#cff,stroke:#333
(EN)
SECTION E
FCC Compliance Statement
(EN)
This device complies with part 15 of the FCC Rules. Operation is subject to the following two conditions: (1) This device may not cause harmful interference, and (2) this device must accept any interference received, including interference that may cause undesired operation.
This equipment has been tested and found to comply with the limits for a Class B digital device, pursuant to part 15 of the FCC Rules. These limits are designed to provide reasonable protection against harmful interference in a residential installation. This equipment generates, uses and can radiate radio frequency energy and, if not installed and used in accordance with the instructions, may cause harmful interference to radio communications. However, there is no guarantee that interference will not occur in a particular installation.
If this equipment does cause harmful interference to radio or television reception, which can be determined by turning the equipment off and on, the user is encouraged to try to correct the interference by one or more of the following measures:
- Reorient or relocate the receiving antenna.
- Increase the separation between the equipment and receiver.
- Connect the equipment into an outlet on a circuit different from that to which the receiver is connected.
- Consult the dealer or an experienced radio/TV technician for help.
Canadian Compliance Statement
This device contains license-exempt transmitter(s)/receiver(s) that comply with Innovation, Science and Economic Development Canada's licence-exempt RSS(s). Operation is subject to the following two conditions: (1) this device may not cause interference and (2) this device must accept any interference, including interference that may cause undesired operation of the device.
This Class [B] digital apparatus complies with Canadian ICES-003
CAN ICES-3 (B)/NMB-3(B)
(EN)
StuckUp Vent/Dash

SCOSCHE
Scosche Industries
1550 Pacific Avenue
Oxnard, California 93033
Phone: 800-363-4490 x1 / 805-486-4450 x1
www.scosche.com
©2022 Scosche Industries
Scosche is a trademark of Scosche Industries
Other marks or brands are the property of their respective owners.
Devices and or appearance may vary.
Designed in Oxnard, California
SI UQ3DV 1/22
Please note that changes or modifications to this product not expressly approved by the party responsible for compliance could void the user's authority to operate the equipment.
This equipment complies with FCC radiation exposure limits set forth for an uncontrolled environment. This equipment shall be installed and operated with minimum distance 15cm between the radiator & body.
This equipment complies with IC exposure limits set forth for an uncontrolled environment. This equipment shall be installed and operated with minimum distance 10cm between the radiator & body.
Brand : Scosche
Model : StuckUp
Category : Battery charger