LV-8D20 - Washing machine Milectric - Free user manual and instructions
Find the device manual for free LV-8D20 Milectric in PDF.


| Product type | Washing machine |
| Brand | Milectric |
| Model | LV-8D20 |
| EAN | 8445639000199 |
| Dimensions (H x W x D) | 845 x 597 x 527 mm |
| Max load capacity | 8 kg |
| Rated voltage | 220-240 V ~ 50 Hz |
| Rated current | 10 A |
| Total power | 2100 W |
| Water pressure | 0.1 - 1 MPa |
| Max spin speed | 1200 rpm |
| Number of programmes | 15 |
| Control panel | Electronic display, programme selector, additional functions buttons, start/pause button |
| Additional functions | Half-load detection, temperature adjustment, spin speed adjustment, delayed start (1-23 h), child lock |
| Technology | Roll&Play for intuitive programming |
| Programme types | Cotton, Eco 40-60, Duvet, Cotton 20°C, Colour, Wool, Rinse, Anti-allergy, Spin/Drain, Delicate, Sport, Mix, Dark clothes, Quick 60', Quick 15' |
| Energy efficiency | Eco 40-60 programme compliant with EU ecodesign |
| Safety features | Child lock, grounding, door lock, overflow protection |
| Maintenance | Clean detergent dispenser monthly, inlet filter and pump filter every 3 months |
| Water supply | Cold water only, single inlet |
| Drain hose connection | Connect to sink or drain; do not kink; max immersion 15 cm |
| Transport bolts | Must be removed before first use |
| Levelling | Adjustable feet; use spirit level |
| Electrical connection | Grounded outlet; no extension cords |
| Detergent dispenser compartments | 3: prewash, main wash, softener |
Frequently Asked Questions - LV-8D20 Milectric
User questions about LV-8D20 Milectric
0 question about this device. Answer the ones you know or ask your own.
Ask a new question about this device
Download the instructions for your Washing machine in PDF format for free! Find your manual LV-8D20 - Milectric and take your electronic device back in hand. On this page are published all the documents necessary for the use of your device. LV-8D20 by Milectric.
USER MANUAL LV-8D20 Milectric
natural_image
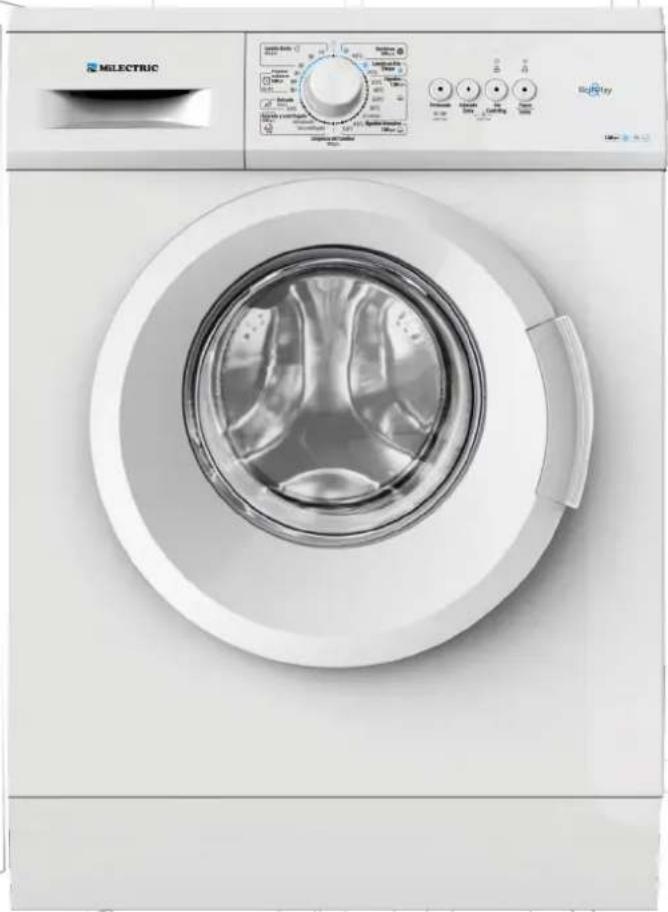
Front view of a white MILECTRIC washing machine with control panel and side door (no visible text or symbols on the device body)LV-8D20
ean: 8445639000199
natural_image
Simple line drawing of a container with a cross mark on a textured surface (no text or symbols)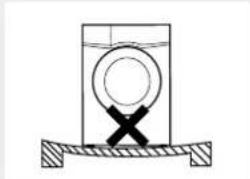
natural_image
Simple line drawing of a container with a circular top and cross mark, resting on a curved surface (no text or symbols)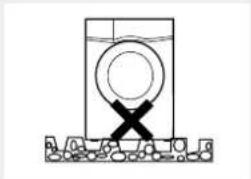
natural_image
Simple line drawing of a container with a circular inlet and cross mark, placed on a surface with no text or symbols.
¡ADVERTENCIA!
Transporte
natural_image
Two stick figures pulling a large gray rectangular object (no text or symbols)natural_image
Technical line drawing of a washing machine with internal chambers and mounting feet (no text or symbols)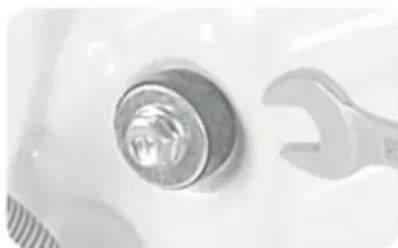
natural_image
Close-up of a metallic circular component with a wrench beside it (no visible text or symbols)natural_image
Close-up of a metallic mechanical knob inserted into a circular opening, with a textured surface and a striped pattern on the left (no visible text or symbols)natural_image
Close-up of a white object with a circular hole and a striped pattern, no visible text or symbols.natural_image
Close-up of a white mechanical component with a metallic handle and a circular housing (no visible text or symbols)natural_image
Close-up of a white sculptural object with arrows indicating motion or transformation, next to a magnifying glass (no text or symbols)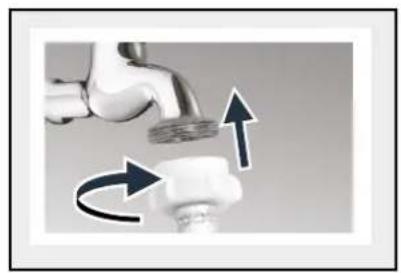
natural_image
Close-up of a faucet with a pipe fitting and a valve, showing directional arrows (no text or symbols)natural_image
Illustration of a box with an arrow pointing upward, alongside a magnified inset showing a small structure labeled 'A' (no text or symbols on the diagram itself)natural_image
Symbol of a trash bin crossed with two crossed lines, representing waste sorting or disposal (no text or labels)
natural_image
Simple line drawing of a sweater with a tag and label (no text or symbols on the sweater itself)flowchart
graph TD
    A["Bag with two fragments"] --> B["Box with two fragments"]
    B --> C["Box with one fragment"]
natural_image
Two handbags with circular designs, one wrapped in a bow and the other in a gift box (no text or symbols)natural_image
Simple line drawing of a bag with a rope tied around it, no text or symbols present.natural_image
Line drawing of a knitted sweater with arms and buttons (no text or symbols)natural_image
Technical line drawing of a washing machine component before and after assembly (no text or symbols)natural_image
Close-up of a hand inserting a circular component into a transparent ring (no text or symbols visible)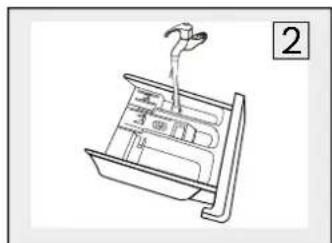
natural_image
Line drawing of a mechanical device with a handle and internal components (no text or symbols)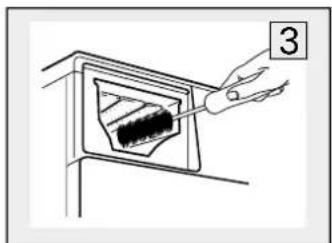
natural_image
Illustration of a hand inserting a device into a wall-mounted device (no text or symbols)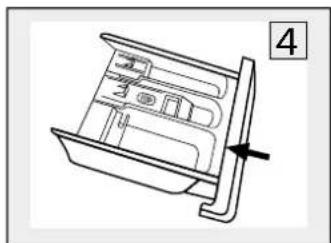
natural_image
Technical line drawing of a mechanical component with no visible text or symbolsnatural_image
Front view of a white MILECTRIC washing machine with control panel and side door (no visible text or symbols on the device itself)LV-8D20
ean: 8445639000199
The picture shown on this page is for reference only. The model purchased may vary aesthetically from the model shown on this page.
Before using your new Infiniton product, please read this user manual carefully to learn how to safely and efficiently use the features offered by this device.
| Index | English |
| Installation | 3 |
| Safety information | 4 |
| Before use | 5 |
| How to use | 9 |
| Maintenance & Cleaning | 10 |
Location
Before installing this Milelectric appliance, you must choose a location that meets the following requirements:
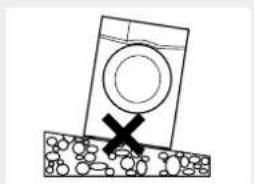
- Rigid, dry and level surface
- Avoid direct sunlight
- Sufficient ventilation
- The ambient temperature must be above 0°C
- Keep the appliance away from any heat source (cookers, boilers, radiators, etc.).
- Install the appliance in a clean place, where there is no accumulation of dirt. Do not obstruct the air inlets of the product.

WARNING! Stability is important to prevent the appliance from moving. Ensure that the product is level and stable. To ensure that the vibration and noise levels emitted by the appliance during operation are normal, the appliance should be placed on a firm and level surface.
natural_image
Simple line drawing of a container with a cross mark on a surface (no text or symbols)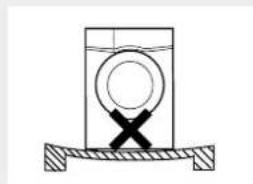
natural_image
Simple line drawing of a container with a circular element and an 'X' mark, resting on a horizontal surface (no text or symbols)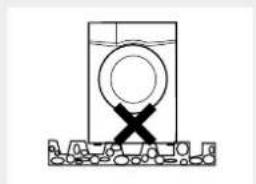
natural_image
Simple line drawing of a container with a circular inlet and cross mark, no text or symbols present
WARNING!
Make sure the power cable is not trapped or
damaged is not trapped or damaged.

WARNING!
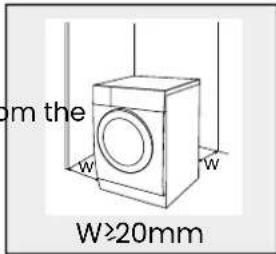
Be sure to maintain the minimum distances from the
walls, as shown in the picture on the right.
Transport
Move the appliance with extreme care. Do not grip any protruding parts of the product. The door of the product must not be used as a carrying handle under any circumstances. If the appliance cannot be transported in an upright position, it can be tilted to the right less than 30^ .

Risk of damage and injury! Improper handling of the appliance may cause injury.

Important! The appliance is very heavy, please never carry the appliance alone;
always do so with the help of another person.
Remove all obstacles from the transport route and the installation site:
- Open doors and remove objects on the floor.
Do not use the open door as a support point.
Remove all packing materials before using the appliance.
Before installing the product, check it for externally visible damage.
Do not install or use the appliance if it is damaged.

natural_image
Two stylized human figures pulling a gray rectangular block (no text or symbols)Do not install the appliance in a room where there is a risk of frost. At temperatures close to freezing point, the product may not operate properly. There is a risk of damage if condensed water is allowed to freeze in the pump and hoses.
Remove the transport bolts
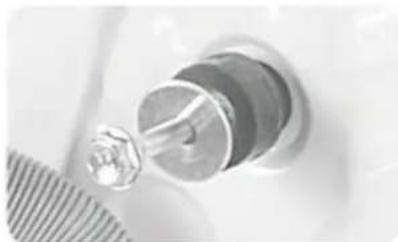
You must remove all the transport bolts from the rear before using your appliance for the first time. Otherwise, the product may produce unusual movement and vibration, as these transport bolts are used to prevent the appliance drum from being damaged during transportation.
Note: Once all transport bolts have been removed, please store them in a safe place for re-installation in case the appliance is transported again.
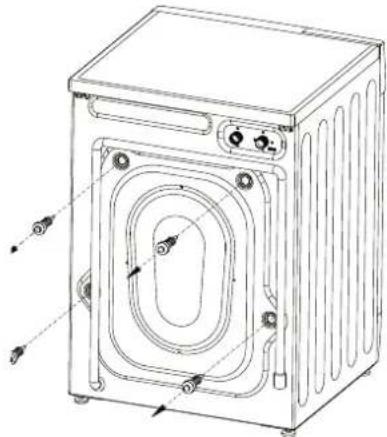
natural_image
Technical line drawing of a front-loading washing machine with internal compartments and mounting holes (no text or labels)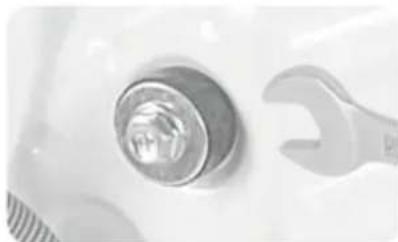
natural_image
Close-up of a white car wheel with a wrench resting on it (no visible text or symbols)Loosen the transport bolts with a spanner.
natural_image
Close-up of a mechanical component with a metallic knob inserted, showing no visible text or symbols.Remove the bolts, including the rubber parts, and save them for possible future use.
natural_image
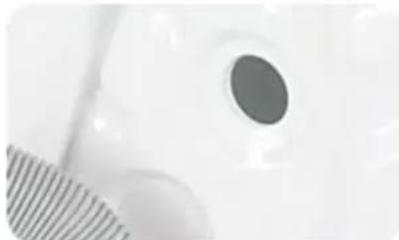
Close-up of a white mechanical component with a circular hole and a striped pattern (no text or symbols visible)Plug the holes with the rubber plugs.
Levelling
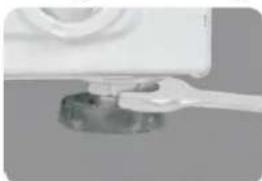
Once you have positioned the appliance in its normal place of operation, make sure that it is completely level. To do this, you should use a spirit level. If the appliance is not completely level, you should adjust the legs according to the following figure:
natural_image
Close-up of a white mechanical component with a metallic handle, possibly a tool or bracket (no visible text or symbols)- Loosen the counter nut
- Turn the foot until it reaches the floor
- Adjust the feet and lock the nuts with a spanner.
Electrical connection
This appliance must be grounded for safety. The power cord of this appliance is equipped with a three-prong plug that fits into a standard three-prong outlet to minimize the possibility of electric shock. Do not, under any circumstances, cut or remove the third grounding prong from the supplied power cord.
Do not cut or remove the third grounding prong of the supplied power cord under any circumstances. This appliance requires a standard 220-240V-50/60Hz three-prong grounded outlet. The cord must be secured behind the appliance and must not be left unattended. appliance and should not be left exposed or dangling, thus avoiding accidents and/or injuries.
Never unplug the appliance by pulling on the power cord. Always grasp the plug firmly and pull it out. Do not use an extension cord with this appliance. If the power cord is If the power cord is too short, have a qualified electrician or serviceman install an outlet near the appliance. The use of an extension cord may adversely affect the performance of the unit.
Water supply connection
To avoid water leaks, please read these instructions carefully.
! WARNING!
Do not kink, crush or modify the supplied water inlet hose on the appliance.
-
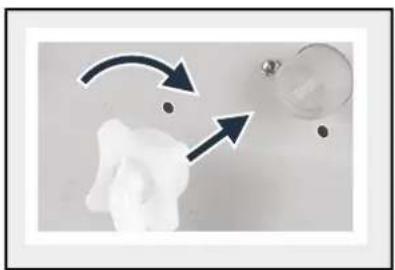
Connect the water supply hose to the water inlet valve and to the cold water tap.
-
Tighten all hose nuts by hand. Never use a tool to tighten the nuts.
natural_image
Close-up of a white object with arrows indicating motion, next to a droplet and ball (no text or symbols)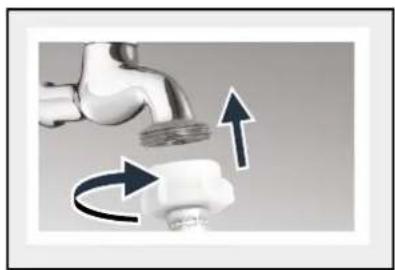
natural_image
Close-up of a faucet with a pipe fitting and a valve, showing directional arrows (no text or symbols)IMPORTANT! Models with a single water inlet must not be connected to the hot water tap. This will damage the laundry in the appliance or may cause a general failure of the appliance.
When you have finished connecting the water connections, please pay special attention to check for leaks at the connection points by opening the taps as much as possible. check for leaks at the connection points by opening the taps as far as possible. If a leak is visible, close the tap and remove the nut. Replace the nut carefully after checking the seal.
Note: Do not use old or used water hoses in your new washing machine, as they may cause stains on your clothes.
Drain hose connection
The end of the drain hose must be connected directly to the drain or sink.
WARNING! Do not kink or lengthen the drain hose, otherwise it may be damaged due to possible water leakage.
If the drain hose comes out of its housing during water drainage, your home could be flooded and you could suffer burns due to the high water temperatures during the washing process. during the washing process. Securely fix the drain hose to avoid these situations and to ensure that the drainage situations and ensure that the water intake and drainage processes take place safely.
There are two ways of attaching the intake end of the drain hose:
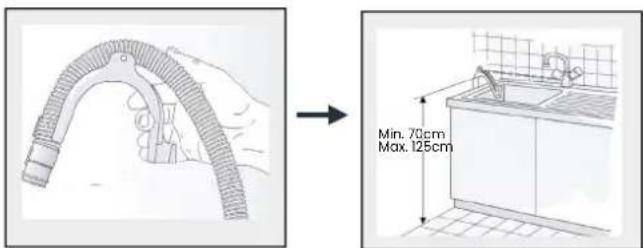
Option 1. Place the end of the drain hose into the sink, using the clamp provided, as shown in the picture.
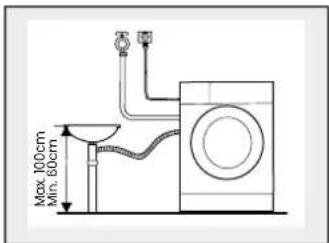
Option 2. Connect the end of the drain hose directly to the sink drain socket, as illustrated in the picture.
Note: In case you connect the drain hose as option 1, To prevent backflow of dirty water into the machine and to facilitate draining, do not immerse the end of the hose into the dirty water and do not insert it into the drain more than 15 cm.
General security information
For your safety and to ensure correct use, before installing and using the device for the first time, please read this user manual carefully, including its tips and warnings. To avoid unnecessary errors and accidents, it is important to ensure that all persons using the device are thoroughly familiar with its operation and safety features. Keep these instructions and ensure that they remain with the device if it is moved or sold, so that all those who use it throughout its lifetime are properly informed about the use and safety of the device.
For the safety of life and property, observe the precautions in these user instructions, as the manufacturer is not liable for damage caused by omission.
Safety of children and vulnerable people
- This appliance can be used by children aged from 8 years and above and persons with reduced physical, sensory or mental capabilities or lack of experience and knowledge if they have been given supervision or instruction concerning use of the appliance in a safe way and understand the hazards involved.
• Children up to 8 years of age can charge and discharge this appliance. - Children should be supervised to ensure that they do not play with the appliance.
- Cleaning and user maintenance shall not be made by children unless they are 8 years of age or older and supervised.
- Keep all containers away from children. There is a risk of suffocation.
- If you are discarding the appliance, pull the plug out of the socket, cut the power cord (as close to the appliance as possible) and remove the door to prevent children from getting an electric shock if it falls or closes.
Electrical connections
- Make sure that the power cord is not trapped by the appliance, as this could damage it.
- Connect the appliance to a grounded socket outlet protected by a fuse that complies with the values in the "Technical specifications" table.
- The installation of the earth connection must be carried out by a qualified electrician.
- Ensure that the machine is installed in accordance with local regulations.
- Water and electrical connections must be carried out by a qualified technician in accordance with the manufacturer's instructions and local safety regulations.
WARNING! Do not use multiple plugs or extension cords.
WARNING! The product must not have an external switching device, such as a timer or be connected to a circuit timer or connected to a circuit that switches on and off regularly.

WARNING!
WARNING!
WARNING!
WARNING!
Do not disconnect the plug from the socket if there are flammable gases nearby.
Never pull out the plug with wet hands.
Always pull the plug, not the cable.
Always unplug the product when not in use.
Unpacking the appliance

WARNING! Packaging material (e.g. film, polystyrene foam) can be dangerous for children.
Risk of suffocation! Keep all packaging out of the reach of children.
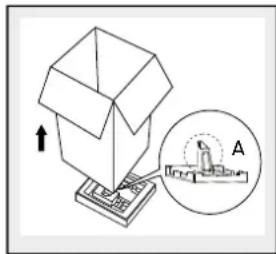
- Remove the cardboard box and the Styrofoam packaging.
- Lift the washer and remove the packaging from the base.
- Make sure to remove the small triangular foam (A) together with the bottom packaging. Otherwise, place the unit on a side surface and remove it manually.
- Remove the tape securing the power cord and drain hose.
- Remove the inlet hose from the drum.
natural_image
Illustration of a cardboard box with an arrow pointing upward, and a magnified inset showing a small circular diagram labeled 'A' (no text or symbols on the diagram itself)Service & Disposal
- Any electrical work required to service the appliance must be carried out by a qualified electrician or competent person.
- This product must be serviced by an authorised Service Centre, and only original spare parts must be used.
natural_image
Symbol of a trash bin crossed with two crossed lines, representing no waste or discharge (no text or labels)
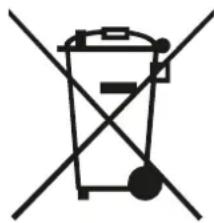
This symbol on the product or on its packaging indicates that this product must not be treated as household waste. Instead, it must be taken to the appropriate collection point for the recycling of electrical and electronic equipment.
By ensuring this product is disposed of correctly, you will help prevent potential negative consequences for the environment and human health, which could otherwise be caused by inappropriate waste handling of this product.
For more detailed information about recycling of this product, please contact your local authorities, your household waste disposal service or the shop where you purchased the product.
Packing materials
Materials with the symbol 🙏 are recyclable. Dispose of the packaging in a suitable collection container for recycling.
Disposal of the device
- Disconnect the plug from the socket.
- Cut the power cord and discard it.
Before first wash cycle
We strongly recommend that before starting a wash cycle for the first time, you remove any residual water that may remain in the washing machine as a result of the tests and quality controls carried out by the manufacturer. From Infiniton we recommend that you start a short wash cycle are clothes.
To do so:
- Open the water inlet tap to the washing machine.
- Close the door.
- Put some detergent, approximately 30 ml. In the detergent compartment.
- Select and start a short programme.
Before each wash
The ambient temperature of the washing machine should be between 5 - 40°C. If used below 0°C, the inlet valve and drain system may freeze and cause damage to the appliance.
If the machine is installed in conditions where there is a risk of freezing, it must be installed immediately in a new location where the ambient temperature is above 5^ C, thus ensuring that the water supply and drain hoses can be thawed before use.
natural_image
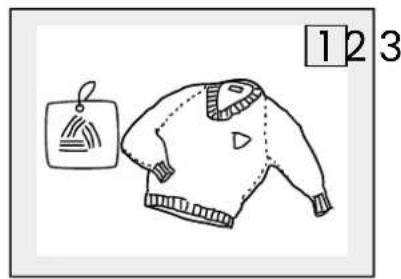
Simple line drawing of a sweater with a tag and label (no text or symbols on the clothing itself)Check clothing care labels.
flowchart
graph TD
    A["Start"] --> B{Processing Step}
    B -->|Yes| C["Packaging"]
    B -->|No| D["End"]
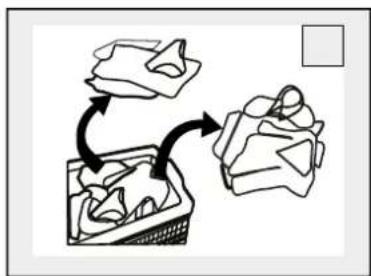
Sort clothes by colour and type of fabric.
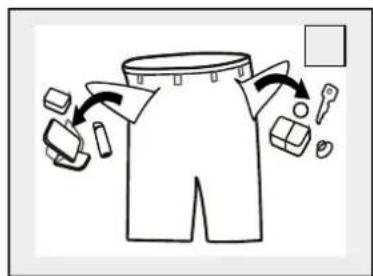
Remove all items that may be contained in pockets of clothing.
natural_image
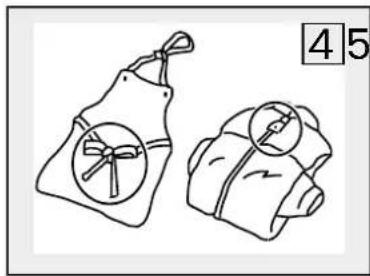
Two handbags with circular designs, one tied with a bow and the other wrapped in a blanket (no text or symbols)Close the zips, buttons and hooks. Loose belts and ties should be tied.
natural_image
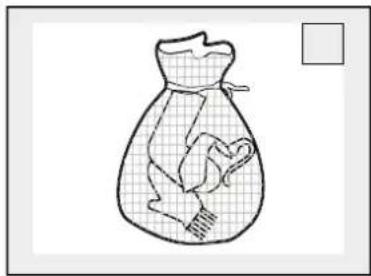
Simple line drawing of a bag with a rope tied around it, no text or symbols present.Place small garments (stockings, belts...) and garments with hooks (bras) in a special fabric bag.
natural_image
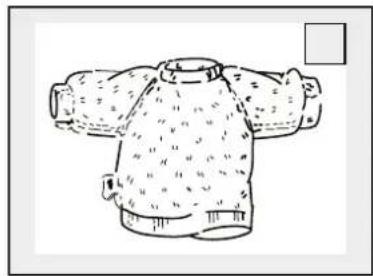
Line drawing of a knitted sweater with shoulder-length sleeves (no text or symbols)Wash long-haired garments and garments that are susceptible to susceptible to pilling, inside out.
WARNING! Do not put clothes that have been in contact with combustible or flammable substances such as wax, oil, paint, petrol, alcohol, paraffin and other flammable materials into the washing machine.
WARNING! Washing loose laundry can create an imbalance in the drum. Always wash more than one laundry item to make the spinning run smoothly.
Note: Refer to the laundry care labels and detergent usage instructions before washing. Use a non-foaming or low sudsing detergent suitable for machine washing properly.
Clothing care labels
The following icons provide care instructions for each garment. The garment label contains symbols for washing, bleaching, drying and ironing, or dry cleaning if necessary. Follow the instructions on the label to prolong the life of the garment and reduce laundry problems.
Washing
Boil wash at 95°C
Colour wash at 60°C
Colour and delicate wash at 60°C
Colour wash at 40°C
Gentle wash at 40°C
Very gentle wash at 40°C
Delicate wash at 30°C
Gentle delicate wash at 30°C
Very gentle delicate wash at 30°C
Hand wash
Do not wash
Note: The number shown in the drawing specifies the maximum wash temperature in degrees Celsius which must not be exceeded.
Drying
Tangible drying/drying at 80°C normal
Tumble dry/ tumble dry at 60°C gentle
Do not tumble dry
Line drying
Line drip dry
Flat tumble drying
F□drip-drying
Line drying in the shade
Imine drip-drying in the shade
Horizontal shade drying
Horizontal drip-drying in the shade
Note: The dots indicate the drying level of the tumble dryer and the lines indicate the type and position of drying.
Ironing
lrring at a max. temperature of 200°C.
Ironing at a max. temperature of 150^ C.
Ironing at a max. temperature of 100^ C.
Do not iron
Note: The dots indicate the ranges of ironing temperature ranges (regulator, steam, travel irons and ironing machines)
Bleach
Any type of bleach
Oxygen bleach only
Do not use bleach
Note: Do not use more detergent than recommended by the product manufacturer.
Note: Use stain and bleach removers before the washing cycle and only when necessary.
Note: Save water and electricity by always loading the washing machine to the maximum load (the exact amount of laundry depends on the depends on the programme used).
Prepare the laundry
The first step to be taken before starting the washing process is to separate the laundry as follows as follows:
- Fabric type. Pay attention to clothing labels:
Cotton, blended fibres, delicate fabrics, synthetics, wool and hand-washed garments.
• Color
Separate coloured and white linen. Wash new coloured linen separately.
- Loading clothes into the washing machine
Wash clothes of different sizes in the same load, distributing all the laundry evenly inside the drum, thus improving washing efficiency.
- Delicate clothing
Wash small garments (nylon stockings, belts...) and garments containing any kind of hooks, e.g. bras, in a cloth bag or a pillowcase with a zip. In case you want to wash curtains, always remove the rings and hooks.
• Empty all pockets
Coins, safety catches... They can damage clothing and the inside of the appliance.
- Locks
Close zips, buttons and hooks. Loose belts and ties should be tied.
- Remove stubborn stains
Stains such as egg, blood, milk, coffee, etc. can be removed with the help of a product which should be applied to the stained area before putting into the washing machine. Stain remover can also be added to the detergent dispenser.
• Tints
Use only dyes suitable for use in washing machines and follow the manufacturer's instructions carefully. There are parts of the washing machine that can be stained by dyes.
- Put the laundry inside the washing machine.
Adding detergents and additives
Use low sudsing and efficient detergents in front-loading washing machines.
The choice of detergent will depend on:
type of fabric (cotton, silk, mixed fabrics, wool...), colour, washing temperature and degrees and types of soiling.
Detergent dispenser (normal)
Prelwash
Detergent
Softener
Press this button to remove the dispenser
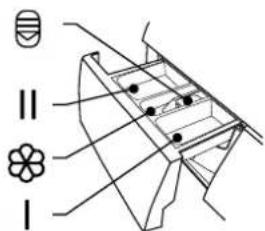
Note: It is only necessary to add detergent in "compartment I" after selecting the prewash function.
Detergent auto dispenser AutoDosing (If it has)
Detergent compartment
Softener compartment
Powdered detergent compartment
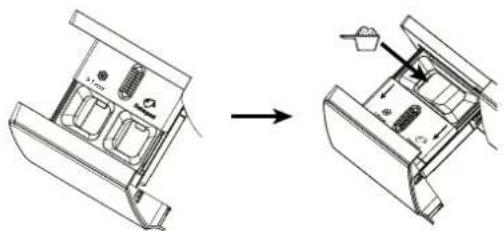
natural_image
Technical line drawing showing a device interior with labeled parts and an arrow indicating transformation (no text or symbols present)Recommendations for a good use of detergent
| Reccomended detergent Wash cycles Wash Temp. Fabric type | |||
| Intensive use with bleaching agents and optical brighteners. | Cotton, ECO 40-60, Mix, Jeans, Intensive. | 20/30/40/60 White clothes made of boil-proof cotton or linen. | |
| Coloured detergent without bleach and optical brighteners. | Cotton, ECO 40-60, Mix, Jeans, Intensive. | Frío/20/30/40 Coloured clothes made of cotton or linen. | |
| Coloured or mild detergent without optical brighteners. | Synthetic. Frío/20/30/40 colourful garments | made of easy-care fibres or synthetic materials. | |
| Mild washing detergent. Synthetic 20/30 Delicate clothes, silk, viscose. | |||
| Specially designed for wool. Wool 20/30 Wool | |||
Note: The detergent or additive can be diluted in a little water before pouring it into the detergent dispenser to avoid blocking the detergent inlet and causing water overflow. Choose the right type of detergent for optimal washing performance and minimum water and energy consumption. To achieve the best result, proper detergent dosage is important. Use a reduced amount of detergent if the drum is not completely full.
Always adjust the amount of detergent to the hardness of the water, if the tap water is soft, use less detergent. Dose according to how dirty your laundry is, less dirty laundry requires less detergent.
The following symptoms are a sign of detergent overdose:
- Foaming.
- Poor washing and rinsing results.
The following symptoms are a sign of insufficient detergent dosage:
- Grey linen.
- build-up of limescale deposits on the drum, heating element and/or laundry.
Remarks:
White stains on dark fabrics are caused by insoluble compounds currently used in some phosphate-free powder detergents. If this occurs, shake or brush the fabric or use liquid detergents. Use only detergents and additives specifically manufactured for household washing machines.
When using descalers, dyes or bleaches during prewashing, make sure that they are suitable for domestic washing machines. Descalers may contain components that can damage your washing machine. Do not use solvents (turpentine, benzine...). Do not wash fabrics that have been treated with solvents or flammable liquids.
Dosing:
Follow the detergent manufacturer's dosage recommendations carefully.
It will depend on:
• Degree and type of soiling.
- Amount of laundry. Follow the detergent manufacturer's instructions for full loads; half load: 3/4 of a full load; minimum load (approx. 1 kg): 1/2 of a full load.
• Water hardness in your area. Soft water requires less detergent than hard water.
Twist and go!
Normally washing machines come with dozens of programmes, and Infiniton does too, but the reality is that we only use 3 of them. Synthetic, cotton and 30/40 degrees. That's why simplifying things is thinking about the customer. We assure you that our seniors will appreciate the efficiency and simplicity. Put Roll&Play in your life. Turn the wheel, press play and that's it. Your clothes will be washed to perfection depending on the time you have available.
Roll&Play
What's Roll&Play technology?
Introducing the easiest to use Milelectric washing machines. Infiniton washing machines with Roll&Play technology are essentially the solution to do the laundry quickly and optimally.
At Milelectric we have a clear philosophy; technology should be within everyone's reach to improve our lives. An accessible and non-exclusive good.
Roll&Play, a child's game!
With Roll&Play technology in Milelectric washing machines, doing the laundry will be easier than ever. This technology helps you to program the washing machine in an intuitive way so that you don't have any problems in your day-to-day life. Select the temperature and type of fabric depending on the clothes you are going to wash, so you can be sure that your clothes will be perfect.
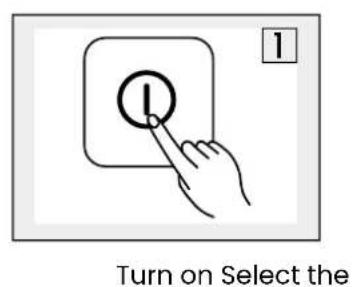
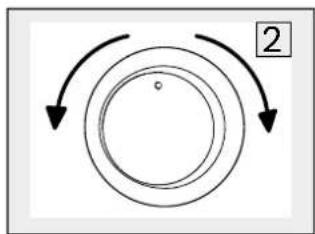
flowchart
graph TD
    A["Top Circle"] --> B["Bottom Circle"]
    B --> C["Bottom Right Arrow 2"]
the right programme
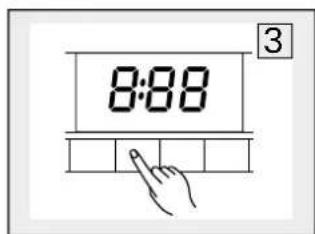
Select the function or keep the default settings
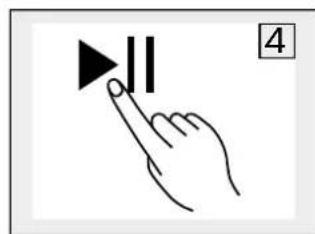
Press Start/Pause to start the programme
Why Roll&Play is essential?
Milelectric simplifies your life with our washing machines. These washing machines develop the best technology to make your life much easier.
Doing the laundry is no longer a chore. Make Roll&Play and spend your time on the things that really matter. These washers not only take care of your most delicate clothes, they also protect everyday fabrics and textures.
Product parts
Due to technological innovations, the product description in this manual may not completely match your appliance. More detailed information corresponds to the final product.
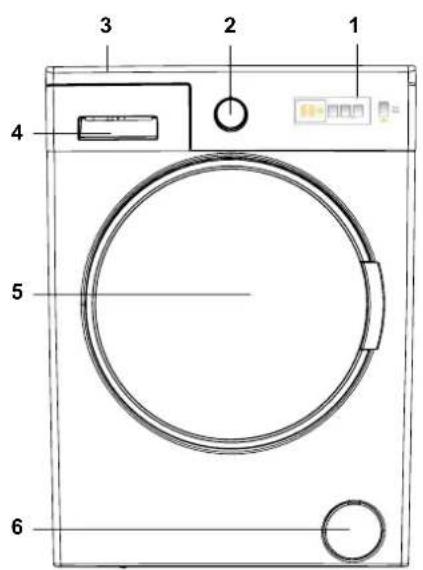
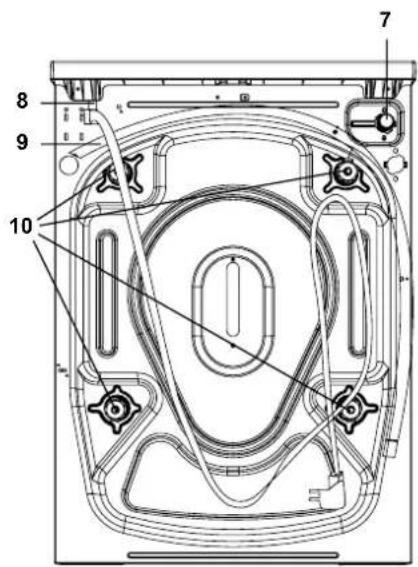
| 1 D | splay |
| 2 | Programme selector |
| 3 | Top tray |
| 4 | Detergent compartment |
| 5 | Drum |
| 6 | Pump filter cover |
| 7 | Water inlet valve |
| 8 | Power cable |
| 9 | Discharge hose |
| 10 | Transport bolts |
| Product dimensions (height x width x depth) 845 x 597 x 527mm | |
| Maximum load capacity (Kg) 8 | |
| Rated voltage and frequency 220-240V ~ 50Hz | |
| Rated current 10A | |
| Total power (W) 2100 | |
| Water pressure (Mpa) Máxima (1Mpa) Mínima (0.1Mpa) | |
| Number of programmes 15 | |
| Spin speed (rpm) 1200rpm | |
Control panel
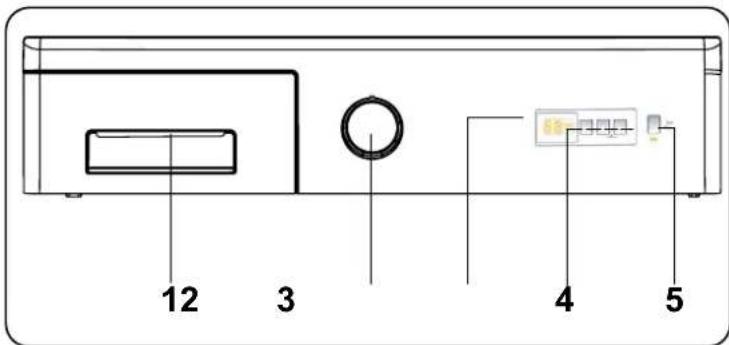
| 1 | Detergent compartment |
| 2 | Programme selector |
| 3 | Control panel |
| 4 | Additional functions button |
| 5 | Start / pause button |
Programme selector
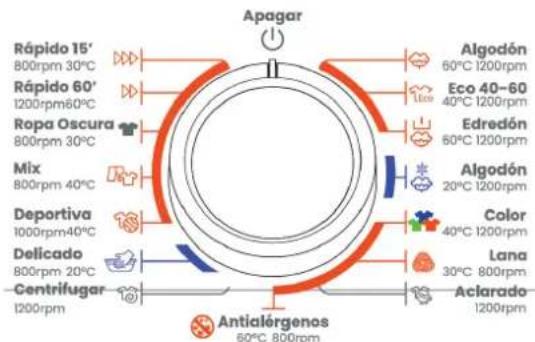
- To select the desired programme, turn the programme selector clockwise or anticlockwise until the marker on the programme selector is on the desired programme.
- Make sure that the programme selector is set to the desired programme.
Panel de mandos
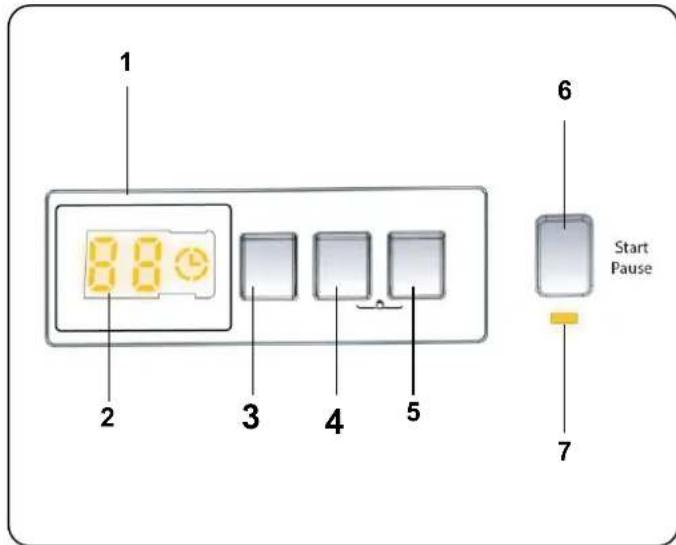
| 1 | Electronic display |
| 2 | LED panel* |
| 3 | Water temperature adjustment button |
| 4 | Spin speed setting (RPM) |
| 5 | Additional delayed start function |
| 6 | Start/Pause button |
| 7 | Start/Pause indicator LED |
*The LED panel shows the delayed start of washing (if set), selected temperature, the selected spin speed and the spin speed. --" is displayed after the selected programme the selected programme is finished. The panel also indicates if a fault has occurred in the machine.
Additional functions
Half-load detection (if the model has it)
Some models may have a half load detection system. If you put less than half of the maximum load of laundry in the machine, the machine will automatically activate the half load function, regardless of the programme you have selected. automatically activates the half load function, regardless of the programme you have selected. This means that the selected programme will be completed in less time and will consume less electricity and water. electricity and water consumption.
Temperature selection
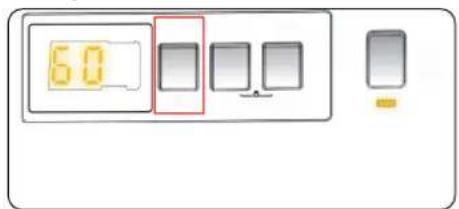
Use the Wash Water Temperature Adjustment button to change the automatically programmed wash water temperature. When you select a programme, the maximum temperature for that programme is automatically selected. To adjust the temperature, press the water temperature adjustment button until the desired temperature is displayed on the digital display.
You can gradually reduce the wash water temperature between the maximum wash water temperature for the selected programme and cold wash selections (- C) by pressing the temperature adjustment button.
If you have skipped the wash water temperature you want to select, keep pressing the Wash Water Temperature Adjustment button until the desired temperature is displayed again.
Spin speed selection
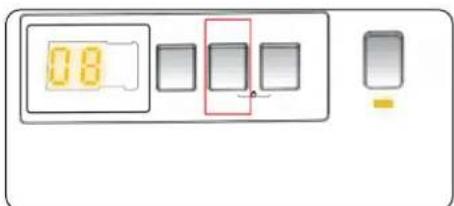
When you select a programme, the maximum spin speed is automatically selected. To adjust the spin speed between maximum spin speed and cancel spin (--) options, press the Spin Speed button until the desired speed is displayed. If you have missed the spin speed you wanted to select, keep pressing the Spin Speed Adjustment button until the desired spin speed is displayed again.
Delayed start
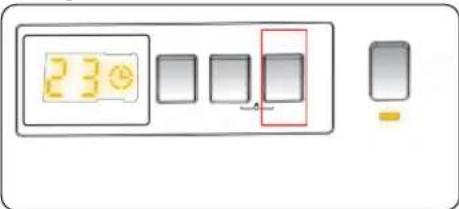
You can use this auxiliary function to delay the start time of the wash cycle from 1 to 23 hours.
To use the delay start function:
- Press the delay key once.
- 01" will be displayed. A clock icon will light up on the display.
- Press the Delayed Start key until the time you want the machine to start the wash cycle arrives.
- If you have skipped the Delayed Time you want to set, you can keep pressing the Delayed Start key until you reach that time again.
- To use the Delayed Time function, you must press the Start/Pause key to start the machine.
- If you want to cancel the delayed start:
- If you have pressed the Start/Pause key to start the machine, you only need to press the Delay key once. The clock icon will go off on the display.
- If you have not pressed the Start/Pause key, press the Delay Start key continuously until the clock icon goes off.
Start/Pause button
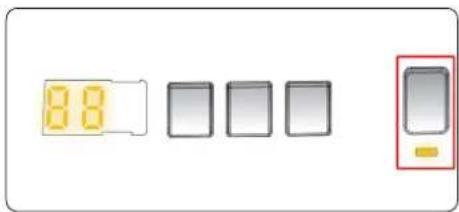
To start the selected programme, press the Programme Start/Pause button.
If you activate the standby mode of the machine, the Start/Pause indicator will flash.
Child Lock
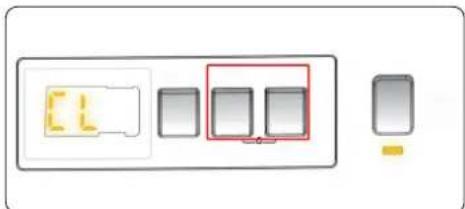
If any button is pressed while the child lock is active or the programme selected on the programme selector is changed, the "CL" symbol will flash on the electronic display for 2 seconds.
If the child lock function is active and a programme is in progress, when the programme selector is set to the CANCEL position and another programme is selected, the selected programme continues from the point where it was.
To deactivate the child lock function, press and hold buttons 2 and 3 at the same time for at least 3 seconds until the "CL" symbol disappears from the electronic display.
Canceling a programme
To cancel a programme in progress at any time:
Set the programme selector to the "OFF" position.
The machine will stop the washing operation and the programme will be cancelled.
Set the programme selector to any other programme to drain the water from the machine.
The machine will perform the necessary draining operation and cancel the programme.
Then you can select and run a new programme.
End of programme
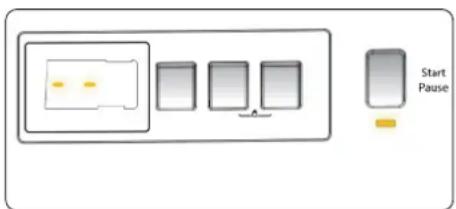
The machine will stop by itself at the end of the selected programme.
- The message “- -” will be flashing on the display.
- You can open the machine door and take out the laundry.
- Leave the machine door open so that the inside of the machine can be dried.
- Turn the programme selector to OFF position.
- Unplug the machine.
- Turn off the water tap.
Programmes table
| Programme W | Washing Temp. (°C) | Centrif. (rpm) | Max. laundry load | Deter-gent drawer | Duration from Program-me (min) | Type of clothing |
| Algodón *60-90- | 80-70-40 | 400-600-800-1000-1200 | 8 2 235 | Heavily soiled cotton and linen garments (underwear, linen, tablecloth, towel max. 4.0 kg, bed linen, etc.). | ||
| Eco 40-60 *40-60 | 400- | 600-800-1000-1200 | 8 2 218 | Soiled cotton and linen garments (underwear, linen, tablecloth, towel max. 4.0 kg, bed linen, etc.). | ||
| Edredón *60-50- | 40-30 | 400-600-800-1000-1200 | 8 1-2 164 | Soiled cotton and linen garments (underwear, linen, tablecloth, towel max. 4.0 kg, bed linen, etc.). | ||
| Algodón 20°C *20 | 400- | 600-800-1000-1200 | 4 2 96 | Lightly soiled cotton and linen garments. Underwear, bed linen, sheets, tablecloth, towel (max. 2.0 kg), bed linen, etc.). | ||
| Color *40-30 400- | 600-800-1000-1200 | 8 2 230 | Lightly soiled cotton and linen garments. Underwear, bed linen, sheets, tablecloth, towel (max. 4.0 kg), bed linen, etc.). | |||
| Lana *30 400- | 600-800 | 2,5 2 43 | Woollen clothing with a label indicating that it is machine washable. | |||
| Aclarado -- 400- | 600-800-1000-1200 | 8 -- 30 | Provides an additional rinse to any type of laundry after the wash cycle. | |||
| Antialérgenos *60-50-40-30 | 400-600-800 | 4 2 197 | Baby clothes | |||
| Centrifugar | -- | 400-600-800-1000-1200 | 8 -- 17 | You can use this programme for any type of laundry if you want an additional spin step after the washing cycle. / You can use the drain programme to drain the water accumulated inside the machine (add or remove laundry). To activate the drain programme, turn the timer to spin/drain programme position. After selecting "spin cancelled" with the auxiliary function key, the programme will start to run. | ||
| Delicado | *30 400- | 600-800 | 2,5 2 90 | Clothes recommended for hand wash or delicate clothes. | ||
| Deportiva *40-30 | 400- | 600-800-1000 | 3,5 2 110 | Heavily soiled or synthetic-blend clothing (synthetic-blend trousers, T-shirts, shirts, nylon socks, etc.). | ||
| Mix | *40-30 400-600-800 | 3,5 2 105 | Soiled cotton, linen, synthetic and coloured laundry can be washed together. | |||
| Ropa oscura | *30 400- | 600-800 | 3,5 2 96 | Black and dark items made of cotton, mixed fibre or jeans. Wash inside out. Jeans often contain excess dye and may run during the first few washes. Wash light and dark coloured items separately. | ||
| Rápido 60' | *60-50-40-30 | 400-600-800-1000-1200 | 4 2 60 | Soiled cotton, linen and coloured garments washed at 60°C in 60 minutes. | ||
| Rápido 15' *30 400- | 600-800 | 2 | 2 15 | In as little as 15 minutes, you can wash lightly soiled cotton, coloured and linen fabrics.. |
NOTE: PROGRAMME DURATION MAY VARY DEPENDING ON THE LOAD VOLUME, WATER SUPPLY, AMBIENT TEMPERATURE AND ADDITIONAL FUNCTIONS SELECTED.
(*) The programme wash water temperature is the factory default.
(**) Due to the short washing time of this programme, we recommend using less detergent. The programme may take more than 15 minutes if the machine detects uneven load. You can open the door of the machine once two minutes have elapsed after a washing operation has been completed (the two-minute period is not included in the programme duration).
According to the regulations 1015/2010 and 1061/2010, programme 1 and programme 2 are respectively "Standard 60°C cotton programme" and "Standard 40°C cotton programme".
The Eco 40-60 programme allows washing cotton laundry with normal soiling considered washable at 40^ or 60^ , in the same cycle, and this programme is used to assess compliance with EU legislation on eco-design.
Consumos
| Programme No- minal capaci- ty Kg. | Energy consumption kWh/cycle | Duration of the pro- gramme Hours: Minutes | Water consumption Litres/cycle | Tem. Máx. °C Rem | aining humidi- ty level %1200rpm | ||||||||||
| Capac. Nom. | 1/2 Load | 1/4 Load | Capac. Nom. | 1/2 Load 1/4 carga | Capac. Nom. | 1/2 Load | 1/4 Load | Capac. Nom. | 1/2 Load | 1/4 Load | Ca- pac. Nom. | 1/2 Load | 1/4 Load | ||
| Algodón 90 | 8 2,38 | 03:07 8 | 2 81 53% | ||||||||||||
| Algodón 60 | 8 1,1 0 | 3:55 82 | 48 53% | ||||||||||||
| Eco 40-60 | 8 | 1,16 | 0,61 | 0,33 | 03:38 | 02:48 | 02:48 | 54 | 43 | 43 | 49 | 36 | 22 | 53% | 53% |
| Deportiva | 3,5 | 0,56 | 01:50 | 50 | 42 | 62% | |||||||||
| Rápido 60 | 4 | 1,02 | 01:00 | 34 | 58 | 53% | |||||||||
| Algodón 20 | 4 | 0,2 | 01:36 | 43 | 20 | 53% | |||||||||
• The most energy-efficient programmes are generally those that run at lower temperatures and for longer durations.
- Loading the household washing machine to the capacity indicated by the manufacturer for each programme will help to save energy and water.
- Programme duration, energy consumption and water consumption levels may vary depending on the weight and type of wash load, additional functions selected, water and ambient temperature.
- It is recommended to use liquid detergent for low temperature washing programmes. The amount of detergent used may vary depending on the amount of laundry and the degree of soiling. Please follow the detergent manufacturers' recommendations on the amount of detergent to be used.
- Noise and remaining moisture level depend on the spin speed. The higher the spin speed, the higher the noise and the lower the remaining moisture level.
• You can access the product database where the model information is stored by scanning the QR code on the energy label.
Important information
Use detergents, softeners and other additives suitable for automatic washing machines only. Excessive foam has occurred and the automatic foam absorption system has been activated due to excessive use of detergent.
We recommend periodic cleaning of the washing machine every 2 months. For periodic cleaning, use the Drum Cleaning programme. If your machine does not have Drum Cleaning programme, use Cotton-90 programme. When necessary, use descalers made specifically for washing machines.
Never try to open the door when the machine is running. You can open the door of your machine 2 minutes after the completion of a washing operation. *
Never try to open the door when the washer is running. The door will open right after the washing cycle is finished. *
Installation and repair procedures should always be carried out by an authorized service agent to avoid possible hazards. The manufacturer will not be held responsible for any damage caused as a result of a procedure performed by an unauthorised person.
(*) Specifications may vary depending on the machine purchased.
WARNING! Before cleaning, unplug the power plug first; do not connect or disconnect the power plug with wet hands, as there is a risk of electric shock and injury.
Do not spill water directly on the appliance, thus avoiding rust, electricity leakage and accidents.
Regular cleaning of this appliance helps to prolong its life.
External cleaning
Clean dust accumulated on the surface of the appliance frequently.
After using detergent, be sure to rinse it with clean water and then wipe it dry with a cloth.
Note: Never use metal scouring pads as this may damage painted, chrome and plastic surfaces.
WARNING! Do not use bristle brushes, wire brushes, detergent, soap powder, alkaline detergent, benzene, gasoline, acid, hot water and other corrosive or soluble elements to clean the surface of the appliance, door gasket, plastic decorative parts, etc. to avoid damage. Carefully dry the door gasket, clean the groove with a wooden stick wrapped with cotton thread.
Cleaning the door
Clean the glass and door gasket after each wash to remove possible lint and/or detergent/softener residues, as leaks may occur.
If any rust stains are found inside the drum, they should be removed with non-chlorine detergent.
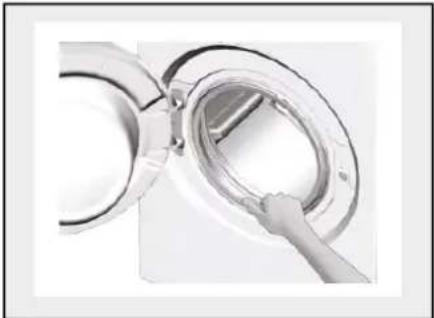
natural_image
Close-up of a hand inserting a circular component into a transparent ring (no text or symbols visible)Cleaning of the detergent dispenser
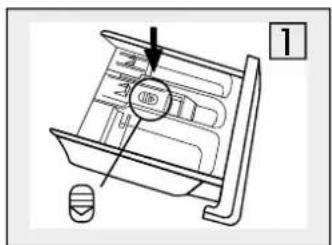
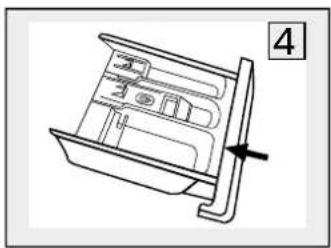
- Open the detergent dispenser, press the locking mechanism and pull out the dispenser completely from the opening.
- Clean the dispenser with plenty of water to remove detergent and fabric softener residues.
- Clean the dispenser shaft with a soft brush.
- Insert the dispenser into the recess until the locking mechanism clicks.
natural_image
Technical line drawing of a mechanical component with no visible text or symbols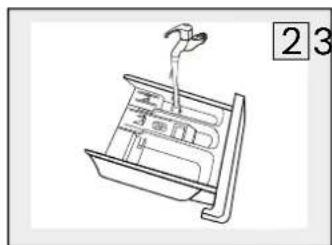
natural_image
Line drawing of a mechanical device with a lever and housing (no text or symbols)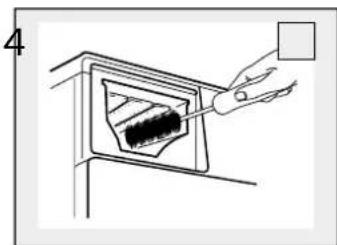
natural_image
Illustration of a hand inserting a small object into a device (no text or symbols visible)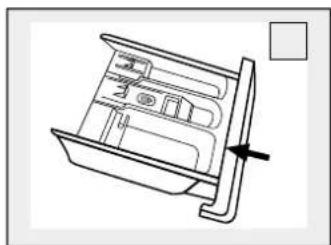
natural_image
Technical line drawing of a mechanical device with internal compartments and a handle (no text or symbols)Important! Depending on the model, the locking mechanism of the detergent dispenser may vary in symbol and location. The above figure is for reference only.
Note: Do not use abrasive or caustic type agents to clean the plastic parts.
Note: Perform a thorough cleaning of the detergent dispenser, following the above steps, at least once a month to ensure normal operation of the appliance.
Cleaning the inlet water filter
Note: If you notice a decrease in water flow, this is a sign that the filter needs to be cleaned.
- Close the tap and remove the water supply hose from the tap.
- Clean the filter with a brush.
- Unscrew the water supply hose from the back of the machine. Remove the filter with long nose pliers.
- Use a brush to clean the filter.
- Reinstall the filter in the water inlet and reconnect the water supply hose.
- Clean the inlet filter every 3 months to ensure normal operation of the appliance.

Cleaning the drain pump filter
Note: Make sure that the machine has finished the washing cycle and is empty. Turn off the machine and unplug it before cleaning the drain pump filter.
Important! Be careful with hot water. Let the water cool down. Risk of scalding.
- Open the bottom cover, located on the front of the washing machine.
- Open the filter by turning it anticlockwise.
- Carefully remove all foreign bodies inside.
- Reinsert the filter by turning clockwise and close the lid.

flowchart
graph TD
    A["1: Open"] --> B["2: Rotating"]
    B --> C["3: Pressing"]
    C --> D["4: Clicking with key inserted"]
Note: Clean the filter periodically every 3 months to ensure normal operation of the appliance.
Important! When the appliance is in use and depending on the selected programme, there may be hot water in the pump.
Never remove the pump cover during a washing cycle. always wait until the appliance has finished the cycle and is empty. When replacing the lid, make sure that it is tightened securely.
Troubleshooting
Whenever there is a problem with the appliance, check if you can solve it by following the tables below. If the problem persists, contact customer service.
| DESCRIPTION POSSIBLE CAUSE SOLUTION | ||
| Washing machine does not start | The door is not closed properly. Clothes get stuck | Check if the laundry is not correctly positioned. Close the door tightly and restart the machine. |
| Door does not open | The child lock may be activated (if available) | Disconnect from the mains and restart. |
| Small water leaks Water connections and drain hose | Check and secure the hose to the water inlet hose and water inlet hose and clean the water outlet hose. | |
| Detergent residue in the dispenser | The detergent is wet and/or coagulated. In most cases this is usually due to the use of powder detergent. | Clean the detergent dispenser |
| Display does not work (If the model has a display) | Connection problem with the main board. | Disconnect from the mains and check that the mains plug is connected correctly. |
| Abnormal noise | The transport bolts have not been removed. The floor is unlevel . | Check whether all transport bolts have been correctly removed. Make sure that the appliance is level with the help of a level. |
| La ropa tiene restos de detergente. | Puede que con algunos deter- gentes aparezcan en la ropa partículas de detergente no disueltas en forma de puntos blancos. | Realice un aclarado adicional o limpie la ropa con un cepillo una vez que se haya secado. |
| Hay puntos grises en la colada. Hay aceite no tratado, crema o ungüento en la colada. | En el próximo lavado utilice la cantidad de detergente indica- da en el envase. | |
| El ciclo de centrifugado no se realiza o se realiza después de lo esperado. | No es un fallo. Se ha activado el sistema de control de carga no homogénea. | El sistema de control de carga no homogénea intentará distribuir la ropa. El ciclo de centrifugado comenzará una vez que la ropa se haya distribuido. En el próximo lavado distribuya la ropa de forma homogénea en el interior del tambor. |
Error code list
| DESCRIPTION POSSIBLE CAUSE SOLUTION | ||
| Er 01 | The door has not closed properly Close the | the machine properly until you hear a clicking sound. If the fault on the machine does not disappear, switch off the machine, unplug it and contact the nearest authorised service agent immediately. |
| Er 02 | Water pressure or water level inside the machine could be low. | Check that the tap is fully open. The water supply may have been cut off. If the problem does not disappear, the machine will stop automatically after a certain period of time. Switch off the machine, close the tap and contact the nearest authorised service agent. |
| Er 03 | The pump or the electrical connection of the pump is defective or the pump filter is clogged. | Clean the pump filter. If the problem does not disappear, contact the nearest authorized service agent. (*) |
| Er 04 | The machine has too much water. The machine will drain the water by itself. Once the water is drained, switch off the machine and unplug it. Turn off the tap and contact the nearest authorised service agent. | |
(*) See the chapter on maintenance and cleaning of the machine.

MiLECTRIC
Máquina de lavar roupa
natural_image
Front view of a MG ELECTRIC washing machine with control panel and side door (no visible text or symbols on the device itself)LV-8D20
ean: 8445639000199
natural_image
Simple line drawing of a mechanical setup with a block, circular components, and a cross mark (no text or symbols)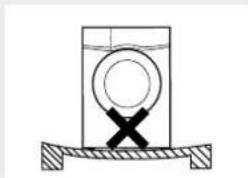
natural_image
Simple line drawing of a container with a cross mark on a base, no text or symbols present.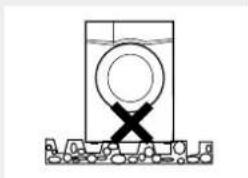
natural_image
Simple line drawing of a washing machine with a circular component and cross symbol (no text or labels)
Transporte
natural_image
Two stick figures carrying a large gray rectangular object, no text or symbols presentnatural_image
Technical line drawing of a washing machine with mounting holes and control knobs (no text or labels)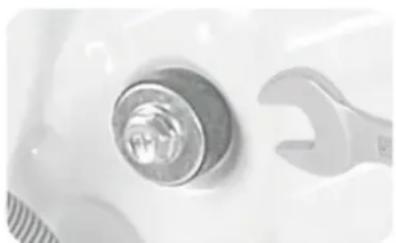
natural_image
Close-up of a mechanical component with a wrench and circular head (no visible text or symbols)natural_image
Close-up of a mechanical knob or knob component with a metallic handle and textured base (no visible text or symbols)natural_image
Close-up of a white object with a circular hole and a striped pattern, no visible text or symbols.natural_image
Close-up of a white object with two arrows pointing to a droplet and a small sphere, no text or symbols visible.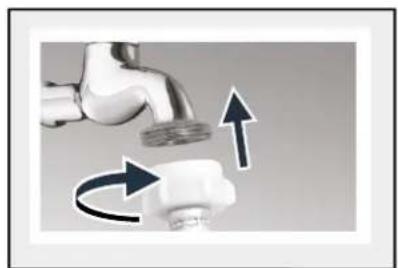
natural_image
Close-up of a faucet with a pipe fitting and directional arrows indicating flow or movement (no text or symbols)natural_image
Illustration of a box with an arrow pointing upward, next to a magnified inset showing a building labeled 'A' (no text or symbols on the main diagram)natural_image
Symbol of a trash bin crossed out by two crossed lines (no text or labels)
natural_image
Simple line drawing of a sweater with a tag and label (no text or symbols on the sweater itself)natural_image
Two handbags with circular designs, one wrapped in a bow tie and the other in a segmented pattern (no text or symbols)natural_image
Simple line drawing of a money bag with a small animal inside, no text or symbols present.natural_image
Line drawing of a knitted sweater with shoulder-length sleeves (no text or symbols)natural_image
Technical line drawing showing a device interior with a component being removed (no text or symbols present)• The most energy-efficient programmes are generally those that run at lower temperatures and for longer durations.
- Loading the household washing machine to the capacity indicated by the manufacturer for each programme will help to save energy and water.
- Programme duration, energy consumption and water consumption levels may vary depending on the weight and type of wash load, additional functions selected, water and ambient temperature.
- It is recommended to use liquid detergent for low temperature washing programmes. The amount of detergent used may vary depending on the amount of laundry and the degree of soiling. Please follow the detergent manufacturers' recommendations on the amount of detergent to be used.
- Noise and remaining moisture level depend on the spin speed. The higher the spin speed, the higher the noise and the lower the remaining moisture level.
• You can access the product database where the model information is stored by scanning the QR code on the energy label.
natural_image
Close-up of a hand holding a transparent ring with a metal object, partially enclosed by a metallic ring (no text or symbols visible)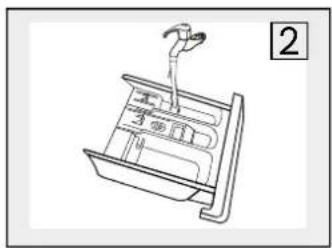
natural_image
Line drawing of a mechanical device with a handle and base plate (no text or symbols)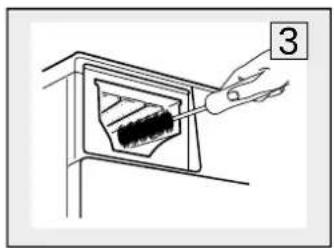
natural_image
Technical line drawing of a mechanical component with an arrow indicating direction (no text or symbols)natural_image
Diagram of a faucet with rotating valve mechanism (no text or symbols)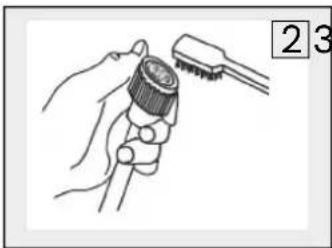
natural_image
Illustration of a hand holding a tool with a brush and a circular component, labeled with numbers 2 and 3 (no text or symbols on the diagram itself)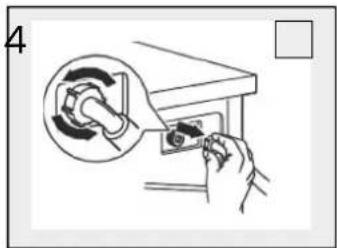
natural_image
Illustration of a hand using a tool to adjust or install a component, with no visible text or symbols.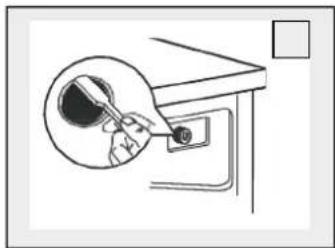
natural_image
Simple line drawing of a hand inserting a circular component into a device (no text or symbols)natural_image
Simple line drawing of a mechanical component with a circular feature and an arrow indicating rotation (no text or symbols)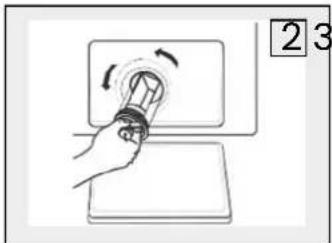
natural_image
Hand holding a light bulb with rotating button, placed on a device (no text or symbols visible)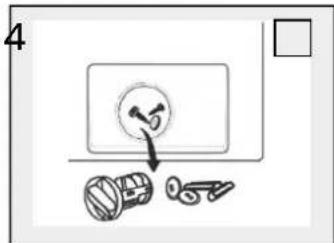
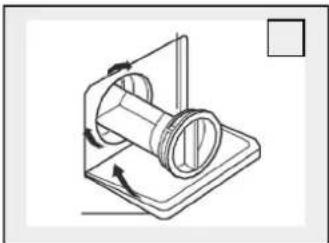
natural_image
Technical line drawing of a mechanical assembly with rotating components (no text or symbols)¿Necesitas ayuda?
natural_image
Silhouette icon of a person wearing a headset with a crossed wrench symbol (no text or numbers)

MiLECTRIC
TÉRMINOS Y REGISTRO DE GARANTÍA
- Transporte
- Location
- Transport
- Remove the transport bolts
- Levelling
- Electrical connection
- Water supply connection
- ! WARNING!
- Drain hose connection
- General security information
- Safety of children and vulnerable people
- Electrical connections
- Unpacking the appliance
- Service & Disposal
- Packing materials
- Disposal of the device
- Before first wash cycle
- Before each wash
- Clothing care labels
- Washing
- Drying
- Ironing
- Bleach
- Prepare the laundry
- Adding detergents and additives
- Detergent dispenser (normal)
- Detergent auto dispenser AutoDosing (If it has)
- Recommendations for a good use of detergent
- Remarks:
- Dosing:
- Twist and go!
- What's Roll&Play technology?
- Roll&Play, a child's game!
- Why Roll&Play is essential?
- Product parts
- Control panel
- Programme selector
- Panel de mandos
- Additional functions
- Half-load detection (if the model has it)
- Temperature selection
- Spin speed selection
- Delayed start
- Start/Pause button
- Child Lock
- Canceling a programme
- End of programme
- Important information
- External cleaning
- Cleaning the door
- Cleaning of the detergent dispenser
- Cleaning the inlet water filter
- Cleaning the drain pump filter
- Troubleshooting
- Error code list
- MiLECTRIC
- ¿Necesitas ayuda?
- TÉRMINOS Y REGISTRO DE GARANTÍA
Brand : Milectric
Model : LV-8D20
Category : Washing machine