
TE-RO 55 - Sander EINHELL - Free user manual and instructions
Find the device manual for free TE-RO 55 EINHELL in PDF.


| Product Type | Random Orbital Sander |
| Model | TE-RO 55 |
| Brand | Einhell |
| Power Input | 300 W |
| No-Load Speed | 6000 - 12000 min⁻¹ |
| Orbit Diameter | 2.5 mm |
| Sandpaper Size | 150 mm (hook-and-loop) |
| Dust Extraction | Integrated dust bag (microfilter) + external vacuum adapter |
| Power Supply | 230 V ~ 50 Hz |
| Weight | 1.5 kg |
| Dimensions (L x W x H) | 220 x 120 x 150 mm |
| Cable Length | 2.0 m |
| Sound Pressure Level | 74 dB(A) |
| Vibration Level | 3.1 m/s² |
| Safety Class | II (double insulated) |
| Maintenance | Keep ventilation slots clean; replace carbon brushes after approx. 50 hours of use |
| Accessories Included | 1 sanding sheet (grit 80), dust bag, hex key |
| Spare Parts Available | Yes: carbon brushes, sanding pad, dust bag, switch |
Frequently Asked Questions - TE-RO 55 EINHELL
User questions about TE-RO 55 EINHELL
0 question about this device. Answer the ones you know or ask your own.
Ask a new question about this device
Download the instructions for your Sander in PDF format for free! Find your manual TE-RO 55 - EINHELL and take your electronic device back in hand. On this page are published all the documents necessary for the use of your device. TE-RO 55 by EINHELL.
USER MANUAL TE-RO 55 EINHELL

2


natural_image
Close-up of mechanical components with springs and a labeled component (23), no readable text or symbols beyond the number 9


natural_image
Close-up of a mechanical component with a threaded spring and labeled part '9' (no readable text or symbols beyond label)





"Caution - Read the operating instructions to reduce the risk of inquiry"

Wear ear-muffs.
The impact of noise can cause damage to hearing.

Wear a breathing mask.
Dust which is injurious to health can be generated when working on wood and other materials.
Never use the device to work on any materials containing asbestos!


Wear safety goggles.
Sparks generated during working or splinters, chips and dust emitted by the device can cause loss of sight.
G
important!
When using equipment, a few safety precautions must be observed to avoid injuries and damage. Please read the complete operating manual with due care. Keep this manual in a safe place, so that the information is available at all times. If you give the equipment to any other person, give them these operating instructions as well.
We accept no liability for damage or accidents which arise due to non-observance of these instructions and the safety information.
1. Safety information
General safety regulations for electric tools
⚠️ CAUTION: Read all safety regulations and instructions.
Any failures made in following the safety regulations and instructions may result in an electric shock, fire and/or serious injury.
Keep all safety regulations and instructions in a safe place for future use.
The term “electric tool” used in the safety regulations refers to electric tools operated from the mains power supply (with a power cable) and to battery operated electric tools (without a power cable).
1. Workplace safety
- Keep your work area clean and well illuminated. Untidy or unlit work areas can result in accidents.
- Do not use this tool in a potentially explosive environment containing combustible liquids, gases or dust.
Electric tools generate sparks, which can in turn ignite dust or vapors.
- Keep children and other persons away from the electric tool while it is being used.
Allowing yourself to get distracted can cause you to lose control of the tool.
2. ELECTRICAL SAFETY
- The tool's connector plug must be able to fit into the socket outlet. Do not modify the plug in any way! Do not use adapter plugs in
conjunction with electrically grounded tools. Unmodified plugs and matching socket outlets reduce the risk of an electric shock.
● Avoid touching grounded surfaces, such as those of pipes/tubes, heaters, cookers and refrigerators.
There is an increased risk of getting an electric shock if you are electrically grounded.
- Keep the tool away from rain and moisture/wet conditions.
Penetration of water into an electric tool increases the risk of an electric shock.
- Do not use the cable to carry the tool, hang it up or pull the plug out of the socket. Keep the cable away from sources of heat, oil, sharp edges and moving tool parts.
Damaged or tangled cable increases the risk of an electric shock.
- If you intend to use an electric tool outdoors, ensure that you only use extension cable that is approved for outdoor applications.
Using extension cable that is approved for outdoor applications reduces the risk of an electric shock.
- If operation of the electric tool in a damp environment can not be avoided, use a earth leakage circuit-breaker. The earth-leakage circuit-breaker reduces the risk of an electric shock.
3. PERSONAL SAFETY
- Be alert, work conscientiously and exercise appropriate caution when using the electric tool. Do not use the tool if you are tired or are under the influence of drugs/medication or alcohol.
One moment of carelessness or lack of attention when using the electric tool can cause serious bodily injury!
● Always wear personal protective equipment (PPE), including safety goggles.
Wearing personal protective equipment such as a dust mask, non-slip footwear, protective headgear and ear muffs (depending upon the type of electric tool and the particular application) reduces the risk of sustaining injury.
● Make sure that the tool cannot start up accidentally. Ensure that the electric tool is switched off before you connect the tool to the power supply and/or insert the battery, or pick up or carry the tool.
Physically touching the switch with your finger
GB
when carrying the tool or connecting the tool to the power supply switched on can lead to accidents.
- Remove adjusting tools/wrench(es) prior to switching on the power tool.
A tool or wrench that is positioned inside a rotating power tool part can cause injury. - Avoid abnormal working postures. Make sure you stand squarely and keep your balance at all times.
This way, you will be able to have better control over the tool in unexpected situations.
● Wear suitable clothes. Never wear loose fitting
clothes or jewelry. Keep hair, clothes and gloves away from moving parts.
Loose clothing, dangling jewelry and long hair can be caught by moving parts.
- If dust extraction and dust collection devices can be mounted, ensure that these are connected and are properly used.
The use of a dust extraction system can reduce the danger posed by dust.
way and that the tool can be used to its full capacity. Have damaged parts repaired prior to using the tool.
The cause of many accidents can be traced back to poorly maintained electric tools.
- Keep your blades sharp and clean.
Properly maintained blades with sharp edges jam less frequently and are easier to use.
● Make sure to use electric tools, accessories, attachments, etc. in accordance with these instructions. Take the conditions in your work area and the job in hand into account.
Using electric tools for applications other than those intended can lead to dangerous situations.
5. SERVICE
● Have your tool repaired only by authorized specialists using original replacement parts.
This will ensure that your tool remains safe to use.
Special safety instructions
4. Using the treatment of electric tools
- Do not overload your tool. Only use suitable electric tools to perform your work.
Using the right electric tool allows you to work better and safer within the tool's quoted capacity range.
- Do not use an electric tool whose switch is defective.
An electric tool that no longer can be switched on or off is dangerous and must be repaired.
- Pull the plug out of the socket and/or remove the battery before making any adjustments to the tool, changing accessories or put the tool down.
This precaution eliminates the possibility of inadvertently starting the tool.
- When not in use, store electric tools out of the
reach of children. Do not allow those persons to use this tool who are unfamiliar with it or who have not read these instructions.
Electric tools are dangerous when they are used by inexperienced persons.
● Take good care of your tool. Check that moving parts properly function and do not jam, that parts are not broken off or damaged in any
⚠️ Always secure the workpiece if possible: Use clamps or a vise to hold the workpiece securely. This is far safer than holding it in your hand and also means that you have both hands free to operate the electric tool.
- Before you put the electric router into operation, check to ensure that the routing tool is firmly seated and runs smoothly!
- Never use a low quality or damaged routing cutter.
- Only use routing cutters whose shaft diameter complies with the specifications in the instructions.
● The maximum speed specified for the routing cutters is not allowed to be exceeded.
● Always guide the power cable away from the back of the tool.
● Never cut over metal parts, screws, nails etc.
● To avoid damage to the router, make sure there are no foreign objects stuck to the workpiece.
● Always guide the router with both hands. - Let the router reach full speed before plunging the routing cutter into the workpiece.
- If the router becomes clogged with work debris, switch it off. Let the router run to a complete stop.
GB
Remove the debris with a long stick and not with your fingers.
- Let the router run to a complete stop before removing the workpiece or setting down the tool.
● Always cut on a counter-rotating basis.
● Watch out for the reaction torque of the tool, especially if the router becomes jammed.
- When you have finished your work, slide the tool back to starting position.
● Use only properly sharpened routing cutters.
- Clamp the routing cutter by friction-locking.
- For deep cuts, carry out the work in several steps
according to the material in question.
- Be sure to use only routing cutters which have the correct shaft diameter and are suitable for the working speed of the router.
Do not lose these safety regulations.
2. Layout/Items supplied
- Extractor adapter
- Routing shoe
- Wing screw
- ON/OFF switch
- Safety lock-off
- Power cable
- Handle
- Motor casing
- Fixing handle
- Clamp nut
- Speed control
- Spindle lock
- Safety guard
- Revolver end stop
- End stop
- Wing screw
- Pointer
- Scale
- Depth stop
- Fine adjuster
- Parallel stop
- Open-ended wrench
- Clamp
- Compass point
- Guide sleeve
2.2 Items supplied
- Open the packaging and take out the equipment with care.
- Remove the packaging material and any packaging and/or transportation braces (if available).
- Check to see if all items are supplied.
- Inspect the equipment and accessories for transport damage.
- If possible, please keep the packaging until the end of the guarantee period.
IMPORTANT
The equipment and packaging material are not toys. Do not let children play with plastic bags, foils or small parts. There is a danger of swallowing or suffocating!
3. Proper use
The router is ideal for machining wood and plastic and also for cutting out knots, cutting grooves, removing recesses, copying curves and logos, etc. The router must not be used for machining metal, stone, etc.
The machine is to be used only for its prescribed purpose. Any other use is deemed to be a case of misuse. The user / operator and not the manufacturer will be liable for any damage or injuries of any kind caused as a result of this.
Please note that our equipment has not been designed for use in commercial, trade or industrial applications. Our warranty will be voided if the machine is used in commercial, trade or industrial businesses or for equivalent purposes.
4. Technical data
See warranty card of your country.
Sound and vibration
Sound and vibration values were measured in accordance with EN 60745.
Wear ear-muffs.
The impact of noise can cause damage to hearing.
GB
Total vibration values (vector sum of three directions) determined in accordance with EN 60745.
Warning!
The specified vibration value was established in accordance with a standardized testing method. It may change according to how the electric equipment is used and may exceed the specified value in exceptional circumstances.
The specified vibration value can be used to compare the equipment with other electric power tools.
The specified vibration value can be used for initial assessment of a harmful effect.
Keep the noise emissions and vibrations to a minimum.
- Only use appliances which are in perfect working order.
● Service and clean the appliance regularly.
● Adapt your working style to suit the appliance.
● Do not overload the appliance.
● Have the appliance serviced whenever necessary.
● Switch the appliance off when it is not in use.
● Wear protective gloves.
Residual risks
Even if you use this electric power tool in accordance with instructions, certain residual risks cannot be rules out. The following hazards may arise in connection with the equipment's construction and layout:
- Lung damage if no suitable protective dust mask is used.
- Damage to hearing if no suitable ear protection is used.
- Health damage caused by hand-arm vibrations if the equipment is used over a prolonged period or is not properly guided and maintained.
5. Before starting the equipment
Before you connect the equipment to the mains supply make sure that the data on the rating plate are identical to the mains data.
Always pull the power plug before making adjustments to the equipment.
All covers and safety devices have to be properly fitted before the machine is switched on.
5.1 Extraction port assembly (Fig. 2/Item 1)
⚠️ Important. For health and safety reasons it is imperative that you use a dust extractor.
- Connect your router to the extraction port (1) of a vacuum cleaner or a dust extraction device. This will provide excellent dust extraction on the workpiece. The benefits are that you will protect both the equipment and your own health. Your work area will also be cleaner and safer.
- Dust created when working may be dangerous. Refer to the section entitled "Safety instructions".
- The vacuum cleaner you use for the extraction work must be suitable for the workpiece material. Use a special vacuum cleaner if you are handling harmful materials.
- Secure the extraction port (1) to the routing shoe (2) using the two countersunk screws (f).
● The extraction port can be connected to extractor units (vacuum cleaners) with a suction hose.
● The internal diameter of the suction port is 36 mm. Now fit a suction hose of the appropriate size to the suction port.
5.2 Safety guard port assembly (Fig. 3/Item 13)
Fit the safety guard (13) as shown in Fig. 3.
5.3 Parallel stop assembly (Fig. 4/Item 21)
● Push the guide shafts (a) of the parallel stop (21) into the holes (b) on the routing shoe (2).
- Set the parallel stop (21) to the required dimension and secure it in place with the wing screws (3).
5.4 Compass point assembly (Fig. 5/Item 24)
- You can cut circular areas using the compass point (24).
- Secure the compass point (24) to the parallel stop (21) as shown in the figure. Now fit the parallel stop (21) with the compass point (24) to the router. The assembly work is to be carried out as described in point 5.3, but the parallel stop (21) must be fitted at an angle of 180^ so that the compass point (24) points downwards (Fig. 5).
- Set the required radius between the compass point (24) and cutter.
- Position the compass point (24) in the center of the circle you wish to route.
GB
5.5 Guide sleeve assembly (Fig. 6-7/Item 25)
- Secure the guide sleeve (25) to the routing shoe (2) using the two countersunk screws (f).
● The guide sleeve (25) is guided along the template (c) using the guide ring (b). - The workpiece (d) must be larger by the difference of “external edge of guide ring” and “external edge of router” (e) to obtain a precise copy.
5.6 Fitting / Removing the cutting tool (Fig. 8-11)
⚠️ Important. Pull out the power plug first.
⚠️ Important. After working with the router, the cutting tool will remain very hot for a relatively long time.
⚠️ Important. Cutters are very sharp. Wear protective gloves at all times when handling cutting tools.
● Cutters with a shaft diameter of 6 mm and 8 mm may be fitted to this router. Most cutters are available in both sizes.
- You can used cutters made of the following materials:
- HSS – Suitable for machining softwood
- TCT – Suitable for machining hardwood, particle board, plastic and aluminum.
- Select the appropriate cutting tool for the job in hand.
- When using the cutters for the first time: Remove the plastic packaging from the cutters heads.
● Clean the nut, clamp and shaft of the cutter before fitting it. - Press the spindle lock (12) and allow the spindle to engage by turning it at the same time.
- Undo the clamp nut (10) using the open-ended spanner (22).
- If necessary take the cutter you wish to remove out of the clamp (23).
- Select the appropriate cutting tool for the job in hand.
- Select the appropriate clamp for the cutter (23).
- Now fit the clamp (23) and nut (10) into the cutting spindle.
● Guide the cutter shaft into the clamp.
● Press and hold the spindle lock (12).
● Tighten the clamp nut (10) using the open-ended spanner (22).
● The cutter must be inserted at least 20 mm into the clamp (23). - Before you start the electric router, check to ensure that the cutting tool is secure and runs smoothly.
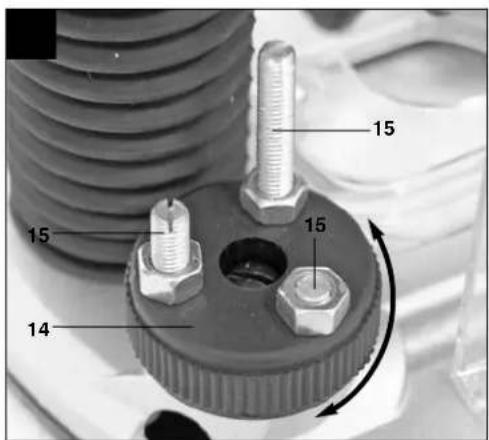
5.7 Adjusting the end stops (Fig. 14/Item 15)
The height of the end stops (15) can be adjusted as required. To do this, undo the lock nut on the end stop (15) and turn it to the required stop height using a screwdriver.
⚠️ Important. Remove the setting and assembly tools before starting the machine
6. Operation
- Never use a low quality or damaged cutter. Use only cutting tools with a shaft diameter of 6 mm or 8 mm. The cutters must also be designed for the appropriate idling speed.
- Secure the workpiece so that it cannot be thrown through the air as you work on it. Use clamps or a vise.
● Always guide the power cable away from the back of the tool.
● Never cut over metal parts, screws, nails etc.
6.1 ON/OFF switch (Fig. 17/Item 4)
Press the safety lock-off (5) and then press the ON/OFF switch (4) to switch on the machine.
Release the ON/OFF switch (4) to switch off the machine.
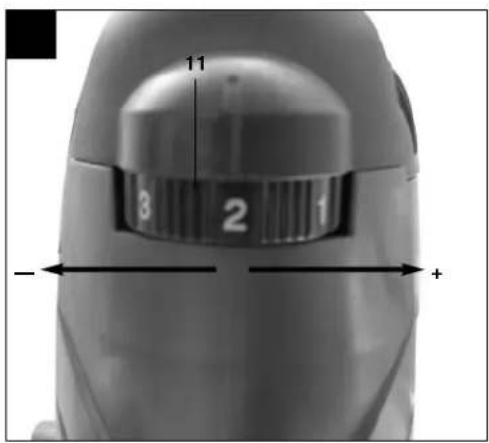
6.2 Speed control (Fig. 18 - Item 11)
The best speed depends on the material and the diameter of the cutter. Select a speed between 11,000 and 30,000 rpm using the speed control switch (11). You can choose from 6 different switch positions. The speeds in the various switch positions are as follows:
Switch position 1: approx. 11,000 rpm (minimum speed)
Switch position 2: approx. 16,000 rpm
Switch position 3: approx. 21,000 rpm
Switch position 4: approx. 25,000 rpm
Switch position 5: approx. 29,000 rpm
Switch position 6: approx. 30,000 rpm (maximum speed)
To increase the speed:
Move the speed control switch (11) in the plus direction.
To reduce the speed:
Move the speed control switch (11) in the minus direction.
GB
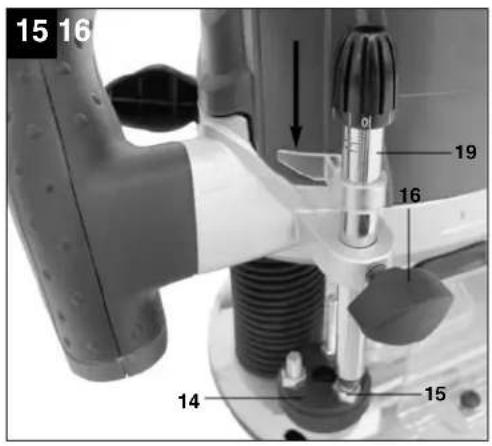
6.3 Adjusting the routing depth (Fig. 12 - 16)
● Place the machine on the workpiece.
● Undo the wing screw (16) and fixing handle (9).
- Slowly move the machine downwards until the cutter makes contact with the workpiece.
● Tighten the fixing handle (9).
- Set the fine adjuster (20) to 0 as shown in Fig. 13.
- Adjust the revolver end stop (14) so that the depth stop (19) is above the end stop (15) set to the lowest height.
● Lower the depth stop (19) until it touches the end stop (15). Then tighten the wing screw (16).
- Set the pointer (17) to the zero point on the scale (18).
- Undo the wing screw (16). Push the depth stop (19) upwards until the pointer (17) points at the required cutting depth on the scale (18). Tighten the wing screw again.
● Test the setting by completing a test cut on a waste piece.
- Now you can carry out the final adjustment of the cutting depth. To do this turn the fine adjuster (20) to the required dimension.
Turn the fine adjuster (20) counter-clockwise: greater cutting depth
Turn the fine adjuster (20) clockwise: lower cutting depth
Turning the fine adjuster (20) through one division corresponds to a change of cutting depth of 0.1 mm, one whole turn corresponds to 1 mm.
6.4 Routing
● To avoid damage to the router, make sure there are no foreign objects attached to the workpiece.
- Connect the mains plug to a suitable socket.
● Hold the tool using both of its handles (7).
- Place the router on the workpiece.
● Set the cutting depth as described in point 6.3.
- Select the speed as described in point 6.2 and switch the machine on (see point 6.1).
- Test the machine settings using a piece of waste.
- Operate the tool at full speed. Only then should you lower the router to its working height and lock the machine with the locking grip (9).
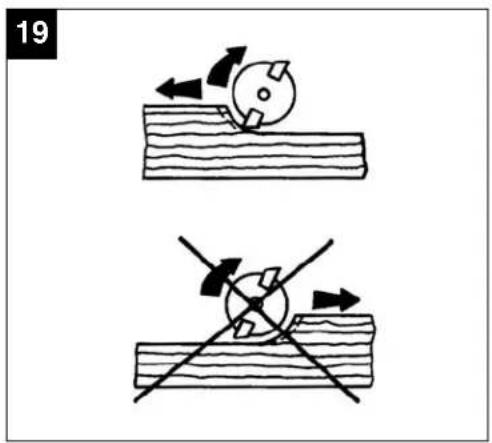
Cutting direction: The cutting tool turns clockwise. To avoid accidents you must always cut against the direction in which the tool turns (Fig. 19).
Feed speed: It is very important to machine the workpiece at the correct feed speed. We recommend
that before you machine the actual workpiece, you carry out several trial cuts on a waste piece of the same type. This will enable you to find the best working speed for the workpiece very easily.
Feed speed too low:
The cutter could heat up excessively. If you are cutting inflammable material such as wood, the workpiece could ignite.
Feed speed too high:
The cutter could be damaged. Cutting quality: Rough and uneven.
Allow the cutter to come to a complete standstill before removing the workpiece or putting down the router.
6.5 Routing in stages
Depending on the hardness of the material you wish to cut and the cutting depth, it may be a good idea to proceed in stages.
- Adjust the end stops as described in point 5.7.
- If you wish to route in several stages, turn the end stop revolver (14) after you have set the cutting depth as described in point 6.3 so that the depth stop (19) is over the highest end stop (15).
- Now route in this setting. After completing the first routing operation, adjust the end stop revolver (14) so that the depth stop (19) is above middle end stop (15). Now complete a routing operation in this setting as well.
- Now set the lowest end stop (15) and finish the routing.
6.6 Routing circles with the compass point (24)
Proceed as follows to route circles around a centre point:
● Fit and adjust the compass point (24) as described in point 5.4.
- Place the compass point (24) on the centre point of the circle you wish to route and apply pressure to it.
- Complete the routing operation as described in point 6.4.
6.7 Routing with the parallel stop (21)
Proceed as follows to route along a straight outer edge of a workpiece:
● Fit the parallel stop (24) as described in point 5.3.
● Guide the parallel stop (24) along the outer edge of the workpiece.
- Complete the routing operation as described in point 6.4.
GB
6.8 Free-hand routing
The router can also be operated without any guide rods. You can use it for freehand routing for creative work such as the production of logos.
● Use a very flat cutter setting for this purpose.
- Check the direction in which the cutter is turning as you machine the workpiece (Fig. 19).
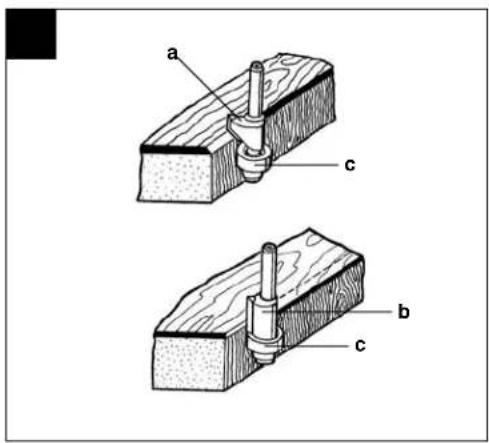
6.9 Shape and edge cutting (Fig. 20)
● Special cutters with a guide ring may be used for cutting shapes (a) and edges (b).
Fit the cutter.
● Carefully guide the machine on to the workpiece.
● Guide the guide journal or ball bearing (c) along the workpiece with gentle pressure.
⚠️ Important:
For deep cuts, carry out the work in several steps according to the material in question. Hold the router in two hands when carrying out all cutting work.
7. Replacing the power cable
If the power cable for this equipment is damaged, it must be replaced by the manufacturer or its after-sales service or similarly trained personnel to avoid danger.
8. Cleaning and maintenance
Always pull out the mains power plug before starting any cleaning work.
8.1 Cleaning
- Keep all safety devices, air vents and the motor housing free of dirt and dust as far as possible. Wipe the equipment with a clean cloth or blow it with compressed air at low pressure.
● We recommend that you clean the device immediately each time you have finished using it. - Clean the equipment regularly with a moist cloth and some soft soap. Do not use cleaning agents or solvents; these could attack the plastic parts of the equipment. Ensure that no water can seep into the device.
8.2 Carbon brushes
In case of excessive sparking, have the carbon brushes checked only by a qualified electrician. Important! The carbon brushes should not be replaced by anyone but a qualified electrician.
8.3 Maintenance
There are no parts inside the equipment which require additional maintenance.
9. Disposal and recycling
The unit is supplied in packaging to prevent its being damaged in transit. This packaging is raw material and can therefore be reused or can be returned to the raw material system.
The unit and its accessories are made of various types of material, such as metal and plastic. Defective components must be disposed of as special waste. Ask your dealer or your local council.
BR


- G
- important!
- Safety information
- General safety regulations for electric tools
- ⚠️ CAUTION: Read all safety regulations and instructions.
- Workplace safety
- ELECTRICAL SAFETY
- PERSONAL SAFETY
- GB
- SERVICE
- Special safety instructions
- Using the treatment of electric tools
- Layout/Items supplied
- Items supplied
- IMPORTANT
- Proper use
- Technical data
- Sound and vibration
- Wear ear-muffs.
- Warning!
- Keep the noise emissions and vibrations to a minimum.
- Residual risks
- Before starting the equipment
- Extraction port assembly (Fig. 2/Item 1)
- Safety guard port assembly (Fig. 3/Item 13)
- Parallel stop assembly (Fig. 4/Item 21)
- Compass point assembly (Fig. 5/Item 24)
- Guide sleeve assembly (Fig. 6-7/Item 25)
- Fitting / Removing the cutting tool (Fig. 8-11)
- ⚠️ Important. Pull out the power plug first.
- Adjusting the end stops (Fig. 14/Item 15)
- Operation
- ON/OFF switch (Fig. 17/Item 4)
- Speed control (Fig. 18 - Item 11)
- Adjusting the routing depth (Fig. 12 - 16)
- Routing
- Feed speed too low:
- Feed speed too high:
- Allow the cutter to come to a complete standstill before removing the workpiece or putting down the router.
- Routing in stages
- Routing circles with the compass point (24)
- Routing with the parallel stop (21)
- Free-hand routing
- Shape and edge cutting (Fig. 20)
- ⚠️ Important:
- Replacing the power cable
- Cleaning and maintenance
- Cleaning
- Carbon brushes
- Maintenance
- Disposal and recycling
Brand : EINHELL
Model : TE-RO 55
Category : Sander